National Biology Handbook
Subpart C, Part 621, ME-02
1 of 20 December 2013
Structures for Wildlife 649
NEST & DEN BOX SPECIFICATIONS and DESIGNS Developed by Jeff Norment, Maine NRCS
Kestrel Box, Photo courtesy of Jeff Norment,
USDA-NRCS
Purpose:
To provide information and guidance concerning construction, placement, density,
and maintenance of nest and den boxes.
Construction:
Nest or den boxes should be made of rough
cut cypress, cedar, redwood, or other rot
resistant wood. Cedar is the best choice.
Boxes shall not be constructed of metal or
plastic or treated with creosote, green
preservative (a.k.a., “pressure treated”) or
finishes with pentachlorophenol as an ingredient.
The outside backs of boxes may be treated
with wood preservative to reduce rot and
extend their life.
With the exception of bat box exteriors, boxes
should not be painted or stained.
For ventilation several ⅝ inch holes should be drilled near the top of a box on both sides,
with an exception for duck nest boxes.
Four ⅜ inch diameter holes should be drilled
in the bottom of each box for drainage, except
for the Peterson bluebird house.
Quarter inch galvanized hardware cloth or
plastic mesh shall be attached to the inside
front panel of all duck nest boxes.
A hinged side or roof should be designed to
allow easy access for box maintenance. All
metal parts should be stainless steel to reduce
likelihood of rust.
Wood screws or concrete coated nails are recommended for box construction.
Galvanized nails should be avoided, due to
their tendency to loosen with wood expansion.
The box floor board should be recessed at
least ¼ inch up from the bottom of the sides.
The top of the box should be flush with the
sides or be slightly overhanging, with a front overhang of at least 2 inches.
Do not add perches to box designs as this will
attract and benefit non-native house sparrows
and European starlings.
Boxes should be firmly attached to a support
post, building or tree. Lag screws and
washers are the preferred means to attach boxes as one can loosen the screws as a tree
grows.
If depredation is a problem, predator guards
should be installed. Guards should be made
of either 26-gauge galvanized metal or of
heavy plastic sheeting (e.g., utility pole wrap).
National Biology Handbook
Subpart C, Part 621, ME-02
2 of 20 December 2013
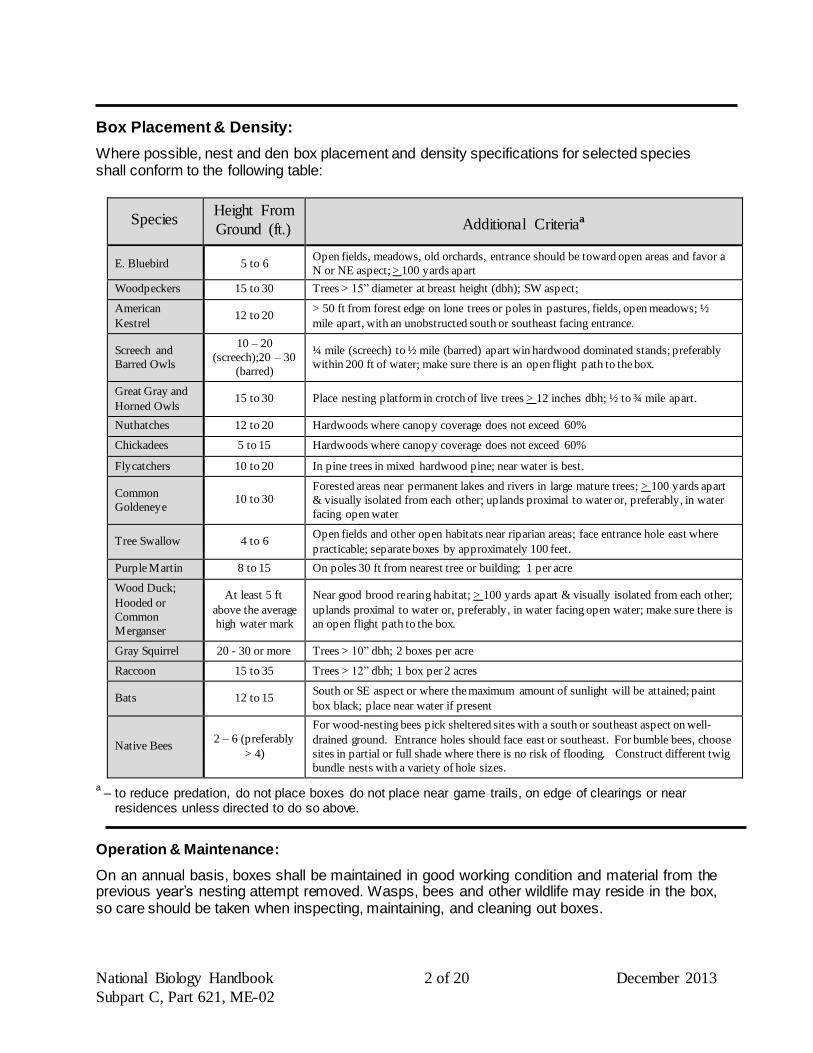
Box Placement & Density:
Where possible, nest and den box placement and density specifications for selected species shall conform to the following table:
Species Height From
Ground (ft.) Additional Criteriaa
E. Bluebird 5 to 6 Open fields, meadows, old orchards, entrance should be toward open areas and favor a
N or NE aspect; > 100 yards apart Woodpeckers 15 to 30 Trees > 15” diameter at breast height (dbh); SW aspect;
American
Kestrel 12 to 20 > 50 ft from forest edge on lone trees or poles in pastures, fields, open meadows; ½
mile apart, with an unobstructed south or southeast facing entrance.
Screech and
Barred Owls
10 – 20
(screech);20 – 30
(barred)
¼ mile (screech) to ½ mile (barred) apart win hardwood dominated stands; preferably
within 200 ft of water; make sure there is an open flight path to the box.
Great Gray and
Horned Owls 15 to 30 Place nesting platform in crotch of live trees > 12 inches dbh; ½ to ¾ mile apart.
Nuthatches 12 to 20 Hardwoods where canopy coverage does not exceed 60%
Chickadees 5 to 15 Hardwoods where canopy coverage does not exceed 60%
Flycatchers 10 to 20 In pine trees in mixed hardwood pine; near water is best.
Common
Goldeneye
10 to 30
Forested areas near permanent lakes and rivers in large mature trees; > 100 yards apart
& visually isolated from each other; uplands proximal to water or, preferably, in water
facing open water
Tree Swallow 4 to 6 Open fields and other open habitats near riparian areas; face entrance hole east where
practicable; separate boxes by approximately 100 feet.
Purple Martin 8 to 15 On poles 30 ft from nearest tree or building; 1 per acre
Wood Duck;
Hooded or
Common
Merganser
At least 5 ft
above the average
high water mark
Near good brood rearing habitat; > 100 yards apart & visually isolated from each other;
uplands proximal to water or, preferably, in water facing open water; make sure there is
an open flight path to the box.
Gray Squirrel 20 - 30 or more Trees > 10” dbh; 2 boxes per acre
Raccoon 15 to 35 Trees > 12” dbh; 1 box per 2 acres
Bats 12 to 15 South or SE aspect or where the maximum amount of sunlight will be attained; paint
box black; place near water if present
Native Bees
2 – 6 (preferably
> 4)
For wood-nesting bees pick sheltered sites with a south or southeast aspect on well-
drained ground. Entrance holes should face east or southeast. For bumble bees, choose
sites in partial or full shade where there is no risk of flooding. Construct different twig
bundle nests with a variety of hole sizes.
a – to reduce predation, do not place boxes do not place near game trails, on edge of clearings or near
residences unless directed to do so above.
Operation & Maintenance:
On an annual basis, boxes shall be maintained in good working condition and material from the previous year’s nesting attempt removed. Wasps, bees and other wildlife may reside in the box, so care should be taken when inspecting, maintaining, and cleaning out boxes.

National Biology Handbook
Subpart C, Part 621, ME-02
3 of 20 December 2013
Several inches of nesting material (e.g., Wood chips, shavings, soft bedding material – do not use sawdust) should be added to boxes prior to the nesting season.
APPENDIX A.
Nest Box Designs
National Biology Handbook
Subpart C, Part 621, ME-02
4 of 20 December 2013
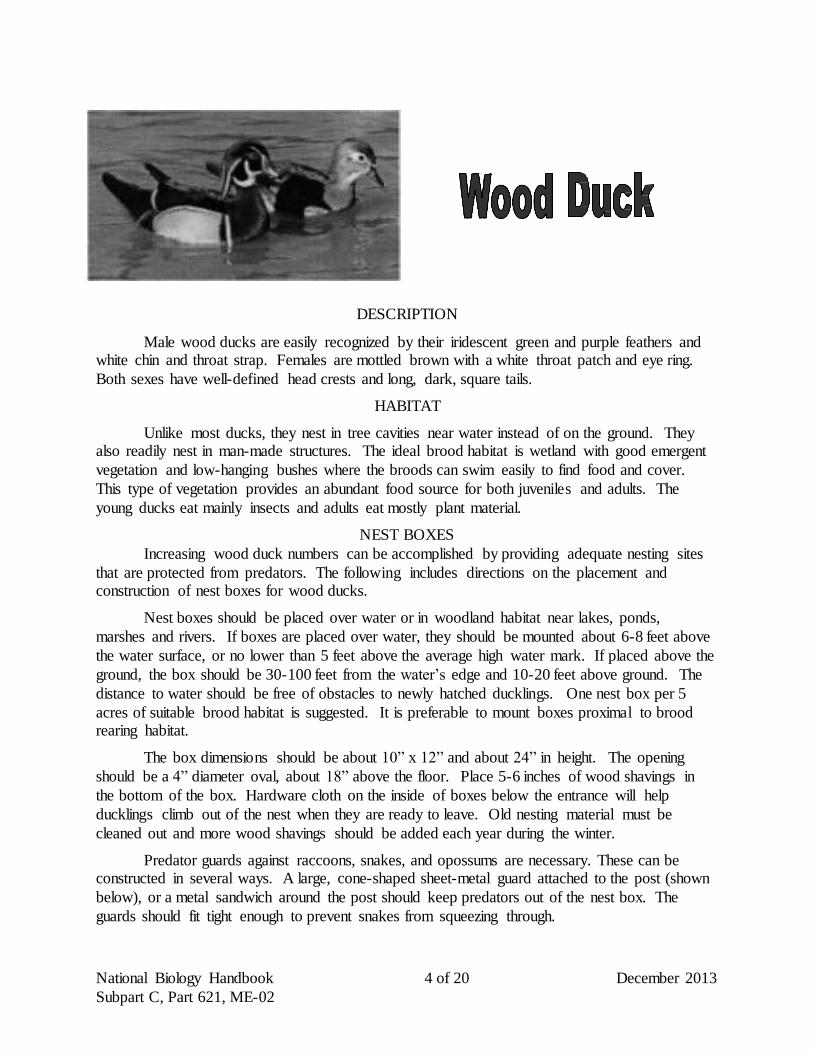
DESCRIPTION
Male wood ducks are easily recognized by their iridescent green and purple feathers and white chin and throat strap. Females are mottled brown with a white throat patch and eye ring.
Both sexes have well-defined head crests and long, dark, square tails.
HABITAT
Unlike most ducks, they nest in tree cavities near water instead of on the ground. They also readily nest in man-made structures. The ideal brood habitat is wetland with good emergent
vegetation and low-hanging bushes where the broods can swim easily to find food and cover.
This type of vegetation provides an abundant food source for both juveniles and adults. The
young ducks eat mainly insects and adults eat mostly plant material.
NEST BOXES
Increasing wood duck numbers can be accomplished by providing adequate nesting sites
that are protected from predators. The following includes directions on the placement and construction of nest boxes for wood ducks.
Nest boxes should be placed over water or in woodland habitat near lakes, ponds,
marshes and rivers. If boxes are placed over water, they should be mounted about 6-8 feet above
the water surface, or no lower than 5 feet above the average high water mark. If placed above the
ground, the box should be 30-100 feet from the water’s edge and 10-20 feet above ground. The
distance to water should be free of obstacles to newly hatched ducklings. One nest box per 5
acres of suitable brood habitat is suggested. It is preferable to mount boxes proximal to brood rearing habitat.
The box dimensions should be about 10” x 12” and about 24” in height. The opening
should be a 4” diameter oval, about 18” above the floor. Place 5-6 inches of wood shavings in
the bottom of the box. Hardware cloth on the inside of boxes below the entrance will help
ducklings climb out of the nest when they are ready to leave. Old nesting material must be
cleaned out and more wood shavings should be added each year during the winter.
Predator guards against raccoons, snakes, and opossums are necessary. These can be constructed in several ways. A large, cone-shaped sheet-metal guard attached to the post (shown
below), or a metal sandwich around the post should keep predators out of the nest box. The
guards should fit tight enough to prevent snakes from squeezing through.

National Biology Handbook
Subpart C, Part 621, ME-02
5 of 20 December 2013
The diagram below serves as a guide for building one type of nest box for wood ducks.
Click here to link to another wood duck nest box
design developed by the USFWS:
MATERIALS LIST 1” thick rough cypress, redwood, or
cedar.
1- cedar, cypress, redwood, cedar or
metal post long enough to extend at
least 8 feet above the average high
water mark.
4 to 6 Sheet metal screws or pop rivets
2 – small hardware hinges
1- small screen door hook and eyes.
1 – plate (4 by 4 ft) of sheet metal.
1 – 12” x 4” x ¼” mesh hardward cloth
or similar plastic mesh
1 – lag screw w/washer
Wood shavings
National Biology Handbook
Subpart C, Part 621, ME-02
6 of 20 December 2013
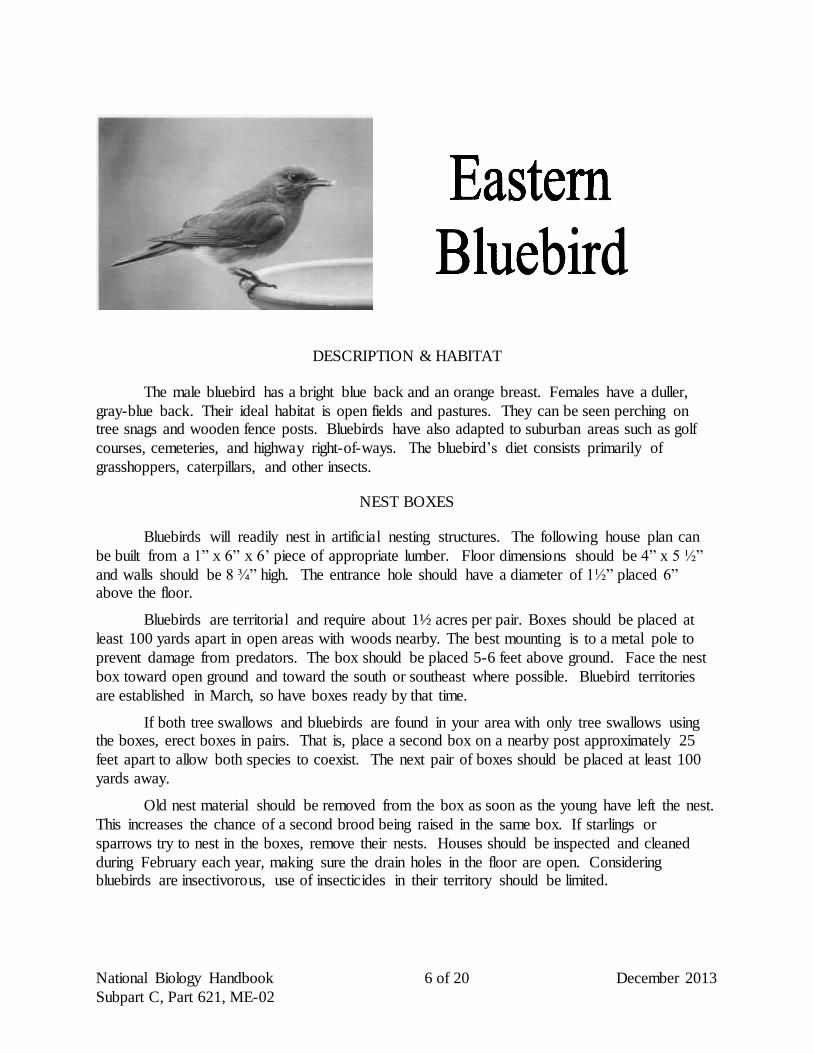
DESCRIPTION & HABITAT
The male bluebird has a bright blue back and an orange breast. Females have a duller,
gray-blue back. Their ideal habitat is open fields and pastures. They can be seen perching on tree snags and wooden fence posts. Bluebirds have also adapted to suburban areas such as golf
courses, cemeteries, and highway right-of-ways. The bluebird’s diet consists primarily of
grasshoppers, caterpillars, and other insects.
NEST BOXES
Bluebirds will readily nest in artificial nesting structures. The following house plan can
be built from a 1” x 6” x 6’ piece of appropriate lumber. Floor dimensions should be 4” x 5 ½”
and walls should be 8 ¾” high. The entrance hole should have a diameter of 1½” placed 6” above the floor.
Bluebirds are territorial and require about 1½ acres per pair. Boxes should be placed at
least 100 yards apart in open areas with woods nearby. The best mounting is to a metal pole to
prevent damage from predators. The box should be placed 5-6 feet above ground. Face the nest
box toward open ground and toward the south or southeast where possible. Bluebird territories
are established in March, so have boxes ready by that time.
If both tree swallows and bluebirds are found in your area with only tree swallows using the boxes, erect boxes in pairs. That is, place a second box on a nearby post approximately 25
feet apart to allow both species to coexist. The next pair of boxes should be placed at least 100
yards away.
Old nest material should be removed from the box as soon as the young have left the nest.
This increases the chance of a second brood being raised in the same box. If starlings or
sparrows try to nest in the boxes, remove their nests. Houses should be inspected and cleaned
during February each year, making sure the drain holes in the floor are open. Considering bluebirds are insectivorous, use of insecticides in their territory should be limited.

National Biology Handbook
Subpart C, Part 621, ME-02
7 of 20 December 2013
Als
o s
uitab
le f
or
tree
sw
allo
ws

National Biology Handbook
Subpart C, Part 621, ME-02
8 of 20 December 2013
DESCRIPTION & HABITAT
The American Kestrel, also called the sparrow hawk, is the smallest member of the falcon
family. The males are easily identifiable by their reddish brown back, slate blue wings and buff
underside. Females are reddish brown, have brown streaks on their chest, and black tail bands.
Kestrels breed in a variety of open habitats, including meadows, grasslands, parkland,
agricultural fields, urban and suburban areas. These areas provide the birds with good nesting sites. Insects, lizards and voles are an abundant food source. Short understory vegetation is ideal
for kestrels to see and catch prey.
NEST BOXES
The biggest threat to the kestrel is habitat loss. With rapid growth and development, the
kestrel is becoming less common. There are several ways to help their declining populations.
The first is to maintain a natural habitat. This can be accomplished by manipulating the
understory to maintain a desirable height for kestrels (e.g., mowing, chopping, grazing). Leave snags (dead trees) standing and leave enough live trees so that normal mortality will provide
enough dead trees for nesting sites for the kestrels.
Another way to help conserve kestrels is to build nest boxes. Nest boxes are best located
in lone trees or in fields and pastures approximately 50 feet from the forest edge. The boxes
should be spaced about 1/2 mile apart. The entrance hole should face south or southeast, with an
unobstructed flight path to the entrance. Place boxes 12-20 feet above ground to keep out
predators. A predator guard can be constructed by wrapping a 3 ft. strip of sheet metal around the pole to prevent raccoons and snakes from entering the nest. Eggs are laid between April and
June, so make sure old nesting material and debris are cleaned out before this time. After
cleaning, place 3 inches of new wood shavings or straw in the nest box.
The following dimensions and construction plan were designed by the Northern Prairie
Wildlife Research Center

National Biology Handbook
Subpart C, Part 621, ME-02
9 of 20 December 2013
Construction of a Kestrel Nest Box

National Biology Handbook
Subpart C, Part 621, ME-02
10 of 20 December 2013
DESCRIPTION
The barred owl is distinguishable by its large round head, horizontal brown and white
barring across its throat, and vertical streaking on its chest. Since owls are most active at night,
they are more easily identified by their calls. The barred owl has a distinct “who cooks for you,
who cooks for you all” sound.
HABITAT
Barred owls are associated primarily with floodplains, river bottoms, field and lake
margins, and almost any woodland area. They nest mainly in tree cavities, but will also use
abandoned hawk and squirrel nests. They also readily nest in man-made structures. The owl’s
diet consists primarily of small rodents, frogs, snakes and insects. Although owls are federally
protected under the Migratory Bird Treaty Act, development is affecting their habitat. You can
help by constructing a nest box.
NEST BOXES
The nest box should be constructed of 3/4 inch plywood. It should be 23 inches high with floor dimensions of 12 1/4 x 12 1/4 inches. The entrance hole should be 12 inches from the floor
and have dimensions of 7 x 7 inches. Place about 3 inches of wood chips in the nest. Place the
box 20 - 30 feet above ground on a tree trunk in a wooded area. Make sure the entrance is not
obscured or obstructed by branches. Barred owls are territorial, and require about 125 acres.
Boxes should be spaced at least 1/2 mile apart. A predator guard can be constructed in order to
keep out raccoons and snakes. Place a 2-3 foot sheet of aluminum around the tree at breast height. Make sure debris is cleaned out and new wood chips are added each year prior to January
when nesting activity begins.
The house plan below was adapted from Woodworking for Wildlife in Tennessee, a
publication of the Tennessee Wildlife Resources Agency.

National Biology Handbook
Subpart C, Part 621, ME-02
11 of 20 December 2013
Construction of a Barred Owl Nest Box

National Biology Handbook
Subpart C, Part 621, ME-02
12 of 20 December 2013
DESCRIPTION & HABITAT
Purple Martins are the largest member of the swallow family. Male martins are dark metallic blue with purple iridescence. The females are blue-brown with a buff-colored belly.
Both sexes have notched tails that are characteristic of swallows. They return to the same nest
area each year. Their nests are made in cavities of twigs, weeds, dead leaves and grasses. Martins prefer to nest in large open areas near water, such as fields, pastures and golf courses.
The diet of the purple martin consists of flying large insects such as beetles, moths and
dragonflies.
NEST BOXES
A shortage of natural nest sites in eastern North America due to competitive exclusion of
martins from suitable tree cavities by introduced bird species (i.e., European starlings, house
sparrows), have resulted in purple martins becoming almost totally dependent on man-made
housing. Once martins nest at your site, they will come back every year, if you manage the site properly. Martins are colonial birds, so apartment style houses are usually best. Martins have
very specific aerial requirements. The house will have the greatest success in attracting birds if it
is placed in an open area 8 - 15 feet above ground at least 40 feet away from trees and buildings.
No more than one house per acre is ideal. Locations near ponds or lakes are ideal.
The dimensions for each compartment floor should measure 6” x 6”and should be 5-7” in
height. The center compartment is for air ventilation. Drill small holes in the interior
compartment walls and exterior walls of the roof to provide good air circulation. Entrance holes should be 2 1/2” in diameter and 1” above the floor of compartment. Houses must be painted
white to reflect heat and to help attract martins and repel
nuisance species such as English sparrow and starlings.
Paint only the outside of the house. A predator guard
should be constructed to keep out cats, raccoons and
snakes. Place smooth sheet metal around the pole or
attach a sheet metal cone to the pole (see illustration at right).
Martins will not nest if sparrows or starlings are
using some compartments. To prevent sparrows and
starlings from nesting, take the houses down from
October until April 1st or plug the entrance holes. If they
do manage to nest, evict them and temporarily plug holes.

National Biology Handbook
Subpart C, Part 621, ME-02
13 of 20 December 2013
Construction of a Purple Martin Nest Box
(The diagram below is from the Cooperative Extension Service located at the University of Georgia)

National Biology Handbook
Subpart C, Part 621, ME-02
14 of 20 December 2013
DESCRIPTION & HABITAT
Bats are seen most frequently on warm nights feeding near water or around lights. They
feed by catching insects while flying in the air. During the day, they find shelter in dark places such as caves, tree cavities, and attics of buildings. Bats prefer to roost within 1/4 mile of a
water source. Snags near wetlands with open water provide ideal habitats.
Bats have been wrongly feared by humans. They are, in fact, rather shy and harmless.
There is a misconception that bats carry rabies, but less than 1/2 of one percent actually carries
the disease. Even if infected, they rarely become aggressive like other animals. Bats provide a
beneficial service to man because they eat a huge amount of insects, including mosquitoes. They
usually consume their weight in insects each night.
Bat populations are declining because of loss and disturbance to natural roosting sites
such as old trees, caves, and old barns, as well as vandalism. There is also a loss of habitat due
to development. Providing a bat house can help sustain the population of bats as well as keeping
them from roosting in occupied dwellings.
BAT HOUSES
The greatest bat house success has been achieved in areas where there is a mixture of
agricultural use and natural vegetation. A single chamber bat house may house 50 bats, while larger houses may attract more than 200. Most houses have 1-4 roosting chambers. The
following is reprinted with permission from Bat Conservation International,
http://www.batcon.org/home/default.asp.
Criteria for Successful Bat Houses
Whether you build or buy a bat house, make sure the dimensions meet the criteria below.
Following these construction and installation guidelines will greatly increase your odds of attracting bats. These recommendations are based on 12 years of bat house research conducted
across the U.S, Canada, and the Caribbean. Small, poorly-made houses commonly sold in stores
or any houses improperly installed are likely to fail.
1. Design - All bat houses should be at least 2 feet tall, have chambers at least 14 inches wide, and have a landing area extending below the entrance at least 3 to 6 inches (some houses feature recessed partitions that offer landing space inside). Taller and wider houses are even better (e.g.
30 to 36 inches tall x 18 to 24 inches wide). Rocket boxes should be at least 3 feet tall and have

National Biology Handbook
Subpart C, Part 621, ME-02
at least 12 inches of linear roost space. Most bat houses have one to four roosting chambers--the
more the better. Chambers should be at least 20 inches tall; taller is better. Roost partitions
should be carefully spaced 3/4 to 1 inch apart. All partitions and landing areas should be
roughened. Wood surfaces can be scratched or grooved horizontally, at roughly 1/4- to 1/2-inch
intervals, or covered with durable square, plastic mesh (1/8" or 1/4" inch mesh. Include vents approximately 6 inches from the bottom of all houses 24 to 32 inches tall where average July
high temperatures are 85 F or above. Front vents are as long as a house is wide, side vents 6
inches tall by 1/2 inch wide. Houses 36 inches tall or taller should have vents approximately 10
to 12 inches from the bottom.
2. Construction - For wooden houses, a combination of exterior plywood (ACX, BCX, or T1- 11 grade) and cedar is best. Plywood for bat house exteriors should be ½ -inch thick or greater
and have at least four plies. Do not use pressure-treated wood. Any screws, hardware or staples
used must be exterior grade (galvanized, coated, stainless, etc). To increase longevity, use screws rather than nails. Caulk all seams, especially around the roof. Alternative materials, such as
plastic or fiber-cement board, may last longer and require less maintenance.
3. Wood Treatment - For the exterior, apply three coats of exterior grade, water-based paint or stain. Available observations suggest that color should be black where average high
temperatures in July are less than 85 ºF, dark colors (such as dark brown or dark gray) where they
are 85 to 95 ºF, medium colors where they are 95 to 100 ºF and white or light colors where they exceed 100 ºF. Much depends upon amount of sun exposure; adjust to darker colors for less sun.
For the interior, use two coats dark, exterior grade, water based stain. Apply stain after creating
scratches or grooves or prior to stapling plastic mesh. Paint fills grooves, making them unusable.
4. Sun Exposure - Houses where high temperatures in July average 80 ºF or less, should
receive at least 10 hours of sun; more is better. At least six hours of direct daily sun are recommended for all bat houses where daily high temperatures in July average less than 100 ºF.
Full, all-day sun is often successful in all but the hottest climates. To create favorable conditions
for maternity colonies in summer, internal bat house temperatures should stay between 80 ºF to
100 ºF as long as possible.
5. Habitat - Most nursery colonies of bats choose roosts within 1/4 mile
of water, preferably a stream, river or
lake. Greatest bat house success has
been achieved in areas of diverse habitat, especially where there is a
15 of 20 December 2013
Areas
Wooden Houses Plastic/Stucco
Houses
1) Dark areas:
Black or dark
color
dark color
2) Medium
areas:
dark or medium
color
medium color
3) Light areas:
Medium or light color
light color
4) Lightest
areas:
White or light
color
light color
National Biology Handbook
Subpart C, Part 621, ME-02
16 of 20 December 2013
mixture of varied agricultural use and natural vegetation. Bat houses are most likely to succeed in
regions where bats are already attempting to live in buildings.
6. Mounting - Bat houses should be mounted on buildings or poles. Houses mounted on trees
or metal siding is seldom used. Wooden, brick, or stone buildings with proper solar exposure are excellent choices, and locations under the eaves often are successful. Economy houses work best
when mounted on buildings. Mounting two bat houses back to back on poles is ideal (face one
house north, the other south). Place houses 3/4 inch apart and cover both with a galvanized metal
roof to protect the center roosting space from rain. All bat houses should be mounted at least 12
feet above ground; 15 to 20 feet is better. Bat houses should not be lit by bright lights.
7. Protection from Predators - Houses mounted on sides of buildings or on metal poles
provide the best protection from predators. Metal predator guards may be helpful, especially on
wooden poles. Bat houses may be found more quickly if located along forest or water edges
where bats tend to fly; however, they should be placed at least 20 to 25 feet from the nearest tree branches, wires or other potential perches for aerial predators.
8. Avoiding Uninvited Guests - Wasps can be a problem before bats fully occupy a house.
Use of 3/4-inch roosting spaces reduces wasp use. If nests accumulate, they should be removed in
late winter or early spring before either wasps or bats return. Open-bottom houses greatly reduce
problems with birds, mice, squirrels or parasites, and guano does not accumulate inside.
9. Timing - Bat houses can be installed at any time of the year, but are more likely to be used
during their first summer if installed before the bats return in spring. To help exclude a colony
from a building, install the bat houses at least two to six weeks before the actual eviction, if
possible.
10. Importance of Local Experimentation - It is best to test for local needs before putting
up more than three to six houses, especially comparing those of different darkness and sun
exposure.

National Biology Handbook
Subpart C, Part 621, ME-02
17 of 20 December 2013
Small Economy Bat House
Materials Needed (makes 1)
¼ sheet (2’x4’) ½” cdx (outdoor grade) plyw ood
1 piece 1”x2” x 8’ pine (furring strip)
1/8” mesh HOPE (plastic) netting, 20” x 22.5”
20-30 1 5/8” multipurpose (dryw all) screw s
1 pint latex acrylic paint
1 tube paintable acrylic caulk
5/16” staples
Recommended Tools
Table saw or handsaw caulking gun
Variable-speed reversing drill scissors
Phillips bit for drill stapler
Tape measure or yardstick paintbrush
Construction Procedure
1. Measure and cut plyw ood into three pieces
26.5” x 24” 16.5” x 24” 5” x 24”
2. Measure and cut furring into one 24” and tw o 20 1/4”
pieces.
3. Screw back to furring, caulking f irst. Start w ith 24”
piece at top.
4. Staple the netting to inside surface of back, starting at
the bottom. Be sure nett ing lies f lat (curve dow n) and
does not pucker.
5. Screw front to furring, top piece f irst (don’t forget to
caulk). Leave ½” vent space betw een top and bottom
front pieces.
View Side 6. Caulk around outside joints if needed to seal roosting
chamber.
7. Attach a 3” x 28” board to the top as a roof, if desired.
8. Paint exterior at least tw ice.
Optional Modifications
1. Wider bat houses can be built for larger colonies. Be
sure to adjust dimensions for back and front pieces,
ceiling furring strip, and netting.
2. Tw o bat houses can be placed back-to-back mounted
on poles. Before assembly, a horizontal ¾” slot should
be cut in the back of each house about 10” from the
bottom edge of the back piece to improve ventilation
and permit movement of bats betw een houses. Tw o
pieces of w ood, 4” x 4 ¼” x3/4”, screw ed horizontally to
each side w ill join the tw o boxes. One 3” x 22” vertical
piece, attached to each side over the horizontal pieces,
blocks light but allow s bats and air to enter. Leave a
¾” space betw een the tw o houses, and roughen the
w ood surfaces or cover the back of each w ith plastic
netting. Do not cover the vents. A tin roof covering
both houses protects them and helps prevent
overheating. Eaves should be about 3” in southern
areas and about 1 ½” in the north.
Bat house information is reprinted w ith permission from Bat
Conservation International (BCI).

National Biology Handbook
Subpart C, Part 621, ME-02
18 of 20 December 2013
© Mace Vaughan; used by Maine NRCS
Native bees provide essential ecological services as pollinators that benefits ecological
health and function, as food for many animal species, and valuable direct and indirect economic
benefits to humans.
The following is printed with permission by The Xerces Society for Invertebrate Conservation, http://www.xerces.org/. The information below is adapted from Nests for Native
Bees, written by Matthew Shepherd.
Native bees are a vital part of our environment. They ensure healthy wildflower communities
and harvests of fruit and vegetables. Bees are suffering from the fragmentation and loss of
their habitat and extensive use of pesticides.
Although flowers that provide nectar and pollen are important for bees, a lack of nesting sites
is probably a greater threat to native bees than a lack of flowers. Unlike butterflies and other pollinator insects, bees make nests in which they create brood cells for their offspring. In
many modern landscapes, a desire for neatness has usually
resulted in the removal of bare or semi-bare ground, dead
trees, and untidy corners of rough grass—all important
nesting sites for bees.
The good news is that there are several easy ways in which
bee nesting sites can be made. Providing suitable nest sites is a simple thing that we all can do to improve our gardens,
farms, parks, and wild areas for these important insects.
Nesting sites for solitary wood-nesting bees
The great majority of bees nest on their own, many in
abandoned beetle tunnels in wood. With wood nests,
providing a range of hole sizes between 3/32” and 3/8” (2.5
mm to 10 mm) in diameter will support a wide range of bee species.
Nesting blocks
Bee blocks can be made by drilling nesting holes between
3/32” and 3/8” in diameter, at approximate ¾” centers, into the side of a block of preservative-

National Biology Handbook
Subpart C, Part 621, ME-02
19 of 20 December 2013
free lumber. The holes need to be smooth inside, as deep as possible, and closed at one end.
The length of the lumber is not critical—8” or more is good—but the lumber should be at
least 4” deep. This block can be fixed firmly to a stake, fence, or building, or placed in a tree.
Twig bundle Some plants, like teasel and bamboo, have
naturally hollow stems. Cut the stems into 6”
to 8” lengths. Be careful to cut the stems close
to a stem node to create a tube with one end
open and the other closed. Take fifteen to
twenty stem pieces of a variety of internal
diameters and tie them into bundles with the
closed ends of the stems together. Fix each bundle to a stake, fence, or tree with the stems
horizontal to the ground.
Logs and snags
Get some logs or old stumps and place them in sunny areas. Those with beetle tunnels are
ideal. Plant a few upright, like dead trees, to ensure some deadwood habitat stays dry. On the
southeast side of each log, drill a range of holes. Make the interior of the holes as smooth as
possible. Bees don’t like rough holes and may avoid them.
Where to place bee blocks and other tunnel nests
Location of the nesting sites is important. All of these types of tunnel nests should to be
placed so that the open holes face towards the east or southeast and the morning sun. Most
solitary bees cannot heat themselves efficiently, and need the sunshine, especially in the
morning, to provide enough warmth so they can become active. Place the nests between two
and six feet above the ground, and fix them firmly so they don’t shake in the wind.
Nesting sites for solitary ground-nesting bees The majority of our native bees build their nests underground. These are harder to provide nest
sites for, as we do not fully understand the specific ground conditions needed by each species.
However, maximizing areas of untilled ground and improving access to the soil surface may
help considerably.
Semi-bare ground
To provide potential nesting sites for these ground nesting bees, simply clear away patches of
vegetation and/or the thatch from a small patch of level or sloping ground, preferably with a south or southeast aspect. Ground-nesting bees need access to the soil surface and typically
prefer well drained areas in an open, sunny place. Different ground conditions—from vertical
banks to flat ground—will draw different bee species, so create nesting patches in different
areas if you can.
Bumble bee nests
Unlike the nests built for solitary bees—who can be very particular about hole diameters—
there are no strict size requirements for bumble bee nests. After emerging from hibernation, a bumble bee queen will hunt for a dry, warm cavity in which to start her colony. Any cavity
large enough for a small colony (for example, a 6 to 8 inch cube) will be OK. In natural
conditions, most bumble bees nest in abandoned mouse holes in the ground or under grass

National Biology Handbook
Subpart C, Part 621, ME-02
20 of 20 December 2013
Bumble bee nests do not need to be double-
chambered. A single chamber with bedding
tussocks. A simple wooden box, with internal
dimensions of about 7” by 7” by 7”, made from
preservative-free lumber will work. Drill a few
ventilation holes near the top (covered with door
screen to deter ants) and some drainage holes in the bottom. Make an entrance tunnel from 3/4”
plastic pipe, marked on the outside with a
contrasting color, and fill the box with soft
bedding material, such as upholsterer’s cotton or
short lengths of unraveled, soft string. The box
must be weather tight; if the nest gets damp, the
larvae may become too cold, and mold and fungus will grow.
Where to put your bee nests
For bumble bee boxes, choose an undisturbed site, in partial or full shade, where there is no
risk of flooding. The box should be on or just under the ground. If you bury it, extend the
entrance tube with an old garden hose so it gently slopes up to the surface. Put your nesting
box out when you first notice bumble bees in the spring, or when the first willows and other
flowers are blooming, and be patient. There is no guarantee that bees will use your box. Only about one in four boxes get occupied. If it has no inhabitants by late July, put the nesting box
into storage until next spring. Since bees need nectar and pollen to supply the brood cells of
their offspring, all nesting sites should be among or close to suitable foraging plants. If they
have both nesting sites and foraging areas close together, it is more likely that they will
occupy the nests.
Photo by Matthew Shepherd,
Xerces Society for Invertebrate Conservation
Recommended