Hands-on Series SORACOM Beam
Introduction
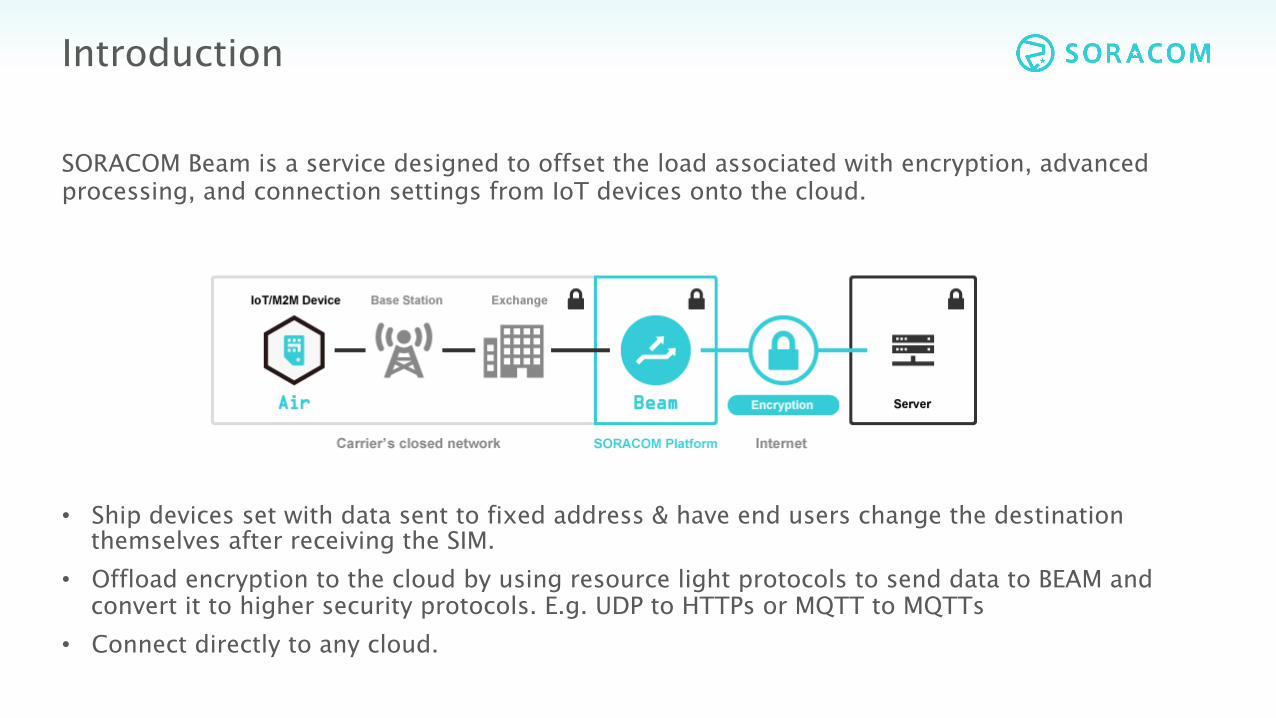
• Ship devices set with data sent to fixed address & have end users change the destination themselves after receiving the SIM.
• Offload encryption to the cloud by using resource light protocols to send data to BEAM and convert it to higher security protocols. E.g. UDP to HTTPs or MQTT to MQTTs
• Connect directly to any cloud.
SORACOM Beam is a service designed to offset the load associated with encryption, advanced processing, and connection settings from IoT devices onto the cloud.

Reading materials for BEAM: • Service Overview • Getting Started - Beam
Resources
Laptop
Wi-Fi Hotspot/ Personal Hotspot
AIR SIM Global SETUP used
• Command Prompt • Internet browser • Putty • Packet Sender
IoT Platform Beam test server
Simulation of IoT Device (*)
Cellular Network
Public Internet
* This setup is for demonstration & testing purpose only. The SIM should reside in the IoT device to secure communication.
Pre-requisite Hands-on Series: • Getting Started • SORACOM AIR
Now log on to https://console.soracom.io/
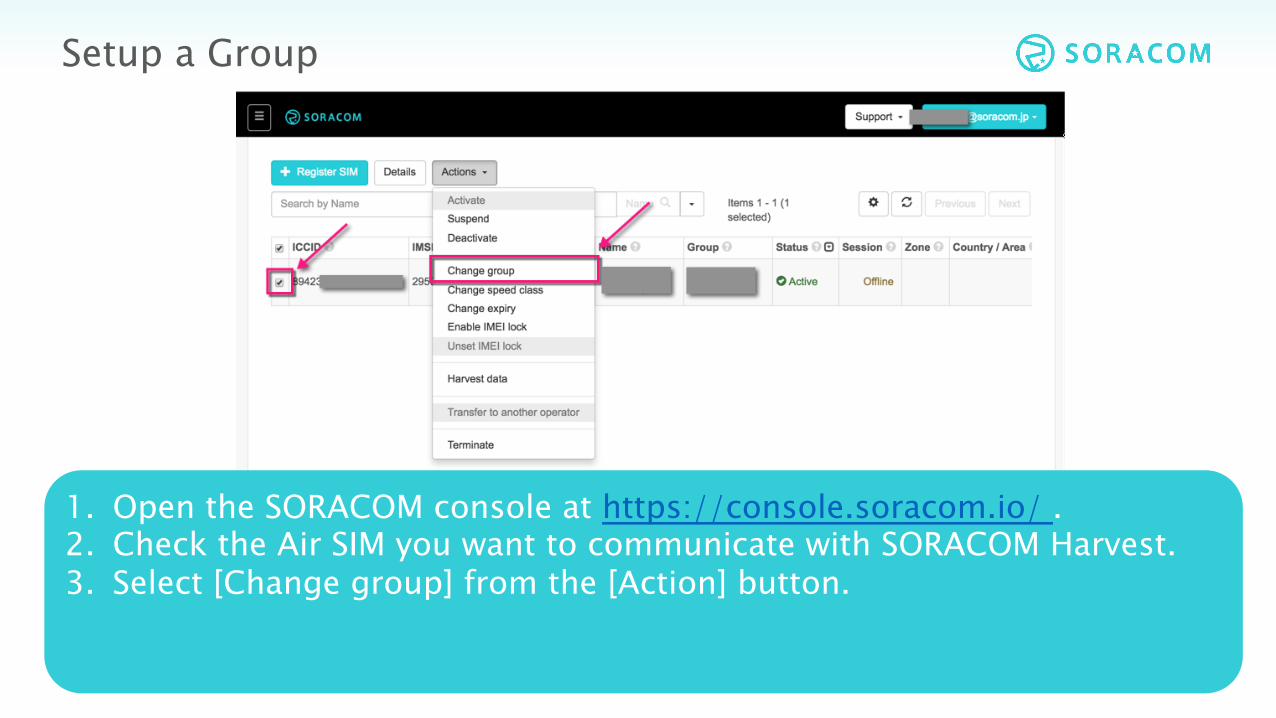
1. Open the SORACOM console at https://console.soracom.io/ . 2. Check the Air SIM you want to communicate with SORACOM Harvest. 3. Select [Change group] from the [Action] button.
Setup a Group

Create a group (via Actions menu)
1. Select [Create…] 2. Enter the group name, e.g. “hello soracom” and click [Create]
Alterna)ve op)on
Choose a group (via side bar)
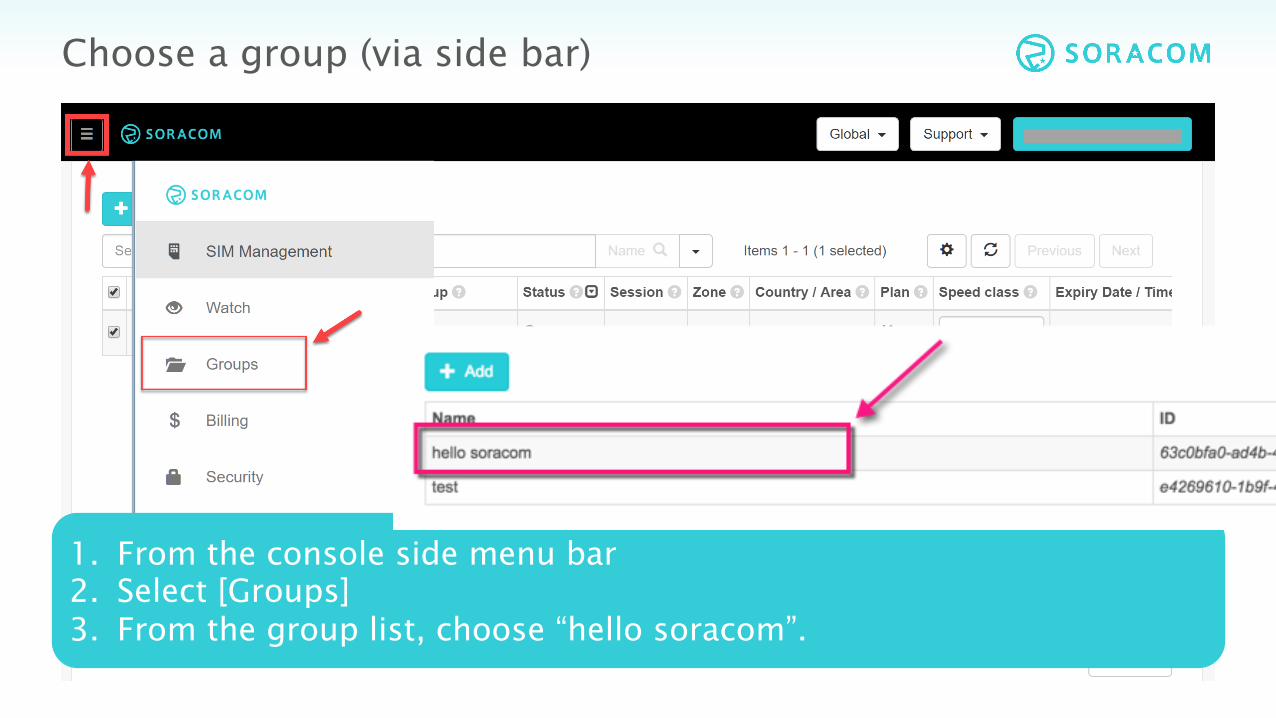
1. From the console side menu bar 2. Select [Groups] 3. From the group list, choose “hello soracom”.

BEAM CONFIGURATION
SORACOM Beam configurations consist of entry and exit points from SORACOM platform and the protocols intended for each. BEAM can also
directly send data to cloud services like AWS IoT, IBM Watson, or Microsoft Azure Event Hub
Before conversion
After conversion
HTTP HTTP/HTTPSMQTT MQTT/MQTTSTCP TCP/TCPSTCP HTTP/HTTPSUDP HTTP/HTTPS

Selecting BEAM configuration
1. Select [SORACOM Beam] configuration 2. Select [+] 3. Select the preferred entry point/ protocol conversion
BEAM configuration – HTTP Entry point
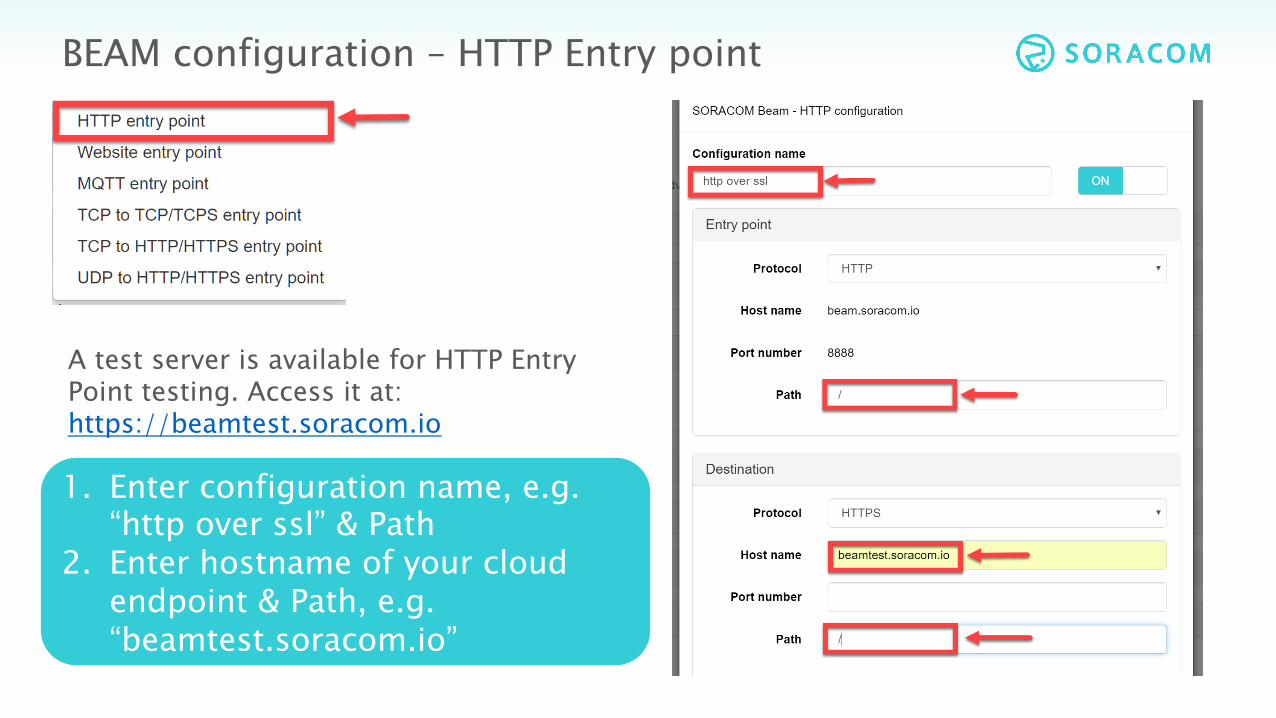
1. Enter configuration name, e.g. “http over ssl” & Path
2. Enter hostname of your cloud endpoint & Path, e.g. “beamtest.soracom.io”
A test server is available for HTTP Entry Point testing. Access it at: https://beamtest.soracom.io
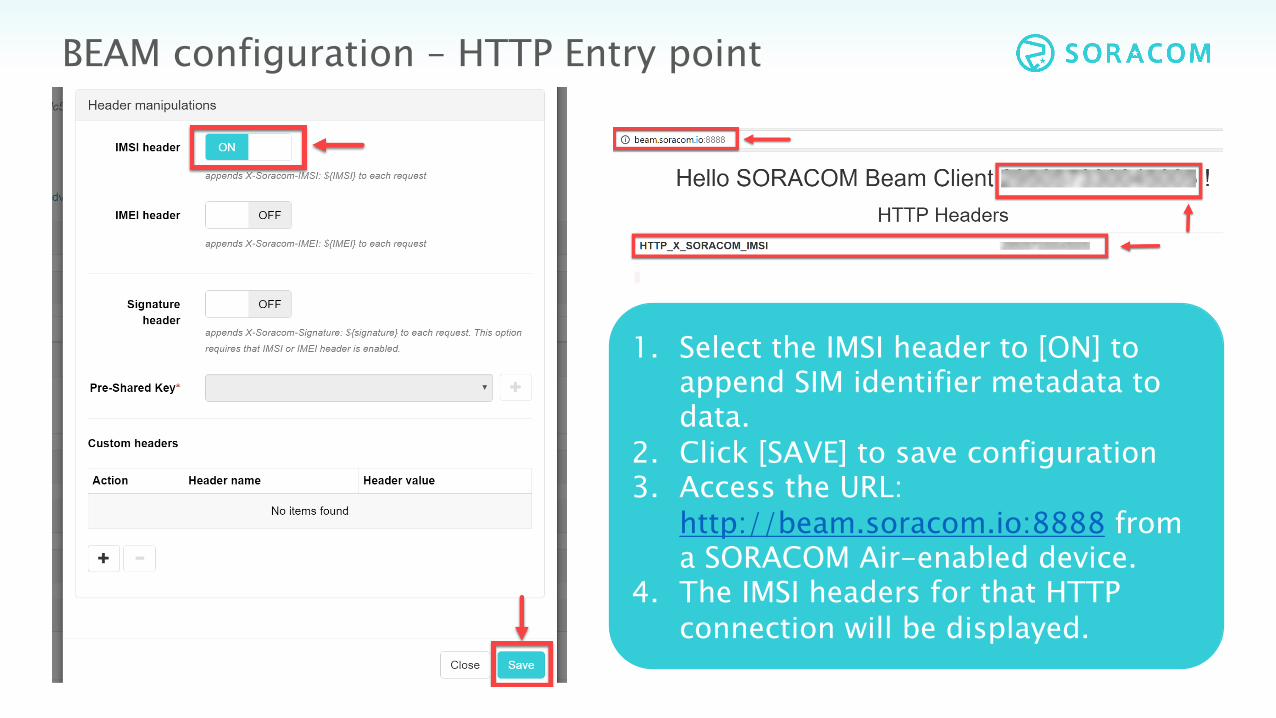
BEAM configuration – HTTP Entry point
1. Select the IMSI header to [ON] to append SIM identifier metadata to data.
2. Click [SAVE] to save configuration 3. Access the URL:
http://beam.soracom.io:8888 from a SORACOM Air-enabled device.
4. The IMSI headers for that HTTP connection will be displayed.

BEAM configuration – Setting custom headers
1. Enter configuration name, e.g. “http with customer header”
2. Select [+] in [Custom headers]
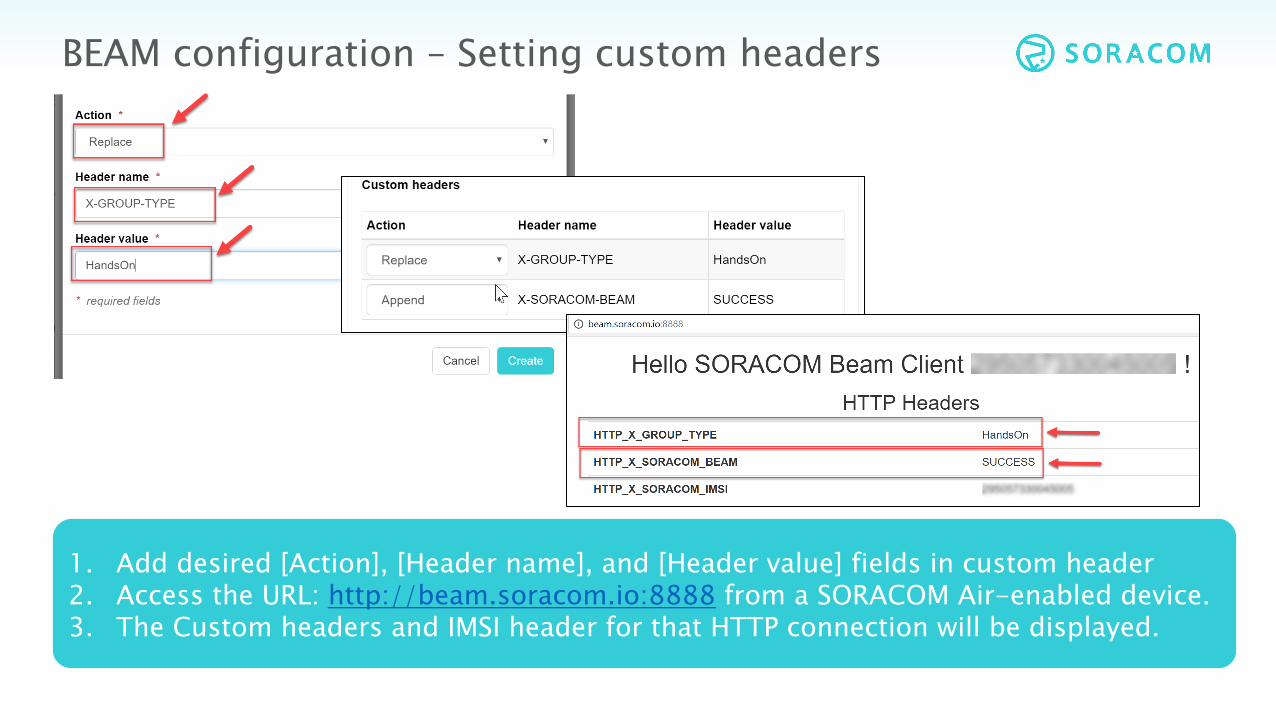
BEAM configuration – Setting custom headers
1. Add desired [Action], [Header name], and [Header value] fields in custom header 2. Access the URL: http://beam.soracom.io:8888 from a SORACOM Air-enabled device. 3. The Custom headers and IMSI header for that HTTP connection will be displayed.

BEAM configuration – TCP to TCP(S)
1. Enter configuration name, e.g. “echo over ssl”
2. Enter hostname of your TCPS endpoint & port number, e.g. “beamtest.soracom.io” and 1234
A test server is available for TCP to TCPs Entry Point testing. Access it at: https://beamtest.soracom.io

BEAM configuration – TCP to TCP(S)
1. Select the IMSI header and IMEI header to [ON]
2. Click [SAVE] to save configuration 3. Telnet beam.soracom.io with port 8023
from a SORACOM Air-enabled device. 4. The IMSI & IMEI as well as the echo
service is available.

BEAM configuration – TCP to HTTP(S)
1. Enter configuration name, e.g. “TCP to HTTPs” 2. Enter hostname of your HTTPS endpoint & Path, e.g.
“beamtest.soracom.io”
A test server is available for TCP to HTTPS Entry Point testing. Access it at: https://beamtest.soracom.io

BEAM configuration – TCP to HTTP(S)
1. Select the IMSI header and IMEI header to [ON]
2. Click [SAVE] to save configuration 3. Telnet beam.soracom.io with port 23080
from a SORACOM Air-enabled device. 4. Each TCP request is answered with a HTTPs
response

BEAM configuration – UDP to HTTP(S)
1. Enter configuration name, e.g. “The UDP Story”
2. Enter hostname of your HTTPS endpoint & Path, e.g. “beamtest.soracom.io”
A test server is available for TCP to HTTPS Entry Point testing. Access it at: https://beamtest.soracom.io

BEAM configuration – UDP to HTTP(S)
1. Select the IMSI header to [ON] if required 2. Click [SAVE] to save configuration 3. Using a tool, e.g. “Packet Sender”, you can send a UDP packet, e.g. “Beam UDP” to
beam.soracom.io with port 23080 from a SORACOM Air-enabled device 4. Successful response is received

BEAM conclusion
You have now mastered the art of using BEAM! It is time for you to make complex services… • Minimize your data payload by using the protocol conversion feature • Send data directly to cloud • Change destination end points in an instant & keep device management
simple.
Find out about our other services to find out how you can send the data without ever passing through public internet.

BEAM configuration – Website entry point
1. Enter configuration name, e.g. “http over ssl” & Path
2. Enter hostname of your cloud endpoint & Path, e.g. “beamtest.soracom.io”
A test server is available for Website Entry Point testing. Access it at: https://beamtest.soracom.io
Recommended