SCOPIA iVIEW Management Suite
Version 7.5
Installation Guide

© 2000-2010 RADVISION Ltd. All intellectual property rights in this publication are owned by RADVISION Ltd and are protected by United States copyright laws, other applicable copyright laws and international treaty provisions. RADVISION Ltd retains all rights not expressly granted.
This publication is RADVISION confidential. No part of this publication may be reproduced in any form whatsoever or used to make any derivative work without prior written approval by RADVISION Ltd.
No representation of warranties for fitness for any purpose other than what is specifically mentioned in this guide is made either by RADVISION Ltd or its agents.
RADVISION Ltd reserves the right to revise this publication and make changes without obligation to notify any person of such revisions or changes. RADVISION Ltd may make improvements or changes in the product(s) and/or the program(s) described in this documentation at any time.
If there is any software on removable media described in this publication, it is furnished under a license agreement included with the product as a separate document. If you are unable to locate a copy, please contact RADVISION Ltd and a copy will be provided to you.
Unless otherwise indicated, RADVISION registered trademarks are registered in the United States and other territories. All registered trademarks recognized.
For further information contact RADVISION or your local distributor or reseller.
Installation Guide for SCOPIA iVIEW Management Suite Version 7.5, November 2010
http://www.radvision.com
RADVISION | Installation Guide for SCOPIA iVIEW Management Suite Version 7.5

Table of Contents| iRADVISION | Installation Guide for SCOPIA iVIEW Management Suite Version 7.5
Table of Contents
1 About SCOPIA iVIEW Communications Manager
2 Verifying System Requirements
Verifying Minimum Hardware Requirements.............................................................2
Supported Operating Systems..............................................................................3
Supported Software .........................................................................................3
Supported Databases ........................................................................................4
Supported VMware...........................................................................................5
Supported LDAP Server Types..............................................................................5
Supported Devices ...........................................................................................5
SNMP Services ................................................................................................6
Port Requirements ...........................................................................................6
Redundancy Requirements .................................................................................8
3 Installing iVIEW Management Suite
How to Install iVIEW Management Suite .................................................................9
Installing iVIEW Management Suite with an Internal Gatekeeper............................ 10
Installing iVIEW Management Suite without an Internal Gatekeeper........................ 14
Installing iVIEW Management Suite for Service Providers ..................................... 18
Confirming the SCOPIA iVIEW Management Suite Installation ...................................... 22
Verifying SCOPIA iVIEW Management Suite Services Are Running.................................. 24
Logging Into SCOPIA iVIEW Management Suite for the First Time.................................. 24
Obtaining Required License Keys........................................................................ 25
1
About SCOPIA iVIEW Communications Manager | 1RADVISION | Installation Guide for SCOPIA iVIEW Management Suite Version 7.5
About SCOPIA iVIEW Communications Manager
RADVISION SCOPIA iVIEW Management Suite is an easy to use, web-based application for managing and monitoring multi-site video networks. This single-installation product contains the following components:
• SCOPIA iVIEW Communications Manager: Provides resource management of network devices for video and audio meetings as well as scheduling, call-routing, and conference control functionalities.
SCOPIA iVIEW Communications Manager optionally includes an internal ITU-T H.323 version 4-compliant gatekeeper to provide call control for IP telephony and multimedia communication networks. This internal gatekeeper is a variation of the RADVISION SCOPIA ECS Gatekeeper (ECS).
SCOPIA iVIEW Communications Manager also contains an internal SIP User Agent to provide call control for IP telephony and multimedia communication on the SIP network.
• SCOPIA iVIEW Network Manager provides a central management interface, enabling network administrators to easily and intuitively control, configure, and maintain collaborative radvision-based communication networks and equipment.

2 Verifying System Requirements
Before installing SCOPIA iVIEW Management Suite, read each section below to understand the minimum system requirements.
• Verifying Minimum Hardware Requirements................................................ page 2
• Supported Operating Systems................................................................. page 3
• Verifying Minimum Hardware Requirements................................................ page 2
• Supported Databases ........................................................................... page 4
• Supported VMware.............................................................................. page 5
• Supported Databases ........................................................................... page 4
• Supported Devices .............................................................................. page 5
• SNMP Services ................................................................................... page 6
• Port Requirements .............................................................................. page 6
• Port Requirements .............................................................................. page 6
Verifying Minimum Hardware Requirements
The following are the minimum hardware requirements that must be met before installing SCOPIA iVIEW Management Suite:
Product Number of Ports
Requirements
iVIEW Management Suite Standalone 25-100 CPU: Intel Single Core 2.8 GHz RAM: 1 GB Disk Space: 20 GB NIC: 100 Mbit
100-1000 CPU: Intel Single Core 3 GHz RAM: 1 GB Disk Space: 20 GB NIC: 100 Mbit
iVIEW Management Suite with internal gatekeeper, including these bundles:
• SCOPIA Bundle 12, 24, 48, and 72
• SCOPIA Elite MCU Bundle 10 and 15
25-1000 CPU: Intel Single Core 2.8 GHz RAM: 2 GB Disk Space: 20 GB NIC: 100 Mbit
Verifying System Requirements | 2RADVISION | Installation Guide for SCOPIA iVIEW Management Suite Version 7.5

Supported Operating Systems
SCOPIA iVIEW Management Suite standalone and SCOPIA iVIEW Management Suite with an internal gatekeeper support these operating systems:
• Microsoft Windows 2003 Standard/Enterprise Edition, SP1 & SP2 (32 Bit only)
• Microsoft Windows 2003 R2 Standard/Enterprise Edition, SP1 & SP2 (32 Bit only)
• Microsoft Windows 2008 Standard/Enterprise Edition, SP1 & SP2 (32 & 64 Bit)
• Microsoft Windows 2008 R2 x64 Edition
Supported Software
The following browsers are supported by in iVIEW Management Suite version 7.5:
• Internet Explorer 6.0 - 8.0
iVIEW Management Suite Outlook Add-on supports these versions of Microsoft Outlook:
• Microsoft Outlook XP on Windows XP
• Microsoft Outlook 2003 on Windows XP
• Microsoft Outlook 2007 on Windows XP
• Microsoft Outlook 2007 on Windows Vista
• Microsoft Outlook 2007 on Windows 7
• Microsoft Outlook 2007 on Windows 7 x64
• Microsoft Outlook 2010 (x32) on Windows XP
• Microsoft Outlook 2010 (x32) on Windows Vista
• Microsoft Outlook 2010 (x32) on Windows 7 (x32 only)
iVIEW Management Suite with internal gatekeeper, including SCOPIA Elite MCU 30 Bundle
100-500 CPU: Intel Single Core 3 GHz RAM: 2 GB Disk Space: 20 GB NIC: 100 Mbit
iVIEW Management Suite with internal gatekeeper
500-1000 CPU: Intel Single Core 3 GHz RAM: 3 GB Disk Space: 20 GB NIC: 100 Mbit
iVIEW Management Suite on VMware 25-500 CPU: Intel Xeon Dual Core 3G Memory: 4G, (assign 2G to virtual machine)
iVIEW Management Suite on VMware 500-1000 CPU: Intel Xeon Dual Core 3G Memory: 6G, (assign 3G to virtual machine)
Product Number of Ports
Requirements
Verifying System Requirements | 3RADVISION | Installation Guide for SCOPIA iVIEW Management Suite Version 7.5

iVIEW Management Suite supports these versions of Microsoft Exchange:
• Microsoft Exchange 2003
• Microsoft Exchange 2007
• Microsoft Exchange 2010
iVIEW Management Suite supports these versions of Lotus Notes:
• Lotus Notes 7
• Lotus Notes 8
• Lotus Notes 8.5
• Lotus Notes 8.5.1
Supported Databases
The following database types are supported by in iVIEW Management Suite version 7.5:
• MySQL internal database server
• Microsoft SQL Server 2000 Standard/Enterprise Edition SP4
• Microsoft SQL Server 2005 Standard/Enterprise Edition SP1
• Microsoft SQL Server 2008
• Microsoft Active Directory Server for Windows 2000 Server
• Microsoft Active Directory Server for Windows 2003 Server
• Microsoft Active Directory Server for Windows 2003 R2 Server
• Microsoft Active Directory Domain Services for Windows 2008 R2 Server
Note: Install external database servers on a separate machine before installing iVIEW Management Suite. Make sure that no database server is installed on the iVIEW Management Suite host server.
Verifying System Requirements | 4RADVISION | Installation Guide for SCOPIA iVIEW Management Suite Version 7.5

When creating a new external database for iVIEW Management Suite, the following requirements must be met:
Table 2-1 External Database Requirements
Supported VMware
iVIEW Management Suite version 7.5 supports VMware vSphere version 4.
The virtual server operating system specifications include:
• Windows 2003 Server R2 SP2 - Enterprise (32 bit only)
• Windows 2008 Server SP2 - Enterprise (32 bit and 64 bit)
• Windows 2008 Server R2 - Enterprise (64 bit)
Supported LDAP Server Types
In addition to Microsoft Active Directory, iVIEW Management Suite supports the following IBM Lotus Domino directory versions:
• Lotus Domino Server version 7.0
• Lotus Domino Server version 8.0
• Lotus Domino Server version 8.5
• Lotus Domino Server version 8.5.1
Supported Devices
iVIEW Management Suite version 7.5 supports the following devices:
• RADVISION SCOPIA ECS Gatekeeper version 7.1
• Cisco IOS H.323 Gatekeeper
• Cisco Unified Communications Manager
• Microsoft LCS 2005 SP1, OCS 2007, and OCS 2007 R2
• Broadsoft IP Centrix
Login Element Maximum Characters
Database Name 32
Database User Name 16
Database Password 12
Verifying System Requirements | 5RADVISION | Installation Guide for SCOPIA iVIEW Management Suite Version 7.5

• RADVISION MCU versions 4.4, 5.7, and 7.5
• RADVISION SCOPIA Gateway versions 5.6
• SCOPIA Desktop version 7.5
• Polycom endpoints
SNMP Services
To enable SNMP services, install the Microsoft Windows SNMP service for iVIEW Management Suite with internal gatekeeper for SCOPIA 100 bundle.
Port Requirements
The following are the required ports for iVIEW Management Suite. Make sure all required ports are available and assigned according to the following guidelines:
Table 2-2 iVIEW Management Suite Server Port Requirements
Protocol Ports Type Direction Purpose Destination
HTTP 80 TCP In from web Web UI access and Web Service access
iVIEW Management Suite standalone server. Port 8080 for iVIEW Management Suite with internal gatekeeper.
XML 3336 TCP In from SCOPIA Desktop Configuration status iVIEW Management Suite standalone server
Internal Gatekeeper HTTP
8011 TCP In from web Log retrieval and advanced commands
iVIEW Management Suite with internal gatekeeper server
Database Connection
3306 TCP Local database connection
If the internal database is installed, the application communicates with the database using port 3306
iVIEW Management Suite standalone server and iVIEW Management Suite with internal gatekeeper server
XML 3271 TCP In from iVIEW Communications Manager
ECS Call Control XML API
iVIEW Management Suite with internal gatekeeper server
Verifying System Requirements | 6RADVISION | Installation Guide for SCOPIA iVIEW Management Suite Version 7.5
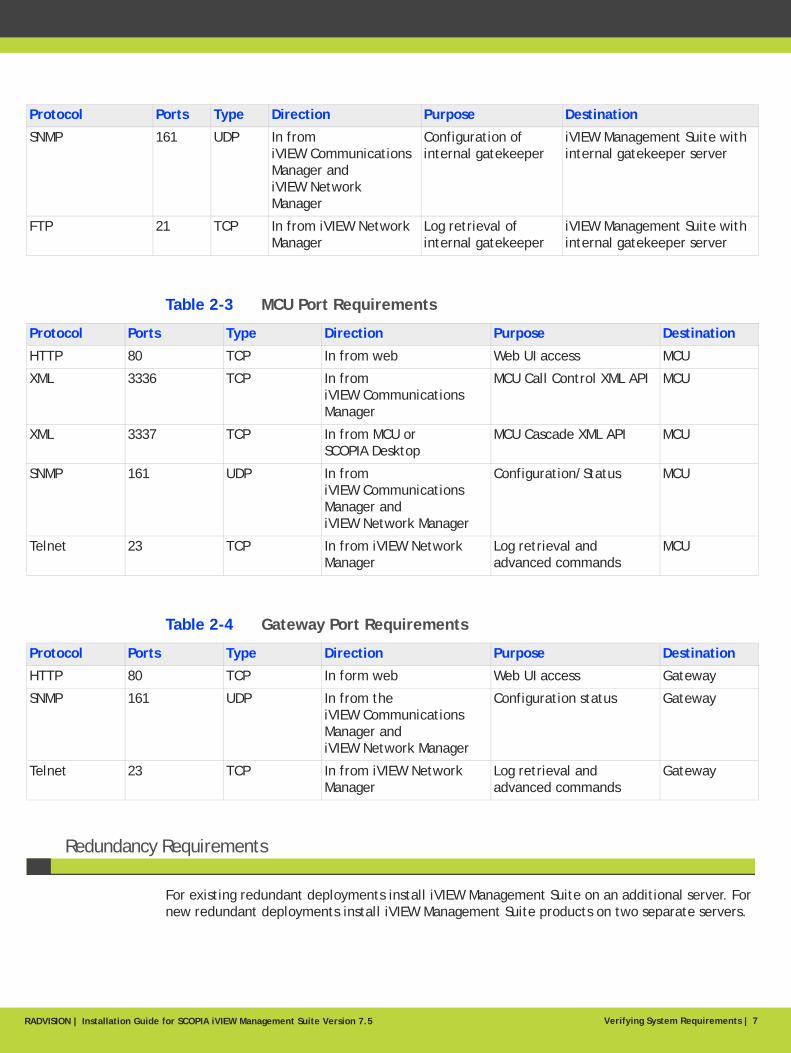
Table 2-3 MCU Port Requirements
Table 2-4 Gateway Port Requirements
Redundancy Requirements
For existing redundant deployments install iVIEW Management Suite on an additional server. For new redundant deployments install iVIEW Management Suite products on two separate servers.
SNMP 161 UDP In from iVIEW Communications Manager and iVIEW Network Manager
Configuration of internal gatekeeper
iVIEW Management Suite with internal gatekeeper server
FTP 21 TCP In from iVIEW Network Manager
Log retrieval of internal gatekeeper
iVIEW Management Suite with internal gatekeeper server
Protocol Ports Type Direction Purpose Destination
Protocol Ports Type Direction Purpose Destination
HTTP 80 TCP In from web Web UI access MCU
XML 3336 TCP In from iVIEW Communications Manager
MCU Call Control XML API MCU
XML 3337 TCP In from MCU or SCOPIA Desktop
MCU Cascade XML API MCU
SNMP 161 UDP In from iVIEW Communications Manager and iVIEW Network Manager
Configuration/Status MCU
Telnet 23 TCP In from iVIEW Network Manager
Log retrieval and advanced commands
MCU
Protocol Ports Type Direction Purpose Destination
HTTP 80 TCP In form web Web UI access Gateway
SNMP 161 UDP In from the iVIEW Communications Manager and iVIEW Network Manager
Configuration status Gateway
Telnet 23 TCP In from iVIEW Network Manager
Log retrieval and advanced commands
Gateway
Verifying System Requirements | 7RADVISION | Installation Guide for SCOPIA iVIEW Management Suite Version 7.5

3 Installing iVIEW Management Suite
Depending on your deployment type and path, there are various steps required to complete a successful installation of iVIEW Management Suite. The following topics are covered in this chapter:
• How to Install iVIEW Management Suite..................................................... page 9
• Confirming the SCOPIA iVIEW Management Suite Installation .......................... page 22
• Verifying SCOPIA iVIEW Management Suite Services Are Running ...................... page 24
• Logging Into SCOPIA iVIEW Management Suite for the First Time...................... page 24
• Obtaining Required License Keys ............................................................ page 25
How to Install iVIEW Management Suite
This section provides general information about iVIEW Management Suite installation and procedures for installing iVIEW Management Suitein different modes.
For most deployments you need to install iVIEW Management Suite with an internal gatekeeper. For large organizations with multiple branches offering service preservation for up to 10,000 users, you would install iVIEW Management Suite in the standalone mode. If you are a service provider, you need to install a standalone iVIEW Management Suite with multi-tenant support, since your large centralized videoconferencing deployment will serve many customers (tenants).
If you need to install iVIEW Management Suite for redundancy, use instructions in this section. The installation procedure for a slave iVIEW Management Suite is the same as for a master iVIEW Management Suite.
• Installing iVIEW Management Suite with an Internal Gatekeeper...................... page 10
• Installing iVIEW Management Suite without an Internal Gatekeeper.................. page 14
• Installing iVIEW Management Suite for Service Providers ............................... page 18
Installing iVIEW Management Suite | 9RADVISION | Installation Guide for SCOPIA iVIEW Management Suite Version 7.5

Installing iVIEW Management Suite with an Internal Gatekeeper
This section provides installation procedure for a typical deployment.
Procedure
Step 1 To start the installation wizard, run the RADVISION iVIEW Management Suite .exe file from the iVIEW Management Suite CD-ROM.
Step 2 Select Next in the Introduction window.
Step 3 Read and accept the license agreement in the License Agreement window, and then select Next.
Step 4 Select the With Gatekeeper for SCOPIA Bundle option in the Installation Type Selection window.
Figure 3-1 The Installation Type Selection Window
Step 5 Select Next.
Installing iVIEW Management Suite | 10RADVISION | Installation Guide for SCOPIA iVIEW Management Suite Version 7.5
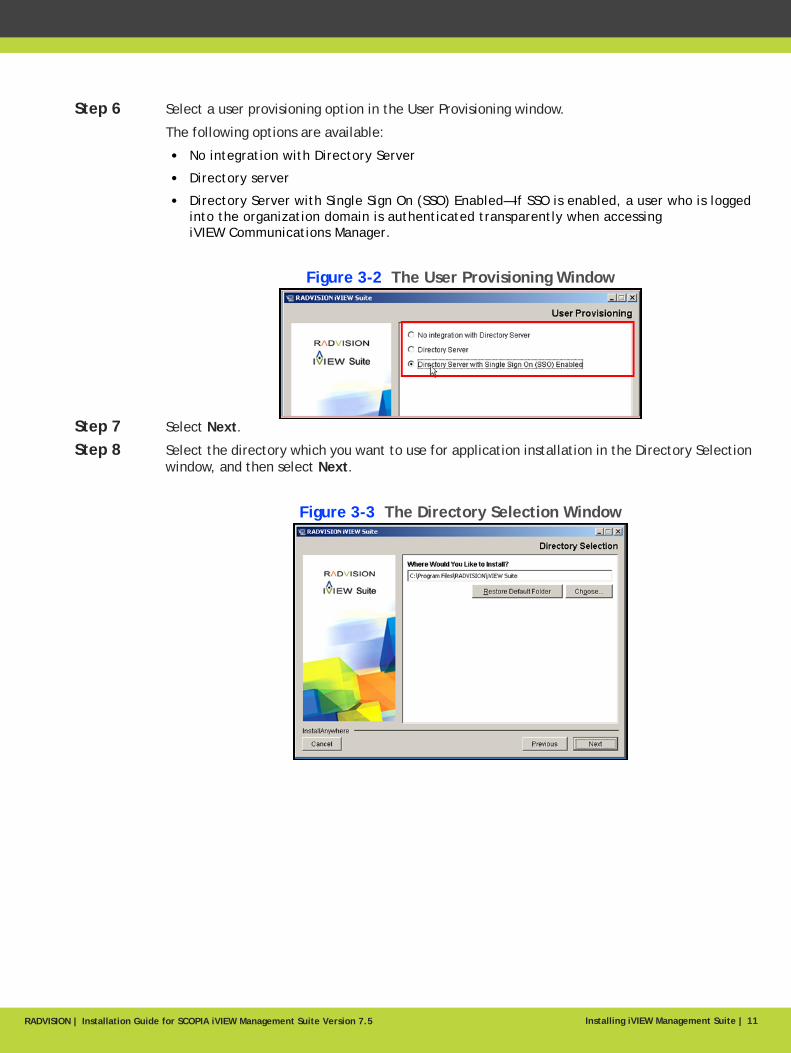
Step 6 Select a user provisioning option in the User Provisioning window.
The following options are available:
• No integration with Directory Server
• Directory server
• Directory Server with Single Sign On (SSO) Enabled—If SSO is enabled, a user who is logged into the organization domain is authenticated transparently when accessing iVIEW Communications Manager.
Figure 3-2 The User Provisioning Window
Step 7 Select Next.
Step 8 Select the directory which you want to use for application installation in the Directory Selection window, and then select Next.
Figure 3-3 The Directory Selection Window
Installing iVIEW Management Suite | 11RADVISION | Installation Guide for SCOPIA iVIEW Management Suite Version 7.5

Step 9 Enter the host name URL and Web server port number used by the application in the iVIEW Server Information window. Make sure that the Web server port is not in use by another application, and then select Next.
Figure 3-4 The iVIEW Server Information Window
The MySQL Installation window opens providing basic information about MySQL database.
Step 10 Define the directory which you want to use for MySQL database installation:
a. In the MySQL installation window, select Next.
b. Define a folder in which you want to install the MySQL database in the Choose a folder for MySQL Installation window.
c. Select Next.
Step 11 Enter mail server information in the Outgoing Mail Server Information window. To confirm that the email server is functioning, enter an email address. If the email server is functioning correctly, you receive a test email.
Figure 3-5 The Outgoing Mail Server Information Window
Typically, you can use port 25 for your outgoing mail server.
Installing iVIEW Management Suite | 12RADVISION | Installation Guide for SCOPIA iVIEW Management Suite Version 7.5

Step 12 Create an administrator account for accessing the application in the Account Login Information window. This account will be used accessing both the SCOPIA iVIEW Communications Manager and iVIEW Management Suite.
Figure 3-6 The iVIEW Account Login Information Window
Step 13 Review the installation summary in the Pre-Installation Summary window, and then click Install to proceed with the installation.
Figure 3-7 The Pre-Installation Summary Window
Do not interrupt the installation. After starting the iVIEW Suite service allow several minutes for server initialization before logging into the user interface.
Installing iVIEW Management Suite | 13RADVISION | Installation Guide for SCOPIA iVIEW Management Suite Version 7.5

Installing iVIEW Management Suite without an Internal Gatekeeper
Use this installation procedure for large distributed deployments.
Procedure
Step 1 To start the installation wizard, run the RADVISION iVIEW Management Suite .exe file from the iVIEW Management Suite CD-ROM.
Step 2 Select Next in the Introduction window.
Step 3 Read and accept the license agreement in the License Agreement window, and then select Next.
Step 4 Select the Standalone option in the Installation Type Selection window.
Figure 3-8 The Installation Type Selection Window
Step 5 Select Next.
Step 6 Select a user provisioning option in the User Provisioning window. The following options are available:
• No integration with Directory Server
• Directory server
• Directory Server with Single Sign On (SSO) Enabled—If SSO is enabled, a user who is logged into the organization domain is authenticated transparently when accessing iVIEW Communications Manager.
Figure 3-9 The User Provisioning Window
Step 7 Select Next.
Installing iVIEW Management Suite | 14RADVISION | Installation Guide for SCOPIA iVIEW Management Suite Version 7.5

Step 8 Select the directory which you want to use for application installation in the Directory Selection window, and then select Next.
Figure 3-10 The Directory Selection Window
Step 9 Enter the host name URL and Web server port number used by the application in the iVIEW Server Information window. Make sure that the Web server port is not in use by another application, and then select Next.
Figure 3-11 The iVIEW Server Information Window
Step 10 To configure a MySQL database, perform these steps:
a. Select Internal Database in the Database Server Selection window.
b. Select Next. The MySQL Installation window is displayed providing basic information about MySQL database.
c. Select Next.
d. Define a folder in which you want to install the MySQL database in the Choose a folder for MySQL Installation window.
e. If you choose to create a new database, enter the server name, port, and administrator login ID and password in the Database Server Administration Information window.
Installing iVIEW Management Suite | 15RADVISION | Installation Guide for SCOPIA iVIEW Management Suite Version 7.5

f. Select Next.
g. Enter the database name, user login ID, and password in the Database Information window.
h. Select Next.
-OR-
Step 11 To configure an MSDE/MS-SQL database, perform these steps:
a. Select MSDE/MS-SQL in the Database Server Selection window.
b. Select Next.
c. Define whether you want to create a new database or connect to an existing database in the Create or Connect window, and then select Next.
Figure 3-12 The Create or Connect Window
d. If you chose to create a new database, enter the server name, port, and administrator login ID and password in the Database Server Administration Information window, and then select Next.
-OR-
e. If you chose to use an existing database, enter the server name, port, database name, user login ID and password in the Existing Database Server User Information window.
Make sure that the existing database is empty. Select Next.
Installing iVIEW Management Suite | 16RADVISION | Installation Guide for SCOPIA iVIEW Management Suite Version 7.5

Step 12 Enter mail server information in the Outgoing Mail Server Information window. To confirm that the email server is functioning, enter an email address. If the email server is functioning correctly, you receive a test email.
Figure 3-13 The Outgoing Mail Server Information Window
Typically, you can use port 25 for your outgoing mail server.
Step 13 Create an administrator account for accessing the application in the Account Login Information window. This account will be used accessing both the SCOPIA iVIEW Communications Manager and iVIEW Management Suite.
Figure 3-14 The iVIEW Account Login Information Window
Installing iVIEW Management Suite | 17RADVISION | Installation Guide for SCOPIA iVIEW Management Suite Version 7.5

Step 14 Review the installation summary in the Pre-Installation Summary window, and then click Install to proceed with the installation.
Figure 3-15 The Pre-Installation Summary Window
Do not interrupt the installation. After starting the iVIEW Suite service allow several minutes for server initialization before logging into the user interface.
Step 15 If you configured an MS-SQL database and you require a language other than English, match the language setting for the computer on which the SQL Server database is installed with the language setting for iVIEW Management Suite.
For example, to view the iVIEW Management Suite user interface in Chinese, you must also set the SQL server database host computer to use Chinese.
Note: Failure to match these language settings can result in the incorrect display of Chinese characters as well as incorrect user or terminal information being stored in the database.
Installing iVIEW Management Suite for Service Providers
Perform this procedure for service provider’s deployments.
Procedure
Step 1 To start the installation wizard, run the RADVISION iVIEW Management Suite .exe file from the iVIEW Management Suite CD-ROM.
Step 2 Select Next in the Introduction window.
Step 3 Read and accept the license agreement in the License Agreement window, and then select Next.
Installing iVIEW Management Suite | 18RADVISION | Installation Guide for SCOPIA iVIEW Management Suite Version 7.5

Step 4 Select the Standalone with Multi-tenant Support option the Installation Type Selection window.
Figure 3-16 The Installation Type Selection Window
Step 5 Select Next.
Step 6 Select the directory which you want to use for application installation in the Directory Selection window, and then select Next.
Step 7 Enter the host name URL and Web server port number used by the application in the Server Information window. Make sure that the Web server port is not in use by another application, and then select Next.
Figure 3-17 The iVIEW Server Information Window
Step 8 To configure a MySQL database, perform these steps:
a. Select Internal Database in the Database Server Selection window.
b. Select Next. The MySQL Installation window is displayed providing basic information about MySQL database.
c. Select Next.
d. Define a folder in which you want to install the MySQL database in the Choose a folder for MySQL Installation window.
Installing iVIEW Management Suite | 19RADVISION | Installation Guide for SCOPIA iVIEW Management Suite Version 7.5

e. If you choose to create a new database, enter the server name, port, and administrator login ID and password in the Database Server Administration Information window.
f. Select Next.
g. Enter the database name, user login ID, and password in the Database Information window.
h. Select Next.
-OR-
Step 9 To configure an MSDE/MS-SQL database, perform these steps:
a. Select MSDE/MS-SQL in the Database Server Selection window.
b. Select Next.
c. Define whether you want to create a new database or connect to an existing database in the Create or Connect window, and then select Next.
Figure 3-18 The Create or Connect Window
d. If you chose to create a new database, enter the server name, port, and administrator login ID and password in the Database Server Administration Information window, and then select Next.
-OR-
e. If you chose to use an existing database, enter the server name, port, database name, user login ID and password in the Existing Database Server User Information window.
Make sure that the existing database is empty. Select Next.
Installing iVIEW Management Suite | 20RADVISION | Installation Guide for SCOPIA iVIEW Management Suite Version 7.5

Step 10 Enter mail server information in the Outgoing Mail Server Information window. To confirm that the email server is functioning, enter an email address. If the email server is functioning correctly, you receive a test email.
Figure 3-19 The Outgoing Mail Server Information Window
Typically, you can use port 25 for your outgoing mail server.
Step 11 Create an administrator account for accessing the application in the Account Login Information window. This account will be used accessing both the SCOPIA iVIEW Communications Manager and iVIEW Management Suite.
Figure 3-20 The iVIEW Account Login Information Window
Installing iVIEW Management Suite | 21RADVISION | Installation Guide for SCOPIA iVIEW Management Suite Version 7.5

Step 12 Review the installation summary in the Pre-Installation Summary window, and then click Install to proceed with the installation.
Figure 3-21 The Pre-Installation Summary Window
Do not interrupt the installation. After starting the iVIEW Suite service allow several minutes for server initialization before logging into the user interface.
Step 13 If you configured an MS-SQL database and you require a language other than English, match the language setting for the computer on which the SQL Server database is installed with the language setting for iVIEW Management Suite.
For example, to view the iVIEW Management Suite user interface in Chinese, you must also set the SQL server database host computer to use Chinese.
Note: Failure to match these language settings can result in the incorrect display of Chinese characters as well as incorrect user or terminal information being stored in the database.
Confirming the SCOPIA iVIEW Management Suite Installation
Before configuring administrative and user settings within SCOPIA iVIEW Management Suite, verify that the installation is complete.
Procedure
Step 1 Wait 2-3 minutes for the server to complete initialization.
Step 2 Go to http://host-URL:port-number.
Step 3 Verify that the SCOPIA iVIEW Communications Manager login window appears.
Step 4 Verify that you can log in to the web interface using the administrator account specified in the installation process.
Installing iVIEW Management Suite | 22RADVISION | Installation Guide for SCOPIA iVIEW Management Suite Version 7.5

Figure 3-22 SCOPIA iVIEW Communications Manager
Installing iVIEW Management Suite | 23RADVISION | Installation Guide for SCOPIA iVIEW Management Suite Version 7.5

Verifying SCOPIA iVIEW Management Suite Services Are Running
iVIEW Management Suite is installed as a Windows Service on your server. iVIEW Management Suite services should automatically start when the server is started. To verify:
Procedure
Step 1 Go to Start > Settings > Control Panel > Administrative Tools > Services and find the list of iVIEW Management Suite related services.
Step 2 Verify that the following services are installed:
• RADVISION iVIEW Management Suite—The service that SCOPIA iVIEW Communications Manager and SCOPIA iVIEW Network Manager run on. This is started automatically.
• RADVISION SipServer—The service for the SIP User agent included with SCOPIA iVIEW Communications Manager for SIP call control. This is started automatically.
You can turn off this service in H.323-only deployments. Access the vcs-core.properties file located by default under C:\Program Files\Radvision\iVIEW Management Suite\iCM\jboss\bin, and make the following change:
vnex.vcms.core.sip.serverAddress=.
• RADVISION SCOPIA ECS Gatekeeper—Internal gatekeeper service. Only available in iVIEW Management Suite with internal gatekeeper for SCOPIA bundle. This is started automatically
• RADVISION SCOPIA ECS Gatekeeper Watchdog—Internal gatekeeper service. Only available in iVIEW Management Suite with internal gatekeeper for SCOPIA bundle. This is started automatically.
• RADVISION SCOPIA ECS Gatekeeper Web Server—The web interface service for the internal gatekeeper. Only available in iVIEW Management Suite with internal gatekeeper for SCOPIA bundle. To access the web interface of the internal gatekeeper, enable this service. The URL of the internal gatekeeper web interface is http://host_server:8011/. The default login ID is “admin”, and there is no password. You can modify the login ID and password via the web interface of the internal gatekeeper.
Logging Into SCOPIA iVIEW Management Suite for the First Time
Procedure
Step 1 Access either the SCOPIA iVIEW Communications Manager or the SCOPIA iVIEW Network Manager login windows from the Start menu of the local server.
Step 2 Log in to SCOPIA iVIEW Communications Manager for the first time.
Step 3 (Optional) Enable directory integration to synchronize user records from a Directory Server.
Installing iVIEW Management Suite | 24RADVISION | Installation Guide for SCOPIA iVIEW Management Suite Version 7.5

Obtaining Required License Keys
At the end of the installation process, a temporary license is automatically installed. This license is valid for 30 days. To obtain anSCOPIA iVIEW Management Suite license, perform the following procedure:
Procedure
Step 1 In the SCOPIA iVIEW Communications Manager toolbar, select the Help About icon:
Step 2 Select Select here for product registration in the Help About window.
The Permanent License Registration Site page opens.
Step 3 Follow the instructions in the How to receive your permanent license section. Upon completion, your license is sent to you by email.
Step 4 After obtaining the license, choose Start > Programs > RADVISION > iVIEW Suite > Update License to apply the new license.
Installing iVIEW Management Suite | 25RADVISION | Installation Guide for SCOPIA iVIEW Management Suite Version 7.5

www.radvision.com
About RADVISIONRADVISION (NASDAQ: RVSN) is the industry’s leading provider of market-proven products and technologies for unified visual communications over IP and 3G networks. With its complete set of standards based video networking infrastructure and developer toolkits for voice, video, data and wireless communications, RADVISION is driving the unified communications evolution by combining the power of video, voice, data and wireless – for high definition video conferencing systems, innovative converged mobile services, and highly scalable video-enabled desktop platforms on IP, 3G and emerging next generation networks. For more information about RADVISION, visit www.radvision.com
This document is not part of a contract of license as may be expressly agreed RADVISION is registered trademarks of RADVISION, Ltd. All trademarks recognized. All rights reserved © 2010 RADVISION, Ltd.
USA/AmericasT +1 201 689 6300F +1 201 689 [email protected]
EMEAT +44 20 3178 8685F +44 20 3178 [email protected]
APACT +852 3472 4388F +852 2801 [email protected]
Recommended


![Enterprise Porta1 Transaction Iview[1]](https://img.dokumen.tips/doc/110x75/563dba8f550346aa9aa6ae23/enterprise-porta1-transaction-iview1.jpg)


