Samsung SecretZone
User Manual

2
Copyright© 2008 Clarus, Inc. All Rights Reserved.[Rev. 02 02/10/2009 Samsung SecretZone User Manual First edition October 2008 This revision - 03] Copyright © 2008 Clarus, Inc. All Rights Reserved. No part of this document may be communicated, distributed, reproduced, or transmitted in any form or by any means without the prior written permission of Clarus, Inc., or Samsung Electronics Co. except as allowed under the copyright laws.Though every care has been taken to ensure the accuracy of this document, Clarus, Inc. and Samsung Electronics Co., cannot accept responsibility for any errors or omissions or for any loss, whether legal or natural, occurring to any person when acting, or refraining from action, because of the information contained herein. Information in this document is subject to change without notice. All brand and product names are trademarks or registered trademarks of their respective companies. Samsung® and Clarus® , Inc. is a registered trademark of Samsung Electronics Co. and Clarus, Inc.Samsung SecretZone is a trademark of Samsung Electronics Co. Microsoft® Microsoft, Encarta, MSN, Windows, and Windows Vista™ are either registered trademarks or trademarks of Microsoft Corporation in the United States and/or other countries. IBM® , PC-DOS, PC are register trademark of International Machine Corporation Intel® and Intel® Pentium® is a registered trademark of Intel Corporation in the United States and/or other countries. Linux © 2006 Red Hat, Inc. All rights reserved. “Red Hat,” Red Hat Linux, the Red Hat “Shadowman” logo, and the products listed are trademarks or registered trademarks of Red Hat, Inc. in the US and other countries. Linux is a registered trademark of Linus Torvalds. Patents Samsung Electronics Co., Ltd. Moreover, Clarus, Inc. may have patents or patent pending applications, trademarks, copyrights, or other intellectual property rights covering subject matter in this document. The furnishing of this document does not give the recipient or reader any license to these patents, trademarks, copyrights, or other intellectual property rights. Please read and understand the complete contents of this manual. The contents of this manual may be modified without prior notice. For more information, please visit
Clarus, Inc. Homepagehttp://www.clarussoft.com/

3
CHAPTER 1 INTRODUCTION ......................................... 5
HANDLING PRECAUTIONS ............................................................. 7 Regular Virus Scanning .......................................................... 7 Safely Remove Hardware ........................................................ 7
CHAPTER 2 TERMS AND CONCEPTS .......................... 8
Idle Timeout ............................................................................ 9 Partition .................................................................................. 9 File Systems ............................................................................ 9 FAT16 ................................................................................... 10 FAT32 ................................................................................... 11 NTFS .................................................................................... 12 Volume .................................................................................. 12 Volume Image ....................................................................... 13 Virtual Drive ......................................................................... 13
CHAPTER 3 INSTALLING THE SOFTWARE ............. 14
INTRODUCTION ........................................................................... 15 BEFORE INSTALLATION .............................................................. 16 PREPARING YOUR COMPUTER ..................................................... 17
System Requirements ............................................................. 17 CONNECTING THE DRIVE TO YOUR COMPUTER .......................... 18 INSTALLING THE SOFTWARE ....................................................... 19
Welcome message ................................................................. 19 Choose the preferred Language ............................................ 20 Install Wizard ........................................................................ 20 Installation Progress Bar ...................................................... 21 Create Password ................................................................... 22 Complete installation ............................................................ 23
CHAPTER 4 SETTING UP THE SECRETZONE ......... 24
GETTING STARTED ..................................................................... 25 Starting the Software ............................................................. 25 Logging In ............................................................................. 26 Samsung SecretZone Main Screen ........................................ 26
MENU CHOICES .......................................................................... 28 ICON DESCRIPTION ..................................................................... 31

4
CHAPTER 5 CREATE A NEW VOLUME IMAGE ...... 33
CREATE NEW .............................................................................. 34 Designating a Letter to your Drive ....................................... 37 Checking the new volume from Windows Explorer ............... 42
CHAPTER 6 WORKING WITH VIRTUAL DRIVE ..... 43
Expand .................................................................................. 44 Changing the Name ............................................................... 46 Create a New Volume ........................................................... 48 Change a Volume Password ................................................. 52 Adding Users ........................................................................ 53 Deleting Users....................................................................... 56 Dismounting a Virtual Drive ................................................. 57 Mounting a Volume Image to a Virtual Drive ....................... 58 Deleting a Volume Image ...................................................... 59
CHAPTER 7 CREATING AN EXECUTABLE IMAGE 60
CONVERTING A VOLUME ............................................................ 61 Launching the Image File ..................................................... 65

Introduction
Samsung SecretZone User Manual Ver 2.0
5
Chapter 1 Introduction
Congratulations on becoming an owner of the
Samsung External Hard Disk Drive with SecretZone.
You made an excellent choice and we hope you will
enjoy all its capabilities.
SecretZone allows you to create multiple virtual drives
on the Samsung External Hard Disk Drive. Samsung‟s SecretZone protects important files and
data in the form of software-based 128-bit AES, 256-
bit AES, and Blowfish 448 encryption. The external
drive owner's data is also locked with a password
which ensures data security. In addition to the
freedom of knowing that your data is secure, you can
transfer your secured data from one Samsung
External Hard Disk Drive to another. No more
transporting information on a memory stick that can
be easily lost, stolen, or misplaced.

Introduction
Samsung SecretZone User Manual Ver 2.0
6
NOTE: PLEASE READ AND UNDERSTAND THE
COMPLETE CONTENTS OF THIS MANUAL.
THE CONTENTS OF THIS MANUAL MAY BE
MODIFIED WITHOUT PRIOR NOTICE.
Inquiries Clarus, Inc. Homepage
http://www.clarussoft.com/

Introduction
Samsung SecretZone User Manual Ver 2.0
7
Handling Precautions
The following are precautions that must be
followed to enjoy a long Samsung External Hard
Disk Drive life.
NOTE: PLEASE READ AND UNDERSTAND ALL
THE FOLLOWING PRECAUTIONS BEFORE
PROCEEDING TO USE TOUR SAMSUNG
EXTERNAL HARD DISK DRIVE
Regular Virus Scanning
Frequently scan the device for viruses and protect the device from virus infection.
Safely Remove Hardware
Always use the Safely Remove Hardware feature before shutting down the Samsung External Hard Disk Drive or disconnecting the USB cable.

Terms and concepts
Samsung SecretZone User Manual Ver 2.0
8
Chapter 2 Terms and
Concepts

Terms and concepts
Samsung SecretZone User Manual Ver 2.0
9
Idle Timeout
As long as the Samsung External Hard Disk
Drive is receiving input or doing a task, the
drive is 'active'. When there is no activity for a
set period of time, the drive becomes 'inactive'.
When the drive is 'inactive' it is called 'Idle'
and the drive will come to a 'rest'. You set the
'Idle Timeout' to start when there has been no
activity for a period of time by entering a time
in this field. For instance, if you want the drive
to rest if there has been no activity for 10
minutes, you would enter a '10'' in the Idle
Timeout field. After 10 minutes of inactivity,
the drive would come to a rest until it detects
activity again.
Partition
Most operating systems, such as Windows NT or Windows XP, allow users to divide a hard disk into multiple partitions, in effect making one physical hard disk into several smaller logical hard disks.
There are many reasons to partition a hard drive but the most widely used is to have one partition that contains all of the programs and one partition that contain all the data. Using this type of partitioning makes backing up your data much easier since it is all contained on one partition. As well, if the operating system has any problems, it is much easier to format and reinstall the operating system.
Partitions are identified by a drive alpha name like the "C" drive or the "G" drive.
File Systems
A File System is how the computer keeps track of where all the files are on the disk. Like a Table of Contents, the File System on a

Terms and concepts
Samsung SecretZone User Manual Ver 2.0
10
computer is referenced whenever you look for, or write to, a file Types of File Systems are FAT16, FAT32, and NTFS. The following will give a brief explanation of each Filing System's Pros, Cons, and the primary audience for the File System.
FAT16
FAT is an abbreviation for File Allocation Table.
The FAT file system is straightforward and is supported by most existing operating systems for personal computers. This makes it an ideal format for solid-state memory cards and a convenient way to share data between operating systems.
TABLE 1. Pros and Cons of FAT16
Pros Cons Used Mostly For:
Can read/write on
most operating
systems (Windows
and Macintosh).
If you lose power while
working, you may
corrupt the FAT and you
take a chance of losing
your data.
Non-IT
environments. More
for home or
individual use.
File transfer using a
disk is more probable
since file sizes must
be smaller than with
NTFS
Can only be partitioned
up to 2 gigabytes.
Terms and concepts
Samsung SecretZone User Manual Ver 2.0
11
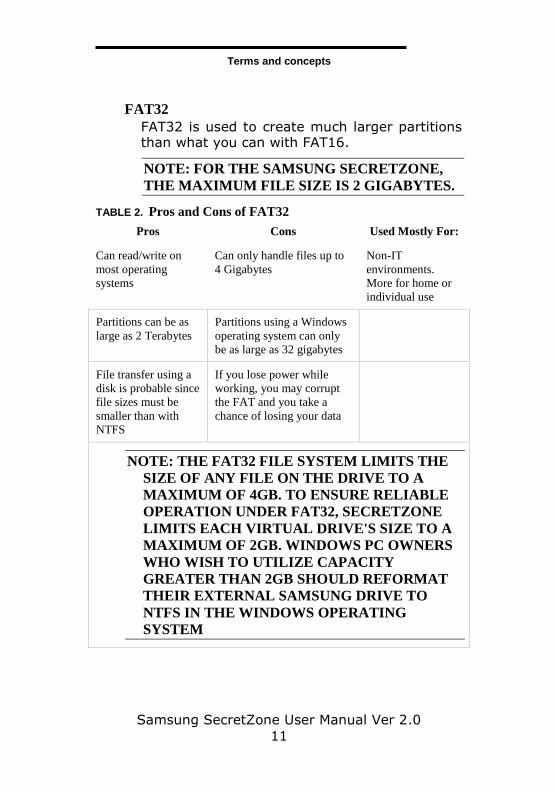
FAT32
FAT32 is used to create much larger partitions than what you can with FAT16.
NOTE: FOR THE SAMSUNG SECRETZONE,
THE MAXIMUM FILE SIZE IS 2 GIGABYTES.
TABLE 2. Pros and Cons of FAT32
Pros Cons Used Mostly For:
Can read/write on
most operating
systems
Can only handle files up to
4 Gigabytes
Non-IT
environments.
More for home or
individual use
Partitions can be as
large as 2 Terabytes
Partitions using a Windows
operating system can only
be as large as 32 gigabytes
File transfer using a
disk is probable since
file sizes must be
smaller than with
NTFS
If you lose power while
working, you may corrupt
the FAT and you take a
chance of losing your data
NOTE: THE FAT32 FILE SYSTEM LIMITS THE
SIZE OF ANY FILE ON THE DRIVE TO A
MAXIMUM OF 4GB. TO ENSURE RELIABLE
OPERATION UNDER FAT32, SECRETZONE
LIMITS EACH VIRTUAL DRIVE'S SIZE TO A
MAXIMUM OF 2GB. WINDOWS PC OWNERS
WHO WISH TO UTILIZE CAPACITY
GREATER THAN 2GB SHOULD REFORMAT
THEIR EXTERNAL SAMSUNG DRIVE TO
NTFS IN THE WINDOWS OPERATING
SYSTEM

Terms and concepts
Samsung SecretZone User Manual Ver 2.0
12
NTFS
NTFS is an abbreviation for Windows NT File System or is sometimes called New Technology File System. If you are familiar with using paper files, the same concept applies here. NTFS is the way in which the operating system (Windows NT, XP, etc) organizes the files on the drive. NTFS is quite secure and robust. It provides security by supporting access control and ownership privileges, meaning you can set permission for groups or individual users to access certain files.
TABLE 3. Pros and Cons of NTFS
Pros Cons Used Mostly For:
Very secure. You can
setup groups with
different permissions
to different files
No file system checker
or deframentation
option
Users with a
professional IT
administrator
Can support files up
to 4 gigabytes
There is no way to
retrieve user data if
accidently erased
Applications require
files over 4 gigabytes
Can maintain file
system for partitions
or drives that are 137
gigabytes and larger
Limited maintenance
tools
Partition/Hard Drive
is more than 137
gigabytes
Volume
A drive Volume is simply the name that you give to a partition. It is often referred to as the Volume Name. So, let's say that you have two partitions; one is for your programs and one is for your data. The partition for your programs may be called PROGRAMS C:. The drives volume name is then PROGRAMS C:.

Terms and concepts
Samsung SecretZone User Manual Ver 2.0
13
Volume Image
The Volume Image is the contents of the volume. So the Programs C: volume contains all of your programs. The Image of that volume would be all of your programs.
Virtual Drive
A virtual drive is a part of the whole drive. So, for instance, if you create a new Volume and name it the "G" drive, that has now become a virtual drive. Since the whole Hard Disk Drive is also called a drive, when you create a partition you also call that a drive - but it is not the whole Hard Disk Drive, it is only a part (or volume) on the Hard Disk Drive. So, just as a room in your house is not the whole house, a virtual drive on a Hard Disk Drive is not the whole drive.

Installing the Software
Samsung SecretZone User Manual Ver 2.0
14
Chapter 3 Installing the
Software

Installing the Software
Samsung SecretZone User Manual Ver 2.0
15
Introduction
Samsung SecretZone is a software program that
runs in the MS windows environment and
protects personal information.
If you want to keep private information or other
important information from others, including
your colleagues at work and your family
members, or if you want to move your data to a
different location, you can use the Samsung
SecretZone, the secure, perfect solution to do
these tasks easily and conveniently.
You can think of Samsung SecretZone as a safe
within your computer, and store your important
data in the safe.
Installing the Software
Samsung SecretZone User Manual Ver 2.0
16
Before Installation
Samsung SecretZone is a software program that
runs in the Microsoft Windows environment and
protects personal, private information.
If you want to keep private information private -
important information unreadable to others -
keep your sensitive data with you at all times -
you can use the SecretZone™ program provided
on the sleek Samsung External Hard Disk Drive.
Have the confidence that your data is secured
using software-based 128-bit AES, 256-bit AES,
or Blowfish 448 encryption. You can think of
Samsung SecretZone as a safe within your
computer.

Installing the Software
Samsung SecretZone User Manual Ver 2.0
17
Preparing your Computer
We recommend that you check the current
condition of your computer and take any
necessary measures to optimize or defragment
it before using this software.
For help with optimizing and defragmenting
your computer, please see the manufacturer's
recommendations.
If your system is unstable, for example if it
displays blue screens, you encounter an error
message while booting the system, or crashes
frequently in everyday use, you must resolve
these problems before using this software. If
you think your system is stable, optimize it
anyway by running the recommended
optimizing software before using this software.
System Requirements
The following is the minimum system specifications for Samsung SecretZone:
TABLE 1. Minimum System Requirements
Component Minimum Specification
CPU Intel® Pentium® equivalent 1GHz
MEMORY 512 MB
HDD 500 MB
Operating System Microsoft Windows® XP SP2 or
Windows Vista™ or Windows 7
( 32-bit only )
Web Browser Microsoft Windows® Internet
Explorer® 5.5

Installing the Software
Samsung SecretZone User Manual Ver 2.0
18
Connecting the Drive to Your Computer
Contained in the packaging is a USB cable. The
smallest end of the cable plugs into the
Samsung External Hard Disk Drive and the
larger end plugs into your Computer. This is
keyed so you can only plug it in one way.
Figure 3-1 Connecting your External drive to your Computer
LED
Connect to Computer
Connect to Samsung External Hard Disk Drive

Installing the Software
Samsung SecretZone User Manual Ver 2.0
19
Installing the Software
When you connect the Samsung External Hard
Disk Drive to your computer, there is a short
pause. After the pause, the Welcome screen
appears.
Welcome message
The first screen is the Welcome Screen. To continue on to the installation:
1. Click Install Samsung SecretZone
Figure 3-2 Samsung SecretZone Install Wizard Welcome
NOTE: WHEN YOU INSTALL THE
SECRETZONE PROGRAM ON THE WINDOWS 7,
YOU SHOULD RUN THE "APPINST.EXE"
MANUALLY IN SAMSUNG EXTERNAL HARD
DRIVE.
THE WINDOWS 7 DOES NOT SUPPORT THE
AUTORUN FUNCTION.

Installing the Software
Samsung SecretZone User Manual Ver 2.0
20
Choose the preferred Language
The first options to choose is the preferred language. From the Choose Setup Language
pull-down: 2. Choose the preferred language
Figure 3-3 Use the Pull-Down to choose the Language
Install Wizard
The Samsung SecretZone Install Wizard will guide you through the steps for installing the SecretZone software. From the Welcome screen:
3. Click Next>
Figure 3-4 Install Wizard will guide you through the setup

Installing the Software
Samsung SecretZone User Manual Ver 2.0
21
Installation Progress Bar
The Progress Bar indicates how far the installation has gone and how much further it has to finish.
Figure 3-5 Installation Progress Bar

Installing the Software
Samsung SecretZone User Manual Ver 2.0
22
Create Password
To start using the SecretZone software, the Administrator password must be setup. From the Create the account for the administrator
screen:
4. Click in the box to the right of Password and enter a password
5. Click in the box to the right of Confirm and re-enter the same password
6. Click Next>
Figure 3-6 Creating the Administrator Password
NOTE: WHATEVER YOU CHOOSE FOR A
PASSWORD - PLEASE WRITE IT DOWN AND
KEEP IT IN A SAFE PLACE. THERE IS NO
OPTION TO RETRIEVE A PASSWORD.

Installing the Software
Samsung SecretZone User Manual Ver 2.0
23
Complete installation
Provided that the installation was successful, the final Samsung SecretZone Install Wizard
screen appears.
7. Click Finish
Figure 3-7 Installation complete

Setting Up the SecretZone
Samsung SecretZone User Manual Ver 2.0
24
Chapter 4 Setting Up the
SecretZone

Setting Up the SecretZone
Samsung SecretZone User Manual Ver 2.0
25
Getting Started
In this section, examples are used to better
explore the many options available.
Now that the software has been installed, start
the SecretZone software to create virtual drives. From the Windows Desktop:
1. Double click the SAMSUNG SECRETZONE icon
Starting the Software
Figure 4-1 Samsung SecretZone Icon
If you do not see the Samsung SecretZone icon on your desktop:
Click START -> PROGRAMS -> SAMSUNG ->
SAMSUNG SECRETZONE -> SAMSUNG SECRETZONE
Figure 4-2 Launch SecretZone from the Start Menu

Setting Up the SecretZone
Samsung SecretZone User Manual Ver 2.0
26
Logging In
The first screen is the Login for
Administrator/User prompt. Make sure that THE
ADMINISTRATOR check box is checked.
2. Click in the Password field
3. Enter your PASSWORD
4. Click OK
Figure 4-3 Login Screen
Samsung SecretZone Main Screen
The following screen is the Samsung SecretZone
Main screen. All changes or modifications are created from this screen.

Setting Up the SecretZone
Samsung SecretZone User Manual Ver 2.0
27
Figure 4-4 Samsung SecretZone Main Screen

Setting Up the SecretZone
Samsung SecretZone User Manual Ver 2.0
28
Menu Choices
Along the very top of the screen is the Menu
items. The following is a description of every
menu item:
File
• New
Create a new volume image and mount volume image to
virtual drive.
• Delete
Deletes the volume image only from the entry list,
without actually deleting the volume. If you want to
delete a volume image from the entry list, it needs to be
disconnected first from the virtual drive.
• Mount
Makes the Virtual Drive visible and assigns a volume
image to virtual drive
• Dismount
Takes the Virtual Drive off so it is not accessible.
• Expand
Expands the size of a volume image. Expanding the
volume image does not affect the existing data.
• Change Password
Changes password for the selected volume image. This
does not change the login password.
• Properties
Provides all the information on volume image and
virtual drive.
• Exit

Setting Up the SecretZone
Samsung SecretZone User Manual Ver 2.0
29
Exits the program
View
•Tiles
View list of the volume image or virtual drives in a tiled
format.
•Icons
View list of the volume image or virtual drives in an
icon format.
•List
View list of the volume image or virtual drives in a list
format
•Details
View list of the volume image or virtual drives a
detailed format
•Refresh
Refreshes the list the volume image or virtual drives
Tools
• Account Management
Administration’s tool for creating and modifying all
volume images and virtual drives. As well, persons with
login ID’s can modify their personal accounts.
• Change User's Password
Administration’s tool for creating and modifying all
passwords. As well, persons with login ID’s can modify
their personal passwords.
• Convert
Converts an image file (MSR) into an executable file
(EXE) or vice versa.

Setting Up the SecretZone
Samsung SecretZone User Manual Ver 2.0
30
After converting an image file into an executable file,
you can use it in another system by connecting it to a
virtual drive.
• Upgrade
This option will upgrade your current volume image file
with the latest encryption. This upgrade offers an even
higher level of security for your sensitive information.
Help
•Help Contents
Click the Help menu to search for help on any Samsung
SecretZone topic.
•About
Gives you information on the revision of your software.

Setting Up the SecretZone
Samsung SecretZone User Manual Ver 2.0
31
Icon Description
Just below the menu items there are icons
which perform the most often used tasks. The
descriptions are the same as the File Menu
descriptions. The only difference is that these icons will save time. Instead of clicking File ->
Change Password, click the Change Password icon
Figure 4-5 Icons are File Menu shortcuts

Setting Up the SecretZone
Samsung SecretZone User Manual Ver 2.0
32
The only icon that has a sub-menu is the View icon, which has Tiles, Icons, List, Details, and Refresh.
Figure 4-6 View Icon has sub-menu’s

Create a New Volume Image
Samsung SecretZone User Manual Ver 2.0
33
Chapter 5 Create a New
Volume Image

Create a New Volume Image
Samsung SecretZone User Manual Ver 2.0
34
Create New
The first thing to do is create a new Volume
Image. This Volume Image is also referred to as
a Drive.
From the Samsung SecretZone Main Screen:
1. Click New Create
Figure 5-1 Click the New Create button

Create a New Volume Image
Samsung SecretZone User Manual Ver 2.0
35
This screen is to designate the size and location
of the volume. The default size is 1024
megabyte however, a volume can be created up
to the size of the Free Space displayed to the
right of the letter designation. In the following
screen, the letter designation is F.
NOTE: THE FAT32 FILE SYSTEM LIMITS THE
SIZE OF ANY FILE ON THE DRIVE TO A
MAXIMUM OF 4GB. TO ENSURE RELIABLE
OPERATION UNDER FAT32, SECRETZONE
LIMITS EACH VIRTUAL DRIVE'S SIZE TO A
MAXIMUM OF 2GB. WINDOWS PC OWNERS
WHO WISH TO UTILIZE CAPACITY GREATER
THAN 2GB SHOULD REFORMAT THEIR
EXTERNAL SAMSUNG DRIVE TO NTFS IN THE
WINDOWS OPERATING SYSTEM
If the size of the volume is correct:
2. Click Browse
Figure 5-2 Create Your New Volume Image Name

Create a New Volume Image
Samsung SecretZone User Manual Ver 2.0
36
The File Selection screen is to assign a Volume
name and file type. For the purposes of this
manual, the File Type will be the default MSR
FILE.
3. Click in the File Name box
4. Type Finances
5. Click OK
Figure 5-3 Volume Name and Type
If the volume name and size are correct:
6. Click Next>>
Figure 5-4 Name and Size complete

Create a New Volume Image
Samsung SecretZone User Manual Ver 2.0
37
Designating a Letter to your Drive
A drive letter not used by any other drive is assigned to the new Volume.
Your local drive called the “C” drive; the “0043” being the alpha letter designation. The drive for this volume is the Virtual Drive and it must have an alpha drive designation as well. In Figure 5-5the alpha designation is G.
Your Virtual drive now must have a label name and have the Idle Timeout given. In the Mount
screen:
7. Click in the Label box and enter a name
8. Click in Idle Timeout and choose 0 (zero)
The File System is NTFS and Access Type is
Read/Write.
9. Click Next>
Figure 5-5 Choosing the File System
NOTE: WITH "AUTO CONNECT" CHECKED, A
SECURE DRIVE MIGHT NOT CONNECT RIGHT
AWAY AFTER REBOOTING. NORMAL

Create a New Volume Image
Samsung SecretZone User Manual Ver 2.0
38
OPERATION WILL RESUME IN A FEW
MINUTES AFTER A REBOOT

Create a New Volume Image
Samsung SecretZone User Manual Ver 2.0
39
In the Create the account for the volume image screen create the password and algorithm for your new drive.
10. Click in the Password box and enter the password for your new virtual drive.
11. Click in the Confirm box and retype your password. 12. Click in the Algorithm box and choose the algorithm
from the pull-down list. For the purposes of this manual, choose AES-128.
13.Click Next >
- Idle timeout means that disconnect virtual drive
without any access during setting time.
- Auto connection means when the system boot
volume image connect as a virtual drive
automatically.
Figure 5-6 Creating the Password and Algorithm

Create a New Volume Image
Samsung SecretZone User Manual Ver 2.0
40
The Result screen gives a summary of the new Virtual Drive.
14. If you are satisfied with the information displayed, click Finish
Figure 5-7 Results screen gives a summary
The Creating the volume image progress bar displays where how much of the task has completed. ( 1GB = 1 min, 10 GB = 12 min )
Figure 5-8 Progress Bar

Create a New Volume Image
Samsung SecretZone User Manual Ver 2.0
41
Upon a successfully created image, a prompt
appears. 15. Click OK
Figure 5-9 Successfully created Image prompt
The Main Screen displays the newly create volume displaying the drives‟ alpha designation.
Figure 5-10 Windows Explorer
From this point, we can exit out of the software and see where the new Virtual Drive is in Windows Explorer.

Create a New Volume Image
Samsung SecretZone User Manual Ver 2.0
42
Checking the new volume from Windows Explorer
From your Windows Desktop:
15. Click Start -> Programs -> Accessories -> Windows Explorer
From the Windows Explorer, you can now see the new Virtual Drive.
Figure 5-11 Your Virtual Drive in Windows

Working With Virtual Drive
Samsung SecretZone User Manual Ver 2.0
43
Chapter 6 Working With
Virtual Drive
Working With Virtual Drive
Samsung SecretZone User Manual Ver 2.0
44
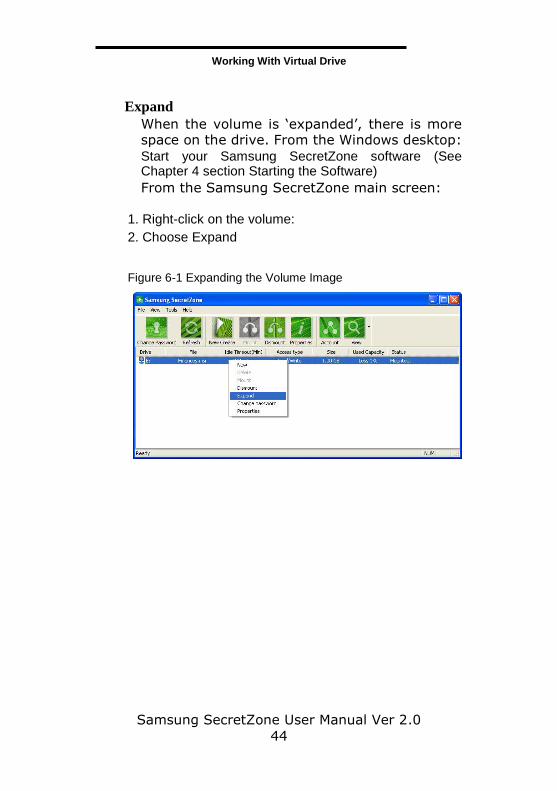
Expand
When the volume is „expanded‟, there is more space on the drive. From the Windows desktop:
Start your Samsung SecretZone software (See Chapter 4 section Starting the Software)
From the Samsung SecretZone main screen:
1. Right-click on the volume:
2. Choose Expand
Figure 6-1 Expanding the Volume Image

Working With Virtual Drive
Samsung SecretZone User Manual Ver 2.0
45
Enter the expansion amount:
3. Click in the Additional box and enter the additional
size
4. Enter your volume image Password in the Password
box '
5. Click OK
Figure 6-2 Change the volume size
After the progress bar is finished, your drive will be expanded.
Figure 6-3 Progress of expansion

Working With Virtual Drive
Samsung SecretZone User Manual Ver 2.0
46
If the image expanded sucessfully, the “Image
is expanded successfully” prompt appears. 6.Click OK
Figure 6-4 A successful expansion prompt
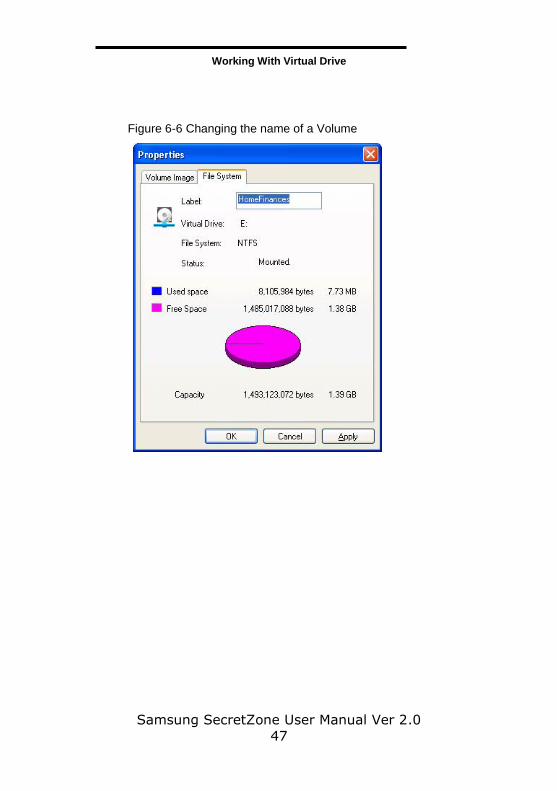
Changing the Name
To keep sensitive files separated, there is the option to create two Virtual Drives. One might be for Home Finances and one might be for investments. The first drive created was called Finances.
1. Click on the Virtual Drive
2. Click Properties
Figure 6-5 Click Properties
3. Click the File System tab 4. Enter HomeFinances Label box
5. Click OK
Working With Virtual Drive
Samsung SecretZone User Manual Ver 2.0
47
Figure 6-6 Changing the name of a Volume

Working With Virtual Drive
Samsung SecretZone User Manual Ver 2.0
48
Create a New Volume
Now that HomeFinance has been created, the next step is create the volume for Investments.
From the Samsung SecretZone Main menu:
1. Click New Create
Figure 6-7 Create the Investments image
2. Click Browse
Figure 6-8 Click Browse
3. Enter Investments in the File Name box 4. Click OK

Working With Virtual Drive
Samsung SecretZone User Manual Ver 2.0
49
Figure 6-9 Enter in the name of the new volume image
5. Click Next>
Figure 6-10 Enter ‘Investments’ in the Label box
Figure 6-11 Click Next to complete mounting the volume image
6. Enter the administrators password for this volume

Working With Virtual Drive
Samsung SecretZone User Manual Ver 2.0
50
image.
7. Click Next >
Figure 6-12 New Password for New Volume Image
The final screen will give you the specifics of
your newly creaed volume image.
You are returned to the Volume Image screen.
8. Click Finish
Figure 6-13 Returned back to the

Working With Virtual Drive
Samsung SecretZone User Manual Ver 2.0
51
The prompt “Image is created successfully”
appears. ( 1GB = 1 min, 10 GB = 12 min ) 9. Click OK
Figure 6-14 Successfully created image
The Main Screen appears showing both new
volume images.
Figure 6-15 Both volume images

Working With Virtual Drive
Samsung SecretZone User Manual Ver 2.0
52
Change a Volume Password
At some point, you may want to change the
password on one, or more, volumes.
From the Samsung SecretZone main screen:
1. Click on the Investments volume or drive
2. Click Change Password icon
Figure 6-16 Click Change Password
3. In the Current field, enter the current password 4. In the New field, enter the new password 5. In the Confirm field, re-enter the new password 6. Click OK
Figure 6-17 Changing the Password of volume image

Working With Virtual Drive
Samsung SecretZone User Manual Ver 2.0
53
Adding Users Others may also use your Samsung External Hard Disk Drive while keeping your information confidential.
We will create an account for John.
From the Samsung SecretZone main menu:
1. Click the Account icon
Figure 6-18 Creating a new User
2. Click Add

Working With Virtual Drive
Samsung SecretZone User Manual Ver 2.0
54
Figure 6-19 Click Add to start adding a new account

Working With Virtual Drive
Samsung SecretZone User Manual Ver 2.0
55
3. In the ID field, enter the name 4. In the Password, enter the password 5. In the Confirm field, reenter the password 6. In the Description field, enter the new users’ role i.e.
Accountant, Investment Manager, etc. 7. Click OK
Figure 6-20 New user and password addition
8. Click Close to return to the main menu

Working With Virtual Drive
Samsung SecretZone User Manual Ver 2.0
56
Deleting Users
Just as quickly as a user was created, a user can be deleted.
Instead of clicking Add, click to highlight the name and choose DELETE.
1. From the main menu:
2. Click Account
3. Click to highlight the account to delete
4. Click Delete
Figure 6-21 Deleting a User
5.Click Yes
Figure 6-22 Confirm User Deletion

Working With Virtual Drive
Samsung SecretZone User Manual Ver 2.0
57
Dismounting a Virtual Drive
Before disconnecting your Samsung External Hard Disk Drive from the computer, you should always dismount the volumes.
From the Samsung SecretZone main menu:
1. Right click the volume to dismount
2. Choose Dismount
Figure 6-23 Dismounting a Volume
NOTE: ATTEMPTING TO "DISCONNECT"
IMMEDIATELY AFTER COPYING/SAVING A
LARGE FILE OR MULTIPLE FILES TO A
SECURE DRIVE CAN LEAD TO AN ERROR.
WAIT 30 TO 60 SECONDS BEFORE
DISCONNECTING A SECURE DRIVE

Working With Virtual Drive
Samsung SecretZone User Manual Ver 2.0
58
Mounting a Volume Image to a Virtual Drive
When the Samsung External Hard Disk Drive is restarted, the drive(s) must be remounted. From the Samsung SecretZone main menu:
1. Click to highlight the drive to mount
2. Click the Mount icon
3. Enter the password
4. Click OK
Figure 6-24 Mount a drive

Working With Virtual Drive
Samsung SecretZone User Manual Ver 2.0
59
Deleting a Volume Image
If a volume is no longer needed, the volume can be deleted.
1. Dismount the volume (see Chapter 6 section Dismounting a Virtual Drive)
2. Right-click on the volume to delete
3. Click Delete
Figure 6-25 Deleting a Volume
This will delete the volume image only from the entry list, without deleting it actually. If you want to delete a volume image from the entry list, it must be disconnected first from the virtual drive.
Creating an Executable Image
Samsung SecretZone User Manual Ver 2.0
60
Chapter 7 Creating an
Executable Image

Creating an Executable Image
Samsung SecretZone User Manual Ver 2.0
61
Converting a Volume
You can convert your secured data into an
executable file that you can take from one
Samsung External drive to another Samsung
External Hard Disk Drive.
NOTE: WHEN YOU CONVERT A VOLUME
IMAGE (.MSR) INTO AN AUTO-EXECUTABLE
FILE (.EXE) IN THE FAT32, THERE IS A 2 GB
LIMIT THAT WILL INCLUDE AN EXECUTABLE
FILE AND AN IMAGE FILE (.MED)
1. Click on the volume that you will take with you
2. Dismount the Virtual Drive (See Chapter 6 Dismounting a Virtual Drive)
3. Click Tools
4. Click Convert
Figure 7-1 Converting an Image
NOTE: THIS OPTION IS ONLY AVAILABLE
FOR SAMSUNG EXTERNAL HARD DISK
DRIVES.
Creating an Executable Image
Samsung SecretZone User Manual Ver 2.0
62
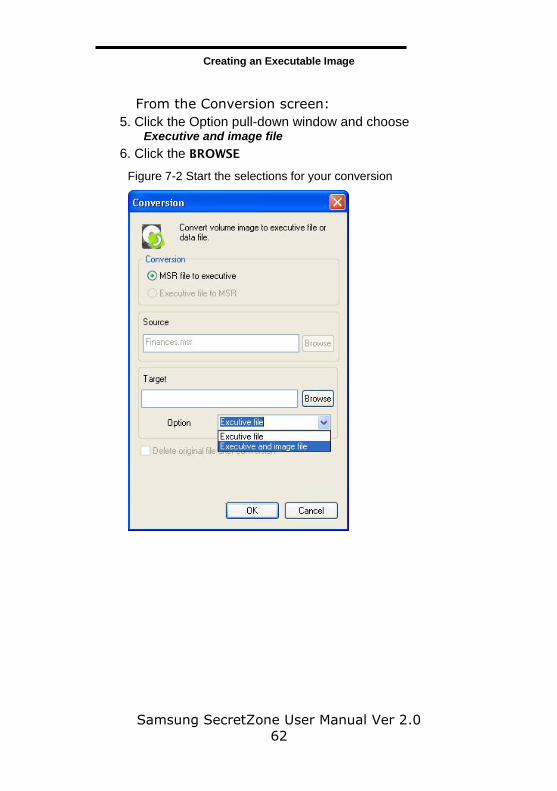
From the Conversion screen:
5. Click the Option pull-down window and choose Executive and image file
6. Click the BROWSE
Figure 7-2 Start the selections for your conversion

Creating an Executable Image
Samsung SecretZone User Manual Ver 2.0
63
7. Choose the Samsung External Drive to save the
secured image onto
8. Enter the name for your secured image. For the
purposes of this manual, we named the file
SecuredImage.
9. Click Open

Creating an Executable Image
Samsung SecretZone User Manual Ver 2.0
64
10. Click OK
Figure 7-3 Name and Save your converted file
When the Progress Bar has completed, your
executable file is completed.

Creating an Executable Image
Samsung SecretZone User Manual Ver 2.0
65
Launching the Image File
When you want to open the secured file on another Samsung External Hard Disk Drive, you can launch your image file right from Windows Explorer.
Figure 7-4 Double click on your saved executable image from Windows Explorer
Enter your Admin password to open the file.

Index
B
Browser, 17
C
Cable
USB cable, 18
Convert, 62
Volume, 61
CPU, 17
D
defragmenting, 17
E
Executable, 61
F
FAT32, 11
File
Image, 65
File Allocation Table, 10
File Systems
FAT, 9
NTFS, 9
RAW, 9
H
Hard Disk Drive, 17
HDD, 17
I
Idle, 9
Timeout, 9
Image Secured, 63
M
Memory, 17
O
Operating System, 17
optimizing, 17
OS, 17
P
partition, 12, 13
Partition, 9, 10, 11, 12, 13
FAT16, 10
FAT32, 11
Password, 22
Admin, 65
Create, 22
Processor, 17
S
Secured Image, 63
System Specifications, 17
T
Timeout
Idle, 9
U
USB, 18
cable, 18
V
Virtual Drive, 13
Virus Scanning, 7
Volume
Convert, 61, 62
W
Web Browser, 17
Windows NT File System, 12
Recommended