
Roller Shade Installation Instructions
Standard Installationp -2-
Spring / Cordless Installationp -3-
Fascia Installationp -4-
Motorized Installationp -6-
Motorized Remote Control Instructionsp -7-
Side Light Blockerp -8-

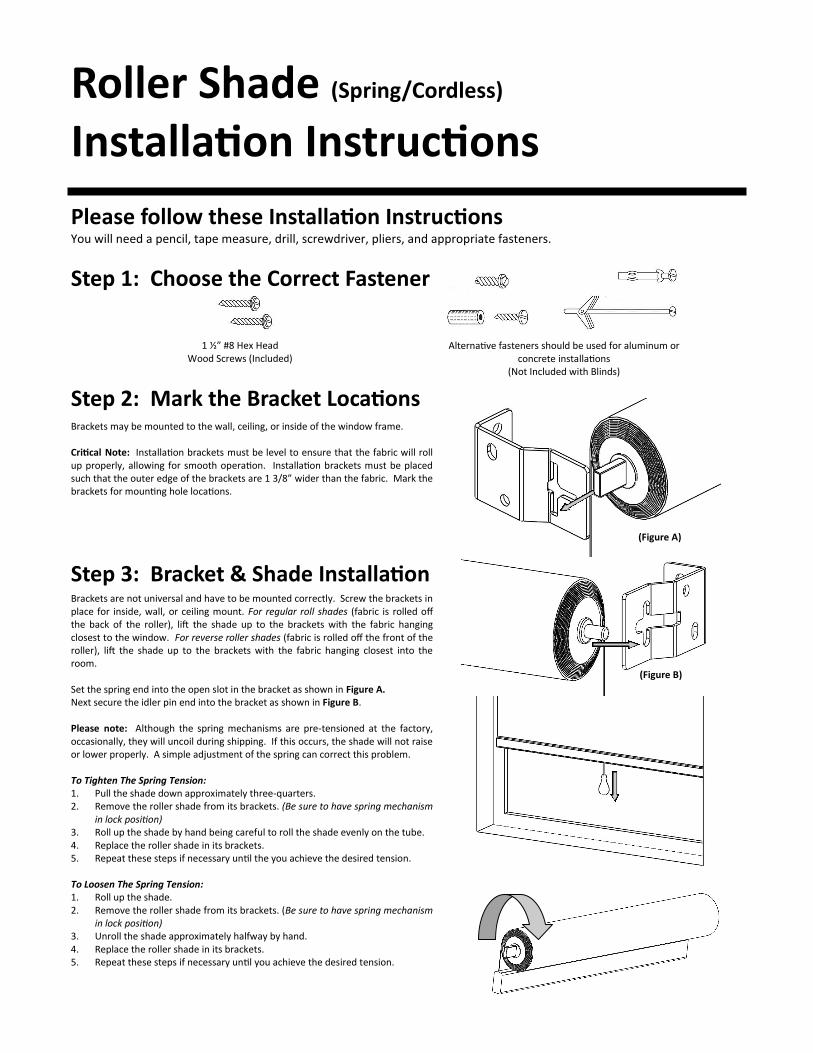
Roller Shade (Spring/Cordless) Installation Instructions
Please follow these Installation Instructions You will need a pencil, tape measure, drill, screwdriver, pliers, and appropriate fasteners.
Step 1: Choose the Correct Fastener
Step 2: Mark the Bracket Locations
Step 3: Bracket & Shade Installation
1 ½” #8 Hex Head Wood Screws (Included)
Alternative fasteners should be used for aluminum or concrete installations
(Not Included with Blinds)
Brackets are not universal and have to be mounted correctly. Screw the brackets in place for inside, wall, or ceiling mount. For regular roll shades (fabric is rolled off the back of the roller), lift the shade up to the brackets with the fabric hanging closest to the window. For reverse roller shades (fabric is rolled off the front of the roller), lift the shade up to the brackets with the fabric hanging closest into the room.
Set the spring end into the open slot in the bracket as shown in Figure A. Next secure the idler pin end into the bracket as shown in Figure B.
Please note: Although the spring mechanisms are pre-tensioned at the factory, occasionally, they will uncoil during shipping. If this occurs, the shade will not raise or lower properly. A simple adjustment of the spring can correct this problem.
To Tighten The Spring Tension: 1. Pull the shade down approximately three-quarters.2. Remove the roller shade from its brackets. (Be sure to have spring mechanism
in lock position)3. Roll up the shade by hand being careful to roll the shade evenly on the tube.4. Replace the roller shade in its brackets.5. Repeat these steps if necessary until the you achieve the desired tension.
To Loosen The Spring Tension: 1. Roll up the shade.2. Remove the roller shade from its brackets. (Be sure to have spring mechanism
in lock position)3. Unroll the shade approximately halfway by hand.4. Replace the roller shade in its brackets. 5. Repeat these steps if necessary until you achieve the desired tension.
Brackets may be mounted to the wall, ceiling, or inside of the window frame.
Critical Note: Installation brackets must be level to ensure that the fabric will roll up properly, allowing for smooth operation. Installation brackets must be placed such that the outer edge of the brackets are 1 3/8” wider than the fabric. Mark the brackets for mounting hole locations.
(Figure B)
(Figure A)

Clutch Operated Roller Shade with Fascia Installation Instructions
Tools Required for Installation:
• Power Drill & Drill Bits
• Installation Screws
• Level
• Pliers
• Measuring Tape
Step #1 – Bracket Installation
1. Bracket positions are illustrated for a shade with the chain control on the right hand side. For a shade with the chain
control on the left hand side, the brackets should be at the opposite end.
2. Brackets may be fixed to any flat surface above, behind, or to the side of the shade. Critical Note: The brackets must be
level to ensure that the fabric rolls up properly, allowing for smooth operation.
3. Install the brackets so that the distance between the clutch end and idle end brackets is 1 ¼” wider than the fabric width.
The open end of the bracket faces downward.
Step #2 – Shade Installation
1. Lift the shade up to brackets with the fabric hanging from the back of the rolled up shade.
2. Fit the spring plunger (the idle end cap) into its bracket. Push the shade into the bracket shown above, depressing the
plunger.
3. With the clutch locating hook pointing downwards, place the hook into the vertical part of the “+” shaped hole in the
bracket. Allow the hook to drop downwards so that it locks into place in the bracket.
4. Install the chain guide and chain guide cover to the clutch bracket. Make sure that the chain control passes through the
opening in the chain guide. Secure the chain guide cover with the screws provided.
5. Install the fascia to the brackets by placing the top of the fascia to the top front corner of the bracket. With your hands,
push the bottom of the fascia to the bottom of the brackets. The fascia should snap in place and should now be secured
to the brackets. Make sure that the lug or tooth on the chain guide cover is locked behind the ridge of the fascia.
6. Place the bracket end caps on each end of the clutch side and idle side bracket. Please note that the square end cap is
installed to the bracket and the curved end cap is secured to the fascia.
Step #3 – Safety Device Installation
Tension devices are designed to minimize the hazards of strangulation and entanglement of small children by restricting
access to the chain control. The tension device (chain safety clip) is sent from the factory already attached to each chain
control. Fix the tension device to the wall or window frame with a screw.
Step #4 – Operate the Shade
Pull the chain control in one direction to raise the shade; then pull it in the opposite direction to lower it again. Make sure
that the fabric rolls straight and does not touch the brackets on either side.
Step #5 – Setting the Bottom Limit
An additional metal bead stop is sent with each shade. This bead stop is used to prevent the shade from being lowered
past its ordered drop (also known as the bottom limit). Lower the shade to the bottom of the window opening. Once the
shade is at the bottommost point, the bead stop needs to be placed over control chain. For Regular Roll shades, place
the bead stop in front of the clutch mechanism so that the chain cannot be pulled from the back any further. For Reverse
Roll shades, place the bead stop in back of the clutch mechanism so that the chain cannot be pulled from the front any
further. With a pair of pliers, squeeze the bead stop so that it cannot be removed.

Product Cut Sheet: Chain Operated Clutch Operating Instructions
Chain Operated Clutch Operating Instructions
It is strongly recommended to use two hands when
operating (raising or lowering) the shade.
Lowering the Shade
Pull the back chain (closest to the window glazing) down
until the bead stop ball on the chain loop stops at the
shade bracket and the shade hembar is approximately ½”
above the window sill.
Raising the Shade
Pull the front chain (furthest from the window glazing)
down until the bead stop ball on the chain loop stops at
the shade bracket and the shade hembar is at the top of
the window.
Preventing Chain Breakage and Clutch Damage
It is important to always use two hands when pulling on
the bead chain. Pull the chain straight down. Do not
under any circumstances pull the bead chain at an angle.
Pulling the bead chain at an angle creates unnecessary
pressure and strain on the bead chain and clutch. This
action inhibits the intended operation of the clutch and
can cause the shade to break.
When lowering the shade, do not let go of the bead chain
as this action can cause the shade to lower quickly
causing harm to the clutch or bead chain breakage.
Allowing the bead chain to glide through the operators
hands with gentle pressure assists in controlling the
speed at which the shade will lower or raise.
(The diagram to the right indicates a left side chain control
with a regular roll shade.)
Safety Clip Installation Safety tension clips are designed to minimize the hazards of strangulation and entanglement of small children by restricting access to the chain control. The safety tension clip is sent from the factory already attached to each chain control. Screw the safety tension clip into the wall or window frame with a screw.
Critical Note: The safety clip should be installed so that the bead chain and bead stop balls move smoothly through the opening of the clip. Removal of this devise or failure to properly install it can cause damage to the clutch lifting mechanism and will result in the voidance of the product’s lifetime limited warranty.

Installation Instructions DC Motor Operated Roller Shade
Alternative fasteners should be used for aluminum or concrete installations (Not Included with Blinds)
Screw the brackets in place. For regular roll shades (fabric is rolled off the back of the roller), lift the shade up to the brackets with the fabric hanging closest to the window. For reverse roller shades (fabric is rolled off the front of the roller), lift the shade up to the brackets with the fabric hanging closest into the room. Push the spring plunger (side opposite of the motor) into it the bracket as shown in the diagram. Push the shade into the bracket, depressing the plunger. With the motor adapter hook pointing downward, place the hook into the central vertical slot in the bracket. Slightly pull down on the shade so that the clutch hook locks into place in the bracket.
Position the installation brackets at each end of the roller shade. In the diagram to the right, bracket positions are illustrated for a shade with a DC motor on the right hand side. For a shade with a motor on the left hand side, the brackets should be at the opposite end. Brackets may be mounted to the wall, ceiling, or inside of the window frame. Note: For the Inside Mount shade with round fascia brackets must be installed 1/8” in from the wall. Critical Note: Installation brackets must be level to ensure that the fabric will roll up properly, allowing for smooth operation. Installation brackets must be placed such that the outer edge of the brackets are 1 1/2” wider than the fabric. Mark the brackets for mounting hole locations. Do not set the brackets too tight and make sure shade rolls smoothly.
Please follow these Installation Instructions You will need a pencil, tape measure, drill, screwdriver.
Step 1: Find Enclosed the Installation Screws
Step 2: Mark the Bracket Locations
Step 3: Bracket & Shade Installation
Step 4: Powering The Motor
1 ½” #8 Hex Head Wood Screws (Included)
Revised 5/2/17
(Step 2: Mark Bracket Locations)
Push the female power adapter into the male motor adapter. Plug in the transformer into the outlet. Motor is ready to be programmed. Use remote control with instructions on the second page to complete programming.
Male Motor Adapter
Female Motor Adapter
Motor Antenna
Power Supply Remote Control
Motor comes pre-programmed based on given measurements to stop at the top, bottom and middle. If programming is lost, please refer to the next page for programming instructions or watch the YouTube Dyl51aDzhzsw video for step by step instructions. To reset motor programming watch YouTube MQleNbFs8QM.
Fascia Motor Bracket
Alternate Installation with
Fascia Brackets
Fascia Idler Bracket
Motor Bracket
Power adapter
Idler Bracket
Plunger
Power adapter and antenna must face up during installation in order to access programming buttons located on the opposite side of the motor head.

Page 2
Installation Instructions DC Motor Operated Roller Shade
Step 5: Programing Motor Functions
It is EXTREMLEY IMPORTANT to charge the motors at least 8 hours on initial Charge Programing:
Press the button on the head of the motor [program button] (the motor will oscillate). Immediately press and hold the ( up
button) on the remote (the motor will oscillate again)
At this time the motor and remote have been joined
Confirm motor rotation by pressing up or down arrow:
To change motor rotation press and hold the (stop button) on the remote (the motor will oscillate) then press and hold the
(down button) on the remote (the motor will oscillate again) verify correct rotation by pressing up or down arrow.
Setting Limits:
* Important the upper limit must be set first
Move the shade 3 to 4” below the upper limit position press the [program button] located on the back of the remote (the mo-
tor will oscillate) this will put the motor in program mode. Now move the shade up to the desired location and press the
(program button) again (the motor will oscillate) the upper limit is now set
Setting Lower Limit
Move the shade down away from the upper limit previously set about 4-6 inches from the desired bottom limit, press the
[program button] (the motor will oscillate) Now move the shade down to the desired location of the lower limit and press the
[program button] again (the motor will oscillate) the lower limit is now set
Setting Intermediate Limits (Up to 5)
Move the shade away from the previously set limit, about 6 inches, press the [program button] (the motor will oscillate) Now
move the shade to the desired location of the intermediate limit and press the [program button] again (the motor will os-
cillate) the intermediate limit is now set
Erasing a Limit * Note the first Limit (upper Limit) cannot be erased Move the shade to the limit you wish to erase. Press and hold the [program button] for approximately 7 seconds. The motor
will oscillate twice at this time the limit has been erased
Adding an a additional remote Individual Channels must be added 1 by 1 (Make sure each remote is on the same channel unless you wish to switch the
channels when transferring the information) DO NOT attempt to transfer all the channels at one time by having the re-
motes on the all channel or you will no longer have individual channels and this can not be undone.
Press and hold the (stop button) on the Remote already programed for approximately 5 seconds
(the motor will oscillate) immediately press the (up button) on the Remote you wish add. Again (the motor will oscillate) the
program instructions have now been copied to the new remote
Setting motor into sleep mode as follows:
Step 1)
Press and hold the program button on the head of the already programmed motor the motor will beep and then jog but keep
holding the button down until you hear a long beep. The motor is now in sleep mode.
Step 2)
Program the new motor buy using the exact same steps as above to begin programming the second motor. When you have
finished setting the limits on the newly programmed motor you would continue in the same fashion until all motors that you
wish to have on that channel are programmed.
Step 3)
You then begin waking up each motor by:
pressing the program button on the head of the motor until the motor beeps then pressing the up button on the remote on the
desired channel
Erasing the limits and putting the motor back to factory Default specifications is done by pressing the program button
on the head of the motor 5 consecutive times and holding the button on the fifth time until the motor jogs, letting you know
the memory has been erased.
Watch the YouTube Dyl51aDzhzsw video for step by step
instructions.
To reset motor programming watch YouTube MQleNbFs8QM.

Side Light Blocker - Installation Instructions
Please follow these Installation Instructions You will need a pencil, tape measure, drill, screwdriver.
Step 1. ADJUSTING THE SIDE LIGHT BLOCKER CHANNEL FOR INSTALLATION
Place the side Light Blocker channel into the window frame, window molding or wall area to be mounted. Mark
locations inside the channel for drilling.
Note: If trimming the side channel is necessary for a proper fit, it can easily be cut with a metal hacksaw blade.
Make sure to mark the channel with the straight line before cutting.
Step 2. INSTALL THE CHANNELS Channels can be installed in front of the fabric as well
as behind the fabric.
Note: Shade must be installed before you start side light blocker installation
Lineup center of the channel with the fabric.
Be sure controls are accessible.
Attach the mounting channel with screws.
Note: Top view shown.
The Side Light Blocker channels are for inside mount only. They can’t be installed
as outside mount or on the mullion between the windows.
Install the channels to follow the shape of the window.
Use screws every 18”. Add screws as needed.
INSIDE MOUNT INSTALLATION ONLY
Make sure the fabric coming off the tube is
not rubbing on the top of channel.
Shade Fabric
Window
Shade Fabric
Window
Side channels installed on the inside
frame of the window
Recommended


