Reporting in QuickBooks 2012

1
Copyright
Copyright 2012 Intuit Ltd.
All rights reserved.
Intuit Limited
Statesman House
Stafferton Way Maidenhead
Berkshire, SL6 1AD
England
Intuit Limited is a company registered in England and Wales with company number 2679414
VAT No: GB 570 145 265
Trademarks
©2012 Intuit Inc. All rights reserved. Intuit, the Intuit logo, Lacerte, ProAdvisor, ProSeries and
QuickBooks, among others, are trademarks or registered trademarks of Intuit Inc. in the United States
and other countries. Other parties’ marks are the property of their respective owners.
Notice to Readers
The publications distributed by Intuit, Inc. are intended to assist accounting professionals in their practices
by providing current and accurate information. However, no assurance is given that the information is
comprehensive in its coverage or that it is suitable in dealing with a client’s particular situation.
Accordingly, the information provided should not be relied upon as a substitute for independent research.
Intuit, Inc. does not render any accounting, legal, or other professional advice nor does it have any
responsibility for updating or revising any information presented herein. Intuit, Inc. cannot warrant that the
material contained herein will continue to be accurate nor that it is completely free of errors when
published. Readers should verify statements before relying on them.

Reporting in QuickBooks
1
TABLE OF CONTENTS
About the Author ............................................................................................................................ 2
Reporting in QuickBooks .............................................................................................................. 3
How to Access Pre-Set Reports and Graphs in QuickBooks .................................................... 3
Who can Access these Reports? .............................................................................................. 7
What types of Report Modifications and Customisations Can be Done?.................................. 7
Other Ways to Customise a Report ......................................................................................... 14
Column widths ................................................................................................................... 14
Column order .................................................................................................................... 14
Column name .................................................................................................................... 14
QuickZoom ........................................................................................................................ 15
Expand and Collapse Reports ................................................................................................. 16
Memorising Reports ................................................................................................................ 18
Processing Multiple Reports .................................................................................................... 23
Memorised report Templates (Exporting and Importing) ......................................................... 25
Exporting Memorised Reports ................................................................................................. 25
Importing Memorised Reports ................................................................................................. 27
Reports Saved to the Icon Bar ................................................................................................ 29
Item-based Reports ................................................................................................................. 30
Find .......................................................................................................................................... 33
QuickBooks Search ................................................................................................................. 35
Preferences to Make Reporting More Useful ............................................................................ 39
Preferences Re Refreshing Data ............................................................................................. 39
Prompt to Modify Report Options Before Opening a Report ................................................... 40
Excel Integration ...................................................................................................................... 41
One-click Refresh/Update of Excel Integration ....................................................................... 43
QuickBooks Financial Statement Designer ............................................................................. 45
Other Financial Statement Designer Features ........................................................................ 51

Reporting in QuickBooks
2
ABOUT THE AUTHOR
Esther Friedberg Karp, MBA is founder and president of EFK CompuBooks Inc. in Toronto. Besides being
an Advanced Certified QuickBooks ProAdvisor and Certified QuickBooks Enterprise Solutions ProAdvisor
in the United States, she is a Certified QuickBooks ProAdvisor and a longtime member of the Voice of
Advisor Council in Canada. She is also a member of the Trainer / Writer Network in both Canada and the
U.S.
Esther is a frequent contributor to Intuit publications on both sides of the Canada/U.S. border, and has
been a featured speaker at business conferences all over North America, in person and via webinar. Her
articles have appeared in Intuit ProLine and its predecessor, ProConnection.
In addition, she has written and presented educational material for The Sleeter Group, Intuit Canada,
Intuit, Inc., and others. Her company's clients hail from all industries in a number of countries, and they
depend on CompuBooks to provide them with seamless administrative and accounting systems.
EFK CompuBooks Inc. provides consulting, speaking and writing to clients continent-wide. Esther can be reached at [email protected]
Esther Friedberg Karp, MBA
President, EFK CompuBooks Inc.
Toronto

Reporting in QuickBooks
3
REPORTING IN QUICKBOOKS
One of the most appealing features of QuickBooks is its reporting function, which is flexible, robust, and
easy to use. Many end users are often surprised at how well QuickBooks turns seemingly disjointed and
meaningless raw data into meaningful reports and graphs. Many accountants are surprised to learn how
much the reports can be customised and automated, and how powerful they are as tools to help small
business owners make better business decisions.
HOW TO ACCESS PRE-SET REPORTS AND GRAPHS IN QUICKBOOKS
Access pre-set reports by selecting Reports from the QuickBooks menu. Once in the Reports menu,
different categories of reports appear:
Company & Financial
VAT
Customers & Receivables
Sales
Jobs, Time & Mileage
Suppliers & Payables
Purchases
Stock
Employees & Payroll
Banking
Accountant & Taxes
Budgets & Forecasts
Lists
Custom Reports
Each category of report has sub-menus for the appropriate reports. For example, the report Profit & Loss
Standard is accessed by selecting Reports > Company & Financial > Profit & Loss Standard.
There are also three separate reports in the Reports menu that are listed underneath those
aforementioned categories:
QuickReport
Transaction History
Transaction Journal

Reporting in QuickBooks
4

Reporting in QuickBooks
5
Please note that under the report category Company & Financial, the report QB Standard Balance
Sheet will be replaced by UK Standard Balance Sheet if the preference for Reports & Graphs (accessed
by selecting Edit > Preferences > Reports & Graphs > Company Preferences) is changed as in the
screen capture below.
Alternately, access the Report Centre by selecting Reports > Report Centre, which offers generic
(without company-specific accounts, names or balances) previews of the various pre-set reports that
come standard with QuickBooks.
There are tabs in the Report Centre:
Standard
Memorised
Favourites
Recent

Reporting in QuickBooks
6
The Standard tab contains all the categories mentioned earlier that exist under the Reports menu.
The Memorised tab contains memorised reports and groups, which will be discussed next.
The Favourites tab contains reports that have been marked as a Fave in the Report Centre by clicking
on the heart below its listing.
To access memorised reports select Reports > Memorised Reports. To see a list of memorised reports
for editing or reorganising select Reports > Memorised Reports > Memorised Report List.

Reporting in QuickBooks
7
WHO CAN ACCESS THESE REPORTS?
Any QuickBooks user with sufficient permissions in their user setup may run reports, even if they were
created by another user. All report titles are visible to all users, regardless of their permission levels.
If a user does not have sufficient access to various areas of company information in their user setup, they
will not be able to produce certain reports. Instead, they will see a message indicating that they do not
have sufficient rights to see the information in that report.
WHAT TYPES OF REPORT MODIFICATIONS AND CUSTOMISATIONS CAN BE DONE?
All reports in QuickBooks can be modified to suit the user’s needs and preferences. As shown in the
screen capture below, the date range (or the date, if the report is as of a particular “snapshot in time”
date) can be modified, as well as the columns, and how the report is sorted. These quick modifications
can be achieved by selecting the various drop-down boxes at the top of the report. (Not all these drop-
down boxes will be available in all reports. For example, if the report is not transaction-based, such as a
list report, certain of these drop-down boxes will not be available.)

Reporting in QuickBooks
8
Aside from these top-of-report drop-down boxes, there are many more modification options available for
reports. Click on the Customise Report button to start modifying. Once that is done, the Modify Report
window opens with four tabs: Display, Filters, Header/Footer, and Fonts & Numbers. Due to the variety
of reports available in QuickBooks, not every Modify Report window’s tabs are exactly as in the screen
captures below.
The Display tab allows you to change the following:
Date: the as of date or date range (regardless of whether you have changed the as of date or
date range directly on the report using the drop-down boxes at the top of the report). Choose a
given date or date range or select from a list of standard date ranges (such as Today, All, Last
Financial Quarter, Next Week, etc.)

Reporting in QuickBooks
9
NOTE: Memorising a report with a specific “from” date and “to” date (or “as of” date in the case of a
Summary Balance Sheet) will mean that running that report in the future will always yield that date or
date range. However, if the report is memorised using one of the standard date ranges, running the
report in the future will yield that date range in relation to the system date when the report is run. For
example, if the date range on a memorised report is “This month to date,” then running it on 15
February 2012 will yield a report for 1 February 2012 through 15 February 2012. Running that same
report on 30 December 2013 will yield a report for 1 December 2013 through December 30, 2013.
However, if the report was memorised with a “from” date of 1 February 2012 and a “to” date of 15
February 2012, the report will always yield results for that date range regardless of when it is run
(until someone changes the date range).
The Report Basis by which income and expenses are to be calculated (accrual or cash basis,
particularly if different from the default report basis chosen in the Preferences section).
Columns determines how the columns are displayed (regardless of whether you have changed
the Columns directly on the report using the drop-down boxes at the top of the report). For
example, you can choose Total for one column or one column for each month (or year, half
month, four week period, quarter, week, or day). There are other ways to choose columns (for
example, one column per supplier).
In many reports (such as list reports and detail reports), the Columns tab determines which
columns to display (by placing a checkmark next to each desired column in a list) and enables
sorting by a chosen column. An example of this functionality can be seen in the screen capture
below, in which the Columns tab is selected (after selecting Customise Report) in a Profit &
Loss Detail report.

Reporting in QuickBooks
10
Sort by determines how the rows in the report are ordered, either by a default order or based on
another parameter. In the example of the report in which the Columns have been chosen, the
available Sort by parameters are those columns that were checked.
Add subcolumns:
o Previous Period
o Previous Year
o Year-to-Date
o % of Row
o % of Columns
o % of Income
o % of Expense
Advanced Options:
o Display Rows
o Display Columns
o Reporting Calendar

Reporting in QuickBooks
11

Reporting in QuickBooks
12
The Filters tab allows the user to decide upon which segment(s) of the business to report. Filter the
report for a combination of one or more classes, names, accounts, and so forth. Filtering may also be
done on custom fields.

Reporting in QuickBooks
13
The Header/Footer tab allows the user to customise and personalise the appearance of the report
beyond what QuickBooks has as its report defaults. Change the title, add a subtitle, page numbers, footer
information, alignment, report basis, date and time prepared, and so on.
The Fonts & Numbers tab allows you to change how an individual report is displayed compared to the
report defaults (as defined in Edit > Preferences > Reports & Graphs > Company Preferences).

Reporting in QuickBooks
14
OTHER WAYS TO CUSTOMISE A REPORT
Column widths
Once a report is displayed, the format might have to be altered slightly to be more to your liking. If the
columns are too wide or too narrow, drag the diamonds between the column headers to change the
column width (or drag the diamonds together to eliminate a column altogether).
Column order
In many reports, it is possible to change the column order by dragging the column headers to move them.
Place the mouse pointer over a column header. If it is a moveable column, the mouse pointer will turn into
a hand. Then drag the column header to its new desired location:
Column name
There is no way to rename columns in QuickBooks reports. The report must be exported to Excel (see
Excel integration section) and the modifications may be made there.
Row order:
The only way to change the order of rows (the rows generally indicate list names, such as Customer
names) that appear in a particular QuickBooks report is to change the order in the list in which these
names reside. For example, to have “Smith” appear before “Jones” in an Open Invoices report, one would
have to open the Customer Centre and move “Smith” so that it appears in the Customer Centre before
“Jones.”

Reporting in QuickBooks
15
QuickZoom
One of the most elegant facets of QuickBooks reporting is the ability to “drill down” from a balance on a
report or area on a graph to find details or ultimately the originating transaction. This “drill down” function
is accessed by double-clicking on a balance in a report (when placing the mouse pointer over the balance
in a report, the pointer turns into a magnifying glass with a Z inside it, indicating that QuickZoom is
possible) or on an area of a graph.
This QuickZoom function may be used sequentially on subsequently more detailed reports until,
ultimately, the original transaction (or list entry, in the case of a List Report) is reached, if you wish.
An example of two sequential QuickZooms is shown in the screen capture below.

Reporting in QuickBooks
16
While there are often several different ways to enter a particular set of debits and credits into QuickBooks,
you can advise your clients on the optimal method to use in order to extract the most meaningful,
informative reporting for them out of QuickBooks.
EXPAND AND COLLAPSE REPORTS
Many reports can be expanded for more detail or collapsed to be grouped for more summary reporting.
At the top of these reports, there will be a button that says either Expand or Collapse. (If it says Expand,
then clicking it will make the report more detailed and will turn that button into a Collapse button. If it says
Collapse, then clicking it will make the report less detailed and will turn that button into an Expand button.)
This report is as detailed as it is going to be; select Collapse to take away detail.

Reporting in QuickBooks
17
This report is as summarised as it is going to be; select Expand to add detail.

Reporting in QuickBooks
18
MEMORISING REPORTS
There are over 135 pre-set or “canned” reports that come with QuickBooks Premier (over 100 in
QuickBooks Pro), and they can be run as-is or modified to suit each user’s individual preferences and
requirements. Modifications might be as simple as changing the date range, or they might be much more
elaborate. Once the modifications have been made, the report template can be memorised so that each
time it is run, it is refreshed with up-to-date data. That way, there is no need to make the same report
modifications over and over every time new data has been entered into the QuickBooks company data
file. In addition, memorised report groups can be created so that multiple reports may be produced at the
press of a button.
Once a report has been modified to your liking, with the report open, memorise it by selecting the
Memorise button at the top of the report. Alternately, select Edit > Memorise or Control+M.
The Memorise Report window will open, and there you can choose the default name for the report to be
memorised or change the name.
Also, if desired, checkmark Save in Memorised Report Group and choose a group in which to save the
new memorised report.

Reporting in QuickBooks
19
If the list of report groups is not sufficient for you and your organisation (perhaps different users want their
own lists of memorised reports), open the list of Memorised Reports by selecting Reports > Memorised
Reports > Memorised Report List.
Reporting in QuickBooks
20
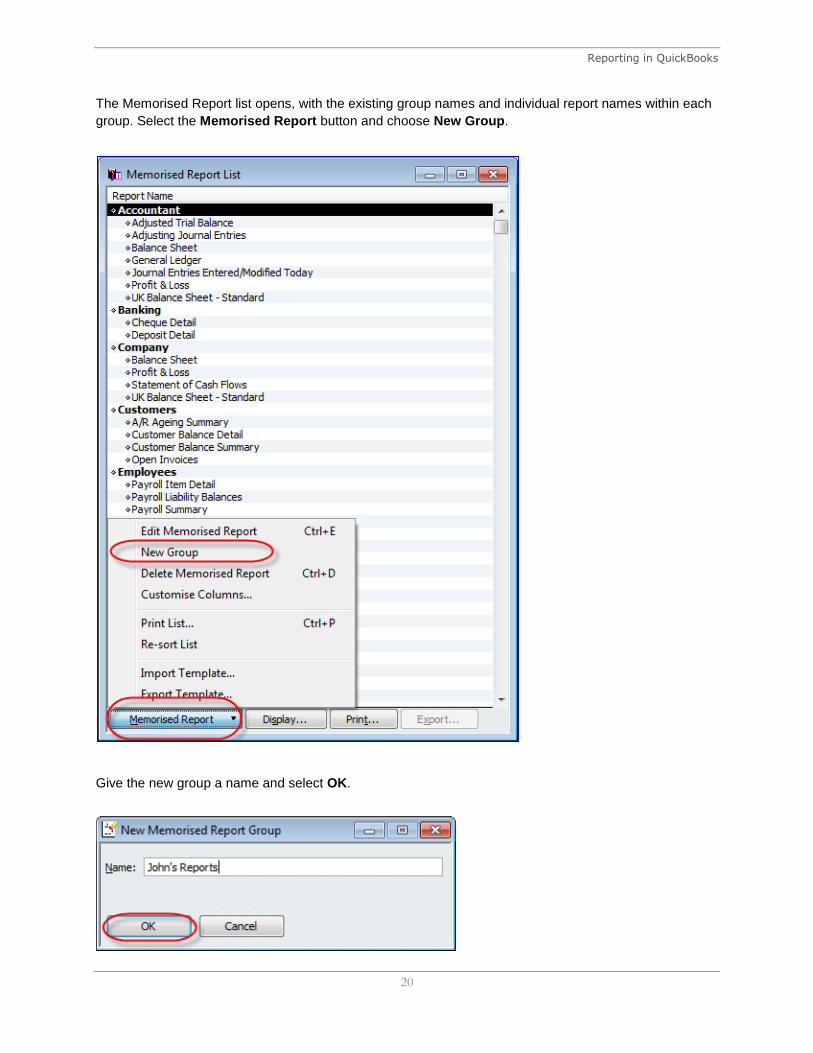
The Memorised Report list opens, with the existing group names and individual report names within each
group. Select the Memorised Report button and choose New Group.
Give the new group a name and select OK.

Reporting in QuickBooks
21
Then it is possible to go back to the already-open report you wish to memorise and assign it to the new
report group. Alternately, if the report has already been saved as a lone report or as part of another
group, right-click on that report in the Memorised Report list and choose Edit Memorised Report.
Then, you may edit the report name and also change the group of which it is to be a part as in the screen
capture below. Make the changes and select OK.

Reporting in QuickBooks
22
Memorised report templates in QuickBooks Premier may be exported out of QuickBooks. These exported
files have filenames like *.QBR. These *.QBR files may be imported into other data files open in
QuickBooks Pro or Premier. This enables you to create reports customised just the way you want in one
data file without having to repeat the work in other similar company files. One caveat is that any *.QBR
files from memorised reports that have custom filters (based on specific list names or custom fields) will
not be able to be exported (and hence, not available for import).
Any report produced in QuickBooks may be saved as a PDF or as an Excel spreadsheet, and can be e-
mailed as either a PDF or spreadsheet attachment in one click as well.
NOTE: there is no way to make memorised changes to any of the pre-set or “canned” reports that
come with QuickBooks. Any changes to be preserved should be saved as a memorised report.

Reporting in QuickBooks
23
PROCESSING MULTIPLE REPORTS
It is very simple to run several reports from the Memorised Report List concurrently.
To process multiple reports select Reports > Process Multiple Reports.
In the window that appears next, select all the reports you wish to run at the same time, by selecting and
checking the reports from All reports, Ungrouped reports or one particular report group.

Reporting in QuickBooks
24
Make changes to the date ranges on the checked reports as needed and then select Display or Print.
Selecting Display will result in all the reports showing in a cascading pattern in QuickBooks. Selecting
Print will result in all the reports printing to the chosen printer.
Reporting in QuickBooks
25
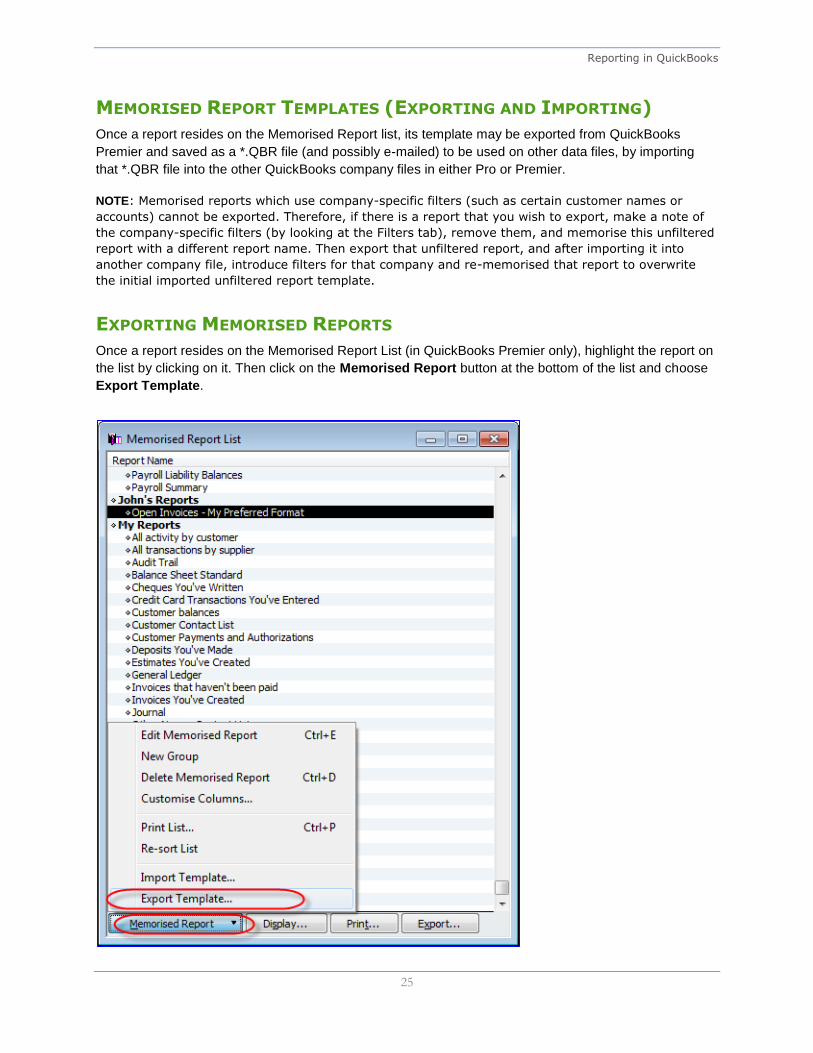
MEMORISED REPORT TEMPLATES (EXPORTING AND IMPORTING)
Once a report resides on the Memorised Report list, its template may be exported from QuickBooks
Premier and saved as a *.QBR file (and possibly e-mailed) to be used on other data files, by importing
that *.QBR file into the other QuickBooks company files in either Pro or Premier.
NOTE: Memorised reports which use company-specific filters (such as certain customer names or
accounts) cannot be exported. Therefore, if there is a report that you wish to export, make a note of
the company-specific filters (by looking at the Filters tab), remove them, and memorise this unfiltered
report with a different report name. Then export that unfiltered report, and after importing it into
another company file, introduce filters for that company and re-memorised that report to overwrite
the initial imported unfiltered report template.
EXPORTING MEMORISED REPORTS
Once a report resides on the Memorised Report List (in QuickBooks Premier only), highlight the report on
the list by clicking on it. Then click on the Memorised Report button at the bottom of the list and choose
Export Template.

Reporting in QuickBooks
26
Then browse to the location where the file should be saved (most likely a convenient location such as the
desktop for easy e-mailing) and make any changes desired to the name of the *.QBR file.
Reporting in QuickBooks
27
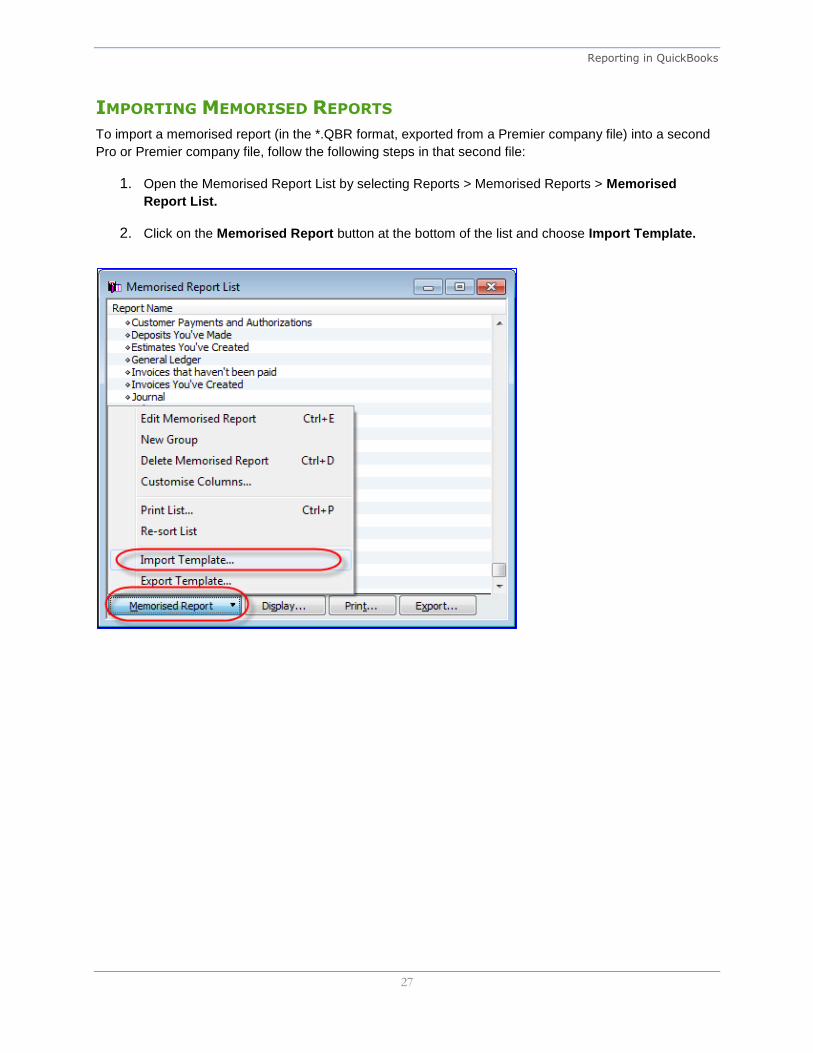
IMPORTING MEMORISED REPORTS
To import a memorised report (in the *.QBR format, exported from a Premier company file) into a second
Pro or Premier company file, follow the following steps in that second file:
1. Open the Memorised Report List by selecting Reports > Memorised Reports > Memorised
Report List.
2. Click on the Memorised Report button at the bottom of the list and choose Import Template.

Reporting in QuickBooks
28
3. Then browse to the location of the saved *.QBR file and select it for importing and choose Open.
4. Then accept the offered name of the report or change its name, and if desired, save it in a
Memorised Report Group as in the screen capture below.

Reporting in QuickBooks
29
REPORTS SAVED TO THE ICON BAR
If there is a report that a particular QuickBooks user runs several times a day, it may be worthwhile to put
that report on the icon bar. This is easy to do. First, run the report (either from the Memorised Reports or
from the Reports menu, and make whatever settings or cosmetic changes you require. Then, when the
report is displayed exactly the way you want it, whether it’s been memorised or not, select Add (report
name in quotes) to Icon Bar.
Then in the Add Window to Icon Bar screen, edit the label for the report as it would appear under an
icon in the icon bar, as well as the description that would appear when the mouse rolls over that icon.
Choose the icon as well.
Be very aware of the number of icons that appear in each user’s icon bar. This method of adding a report
to a particular user’s icon bar should be saved for only important, often-used reports.
Later on, one can customise the icon bar by right-clicking on it and moving around, changing, and
deleting icons.

Reporting in QuickBooks
30
ITEM-BASED REPORTS
While QuickBooks does a wonderful job of reporting on financials (using accounts from the Chart of
Accounts), reporting based on items in the Item List can provide much more detailed and granular
information.
Using items enables the QuickBooks user to employ a relatively short Chart of Accounts, while still
yielding detailed reports. Many items, for example, can be linked to one or two income accounts.
In the screen capture below, the total income figure of 65, 010.65 is an aggregate without any detail
(beyond a division between Sales and Services Income).

Reporting in QuickBooks
31
QuickZooming on that figure produces the Transaction Detail by Account, but does not give sufficient
detail as to what was sold.
Selecting Expand at the top of the Transaction Detail by Account produces more detail, but there is still
no information regarding what was sold. It would be possible to customise this expanded report and add a
column for the Item, but we would still have to do further customisation to get definitive information on
what was sold.

Reporting in QuickBooks
32
An item-based report, however, would give us the sales information we need. For example, if we select
Reports > Sales > Sales by Item Summary for the same date range, we see exactly how much of each
item was sold, to add up to that same sales figure. We see quantities as well as amounts (along with
other columns which provide valuable information such as Gross Margin).

Reporting in QuickBooks
33
A similar report on purchases (Reports > Purchases > Purchases by Item Summary) shows the
quantity and value of each item purchased.
Using items on both sales and purchase transactions can provide valuable reports, and in the case of
stock items, stock reports can be produced as well. These stock reports provide much more information
than the Stock value on the balance sheet.
FIND
One quick way of finding transactions for which you know very little detail is to use the Find function and
enter just the field(s) for which you do have information.
Access this feature by selecting Edit > Find or Control+F.

Reporting in QuickBooks
34
Choose either the Simple tab and select a Transaction Type and any combination of details you have for
Customer:Job, date range, document number, and amount, then select Find.
Or use the Advanced tab and highlight one or more fields for which you have information (sometimes just
an amount will do; in this case we could have chosen “less than or equal to” or “more than or equal to” if
we didn’t know the exact amount) and select Find.
In either case, the list of transactions that match the Find criteria are listed in the lower part of the Find
screen. At that point, select Go To to open the selected transaction (or double-click on that transaction in
the list), or Report to see a report of these matching transactions (from which you may QuickZoom to
individual transactions) or Export to export the list to Excel (see more on Excel reporting below).

Reporting in QuickBooks
35
QUICKBOOKS SEARCH
There are times when an accounting professional is not familiar with the transactions or names in a
client’s QuickBooks company file. The QuickBooks Search function will help locate any transaction or list
name that matches the amount or text you enter.
Access QuickBooks Search by selecting Edit > Search or by selecting F3:

Reporting in QuickBooks
36
In the screen capture below, the accounting professional was looking for the name Tom. She entered the
name in the text field at the top and clicked the magnifying glass icon. Had she known an amount, she
could have entered it in the amount field (and chosen Exactly or Greater than or Less than) and/or a
date range in the date fields.
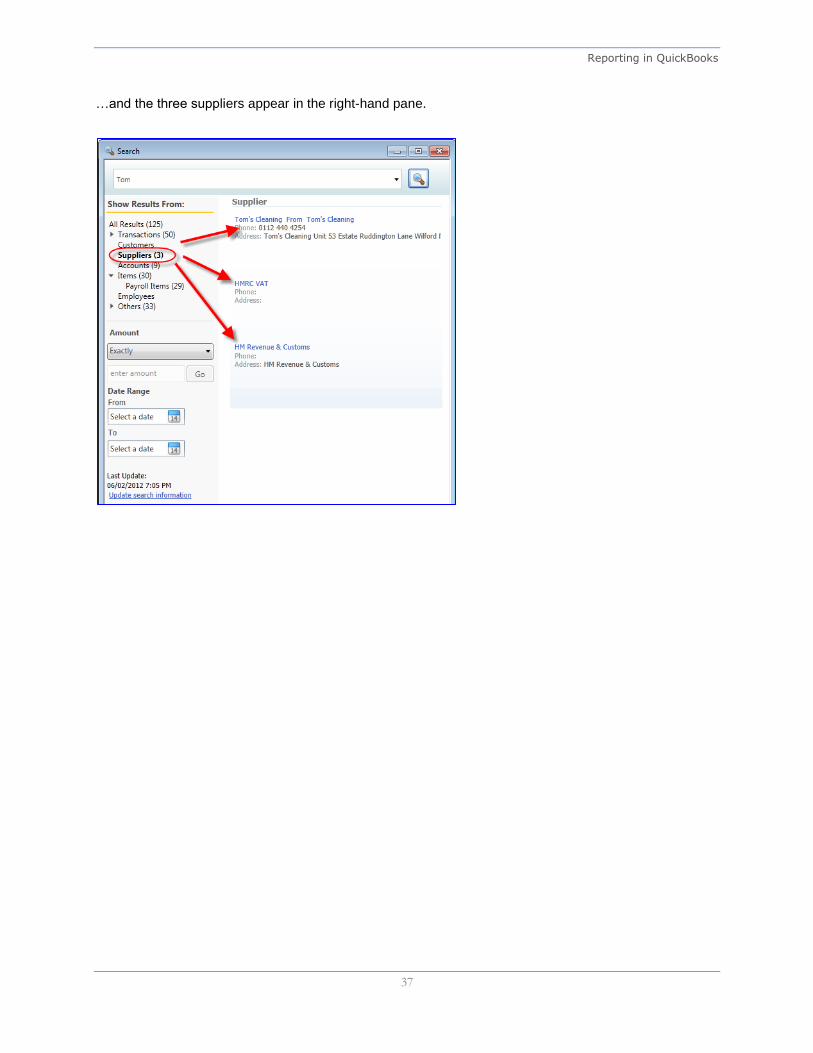
The results are grouped by transactions and the various lists. Double-click on the Suppliers listing, which
indicates three matches…
Reporting in QuickBooks
37
…and the three suppliers appear in the right-hand pane.

Reporting in QuickBooks
38
Hovering the mouse over the first name in the list makes some “clickable” icons appear, enabling the user
to open or edit the name on the list (in this case, a supplier) or enter a transactions (in this case, a bill).
The icons that appear vary by the type of result that is showing in the right-hand pane.
The Search function does not yield a report, but it does produce a wide array of results. This is quite
useful if the “searcher” does not have that much information on which to base a search.

Reporting in QuickBooks
39
PREFERENCES TO MAKE REPORTING MORE USEFUL
PREFERENCES RE REFRESHING DATA
When a report or graph has been built and is open in QuickBooks while new transactions are being
entered, the information in that report may change, depending on what those new transactions are.
If the new transactions would change the information in a report that is currently open, each user should
determine whether the report should refresh with the new data. If open reports are set to refresh
themselves always with new data, QuickBooks could slow down.
Therefore, each user should control whether they want QuickBooks to prompt them to refresh report or
graphs with new data, refresh automatically (which takes up the most resources), or not refresh at all.
To change the settings for refreshing reports and graphs, select Edit > Preferences > Reports &
Graphs > My Preferences and select the radio button next to one of the following:
Prompt me to refresh
Refresh automatically
Don’t refresh
And then select OK.

Reporting in QuickBooks
40
PROMPT TO MODIFY REPORT OPTIONS BEFORE OPENING A REPORT
In certain company data files, running reports which require calculations by sifting through a lot of data
can take some time, and so calling up a time-consuming report you intend to modify and refresh
ultimately anyway can be quite frustrating.
However, there is a preference which can be set so that any time a report is run, it first presents the user
with a modification screen so that no time is wasted running the report with the wrong settings when it first
appears.
This is a user-by-user preference, as different users may wish to handle the initial appearance of reports
differently.
Access this preference by selecting Edit > Preferences > Reports & Graphs > My Preferences and
check the box next to Prompt me to modify report options before opening a report.

Reporting in QuickBooks
41
EXCEL INTEGRATION
Any report in QuickBooks may be exported to Excel, and this can be very useful for performing extra
formatting and calculations that cannot be done within QuickBooks.
Access this feature with the desired report open by selecting the Excel button at the top of the report.
Then choose whether to Create New Worksheet or Update Existing Worksheet.
Reporting in QuickBooks
42
As with saving a report to PDF, the advantage of doing this (as opposed to printing or using the e-mail
function previously mentioned) is that the report may be saved anywhere on the computer or network that
you choose and you may name the report something unique and meaningful
(e.g. “AdjTrialBalNov2014SavedDec122014.xlsx”).
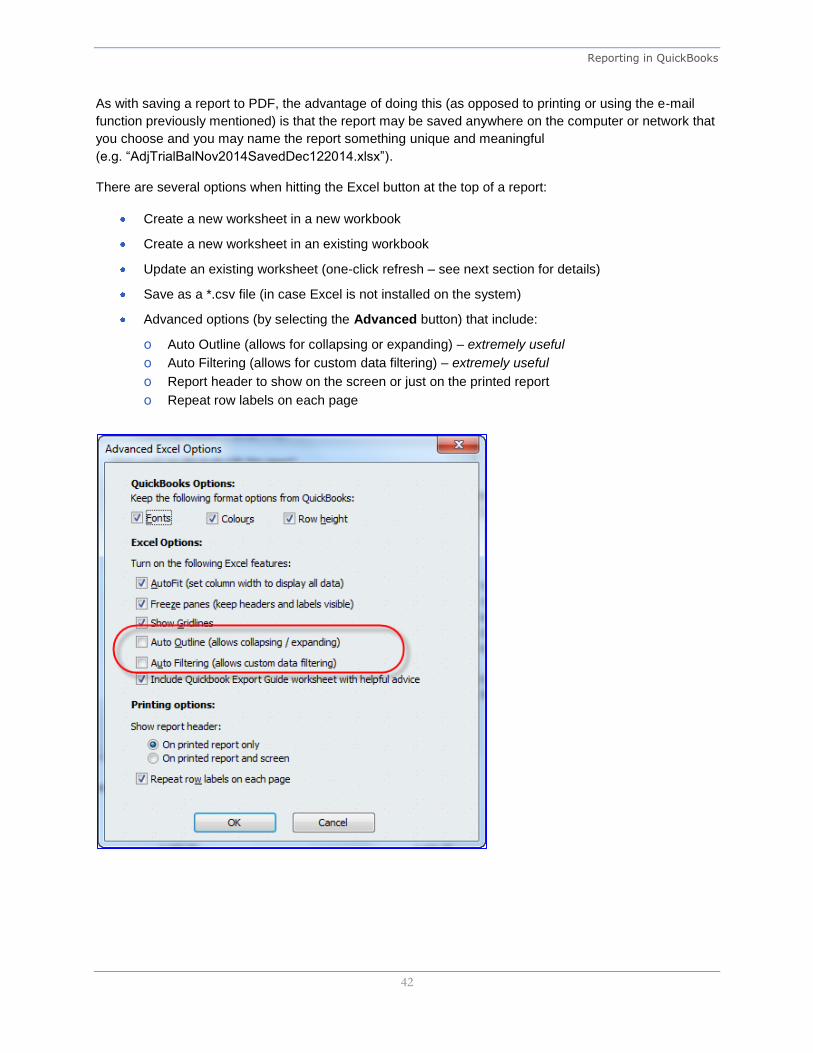
There are several options when hitting the Excel button at the top of a report:
Create a new worksheet in a new workbook
Create a new worksheet in an existing workbook
Update an existing worksheet (one-click refresh – see next section for details)
Save as a *.csv file (in case Excel is not installed on the system)
Advanced options (by selecting the Advanced button) that include:
o Auto Outline (allows for collapsing or expanding) – extremely useful
o Auto Filtering (allows for custom data filtering) – extremely useful
o Report header to show on the screen or just on the printed report
o Repeat row labels on each page

Reporting in QuickBooks
43
ONE-CLICK REFRESH/UPDATE OF EXCEL INTEGRATION
As mentioned above in the section on Excel Integration, any QuickBooks report may be exported to
Excel. Many users make a series of specific formatting changes once the Excel export has taken place,
such as changing column and row sizes, renaming report headers and column and row headers, and
inserting rows and formulas. All these desired formatting changes would have to be repeated any time the
same report in QuickBooks was exported to Excel with refreshed data.
With the one-click refresh feature, however, the tedious task of repeating the formatting changes every
time the same report is exported to Excel is unnecessary.
When a new, refreshed version of a report (that was already exported, formatted and saved in Excel) is
run in QuickBooks, access this feature by selecting the Excel button at the top of the desired report in
QuickBooks, and then choose Update Existing Worksheet.
Alternately, there is another way to update an existing worksheet with refreshed QuickBooks data, but
this time from Excel as opposed to from QuickBooks. In Excel, click the QuickBooks tab and select
Update Report.
NOTE: The first time you update a report from Excel, QuickBooks must be open. This is important
because QuickBooks automatically updates your integrated applications preference. Basically, it tells
QuickBooks that Excel has permission to access your data. After that, you can update reports from
Excel even if QuickBooks is closed.

Reporting in QuickBooks
44
NOTE: If you select How it works in the Send Report to Excel window, there is a description of
which formatting changes are preserved when updating a QuickBooks report in Excel. For more
information, there is a Watch a Video link in this How it works window.

Reporting in QuickBooks
45
QUICKBOOKS FINANCIAL STATEMENT DESIGNER
Accounting professionals wishing to produce professionally formatted financial statements and supporting
documents will want to make use of the Financial Statement Designer, available for free and only in
QuickBooks Premier.
With this tool, you can create professional-looking financial statements in accordance with Generally
Accepted Accounting Principles for those clients who use QuickBooks. It includes a selection of
preformatted Balance Sheets, Income Statements, Statements of Cash Flows, and Statements of
Retained Earnings. It also comes with some preformatted title pages, and accountants’ reports, auditors’
reports, review reports and audit reports.
Access this feature by selecting Accountant > Financial Statement Designer.

Reporting in QuickBooks
46
There are over 35 pre-set templates for financial statements and supporting documents, but the
accounting professional may create their own templates.

Reporting in QuickBooks
47
After choosing or creating and editing a template, an Excel-like window opens with the data populated for
the chosen template from the QuickBooks company file.
The accounting professional may insert rows (for subtotals, grouped accounts, and blank rows for
spacing), columns (to show prior year balances, and to calculate variances, ratios and percentages),
combine fields, rename accounts, make formatting changes, determine rounding, and much more.
This can all be done in a familiar Excel-like interface.

Reporting in QuickBooks
48
These edits can be changed and applied to refreshed data.

Reporting in QuickBooks
49
The accountant’s information and company information can be inserted, along with footers, page
numbers and other edits well beyond the capabilities of QuickBooks reporting.

Reporting in QuickBooks
50
The Financial Statement Designer can produce balance sheets in UK format.

Reporting in QuickBooks
51
OTHER FINANCIAL STATEMENT DESIGNER FEATURES
Reuse your customised financial statements with the same or multiple different clients
Supporting Document Editor allows you to prepare custom title pages, accountant reports and
notes
Zoom in from financial statements to view detail, make changes and quickly return the financials
Print a complete set of financial statements including title pages, accountants reports and notes
Export to Excel or save as a PDF for printing or emailing
Recommended