Reelcraft Industries
Industrial Grade Hose Reels
Series DP

© Reelcraft Industries October 30, 2007 © SKF Group Slide 2
Intended Applications1

© Reelcraft Industries
Intended Applications
DP5000 / DP7000
• Air / water
• Grease
• Oil transfer

© Reelcraft Industries
Anatomy of a Hose Reel2

© Reelcraft Industries
Glossary of General Terms
Swivel /
rotary union
Guide
arm
Roller guide /
fair leadRoller
Ratchet wheelLatch pawl
Spring pan /
canister
Inlet
BaseHubSpool

© Reelcraft Industries
Model Significance
DP5835 OMP-B
Series designation:
DP5 – Dual Pedestal Series 5000
DP7 – Dual Pedestal Series 7000
Hose size (I.D.):
4 – 1/4”
6 – 3/8”
8 – 1/2”
Hose
length (ft)
Pressure rating:
OLP - Low ≈ 300 psi
OMP - Medium ≈ 3000 psi
OHP - High ≈ 5000 psi
Engineering notes:Color: NOTE: other options available
“-35NK” = black “-17WH” = white
“-40BL” = blue “-39GY” = grey
Seal Change:
No Suffix = Aflas “-B” = Buna
“-V” = Viton “-E” = EPR
Special Customer Number:
“-XXX” – Usually designated by two to three numbers and
signifies a customer driven change to a standard product.

© Reelcraft Industries
Product Features3

© Reelcraft Industries
Base
Series DP reels utilize two interlocking plates
stamped from 11 gauge carbon steel. They are held
permanently in place by rivets.
© Reelcraft Industries
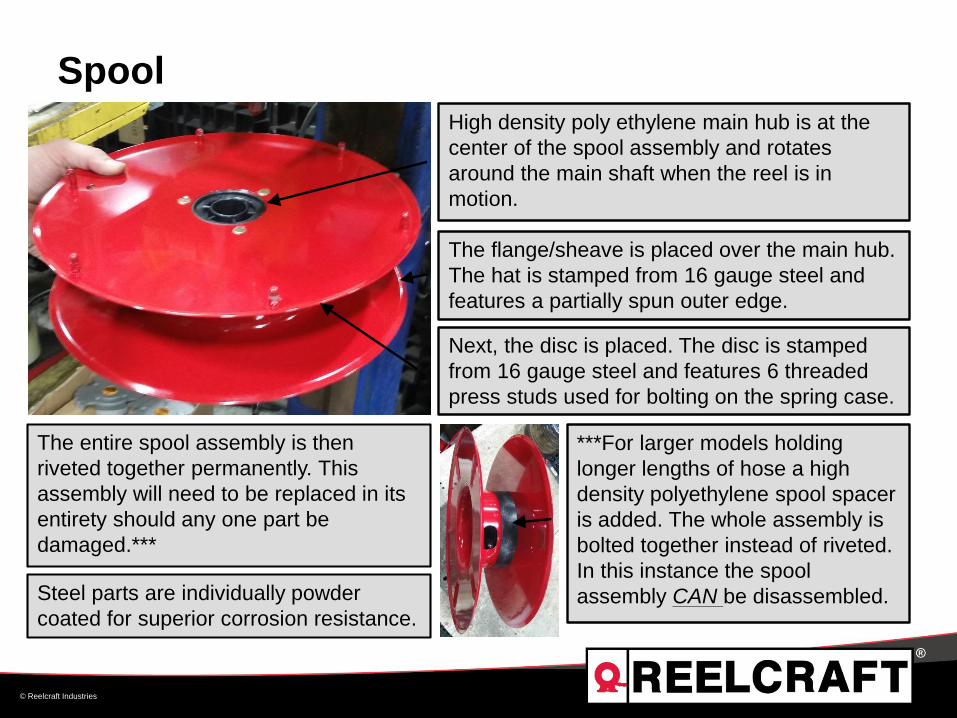
Spool
Next, the disc is placed. The disc is stamped
from 16 gauge steel and features 6 threaded
press studs used for bolting on the spring case.
High density poly ethylene main hub is at the
center of the spool assembly and rotates
around the main shaft when the reel is in
motion.
The flange/sheave is placed over the main hub.
The hat is stamped from 16 gauge steel and
features a partially spun outer edge.
The entire spool assembly is then
riveted together permanently. This
assembly will need to be replaced in its
entirety should any one part be
damaged.***
Steel parts are individually powder
coated for superior corrosion resistance.
***For larger models holding
longer lengths of hose a high
density polyethylene spool spacer
is added. The whole assembly is
bolted together instead of riveted.
In this instance the spool
assembly CAN be disassembled.
© Reelcraft Industries
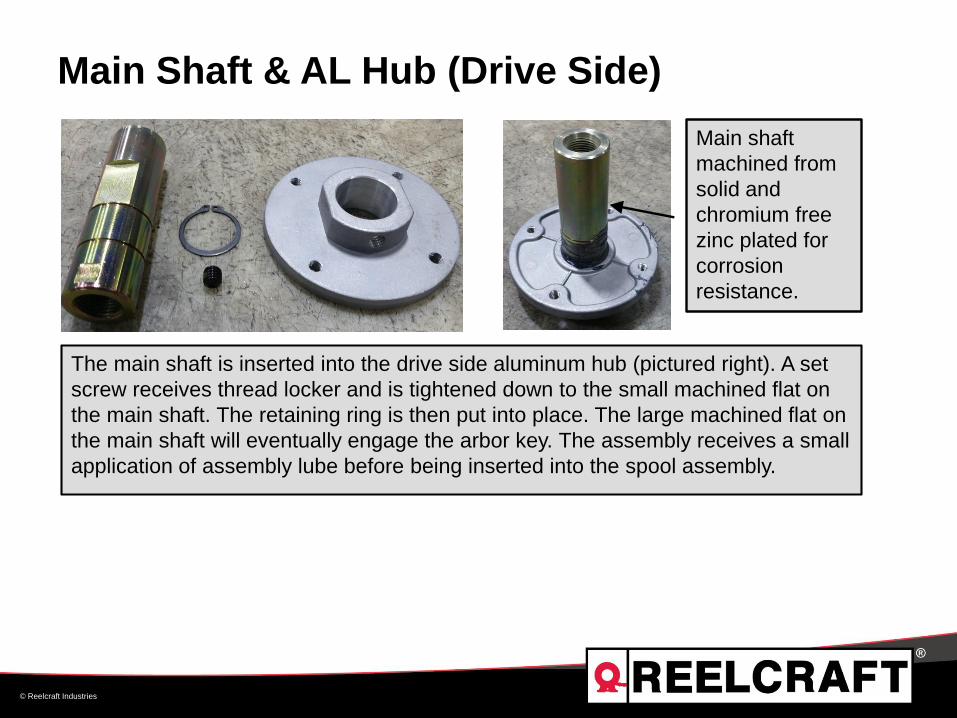
Main Shaft & AL Hub (Drive Side)
Main shaft
machined from
solid and
chromium free
zinc plated for
corrosion
resistance.
The main shaft is inserted into the drive side aluminum hub (pictured right). A set
screw receives thread locker and is tightened down to the small machined flat on
the main shaft. The retaining ring is then put into place. The large machined flat on
the main shaft will eventually engage the arbor key. The assembly receives a small
application of assembly lube before being inserted into the spool assembly.
© Reelcraft Industries
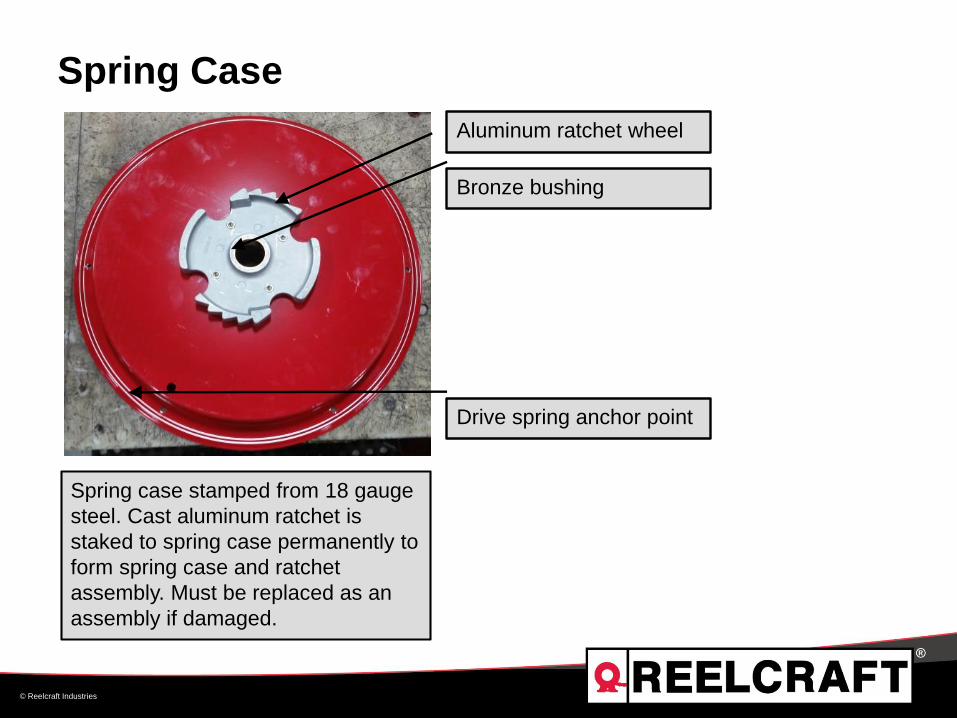
Spring Case
Drive spring anchor point
Spring case stamped from 18 gauge
steel. Cast aluminum ratchet is
staked to spring case permanently to
form spring case and ratchet
assembly. Must be replaced as an
assembly if damaged.
Aluminum ratchet wheel
Bronze bushing
© Reelcraft Industries
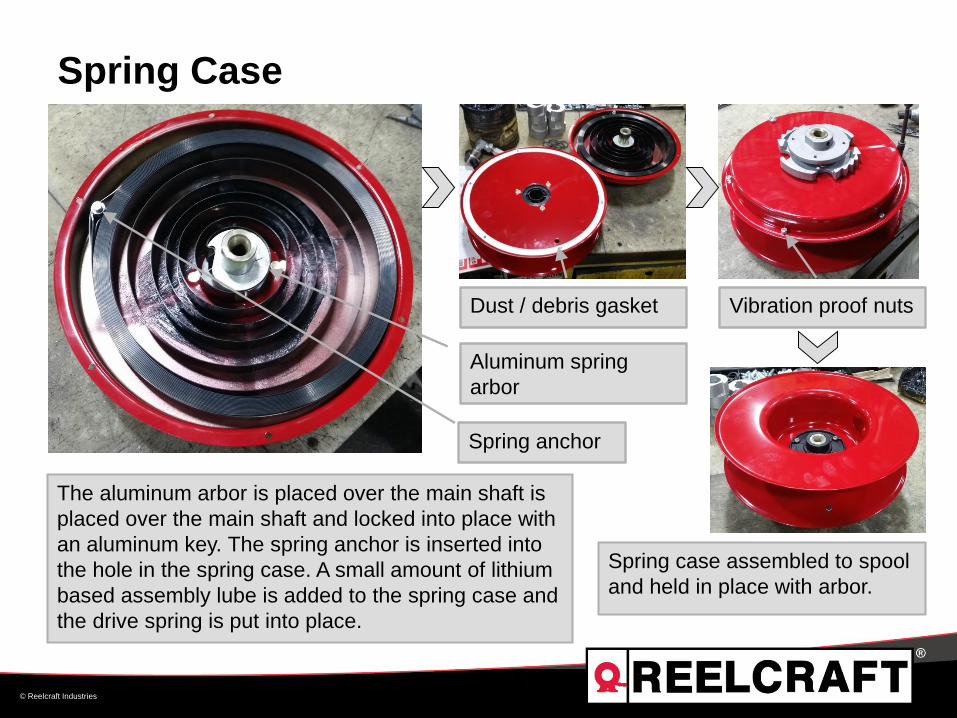
Spring Case
The aluminum arbor is placed over the main shaft is
placed over the main shaft and locked into place with
an aluminum key. The spring anchor is inserted into
the hole in the spring case. A small amount of lithium
based assembly lube is added to the spring case and
the drive spring is put into place.
Spring anchor
Aluminum spring
arbor
Dust / debris gasket Vibration proof nuts
Spring case assembled to spool
and held in place with arbor.
© Reelcraft Industries
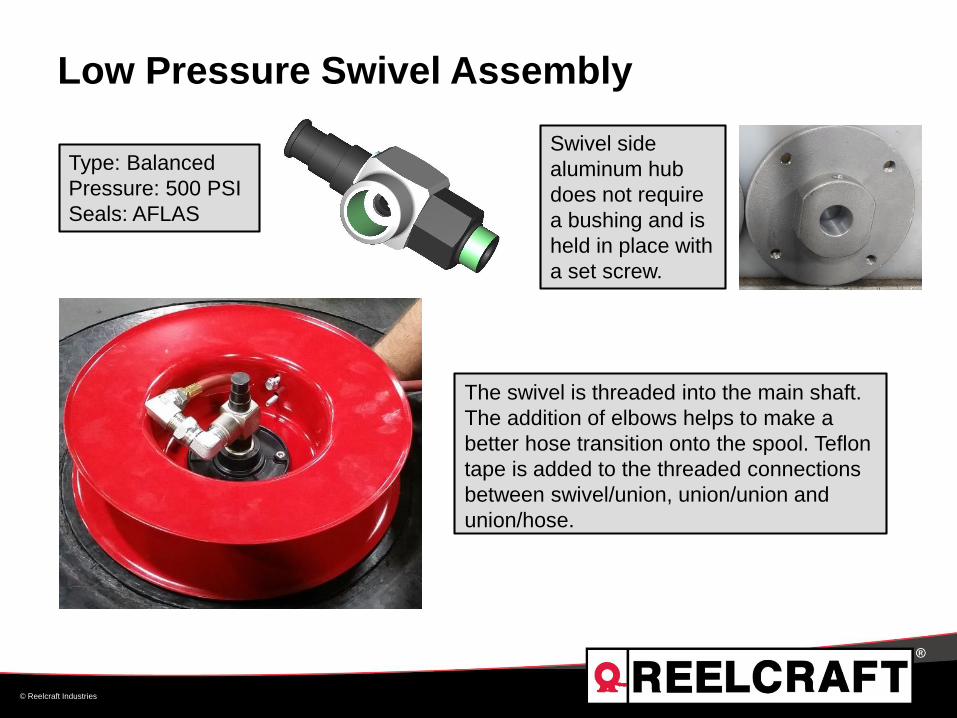
Low Pressure Swivel Assembly
The swivel is threaded into the main shaft.
The addition of elbows helps to make a
better hose transition onto the spool. Teflon
tape is added to the threaded connections
between swivel/union, union/union and
union/hose.
Type: Balanced
Pressure: 500 PSI
Seals: AFLAS
Swivel side
aluminum hub
does not require
a bushing and is
held in place with
a set screw.

© Reelcraft Industries
Medium & High Pressure Swivel Assembly
Type: Ball bearing
Pressure: 5000 PSI
Seals: AFLAS
Swivel side aluminum hub
features a bronze bushing and is
held in place with a snap ring.
The swivel spins in the arbor and
necessitates a bushing.
© Reelcraft Industries
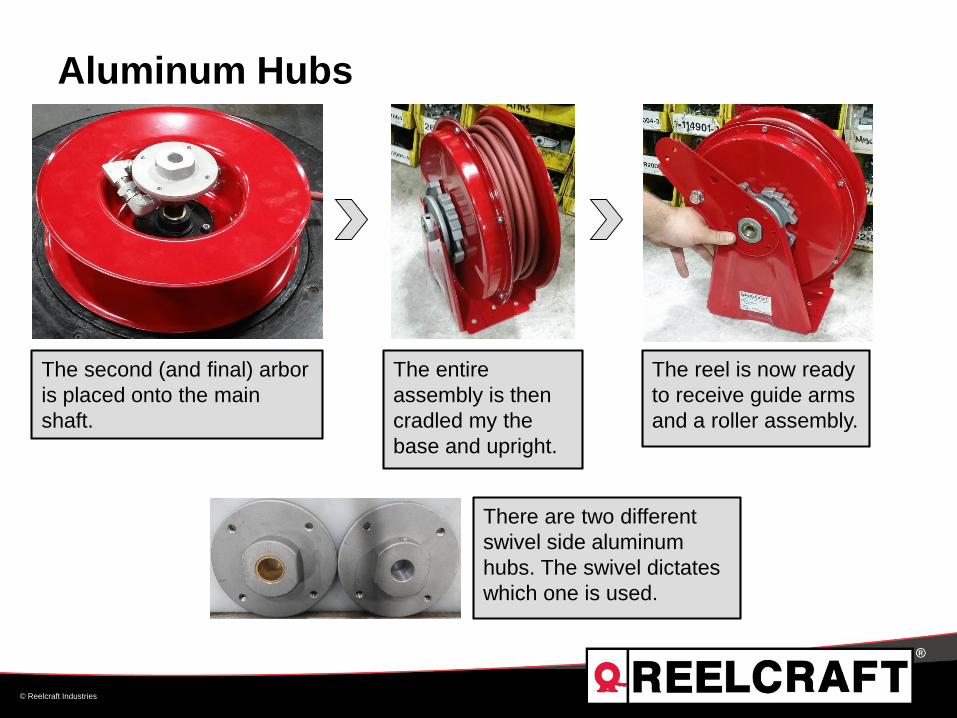
Aluminum Hubs
The second (and final) arbor
is placed onto the main
shaft.
The entire
assembly is then
cradled my the
base and upright.
The reel is now ready
to receive guide arms
and a roller assembly.
There are two different
swivel side aluminum
hubs. The swivel dictates
which one is used.

© Reelcraft Industries
Guide Arm
Guide arm mounting
holes allow for guide to
be re-positioned every 45°.
Series DP reels are supported on both sides of the reel
with a guide arm stamped from industrial grade 11 gauge
steel.
Guide arms are stamped rather
than pressed, allowing us to
engineer far greater strength &
rigidity into raw steel.
Unless otherwise specified,
reels ship in the side wind
position. Reels can be
ordered in any position by
adding the correct suffix to
the part number (TW or
BW). NOTE: when a
customer changes the guide
arm position, they must
change the U-bolt location,
consult the users manual for
more information.

© Reelcraft Industries
Ratchet & Latch Parts
Snap ring
Wear washer
Torsion latch spring
Latch pawl stud
Latch pawl
Latch pawl base
Hex nut
View of latch pawl engaging
ratchet mounted on guide
arm.
Torsion springs outlast the more
conventional tension springs 10:1
because they are only in use for a
fraction of the time.

© Reelcraft Industries October 30, 2007 © SKF Group Slide 18
FAQs4

© Reelcraft Industries
My Reel Won’t Retract at All!?!
Freight damage
• Series DP reels leave the
factory in a double wall,
corrugated cardboard box. They
are enclosed in a bag and have
high density foam inserts to
protect the reel.
• It is always wise to inspect the
packaging before receipt of a
reel. If the packaging is
damaged, un-box and ensure
that the reel operates smoothly
and there are no dents,
scratches or dings in the sheet
metal before signing for
delivery.
Latch out
• Latching parts are mounted on
the guide arm, therefore; it is
impossible to latch this reel out
at full extension.
• There is a U-bolt on these
models, but only one position. It
is designed to alleviate tension
on the swivel from hose pull.

© Reelcraft Industries
My Reel Will Not Retract at All!?!
Damaged, disassembled or
missing latch spring
• The latch spring holds the
pawl tight to the ratchet.
• Over the life of a reel, latch
springs may stretch while they
wear and become ineffective.
• Investigate & replace latch
spring.
Constant tension
• Reelcraft offers most all of it’s
latching reels in a constant
tension version as well. This will
be designated in the part
number with a “-CT” suffix.
DP7650 OLP (standard)
DP7650 OLP-CT (constant tension)
© Reelcraft Industries
My Reel Won’t Latch!?!
Add tension
• Coil springs with time will
loose some of their tension.
Customer supplied hose
• Customer’s hose may not
meet our minimum bend radius
or recommended O.D.
Reel mounted in excess of 15’
overhead
• This type of installation
necessitates that the bumper be
set such that 15’ or more of
hose is hanging off the reel at
all times. In turn, tension is
increased on the drive spring,
causing it to wear prematurely
or in extreme cases fail entirely.
• Always consult engineering in
this type of application.

© Reelcraft Industries
My Reel is Making an Alarming Noise
Intermittent coil release
• Suction is generated between
coils causing the retraction of
hose to be sporadic, usually
accompanied by an out of the
ordinary noise.
• Usually a warranty issue.
Spring thump
• It is typically evident when the
hose is allowed to retract quickly.
• Caused by excess movement of
spring assembly within the spring
pan.
• It is not detrimental to the reel’s
function.

© Reelcraft Industries
My Reel Isn’t Building Any Tension!?!
Spring form broken
• The part of the spring that
engages the arbor has fractured
causing the spring to spin freely of
the arbor.
• If experienced in warranty
period, potential return

© Reelcraft Industries
My Reel is Leaking At The Swivel Union!?!
If the leak has occurred at the threaded portion that
mates to the main shaft, the most likely fix will be
further tightening the swivel or additional pipe tape.
Leaks may also occur at either end of the swivel
body. The cause of this type of leak is a failure in
the O-ring(s).
Leaks at either the threaded portion where the ell
meets the swivel body or where the ell attaches to
the hose can generally be corrected with either
tightening or additional pipe tape.
It is always important to verify that compatible
fittings are used. Our most common is National
Pipe Thread Fitting (NPTF or NPT, for short).

© Reelcraft Industries
Servicing a Balanced Style Swivel
The stem can be
disassembled from the
swivel body by removing
an external snap ring.
O-rings are wear items
and can possibly leak.
NOTE: Different swivel designs will incorporate a different
number of o-rings and/or backup o-rings.

© Reelcraft Industries
Servicing a Ball-Bearing Style Swivel
Step 1: Remove
grease fitting.
Step 2: Remove ball bearings through grease port. Note:
there may be grease making this difficult. If needed pre-
soak with de-greaser. The stem will not separate from
the body unless all ball bearings are removed.
Step 3: Replace worn /
damaged O-rings / back-up O-
rings. Service kits are available
for most swivels.
Step 4: Re-assemble swivel stem and body. Replace all bearings and then grease fitting.
Grease fitting and assemble back onto main shaft of the hose reel.
Recommended