Red Hat Enterprise Linux 8
Managing file systems
Creating, modifying, and administering file systems in Red Hat Enterprise Linux 8
Last Updated: 2020-03-16

Red Hat Enterprise Linux 8 Managing file systems
Creating, modifying, and administering file systems in Red Hat Enterprise Linux 8

Legal Notice
Copyright © 2020 Red Hat, Inc.
The text of and illustrations in this document are licensed by Red Hat under a Creative CommonsAttribution–Share Alike 3.0 Unported license ("CC-BY-SA"). An explanation of CC-BY-SA isavailable athttp://creativecommons.org/licenses/by-sa/3.0/. In accordance with CC-BY-SA, if you distribute this document or an adaptation of it, you mustprovide the URL for the original version.
Red Hat, as the licensor of this document, waives the right to enforce, and agrees not to assert,Section 4d of CC-BY-SA to the fullest extent permitted by applicable law.
Red Hat, Red Hat Enterprise Linux, the Shadowman logo, the Red Hat logo, JBoss, OpenShift,Fedora, the Infinity logo, and RHCE are trademarks of Red Hat, Inc., registered in the United Statesand other countries.
Linux ® is the registered trademark of Linus Torvalds in the United States and other countries.
Java ® is a registered trademark of Oracle and/or its affiliates.
XFS ® is a trademark of Silicon Graphics International Corp. or its subsidiaries in the United Statesand/or other countries.
MySQL ® is a registered trademark of MySQL AB in the United States, the European Union andother countries.
Node.js ® is an official trademark of Joyent. Red Hat is not formally related to or endorsed by theofficial Joyent Node.js open source or commercial project.
The OpenStack ® Word Mark and OpenStack logo are either registered trademarks/service marksor trademarks/service marks of the OpenStack Foundation, in the United States and othercountries and are used with the OpenStack Foundation's permission. We are not affiliated with,endorsed or sponsored by the OpenStack Foundation, or the OpenStack community.
All other trademarks are the property of their respective owners.
Abstract
This documentation collection provides instructions on how to effectively manage file systems inRed Hat Enterprise Linux 8.
. . . . . . . . . . . . . . . . . . . . . . . . . . . . . . . . . . . . . . . . . . . . . . . . . . . . . . . . . . . . . . . . . . . . . . . . . . . . . . . . . . . . . . . . . . . . . . . . . . . . . . . . . . . . . . . . . . . . . . . . . . . . . . . . . . . . . . . . . . . . . . . . . . . . . . . . . . . . . . . . . . . . . . . . . . . . . . . . . . . . . . . . . . . . . . . . . . . . . . . . . . . . . . . . . . . . . . . . . . . . . . . . . . . . . . . . . . . . . . . . . . . . . . . . . . . . . . . . . . . . . . . . . . . . . . . . . . . . . . . .
. . . . . . . . . . . . . . . . . . . . . . . . . . . . . . . . . . . . . . . . . . . . . . . . . . . . . . . . . . . . . . . . . . . . . . . . . . . . . . . . . . . . . . . . . . . . . . . . . . . . . . . . . . . . . . . . . . . . . . . . . . . . . . . . . . . . . . . . . . . . . . . . . . . . . . . . . . . . . . . . . . . . . . . . . . . . . . . . . . . . . . . . . . . . . . . . . . . . . . . . . . . . . . . . . . . . . . . . . . . . . . . . . . . . . . . . . . . . . . . . . . . . . . . . . . . . . . . . . . . . . . . . . . . . . . . . . . . . . . . .
. . . . . . . . . . . . . . . . . . . . . . . . . . . . . . . . . . . . . . . . . . . . . . . . . . . . . . . . . . . . . . . . . . . . . . . . . . . . . . . . . . . . . . . . . . . . . . . . . . . . . . . . . . . . . . . . . . . . . . . . . . . . . . . . . . . . . . . . . . . . . . . . . . . . . . . . . . . . . . . . . . . . . . . . . . . . . . . . . . . . . . . . . . . . . . . . . . . . . . . . . . . . . . . . . . . . . . . . . . . . . . . . . . . . . . . . . . . . . . . . . . . . . . . . . . . . . . . . . . . . . . . . . . . . . . . . . . . . . . . .
. . . . . . . . . . . . . . . . . . . . . . . . . . . . . . . . . . . . . . . . . . . . . . . . . . . . . . . . . . . . . . . . . . . . . . . . . . . . . . . . . . . . . . . . . . . . . . . . . . . . . . . . . . . . . . . . . . . . . . . . . . . . . . . . . . . . . . . . . . . . . . . . . . . . . . . . . . . . . . . . . . . . . . . . . . . . . . . . . . . . . . . . . . . . . . . . . . . . . . . . . . . . . . . . . . . . . . . . . . . . . . . . . . . . . . . . . . . . . . . . . . . . . . . . . . . . . . . . . . . . . . . . . . . . . . . . . . . . . . . .
. . . . . . . . . . . . . . . . . . . . . . . . . . . . . . . . . . . . . . . . . . . . . . . . . . . . . . . . . . . . . . . . . . . . . . . . . . . . . . . . . . . . . . . . . . . . . . . . . . . . . . . . . . . . . . . . . . . . . . . . . . . . . . . . . . . . . . . . . . . . . . . . . . . . . . . . . . . . . . . . . . . . . . . . . . . . . . . . . . . . . . . . . . . . . . . . . . . . . . . . . . . . . . . . . . . . . . . . . . . . . . . . . . . . . . . . . . . . . . . . . . . . . . . . . . . . . . . . . . . . . . . . . . . . . . . . . . . . . . . .
Table of Contents
PROVIDING FEEDBACK ON RED HAT DOCUMENTATION
CHAPTER 1. OVERVIEW OF AVAILABLE FILE SYSTEMS1.1. TYPES OF FILE SYSTEMS1.2. LOCAL FILE SYSTEMS
Available local file systems1.3. THE XFS FILE SYSTEM
Performance characteristics1.4. THE EXT4 FILE SYSTEM1.5. CHOOSING A LOCAL FILE SYSTEM1.6. NETWORK FILE SYSTEMS
Available network file systems1.7. SHARED STORAGE FILE SYSTEMS
Comparison with network file systemsConcurrencyPerformance characteristicsAvailable shared storage file systems
1.8. CHOOSING BETWEEN NETWORK AND SHARED STORAGE FILE SYSTEMS1.9. VOLUME-MANAGING FILE SYSTEMS
Available volume-managing file systems
CHAPTER 2. MANAGING LOCAL STORAGE USING RHEL SYSTEM ROLES2.1. INTRODUCTION TO THE STORAGE ROLE2.2. STORAGE ROLE PARAMETERS
CHAPTER 3. MOUNTING NFS SHARES3.1. INTRODUCTION TO NFS3.2. SUPPORTED NFS VERSIONS
Default NFS versionFeatures of minor NFS versions
3.3. SERVICES REQUIRED BY NFSThe RPC services with NFSv4
3.4. NFS HOST NAME FORMATS3.5. INSTALLING NFS3.6. DISCOVERING NFS EXPORTS3.7. MOUNTING AN NFS SHARE WITH MOUNT3.8. COMMON NFS MOUNT OPTIONS3.9. RELATED INFORMATION
CHAPTER 4. EXPORTING NFS SHARES4.1. INTRODUCTION TO NFS4.2. SUPPORTED NFS VERSIONS
Default NFS versionFeatures of minor NFS versions
4.3. THE TCP AND UDP PROTOCOLS IN NFSV3 AND NFSV44.4. SERVICES REQUIRED BY NFS
The RPC services with NFSv44.5. NFS HOST NAME FORMATS4.6. NFS SERVER CONFIGURATION
4.6.1. The /etc/exports configuration fileExport entryDefault options
8
999
10101111
1213131313141414141515
161616
181818181819
20202121212223
25252525252626272728282829
Table of Contents
1

. . . . . . . . . . . . . . . . . . . . . . . . . . . . . . . . . . . . . . . . . . . . . . . . . . . . . . . . . . . . . . . . . . . . . . . . . . . . . . . . . . . . . . . . . . . . . . . . . . . . . . . . . . . . . . . . . . . . . . . . . . . . . . . . . . . . . . . . . . . . . . . . . . . . . . . . . . . . . . . . . . . . . . . . . . . . . . . . . . . . . . . . . . . . . . . . . . . . . . . . . . . . . . . . . . . . . . . . . . . . . . . . . . . . . . . . . . . . . . . . . . . . . . . . . . . . . . . . . . . . . . . . . . . . . . . . . . . . . . . .
. . . . . . . . . . . . . . . . . . . . . . . . . . . . . . . . . . . . . . . . . . . . . . . . . . . . . . . . . . . . . . . . . . . . . . . . . . . . . . . . . . . . . . . . . . . . . . . . . . . . . . . . . . . . . . . . . . . . . . . . . . . . . . . . . . . . . . . . . . . . . . . . . . . . . . . . . . . . . . . . . . . . . . . . . . . . . . . . . . . . . . . . . . . . . . . . . . . . . . . . . . . . . . . . . . . . . . . . . . . . . . . . . . . . . . . . . . . . . . . . . . . . . . . . . . . . . . . . . . . . . . . . . . . . . . . . . . . . . . . .
. . . . . . . . . . . . . . . . . . . . . . . . . . . . . . . . . . . . . . . . . . . . . . . . . . . . . . . . . . . . . . . . . . . . . . . . . . . . . . . . . . . . . . . . . . . . . . . . . . . . . . . . . . . . . . . . . . . . . . . . . . . . . . . . . . . . . . . . . . . . . . . . . . . . . . . . . . . . . . . . . . . . . . . . . . . . . . . . . . . . . . . . . . . . . . . . . . . . . . . . . . . . . . . . . . . . . . . . . . . . . . . . . . . . . . . . . . . . . . . . . . . . . . . . . . . . . . . . . . . . . . . . . . . . . . . . . . . . . . . .
. . . . . . . . . . . . . . . . . . . . . . . . . . . . . . . . . . . . . . . . . . . . . . . . . . . . . . . . . . . . . . . . . . . . . . . . . . . . . . . . . . . . . . . . . . . . . . . . . . . . . . . . . . . . . . . . . . . . . . . . . . . . . . . . . . . . . . . . . . . . . . . . . . . . . . . . . . . . . . . . . . . . . . . . . . . . . . . . . . . . . . . . . . . . . . . . . . . . . . . . . . . . . . . . . . . . . . . . . . . . . . . . . . . . . . . . . . . . . . . . . . . . . . . . . . . . . . . . . . . . . . . . . . . . . . . . . . . . . . . .
Default and overridden options4.6.2. The exportfs utility
Common exportfs options4.7. NFS AND RPCBIND4.8. INSTALLING NFS4.9. STARTING THE NFS SERVER4.10. TROUBLESHOOTING NFS AND RPCBIND4.11. CONFIGURING THE NFS SERVER TO RUN BEHIND A FIREWALL4.12. EXPORTING RPC QUOTA THROUGH A FIREWALL4.13. ENABLING NFS OVER RDMA (NFSORDMA)4.14. CONFIGURING AN NFSV4-ONLY SERVER
4.14.1. Benefits and drawbacks of an NFSv4-only server4.14.2. NFS and rpcbind4.14.3. Configuring the NFS server to support only NFSv44.14.4. Verifying the NFSv4-only configuration
4.15. RELATED INFORMATION
CHAPTER 5. SECURING NFS5.1. NFS SECURITY WITH AUTH_SYS AND EXPORT CONTROLS5.2. NFS SECURITY WITH AUTH_GSS5.3. CONFIGURING AN NFS SERVER AND CLIENT TO USE KERBEROS5.4. NFSV4 SECURITY OPTIONS5.5. FILE PERMISSIONS ON MOUNTED NFS EXPORTS
CHAPTER 6. ENABLING PNFS SCSI LAYOUTS IN NFS6.1. THE PNFS TECHNOLOGY6.2. PNFS SCSI LAYOUTS
Operations between the client and the serverDevice reservations
6.3. CHECKING FOR A SCSI DEVICE COMPATIBLE WITH PNFS6.4. SETTING UP PNFS SCSI ON THE SERVER6.5. SETTING UP PNFS SCSI ON THE CLIENT6.6. RELEASING THE PNFS SCSI RESERVATION ON THE SERVER6.7. MONITORING PNFS SCSI LAYOUTS FUNCTIONALITY
6.7.1. Checking pNFS SCSI operations from the server using nfsstat6.7.2. Checking pNFS SCSI operations from the client using mountstats
CHAPTER 7. MOUNTING AN SMB SHARE ON RED HAT ENTERPRISE LINUX7.1. SUPPORTED SMB PROTOCOL VERSIONS7.2. UNIX EXTENSIONS SUPPORT7.3. MANUALLY MOUNTING AN SMB SHARE7.4. MOUNTING AN SMB SHARE AUTOMATICALLY WHEN THE SYSTEM BOOTS7.5. AUTHENTICATING TO AN SMB SHARE USING A CREDENTIALS FILE7.6. PERFORMING A MULTI-USER SMB MOUNT
7.6.1. Mounting a share with the multiuser option7.6.2. Verifying if an SMB share is mounted with the multiuser option7.6.3. Accessing a share as a user
7.7. FREQUENTLY USED MOUNT OPTIONS
CHAPTER 8. OVERVIEW OF PERSISTENT NAMING ATTRIBUTES8.1. DISADVANTAGES OF NON-PERSISTENT NAMING ATTRIBUTES8.2. FILE SYSTEM AND DEVICE IDENTIFIERS
File system identifiersDevice identifiers
30303031313132333435353536363738
393939394040
424242424243444445464646
4848484950505151525252
5454545555
Red Hat Enterprise Linux 8 Managing file systems
2
. . . . . . . . . . . . . . . . . . . . . . . . . . . . . . . . . . . . . . . . . . . . . . . . . . . . . . . . . . . . . . . . . . . . . . . . . . . . . . . . . . . . . . . . . . . . . . . . . . . . . . . . . . . . . . . . . . . . . . . . . . . . . . . . . . . . . . . . . . . . . . . . . . . . . . . . . . . . . . . . . . . . . . . . . . . . . . . . . . . . . . . . . . . . . . . . . . . . . . . . . . . . . . . . . . . . . . . . . . . . . . . . . . . . . . . . . . . . . . . . . . . . . . . . . . . . . . . . . . . . . . . . . . . . . . . . . . . . . . . .
. . . . . . . . . . . . . . . . . . . . . . . . . . . . . . . . . . . . . . . . . . . . . . . . . . . . . . . . . . . . . . . . . . . . . . . . . . . . . . . . . . . . . . . . . . . . . . . . . . . . . . . . . . . . . . . . . . . . . . . . . . . . . . . . . . . . . . . . . . . . . . . . . . . . . . . . . . . . . . . . . . . . . . . . . . . . . . . . . . . . . . . . . . . . . . . . . . . . . . . . . . . . . . . . . . . . . . . . . . . . . . . . . . . . . . . . . . . . . . . . . . . . . . . . . . . . . . . . . . . . . . . . . . . . . . . . . . . . . . . .
Recommendations8.3. DEVICE NAMES MANAGED BY THE UDEV MECHANISM IN /DEV/DISK/
8.3.1. File system identifiersThe UUID attribute in /dev/disk/by-uuid/The Label attribute in /dev/disk/by-label/
8.3.2. Device identifiersThe WWID attribute in /dev/disk/by-id/The Partition UUID attribute in /dev/disk/by-partuuidThe Path attribute in /dev/disk/by-path/
8.4. THE WORLD WIDE IDENTIFIER WITH DM MULTIPATH8.5. LIMITATIONS OF THE UDEV DEVICE NAMING CONVENTION8.6. LISTING PERSISTENT NAMING ATTRIBUTES8.7. MODIFYING PERSISTENT NAMING ATTRIBUTES
CHAPTER 9. GETTING STARTED WITH PARTITIONS9.1. VIEWING THE PARTITION TABLE
9.1.1. Viewing the partition table with parted9.1.2. Example output of parted print
9.2. CREATING A PARTITION TABLE ON A DISK9.2.1. Considerations before modifying partitions on a disk
The maximum number of partitionsThe maximum size of a partitionSize alignment
9.2.2. Comparison of partition table types9.2.3. Creating a partition table on a disk with parted
9.3. CREATING A PARTITION9.3.1. Considerations before modifying partitions on a disk
The maximum number of partitionsThe maximum size of a partitionSize alignment
9.3.2. Partition typesPartition types or flagsPartition file system type
9.3.3. Creating a partition with parted9.3.4. Setting a partition type with fdisk
9.4. REMOVING A PARTITION9.4.1. Considerations before modifying partitions on a disk
The maximum number of partitionsThe maximum size of a partitionSize alignment
9.4.2. Removing a partition with parted9.5. RESIZING A PARTITION
9.5.1. Considerations before modifying partitions on a diskThe maximum number of partitionsThe maximum size of a partitionSize alignment
9.5.2. Resizing a partition with parted
CHAPTER 10. GETTING STARTED WITH XFS10.1. THE XFS FILE SYSTEM
Performance characteristics10.2. CREATING AN XFS FILE SYSTEM
10.2.1. Creating an XFS file system with mkfs.xfs
55555555565656575757585860
61616161
6262636363636465656565656666666768696970707070727272727273
7575767676
Table of Contents
3
. . . . . . . . . . . . . . . . . . . . . . . . . . . . . . . . . . . . . . . . . . . . . . . . . . . . . . . . . . . . . . . . . . . . . . . . . . . . . . . . . . . . . . . . . . . . . . . . . . . . . . . . . . . . . . . . . . . . . . . . . . . . . . . . . . . . . . . . . . . . . . . . . . . . . . . . . . . . . . . . . . . . . . . . . . . . . . . . . . . . . . . . . . . . . . . . . . . . . . . . . . . . . . . . . . . . . . . . . . . . . . . . . . . . . . . . . . . . . . . . . . . . . . . . . . . . . . . . . . . . . . . . . . . . . . . . . . . . . . . .
. . . . . . . . . . . . . . . . . . . . . . . . . . . . . . . . . . . . . . . . . . . . . . . . . . . . . . . . . . . . . . . . . . . . . . . . . . . . . . . . . . . . . . . . . . . . . . . . . . . . . . . . . . . . . . . . . . . . . . . . . . . . . . . . . . . . . . . . . . . . . . . . . . . . . . . . . . . . . . . . . . . . . . . . . . . . . . . . . . . . . . . . . . . . . . . . . . . . . . . . . . . . . . . . . . . . . . . . . . . . . . . . . . . . . . . . . . . . . . . . . . . . . . . . . . . . . . . . . . . . . . . . . . . . . . . . . . . . . . . .
10.2.2. Creating an XFS file system on a block device using RHEL System Roles10.2.2.1. Example Ansible playbook to create an XFS file system on a block device10.2.2.2. Additional resources
10.3. BACKING UP AN XFS FILE SYSTEM10.3.1. Features of XFS backup10.3.2. Backing up an XFS file system with xfsdump10.3.3. Additional resources
10.4. RESTORING AN XFS FILE SYSTEM FROM BACKUP10.4.1. Features of restoring XFS from backup10.4.2. Restoring an XFS file system from backup with xfsrestore10.4.3. Informational messages when restoring an XFS backup from a tape10.4.4. Additional resources
10.5. INCREASING THE SIZE OF AN XFS FILE SYSTEM10.5.1. Increasing the size of an XFS file system with xfs_growfs
CHAPTER 11. CHECKING AND REPAIRING A FILE SYSTEM11.1. SCENARIOS THAT REQUIRE A FILE SYSTEM CHECK11.2. POTENTIAL SIDE EFFECTS OF RUNNING FSCK11.3. ERROR-HANDLING MECHANISMS IN XFS
Unclean unmountsCorruption
11.4. CHECKING AN XFS FILE SYSTEM WITH XFS_REPAIR11.5. REPAIRING AN XFS FILE SYSTEM WITH XFS_REPAIR11.6. ERROR HANDLING MECHANISMS IN EXT2, EXT3, AND EXT411.7. CHECKING AN EXT2, EXT3, OR EXT4 FILE SYSTEM WITH E2FSCK11.8. REPAIRING AN EXT2, EXT3, OR EXT4 FILE SYSTEM WITH E2FSCK
CHAPTER 12. MOUNTING FILE SYSTEMS12.1. THE LINUX MOUNT MECHANISM12.2. LISTING CURRENTLY MOUNTED FILE SYSTEMS12.3. MOUNTING A FILE SYSTEM WITH MOUNT12.4. MOVING A MOUNT POINT12.5. UNMOUNTING A FILE SYSTEM WITH UMOUNT12.6. COMMON MOUNT OPTIONS12.7. SHARING A MOUNT ON MULTIPLE MOUNT POINTS
12.7.1. Types of shared mounts12.7.2. Creating a private mount point duplicate12.7.3. Creating a shared mount point duplicate12.7.4. Creating a slave mount point duplicate12.7.5. Preventing a mount point from being duplicated12.7.6. Related information
12.8. PERSISTENTLY MOUNTING FILE SYSTEMS12.8.1. The /etc/fstab file12.8.2. Adding a file system to /etc/fstab12.8.3. Persistently mounting a file system using RHEL System Roles
12.8.3.1. Example Ansible playbook to persistently mount a file system12.8.3.2. Additional resources
12.9. MOUNTING FILE SYSTEMS ON DEMAND12.9.1. The autofs service12.9.2. The autofs configuration files
The master map fileMap filesThe amd map format
7777787878797980808081
828282
8383848484848586878788
898989909191
929393939596979898989899
100100100100101101101102
Red Hat Enterprise Linux 8 Managing file systems
4

. . . . . . . . . . . . . . . . . . . . . . . . . . . . . . . . . . . . . . . . . . . . . . . . . . . . . . . . . . . . . . . . . . . . . . . . . . . . . . . . . . . . . . . . . . . . . . . . . . . . . . . . . . . . . . . . . . . . . . . . . . . . . . . . . . . . . . . . . . . . . . . . . . . . . . . . . . . . . . . . . . . . . . . . . . . . . . . . . . . . . . . . . . . . . . . . . . . . . . . . . . . . . . . . . . . . . . . . . . . . . . . . . . . . . . . . . . . . . . . . . . . . . . . . . . . . . . . . . . . . . . . . . . . . . . . . . . . . . . . .
. . . . . . . . . . . . . . . . . . . . . . . . . . . . . . . . . . . . . . . . . . . . . . . . . . . . . . . . . . . . . . . . . . . . . . . . . . . . . . . . . . . . . . . . . . . . . . . . . . . . . . . . . . . . . . . . . . . . . . . . . . . . . . . . . . . . . . . . . . . . . . . . . . . . . . . . . . . . . . . . . . . . . . . . . . . . . . . . . . . . . . . . . . . . . . . . . . . . . . . . . . . . . . . . . . . . . . . . . . . . . . . . . . . . . . . . . . . . . . . . . . . . . . . . . . . . . . . . . . . . . . . . . . . . . . . . . . . . . . . .
. . . . . . . . . . . . . . . . . . . . . . . . . . . . . . . . . . . . . . . . . . . . . . . . . . . . . . . . . . . . . . . . . . . . . . . . . . . . . . . . . . . . . . . . . . . . . . . . . . . . . . . . . . . . . . . . . . . . . . . . . . . . . . . . . . . . . . . . . . . . . . . . . . . . . . . . . . . . . . . . . . . . . . . . . . . . . . . . . . . . . . . . . . . . . . . . . . . . . . . . . . . . . . . . . . . . . . . . . . . . . . . . . . . . . . . . . . . . . . . . . . . . . . . . . . . . . . . . . . . . . . . . . . . . . . . . . . . . . . . .
12.9.3. Configuring autofs mount points12.9.4. Automounting NFS server user home directories with autofs service12.9.5. Overriding or augmenting autofs site configuration files12.9.6. Using LDAP to store automounter maps
12.10. SETTING READ-ONLY PERMISSIONS FOR THE ROOT FILE SYSTEM12.10.1. Files and directories that always retain write permissions12.10.2. Configuring the root file system to mount with read-only permissions on boot
CHAPTER 13. LIMITING STORAGE SPACE USAGE WITH QUOTAS13.1. DISK QUOTAS
13.1.1. The xfs_quota toolAdditional resources
13.2. MANAGING XFS DISK QUOTAS13.2.1. File system quota management in XFS13.2.2. Enabling disk quotas for XFS13.2.3. Reporting XFS usage
PrerequisitesProcedureAdditional resources
13.2.4. Modifying XFS quota limitsPrerequisitesProcedureAdditional resources
13.2.5. Setting project limits for XFSProcedureAdditional resources
13.3. MANAGING EXT3 AND EXT4 DISK QUOTAS13.3.1. Installing the quota tool13.3.2. Enabling quota feature on file system creation13.3.3. Enabling quota feature on existing file systems13.3.4. Enabling quota enforcement13.3.5. Assigning quotas per user13.3.6. Assigning quotas per group13.3.7. Assigning quotas per project13.3.8. Setting the grace period for soft limits13.3.9. Turning file system quotas off13.3.10. Reporting on disk quotas
CHAPTER 14. DISCARDING UNUSED BLOCKS14.1. BLOCK DISCARD OPERATIONS
Requirements14.2. TYPES OF BLOCK DISCARD OPERATIONS
Recommendations14.3. PERFORMING BATCH BLOCK DISCARD14.4. ENABLING ONLINE BLOCK DISCARD14.5. ENABLING ONLINE BLOCK DISCARD USING RHEL SYSTEM ROLES
14.5.1. Example Ansible playbook to enable online block discard14.5.2. Additional resources
14.6. ENABLING PERIODIC BLOCK DISCARD
CHAPTER 15. MANAGING LAYERED LOCAL STORAGE WITH STRATIS15.1. SETTING UP STRATIS FILE SYSTEMS
15.1.1. The purpose and features of Stratis15.1.2. Components of a Stratis volume
102103104105107107108
110110110110110111111111
112112112112112112113113113113114114114114115116117118119119
120
121121121121121121122122123123123
124124124124
Table of Contents
5
. . . . . . . . . . . . . . . . . . . . . . . . . . . . . . . . . . . . . . . . . . . . . . . . . . . . . . . . . . . . . . . . . . . . . . . . . . . . . . . . . . . . . . . . . . . . . . . . . . . . . . . . . . . . . . . . . . . . . . . . . . . . . . . . . . . . . . . . . . . . . . . . . . . . . . . . . . . . . . . . . . . . . . . . . . . . . . . . . . . . . . . . . . . . . . . . . . . . . . . . . . . . . . . . . . . . . . . . . . . . . . . . . . . . . . . . . . . . . . . . . . . . . . . . . . . . . . . . . . . . . . . . . . . . . . . . . . . . . . . .
. . . . . . . . . . . . . . . . . . . . . . . . . . . . . . . . . . . . . . . . . . . . . . . . . . . . . . . . . . . . . . . . . . . . . . . . . . . . . . . . . . . . . . . . . . . . . . . . . . . . . . . . . . . . . . . . . . . . . . . . . . . . . . . . . . . . . . . . . . . . . . . . . . . . . . . . . . . . . . . . . . . . . . . . . . . . . . . . . . . . . . . . . . . . . . . . . . . . . . . . . . . . . . . . . . . . . . . . . . . . . . . . . . . . . . . . . . . . . . . . . . . . . . . . . . . . . . . . . . . . . . . . . . . . . . . . . . . . . . . .
15.1.3. Block devices usable with StratisSupported devicesUnsupported devices
15.1.4. Installing Stratis15.1.5. Creating a Stratis pool15.1.6. Creating a Stratis file system15.1.7. Mounting a Stratis file system15.1.8. Persistently mounting a Stratis file system15.1.9. Related information
15.2. EXTENDING A STRATIS VOLUME WITH ADDITIONAL BLOCK DEVICES15.2.1. Components of a Stratis volume15.2.2. Adding block devices to a Stratis pool15.2.3. Related information
15.3. MONITORING STRATIS FILE SYSTEMS15.3.1. Stratis sizes reported by different utilities15.3.2. Displaying information about Stratis volumes15.3.3. Related information
15.4. USING SNAPSHOTS ON STRATIS FILE SYSTEMS15.4.1. Characteristics of Stratis snapshots15.4.2. Creating a Stratis snapshot15.4.3. Accessing the content of a Stratis snapshot15.4.4. Reverting a Stratis file system to a previous snapshot15.4.5. Removing a Stratis snapshot15.4.6. Related information
15.5. REMOVING STRATIS FILE SYSTEMS15.5.1. Components of a Stratis volume15.5.2. Removing a Stratis file system15.5.3. Removing a Stratis pool15.5.4. Related information
CHAPTER 16. GETTING STARTED WITH AN EXT3 FILE SYSTEM16.1. FEATURES OF AN EXT3 FILE SYSTEM16.2. CREATING AN EXT3 FILE SYSTEM16.3. MOUNTING AN EXT3 FILE SYSTEM16.4. RESIZING AN EXT3 FILE SYSTEM16.5. CREATING AND MOUNTING EXT3 FILE SYSTEMS USING RHEL SYSTEM ROLES
16.5.1. Example Ansible playbook to create and mount an ext3 file system16.5.2. Additional resources
CHAPTER 17. GETTING STARTED WITH AN EXT4 FILE SYSTEM17.1. FEATURES OF AN EXT4 FILE SYSTEM17.2. CREATING AN EXT4 FILE SYSTEM17.3. MOUNTING AN EXT4 FILE SYSTEM17.4. RESIZING AN EXT4 FILE SYSTEM17.5. CREATING AND MOUNTING EXT4 FILE SYSTEMS USING RHEL SYSTEM ROLES
17.5.1. Example Ansible playbook to create and mount an ext4 file system17.5.2. Additional resources
125125126126126127128128129129129130131131131131132132132132133133134134135135135136137
138138138139140141141
142
143143143145145146147147
Red Hat Enterprise Linux 8 Managing file systems
6

Table of Contents
7

PROVIDING FEEDBACK ON RED HAT DOCUMENTATIONWe appreciate your input on our documentation. Please let us know how we could make it better. To doso:
For simple comments on specific passages:
1. Make sure you are viewing the documentation in the Multi-page HTML format. In addition,ensure you see the Feedback button in the upper right corner of the document.
2. Use your mouse cursor to highlight the part of text that you want to comment on.
3. Click the Add Feedback pop-up that appears below the highlighted text.
4. Follow the displayed instructions.
For submitting more complex feedback, create a Bugzilla ticket:
1. Go to the Bugzilla website.
2. As the Component, use Documentation.
3. Fill in the Description field with your suggestion for improvement. Include a link to therelevant part(s) of documentation.
4. Click Submit Bug.
Red Hat Enterprise Linux 8 Managing file systems
8
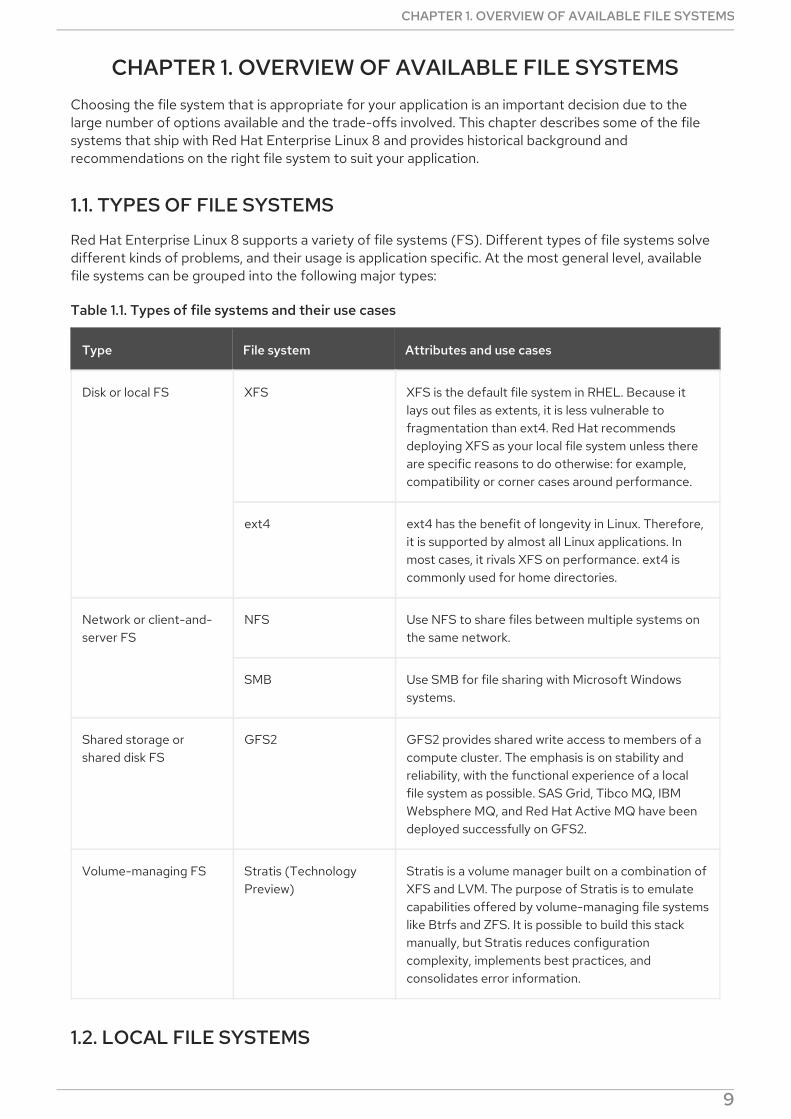
CHAPTER 1. OVERVIEW OF AVAILABLE FILE SYSTEMSChoosing the file system that is appropriate for your application is an important decision due to thelarge number of options available and the trade-offs involved. This chapter describes some of the filesystems that ship with Red Hat Enterprise Linux 8 and provides historical background andrecommendations on the right file system to suit your application.
1.1. TYPES OF FILE SYSTEMS
Red Hat Enterprise Linux 8 supports a variety of file systems (FS). Different types of file systems solvedifferent kinds of problems, and their usage is application specific. At the most general level, availablefile systems can be grouped into the following major types:
Table 1.1. Types of file systems and their use cases
Type File system Attributes and use cases
Disk or local FS XFS XFS is the default file system in RHEL. Because itlays out files as extents, it is less vulnerable tofragmentation than ext4. Red Hat recommendsdeploying XFS as your local file system unless thereare specific reasons to do otherwise: for example,compatibility or corner cases around performance.
ext4 ext4 has the benefit of longevity in Linux. Therefore,it is supported by almost all Linux applications. Inmost cases, it rivals XFS on performance. ext4 iscommonly used for home directories.
Network or client-and-server FS
NFS Use NFS to share files between multiple systems onthe same network.
SMB Use SMB for file sharing with Microsoft Windowssystems.
Shared storage orshared disk FS
GFS2 GFS2 provides shared write access to members of acompute cluster. The emphasis is on stability andreliability, with the functional experience of a localfile system as possible. SAS Grid, Tibco MQ, IBMWebsphere MQ, and Red Hat Active MQ have beendeployed successfully on GFS2.
Volume-managing FS Stratis (TechnologyPreview)
Stratis is a volume manager built on a combination ofXFS and LVM. The purpose of Stratis is to emulatecapabilities offered by volume-managing file systemslike Btrfs and ZFS. It is possible to build this stackmanually, but Stratis reduces configurationcomplexity, implements best practices, andconsolidates error information.
1.2. LOCAL FILE SYSTEMS
CHAPTER 1. OVERVIEW OF AVAILABLE FILE SYSTEMS
9

Local file systems are file systems that run on a single, local server and are directly attached to storage.
For example, a local file system is the only choice for internal SATA or SAS disks, and is used when yourserver has internal hardware RAID controllers with local drives. Local file systems are also the mostcommon file systems used on SAN attached storage when the device exported on the SAN is notshared.
All local file systems are POSIX-compliant and are fully compatible with all supported Red HatEnterprise Linux releases. POSIX-compliant file systems provide support for a well-defined set ofsystem calls, such as read(), write(), and seek().
From the application programmer’s point of view, there are relatively few differences between local filesystems. The most notable differences from a user’s perspective are related to scalability andperformance. When considering a file system choice, consider how large the file system needs to be,what unique features it should have, and how it performs under your workload.
Available local file systems
XFS
ext4
1.3. THE XFS FILE SYSTEM
XFS is a highly scalable, high-performance, robust, and mature 64-bit journaling file system thatsupports very large files and file systems on a single host. It is the default file system in Red HatEnterprise Linux 8. XFS was originally developed in the early 1990s by SGI and has a long history ofrunning on extremely large servers and storage arrays.
The features of XFS include:
Reliability
Metadata journaling, which ensures file system integrity after a system crash by keeping arecord of file system operations that can be replayed when the system is restarted and thefile system remounted
Extensive run-time metadata consistency checking
Scalable and fast repair utilities
Quota journaling. This avoids the need for lengthy quota consistency checks after a crash.
Scalability and performance
Supported file system size up to 1024 TiB
Ability to support a large number of concurrent operations
B-tree indexing for scalability of free space management
Sophisticated metadata read-ahead algorithms
Optimizations for streaming video workloads
Allocation schemes
Extent-based allocation
Red Hat Enterprise Linux 8 Managing file systems
10

Extent-based allocation
Stripe-aware allocation policies
Delayed allocation
Space pre-allocation
Dynamically allocated inodes
Other features
Reflink-based file copies (new in Red Hat Enterprise Linux 8)
Tightly integrated backup and restore utilities
Online defragmentation
Online file system growing
Comprehensive diagnostics capabilities
Extended attributes (xattr). This allows the system to associate several additionalname/value pairs per file.
Project or directory quotas. This allows quota restrictions over a directory tree.
Subsecond timestamps
Performance characteristicsXFS has a high performance on large systems with enterprise workloads. A large system is one with arelatively high number of CPUs, multiple HBAs, and connections to external disk arrays. XFS alsoperforms well on smaller systems that have a multi-threaded, parallel I/O workload.
XFS has a relatively low performance for single threaded, metadata-intensive workloads: for example, aworkload that creates or deletes large numbers of small files in a single thread.
1.4. THE EXT4 FILE SYSTEM
The ext4 file system is the fourth generation of the ext file system family. It was the default file systemin Red Hat Enterprise Linux 6.
The ext4 driver can read and write to ext2 and ext3 file systems, but the ext4 file system format is notcompatible with ext2 and ext3 drivers.
ext4 adds several new and improved features, such as:
Supported file system size up to 50 TiB
Extent-based metadata
Delayed allocation
Journal checksumming
Large storage support
CHAPTER 1. OVERVIEW OF AVAILABLE FILE SYSTEMS
11

The extent-based metadata and the delayed allocation features provide a more compact and efficientway to track utilized space in a file system. These features improve file system performance and reducethe space consumed by metadata. Delayed allocation allows the file system to postpone selection of thepermanent location for newly written user data until the data is flushed to disk. This enables higherperformance since it can allow for larger, more contiguous allocations, allowing the file system to makedecisions with much better information.
File system repair time using the fsck utility in ext4 is much faster than in ext2 and ext3. Some filesystem repairs have demonstrated up to a six-fold increase in performance.
1.5. CHOOSING A LOCAL FILE SYSTEM
To choose a file system that meets your application requirements, you need to understand the targetsystem on which you are going to deploy the file system. You can use the following questions to informyour decision:
Do you have a large server?
Do you have large storage requirements or have a local, slow SATA drive?
What kind of I/O workload do you expect your application to present?
What are your throughput and latency requirements?
How stable is your server and storage hardware?
What is the typical size of your files and data set?
If the system fails, how much downtime can you suffer?
If both your server and your storage device are large, XFS is the best choice. Even with smaller storagearrays, XFS performs very well when the average file sizes are large (for example, hundreds ofmegabytes in size).
If your existing workload has performed well with ext4, staying with ext4 should provide you and yourapplications with a very familiar environment.
The ext4 file system tends to perform better on systems that have limited I/O capability. It performsbetter on limited bandwidth (less than 200MB/s) and up to around 1000 IOPS capability. For anythingwith higher capability, XFS tends to be faster.
XFS consumes about twice the CPU-per-metadata operation compared to ext4, so if you have a CPU-bound workload with little concurrency, then ext4 will be faster. In general, ext4 is better if an applicationuses a single read/write thread and small files, while XFS shines when an application uses multipleread/write threads and bigger files.
You cannot shrink an XFS file system. If you need to be able to shrink the file system, consider usingext4, which supports offline shrinking.
In general, Red Hat recommends that you use XFS unless you have a specific use case for ext4. Youshould also measure the performance of your specific application on your target server and storagesystem to make sure that you choose the appropriate type of file system.
Table 1.2. Summary of local file system recommendations
Red Hat Enterprise Linux 8 Managing file systems
12

Scenario Recommended file system
No special use case XFS
Large server XFS
Large storage devices XFS
Large files XFS
Multi-threaded I/O XFS
Single-threaded I/O ext4
Limited I/O capability (under 1000 IOPS) ext4
Limited bandwidth (under 200MB/s) ext4
CPU-bound workload ext4
Support for offline shrinking ext4
1.6. NETWORK FILE SYSTEMS
Network file systems, also referred to as client/server file systems, enable client systems to access filesthat are stored on a shared server. This makes it possible for multiple users on multiple systems to sharefiles and storage resources.
Such file systems are built from one or more servers that export a set of file systems to one or moreclients. The client nodes do not have access to the underlying block storage, but rather interact with thestorage using a protocol that allows for better access control.
Available network file systems
The most common client/server file system for RHEL customers is the NFS file system. RHELprovides both an NFS server component to export a local file system over the network and anNFS client to import these file systems.
RHEL also includes a CIFS client that supports the popular Microsoft SMB file servers forWindows interoperability. The userspace Samba server provides Windows clients with aMicrosoft SMB service from a RHEL server.
1.7. SHARED STORAGE FILE SYSTEMS
Shared storage file systems, sometimes referred to as cluster file systems, give each server in thecluster direct access to a shared block device over a local storage area network (SAN).
Comparison with network file systemsLike client/server file systems, shared storage file systems work on a set of servers that are all membersof a cluster. Unlike NFS, however, no single server provides access to data or metadata to other
CHAPTER 1. OVERVIEW OF AVAILABLE FILE SYSTEMS
13
members: each member of the cluster has direct access to the same storage device (the sharedstorage), and all cluster member nodes access the same set of files.
ConcurrencyCache coherency is key in a clustered file system to ensure data consistency and integrity. There mustbe a single version of all files in a cluster visible to all nodes within a cluster. The file system must preventmembers of the cluster from updating the same storage block at the same time and causing datacorruption. In order to do that, shared storage file systems use a cluster wide-locking mechanism toarbitrate access to the storage as a concurrency control mechanism. For example, before creating a newfile or writing to a file that is opened on multiple servers, the file system component on the server mustobtain the correct lock.
The requirement of cluster file systems is to provide a highly available service like an Apache web server.Any member of the cluster will see a fully coherent view of the data stored in their shared disk filesystem, and all updates will be arbitrated correctly by the locking mechanisms.
Performance characteristicsShared disk file systems do not always perform as well as local file systems running on the same systemdue to the computational cost of the locking overhead. Shared disk file systems perform well withworkloads where each node writes almost exclusively to a particular set of files that are not shared withother nodes or where a set of files is shared in an almost exclusively read-only manner across a set ofnodes. This results in a minimum of cross-node cache invalidation and can maximize performance.
Setting up a shared disk file system is complex, and tuning an application to perform well on a shareddisk file system can be challenging.
Available shared storage file systems
Red Hat Enterprise Linux provides the GFS2 file system. GFS2 comes tightly integrated withthe Red Hat Enterprise Linux High Availability Add-On and the Resilient Storage Add-On.Red Hat Enterprise Linux supports GFS2 on clusters that range in size from 2 to 16 nodes.
1.8. CHOOSING BETWEEN NETWORK AND SHARED STORAGE FILESYSTEMS
When choosing between network and shared storage file systems, consider the following points:
NFS-based network file systems are an extremely common and popular choice forenvironments that provide NFS servers.
Network file systems can be deployed using very high-performance networking technologieslike Infiniband or 10 Gigabit Ethernet. This means that you should not turn to shared storage filesystems just to get raw bandwidth to your storage. If the speed of access is of primeimportance, then use NFS to export a local file system like XFS.
Shared storage file systems are not easy to set up or to maintain, so you should deploy themonly when you cannot provide your required availability with either local or network file systems.
A shared storage file system in a clustered environment helps reduce downtime by eliminatingthe steps needed for unmounting and mounting that need to be done during a typical fail-overscenario involving the relocation of a high-availability service.
Red Hat recommends that you use network file systems unless you have a specific use case for sharedstorage file systems. Use shared storage file systems primarily for deployments that need to providehigh-availability services with minimum downtime and have stringent service-level requirements.
Red Hat Enterprise Linux 8 Managing file systems
14
1.9. VOLUME-MANAGING FILE SYSTEMS
Volume-managing file systems integrate the entire storage stack for the purposes of simplicity and in-stack optimization.
Available volume-managing file systems
Red Hat Enterprise Linux 8 provides the Stratis volume manager as a Technology Preview.Stratis uses XFS for the file system layer and integrates it with LVM, Device Mapper, and othercomponents.Stratis was first released in Red Hat Enterprise Linux 8.0. It is conceived to fill the gap createdwhen Red Hat deprecated Btrfs. Stratis 1.0 is an intuitive, command line-based volume managerthat can perform significant storage management operations while hiding the complexity fromthe user:
Volume management
Pool creation
Thin storage pools
Snapshots
Automated read cache
Stratis offers powerful features, but currently lacks certain capabilities of other offerings that itmight be compared to, such as Btrfs or ZFS. Most notably, it does not support CRCs with selfhealing.
CHAPTER 1. OVERVIEW OF AVAILABLE FILE SYSTEMS
15

CHAPTER 2. MANAGING LOCAL STORAGE USING RHELSYSTEM ROLES
To manage LVM and local file systems (FS) using Ansible, you can use the storage role, which is one ofthe RHEL System Roles available in RHEL 8.
Using the storage role enables you to automate administration of file systems on disks and logicalvolumes on multiple machines and across all versions of RHEL starting with RHEL 7.7.
For more information on RHEL System Roles and how to apply them, see What RHEL System Roles areand which tasks they can be used for.
2.1. INTRODUCTION TO THE STORAGE ROLE
The storage role can manage:
File systems on disks which have not been partitioned
Complete LVM volume groups including their logical volumes and file systems
With the storage role you can perform the following tasks:
Create a file system
Remove a file system
Mount a file system
Unmount a file system
Create LVM volume groups
Remove LVM volume groups
Create logical volumes
Remove logical volumes
2.2. STORAGE ROLE PARAMETERS
The section provides a table with input variables that the storage role accepts.
Table 2.1. Storage role parameters
Parameter Description Additional information
storage_volumes List of file systems on allunpartitioned disks to bemanaged.
Partitions are currentlyunsupported.
Red Hat Enterprise Linux 8 Managing file systems
16

storage_pools List of pools to be managed. Currently the only supported pooltype is LVM. With LVM, poolsrepresent volume groups (VGs).Under each pool there is a list ofvolumes to be managed by therole. With LVM, each volumecorresponds to a logical volume(LV) with a file system.
storage_safe_mode Boolean option to enable anddisable safe mode.
In safe mode, the storage roledoes not reformat diskscontaining data such as filesystems or LVM physical volumes,but instead the role aborts with anerror message. By default, safemode is on to preventaccidentally overwriting existingdata. Red Hat recommends tokeep safe mode enabled, anddisable it only for specific casesand after thorough testing.
Parameter Description Additional information
The storage role only changes file systems, volumes, and pools that are listed in the following variables:
storage_pools
storage_volumes
Additional resources
For more information, install the rhel-system-roles package, and see the /usr/share/doc/rhel-system-roles/storage/ and /usr/share/ansible/roles/rhel-system-roles.storage/ directories.
CHAPTER 2. MANAGING LOCAL STORAGE USING RHEL SYSTEM ROLES
17
CHAPTER 3. MOUNTING NFS SHARESAs a system administrator, you can mount remote NFS shares on your system to access shared data.
3.1. INTRODUCTION TO NFS
This section explains the basic concepts of the NFS service.
A Network File System (NFS) allows remote hosts to mount file systems over a network and interactwith those file systems as though they are mounted locally. This enables you to consolidate resourcesonto centralized servers on the network.
The NFS server refers to the /etc/exports configuration file to determine whether the client is allowedto access any exported file systems. Once verified, all file and directory operations are available to theuser.
3.2. SUPPORTED NFS VERSIONS
This section lists versions of NFS supported in Red Hat Enterprise Linux and their features.
Currently, Red Hat Enterprise Linux 8 supports the following major versions of NFS:
NFS version 3 (NFSv3) supports safe asynchronous writes and is more robust at error handlingthan the previous NFSv2; it also supports 64-bit file sizes and offsets, allowing clients to accessmore than 2 GB of file data.
NFS version 4 (NFSv4) works through firewalls and on the Internet, no longer requires an rpcbind service, supports Access Control Lists (ACLs), and utilizes stateful operations.
NFS version 2 (NFSv2) is no longer supported by Red Hat.
Default NFS versionThe default NFS version in Red Hat Enterprise Linux 8 is 4.2. NFS clients attempt to mount usingNFSv4.2 by default, and fall back to NFSv4.1 when the server does not support NFSv4.2. The mountlater falls back to NFSv4.0 and then to NFSv3.
Features of minor NFS versionsFollowing are the features of NFSv4.2 in Red Hat Enterprise Linux 8:
Server-side copy
Enables the NFS client to efficiently copy data without wasting network resources using the copy_file_range() system call.
Sparse files
Enables files to have one or more holes, which are unallocated or uninitialized data blocks consistingonly of zeroes. The lseek() operation in NFSv4.2 supports seek_hole() and seek_data(), whichenables applications to map out the location of holes in the sparse file.
Space reservation
Permits storage servers to reserve free space, which prohibits servers to run out of space. NFSv4.2supports the allocate() operation to reserve space, the deallocate() operation to unreserve space,and the fallocate() operation to preallocate or deallocate space in a file.
Labeled NFS
Enforces data access rights and enables SELinux labels between a client and a server for individualfiles on an NFS file system.
Red Hat Enterprise Linux 8 Managing file systems
18

Layout enhancements
Provides the layoutstats() operation, which enables some Parallel NFS (pNFS) servers to collectbetter performance statistics.
Following are the features of NFSv4.1:
Enhances performance and security of network, and also includes client-side support for pNFS.
No longer requires a separate TCP connection for callbacks, which allows an NFS server to grantdelegations even when it cannot contact the client: for example, when NAT or a firewallinterferes.
Provides exactly once semantics (except for reboot operations), preventing a previous issuewhereby certain operations sometimes returned an inaccurate result if a reply was lost and theoperation was sent twice.
3.3. SERVICES REQUIRED BY NFS
This section lists system services that are required for running an NFS server or mounting NFS shares.Red Hat Enterprise Linux starts these services automatically.
Red Hat Enterprise Linux uses a combination of kernel-level support and service processes to provideNFS file sharing. All NFS versions rely on Remote Procedure Calls (RPC) between clients and servers.To share or mount NFS file systems, the following services work together depending on which version ofNFS is implemented:
nfsd
The NFS server kernel module that services requests for shared NFS file systems.
rpcbind
Accepts port reservations from local RPC services. These ports are then made available (oradvertised) so the corresponding remote RPC services can access them. The rpcbind serviceresponds to requests for RPC services and sets up connections to the requested RPC service. This isnot used with NFSv4.
rpc.mountd
This process is used by an NFS server to process MOUNT requests from NFSv3 clients. It checks thatthe requested NFS share is currently exported by the NFS server, and that the client is allowed toaccess it. If the mount request is allowed, the nfs-mountd service replies with a Success status andprovides the File-Handle for this NFS share back to the NFS client.
rpc.nfsd
This process enables explicit NFS versions and protocols the server advertises to be defined. It workswith the Linux kernel to meet the dynamic demands of NFS clients, such as providing server threadseach time an NFS client connects. This process corresponds to the nfs-server service.
lockd
This is a kernel thread that runs on both clients and servers. It implements the Network LockManager (NLM) protocol, which enables NFSv3 clients to lock files on the server. It is startedautomatically whenever the NFS server is run and whenever an NFS file system is mounted.
rpc.statd
This process implements the Network Status Monitor (NSM) RPC protocol, which notifies NFSclients when an NFS server is restarted without being gracefully brought down. The rpc-statd serviceis started automatically by the nfs-server service, and does not require user configuration. This is notused with NFSv4.
CHAPTER 3. MOUNTING NFS SHARES
19
rpc.rquotad
This process provides user quota information for remote users. The rpc-rquotad service is startedautomatically by the nfs-server service and does not require user configuration.
rpc.idmapd
This process provides NFSv4 client and server upcalls, which map between on-the-wire NFSv4names (strings in the form of user@domain) and local UIDs and GIDs. For idmapd to function withNFSv4, the /etc/idmapd.conf file must be configured. At a minimum, the Domain parameter shouldbe specified, which defines the NFSv4 mapping domain. If the NFSv4 mapping domain is the sameas the DNS domain name, this parameter can be skipped. The client and server must agree on theNFSv4 mapping domain for ID mapping to function properly.Only the NFSv4 server uses rpc.idmapd, which is started by the nfs-idmapd service. The NFSv4client uses the keyring-based nfsidmap utility, which is called by the kernel on-demand to performID mapping. If there is a problem with nfsidmap, the client falls back to using rpc.idmapd.
The RPC services with NFSv4The mounting and locking protocols have been incorporated into the NFSv4 protocol. The server alsolistens on the well-known TCP port 2049. As such, NFSv4 does not need to interact with rpcbind, lockd, and rpc-statd services. The nfs-mountd service is still required on the NFS server to set up theexports, but is not involved in any over-the-wire operations.
Additional resources
To configure an NFSv4-only server, which does not require rpcbind, see Section 4.14,“Configuring an NFSv4-only server”.
3.4. NFS HOST NAME FORMATS
This section describes different formats that you can use to specify a host when mounting or exportingan NFS share.
You can specify the host in the following formats:
Single machine
Either of the following:
A fully-qualified domain name (that can be resolved by the server)
Host name (that can be resolved by the server)
An IP address.
Series of machines specified with wildcards
You can use the * or ? characters to specify a string match.Wildcards are not to be used with IP addresses; however, they might accidentally work if reverse DNSlookups fail. When specifying wildcards in fully qualified domain names, dots (.) are not included inthe wildcard. For example, *.example.com includes one.example.com but does not include one.two.example.com.
IP networks
Either of the following formats is valid:
a.b.c.d/z, where a.b.c.d is the network and z is the number of bits in the netmask; for
Red Hat Enterprise Linux 8 Managing file systems
20
a.b.c.d/z, where a.b.c.d is the network and z is the number of bits in the netmask; forexample 192.168.0.0/24.
a.b.c.d/netmask, where a.b.c.d is the network and netmask is the netmask; for example, 192.168.100.8/255.255.255.0.
Netgroups
The @group-name format , where group-name is the NIS netgroup name.
3.5. INSTALLING NFS
This procedure installs all packages necessary to mount or export NFS shares.
Procedure
Install the nfs-utils package:
# yum install nfs-utils
3.6. DISCOVERING NFS EXPORTS
This procedure discovers which file systems a given NFSv3 or NFSv4 server exports.
Procedure
With any server that supports NFSv3, use the showmount utility:
$ showmount --exports my-server
Export list for my-server/exports/foo/exports/bar
With any server that supports NFSv4, mount the root directory and look around:
# mount my-server:/ /mnt/# ls /mnt/
exports
# ls /mnt/exports/
foobar
On servers that support both NFSv4 and NFSv3, both methods work and give the same results.
Additional resources
The showmount(8) man page.
3.7. MOUNTING AN NFS SHARE WITH MOUNT
CHAPTER 3. MOUNTING NFS SHARES
21
This procedure mounts an NFS share exported from a server using the mount utility.
Procedure
To mount an NFS share, use the following command:
# mount -t nfs -o options host:/remote/export /local/directory
This command uses the following variables:
options
A comma-delimited list of mount options.
host
The host name, IP address, or fully qualified domain name of the server exporting the filesystem you wish to mount.
/remote/export
The file system or directory being exported from the server, that is, the directory you wish tomount.
/local/directory
The client location where /remote/export is mounted.
Additional resources
Section 3.8, “Common NFS mount options”
Section 3.4, “NFS host name formats”
Section 12.3, “Mounting a file system with mount”
The mount(8) man page
3.8. COMMON NFS MOUNT OPTIONS
This section lists options commonly used when mounting NFS shares. These options can be used withmanual mount commands, /etc/fstab settings, and autofs.
Common NFS mount options
lookupcache=mode
Specifies how the kernel should manage its cache of directory entries for a given mount point. Validarguments for mode are all, none, or positive.
nfsvers=version
Specifies which version of the NFS protocol to use, where version is 3, 4, 4.0, 4.1, or 4.2. This is usefulfor hosts that run multiple NFS servers, or to disable retrying a mount with lower versions. If noversion is specified, NFS uses the highest version supported by the kernel and the mount utility.The option vers is identical to nfsvers, and is included in this release for compatibility reasons.
noacl
Turns off all ACL processing. This may be needed when interfacing with older versions of Red HatEnterprise Linux, Red Hat Linux, or Solaris, because the most recent ACL technology is notcompatible with older systems.
Red Hat Enterprise Linux 8 Managing file systems
22
nolock
Disables file locking. This setting is sometimes required when connecting to very old NFS servers.
noexec
Prevents execution of binaries on mounted file systems. This is useful if the system is mounting anon-Linux file system containing incompatible binaries.
nosuid
Disables the set-user-identifier and set-group-identifier bits. This prevents remote users fromgaining higher privileges by running a setuid program.
port=num
Specifies the numeric value of the NFS server port. If num is 0 (the default value), then mountqueries the rpcbind service on the remote host for the port number to use. If the NFS service on theremote host is not registered with its rpcbind service, the standard NFS port number of TCP 2049 isused instead.
rsize=num and wsize=num
These options set the maximum number of bytes to be transferred in a single NFS read or writeoperation.There is no fixed default value for rsize and wsize. By default, NFS uses the largest possible valuethat both the server and the client support. In Red Hat Enterprise Linux 8, the client and servermaximum is 1,048,576 bytes. For more details, see the What are the default and maximum values forrsize and wsize with NFS mounts? KBase article.
sec=mode
Security flavors to use for accessing files on the mounted export.The default setting is sec=sys, which uses local UNIX UIDs and GIDs. These use AUTH_SYS toauthenticate NFS operations.
Other options include:
sec=krb5 uses Kerberos V5 instead of local UNIX UIDs and GIDs to authenticate users.
sec=krb5i uses Kerberos V5 for user authentication and performs integrity checking of NFSoperations using secure checksums to prevent data tampering.
sec=krb5p uses Kerberos V5 for user authentication, integrity checking, and encrypts NFStraffic to prevent traffic sniffing. This is the most secure setting, but it also involves the mostperformance overhead.
tcp
Instructs the NFS mount to use the TCP protocol.
Additional resources
The mount(8) man page
The nfs(5) man page
3.9. RELATED INFORMATION
The Linux NFS wiki: https://linux-nfs.org
To mount NFS shares persistently, see Section 12.8, “Persistently mounting file systems” .
CHAPTER 3. MOUNTING NFS SHARES
23
To mount NFS shares on demand, see Section 12.9, “Mounting file systems on demand” .
Red Hat Enterprise Linux 8 Managing file systems
24
CHAPTER 4. EXPORTING NFS SHARESAs a system administrator, you can use the NFS server to share a directory on your system over network.
4.1. INTRODUCTION TO NFS
This section explains the basic concepts of the NFS service.
A Network File System (NFS) allows remote hosts to mount file systems over a network and interactwith those file systems as though they are mounted locally. This enables you to consolidate resourcesonto centralized servers on the network.
The NFS server refers to the /etc/exports configuration file to determine whether the client is allowedto access any exported file systems. Once verified, all file and directory operations are available to theuser.
4.2. SUPPORTED NFS VERSIONS
This section lists versions of NFS supported in Red Hat Enterprise Linux and their features.
Currently, Red Hat Enterprise Linux 8 supports the following major versions of NFS:
NFS version 3 (NFSv3) supports safe asynchronous writes and is more robust at error handlingthan the previous NFSv2; it also supports 64-bit file sizes and offsets, allowing clients to accessmore than 2 GB of file data.
NFS version 4 (NFSv4) works through firewalls and on the Internet, no longer requires an rpcbind service, supports Access Control Lists (ACLs), and utilizes stateful operations.
NFS version 2 (NFSv2) is no longer supported by Red Hat.
Default NFS versionThe default NFS version in Red Hat Enterprise Linux 8 is 4.2. NFS clients attempt to mount usingNFSv4.2 by default, and fall back to NFSv4.1 when the server does not support NFSv4.2. The mountlater falls back to NFSv4.0 and then to NFSv3.
Features of minor NFS versionsFollowing are the features of NFSv4.2 in Red Hat Enterprise Linux 8:
Server-side copy
Enables the NFS client to efficiently copy data without wasting network resources using the copy_file_range() system call.
Sparse files
Enables files to have one or more holes, which are unallocated or uninitialized data blocks consistingonly of zeroes. The lseek() operation in NFSv4.2 supports seek_hole() and seek_data(), whichenables applications to map out the location of holes in the sparse file.
Space reservation
Permits storage servers to reserve free space, which prohibits servers to run out of space. NFSv4.2supports the allocate() operation to reserve space, the deallocate() operation to unreserve space,and the fallocate() operation to preallocate or deallocate space in a file.
Labeled NFS
Enforces data access rights and enables SELinux labels between a client and a server for individualfiles on an NFS file system.
CHAPTER 4. EXPORTING NFS SHARES
25
Layout enhancements
Provides the layoutstats() operation, which enables some Parallel NFS (pNFS) servers to collectbetter performance statistics.
Following are the features of NFSv4.1:
Enhances performance and security of network, and also includes client-side support for pNFS.
No longer requires a separate TCP connection for callbacks, which allows an NFS server to grantdelegations even when it cannot contact the client: for example, when NAT or a firewallinterferes.
Provides exactly once semantics (except for reboot operations), preventing a previous issuewhereby certain operations sometimes returned an inaccurate result if a reply was lost and theoperation was sent twice.
4.3. THE TCP AND UDP PROTOCOLS IN NFSV3 AND NFSV4
NFSv4 requires the Transmission Control Protocol (TCP) running over an IP network.
NFSv3 could also use the User Datagram Protocol (UDP) in earlier Red Hat Enterprise Linux versions. InRed Hat Enterprise Linux 8, NFS over UDP is no longer supported. By default, UDP is disabled in theNFS server.
4.4. SERVICES REQUIRED BY NFS
This section lists system services that are required for running an NFS server or mounting NFS shares.Red Hat Enterprise Linux starts these services automatically.
Red Hat Enterprise Linux uses a combination of kernel-level support and service processes to provideNFS file sharing. All NFS versions rely on Remote Procedure Calls (RPC) between clients and servers.To share or mount NFS file systems, the following services work together depending on which version ofNFS is implemented:
nfsd
The NFS server kernel module that services requests for shared NFS file systems.
rpcbind
Accepts port reservations from local RPC services. These ports are then made available (oradvertised) so the corresponding remote RPC services can access them. The rpcbind serviceresponds to requests for RPC services and sets up connections to the requested RPC service. This isnot used with NFSv4.
rpc.mountd
This process is used by an NFS server to process MOUNT requests from NFSv3 clients. It checks thatthe requested NFS share is currently exported by the NFS server, and that the client is allowed toaccess it. If the mount request is allowed, the nfs-mountd service replies with a Success status andprovides the File-Handle for this NFS share back to the NFS client.
rpc.nfsd
This process enables explicit NFS versions and protocols the server advertises to be defined. It workswith the Linux kernel to meet the dynamic demands of NFS clients, such as providing server threadseach time an NFS client connects. This process corresponds to the nfs-server service.
lockd
This is a kernel thread that runs on both clients and servers. It implements the Network Lock
Red Hat Enterprise Linux 8 Managing file systems
26
This is a kernel thread that runs on both clients and servers. It implements the Network LockManager (NLM) protocol, which enables NFSv3 clients to lock files on the server. It is startedautomatically whenever the NFS server is run and whenever an NFS file system is mounted.
rpc.statd
This process implements the Network Status Monitor (NSM) RPC protocol, which notifies NFSclients when an NFS server is restarted without being gracefully brought down. The rpc-statd serviceis started automatically by the nfs-server service, and does not require user configuration. This is notused with NFSv4.
rpc.rquotad
This process provides user quota information for remote users. The rpc-rquotad service is startedautomatically by the nfs-server service and does not require user configuration.
rpc.idmapd
This process provides NFSv4 client and server upcalls, which map between on-the-wire NFSv4names (strings in the form of user@domain) and local UIDs and GIDs. For idmapd to function withNFSv4, the /etc/idmapd.conf file must be configured. At a minimum, the Domain parameter shouldbe specified, which defines the NFSv4 mapping domain. If the NFSv4 mapping domain is the sameas the DNS domain name, this parameter can be skipped. The client and server must agree on theNFSv4 mapping domain for ID mapping to function properly.Only the NFSv4 server uses rpc.idmapd, which is started by the nfs-idmapd service. The NFSv4client uses the keyring-based nfsidmap utility, which is called by the kernel on-demand to performID mapping. If there is a problem with nfsidmap, the client falls back to using rpc.idmapd.
The RPC services with NFSv4The mounting and locking protocols have been incorporated into the NFSv4 protocol. The server alsolistens on the well-known TCP port 2049. As such, NFSv4 does not need to interact with rpcbind, lockd, and rpc-statd services. The nfs-mountd service is still required on the NFS server to set up theexports, but is not involved in any over-the-wire operations.
Additional resources
To configure an NFSv4-only server, which does not require rpcbind, see Section 4.14,“Configuring an NFSv4-only server”.
4.5. NFS HOST NAME FORMATS
This section describes different formats that you can use to specify a host when mounting or exportingan NFS share.
You can specify the host in the following formats:
Single machine
Either of the following:
A fully-qualified domain name (that can be resolved by the server)
Host name (that can be resolved by the server)
An IP address.
Series of machines specified with wildcards
You can use the * or ? characters to specify a string match.Wildcards are not to be used with IP addresses; however, they might accidentally work if reverse DNS
CHAPTER 4. EXPORTING NFS SHARES
27
lookups fail. When specifying wildcards in fully qualified domain names, dots (.) are not included inthe wildcard. For example, *.example.com includes one.example.com but does not include one.two.example.com.
IP networks
Either of the following formats is valid:
a.b.c.d/z, where a.b.c.d is the network and z is the number of bits in the netmask; forexample 192.168.0.0/24.
a.b.c.d/netmask, where a.b.c.d is the network and netmask is the netmask; for example, 192.168.100.8/255.255.255.0.
Netgroups
The @group-name format , where group-name is the NIS netgroup name.
4.6. NFS SERVER CONFIGURATION
This section describes the syntax and options of two ways to configure exports on an NFS server:
Manually editing the /etc/exports configuration file
Using the exportfs utility on the command line
4.6.1. The /etc/exports configuration file
The /etc/exports file controls which file systems are exported to remote hosts and specifies options. Itfollows the following syntax rules:
Blank lines are ignored.
To add a comment, start a line with the hash mark (#).
You can wrap long lines with a backslash (\).
Each exported file system should be on its own individual line.
Any lists of authorized hosts placed after an exported file system must be separated by spacecharacters.
Options for each of the hosts must be placed in parentheses directly after the host identifier,without any spaces separating the host and the first parenthesis.
Export entryEach entry for an exported file system has the following structure:
export host(options)
It is also possible to specify multiple hosts, along with specific options for each host. To do so, list themon the same line as a space-delimited list, with each host name followed by its respective options (inparentheses), as in:
export host1(options1) host2(options2) host3(options3)
Red Hat Enterprise Linux 8 Managing file systems
28
In this structure:
export
The directory being exported
host
The host or network to which the export is being shared
options
The options to be used for host
Example 4.1. A simple /etc/exports file
In its simplest form, the /etc/exports file only specifies the exported directory and the hostspermitted to access it:
/exported/directory bob.example.com
Here, bob.example.com can mount /exported/directory/ from the NFS server. Because no optionsare specified in this example, NFS uses default options.
IMPORTANT
The format of the /etc/exports file is very precise, particularly in regards to use of thespace character. Remember to always separate exported file systems from hosts andhosts from one another with a space character. However, there should be no other spacecharacters in the file except on comment lines.
For example, the following two lines do not mean the same thing:
/home bob.example.com(rw)/home bob.example.com (rw)
The first line allows only users from bob.example.com read and write access to the /home directory. The second line allows users from bob.example.com to mount thedirectory as read-only (the default), while the rest of the world can mount it read/write.
Default optionsThe default options for an export entry are:
ro
The exported file system is read-only. Remote hosts cannot change the data shared on the filesystem. To allow hosts to make changes to the file system (that is, read and write), specify the rwoption.
sync
The NFS server will not reply to requests before changes made by previous requests are written todisk. To enable asynchronous writes instead, specify the option async.
wdelay
The NFS server will delay writing to the disk if it suspects another write request is imminent. This canimprove performance as it reduces the number of times the disk must be accessed by separate writecommands, thereby reducing write overhead. To disable this, specify the no_wdelay option, which isavailable only if the default sync option is also specified.
CHAPTER 4. EXPORTING NFS SHARES
29
root_squash
This prevents root users connected remotely (as opposed to locally) from having root privileges;instead, the NFS server assigns them the user ID nfsnobody. This effectively "squashes" the powerof the remote root user to the lowest local user, preventing possible unauthorized writes on theremote server. To disable root squashing, specify the no_root_squash option.To squash every remote user (including root), use the all_squash option. To specify the user andgroup IDs that the NFS server should assign to remote users from a particular host, use the anonuidand anongid options, respectively, as in:
export host(anonuid=uid,anongid=gid)
Here, uid and gid are user ID number and group ID number, respectively. The anonuid and anongidoptions enable you to create a special user and group account for remote NFS users to share.
By default, access control lists (ACLs) are supported by NFS under Red Hat Enterprise Linux. To disablethis feature, specify the no_acl option when exporting the file system.
Default and overridden optionsEach default for every exported file system must be explicitly overridden. For example, if the rw optionis not specified, then the exported file system is shared as read-only. The following is a sample line from /etc/exports which overrides two default options:
/another/exported/directory 192.168.0.3(rw,async)
In this example, 192.168.0.3 can mount /another/exported/directory/ read and write, and all writes todisk are asynchronous.
4.6.2. The exportfs utility
The exportfs utility enables the root user to selectively export or unexport directories without restartingthe NFS service. When given the proper options, the exportfs utility writes the exported file systems to /var/lib/nfs/xtab. Because the nfs-mountd service refers to the xtab file when deciding accessprivileges to a file system, changes to the list of exported file systems take effect immediately.
Common exportfs optionsThe following is a list of commonly-used options available for exportfs:
-r
Causes all directories listed in /etc/exports to be exported by constructing a new export list in /etc/lib/nfs/xtab. This option effectively refreshes the export list with any changes made to /etc/exports.
-a
Causes all directories to be exported or unexported, depending on what other options are passed to exportfs. If no other options are specified, exportfs exports all file systems specified in /etc/exports.
-o file-systems
Specifies directories to be exported that are not listed in /etc/exports. Replace file-systems withadditional file systems to be exported. These file systems must be formatted in the same way theyare specified in /etc/exports. This option is often used to test an exported file system before addingit permanently to the list of exported file systems.
-i
Ignores /etc/exports; only options given from the command line are used to define exported file
Red Hat Enterprise Linux 8 Managing file systems
30
Ignores /etc/exports; only options given from the command line are used to define exported filesystems.
-u
Unexports all shared directories. The command exportfs -ua suspends NFS file sharing while keepingall NFS services up. To re-enable NFS sharing, use exportfs -r.
-v
Verbose operation, where the file systems being exported or unexported are displayed in greaterdetail when the exportfs command is executed.
If no options are passed to the exportfs utility, it displays a list of currently exported file systems.
Additional resources
For information on different methods for specifying host names, see Section 4.5, “NFS hostname formats”.
For a complete list of export options, see the exports(5) man page.
For more information about the exportfs utility, see the exportfs(8) man page.
4.7. NFS AND RPCBIND
This section explains the purpose of the rpcbind service, which is required by NFSv3.
The rpcbind service maps Remote Procedure Call (RPC) services to the ports on which they listen. RPCprocesses notify rpcbind when they start, registering the ports they are listening on and the RPCprogram numbers they expect to serve. The client system then contacts rpcbind on the server with aparticular RPC program number. The rpcbind service redirects the client to the proper port number so itcan communicate with the requested service.
Because RPC-based services rely on rpcbind to make all connections with incoming client requests, rpcbind must be available before any of these services start.
Access control rules for rpcbind affect all RPC-based services. Alternatively, it is possible to specifyaccess control rules for each of the NFS RPC daemons.
Additional resources
For the precise syntax of access control rules, see the rpc.mountd(8) and rpc.statd(8) manpages.
4.8. INSTALLING NFS
This procedure installs all packages necessary to mount or export NFS shares.
Procedure
Install the nfs-utils package:
# yum install nfs-utils
4.9. STARTING THE NFS SERVER
CHAPTER 4. EXPORTING NFS SHARES
31

This procedure describes how to start the NFS server, which is required to export NFS shares.
Prerequisites
For servers that support NFSv2 or NFSv3 connections, the rpcbind service must be running. Toverify that rpcbind is active, use the following command:
$ systemctl status rpcbind
If the service is stopped, start and enable it:
$ systemctl enable --now rpcbind
Procedure
To start the NFS server and enable it to start automatically at boot, use the following command:
# systemctl enable --now nfs-server
Additional resources
To configure an NFSv4-only server, which does not require rpcbind, see Section 4.14,“Configuring an NFSv4-only server”.
4.10. TROUBLESHOOTING NFS AND RPCBIND
Because the rpcbind service provides coordination between RPC services and the port numbers usedto communicate with them, it is useful to view the status of current RPC services using rpcbind whentroubleshooting. The rpcinfo utility shows each RPC-based service with port numbers, an RPC programnumber, a version number, and an IP protocol type (TCP or UDP).
Procedure
1. To make sure the proper NFS RPC-based services are enabled for rpcbind, use the followingcommand:
# rpcinfo -p
Example 4.2. rpcinfo -p command output
The following is sample output from this command:
program vers proto port service 100000 4 tcp 111 portmapper 100000 3 tcp 111 portmapper 100000 2 tcp 111 portmapper 100000 4 udp 111 portmapper 100000 3 udp 111 portmapper 100000 2 udp 111 portmapper 100005 1 udp 20048 mountd 100005 1 tcp 20048 mountd 100005 2 udp 20048 mountd 100005 2 tcp 20048 mountd
Red Hat Enterprise Linux 8 Managing file systems
32
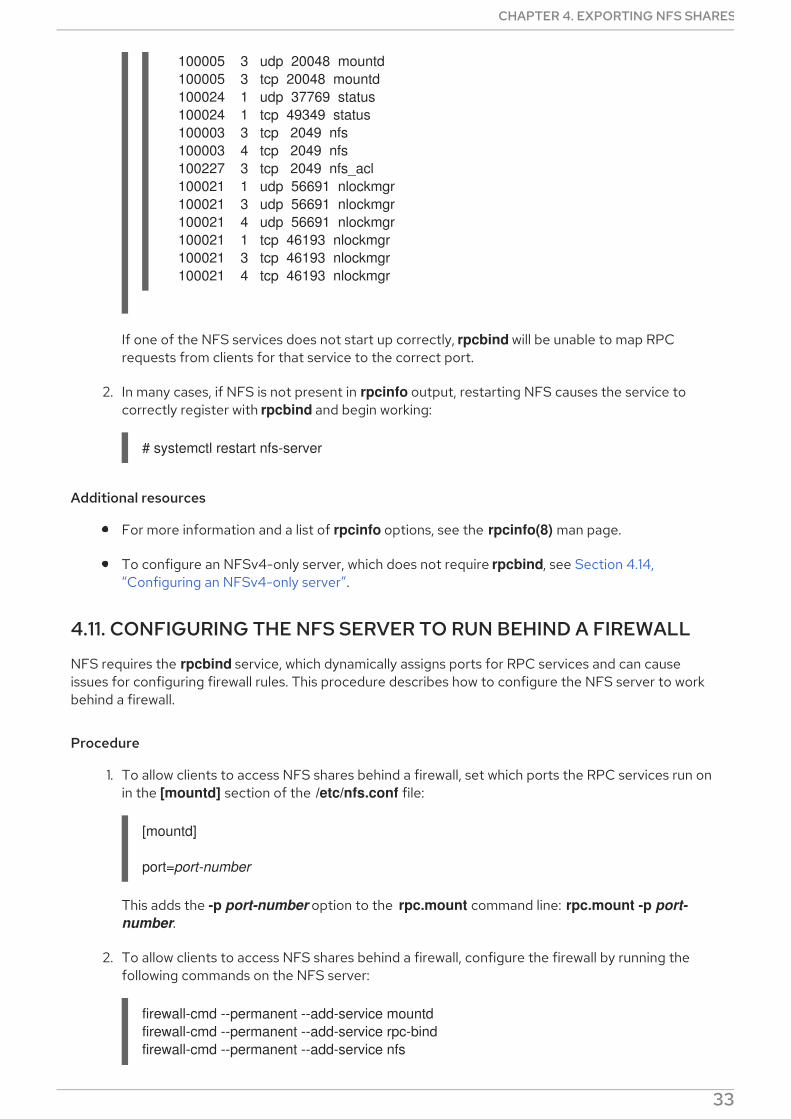
100005 3 udp 20048 mountd 100005 3 tcp 20048 mountd 100024 1 udp 37769 status 100024 1 tcp 49349 status 100003 3 tcp 2049 nfs 100003 4 tcp 2049 nfs 100227 3 tcp 2049 nfs_acl 100021 1 udp 56691 nlockmgr 100021 3 udp 56691 nlockmgr 100021 4 udp 56691 nlockmgr 100021 1 tcp 46193 nlockmgr 100021 3 tcp 46193 nlockmgr 100021 4 tcp 46193 nlockmgr
If one of the NFS services does not start up correctly, rpcbind will be unable to map RPCrequests from clients for that service to the correct port.
2. In many cases, if NFS is not present in rpcinfo output, restarting NFS causes the service tocorrectly register with rpcbind and begin working:
# systemctl restart nfs-server
Additional resources
For more information and a list of rpcinfo options, see the rpcinfo(8) man page.
To configure an NFSv4-only server, which does not require rpcbind, see Section 4.14,“Configuring an NFSv4-only server”.
4.11. CONFIGURING THE NFS SERVER TO RUN BEHIND A FIREWALL
NFS requires the rpcbind service, which dynamically assigns ports for RPC services and can causeissues for configuring firewall rules. This procedure describes how to configure the NFS server to workbehind a firewall.
Procedure
1. To allow clients to access NFS shares behind a firewall, set which ports the RPC services run onin the [mountd] section of the /etc/nfs.conf file:
[mountd]
port=port-number
This adds the -p port-number option to the rpc.mount command line: rpc.mount -p port-number.
2. To allow clients to access NFS shares behind a firewall, configure the firewall by running thefollowing commands on the NFS server:
firewall-cmd --permanent --add-service mountdfirewall-cmd --permanent --add-service rpc-bindfirewall-cmd --permanent --add-service nfs
CHAPTER 4. EXPORTING NFS SHARES
33

firewall-cmd --permanent --add-port=<mountd-port>/tcpfirewall-cmd --permanent --add-port=<mountd-port>/udpfirewall-cmd --reload
In the commands, replace <mountd-port> with the intended port or a port range. Whenspecifying a port range, use the --add-port=<mountd-port>-<mountd-port>/udp syntax.
3. To allow NFSv4.0 callbacks to pass through firewalls, set /proc/sys/fs/nfs/nfs_callback_tcpport and allow the server to connect to that port on theclient.This step is not needed for NFSv4.1 or higher, and the other ports for mountd, statd, and lockdare not required in a pure NFSv4 environment.
4. To specify the ports to be used by the RPC service nlockmgr, set the port number for the nlm_tcpport and nlm_udpport options in the /etc/modprobe.d/lockd.conf file.
5. Restart the NFS server:
# systemctl restart nfs-server
If NFS fails to start, check /var/log/messages. Commonly, NFS fails to start if you specify a portnumber that is already in use.
6. Confirm the changes have taken effect:
# rpcinfo -p
Additional resources
To configure an NFSv4-only server, which does not require rpcbind, see Section 4.14,“Configuring an NFSv4-only server”.
4.12. EXPORTING RPC QUOTA THROUGH A FIREWALL
If you export a file system that uses disk quotas, you can use the quota Remote Procedure Call (RPC)service to provide disk quota data to NFS clients.
Procedure
1. Enable and start the rpc-rquotad service:
# systemctl enable --now rpc-rquotad
NOTE
The rpc-rquotad service is, if enabled, started automatically after starting thenfs-server service.
2. To make the quota RPC service accessible behind a firewall, the TCP (or UDP, if UDP isenabled) port 875 need to be open. The default port number is defined in the /etc/services file.You can override the default port number by appending -p port-number to the RPCRQUOTADOPTS variable in the /etc/sysconfig/rpc-rquotad file.
3. By default, remote hosts can only read quotas. If you want to allow clients to set quotas, append
Red Hat Enterprise Linux 8 Managing file systems
34

3. By default, remote hosts can only read quotas. If you want to allow clients to set quotas, appendthe -S option to the RPCRQUOTADOPTS variable in the /etc/sysconfig/rpc-rquotad file.
4. Restart rpc-rquotad for the changes in the /etc/sysconfig/rpc-rquotad file to take effect:
# systemctl restart rpc-rquotad
4.13. ENABLING NFS OVER RDMA (NFSORDMA)
The remote direct memory access (RDMA) service works automatically in Red Hat Enterprise Linux 8 ifthere is RDMA-capable hardware present.
Procedure
1. Install the rdma-core package:
# yum install rdma-core
2. To enable automatic loading of NFSoRDMA server modules, add the SVCRDMA_LOAD=yesoption on a new line in the /etc/rdma/rdma.conf configuration file.The rdma=20049 option in the [nfsd] section of the /etc/nfs.conf file specifies the port numberon which the NFSoRDMA service listens for clients. The RFC 5667 standard specifies thatservers must listen on port 20049 when providing NFSv4 services over RDMA.
The /etc/rdma/rdma.conf file contains a line that sets the XPRTRDMA_LOAD=yes option bydefault, which requests the rdma service to load the NFSoRDMA client module.
3. Restart the nfs-server service:
# systemctl restart nfs-server
Additional resources
The RFC 5667 standard: https://tools.ietf.org/html/rfc5667.
4.14. CONFIGURING AN NFSV4-ONLY SERVER
As an NFS server administrator, you can configure the NFS server to support only NFSv4, whichminimizes the number of open ports and running services on the system.
4.14.1. Benefits and drawbacks of an NFSv4-only server
This section explains the benefits and drawbacks of configuring the NFS server to only support NFSv4.
By default, the NFS server supports NFSv2, NFSv3, and NFSv4 connections in Red HatEnterprise Linux 8. However, you can also configure NFS to support only NFS version 4.0 and later. Thisminimizes the number of open ports and running services on the system, because NFSv4 does notrequire the rpcbind service to listen on the network.
When your NFS server is configured as NFSv4-only, clients attempting to mount shares using NFSv2 orNFSv3 fail with an error like the following:
Requested NFS version or transport protocol is not supported.
CHAPTER 4. EXPORTING NFS SHARES
35

Optionally, you can also disable listening for the RPCBIND, MOUNT, and NSM protocol calls, which arenot necessary in the NFSv4-only case.
The effects of disabling these additional options are:
Clients that attempt to mount shares from your server using NFSv2 or NFSv3 becomeunresponsive.
The NFS server itself is unable to mount NFSv2 and NFSv3 file systems.
4.14.2. NFS and rpcbind
This section explains the purpose of the rpcbind service, which is required by NFSv3.
The rpcbind service maps Remote Procedure Call (RPC) services to the ports on which they listen. RPCprocesses notify rpcbind when they start, registering the ports they are listening on and the RPCprogram numbers they expect to serve. The client system then contacts rpcbind on the server with aparticular RPC program number. The rpcbind service redirects the client to the proper port number so itcan communicate with the requested service.
Because RPC-based services rely on rpcbind to make all connections with incoming client requests, rpcbind must be available before any of these services start.
Access control rules for rpcbind affect all RPC-based services. Alternatively, it is possible to specifyaccess control rules for each of the NFS RPC daemons.
Additional resources
For the precise syntax of access control rules, see the rpc.mountd(8) and rpc.statd(8) manpages.
4.14.3. Configuring the NFS server to support only NFSv4
This procedure describes how to configure your NFS server to support only NFS version 4.0 and later.
Procedure
1. Disable NFSv2 and NFSv3 by adding the following lines to the [nfsd] section of the /etc/nfs.conf configuration file:
[nfsd]
vers2=novers3=no
2. Optionally, disable listening for the RPCBIND, MOUNT, and NSM protocol calls, which are notnecessary in the NFSv4-only case. Disable related services:
# systemctl mask --now rpc-statd.service rpcbind.service rpcbind.socket
3. Restart the NFS server:
# systemctl restart nfs-server
Red Hat Enterprise Linux 8 Managing file systems
36
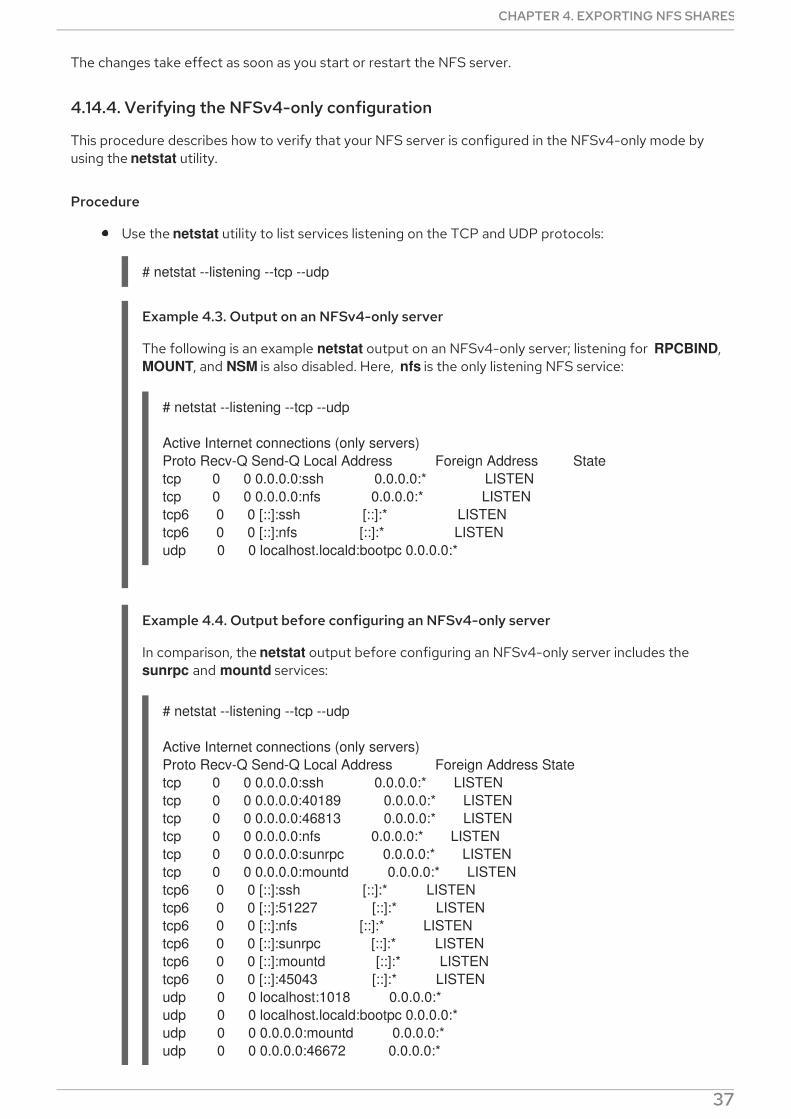
The changes take effect as soon as you start or restart the NFS server.
4.14.4. Verifying the NFSv4-only configuration
This procedure describes how to verify that your NFS server is configured in the NFSv4-only mode byusing the netstat utility.
Procedure
Use the netstat utility to list services listening on the TCP and UDP protocols:
# netstat --listening --tcp --udp
Example 4.3. Output on an NFSv4-only server
The following is an example netstat output on an NFSv4-only server; listening for RPCBIND,MOUNT, and NSM is also disabled. Here, nfs is the only listening NFS service:
# netstat --listening --tcp --udp
Active Internet connections (only servers)Proto Recv-Q Send-Q Local Address Foreign Address Statetcp 0 0 0.0.0.0:ssh 0.0.0.0:* LISTENtcp 0 0 0.0.0.0:nfs 0.0.0.0:* LISTENtcp6 0 0 [::]:ssh [::]:* LISTENtcp6 0 0 [::]:nfs [::]:* LISTENudp 0 0 localhost.locald:bootpc 0.0.0.0:*
Example 4.4. Output before configuring an NFSv4-only server
In comparison, the netstat output before configuring an NFSv4-only server includes the sunrpc and mountd services:
# netstat --listening --tcp --udp
Active Internet connections (only servers)Proto Recv-Q Send-Q Local Address Foreign Address Statetcp 0 0 0.0.0.0:ssh 0.0.0.0:* LISTENtcp 0 0 0.0.0.0:40189 0.0.0.0:* LISTENtcp 0 0 0.0.0.0:46813 0.0.0.0:* LISTENtcp 0 0 0.0.0.0:nfs 0.0.0.0:* LISTENtcp 0 0 0.0.0.0:sunrpc 0.0.0.0:* LISTENtcp 0 0 0.0.0.0:mountd 0.0.0.0:* LISTENtcp6 0 0 [::]:ssh [::]:* LISTENtcp6 0 0 [::]:51227 [::]:* LISTENtcp6 0 0 [::]:nfs [::]:* LISTENtcp6 0 0 [::]:sunrpc [::]:* LISTENtcp6 0 0 [::]:mountd [::]:* LISTENtcp6 0 0 [::]:45043 [::]:* LISTENudp 0 0 localhost:1018 0.0.0.0:*udp 0 0 localhost.locald:bootpc 0.0.0.0:*udp 0 0 0.0.0.0:mountd 0.0.0.0:*udp 0 0 0.0.0.0:46672 0.0.0.0:*
CHAPTER 4. EXPORTING NFS SHARES
37
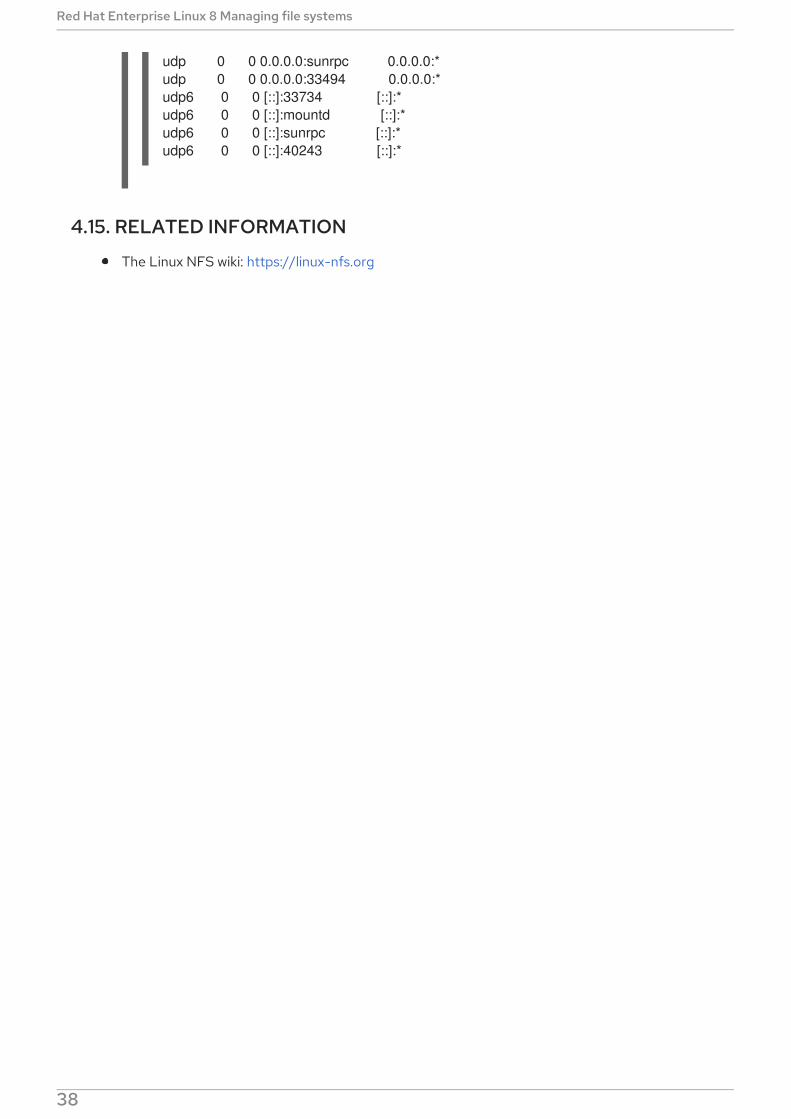
udp 0 0 0.0.0.0:sunrpc 0.0.0.0:*udp 0 0 0.0.0.0:33494 0.0.0.0:*udp6 0 0 [::]:33734 [::]:*udp6 0 0 [::]:mountd [::]:*udp6 0 0 [::]:sunrpc [::]:*udp6 0 0 [::]:40243 [::]:*
4.15. RELATED INFORMATION
The Linux NFS wiki: https://linux-nfs.org
Red Hat Enterprise Linux 8 Managing file systems
38

CHAPTER 5. SECURING NFSTo minimize NFS security risks and protect data on the server, consider the following sections whenexporting NFS file systems on a server or mounting them on a client.
5.1. NFS SECURITY WITH AUTH_SYS AND EXPORT CONTROLS
NFS provides the following traditional options in order to control access to exported files:
The server restricts which hosts are allowed to mount which file systems either by IP address orby host name.
The server enforces file system permissions for users on NFS clients in the same way it does forlocal users. Traditionally, NFS does this using the AUTH_SYS call message (also called AUTH_UNIX), which relies on the client to state the UID and GIDs of the user. Be aware thatthis means that a malicious or misconfigured client might easily get this wrong and allow a useraccess to files that it should not.
To limit the potential risks, administrators often limits the access to read-only or squash userpermissions to a common user and group ID. Unfortunately, these solutions prevent the NFS share frombeing used in the way it was originally intended.
Additionally, if an attacker gains control of the DNS server used by the system exporting the NFS filesystem, they can point the system associated with a particular hostname or fully qualified domain nameto an unauthorized machine. At this point, the unauthorized machine is the system permitted to mountthe NFS share, because no username or password information is exchanged to provide additionalsecurity for the NFS mount.
Wildcards should be used sparingly when exporting directories through NFS, as it is possible for thescope of the wildcard to encompass more systems than intended.
Additional resources
For more information on securing NFS and rpcbind, see the iptables man page.
5.2. NFS SECURITY WITH AUTH_GSS
All version of NFS support RPCSEC_GSS and the Kerberos mechanism.
Unlike AUTH_SYS, with the RPCSEC_GSS Kerberos mechanism, the server does not depend on theclient to correctly represent which user is accessing the file. Instead, cryptography is used toauthenticate users to the server, which prevents a malicious client from impersonating a user withouthaving that user’s Kerberos credentials. Using the RPCSEC_GSS Kerberos mechanism is the moststraightforward way to secure mounts because after configuring Kerberos, no additional setup isneeded.
5.3. CONFIGURING AN NFS SERVER AND CLIENT TO USE KERBEROS
Kerberos is a network authentication system that allows clients and servers to authenticate to eachother by using symmetric encryption and a trusted third party, the KDC. Red Hat recommends usingIdentity Management (IdM) for setting up Kerberos.
Prerequisites
CHAPTER 5. SECURING NFS
39

The Kerberos Key Distribution Centre (KDC) is installed and configured.
Procedure
1. Create the nfs/hostname.domain@REALM principal on the NFS server side.
Create the host/hostname.domain@REALM principal on both the server and the clientside.
Add the corresponding keys to keytabs for the client and server.
2. On the server side, use the sec= option to enable the wanted security flavors. To enable allsecurity flavors as well as non-cryptographic mounts:
/export *(sec=sys:krb5:krb5i:krb5p)
Valid security flavors to use with the sec= option are:
sys: no cryptographic protection, the default
krb5: authentication only
krb5i: integrity protection
krb5p: privacy protection
3. On the client side, add sec=krb5 (or sec=krb5i, or sec=krb5p, depending on the setup) to themount options:
# mount -o sec=krb5 server:/export /mnt
Additional resources
If you need to write files as root on the Kerberos-secured NFS share and keep root ownershipon these files, see https://access.redhat.com/articles/4040141. Note that this configuration isnot recommended.
For more information on NFS configuration, see the exports(5) and nfs(5) man pages.
5.4. NFSV4 SECURITY OPTIONS
NFSv4 includes ACL support based on the Microsoft Windows NT model, not the POSIX model,because of the Microsoft Windows NT model’s features and wide deployment.
Another important security feature of NFSv4 is the removal of the use of the MOUNT protocol formounting file systems. The MOUNT protocol presented a security risk because of the way the protocolprocessed file handles.
5.5. FILE PERMISSIONS ON MOUNTED NFS EXPORTS
Once the NFS file system is mounted as either read or read and write by a remote host, the onlyprotection each shared file has is its permissions. If two users that share the same user ID value mountthe same NFS file system on different client systems, they can modify each others' files. Additionally,
Red Hat Enterprise Linux 8 Managing file systems
40
anyone logged in as root on the client system can use the su - command to access any files with theNFS share.
By default, access control lists (ACLs) are supported by NFS under Red Hat Enterprise Linux. Red Hatrecommends to keep this feature enabled.
By default, NFS uses root squashing when exporting a file system. This sets the user ID of anyoneaccessing the NFS share as the root user on their local machine to nobody. Root squashing is controlledby the default option root_squash; for more information about this option, see Section 4.6, “NFS serverconfiguration”.
When exporting an NFS share as read-only, consider using the all_squash option. This option makesevery user accessing the exported file system take the user ID of the nfsnobody user.
CHAPTER 5. SECURING NFS
41

CHAPTER 6. ENABLING PNFS SCSI LAYOUTS IN NFSYou can configure the NFS server and client to use the pNFS SCSI layout for accessing data. pNFSSCSI is beneficial in use cases that involve longer-duration single-client access to a file.
Prerequisites
Both the client and the server must be able to send SCSI commands to the same block device.That is, the block device must be on a shared SCSI bus.
The block device must contain an XFS file system.
The SCSI device must support SCSI Persistent Reservations as described in the SCSI-3 PrimaryCommands specification.
6.1. THE PNFS TECHNOLOGY
The pNFS architecture improves the scalability of NFS. When a server implements pNFS, the client isable to access data through multiple servers concurrently. This can lead to performance improvements.
pNFS supports the following storage protocols or layouts on RHEL:
Files
Flexfiles
SCSI
6.2. PNFS SCSI LAYOUTS
The SCSI layout builds on the work of pNFS block layouts. The layout is defined across SCSI devices. Itcontains a sequential series of fixed-size blocks as logical units (LUs) that must be capable ofsupporting SCSI persistent reservations. The LU devices are identified by their SCSI deviceidentification.
pNFS SCSI performs well in use cases that involve longer-duration single-client access to a file. Anexample might be a mail server or a virtual machine housing a cluster.
Operations between the client and the serverWhen an NFS client reads from a file or writes to it, the client performs a LAYOUTGET operation. Theserver responds with the location of the file on the SCSI device. The client might need to perform anadditional operation of GETDEVICEINFO to determine which SCSI device to use. If these operationswork correctly, the client can issue I/O requests directly to the SCSI device instead of sending READand WRITE operations to the server.
Errors or contention between clients might cause the server to recall layouts or not issue them to theclients. In those cases, the clients fall back to issuing READ and WRITE operations to the server insteadof sending I/O requests directly to the SCSI device.
To monitor the operations, see Section 6.7, “Monitoring pNFS SCSI layouts functionality” .
Device reservationspNFS SCSI handles fencing through the assignment of reservations. Before the server issues layouts toclients, it reserves the SCSI device to ensure that only registered clients may access the device. If aclient can issue commands to that SCSI device but is not registered with the device, many operations
Red Hat Enterprise Linux 8 Managing file systems
42
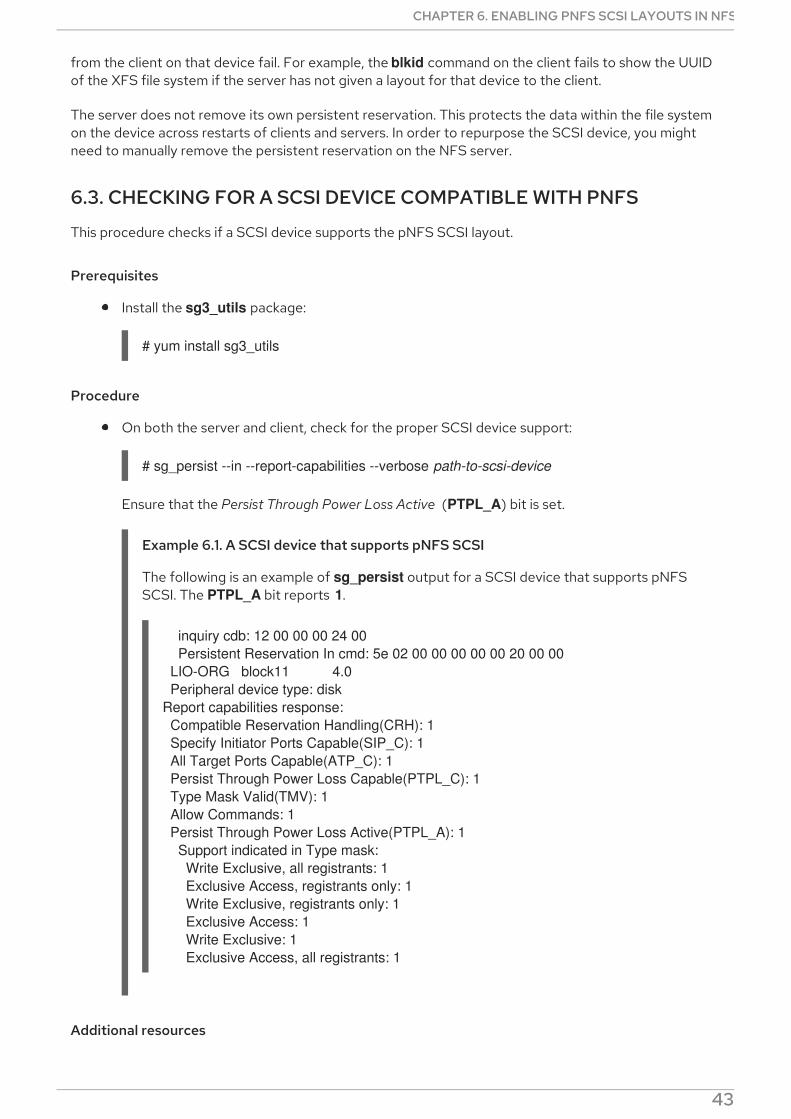
from the client on that device fail. For example, the blkid command on the client fails to show the UUIDof the XFS file system if the server has not given a layout for that device to the client.
The server does not remove its own persistent reservation. This protects the data within the file systemon the device across restarts of clients and servers. In order to repurpose the SCSI device, you mightneed to manually remove the persistent reservation on the NFS server.
6.3. CHECKING FOR A SCSI DEVICE COMPATIBLE WITH PNFS
This procedure checks if a SCSI device supports the pNFS SCSI layout.
Prerequisites
Install the sg3_utils package:
# yum install sg3_utils
Procedure
On both the server and client, check for the proper SCSI device support:
# sg_persist --in --report-capabilities --verbose path-to-scsi-device
Ensure that the Persist Through Power Loss Active (PTPL_A) bit is set.
Example 6.1. A SCSI device that supports pNFS SCSI
The following is an example of sg_persist output for a SCSI device that supports pNFSSCSI. The PTPL_A bit reports 1.
inquiry cdb: 12 00 00 00 24 00 Persistent Reservation In cmd: 5e 02 00 00 00 00 00 20 00 00 LIO-ORG block11 4.0 Peripheral device type: diskReport capabilities response: Compatible Reservation Handling(CRH): 1 Specify Initiator Ports Capable(SIP_C): 1 All Target Ports Capable(ATP_C): 1 Persist Through Power Loss Capable(PTPL_C): 1 Type Mask Valid(TMV): 1 Allow Commands: 1 Persist Through Power Loss Active(PTPL_A): 1 Support indicated in Type mask: Write Exclusive, all registrants: 1 Exclusive Access, registrants only: 1 Write Exclusive, registrants only: 1 Exclusive Access: 1 Write Exclusive: 1 Exclusive Access, all registrants: 1
Additional resources
CHAPTER 6. ENABLING PNFS SCSI LAYOUTS IN NFS
43
The sg_persist(8) man page
6.4. SETTING UP PNFS SCSI ON THE SERVER
This procedure configures an NFS server to export a pNFS SCSI layout.
Procedure
1. On the server, mount the XFS file system created on the SCSI device.
2. Configure the NFS server to export NFS version 4.1 or higher. Set the following option in the [nfsd] section of the /etc/nfs.conf file:
[nfsd]
vers4.1=y
3. Configure the NFS server to export the XFS file system over NFS with the pnfs option:
Example 6.2. An entry in /etc/exports to export pNFS SCSI
The following entry in the /etc/exports configuration file exports the file system mounted at /exported/directory/ to the allowed.example.com client as a pNFS SCSI layout:
/exported/directory allowed.example.com(pnfs)
Additional resources
For more information on configuring an NFS server, see Chapter 4, Exporting NFS shares.
6.5. SETTING UP PNFS SCSI ON THE CLIENT
This procedure configures an NFS client to mount a pNFS SCSI layout.
Prerequisites
The NFS server is configured to export an XFS file system over pNFS SCSI. See Section 6.4,“Setting up pNFS SCSI on the server”.
Procedure
On the client, mount the exported XFS file system using NFS version 4.1 or higher:
# mount -t nfs -o nfsvers=4.1 host:/remote/export /local/directory
Do not mount the XFS file system directly without NFS.
Additional resources
For more information on mounting NFS shares, see Chapter 3, Mounting NFS shares.
Red Hat Enterprise Linux 8 Managing file systems
44

6.6. RELEASING THE PNFS SCSI RESERVATION ON THE SERVER
This procedure releases the persistent reservation that an NFS server holds on a SCSI device. Thisenables you to repurpose the SCSI device when you no longer need to export pNFS SCSI.
You must remove the reservation from the server. It cannot be removed from a different IT Nexus.
Prerequisites
Install the sg3_utils package:
# yum install sg3_utils
Procedure
1. Query an existing reservation on the server:
# sg_persist --read-reservation path-to-scsi-device
Example 6.3. Querying a reservation on /dev/sda
# sg_persist --read-reservation /dev/sda
LIO-ORG block_1 4.0 Peripheral device type: disk PR generation=0x8, Reservation follows: Key=0x100000000000000 scope: LU_SCOPE, type: Exclusive Access, registrants only
2. Remove the existing registration on the server:
# sg_persist --out \ --release \ --param-rk=reservation-key \ --prout-type=6 \ path-to-scsi-device
Example 6.4. Removing a reservation on /dev/sda
# sg_persist --out \ --release \ --param-rk=0x100000000000000 \ --prout-type=6 \ /dev/sda
LIO-ORG block_1 4.0 Peripheral device type: disk
Additional resources
CHAPTER 6. ENABLING PNFS SCSI LAYOUTS IN NFS
45

The sg_persist(8) man page
6.7. MONITORING PNFS SCSI LAYOUTS FUNCTIONALITY
You can monitor if the pNFS client and server exchange proper pNFS SCSI operations or if they fallback on regular NFS operations.
Prerequisites
A pNFS SCSI client and server are configured.
6.7.1. Checking pNFS SCSI operations from the server using nfsstat
This procedure uses the nfsstat utility to monitor pNFS SCSI operations from the server.
Procedure
1. Monitor the operations serviced from the server:
# watch --differences \ "nfsstat --server | egrep --after-context=1 read\|write\|layout"
Every 2.0s: nfsstat --server | egrep --after-context=1 read\|write\|layout
putrootfh read readdir readlink remove rename2 0% 0 0% 1 0% 0 0% 0 0% 0 0%--setcltidconf verify write rellockowner bc_ctl bind_conn0 0% 0 0% 0 0% 0 0% 0 0% 0 0%--getdevlist layoutcommit layoutget layoutreturn secinfononam sequence0 0% 29 1% 49 1% 5 0% 0 0% 2435 86%
2. The client and server use pNFS SCSI operations when:
The layoutget, layoutreturn, and layoutcommit counters increment. This means that theserver is serving layouts.
The server read and write counters do not increment. This means that the clients areperforming I/O requests directly to the SCSI devices.
6.7.2. Checking pNFS SCSI operations from the client using mountstats
This procedure uses the /proc/self/mountstats file to monitor pNFS SCSI operations from the client.
Procedure
1. List the per-mount operation counters:
# cat /proc/self/mountstats \ | awk /scsi_lun_0/,/^$/ \ | egrep device\|READ\|WRITE\|LAYOUT
device 192.168.122.73:/exports/scsi_lun_0 mounted on /mnt/rhel7/scsi_lun_0 with fstype
Red Hat Enterprise Linux 8 Managing file systems
46

nfs4 statvers=1.1 nfsv4: bm0=0xfdffbfff,bm1=0x40f9be3e,bm2=0x803,acl=0x3,sessions,pnfs=LAYOUT_SCSI READ: 0 0 0 0 0 0 0 0 WRITE: 0 0 0 0 0 0 0 0 READLINK: 0 0 0 0 0 0 0 0 READDIR: 0 0 0 0 0 0 0 0 LAYOUTGET: 49 49 0 11172 9604 2 19448 19454 LAYOUTCOMMIT: 28 28 0 7776 4808 0 24719 24722 LAYOUTRETURN: 0 0 0 0 0 0 0 0 LAYOUTSTATS: 0 0 0 0 0 0 0 0
2. In the results:
The LAYOUT statistics indicate requests where the client and server use pNFS SCSIoperations.
The READ and WRITE statistics indicate requests where the client and server fall back toNFS operations.
CHAPTER 6. ENABLING PNFS SCSI LAYOUTS IN NFS
47

CHAPTER 7. MOUNTING AN SMB SHARE ON RED HATENTERPRISE LINUX
The Server Message Block (SMB) protocol implements an application-layer network protocol used toaccess resources on a server, such as file shares and shared printers.
NOTE
In the context of SMB, you can find mentions about the Common Internet File System(CIFS) protocol, which is a dialect of SMB. Both the SMB and CIFS protocol aresupported, and the kernel module and utilities involved in mounting SMB and CIFS sharesboth use the name cifs.
This section describes how to mount shares from an SMB server. For details about setting up an SMBserver on Red Hat Enterprise Linux using Samba, see the section about using Samba in the Configuringand deploying different types of servers guide.
Prerequisites
On Microsoft Windows, SMB is implemented by default. On Red Hat Enterprise Linux, the cifs.ko filesystem module of the kernel provides support for mounting SMB shares. Therefor install the cifs-utilspackage:
# yum install cifs-utils
The cifs-utils package provides utilities to:
Mount SMB and CIFS shares
Manage NT Lan Manager (NTLM) credentials in the kernel’s keyring
Set and display Access Control Lists (ACL) in a security descriptor on SMB and CIFS shares
7.1. SUPPORTED SMB PROTOCOL VERSIONS
The cifs.ko kernel module supports the following SMB protocol versions:
SMB 1
SMB 2.0
SMB 2.1
SMB 3.0
SMB 3.1.1
NOTE
Depending on the protocol version, not all SMB features are implemented.
7.2. UNIX EXTENSIONS SUPPORT
Samba uses the CAP_UNIX capability bit in the SMB protocol to provide the UNIX extensions feature.
Red Hat Enterprise Linux 8 Managing file systems
48

Samba uses the CAP_UNIX capability bit in the SMB protocol to provide the UNIX extensions feature.These extensions are also supported by the cifs.ko kernel module. However, both Samba and the kernelmodule support UNIX extensions only in the SMB 1 protocol.
To use UNIX extensions:
1. Set the server min protocol parameter in the [global] section in the /etc/samba/smb.conf fileto NT1.
2. Mount the share using the SMB 1 protocol by providing the -o vers=1.0 option to the mountcommand. For example:
# mount -t cifs -o vers=1.0,username=user_name //server_name/share_name /mnt/
By default, the kernel module uses SMB 2 or the highest later protocol version supported by theserver. Passing the -o vers=1.0 option to the mount command forces that the kernel moduleuses the SMB 1 protocol that is required for using UNIX extensions.
To verify if UNIX extensions are enabled, display the options of the mounted share:
# mount...//server/share on /mnt type cifs (...,unix,...)
If the unix entry is displayed in the list of mount options, UNIX extensions are enabled.
7.3. MANUALLY MOUNTING AN SMB SHARE
If you only require an SMB share to be temporary mounted, you can mount it manually using the mountutility.
NOTE
Manually mounted shares are not mounted automatically again when you reboot thesystem. To configure that Red Hat Enterprise Linux automatically mounts the share whenthe system boots, see Section 7.4, “Mounting an SMB share automatically when thesystem boots”.
Prerequisites
The cifs-utils package is installed.
Procedure
To manually mount an SMB share, use the mount utility with the -t cifs parameter:
# mount -t cifs -o username=user_name //server_name/share_name /mnt/Password for user_name@//server_name/share_name: password
In the -o parameter, you can specify options that are used to mount the share. For details, seeSection 7.7, “Frequently used mount options” and the OPTIONS section in the mount.cifs(8) man page.
Example 7.1. Mounting a share using an encrypted SMB 3.0 connection
To mount the \\server\example\ share as the DOMAIN\Administrator user over an encrypted SMB
CHAPTER 7. MOUNTING AN SMB SHARE ON RED HAT ENTERPRISE LINUX
49
To mount the \\server\example\ share as the DOMAIN\Administrator user over an encrypted SMB3.0 connection into the /mnt/ directory:
# mount -t cifs -o username=DOMAIN\Administrator,seal,vers=3.0 //server/example /mnt/Password for DOMAIN\Administrator@//server_name/share_name: password
7.4. MOUNTING AN SMB SHARE AUTOMATICALLY WHEN THESYSTEM BOOTS
If access to a mounted SMB share is permanently required on a server, mount the share automatically atboot time.
Prerequisites
The cifs-utils package is installed.
Procedure
To mount an SMB share automatically when the system boots, add an entry for the share to the /etc/fstab file. For example:
//server_name/share_name /mnt cifs credentials=/root/smb.cred 0 0
IMPORTANT
To enable the system to mount a share automatically, you must store the user name,password, and domain name in a credentials file. For details, see Section 7.5,“Authenticating to an SMB share using a credentials file”.
In the fourth field of the row in the /etc/fstab, specify mount options, such as the path to the credentialsfile. For details, see Section 7.7, “Frequently used mount options” and the OPTIONS section in the mount.cifs(8) man page.
To verify that the share mounts successfully, enter:
# mount /mnt/
7.5. AUTHENTICATING TO AN SMB SHARE USING A CREDENTIALSFILE
In certain situations, such as when mounting a share automatically at boot time, a share should bemounted without entering the user name and password. To implement this, create a credentials file.
Prerequisites
The cifs-utils package is installed.
Procedure
1. Create a file, such as /root/smb.cred, and specify the user name, password, and domain name
Red Hat Enterprise Linux 8 Managing file systems
50

1. Create a file, such as /root/smb.cred, and specify the user name, password, and domain namethat file:
username=user_namepassword=passworddomain=domain_name
2. Set the permissions to only allow the owner to access the file:
# chown user_name /root/smb.cred# chmod 600 /root/smb.cred
You can now pass the credentials=file_name mount option to the mount utility or use it in the /etc/fstab file to mount the share without being prompted for the user name and password.
7.6. PERFORMING A MULTI-USER SMB MOUNT
The credentials you provide to mount a share determine the access permissions on the mount point bydefault. For example, if you use the DOMAIN\example user when you mount a share, all operations onthe share will be executed as this user, regardless which local user performs the operation.
However, in certain situations, the administrator wants to mount a share automatically when the systemboots, but users should perform actions on the share’s content using their own credentials. The multiuser mount options lets you configure this scenario.
IMPORTANT
To use the multiuser mount option, you must additionally set the sec mount option to asecurity type that supports providing credentials in a non-interactive way, such as krb5 orthe ntlmssp option with a credentials file. For details, see Section 7.6.3, “Accessing ashare as a user”.
The root user mounts the share using the multiuser option and an account that has minimal access tothe contents of the share. Regular users can then provide their user name and password to the currentsession’s kernel keyring using the cifscreds utility. If the user accesses the content of the mountedshare, the kernel uses the credentials from the kernel keyring instead of the one initially used to mountthe share.
Using this feature consists of the following steps:
Mount a share with the multiuser option.
Optionally, verify if the share was successfully mounted with the multiuser option.
Access the share as a user .
Prerequisites
The cifs-utils package is installed.
7.6.1. Mounting a share with the multiuser option
Before users can access the share with their own credentials, mount the share as the root user using anaccount with limited permissions.
CHAPTER 7. MOUNTING AN SMB SHARE ON RED HAT ENTERPRISE LINUX
51

Procedure
To mount a share automatically with the multiuser option when the system boots:
1. Create the entry for the share in the /etc/fstab file. For example:
//server_name/share_name /mnt cifs multiuser,sec=ntlmssp,credentials=/root/smb.cred 0 0
2. Mount the share:
# mount /mnt/
If you do not want to mount the share automatically when the system boots, mount it manually bypassing -o multiuser,sec=security_type to the mount command. For details about mounting an SMBshare manually, see Section 7.3, “Manually mounting an SMB share” .
7.6.2. Verifying if an SMB share is mounted with the multiuser option
To verify if a share is mounted with the multiuser option, display the mount options.
Procedure
# mount...//server_name/share_name on /mnt type cifs (sec=ntlmssp,multiuser,...)
If the multiuser entry is displayed in the list of mount options, the feature is enabled.
7.6.3. Accessing a share as a user
If an SMB share is mounted with the multiuser option, users can provide their credentials for the serverto the kernel’s keyring:
# cifscreds add -u SMB_user_name server_namePassword: password
When the user performs operations in the directory that contains the mounted SMB share, the serverapplies the file system permissions for this user, instead of the one initially used when the share wasmounted.
NOTE
Multiple users can perform operations using their own credentials on the mounted shareat the same time.
7.7. FREQUENTLY USED MOUNT OPTIONS
When you mount an SMB share, the mount options determine:
How the connection will be established with the server. For example, which SMB protocolversion is used when connecting to the server.
Red Hat Enterprise Linux 8 Managing file systems
52

How the share will be mounted into the local file system. For example, if the system overridesthe remote file and directory permissions to enable multiple local users to access the contenton the server.
To set multiple options in the fourth field of the /etc/fstab file or in the -o parameter of a mountcommand, separate them with commas. For example, see Section 7.6.1, “Mounting a share with themultiuser option”.
The following list gives frequently used mount options:
Option Description
credentials=file_name Sets the path to the credentials file. See Section 7.5, “Authenticating to anSMB share using a credentials file”
dir_mode=mode Sets the directory mode if the server does not support CIFS UNIX extensions.
file_mode=mode Sets the file mode if the server does not support CIFS UNIX extensions.
password=password Sets the password used to authenticate to the SMB server. Alternatively,specify a credentials file using the credentials option.
seal Enables encryption support for connections using SMB 3.0 or a laterprotocol version. Therefore, use seal together with the vers mount optionset to 3.0 or later. See Example 7.1, “Mounting a share using an encryptedSMB 3.0 connection”.
sec=security_mode Sets the security mode, such as ntlmsspi, to enable NTLMv2 passwordhashing and enabled packet signing. For a list of supported values, see theoption’s description in the mount.cifs(8) man page.
If the server does not support the ntlmv2 security mode, use sec=ntlmssp,which is the default.
For security reasons, do not use the insecure ntlm security mode.
username=user_name Sets the user name used to authenticate to the SMB server. Alternatively,specify a credentials file using the credentials option.
vers=SMB_protocol_version Sets the SMB protocol version used for the communication with the server.
For a complete list, see the OPTIONS section in the mount.cifs(8) man page.
CHAPTER 7. MOUNTING AN SMB SHARE ON RED HAT ENTERPRISE LINUX
53
CHAPTER 8. OVERVIEW OF PERSISTENT NAMINGATTRIBUTES
As a system administrator, you need to refer to storage volumes using persistent naming attributes tobuild storage setups that are reliable over multiple system boots.
8.1. DISADVANTAGES OF NON-PERSISTENT NAMING ATTRIBUTES
Red Hat Enterprise Linux provides a number of ways to identify storage devices. It is important to usethe correct option to identify each device when used in order to avoid inadvertently accessing the wrongdevice, particularly when installing to or reformatting drives.
Traditionally, non-persistent names in the form of /dev/sd(major number)(minor number) are used onLinux to refer to storage devices. The major and minor number range and associated sd names areallocated for each device when it is detected. This means that the association between the major andminor number range and associated sd names can change if the order of device detection changes.
Such a change in the ordering might occur in the following situations:
The parallelization of the system boot process detects storage devices in a different order witheach system boot.
A disk fails to power up or respond to the SCSI controller. This results in it not being detected bythe normal device probe. The disk is not accessible to the system and subsequent devices willhave their major and minor number range, including the associated sd names shifted down. Forexample, if a disk normally referred to as sdb is not detected, a disk that is normally referred toas sdc would instead appear as sdb.
A SCSI controller (host bus adapter, or HBA) fails to initialize, causing all disks connected to thatHBA to not be detected. Any disks connected to subsequently probed HBAs are assigneddifferent major and minor number ranges, and different associated sd names.
The order of driver initialization changes if different types of HBAs are present in the system.This causes the disks connected to those HBAs to be detected in a different order. This mightalso occur if HBAs are moved to different PCI slots on the system.
Disks connected to the system with Fibre Channel, iSCSI, or FCoE adapters might beinaccessible at the time the storage devices are probed, due to a storage array or interveningswitch being powered off, for example. This might occur when a system reboots after a powerfailure, if the storage array takes longer to come online than the system take to boot. Althoughsome Fibre Channel drivers support a mechanism to specify a persistent SCSI target ID toWWPN mapping, this does not cause the major and minor number ranges, and the associated sdnames to be reserved; it only provides consistent SCSI target ID numbers.
These reasons make it undesirable to use the major and minor number range or the associated sdnames when referring to devices, such as in the /etc/fstab file. There is the possibility that the wrongdevice will be mounted and data corruption might result.
Occasionally, however, it is still necessary to refer to the sd names even when another mechanism isused, such as when errors are reported by a device. This is because the Linux kernel uses sd names (andalso SCSI host/channel/target/LUN tuples) in kernel messages regarding the device.
8.2. FILE SYSTEM AND DEVICE IDENTIFIERS
This sections explains the difference between persistent attributes identifying file systems and block
Red Hat Enterprise Linux 8 Managing file systems
54
This sections explains the difference between persistent attributes identifying file systems and blockdevices.
File system identifiersFile system identifiers are tied to a particular file system created on a block device. The identifier is alsostored as part of the file system. If you copy the file system to a different device, it still carries the samefile system identifier. On the other hand, if you rewrite the device, such as by formatting it with the mkfsutility, the device loses the attribute.
File system identifiers include:
Unique identifier (UUID)
Label
Device identifiersDevice identifiers are tied to a block device: for example, a disk or a partition. If you rewrite the device,such as by formatting it with the mkfs utility, the device keeps the attribute, because it is not stored inthe file system.
Device identifiers include:
World Wide Identifier (WWID)
Partition UUID
Serial number
Recommendations
Some file systems, such as logical volumes, span multiple devices. Red Hat recommendsaccessing these file systems using file system identifiers rather than device identifiers.
8.3. DEVICE NAMES MANAGED BY THE UDEV MECHANISM IN/DEV/DISK/
This section lists different kinds of persistent naming attributes that the udev service provides in the /dev/disk/ directory.
The udev mechanism is used for all types of devices in Linux, not just for storage devices. In the case ofstorage devices, Red Hat Enterprise Linux contains udev rules that create symbolic links in the /dev/disk/ directory. This enables you to refer to storage devices by:
Their content
A unique identifier
Their serial number.
Although udev naming attributes are persistent, in that they do not change on their own across systemreboots, some are also configurable.
8.3.1. File system identifiers
The UUID attribute in /dev/disk/by-uuid/
Entries in this directory provide a symbolic name that refers to the storage device by a unique identifier
CHAPTER 8. OVERVIEW OF PERSISTENT NAMING ATTRIBUTES
55
Entries in this directory provide a symbolic name that refers to the storage device by a unique identifier(UUID) in the content (that is, the data) stored on the device. For example:
/dev/disk/by-uuid/3e6be9de-8139-11d1-9106-a43f08d823a6
You can use the UUID to refer to the device in the /etc/fstab file using the following syntax:
UUID=3e6be9de-8139-11d1-9106-a43f08d823a6
You can configure the UUID attribute when creating a file system, and you can also change it later on.
The Label attribute in /dev/disk/by-label/Entries in this directory provide a symbolic name that refers to the storage device by a label in thecontent (that is, the data) stored on the device.
For example:
/dev/disk/by-label/Boot
You can use the label to refer to the device in the /etc/fstab file using the following syntax:
LABEL=Boot
You can configure the Label attribute when creating a file system, and you can also change it later on.
8.3.2. Device identifiers
The WWID attribute in /dev/disk/by-id/The World Wide Identifier (WWID) is a persistent, system-independent identifier that the SCSIStandard requires from all SCSI devices. The WWID identifier is guaranteed to be unique for everystorage device, and independent of the path that is used to access the device. The identifier is aproperty of the device but is not stored in the content (that is, the data) on the devices.
This identifier can be obtained by issuing a SCSI Inquiry to retrieve the Device Identification VitalProduct Data (page 0x83) or Unit Serial Number (page 0x80).
Red Hat Enterprise Linux automatically maintains the proper mapping from the WWID-based devicename to a current /dev/sd name on that system. Applications can use the /dev/disk/by-id/ name toreference the data on the disk, even if the path to the device changes, and even when accessing thedevice from different systems.
Example 8.1. WWID mappings
WWID symlink Non-persistent device Note
/dev/disk/by-id/scsi-3600508b400105e210000900000490000
/dev/sda A device with a page 0x83 identifier
/dev/disk/by-id/scsi-SSEAGATE_ST373453LW_3HW1RHM6
/dev/sdb A device with a page 0x80 identifier
Red Hat Enterprise Linux 8 Managing file systems
56

/dev/disk/by-id/ata-SAMSUNG_MZNLN256HMHQ-000L7_S2WDNX0J336519-part3
/dev/sdc3 A disk partition
WWID symlink Non-persistent device Note
In addition to these persistent names provided by the system, you can also use udev rules to implementpersistent names of your own, mapped to the WWID of the storage.
The Partition UUID attribute in /dev/disk/by-partuuidThe Partition UUID (PARTUUID) attribute identifies partitions as defined by GPT partition table.
Example 8.2. Partition UUID mappings
PARTUUID symlink Non-persistent device
/dev/disk/by-partuuid/4cd1448a-01 /dev/sda1
/dev/disk/by-partuuid/4cd1448a-02 /dev/sda2
/dev/disk/by-partuuid/4cd1448a-03 /dev/sda3
The Path attribute in /dev/disk/by-path/This attribute provides a symbolic name that refers to the storage device by the hardware path used toaccess the device.
WARNING
The Path attribute is unreliable, and Red Hat does not recommend using it.
8.4. THE WORLD WIDE IDENTIFIER WITH DM MULTIPATH
This section describes the mapping between the World Wide Identifier (WWID) and non-persistentdevice names in a Device Mapper Multipath configuration.
If there are multiple paths from a system to a device, DM Multipath uses the WWID to detect this. DMMultipath then presents a single "pseudo-device" in the /dev/mapper/wwid directory, such as /dev/mapper/3600508b400105df70000e00000ac0000.
The command multipath -l shows the mapping to the non-persistent identifiers:
CHAPTER 8. OVERVIEW OF PERSISTENT NAMING ATTRIBUTES
57
Host:Channel:Target:LUN
/dev/sd name
major:minor number
Example 8.3. WWID mappings in a multipath configuration
An example output of the multipath -l command:
3600508b400105df70000e00000ac0000 dm-2 vendor,product[size=20G][features=1 queue_if_no_path][hwhandler=0][rw]\_ round-robin 0 [prio=0][active] \_ 5:0:1:1 sdc 8:32 [active][undef] \_ 6:0:1:1 sdg 8:96 [active][undef]\_ round-robin 0 [prio=0][enabled] \_ 5:0:0:1 sdb 8:16 [active][undef] \_ 6:0:0:1 sdf 8:80 [active][undef]
DM Multipath automatically maintains the proper mapping of each WWID-based device name to itscorresponding /dev/sd name on the system. These names are persistent across path changes, and theyare consistent when accessing the device from different systems.
When the user_friendly_names feature of DM Multipath is used, the WWID is mapped to a name of theform /dev/mapper/mpathN. By default, this mapping is maintained in the file /etc/multipath/bindings.These mpathN names are persistent as long as that file is maintained.
IMPORTANT
If you use user_friendly_names, then additional steps are required to obtain consistentnames in a cluster.
8.5. LIMITATIONS OF THE UDEV DEVICE NAMING CONVENTION
The following are some limitations of the udev naming convention:
It is possible that the device might not be accessible at the time the query is performedbecause the udev mechanism might rely on the ability to query the storage device when the udev rules are processed for a udev event. This is more likely to occur with Fibre Channel, iSCSIor FCoE storage devices when the device is not located in the server chassis.
The kernel might send udev events at any time, causing the rules to be processed and possiblycausing the /dev/disk/by-*/ links to be removed if the device is not accessible.
There might be a delay between when the udev event is generated and when it is processed,such as when a large number of devices are detected and the user-space udevd service takessome amount of time to process the rules for each one. This might cause a delay between whenthe kernel detects the device and when the /dev/disk/by-*/ names are available.
External programs such as blkid invoked by the rules might open the device for a brief period oftime, making the device inaccessible for other uses.
8.6. LISTING PERSISTENT NAMING ATTRIBUTES
Red Hat Enterprise Linux 8 Managing file systems
58

This procedure describes how to find out the persistent naming attributes of non-persistent storagedevices.
Procedure
To list the UUID and Label attributes, use the lsblk utility:
$ lsblk --fs storage-device
For example:
Example 8.4. Viewing the UUID and Label of a file system
$ lsblk --fs /dev/sda1
NAME FSTYPE LABEL UUID MOUNTPOINTsda1 xfs Boot afa5d5e3-9050-48c3-acc1-bb30095f3dc4 /boot
To list the PARTUUID attribute, use the lsblk utility with the --output +PARTUUID option:
$ lsblk --output +PARTUUID
For example:
Example 8.5. Viewing the PARTUUID attribute of a partition
$ lsblk --output +PARTUUID /dev/sda1
NAME MAJ:MIN RM SIZE RO TYPE MOUNTPOINT PARTUUIDsda1 8:1 0 512M 0 part /boot 4cd1448a-01
To list the WWID attribute, examine the targets of symbolic links in the /dev/disk/by-id/directory. For example:
Example 8.6. Viewing the WWID of all storage devices on the system
$ file /dev/disk/by-id/*
/dev/disk/by-id/ata-QEMU_HARDDISK_QM00001symbolic link to ../../sda/dev/disk/by-id/ata-QEMU_HARDDISK_QM00001-part1symbolic link to ../../sda1/dev/disk/by-id/ata-QEMU_HARDDISK_QM00001-part2symbolic link to ../../sda2/dev/disk/by-id/dm-name-rhel_rhel8-rootsymbolic link to ../../dm-0/dev/disk/by-id/dm-name-rhel_rhel8-swapsymbolic link to ../../dm-1/dev/disk/by-id/dm-uuid-LVM-QIWtEHtXGobe5bewlIUDivKOz5ofkgFhP0RMFsNyySVihqEl2cWWbR7MjXJolD6gsymbolic link to ../../dm-1/dev/disk/by-id/dm-uuid-LVM-
CHAPTER 8. OVERVIEW OF PERSISTENT NAMING ATTRIBUTES
59
QIWtEHtXGobe5bewlIUDivKOz5ofkgFhXqH2M45hD2H9nAf2qfWSrlRLhzfMyOKdsymbolic link to ../../dm-0/dev/disk/by-id/lvm-pv-uuid-atlr2Y-vuMo-ueoH-CpMG-4JuH-AhEF-wu4QQmsymbolic link to ../../sda2
8.7. MODIFYING PERSISTENT NAMING ATTRIBUTES
This procedure describes how to change the UUID or Label persistent naming attribute of a file system.
NOTE
Changing udev attributes happens in the background and might take a long time. The udevadm settle command waits until the change is fully registered, which ensures thatyour next command will be able to utilize the new attribute correctly.
In the following commands:
Replace new-uuid with the UUID you want to set; for example, 1cdfbc07-1c90-4984-b5ec-f61943f5ea50. You can generate a UUID using the uuidgen command.
Replace new-label with a label; for example, backup_data.
Prerequisites
If you are modifying the attributes of an XFS file system, unmount it first.
Procedure
To change the UUID or Label attributes of an XFS file system, use the xfs_admin utility:
# xfs_admin -U new-uuid -L new-label storage-device# udevadm settle
To change the UUID or Label attributes of an ext4, ext3, or ext2 file system, use the tune2fsutility:
# tune2fs -U new-uuid -L new-label storage-device# udevadm settle
To change the UUID or Label attributes of a swap volume, use the swaplabel utility:
# swaplabel --uuid new-uuid --label new-label swap-device# udevadm settle
Red Hat Enterprise Linux 8 Managing file systems
60

CHAPTER 9. GETTING STARTED WITH PARTITIONSAs a system administrator, you can use the following procedures to create, delete, and modify varioustypes of disk partitions.
For an overview of the advantages and disadvantages to using partitions on block devices, see thefollowing KBase article: https://access.redhat.com/solutions/163853.
9.1. VIEWING THE PARTITION TABLE
As a system administrator, you can display the partition table of a block device to see the partition layoutand details about individual partitions.
9.1.1. Viewing the partition table with parted
This procedure describes how to view the partition table on a block device using the parted utility.
Procedure
1. Start the interactive parted shell:
# parted block-device
Replace block-device with the path to the device you want to examine: for example, /dev/sda.
2. View the partition table:
(parted) print
3. Optionally, use the following command to switch to another device you want to examine next:
(parted) select block-device
Additional resources
The parted(8) man page.
9.1.2. Example output of parted print
This section provides an example output of the print command in the parted shell and describes fields inthe output.
Example 9.1. Output of the print command
Model: ATA SAMSUNG MZNLN256 (scsi)Disk /dev/sda: 256GBSector size (logical/physical): 512B/512BPartition Table: msdosDisk Flags:
Number Start End Size Type File system Flags
CHAPTER 9. GETTING STARTED WITH PARTITIONS
61

1 1049kB 269MB 268MB primary xfs boot 2 269MB 34.6GB 34.4GB primary 3 34.6GB 45.4GB 10.7GB primary 4 45.4GB 256GB 211GB extended 5 45.4GB 256GB 211GB logical
Following is a description of the fields:
Model: ATA SAMSUNG MZNLN256 (scsi)
The disk type, manufacturer, model number, and interface.
Disk /dev/sda: 256GB
The file path to the block device and the storage capacity.
Partition Table: msdos
The disk label type.
Number
The partition number. For example, the partition with minor number 1 corresponds to /dev/sda1.
Start and End
The location on the device where the partition starts and ends.
Type
Valid types are metadata, free, primary, extended, or logical.
File system
The file system type. If the File system field of a device shows no value, this means that its filesystem type is unknown. The parted utility cannot recognize the file system on encrypteddevices.
Flags
Lists the flags set for the partition. Available flags are boot, root, swap, hidden, raid, lvm, or lba.
9.2. CREATING A PARTITION TABLE ON A DISK
As a system administrator, you can format a block device with different types of partition tables toenable using partitions on the device.
WARNING
Formatting a block device with a partition table deletes all data stored on thedevice.
9.2.1. Considerations before modifying partitions on a disk
This section lists key points to consider before creating, removing, or resizing partitions.
NOTE
Red Hat Enterprise Linux 8 Managing file systems
62

NOTE
This section does not cover the DASD partition table, which is specific to the IBM Zarchitecture. For information on DASD, see:
Configuring a Linux instance on IBM Z
The What you should know about DASD article at the IBM Knowledge Center
The maximum number of partitionsThe number of partitions on a device is limited by the type of the partition table:
On a device formatted with the Master Boot Record (MBR) partition table, you can have either:
Up to four primary partitions, or
Up to three primary partitions, one extended partition, and multiple logical partitions withinthe extended.
On a device formatted with the GUID Partition Table (GPT), the maximum number ofpartitions is 128. While the GPT specification allows for more partitions by growing the areareserved for the partition table, common practice used by the parted utility is to limit it toenough area for 128 partitions.
The maximum size of a partitionThe size of a partition on a device is limited by the type of the partition table:
On a device formatted with the Master Boot Record (MBR) partition table, the maximum size is2TiB.
On a device formatted with the GUID Partition Table (GPT), the maximum size is 8ZiB.
If you want to create a partition larger than 2TiB, the disk must be formatted with GPT.
Size alignmentThe parted utility enables you to specify partition size using multiple different suffixes:
MiB, GiB, or TiB
Size expressed in powers of 2.
The starting point of the partition is aligned to the exact sector specified by size.
The ending point is aligned to the specified size minus 1 sector.
MB, GB, or TB
Size expressed in powers of 10.The starting and ending point is aligned within one half of the specified unit: for example, ±500KBwhen using the MB suffix.
9.2.2. Comparison of partition table types
This section compares the properties of different types of partition tables that you can create on a blockdevice.
Table 9.1. Partition table types
CHAPTER 9. GETTING STARTED WITH PARTITIONS
63

Partition table Maximum number of partitions Maximum partition size
Master Boot Record (MBR) 4 primary, or 3 primary and 12logical inside an extendedpartition
2TiB
GUID Partition Table (GPT) 128 8ZiB
9.2.3. Creating a partition table on a disk with parted
This procedure describes how to format a block device with a partition table using the parted utility.
Procedure
1. Start the interactive parted shell:
# parted block-device
Replace block-device with the path to the device where you want to create a partition table:for example, /dev/sda.
2. Determine if there already is a partition table on the device:
(parted) print
If the device already contains partitions, they will be deleted in the next steps.
3. Create the new partition table:
(parted) mklabel table-type
Replace table-type with with the intended partition table type:
msdos for MBR
gpt for GPT
Example 9.2. Creating a GPT table
For example, to create a GPT table on the disk, use:
(parted) mklabel gpt
The changes start taking place as soon as you enter this command, so review it before executingit.
4. View the partition table to confirm that the partition table exists:
(parted) print
5. Exit the parted shell:
Red Hat Enterprise Linux 8 Managing file systems
64
(parted) quit
Additional resources
The parted(8) man page.
Next steps
Create partitions on the device. See Section 9.3, “Creating a partition” for details.
9.3. CREATING A PARTITION
As a system administrator, you can create new partitions on a disk.
9.3.1. Considerations before modifying partitions on a disk
This section lists key points to consider before creating, removing, or resizing partitions.
NOTE
This section does not cover the DASD partition table, which is specific to the IBM Zarchitecture. For information on DASD, see:
Configuring a Linux instance on IBM Z
The What you should know about DASD article at the IBM Knowledge Center
The maximum number of partitionsThe number of partitions on a device is limited by the type of the partition table:
On a device formatted with the Master Boot Record (MBR) partition table, you can have either:
Up to four primary partitions, or
Up to three primary partitions, one extended partition, and multiple logical partitions withinthe extended.
On a device formatted with the GUID Partition Table (GPT), the maximum number ofpartitions is 128. While the GPT specification allows for more partitions by growing the areareserved for the partition table, common practice used by the parted utility is to limit it toenough area for 128 partitions.
The maximum size of a partitionThe size of a partition on a device is limited by the type of the partition table:
On a device formatted with the Master Boot Record (MBR) partition table, the maximum size is2TiB.
On a device formatted with the GUID Partition Table (GPT), the maximum size is 8ZiB.
If you want to create a partition larger than 2TiB, the disk must be formatted with GPT.
Size alignmentThe parted utility enables you to specify partition size using multiple different suffixes:
CHAPTER 9. GETTING STARTED WITH PARTITIONS
65

MiB, GiB, or TiB
Size expressed in powers of 2.
The starting point of the partition is aligned to the exact sector specified by size.
The ending point is aligned to the specified size minus 1 sector.
MB, GB, or TB
Size expressed in powers of 10.The starting and ending point is aligned within one half of the specified unit: for example, ±500KBwhen using the MB suffix.
9.3.2. Partition types
This section describes different attributes that specify the type of a partition.
Partition types or flagsThe partition type, or flag, is used by a running system only rarely. However, the partition type mattersto on-the-fly generators, such as systemd-gpt-auto-generator, which use the partition type to, forexample, automatically identify and mount devices.
The parted utility provides some control of partition types by mapping the partition type toflags. The parted utility can handle only certain partition types: for example LVM, swap, or RAID.
The fdisk utility supports the full range of partition types by specifying hexadecimal codes.
Partition file system typeThe parted utility optionally accepts a file system type argument when creating a partition. The value isused to:
Set the partition flags on MBR, or
Set the partition UUID type on GPT. For example, the swap, fat, or hfs file system types setdifferent GUIDs. The default value is the Linux Data GUID.
The argument does not modify the file system on the partition in any way. It only differentiates betweenthe supported flags or GUIDs.
The following file system types are supported:
xfs
ext2
ext3
ext4
fat16
fat32
hfs
hfs+
Red Hat Enterprise Linux 8 Managing file systems
66

linux-swap
ntfs
reiserfs
9.3.3. Creating a partition with parted
This procedure describes how to create a new partition on a block device using the parted utility.
Prerequisites
There is a partition table on the disk. For details on how to format the disk, see Section 9.2,“Creating a partition table on a disk”.
If the partition you want to create is larger than 2TiB, the disk must be formatted with the GUIDPartition Table (GPT).
Procedure
1. Start the interactive parted shell:
# parted block-device
Replace block-device with the path to the device where you want to create a partition: forexample, /dev/sda.
2. View the current partition table to determine if there is enough free space:
(parted) print
If there is not enough free space, you can resize an existing partition. For more information,see Section 9.5, “Resizing a partition” .
From the partition table, determine:
The start and end points of the new partition
On MBR, what partition type it should be.
3. Create the new partition:
(parted) mkpart part-type name fs-type start end
Replace part-type with with primary, logical, or extended based on what you decided fromthe partition table. This applies only to the MBR partition table.
Replace name with an arbitrary partition name. This is required for GPT partition tables.
Replace fs-type with any one of xfs, ext2, ext3, ext4, fat16, fat32, hfs, hfs+, linux-swap, ntfs, or reiserfs. The fs-type parameter is optional. Note that parted does not create thefile system on the partition.
Replace start and end with the sizes that determine the starting and ending points of the
CHAPTER 9. GETTING STARTED WITH PARTITIONS
67
Replace start and end with the sizes that determine the starting and ending points of thepartition, counting from the beginning of the disk. You can use size suffixes, such as 512MiB,20GiB, or 1.5TiB. The default size megabytes.
Example 9.3. Creating a small primary partition
For example, to create a primary partition from 1024MiB until 2048MiB on an MBR table, use:
(parted) mkpart primary 1024MiB 2048MiB
The changes start taking place as soon as you enter this command, so review it before executingit.
4. View the partition table to confirm that the created partition is in the partition table with thecorrect partition type, file system type, and size:
(parted) print
5. Exit the parted shell:
(parted) quit
6. Use the following command to wait for the system to register the new device node:
# udevadm settle
7. Verify that the kernel recognizes the new partition:
# cat /proc/partitions
Additional resources
The parted(8) man page.
9.3.4. Setting a partition type with fdisk
This procedure describes how to set a partition type, or flag, using the fdisk utility.
Prerequisites
There is a partition on the disk.
Procedure
1. Start the interactive fdisk shell:
# fdisk block-device
Replace block-device with the path to the device where you want to set a partition type: forexample, /dev/sda.
Red Hat Enterprise Linux 8 Managing file systems
68

2. View the current partition table to determine the minor partition number:
Command (m for help): print
You can see the current partition type in the Type column and its corresponding type ID in the Id column.
3. Enter the partition type command and select a partition using its minor number:
Command (m for help): typePartition number (1,2,3 default 3): 2
4. Optionally, list the available hexadecimal codes:
Hex code (type L to list all codes): L
5. Set the partition type:
Hex code (type L to list all codes): 8e
6. Write your changes and exit the fdisk shell:
Command (m for help): writeThe partition table has been altered.Syncing disks.
7. Verify your changes:
# fdisk --list block-device
9.4. REMOVING A PARTITION
As a system administrator, you can remove a disk partition that is no longer used to free up disk space.
WARNING
Removing a partition deletes all data stored on the partition.
9.4.1. Considerations before modifying partitions on a disk
This section lists key points to consider before creating, removing, or resizing partitions.
NOTE
CHAPTER 9. GETTING STARTED WITH PARTITIONS
69
NOTE
This section does not cover the DASD partition table, which is specific to the IBM Zarchitecture. For information on DASD, see:
Configuring a Linux instance on IBM Z
The What you should know about DASD article at the IBM Knowledge Center
The maximum number of partitionsThe number of partitions on a device is limited by the type of the partition table:
On a device formatted with the Master Boot Record (MBR) partition table, you can have either:
Up to four primary partitions, or
Up to three primary partitions, one extended partition, and multiple logical partitions withinthe extended.
On a device formatted with the GUID Partition Table (GPT), the maximum number ofpartitions is 128. While the GPT specification allows for more partitions by growing the areareserved for the partition table, common practice used by the parted utility is to limit it toenough area for 128 partitions.
The maximum size of a partitionThe size of a partition on a device is limited by the type of the partition table:
On a device formatted with the Master Boot Record (MBR) partition table, the maximum size is2TiB.
On a device formatted with the GUID Partition Table (GPT), the maximum size is 8ZiB.
If you want to create a partition larger than 2TiB, the disk must be formatted with GPT.
Size alignmentThe parted utility enables you to specify partition size using multiple different suffixes:
MiB, GiB, or TiB
Size expressed in powers of 2.
The starting point of the partition is aligned to the exact sector specified by size.
The ending point is aligned to the specified size minus 1 sector.
MB, GB, or TB
Size expressed in powers of 10.The starting and ending point is aligned within one half of the specified unit: for example, ±500KBwhen using the MB suffix.
9.4.2. Removing a partition with parted
This procedure describes how to remove a disk partition using the parted utility.
Procedure
Red Hat Enterprise Linux 8 Managing file systems
70

1. Start the interactive parted shell:
# parted block-device
Replace block-device with the path to the device where you want to remove a partition: forexample, /dev/sda.
2. View the current partition table to determine the minor number of the partition to remove:
(parted) print
3. Remove the partition:
(parted) rm minor-number
Replace minor-number with the minor number of the partition you want to remove: forexample, 3.
The changes start taking place as soon as you enter this command, so review it before executingit.
4. Confirm that the partition is removed from the partition table:
(parted) print
5. Exit the parted shell:
(parted) quit
6. Verify that the kernel knows the partition is removed:
# cat /proc/partitions
7. Remove the partition from the /etc/fstab file if it is present. Find the line that declares theremoved partition, and remove it from the file.
8. Regenerate mount units so that your system registers the new /etc/fstab configuration:
# systemctl daemon-reload
9. If you have deleted a swap partition or removed pieces of LVM, remove all references to thepartition from the kernel command line in the /etc/default/grub file and regenerate GRUBconfiguration:
On a BIOS-based system:
# grub2-mkconfig --output=/etc/grub2.cfg
On a UEFI-based system:
# grub2-mkconfig --output=/etc/grub2-efi.cfg
10. To register the changes in the early boot system, rebuild the initramfs file system:
CHAPTER 9. GETTING STARTED WITH PARTITIONS
71

# dracut --force --verbose
Additional resources
The parted(8) man page
9.5. RESIZING A PARTITION
As a system administrator, you can extend a partition to utilize unused disk space, or shrink a partition touse its capacity for different purposes.
9.5.1. Considerations before modifying partitions on a disk
This section lists key points to consider before creating, removing, or resizing partitions.
NOTE
This section does not cover the DASD partition table, which is specific to the IBM Zarchitecture. For information on DASD, see:
Configuring a Linux instance on IBM Z
The What you should know about DASD article at the IBM Knowledge Center
The maximum number of partitionsThe number of partitions on a device is limited by the type of the partition table:
On a device formatted with the Master Boot Record (MBR) partition table, you can have either:
Up to four primary partitions, or
Up to three primary partitions, one extended partition, and multiple logical partitions withinthe extended.
On a device formatted with the GUID Partition Table (GPT), the maximum number ofpartitions is 128. While the GPT specification allows for more partitions by growing the areareserved for the partition table, common practice used by the parted utility is to limit it toenough area for 128 partitions.
The maximum size of a partitionThe size of a partition on a device is limited by the type of the partition table:
On a device formatted with the Master Boot Record (MBR) partition table, the maximum size is2TiB.
On a device formatted with the GUID Partition Table (GPT), the maximum size is 8ZiB.
If you want to create a partition larger than 2TiB, the disk must be formatted with GPT.
Size alignmentThe parted utility enables you to specify partition size using multiple different suffixes:
MiB, GiB, or TiB
Size expressed in powers of 2.
The starting point of the partition is aligned to the exact sector specified by size.
Red Hat Enterprise Linux 8 Managing file systems
72

The starting point of the partition is aligned to the exact sector specified by size.
The ending point is aligned to the specified size minus 1 sector.
MB, GB, or TB
Size expressed in powers of 10.The starting and ending point is aligned within one half of the specified unit: for example, ±500KBwhen using the MB suffix.
9.5.2. Resizing a partition with parted
This procedure resizes a disk partition using the parted utility.
Prerequisites
If you want to shrink a partition, back up the data that are stored on it.
WARNING
Shrinking a partition might result in data loss on the partition.
If you want to resize a partition to be larger than 2TiB, the disk must be formatted with the GUIDPartition Table (GPT). For details on how to format the disk, see Section 9.2, “Creating apartition table on a disk”.
Procedure
1. If you want to shrink the partition, shrink the file system on it first so that it is not larger than theresized partition. Note that XFS does not support shrinking.
2. Start the interactive parted shell:
# parted block-device
Replace block-device with the path to the device where you want to resize a partition: forexample, /dev/sda.
3. View the current partition table:
(parted) print
From the partition table, determine:
The minor number of the partition
The location of the existing partition and its new ending point after resizing
4. Resize the partition:
CHAPTER 9. GETTING STARTED WITH PARTITIONS
73
(parted) resizepart minor-number new-end
Replace minor-number with the minor number of the partition that you are resizing: forexample, 3.
Replace new-end with the size that determines the new ending point of the resizedpartition, counting from the beginning of the disk. You can use size suffixes, such as 512MiB,20GiB, or 1.5TiB. The default size megabytes.
Example 9.4. Extending a partition
For example, to extend a partition located at the beginning of the disk to be 2GiB in size, use:
(parted) resizepart 1 2GiB
The changes start taking place as soon as you enter this command, so review it before executingit.
5. View the partition table to confirm that the resized partition is in the partition table with thecorrect size:
(parted) print
6. Exit the parted shell:
(parted) quit
7. Verify that the kernel recognizes the new partition:
# cat /proc/partitions
8. If you extended the partition, extend the file system on it as well. See (reference) for details.
Additional resources
The parted(8) man page.
Red Hat Enterprise Linux 8 Managing file systems
74
CHAPTER 10. GETTING STARTED WITH XFSThis is an overview of how to create and maintain XFS file systems.
10.1. THE XFS FILE SYSTEM
XFS is a highly scalable, high-performance, robust, and mature 64-bit journaling file system thatsupports very large files and file systems on a single host. It is the default file system in Red HatEnterprise Linux 8. XFS was originally developed in the early 1990s by SGI and has a long history ofrunning on extremely large servers and storage arrays.
The features of XFS include:
Reliability
Metadata journaling, which ensures file system integrity after a system crash by keeping arecord of file system operations that can be replayed when the system is restarted and thefile system remounted
Extensive run-time metadata consistency checking
Scalable and fast repair utilities
Quota journaling. This avoids the need for lengthy quota consistency checks after a crash.
Scalability and performance
Supported file system size up to 1024 TiB
Ability to support a large number of concurrent operations
B-tree indexing for scalability of free space management
Sophisticated metadata read-ahead algorithms
Optimizations for streaming video workloads
Allocation schemes
Extent-based allocation
Stripe-aware allocation policies
Delayed allocation
Space pre-allocation
Dynamically allocated inodes
Other features
Reflink-based file copies (new in Red Hat Enterprise Linux 8)
Tightly integrated backup and restore utilities
Online defragmentation
CHAPTER 10. GETTING STARTED WITH XFS
75

Online file system growing
Comprehensive diagnostics capabilities
Extended attributes (xattr). This allows the system to associate several additionalname/value pairs per file.
Project or directory quotas. This allows quota restrictions over a directory tree.
Subsecond timestamps
Performance characteristicsXFS has a high performance on large systems with enterprise workloads. A large system is one with arelatively high number of CPUs, multiple HBAs, and connections to external disk arrays. XFS alsoperforms well on smaller systems that have a multi-threaded, parallel I/O workload.
XFS has a relatively low performance for single threaded, metadata-intensive workloads: for example, aworkload that creates or deletes large numbers of small files in a single thread.
10.2. CREATING AN XFS FILE SYSTEM
As a system administrator, you can create an XFS file system on a block device to enable it to store filesand directories.
10.2.1. Creating an XFS file system with mkfs.xfs
This procedure describes how to create an XFS file system on a block device.
Procedure
1. To create the file system:
If the device is a regular partition, an LVM volume, an MD volume, a disk, or a similar device,use the following command:
# mkfs.xfs block-device
Replace block-device with the path to the block device. For example, /dev/sdb1, /dev/disk/by-uuid/05e99ec8-def1-4a5e-8a9d-5945339ceb2a, or /dev/my-volgroup/my-lv.
In general, the default options are optimal for common use.
When using mkfs.xfs on a block device containing an existing file system, add the -foption to overwrite that file system.
To create the file system on a hardware RAID device, check if the system correctly detectsthe stripe geometry of the device:
If the stripe geometry information is correct, no additional options are needed. Createthe file system:
# mkfs.xfs block-device
If the information is incorrect, specify stripe geometry manually with the su and sw
Red Hat Enterprise Linux 8 Managing file systems
76

If the information is incorrect, specify stripe geometry manually with the su and swparameters of the -d option. The su parameter specifies the RAID chunk size, and the sw parameter specifies the number of data disks in the RAID device.For example:
# mkfs.xfs -d su=64k,sw=4 /dev/sda3
2. Use the following command to wait for the system to register the new device node:
# udevadm settle
Additional resources
The mkfs.xfs(8) man page.
10.2.2. Creating an XFS file system on a block device using RHEL System Roles
This section describes how to create an XFS file system on a block device on multiple target machinesusing the storage role.
Prerequisites
An Ansible playbook that uses the storage role exists.For information on how to apply such a playbook, see Applying a role .
10.2.2.1. Example Ansible playbook to create an XFS file system on a block device
This section provides an example Ansible playbook. This playbook applies the storage role to create anXFS file system on a block device (/dev/sdb) using the default parameters.
WARNING
The storage role can create file systems only on whole disks. Partitions are notsupported.
---- hosts: all vars: storage_volumes: - name: barefs type: disk disks: - sdb fs_type: xfs roles: - rhel-system-roles.storage
The volume name (barefs in the example) is currently arbitrary. The volume is identified by the disk
CHAPTER 10. GETTING STARTED WITH XFS
77

The volume name (barefs in the example) is currently arbitrary. The volume is identified by the diskdevice listed under the disks: attribute.
XFS is the default file system type in RHEL 8, so fs_type: xfs can be omitted.
NOTE
To create a file system on a logical volume, do not provide the path to the LV deviceunder the disks: attribute. Instead, provide the LVM setup including the enclosingvolume group as described in Configuring and managing logical volumes.
10.2.2.2. Additional resources
For more information about the storage role, see Section 2.1, “Introduction to the storage role” .
10.3. BACKING UP AN XFS FILE SYSTEM
As a system administrator, you can use the xfsdump to back up an XFS file system into a file or on atape. This provides a simple backup mechanism.
10.3.1. Features of XFS backup
This section describes key concepts and features of backing up an XFS file system with the xfsdumputility.
You can use the xfsdump utility to:
Perform backups to regular file images.Only one backup can be written to a regular file.
Perform backups to tape drives.The xfsdump utility also enables you to write multiple backups to the same tape. A backup canspan multiple tapes.
To back up multiple file systems to a single tape device, simply write the backup to a tape thatalready contains an XFS backup. This appends the new backup to the previous one. By default, xfsdump never overwrites existing backups.
Create incremental backups.The xfsdump utility uses dump levels to determine a base backup to which other backups arerelative. Numbers from 0 to 9 refer to increasing dump levels. An incremental backup only backsup files that have changed since the last dump of a lower level:
To perform a full backup, perform a level 0 dump on the file system.
A level 1 dump is the first incremental backup after a full backup. The next incrementalbackup would be level 2, which only backs up files that have changed since the last level1 dump; and so on, to a maximum of level 9.
Exclude files from a backup using size, subtree, or inode flags to filter them.
Additional resources
The xfsdump(8) man page.
Red Hat Enterprise Linux 8 Managing file systems
78

10.3.2. Backing up an XFS file system with xfsdump
This procedure describes how to back up the content of an XFS file system into a file or a tape.
Prerequisites
An XFS file system that you can back up.
Another file system or a tape drive where you can store the backup.
Procedure
Use the following command to back up an XFS file system:
# xfsdump -l level [-L label] \ -f backup-destination path-to-xfs-filesystem
Replace level with the dump level of your backup. Use 0 to perform a full backup or 1 to 9 toperform consequent incremental backups.
Replace backup-destination with the path where you want to store your backup. Thedestination can be a regular file, a tape drive, or a remote tape device. For example, /backup-files/Data.xfsdump for a file or /dev/st0 for a tape drive.
Replace path-to-xfs-filesystem with the mount point of the XFS file system you want toback up. For example, /mnt/data/. The file system must be mounted.
When backing up multiple file systems and saving them on a single tape device, add asession label to each backup using the -L label option so that it is easier to identify themwhen restoring. Replace label with any name for your backup: for example, backup_data.
Example 10.1. Backing up multiple XFS file systems
To back up the content of XFS file systems mounted on the /boot/ and /data/ directoriesand save them as files in the /backup-files/ directory:
# xfsdump -l 0 -f /backup-files/boot.xfsdump /boot# xfsdump -l 0 -f /backup-files/data.xfsdump /data
To back up multiple file systems on a single tape device, add a session label to each backupusing the -L label option:
# xfsdump -l 0 -L "backup_boot" -f /dev/st0 /boot# xfsdump -l 0 -L "backup_data" -f /dev/st0 /data
Additional resources
The xfsdump(8) man page.
10.3.3. Additional resources
The xfsdump(8) man page.
CHAPTER 10. GETTING STARTED WITH XFS
79
10.4. RESTORING AN XFS FILE SYSTEM FROM BACKUP
As a system administrator, you can use the xfsrestore utility to restore XFS backup created with the xfsdump utility and stored in a file or on a tape.
10.4.1. Features of restoring XFS from backup
This section describes key concepts and features of restoring an XFS file system from backup with the xfsrestore utility.
The xfsrestore utility restores file systems from backups produced by xfsdump. The xfsrestore utilityhas two modes:
The simple mode enables users to restore an entire file system from a level 0 dump. This is thedefault mode.
The cumulative mode enables file system restoration from an incremental backup: that is,level 1 to level 9.
A unique session ID or session label identifies each backup. Restoring a backup from a tape containingmultiple backups requires its corresponding session ID or label.
To extract, add, or delete specific files from a backup, enter the xfsrestore interactive mode. Theinteractive mode provides a set of commands to manipulate the backup files.
Additional resources
The xfsrestore(8) man page.
10.4.2. Restoring an XFS file system from backup with xfsrestore
This procedure describes how to restore the content of an XFS file system from a file or tape backup.
Prerequisites
A file or tape backup of XFS file systems, as described in Section 10.3, “Backing up an XFS filesystem”.
A storage device where you can restore the backup.
Procedure
The command to restore the backup varies depending on whether you are restoring from a fullbackup or an incremental one, or are restoring multiple backups from a single tape device:
# xfsrestore [-r] [-S session-id] [-L session-label] [-i] -f backup-location restoration-path
Replace backup-location with the location of the backup. This can be a regular file, a tapedrive, or a remote tape device. For example, /backup-files/Data.xfsdump for a file or /dev/st0 for a tape drive.
Replace restoration-path with the path to the directory where you want to restore the filesystem. For example, /mnt/data/.
Red Hat Enterprise Linux 8 Managing file systems
80
To restore a file system from an incremental (level 1 to level 9) backup, add the -r option.
To restore a backup from a tape device that contains multiple backups, specify the backupusing the -S or -L options.The -S option lets you choose a backup by its session ID, while the -L option lets you chooseby the session label. To obtain the session ID and session labels, use the xfsrestore -Icommand.
Replace session-id with the session ID of the backup. For example, b74a3586-e52e-4a4a-8775-c3334fa8ea2c. Replace session-label with the session label of the backup. Forexample, my_backup_session_label.
To use xfsrestore interactively, use the -i option.The interactive dialog begins after xfsrestore finishes reading the specified device.Available commands in the interactive xfsrestore shell include cd, ls, add, delete, and extract; for a complete list of commands, use the help command.
Example 10.2. Restoring Multiple XFS File Systems
To restore the XFS backup files and save their content into directories under /mnt/:
# xfsrestore -f /backup-files/boot.xfsdump /mnt/boot/# xfsrestore -f /backup-files/data.xfsdump /mnt/data/
To restore from a tape device containing multiple backups, specify each backup by itssession label or session ID:
# xfsrestore -L "backup_boot" -f /dev/st0 /mnt/boot/# xfsrestore -S "45e9af35-efd2-4244-87bc-4762e476cbab" \ -f /dev/st0 /mnt/data/
Additional resources
The xfsrestore(8) man page.
10.4.3. Informational messages when restoring an XFS backup from a tape
When restoring a backup from a tape with backups from multiple file systems, the xfsrestore utilitymight issue messages. The messages inform you whether a match of the requested backup has beenfound when xfsrestore examines each backup on the tape in sequential order. For example:
xfsrestore: preparing drivexfsrestore: examining media file 0xfsrestore: inventory session uuid (8590224e-3c93-469c-a311-fc8f23029b2a) does not match the media header's session uuid (7eda9f86-f1e9-4dfd-b1d4-c50467912408)xfsrestore: examining media file 1xfsrestore: inventory session uuid (8590224e-3c93-469c-a311-fc8f23029b2a) does not match the media header's session uuid (7eda9f86-f1e9-4dfd-b1d4-c50467912408)[...]
The informational messages keep appearing until the matching backup is found.
CHAPTER 10. GETTING STARTED WITH XFS
81
10.4.4. Additional resources
The xfsrestore(8) man page.
10.5. INCREASING THE SIZE OF AN XFS FILE SYSTEM
As a system administrator, you can increase the size of an XFS file system to utilize larger storagecapacity.
IMPORTANT
It is not currently possible to decrease the size of XFS file systems.
10.5.1. Increasing the size of an XFS file system with xfs_growfs
This procedure describes how to grow an XFS file system using the xfs_growfs utility.
Prerequisites
Ensure that the underlying block device is of an appropriate size to hold the resized file systemlater. Use the appropriate resizing methods for the affected block device.
Mount the XFS file system.
Procedure
While the XFS file system is mounted, use the xfs_growfs utility to increase its size:
# xfs_growfs file-system -D new-size
Replace file-system with the mount point of the XFS file system.
With the -D option, replace new-size with the desired new size of the file system specified inthe number of file system blocks.To find out the block size in kB of a given XFS file system, use the xfs_info utility:
# xfs_info block-device
...data = bsize=4096...
Without the -D option, xfs_growfs grows the file system to the maximum size supported bythe underlying device.
Additional resources
The xfs_growfs(8) man page.
Red Hat Enterprise Linux 8 Managing file systems
82

CHAPTER 11. CHECKING AND REPAIRING A FILE SYSTEMRHEL provides file system administration utilities which are capable of checking and repairing filesystems. These tools are often referred to as fsck tools, where fsck is a shortened version of file systemcheck. In most cases, these utilities are run automatically during system boot, if needed, but can also bemanually invoked if required.
IMPORTANT
File system checkers guarantee only metadata consistency across the file system. Theyhave no awareness of the actual data contained within the file system and are not datarecovery tools.
11.1. SCENARIOS THAT REQUIRE A FILE SYSTEM CHECK
The relevant fsck tools can be used to check your system if any of the following occurs:
System fails to boot
Files on a specific disk become corrupt
The file system shuts down or changes to read-only due to inconsistencies
A file on the file system is inaccessible
File system inconsistencies can occur for various reasons, including but not limited to hardware errors,storage administration errors, and software bugs.
IMPORTANT
File system check tools cannot repair hardware problems. A file system must be fullyreadable and writable if repair is to operate successfully. If a file system was corrupteddue to a hardware error, the file system must first be moved to a good disk, for examplewith the dd(8) utility.
For journaling file systems, all that is normally required at boot time is to replay the journal if requiredand this is usually a very short operation.
However, if a file system inconsistency or corruption occurs, even for journaling file systems, then thefile system checker must be used to repair the file system.
IMPORTANT
It is possible to disable file system check at boot by setting the sixth field in /etc/fstab to 0. However, Red Hat does not recommend doing so unless you are having issues with fsckat boot time, for example with extremely large or remote file systems.
Additional resources
The fstab(5) man page.
The fsck(8) man page.
The dd(8) man page.
CHAPTER 11. CHECKING AND REPAIRING A FILE SYSTEM
83

11.2. POTENTIAL SIDE EFFECTS OF RUNNING FSCK
Generally, running the file system check and repair tool can be expected to automatically repair at leastsome of the inconsistencies it finds. In some cases, the following issues can arise:
Severely damaged inodes or directories may be discarded if they cannot be repaired.
Significant changes to the file system may occur.
To ensure that unexpected or undesirable changes are not permanently made, ensure you follow anyprecautionary steps outlined in the procedure.
11.3. ERROR-HANDLING MECHANISMS IN XFS
This section describes how XFS handles various kinds of errors in the file system.
Unclean unmountsJournalling maintains a transactional record of metadata changes that happen on the file system.
In the event of a system crash, power failure, or other unclean unmount, XFS uses the journal (alsocalled log) to recover the file system. The kernel performs journal recovery when mounting the XFS filesystem.
CorruptionIn this context, corruption means errors on the file system caused by, for example:
Hardware faults
Bugs in storage firmware, device drivers, the software stack, or the file system itself
Problems that cause parts of the file system to be overwritten by something outside of the filesystem
When XFS detects corruption in the file system or the file-system metadata, it may shut down the filesystem and report the incident in the system log. Note that if the corruption occurred on the file systemhosting the /var directory, these logs will not be available after a reboot.
Example 11.1. System log entry reporting an XFS corruption
# dmesg --notime | tail -15
XFS (loop0): Mounting V5 FilesystemXFS (loop0): Metadata CRC error detected at xfs_agi_read_verify+0xcb/0xf0 [xfs], xfs_agi block 0x2XFS (loop0): Unmount and run xfs_repairXFS (loop0): First 128 bytes of corrupted metadata buffer:00000000027b3b56: 00 00 00 00 00 00 00 00 00 00 00 00 00 00 00 00 ................000000005f9abc7a: 00 00 00 00 00 00 00 00 00 00 00 00 00 00 00 00 ................000000005b0aef35: 00 00 00 00 00 00 00 00 00 00 00 00 00 00 00 00 ................00000000da9d2ded: 00 00 00 00 00 00 00 00 00 00 00 00 00 00 00 00 ................000000001e265b07: 00 00 00 00 00 00 00 00 00 00 00 00 00 00 00 00 ................000000006a40df69: 00 00 00 00 00 00 00 00 00 00 00 00 00 00 00 00 ................000000000b272907: 00 00 00 00 00 00 00 00 00 00 00 00 00 00 00 00 ................00000000e484aac5: 00 00 00 00 00 00 00 00 00 00 00 00 00 00 00 00 ................
Red Hat Enterprise Linux 8 Managing file systems
84
XFS (loop0): metadata I/O error in "xfs_trans_read_buf_map" at daddr 0x2 len 1 error 74XFS (loop0): xfs_imap_lookup: xfs_ialloc_read_agi() returned error -117, agno 0XFS (loop0): Failed to read root inode 0x80, error 11
User-space utilities usually report the Input/output error message when trying to access a corruptedXFS file system. Mounting an XFS file system with a corrupted log results in a failed mount and thefollowing error message:
mount: /mount-point: mount(2) system call failed: Structure needs cleaning.
You must manually use the xfs_repair utility to repair the corruption.
Additional resources
The xfs_repair(8) man page provides a detailed list of XFS corruption checks.
11.4. CHECKING AN XFS FILE SYSTEM WITH XFS_REPAIR
This procedure performs a read-only check of an XFS file system using the xfs_repair utility. You mustmanually use the xfs_repair utility to repair any corruption. Unlike other file system repair utilities, xfs_repair does not run at boot time, even when an XFS file system was not cleanly unmounted. In theevent of an unclean unmount, XFS simply replays the log at mount time, ensuring a consistent filesystem; xfs_repair cannot repair an XFS file system with a dirty log without remounting it first.
NOTE
Although an fsck.xfs binary is present in the xfsprogs package, this is present only tosatisfy initscripts that look for an fsck.file system binary at boot time. fsck.xfsimmediately exits with an exit code of 0.
Procedure
1. Replay the log by mounting and unmounting the file system:
# mount file-system# umount file-system
NOTE
If the mount fails with a structure needs cleaning error, the log is corrupted andcannot be replayed. The dry run should discover and report more on-diskcorruption as a result.
2. Use the xfs_repair utility to perform a dry run to check the file system. Any errors are printedand an indication of the actions that would be taken, without modifying the file system.
# xfs_repair -n block-device
3. Mount the file system:
# mount file-system
CHAPTER 11. CHECKING AND REPAIRING A FILE SYSTEM
85

Additional resources
The xfs_repair(8) man page.
The xfs_metadump(8) man page.
11.5. REPAIRING AN XFS FILE SYSTEM WITH XFS_REPAIR
This procedure repairs a corrupted XFS file system using the xfs_repair utility.
Procedure
1. Create a metadata image prior to repair for diagnostic or testing purposes using the xfs_metadump utility. A pre-repair file system metadata image can be useful for supportinvestigations if the corruption is due to a software bug. Patterns of corruption present in thepre-repair image can aid in root-cause analysis.
Use the xfs_metadump debugging tool to copy the metadata from an XFS file system to afile. The resulting metadump file can be compressed using standard compression utilities toreduce the file size if large metadump files need to be sent to support.
# xfs_metadump block-device metadump-file
2. Replay the log by remounting the file system:
# mount file-system# umount file-system
3. Use the xfs_repair utility to repair the unmounted file system:
If the mount succeeded, no additional options are required:
# xfs_repair block-device
If the mount failed with the Structure needs cleaning error, the log is corrupted and cannotbe replayed. Use the -L option (force log zeroing) to clear the log:
WARNING
This command causes all metadata updates in progress at the time ofthe crash to be lost, which might cause significant file system damageand data loss. This should be used only as a last resort if the log cannotbe replayed.
# xfs_repair -L block-device
4. Mount the file system:
# mount file-system
Red Hat Enterprise Linux 8 Managing file systems
86

Additional resources
The xfs_repair(8) man page.
11.6. ERROR HANDLING MECHANISMS IN EXT2, EXT3, AND EXT4
The ext2, ext3, and ext4 file systems use the e2fsck utility to perform file system checks and repairs.The file names fsck.ext2, fsck.ext3, and fsck.ext4 are hardlinks to the e2fsck utility. These binaries arerun automatically at boot time and their behavior differs based on the file system being checked and thestate of the file system.
A full file system check and repair is invoked for ext2, which is not a metadata journaling file system, andfor ext4 file systems without a journal.
For ext3 and ext4 file systems with metadata journaling, the journal is replayed in userspace and theutility exits. This is the default action because journal replay ensures a consistent file system after acrash.
If these file systems encounter metadata inconsistencies while mounted, they record this fact in the filesystem superblock. If e2fsck finds that a file system is marked with such an error, e2fsck performs a fullcheck after replaying the journal (if present).
Additional resources
The fsck(8) man page.
The e2fsck(8) man page.
11.7. CHECKING AN EXT2, EXT3, OR EXT4 FILE SYSTEM WITH E2FSCK
This procedure checks an ext2, ext3, or ext4 file system using the e2fsck utility.
Procedure
1. Replay the log by remounting the file system:
# mount file-system# umount file-system
2. Perform a dry run to check the file system.
# e2fsck -n block-device
NOTE
Any errors are printed and an indication of the actions that would be taken,without modifying the file system. Later phases of consistency checking mayprint extra errors as it discovers inconsistencies which would have been fixed inearly phases if it were running in repair mode.
Additional resources
CHAPTER 11. CHECKING AND REPAIRING A FILE SYSTEM
87
The e2image(8) man page.
The e2fsck(8) man page.
11.8. REPAIRING AN EXT2, EXT3, OR EXT4 FILE SYSTEM WITH E2FSCK
This procedure repairs a corrupted ext2, ext3, or ext4 file system using the e2fsck utility.
Procedure
1. Save a file system image for support investigations. A pre-repair file system metadata imagecan be useful for support investigations if the corruption is due to a software bug. Patterns ofcorruption present in the pre-repair image can aid in root-cause analysis.
NOTE
Severely damaged file systems may cause problems with metadata imagecreation.
If you are creating the image for testing purposes, use the -r option to create a sparse file ofthe same size as the file system itself. e2fsck can then operate directly on the resulting file.
# e2image -r block-device image-file
If you are creating the image to be archived or provided for diagnostic, use the -Q option,which creates a more compact file format suitable for transfer.
# e2image -Q block-device image-file
2. Replay the log by remounting the file system:
# mount file-system# umount file-system
3. Automatically repair the file system. If user intervention is required, e2fsck indicates the unfixedproblem in its output and reflects this status in the exit code.
# e2fsck -p block-device
Additional resources
The e2image(8) man page.
The e2fsck(8) man page.
Red Hat Enterprise Linux 8 Managing file systems
88

CHAPTER 12. MOUNTING FILE SYSTEMSAs a system administrator, you can mount file systems on your system to access data on them.
12.1. THE LINUX MOUNT MECHANISM
This section explains basic concepts of mounting file systems on Linux.
On Linux, UNIX, and similar operating systems, file systems on different partitions and removabledevices (CDs, DVDs, or USB flash drives for example) can be attached to a certain point (the mountpoint) in the directory tree, and then detached again. While a file system is mounted on a directory, theoriginal content of the directory is not accessible.
Note that Linux does not prevent you from mounting a file system to a directory with a file systemalready attached to it.
When mounting, you can identify the device by:
a universally unique identifier (UUID): for example, UUID=34795a28-ca6d-4fd8-a347-73671d0c19cb
a volume label: for example, LABEL=home
a full path to a non-persistent block device: for example, /dev/sda3
When you mount a file system using the mount command without all required information, that iswithout the device name, the target directory, or the file system type, the mount utility reads thecontent of the /etc/fstab file to check if the given file system is listed there. The /etc/fstab file containsa list of device names and the directories in which the selected file systems are set to be mounted aswell as the file system type and mount options. Therefore, when mounting a file system that is specifiedin /etc/fstab, the following command syntax is sufficient:
Mounting by the mount point:
# mount directory
Mounting by the block device:
# mount device
Additional resources
The mount(8) man page.
For information on how to list persistent naming attributes such as the UUID, see Section 8.6,“Listing persistent naming attributes”.
12.2. LISTING CURRENTLY MOUNTED FILE SYSTEMS
This procedure describes how to list all currently mounted file systems on the command line.
Procedure
To list all mounted file systems, use the findmnt utility:
CHAPTER 12. MOUNTING FILE SYSTEMS
89

$ findmnt
To limit the listed file systems only to a certain file system type, add the --types option:
$ findmnt --types fs-type
For example:
Example 12.1. Listing only XFS file systems
$ findmnt --types xfs
TARGET SOURCE FSTYPE OPTIONS/ /dev/mapper/luks-5564ed00-6aac-4406-bfb4-c59bf5de48b5 xfs rw,relatime├─/boot /dev/sda1 xfs rw,relatime└─/home /dev/mapper/luks-9d185660-7537-414d-b727-d92ea036051e xfs rw,relatime
Additional resources
The findmnt(8) man page.
12.3. MOUNTING A FILE SYSTEM WITH MOUNT
This procedure describes how to mount a file system using the mount utility.
Prerequisites
Make sure that no file system is already mounted on your chosen mount point:
$ findmnt mount-point
Procedure
1. To attach a certain file system, use the mount utility:
# mount device mount-point
Example 12.2. Mounting an XFS file system
For example, to mount a local XFS file system identified by UUID:
# mount UUID=ea74bbec-536d-490c-b8d9-5b40bbd7545b /mnt/data
2. If mount cannot recognize the file system type automatically, specify it using the --typesoption:
# mount --types type device mount-point
Example 12.3. Mounting an NFS file system
Red Hat Enterprise Linux 8 Managing file systems
90
For example, to mount a remote NFS file system:
# mount --types nfs4 host:/remote-export /mnt/nfs
Additional resources
The mount(8) man page.
12.4. MOVING A MOUNT POINT
This procedure describes how to change the mount point of a mounted file system to a differentdirectory.
Procedure
1. To change the directory in which a file system is mounted:
# mount --move old-directory new-directory
Example 12.4. Moving a home file system
For example, to move the file system mounted in the /mnt/userdirs/ directory to the /home/mount point:
# mount --move /mnt/userdirs /home
2. Verify that the file system has been moved as expected:
$ findmnt$ ls old-directory$ ls new-directory
Additional resources
The mount(8) man page.
12.5. UNMOUNTING A FILE SYSTEM WITH UMOUNT
This procedure describes how to unmount a file system using the umount utility.
Procedure
1. Try unmounting the file system using either of the following commands:
By mount point:
# umount mount-point
By device:
CHAPTER 12. MOUNTING FILE SYSTEMS
91
# umount device
If the command fails with an error similar to the following, it means that the file system is in usebecause of a process is using resources on it:
umount: /run/media/user/FlashDrive: target is busy.
2. If the file system is in use, use the fuser utility to determine which processes are accessing it.For example:
$ fuser --mount /run/media/user/FlashDrive
/run/media/user/FlashDrive: 18351
Afterwards, terminate the processes using the file system and try unmounting it again.
12.6. COMMON MOUNT OPTIONS
This section lists some commonly used options of the mount utility.
You can use these options in the following syntax:
# mount --options option1,option2,option3 device mount-point
Table 12.1. Common mount options
Option Description
async Enables asynchronous input and output operations on the file system.
auto Enables the file system to be mounted automatically using the mount -acommand.
defaults Provides an alias for the async,auto,dev,exec,nouser,rw,suid options.
exec Allows the execution of binary files on the particular file system.
loop Mounts an image as a loop device.
noauto Default behavior disables the automatic mount of the file system using the mount -a command.
noexec Disallows the execution of binary files on the particular file system.
nouser Disallows an ordinary user (that is, other than root) to mount and unmount the filesystem.
remount Remounts the file system in case it is already mounted.
Red Hat Enterprise Linux 8 Managing file systems
92
ro Mounts the file system for reading only.
rw Mounts the file system for both reading and writing.
user Allows an ordinary user (that is, other than root) to mount and unmount the filesystem.
Option Description
12.7. SHARING A MOUNT ON MULTIPLE MOUNT POINTS
As a system administrator, you can duplicate mount points to make the file systems accessible frommultiple directories.
12.7.1. Types of shared mounts
There are multiple types of shared mounts that you can use. The difference between them is whathappens when you mount another file system under one of the shared mount points. The shared mountsare implemented using the shared subtrees functionality.
The types are:
Private mount
This type does not receive or forward any propagation events.When you mount another file system under either the duplicate or the original mount point, it is notreflected in the other.
Shared mount
This type creates an exact replica of a given mount point.When a mount point is marked as a shared mount, any mount within the original mount point isreflected in it, and vice versa.
This is the default mount type of the root file system.
Slave mount
This type creates a limited duplicate of a given mount point.When a mount point is marked as a slave mount, any mount within the original mount point isreflected in it, but no mount within a slave mount is reflected in its original.
Unbindable mount
This type prevents the given mount point from being duplicated whatsoever.
12.7.2. Creating a private mount point duplicate
This procedure duplicates a mount point as a private mount. File systems that you later mount under theduplicate or the original mount point are not reflected in the other.
Procedure
1. Create a virtual file system (VFS) node from the original mount point:
CHAPTER 12. MOUNTING FILE SYSTEMS
93

# mount --bind original-dir original-dir
2. Mark the original mount point as private:
# mount --make-private original-dir
Alternatively, to change the mount type for the selected mount point and all mount pointsunder it, use the --make-rprivate option instead of --make-private.
3. Create the duplicate:
# mount --bind original-dir duplicate-dir
Example 12.5. Duplicating /media into /mnt as a private mount point
1. Create a VFS node from the /media directory:
# mount --bind /media /media
2. Mark the /media directory as private:
# mount --make-private /media
3. Create its duplicate in /mnt:
# mount --bind /media /mnt
4. It is now possible to verify that /media and /mnt share content but none of the mounts within/media appear in /mnt. For example, if the CD-ROM drive contains non-empty media andthe /media/cdrom/ directory exists, use:
# mount /dev/cdrom /media/cdrom# ls /media/cdromEFI GPL isolinux LiveOS# ls /mnt/cdrom#
5. It is also possible to verify that file systems mounted in the /mnt directory are not reflectedin /media. For instance, if a non-empty USB flash drive that uses the /dev/sdc1 device isplugged in and the /mnt/flashdisk/ directory is present, use:
# mount /dev/sdc1 /mnt/flashdisk# ls /media/flashdisk# ls /mnt/flashdisken-US publican.cfg
Additional resources
The mount(8) man page.
Red Hat Enterprise Linux 8 Managing file systems
94

12.7.3. Creating a shared mount point duplicate
This procedure duplicates a mount point as a shared mount. File systems that you later mount under theoriginal directory or the duplicate are always reflected in the other.
Procedure
1. Create a virtual file system (VFS) node from the original mount point:
# mount --bind original-dir original-dir
2. Mark the original mount point as shared:
# mount --make-shared original-dir
Alternatively, to change the mount type for the selected mount point and all mount pointsunder it, use the --make-rshared option instead of --make-shared.
3. Create the duplicate:
# mount --bind original-dir duplicate-dir
Example 12.6. Duplicating /media into /mnt as a shared mount point
To make the /media and /mnt directories share the same content:
1. Create a VFS node from the /media directory:
# mount --bind /media /media
2. Mark the /media directory as shared:
# mount --make-shared /media
3. Create its duplicate in /mnt:
# mount --bind /media /mnt
4. It is now possible to verify that a mount within /media also appears in /mnt. For example, ifthe CD-ROM drive contains non-empty media and the /media/cdrom/ directory exists, use:
# mount /dev/cdrom /media/cdrom# ls /media/cdromEFI GPL isolinux LiveOS# ls /mnt/cdromEFI GPL isolinux LiveOS
5. Similarly, it is possible to verify that any file system mounted in the /mnt directory isreflected in /media. For instance, if a non-empty USB flash drive that uses the /dev/sdc1device is plugged in and the /mnt/flashdisk/ directory is present, use:
# mount /dev/sdc1 /mnt/flashdisk# ls /media/flashdisk
CHAPTER 12. MOUNTING FILE SYSTEMS
95
en-US publican.cfg# ls /mnt/flashdisken-US publican.cfg
Additional resources
The mount(8) man page.
12.7.4. Creating a slave mount point duplicate
This procedure duplicates a mount point as a slave mount. File systems that you later mount under theoriginal mount point are reflected in the duplicate but not the other way around.
Procedure
1. Create a virtual file system (VFS) node from the original mount point:
# mount --bind original-dir original-dir
2. Mark the original mount point as shared:
# mount --make-shared original-dir
Alternatively, to change the mount type for the selected mount point and all mount pointsunder it, use the --make-rshared option instead of --make-shared.
3. Create the duplicate and mark it as slave:
# mount --bind original-dir duplicate-dir# mount --make-slave duplicate-dir
Example 12.7. Duplicating /media into /mnt as a slave mount point
This example shows how to get the content of the /media directory to appear in /mnt as well, butwithout any mounts in the /mnt directory to be reflected in /media.
1. Create a VFS node from the /media directory:
# mount --bind /media /media
2. Mark the /media directory as shared:
# mount --make-shared /media
3. Create its duplicate in /mnt and mark it as slave:
# mount --bind /media /mnt# mount --make-slave /mnt
4. Verify that a mount within /media also appears in /mnt. For example, if the CD-ROM drivecontains non-empty media and the /media/cdrom/ directory exists, use:
Red Hat Enterprise Linux 8 Managing file systems
96

# mount /dev/cdrom /media/cdrom# ls /media/cdromEFI GPL isolinux LiveOS# ls /mnt/cdromEFI GPL isolinux LiveOS
5. Also verify that file systems mounted in the /mnt directory are not reflected in /media. Forinstance, if a non-empty USB flash drive that uses the /dev/sdc1 device is plugged in andthe /mnt/flashdisk/ directory is present, use:
# mount /dev/sdc1 /mnt/flashdisk# ls /media/flashdisk# ls /mnt/flashdisken-US publican.cfg
Additional resources
The mount(8) man page.
12.7.5. Preventing a mount point from being duplicated
This procedure marks a mount point as unbindable so that it is not possible to duplicate it in anothermount point.
Procedure
To change the type of a mount point to an unbindable mount, use:
# mount --bind mount-point mount-point# mount --make-unbindable mount-point
Alternatively, to change the mount type for the selected mount point and all mount pointsunder it, use the --make-runbindable option instead of --make-unbindable.
Any subsequent attempt to make a duplicate of this mount fails with the following error:
# mount --bind mount-point duplicate-dir
mount: wrong fs type, bad option, bad superblock on mount-point,missing codepage or helper program, or other errorIn some cases useful info is found in syslog - trydmesg | tail or so
Example 12.8. Preventing /media from being duplicated
To prevent the /media directory from being shared, use:
# mount --bind /media /media# mount --make-unbindable /media
Additional resources
CHAPTER 12. MOUNTING FILE SYSTEMS
97

Additional resources
The mount(8) man page.
12.7.6. Related information
The Shared subtrees article on Linux Weekly News: https://lwn.net/Articles/159077/.
12.8. PERSISTENTLY MOUNTING FILE SYSTEMS
As a system administrator, you can persistently mount file systems to configure non-removable storage.
12.8.1. The /etc/fstab file
This section describes the /etc/fstab configuration file, which controls persistent mount points of filesystems. Using /etc/fstab is the recommended way to persistently mount file systems.
Each line in the /etc/fstab file defines a mount point of a file system. It includes six fields separated bywhite space:
1. The block device identified by a persistent attribute or a path it the /dev directory.
2. The directory where the device will be mounted.
3. The file system on the device.
4. Mount options for the file system. The option defaults means that the partition is mounted atboot time with default options. This section also recognizes systemd mount unit options in the x-systemd.option format.
5. Backup option for the dump utility.
6. Check order for the fsck utility.
Example 12.9. The /boot file system in /etc/fstab
Block device Mountpoint
File system Options Backup Check
UUID=ea74bbec-536d-490c-b8d9-5b40bbd7545b
/boot xfs defaults 0 0
The systemd service automatically generates mount units from entries in /etc/fstab.
Additional resources
The fstab(5) man page.
The fstab section of the systemd.mount(5) man page.
12.8.2. Adding a file system to /etc/fstab
Red Hat Enterprise Linux 8 Managing file systems
98

This procedure describes how to configure persistent mount point for a file system in the /etc/fstabconfiguration file.
Procedure
1. Find out the UUID attribute of the file system:
$ lsblk --fs storage-device
For example:
Example 12.10. Viewing the UUID of a partition
$ lsblk --fs /dev/sda1
NAME FSTYPE LABEL UUID MOUNTPOINTsda1 xfs Boot ea74bbec-536d-490c-b8d9-5b40bbd7545b /boot
2. If the mount point directory does not exist, create it:
# mkdir --parents mount-point
3. As root, edit the /etc/fstab file and add a line for the file system, identified by the UUID.For example:
Example 12.11. The /boot mount point in /etc/fstab
UUID=ea74bbec-536d-490c-b8d9-5b40bbd7545b /boot xfs defaults 0 0
4. Regenerate mount units so that your system registers the new configuration:
# systemctl daemon-reload
5. Try mounting the file system to verify that the configuration works:
# mount mount-point
Additional resources
Other persistent attributes that you can use to identify the file system: Section 8.3, “Devicenames managed by the udev mechanism in /dev/disk/”
12.8.3. Persistently mounting a file system using RHEL System Roles
This section describes how to persistently mount a file system using the storage role.
Prerequisites
An Ansible playbook that uses the storage role exists.
CHAPTER 12. MOUNTING FILE SYSTEMS
99

For information on how to apply such a playbook, see Applying a role .
12.8.3.1. Example Ansible playbook to persistently mount a file system
This section provides an example Ansible playbook. This playbook applies the storage role toimmediately and persistently mount an XFS file system.
---- hosts: all vars: storage_volumes: - name: barefs type: disk disks: - sdb fs_type: xfs mount_point: /mnt/data roles: - rhel-system-roles.storage
NOTE
Applying the storage role in this playbook adds the file system to the /etc/fstab file, andmounts the file system immediately. If the file system does not exist on the /dev/sdb diskdevice, it is created. If the mount point directory does not exist, it is created as well.
12.8.3.2. Additional resources
For more information about the storage role, see Section 2.1, “Introduction to the storage role” .
12.9. MOUNTING FILE SYSTEMS ON DEMAND
As a system administrator, you can configure file systems, such as NFS, to mount automatically ondemand.
12.9.1. The autofs service
This section explains the benefits and basic concepts of the autofs service, used to mount file systemson demand.
One drawback of permanent mounting using the /etc/fstab configuration is that, regardless of howinfrequently a user accesses the mounted file system, the system must dedicate resources to keep themounted file system in place. This might affect system performance when, for example, the system ismaintaining NFS mounts to many systems at one time.
An alternative to /etc/fstab is to use the kernel-based autofs service. It consists of the followingcomponents:
A kernel module that implements a file system, and
A user-space service that performs all of the other functions.
The autofs service can mount and unmount file systems automatically (on-demand), therefore saving
Red Hat Enterprise Linux 8 Managing file systems
100
The autofs service can mount and unmount file systems automatically (on-demand), therefore savingsystem resources. It can be used to mount file systems such as NFS, AFS, SMBFS, CIFS, and local filesystems.
Additional resources
The autofs(8) man page.
12.9.2. The autofs configuration files
This section describes the usage and syntax of configuration files used by the autofs service.
The master map fileThe autofs service uses /etc/auto.master (master map) as its default primary configuration file. This canbe changed to use another supported network source and name using the autofs configuration in the /etc/autofs.conf configuration file in conjunction with the Name Service Switch (NSS) mechanism.
All on-demand mount points must be configured in the master map. Mount point, host name, exporteddirectory, and options can all be specified in a set of files (or other supported network sources) ratherthan configuring them manually for each host.
The master map file lists mount points controlled by autofs, and their corresponding configuration filesor network sources known as automount maps. The format of the master map is as follows:
mount-point map-name options
The variables used in this format are:
mount-point
The autofs mount point; for example, /mnt/data/.
map-file
The map source file, which contains a list of mount points and the file system location from whichthose mount points should be mounted.
options
If supplied, these apply to all entries in the given map, if they do not themselves have optionsspecified.
Example 12.12. The /etc/auto.master file
The following is a sample line from /etc/auto.master file:
/mnt/data /etc/auto.data
Map filesMap files configure the properties of individual on-demand mount points.
The automounter creates the directories if they do not exist. If the directories exist before theautomounter was started, the automounter will not remove them when it exits. If a timeout is specified,the directory is automatically unmounted if the directory is not accessed for the timeout period.
The general format of maps is similar to the master map. However, the options field appears betweenthe mount point and the location instead of at the end of the entry as in the master map:
CHAPTER 12. MOUNTING FILE SYSTEMS
101
mount-point options location
The variables used in this format are:
mount-point
This refers to the autofs mount point. This can be a single directory name for an indirect mount orthe full path of the mount point for direct mounts. Each direct and indirect map entry key (mount-point) can be followed by a space separated list of offset directories (subdirectory names eachbeginning with /) making them what is known as a multi-mount entry.
options
When supplied, these are the mount options for the map entries that do not specify their ownoptions. This field is optional.
location
This refers to the file system location such as a local file system path (preceded with the Sun mapformat escape character : for map names beginning with /), an NFS file system or other valid filesystem location.
Example 12.13. A map file
The following is a sample from a map file; for example, /etc/auto.misc:
payroll -fstype=nfs4 personnel:/dev/disk/by-uuid/52b94495-e106-4f29-b868-fe6f6c2789b1sales -fstype=xfs :/dev/disk/by-uuid/5564ed00-6aac-4406-bfb4-c59bf5de48b5
The first column in the map file indicates the autofs mount point: sales and payroll from the servercalled personnel. The second column indicates the options for the autofs mount. The third columnindicates the source of the mount.
Following the given configuration, the autofs mount points will be /home/payroll and /home/sales.The -fstype= option is often omitted and is generally not needed for correct operation.
Using the given configuration, if a process requires access to an autofs unmounted directory such as /home/payroll/2006/July.sxc, the autofs service automatically mounts the directory.
The amd map formatThe autofs service recognizes map configuration in the amd format as well. This is useful if you want toreuse existing automounter configuration written for the am-utils service, which has been removed fromRed Hat Enterprise Linux.
However, Red Hat recommends using the simpler autofs format described in the previous sections.
Additional resources
The autofs(5), autofs.conf(5), and auto.master(5) man pages.
For details on the amd map format, see the /usr/share/doc/autofs/README.amd-maps file,which is provided by the autofs package.
12.9.3. Configuring autofs mount points
This procedure describes how to configure on-demand mount points using the autofs service.
Prerequisites
Red Hat Enterprise Linux 8 Managing file systems
102
Prerequisites
Install the autofs package:
# yum install autofs
Start and enable the autofs service:
# systemctl enable --now autofs
Procedure
1. Create a map file for the on-demand mount point, located at /etc/auto.identifier. Replaceidentifier with a name that identifies the mount point.
2. In the map file, fill in the mount point, options, and location fields as described in Section 12.9.2,“The autofs configuration files”.
3. Register the map file in the master map file, as described in Section 12.9.2, “The autofsconfiguration files”.
4. Try accessing content in the on-demand directory:
$ ls automounted-directory
12.9.4. Automounting NFS server user home directories with autofs service
This procedure describes how to configure the autofs service to mount user home directoriesautomatically.
Prerequisites
The autofs package is installed.
The autofs service is enabled and running.
Procedure
1. Specify the mount point and location of the map file by editing the /etc/auto.master file on aserver on which you need to mount user home directories. To do so, add the following line intothe /etc/auto.master file:
/home /etc/auto.home
2. Create a map file with the name of /etc/auto.home on a server on which you need to mountuser home directories, and edit the file with the following parameters:
* -fstype=nfs,rw,sync host.example.com:/home/&i
You can skip fstype parameter, as it is nfs by default. For more information, see autofs(5) manpage.
3. Reload the autofs service:
CHAPTER 12. MOUNTING FILE SYSTEMS
103

# systemctl reload autofs
12.9.5. Overriding or augmenting autofs site configuration files
It is sometimes useful to override site defaults for a specific mount point on a client system.
Example 12.14. Initial conditions
For example, consider the following conditions:
Automounter maps are stored in NIS and the /etc/nsswitch.conf file has the followingdirective:
automount: files nis
The auto.master file contains:
+auto.master
The NIS auto.master map file contains:
/home auto.home
The NIS auto.home map contains:
beth fileserver.example.com:/export/home/bethjoe fileserver.example.com:/export/home/joe* fileserver.example.com:/export/home/&
The file map /etc/auto.home does not exist.
Example 12.15. Mounting home directories from a different server
Given the preceding conditions, let’s assume that the client system needs to override the NIS map auto.home and mount home directories from a different server.
In this case, the client needs to use the following /etc/auto.master map:
/home /etc/auto.home+auto.master
The /etc/auto.home map contains the entry:
* host.example.com:/export/home/&
Because the automounter only processes the first occurrence of a mount point, the /home directorycontains the content of /etc/auto.home instead of the NIS auto.home map.
Example 12.16. Augmenting auto.home with only selected entries
Red Hat Enterprise Linux 8 Managing file systems
104
Alternatively, to augment the site-wide auto.home map with just a few entries:
1. Create an /etc/auto.home file map, and in it put the new entries. At the end, include the NIS auto.home map. Then the /etc/auto.home file map looks similar to:
mydir someserver:/export/mydir+auto.home
2. With these NIS auto.home map conditions, listing the content of the /home directoryoutputs:
$ ls /home
beth joe mydir
This last example works as expected because autofs does not include the contents of a file map ofthe same name as the one it is reading. As such, autofs moves on to the next map source in the nsswitch configuration.
12.9.6. Using LDAP to store automounter maps
This procedure configures autofs to store automounter maps in LDAP configuration rather than in autofs map files.
Prerequisites
LDAP client libraries must be installed on all systems configured to retrieve automounter mapsfrom LDAP. On Red Hat Enterprise Linux, the openldap package should be installedautomatically as a dependency of the autofs package.
Procedure
1. To configure LDAP access, modify the /etc/openldap/ldap.conf file. Ensure that the BASE, URI, and schema options are set appropriately for your site.
2. The most recently established schema for storing automount maps in LDAP is described by the rfc2307bis draft. To use this schema, set it in the /etc/autofs.conf configuration file byremoving the comment characters from the schema definition. For example:
Example 12.17. Setting autofs configuration
DEFAULT_MAP_OBJECT_CLASS="automountMap"DEFAULT_ENTRY_OBJECT_CLASS="automount"DEFAULT_MAP_ATTRIBUTE="automountMapName"DEFAULT_ENTRY_ATTRIBUTE="automountKey"DEFAULT_VALUE_ATTRIBUTE="automountInformation"
3. Ensure that all other schema entries are commented in the configuration. The automountKeyattribute replaces the cn attribute in the rfc2307bis schema. Following is an example of anLDAP Data Interchange Format (LDIF) configuration:
Example 12.18. LDF Configuration
CHAPTER 12. MOUNTING FILE SYSTEMS
105

# extended LDIF## LDAPv3# base <> with scope subtree# filter: (&(objectclass=automountMap)(automountMapName=auto.master))# requesting: ALL#
# auto.master, example.comdn: automountMapName=auto.master,dc=example,dc=comobjectClass: topobjectClass: automountMapautomountMapName: auto.master
# extended LDIF## LDAPv3# base <automountMapName=auto.master,dc=example,dc=com> with scope subtree# filter: (objectclass=automount)# requesting: ALL#
# /home, auto.master, example.comdn: automountMapName=auto.master,dc=example,dc=comobjectClass: automountcn: /home
automountKey: /homeautomountInformation: auto.home
# extended LDIF## LDAPv3# base <> with scope subtree# filter: (&(objectclass=automountMap)(automountMapName=auto.home))# requesting: ALL#
# auto.home, example.comdn: automountMapName=auto.home,dc=example,dc=comobjectClass: automountMapautomountMapName: auto.home
# extended LDIF## LDAPv3# base <automountMapName=auto.home,dc=example,dc=com> with scope subtree# filter: (objectclass=automount)# requesting: ALL#
# foo, auto.home, example.comdn: automountKey=foo,automountMapName=auto.home,dc=example,dc=comobjectClass: automountautomountKey: fooautomountInformation: filer.example.com:/export/foo
Red Hat Enterprise Linux 8 Managing file systems
106

# /, auto.home, example.comdn: automountKey=/,automountMapName=auto.home,dc=example,dc=comobjectClass: automountautomountKey: /automountInformation: filer.example.com:/export/&
Additional resources
The rfc2307bis draft: https://tools.ietf.org/html/draft-howard-rfc2307bis.
12.10. SETTING READ-ONLY PERMISSIONS FOR THE ROOT FILESYSTEM
Sometimes, you need to mount the root file system (/) with read-only permissions. Example use casesinclude enhancing security or ensuring data integrity after an unexpected system power-off.
12.10.1. Files and directories that always retain write permissions
For the system to function properly, some files and directories need to retain write permissions. Whenthe root file system is mounted in read-only mode, these files are mounted in RAM using the tmpfstemporary file system.
The default set of such files and directories is read from the /etc/rwtab file, which contains:
dirs /var/cache/mandirs /var/gdm<content truncated>
empty /tmpempty /var/cache/foomatic<content truncated>
files /etc/adjtimefiles /etc/ntp.conf<content truncated>
Entries in the /etc/rwtab file follow this format:
copy-method path
In this syntax:
Replace copy-method with one of the keywords specifying how the file or directory is copied totmpfs.
Replace path with the path to the file or directory.
The /etc/rwtab file recognizes the following ways in which a file or directory can be copied to tmpfs:
empty
An empty path is copied to tmpfs. For example:
CHAPTER 12. MOUNTING FILE SYSTEMS
107
empty /tmp
dirs
A directory tree is copied to tmpfs, empty. For example:
dirs /var/run
files
A file or a directory tree is copied to tmpfs intact. For example:
files /etc/resolv.conf
The same format applies when adding custom paths to /etc/rwtab.d/.
12.10.2. Configuring the root file system to mount with read-only permissions onboot
With this procedure, the root file system is mounted read-only on all following boots.
Procedure
1. In the /etc/sysconfig/readonly-root file, set the READONLY option to yes:
# Set to 'yes' to mount the file systems as read-only.READONLY=yes
2. Add the ro option in the root entry ( /) in the /etc/fstab file:
/dev/mapper/luks-c376919e... / xfs x-systemd.device-timeout=0,ro 1 1
3. Add the ro option to the GRUB_CMDLINE_LINUX directive in the /etc/default/grub file andensure that the directive does not contain rw:
GRUB_CMDLINE_LINUX="rhgb quiet... ro"
4. Recreate the GRUB2 configuration file:
# grub2-mkconfig -o /boot/grub2/grub.cfg
5. If you need to add files and directories to be mounted with write permissions in the tmpfs filesystem, create a text file in the /etc/rwtab.d/ directory and put the configuration there.For example, to mount the /etc/example/file file with write permissions, add this line to the /etc/rwtab.d/example file:
files /etc/example/file
IMPORTANT
Changes made to files and directories in tmpfs do not persist across boots.
Red Hat Enterprise Linux 8 Managing file systems
108

6. Reboot the system to apply the changes.
Troubleshooting
If you mount the root file system with read-only permissions by mistake, you can remount it withread-and-write permissions again using the following command:
# mount -o remount,rw /
CHAPTER 12. MOUNTING FILE SYSTEMS
109
CHAPTER 13. LIMITING STORAGE SPACE USAGE WITHQUOTAS
You can restrict the amount of disk space available to users or groups by implementing disk quotas. Youcan also define a warning level at which system administrators are informed before a user consumes toomuch disk space or a partition becomes full.
13.1. DISK QUOTAS
In most computing environments, disk space is not infinite. The quota subsystem provides a mechanismto control usage of disk space.
You can configure disk quotas for individual users as well as user groups on the local file systems. Thismakes it possible to manage the space allocated for user-specific files (such as email) separately fromthe space allocated to the projects that a user works on. The quota subsystem warns users when theyexceed their allotted limit, but allows some extra space for current work (hard limit/soft limit).
If quotas are implemented, you need to check if the quotas are exceeded and make sure the quotas areaccurate. If users repeatedly exceed their quotas or consistently reach their soft limits, a systemadministrator can either help the user determine how to use less disk space or increase the user’s diskquota.
You can set quotas to control:
The number of consumed disk blocks.
The number of inodes, which are data structures that contain information about files in UNIX filesystems. Because inodes store file-related information, this allows control over the number offiles that can be created.
13.1.1. The xfs_quota tool
You can use the xfs_quota tool to manage quotas on XFS file systems. In addition, you can use XFS filesystems with limit enforcement turned off as an effective disk usage accounting system.
The XFS quota system differs from other file systems in a number of ways. Most importantly, XFSconsiders quota information as file system metadata and uses journaling to provide a higher levelguarantee of consistency.
Additional resources
The xfs_quota(8) man page.
13.2. MANAGING XFS DISK QUOTAS
You can use the xfs_quota tool to manage quotas in XFS and to configure limits for project-controlleddirectories.
Generic quota configuration tools (quota, repquota, and edquota for example) may also be used tomanipulate XFS quotas. However, these tools cannot be used with XFS project quotas.
IMPORTANT
Red Hat recommends the use of xfs_quota over all other available tools.
Red Hat Enterprise Linux 8 Managing file systems
110

13.2.1. File system quota management in XFS
The XFS quota subsystem manages limits on disk space (blocks) and file (inode) usage. XFS quotascontrol or report on usage of these items on a user, group, or directory or project level. Group andproject quotas are only mutually exclusive on older non-default XFS disk formats.
When managing on a per-directory or per-project basis, XFS manages the disk usage of directoryhierarchies associated with a specific project.
13.2.2. Enabling disk quotas for XFS
This procedure enables disk quotas for users, groups, and projects on an XFS file system. Once quotasare enabled, the xfs_quota tool can be used to set limits and report on disk usage.
Procedure
1. Enable quotas for users:
# mount -o uquota /dev/xvdb1 /xfs
Replace uquota with uqnoenforce to allow usage reporting without enforcing any limits.
2. Enable quotas for groups:
# mount -o gquota /dev/xvdb1 /xfs
Replace gquota with gqnoenforce to allow usage reporting without enforcing any limits.
3. Enable quotas for projects:
# mount -o pquota /dev/xvdb1 /xfs
Replace pquota with pqnoenforce to allow usage reporting without enforcing any limits.
4. Alternatively, include the quota mount options in the /etc/fstab file. The following exampleshows entries in the /etc/fstab file to enable quotas for users, groups, and projects, respectively,on an XFS file system. These examples also mount the file system with read/write permissions:
# vim /etc/fstab/dev/xvdb1 /xfs xfs rw,quota 0 0/dev/xvdb1 /xfs xfs rw,gquota 0 0/dev/xvdb1 /xfs xfs rw,prjquota 0 0
Additional resources
The mount(8) man page.
The xfs_quota(8) man page.
13.2.3. Reporting XFS usage
You can use the xfs_quota tool to set limits and report on disk usage. By default, xfs_quota is runinteractively, and in basic mode. Basic mode subcommands simply report usage, and are available to allusers.
CHAPTER 13. LIMITING STORAGE SPACE USAGE WITH QUOTAS
111

Prerequisites
Quotas have been enabled for the XFS file system. See Enabling disk quotas for XFS .
Procedure
1. Start the xfs_quota shell:
# xfs_quota
2. Show usage and limits for the given user:
# xfs_quota> quota username
3. Show free and used counts for blocks and inodes:
# xfs_quota> df
4. Run the help command to display the basic commands available with xfs_quota.
# xfs_quota> help
5. Specify q to exit xfs_quota.
# xfs_quota> q
Additional resources
The xfs_quota(8) man page.
13.2.4. Modifying XFS quota limits
Start the xfs_quota tool with the -x option to enable expert mode and run the administratorcommands, which allow modifications to the quota system. The subcommands of this mode allow actualconfiguration of limits, and are available only to users with elevated privileges.
Prerequisites
Quotas have been enabled for the XFS file system. See Enabling disk quotas for XFS .
Procedure
1. Start the xfs_quota shell with the -x option to enable expert mode:
# xfs_quota -x
2. Report quota information for a specific file system:
# xfs_quota> report /path
For example, to display a sample quota report for /home (on /dev/blockdevice), use thecommand report -h /home. This displays output similar to the following:
User quota on /home (/dev/blockdevice)
Red Hat Enterprise Linux 8 Managing file systems
112
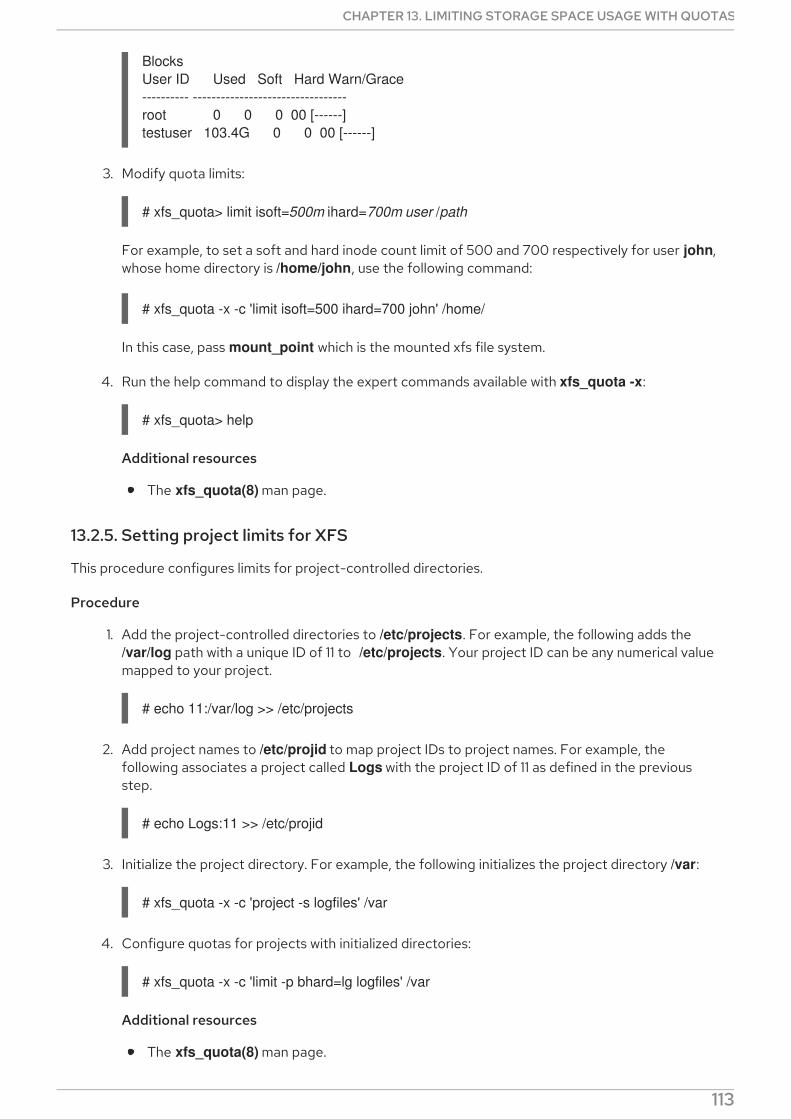
BlocksUser ID Used Soft Hard Warn/Grace---------- ---------------------------------root 0 0 0 00 [------]testuser 103.4G 0 0 00 [------]
3. Modify quota limits:
# xfs_quota> limit isoft=500m ihard=700m user /path
For example, to set a soft and hard inode count limit of 500 and 700 respectively for user john,whose home directory is /home/john, use the following command:
# xfs_quota -x -c 'limit isoft=500 ihard=700 john' /home/
In this case, pass mount_point which is the mounted xfs file system.
4. Run the help command to display the expert commands available with xfs_quota -x:
# xfs_quota> help
Additional resources
The xfs_quota(8) man page.
13.2.5. Setting project limits for XFS
This procedure configures limits for project-controlled directories.
Procedure
1. Add the project-controlled directories to /etc/projects. For example, the following adds the /var/log path with a unique ID of 11 to /etc/projects. Your project ID can be any numerical valuemapped to your project.
# echo 11:/var/log >> /etc/projects
2. Add project names to /etc/projid to map project IDs to project names. For example, thefollowing associates a project called Logs with the project ID of 11 as defined in the previousstep.
# echo Logs:11 >> /etc/projid
3. Initialize the project directory. For example, the following initializes the project directory /var:
# xfs_quota -x -c 'project -s logfiles' /var
4. Configure quotas for projects with initialized directories:
# xfs_quota -x -c 'limit -p bhard=lg logfiles' /var
Additional resources
The xfs_quota(8) man page.
CHAPTER 13. LIMITING STORAGE SPACE USAGE WITH QUOTAS
113
The projid(5) man page.
The projects(5) man page.
13.3. MANAGING EXT3 AND EXT4 DISK QUOTAS
You have to enable disk quotas on your system before you can assign them. You can assign disk quotasper user, per group or per project. However, if there is a soft limit set, you can exceed these quotas for aconfigurable period of time, known as the grace period.
13.3.1. Installing the quota tool
You must install the quota RPM package to implement disk quotas.
Procedure
Install the quota package:
# yum install quota
13.3.2. Enabling quota feature on file system creation
This procedure describes how to enable quotas on file system creation.
Procedure
1. Enable quotas on file system creation:
# mkfs.ext4 -O quota /dev/sda
NOTE
Only user and group quotas are enabled and initialized by default.
2. Change the defaults on file system creation:
# mkfs.ext4 -O quota -E quotatype=usrquota:grpquota:prjquota /dev/sda
3. Mount the file system:
# mount /dev/sda
Additional resources
See the man page for ext4 for additional information.
13.3.3. Enabling quota feature on existing file systems
This procedure describes how to enable the quota feature on existing file system using the tune2fscommand.
Red Hat Enterprise Linux 8 Managing file systems
114
Procedure
1. Unmount the file system:
# umount /dev/sda
2. Enable quotas on existing file system:
# tune2fs -O quota /dev/sda
NOTE
Only user and group quotas are initialized by default.
3. Change the defaults:
# tune2fs -Q usrquota,grpquota,prjquota /dev/sda
4. Mount the file system:
# mount /dev/sda
Additional resources
See the man page for ext4 for additional information.
13.3.4. Enabling quota enforcement
The quota accounting is enabled by default after mounting the file system without any additionaloptions, but quota enforcement is not.
Prerequisites
Quota feature is enabled and the default quotas are initialized.
Procedure
Enable quota enforcement by quotaon for the user quota:
# mount /dev/sda /mnt
# quotaon /mnt
NOTE
The quota enforcement can be enabled at mount time using usrquota, grpquota, or prjquota mount options.
# mount -o usrquota,grpquota,prjquota /dev/sda /mnt
Enable user, group, and project quotas for all file systems:
CHAPTER 13. LIMITING STORAGE SPACE USAGE WITH QUOTAS
115
# quotaon -vaugP
If neither of the -u, -g, or -P options are specified, only the user quotas are enabled.
If only -g option is specified, only group quotas are enabled.
If only -P option is specified, only project quotas are enabled.
Enable quotas for a specific file system, such as /home:
# quotaon -vugP /home
Additional resources
See the quotaon(8) man page.
13.3.5. Assigning quotas per user
The disk quotas are assigned to users with the edquota command.
NOTE
The text editor defined by the EDITOR environment variable is used by edquota. Tochange the editor, set the EDITOR environment variable in your ~/.bash_profile file tothe full path of the editor of your choice.
Prerequisites
User must exist prior to setting the user quota.
Procedure
1. Assign the quota for a user:
# edquota username
Replace username with the user to which you want to assign the quotas.
For example, if you enable a quota for the /dev/sda partition and execute the command edquota testuser, the following is displayed in the default editor configured on the system:
Disk quotas for user testuser (uid 501):Filesystem blocks soft hard inodes soft hard/dev/sda 44043 0 0 37418 0 0
2. Change the desired limits.If any of the values are set to 0, limit is not set. Change them in the text editor.
For example, the following shows the soft and hard block limits for the testuser have been set to50000 and 55000 respectively.
Red Hat Enterprise Linux 8 Managing file systems
116
Disk quotas for user testuser (uid 501):Filesystem blocks soft hard inodes soft hard/dev/sda 44043 50000 55000 37418 0 0
The first column is the name of the file system that has a quota enabled for it.
The second column shows how many blocks the user is currently using.
The next two columns are used to set soft and hard block limits for the user on the filesystem.
The inodes column shows how many inodes the user is currently using.
The last two columns are used to set the soft and hard inode limits for the user on the filesystem.
The hard block limit is the absolute maximum amount of disk space that a user or groupcan use. Once this limit is reached, no further disk space can be used.
The soft block limit defines the maximum amount of disk space that can be used.However, unlike the hard limit, the soft limit can be exceeded for a certain amount oftime. That time is known as the grace period. The grace period can be expressed inseconds, minutes, hours, days, weeks, or months.
Verification steps
Verify that the quota for the user has been set:
# quota -v testuserDisk quotas for user testuser:Filesystem blocks quota limit grace files quota limit grace/dev/sda 1000* 1000 1000 0 0 0
13.3.6. Assigning quotas per group
You can assign quotas on a per-group basis.
Prerequisites
Group must exist prior to setting the group quota.
Procedure
1. Set a group quota:
# edquota -g groupname
For example, to set a group quota for the devel group:
# edquota -g devel
This command displays the existing quota for the group in the text editor:
CHAPTER 13. LIMITING STORAGE SPACE USAGE WITH QUOTAS
117

Disk quotas for group devel (gid 505):Filesystem blocks soft hard inodes soft hard/dev/sda 440400 0 0 37418 0 0
2. Modify the limits and save the file.
Verification steps
Verify that the group quota is set:
# quota -vg groupname
13.3.7. Assigning quotas per project
This procedure assigns quotas per project.
Prerequisites
Project quota is enabled on your file system.
Procedure
1. Add the project-controlled directories to /etc/projects. For example, the following adds the /var/log path with a unique ID of 11 to /etc/projects. Your project ID can be any numerical valuemapped to your project.
# echo 11:/var/log >> /etc/projects
2. Add project names to /etc/projid to map project IDs to project names. For example, thefollowing associates a project called Logs with the project ID of 11 as defined in the previousstep.
# echo Logs:11 >> /etc/projid
3. Set the desired limits:
# edquota -P 11
NOTE
You can choose the project either by its project ID (11 in this case), or by itsname (Logs in this case).
4. Using quotaon, enable quota enforcement:See Enabling quota enforcement.
Verification steps
Verify that the project quota is set:
# quota -vP 11
Red Hat Enterprise Linux 8 Managing file systems
118
NOTE
You can verify either by the project ID, or by the project name.
Additional resources
The edquota(8) man page.
The projid(5) man page.
The projects(5) man page.
13.3.8. Setting the grace period for soft limits
If a given quota has soft limits, you can edit the grace period, which is the amount of time for which a softlimit can be exceeded. You can set the grace period for users, groups, or projects.
Procedure
Edit the grace period:
# edquota -t
IMPORTANT
While other edquota commands operate on quotas for a particular user, group, or project,the -t option operates on every file system with quotas enabled.
Additional resources
The edquota(8) man page.
13.3.9. Turning file system quotas off
Use quotaoff to turn disk quota enforcement off on the specified file systems. Quota accounting staysenabled after executing this command.
Procedure
To turn all user and group quotas off:
# quotaoff -vaugP
If neither of the -u, -g, or -P options are specified, only the user quotas are disabled.
If only -g option is specified, only group quotas are disabled.
If only -P option is specified, only project quotas are disabled.
The -v switch causes verbose status information to display as the command executes.
Additional resources
See the quotaoff(8) man page.
CHAPTER 13. LIMITING STORAGE SPACE USAGE WITH QUOTAS
119
13.3.10. Reporting on disk quotas
You can create a disk quota report using the repquota utility.
Procedure
1. Run the repquota command:
# repquota
For example, the command repquota /dev/sda produces this output:
*** Report for user quotas on device /dev/sdaBlock grace time: 7days; Inode grace time: 7days Block limits File limitsUser used soft hard grace used soft hard grace----------------------------------------------------------------------root -- 36 0 0 4 0 0kristin -- 540 0 0 125 0 0testuser -- 440400 500000 550000 37418 0 0
2. View the disk usage report for all quota-enabled file systems:
# repquota -augP
The -- symbol displayed after each user determines whether the block or inode limits have beenexceeded. If either soft limit is exceeded, a + character appears in place of the corresponding -character. The first - character represents the block limit, and the second represents the inode limit.
The grace columns are normally blank. If a soft limit has been exceeded, the column contains a timespecification equal to the amount of time remaining on the grace period. If the grace period has expired, none appears in its place.
Additional resources
The repquota(8) man page for more information.
Red Hat Enterprise Linux 8 Managing file systems
120

CHAPTER 14. DISCARDING UNUSED BLOCKSYou can perform or schedule discard operations on block devices that support them.
14.1. BLOCK DISCARD OPERATIONS
Block discard operations discard blocks that are no longer in use by a mounted file system. They areuseful on:
Solid-state drives (SSDs)
Thinly-provisioned storage
RequirementsThe block device underlying the file system must support physical discard operations.
Physical discard operations are supported if the value in the /sys/block/device/queue/discard_max_bytes file is not zero.
14.2. TYPES OF BLOCK DISCARD OPERATIONS
You can run discard operations using different methods:
Batch discard
Are run explicitly by the user. They discard all unused blocks in the selected file systems.
Online discard
Are specified at mount time. They run in real time without user intervention. Online discardoperations discard only the blocks that are transitioning from used to free.
Periodic discard
Are batch operations that are run regularly by a systemd service.
All types are supported by the XFS and ext4 file systems and by VDO.
RecommendationsRed Hat recommends that you use batch or periodic discard.
Use online discard only if:
the system’s workload is such that batch discard is not feasible, or
online discard operations are necessary to maintain performance.
14.3. PERFORMING BATCH BLOCK DISCARD
This procedure performs a batch block discard operation to discard unused blocks on a mounted filesystem.
Prerequisites
The file system is mounted.
The block device underlying the file system supports physical discard operations.
CHAPTER 14. DISCARDING UNUSED BLOCKS
121
Procedure
Use the fstrim utility:
To perform discard only on a selected file system, use:
# fstrim mount-point
To perform discard on all mounted file systems, use:
# fstrim --all
If you execute the fstrim command on:
a device that does not support discard operations, or
a logical device (LVM or MD) composed of multiple devices, where any one of the device doesnot support discard operations,
the following message displays:
# fstrim /mnt/non_discard
fstrim: /mnt/non_discard: the discard operation is not supported
Additional resources
The fstrim(8) man page
14.4. ENABLING ONLINE BLOCK DISCARD
This procedure enables online block discard operations that automatically discard unused blocks on allsupported file systems.
Procedure
Enable online discard at mount time:
When mounting a file system manually, add the -o discard mount option:
# mount -o discard device mount-point
When mounting a file system persistently, add the discard option to the mount entry in the /etc/fstab file.
Additional resources
The mount(8) man page
The fstab(5) man page
14.5. ENABLING ONLINE BLOCK DISCARD USING RHEL SYSTEMROLES
Red Hat Enterprise Linux 8 Managing file systems
122

This section describes how to enable online block discard using the storage role.
Prerequisites
An Ansible playbook including the storage role exists.
For information on how to apply such a playbook, see Applying a role .
14.5.1. Example Ansible playbook to enable online block discard
This section provides an example Ansible playbook. This playbook applies the storage role to mount anXFS file system with online block discard enabled.
---- hosts: all vars: storage_volumes: - name: barefs type: disk disks: - sdb fs_type: xfs mount_point: /mnt/data mount_options: discard roles: - rhel-system-roles.storage
NOTE
This playbook also performs all the operations of the persistent mount exampledescribed in Section 12.8.3.1, “Example Ansible playbook to persistently mount a filesystem”.
14.5.2. Additional resources
For more information about the storage role, see Section 2.1, “Introduction to the storage role” .
14.6. ENABLING PERIODIC BLOCK DISCARD
This procedure enables a systemd timer that regularly discards unused blocks on all supported filesystems.
Procedure
Enable and start the systemd timer:
# systemctl enable --now fstrim.timer
CHAPTER 14. DISCARDING UNUSED BLOCKS
123
CHAPTER 15. MANAGING LAYERED LOCAL STORAGE WITHSTRATIS
You can easily set up and manage complex storage configurations integrated by the Stratis high-levelsystem.
IMPORTANT
Stratis is available as a Technology Preview. For information on Red Hat scope of supportfor Technology Preview features, see the Technology Preview Features Support Scopedocument.
Customers deploying Stratis are encouraged to provide feedback to Red Hat.
15.1. SETTING UP STRATIS FILE SYSTEMS
As a system administrator, you can enable and set up the Stratis volume-managing file system on yoursystem to easily manage layered storage.
15.1.1. The purpose and features of Stratis
Stratis is a local storage-management solution for Linux. It is focused on simplicity and ease of use, andgives you access to advanced storage features.
Stratis makes the following activities easier:
Initial configuration of storage
Making changes later
Using advanced storage features
Stratis is a hybrid user-and-kernel local storage management system that supports advanced storagefeatures. The central concept of Stratis is a storage pool. This pool is created from one or more localdisks or partitions, and volumes are created from the pool.
The pool enables many useful features, such as:
File system snapshots
Thin provisioning
Tiering
15.1.2. Components of a Stratis volume
Externally, Stratis presents the following volume components in the command-line interface and theAPI:
blockdev
Block devices, such as a disk or a disk partition.
pool
Composed of one or more block devices.
Red Hat Enterprise Linux 8 Managing file systems
124

A pool has a fixed total size, equal to the size of the block devices.
The pool contains most Stratis layers, such as the non-volatile data cache using the dm-cachetarget.
Stratis creates a /stratis/my-pool/ directory for each pool. This directory contains links to devicesthat represent Stratis file systems in the pool.
filesystem
Each pool can contain one or more file systems, which store files.File systems are thinly provisioned and do not have a fixed total size. The actual size of a file systemgrows with the data stored on it. If the size of the data approaches the virtual size of the file system,Stratis grows the thin volume and the file system automatically.
The file systems are formatted with XFS.
IMPORTANT
Stratis tracks information about file systems created using Stratis that XFS is notaware of, and changes made using XFS do not automatically create updates in Stratis.Users must not reformat or reconfigure XFS file systems that are managed by Stratis.
Stratis creates links to file systems at the /stratis/my-pool/my-fs path.
NOTE
Stratis uses many Device Mapper devices, which show up in dmsetup listings and the /proc/partitions file. Similarly, the lsblk command output reflects the internal workingsand layers of Stratis.
15.1.3. Block devices usable with Stratis
This section lists storage devices that you can use for Stratis.
Supported devicesStratis pools have been tested to work on these types of block devices:
LUKS
LVM logical volumes
MD RAID
DM Multipath
iSCSI
HDDs and SSDs
NVMe devices
CHAPTER 15. MANAGING LAYERED LOCAL STORAGE WITH STRATIS
125

WARNING
In the current version, Stratis does not handle failures in hard drives or otherhardware. If you create a Stratis pool over multiple hardware devices, you increasethe risk of data loss because multiple devices must be operational to access thedata.
Unsupported devicesBecause Stratis contains a thin-provisioning layer, Red Hat does not recommend placing a Stratis poolon block devices that are already thinly-provisioned.
Additional resources
For iSCSI and other block devices requiring network, see the systemd.mount(5) man page forinformation on the _netdev mount option.
15.1.4. Installing Stratis
This procedure installs all packages necessary to use Stratis.
Procedure
1. Install packages that provide the Stratis service and command-line utilities:
# yum install stratisd stratis-cli
2. Make sure that the stratisd service is enabled:
# systemctl enable --now stratisd
15.1.5. Creating a Stratis pool
This procedure creates a Stratis pool from one or more block devices.
Prerequisites
Stratis is installed. See Section 15.1.4, “Installing Stratis”.
The stratisd service is running.
The block devices on which you are creating a Stratis pool are not in use and not mounted.
The block devices on which you are creating a Stratis pool are at least 1 GiB in size each.
On the IBM Z architecture, the /dev/dasd* block devices must to be partitioned. Use thepartition in the Stratis pool.For information on partitioning DASD devices, see Configuring a Linux instance on IBM Z .
Procedure
Red Hat Enterprise Linux 8 Managing file systems
126

1. If the selected block device contains file system, partition table, or RAID signatures, erase them:
# wipefs --all block-device
Replace block-device with the path to a block device, such as /dev/sdb.
2. To create a Stratis pool on the block device, use:
# stratis pool create my-pool block-device
Replace my-pool with an arbitrary name for the pool.
Replace block-device with the path to the empty or wiped block device, such as /dev/sdb.
To create a pool from more than one block device, list them all on the command line:
# stratis pool create my-pool device-1 device-2 device-n
3. To verify, list all pools on your system:
# stratis pool list
Additional resources
The stratis(8) man page
Next steps
Create a Stratis file system on the pool. See Section 15.1.6, “Creating a Stratis file system” .
15.1.6. Creating a Stratis file system
This procedure creates a Stratis file system on an existing Stratis pool.
Prerequisites
Stratis is installed. See Section 15.1.4, “Installing Stratis”.
The stratisd service is running.
You have created a Stratis pool. See Section 15.1.5, “Creating a Stratis pool” .
Procedure
1. To create a Stratis file system on a pool, use:
# stratis fs create my-pool my-fs
Replace my-pool with the name of your existing Stratis pool.
Replace my-fs with an arbitrary name for the file system.
2. To verify, list file systems within the pool:
CHAPTER 15. MANAGING LAYERED LOCAL STORAGE WITH STRATIS
127

# stratis fs list my-pool
Additional resources
The stratis(8) man page
Next steps
Mount the Stratis file system. See Section 15.1.7, “Mounting a Stratis file system” .
15.1.7. Mounting a Stratis file system
This procedure mounts an existing Stratis file system to access the content.
Prerequisites
Stratis is installed. See Section 15.1.4, “Installing Stratis”.
The stratisd service is running.
You have created a Stratis file system. See Section 15.1.6, “Creating a Stratis file system” .
Procedure
To mount the file system, use the entries that Stratis maintains in the /stratis/ directory:
# mount /stratis/my-pool/my-fs mount-point
The file system is now mounted on the mount-point directory and ready to use.
Additional resources
The mount(8) man page
15.1.8. Persistently mounting a Stratis file system
This procedure persistently mounts a Stratis file system so that it is available automatically after bootingthe system.
Prerequisites
Stratis is installed. See Section 15.1.4, “Installing Stratis”.
The stratisd service is running.
You have created a Stratis file system. See Section 15.1.6, “Creating a Stratis file system” .
Procedure
1. Determine the UUID attribute of the file system:
$ lsblk --output=UUID /stratis/my-pool/my-fs
Red Hat Enterprise Linux 8 Managing file systems
128
For example:
Example 15.1. Viewing the UUID of Stratis file system
$ lsblk --output=UUID /stratis/my-pool/fs1
UUIDa1f0b64a-4ebb-4d4e-9543-b1d79f600283
2. If the mount point directory does not exist, create it:
# mkdir --parents mount-point
3. As root, edit the /etc/fstab file and add a line for the file system, identified by the UUID. Use xfsas the file system type and add the x-systemd.requires=stratisd.service option.For example:
Example 15.2. The /fs1 mount point in /etc/fstab
UUID=a1f0b64a-4ebb-4d4e-9543-b1d79f600283 /fs1 xfs defaults,x-systemd.requires=stratisd.service 0 0
4. Regenerate mount units so that your system registers the new configuration:
# systemctl daemon-reload
5. Try mounting the file system to verify that the configuration works:
# mount mount-point
Additional resources
Section 12.8, “Persistently mounting file systems”
15.1.9. Related information
The Stratis Storage website: https://stratis-storage.github.io/
15.2. EXTENDING A STRATIS VOLUME WITH ADDITIONAL BLOCKDEVICES
You can attach additional block devices to a Stratis pool to provide more storage capacity for Stratis filesystems.
15.2.1. Components of a Stratis volume
Externally, Stratis presents the following volume components in the command-line interface and theAPI:
CHAPTER 15. MANAGING LAYERED LOCAL STORAGE WITH STRATIS
129
blockdev
Block devices, such as a disk or a disk partition.
pool
Composed of one or more block devices.A pool has a fixed total size, equal to the size of the block devices.
The pool contains most Stratis layers, such as the non-volatile data cache using the dm-cachetarget.
Stratis creates a /stratis/my-pool/ directory for each pool. This directory contains links to devicesthat represent Stratis file systems in the pool.
filesystem
Each pool can contain one or more file systems, which store files.File systems are thinly provisioned and do not have a fixed total size. The actual size of a file systemgrows with the data stored on it. If the size of the data approaches the virtual size of the file system,Stratis grows the thin volume and the file system automatically.
The file systems are formatted with XFS.
IMPORTANT
Stratis tracks information about file systems created using Stratis that XFS is notaware of, and changes made using XFS do not automatically create updates in Stratis.Users must not reformat or reconfigure XFS file systems that are managed by Stratis.
Stratis creates links to file systems at the /stratis/my-pool/my-fs path.
NOTE
Stratis uses many Device Mapper devices, which show up in dmsetup listings and the /proc/partitions file. Similarly, the lsblk command output reflects the internal workingsand layers of Stratis.
15.2.2. Adding block devices to a Stratis pool
This procedure adds one or more block devices to a Stratis pool to be usable by Stratis file systems.
Prerequisites
Stratis is installed. See Section 15.1.4, “Installing Stratis”.
The stratisd service is running.
The block devices that you are adding to the Stratis pool are not in use and not mounted.
The block devices that you are adding to the Stratis pool are at least 1 GiB in size each.
Procedure
To add one or more block devices to the pool, use:
Red Hat Enterprise Linux 8 Managing file systems
130

# stratis pool add-data my-pool device-1 device-2 device-n
Additional resources
The stratis(8) man page
15.2.3. Related information
The Stratis Storage website: https://stratis-storage.github.io/
15.3. MONITORING STRATIS FILE SYSTEMS
As a Stratis user, you can view information about Stratis volumes on your system to monitor their stateand free space.
15.3.1. Stratis sizes reported by different utilities
This section explains the difference between Stratis sizes reported by standard utilities such as df andthe stratis utility.
Standard Linux utilities such as df report the size of the XFS file system layer on Stratis, which is 1 TiB.This is not useful information, because the actual storage usage of Stratis is less due to thin provisioning,and also because Stratis automatically grows the file system when the XFS layer is close to full.
IMPORTANT
Regularly monitor the amount of data written to your Stratis file systems, which isreported as the Total Physical Used value. Make sure it does not exceed the Total PhysicalSize value.
Additional resources
The stratis(8) man page
15.3.2. Displaying information about Stratis volumes
This procedure lists statistics about your Stratis volumes, such as the total, used, and free size or filesystems and block devices belonging to a pool.
Prerequisites
Stratis is installed. See Section 15.1.4, “Installing Stratis”.
The stratisd service is running.
Procedure
To display information about all block devices used for Stratis on your system:
# stratis blockdev
Pool Name Device Node Physical Size State Tiermy-pool /dev/sdb 9.10 TiB In-use Data
CHAPTER 15. MANAGING LAYERED LOCAL STORAGE WITH STRATIS
131
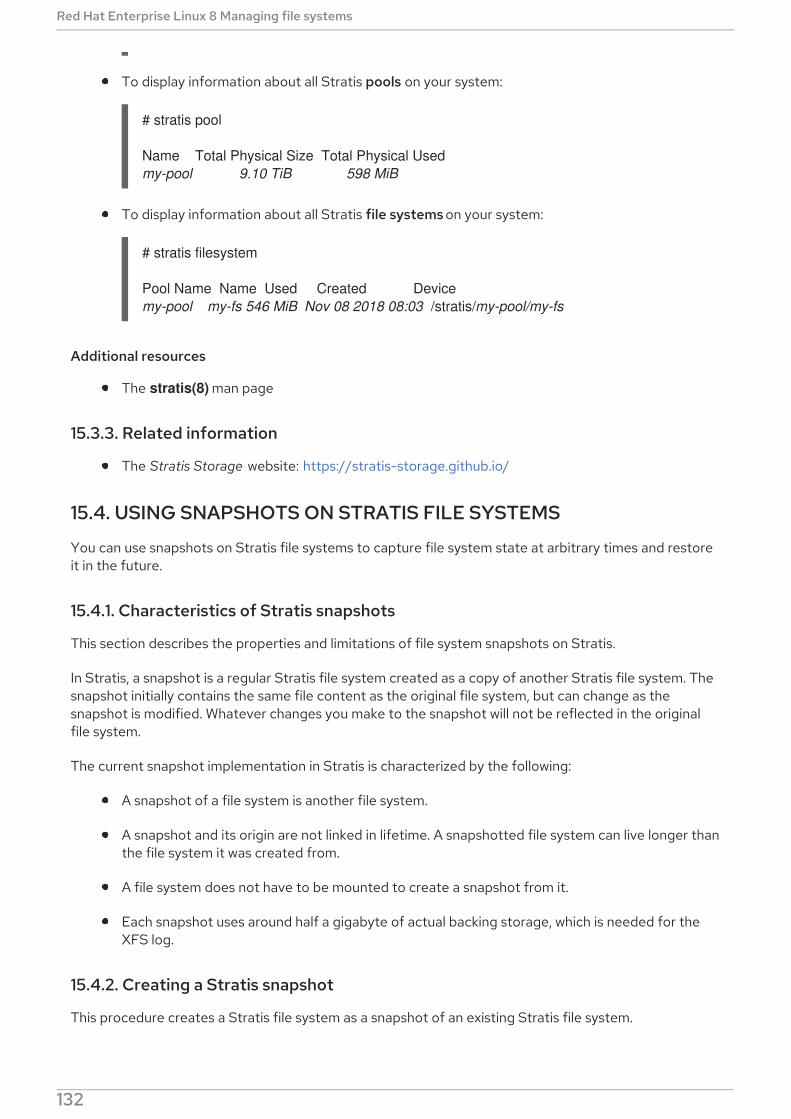
To display information about all Stratis pools on your system:
# stratis pool
Name Total Physical Size Total Physical Usedmy-pool 9.10 TiB 598 MiB
To display information about all Stratis file systems on your system:
# stratis filesystem
Pool Name Name Used Created Devicemy-pool my-fs 546 MiB Nov 08 2018 08:03 /stratis/my-pool/my-fs
Additional resources
The stratis(8) man page
15.3.3. Related information
The Stratis Storage website: https://stratis-storage.github.io/
15.4. USING SNAPSHOTS ON STRATIS FILE SYSTEMS
You can use snapshots on Stratis file systems to capture file system state at arbitrary times and restoreit in the future.
15.4.1. Characteristics of Stratis snapshots
This section describes the properties and limitations of file system snapshots on Stratis.
In Stratis, a snapshot is a regular Stratis file system created as a copy of another Stratis file system. Thesnapshot initially contains the same file content as the original file system, but can change as thesnapshot is modified. Whatever changes you make to the snapshot will not be reflected in the originalfile system.
The current snapshot implementation in Stratis is characterized by the following:
A snapshot of a file system is another file system.
A snapshot and its origin are not linked in lifetime. A snapshotted file system can live longer thanthe file system it was created from.
A file system does not have to be mounted to create a snapshot from it.
Each snapshot uses around half a gigabyte of actual backing storage, which is needed for theXFS log.
15.4.2. Creating a Stratis snapshot
This procedure creates a Stratis file system as a snapshot of an existing Stratis file system.
Red Hat Enterprise Linux 8 Managing file systems
132

Prerequisites
Stratis is installed. See Section 15.1.4, “Installing Stratis”.
The stratisd service is running.
You have created a Stratis file system. See Section 15.1.6, “Creating a Stratis file system” .
Procedure
To create a Stratis snapshot, use:
# stratis fs snapshot my-pool my-fs my-fs-snapshot
Additional resources
The stratis(8) man page
15.4.3. Accessing the content of a Stratis snapshot
This procedure mounts a snapshot of a Stratis file system to make it accessible for read and writeoperations.
Prerequisites
Stratis is installed. See Section 15.1.4, “Installing Stratis”.
The stratisd service is running.
You have created a Stratis snapshot. See Section 15.4.2, “Creating a Stratis snapshot” .
Procedure
To access the snapshot, mount it as a regular file system from the /stratis/my-pool/ directory:
# mount /stratis/my-pool/my-fs-snapshot mount-point
Additional resources
Section 15.1.7, “Mounting a Stratis file system”
The mount(8) man page
15.4.4. Reverting a Stratis file system to a previous snapshot
This procedure reverts the content of a Stratis file system to the state captured in a Stratis snapshot.
Prerequisites
Stratis is installed. See Section 15.1.4, “Installing Stratis”.
The stratisd service is running.
You have created a Stratis snapshot. See Section 15.4.2, “Creating a Stratis snapshot” .
CHAPTER 15. MANAGING LAYERED LOCAL STORAGE WITH STRATIS
133

Procedure
1. Optionally, back up the current state of the file system to be able to access it later:
# stratis filesystem snapshot my-pool my-fs my-fs-backup
2. Unmount and remove the original file system:
# umount /stratis/my-pool/my-fs# stratis filesystem destroy my-pool my-fs
3. Create a copy of the snapshot under the name of the original file system:
# stratis filesystem snapshot my-pool my-fs-snapshot my-fs
4. Mount the snapshot, which is now accessible with the same name as the original file system:
# mount /stratis/my-pool/my-fs mount-point
The content of the file system named my-fs is now identical to the snapshot my-fs-snapshot.
Additional resources
The stratis(8) man page
15.4.5. Removing a Stratis snapshot
This procedure removes a Stratis snapshot from a pool. Data on the snapshot are lost.
Prerequisites
Stratis is installed. See Section 15.1.4, “Installing Stratis”.
The stratisd service is running.
You have created a Stratis snapshot. See Section 15.4.2, “Creating a Stratis snapshot” .
Procedure
1. Unmount the snapshot:
# umount /stratis/my-pool/my-fs-snapshot
2. Destroy the snapshot:
# stratis filesystem destroy my-pool my-fs-snapshot
Additional resources
The stratis(8) man page
15.4.6. Related information
Red Hat Enterprise Linux 8 Managing file systems
134
The Stratis Storage website: https://stratis-storage.github.io/
15.5. REMOVING STRATIS FILE SYSTEMS
You can remove an existing Stratis file system or a Stratis pool, destroying data on them.
15.5.1. Components of a Stratis volume
Externally, Stratis presents the following volume components in the command-line interface and theAPI:
blockdev
Block devices, such as a disk or a disk partition.
pool
Composed of one or more block devices.A pool has a fixed total size, equal to the size of the block devices.
The pool contains most Stratis layers, such as the non-volatile data cache using the dm-cachetarget.
Stratis creates a /stratis/my-pool/ directory for each pool. This directory contains links to devicesthat represent Stratis file systems in the pool.
filesystem
Each pool can contain one or more file systems, which store files.File systems are thinly provisioned and do not have a fixed total size. The actual size of a file systemgrows with the data stored on it. If the size of the data approaches the virtual size of the file system,Stratis grows the thin volume and the file system automatically.
The file systems are formatted with XFS.
IMPORTANT
Stratis tracks information about file systems created using Stratis that XFS is notaware of, and changes made using XFS do not automatically create updates in Stratis.Users must not reformat or reconfigure XFS file systems that are managed by Stratis.
Stratis creates links to file systems at the /stratis/my-pool/my-fs path.
NOTE
Stratis uses many Device Mapper devices, which show up in dmsetup listings and the /proc/partitions file. Similarly, the lsblk command output reflects the internal workingsand layers of Stratis.
15.5.2. Removing a Stratis file system
This procedure removes an existing Stratis file system. Data stored on it are lost.
Prerequisites
CHAPTER 15. MANAGING LAYERED LOCAL STORAGE WITH STRATIS
135
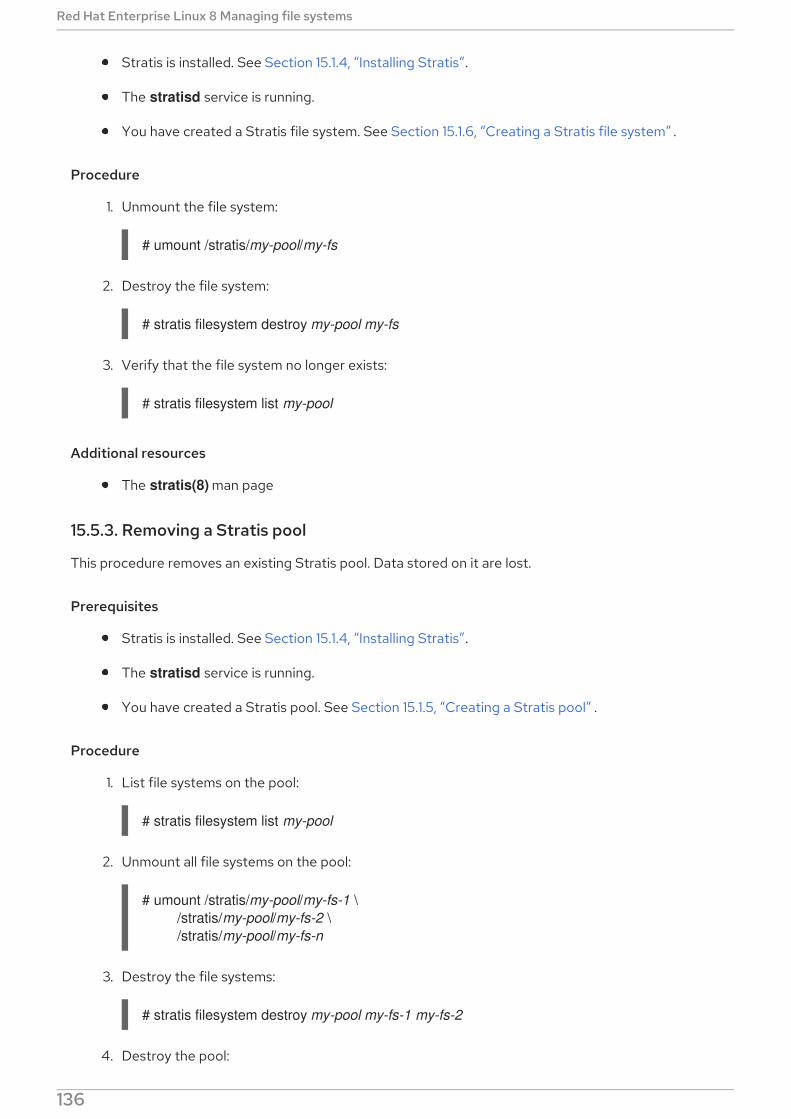
Stratis is installed. See Section 15.1.4, “Installing Stratis”.
The stratisd service is running.
You have created a Stratis file system. See Section 15.1.6, “Creating a Stratis file system” .
Procedure
1. Unmount the file system:
# umount /stratis/my-pool/my-fs
2. Destroy the file system:
# stratis filesystem destroy my-pool my-fs
3. Verify that the file system no longer exists:
# stratis filesystem list my-pool
Additional resources
The stratis(8) man page
15.5.3. Removing a Stratis pool
This procedure removes an existing Stratis pool. Data stored on it are lost.
Prerequisites
Stratis is installed. See Section 15.1.4, “Installing Stratis”.
The stratisd service is running.
You have created a Stratis pool. See Section 15.1.5, “Creating a Stratis pool” .
Procedure
1. List file systems on the pool:
# stratis filesystem list my-pool
2. Unmount all file systems on the pool:
# umount /stratis/my-pool/my-fs-1 \ /stratis/my-pool/my-fs-2 \ /stratis/my-pool/my-fs-n
3. Destroy the file systems:
# stratis filesystem destroy my-pool my-fs-1 my-fs-2
4. Destroy the pool:
Red Hat Enterprise Linux 8 Managing file systems
136
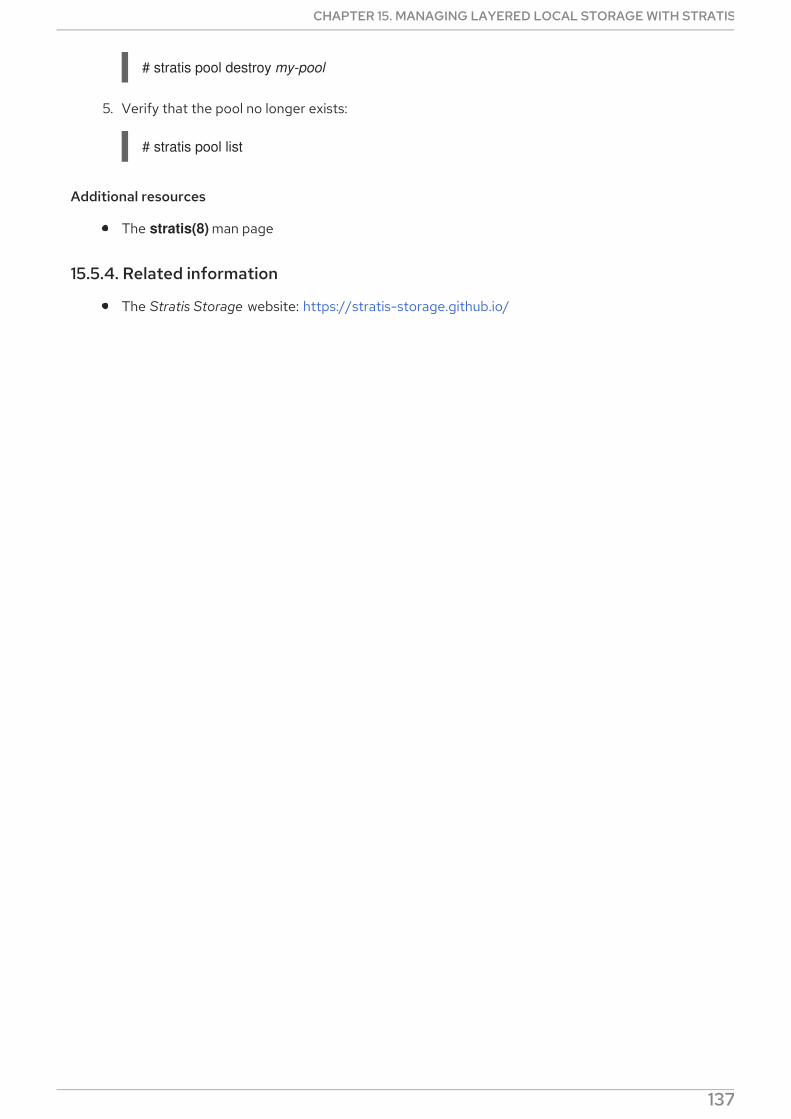
# stratis pool destroy my-pool
5. Verify that the pool no longer exists:
# stratis pool list
Additional resources
The stratis(8) man page
15.5.4. Related information
The Stratis Storage website: https://stratis-storage.github.io/
CHAPTER 15. MANAGING LAYERED LOCAL STORAGE WITH STRATIS
137
CHAPTER 16. GETTING STARTED WITH AN EXT3 FILESYSTEM
As a system administrator, you can create, mount, resize, backup, and restore an ext3 file system. Theext3 file system is essentially an enhanced version of the ext2 file system.
16.1. FEATURES OF AN EXT3 FILE SYSTEM
Following are the features of an ext3 file system:
Availability: After an unexpected power failure or system crash, file system check is not requireddue to the journaling provided. The default journal size takes about a second to recover,depending on the speed of the hardware
NOTE
The only supported journaling mode in ext3 is data=ordered (default). For moreinformation, see Is the EXT journaling option "data=writeback" supported inRHEL? Knowledgebase article.
Data Integrity: The ext3 file system prevents loss of data integrity during an unexpected powerfailure or system crash.
Speed: Despite writing some data more than once, ext3 has a higher throughput in most casesthan ext2 because ext3’s journaling optimizes hard drive head motion.
Easy Transition: It is easy to migrate from ext2 to ext3 and gain the benefits of a robustjournaling file system without reformatting.
Additional resources
The ext3 man page.
16.2. CREATING AN EXT3 FILE SYSTEM
As a system administrator, you can create an ext3 file system on a block device using mkfs.ext3command.
Prerequisites
A partition on your disk. For information on creating MBR or GPT partitions, see Section 9.2,“Creating a partition table on a disk”.Alternatively, use an LVM or MD volume.
Procedure
1. To create an ext3 file system:
For a regular-partition device, an LVM volume, an MD volume, or a similar device, use thefollowing command:
# mkfs.ext3 /dev/block_device
Red Hat Enterprise Linux 8 Managing file systems
138

Replace /dev/block_device with the path to a block device.
For example, /dev/sdb1, /dev/disk/by-uuid/05e99ec8-def1-4a5e-8a9d-5945339ceb2a, or /dev/my-volgroup/my-lv. In general, the default options are optimal for most usagescenarios.
NOTE
To specify a UUID when creating a file system:
# mkfs.ext3 -U UUID /dev/block_device
Replace UUID with the UUID you want to set: for example, 7cd65de3-e0be-41d9-b66d-96d749c02da7.
Replace /dev/block_device with the path to an ext3 file system to have theUUID added to it: for example, /dev/sda8.
To specify a label when creating a file system:
# mkfs.ext3 -L label-name /dev/block_device
2. To view the created ext3 file system:
# blkid
Additional resources
The ext3 man page.
The mkfs.ext3 man page.
16.3. MOUNTING AN EXT3 FILE SYSTEM
As a system administrator, you can mount an ext3 file system using the mount utility.
Prerequisites
An ext3 file system. For information on creating an ext3 file system, see Section 16.2, “Creatingan ext3 file system”.
Procedure
1. To create a mount point to mount the file system:
# mkdir /mount/point
Replace /mount/point with the directory name where mount point of the partition must becreated.
2. To mount an ext3 file system:
To mount an ext3 file system with no extra options:
CHAPTER 16. GETTING STARTED WITH AN EXT3 FILE SYSTEM
139

# mount /dev/block_device /mount/point
To mount the file system persistently, see Section 12.8, “Persistently mounting filesystems”.
3. To view the mounted file system:
# df -h
Additional resources
The mount man page.
The ext3 man page.
The fstab man page.
Chapter 12, Mounting file systems
16.4. RESIZING AN EXT3 FILE SYSTEM
As a system administrator, you can resize an ext3 file system using the resize2fs utility. The resize2fsutility reads the size in units of file system block size, unless a suffix indicating a specific unit is used. Thefollowing suffixes indicate specific units:
s (sectors) - 512 byte sectors
K (kilobytes) - 1,024 bytes
M (megabytes) - 1,048,576 bytes
G (gigabytes) - 1,073,741,824 bytes
T (terabytes) - 1,099,511,627,776 bytes
Prerequisites
An ext3 file system. For information on creating an ext3 file system, see Section 16.2, “Creatingan ext3 file system”.
An underlying block device of an appropriate size to hold the file system after resizing.
Procedure
1. To resize an ext3 file system, take the following steps:
To shrink and grow the size of an unmounted ext3 file system:
# umount /dev/block_device# e2fsck -f /dev/block_device# resize2fs /dev/block_device size
Replace /dev/block_device with the path to the block device, for example /dev/sdb1.
Replace size with the required resize value using s, K, M, G, and T suffixes.
Red Hat Enterprise Linux 8 Managing file systems
140
An ext3 file system may be grown while mounted using the resize2fs command:
# resize2fs /mount/device size
NOTE
The size parameter is optional (and often redundant) when expanding. The resize2fs automatically expands to fill the available space of the container,usually a logical volume or partition.
2. To view the resized file system:
# df -h
Additional resources
The resize2fs man page.
The e2fsck man page.
The ext3 man page.
16.5. CREATING AND MOUNTING EXT3 FILE SYSTEMS USING RHELSYSTEM ROLES
This section describes how to create an ext3 file system with a given label on a disk, and persistentlymount the file system using the storage role.
Prerequisites
An Ansible playbook including the storage role exists.
For information on how to apply such a playbook, see Applying a role .
16.5.1. Example Ansible playbook to create and mount an ext3 file system
This section provides an example Ansible playbook. This playbook applies the storage role to create andmount an ext3 file system.
The playbook creates an ext3 file system with a given label defined in fs_label:, and persistently mountsthe file system.
---- hosts: all vars: storage_volumes: - name: barefs type: disk disks: - sdb fs_type: ext3 fs_label: label-name
CHAPTER 16. GETTING STARTED WITH AN EXT3 FILE SYSTEM
141

mount_point: /mnt/data roles: - rhel-system-roles.storage
16.5.2. Additional resources
For more information about the storage role, see Section 2.1, “Introduction to the storage role” .
Red Hat Enterprise Linux 8 Managing file systems
142

CHAPTER 17. GETTING STARTED WITH AN EXT4 FILESYSTEM
As a system administrator, you can create, mount, resize, backup, and restore an ext4 file system. Theext4 file system is a scalable extension of the ext3 file system. With Red Hat Enterprise Linux 8, it cansupport a maximum individual file size of 16 terabytes, and file system to a maximum of 50 terabytes.
17.1. FEATURES OF AN EXT4 FILE SYSTEM
Following are the features of an ext4 file system:
Using extents: The ext4 file system uses extents, which improves performance when using largefiles and reduces metadata overhead for large files.
Ext4 labels unallocated block groups and inode table sections accordingly, which allows theblock groups and table sections to be skipped during a file system check. It leads to a quick filesystem check, which becomes more beneficial as the file system grows in size.
Metadata checksum: By default, this feature is enabled in Red Hat Enterprise Linux 8.
Allocation features of an ext4 file system:
Persistent pre-allocation
Delayed allocation
Multi-block allocation
Stripe-aware allocation
Extended attributes (xattr): This allows the system to associate several additional name andvalue pairs per file.
Quota journaling: This avoids the need for lengthy quota consistency checks after a crash.
NOTE
The only supported journaling mode in ext4 is data=ordered (default). For moreinformation, see Is the EXT journaling option "data=writeback" supported inRHEL? Knowledgebase article.
Subsecond timestamps — This gives timestamps to the subsecond.
Additional resources
The ext4 man page.
17.2. CREATING AN EXT4 FILE SYSTEM
As a system administrator, you can create an ext4 file system on a block device using mkfs.ext4command.
Prerequisites
A partition on your disk. For information on creating MBR or GPT partitions, see Section 9.2,
CHAPTER 17. GETTING STARTED WITH AN EXT4 FILE SYSTEM
143
A partition on your disk. For information on creating MBR or GPT partitions, see Section 9.2,“Creating a partition table on a disk”.Alternatively, use an LVM or MD volume.
Procedure
1. To create an ext4 file system:
For a regular-partition device, an LVM volume, an MD volume, or a similar device, use thefollowing command:
# mkfs.ext4 /dev/block_device
Replace /dev/block_device with the path to a block device.
For example, /dev/sdb1, /dev/disk/by-uuid/05e99ec8-def1-4a5e-8a9d-5945339ceb2a, or /dev/my-volgroup/my-lv. In general, the default options are optimal for most usagescenarios.
For striped block devices (for example, RAID5 arrays), the stripe geometry can be specifiedat the time of file system creation. Using proper stripe geometry enhances the performanceof an ext4 file system. For example, to create a file system with a 64k stride (that is, 16 x4096) on a 4k-block file system, use the following command:
# mkfs.ext4 -E stride=16,stripe-width=64 /dev/block_device
In the given example:
stride=value: Specifies the RAID chunk size
stripe-width=value: Specifies the number of data disks in a RAID device, or the numberof stripe units in the stripe.
NOTE
To specify a UUID when creating a file system:
# mkfs.ext4 -U UUID /dev/block_device
Replace UUID with the UUID you want to set: for example, 7cd65de3-e0be-41d9-b66d-96d749c02da7.
Replace /dev/block_device with the path to an ext4 file system to have theUUID added to it: for example, /dev/sda8.
To specify a label when creating a file system:
# mkfs.ext4 -L label-name /dev/block_device
2. To view the created ext4 file system:
# blkid
Additional resources
Red Hat Enterprise Linux 8 Managing file systems
144

Additional resourcesThe ext4 man page.
The mkfs.ext4 man page.
17.3. MOUNTING AN EXT4 FILE SYSTEM
As a system administrator, you can mount an ext4 file system using the mount utility.
Prerequisites
An ext4 file system. For information on creating an ext4 file system, see Section 17.2, “Creatingan ext4 file system”.
Procedure
1. To create a mount point to mount the file system:
# mkdir /mount/point
Replace /mount/point with the directory name where mount point of the partition must becreated.
2. To mount an ext4 file system:
To mount an ext4 file system with no extra options:
# mount /dev/block_device /mount/point
To mount the file system persistently, see Section 12.8, “Persistently mounting filesystems”.
3. To view the mounted file system:
# df -h
Additional resources
The mount man page.
The ext4 man page.
The fstab man page.
Chapter 12, Mounting file systems
17.4. RESIZING AN EXT4 FILE SYSTEM
As a system administrator, you can resize an ext4 file system using the resize2fs utility. The resize2fsutility reads the size in units of file system block size, unless a suffix indicating a specific unit is used. Thefollowing suffixes indicate specific units:
s (sectors) - 512 byte sectors
K (kilobytes) - 1,024 bytes
CHAPTER 17. GETTING STARTED WITH AN EXT4 FILE SYSTEM
145

M (megabytes) - 1,048,576 bytes
G (gigabytes) - 1,073,741,824 bytes
T (terabytes) - 1,099,511,627,776 bytes
Prerequisites
An ext4 file system. For information on creating an ext4 file system, see Section 17.2, “Creatingan ext4 file system”.
An underlying block device of an appropriate size to hold the file system after resizing.
Procedure
1. To resize an ext4 file system, take the following steps:
To shrink and grow the size of an unmounted ext4 file system:
# umount /dev/block_device# e2fsck -f /dev/block_device# resize2fs /dev/block_device size
Replace /dev/block_device with the path to the block device, for example /dev/sdb1.
Replace size with the required resize value using s, K, M, G, and T suffixes.
An ext4 file system may be grown while mounted using the resize2fs command:
# resize2fs /mount/device size
NOTE
The size parameter is optional (and often redundant) when expanding. The resize2fs automatically expands to fill the available space of the container,usually a logical volume or partition.
2. To view the resized file system:
# df -h
Additional resources
The resize2fs man page.
The e2fsck man page.
The ext4 man page.
17.5. CREATING AND MOUNTING EXT4 FILE SYSTEMS USING RHELSYSTEM ROLES
This section describes how to create an ext4 file system with a given label on a disk, and persistently
Red Hat Enterprise Linux 8 Managing file systems
146
This section describes how to create an ext4 file system with a given label on a disk, and persistentlymount the file system using the storage role.
Prerequisites
An Ansible playbook including the storage role exists.
For information on how to apply such a playbook, see Applying a role .
17.5.1. Example Ansible playbook to create and mount an ext4 file system
This section provides an example Ansible playbook. This playbook applies the storage role to create andmount an ext4 file system.
The playbook creates an ext4 file system with a given label defined in fs_label:, and persistently mountsthe file system.
---- hosts: all vars: storage_volumes: - name: barefs type: disk disks: - sdb fs_type: ext4 fs_label: label-name mount_point: /mnt/data roles: - rhel-system-roles.storage
17.5.2. Additional resources
For more information about the storage role, see Section 2.1, “Introduction to the storage role” .
CHAPTER 17. GETTING STARTED WITH AN EXT4 FILE SYSTEM
147
Recommended