As of March 9, 2010 Final
Participant Guide – PO320: Processing Purchase Requisitions
State of Kansas

PO320: Processing Purchase Requisitions Participant Guide
Statewide Management, Accounting and Reporting Tool
As of March 9, 2010 Page 2 of 108 Final
TABLE OF CONTENTS
Course Overview ........................................................................................................... 4
Course Objectives ....................................................................................................... 4 Agenda ........................................................................................................................ 4
Lesson 1: Understanding Purchase Requisitions ...................................................... 6
Objectives ................................................................................................................... 6 Topic 1: Purchase Requisition Key Concepts .............................................................. 8 Topic 2: Purchase Requisitions within the Purchasing Process ................................... 9 Lesson Review .......................................................................................................... 14
Lesson 2: Performing Item Searches ......................................................................... 16
Objectives ................................................................................................................. 16 Topic 1: Browsing Item Catalogs ............................................................................... 17
2. Add Items and Services Page ............................................................................ 18 Catalog Search Results Page ................................................................................ 20
Topic 2: Advanced Search Options for Items ............................................................. 21 Search Settings Page ............................................................................................ 21 Advance Search – Search Catalog ........................................................................ 23 Compare Button - Comparison Searching ............................................................. 24
Lesson Review .......................................................................................................... 25
Lesson 3: Creating and Modifying Purchase Requisitions ...................................... 27
Objectives ................................................................................................................. 27 Topic 1: Creating a Purchase Order Requisition Using an item from the Item Master List and a Procurement Card ..................................................................................... 28
Requisition Summary ............................................................................................ 29 Create Requisition - Specify Business Unit and Requester Page .......................... 30 1. Define Requisition Page – Header Information .................................................. 31 1. Define Requisition – Line Defaults Expanded .................................................... 32 3. Review and Submit Page .................................................................................. 34 3. Review and Submit – Business Procurement Card (P-Card) Information ........... 35 3. Review and Submit – Requisition Lines Section ................................................ 36 Line Details Page .................................................................................................. 39 Line Comments Page ............................................................................................ 43 3. Review and Submit – Requisition Lines Section ................................................ 45 3. Review and Submit – Accounting Lines Section – Chartfields1 Tab .................. 48 3. Review and Submit – Accounting Lines Section – Asset Information Tab .......... 49 Shipping Address Page ......................................................................................... 50 Modify Line / Shipping / Accounting Page .............................................................. 52 Distribution Change Options Page ......................................................................... 56 3. Review and Submit – Justifications/Comments Field ......................................... 60 3. Review and Submit – Check Budget Button ...................................................... 62

PO320: Processing Purchase Requisitions Participant Guide
Statewide Management, Accounting and Reporting Tool
As of March 9, 2010 Page 3 of 108 Final
3. Review and Submit – Action buttons ................................................................. 63 Confirmation Page ................................................................................................. 65
Topic 2: Creating a Purchase Requisition without an Item from the Item Master List and without a Procurement Card ............................................................................... 69
2. Add Items and Services - Special Request Page ............................................... 69 2. Add Items and Services - Special Item Request Page ....................................... 70
Topic 3: Creating a Purchase Requisition for a Fixed Asset Item .............................. 74 Topic 4: Creating a Purchase Requisition for a Project Item ...................................... 75 Topic 5: Creating a Purchase Requisition using Prior Authorization Request ............ 76
Purchase requisitions that require Prior Authorization:........................................... 76 Topic 6: Using a Web Catalog to Create a Purchase Requisition .............................. 77
2. Add Items and Services - Web Tab ................................................................... 78 Web Tab - Staples Advantage Online Catalog ....................................................... 80 Staples - Item Search Page ................................................................................... 81 Staples - Cart Page ............................................................................................... 82 Staples - Confirm Order Page ................................................................................ 83 Editing a Web Catalog Purchase Requisition – Quantity ........................................ 85 Editing a Web Catalog Purchase Requisition – Shipping Address ......................... 85
Topic 7: Editing, Saving, and Submitting Requisitions ............................................... 88 Manage Requisitions Page .................................................................................... 88
Lesson Review .......................................................................................................... 90
Lesson 4: Managing Purchase Requisitions ............................................................. 91
Objectives ................................................................................................................. 91 Topic 1: Purchase Requisition Status ........................................................................ 91 Topic 2: Manage Purchase Requisitions ................................................................... 92
Manage Requisitions - Requisitions Section Expanded ......................................... 92 Requisition Details Page ........................................................................................ 93 Requisition Schedule and Distribution Page .......................................................... 95
Lesson Review .......................................................................................................... 97
Lesson 5: Item Selection Methods ............................................................................. 98
Objectives ................................................................................................................. 98 Topic 1: Favorite Items .............................................................................................. 98
2. Add Items and Services - Favorites Tab ............................................................ 99 Topic 2: Personal Templates ................................................................................... 101
Add Selected Items to Template(s) Page ............................................................ 102 Topic 3: Special Request for Services ..................................................................... 104
Special Request - Variable Cost Service Page .................................................... 104 Special Request - Fixed Cost Service Page ........................................................ 106
Lesson Review ........................................................................................................ 108

PO320: Processing Purchase Requisitions Participant Guide
Statewide Management, Accounting and Reporting Tool
Participant Notes:
As of March 9, 2010 Page 4 of 108 Final
Course Overview
Course Objectives
Upon completion of the course, you will be able to:
Define basic purchase requisition terms
Explain how purchase requisitions fit in the end to end processes for Purchasing
Create and edit purchase requisitions within the SMART system
Use item selection methods and special requests
Manage purchase requisitions
Agenda
Today, we will cover the following topics:
Purchase Requisition Key Terms
Purchase Requisitions within the Purchasing Process
Browsing Catalogs
Advanced Search Options
Creating a Purchase Requisition Using an Item from the Item Master List and a
Procurement Card
Creating a Purchase Requisition without an Item From The Item Master List
Creating a Purchase Requisition for a Fixed Asset Item
Creating a Purchase Requisition for a Project Item
Creating a Purchase Requisition with Prior Authorization Approval
Editing, Saving and Submitting Purchase Requisitions

PO320: Processing Purchase Requisitions Participant Guide
Statewide Management, Accounting and Reporting Tool
Participant Notes:
As of March 9, 2010 Page 5 of 108 Final
Purchase Requisition Statuses
Managing Purchase Requisitions
Favorite Items
Personal Templates
Special Requests For Goods
Special Requests For Services
Rest of this page left intentionally blank. Please turn to the next page.

PO320: Processing Purchase Requisitions Participant Guide
Statewide Management, Accounting and Reporting Tool
Participant Notes:
As of March 9, 2010 Page 6 of 108 Final
Lesson 1: Understanding Purchase Requisitions
Objectives Upon completion of this lesson, you will be able to:
Define basic purchase requisition terms
Explain how purchase requisitions fit in to the end-to-end processes for
Purchasing
List the roles involved in the purchase requisition process and describe the tasks
performed by each role
Purchase requisition – Record of a request for items
Sourcing – The process of creating purchase orders from requisitions
Purchase order – Commitments from an organization to vendors to purchase
goods or services from that vendor on a specific date; creates an encumbrance
in SMART
Budget checking – The process of comparing expenditure or revenue
transactions against a defined budget
Items – A good or service purchased by the State of Kansas
Item Catalog – A collection of item categories
Item Category – A grouping of items

PO320: Processing Purchase Requisitions Participant Guide
Statewide Management, Accounting and Reporting Tool
Participant Notes:
As of March 9, 2010 Page 7 of 108 Final
Favorite items – Frequently used items or transactions that are maintained in a
single location
Speed Charts – Pre-defined ChartField combinations that can be defined with a
single accounting distribution or with multiple accounting distributions.
Speedcharts are identified and invoiced with Speedchart code during data entry
to increase efficiency by reducing the number of keystrokes for frequently used
accounting distributions
Account Codes – The ChartField that categorizes the nature of a transaction as
a specific type of revenue, expense, asset or liability
Schedule –The schedule defines when and where you want the line items
delivered
Vendors – A vendor is any person or a company from which the State of Kansas
purchases goods or services, including state agencies, sub recipients, and sub-
grantees
Buyer – An individual that updates and approves Purchase Orders within
SMART
Requester – An individual who requests goods or services to be entered into
SMART by the Requisitioner, and whose ID appears on the various procurement
pages that reference Purchase Orders
Requisitioner – The individual that enters the purchase requisition into SMART.
This may be the same individual as the Requester.
Templates –Templates provide a way to group items that are often ordered
together. Personal templates enable you to quickly create requisitions in SMART
for frequently ordered items.

PO320: Processing Purchase Requisitions Participant Guide
Statewide Management, Accounting and Reporting Tool
Participant Notes:
As of March 9, 2010 Page 8 of 108 Final
eProcurement – A SMART module that provides the ability to enter requisitions
either from an online catalog from which a Requisitioner can search for goods
and services from various suppliers, or enables a Requisitioner to be able to add
a free-form (special request) item (if the item is not found in an online catalog)
Topic 1: Purchase Requisition Key Concepts
Requisition elements: Requisitions consist of four basic elements: headers,
lines, schedules, and distributions. Each requisition has one header, which can
have multiple lines. Each line can have multiple schedules, and each schedule
can have multiple distributions. The schedule defines when and where you want
the line items delivered. The distribution defines internal information for the
schedule, such as the way in which accounts and departments should be
charged for the purchase and the total price each department should pay.
Rest of this page left intentionally blank. Please turn to the next page.

PO320: Processing Purchase Requisitions Participant Guide
Statewide Management, Accounting and Reporting Tool
Participant Notes:
As of March 9, 2010 Page 9 of 108 Final
Figure 1. Requisition Elements
Topic 2: Purchase Requisitions within the Purchasing Process
The following roles are involved in the Purchase Requisition Process:
SMART User Role Key Activities per Role – Processing Purchase Requisitions
Agency Requisitioner Creates requisitions Kansas Buyer Updates purchase orders, dispatches purchase
orders Agency Contract Processor
Creates contracts, sets up collaborations, performs contract maintenance
Kansas RFx Processor (KDOT)
Initiates sourcing events, performs RFx maintenance, recommends awarding of events
Agency Requisition Maintains agency requisitions, closes out unused

PO320: Processing Purchase Requisitions Participant Guide
Statewide Management, Accounting and Reporting Tool
Participant Notes:
As of March 9, 2010 Page 10 of 108 Final
SMART User Role Key Activities per Role – Processing Purchase Requisitions
Administrator requisitions Kansas Super Buyer (KDOT)
Creates purchase orders, creates purchase orders from events
Agency Buying Administrator
Maintains agency purchase orders and closes out unfilled purchase orders
Central Purchasing Administrator
Maintains the setup tables related to Purchasing, excluding the Items Table Master
All Approver roles Agency Purchasing Approver
Kansas Ad-Hoc Approver
Kansas Ad-Hoc Requester
Approval roles associated with purchase requisitions
Table 1. SMART User Role Definitions
Rest of this page left intentionally blank. Please turn to the next page.

PO320: Processing Purchase Requisitions Participant Guide
Statewide Management, Accounting and Reporting Tool
Participant Notes:
As of March 9, 2010 Page 11 of 108 Final
Figure 2. End-to-End Purchasing Process
Managing requisitions involves creating requisitions, budget checking the requisitions, approving the requisitions, and selecting a vendor. After you dispatch, receive, process, and reconcile the purchase order, requisitions are closed via an automatically generated batch process in SMART.
Rest of this page left intentionally blank. Please turn to the next page.

PO320: Processing Purchase Requisitions Participant Guide
Statewide Management, Accounting and Reporting Tool
Participant Notes:
As of March 9, 2010 Page 12 of 108 Final
Figure 3. Creating a Requisition Process Part 1

PO320: Processing Purchase Requisitions Participant Guide
Statewide Management, Accounting and Reporting Tool
Participant Notes:
As of March 9, 2010 Page 13 of 108 Final
Figure 4. Creating a Requisition Process Part 2
Rest of this page left intentionally blank. Please turn to the next page.

PO320: Processing Purchase Requisitions Participant Guide
Statewide Management, Accounting and Reporting Tool
Participant Notes:
As of March 9, 2010 Page 14 of 108 Final
Route for Amount
Approval
Approval Action
Budget
Checking
Batch Process
runs
Passed Budget
Check?
Purchase Order is
CreatedCorrect
Distribution(s) or
Modify Budget
Yes
No
Route for
Commodity
Approval
Route for
Chartfield
Approval
Notify Requestor
Approve
Deny
Push Back
Auto Sourcing
Batch Process
runs
Figure 5. Processing a Requisition Process
Lesson Review
In this lesson, you learned:
The key terms associated with purchase requisitions in SMART
The business processes of purchase requisitions within SMART
The roles and tasks that interact with purchase requisitions within SMART

PO320: Processing Purchase Requisitions Participant Guide
Statewide Management, Accounting and Reporting Tool
Participant Notes:
As of March 9, 2010 Page 15 of 108 Final
The following are additional resources that provide more detail about the topic we have covered:
SMART Website – Purchasing – eProcurement materials
State of Kansas Division of Purchases website - http://www.da.ks.gov/purch/
Rest of this page left intentionally blank. Please turn to the next page.
PO320: Processing Purchase Requisitions Participant Guide
Statewide Management, Accounting and Reporting Tool
Participant Notes:
As of March 9, 2010 Page 16 of 108 Final
Lesson 2: Performing Item Searches
Prologue: Lesson 2 is designed to teach you how the Item Master List and Item Catalogs are structured within SMART. Once you understand how items are structured and stored in SMART, you then learn several search methods used to locate items. From Lesson 2, you continue to Lesson 3 where you learn how to create and modify purchase requisitions in SMART.
Objectives
Upon completion of this lesson, you will be able to:
Browse catalogs within SMART
Perform keyword, advanced and compare searches within SMART
Item Master List: Detailed list of items maintained in SMART by the State of
Kansas
Note It is important to know that in July 2010, the SMART Item Master Catalog
list will contain ONLY statewide contract items. The Item Master Catalog List is
maintained by Central Division of Purchases.

PO320: Processing Purchase Requisitions Participant Guide
Statewide Management, Accounting and Reporting Tool
Participant Notes:
As of March 9, 2010 Page 17 of 108 Final
Topic 1: Browsing Item Catalogs
Item Catalogs: Item catalogs are a collection of specific State of Kansas
statewide contract items in SMART.
Item Categories: Item categories provide transaction information for requisitions,
requests for quotes, contracts, and purchase orders.
Rest of this page left intentionally blank. Please turn to the next page.

PO320: Processing Purchase Requisitions Participant Guide
Statewide Management, Accounting and Reporting Tool
Participant Notes:
As of March 9, 2010 Page 18 of 108 Final
2. Add Items and Services Page
Use this page to request an item or service
Page Name Navigation
Add Items and Services
eProcurement > Create Requisition > 2. Add Items and Services
Figure 6. Add Items and Services Page_Catalog Tab

PO320: Processing Purchase Requisitions Participant Guide
Statewide Management, Accounting and Reporting Tool
Participant Notes:
As of March 9, 2010 Page 19 of 108 Final
Fields Description Search Use this field to enter the item you wish to
search for Select a Catalog Use this drop-down box to select the
catalog you wish to browse. Navigate categories by clicking folders. View items in a category by clicking the category name. Use the checkboxes to select categories to search.
Description Use this field to search based on a description of the item
Manufacturer Use this field to search based on the company that makes/sells the item
Manufacturer‟s Item Use this field to enter the identification number/name of the item classified by the Mfg. (Can be different than the Vendor Item ID)
Vendor Use this field to enter the name of Vendor Vendor Item ID Use this field to enter the ID
name/number of the item classified by the vendor. (Can be different from the mfg. id)
Item ID Use this field to search based on Item ID UPN ID Use this field to search based on UPN ID Images Checkbox Use this field to include images in the
catalog search
Table 2. Add Items and Services Page_Catalog Tab Fields
Rest of this page left intentionally blank. Please turn to the next page.

PO320: Processing Purchase Requisitions Participant Guide
Statewide Management, Accounting and Reporting Tool
Participant Notes:
As of March 9, 2010 Page 20 of 108 Final
Catalog Search Results Page
The Catalog search results page displays the results of your item search. You can then select the item(s) to requisition. This search will pull every item in the catalog that matches the key word/value(s) that were entered into the search field(s).
Figure 7. Add Items and Services_Catalog Search Results
Fields Description Quantity Use the Quantity field to specify the
number of items you want to order. By default, a value of one is specified in the Quantity field.
Select Item Checkbox Use this field to select the item(s) you wish to use
Add Buttons Use this button (in conjunction with the Select item checkbox/es) to add the item(s) to the requisition
Table 3. Add Items and Services_Catalog Search Results Page Elements

PO320: Processing Purchase Requisitions Participant Guide
Statewide Management, Accounting and Reporting Tool
Participant Notes:
As of March 9, 2010 Page 21 of 108 Final
We will now complete Activity1: Browsing Item Catalogs in your Activity Guide.
We will now complete Activity 2: Item Keyword Search in your Activity Guide.
Topic 2: Advanced Search Options for Items
Basic Search Page When you use the search field, rather than using the catalog look-up, the results display on a separate tab.
Search Settings Page
Use the Search Settings page to define the number of rows of results that you want to display per page.
Page Name Navigation
Create Requisitions Search Settings
eProcurement > Create Requisition > 2. Add Items and Services > Search Settings Link
Rest of this page left intentionally blank. Please turn to the next page.
Page 15 Please review the Prologue with the class.
Use the concept slides to cover the key terms and concepts

PO320: Processing Purchase Requisitions Participant Guide
Statewide Management, Accounting and Reporting Tool
Participant Notes:
As of March 9, 2010 Page 22 of 108 Final
Figure 8. Create Requisitions Search Settings Page
Fields Description Catalog Results – Display Use this field to determine how many
catalog rows per page you wish to view. You can view 15-100 rows at a time.
Display Catalog Search Fields Use this checkbox to display or not display catalog search fields
Do not show search result navigation message
Use this checkbox to show or not show search result navigation

PO320: Processing Purchase Requisitions Participant Guide
Statewide Management, Accounting and Reporting Tool
Participant Notes:
As of March 9, 2010 Page 23 of 108 Final
Fields Description Item ID Select this checkbox to include (or
deselect to not include) the Item ID in the search results
Category Description Use this checkbox to include (or deselect to not include) a category description in the search results
Table 4. Create Requisitions Search Page Elements
Advance Search – Search Catalog
Searching with field data in the Search Catalog section allows you to further define or refine your search. Using additional search criteria may help to narrow the search for specific item(s). Note: The Search Catalog function is spelling and grammar specific.
Figure 9. Add Items and Services - Search Catalog
We will now complete Activity 3: Item Advanced Search in your Activity Guide.

PO320: Processing Purchase Requisitions Participant Guide
Statewide Management, Accounting and Reporting Tool
Participant Notes:
As of March 9, 2010 Page 24 of 108 Final
Compare Button - Comparison Searching
When searching for an item to requisition, you have the ability to compare up to five items side by side. Use the item selection checkboxes to select the desired items, and then click the Compare button on the Search Results page to display the comparison:
Figure 10. Search Results page for items
Rest of this page left intentionally blank. Please turn to the next page.

PO320: Processing Purchase Requisitions Participant Guide
Statewide Management, Accounting and Reporting Tool
Participant Notes:
As of March 9, 2010 Page 25 of 108 Final
Figure 11. Side by Side Comparison for 2 Items Expanded
We will now complete Activity 4: Side by Side Comparison for Items in your Activity Guide.
Lesson Review
In this lesson, you learned:
How to browse item catalogs in SMART
How to perform keyword searches, advanced searches and compare searches
for items within SMART

PO320: Processing Purchase Requisitions Participant Guide
Statewide Management, Accounting and Reporting Tool
Participant Notes:
As of March 9, 2010 Page 26 of 108 Final
We will now complete Activity 5: Item Keyword Search in your Activity Guide.
Rest of this page left intentionally blank. Please turn to the next page.

PO320: Processing Purchase Requisitions Participant Guide
Statewide Management, Accounting and Reporting Tool
Participant Notes:
As of March 9, 2010 Page 27 of 108 Final
Lesson 3: Creating and Modifying Purchase Requisitions
Objectives
Upon completion of this lesson, you will be able to perform the following in SMART:
Create a new purchase requisition, with or without a procurement card
Create a new purchase requisition, with or without an item from the item table
Create a new purchase requisition for an item which will become a fixed asset
Create a new purchase requisition for an item which will become a part of a
project
Create a new purchase requisition, with or without prior authorization request
Create a new purchase requisition using the Web Tab (Direct Connect)
Edit, save and submit purchase requisitions
Use the Manage Requisitions page to manage purchase requisitions
(Business ) Procurement Card (P-card): A business procurement card is used
by authorized employees to make purchases on behalf of their agency
Prior Authorization Request: A process that is required by the Division of
Purchases to pre-approve certain transactions

PO320: Processing Purchase Requisitions Participant Guide
Statewide Management, Accounting and Reporting Tool
Participant Notes:
As of March 9, 2010 Page 28 of 108 Final
Topic 1: Creating a Purchase Order Requisition Using an item from the Item Master List and a Procurement Card
When creating a requisition, SMART requires you to designate a Requester. If
the Requester holds a business procurement card for the State of Kansas,
SMART enables you to use the Requester's procurement card details as
payment for the requisition if desired. It is important to know that you do not
need a business procurement card to create a requisition in SMART.
Requisitioners are able to view masked procurement card information of a
Requester (cardholder). The only cards the Requisitioner will have the ability to
pay with on a requisition will be cards they have proxies to. A Requisitioner can
enter requisitions for any Requester in their business unit, but if they do not have
proxy to each Requesters card in the Purchasing module, they will not be able to
use the Requesters P-card as a payment method on the requisition.
We will now complete a walkthrough using a UPK simulation: Creating Requisitions Using Procurement Cards.
You will now complete Activity 6: Creating Requisitions Using Procurement Cards in your Activity Guide.

PO320: Processing Purchase Requisitions Participant Guide
Statewide Management, Accounting and Reporting Tool
Participant Notes:
As of March 9, 2010 Page 29 of 108 Final
Requisition Summary
Page Name Navigation
Requisition Summary eProcurement > Create Requisition
A. B.
Figure 12 A & B. Create Requisition – Requisition Summary
Figure A: Displays the Requisition Summary as it first appears, before any
items have been added to the purchase requisition in SMART.
Figure B: As items are added to the purchase requisition in SMART, the
Requisition Summary keeps a running total (summary) of the items, quantities,
requisition lines and cost for the purchase requisition.
Fields Description Description Provides a description of the item(s)
and/or service(s) on the requisition Qty Indicates the number of item(s) and/or
service(s) ordered on the requisition UOM Unit of Measure. Indicates the unit of
measure for the item(s) and/or service(s) Total Lines Indicates the total number of lines on the
purchase requisition in SMART Total Amount (USD) Indicates the sum total of the purchase
requisition in SMART
Table 5. Create Requisition – Requisition Summary

PO320: Processing Purchase Requisitions Participant Guide
Statewide Management, Accounting and Reporting Tool
Participant Notes:
As of March 9, 2010 Page 30 of 108 Final
Create Requisition - Specify Business Unit and Requester Page
Page Name Navigation
Specify Business Unit and Requester
eProcurement > Create Requisition
Figure 13. Create Requisition – Specify Business Unit and Requester
Fields Description Business Unit The Business Unit field defaults based on
your agency number. Depending on your security level, you can accept the default or enter a different Business Unit number.
Requester Enter the SMART User ID of the person making the request for goods or services. If you do not know the Requester‟s SMART User ID, click the LookUp button to view a list of available options.
Table 6. Create Requisition – Specify Business Unit and Requester

PO320: Processing Purchase Requisitions Participant Guide
Statewide Management, Accounting and Reporting Tool
Participant Notes:
As of March 9, 2010 Page 31 of 108 Final
1. Define Requisition Page – Header Information
Use this page to view default values for requisition lines.
The values displayed in the Define Requisitions page should NOT be edited on this page. (Use the 3. Review and Submit page to edit or change default value information. The 3. Review and Submit page is covered later in this course).
Page Name Navigation
Define Requisition eProcurement > Create Requisition > Specify Business Unit and Requester
Figure 14. Define Requisition Page – Header Information
Fields Description Business Unit SMART auto defaults the Business Unit
(agency)

PO320: Processing Purchase Requisitions Participant Guide
Statewide Management, Accounting and Reporting Tool
Participant Notes:
As of March 9, 2010 Page 32 of 108 Final
Fields Description Prior Authorization Type Use the Prior Authorization Type field to
enter the prior authorization value if applicable. If the requisition does not use a prior authorization, leave the field blank (empty). The default value for this field is blank (empty). . The use of the Prior Authorization field is covered later in this course. Note: The use of the Prior Authorization Type field replaces the current State of Kansas Prior Authorization Request paper process.
Requester SMART auto defaults the Requester that was chosen on the Specify Business Unit and Requester page
Requisition Name SMART auto defaults the requisition number into the Requisition Name field when the requisition is first saved. Do not enter any information in this field.
Priority Indicate whether the request is a high, medium, or low priority. Medium priority is the default.
Table 7. Define Requisition Page – Header Information
1. Define Requisition – Line Defaults Expanded
Page Name Navigation
Define Requisition – Line Defaults Expanded
eProcurement > Create Requisition > Specify Business Unit and Requester

PO320: Processing Purchase Requisitions Participant Guide
Statewide Management, Accounting and Reporting Tool
Participant Notes:
As of March 9, 2010 Page 33 of 108 Final
Figure 15. Define Requisition – Line Defaults Expanded
The values displayed in the Define Requisitions page – Line Defaults, Shipping Defaults, and Accounting Defaults sections should NOT be edited on this page. (Use the 3. Review and Submit page to edit or change default value information. The 3. Review and Submit page is covered later in this course).
Rest of this page left intentionally blank. Please turn to the next page.

PO320: Processing Purchase Requisitions Participant Guide
Statewide Management, Accounting and Reporting Tool
Participant Notes:
As of March 9, 2010 Page 34 of 108 Final
3. Review and Submit Page
Use this page to review and edit the requisition details, prior to saving and submitting the requisition into the SMART workflow process for approval.
Page Name Navigation
Review and Submit eProcurement > Create Requisition > 3. Review and Submit
Figure 16. 3. Review and Submit Page
Rest of this page left intentionally blank. Please turn to the next page.
PO320: Processing Purchase Requisitions Participant Guide
Statewide Management, Accounting and Reporting Tool
Participant Notes:
As of March 9, 2010 Page 35 of 108 Final
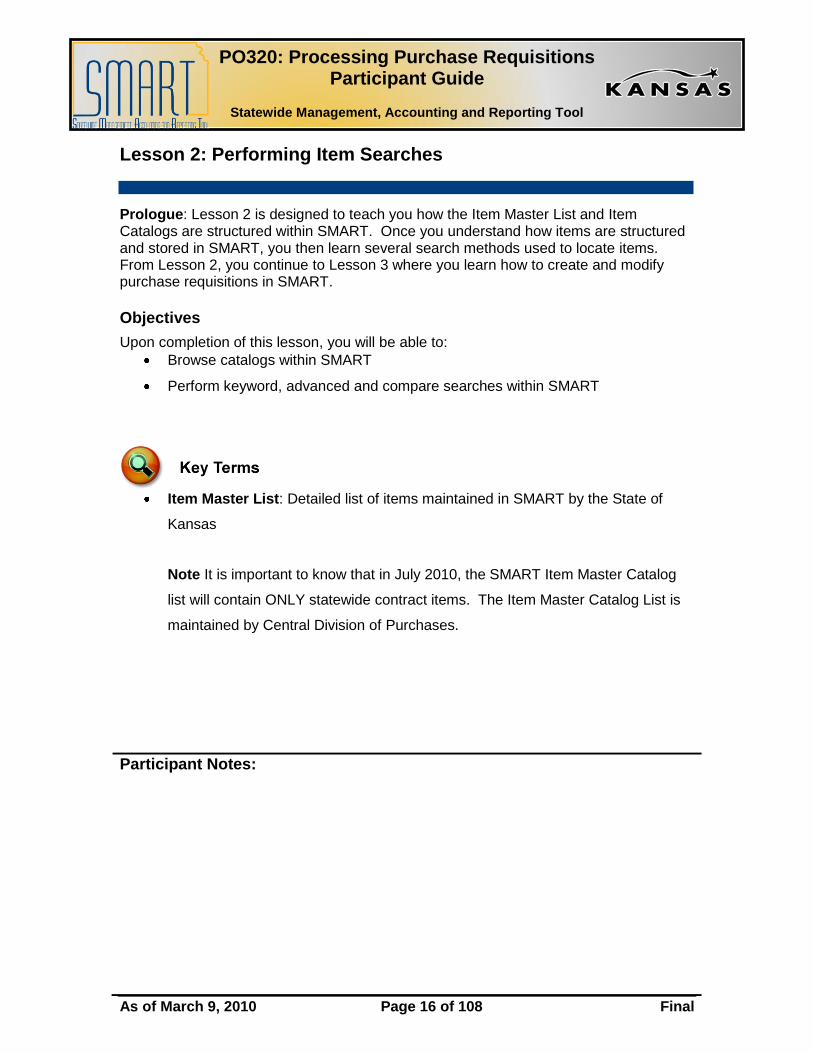
3. Review and Submit – Business Procurement Card (P-Card) Information
Figure 17. Review and Submit – P-Card Information
Fields Description Card Number Use this field to select the procurement
card information if the Requester holds more than one business procurement card for the State of Kansas. Use the drop-down list to select the desired business procurement card number. For security purposes, business procurement card numbers are encrypted in SMART. Therefore, you are able to view only the last four digits of a business procurement card number.
Expiration Date The Expiration Date defaults based on the business procurement card option chosen in the Card Number field.
Use Procurement Card Use this checkbox to signify that you want to use the selected business procurement card. This check box auto defaults as selected when a business procurement card is selected in the Card Number field.
Table 8. Review and Submit – P-Card Information

PO320: Processing Purchase Requisitions Participant Guide
Statewide Management, Accounting and Reporting Tool
Participant Notes:
As of March 9, 2010 Page 36 of 108 Final
3. Review and Submit – Requisition Lines Section
The items added to a requisition are displayed in the Requisition Lines section. The Requisition Lines section includes details such as the Description of the items, Quantity of items ordered, and the Total Amount of the purchase.
Figure 18. Review and Submit - Requisition Lines Section
Fields Description Expand Section button Click the Expand Section button to open
the Shipping and Distribution (Accounting) information for the requisition line.
Line Selection checkbox Use the Line Selection checkbox to select the requisition line(s) on which to perform actions.
Line (number) SMART auto assigns a Line number to each requisition line.

PO320: Processing Purchase Requisitions Participant Guide
Statewide Management, Accounting and Reporting Tool
Participant Notes:
As of March 9, 2010 Page 37 of 108 Final
Fields Description Description link Click the Description link on a
requisition line to view the item‟s description in SMART. Use the Return to previous page link to return to the Review and Submit page.
Vendor Name The Vendor Name auto defaults based on the item that was selected from the item master catalog, or defaults based on a special request. (Special requests are covered later in this course)
Quantity Use this field to enter or edit the Quantity of items for the requisition line.
UOM UOM = Unit of Measure. Auto defaults based on the item that was selected from the item master catalog, or defaults based on a special request. (Special requests are covered later in this course)
Price The Price auto defaults based on the item that was selected from the item master catalog, or defaults based on a special request. (Special requests are covered later in this course)
Total Represents the Total (cost) for the requisition line. (Quantity x Price = Total)
Line Details Button Use this button to open the Line Details page. (The use of the Line Details page is covered later in this course).

PO320: Processing Purchase Requisitions Participant Guide
Statewide Management, Accounting and Reporting Tool
Participant Notes:
As of March 9, 2010 Page 38 of 108 Final
Fields Description
Line Comments Button Click this button to open the Line Comments page. Use the Line Comments page to enter line comments for the requisition line. Field length is 32700 characters (including spaces and punctuation). (The use of the Line Comments page is covered later in this course).
Select All / Deselect All checkbox Use the Select All / Deselect All checkbox to select or deselect ALL lines on the requisition
Total Amount Represents the Total Amount or cost of the requisition (the sum total of all requisition line totals)
Add to Favorites button Select the desired item(s) using the line selection checkbox. Click the Add to Favorites button to add the item(s) to the Favorites list. (The use of Favorite items is covered later in this course)
Add to Template(s) button Select the desired item(s) using the line selection checkbox. Click the Add to Template(s) button to create a personal template for the selected item(s). (The use of Personal Templates is covered later in this course)
Modify Line / Shipping / Accounting button
Select the desired line(s) using the line selection checkbox. Click the Modify Line / Shipping / Accounting button to open the Modify Line / Shipping / Accounting page. (The use of the Modify Line / Shipping / Accounting page is covered later in this course)

PO320: Processing Purchase Requisitions Participant Guide
Statewide Management, Accounting and Reporting Tool
Participant Notes:
As of March 9, 2010 Page 39 of 108 Final
Fields Description Delete button Select the desired line(s) using the line
selection checkbox, then click the Delete button to delete the lines from the requisition
Table 9. Review and Submit - Requisition Lines Section
Line Details Page
Use the Line Details page to enter contract information, confirm requisition information, and edit additional details for a line. Note: The State of Kansas is not using the Sourcing Controls section on the Line Details page.
Page Name Navigation
Line Details eProcurement > Create Requisition > 3. Review and Submit > Requisition Lines > Line Details Button
Rest of this page left intentionally blank. Please turn to the next page.

PO320: Processing Purchase Requisitions Participant Guide
Statewide Management, Accounting and Reporting Tool
Participant Notes:
As of March 9, 2010 Page 40 of 108 Final
Figure 19. Line Details Page

PO320: Processing Purchase Requisitions Participant Guide
Statewide Management, Accounting and Reporting Tool
Participant Notes:
As of March 9, 2010 Page 41 of 108 Final
Fields Description Buyer If necessary, use the Buyer field to
specify the Buyer for the requisition line. If you do not specify a Buyer in the Buyer field, SMART auto defaults the Buyer (based on Requester chosen). SMART auto defaults the Buyer information when the requisition is saved and submitted into the Workflow Approval process.
Vendor The Vendor is auto defaulted by SMART from either the item master catalog, or from a special request. Use the Vendor field to change the vendor if necessary. Use the LookUp button to view and select from a list of available options as needed.
Vendor Location Use this field to edit the default Vendor Location information. If necessary, use the LookUp button to view and select from a list of available options.
Vendor‟s Catalog Use this field to enter the Vendor’s Catalog in which the item can be found
Inspection Required Use the Inspection Required checkbox to designate that an inspection is required for item(s) upon delivery. Note: This leaves special delivery instructions on the Inspect Receipts page for the Receiver who creates the receipt in SMART.
Table 10. Line Detail Page Elements
Figure 20. Line Details_Contract Expanded

PO320: Processing Purchase Requisitions Participant Guide
Statewide Management, Accounting and Reporting Tool
Participant Notes:
As of March 9, 2010 Page 42 of 108 Final
Fields Data Contract ID Use the Contract ID field to enter the
contract number for this item (if applicable)
Line The State of Kansas is NOT using the Contract Line field. Please do not enter any information into this field.
Table 11. Line Details_Contract Expanded Fields
Rest of this page left intentionally blank. Please turn to the next page.

PO320: Processing Purchase Requisitions Participant Guide
Statewide Management, Accounting and Reporting Tool
Participant Notes:
As of March 9, 2010 Page 43 of 108 Final
Line Comments Page
Use the Line Comments page to record comments about an item and/or add an attachment.
Page Name Navigation
Line Comments eProcurement > Create Requisition > Review and Submit > Requisition Lines > Line Comments button
Figure 21. Line Comments Page
Fields Description Text Box Use the text box to enter free text line comments for the
requisition line. Field length is 32700 characters (including spaces and punctuation).
Send to Vendor Use this checkbox to display the line comments to the vendor on the purchase order

PO320: Processing Purchase Requisitions Participant Guide
Statewide Management, Accounting and Reporting Tool
Participant Notes:
As of March 9, 2010 Page 44 of 108 Final
Fields Description Show at Receipt Use this checkbox to display the comments at the receipt
in SMART Show at Voucher Use this checkbox to show the comments at the voucher
in SMART (Accounts Payable process) Add Attachment Click the attach button to browse, locate and upload file(s)
from your agency‟s local server to the requisition line. Examples of requisition line attachments are: Justification related to a Prior Authorization Request, quotes from competing vendors, or a notice from a manufacturer that there are no resellers available for the item(s). Note: Please do not use SMART as a document repository. Use the SMART attachment function sparingly and only when absolutely necessary. Thank you.
Table 12. Line Comments Page
Rest of this page left intentionally blank. Please turn to the next page.

PO320: Processing Purchase Requisitions Participant Guide
Statewide Management, Accounting and Reporting Tool
Participant Notes:
As of March 9, 2010 Page 45 of 108 Final
3. Review and Submit – Requisition Lines Section
Clicking the Expand Section button to the left of a requisition line number opens additional information containing the Shipping and Accounting information for the requisition line. Use the Requisition Lines section to view, edit, and even split distribution and shipping information if necessary.
Page Name Navigation
Requisition Lines – Split Distribution and Shipping
eProcurement > Create Requisition > Review and Submit > Requisition Lines > Expand Line Information > Requisition Lines
Figure 22. Requisition Lines Expanded – Shipping Line (Split Distribution/Schedule)

PO320: Processing Purchase Requisitions Participant Guide
Statewide Management, Accounting and Reporting Tool
Participant Notes:
As of March 9, 2010 Page 46 of 108 Final
Fields Description Consolidate with other Reqs checkbox
Defaults as selected based on the agency (business unit), and based on the Requester chosen. The use of the Consolidate with other Reqs checkbox is agency specific. Please refer to your agency guidelines in the use of this checkbox. Note: Selecting this checkbox will not consolidate this requisition with requisitions from a different business unit (agency). This checkbox will consolidate only requisitions with the same Business Unit number.
Override Suggested Vendor
Defaults as selected based on the agency (business unit), and based on the Requester chosen. The use of the Override Suggested Vendor checkbox is agency specific. Please refer to your agency guidelines in the use of this checkbox.
Shipping Line (number)
SMART auto assigns a Shipping Line number to each shipping line on the requisition. Note: Be careful! Do not confuse this number with the requisition line number, or with the Distribution line number.
Due Date Use this field to enter the Due Date for the delivery of the item(s) Quantity Use this field to enter the Quantity of items for the shipment + button Use the + button to add split the line schedule into multiple Ship To
addresses (locations) - button Use the – button to delete or remove schedule lines (Shipping lines) Status Displays the current Status of the shipping line. The SMART default
value is „Active‟. Ship To Use this field to enter the desired Ship To location code (address)
for the Shipping Line. If you do not know the Ship To code, click the LookUp button to view and select from a list of available options.
Modify Shipping Address link
Click the Modify Shipping Address link to open the Shipping Address page. Use the Shipping Address page to enter the desired shipping address (override the default Ship To address). The use of the Shipping Address page is covered later in this course.

PO320: Processing Purchase Requisitions Participant Guide
Statewide Management, Accounting and Reporting Tool
Participant Notes:
As of March 9, 2010 Page 47 of 108 Final
Fields Description Attention SMART auto defaults the Requester‟s name into the Attention field.
It is State of Kansas best practice NOT to change the default name in the Attention field. If you need to add an Attention name for delivery purposes, please add the name to the Line Comments page.
Distribute By drop-down list
There are two options for the Distribute By field: Qty (Quantity) – Qty is the default selection in SMART. Use the Qty option to designate the distribution by quantity Amt (Amount) – use the Amt option to designate the distribution by Percentage amount(s) in the Percent field Note: If you are creating a requisition line containing an item from the item master catalog, you will receive a Warning message dialog box (as shown below). You will not receive this Warning message if you are creating a special request for an item or a service.
If you receive this Warning message, click the OK button to proceed. The State of Kansas is not using inventory items, therefore this error message does not apply. Click the OK button to close the message dialog box and proceed with the requisition.
Speedchart If your agency is using Speedcharts, enter the agency specific Speedchart code into the Speedchart field. If you do not know the SpeedChart code, use the LookUp button to view and select from the list of available options.
Table 13. Requisition Lines Expanded – Shipping Line (Split Distribution/Schedule)

PO320: Processing Purchase Requisitions Participant Guide
Statewide Management, Accounting and Reporting Tool
Participant Notes:
As of March 9, 2010 Page 48 of 108 Final
3. Review and Submit – Accounting Lines Section – Chartfields1 Tab
Figure 23. Requisition Lines Expanded – Accounting Lines – Chartfields1 tab
Fields Description Chartfields1 tab
Use the Chartfields1 tab to enter or split Chartfield (accounting distribution) information. Required Chartfields for the State of Kansas are: Dept (Department), Fund, Bud Unit (Budget Unit), Program, and Account. Note: If you are entering items for use on a project, the following project Chartfields are also required: PC Business Unit (Project Costing business unit), Project, and Activity. Use the horizontal scrollbar to scroll to the right to access additional Chartfield information, and to access the + and – buttons.
Line Accounting lines are assigned distribution Line numbers. The default distribution line number is „1‟. Additional distribution line numbers are auto assigned by SMART when one line distribution is split into multiple distribution lines.
Status The Status field displays the current status for the distribution line. Note: The default status value for a new distribution line is „Open‟.
Location Use the Location field to enter the Location code for the accounting line. If you do not know the Location code, use the LookUp button to view and select from a list of available options.
Quantity The Quantity field is used to split the distribution by the quantity (of items or services) specified in the Quantity field. Enter the desired quantity for this specific distribution line into the Quantity field. Note: You must choose the option of „Qty‟ in the „Distribute by‟ field.
Percent The Percent field is used to split the distribution line by a percentage amount. Enter the desired percent (split percentage amount) for this specific distribution line into the Percent field. Note: You must choose the option of „Amt‟ in the „Distribute by‟ field.

PO320: Processing Purchase Requisitions Participant Guide
Statewide Management, Accounting and Reporting Tool
Participant Notes:
As of March 9, 2010 Page 49 of 108 Final
Fields Description GL Unit Use the GL Unit field to enter the GL (General Ledger) Business
Unit number. The default value is based on your agency business unit number.
+ button Use the + button to add additional distribution lines (split the line distribution).
- button Use the – button to remove or delete distribution lines. Details tab The State of Kansas is not using the information on the Details tab.
Please do not use the Details tab.
Table 14. Requisition Lines Expanded – Accounting Lines – Chartfields1 Tab
3. Review and Submit – Accounting Lines Section – Asset Information Tab
Figure 24. Requisition Lines Expanded – Accounting Lines – Asset Information tab
Fields Description Asset Information tab
Use the Asset Information tab to enter the Asset Information for the requisition line(s). Note: It is important to know that information MUST be entered into both the AM Business Unit field AND the Profile ID field in order for the asset information to be passed into the SMART Asset Management module. If you do not enter information into both these fields, SMART will not recognize the Asset Management information, and will not pass the asset information onto the Asset Management module in SMART.
AM Business Unit
The AM Business Unit number MUST be the same business unit number as the PO Business Unit number displayed at the header level of the purchase requisition

PO320: Processing Purchase Requisitions Participant Guide
Statewide Management, Accounting and Reporting Tool
Participant Notes:
As of March 9, 2010 Page 50 of 108 Final
Fields Description Profile ID Use the Profile ID field to enter the Profile ID number. If you do not
know the Profile ID number, click the LookUp button to view and select from an available list of options.
Tag Number Use the Tag Number field to enter the Asset Tag Number for the item.
Table 15. Requisition Lines Expanded – Accounting Lines – Asset Information Tab
Shipping Address Page
Clicking the Modify Shipping Address link opens the Shipping Address page. Use the
Shipping Address page to edit the Shipping Address for the Ship To location for the
requisition schedule line.
Page Name Navigation
Shipping Address eProcurement > Create Requisition > Review and Submit > Requisition Lines > Expand Line Information > Requisition Lines > Modify Shipping Address link
Rest of this page left intentionally blank. Please turn to the next page.

PO320: Processing Purchase Requisitions Participant Guide
Statewide Management, Accounting and Reporting Tool
Participant Notes:
As of March 9, 2010 Page 51 of 108 Final
Figure 25. Shipping Address page
Rest of this page left intentionally blank. Please turn to the next page.

PO320: Processing Purchase Requisitions Participant Guide
Statewide Management, Accounting and Reporting Tool
Participant Notes:
As of March 9, 2010 Page 52 of 108 Final
Modify Line / Shipping / Accounting Page
Use the Modify Line / Shipping / Accounting page to change schedule (shipping) and distribution (accounting) information for multiple requisition lines at the same time when creating or editing a requisition. Using the Modify Line / Shipping / Accounting page enables you to make changes to multiple lines at the same time on the requisition, rather than having to edit every requisition line individually. Prior to clicking the Modify Line / Shipping / Accounting button, use the Line Selection checkboxes in the Requisition Lines section of the Review and Submit page to select the desired requisition lines you wish to modify. Alternatively, use the Select All/Deselect All checkbox to select or deselect all requisition lines on the requisition. Use the Modify Line / Shipping / Accounting page to update the information for the selected requisition lines. The values and information entered into the Modify Line / Shipping / Accounting page overrides the SMART default information for the requisition lines. When you have finished entering information into the Modify Line / Shipping / Accounting page, click the Apply button to open the Distribution Change Options page. (The use of the Distribution Change Options page is covered later in this course).
Page Name Navigation
Modify Line / Shipping / Accounting
eProcurement > Create Requisition > 3. Review and Submit > Requisition Lines > Line Selection checkboxes OR Select All/Deselect All checkbox > Modify Line / Shipping / Accounting button
Rest of this page left intentionally blank. Please turn to the next page.

PO320: Processing Purchase Requisitions Participant Guide
Statewide Management, Accounting and Reporting Tool
Participant Notes:
As of March 9, 2010 Page 53 of 108 Final
Figure 26. Create Requisition_Modify Line / Shipping / Accounting Page
Fields Description Vendor ID Use the Vendor ID field to enter the
Vendor ID number. If you do not know the Vendor ID number, click the LookUp button to view and select from the list of available options.
Vendor Location Use this field to edit the default Vendor Location information. If necessary, use the LookUp button to view and select from a list of available options.

PO320: Processing Purchase Requisitions Participant Guide
Statewide Management, Accounting and Reporting Tool
Participant Notes:
As of March 9, 2010 Page 54 of 108 Final
Fields Description Buyer If necessary, use the Buyer field to
specify the Buyer for the selected requisition lines. If you do not specify a Buyer in the Buyer field, SMART auto defaults the Buyer (based on Requester chosen). SMART auto defaults the Buyer information when the requisition is saved and submitted into the Workflow Approval process.
Category Use this field to enter the category code for the selected line item(s). Note: Category codes are mapped to Account Chartfield codes in SMART.
Table 16. Create Requisition_Modify Line / Shipping / Accounting Page – Line Information
Fields Description Ship To Use this field to enter the desired Ship To
location code (address) for the selected Shipping Lines. If you do not know the Ship To code, click the LookUp button to view and select from a list of available options.
Modify Shipping Address link Click the Modify Shipping Address link to open the Shipping Address page. Use the Shipping Address page to enter the desired shipping address (override the default Ship To address for the selected Shipping lines). The use of the Shipping Address page is covered earlier in this course.
Due Date Use this field to enter the Due Date for the delivery of the item(s), for the selected requisition lines.

PO320: Processing Purchase Requisitions Participant Guide
Statewide Management, Accounting and Reporting Tool
Participant Notes:
As of March 9, 2010 Page 55 of 108 Final
Fields Description Attention Use the Attention field to enter the name
of the contact person for the selected requisition line deliveries. For example: Enter the name of the Requester.
Table 17. Create Requisition_Modify Line / Shipping / Accounting Page – Shipping Information
Fields Description Chartfields1 tab
Use the Chartfields1 tab to enter or split Chartfield (accounting distribution) information. Required Chartfields for the State of Kansas are: Dept (Department), Fund, Bud Unit (Budget Unit), Program, and Account. Note: If you are entering items for use on a project, the following project Chartfields are also required: PC Business Unit (Project Costing business unit), Project, and Activity. Use the horizontal scrollbar to scroll to the right to access additional Chartfield information, and to access the + and – buttons.
Asset Information tab
Use the Asset Information tab to enter the Asset Information for the requisition line(s). Note: It is important to know that information MUST be entered into both the AM Business Unit field AND the Profile ID field in order for the asset information to be passed into the SMART Asset Management module. If you do not enter information into both these fields, SMART will not recognize the Asset Management information, and will not pass the asset information onto the Asset Management module in SMART.
Table 18. Create Requisition_Modify Line / Shipping / Accounting Page – Accounting Information
Note: Please refer to the ‘3. Review and Submit – Requisition Lines Section‟ for more information pertaining to the use of the fields located in the Chartfields1 Tab and the Asset Information tab.

PO320: Processing Purchase Requisitions Participant Guide
Statewide Management, Accounting and Reporting Tool
Participant Notes:
As of March 9, 2010 Page 56 of 108 Final
Distribution Change Options Page
Clicking the Apply button on the Modify Line / Shipping / Accounting page prompts SMART to open the Distribution Change Options page. The Distribution Change Options page allows you to select instructions that tell SMART how to apply the changes you made on the Modify Line / Shipping / Accounting page. The Distribution Change Options page offers three options:
All Distribution Lines
Matching Distribution Lines
Replace Distribution Lines
Note: Definitions and explanations of these options are provided following the screenshot (below). Select the desired option using the radio button to the left of the option. You are able to use the Distribution Change Options page while creating or editing requisitions.
Page Name Navigation
Distribution Change Options
eProcurement > Create Requisition > 3. Review and Submit > Requisition Lines > Modify Line / Shipping / Accounting > Apply button
Rest of this page left intentionally blank. Please turn to the next page.

PO320: Processing Purchase Requisitions Participant Guide
Statewide Management, Accounting and Reporting Tool
Participant Notes:
As of March 9, 2010 Page 57 of 108 Final
Figure 27. Distribution Change Options Page
Rest of this page left intentionally blank. Please turn to the next page.

PO320: Processing Purchase Requisitions Participant Guide
Statewide Management, Accounting and Reporting Tool
Participant Notes:
As of March 9, 2010 Page 58 of 108 Final
Fields Description All Distribution Lines The All Distribution Lines option is the
default selection for the State of Kansas. Chartfield values entered into a single distribution line on the Modify Line / Shipping / Accounting page are applied to ALL selected requisition lines (that were selected on the Review and Submit page using the Line Selection checkbox/es). Only Chartfield values that are entered on the Modify Line / Shipping / Accounting page are updated. Chartfields left blank (empty) do not override the SMART default values for the selected requisition lines. Any requisition lines that are not selected (on the Review and Submit page) retain all SMART default information. The distribution information for these unselected lines is not changed.

PO320: Processing Purchase Requisitions Participant Guide
Statewide Management, Accounting and Reporting Tool
Participant Notes:
As of March 9, 2010 Page 59 of 108 Final
Fields Description Matching Distribution Lines Enter the desired Chartfield values into
specific distribution line(s) on the Modify Line / Shipping / Accounting page. For example: If you enter Chartfield values for only distribution Line numbers 1, 3 and 7, then only distribution Line numbers 1, 3 and 7 are updated. All other distribution lines are not updated. Chartfields left blank (empty) do not override the SMART default values for the selected lines. Any requisition lines that are not selected (on the Review and Submit page) retain all SMART default information. The distribution information for these unselected lines is not changed

PO320: Processing Purchase Requisitions Participant Guide
Statewide Management, Accounting and Reporting Tool
Participant Notes:
As of March 9, 2010 Page 60 of 108 Final
Fields Description Replace Distribution Lines Chartfield values entered into a single
distribution line on the Modify Line / Shipping / Accounting page are applied to ALL selected requisition lines (that were selected on the Review and Submit page using the Line Selection checkbox/es). Chartfield values that are entered on the Modify Line / Shipping / Accounting page are updated. Chartfields left blank (empty) are overridden with blank fields (deletes SMART Chartfield default values) Any requisition lines that are not selected (on the Review and Submit page) retain all SMART default information. The distribution information for these unselected lines is not changed.
Table 19. Distribution Change Options Page
3. Review and Submit – Justifications/Comments Field
Page Name Navigation
Justification/Comments eProcurement > Create Requisition > 3. Review and Submit > Justification/Comments

PO320: Processing Purchase Requisitions Participant Guide
Statewide Management, Accounting and Reporting Tool
Participant Notes:
As of March 9, 2010 Page 61 of 108 Final
Figure 28.A. Review and Submit_Justification/Comments Field
Figure 28.B. Review and Submit_Justification/Comments_Expand Section
Fields Description Figure A - Justification/Comments and the Expand button
Use the Justification/Comments free text field to enter the reason for the purchase requisition creation. Field length is 32700 characters (including spaces and punctuation). If desired, click the Expand Section button in the Justification/Comments section. Clicking the Expand section button opens a new window displaying the Justification / Comments field.

PO320: Processing Purchase Requisitions Participant Guide
Statewide Management, Accounting and Reporting Tool
Participant Notes:
As of March 9, 2010 Page 62 of 108 Final
Fields Description Figure B – Justification/Comments in new window and the OK button
If you clicked the Expand button to open the Justification/Comments field in a new window, enter comments into the free text field and click the OK button. Clicking the OK button closes the window, and retains the comments in the Justification/Comments text box on the Review and Submit page.
Table 20. Review and Submit_Justification/Comments
3. Review and Submit – Check Budget Button
Page Name Navigation
Check Budget button eProcurement > Create Requisition > 3. Review and Submit
Figure 29. Review and Submit_Check Budget button
If your agency is set up for purchase requisitions to pre-encumber funds (only four agencies are doing this at go live July 2010), then clicking the Check Budget button prompts SMART to simultaneously combination edit (check for valid ChartField accounting strings), and creates a pre encumbrance for the budget funds. The pre-encumbrance becomes a hard encumbrance at the time of purchase order creation (batch process for auto sourcing in SMART).

PO320: Processing Purchase Requisitions Participant Guide
Statewide Management, Accounting and Reporting Tool
Participant Notes:
As of March 9, 2010 Page 63 of 108 Final
Most state agencies are NOT set up to pre-encumber funds at Go Live (in July 2010). If your agency is not using pre-encumbrances, please DO NOT USE the Check Budget button as this may potentially cause performance issues in SMART. Note: In extremely rare circumstances, the Check Budget button may be used by non-pre-encumbrance agencies as an exception process to the regularly scheduled batch process for budget checking in SMART.
3. Review and Submit – Action buttons
Page Name Navigation
Review and Submit eProcurement > Create Requisition > 3. Review and Submit > Action buttons and link (bottom left corner of page)
Figure 30. Review and Submit_Action buttons
Fields Description Save & submit button Use the Save & submit button to save
the requisition and submit it directly into the Workflow approval process. Clicking the Save & submit button opens the Confirmation page. The use of the Confirmation page is covered later in this course.

PO320: Processing Purchase Requisitions Participant Guide
Statewide Management, Accounting and Reporting Tool
Participant Notes:
As of March 9, 2010 Page 64 of 108 Final
Fields Description Save & preview approvals button Use the Save & preview approvals
button to save the requisition for later use. Clicking the Save & preview approvals button DOES NOT submit the requisition into the Workflow approval process. Clicking the Save & preview approvals button opens the Confirmation page. The use of the Confirmation page is covered later in this course.
Cancel requisition button or Cancel Changes button
Use the Cancel requisition button to cancel the entire purchase requisition in SMART. Important! The cancellation of a purchase requisition CANNOT be reversed. SMART provides a message prompt asking you to confirm your cancellation decision. Note: Depending on the status and/or workflow approval processing of the requisition, this button‟s title may appear as „Cancel Changes‟. Use the Cancel Changes button to cancel changes you have made to the requisition.
Find more items link Clicking the Find more items link navigates you away from the „3. Review and Submit‟ page, and returns you to the „2. Add items and services‟ page.
Table 21. Review and Submit_Action buttons

PO320: Processing Purchase Requisitions Participant Guide
Statewide Management, Accounting and Reporting Tool
Participant Notes:
As of March 9, 2010 Page 65 of 108 Final
Confirmation Page
Page Name Navigation
Confirmation page eProcurement > Create Requisition > 3. Review and Submit > Save & preview approvals button OR Save & Submit button
Figure 31. Confirmation Page
Clicking the „Save & preview approvals‟ button or the „Save & Submit‟ button on the „3. Review and Submit‟ page opens the Confirmation page.
PO320: Processing Purchase Requisitions Participant Guide
Statewide Management, Accounting and Reporting Tool
Participant Notes:
As of March 9, 2010 Page 66 of 108 Final
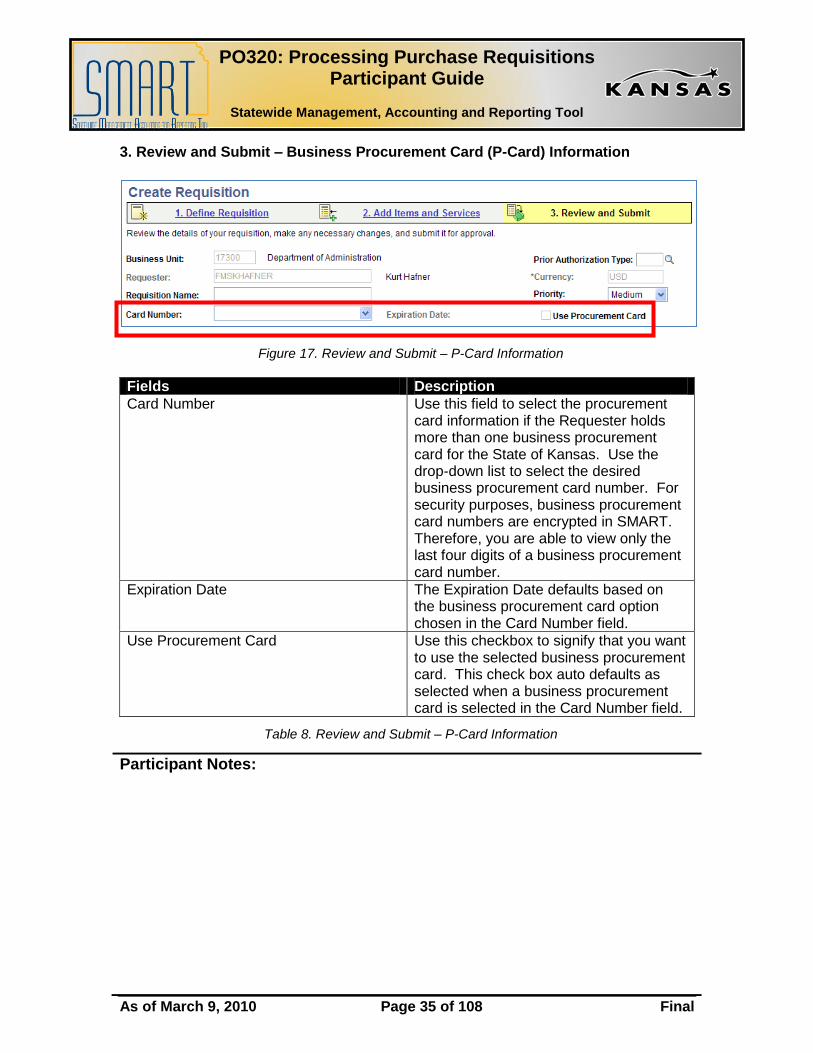
Fields Description Requested For
Displays the name of the Requester
Number of Lines
Displays the total number of lines on the requisition
Requisition Name
When you click either the Save & submit button or the Save & preview approvals button, SMART auto assigns a requisition ID number to the requisition. The requisition ID number is defaulted into the Requisition Name field.
Total Amount
Displays the Total Amount (total cost) for the requisition
Requisition ID
When you click either the Save & submit button or the Save & preview approvals button, SMART auto assigns a requisition ID number to the requisition. The requisition ID number is defaulted into the Requisition ID field.
Business Unit
Displays the Business Unit number for the agency
Priority Displays the Priority level designated on the requisition Budget Status
There are three Budget Status options: Not Checked: Budget Checking has not occurred. The Budget
Check batch process has not run, or a manual Budget Check has not
been performed on the requisition. This status is the default value for
a new requisition.
Valid: The Budget Checking batch process has been run. SMART
validated all accounting information as correct (combination edits).
The requisition successfully passed the Budget Checking process
which changed the status to „Valid‟.
Error: The Budget Checking batch process has run. SMART
identified error/s in the accounting information for the requisition. The
requisition did not pass Budget Checking successfully, therefore the
status was changed to „Error‟
PO320: Processing Purchase Requisitions Participant Guide
Statewide Management, Accounting and Reporting Tool
Participant Notes:
As of March 9, 2010 Page 67 of 108 Final
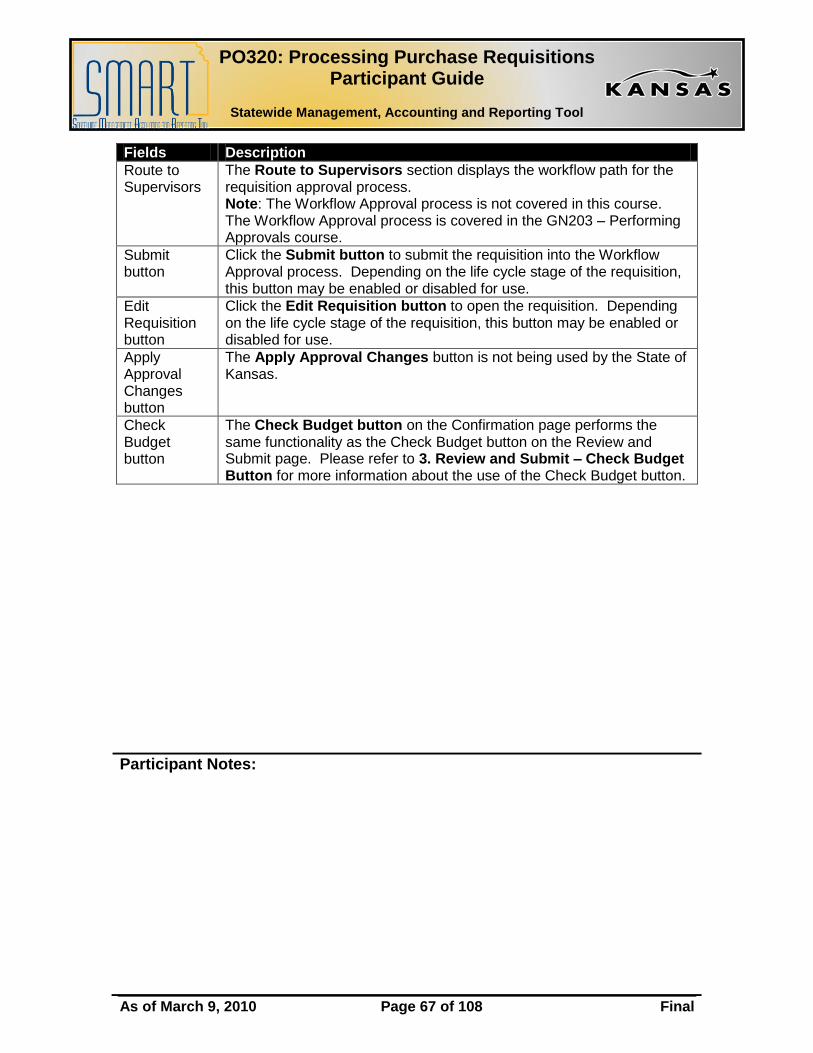
Fields Description Route to Supervisors
The Route to Supervisors section displays the workflow path for the requisition approval process. Note: The Workflow Approval process is not covered in this course. The Workflow Approval process is covered in the GN203 – Performing Approvals course.
Submit button
Click the Submit button to submit the requisition into the Workflow Approval process. Depending on the life cycle stage of the requisition, this button may be enabled or disabled for use.
Edit Requisition button
Click the Edit Requisition button to open the requisition. Depending on the life cycle stage of the requisition, this button may be enabled or disabled for use.
Apply Approval Changes button
The Apply Approval Changes button is not being used by the State of Kansas.
Check Budget button
The Check Budget button on the Confirmation page performs the same functionality as the Check Budget button on the Review and Submit page. Please refer to 3. Review and Submit – Check Budget Button for more information about the use of the Check Budget button.
PO320: Processing Purchase Requisitions Participant Guide
Statewide Management, Accounting and Reporting Tool
Participant Notes:
As of March 9, 2010 Page 68 of 108 Final
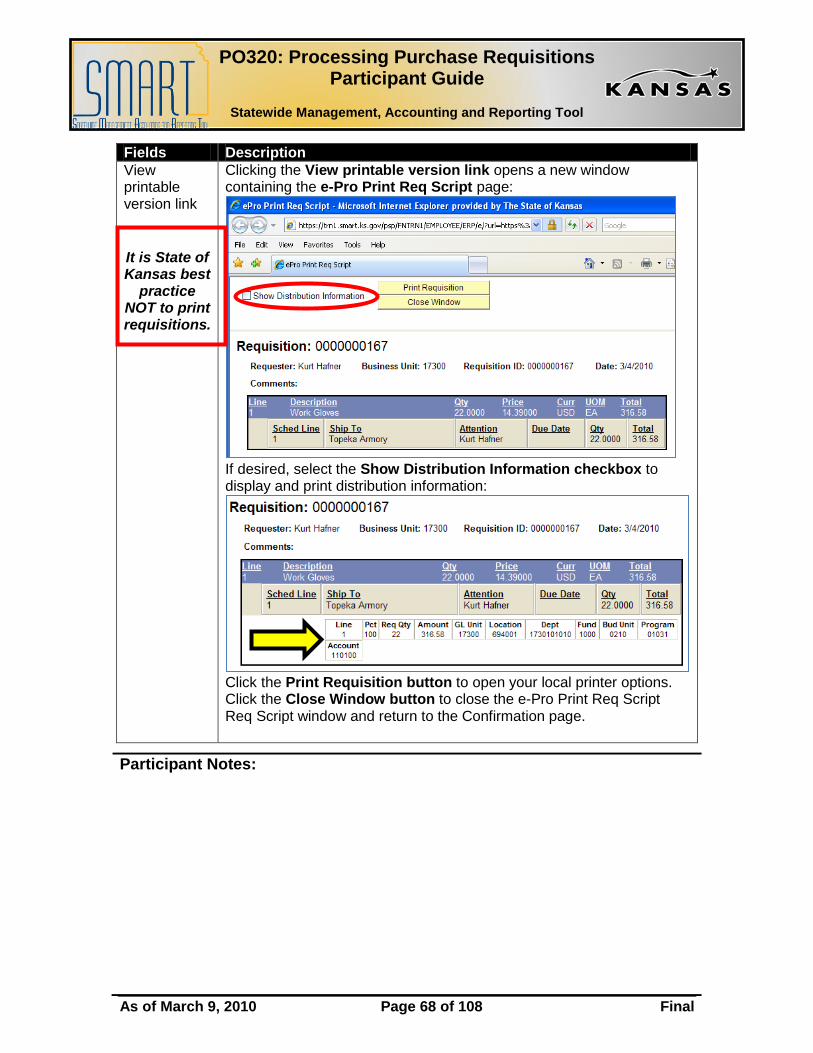
Fields Description View printable version link It is State of Kansas best
practice NOT to print requisitions.
Clicking the View printable version link opens a new window containing the e-Pro Print Req Script page:
If desired, select the Show Distribution Information checkbox to display and print distribution information:
Click the Print Requisition button to open your local printer options. Click the Close Window button to close the e-Pro Print Req Script Req Script window and return to the Confirmation page.

PO320: Processing Purchase Requisitions Participant Guide
Statewide Management, Accounting and Reporting Tool
Participant Notes:
As of March 9, 2010 Page 69 of 108 Final
Fields Description Manage Requisitions link
Click the Manage Requisitions link to navigate to the Manage Requisitions page. The use of the Manage Requisitions page is covered later in this course.
Create New Requisition link
Click the Create New Requisition link to begin the creation of a new requisition in SMART. Clicking the Create New Requisition link navigates you to the Specify Business Unit and Requester page in the SMART e-Procurement module.
Table 22. Confirmation Page
Topic 2: Creating a Purchase Requisition without an Item from the Item Master List and without a Procurement Card
Only statewide contract items appear in the item master catalog in SMART (at
Go Live, July 2010). Your agency may need to order items that are not in the
SMART item master catalog. Use the Special Request Page to requisition items
that you cannot locate by browsing the catalog or by using an item search.
2. Add Items and Services - Special Request Page
Use the Special Request page to create a request for a special item or service. A special item is an item that is not listed in the SMART item master catalog (which contains only statewide contract items), or in a Direct Connect (Web) catalog. You can choose links on the Special Request page to create Special Items, Fixed Cost Service, Variable Cost Service, and Time and Materials.
Page Name Navigation
Special Request eProcurement > Create Requisition > 2. Add Items and Services > Special Request Tab

PO320: Processing Purchase Requisitions Participant Guide
Statewide Management, Accounting and Reporting Tool
Participant Notes:
As of March 9, 2010 Page 70 of 108 Final
Figure 32. Add Items and Services_Special Request Tab
We will now complete Activity 7: Creating a Purchase Requisition Using a Special Request for Items in your Activity Guide.
2. Add Items and Services - Special Item Request Page
Use this page to request an item that is not in a catalog.
Page Name Navigation
Special Request eProcurement > Create Requisition > 2. Add Items and Services > Special Request Tab >Special Item Link

PO320: Processing Purchase Requisitions Participant Guide
Statewide Management, Accounting and Reporting Tool
Participant Notes:
As of March 9, 2010 Page 71 of 108 Final
Figure 33. Special Request Page – Special Item Link Expanded
Note: Fields notated with an asterisk (*) in SMART are required fields that must have data entered into them.

PO320: Processing Purchase Requisitions Participant Guide
Statewide Management, Accounting and Reporting Tool
Participant Notes:
As of March 9, 2010 Page 72 of 108 Final
Fields Description Item Description Use the Item Description field to enter a description
of the item you are requesting. Field length is 254 characters (including spaces and punctuation).
Price Use the Price field to enter the price of the item you are requesting (= price per unit of measure)
Quantity Use the Quantity field to enter the quantity of the item(s) you are requisitioning
Unit of Measure Use the Unit of Measure field to enter the unit of measure (UOM) for the item(s) you are requisitioning. If you do not know the UOM, click the LookUp button to view and select from a list of available options.
Category When creating a Special Request in SMART, you MUST populate a Category code. Use the Category field to enter the Category code number for the item(s) you are requisitioning. Note: Category codes are mapped to Account Chartfield codes in SMART. If you do not know the Category code, click the LookUp button to view and select from a list of available options.
Vendor ID When creating a Special Request in SMART, you need to populate a Vendor ID. If you do not know the Vendor ID number, click the LookUp button to view and select from a list of available options. Note: Vendor ID‟s are maintained by Central. If you cannot locate the Vendor ID, please add the Vendor information to the Additional Information text field and leave the Vendor ID field empty (blank).
Vendor Item ID Use the Vendor Item ID field to enter a Vendor‟s reference or product number for the item. For example: The number/reference that the vendor uses in their catalog. This is an optional field in SMART.

PO320: Processing Purchase Requisitions Participant Guide
Statewide Management, Accounting and Reporting Tool
Participant Notes:
As of March 9, 2010 Page 73 of 108 Final
Fields Description Mfg ID Use the Mfg ID field to enter the manufacturer‟s ID
number in SMART. If you do not know the Mfg ID number, click the LookUp button to view and select from a list of available options. This is an optional field in SMART.
Mfg Item ID Use the Mfg Item ID field to enter the manufacturer‟s reference or product number for the item. For example SKU (Stock Keeping Unit) number. This is an optional field in SMART.
Additional Information Use the Additional Information field to enter any additional information about the item. This field is a free text field.
Send to Vendor Use the Send to Vendor checkbox to display the Additional Information text to the vendor on the purchase order
Show at Receipt Use the Show at Receipt checkbox to display the Additional Information text at the receipt in SMART
Show at Voucher Use the Show at Voucher checkbox to show the Additional Information text at the voucher in SMART (Accounts Payable process)
Request New Item The State of Kansas is not using this functionality. Please do NOT select the Request New Item checkbox.
Add Item button Once you have completed entering all information into the Special Item request form, click the Add Item button to have SMART transfer the special item information to the 3. Review and Submit page.
Cancel button Click the Cancel button to cancel the special request for the item, and to return to the 2. Add Items and Services page.

PO320: Processing Purchase Requisitions Participant Guide
Statewide Management, Accounting and Reporting Tool
Participant Notes:
As of March 9, 2010 Page 74 of 108 Final
Fields Description Add or Start New Type button
Once you have completed entering all information into the Special Item request form, click the Add or Start New Type button to have SMART transfer the special item information to the 3. Review and Submit page. Additionally, SMART transfers you back to the Special Request page.
Table 23. Special Request Page – Special Item Link Expanded
Topic 3: Creating a Purchase Requisition for a Fixed Asset Item
Your agency Asset Processor should communicate with you any time you
purchase an item that will become an asset
Asset details are entered at the line level
If you consider an item to be an asset, you must populate both the AM Unit field
and the Profile ID field. Both these fields must contain data for the information to
be passed through SMART into the Asset Management module. If only one of
these fields is populated, SMART will not consider the item an asset, and will not
pass the asset information onto the Asset Management module.
The AM Unit number must match the PO Business Unit number displayed at the
header level
We will now complete Activity 8: Create a Purchase Requisition for a Fixed Asset Item in your Activity Guide.

PO320: Processing Purchase Requisitions Participant Guide
Statewide Management, Accounting and Reporting Tool
Participant Notes:
As of March 9, 2010 Page 75 of 108 Final
Topic 4: Creating a Purchase Requisition for a Project Item
Your agency Project Manager should communicate with you any time you
purchase an item that is used for a project and/or grant that is setup in SMART
Project Costing
To associate an item to a particular project, enter the project ChartFields at the
line level. These fields include Project Business Unit, Project ID, Activity, Source
Type, Category, and Subcategory
To split a line‟s Distribution (Chartfields) and/or Schedule information (such as
Ship To location), navigate to the Review and Submit page – Requisition Lines
(expanded). Use the „+‟ button to add Distribution/Schedule information, or use
the „–„ button to remove Distribution/Schedule information as required.
We will now complete an Activity 9: Create a Purchase Requisition for a Project Item in your Activity Guide.
Rest of this page left intentionally blank. Please turn to the next page.

PO320: Processing Purchase Requisitions Participant Guide
Statewide Management, Accounting and Reporting Tool
Participant Notes:
As of March 9, 2010 Page 76 of 108 Final
Topic 5: Creating a Purchase Requisition using Prior Authorization Request
On occasion, items are needed that cannot go out for competitive bid due to
circumstances. Some examples might be an item that is only sold by one vendor
in the entire country, or an emergency situation during which failing to procure
the item immediately would be detrimental to the agency‟s function. In these
circumstances, an agency must request prior authorization from the Division of
Purchases to procure an item outside of the bid process.
Purchase requisitions that require Prior Authorization:
Purchase requisitions containing Prior Authorization lines should contain ONLY
Prior Authorization lines.
Please do NOT add non-Prior Authorization lines/items to a purchase requisition
that contains Prior Authorization lines/items. Please create a new (separate)
purchase requisition for non-Prior Authorization lines/items.
Please do NOT mix Prior Authorization types on a purchase requisition. Prior
Authorization types are entered at the HEADER level of a purchase requisition,
therefore only ONE type of Prior Authorization can be assigned to each purchase
requisition.
If you need to use multiple Prior Authorization types when creating a purchase
requisition, please create multiple purchase requisitions - one purchase
requisition for EACH Prior Authorization type.
For example: The State of Kansas will not approve a purchase requisition which
contains a line item that is a Prior Authorization type of OKP (Only Known

PO320: Processing Purchase Requisitions Participant Guide
Statewide Management, Accounting and Reporting Tool
Participant Notes:
As of March 9, 2010 Page 77 of 108 Final
Provider), and that contains a line item that is a Prior Authorization type of USE
(Purchase of Used Equipment) on the same purchase requisition. In this
example, the Requisitioner needs to create two (2) separate purchase
requisitions, the first using the Prior Authorization type of OKP, and the second
purchase requisition using the Prior Authorization type of USE.
We will now complete Activity 10: Creating a Purchase Requisition That References a Prior Authorization Request in your Activity Guide.
Topic 6: Using a Web Catalog to Create a Purchase Requisition
SMART contains the functionality to allow you to search certain vendor's online catalogs so you can add items to the requisition in SMART. Use the Web tab (Direct Connect) while creating the requisition in SMART to gain access to the vendor's online catalog. Once you have located the items you need in the vendor's catalog, SMART imports the item information into the requisition. This topic uses the example of Staples Advantage (Corporate Express) to order office supplies.
Staples will send an email directly to the Requester when the purchase order is
received, and then another email when the item is shipped.
The State of Kansas minimum order amount for a Staples order is $35.00 for
each Ship To Location.
Extra delivery charges appear for various reasons, for example: Furniture with
setup required, special delivery services, or furniture non in stock, etc.
You are able to modify a Ship To address or location on the purchase requisition
in SMART.

PO320: Processing Purchase Requisitions Participant Guide
Statewide Management, Accounting and Reporting Tool
Participant Notes:
As of March 9, 2010 Page 78 of 108 Final
You cannot split one purchase requisition line into multiple ship to locations (for
Direct Connect/Web Catalog purchase requisitions).
It is important to know that Staples change their web catalog prices quarterly.
For Staples (Direct Connect) purchase requisitions on which you want to add an
Attention name for delivery purposes, please add the name of the contact in the
Line Comments page for the requisition line.
For Staples (Direct Connect) purchase requisitions that have multiple Ship To
locations, do NOT change the name in the Attention field. Changing the default
name in the Attention field may cause an issue with the Direct Connect interface
between the State of Kansas and Staples website.
We will now complete a walkthrough using a UPK simulation: Creating Requisitions Using the Web Catalog.
2. Add Items and Services - Web Tab
Use this page to access the Staples Advantage website for office supplies.
Page Name Navigation
Web Catalog eProcurement > Add Items and Services > Web Tab

PO320: Processing Purchase Requisitions Participant Guide
Statewide Management, Accounting and Reporting Tool
Participant Notes:
As of March 9, 2010 Page 79 of 108 Final
Figure 34. Web Catalog Page Expanded
Rest of this page left intentionally blank. Please turn to the next page.

PO320: Processing Purchase Requisitions Participant Guide
Statewide Management, Accounting and Reporting Tool
Participant Notes:
As of March 9, 2010 Page 80 of 108 Final
Web Tab - Staples Advantage Online Catalog
Use this page to order office supplies.
Page Name Navigation
Staples Advantage Online Catalog
eProcurement > Add Items and Services > Web Tab >Staples Advantage Link
Figure 35. Staples Advantage Online Catalog

PO320: Processing Purchase Requisitions Participant Guide
Statewide Management, Accounting and Reporting Tool
Participant Notes:
As of March 9, 2010 Page 81 of 108 Final
Fields Description Keyword Use this field to enter search
criteria/keyword. The more specific the criteria, the better the search results.
Item Number Use this radio button to search by an item number from the Staples catalog
Table 24. Staples Advantage Online Catalog Page Elements
Staples - Item Search Page
Use this page to select the item(s) you wish to purchase.
Figure 36 Staples Advantage - Item Search Page

PO320: Processing Purchase Requisitions Participant Guide
Statewide Management, Accounting and Reporting Tool
Participant Notes:
As of March 9, 2010 Page 82 of 108 Final
Fields Description Qty Use this field to enter the quantity of the
item you wish to purchase Add to Cart Use this button to select the item(s) for
purchase Go To Cart Use this button to reivew your slelected
items and to finalize your Requisition
Table 25. Staples Advantage - Items Search Page Elements
Staples - Cart Page
Use this page to verify your item(s), quantity, and price and select your delivery service.
Figure 37. Staples Advantage - Cart Page

PO320: Processing Purchase Requisitions Participant Guide
Statewide Management, Accounting and Reporting Tool
Participant Notes:
As of March 9, 2010 Page 83 of 108 Final
Fields Description Delivery Service Use these radio buttons to select between
Premium Service or Scheduled delivery if available
Secure Checkout Use this button to begin the checkout process. Note: There is also a Check Out link at the bottom of the page, which you can use to perform the same function as the Secure Checkout button located at the top of the page.
Table 26. Staples Advantage - Cart Page Elements
Staples - Confirm Order Page
Use the Confirm Order page to review the items before clicking the Confirm Order button. Once you have reviewed all items on the Confirm Order page, click the Confirm Order button. Clicking the Confirm Order button transfers the item information from the vendor catalog to the purchase requisition in SMART, and returns you to the purchase requisition in SMART.
Note: Estimated Tax will appear on the Confirm Order page. The Estimated Tax amount will NOT transfer to the requisition in SMART.
Rest of this page left intentionally blank. Please turn to the next page.
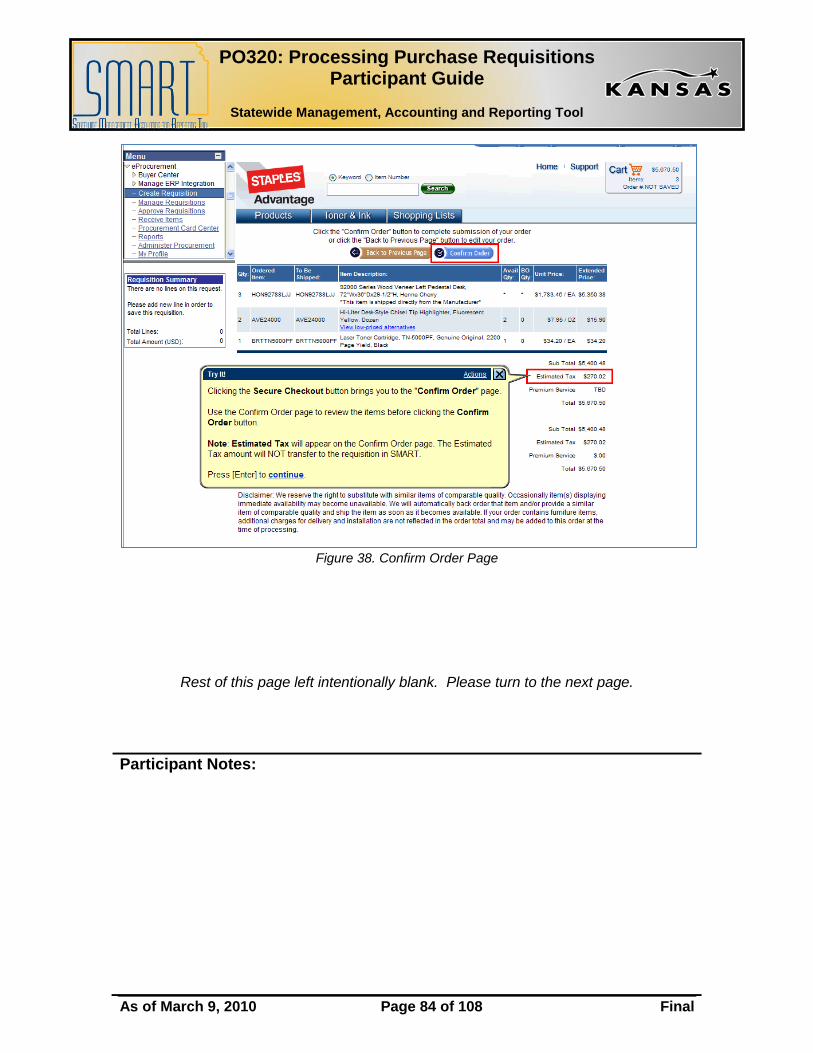
PO320: Processing Purchase Requisitions Participant Guide
Statewide Management, Accounting and Reporting Tool
Participant Notes:
As of March 9, 2010 Page 84 of 108 Final
Figure 38. Confirm Order Page
Rest of this page left intentionally blank. Please turn to the next page.

PO320: Processing Purchase Requisitions Participant Guide
Statewide Management, Accounting and Reporting Tool
Participant Notes:
As of March 9, 2010 Page 85 of 108 Final
Editing a Web Catalog Purchase Requisition – Quantity
Quantities cannot be changed after pulling items into a requisition from a vendor‟s website. To edit quantities on a web catalog requisition, you have two options: 1) Delete the requisition and start over, or 2) Delete the line, go back to the vendor‟s website using the “Add Items and Services” page, re-enter the item and correct quantity.
Editing a Web Catalog Purchase Requisition – Shipping Address
Staples do not ship items based on the purchase requisition Ship To information, they ship items based on the purchase order Ship To information. The interface built between the State of Kansas and Staples is set up to communicate twice: First we access item information from the Staples Advantage web catalog, which populates into the purchase requisition in SMART.
Second, once the purchase requisition has been through the approval workflow process and the Auto Sourcing process successfully (to create the purchase order), the purchase order is then transmitted electronically through the interface to Staples.
If you manually modify a Shipping (Ship To) address while creating a purchase requisition in SMART, the State of Kansas best practice recommends that you include a name for the new shipping location in the “Address 1” field.
For example: In this example, you are a Requisitioner for the Department of Transportation who is shipping something to the Hyatt Place hotel. When entering the purchase requisition in SMART, you need to modify the shipping address information by entering the hotel name (you are shipping to) in the Address 1 line, and then enter the actual street address information in the Address 2 line.

PO320: Processing Purchase Requisitions Participant Guide
Statewide Management, Accounting and Reporting Tool
Participant Notes:
As of March 9, 2010 Page 86 of 108 Final
Figure 39. 3. Review and Submit page – Modify Shipping Address Link
Rest of this page left intentionally blank. Please turn to the next page.

PO320: Processing Purchase Requisitions Participant Guide
Statewide Management, Accounting and Reporting Tool
Participant Notes:
As of March 9, 2010 Page 87 of 108 Final
Figure 40. Shipping Address Page – Modified Shipping Address 1 field
If you do not enter the hotel name in the Address 1 line, the shipping address on the purchase requisition (and the purchase order) might look something like this:
Department of Transportation (Staples will always put the location code name first in the shipping address, regardless of whether the remaining address information has changed),1234 Main St., Topeka, KS 66612
Instead of the correct address which should appear as: Department of Transportation, Hyatt Place, 1234 Main St., Topeka KS 66612.

PO320: Processing Purchase Requisitions Participant Guide
Statewide Management, Accounting and Reporting Tool
Participant Notes:
As of March 9, 2010 Page 88 of 108 Final
Topic 7: Editing, Saving, and Submitting Requisitions
You may need to edit a requisition after it is created by adding line comments, changing item quantities, and changing the distribution of items among departments. You can edit a requisition before finalizing and submitting for approval.
Several screens used to modify requisitions are accessed via the Review and
Submit requisitions page
Editing requisitions can take place before or after saving
Manage Requisitions Page
Use the Manage Requisitions page to view a list of requisitions in various statuses, after they have been saved. From this page, you can access other pages to review requisition details and edit or cancel requisitions.
We will now complete a walkthrough using a UPK simulation: Editing, Saving, and Submitting Requisitions.
We will now complete Activity 11: Editing, Saving, and Submitting Requisitions in your Activity Guide
Page Name Navigation
Manage Requisitions eProcurement > Manage Requisitions

PO320: Processing Purchase Requisitions Participant Guide
Statewide Management, Accounting and Reporting Tool
Participant Notes:
As of March 9, 2010 Page 89 of 108 Final
Figure 41. Manage Requisitions Page
Fields Description Request Status Use this dropdown to select from the
follwing Requisition Statuses: All But Complete, Approved, Cancelled, Denied, Open, PO(s) Created, PO(s) Dispatched, Pending, Received, Service Complete, Service Filled, or Service Sourced
Budget Status Use this dropdown to select one of the following budget statuses for the Requisition: Error, Not Chk’d, or Valid
Entered By Use this field to search for the person that created the requisition

PO320: Processing Purchase Requisitions Participant Guide
Statewide Management, Accounting and Reporting Tool
Participant Notes:
As of March 9, 2010 Page 90 of 108 Final
Fields Description PO ID Use this field to enter the PO ID
(purchase order number) Select Action Dropdown Use this dropdown to select from the
following action for requisition management: Cancel Requisition, Copy Requisition, Edit Requisition, or Budget Check
Create New Requisition Click this link to create a new requisition. Inquire Change Request The State of Kansas is not using this
functionality. Please do not use this link. Inquire Receipts Click this link to access the Receipts For
page where you can view and maintain receipts
Requisition Report The State of Kansas is not using this functionality. Please do not use this link.
Table 27. Manage Requisitions Page Elements
Lesson Review
In this lesson, you learned how to:
Navigate within SMART to create purchase requisitions
Locate and use items on the items master list for a purchase requisition
Enter asset information and project information on a purchase requisition
Use a Prior Authorization Request to create a purchase requisition
Edit, save, and submit purchase requisitions

PO320: Processing Purchase Requisitions Participant Guide
Statewide Management, Accounting and Reporting Tool
Participant Notes:
As of March 9, 2010 Page 91 of 108 Final
Lesson 4: Managing Purchase Requisitions
Objectives
Upon completion of this lesson, you will be able to:
View and understand purchase requisition statuses
Manage purchase requisitions
Topic 1: Purchase Requisition Status
Approved: The requisition is approved and can become a purchase order.
Canceled: The requisition was entered and saved but was canceled. A canceled
requisition can be reopened within a certain number of days as specified for the
Purchasing business unit; otherwise, it is closed permanently.
Complete: After the requisition is dispatched on a purchase order, the goods are
received and the vendor is paid. A background process identifies the requisition
status as Complete. Canceled requisitions are also identified as Complete.
Denied: The requisition is denied in the approval process.
Open: The requisition has been entered and saved but not yet submitted, or the
receipt has been entered and saved but might have errors.
PO(s) Created: The requisition has been placed on a purchase order.

PO320: Processing Purchase Requisitions Participant Guide
Statewide Management, Accounting and Reporting Tool
Participant Notes:
As of March 9, 2010 Page 92 of 108 Final
PO(s) Dispatched: The requisition has been placed on a purchase order, and
the purchase order has been dispatched to the vendor.
Pending: The requisition has been submitted and is awaiting approval.
Received: The requisition has been placed on a purchase order. The purchase
order has been dispatched to the vendor, and the goods have been partially or
fully received.
Topic 2: Manage Purchase Requisitions
The SMART Manage Requisition feature provides you with the ability to review,
edit, approve, or cancel requisitions. After the requisition is auto sourced to a
purchase order, the goods are received and the vendor is paid. The requisition
status will changed to "Complete". Canceled requisitions are also identified as
"Complete".
Manage Requisitions - Requisitions Section Expanded
Click the Expand Section button to view the life span and line items for a requisition. Stages in the requisition cycle that are complete or in progress are highlighted with active links. You can click any link to view the detail of a stage.
Page Name Navigation
Requisitions Section Expanded
eProcurement > Manage Requisitions > Expand Section (Requisition)

PO320: Processing Purchase Requisitions Participant Guide
Statewide Management, Accounting and Reporting Tool
Participant Notes:
As of March 9, 2010 Page 93 of 108 Final
Figure 42. Requisitions Section Expanded
Requisition Details Page
Use this page to view details about individual requisitions. The PO Information header bar appears only if a purchase order was created for the requisition.
Page Name Navigation
Requisitions Details eProcurement > Manage Requisitions > Requisition ID Link

PO320: Processing Purchase Requisitions Participant Guide
Statewide Management, Accounting and Reporting Tool
Participant Notes:
As of March 9, 2010 Page 94 of 108 Final
Figure 43. Requisition Details Page
Fields Description Item Description Use this link to view an item's description.
You can also access the item's detail document.
Source Status Use this field to view the stage of the requisition line in the sourcing process. Values include: Not Sourced, the requisition line has not been sourced; Available, the requisition line has not yet been placed on a PO; In Process, a sourcing process is running on this requisition line, or there is an error in creating a PO; Sourcing Complete, the requisition line has been sourced to a PO
Table 28. Requisition Details Page Elements

PO320: Processing Purchase Requisitions Participant Guide
Statewide Management, Accounting and Reporting Tool
Participant Notes:
As of March 9, 2010 Page 95 of 108 Final
Requisition Schedule and Distribution Page
Use this page to view line details, schedules, and distribution information.
Page Name Navigation
Requisitions Schedule and Distribution
eProcurement > Manage Requisitions > Requisition ID Link > Requisition Detail Page > Requisitions Schedule and Distribution Link
Figure 44. Requisition Schedule Distribution Page
Fields Description Line Section This section contains all lines on a
requisition. To view the item's description, click the item name.
Schedule This section displays shipping information for the item, such as where the Ship To location, Due Date, price per item, and total amount.
Distribution Section This section displays the ChartField (distribution) information for the item

PO320: Processing Purchase Requisitions Participant Guide
Statewide Management, Accounting and Reporting Tool
Participant Notes:
As of March 9, 2010 Page 96 of 108 Final
Fields Description Dist # This section displays the number the
system assigns to this distribution. SMART uses this numbering to distinguish between multiple distributions for a single requisition line.
Distribution Type This displays the method by which the system allocates or charges an expense account distribution. Values include: Amt, the sum of all distribution amounts must equal the schedule amount (merchandise amount); Qty, the sum of all distribution quantities must equal the schedule quantity.
Table 29. Requisition Schedule Distribution Page Elements
Figure 45. Requisition Schedule Distribution Page_Details Tab
Note: The State of Kansas is not using the More Details or the More Details 2 tabs
Figure 46. Requisition Schedule Distribution Page_Asset Information Tab

PO320: Processing Purchase Requisitions Participant Guide
Statewide Management, Accounting and Reporting Tool
Participant Notes:
As of March 9, 2010 Page 97 of 108 Final
We will now complete a walkthrough using a UPK simulation: Managing Requisitions.
Lesson Review
In this lesson, you learned:
Purchase requisition statuses and the definition of each status
How to navigate in SMART to locate purchase requisition information
The processes associated with managing purchase requisitions in SMART
You will now complete Activity 12: Using the Manage Requisitions Page in SMART.
Rest of this page left intentionally blank. Please turn to the next page.

PO320: Processing Purchase Requisitions Participant Guide
Statewide Management, Accounting and Reporting Tool
Participant Notes:
As of March 9, 2010 Page 98 of 108 Final
Lesson 5: Item Selection Methods
Objectives
Upon completion of this lesson, you will be able to:
Locate, select and save favorite items
Create and use personal templates
Create, edit and cancel special requests for goods
Create, edit and cancel special requests for services
Topic 1: Favorite Items
Favorites are frequently ordered items that you can maintain in a single location.
You can create a list of frequently ordered (favorite) items and use the list to add
items to a requisition without searching the item catalog.
The list of favorite items that you create is based on the Requester‟s user ID. It
is not specific to the Requisitioner‟s user ID.
Sharing of favorite items varies across agencies (Business Units).
If an agency (Business Unit) allows a Requisitioner to create requisitions on
behalf of multiple Requesters, that Requisitioner will have access to multiple
Favorite Items.
If an agency (Business Unit) limits a Requisitioner access to only himself/herself
as a Requester, then his/her favorite items will not be shared (the Requisitioner‟s
favorite items will not be able to be used by any other Requisitioners).
Adding items to favorites can be done on several pages when creating a
requisition

PO320: Processing Purchase Requisitions Participant Guide
Statewide Management, Accounting and Reporting Tool
Participant Notes:
As of March 9, 2010 Page 99 of 108 Final
2. Add Items and Services - Favorites Tab
When you select and add an item to Favorites, SMART provides a Confirmation message prompt in a new window. Click the Close button to close the Confirmation message window.
Figure 47. 2. Add Favorite Items Confirmation Message
Use the Favorites tab page to view and select items you have designated as favorites.
Page Name Navigation
Favorites Tab eProcurement > Add Items and Services > Favorites Tab

PO320: Processing Purchase Requisitions Participant Guide
Statewide Management, Accounting and Reporting Tool
Participant Notes:
As of March 9, 2010 Page 100 of 108 Final
Figure 48. 2. Add Items and Services_Favorites Tab
We will now complete Activity 13: Favorite Items, and Activity 14: Using a Favorite Item in your Activity Guide.

PO320: Processing Purchase Requisitions Participant Guide
Statewide Management, Accounting and Reporting Tool
Participant Notes:
As of March 9, 2010 Page 101 of 108 Final
Topic 2: Personal Templates
Personal Templates are a way to group items that are often ordered together.
Personal templates enable you to quickly create requisitions for frequently
ordered items.
Personal templates are based on the Requester‟s user ID. They are not user
specific to the Requisitioner‟s user ID.
Sharing of personal templates varies across agencies (Business Units)
If an agency (Business Unit) allows a Requisitioner to create requisitions on
behalf of multiple Requesters, that Requisitioner will have access to multiple
personal templates.
If an agency (Business Unit) limits a Requisitioner access to only himself/herself
as a Requester, then his/her personal templates will not be shared (the
Requisitioner‟s personal templates will not be able to be used by any other
Requisitioners).
When using an existing personal template: Click the Expand Section button to
view the items and quantities contained within the template. The Quantity field
designates the number of templates you want to order (not the total number of
items you want to order). For example: If your template contains 3 chairs, and
you enter a quantity of „3‟ into the Quantity field, a total of 9 items will appear on
the 3. Review and Submit page. (3 chairs x 3 templates = total of 9 items)
To use an existing personal template, click the Expand section button for the
desired template, enter the quantity into the Quantity field, and then click the
Add button. Clicking the Add button adds the items to the 3. Review and
Submit page.

PO320: Processing Purchase Requisitions Participant Guide
Statewide Management, Accounting and Reporting Tool
Participant Notes:
As of March 9, 2010 Page 102 of 108 Final
Add Selected Items to Template(s) Page
Use this page to create a personal template.
Page Name Navigation
Add Selected Items to Template(s) Page
eProcurement > 3. Review and Submit > Select the Line selection Checkbox(es) > Click the Add to Template(s) button
Figure 49. Add Selected Items to Template(s) Page

PO320: Processing Purchase Requisitions Participant Guide
Statewide Management, Accounting and Reporting Tool
Participant Notes:
As of March 9, 2010 Page 103 of 108 Final
Page Name Navigation
Templates Add Items or Services > Templates > Expand Section button
Figure 50. 2. Add Items and Services_Templates Tab_Use Existing Personal Template
We will now complete Activity 15: Personal Templates, and Activity 16: Using a Personal Template in your Activity Guide.

PO320: Processing Purchase Requisitions Participant Guide
Statewide Management, Accounting and Reporting Tool
Participant Notes:
As of March 9, 2010 Page 104 of 108 Final
Topic 3: Special Request for Services
Special request for services: You can create a special request for services in
SMART. Services include tasks that are performed by outside agents. For
example, package delivery, temporary help, or repair work.
Special Request - Variable Cost Service Page
Use this page to service that is based on the number of hours of work.
Page Name Navigation
Variable Cost Service Page
Add Items or Services > Special Request > Variable Cost Service Link
Figure 51. Variable Cost Service Page

PO320: Processing Purchase Requisitions Participant Guide
Statewide Management, Accounting and Reporting Tool
Participant Notes:
As of March 9, 2010 Page 105 of 108 Final
Fields Description Service Description Use this field to specify details about the
service that you are requesting. # of Units of Work Use this field to enter the time that is
needed to complete the service, based on the unit of work. For example, 2 hours or 6 days.
Unit of Work Use this field to enter the number of measured time-based units of work needed for the service.
Rate Use this field to specify the unit price for this service, based on the unit of work.
Category When creating a Special Request in SMART, you MUST populate a Category code. Use the Category field to enter the Category code number for the item(s) you are requisitioning. Note: Category codes are mapped to Account Chartfield codes in SMART. If you do not know the Category code, click the LookUp button to view and select from a list of available options.
Vendor ID When creating a Special Request in SMART, you need to populate a Vendor ID. If you do not know the Vendor ID number, click the LookUp button to view and select from a list of available options. Note: Vendor ID‟s are maintained by Central. If you cannot locate the Vendor ID, please add the Vendor information to the Additional Information text field and leave the Vendor ID field empty (blank).
Quote Number Use this field to enter the quote number given to you by the Vendor
Beginning Date Use this field to enter the beginning date of service

PO320: Processing Purchase Requisitions Participant Guide
Statewide Management, Accounting and Reporting Tool
Participant Notes:
As of March 9, 2010 Page 106 of 108 Final
Fields Description Date of Completion Use this field to enter the ending date of
service Additional Comments Use this field to enter any additional
comments for the special request
Table 30. Variable Cost Service Page Elements
Special Request - Fixed Cost Service Page
Use this page to request a fixed-cost service. This is a service with a fixed fee and is not part of the standard item catalog.
Page Name Navigation
Fixed Cost Service Expanded
Add Items and Services > Special Request Tab > Fixed Cost Service Link
Figure 52. Fixed Cost Service Expanded Page

PO320: Processing Purchase Requisitions Participant Guide
Statewide Management, Accounting and Reporting Tool
Participant Notes:
As of March 9, 2010 Page 107 of 108 Final
Fields Description Value of Service Use this field to enter the cost of this
service. This amount is saved on the requisition line with the quantity 1 and the unit of measure Each.
Category When creating a Special Request in SMART, you MUST populate a Category code. Use the Category field to enter the Category code number for the item(s) you are requisitioning. Note: Category codes are mapped to Account Chartfield codes in SMART. If you do not know the Category code, click the LookUp button to view and select from a list of available options.
Vendor ID When creating a Special Request in SMART, you need to populate a Vendor ID. If you do not know the Vendor ID number, click the LookUp button to view and select from a list of available options. Note: Vendor ID‟s are maintained by Central. If you cannot locate the Vendor ID, please add the Vendor information to the Additional Information text field and leave the Vendor ID field empty (blank).
Table 31. Fixed Cost Service Page Elements
You will now complete Activity 17: Create a Special Request for a Fixed Cost Service in your Activity Guide.

PO320: Processing Purchase Requisitions Participant Guide
Statewide Management, Accounting and Reporting Tool
Participant Notes:
As of March 9, 2010 Page 108 of 108 Final
Lesson Review
In this lesson, you learned:
How to locate, select and save favorite items in SMART
Create personal templates, and create requisitions using personal templates
How to create, edit and cancel special requests for services
You will now complete Activity 18: Processing Purchase Requisitions in SMART in your Activity Guide.
Rest of this page left intentionally blank.
Recommended