P2WW-3940-08ENZ2
PaperStream NX Manager 1.6
User's Guide
Contents
Introduction 6
Manuals .............................................................................................................................................................. 6
Trademarks ......................................................................................................................................................... 8
Manufacturer...................................................................................................................................................... 8
Use in High-Safety Applications ........................................................................................................................ 8
Abbreviations Used in This Manual ................................................................................................................... 9
Arrow Symbols in This Manual ......................................................................................................................... 10
Screen Examples in This Manual...................................................................................................................... 10
Notice................................................................................................................................................................ 10
Before Using NX Manager 11
Overview ........................................................................................................................................................... 11
Main Features................................................................................................................................................... 12
Main Functions ................................................................................................................................................. 12
System Configuration....................................................................................................................................... 16
System Requirements ...................................................................................................................................... 18
The Flow from the Installation to the Operations 22
Installation 23
Installing NX Manager ..................................................................................................................................... 23
Importing a Certificate (for HTTPS)................................................................................................................. 25
Changing the Firewall Settings........................................................................................................................ 26
Setting a User in order for the Authentication Function That Is Used to Establish a REST API Linkageor a Web Scan Linkage, to Authenticate the User........................................................................................... 26
Creating a User ([Local Users and Groups] Window) ..................................................................................................... 27
Creating a User (Command Prompt).............................................................................................................................. 27
Adding a User to the Group ([Local Users and Groups] Window)................................................................................... 28
Adding a User to the Group (Command Prompt) ........................................................................................................... 28
Settings 29
Logging in to NX Manager ............................................................................................................................... 29
Configuring the NX Manager Preferences ....................................................................................................... 31
Setting the Authentication Method ................................................................................................................ 32
2

Registering a Scanner ...................................................................................................................................... 33
Understanding the Flow for Setting a Job ....................................................................................................... 33
Setting Jobs ...................................................................................................................................................... 35Creating a New Job........................................................................................................................................................ 35
Cloning a Job ................................................................................................................................................................. 37
Editing a Job.................................................................................................................................................................. 39
Deleting a Job ............................................................................................................................................................... 41
Filtering Jobs ................................................................................................................................................................. 42
Setting Job Groups............................................................................................................................................ 43Creating a New Job Group (When the Authentication Method is [None] or [Job group code]) ...................................... 43
Creating a New Job Group (When the Authentication Method is [Username/Password], [NFC], or [Username/
Password or NFC]) ......................................................................................................................................................... 50
Creating a New Job Group (When the Authentication Method is [Scanner]) ................................................................. 58
Cloning a Job Group....................................................................................................................................................... 65
Editing a Job Group ....................................................................................................................................................... 67
Deleting a Job Group ..................................................................................................................................................... 69
Operations 71
Processing a Job with the Scanner................................................................................................................... 71
Managing Scanners .......................................................................................................................................... 71Checking Scanners......................................................................................................................................................... 72
Deleting a Scanner ........................................................................................................................................................ 72
Filtering Scanners.......................................................................................................................................................... 73
Managing Users................................................................................................................................................ 74Checking Users .............................................................................................................................................................. 74
Filtering Users ............................................................................................................................................................... 75
Managing Profiles ............................................................................................................................................ 76Checking Profiles........................................................................................................................................................... 76
Importing Profiles ......................................................................................................................................................... 77
Deleting Profiles............................................................................................................................................................ 78
Filtering Profiles ............................................................................................................................................................ 79
Checking Statuses............................................................................................................................................. 80
Monitoring Scanning Statuses ......................................................................................................................... 81Checking Scanning Statuses .......................................................................................................................................... 81
Exporting Scanning Statuses to a File............................................................................................................................ 82
Changing the Scanning Status from [Error] to [Error (Checked)]................................................................................... 83
Filtering Scanning Statuses ........................................................................................................................................... 84
Retrying a Batch............................................................................................................................................................ 85
Contents
3

Managing Event Logs....................................................................................................................................... 86Checking Event Logs...................................................................................................................................................... 86
Exporting Event Logs to a File ....................................................................................................................................... 87
Clearing Event Logs....................................................................................................................................................... 88
Changing the Event Log Type from [Error] to [Error (Checked)] .................................................................................... 89
Filtering Event Logs....................................................................................................................................................... 90
Changing the Password for Logging in to NX Manager .................................................................................. 91
Maintenance 93
Backing Up and Restoring the Data Related to NX Manager.......................................................................... 93Backing Up the Data Related to NX Manager ................................................................................................................ 93
Restoring the Data Related to NX Manager................................................................................................................... 94
Backing Up and Restoring the Data Related to NX Manager Database ......................................................... 94Backing Up the Data Related to NX Manager Database ................................................................................................ 94
Restoring the Data Related to NX Manager Database ................................................................................................... 95
Backing Up and Restoring the Data Related to NX Manager Database (Simple Tool) .................................. 95Backing Up the Data Related to NX Manager Database (Simple Tool) .......................................................................... 96
Restoring the Data Related to NX Manager Database (Simple Tool) ............................................................................. 96
Obtaining the Maintenance Information on NX Manager.............................................................................. 97
Windows 99
Login Window................................................................................................................................................... 99
Common Items in the NX Manager Administrator Window (on the Web)..................................................... 99
[Change password] Window .......................................................................................................................... 100
[Scanner List] Window................................................................................................................................... 100
Authentication ............................................................................................................................................... 101[Authentication] Window............................................................................................................................................ 101
[Active Directory Connection Test] Window/[Active Directory connection] Window..................................................... 104
Job................................................................................................................................................................... 104[Job list] Window......................................................................................................................................................... 104
[Create New Job] Window/[Edit Job] Window.............................................................................................................. 105
[Counter Options] Window.......................................................................................................................................... 128
Job Group ........................................................................................................................................................ 129[Job Group List] Window ............................................................................................................................................. 129
[New Job Group (1/2)] Window/[New Job Group (1/3)] Window.................................................................................. 130
[New Job Group (2/2)] Window/[New Job Group (2/3)] Window.................................................................................. 130
[New Job Group (3/3)] Window ................................................................................................................................... 133
Contents
4

[Clone Job Group] Window/[Edit Job Group] Window .................................................................................................. 135
[Edit Level] Window.................................................................................................................................................... 138
[Browse job groups] Window ...................................................................................................................................... 138
Window for Adding a Job to a Job Group...................................................................................................................... 139
Window for Adding a User to a Job Group.................................................................................................................... 140
Window for Adding a Scanner to a Job Group .............................................................................................................. 143
[User List] Window......................................................................................................................................... 143
[Profile List] Window..................................................................................................................................... 144
[Status] Window ............................................................................................................................................ 145
Batch Log........................................................................................................................................................ 147[Batch Log List] Window ............................................................................................................................................. 147
[Batch Log Details] Window........................................................................................................................................ 150
Event Log........................................................................................................................................................ 152[Event Log List] Window ............................................................................................................................................. 152
[Event Log Details] Window........................................................................................................................................ 153
[Settings] Window ......................................................................................................................................... 154
[Information] Window................................................................................................................................... 159
Appendix 160
Message List ................................................................................................................................................... 160Messages in Batch Logs Displayed in the NX Manager Administrator Window (on the Web)...................................... 160
Messages in Event Logs Displayed in the NX Manager Administrator Window (on the Web)...................................... 163
Messages from Commands for Backing up and Restoring the Data Related to NX Manager ....................................... 169
Messages from Commands for Backing up and Restoring the Data Related to NX Manager Database........................ 173
Messages in Event Logs for Windows Server................................................................................................................ 176
Specifications of Jobs/Job Groups................................................................................................................... 178
Specifications of the Index File...................................................................................................................... 179
Operation Specifications of a PaperStream IP Driver Profile........................................................................ 182
Specifications of the Image File .................................................................................................................... 184
Specifications of Barcodes ............................................................................................................................. 185
Specifications of an Error Notification e-Mail ............................................................................................... 187
Specifications of a Batch Log Notification e-Mail......................................................................................... 188
Migrating NX Manager................................................................................................................................... 189
Upgrading NX Manager .................................................................................................................................. 189
Uninstalling NX Manager ............................................................................................................................... 190
Contents
5

Introduction
Thank you for purchasing this product.This manual explains about the overview, installation, settings, operations, maintenance, windows, andtroubleshooting for this product.The contents of this manual are subject to change as this product is upgraded.The latest PaparStream NX Manager User's Guide can be downloaded from the following website.You need to have access to the Internet to download the manual.https://www.fujitsu.com/global/support/products/computing/peripheral/scanners/fi/manuals/
Manuals
The following manuals are included for this product.Read them as needed.
Manual Description
PaperStream NX Manager User's Guide(this manual) (HTML/PDF)
Describes an overview of this product as well as detailedinformation on how to install, set, operate, and maintain thisproduct, and also describes items displayed in the windows.The latest PaparStream NX Manager User's Guide can bedownloaded from the following website.You need to have access to the Internet to download the manual.https://www.fujitsu.com/global/support/products/computing/peripheral/scanners/fi/manuals/
PaperStream NX Manager Web Scan User'sGuide (HTML/PDF)
Describes an overview of PaperStream NX Manager Web Scan forthis product, how to use the application, and describes itemsdisplayed in the windows.The latest PaperStream NX Manager Web Scan User's Guide canbe downloaded from the following website.You need to have access to the Internet to download the manual.https://www.fujitsu.com/global/support/products/computing/peripheral/scanners/fi/manuals/
PaperStream NX Manager SDK ReferenceGuide (PDF)
Describes an overview of SDK for this product and describes itsdevelopment environment, system design, usage, API reference,and troubleshooting.For details about how to obtain the PaperStream NX ManagerSDK Reference Guide, contact the distributor/dealer where youpurchased this product. Refer to the contact information in theContact List if supplied with this product, or refer to the contactinformation in the Contact for Inquiries section if provided inSafety Precautions supplied with this product, and then make aninquiry.
6
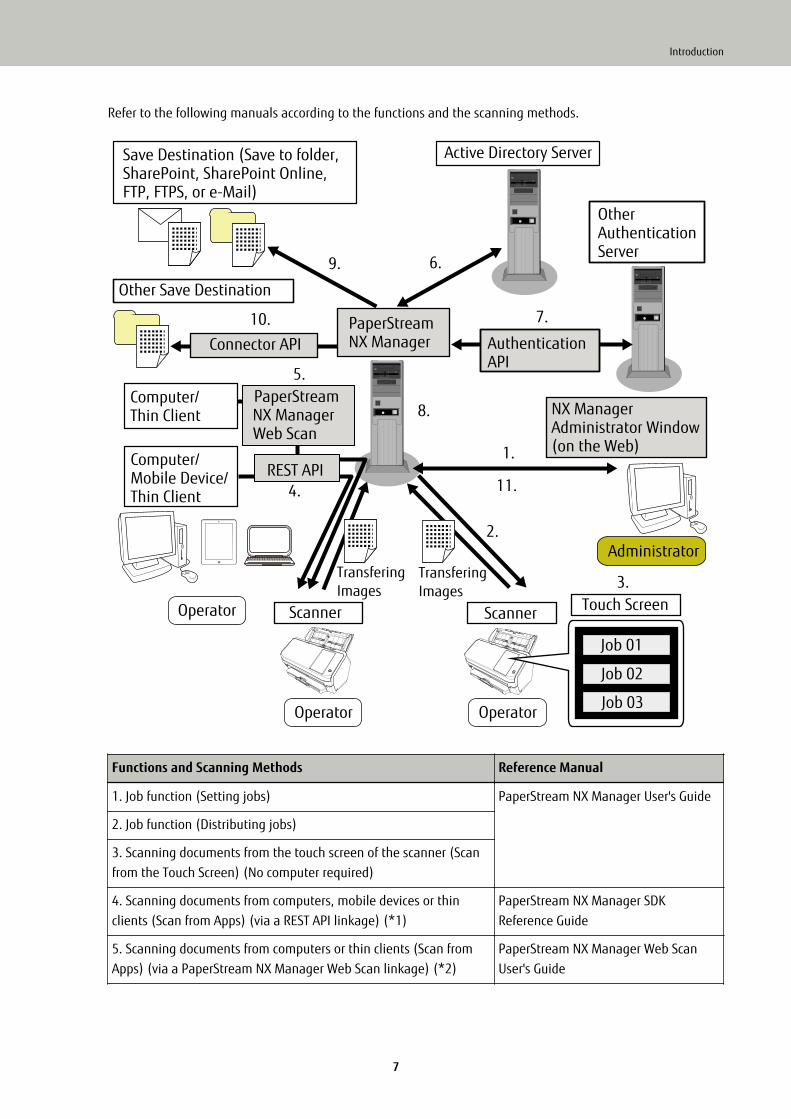
Refer to the following manuals according to the functions and the scanning methods.
7.
1.
4.
3.
6.
2.
9.
8.
5.
Functions and Scanning Methods Reference Manual
1. Job function (Setting jobs) PaperStream NX Manager User's Guide
2. Job function (Distributing jobs)
3. Scanning documents from the touch screen of the scanner (Scanfrom the Touch Screen) (No computer required)
4. Scanning documents from computers, mobile devices or thinclients (Scan from Apps) (via a REST API linkage) (*1)
PaperStream NX Manager SDKReference Guide
5. Scanning documents from computers or thin clients (Scan fromApps) (via a PaperStream NX Manager Web Scan linkage) (*2)
PaperStream NX Manager Web ScanUser's Guide
Introduction
7

Functions and Scanning Methods Reference Manual
PaperStream NX Manager SDKReference Guide
6. User authentication function (via an Active Directory linkage) PaperStream NX Manager User's Guide
7. User authentication function (via an Authentication API linkage) PaperStream NX Manager SDKReference Guide
8. Image processing function PaperStream NX Manager User's Guide
9. Release function (via a standard connector linkage)
10. Release function (via a Connector API linkage) PaperStream NX Manager SDKReference Guide
11. Scanning status monitoring function PaperStream NX Manager User's Guide
*1:For a REST API linkage, users can scan documents from computers, mobile devices, or thin clients bycreating a user application with a REST API.
*2:For a PaperStream NX Manager Web Scan linkage, users can scan documents from computers, mobiledevices, or thin clients without the need of creating a user application.
Trademarks
PaperStream is a registered trademark of PFU Limited in Japan.Other company names and product names are the registered trademarks or trademarks of the respectivecompanies.
Manufacturer
PFU LimitedYOKOHAMA i-MARK PLACE, 4-4-5 Minatomirai, Nishi-ku, Yokohama, Kanagawa, 220-8567, Japan© PFU Limited 2018-2020
Use in High-Safety Applications
This product has been designed and manufactured on the assumption that it will be used in office, personal,domestic, regular industrial, and general-purpose applications. It has not been designed and manufactured foruse in applications (simply called "high-safety applications" from here on) that directly involve danger to lifeand health when a high degree of safety is required, for example, in the control of nuclear reactions at nuclearpower facilities, automatic flight control of aircraft, air traffic control, operation control in mass-transportsystems, medical equipment for sustaining life, and missile firing control in weapons systems, and whenprovisionally the safety in question is not ensured. The user should use this product with adopting measures forensuring safety in such high-safety applications. PFU Limited assumes no liability whatsoever for damages
Introduction
8

arising from use of this product by the user in high-safety applications, and for any claims or compensation fordamages by the user or a third party.
Abbreviations Used in This Manual
The following abbreviations are used in this manual.
Name Indication
Windows® 7 Professional (32-bit/64-bit)
Windows® 7 Enterprise (32-bit/64-bit)
Windows 7 (*1)
Windows Server® 2012 Standard (64-bit) Windows Server 2012 (*1) (*2)
Windows Server® 2012 R2 Standard (64-bit) Windows Server 2012 R2 (*1) (*2)
Windows® 8.1 (32-bit/64-bit)
Windows® 8.1 Pro (32-bit/64-bit)
Windows® 8.1 Enterprise (32-bit/64-bit)
Windows 8.1 (*1)
Windows® 10 Home (32-bit/64-bit)
Windows® 10 Pro (32-bit/64-bit)
Windows® 10 Enterprise (32-bit/64-bit)
Windows® 10 Education (32-bit/64-bit)
Windows 10 (*1)
Windows Server® 2016 Standard (64-bit) Windows Server 2016 (*1) (*2)
Windows Server® 2019 Standard (64-bit) Windows Server 2019 (*1) (*2)
PaperStream IP (TWAIN)PaperStream IP (TWAIN x64)
PaperStream IP driver
Microsoft® SharePoint® Server 2010 (Service Pack 2)
Microsoft® SharePoint® Server 2013 (Service Pack 1)
Microsoft® SharePoint® Server 2016
SharePoint Server (*3)
Microsoft® SharePoint® Online SharePoint Online (*3)
Microsoft® .NET Framework .NET Framework
Internet Explorer® Internet Explorer
Microsoft® Internet Information Services IIS
Microsoft® SQL Server™ 2014 Express Edition (64-bit) SQL Server 2014 Express Edition (*4)
Active Directory™ Active Directory
PaperStream NX Manager NX Manager
Introduction
9

Name Indication
PaperStream NX Manager Web Scan Web Scan
*1:Where there is no distinction between the different versions of the above operating system, the generalterm "Windows" is used.
*2:Where there is no distinction among Windows Server 2012, Windows Server 2012 R2, Windows Server 2016,and Windows Server 2019, the general term "Windows Server" is used.
*3:Where there is no distinction between SharePoint Server and SharePoint Online, the general term"SharePoint" is used.
*4:Where there is no distinction among editions, the general term "SQL Server" is used.
Arrow Symbols in This Manual
Right-arrow symbols (→) are used to separate icons or menu options which should be selected in succession.
Example:Right-click the Start screen, and select [All apps] on the app bar → [Control Panel] under [WindowsSystem].
Screen Examples in This Manual
Microsoft product screenshots are reprinted with permission from Microsoft Corporation.The screen examples in this manual are subject to change without notice in the interest of productdevelopment.If the actual displayed screen differs from the screen examples in this manual, operate by following the actualdisplayed screen while referring to the user's manual of the scanner application that you are using.The screenshots used in this manual are of Windows 10. The actual windows and operations may differdepending on the operating system. Also note that the screens and operations may differ from this manualafter the scanner application software is updated. In that case, refer to the manual provided upon updating thesoftware.
Notice
● The contents of this manual are subject to change without notice.
● PFU Limited assumes no liability for incidental or consequential damages arising from the use of thisproduct, and any claims by a third party.
● Copying of the contents of this manual, in whole or in part, as well as the scanner applications is prohibitedunder the copyright law.
Issue date: July 2020Issued by: PFU Limited
Introduction
10
Before Using NX Manager
This section explains about things you need to know before using NX Manager such as the overview, main features,and main functions of NX Manager.
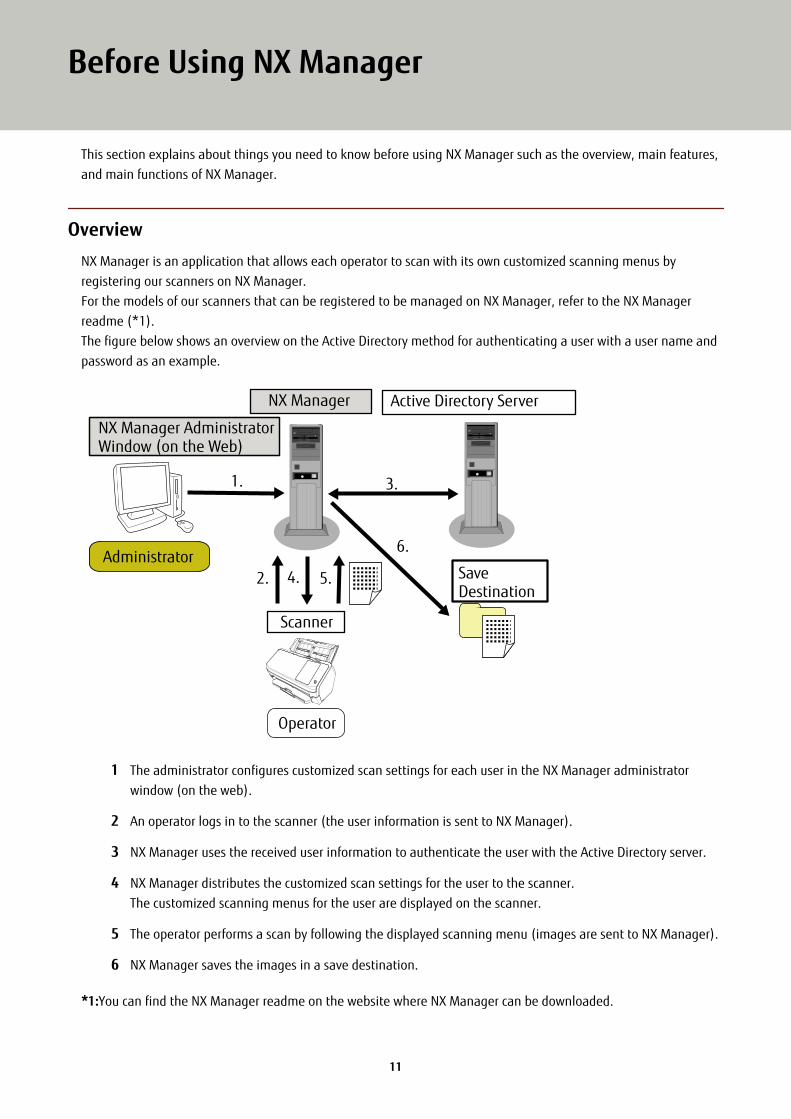
OverviewNX Manager is an application that allows each operator to scan with its own customized scanning menus byregistering our scanners on NX Manager.For the models of our scanners that can be registered to be managed on NX Manager, refer to the NX Managerreadme (*1).The figure below shows an overview on the Active Directory method for authenticating a user with a user name andpassword as an example.
NX Manager Administrator Window (on the Web)
NX Manager
Administrator4.
3.
2.
1.
Operator
5.
Scanner
Save Destination
Active Directory Server
6.
1 The administrator configures customized scan settings for each user in the NX Manager administratorwindow (on the web).
2 An operator logs in to the scanner (the user information is sent to NX Manager).
3 NX Manager uses the received user information to authenticate the user with the Active Directory server.
4 NX Manager distributes the customized scan settings for the user to the scanner.The customized scanning menus for the user are displayed on the scanner.
5 The operator performs a scan by following the displayed scanning menu (images are sent to NX Manager).
6 NX Manager saves the images in a save destination.
*1:You can find the NX Manager readme on the website where NX Manager can be downloaded.
11
Main FeaturesThe following shows the main features of NX Manager.
● Custom scans for each operator
The displayed scanning menus are customized according to the operator. Operators simply follow the displayedscanning menu to perform a regular scan with ease.
● Choices of save destinations for images in accordance with your environment
Images can be saved in a save destination such as a folder or SharePoint.You can select a save destination in accordance with your environment.
● Scanning status monitoring
You can monitor the processing status for images on NX Manager.In addition, the records of processing results can be managed on NX Manager.
● NX Manager error notifications via e-mail
An administrator can be notified of errors that occur in NX Manager (batch logs and event logs) via e-mail.By checking e-mail notifications, an administrator can quickly troubleshoot errors that occur in NX Manager .This feature using e-mail notifications is easy to be adopted because it uses an existing e-mail system.
● Central operation for multiple scanners
Multiple scanners can be operated centrally.The customized scan settings for the operator can be distributed to scanners that are placed in variouslocations.Images transferred from each scanner can be processed on NX Manager and saved in save destinations inaccordance with the environment of the operator.You can monitor the processing status for images on NX Manager.
Main FunctionsThe following shows the main functions of NX Manager.
● User authentication function
This function identifies the user who uses the scanner.Some authentication methods require an authentication server.A standard feature of NX Manager allows the Active Directory server to be used for Active Directory linkage.To use an authentication server that is not used as a standard feature of NX Manager, Authentication APIlinkage is required.The following shows the authentication methods and the required linkages.
Before Using NX Manager
12

AuthenticationMethod
Description Active DirectoryLinkage
AuthenticationAPI Linkage
None No authentication required for using thescanner.
— —
Job group code This method authenticates a user with a jobgroup code.
— —
Username/Password This method authenticates a user with a username and password.
○ ○
NFC This method authenticates a user with a smartcard.
× ○
Username/Passwordor NFC
This method authenticates a user with one ofthe following.
● User name and password
● Smart card
× ○
Scanner This method authenticates a user using aspecific scanner.
— —
○:Required
×:Not available
—:Not required
For details about a linkage using an Authentication API, refer to PaperStream NX Manager SDK ReferenceGuide.
● Job function
This function allows the scan settings to be customized for each operator and be distributed to the scanner.The customized scan settings are called a "job".Multiple jobs can be grouped into one job group.When the authentication method is [Job group code], setting a job group to a job group code links the jobgroup with the job group code, and the jobs specific to the job group code are distributed to the scanner.When the authentication method is [Username/Password], [NFC], or [Username/Password or NFC], adding auser to a job group links the job group with the user, and the jobs specific to the user are distributed to thescanner.When the authentication method is [Scanner], adding a scanner to a job group links the job group with thescanner, and the jobs specific to the scanner are distributed to the scanner.The linkage of a job group differs as follows depending on the authentication method.
AuthenticationMethod
Linkage of aJob Group
Operations on the Scanner
None None Jobs are displayed when you turn on the scanner.
Before Using NX Manager
13

AuthenticationMethod
Linkage of aJob Group
Operations on the Scanner
Job group code Job group code Entering a job group code on the touch screen of the scannerdisplays jobs corresponding to the job group code.
Username/Password User (*1) Entering a user name and a password on the touch screen of thescanner displays jobs corresponding to the user.
NFC User Authenticating a user by holding a smart card over the contactlesssmart card reader displays jobs corresponding to the user who isauthenticated with the smart card.
Username/Passwordor NFC
User Authenticating a user with one of the following displays jobscorresponding to the authenticated user.
● User name and password
● Smart card
Scanner Scanner Turning on the scanner displays jobs corresponding to the scanner.
*1:When the authentication mode is [Active Directory], a user group registered on the authentication servercan also correlate with a job group.
Levels can be created in a job group to sort and organize jobs in the job group.For details about specifications such as the number of jobs and job groups which can be created, refer toSpecifications of Jobs/Job Groups (page 178).
Before Using NX Manager
14

The following shows the relationship diagram for jobs, job groups, and users.
Scanner
User 2
Job Group CJob bJob f
Job a
Job b
Job d
Job e
Job f
Job Group A
Job Group B
Job Group C
User 1
User 2
User 3
User 4
User 5
Job List Job Group List User List
1.3.5.
2.4.
6. 7.
Job c
1 Select [Username/Password], [NFC], or [Username/Password or NFC] for the authentication method.
2 Create jobs.
3 Create a job group.
4 Set the jobs in the job group.
5 Add a user to the job group.
6 Log into the scanner (the user information is sent).
7 Jobs corresponding to the user are distributed to the scanner.Jobs corresponding to the user are displayed on the scanner.
In the above relationship diagram for jobs, job groups, and users, when User 2 logs into the scanner, jobscorresponding to User 2 are distributed. In other words, Job group C, which Job b and Job f are set in, isdistributed to the scanner.On the scanner, jobs corresponding to User 2 are displayed. In other words, Job group C, which Job b and Job fare set in, is displayed.
● Image processing function
This function processes images according to the PaperStream IP driver profile.
Before Using NX Manager
15

For details about the operation specifications of a PaperStream IP driver profile, refer to OperationSpecifications of a PaperStream IP Driver Profile (page 182).
● Release function
This function saves images in save destinations.As a standard feature of NX Manager, you can save images to the following save destinations: Save to folder,SharePoint, SharePoint Online, FTP, FTPS, or e-Mail. When [e-Mail] is selected for [Save Destination], imagescan be sent by e-mail as an attachment.To save images to a location that is not a standard save destination, a linkage via a Connector API is required.You can save images to save destinations such as ECM (Enterprise Contents Management).For details about a linkage using a Connector API, refer to PaperStream NX Manager SDK Reference Guide.Meta information of an image can be generated as an index file to save the image with the information.For details about the specifications of the index file, refer to Specifications of the Index File (page 179).
● Scanning status monitoring function
This function monitors the processing status of images on NX Manager and retries image processing and imagesaving to the save destination.You can monitor the scanning status in the [Batch Log List] window that is displayed by clicking [Batch Log] inthe left menu in the NX Manager administrator window (on the web).In addition, the records of processing results can be managed on NX Manager, and an administrator can benotified of errors that occur on NX Manager via e-mail.
System ConfigurationThis section explains about the system configuration of NX Manager.
Before Using NX Manager
16
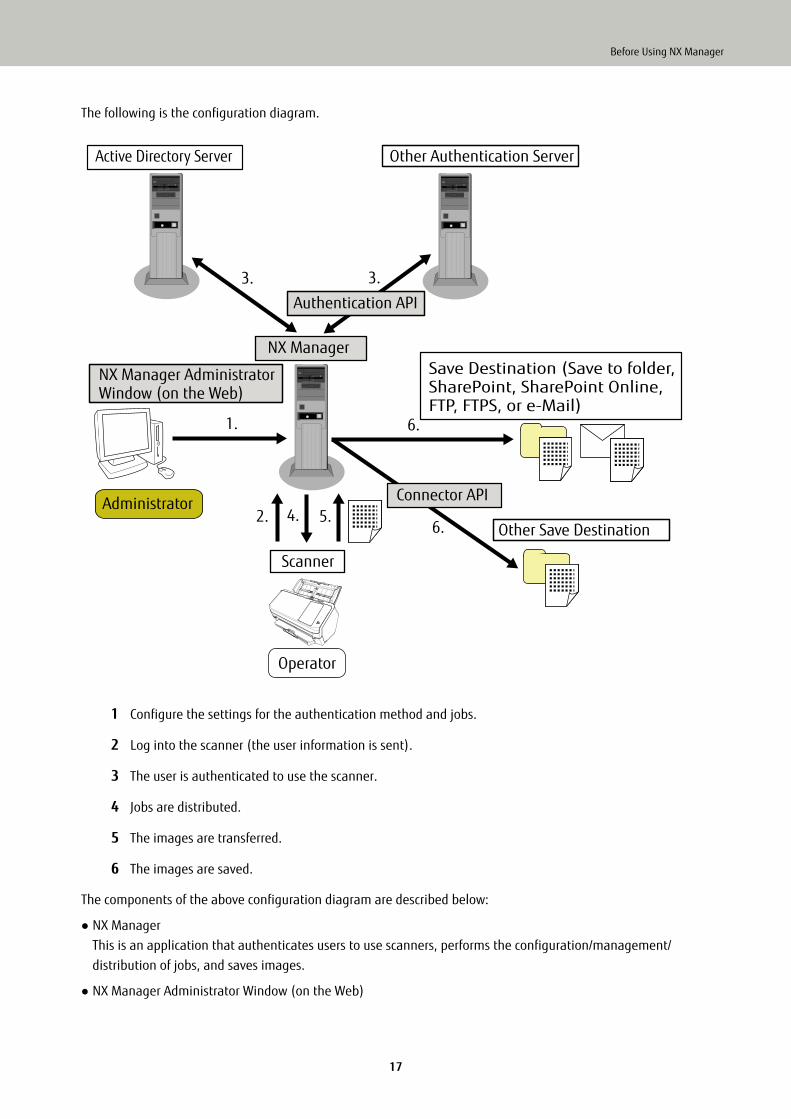
The following is the configuration diagram.
NX Manager
Administrator
Operator
Connector API
Active Directory Server Other Authentication Server
Save Destination (Save to folder, SharePoint, SharePoint Online, FTP, FTPS, or e-Mail)
Other Save Destination
Scanner
1.
3. 3.
6.
6.
NX Manager Administrator Window (on the Web)
Authentication API
4.2. 5.
1 Configure the settings for the authentication method and jobs.
2 Log into the scanner (the user information is sent).
3 The user is authenticated to use the scanner.
4 Jobs are distributed.
5 The images are transferred.
6 The images are saved.
The components of the above configuration diagram are described below:
● NX ManagerThis is an application that authenticates users to use scanners, performs the configuration/management/distribution of jobs, and saves images.
● NX Manager Administrator Window (on the Web)
Before Using NX Manager
17

This window is used to configure the preferences setting, authentication method setting, and job setting for NXManager.The processing status of the images on NX Manager can also be checked in this window.
● ScannerThis is our scanner that can be registered to be managed on NX Manager.Performs customized scans for each operator and transfers the images to NX Manager.
● Active Directory ServerThe linkage with this authentication server is a standard feature of NX Manager.The Active Directory linkage uses the user information that is sent from the scanner to NX Manager toauthenticate the user to use the scanner.
● Other Authentication ServerThis is an authentication server that is not used as a standard feature of NX Manager.A linkage via an Authentication API is required.A linkage via an Authentication API uses the user information that is sent from the scanner to NX Manager toauthenticate the user to use the scanner.
● Authentication APIThis is an API (Application Programming Interface) that is used to establish a link with other authenticationserver.For details, refer to PaperStream NX Manager SDK Reference Guide.
● Save Destination (Save to folder, SharePoint, SharePoint Online, FTP, FTPS, or e-Mail)Save destination for images that can be used with the standard feature of NX Manager.When [e-Mail] is selected for [Save Destination], images can be sent by e-mail as an attachment.
● Other Save DestinationSave destination that cannot be used with a standard feature of NX Manager.Other than the save destination that can be used with the standard feature of NX Manager, images can be savedin a save destination via a Connector API linkage.For example, you can save images to save destinations such as ECM (Enterprise Contents Management).
● Connector APIThis is an API (Application Programming Interface) that is used to establish a link with other save destinations.For details, refer to PaperStream NX Manager SDK Reference Guide.
● AdministratorThis is a user who uses NX manager through the NX Manager administrator window (on the web).
● OperatorThis is a user who performs a scan by using the scanner.
System RequirementsThe following shows the system requirements of NX Manager.
● Software
● Operating system (*1)
Before Using NX Manager
18
- Windows Server 2012
- Windows Server 2012 R2
- Windows Server 2016
- Windows Server 2019
● .NET Framework 4.5.2 or later
● IIS 8.0 or later
● SQL Server 2014 Express Edition (*2)
● Browser
- Internet Explorer 11
*1:To use NX Manager on Windows, you need to purchase a CAL (Client Access License).A Client Access License is required for each scanner that is connected to NX Manager, or for each user whouses a scanner that is connected to NX Manager.For details about Client Access Licenses, contact Microsoft.
*2:If SQL Server 2014 Express Edition is not installed yet, it is installed together with NX Manager when NXManager is installed.
● Hardware
The recommended values for hardware requirements are as follows:
CPU 3.5 GHz quad-core processor or higher
Memory 16 GB or more
Disk space 120 GB or more of free disk space
ATTENTION
Having a computer only for NX Manager is recommended.When using NX Manager together with another server function such as the following, design the systempaying attention to the load on the computer.
● Database of products other than NX Manager (*1)
● Authentication server such as Active DirectoryFor details, contact the distributor/dealer where you purchased this product. Refer to the contact informationin the Contact List if supplied with this product, or refer to the contact information in the Contact forInquiries section if provided in Safety Precautions supplied with this product, and then make an inquiry.
*1: When a product other than SQL Server 2014 Express Edition is used, the FILESTREAM function must beenabled on SQL Server.For details about how to enable the FILESTREAM function, refer to the section on "Enable andconfigure FILESTREAM" on the Microsoft website.Note that the FILESTREAM function cannot be enabled on SQL Server 32-bit versions.
Before Using NX Manager
19

HINT
NX Manager and the Scanner Central Admin Server can be installed on the computer.
● Network conditions
HTTP/HTTPS communication from the scanner to NX Manager is possible.
ATTENTION
Configure the settings for the communication protocol settings on the scanner so that they are the same asthe settings for the communication protocol configured in NX Manager.
● A list of port numbers to be used
Function From/To Port Number Protocol Number
Scanner connection Scanner → NX Manager 20447 (HTTP/HTTPS) (*1) 6 (TCP)
Browser connection Browser → NX Manager 10447 (HTTP/HTTPS) (*1) 6 (TCP)
REST API linkage User application for a REST API → NXManager
30447 (HTTP/HTTPS) (*1) 6 (TCP)
Web Scan linkage Web Scan → NX Manager 40447 (HTTP/HTTPS) (*1) 6 (TCP)
Active Directorylinkage
NX Manager → Active Directoryserver
3268 (Active Directory GlobalCatalog) (*1)
6 (TCP)
3269 (Active Directory GlobalCatalog over SSL) (*1)
6 (TCP)
Save to folder NX Manager → Folder 137, 138, 139, 445 (SMB) 6 (TCP)17 (UDP)
SharePoint NX Manager → SharePoint Server 80 (HTTP) (*1)/443 (HTTPS)(*1)
6 (TCP)
SharePoint Online NX Manager → SharePoint Online 443 (HTTPS) (*1) 6 (TCP)
FTP NX Manager → FTP server 20, 21 (FTP) (*1) 6 (TCP)
FTPS NX Manager → FTPS server 989, 990 (FTPS) (*1) 6 (TCP)
e-Mail NX Manager → SMTP server 25 (SMTP)/465 (SSL)/587(STARTTLS) (*1)
6 (TCP)
*1:This can be modified.
ATTENTION
● It is recommended that you install PaperStream NX Manager on a server that restricts access with the useof a firewall or other methods in order to protect personal information.
Before Using NX Manager
20
● It is also recommended that you use encrypted communication when managing personal information.
● The number of scanners that can be registered
The maximum number of scanners that can be registered in NX Manager is 1,000.The number of scanners, which is managed by NX Manager, that can perform a scan at the same time is up to40 scanners.
ATTENTION
● The value that is indicated for the number of scanners that can perform a scan at the same time is for therecommended environment. This value varies depending on the actual network bandwidth, hard disk driveperformance, and other factors.Evaluate the environment before use.
● No errors will occur if the number of scanners that can perform a scan at the same time is exceeded.However, the speed for transferring images created from documents that are scanned with each scannerto NX Manager will drop.
HINT
Scanning at the same time means to transfer the images created from documents that are scanned witheach scanner to NX Manager at the same time.
● Managing personal information
When you manage personal information, it is recommended that the following security level is ensured.
● For the NX Manager login password, use eight characters or more. In addition, the password must be acombination of two or more character types (alphabet, number, and symbol).
● Run NX Manager on the environment where data on the disk is encrypted.
● Encrypt communication (the method for opening the NX Manager administrator window (on the web) andthe method for saving the images in a save destination).
Example:To encrypt the method for saving images in a save destination
- Change from [FTP] to [FTPS].
- Change the SharePoint protocol from "http" to "https".
Before Using NX Manager
21

The Flow from the Installation to theOperations
This section explains about the flow from the installation to the operations of NX Manager.The flow from the installation to operations is as follows:
Installation(page 23)
● Installing NX Manager (page 23)
● Importing a Certificate (for HTTPS) (page 25)
● Changing the Firewall Settings (page 26)
● Setting a User in order for the Authentication Function That Is Used to Establish a REST APILinkage or a Web Scan Linkage, to Authenticate the User (page 26)
Settings (page 29) ● Logging in to NX Manager (page 29)
● Configuring the NX Manager Preferences (page 31)
● Setting the Authentication Method (page 32)
● Registering a Scanner (page 33)
● Understanding the Flow for Setting a Job (page 33)
● Setting Jobs (page 35)
● Setting Job Groups (page 43)
Operations (page 71) ● Processing a Job with the Scanner (page 71)
● Managing Scanners (page 71)
● Managing Users (page 74)
● Managing Profiles (page 76)
● Checking Statuses (page 80)
● Monitoring Scanning Statuses (page 81)
● Managing Event Logs (page 86)
● Changing the Password for Logging in to NX Manager (page 91)
22

Installation
This section explains about the installation of NX Manager.
Installing NX Manager
1 Turn on the computer and log onto Windows Server as a user with administrator privileges.
2 Obtain the installer for NX Manager.For details about how to obtain the installer for NX Manager, contact the distributor/dealer where youpurchased this product. Refer to the contact information in the Contact List if supplied with this product, orrefer to the contact information in the Contact for Inquiries section if provided in Safety Precautions suppliedwith this product, and then make an inquiry.
3 Start the installer for NX Manager.
4 Install the software by following the instructions displayed in the window.
ATTENTION
If a previous version of PaperStream NX Manager or PaperStream NX Manager Database has already beeninstalled, an upgrade is performed.If PaperStream NX Manager Database is used on a separate server, some of the settings are reset to theirdefault values after the upgrade.Before upgrading, contact the distributor/dealer where you purchased this product. Refer to the contactinformation in the Contact List if supplied with this product, or refer to the contact information in theContact for Inquiries section if provided in Safety Precautions supplied with this product, and then make aninquiry.Just in case, back up the data related to NX Manager and NX Manager Database beforehand.For details, refer to Backing Up and Restoring the Data Related to NX Manager (page 93) and BackingUp and Restoring the Data Related to NX Manager Database (page 94).
HINT
● Select the software to install as needed.You can select the following software:
- PaperStream NX Manager
- PaperStream NX Manager Database
- PaperStream IP (TWAIN x64) (*1)
*1: Use the PaperStream IP driver that is supplied with the installer for NX Manager. If any otherversion of the PaperStream IP driver is used, NX Manager may not work properly.
To operate NX Manager with a single server, you can leave the default settings unchanged. Install thethree software applications shown above in a single server.
23

To operate PaperStream NX Manager Database on another server, contact the distributor/dealer whereyou purchased this product. Refer to the contact information in the Contact List if supplied with thisproduct, or refer to the contact information in the Contact for Inquiries section if provided in SafetyPrecautions supplied with this product, and then make an inquiry.
● Change the SQL Server settings if needed.To operate NX Manager with a single server, you can leave the default settings unchanged.To operate PaperStream NX Manager Database on another server, contact the distributor/dealer whereyou purchased this product. Refer to the contact information in the Contact List if supplied with thisproduct, or refer to the contact information in the Contact for Inquiries section if provided in SafetyPrecautions supplied with this product, and then make an inquiry.
● Change the settings below if needed.
- The setting for communicating with the scannerCommunication Port (Default: 20447)Communication Protocol (Default: Use HTTP)
- The setting for communicating with the browserCommunication Port (Default: 10447)Communication Protocol (Default: Use HTTP)
- The setting for using the REST APICommunication Port (Default: 30447)Communication Protocol (Default: Use HTTPS)
- The setting for using Web ScanCommunication Port (Default: 40447)Communication Protocol (Default: Use HTTPS)
For details about the port numbers, refer to System Requirements (page 18).
● Change the settings of the authentication function that is used to establish a REST API linkage or a WebScan linkage if needed.To enable the authentication function that is used to establish a REST API linkage or a Web Scan linkage,leave the default settings unchanged.In this case, however, a user must be set in order for the authentication function to authenticate theuser.For details, refer to Setting a User in order for the Authentication Function That Is Used to Establish aREST API Linkage or a Web Scan Linkage, to Authenticate the User (page 26).
5 After the installation is complete, restart the computer when a window that asks you whether to restartthe computer appears.
ATTENTION
If the message "Installation failed. Error code: 5401" appears during the installation, perform the followingprocedure.
1 Stop the installation by following the instructions displayed in the window.
Installation
24

2 Delete the following files in the folder that includes database files of the instance, which is specifiedduring the installation.
● NxManagerSessionDB.mdf
● NxManagerSessionDB_log.ldfThese files are saved in the following folder by default:
C:\Program Files\Microsoft SQL Server\MSSQL12.<InstanceName>\MSSQL\<DATA folder>
3 Install NX Manager again.
Importing a Certificate (for HTTPS)To use HTTPS for communication, import a certificate.This section describes an example in which IIS 8.0 is used.
1 Open IIS.
2 Click [Server Certificates] on the home screen.
3 Click [Import] under [Actions].
4 Follow the instructions displayed in the window.
5 Right-click each site below and click [Edit Bindings].
● NmConsole
● NmWebAPI
● NmWebService
● NmWebScanApp
6 Click the port with the type "https" and then click the [Edit] button.
7 Select the imported certificate and click the [OK] button.
HINT
Set the thumbprint data of the imported certificate to CertHash.xml.
● CertHash.xml is stored in the following location:
<Installation folder for PaperStream NX Manager>\NXManager\Application\Bin\CertHash.xml
● An example of setting the thumbprint data of certificate "cc ce a0 66 e3 9c 9b 2a 65 45 03 a3 c4 f4 e5 e6 ad ecdf 9f" is shown below.
<?xml version="1.0" encoding="utf-8" ?><IISPolicy><CertHash>cc ce a0 66 e3 9c 9b 2a 65 45 03 a3 c4 f4 e5 e6 ad ec df 9f</CertHash>
Installation
25

</IISPolicy>
Changing the Firewall SettingsChange the firewall settings to allow NX Manager to communicate with the following ports.
Function From/To Port Number Protocol Number
Scanner connection Scanner → NX Manager 20447 (HTTP/HTTPS) (*1) 6 (TCP)
Browser connection Browser → NX Manager 10447 (HTTP/HTTPS) (*2) 6 (TCP)
REST API linkage User application for a REST API → NX Manager 30447 (HTTP/HTTPS) (*3) 6 (TCP)
Web Scan linkage Web Scan → NX Manager 40447 (HTTP/HTTPS) (*4) 6 (TCP)
*1:The port number that was set when NX Manager was installed or the port number that was set with IIS, in orderto communicate with the scanner.
*2:The port number that was set when NX Manager was installed or the port number that was set with IIS, in orderto communicate with the browser.
*3:The port number that was set when NX Manager was installed or the port number that was set with IIS, in orderto establish a link with a REST API.
*4:The port number that was set when NX Manager was installed or the port number that was set with IIS, in orderto establish a link with Web Scan.
For details about how to change the firewall settings, refer to the manual of the firewall software that is used oneach server.
Setting a User in order for the Authentication Function That Is Used to Establisha REST API Linkage or a Web Scan Linkage, to Authenticate the User
If you enabled the authentication function that is used to establish a REST API linkage or a Web Scan linkage whenyou installed NX Manager, set a user in order for the authentication function to authenticate the user.
1 Create a user.When you create a new user in order for the authentication function to authenticate the user, create the useron the Windows Server which you installed NX Manager on.When you use an existing user in order for the authentication function to authenticate the user, perform step2 only.Only the Windows Server local user who installed NX Manager can be set for the authentication function.For details, refer to the following.
● When creating a user in the [Local Users and Groups] windowRefer to Creating a User ([Local Users and Groups] Window) (page 27).
● When creating a user by using the command promptRefer to Creating a User (Command Prompt) (page 27).
Installation
26

ATTENTION
If you cannot create a user in the [Local Users and Groups window, create a user by using the commandprompt.
2 Set a group.Add a user to the PaperStreamNxManagerOperators group in order for the authentication function toauthenticate the user.The PaperStreamNxManagerOperators group is created when NX Manager is installed.For details, refer to the following.
● When adding a user to the group in the [Local Users and Groups] windowRefer to Adding a User to the Group ([Local Users and Groups] Window) (page 28).
● When adding a user to the group by using the command promptRefer to Adding a User to the Group (Command Prompt) (page 28).
ATTENTION
If you cannot add a user to the group in the [Local Users and Groups] window, add a user to the group byusing the command prompt.
Creating a User ([Local Users and Groups] Window)
1 Press the [Windows] key and the [R] key at the same time to display the [Run] window.
2 Enter "lusrmgr.msc" in the [Open] field and click the [OK] button to display the [Local Users andGroups] window.
3 Click [Users] on the left menu to display the user list on the right.
4 Right-click the user list displayed on the right and click [New User] to display the [New User] window.
5 Specify the following items and then click the [Create] button.
● User nameEnter a user name in order for the authentication function to authenticate the user.
● Password/Confirm passwordEnter a password for the user in order for the authentication function to authenticate the user.
● [User must change password at next logon] check boxClear the check box.
6 Check that the user you created is displayed in the user list.
Creating a User (Command Prompt)
1 Display the command prompt window as a user with Administrator privileges for a computer.
2 Execute the following command to create a user.
Installation
27

net user <UserName> <Password> /add
3 Execute the following command and check that the user you created is displayed.
net user
Adding a User to the Group ([Local Users and Groups] Window)
1 Press the [Windows] key and the [R] key at the same time to display the [Run] window.
2 Enter "lusrmgr.msc" in the [Open] field and click the [OK] button to display the [Local Users andGroups] window.
3 Click [Groups] on the left menu to display the group list on the right.
4 In the group list displayed on the right, right-click [PaperStreamNxManagerOperators] and select[Properties] to display the [PaperStreamNxManagerOperators Properties] window.
5 Click the [Add] button to display the window for selecting a user.
6 Click the [Advanced] button and click the [Find Now] button to display [Search results].
7 From [Search results], select a user in order for the authentication function to authenticate the user andclick the [OK] button.
8 Check that the user you selected is displayed in [Enter the object names to select] and then click the[OK] button.
9 Check that the user you selected is displayed in [Members] and then click the [OK] button.
Adding a User to the Group (Command Prompt)
1 Display the command prompt window as a user with Administrator privileges for a computer.
2 Execute the following command to add a user to the group.
net localgroup PaperStreamNxManagerOperators <UserName> /add
3 Execute the following command to check that the user has been added to the group.
net localgroup PaperStreamNxManagerOperators
Installation
28

Settings
This section explains about settings in the NX Manager administrator window (on the web).
Logging in to NX ManagerLog in to NX Manager with a browser.The administrator can configure the NX Manager settings, including the preferences setting, authentication methodsetting, and job setting, in the NX Manager administrator window (on the web).The processing status of the images on NX Manager can also be checked in the NX Manager administrator window(on the web).
1 Turn on the computer and enter the following URL in the URL input field on the browser to establish aconnection.
http or https://<the IP address or host name of the computer in which NX Manager is installed>:<the portnumber to communicate with NX Manager>/NmConsole/Login/Login
The login window appears.
ATTENTION
● When HTTPS is used, import a certificate if the [There is a problem with this website's securitycertificate.] window is displayed.For details, refer to Importing a Certificate (for HTTPS) (page 25).
29

● Some parts in the NX Manager administrator window (on the web) may not be displayed properly.If this is the case, click [Tools] → [Internet options] in Internet Explorer, perform the following in the[Internet Options] window that appears, and restart the computer.
- Under the [Security] tab, select [Trusted sites] and click the [Sites] button. In the [Trusted sites]window that appears, add the IP address, host name, or the FQDN name of the computer where NXManager has been installed.
- Under the [General] tab, click the [Delete] button to delete temporary files and history information.If the problem still persists even after you perform the above procedure on Windows Server, select [LocalServer] in the [Server Manager] window and select [Off] for [IE Enhanced Security Configuration] in[PROPERTIES].
HINT
Clicking at the upper right of the login window adds the login window to your favorites in Internet
Explorer.
2 Enter a value for each item.The default values for the user name and the password are as follows:Username: adminPassword: passwordFor details about each item, refer to Login Window (page 99).
3 Click the [Login] button.
Settings
30
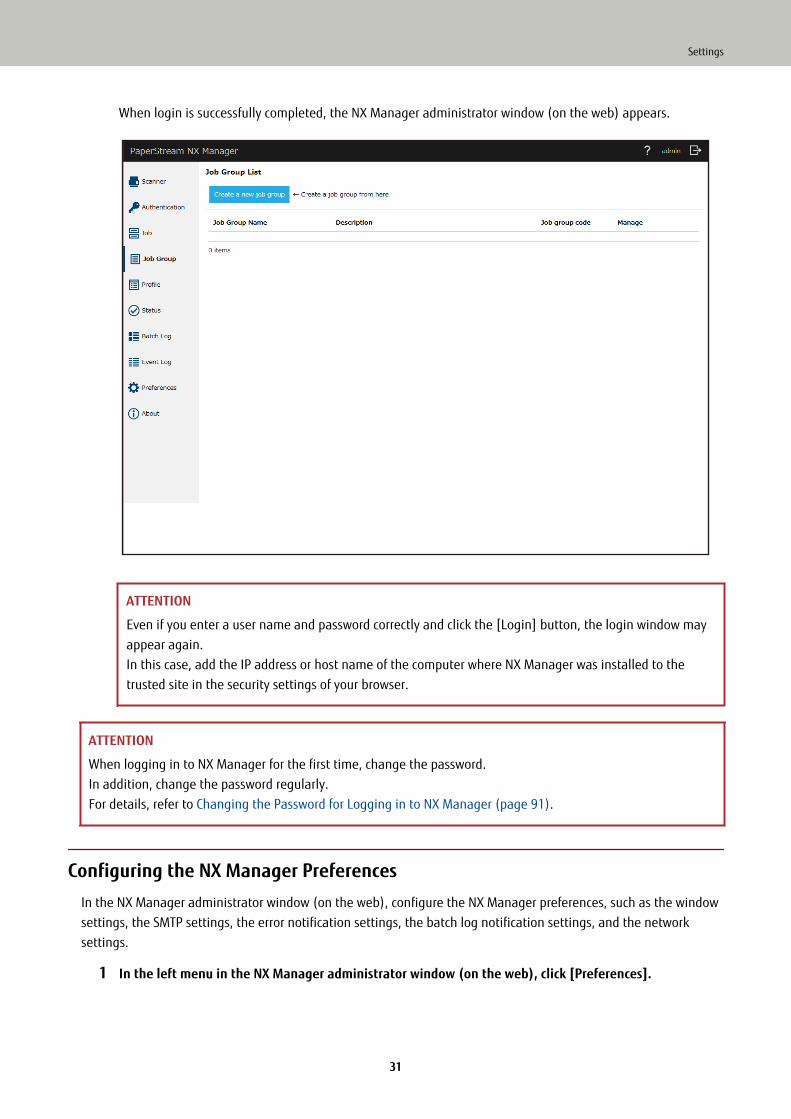
When login is successfully completed, the NX Manager administrator window (on the web) appears.
ATTENTION
Even if you enter a user name and password correctly and click the [Login] button, the login window mayappear again.In this case, add the IP address or host name of the computer where NX Manager was installed to thetrusted site in the security settings of your browser.
ATTENTION
When logging in to NX Manager for the first time, change the password.In addition, change the password regularly.For details, refer to Changing the Password for Logging in to NX Manager (page 91).
Configuring the NX Manager PreferencesIn the NX Manager administrator window (on the web), configure the NX Manager preferences, such as the windowsettings, the SMTP settings, the error notification settings, the batch log notification settings, and the networksettings.
1 In the left menu in the NX Manager administrator window (on the web), click [Preferences].
Settings
31

The [Settings] window appears.
2 Specify each item.For details about each item, refer to [Settings] Window (page 154).
3 Click the [Save] button.The settings are saved.
Setting the Authentication MethodIn the NX Manager administrator window (on the web), set the authentication method.
1 In the left menu in the NX Manager administrator window (on the web), click [Authentication].
Settings
32

The [Authentication] window appears.
2 Specify each item.For details about each item, refer to [Authentication] Window (page 101).
3 Click the [Save] button.The settings are saved.
Registering a ScannerSelect [Enable] for [PaperStream NX Manager] on a scanner to register the scanner with NX Manager.For details, refer to the Operator's Guide of your scanner.
Understanding the Flow for Setting a JobThe job setting flow differs as follows depending on the authentication method.
Settings
33

● When the authentication method is [None] or [Job group code]
Create a job For details, refer to Creating a New Job (page 35).
Create a job group For details, refer to Creating a New Job Group (When the Authentication Method is [None]or [Job group code]) (page 43).
Set the job in thejob group
While creating a job group, jobs can be set in the job group.For details, refer to Creating a New Job Group (When the Authentication Method is[None] or [Job group code]) (page 43).
● When the authentication method is [Username/Password], [NFC], or [Username/Password or NFC]
Create a job For details, refer to Creating a New Job (page 35).
Create a job group For details, refer to Creating a New Job Group (When the Authentication Method is[Username/Password], [NFC], or [Username/Password or NFC]) (page 50).
Set the job in thejob group
While creating a job group, jobs can be set in the job group.For details, refer to Creating a New Job Group (When the Authentication Method is[Username/Password], [NFC], or [Username/Password or NFC]) (page 50).
Add a user to thejob group
While creating a job group, users can be added to the job group.For details, refer to Creating a New Job Group (When the Authentication Method is[Username/Password], [NFC], or [Username/Password or NFC]) (page 50).
Settings
34

● When the authentication method is [Scanner]
Create a job For details, refer to Creating a New Job (page 35).
Create a job group For details, refer to Creating a New Job Group (When the Authentication Method is[Scanner]) (page 58).
Set the job in the jobgroup
While creating a job group, jobs can be set in the job group.For details, refer to Creating a New Job Group (When the Authentication Method is[Scanner]) (page 58).
Add a scanner to thejob group
While creating a job group, scanners can be added to the job group.For details, refer to Creating a New Job Group (When the Authentication Method is[Scanner]) (page 58).
Setting JobsSet a job in the NX Manager administrator window (on the web).
Creating a New JobThis section describes an example in which the authentication method is [None].
1 In the left menu in the NX Manager administrator window (on the web), click [Job].
Settings
35
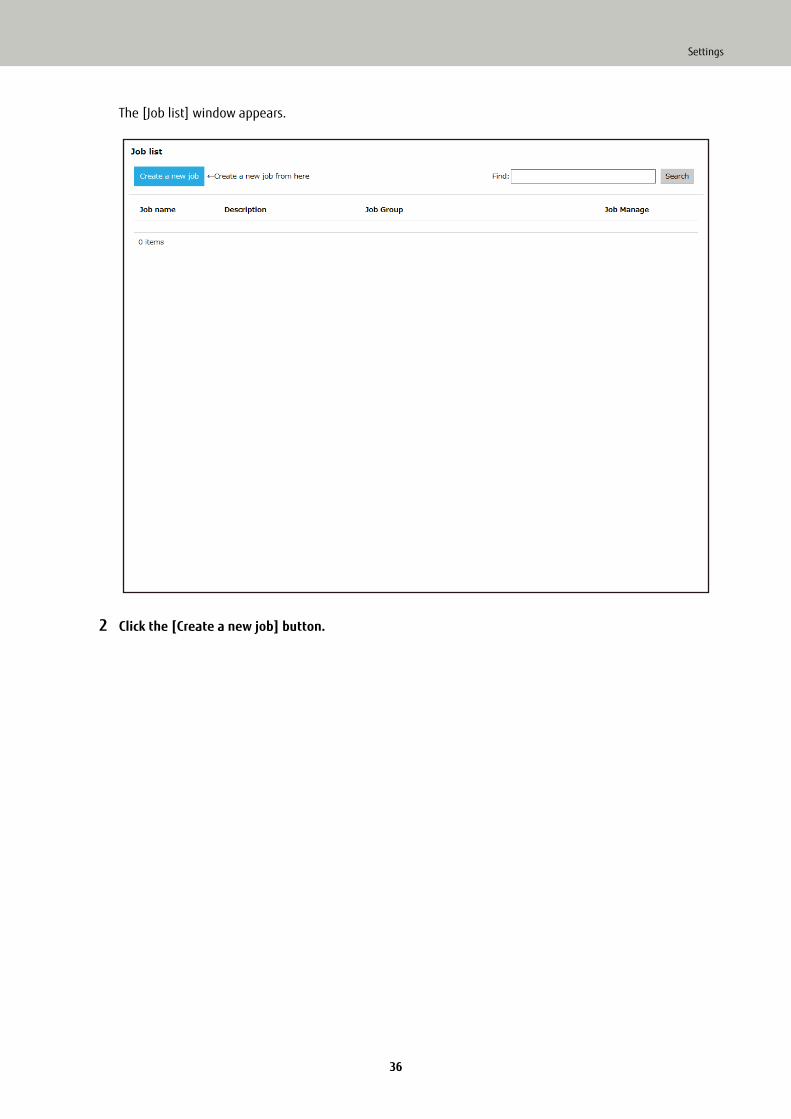
The [Job list] window appears.
2 Click the [Create a new job] button.
Settings
36
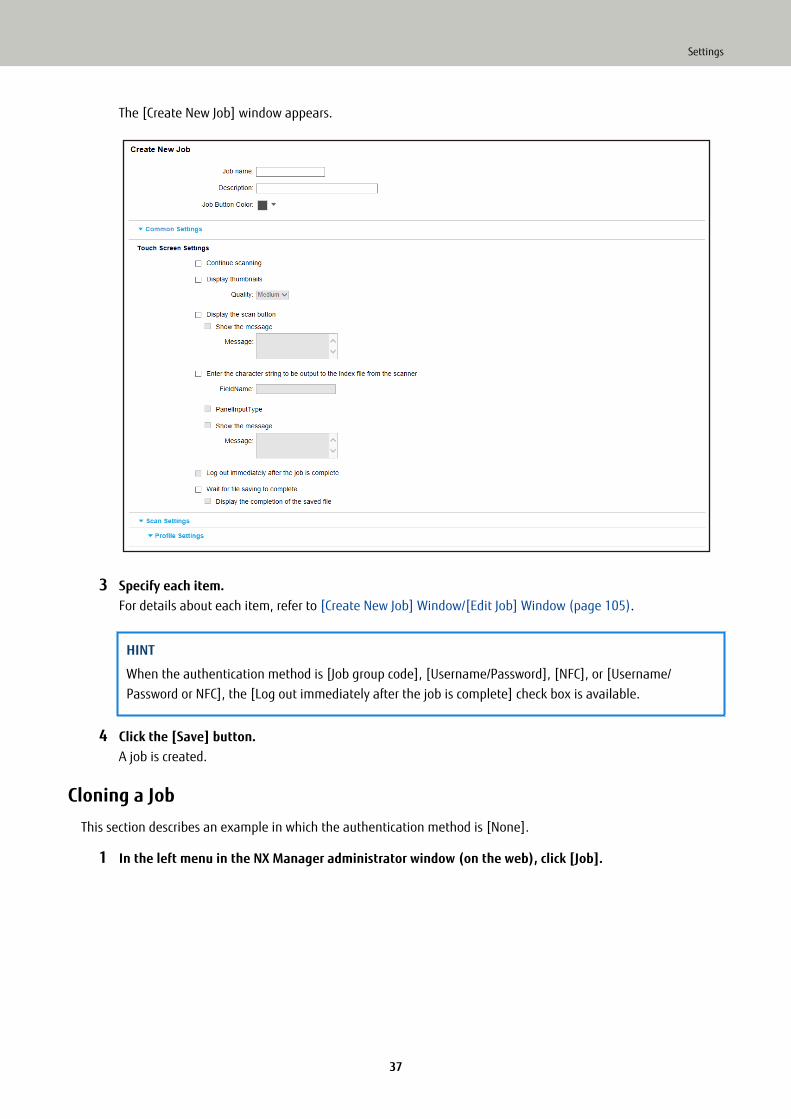
The [Create New Job] window appears.
3 Specify each item.For details about each item, refer to [Create New Job] Window/[Edit Job] Window (page 105).
HINT
When the authentication method is [Job group code], [Username/Password], [NFC], or [Username/Password or NFC], the [Log out immediately after the job is complete] check box is available.
4 Click the [Save] button.A job is created.
Cloning a JobThis section describes an example in which the authentication method is [None].
1 In the left menu in the NX Manager administrator window (on the web), click [Job].
Settings
37

The [Job list] window appears.
2 Click [Clone] in the [Job Manage] column that appears when you place the mouse pointer over the rowof a job.
Settings
38
The [Create New Job] window appears.
3 Specify each item.For details about each item, refer to [Create New Job] Window/[Edit Job] Window (page 105).
HINT
When the authentication method is [Job group code], [Username/Password], [NFC], or [Username/Password or NFC], the [Log out immediately after the job is complete] check box is available.
4 Click the [Save] button.A job is created.
Editing a JobThis section describes an example in which the authentication method is [None].
1 In the left menu in the NX Manager administrator window (on the web), click [Job].
Settings
39
The [Job list] window appears.
2 Click [Edit] in the [Job Manage] column that appears when you place the mouse pointer over the row ofa job.
Settings
40
The [Edit Job] window appears.
3 Specify each item.For details about each item, refer to [Create New Job] Window/[Edit Job] Window (page 105).
HINT
When the authentication method is [Job group code], [Username/Password], [NFC], or [Username/Password or NFC], the [Log out immediately after the job is complete] check box is available.
4 Click the [Save] button.The settings are saved.
Deleting a Job
1 In the left menu in the NX Manager administrator window (on the web), click [Job].
Settings
41
The [Job list] window appears.
2 Click [Delete] in the [Job Manage] column that appears when you place the mouse pointer over the rowof a job.A confirmation window appears.
3 Click the [OK] button.The job is deleted.
Filtering JobsFilter the jobs that are displayed in the job list.
1 In the left menu in the NX Manager administrator window (on the web), click [Job].
Settings
42

The [Job list] window appears.
2 Enter a part of a character string or a whole character string in [Find] to narrow down the displayeditems.For details about each item, refer to [Job list] Window (page 104).
3 Click the [Search] button.The filtered results are displayed.
Setting Job GroupsSet a job group in the NX Manager administrator window (on the web).
Creating a New Job Group (When the Authentication Method is [None] or [Jobgroup code])
When the authentication method is [None] or [Job group code], create a new job group as follows.This section describes an example in which the authentication method is [None].
1 In the left menu in the NX Manager administrator window (on the web), click [Job Group].
Settings
43

The [Job Group List] window appears.
2 Click the [Create a new job group] button.
Settings
44
The [New Job Group (1/2)] window appears.
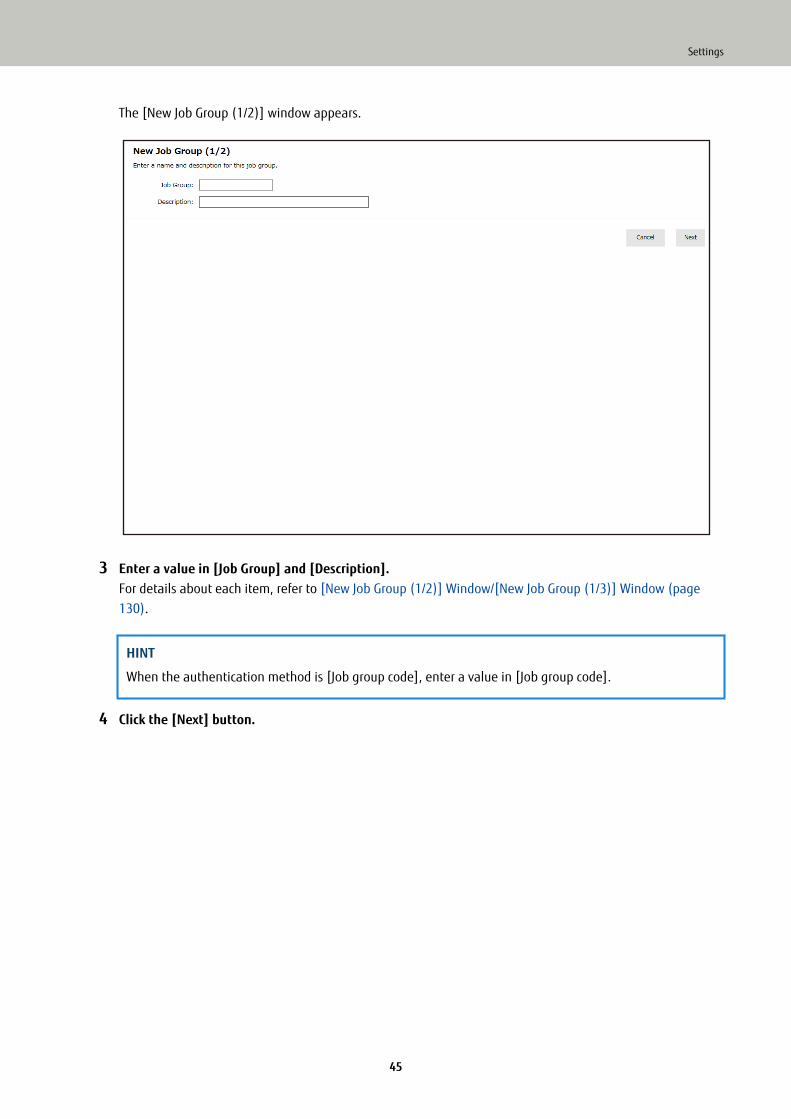
3 Enter a value in [Job Group] and [Description].For details about each item, refer to [New Job Group (1/2)] Window/[New Job Group (1/3)] Window (page130).
HINT
When the authentication method is [Job group code], enter a value in [Job group code].
4 Click the [Next] button.
Settings
45

The [New Job Group (2/2)] window appears.
5 Set jobs in the job group.For details about each item, refer to [New Job Group (2/2)] Window/[New Job Group (2/3)] Window (page130).
● The procedure to add a job to the job group is as follows:
a Click [Add Job].
Settings
46

Displays the window for adding a job to the job group.
b Select the check box for the job to be added.For details about each item, refer to Window for Adding a Job to a Job Group (page 139).
c Click the [OK] button.The job is added to the job group.
● The procedure to create a job in the job group is as follows:
a Click [New Job].
Settings
47

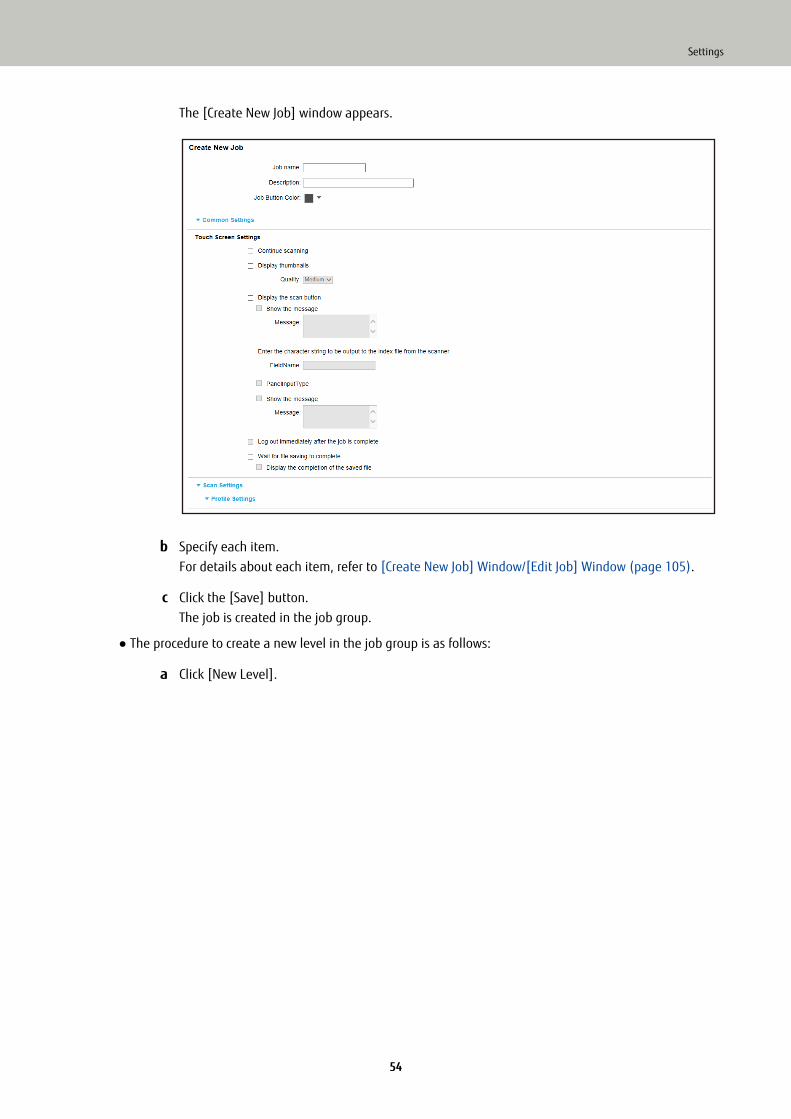
The [Create New Job] window appears.
b Specify each item.For details about each item, refer to [Create New Job] Window/[Edit Job] Window (page 105).
c Click the [Save] button.The job is created in the job group.
● The procedure to create a new level in the job group is as follows:
a Click [New Level].
Settings
48

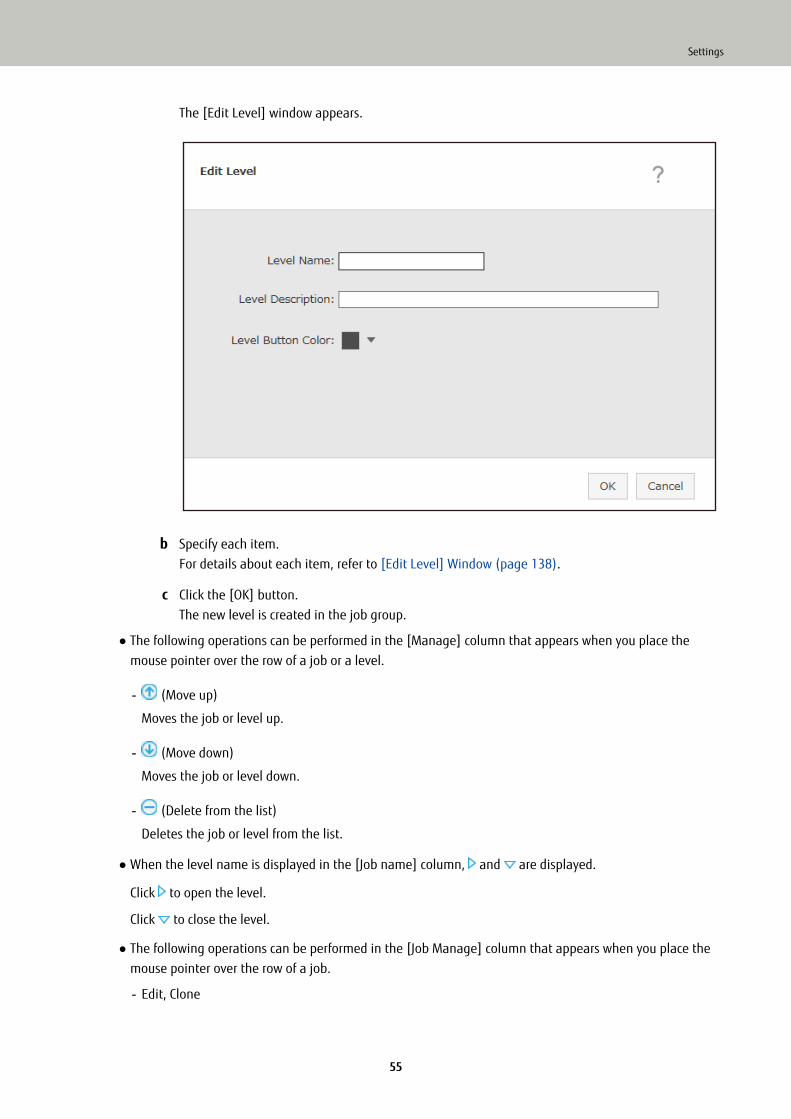
The [Edit Level] window appears.
b Specify each item.For details about each item, refer to [Edit Level] Window (page 138).
c Click the [OK] button.The new level is created in the job group.
● The following operations can be performed in the [Manage] column that appears when you place themouse pointer over the row of a job or a level.
- (Move up)
Moves the job or level up.
- (Move down)
Moves the job or level down.
- (Delete from the list)
Deletes the job or level from the list.
● When the level name is displayed in the [Job name] column, and are displayed.
Click to open the level.
Click to close the level.
● The following operations can be performed in the [Job Manage] column that appears when you place themouse pointer over the row of a job.
- Edit, Clone
Settings
49

The procedure is the same as the procedure to create a job in a job group.
● The following operations can be performed in the [Job Manage] column that appears when you place themouse pointer over the row of a level.
- Add JobThe procedure is the same as the procedure to add a job to a job group.
- New JobThe procedure is the same as the procedure to create a job in a job group.
- New Level, Edit, CloneThe procedure is the same as the procedure to create a level in a job group.
6 Click the [Complete] button.The new job group is created.
Creating a New Job Group (When the Authentication Method is [Username/Password], [NFC], or [Username/Password or NFC])
When the authentication method is [Username/Password], [NFC], or [Username/Password or NFC], create a new jobgroup as follows.
1 In the left menu in the NX Manager administrator window (on the web), click [Job Group].The [Job Group List] window appears.
Settings
50
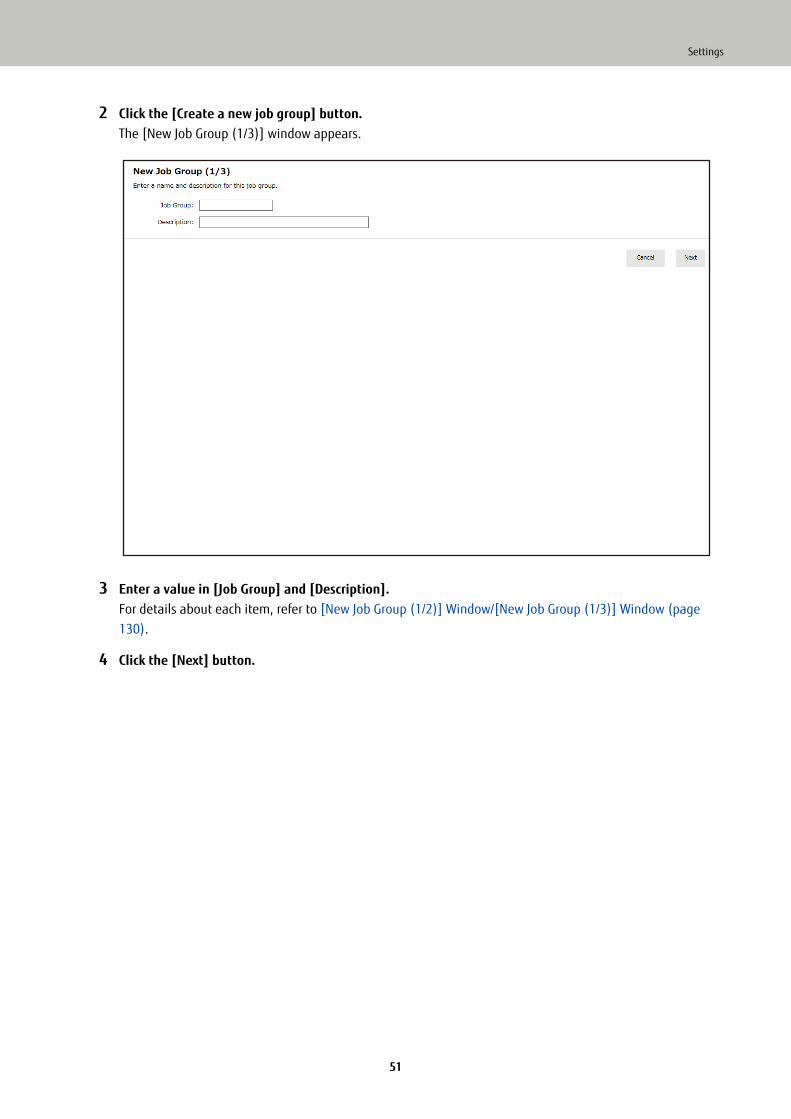
2 Click the [Create a new job group] button.The [New Job Group (1/3)] window appears.
3 Enter a value in [Job Group] and [Description].For details about each item, refer to [New Job Group (1/2)] Window/[New Job Group (1/3)] Window (page130).
4 Click the [Next] button.
Settings
51

The [New Job Group (2/3)] window appears.
5 Set jobs in the job group.For details about each item, refer to [New Job Group (2/2)] Window/[New Job Group (2/3)] Window (page130).
● The procedure to add a job to the job group is as follows:
a Click [Add Job].
Settings
52

Displays the window for adding a job to the job group.
b Select the check box for the job to be added.For details about each item, refer to Window for Adding a Job to a Job Group (page 139).
c Click the [OK] button.The job is added to the job group.
● The procedure to create a job in the job group is as follows:
a Click [New Job].
Settings
53
The [Create New Job] window appears.
b Specify each item.For details about each item, refer to [Create New Job] Window/[Edit Job] Window (page 105).
c Click the [Save] button.The job is created in the job group.
● The procedure to create a new level in the job group is as follows:
a Click [New Level].
Settings
54
The [Edit Level] window appears.
b Specify each item.For details about each item, refer to [Edit Level] Window (page 138).
c Click the [OK] button.The new level is created in the job group.
● The following operations can be performed in the [Manage] column that appears when you place themouse pointer over the row of a job or a level.
- (Move up)
Moves the job or level up.
- (Move down)
Moves the job or level down.
- (Delete from the list)
Deletes the job or level from the list.
● When the level name is displayed in the [Job name] column, and are displayed.
Click to open the level.
Click to close the level.
● The following operations can be performed in the [Job Manage] column that appears when you place themouse pointer over the row of a job.
- Edit, Clone
Settings
55

The procedure is the same as the procedure to create a job in a job group.
● The following operations can be performed in the [Job Manage] column that appears when you place themouse pointer over the row of a level.
- Add JobThe procedure is the same as the procedure to add a job to a job group.
- New JobThe procedure is the same as the procedure to create a job in a job group.
- New Level, Edit, CloneThe procedure is the same as the procedure to create a level in a job group.
6 Click the [Next] button.The [New Job Group (3/3)] window appears.
7 Set a user in the job group.For details about each item, refer to [New Job Group (3/3)] Window (page 133).
● The procedure to add a user to the job group is as follows:
a Click [Add].
Settings
56

Displays the window for adding a user to the job group.
HINT
● When the authentication mode is [Active Directory], the [Active Directory connection]window appears.For details about the [Active Directory connection] window, refer to [Active DirectoryConnection Test] Window/[Active Directory connection] Window (page 104).
● When the authentication mode is [Active Directory], the user names of user accounts with nouser principal names specified are not displayed in the window for adding a user to the jobgroup.
b Select the check box for the user to be added.For details about each item, refer to Window for Adding a User to a Job Group (page 140).
c Click the [OK] button.The user is added to the job group.
● To delete a user from the list, click (Delete from the list) in the [Manage] column that appears when
you place the mouse pointer over the row of the user.
8 Click the [Complete] button.The new job group is created.
Settings
57

Creating a New Job Group (When the Authentication Method is [Scanner])When the authentication method is [Scanner], create a new job group as follows.
1 In the left menu in the NX Manager administrator window (on the web), click [Job Group].The [Job Group List] window appears.
2 Click the [Create a new job group] button.
Settings
58

The [New Job Group (1/3)] window appears.
3 Enter a value in [Job Group] and [Description].For details about each item, refer to [New Job Group (1/2)] Window/[New Job Group (1/3)] Window (page130).
4 Click the [Next] button.
Settings
59
The [New Job Group (2/3)] window appears.
5 Set jobs in the job group.For details about each item, refer to [New Job Group (2/2)] Window/[New Job Group (2/3)] Window (page130).
● The procedure to add a job to the job group is as follows:
a Click [Add Job].
Settings
60

Displays the window for adding a job to the job group.
b Select the check box for the job to be added.For details about each item, refer to Window for Adding a Job to a Job Group (page 139).
c Click the [OK] button.The job is added to the job group.
● The procedure to create a job in the job group is as follows:
a Click [New Job].
Settings
61

The [Create New Job] window appears.
b Specify each item.For details about each item, refer to [Create New Job] Window/[Edit Job] Window (page 105).
c Click the [Save] button.The job is created in the job group.
● The procedure to create a new level in the job group is as follows:
a Click [New Level].
Settings
62

The [Edit Level] window appears.
b Specify each item.For details about each item, refer to [Edit Level] Window (page 138).
c Click the [OK] button.The new level is created in the job group.
● The following operations can be performed in the [Manage] column that appears when you place themouse pointer over the row of a job or a level.
- (Move up)
Moves the job or level up.
- (Move down)
Moves the job or level down.
- (Delete from the list)
Deletes the job or level from the list.
● When the level name is displayed in the [Job name] column, and are displayed.
Click to open the level.
Click to close the level.
● The following operations can be performed in the [Job Manage] column that appears when you place themouse pointer over the row of a job.
- Edit, Clone
Settings
63

The procedure is the same as the procedure to create a job in a job group.
● The following operations can be performed in the [Job Manage] column that appears when you place themouse pointer over the row of a level.
- Add JobThe procedure is the same as the procedure to add a job to a job group.
- New JobThe procedure is the same as the procedure to create a job in a job group.
- New Level, Edit, CloneThe procedure is the same as the procedure to create a level in a job group.
6 Click the [Next] button.The [New Job Group (3/3)] window appears.
7 Set a scanner to the job groupFor details about each item, refer to [New Job Group (3/3)] Window (page 133).
● The procedure to add a scanner to the job group is as follows:
a Click [Add].
Settings
64

Displays the window for adding a scanner to the job group.
b Select the check box for the scanner to be added.For details about each item, refer to Window for Adding a Scanner to a Job Group (page 143).
c Click the [OK] button.The scanner is added to the job group.
● To delete a scanner from the list, click (Delete from the list) in the [Manage] column that appears when
you place the mouse pointer over the row of the scanner.
8 Click the [Complete] button.The new job group is created.
Cloning a Job GroupThis section describes an example in which the authentication method is [Username/Password], [NFC], or[Username/Password or NFC].
1 In the left menu in the NX Manager administrator window (on the web), click [Job Group].
Settings
65
The [Job Group List] window appears.
2 Click [Clone] in the [Manage] column that appears when you place the mouse pointer over the row of ajob group.
Settings
66

The [Clone Job Group] window appears.
3 Specify each item.For details about each item, refer to [Clone Job Group] Window/[Edit Job Group] Window (page 135).
HINT
● When the authentication method is [None], no user list is displayed.
● When the authentication method is [Job group code], no user list is displayed. The input field for [Jobgroup code] appears.
● When the authentication method is [Scanner], no user list is displayed. A scanner list is displayed.
4 Click the [Complete] button.The new job group is created.
Editing a Job GroupThis section describes an example in which the authentication method is [Username/Password], [NFC], or[Username/Password or NFC].
1 In the left menu in the NX Manager administrator window (on the web), click [Job Group].
Settings
67

The [Job Group List] window appears.
2 Click [Edit] in the [Manage] column that appears when you place the mouse pointer over the row of ajob group.
Settings
68
The [Edit Job Group] window appears.
3 Specify each item.For details about each item, refer to [Clone Job Group] Window/[Edit Job Group] Window (page 135).
HINT
● When the authentication method is [None], no user list is displayed.
● When the authentication method is [Job group code], no user list is displayed. The input field for [Jobgroup code] appears.
● When the authentication method is [Scanner], no user list is displayed. A scanner list is displayed.
4 Click the [Complete] button.The settings are saved.
Deleting a Job GroupThis section describes an example in which the authentication method is [Username/Password], [NFC], or[Username/Password or NFC].
1 In the left menu in the NX Manager administrator window (on the web), click [Job Group].
Settings
69

The [Job Group List] window appears.
2 Click [Delete] in the [Manage] column that appears when you place the mouse pointer over the row of ajob group.A confirmation window appears.
3 Click the [OK] button.The job group is deleted.
Settings
70
Operations
This section explains about the operations using NX Manager.
Processing a Job with the Scanner
1 Turn on the scanner.For details, refer to the Operator's Guide of your scanner.The contents that are displayed on the touch screen of the scanner differ depending on the authenticationmethod.
AuthenticationMethod
Contents Displayed on the Scanner Touch Screen
None Jobs are displayed.
Job group code A screen for entering a job group code appears.Entering a job group code displays jobs corresponding to the job group code.
Username/Password A screen for entering a user name and password appears.Entering a user name and a password displays jobs corresponding to the user.
NFC A screen that instructs a user to hold a smart card over the contactless smart cardreader to authenticate the user appears.Once the user is authenticated, jobs corresponding to the user who is authenticatedwith the smart card are displayed.
Username/Passwordor NFC
The screen that appears first instructs a user to hold a smart card over the contactlesssmart card reader to authenticate the user.A screen for entering a user name and password appears by changing the tab.For the screen that instructs a user to hold a smart card over the contactless smartcard reader to authenticate the user, jobs corresponding to the user who isauthenticated with the smart card are displayed.For the screen for entering a user name and password, entering the user name andpassword displays jobs corresponding to the user.
Scanner Jobs corresponding to the scanner are displayed.
2 Load documents in the ScanSnap.For details, refer to the Operator's Guide of your scanner.
3 Select a job and start a scan by following the instructions on the touch screen of the scanner.
Managing ScannersManage scanners in the NX Manager administrator window (on the web).
71

Checking Scanners
1 In the left menu in the NX Manager administrator window (on the web), click [Scanner].The [Scanner List] window appears.
2 Check the information of scanners.For details about each item, refer to [Scanner List] Window (page 100).
Deleting a Scanner
1 In the left menu in the NX Manager administrator window (on the web), click [Scanner].
Operations
72

The [Scanner List] window appears.
2 Click [Delete] in the [Scanner Manage] column that appears when you place the mouse pointer over therow of a scanner.A confirmation window appears.
3 Click the [OK] button.The scanner is deleted.
Filtering ScannersFilter the scanners that are displayed in the scanner list.
1 In the left menu in the NX Manager administrator window (on the web), click [Scanner].
Operations
73
The [Scanner List] window appears.
2 Enter a part of a character string or a whole character string in [Find] to narrow down the displayeditems.For details about each item, refer to [Scanner List] Window (page 100).
3 Click the [Search] button.The filtered results are displayed.
Managing UsersManage users in the NX Manager administrator window (on the web).
Checking UsersThis section describes an example in which the authentication mode is "Authentication server that requires alinkage via an Authentication API".
1 In the left menu in the NX Manager administrator window (on the web), click [User].
Operations
74

The [User List] window appears.
HINT
[User] in the left menu is displayed when the authentication method is [Username/Password], [NFC], or[Username/Password or NFC].
2 Check the information of the users.For details about each item, refer to [User List] Window (page 143).
Filtering UsersFilter the users that are displayed in the user list.This section describes an example in which the authentication mode is "Authentication server that requires alinkage via an Authentication API".
1 In the left menu in the NX Manager administrator window (on the web), click [User].
Operations
75

The [User List] window appears.
HINT
[User] in the left menu is displayed when the authentication method is [Username/Password], [NFC], or[Username/Password or NFC].
2 Enter a part of a character string or a whole character string in [Find] to narrow down the displayeditems.For details about each item, refer to [User List] Window (page 143).
3 Click the [Search] button.The filtered results are displayed.
Managing ProfilesManage profiles in the NX Manager administrator window (on the web).
Checking Profiles
1 In the left menu in the NX Manager administrator window (on the web), click [Profile].
Operations
76
The [Profile List] window appears.
2 Check the information of the profiles.For details about each item, refer to [Profile List] Window (page 144).
Importing Profiles
1 In the left menu in the NX Manager administrator window (on the web), click [Profile].
Operations
77
The [Profile List] window appears.
2 Click the [Import a profile] button.The [Choose File to Upload] window appears.
3 Select a PaperStream IP driver profile to be imported.Among PaperStream IP driver profiles, you can only import a scanning profile (*.pav) that was backed upfrom the PaperStream IP driver.
4 Click the [Open] button.The imported profile is added.
Deleting Profiles
1 In the left menu in the NX Manager administrator window (on the web), click [Profile].
Operations
78

The [Profile List] window appears.
2 Click [Delete] in the [Profile Manage] column that appears when you place the mouse pointer over therow of a profile.A confirmation window appears.
3 Click the [OK] button.The profile is deleted.
Filtering ProfilesFilter the profiles that are displayed in the profile list.
1 In the left menu in the NX Manager administrator window (on the web), click [Profile].
Operations
79
The [Profile List] window appears.
2 Enter a part of a character string or a whole character string in [Find] to narrow down the displayeditems.For details about each item, refer to [Profile List] Window (page 144).
3 Click the [Search] button.The filtered results are displayed.
Checking StatusesCheck statuses in the NX Manager administrator window (on the web).
1 In the left menu in the NX Manager administrator window (on the web), click [Status].
Operations
80
The [Status] window appears.
2 Check the statuses for [Batch Log] and [Event Log].For details about each item, refer to [Status] Window (page 145).
Monitoring Scanning StatusesMonitor scanning statuses in the NX Manager administrator window (on the web).
Checking Scanning Statuses
1 In the left menu in the NX Manager administrator window (on the web), click [Batch Log].
Operations
81

The [Batch Log List] window appears.
2 Check the scanning status.For details about each item, refer to [Batch Log List] Window (page 147).
HINT
The details of a batch log can be checked in the [Batch Log Details] window that appears when you clickthe batch log in the [Start Date/Time] column.For details about the [Batch Log Details] window, refer to [Batch Log Details] Window (page 150).
Exporting Scanning Statuses to a File
1 In the left menu in the NX Manager administrator window (on the web), click [Batch Log].
Operations
82

The [Batch Log List] window appears.
2 Click the [Export] button.A confirmation window appears.
3 Click the [OK] button.The window appears asking you whether to open or save the file.
4 Click the [▼] button to the right of the [Save] button and then click [Save as].The [Save as] window appears.
5 Enter a name in [File name] and select a type for [Save as type].
6 Click the [Save] button.The file with the exported scanning statuses is saved.
Changing the Scanning Status from [Error] to [Error (Checked)]In order for you to know that batch logs have been checked, you can change the status for batch from [Error] to[Error (Checked)].
1 In the left menu in the NX Manager administrator window (on the web), click [Batch Log].
Operations
83

The [Batch Log List] window appears.
2 Click the [Mark all errors as "Checked"] button.A confirmation window appears.
3 Click the [OK] button.All of the [Error] batches become [Error (Checked)] batches.
Filtering Scanning StatusesFilter the batch logs (scanning status) that are displayed in the batch log list.
1 In the left menu in the NX Manager administrator window (on the web), click [Batch Log].
Operations
84

The [Batch Log List] window appears.
2 Enter values in the [Date/Time] fields, select a status from the [Status] menu, and enter a part of acharacter string or a whole character string in [Find] to narrow down the displayed items.For details about each item, refer to [Batch Log List] Window (page 147).
3 Click the [Search] button.The filtered results are displayed.
Retrying a BatchWhen [Retry] is displayed in the [Batch Manage] column in the [Batch Log List] window that is displayed by clicking[Batch Log] in the left menu in the NX Manager administrator window (on the web), take appropriate actionsaccording to Messages in Batch Logs Displayed in the NX Manager Administrator Window (on the Web) (page 160)and then retry the batch.
1 In the left menu in the NX Manager administrator window (on the web), click [Batch Log].
Operations
85

The [Batch Log List] window appears.
2 Click [Retry] in the [Batch Manage] column.A confirmation window appears.
3 Click the [OK] button.The batch is retried.
Managing Event LogsManage event logs in the NX Manager administrator window (on the web).In the event logs, you can check system errors that occur in NX Manager and configuration errors in NX Manager.
Checking Event Logs
1 In the left menu in the NX Manager administrator window (on the web), click [Event Log].
Operations
86
The [Event Log List] window appears.
2 Check event logs.For details about each item, refer to [Event Log List] Window (page 152).
HINT
The details of an event log can be checked in the [Event Log Details] window that appears when you clickthe event log in the [Event Date/Time] column.For details about the [Event Log Details] window, refer to [Event Log Details] Window (page 153).
Exporting Event Logs to a File
1 In the left menu in the NX Manager administrator window (on the web), click [Event Log].
Operations
87

The [Event Log List] window appears.
2 Click the [Export] button.A confirmation window appears.
3 Click the [OK] button.The window appears asking you whether to open or save the file.
4 Click the [▼] button to the right of the [Save] button and then click [Save as].The [Save as] window appears.
5 Enter a name in [File name] and select a type for [Save as type].
6 Click the [Save] button.The file with the exported event logs is saved.
Clearing Event LogsWhen too many event logs are displayed in the event log list or when you want to initialize the list, clear event logs.
1 In the left menu in the NX Manager administrator window (on the web), click [Event Log].
Operations
88

The [Event Log List] window appears.
2 Click the [Clear] button.A confirmation window appears.
3 Click the [OK] button.Event logs are cleared.
Changing the Event Log Type from [Error] to [Error (Checked)]In order for you to know that event logs have been checked, you can change the event log type from [Error] to [Error(Checked)].
1 In the left menu in the NX Manager administrator window (on the web), click [Event Log].
Operations
89

The [Event Log List] window appears.
2 Click the [Mark all errors as "Checked"] button.A confirmation window appears.
3 Click the [OK] button.All of the [Error] event logs become the [Error (Checked)] event logs.
Filtering Event LogsFilter the event logs that are displayed in the event log list.
1 In the left menu in the NX Manager administrator window (on the web), click [Event Log].
Operations
90

The [Event Log List] window appears.
2 Select the types that you want to display for [Filter the list by type] and enter a part of a characterstring or a whole character string in [Find] to narrow down the displayed items.For details about each item, refer to [Event Log List] Window (page 152).
3 Click the [Search] button.The filtered results are displayed.
Changing the Password for Logging in to NX ManagerChange the password for logging in to NX Manager.
1 Click [Change password] that appears when you place the mouse pointer over the login user name atthe upper right of the NX Manager administrator window (on the web).
Operations
91

The [Change password] window appears.
2 Enter a value for each item.For details about each item, refer to [Change password] Window (page 100).
3 Click the [Change password] button.The password is changed.
ATTENTION
If you lose the password, you can no longer log in to NX Manager.Be sure not to lose the password.If you lose the password, contact the distributor/dealer where you purchased this product. Refer to the contactinformation in the Contact List if supplied with this product, or refer to the contact information in the Contact forInquiries section if provided in Safety Precautions supplied with this product, and then make an inquiry.
Operations
92

Maintenance
This section explains about the maintenance of NX Manager.
Backing Up and Restoring the Data Related to NX ManagerNX Manager comes with a tool to back up and restore the data related to NX Manager.
ATTENTION
● A tool to back up and restore the data related to NX Manager must be run by a user with Administratorprivileges for a computer.
● When backing up and restoring the data related to NX Manager, you also need to back up and restore the datarelated to NX Manager Database.When backing up and restoring the data related to NX Manager Database, the imported PaperStream IP driverprofile is also backed up and restored.To back up and restore the data related to NX Manager Database from the previous version to the latest versionof NX Manager, use the tool described in Backing Up and Restoring the Data Related to NX Manager Database(page 94).To back up and restore the data related to NX Manager Database between the same versions of NX Manager,use the tool described in Backing Up and Restoring the Data Related to NX Manager Database (page 94) orthe simple tool described in Backing Up and Restoring the Data Related to NX Manager Database (Simple Tool)(page 95).
Backing Up the Data Related to NX ManagerBack up the data related to NX Manager.The data related to NX Manager can be restored with the backup files. Perform the backup procedure regularly justin case.While the data related to NX Manager is being backed up, the NX Manager functions are temporarily suspended. Donot back up the data related to NX Manager when using any of the NX Manager functions.
● Place where the command is stored
<Installation folder for PaperStream NX Manager>\NXManager\Application\Bin folder
● Command format
NmBackup.exe <Backup file name>
● Return value
- 0Successful completion
- Other than 0Abnormal termination
93

Restoring the Data Related to NX ManagerRetrieve the backed-up data related to NX Manager and return it to NX Manager in order to restore the data.
● Place where the command is stored
<Installation folder for PaperStream NX Manager>\NXManager\Application\Bin folder
● Command format
NmRestore.exe <Backup file name>
● Return value
- 0Successful completion
- Other than 0Abnormal termination
Backing Up and Restoring the Data Related to NX Manager DatabaseNX Manager comes with a tool to back up and restore the data related to NX Manager Database.This tool also backs up and restores the PaperStream IP driver profile imported to NX Manager.
ATTENTION
● A tool to back up and restore the data related to NX Manager Database must be run by a user withAdministrator privileges for a computer.
● Backing up and restoring the data related to NX Manager Database also restores the data of batch logs andevent logs.
● Before backing up and restoring the data related to NX Manager Database, make sure that all batch processesin NX Manager have been completed.If the data related to NX Manager Database is backed up or restored while any batch is being processed, thebatch processing may not be executed correctly.
● When backing up and restoring the data related to NX Manager Database, you also need to back up andrestore the data related to NX Manager.For details, refer to Backing Up and Restoring the Data Related to NX Manager (page 93).
● To back up and restore the data related to NX Manager Database from the previous version to the latest versionof NX Manager, use this tool.To back up and restore the data related to NX Manager Database between the same versions of NX Manager,use this tool or the simple tool described in Backing Up and Restoring the Data Related to NX ManagerDatabase (Simple Tool) (page 95).
Backing Up the Data Related to NX Manager DatabaseBack up the data related to NX Manager Database.
Maintenance
94

The data related to NX Manager Database can be restored with the backup files. Perform the backup procedureregularly just in case.
● Place where the command is stored
<Installation folder for PaperStream NX Manager>\NXManager\Database\Bin folder
● Command format
NmDatabaseBackup.exe <Backup file name>
● Return value
- 0Successful completion
- Other than 0Abnormal termination
Restoring the Data Related to NX Manager DatabaseRetrieve the backed-up data related to NX Manager Database and return it to NX Manager Database in order torestore the data.
● Place where the command is stored
<Installation folder for PaperStream NX Manager>\NXManager\Database\Bin folder
● Command format
NmDatabaseRestore.exe <Backup file name>
● Return value
- 0Successful completion
- Other than 0Abnormal termination
Backing Up and Restoring the Data Related to NX Manager Database (SimpleTool)
NX Manager comes with a simple tool to back up and restore the data related to the NX Manager Database usingthe SQL Server function.Use this simple tool to back up and restore the data related to NX Manager Database between the same versions ofNX Manager.This tool also backs up and restores the PaperStream IP driver profile imported to NX Manager.
Maintenance
95

ATTENTION
● A simple tool to back up and restore the data related to NX Manager Database must be run by a user withAdministrator privileges for a computer.
● Before backing up and restoring the data related to NX Manager Database, make sure that all batch processesin NX Manager have been completed.If the data related to NX Manager Database is backed up or restored while any batch is being processed, thebatch processing may not be executed correctly.
● When backing up and restoring the data related to NX Manager Database, you also need to back up andrestore the data related to NX Manager.For details, refer to Backing Up and Restoring the Data Related to NX Manager (page 93).
● To back up and restore the data related to NX Manager Database from the previous version to the latest versionof NX Manager, use the tool described in Backing Up and Restoring the Data Related to NX Manager Database(page 94).To back up and restore the data related to NX Manager Database between the same versions of NX Manager,use the tool described in Backing Up and Restoring the Data Related to NX Manager Database (page 94) or thissimple tool.
Backing Up the Data Related to NX Manager Database (Simple Tool)Back up the data related to NX Manager Database by executing the tool to back up and restore the data related toNX Manager Database using the SQL Server function.
● Place where the command is stored
<Installation folder for PaperStream NX Manager Database>\NXManager\Database\Bin folder
● Command format
NmBackupDatabase.bat <Database instance name> <Backup folder name>
Example:
NmBackupDatabase.bat .\NXMANAGER C:\Temp\NXManagerDatabaseBackup
Restoring the Data Related to NX Manager Database (Simple Tool)Restore the data related to NX Manager Database by executing the tool to back up and restore the data related toNX Manager Database using the SQL Server function.
● Place where the command is stored
<Installation folder for PaperStream NX Manager Database>\NXManager\Database\Bin folder
● Command format
NmRestoreDatabase.bat <Database instance name> <Backup folder name>
Example:
Maintenance
96

NmRestoreDatabase.bat .\NXMANAGER C:\Temp\NXManagerDatabaseBackup
Obtaining the Maintenance Information on NX ManagerIf trouble occurs during the installation or operation of NX Manager, obtain the maintenance information on NXManager in order to investigate the cause.While the maintenance information is being obtained, the NX Manager functions are temporarily suspended. Donot try to obtain the maintenance information unless you are asked to do so by our support staff or trouble occurs.
● Place where the command is storedDescribes the place where the command is stored for each case in the following.
- To operate NX Manager with a single serverExecute the command stored in either of the following folders.Either command is available for you to execute because the same maintenance information is obtained byexecuting the command stored in either folders.
<Installation folder for PaperStream NX Manager>\NXManager\Application\Bin folder
Or
<Installation folder for PaperStream NX Manager Database>\NXManager\Database\Bin folder
- To operate PaperStream NX Manager Database on another server
● Server where you installed PaperStream NX Manager and PaperStream IP (TWAIN x64)Execute the command stored in the following folder.
<Installation folder for PaperStream NX Manager>\NXManager\Application\Bin folder
● Server where you installed PaperStream NX Manager DatabaseExecute the command stored in the following folder.
<Installation folder for PaperStream NX Manager Database>\NXManager\Database\Bin folder
For details about operating PaperStream NX Manager Database on another server, contact the distributor/dealerwhere you purchased this product. Refer to the contact information in the Contact List if supplied with thisproduct, or refer to the contact information in the Contact for Inquiries section if provided in Safety Precautionssupplied with this product, and then make an inquiry.
● Command format
NmInvestigate.exe -d <Destination folder name> [-p <Password for encryption>] [-v]
Specify -v when displaying the processing status
● Return value
- 0Successful completion
- Other than 0Abnormal termination
Maintenance
97

The maintenance information is categorized by an information type and saved in the destination folder.When the password for encryption is specified, the maintenance information is encrypted.
Maintenance
98

Windows
This section explains about the NX Manager administrator window (on the web).
ATTENTION
Do not copy a tab on the browser. There is no guarantee that the system operates properly if a tab is copied onthe browser.
Login WindowEnter a user name and password for logging in to NX Manager.
Display the window for adding the login window to your favorites in Internet Explorer.
Username
Enter a user name for logging in to NX Manager.
Password
Enter a password for logging in to NX Manager.
[Login] button
Logs in to NX Manager with the user name and password that you entered.
Common Items in the NX Manager Administrator Window (on the Web)
Left menu
Click each item on the left menu to display the corresponding window on the right side.
HINT
[User] in the left menu is displayed when the authentication method is [Username/Password], [NFC], or[Username/Password or NFC].
Displays the Help for the window that is currently displayed.
99

Displays the user name who is logged in to NX Manager.Click [Change password] which appears when the mouse pointer is placed over the login user name. In thedisplayed [Change password] window, you can change the password to log in to NX Manager.For details about the [Change password] window, refer to [Change password] Window (page 100).
Logs out from NX Manager.
[Change password] WindowChange the password for logging in to NX Manager.
Username
Displays the user name who is logged in to NX Manager.
Current password
Enter the current password for logging in to NX Manager.
New password
Enter a new password for logging in to NX Manager.At least seven characters must be entered.Up to 128 characters can be entered.Alphanumeric characters and symbols can be used.
Confirm new password
Enter the new password again for logging in to NX Manager.
[Change password] button
Changes the password for logging in to NX Manager.
[Cancel] button
Cancels the operation.
[Scanner List] WindowCheck, delete, and find a scanner.
Find
Enter a part of a character string or a whole character string to narrow down the displayed items.Up to 32 characters can be entered.
Windows
100

[Search] button
Displays the result of narrowing down the list.
ID
Displays the ID.
Scanner Name
Displays the names of the scanners registered in NX Manager.
Serial Number
Displays the serial numbers of the scanners registered in NX Manager.
IP Address
Displays the IP addresses of the scanners registered in NX Manager.
MAC Address
Displays the MAC addresses of the scanners registered in NX Manager.
Job Group Name
Displays the name of the job group correlating to the registered scanner in NX Manager.When there is no correlated job group, no job group name is displayed.Each scanner can correlate with one job group.Click the displayed job group name to display the [Browse job groups] window, and check the settings ofthe job group.For details about the [Browse job groups] window, refer to [Browse job groups] Window (page 138).
HINT
[Job Group Name] is displayed when the authentication method is [Scanner].
Scanner Manage
To delete a scanner, click [Delete] in the [Scanner Manage] column that appears when you place themouse pointer over the row of the scanner.
Authentication
[Authentication] WindowSet an authentication method.
Authentication Method
Select an authentication method.
● NoneThe scanner is used without authentication.
Windows
101

● Job group codeAuthenticates a user with a job group code.
● Username/PasswordAuthenticates a user with a user name and password.
● NFCAuthenticates a user with a smart card.
● Username/Password or NFCAuthenticates a user with one of the following.
- User name and password
- Smart card
● ScannerAuthenticates a user using a specific scanner.
When the authentication method is [Username/Password], [NFC], or [Username/Password or NFC]
Specify the following:
Authentication Mode
Select an authentication mode.
● Active DirectoryThe Active Directory server is used as an authentication server.
● Authentication server that requires a linkage via an Authentication APIUse a server other than the Active Directory server as an authentication server, which requires alinkage via an Authentication API.
HINT
● [Active Directory] is displayed when the authentication method is [Username/Password].
● For "Authentication server that requires a linkage via an Authentication API", the displayed nameis a name obtained from the Authentication API.
When the authentication mode is [Active Directory]
Specify the following:
Server
Enter the server name of the Active Directory server.Up to 255 characters can be entered.
Port Number
Enter the port number of the Active Directory server.Up to 5 characters can be entered.
[SSL] check box
Select this check box to enable SSL.
Windows
102

When the check box is selected, the initial value for the port number is "636".When the check box is cleared, the initial value for the port number is "389".
Search Base
Enter the search base.Up to 255 characters can be entered.
Example:cn=Users,dc=example,dc=com
Timeout Time
Select the time for the timeout time.
Authentication Type
Select an authentication type.
● NTLM
● Kerberos(V5)
● Kerberos/NTLM
Domain Name (Realm)
Enter a domain name (realm).Up to 255 characters can be entered.
HINT
[Domain Name (Realm)] is displayed when the authentication type is [Kerberos(V5)] or[Kerberos/NTLM].
[Connection Test] button
Displays the [Active Directory Connection Test] window to test whether the Active Directoryserver can be connected.For details about the [Active Directory Connection Test] window, refer to [Active DirectoryConnection Test] Window/[Active Directory connection] Window (page 104).
When the authentication mode is "Authentication server that requires a linkage via anAuthentication API"
If meta data can be obtained from an Authentication API, set the following items.
[Set a current user name for a job from metadata] check box
Select this check box to use meta data that is obtained from an Authentication API for the nameof a user running a job.When this check box is selected, you can select [Metadata Field Name].
Metadata Field Name
Select a meta data field name that you want to use.Up to 10 meta data field names obtained from an Authentication API are displayed.
Windows
103

[Save] button
Saves the settings.
ATTENTION
● If the authentication method is changed, all of the job groups are deleted. Create job groups again.
● After changing the authentication method, restart the scanner.
[Active Directory Connection Test] Window/[Active Directory connection]Window
Connect to the Active Directory server.
Username
Enter the user name to connect to the Active Directory server.Up to 256 characters can be entered.
Password
Enter the password to connect to the Active Directory server.Up to 127 characters can be entered.Alphanumeric characters and symbols can be used.
[Connect] button
Connects to the Active Directory server with the entered user name and password.
[Cancel] button
Cancels the operation.
Job
[Job list] WindowPerform operations such as creating a new job, cloning an existing job, and editing a job.
[Create a new job] button
Displays the [Create New Job] window in which you can create a new job.For details about the [Create New Job] window, refer to [Create New Job] Window/[Edit Job] Window (page105).Up to 1,000 jobs can be created.
Find
Enter a part of a character string or a whole character string to narrow down the displayed items.Up to 256 characters can be entered.
Windows
104

[Search] button
Displays the result of narrowing down the list.
Job name
Displays the names of the registered jobs.
Description
Displays the descriptions of the registered jobs.
Job Group
Displays the names of the job groups that are correlated to the registered jobs.When there is no correlated job group, no job group name is displayed.When multiple job groups are correlated to the job, each job group name is separated with a comma (,).Click the displayed job group name to display the [Browse job groups] window, and check the settings ofthe job group.For details about the [Browse job groups] window, refer to [Browse job groups] Window (page 138).
Job Manage
The following operations can be performed in the [Job Manage] column that appears when you place themouse pointer over the row of a job.
● EditDisplays the [Edit Job] window in which you can edit the job.For details about the [Edit Job] window, refer to [Create New Job] Window/[Edit Job] Window (page105).
● CloneDisplays the [Create New Job] window in which you can clone an existing job.For details about the [Create New Job] window, refer to [Create New Job] Window/[Edit Job] Window(page 105).
● DeleteDeletes a job.
[Create New Job] Window/[Edit Job] WindowCreate a new job, clone an existing job, and edit a job.
This job is added to the following job group
Displays the name of the job group correlating to the registered job.When no job group is correlated to the job, no job group name is displayed.When multiple job groups are correlated to the job, each job group name is separated with a comma (,).Click the displayed job group name to display the [Browse job groups] window, and check the settings ofthe job group.For details about the [Browse job groups] window, refer to [Browse job groups] Window (page 138).
Windows
105

HINT
[This job is added to the following job group] is displayed when you edit a job.
Job name
Enter a job name.Up to 48 characters can be entered.The following characters cannot be used:% \ / * : ? " < > | Control characters from 0x00 to 0x1f
ATTENTION
If a character that cannot be used on the touch screen of the scanner (such as platform-dependentcharacters) is entered, the job name may not be displayed correctly on the touch screen of the scanner.Make sure that the entered job name is displayed correctly on the touch screen of the scanner.
Description
Enter a job description.Up to 256 characters can be entered.
Job Button Color
Select a color for a job that you want to display on the touch screen of the scanner.
Common Settings
Click [Common Settings] to open or hide the items in the common settings.
Touch Screen Settings
[Continue scanning] check box
Select this check box to continue scanning after a scan.
[Display thumbnails] check box
Select this check box to display the thumbnail of the image on the touch screen of the scanner.When this check box is selected, you can select [Quality].
ATTENTION
Thumbnails of images that are yet to be processed are displayed.For example, even if you specify [Black & White] for the image mode, color images ofthumbnails will still be displayed since color images were transferred as they are from thescanner.
Windows
106

HINT
The [Display thumbnails] check box becomes unavailable when [Front/Back Merging] is set inthe profile for the PaperStream IP driver.
Quality
Select the quality of the thumbnails.
● Low
● Medium
● High
[Display the scan button] check box
Select this check box to display the scan button on the touch screen of the scanner.When this check box is selected, the [Show the message] check box becomes available.
[Show the message] check box
Select this check box to display the message on the touch screen of the scanner.When this is selected, enter a message in [Message].
Message
Enter a message that you want to display on the touch screen of the scanner.Up to 100 characters can be entered.
ATTENTION
● If a character that cannot be used on the touch screen of the scanner (such asplatform-dependent characters) is entered, the message may not be displayedcorrectly on the touch screen of the scanner.Make sure that the entered message is displayed correctly on the touch screen ofthe scanner.
● When a message is displayed on the touch screen of the scanner, spaces at thebeginning of a character string that has been brought down are removed.
[Input meta data from a scanner] check box
Select this check box to display an input field on the touch screen of the scanner for entering acharacter string that is output to the index file.When this check box is selected, specify [Field Name], and select or clear the [Input numericalcharacters only] check box and the [Show the message] check box.
Field Name
Enter a name of the input field displayed on the touch screen of the scanner for entering acharacter string that is output to the index file.Up to 32 characters can be entered.The following characters cannot be used:
Windows
107
< >
ATTENTION
● If a character that cannot be used on the touch screen of the scanner (such as platform-dependent characters) is entered, the field name may not be displayed correctly on thetouch screen of the scanner.Make sure that the entered field name is displayed correctly on the touch screen of thescanner.
● Depending on the character type for the entered field name, a part of the field namemay not be displayed on the touch screen of the scanner.Make sure that the entered field name is displayed correctly on the touch screen of thescanner.
HINT
A value entered in [Field Name] becomes a value for "item name" in the index file.For details about the specifications of the index file, refer to Specifications of the IndexFile (page 179).
[Input numerical characters only] check box
Select this check box to only allow numerical characters to be entered on the touch screenof the scanner.
[Show the message] check box
Select this check box to display the message on the touch screen of the scanner.When this is selected, enter a message in [Message].
Message
Enter a message that you want to display on the touch screen of the scanner.Up to 100 characters can be entered.
ATTENTION
● If a character that cannot be used on the touch screen of the scanner (such asplatform-dependent characters) is entered, the message may not be displayedcorrectly on the touch screen of the scanner.Make sure that the entered message is displayed correctly on the touch screen ofthe scanner.
● When a message is displayed on the touch screen of the scanner, spaces at thebeginning of a character string that has been brought down are removed.
[Log out immediately after the job is complete] check box
Select this check box to log out immediately after the job is complete.
Windows
108

HINT
When the authentication method is [Job group code], [Username/Password], [NFC], or[Username/Password or NFC], the [Log out immediately after the job is complete] check boxis available.
[Wait for file saving to complete] check box
Select this check box to display a status on the touch screen of the scanner that indicates thatthe scanner is waiting for the saving of files in the save destination to be complete.When this check box is selected, the [Display the completion of the saved file] check boxbecomes available.
[Display the completion of the saved file] check box
Select this check box to display a notification on the touch screen of the scanner thatindicates that the saving of files in the save destination is complete.
Scan Settings
Click [Scan Settings] to open or hide the items in the scan settings.
Profile Settings
Click [Profile Settings] to open or hide the items in the profile settings.
Scanner Driver Profile to Be Used
Select a PaperStream IP driver profile to be used.You can select a PaperStream IP driver profile to be imported in the window that appears whenyou click the [Import] button.The imported profile is displayed as one of the selection items for [Scanner Driver Profile to BeUsed].Among PaperStream IP driver profiles, you can only import a scanning profile (*.pav) that wasbacked up from the PaperStream IP driver.For details about the procedure to back up a scanning profile (*.pav) from the PaperStream IPdriver, refer to the Help for the PaperStream IP driver.
ATTENTION
Some of the functions that are set in a PaperStream IP driver profile do not operate with NXManager.For details about the operation specifications of a PaperStream IP driver profile, refer toOperation Specifications of a PaperStream IP Driver Profile (page 182).
HINT
● When NX Manager is installed, the preset profiles of the PaperStream IP driver areautomatically imported to NX Manager.For details about the preset profiles of the PaperStream IP driver, refer to the Help for thePaperStream IP driver.
Windows
109
● Among the preset profiles of the PaperStream IP driver that are automatically imported toNX Manager, the [PaperStream IP Default] profile corresponds to [Current Setting] of thepreset profile of the PaperStream IP driver.
● The preset profiles of the PaperStream IP driver that are automatically imported to NXManage cannot be deleted.
● Even if a scanner is not connected, a PaperStream IP driver profile can be created by usingPaperStream NX Manager Profile Creation Tool.To start PaperStream NX Manager Profile Creation Tool, run "NmPSIPProfile.exe" stored inthe following folder:
%ProgramFiles%\PaperStream IP\NmPSIPProfile folder
Example:
C:\Program Files\PaperStream IP\NmPSIPProfile folder
For details about how to use PaperStream NX Manager Profile Creation Tool, refer to theprocedure described in the [PaperStream NX Manager Profile Creation Tool] window that isdisplayed.
● The selection items for [Scanner Driver Profile to Be Used] show the items managed in the[Profile List] window that is displayed by clicking [Profile] in the left menu in the NXManager administrator window (on the web).However, the preset profiles of the PaperStream IP driver that are automatically imported toNX Manager are not displayed in the [Profile List] window.For details about the [Profile List] window, refer to [Profile List] Window (page 144).
You can change [Image Mode], [Resolution], [Paper Size], and [Sides] from among the itemsthat have been set in your profile for the PaperStream IP driver.
Image Mode
The image mode can be changed. Select a value that you want to set.When [Apply the profile settings] is selected, the current value is displayed on the right of thelist.If you do not change the value, select [Apply the profile settings].
ATTENTION
When the following profile is selected for [Scanner Driver Profile to Be Used], this item cannotbe changed.
● A profile with [Multi Image Output] set for [Image Mode]
Resolution
The resolution can be changed. Select a value that you want to set.When [Apply the profile settings] is selected, the current value is displayed on the right of thelist.If you do not change the value, select [Apply the profile settings].
Windows
110
ATTENTION
When the following profile is selected for [Scanner Driver Profile to Be Used], this item cannotbe changed.
● A profile with [Multi Image Output] set for [Image Mode]
Paper Size
The paper size can be changed. Select a value that you want to set.When [Apply the profile settings] is selected, the current value is displayed on the right of thelist.If you do not change the value, select [Apply the profile settings].When you select [Custom], specify the following:
Unit
Select a unit for the paper size.The maximum length and width values available for the selected unit are displayed on theright of the list.
Length
Enter a length for the paper size.
Width
Enter a width for the paper size.
Sides
The scanning side can be changed. Select a value that you want to set.When [Apply the profile settings] is selected, the current value is displayed on the right of thelist.If you do not change the value, select [Apply the profile settings].
ATTENTION
When a profile with [On] set for [Front/Back Merging] is selected for [Scanner Driver Profile toBe Used], this item cannot be changed.
Separation
Document Separator
Select whether to divide documents, and how documents should be divided if documents are tobe divided.Dividing documents refers to saving documents of multiple sheets in different folders/files asdivided with a blank page, a patch code, a barcode, or by a number of pages withoutinterrupting the scanning operation.
Windows
111
HINT
By using [Document Counter] for [File Name] in [File Properties], a file name for eachdocument that is divided can be changed.
● NoneDoes not divide documents.
● Blank PageDivides documents with a blank page.
[Remove separator] check box
Select this check box to remove images of blank page documents that are used asseparators.
[Separate a document when both sides are blank] check box
Select this check box to divide documents only when a document is blank on both sides.
● Number of imagesDivides documents by a number of pages.Enter a number of pages that documents should be divided by.Up to 4 characters can be entered.
● Patch CodeDivides documents by patch code.
Patch Code Type
Select the check box of the patch code type that is to be used as a separator.
[Remove separator] check box
Select this check box to remove images of documents that have patch codes printed onthem which are used as separators.
● BarcodeDivides documents by barcode.For details about specifications of barcodes, refer to "Specifications of Barcodes (page 185)".
Barcode Type
Select the check box of the barcode type that is to be used as a separator.
Detection Area
Select an area of a document where a barcode is detected (barcode detecting area).
- WholeSets the whole area of the document as the barcode detecting area.
- CustomSets the area which you specify as the barcode detecting area.
Windows
112

Unit
Select a unit for specifying the barcode detecting area.
● mm
● inch
Top
Specify a length from the top of a document to the barcode detecting area.You can specify a value between 0 and the length or width of the document(whichever is bigger).
Left
Specify a length from the left of a document to the barcode detecting area.You can specify a value between 0 and the length or width of the document(whichever is bigger).
Length
Specify the length of the barcode detecting area.You can specify a value between 0 and the length or width of the document(whichever is bigger).
Width
Specify the width of the barcode detecting area.You can specify a value between 0 and the length or width of the document(whichever is bigger).
ATTENTION
When specifying [Top], [Left], [Length], or [Width], pay attention of the following:
● When [mm] is specified for the unit, the specified value is rounded off to onedecimal place and then set.
● When [inch] is specified for the unit, the specified value is rounded off to threedecimal places and then set.
● "[Top] + [Length]" must be the length or width of the document (whichever isbigger) or less.
● "[Left] + [Width]" must be the length or width of the document (whichever isbigger) or less.
[Remove separator] check box
Select this check box to remove images of documents that have barcodes printed on themwhich are used as separators.
Save Destination Settings
Click [Save Destination Settings] to open or hide the items in the save destination settings.
Windows
113

Save Destination
Type
Select a save destination type to save images.
● Save to folder
● SharePoint
● SharePoint Online
● FTP/FTPS
● Save destination that is linked by using a Connector API
HINT
For "Save destination that is linked by using a Connector API", the displayed name is a nameobtained from the Connector API.
When [Save to folder], [SharePoint], [SharePoint Online], [FTP/FTPS], or "Save destination thatis linked by using a Connector API" is selected as the type
Specify the following:
[Overwrite if the same file name already exists] check box
Select this check box to overwrite the existing file with the file if the same file name alreadyexists.
ATTENTION
When the [Overwrite if the same file name already exists] check box is not selected, anerror occurs if the same file name already exists.
When [SharePoint] or [SharePoint Online] is selected as the type
Specify the following:
Site URL
Enter a site URL for SharePoint Server or SharePoint Online.Up to 256 characters can be entered.
Library
Enter a library for SharePoint Server or SharePoint Online.Up to 255 characters can be entered.Enter the display name that is displayed on SharePoint Server or SharePoint Online.Library names in an alphanumeric format included in a URL for SharePoint Server orSharePoint Online cannot be entered.
Windows
114
Username
Enter the user name to connect to SharePoint Server or SharePoint Online.Up to 256 characters can be entered.
Password
Enter the password to connect to SharePoint Server or SharePoint Online.Up to 256 characters can be entered.
[Enable proxy] check box
Select this check box to enable proxy settings.Configure the proxy server settings in [Network Settings] in the [Settings] window that isdisplayed by clicking [Preferences] in the left menu in the NX Manager administratorwindow (on the web).For details about the [Settings] window, refer to [Settings] Window (page 154).
When [FTP/FTPS] is selected as the type
Specify the following:
Server
Enter the server name of the FTP/FTPS server.Up to 255 characters can be entered.
Protocol
Select a protocol.
● FTP
● FTPS
Encryption
Select an encryption method.
● Explicit
● Implicit
HINT
[Encryption] can be selected when the protocol is [FTPS].
Port Number
Enter the port number of the FTP/FTPS server.Up to 5 characters can be entered.The default value of the port number is "21" when the protocol is [FTP].The default value of the port number is "21" when the protocol is [FTPS] and the encryptionmethod is [Explicit].The default value of the port number is "990" when the protocol is [FTPS] and the encryptionmethod is [Implicit].
Windows
115
[Use passive mode] check box
Select this check box to use the passive mode.
[Enable proxy] check box
Select this check box to enable proxy settings.Configure the proxy server settings in [Network Settings] in the [Settings] window that isdisplayed by clicking [Preferences] in the left menu in the NX Manager administratorwindow (on the web).For details about the [Settings] window, refer to [Settings] Window (page 154).
When [e-Mail] is selected as the type
Specify the following:
Recipient e-Mail Address
Enter a recipient e-mail address.Multiple recipient e-mail addresses can be entered by separating each e-mail address witha line break.Up to 255 characters can be entered for each e-mail address.
Sender e-Mail Address
Enter a sender e-mail address.Enter an e-mail address that exists on the SMTP server for the sender e-mail address.Up to 255 characters can be entered.
Subject
Enter an e-mail subject.Up to 128 characters can be entered.
Character Encoding
Select a character encoding in e-mails.
● Automatic
● Unicode(UTF-8)
HINT
When [Automatic] is selected for [Character Encoding], character encoding for themessage of an e-mail is automatically selected according to the system accountlanguage specified in the operating system.The following shows languages and corresponding character encodings.
Language Character Encoding
Arabic US-ASCII
Italian ISO-8859-1
Spanish ISO-8859-1
Windows
116

Language Character Encoding
German ISO-8859-1
Turkish ISO-8859-9
French ISO-8859-1
Portuguese ISO-8859-1
Russian KOI8-R
English US-ASCII
Korean KS_C_5601-1987
Chinese (Simplified) GB2312
Chinese (Traditional) Big5
Japanese ISO-2022-JP (JIS code)
Languages other than the ones listed above US-ASCII
When "Save destination that is linked by using a Connector API" is selected as the type
ATTENTION
● The user application for Connector API is invoked just once even if [Multi Image Output] isset in the profile for PaperStream IP driver.
● When [Multi Image Output] is set in the profile for PaperStream IP driver, recreate the userapplication for Connector API so that multiple index files can be obtained.
Specify the following:
Parameters
Enter a parameter to establish a linkage by using the Connector API.Up to 256 characters can be entered.When entering the following argument, the corresponding value is passed to anapplication.
● %dPasses the full path, including the folder name in which the images are saved, to theapplication.If this argument is not entered, the value that is automatically added to the end of the filename of the user application for Connector API is passed to the application.
● %iPasses a full path including a index file name, to the application.For details about the specifications of the index file, refer to Specifications of the IndexFile (page 179).
Windows
117

Examples of the specified parameters and the values that are passed to the application areshown below.In the examples below, "Application.exe" is used as the file name of the user application forConnector API. The actual file name is the file name of the user application for ConnectorAPI created by the user.
Example:When "%d" is specified for the parameterThe following value is passed to the application:
Application.exe <Folder name>
Example:When "%i" is specified for the parameterThe following value is passed to the application:
Application.exe <Folder name> <Index file name>
"%d" is automatically added to the end of the file name of the user application forConnector API.
Example:When "/s %i %d" is specified for the parameterThe following value is passed to the application:
Application.exe /s <Index file name> <Folder name>
You can specify more than one argument. You can specify any parameter createdby the user, other than "%i" and "%d".In the above example, "/s" is a parameter created by the user.Specify "/s" for the parameter to pass the desired character string to theapplication.
Example:When "%d %i" is specified for the parameter and [Multi Image Output] is set in theprofile for the PaperStream IP driverThe following value is passed to the application:
Application.exe <Folder name> <Index file name 1> <Index file name 2> <Indexfile name 3>
In this example, file names are specified in order of output multiple images suchas "Index file name 1" for the 1st, "Index file name 2" for the 2nd, and "Index filename 3" for the 3rd.
File Properties
HINT
When [Multi Image Output] is set in the profile for the PaperStream IP driver, [1st], [2nd], and[3rd] and their image types are displayed.
Windows
118

When [Save to folder], [SharePoint], [SharePoint Online], [FTP/FTPS], [e-Mail], or "Savedestination that is linked by using a Connector API" is selected as the type
Specify the following:
File Format
Select a file format of the image file.
● PDF File(*.pdf)
● SinglePage PDF File(*.pdf)
● Tagged Image File Format(*.tif)
● MultiPage Tagged Image File Format(*.tif)
● JPEG File(*.jpg)For details about the specifications of the image file, refer to Specifications of the Image File(page 184).
HINT
The selections differ depending on the image mode set in the profile for the PaperStreamIP driver.When the image mode is [Black & White] or [Automatic Color Detection], [JPEGFile(*.jpg)] does not appear.
File Name
Enter a name of the image file.The following characters cannot be used:.. % \ / * : ? " < > | Control characters from 0x00 to 0x1fHowever, when [Save to folder] or "Save destination that is linked by using a Connector API"is selected as the type, \ can be used.
ATTENTION
● If the selected item with the [Name Rule] button contains a character that cannot beused as a file name, it will be replaced with "=".
● When [SharePoint] or [SharePoint Online] is select as the type, if a file name containscharacters (such as a tilde (~) or sharp (#)) that cannot be used in SharePoint, savingthe images fails.Characters that cannot be used in SharePoint vary depending on the version of theSharePoint.For details, refer to the Microsoft website.
HINT
When [Save to folder] or "Save destination that is linked by using a Connector API" isselected as the type, \ can be used as a folder separator. If there is no folder, a folder iscreated.
Windows
119

\ cannot be used as a leading or trailing character.
[Name Rule] button
Select items to be used for the file name.A selected item is displayed in < > in the input field for [File Name].
● Batch IndexAdds the database-based ID of the batch used for scanning to the file name.
● Job nameAdds the job name used for scanning to the file name.
● Scanner NameAdds the scanner name used for scanning to the file name.
● UsernameAdds the user name used for scanning to the file name.When the authentication method is [None], [Job group code], or [Scanner], "USER" isadded to the file name.
● User Principal NameAdds the user principal name used for scanning to the file name.When the authentication method is [Username/Password] and the authentication modeis [Active Directory], the user principal name obtained from Active Directory is added tothe file name.Otherwise, it is not added to the file name.
● Job Group NameAdds the job group name used for scanning to the file name.
● Job group codeAdds the job group code used for scanning to the file name.When the authentication method is [Job group code], the job group code used for the jobgroup is added to the file name.Otherwise, it is not added to the file name.
● Batch IDAdds the batch ID used for scanning to the file name.
● Date
- MMddyyyyAdds the receiving date of the scanning finish notification to the file name in the dateformat "MMddyyyy".
- ddMMyyyyAdds the receiving date of the scanning finish notification to the file name in the dateformat "ddMMyyyy".
- yyyyMMddAdds the receiving date of the scanning finish notification to the file name in the dateformat "yyyyMMdd".
● Time
Windows
120

Adds the receiving time of the scanning finish notification to the file name.
● Document CounterAdds the document counter to the file name.When this is selected, specify [Minimum digits] in the [Counter Options] window that isdisplayed when the [Counter Options] button is clicked.For details about the [Counter Options] window, refer to [Counter Options] Window (page128).
● Page CounterAdds the page counter to the file name.When this is selected, specify [Minimum digits] in the [Counter Options] window that isdisplayed when the [Counter Options] button is clicked.For details about the [Counter Options] window, refer to [Counter Options] Window (page128).
● Document Separator ValueAdds the document separator value to the file name.When a barcode is used for separating documents, up to 128 characters for the barcode isadded to the file name.When a separator other than a barcode is used, a character string in the format of"SEPARATOR" + separator number (four digit number) is added to the file name.A separator number (four digits number) starts from "0001" and increments by one foreach separation.A separator number is between "SEPARATOR0001" and "SEPARATOR1000".
● Multi-image Output NumberAdds a multi-image output number to the file name.This becomes available when [Multi Image Output] is set in the profile for thePaperStream IP driver. The number "1" is added to the file name for the 1st, "2" for the2nd, and "3" for the 3rd.The fixed number "1" is added to the file name when [Multi Image Output] is not set inthe profile for the PaperStream IP driver.
● Meta DataStores additional information as meta data. This information can be output in an indexfile or used for a file name.
- A character string entered on the touch screen of the scannerStores a character string that is entered by an operator on the touch screen of thescanner for a field name that was set in the [Create New Job] window/[Edit Job]window.When you click the [Name Rule] button and select [Meta Data] → "A character stringentered on the touch screen of the scanner", the character string is displayed in thefollowing format in the input field for [File Name].<Field: [Field name set in the [Create New Job] window/[Edit Job] window]>
Example:If a field name set in the [Create New Job] window/[Edit Job] window is "FAXNumber"<Field: FAX Number>
Windows
121
When an image is saved, this field name (which was set in the [Create New Job]window/[Edit Job] window) is replaced with a character string (which is entered by anoperator on the touch screen of the scanner).If a field name set in the [Create New Job] window/[Edit Job] window is "FAX Number"and "1234567890" is entered for "FAX Number" on the touch screen of the scanner, thefile name becomes "1234567890".
HINT
For "A character string entered on the touch screen of the scanner", the displayedname is a field name set in the [Create New Job] window/[Edit Job] window.
- Information (properties) of the user authenticated via an Authentication APIStores a value for a meta data field name obtained from an Authentication API.A selected item is displayed in the following format in the input field for [File Name].<Field: [Meta data field name obtained from an Authentication API]>
Example:If a meta data field name obtained from an Authentication API is "Employeenumber"<Field: Employee number>
When an image is saved, the meta data field name is replaced with a value for a metadata field name obtained from an Authentication API.If a meta data field name obtained from an Authentication API is "Employee number"and the value is "123456", the file name becomes "123456".
HINT
● For "Information (properties) of the user authenticated via an Authentication API",the displayed name is a meta data field name obtained from an AuthenticationAPI.
● Even if a group name is returned as a user name that was authenticated from anAuthentication API and a group registered with an authentication server iscorrelated to a job group, you can use a user name for a file name by creating auser name in a meta data field.
HINT
[Meta Data] is displayed in the following cases:
● When the [Input meta data from a scanner] check box is selected
● When the authentication mode is "Authentication server that requires a linkage viaan Authentication API" and when one or more meta data field names can beobtained from an Authentication API
Windows
122

[Counter Options] button
Displays the [Counter Options] window to set [Minimum digits] for [Document Counter] or[Page Counter].For details about the [Counter Options] window, refer to [Counter Options] Window (page128).
When [Save to folder] is selected as the type
Specify the following:
Destination folder name
Enter the folder name for the destination.Up to 247 characters can be entered.
[Authentication required] check box
Select this check box when authentication is required in order to connect to thedestination folder.When this is selected, enter [Username] and [Password].
Username
Enter the user name to connect to the destination folder.Up to 256 characters can be entered.
Password
Enter the password to connect to the destination folder.Up to 256 characters can be entered.
[Apply the above to the authentication settings for all destination folders] check box
Select this check box to apply values specified in [Username] and [Password] for [1st]to [2nd] and [3rd].
HINT
The [Apply the above to the authentication settings for all destination folders] checkbox is displayed when [Multi Image Output] is set in the profile for the PaperStreamIP driver.
When [FTP/FTPS] is selected as the type
Specify the following:
Destination folder path
Enter the folder name for the destination.Up to 255 characters can be entered.
Username
Enter the user name to connect to the FTP/FTPS server.
Windows
123

Up to 256 characters can be entered.
Password
Enter the password to connect to the FTP/FTPS server.Up to 256 characters can be entered.
[Apply the above to the authentication settings for all destination folders] check box
Select this check box to apply values specified in [Username] and [Password] for [1st] to[2nd] and [3rd].
HINT
The [Apply the above to the authentication settings for all destination folders] check boxis displayed when [Multi Image Output] is set in the profile for the PaperStream IP driver.
Index File
[Output] check box
Select this check box to output an index file.For details about the specifications of the index file, refer to Specifications of the Index File(page 179).When this is selected, specify [File Name], and select or clear the [Overwrite if the same filename already exists] check box.
File Name
Enter a name of the index file.The following characters cannot be used:.. % \ / * : ? " < > | Control characters from 0x00 to 0x1fHowever, when [Save to folder] or "Save destination that is linked by using a Connector API"is selected as the type, \ can be used.
ATTENTION
If the selected item with the [Name Rule] button contains a character that cannot beused as a file name, it will be replaced with "=".
HINT
When [Save to folder] or "Save destination that is linked by using a Connector API" isselected as the type, \ can be used as a folder separator. If there is no folder, a folder iscreated.\ cannot be used as a leading or trailing character.
[Name Rule] button
Select items to be used for the file name.A selected item is displayed in < > in the input field for [File Name].
Windows
124

● Batch IndexAdds the database-based ID of the batch used for scanning to the file name.
● Job nameAdds the job name used for scanning to the file name.
● Scanner NameAdds the scanner name used for scanning to the file name.
● UsernameAdds the user name used for scanning to the file name.When the authentication method is [None], [Job group code], or [Scanner], "USER" isadded to the file name.
● User Principal NameAdds the user principal name used for scanning to the file name.When the authentication method is [Username/Password] and the authentication modeis [Active Directory], the user principal name obtained from Active Directory is added tothe file name.Otherwise, it is not added to the file name.
● Job Group NameAdds the job group name used for scanning to the file name.
● Job group codeAdds the job group code used for scanning to the file name.When the authentication method is [Job group code], the job group code used for the jobgroup is added to the file name.Otherwise, it is not added to the file name.
● Batch IDAdds the batch ID used for scanning to the file name.
● Date
- MMddyyyyAdds the receiving date of the scanning finish notification to the file name in the dateformat "MMddyyyy".
- ddMMyyyyAdds the receiving date of the scanning finish notification to the file name in the dateformat "ddMMyyyy".
- yyyyMMddAdds the receiving date of the scanning finish notification to the file name in the dateformat "yyyyMMdd".
● TimeAdds the receiving time of the scanning finish notification to the file name.
● Document Separator ValueAdds the document separator value to the file name.When a barcode is used for separating documents, up to 128 characters for the barcode isadded to the file name.
Windows
125

When a separator other than a barcode is used, a character string in the format of"SEPARATOR" + separator number (four digit number) is added to the file name.A separator number (four digits number) starts from "0001" and increments by one foreach separation.A separator number is between "SEPARATOR0001" and "SEPARATOR1000".
● Multi-image Output NumberAdds a multi-image output number to the file name.This becomes available when [Multi Image Output] is set in the profile for thePaperStream IP driver. The number "1" is added to the file name for the 1st, "2" for the2nd, and "3" for the 3rd.The fixed number "1" is added to the file name when [Multi Image Output] is not set inthe profile for the PaperStream IP driver.
● Meta DataStores additional information as meta data. This information can be output in an indexfile or used for a file name.
- A character string entered on the touch screen of the scannerStores a character string that is entered by an operator on the touch screen of thescanner for a field name that was set in the [Create New Job] window/[Edit Job]window.When you click the [Name Rule] button and select [Meta Data] → "A character stringentered on the touch screen of the scanner", the character string is displayed in thefollowing format in the input field for [File Name].<Field: [Field name set in the [Create New Job] window/[Edit Job] window]>
Example:If a field name set in the [Create New Job] window/[Edit Job] window is "FAXNumber"<Field: FAX Number>
When an image is saved, this field name (which was set in the [Create New Job]window/[Edit Job] window) is replaced with a character string (which is entered by anoperator on the touch screen of the scanner).If a field name set in the [Create New Job] window/[Edit Job] window is "FAX Number"and "1234567890" is entered for "FAX Number" on the touch screen of the scanner, thefile name becomes "1234567890".
HINT
For "A character string entered on the touch screen of the scanner", the displayedname is a field name set in the [Create New Job] window/[Edit Job] window.
- Information (properties) of the user authenticated via an Authentication APIStores a value for a meta data field name obtained from an Authentication API.A selected item is displayed in the following format in the input field for [File Name].<Field: [Meta data field name obtained from an Authentication API]>
Windows
126
Example:If a meta data field name obtained from an Authentication API is "Employeenumber"<Field: Employee number>
When an image is saved, the meta data field name is replaced with a value for a metadata field name obtained from an Authentication API.If a meta data field name obtained from an Authentication API is "Employee number"and the value is "123456", the file name becomes "123456".
HINT
● For "Information (properties) of the user authenticated via an Authentication API",the displayed name is a meta data field name obtained from an AuthenticationAPI.
● Even if a group name is returned as a user name that was authenticated from anAuthentication API and a group registered with an authentication server iscorrelated to a job group, you can use a user name for a file name by creating auser name in a meta data field.
HINT
[Meta Data] is displayed in the following cases:
● When the [Input meta data from a scanner] check box is selected
● When the authentication mode is "Authentication server that requires a linkage viaan Authentication API" and when one or more meta data field names can beobtained from an Authentication API
[Overwrite if the same file name already exists] check box
Select this check box to overwrite the existing file with the file if the same file name alreadyexists.
ATTENTION
When the [Overwrite if the same file name already exists] check box is not selected, theoperation is different for each type.When the type is [Save to folder], the new content is appended if the same file namealready exists.When the type is [SharePoint], [SharePoint Online], or [FTP/FTPS], saving the file fails ifthe same file name already exists.
HINT
The [Overwrite if the same file name already exists] check box is displayed when the typeis [Save to folder], [SharePoint], [SharePoint Online], or [FTP/FTPS].
Windows
127

[Save] button
Creates the job that you configured when you create a new job or clone an existing job.Saves the settings when you edit a job.
[Cancel] button
Cancels the operation.
[Counter Options] WindowSpecify the minimum digits for [Document Counter] or the minimum digits for [Page Counter] for a file name whichis used in the name of an image file.
Document Counter
Minimum digits
Select the minimum digits of the document counter.
● 1
● 2
● 3
● 4
When you set [Separation] so that documents do not get divided, the document counter is set to "1" andthe number of digits that you selected in [Minimum digits] is applied.
Example:When [Separation] is set so that documents do not get divided and [Minimum digits] is [4]0001
When you set [Separation] so that documents get divided, the document counter starts with "1" and thenumber of digits that you selected in [Minimum digits] is applied.
Example:When [Separation] is set so that documents get divided and [Minimum digits] is [4]0001, 0002, 0003, ...
Page Counter
Minimum digits
Select the minimum digits of the page counter.
● 1
● 2
● 3
● 4
The value starts with "1" in the number of digits selected in [Minimum digits] for each page.
Example:When [Minimum digits] is [4]0001, 0002, 0003, ...
Windows
128

[OK] button
Saves the settings.
[Cancel] button
Cancels the operation.
Job Group
[Job Group List] WindowPerform operations such as creating a new job group, cloning an existing job group, and editing a job group.
[Create a new job group] button
Displays the [New Job Group (1/2)] window or the [New Job Group (1/3)] window in which you can create anew job group.For details about the [New Job Group (1/2)] window or the [New Job Group (1/3)] window, refer to [NewJob Group (1/2)] Window/[New Job Group (1/3)] Window (page 130).Up to 100 job groups can be created.
Job Group Name
Displays the names of the registered job groups.
Description
Displays the descriptions of the registered job groups.
Job group code
Displays the job group code of the registered job group.
HINT
[Job group code] is displayed when the authentication method is [Job group code].
Manage
The following operations can be performed in the [Manage] column that appears when you place themouse pointer over the row of a job group.
● EditDisplays the [Edit Job Group] window in which you can edit the job group.For details about the [Edit Job Group] window, refer to [Clone Job Group] Window/[Edit Job Group]Window (page 135).
● CloneDisplays the [Clone Job Group] window in which you can clone an existing job group.For details about the [Clone Job Group] window, refer to [Clone Job Group] Window/[Edit Job Group]Window (page 135).
● Delete
Windows
129

Deletes a job group.
[New Job Group (1/2)] Window/[New Job Group (1/3)] WindowEnter a name, description, and a job group code for the job group.
Job Group
Enter a job group name.Up to 32 characters can be entered.
ATTENTION
If a character that cannot be used on the touch screen of the scanner (such as platform-dependentcharacters) is entered, the job group name may not be displayed correctly on the touch screen of thescanner.Make sure that the entered job group name is properly displayed on the touch screen of the scanner.
Description
Enter a job group description.Up to 256 characters can be entered.
Job group code
Enter a job group code for the job group.Up to 8 characters can be entered.Use characters that can be entered on the touch screen of the scanner.
HINT
[Job group code] is displayed when the authentication method is [Job group code].
[Cancel] button
Cancels the operation.
[Next] button
The [New Job Group (2/2)] window or the [New Job Group (2/3)] window appears.For details about the [New Job Group (2/2)] window or the [New Job Group (2/3)] window, refer to [NewJob Group (2/2)] Window/[New Job Group (2/3)] Window (page 130).
[New Job Group (2/2)] Window/[New Job Group (2/3)] WindowAdd a job to the job group.
Job Group
Displays the job group name which was entered in the [New Job Group (1/2)] window or the [New JobGroup (1/3)] window.
Windows
130

Description
Displays the description of the job group which was entered in the [New Job Group (1/2)] window or the[New Job Group (1/3)] window.
Job group code
Displays the job group code of the job group which was entered in the [New Job Group (1/2)] window.
HINT
[Job group code] is displayed when the authentication method is [Job group code].
Job list
Displays a list of jobs or levels to be added to the job group.
Add Job
Displays the window for adding a job to the job group.For details about the window for adding a job to a job group, refer to Window for Adding a Job to aJob Group (page 139).
New Job
Displays the [Create New Job] window in which you can create a new job to be added to the jobgroup.For details about the [Create New Job] window, refer to [Create New Job] Window/[Edit Job] Window(page 105).
New Level
Displays the [Edit Level] window in which you can create a level to be added to the job group.For details about the [Edit Level] window, refer to [Edit Level] Window (page 138).
Manage
The following operations can be performed in the [Manage] column that appears when you place themouse pointer over the row of a job or a level.
● (Move up)
Moves the job or level up.
● (Move down)
Moves the job or level down.
● (Delete from the list)
Deletes the job or level from the list.
Job name
Displays the names of jobs or levels to be added to the job group.
When the level name is displayed, and are displayed.
Windows
131

Click to open the level.
Click to close the level.
Description
Displays the descriptions of jobs or levels to be added to the job group.
Job Manage
● The following operations can be performed in the [Job Manage] column that appears when youplace the mouse pointer over the row of a job.
- EditDisplays the [Edit Job] window in which you can edit a job to be added to the job group.For details about the [Edit Job] window, refer to [Create New Job] Window/[Edit Job] Window(page 105).
- CloneDisplays the [Create New Job] window in which you can clone an existing job to be added to thejob group.For details about the [Create New Job] window, refer to [Create New Job] Window/[Edit Job]Window (page 105).
● The following operations can be performed in the [Job Manage] column that appears when youplace the mouse pointer over the row of a level.
- Add JobDisplays the window for adding a job to the job group.For details about the window for adding a job to a job group, refer to Window for Adding a Job toa Job Group (page 139).
- New JobDisplays the [Create New Job] window in which you can create a new job to be added to the jobgroup.For details about the [Create New Job] window, refer to [Create New Job] Window/[Edit Job]Window (page 105).
- New Level, Edit, CloneDisplays the [Edit Level] window in which you can create a new level, edit a level, and clone anexisting level to be added to the job group.For details about the [Edit Level] window, refer to [Edit Level] Window (page 138).
[Cancel] button
Cancels the operation.
[Back] button
The [New Job Group (1/2)] window or the [New Job Group (1/3)] window appears.For details about the [New Job Group (1/2)] window or the [New Job Group (1/3)] window, refer to [NewJob Group (1/2)] Window/[New Job Group (1/3)] Window (page 130).
Windows
132

[Complete] button
The job group is created.
HINT
The [Complete] button is displayed when the authentication method is either [None] or [Job groupcode].
[Next] button
The [New Job Group (3/3)] window appears.For details about the [New Job Group (3/3)] window, refer to [New Job Group (3/3)] Window (page 133).
HINT
The [Next] button is displayed when the authentication method is [Username/Password], [NFC],[Username/Password or NFC], or [Scanner].
[New Job Group (3/3)] WindowAdd a user or scanner to the job group.
HINT
The [New Job Group (3/3)] window is displayed when the authentication method is [Username/Password], [NFC],[Username/Password or NFC], or [Scanner].
Job Group
Displays the job group name which was entered in the [New Job Group (1/2)] window or the [New JobGroup (1/3)] window.
Description
Displays the description of the job group which was entered in the [New Job Group (1/2)] window or the[New Job Group (1/3)] window.
User List
Displays a list of users to be added to the job group.
HINT
[User List] is displayed when the authentication method is [Username/Password], [NFC], or [Username/Password or NFC].
Add
Displays the window for adding a user to the job group.For details about the window for adding a user to a job group, refer to Window for Adding a User to aJob Group (page 140).
Windows
133

HINT
When the authentication mode is [Active Directory], the [Active Directory connection] windowappears.For details about the [Active Directory connection] window, refer to [Active Directory ConnectionTest] Window/[Active Directory connection] Window (page 104).
Manage
To delete a user from the list, click (Delete from the list) in the [Manage] column that appears
when you place the mouse pointer over the row of the user.
Username
Displays the names of users to be added to the job group.
Scanner List
Displays a list of scanners to be added to the job group.
HINT
[Scanner List] is displayed when the authentication method is [Scanner].
Add
Displays the window for adding a scanner to the job group.For details about the window for adding a scanner to a job group, refer to Window for Adding aScanner to a Job Group (page 143).
Manage
To delete a scanner from the list, click (Delete from the list) in the [Manage] column that appears
when you place the mouse pointer over the row of the scanner.
Scanner Name
Displays the names of scanners to be added to the job group.
[Cancel] button
Cancels the operation.
[Back] button
The [New Job Group (2/2)] window or the [New Job Group (2/3)] window appears.For details about the [New Job Group (2/2)] window or the [New Job Group (2/3)] window, refer to [NewJob Group (2/2)] Window/[New Job Group (2/3)] Window (page 130).
[Complete] button
The job group is created.
Windows
134

[Clone Job Group] Window/[Edit Job Group] WindowClone an existing job group, and edit a job group.
Job Group
Enter a job group name.Up to 32 characters can be entered.
Description
Enter a job group description.Up to 256 characters can be entered.
Job group code
Enter a job group code for the job group.Up to 8 characters can be entered.Use characters that can be entered on the touch screen of the scanner.
HINT
[Job group code] is displayed when the authentication method is [Job group code].
Job list
Displays a list of jobs or levels to be added to the job group.Click [Job list] to open or hide the items in the job list.
Add Job
Displays the window for adding a job to the job group.For details about the window for adding a job to a job group, refer to Window for Adding a Job to aJob Group (page 139).
New Job
Displays the [Create New Job] window in which you can create a new job to be added to the jobgroup.For details about the [Create New Job] window, refer to [Create New Job] Window/[Edit Job] Window(page 105).
New Level
Displays the [Edit Level] window in which you can create a level to be added to the job group.For details about the [Edit Level] window, refer to [Edit Level] Window (page 138).
Manage
The following operations can be performed in the [Manage] column that appears when you place themouse pointer over the row of a job or a level.
● (Move up)
Moves the job or level up.
Windows
135

● (Move down)
Moves the job or level down.
● (Delete from the list)
Deletes the job or level from the list.
Job name
Displays the names of jobs or levels to be added to the job group.
When the level name is displayed, and are displayed.
Click to open the level.
Click to close the level.
Description
Displays the descriptions of jobs or levels to be added to the job group.
Job Manage
● The following operations can be performed in the [Job Manage] column that appears when youplace the mouse pointer over the row of a job.
- EditDisplays the [Edit Job] window in which you can edit a job to be added to the job group.For details about the [Edit Job] window, refer to [Create New Job] Window/[Edit Job] Window(page 105).
- CloneDisplays the [Create New Job] window in which you can clone an existing job to be added to thejob group.For details about the [Create New Job] window, refer to [Create New Job] Window/[Edit Job]Window (page 105).
● The following operations can be performed in the [Job Manage] column that appears when youplace the mouse pointer over the row of a level.
- Add JobDisplays the window for adding a job to the job group.For details about the window for adding a job to a job group, refer to Window for Adding a Job toa Job Group (page 139).
- New JobDisplays the [Create New Job] window in which you can create a new job to be added to the jobgroup.For details about the [Create New Job] window, refer to [Create New Job] Window/[Edit Job]Window (page 105).
- New Level, Edit, CloneDisplays the [Edit Level] window in which you can create a new level, edit a level, and clone anexisting level to be added to the job group.For details about the [Edit Level] window, refer to [Edit Level] Window (page 138).
Windows
136

User List
Displays a list of users to be added to the job group.Click [User List] to open or hide the items in the user list.
HINT
[User List] is displayed when the authentication method is [Username/Password], [NFC], or [Username/Password or NFC].
Add
Displays the window for adding a user to the job group.For details about the window for adding a user to a job group, refer to Window for Adding a User to aJob Group (page 140).
HINT
When the authentication mode is [Active Directory], the [Active Directory connection] windowappears.For details about the [Active Directory connection] window, refer to [Active Directory ConnectionTest] Window/[Active Directory connection] Window (page 104).
Manage
To delete a user from the list, click (Delete from the list) in the [Manage] column that appears
when you place the mouse pointer over the row of the user.
Username
Displays the names of users to be added to the job group.
Scanner List
Displays a list of scanners to be added to the job group.Click [Scanner List] to open or hide the items in the scanner list.
HINT
[Scanner List] is displayed when the authentication method is [Scanner].
Add
Displays the window for adding a scanner to the job group.For details about the window for adding a scanner to a job group, refer to Window for Adding aScanner to a Job Group (page 143).
Manage
To delete a scanner from the list, click (Delete from the list) in the [Manage] column that appears
when you place the mouse pointer over the row of the scanner.
Windows
137

Scanner Name
Displays the names of scanners to be added to the job group.
[Cancel] button
Cancels the operation.
[Complete] button
Creates the job group when a job group is cloned.Saves the settings when a job group is edited.
[Edit Level] WindowCreate a new level, edit a level, and clone an existing level.
Level Name
Enter a level name.Up to 48 characters can be entered.
Level Description
Enter a level description.Up to 256 characters can be entered.
Level Button Color
Select a color for a level that you want to display on the touch screen of the scanner.
[OK] button
Creates the level when a level is created or cloned.Saves the settings when a level is edited.
[Cancel] button
Cancels the operation.
[Browse job groups] WindowCheck the settings of a job group.
Job Group Name
Displays the name of the registered job group.
Description
Displays the description of the registered job group.
Job group code
Displays the job group code of the registered job group.
Windows
138

HINT
[Job group code] is displayed when the authentication method is [Job group code].
Job list
Displays a list of jobs or levels added to the job group.
Job name
Displays the names of jobs or levels added to the job group.
Description
Displays the descriptions of jobs or levels added to the job group.
User List
Displays a list of users added to the job group.
HINT
[User List] is displayed when the authentication method is [Username/Password], [NFC], or [Username/Password or NFC].
Username
Displays the names of users added to the job group.
Scanner List
Displays a list of scanners added to the job group.
HINT
[Scanner List] is displayed when the authentication method is [Scanner].
Scanner Name
Displays the names of scanners added to the job group.
[OK] button
Closes the window.
Window for Adding a Job to a Job GroupAdd a job to a job group.
Job Group
Displays the name of the job group to which a job is to be added.
Filtering characters
Enter a part of a character string or a whole character string to narrow down the displayed items.
Windows
139

Up to 256 characters can be entered.
[Search] button
Displays the result of narrowing down the list.
Job name
Displays the names of the registered jobs.Selecting the check box to the left of [Job name] changes the check boxes for all jobs selected.Clearing the check box to the left of [Job name] changes the check boxes for all jobs cleared.The jobs with their check boxes on the left selected are added to the job group.
Description
Displays the descriptions of the registered jobs.
Job Group Name
Displays the name of the job group correlating to the registered job.When no job group is correlated to the job, no job group name is displayed.When multiple job groups are correlated to the job, each job group name is separated with a comma (,).
[OK] button
Adds the job to the job group.
[Cancel] button
Cancels the operation.
Window for Adding a User to a Job GroupAdd a user to a job group.
Job Group
Displays the name of the job group to which a user is to be added.
Search Base
Enter the search base.Up to 255 characters can be entered.
Example:cn=Users,dc=example,dc=com
HINT
[Search Base] is displayed when the authentication mode is [Active Directory].
Find
Enter a part of a character string or a whole character string to narrow down the displayed items.Up to 256 characters can be entered.
Windows
140

[Search] button
Displays the result of narrowing down the list.
[Username] check box
Select this check box to filter the list by user names.
HINT
The [Username] check box is displayed when the authentication mode is [Active Directory].
[Group Name] check box
Select this check box to filter the list by group names.
HINT
The [Group Name] check box is displayed when the authentication mode is [Active Directory].
[User Principal Name] check box
Select this check box to filter the list by user principal names.
HINT
The [User Principal Name] check box is displayed when the authentication mode is [Active Directory]and the [Username] check box is selected.
[Last Name] check box
Select this check box to filter the list by last names.
HINT
The [Last Name] check box is displayed when the authentication mode is [Active Directory] and the[Username] check box is selected.
[First Name] check box
Select this check box to filter the list by first names.
HINT
The [First Name] check box is displayed when the authentication mode is [Active Directory] and the[Username] check box is selected.
[Common Name] check box
Select this check box to filter the list by common names.
Windows
141

HINT
The [Common Name] check box is displayed when the authentication mode is [Active Directory] andthe [Username] check box is selected.
[Display Name] check box
Select this check box to filter the list by display names.
HINT
The [Display Name] check box is displayed when the authentication mode is [Active Directory] and the[Username] check box is selected.
Identifier Name
Displays the user names or group names registered on the authentication server.A user principal name is displayed for a user name and a common name is displayed for a group name.Selecting the check box to the left of [Identifier Name] changes the check boxes for all identifiers selected.Clearing the check box to the left of [Identifier Name] changes the check boxes for all identifiers cleared.The users with the check boxes to the left of identifiers selected are added to the job group.
HINT
● [Identifier Name] is displayed when the authentication mode is [Active Directory].
● User accounts with no user principal names specified are not displayed.
Type
Displays the types of accounts registered on the authentication server.
HINT
[Type] is displayed when the authentication mode is [Active Directory].
Username
Displays the names of the users registered on the authentication server.Selecting the check box to the left of [Username] changes the check boxes for all users selected.Clearing the check box to the left of [Username] changes the check boxes for all users cleared.The users with their check boxes on the left selected are added to the job group.
HINT
[Username] is displayed when the authentication mode is "Authentication server that requires alinkage via an Authentication API".
Job Group Name
Displays the name of the job group correlating to the user registered on the authentication server.
Windows
142

When there is no correlated job group, no job group name is displayed.Each user can correlate with one job group.
[OK] button
Adds the user to the job group.
[Cancel] button
Cancels the operation.
Window for Adding a Scanner to a Job GroupAdd a scanner to a job group.
Job Group
Displays the name of the job group to which a scanner is to be added.
Filtering characters
Enter a part of a character string or a whole character string to narrow down the displayed items.Up to 256 characters can be entered.
[Search] button
Displays the result of narrowing down the list.
Scanner Name
Displays the names of the scanners registered in NX Manager.Selecting the check box to the left of [Scanner Name] changes the check boxes for all scanners selected.Clearing the check box to the left of [Scanner Name] changes the check boxes for all scanners cleared.The scanners with their check boxes on the left selected are added to the job group.
Job Group Name
Displays the name of the job group correlating to the registered scanner in NX Manager.When there is no correlated job group, no job group name is displayed.Each scanner can correlate with one job group.
[OK] button
Add a scanner to a job group.
[Cancel] button
Cancels the operation.
[User List] WindowCheck and find a user.
Find
Enter a part of a character string or a whole character string to narrow down the displayed items.
Windows
143

Up to 256 characters can be entered.
[Search] button
Displays the result of narrowing down the list.
Identifier Name
Displays the user names or group names registered on the authentication server.A user principal name is displayed for a user name and a common name is displayed for a group name.
HINT
● [Identifier Name] is displayed when the authentication mode is [Active Directory].
● User accounts with no user principal names specified are not displayed.
Type
Displays the types of accounts registered on the authentication server.
HINT
[Type] is displayed when the authentication mode is [Active Directory].
Username
Displays the names of the users registered on the authentication server.
HINT
[Username] is displayed when the authentication mode is "Authentication server that requires alinkage via an Authentication API".
Job Group
Displays the name of the job group correlating to the user registered on the authentication server.When there is no correlated job group, no job group name is displayed.Each user can correlate with one job group.Click the displayed job group name to display the [Browse job groups] window, and check the settings ofthe job group.For details about the [Browse job groups] window, refer to [Browse job groups] Window (page 138).
[Profile List] WindowPerform operations such as checking, importing, or deleting a PaperStream IP driver profile.
[Import a profile] button
Imports a PaperStream IP driver profile.Among PaperStream IP driver profiles, you can only import a scanning profile (*.pav) that was backed upfrom the PaperStream IP driver.
Windows
144

For details about the procedure to back up a scanning profile (*.pav) from the PaperStream IP driver, referto the Help for the PaperStream IP driver.
ATTENTION
Some of the functions that are set in a PaperStream IP driver profile do not operate with NX Manager.For details about the operation specifications of a PaperStream IP driver profile, refer to OperationSpecifications of a PaperStream IP Driver Profile (page 182).
HINT
Even if a scanner is not connected, a PaperStream IP driver profile can be created by using PaperStreamNX Manager Profile Creation Tool.To start PaperStream NX Manager Profile Creation Tool, run "NmPSIPProfile.exe" stored in the followingfolder:
%ProgramFiles%\PaperStream IP\NmPSIPProfile folder
Example:
C:\Program Files\PaperStream IP\NmPSIPProfile folder
For details about how to use PaperStream NX Manager Profile Creation Tool, refer to the proceduredescribed in the [PaperStream NX Manager Profile Creation Tool] window that is displayed.
Find
Enter a part of a character string or a whole character string to narrow down the displayed items.Up to 256 characters can be entered.
[Search] button
Displays the result of narrowing down the list.
ID
Displays the ID.
Profile Name
Displays the name of the imported PaperStream IP scanner driver profile.
Profile Manage
Delete a PaperStream IP driver profile by clicking [Delete] in the [Profile Manage] column that appearswhen you place the mouse pointer over the row of the PaperStream IP driver profile.
[Status] WindowCheck the statuses.
Windows
145

Last update time
Displays the last date and time when the [Status] window was updated.
Updating every X second(s)
Displays that the statuses are updated every X second(s).The value applied to X is the value selected in [Window Refresh Interval] in [Window Settings] in the[Settings] window that is displayed by clicking [Preferences] in the left menu in the NX Manageradministrator window (on the web).For details about the [Settings] window, refer to [Settings] Window (page 154).
[Update Now] button
Updates the [Status] window.
Batch Log
Displays the number of the following batches.
● The number of batches with the [Error] statusDisplays the number of batches with the [Error] status.Click the number to display the [Batch Log List] window.For details about the [Batch Log List] window, refer to [Batch Log List] Window (page 147).The following shows the descriptions of the displayed icons.
Icon Description
Displayed when there are no batches with the [Error] status.
Displayed when there are batches with the [Error] status.
● The number of remaining batchesDisplays the number of remaining batches.A remaining batch refers to a batch that is waiting to be processed on NX Manager.Click the number to display the [Batch Log List] window.For details about the [Batch Log List] window, refer to [Batch Log List] Window (page 147).The following shows the descriptions of the displayed icons.
Icon Description
Displayed when there are 0 to 30 batches waiting to be processedon NX Manager.
Windows
146
Icon Description
Displayed when there are 31 batches or more waiting to beprocessed on NX Manager.
Event Log
Displays the number of event logs with [Error] for the event type.Click the number to display the [Event Log List] window.For details about the [Event Log List] window, refer to [Event Log List] Window (page 152).The following shows the descriptions of the displayed icons.
Icon Description
Displayed when there are no event logs with [Error] as the event type.
Displayed when there are event logs with [Error] as the event type.
Batch Log
[Batch Log List] WindowCheck the batch logs (scanning status).
Status showing how many batches are remaining
Displays the icon in accordance with the number of remaining batches.A remaining batch refers to a batch that is waiting to be processed on NX Manager.The following shows the descriptions of the displayed icons.
Icon Description
Displayed when there are 0 to 30 batches waiting to be processed on NX Manager.
Displayed when there are 31 batches or more waiting to be processed on NX Manager.
The number of batches that remain
Displays the number of remaining batches.
Windows
147

Last update time
Displays the last update date and time of the [Status] window that is displayed by clicking [Status] in theleft menu in the NX Manager administrator window (on the web).
[Export] button
Exports batch logs to a file.
[Mark all errors as "Checked"] button
Changes all batches with the [Error] status to [Error (Checked)] status.
Date/Time
Enter the period that is used to select batch logs to be displayed.
Start date of the period
Enter the start date of the period that is used to select batch logs to be displayed.Up to 100 characters can be entered.
Start time for the period
Enter the start time of the period that is used to select batch logs to be displayed.Up to 100 characters can be entered.
End date of the period
Enter the end date of the period that is used to select batch logs to be displayed.Up to 100 characters can be entered.
End time of the period
Enter the end time of the period that is used to select batch logs to be displayed.Up to 100 characters can be entered.
Status
Select the status of the batch to be displayed.
Find
Enter a part of a character string or a whole character string to narrow down the displayed items.Up to 1,024 characters can be entered.Only [Scanner Name], [Username], [Job name], and [Description] are available for narrowing down thedisplayed items.
[Search] button
Displays the result of narrowing down the list.
Start Date/Time
Displays the date and time when the scan was started.Click the displayed start date/time to display the [Batch Log Details] window, and check the details of thebatch log.
Windows
148

For details about the [Batch Log Details] window, refer to [Batch Log Details] Window (page 150).
HINT
When the status of a batch is [Error], checking the details of the batch log in the [Batch Log Details]window and then closing the window changes the status to [Error (Checked)].
Scanner Name
Displays the name of the scanner which performed the scan.
Username
Displays the user name who performed the scan.
HINT
[Username] is displayed when the authentication method is [Username/Password], [NFC], or[Username/Password or NFC].
Job name
Displays the job name of the scan.
Status
Displays one of the following as the status of the batch.
● ErrorFailed to process or save the image transferred from the scanner.
● AcceptingAccepting the image being transferred from the scanner.
● Waiting to process imagesWaiting to process the image that has been transferred from the scanner.
● Processing imagesProcessing the image transferred from the scanner.
● Performing a QCConfiguring the scan settings in Web Scan.
● Waiting to edit imagesWaiting to edit the image created from a document that is scanned with Web Scan.
● Editing imagesEditing the image created from a document that is scanned with Web Scan.
● Waiting to save a fileThe image transferred from the scanner has been processed and is waiting for file saving.
● Files are being savedThe image transferred from the scanner and the index file are being saved to the save destination.
● Completed
Windows
149

The image transferred from the scanner and the index file have been saved and batch processing iscompleted.
● CancelScanning has been stopped/canceled.
● Error (Checked)Checked the batch with the [Error] status in the [Batch Log Details] window.
HINT
The icon is displayed when the status of a batch is [Error].
Description
Displays the description of the batch.
Batch Manage
When [Retry] is displayed, take appropriate actions according to Messages in Batch Logs Displayed in theNX Manager Administrator Window (on the Web) (page 160) and then click [Retry] to retry the batch.
HINT
[Retry] is displayed when the status of a batch is [Error].
[Batch Log Details] WindowCheck details of the batch log.
Start Date/Time
Displays the date and time when the scan was started.
Last Modified
Displays the date and time when the batch was modified most recently.
Serial Number
Displays the serial number of the scanner which performed the scan.
Scanner Name
Displays the name of the scanner which performed the scan.
IP Address
Displays the IP address of the scanner which performed the scan.
Username
Displays the user name who performed the scan.
Windows
150
Job name
Displays the job name of the scan.
Retry
Displays whether the batch can be retried.
Batch ID
Displays the batch ID.
Status
Displays one of the following as the status of the batch.
● ErrorFailed to process or save the image transferred from the scanner.
● AcceptingAccepting the image being transferred from the scanner.
● Waiting to process imagesWaiting to process the image that has been transferred from the scanner.
● Processing imagesProcessing the image transferred from the scanner.
● Performing a QCConfiguring the scan settings in Web Scan.
● Waiting to edit imagesWaiting to edit the image created from a document that is scanned with Web Scan.
● Editing imagesEditing the image created from a document that is scanned with Web Scan.
● Waiting to save a fileThe image transferred from the scanner has been processed and is waiting for file saving.
● Files are being savedThe image transferred from the scanner and the index file are being saved to the save destination.
● CompletedThe image transferred from the scanner and the index file have been saved and batch processing iscompleted.
● CancelScanning has been stopped/canceled.
● Error (Checked)Checked the batch with the [Error] status in the [Batch Log Details] window.
Description
Displays the description of the batch.
[OK] button
Closes the window.
Windows
151

Event Log
[Event Log List] WindowCheck event logs.
[Export] button
Outputs event logs to a file.
[Clear] button
Clears event logs.
[Mark all errors as "Checked"] button
All of the [Error] event logs become the [Error (Checked)] event logs.
Filter the list by type
Select each check box for event types that you want to filter logs by.
[Information] check box
Select this check box to filter by [Information] for the event type.
[Warning] check box
Select this check box to filter by [Warning] for the event type.
[Error] check box
Select this check box to filter by [Error] for the event type.
[Error (Checked)] check box
Select this check box to filter by [Error (Checked)] for the event type.
Find
Enter a part of a character string or a whole character string to narrow down the displayed items.Up to 1,024 characters can be entered.Only [Message] is available for narrowing down the displayed items.
[Search] button
Displays the result of narrowing down the list.
Event Date/Time
Displays the date/time when the event occurred.Click the displayed event date/time to display the [Event Log Details] window, and check the details of theevent log.For details about the [Event Log Details] window, refer to [Event Log Details] Window (page 153).
Windows
152

Event Type
Displays the following event types.
● Information
● Warning
● Error
● Error (Checked)
Message
Displays the message of the event log.For details about the message of the event log, refer to Messages in Event Logs Displayed in the NXManager Administrator Window (on the Web) (page 163).
[Event Log Details] WindowCheck details of an event log.
Event Date/Time
Displays the date/time when the event occurred.
Source of the Event
Displays the source of the event.
IP Address
Displays the IP address of the scanner which performed the scan.
Scanner Model
Displays the name of the scanner model which performed the scan.
Serial Number
Displays the serial number of the scanner which performed the scan.
Username
Displays the user name who performed the scan.
Job name
Displays the job name of the scan.
Event Type
Displays the following event types.
● Information
● Warning
● Error
● Error (Checked)
Windows
153

[Error Details] button
Check details of the error.
HINT
The [Error Details] button is displayed when the event type is [Error].
Event Code
Displays the event code of the event log.
Message
Displays the message of the event log.For details about the message of the event log, refer to Messages in Event Logs Displayed in the NXManager Administrator Window (on the Web) (page 163).
[OK] button
Closes the window.
[Settings] WindowConfigure settings in NX Manager.
Window Settings
Window Refresh Interval
Select an interval to update the [Status] window that is displayed by clicking [Status] in the left menuin the NX Manager administrator window (on the web).
SMTP Settings
Set SMTP for sending e-mails in the following cases:
● When sending an error notification by e-mail
● When sending batch status by e-mail
● When selecting [e-Mail] for [Save Destination] in the job settings
SMTP Server
Enter the server name of the SMTP server.Up to 255 characters can be entered.
SMTP Server Port Number
Enter the port number of the SMTP server.An integer between 1 to 65535 can be entered.
Windows
154
SSL
Select whether or not to use SSL for the communication with the SMTP server and select the SSLmethod.
● Off
● SSL on
● STARTTLS on
[Authentication required] check box
Select this check box when connecting to the SMTP server requires an authentication.When this is selected, enter [Username] and [Password].
Username
Enter the user name to connect to the SMTP server.Up to 256 characters can be entered.Alphanumeric characters and symbols can be used.
Password
Enter the password to connect to the SMTP server.Up to 256 characters can be entered.
e-Mail Saving Settings
Set this when selecting [e-Mail] for [Save Destination] in the job settings.
Attached File Size
Enter the total size of the image files that can be sent by e-mail.An integer from 1 to 2147483647 can be entered.One integer is equivalent to one MB.
Error Notification Settings
[Send error notifications] check box
Select this check box to send e-mail when an error occurs in the [Event Log List] window that isdisplayed by clicking [Event Log] in the left menu in the NX Manager administrator window (on theweb).For detailed information regarding e-mails, refer to "Specifications of an Error Notification e-Mail(page 187)".
Recipient e-Mail Address
Enter a recipient e-mail address.Multiple recipient e-mail addresses can be entered by separating each e-mail address with a linebreak.Up to 255 characters can be entered for each e-mail address.
Sender e-Mail Address
Enter a sender e-mail address.
Windows
155
Enter an e-mail address that exists on the SMTP server for the sender e-mail address.Up to 255 characters can be entered.
Subject
Enter an e-mail subject.Up to 128 characters can be entered.
Character Encoding
Select a character encoding in e-mails.
● Automatic
● Unicode(UTF-8)
HINT
When [Automatic] is selected for [Character Encoding], character encoding for the message ofan e-mail is automatically selected according to the system account language specified in theoperating system.Note that when performing an e-mailing test, character encoding for the message of an e-mail is automatically selected according to the language specified in the browser.The following shows languages and corresponding character encodings.
Language Character Encoding
Arabic US-ASCII
Italian ISO-8859-1
Spanish ISO-8859-1
German ISO-8859-1
Turkish ISO-8859-9
French ISO-8859-1
Portuguese ISO-8859-1
Russian KOI8-R
English US-ASCII
Korean KS_C_5601-1987
Chinese (Simplified) GB2312
Chinese (Traditional) Big5
Japanese ISO-2022-JP (JIS code)
Languages other than the ones listed above US-ASCII
Windows
156

[Test] button
Tests if an e-mail can be sent.
Batch Log Notification Settings
[Send a batch log notification e-Mail] check box
Select this check box to send batch status by e-mail.For detailed information regarding e-mails, refer to "Specifications of a Batch Log Notification e-Mail(page 188)".
[Notify for "Error" batch logs only] check box
Select this check box to send a notification by e-mail when the batch status is displayed as[Error] or [Error (Checked)] in the [Batch Log List] window that is displayed by clicking [BatchLog] in the left menu in the NX Manager administrator window (on the web).When this check box is cleared, a notification is sent by e-mail when the batch status isdisplayed as [Error], [Completed], or [Error (Checked)] in the [Batch Log List] window that isdisplayed by clicking [Batch Log] in the left menu in the NX Manager administrator window (onthe web).
Recipient e-Mail Address
Enter a recipient e-mail address.Multiple recipient e-mail addresses can be entered by separating each e-mail address with a linebreak.Up to 255 characters can be entered for each e-mail address.
Sender e-Mail Address
Enter a sender e-mail address.Enter an e-mail address that exists on the SMTP server for the sender e-mail address.Up to 255 characters can be entered.
Subject
Enter an e-mail subject.Up to 128 characters can be entered.
Character Encoding
Select a character encoding in e-mails.
● Automatic
● Unicode(UTF-8)
HINT
When [Automatic] is selected for [Character Encoding], character encoding for the message ofan e-mail is automatically selected according to the system account language specified in theoperating system.
Windows
157

Note that when performing an e-mailing test, character encoding for the message of an e-mail is automatically selected according to the language specified in the browser.The following shows languages and corresponding character encodings.
Language Character Encoding
Arabic US-ASCII
Italian ISO-8859-1
Spanish ISO-8859-1
German ISO-8859-1
Turkish ISO-8859-9
French ISO-8859-1
Portuguese ISO-8859-1
Russian KOI8-R
English US-ASCII
Korean KS_C_5601-1987
Chinese (Simplified) GB2312
Chinese (Traditional) Big5
Japanese ISO-2022-JP (JIS code)
Languages other than the ones listed above US-ASCII
[Test] button
Tests if an e-mail can be sent.
Network Settings
[Use proxy server] check box
Select this check box when you select [SharePoint], [SharePoint Online], or [FTP/FTPS] for [SaveDestination] in the job settings and when these save destinations are necessary to be accessed via aproxy server.
Proxy Server
Enter the server name of the proxy server.Up to 255 characters can be entered.
Proxy Server Port Number
Enter the port number of the proxy server.An integer between 1 to 65535 can be entered.
Windows
158
Exceptions
Enter addresses that are exceptions which do not use the proxy server.Multiple addresses can be entered by separating each address with a semi-colon (;).Up to 255 characters can be entered for each address. Up to 2,064 characters in total can beentered.Alphanumeric characters and symbols (- , _ , * , / , :) can be used.
[Authentication required] check box
Select this check box when connecting to the proxy server requires an authentication.When this is selected, enter [Username] and [Password].
Username
Enter the user name to connect to the proxy server.Up to 256 characters can be entered.Alphanumeric characters and symbols can be used.
Password
Enter the password to connect to the proxy server.Up to 256 characters can be entered.
[Save] button
Saves the settings.
[Information] WindowCheck the version information.Displays the following.
● Version of NX Manager
● Version of Connector API
● Version of Authentication API
● Copyright
Windows
159

Appendix
The appendix provides additional information.
Message ListThis section shows lists of messages that appear while NX Manager is in use.
Messages in Batch Logs Displayed in the NX Manager Administrator Window (onthe Web)
Messages are displayed in [Description] in the [Batch Log List] window that is displayed by clicking [Batch Log] inthe left menu in the NX Manager administrator window (on the web).
Message Solution
Failed to authenticate the specified folder.Detail code: <Details> Folder path:<FolderPath>
Review the authentication settings and click [Retry] in the [BatchManage] column in the [Batch Log List] window.
Failed to connect to the specified folder. Thecomputer may not be connected to thenetwork.
Check the network connection and then click [Retry] in the [BatchManage] column in the [Batch Log List] window.
Image processing failed. Detail code: <Servererror code> (<Image processing error code>)
● <Server error code>
- 3, 4, 5, 6, 7, 10, 11, 12, 13, 14, 15, 16, 17, 18Check <Image processing error code> and take appropriateactions.
- 2, 9Click [Retry] in the [Batch Manage] column in the [Batch LogList] window.
If the problem persists, contact the distributor/dealer where youpurchased this product. Refer to the contact information in theContact List if supplied with this product, or refer to the contactinformation in the Contact for Inquiries section if provided inSafety Precautions supplied with this product, and then make aninquiry.
● <Image processing error code>
- 101Not enough memory available to complete this operation. Click[Retry] in the [Batch Manage] column in the [Batch Log List]window.
- 102Failed to write to the disk. Check the disk space and click [Retry]in the [Batch Manage] column in the [Batch Log List] window.
Failed to edit the images. Detail code:<Server error code> (<Image processing errorcode>)
160
Message Solution
- 103Click [Retry] in the [Batch Manage] column in the [Batch LogList] window.
- 111Check that PaperStream IP (TWAIN x64) is installed.
If the problem persists, contact the distributor/dealer where youpurchased this product. Refer to the contact information in theContact List if supplied with this product, or refer to the contactinformation in the Contact for Inquiries section if provided inSafety Precautions supplied with this product, and then make aninquiry.
Failed to save the image. Review the job settings and click [Retry] in the [Batch Manage]column in the [Batch Log List] window.Failed to save to SharePoint.
Failed to save to SharePoint Online.
Failed to save the image to the folderspecified by the connector API.
Failed to connect to the FTP/FTPS server.
Failed to save to the FTP/FTPS server.
Failed to save the image. Details: <Details> Review the job settings by referring to the details, and click [Retry]in the [Batch Manage] column in the [Batch Log List] window.
Failed to save the image. Details: The accesspermission has not been set for the specifieduser.
Review the image save destination settings and the job settingsand click [Retry] in the [Batch Manage] column in the [Batch LogList] window.
Failed to add information to the index file.File name: <FileName> Details: <Details>
Review the index file in the save destination by referring to thedetails, and click [Retry] in the [Batch Manage] column in the[Batch Log List] window.
Failed to save the index file. Details:<Details>
Review the job settings by referring to the details, and click [Retry]in the [Batch Manage] column in the [Batch Log List] window.
Failed to save to SharePoint. Details:<Details>
Failed to save to SharePoint. Details: Theaccess permission has not been set for thespecified user.
Review the image save destination settings and the job settingsand click [Retry] in the [Batch Manage] column in the [Batch LogList] window.
Failed to save to SharePoint Online. Details:<Details>
Review the job settings by referring to the details, and click [Retry]in the [Batch Manage] column in the [Batch Log List] window.
Appendix
161
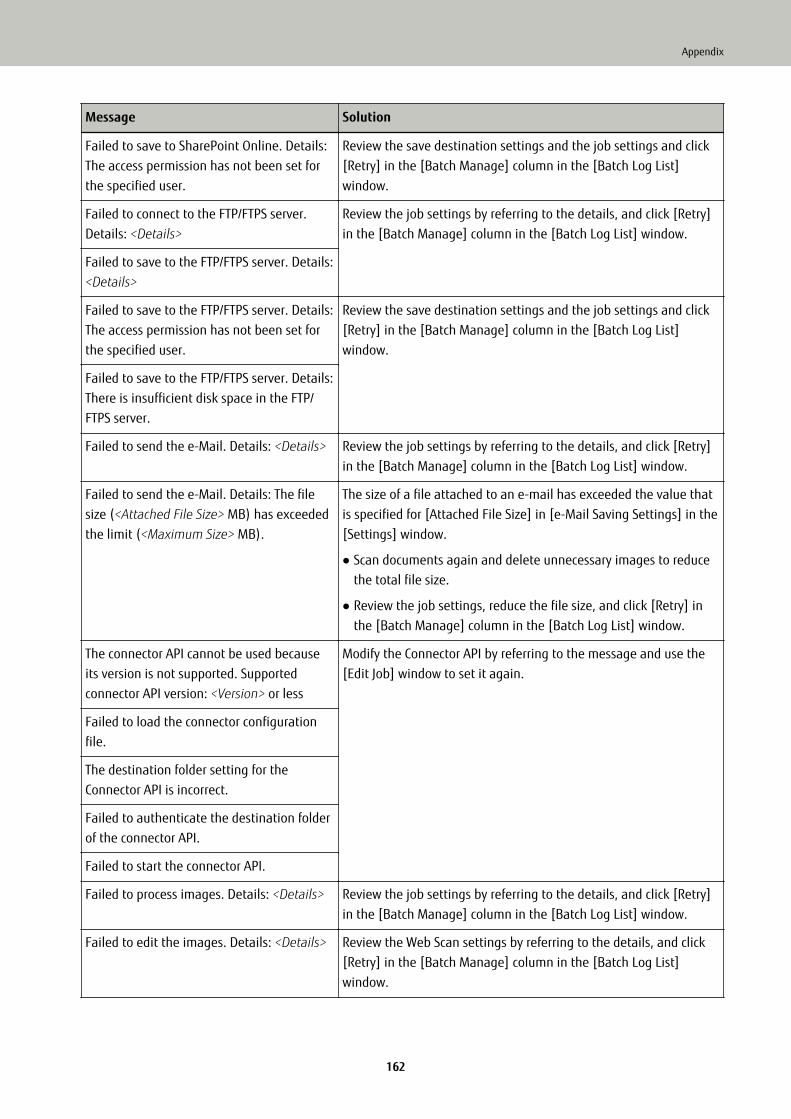
Message Solution
Failed to save to SharePoint Online. Details:The access permission has not been set forthe specified user.
Review the save destination settings and the job settings and click[Retry] in the [Batch Manage] column in the [Batch Log List]window.
Failed to connect to the FTP/FTPS server.Details: <Details>
Review the job settings by referring to the details, and click [Retry]in the [Batch Manage] column in the [Batch Log List] window.
Failed to save to the FTP/FTPS server. Details:<Details>
Failed to save to the FTP/FTPS server. Details:The access permission has not been set forthe specified user.
Review the save destination settings and the job settings and click[Retry] in the [Batch Manage] column in the [Batch Log List]window.
Failed to save to the FTP/FTPS server. Details:There is insufficient disk space in the FTP/FTPS server.
Failed to send the e-Mail. Details: <Details> Review the job settings by referring to the details, and click [Retry]in the [Batch Manage] column in the [Batch Log List] window.
Failed to send the e-Mail. Details: The filesize (<Attached File Size> MB) has exceededthe limit (<Maximum Size> MB).
The size of a file attached to an e-mail has exceeded the value thatis specified for [Attached File Size] in [e-Mail Saving Settings] in the[Settings] window.
● Scan documents again and delete unnecessary images to reducethe total file size.
● Review the job settings, reduce the file size, and click [Retry] inthe [Batch Manage] column in the [Batch Log List] window.
The connector API cannot be used becauseits version is not supported. Supportedconnector API version: <Version> or less
Modify the Connector API by referring to the message and use the[Edit Job] window to set it again.
Failed to load the connector configurationfile.
The destination folder setting for theConnector API is incorrect.
Failed to authenticate the destination folderof the connector API.
Failed to start the connector API.
Failed to process images. Details: <Details> Review the job settings by referring to the details, and click [Retry]in the [Batch Manage] column in the [Batch Log List] window.
Failed to edit the images. Details: <Details> Review the Web Scan settings by referring to the details, and click[Retry] in the [Batch Manage] column in the [Batch Log List]window.
Appendix
162
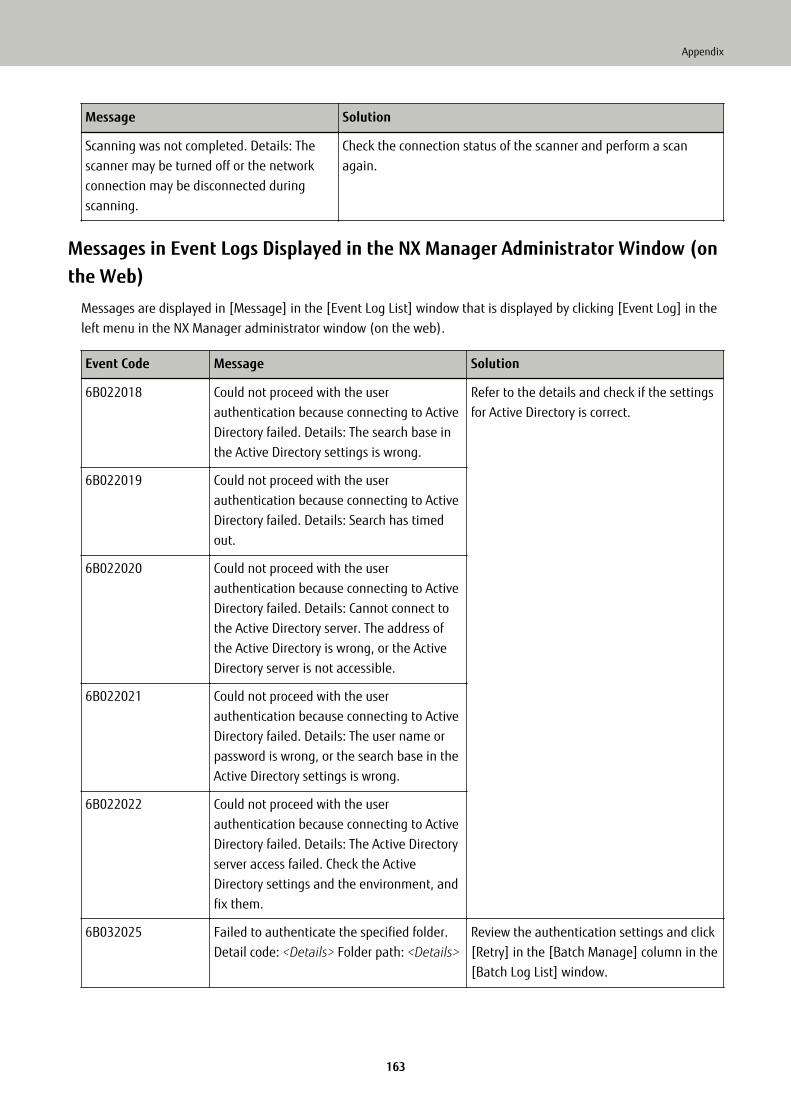
Message Solution
Scanning was not completed. Details: Thescanner may be turned off or the networkconnection may be disconnected duringscanning.
Check the connection status of the scanner and perform a scanagain.
Messages in Event Logs Displayed in the NX Manager Administrator Window (onthe Web)
Messages are displayed in [Message] in the [Event Log List] window that is displayed by clicking [Event Log] in theleft menu in the NX Manager administrator window (on the web).
Event Code Message Solution
6B022018 Could not proceed with the userauthentication because connecting to ActiveDirectory failed. Details: The search base inthe Active Directory settings is wrong.
Refer to the details and check if the settingsfor Active Directory is correct.
6B022019 Could not proceed with the userauthentication because connecting to ActiveDirectory failed. Details: Search has timedout.
6B022020 Could not proceed with the userauthentication because connecting to ActiveDirectory failed. Details: Cannot connect tothe Active Directory server. The address ofthe Active Directory is wrong, or the ActiveDirectory server is not accessible.
6B022021 Could not proceed with the userauthentication because connecting to ActiveDirectory failed. Details: The user name orpassword is wrong, or the search base in theActive Directory settings is wrong.
6B022022 Could not proceed with the userauthentication because connecting to ActiveDirectory failed. Details: The Active Directoryserver access failed. Check the ActiveDirectory settings and the environment, andfix them.
6B032025 Failed to authenticate the specified folder.Detail code: <Details> Folder path: <Details>
Review the authentication settings and click[Retry] in the [Batch Manage] column in the[Batch Log List] window.
Appendix
163
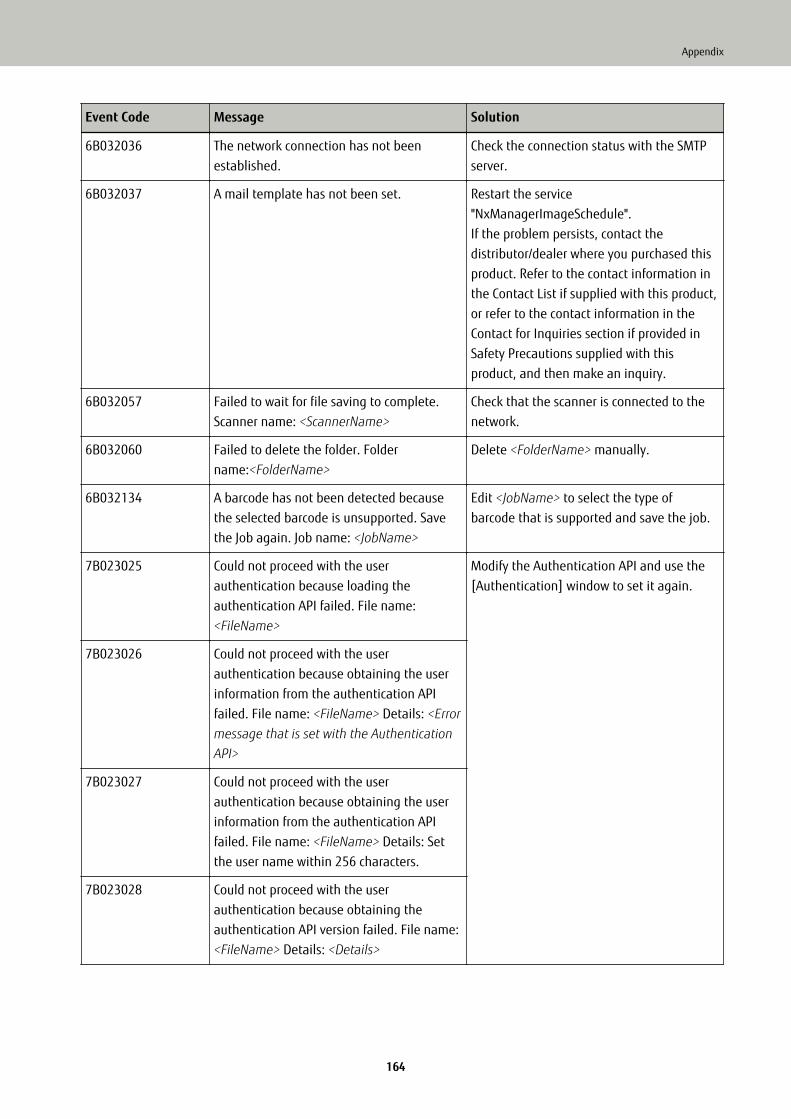
Event Code Message Solution
6B032036 The network connection has not beenestablished.
Check the connection status with the SMTPserver.
6B032037 A mail template has not been set. Restart the service"NxManagerImageSchedule".If the problem persists, contact thedistributor/dealer where you purchased thisproduct. Refer to the contact information inthe Contact List if supplied with this product,or refer to the contact information in theContact for Inquiries section if provided inSafety Precautions supplied with thisproduct, and then make an inquiry.
6B032057 Failed to wait for file saving to complete.Scanner name: <ScannerName>
Check that the scanner is connected to thenetwork.
6B032060 Failed to delete the folder. Foldername:<FolderName>
Delete <FolderName> manually.
6B032134 A barcode has not been detected becausethe selected barcode is unsupported. Savethe Job again. Job name: <JobName>
Edit <JobName> to select the type ofbarcode that is supported and save the job.
7B023025 Could not proceed with the userauthentication because loading theauthentication API failed. File name:<FileName>
Modify the Authentication API and use the[Authentication] window to set it again.
7B023026 Could not proceed with the userauthentication because obtaining the userinformation from the authentication APIfailed. File name: <FileName> Details: <Errormessage that is set with the AuthenticationAPI>
7B023027 Could not proceed with the userauthentication because obtaining the userinformation from the authentication APIfailed. File name: <FileName> Details: Setthe user name within 256 characters.
7B023028 Could not proceed with the userauthentication because obtaining theauthentication API version failed. File name:<FileName> Details: <Details>
Appendix
164

Event Code Message Solution
7B023029 Could not proceed with the userauthentication because the authenticationAPI version is not supported.Supported authentication API version:<NXManager Authentication API version> orlessFile name: <FileName> Version:<Authentication API version>
7B023030 Could not notify the scanner about theparameter of the smart card reader becausethe authentication API version is notsupported. File name: <FileName>
7B023031 Could not notify the scanner about theparameter used for scanning the smart cardbecause obtaining the parameter forscanning with the authentication API failed.File name: <FileName> Details: <Errormessage that is set with the AuthenticationAPI>
7B023032 Could not notify the scanner about theparameter used for scanning the smart cardbecause obtaining the parameter forscanning with the authentication API failed.File name: <FileName> Details: Theparameter used for scanning the smart cardexceeds the maximum allowed.
7B023033 Could not notify the scanner about theparameter used for scanning the smart cardbecause obtaining the authentication APIversion failed. File name: <FileName>Details: <Details>
7B023034 Could not notify the scanner about theparameter of the smart card reader becausethe authentication API version is notsupported.Supported authentication API version:<NXManager Authentication API version> orlessFile name: <FileName> Version:<Authentication API version>
Appendix
165
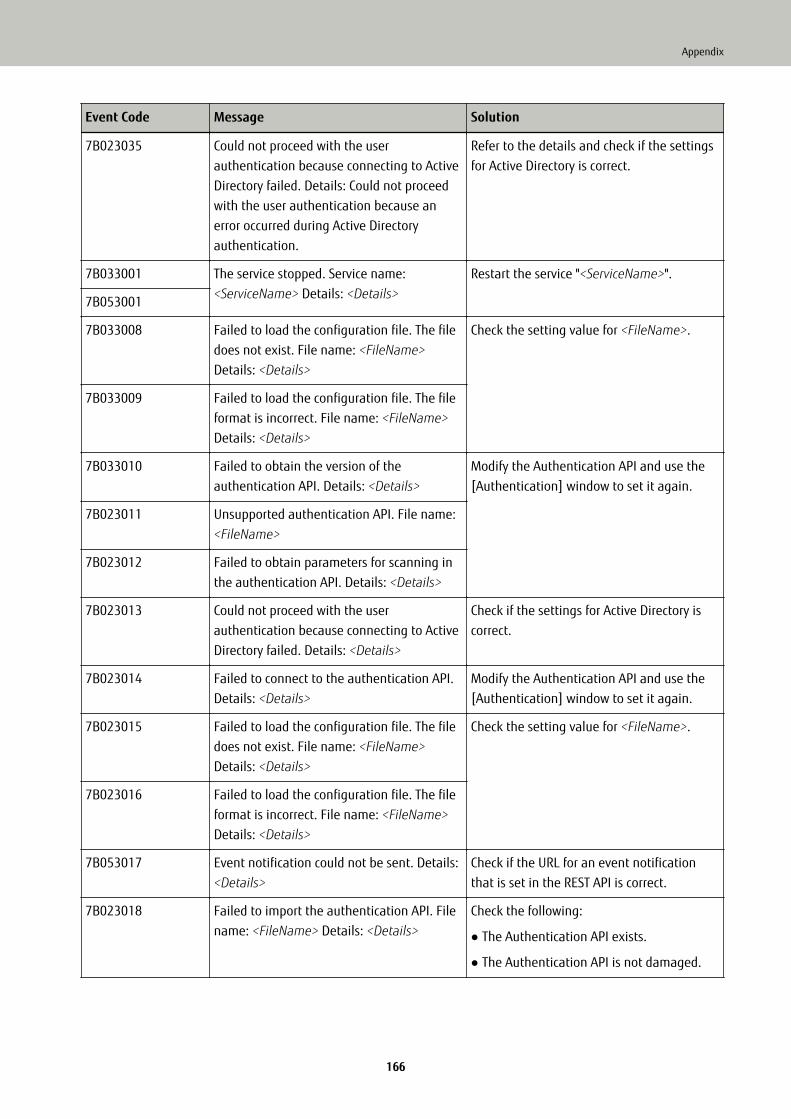
Event Code Message Solution
7B023035 Could not proceed with the userauthentication because connecting to ActiveDirectory failed. Details: Could not proceedwith the user authentication because anerror occurred during Active Directoryauthentication.
Refer to the details and check if the settingsfor Active Directory is correct.
7B033001 The service stopped. Service name:<ServiceName> Details: <Details>
Restart the service "<ServiceName>".
7B053001
7B033008 Failed to load the configuration file. The filedoes not exist. File name: <FileName>Details: <Details>
Check the setting value for <FileName>.
7B033009 Failed to load the configuration file. The fileformat is incorrect. File name: <FileName>Details: <Details>
7B033010 Failed to obtain the version of theauthentication API. Details: <Details>
Modify the Authentication API and use the[Authentication] window to set it again.
7B023011 Unsupported authentication API. File name:<FileName>
7B023012 Failed to obtain parameters for scanning inthe authentication API. Details: <Details>
7B023013 Could not proceed with the userauthentication because connecting to ActiveDirectory failed. Details: <Details>
Check if the settings for Active Directory iscorrect.
7B023014 Failed to connect to the authentication API.Details: <Details>
Modify the Authentication API and use the[Authentication] window to set it again.
7B023015 Failed to load the configuration file. The filedoes not exist. File name: <FileName>Details: <Details>
Check the setting value for <FileName>.
7B023016 Failed to load the configuration file. The fileformat is incorrect. File name: <FileName>Details: <Details>
7B053017 Event notification could not be sent. Details:<Details>
Check if the URL for an event notificationthat is set in the REST API is correct.
7B023018 Failed to import the authentication API. Filename: <FileName> Details: <Details>
Check the following:
● The Authentication API exists.
● The Authentication API is not damaged.
Appendix
166

Event Code Message Solution
7B033019 The network connection has not beenestablished.
Check the connection status with the SMTPserver.
7B033021 Failed to send an error notification e-Mail.<Details>
Check the communication status with theSMTP server and the settings for sending e-mails, and then restart the service"NxManagerImageSchedule".If the problem persists, contact thedistributor/dealer where you purchased thisproduct. Refer to the contact information inthe Contact List if supplied with this product,or refer to the contact information in theContact for Inquiries section if provided inSafety Precautions supplied with thisproduct, and then make an inquiry.
7B033022 Failed to send a batch log notification e-Mail. <Details>
7B033023 Failed to set preset profile. Perform the following:
● Restart the service"NxManagerImageSchedule".
● Check that PaperStream IP (TWAIN x64) isinstalled.
If the problem persists, contact thedistributor/dealer where you purchased thisproduct. Refer to the contact information inthe Contact List if supplied with this product,or refer to the contact information in theContact for Inquiries section if provided inSafety Precautions supplied with thisproduct, and then make an inquiry.
7B033100 An internal error occurred. Details: <Details> Restart the service"NxManagerImageProcess".If the problem persists, contact thedistributor/dealer where you purchased thisproduct. Refer to the contact information inthe Contact List if supplied with this product,or refer to the contact information in theContact for Inquiries section if provided inSafety Precautions supplied with thisproduct, and then make an inquiry.
7B033101 Restart the service"NxManagerImageRelease".If the problem persists, contact thedistributor/dealer where you purchased this
Appendix
167
Event Code Message Solution
product. Refer to the contact information inthe Contact List if supplied with this product,or refer to the contact information in theContact for Inquiries section if provided inSafety Precautions supplied with thisproduct, and then make an inquiry.
7B033102 Restart the service"NxManagerImageSchedule".If the problem persists, contact thedistributor/dealer where you purchased thisproduct. Refer to the contact information inthe Contact List if supplied with this product,or refer to the contact information in theContact for Inquiries section if provided inSafety Precautions supplied with thisproduct, and then make an inquiry.
7B023103 Restart the computer in which NX Manageris installed.If the problem persists, contact thedistributor/dealer where you purchased thisproduct. Refer to the contact information inthe Contact List if supplied with this product,or refer to the contact information in theContact for Inquiries section if provided inSafety Precautions supplied with thisproduct, and then make an inquiry.
7B023104
7B023105
7B023106
7B023107
7B023108
7B023109
7B023110
7B023111
7B043112 Check that PaperStream IP (TWAIN x64) isinstalled.
7B043113 Restart the computer in which NX Manageris installed.If the problem persists, contact thedistributor/dealer where you purchased thisproduct. Refer to the contact information inthe Contact List if supplied with this product,or refer to the contact information in theContact for Inquiries section if provided inSafety Precautions supplied with thisproduct, and then make an inquiry.
7B043114
7B043115
7B043116
7B043117
7B043118
7B043119
7B043120
Appendix
168

Event Code Message Solution
7B043121
7B043122
7B043123
7B043124
7B043125
7B043126
7B043127
7B043128
7B043129
7B043130
7B043131
7B043132
7B043133
7B053134 Restart the service "NxManagerWebhooks".
Messages from Commands for Backing up and Restoring the Data Related to NXManager
Messages are displayed in the command prompt on the computer where a command to back up or restore the datarelated to NX Manager is executed.There are two types of messages shown below:
● Information
● Error
● Information
Code Message Solution
0B062001 Start backup. No action required.
0B062002 Exit backup.
0B063001 Start restoration.
0B063002 Exit restoration.
● Error
Code Message Solution
7B062001 PaperStream NX Manager is not installed. PaperStream NX Manager is not installed.
Appendix
169

Code Message Solution
Try again using a computer on whichPaperStream NX Manager has beencorrectly installed.
7B062002 The specified backup file is incorrect. The backup file name is not specified inthe parameter for the backup command.Specify the backup file name and tryagain.
7B062003 The backup file already exists. A backup file with the same name alreadyexists.Delete the backup file that already existsor change the backup file name, and tryagain.
7B062004 The specified backup file is incorrect. This error message is displayed in thefollowing cases. After checking the error,run the command again.
● You have no write permissions for thebackup file specified in the parameterfor the backup command.
● The specified backup file already existsas a file.
● The backup file full path is longer than128 bytes.
7B062005 Backup failed. If this message appears with an auxiliarycode "7B069012", free disk space may beinsufficient. Ensure that there is enoughfree disk space available, and try again.If this message appears without anauxiliary code, the contents of the problemare shown in the following format.. . .Problem details. . .When the .NET Framework language packis not installed, the details of the problemare displayed in English.If this message appears frequently with anauxiliary code other than those mentionedabove, contact the distributor/dealerwhere you purchased this product. Refer tothe contact information in the Contact Listif supplied with this product, or refer to the
Appendix
170

Code Message Solution
contact information in the Contact forInquiries section if provided in SafetyPrecautions supplied with this product,and then make an inquiry.
7B062006 Backup or restoration is already running. Try again, after finishing the backup orrestoration.
7B062007 The specified option is invalid. The same option is specified more thanonce. Avoid specifying the same optionmore than once and try again.
7B062008 The version of the backup file is notsupported for restoration.
The specified backup file is not supportedby the current version of NX Manager.Specify the backup file of the correctversion and try again.
7B062009 Log on as a user with Administratorprivileges.
You do not have Administrator privileges.Try again as a user with Administratorprivileges for a computer.
7B063001 PaperStream NX Manager is not installed. PaperStream NX Manager is not installed.Try again using a computer on whichPaperStream NX Manager has beencorrectly installed.
7B063002 The specified backup file is incorrect. The backup file name is not specified inthe parameter for the restore command.Specify the backup file name and tryagain.
7B063003 The backup file does not exist. Specify the backup file name that youspecified in the backup command and tryagain. Or, check the read permission forthe specified backup file.
7B063004 Restoration failed. If this message appears with an auxiliarycode "7B069013", free disk space may beinsufficient. Ensure that there is enoughfree disk space available, and try again.If this message appears with an auxiliarycode "7B069010", a file in the restorationfolder may be in use. Check that the file isnot in use, and try again.If this message appears without anauxiliary code, the contents of the problemare shown in the following format.. . .
Appendix
171

Code Message Solution
Problem details. . .When the .NET Framework language packis not installed, the details of the problemare displayed in English.If this message appears frequently with anauxiliary code other than those mentionedabove, contact the distributor/dealerwhere you purchased this product. Refer tothe contact information in the Contact Listif supplied with this product, or refer to thecontact information in the Contact forInquiries section if provided in SafetyPrecautions supplied with this product,and then make an inquiry.
7B063005 Backup or restoration is already running. Try again, after finishing the backup orrestoration.
7B063006 Port number (XXXX) is already in use. Port number (XXXX) is already in use byanother application. Change the settingsof the application using XXXX, and tryrestoring again.
7B063007 The specified option is invalid. The same option is specified more thanonce. Avoid specifying the same optionmore than once and try again.
7B063008 The specified backup file is incorrect. This error message is displayed in thefollowing cases. After checking the error,run the command again.
● You have no write permissions for thebackup file specified in the parameterfor the backup command.
● The specified backup file already existsas a file.
● The backup file full path is longer than128 bytes.
7B063009 Log on as a user with Administratorprivileges.
You do not have Administrator privileges.Try again as a user with Administratorprivileges for a computer.
Appendix
172
Messages from Commands for Backing up and Restoring the Data Related to NXManager Database
Messages are displayed in the command prompt on the computer where a command to back up or restore the datarelated to NX Manager Database is executed.There are two types of messages shown below:
● Information
● Error
● Information
Code Message Solution
0B062001 Start backup. No action required.
0B062002 Exit backup.
0B063001 Start restoration.
0B063002 Exit restoration.
● Error
Code Message Solution
7B060001 PaperStream NX Manager Database is notinstalled.
PaperStream NX Manager Database is notinstalled.Try again using a computer on whichPaperStream NX Manager Database hasbeen correctly installed.
7B060002 The specified option is invalid. The backup file name is not specified inthe parameter for the backup command.Specify the backup file name and tryagain.
7B060003 The backup file already exists. A backup file with the same name alreadyexists.Delete the backup file that already existsor change the backup file name, and tryagain.
7B060004 The specified backup file is incorrect. This error message is displayed in thefollowing cases. After checking the error,run the command again.
● You have no write permissions for thebackup file specified in the parameterfor the backup command.
Appendix
173
Code Message Solution
● The backup file full path is longer than128 bytes.
7B060005 Backup failed. If this message appears with an auxiliarycode "7B069012", free disk space may beinsufficient. Ensure that there is enoughfree disk space available, and try again.If this message appears without anauxiliary code, the contents of the problemare shown in the following format.. . .Problem details. . .When the .NET Framework language packis not installed, the details of the problemare displayed in English.If this message appears frequently with anauxiliary code other than those mentionedabove, contact the distributor/dealerwhere you purchased this product. Refer tothe contact information in the Contact Listif supplied with this product, or refer to thecontact information in the Contact forInquiries section if provided in SafetyPrecautions supplied with this product,and then make an inquiry.
7B060006 Backup or restoration is already running. Try again, after finishing the backup orrestoration.
7B060007 The specified option is invalid. Refer to Backing Up the Data Related toNX Manager Database (page 94) to checkthe option that you specified and tryagain.
7B060009 Log on as a user with Administratorprivileges.
You do not have Administrator privileges.Try again as a user with Administratorprivileges for a computer.
7B061001 PaperStream NX Manager Database is notinstalled.
PaperStream NX Manager Database is notinstalled.Try again using a computer on whichPaperStream NX Manager Database hasbeen correctly installed.
7B061002 The specified option is invalid. The backup file name is not specified inthe parameter for the restore command.
Appendix
174
Code Message Solution
Specify the backup file name and tryagain.
7B061003 The backup file does not exist. Specify the backup file name that youspecified in the backup command and tryagain. Or, check the read permission forthe specified backup file.
7B061004 The specified backup file is incorrect. The backup file full path is longer than 128bytes. Check the length of the path and tryagain.
7B061005 Restoration failed. If this message appears with an auxiliarycode "7B069013", free disk space may beinsufficient. Ensure that there is enoughfree disk space available, and try again.If this message appears without anauxiliary code, the contents of the problemare shown in the following format.. . .Problem details. . .When the .NET Framework language packis not installed, the details of the problemare displayed in English.If this message appears frequently with anauxiliary code other than those mentionedabove, contact the distributor/dealerwhere you purchased this product. Refer tothe contact information in the Contact Listif supplied with this product, or refer to thecontact information in the Contact forInquiries section if provided in SafetyPrecautions supplied with this product,and then make an inquiry.
7B061006 Backup or restoration is already running. Try again, after finishing the backup orrestoration.
7B061007 The specified option is invalid. Refer to Restoring the Data Related to NXManager Database (page 95) to check theoption that you specified and try again.
7B061008 The version of the backup file is notsupported for restoration.
The backup file cannot be restoredbecause the version that you specified islater than the PaperStream NX ManagerDatabase version that is installed.
Appendix
175

Code Message Solution
Check the version of PaperStream NXManager Database that is installed, andtry again.
7B061009 Log on as a user with Administratorprivileges.
You do not have Administrator privileges.Try again as a user with Administratorprivileges for a computer.
Messages in Event Logs for Windows ServerMessages are displayed in the event log list for Windows Server.
● Log type: Application
● Event source: PaperStream NX Manager
Event code Message Solution
11001 The service started normally. Service name:<ServiceName>
No action required.
11002 The service stopped normally. Service name:<ServiceName>
12037 A mail template has not been set. Restart the service"NxManagerImageSchedule".If the problem persists, contact thedistributor/dealer where you purchased thisproduct. Refer to the contact information inthe Contact List if supplied with this product,or refer to the contact information in theContact for Inquiries section if provided inSafety Precautions supplied with thisproduct, and then make an inquiry.
13003 Failed to access the database. Details:<Details>
Check the operational status of thedatabase.
13007 The service stopped. Service name:<ServiceName> Details: <Details>
Restart the service "<ServiceName>".
13008 Failed to load the configuration file. The filedoes not exist. File name: <FileName>Details: <Details>
Check the setting value for <FileName>.
13009 Failed to load the configuration file. The fileformat is incorrect. File name: <FileName>Details: <Details>
13017 Event notification could not be sent. Details:<Details>
Check if the URL for an event notificationthat is set in the REST API is correct.
Appendix
176

Event code Message Solution
13100 An internal error occurred. Details: <Details> Restart the service"NxManagerImageProcess".If the problem persists, contact thedistributor/dealer where you purchased thisproduct. Refer to the contact information inthe Contact List if supplied with this product,or refer to the contact information in theContact for Inquiries section if provided inSafety Precautions supplied with thisproduct, and then make an inquiry.
13101 Restart the service"NxManagerImageRelease".If the problem persists, contact thedistributor/dealer where you purchased thisproduct. Refer to the contact information inthe Contact List if supplied with this product,or refer to the contact information in theContact for Inquiries section if provided inSafety Precautions supplied with thisproduct, and then make an inquiry.
13102 Restart the service"NxManagerImageSchedule".If the problem persists, contact thedistributor/dealer where you purchased thisproduct. Refer to the contact information inthe Contact List if supplied with this product,or refer to the contact information in theContact for Inquiries section if provided inSafety Precautions supplied with thisproduct, and then make an inquiry.
13103 Restart the computer in which NX Manageris installed.If the problem persists, contact thedistributor/dealer where you purchased thisproduct. Refer to the contact information inthe Contact List if supplied with this product,or refer to the contact information in theContact for Inquiries section if provided inSafety Precautions supplied with thisproduct, and then make an inquiry.
13104
13105
13106
13107
13108
13109
13110
13111
Appendix
177
Event code Message Solution
13112 Check that PaperStream IP (TWAIN x64) isinstalled.
13113 Restart the computer in which NX Manageris installed.If the problem persists, contact thedistributor/dealer where you purchased thisproduct. Refer to the contact information inthe Contact List if supplied with this product,or refer to the contact information in theContact for Inquiries section if provided inSafety Precautions supplied with thisproduct, and then make an inquiry.
13114
13115
13116
13117
13118
13119
13120
13121
13122
13123
13124
13125
13126
13127
13128
13129
13130
13131
13132
13133
13134 An internal error occurred. Details: <Details> Restart the service "NxManagerWebhooks".
Specifications of Jobs/Job Groups
Item Specification
The number of levels that can be created in one job group 1 to 4
The number of jobs that can be set in one level in a job group Up to 20
The total number of jobs that can be set in one job group 1 to 1,000
The number of users that can be added to one job group 1 to 3,000 (for all job groups in total)
Appendix
178

Item Specification
The number of scanners that can be added to one job group Up to 1,000 (for all job groups in total)
The number of job groups that can be added to one user 1 (Each user can correlate with one job group)
The number of job groups that can be added to one scanner 1 (Each scanner can correlate with one job group)
The number of job groups that can be created Up to 100
The number of jobs that can be created Up to 1,000
Specifications of the Index File
● File format
XML
● Character code
UTF-8
● Output unit for files
Per batch
HINT
● When [Multi Image Output] is set in the profile for the PaperStream IP driver, index files are separatelyoutput for the 1st, 2nd, and 3rd images.If the same name is specified for the 1st, 2nd, and 3rd index files, the index files are merged in this orderand output as one file.
● If a version earlier than 1.4.0 is obtained by the user application for Connector API, the 1st, 2nd, and 3rdindex files are merged in this order and output as one file.
● Output Items
Item Description XML Item Name
Separator No. Document stack number Separator No.
Total number ofpages in thedocument
Total number of pages in the document stack Total pages in current document
Page number in thedocument
Page number in the document stack Page Number in Document
Page number Page number that is counted from the first page Page number
Appendix
179

Item Description XML Item Name
Actual page number Page number that includes the pages skipped due tothe blank page skip or removal of the job separators
Actual page number
Date and time Date and time when the scan was started Date&Time
Username Name of the user who performed the scan (*1) User name
User principal name User principal name when the scan was performed(*2)
User Principal Name(ActiveDirectory)
File name (fullpath)
File name (full path) of the image file (*3) Full Path
File name File name of the image file File name
Folder name Name of the destination folder where the image fileis saved (*3)
Folder name
Scanner modelname
Model name of the scanner that is used for scanning Scanner name
Resolution Resolution of the image (Unit: DPI) Resolution
Width Width of the image (Unit: pixels) Width
Height Height of the image (Unit: pixels) Height
Bit depth Bit depth of the image Bit depth
Scanning side Scanning side of the image (front/back) Output side
Job group name Name of a job group that a job (that is used forscanning) is correlated to
Job group name
Job group code Job group code that a job (that is used for scanning)is correlated to
Job group code
Job name Name of the job that is used for scanning Job name
Scanner name(device name)
Name of the scanner that is used for scanning Scanner device name
Barcode Value for a barcode when documents are separatedby barcodes
Barcode(Separator)
Type of barcode when documents are separated bybarcodes
Barcode Type(Separator)
Meta data Character string that is entered by an operator on thetouch screen of the scanner for a field name that wasset in the [Create New Job] window/[Edit Job] window(*5)
Character string that is enteredin [Field Name] in the [CreateNew Job] window/[Edit Job]window (Scanner Entry)
Appendix
180

Item Description XML Item Name
Value for a meta data field name obtained from anAuthentication API (*6)
Meta data field name obtainedfrom an Authentication API(Authentication API)
*1:Output only when one of the following authentication methods is used.
● Username/Password
● NFC
● Username/Password or NFC
*2:Output only when the authentication method is [Username/Password] and the authentication mode is[Active Directory].
*3:Output only when one of the following save destinations is used.
● Save to folder
● Save destination that uses the Connector API
*4:Output only when the authentication method is [Job group code].
*5:Output only when the [Input meta data from a scanner] check box is selected in the [Create New Job]window/[Edit Job] window.
*6:Output only when the authentication mode is "Authentication server that requires a linkage via anAuthentication API" and when one or more meta data field names can be obtained from an AuthenticationAPI.If multiple meta data fields are obtained from an Authentication API, all the fields are output.For details, refer to Output example (page 181).
● Output example
<?xml version="1.0" encoding="UTF-8"?><root><page><item name="Separator No." value="Separator No." /><item name="Total pages in current document" value="Total number of pages in the document stack" /><item name="Page Number in Document" value="Page number in the document stack" /><item name="Page number" value="Page number" /><item name="Actual page number" value="Actual page number" /><item name="Date&Time" value="Date and time" /><item name="User name" value="User name" /><item name="User Principal Name(Active Directory)" value="User principal name" /><item name="Full Path" value="File name (full path)" /><item name="File name" value="File name" /><item name="Folder name" value="Folder name" /><item name="Scanner name" value="Scanner model name" /><item name="Resolution" value="Resolution" /><item name="Width" value="Width" />
Appendix
181

<item name="Height" value="Height" /><item name="Bit depth" value="Bit depth" /><item name="Output side" value="Scanning side" /><item name="Job group name" value="Job group name" /><item name="Job group code" value="Job group code" /><item name="Job name" value="Job name" /><item name="Scanner device name" value="Scanner name (device name)" /><item name="Barcode(Separator)" value="Value for a barcode when documents are separated by barcodes" /><item name="Barcode Type(Separator)" value="Type of barcode when documents are separated bybarcodes" /><item name="Character string that is entered in [Field Name] in the [Create New Job] window/[Edit Job]window (Scanner Entry)" value="Character string that is entered by an operator on the touch screen of thescanner for a field name that was set in the [Create New Job] window/[Edit Job] window" />(*1)<item name="Meta data field name obtained from an Authentication API (Authentication API)" value="Valuefor a meta data field name obtained from an Authentication API" />(*2)</page>..</root>
*1:If a field name set in the [Create New Job] window/[Edit Job] window is "FAX Number" and "1234567890" isentered for "FAX Number" on the touch screen of the scanner, the output is as follows:<item name="FAX Number (Scanner Entry)" value="1234567890" />
*2:If a meta data field name obtained from an Authentication API is "Employee number" and the value is"123456", the output is as follows:<item name="Employee number (Authentication API)" value="123456" />If multiple meta data fields are obtained from an Authentication API, the output is as follows:<item name="Employee number (Authentication API)" value="123456" /><item name="Department code (Authentication API)" value="7890" /><item name="E-mail address (Authentication API)" value="[email protected]" />
● Page-based information is delimited by the "page" element. Each item information in the page is delimitedby the "item" element. The "name" attribute of the "item" element contains the XML item name of thecorresponding item. The "value" attribute is the value of the corresponding item.
● The following characters are output as entity references: "<", ">", "&", """.
Operation Specifications of a PaperStream IP Driver ProfileThis section explains about the operation specifications of functions which have been set in a profile of PaperStreamIP driver.Out of the functions that are set in a PaperStream IP driver profile, some of them are not supported by NX Manager.The functions that are not supported are shown in the table. Except for the functions shown in the table, all otherfunctions are supported.In the following table, hyphens (-) are used to connect items to be set in the PaperStream IP driver windows andindicate the level of the items.
Appendix
182
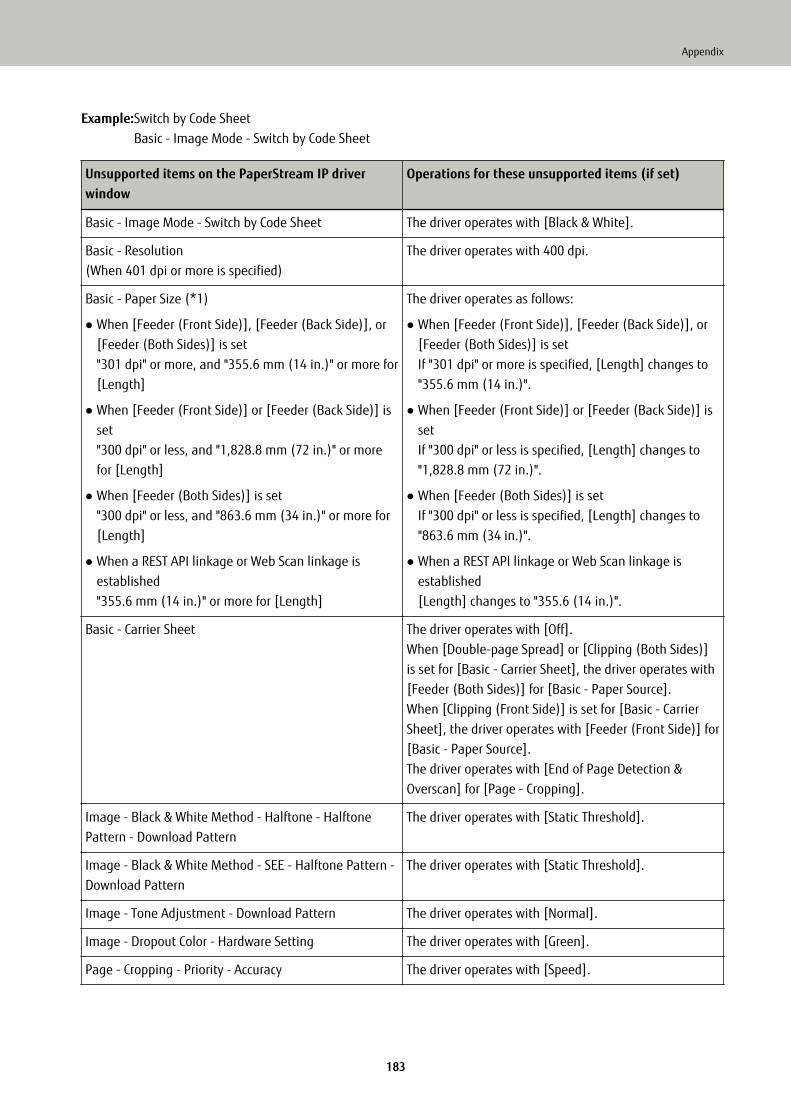
Example:Switch by Code SheetBasic - Image Mode - Switch by Code Sheet
Unsupported items on the PaperStream IP driverwindow
Operations for these unsupported items (if set)
Basic - Image Mode - Switch by Code Sheet The driver operates with [Black & White].
Basic - Resolution(When 401 dpi or more is specified)
The driver operates with 400 dpi.
Basic - Paper Size (*1)
● When [Feeder (Front Side)], [Feeder (Back Side)], or[Feeder (Both Sides)] is set"301 dpi" or more, and "355.6 mm (14 in.)" or more for[Length]
● When [Feeder (Front Side)] or [Feeder (Back Side)] isset"300 dpi" or less, and "1,828.8 mm (72 in.)" or morefor [Length]
● When [Feeder (Both Sides)] is set"300 dpi" or less, and "863.6 mm (34 in.)" or more for[Length]
● When a REST API linkage or Web Scan linkage isestablished"355.6 mm (14 in.)" or more for [Length]
The driver operates as follows:
● When [Feeder (Front Side)], [Feeder (Back Side)], or[Feeder (Both Sides)] is setIf "301 dpi" or more is specified, [Length] changes to"355.6 mm (14 in.)".
● When [Feeder (Front Side)] or [Feeder (Back Side)] issetIf "300 dpi" or less is specified, [Length] changes to"1,828.8 mm (72 in.)".
● When [Feeder (Both Sides)] is setIf "300 dpi" or less is specified, [Length] changes to"863.6 mm (34 in.)".
● When a REST API linkage or Web Scan linkage isestablished[Length] changes to "355.6 (14 in.)".
Basic - Carrier Sheet The driver operates with [Off].When [Double-page Spread] or [Clipping (Both Sides)]is set for [Basic - Carrier Sheet], the driver operates with[Feeder (Both Sides)] for [Basic - Paper Source].When [Clipping (Front Side)] is set for [Basic - CarrierSheet], the driver operates with [Feeder (Front Side)] for[Basic - Paper Source].The driver operates with [End of Page Detection &Overscan] for [Page - Cropping].
Image - Black & White Method - Halftone - HalftonePattern - Download Pattern
The driver operates with [Static Threshold].
Image - Black & White Method - SEE - Halftone Pattern -Download Pattern
The driver operates with [Static Threshold].
Image - Tone Adjustment - Download Pattern The driver operates with [Normal].
Image - Dropout Color - Hardware Setting The driver operates with [Green].
Page - Cropping - Priority - Accuracy The driver operates with [Speed].
Appendix
183

Unsupported items on the PaperStream IP driverwindow
Operations for these unsupported items (if set)
Page - Split Image The driver operates with [Off].
Paper Feeding - Multifeed Detection - Action - Stop andShow Image
If a multifeed is detected, you will be notified of an errorafter a scan is performed.In the error window, you can select whether to save animage or not.Note that no image is displayed in the error window.
Batch - Assisted Scan The driver operates with [Off].
Batch - Continuous Scan The driver operates with [Off].
Batch - Job Control The driver operates with [Off].
Batch - Patch Code Detection The driver operates with [Off].
Batch - Barcode Detection The driver operates with [Off].
Batch - Automatic Profile Selection The driver operates with [Off].The driver operates with [Automatic] for [Page -Rotation].
Output - Statistic Information - Display The driver operates with [Do not display].
Output - Statistic Information - Save The driver operates with [Off].
Toolbar - Option - Use separate settings for front andback side
The driver operates with [Use same setting for front andback side].
Toolbar - Option - Set separate scanning areas for eachside
The driver operates with [Set same scanning area foreach side].
Toolbar - Configuration - Event - Error/Warning Event -Message Display (When driver dialog is shown)
The driver operates with [Do not display].
Toolbar - Configuration - Event - Error/Warning Event -Message Display (When driver dialog is not shown)
The driver operates with [Do not display].
*1:If there is a length specified for any items in the PaperStream IP driver profile, the value for the length changesin accordance with the paper size.
Specifications of the Image File
● Black & white image
File format Compression format
PDF File (*.pdf) (*1) CCITT G4
SinglePage PDF File (*.pdf) (*1)
Appendix
184
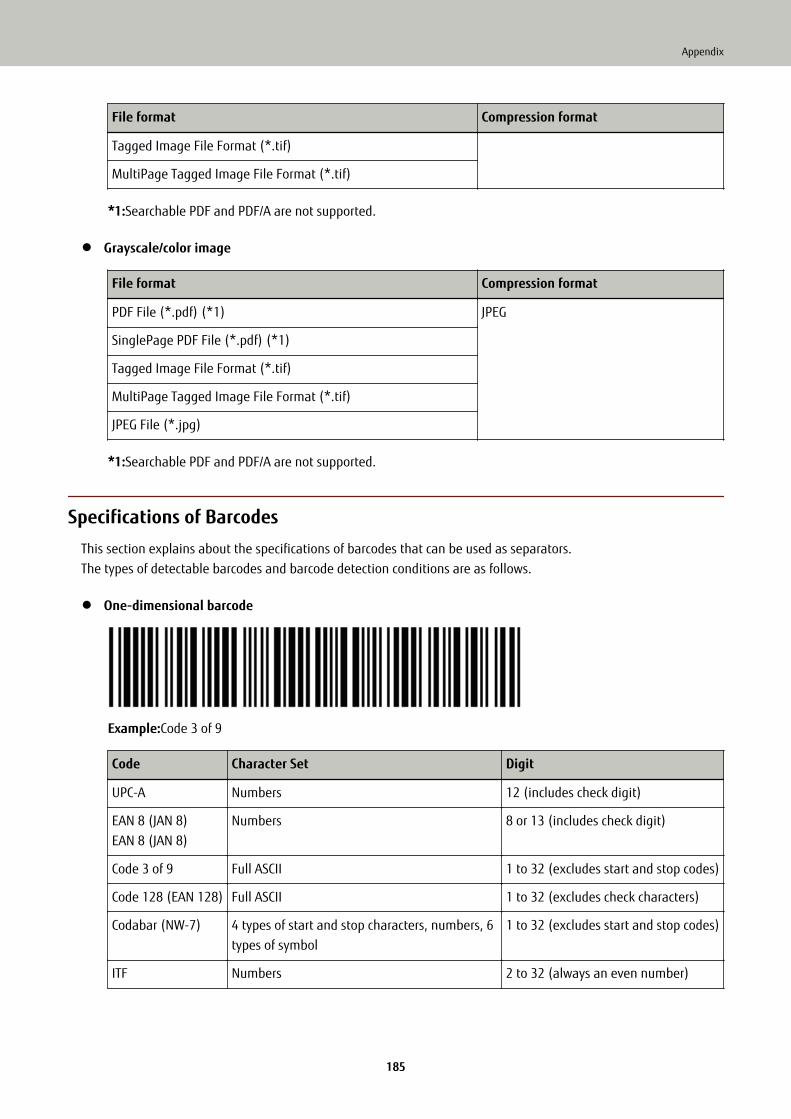
File format Compression format
Tagged Image File Format (*.tif)
MultiPage Tagged Image File Format (*.tif)
*1:Searchable PDF and PDF/A are not supported.
● Grayscale/color image
File format Compression format
PDF File (*.pdf) (*1) JPEG
SinglePage PDF File (*.pdf) (*1)
Tagged Image File Format (*.tif)
MultiPage Tagged Image File Format (*.tif)
JPEG File (*.jpg)
*1:Searchable PDF and PDF/A are not supported.
Specifications of BarcodesThis section explains about the specifications of barcodes that can be used as separators.The types of detectable barcodes and barcode detection conditions are as follows.
● One-dimensional barcode
Example:Code 3 of 9
Code Character Set Digit
UPC-A Numbers 12 (includes check digit)
EAN 8 (JAN 8)EAN 8 (JAN 8)
Numbers 8 or 13 (includes check digit)
Code 3 of 9 Full ASCII 1 to 32 (excludes start and stop codes)
Code 128 (EAN 128) Full ASCII 1 to 32 (excludes check characters)
Codabar (NW-7) 4 types of start and stop characters, numbers, 6types of symbol
1 to 32 (excludes start and stop codes)
ITF Numbers 2 to 32 (always an even number)
Appendix
185

● Detection Conditions for One-dimensional Barcodes
Item Condition
Barcode height 10 to 30 mm/0.39 to 1.18 in.
Barcode width 300 mm/11.81 in. or shorter
Barcode margin 5 mm/0.20 in. or more around a barcode(For ITF, 5 mm/0.20 in. or more, or at least 6 times the width of the narrow element(whichever is wider) on both the right and left sides of ITF)
Barcode color Black
Barcode backgroundcolor
White
Resolution 200 dpi or higher
Barcode angle Horizontal and vertical
Narrow elementwidth/Module width
● UPC-A/EAN 8 (JAN 8)/EAN13 (JAN 13)300 dpi or higher: 0.264 mm/0.010 in. or moreLess than 300 dpi: 0.30 mm/0.012 in. or more
● Code 3 of 9/Code 128 (EAN 128)/Codabar (NW-7)300 dpi or higher: 0.20 mm/0.008 in. or moreLess than 300 dpi: 0.30 mm/0.012 in. or more
● ITF300 dpi or higher: 0.254 mm/0.010 in. or moreLess than 300 dpi: 0.30 mm/0.012 in. or more
Wide element width 14.0 mm/0.55 in. or less(For UPC-A, EAN 8 (JAN 8), EAN13 (JAN 13), and Code 128 (EAN 128), width of thewidest element (4 modules wide))
Intercharacter gap ● UPC-A/EAN 8 (JAN 8)/EAN13 (JAN 13)/Code 128 (EAN 128)/ITFThere are no gaps between the characters.
● Code 3 of 9/Codabar (NW-7)Equal to or greater than the narrow element width, and equal to or less than 1.52mm/0.06 in. or 3 times the narrow element width (whichever is bigger)
HINT
● Skewed barcodes may not be recognized correctly.
● Using the same sheet repeatedly may decrease the recognition accuracy due to accumulated dirt on thesheets. If the sheet is not recognized correctly or gets smudged, replace it with a new sheet.
● If the character string recognized from a one-dimensional barcode includes the control code [NUL], thiscontrol code is replaced with " " (space).
● If control character recognition fails, the following results may be delivered:
Appendix
186

- The control characters are recognized as numerical characters.
- Not only the character codes but also other characters on the barcode are skipped without beingrecognized.
● The barcode may not be recognized correctly depending on the document (if skewed), the settingsconfigured in the profile for the PaperStream IP driver, and/or the condition of printed barcodes. Make surethat the barcode is correctly recognized before starting operations.
● If barcode scanning performance deteriorates, limit the barcode types to be detected or narrow thebarcode area to improve the scanning performance.
● If more than one barcode exists in the barcode recognition area, which barcode (or data area) will becomevalid is unknown. Therefore, if more than one barcode or data area exists, make sure to specify therecognition area so that only a single barcode or data area is included.
● If more than one barcode exists in the barcode recognition area, the order in which barcodes are detectedis undetermined.
● Barcodes may be recognized even when the barcode is not black or its background color is not white.Before using this function, adjust the settings so the results will match your intended use.
● Barcode recognition results may include errors if a barcode is smaller than the minimum size required.
Specifications of an Error Notification e-MailThis section explains about the specifications of an error notification e-mail.
Item Description
Event Date/Time Displays the date/time when the event occurred.
Source of the Event Displays the source of the event.
IP Address Displays the IP address of the scanner which performed the scan.
Scanner Model Displays the name of the scanner model which performed the scan.
Serial Number Displays the serial number of the scanner which performed the scan.
Username Displays the user name who performed the scan.
Job name Displays the job name of the scan.
Event Type Displays the following event types.
● Information
● Warning
● Error
● Error (Checked)
Event Code Displays the event code of the event log.
Message Displays the message of the event log.
Appendix
187

Specifications of a Batch Log Notification e-MailThis section explains about the specifications of a batch log notification e-mail.
Item Description
Start Date/Time Displays the date and time when the scan was started.
Last Modified Displays the date and time when the batch was modified most recently.
Serial Number Displays the serial number of the scanner which performed the scan.
Scanner Name Displays the name of the scanner which performed the scan.
IP Address Displays the IP address of the scanner which performed the scan.
Username Displays the user name who performed the scan.
Job name Displays the job name of the scan.
Image Status Displays one of the following statuses of an image transferred from the scanner.
● DeleteImages are transferred from a scanner to a destination in which they are saved and thendeleted from NX Manager.
● UndeletedBatch processing is not complete and images transferred from a scanner still remain in NXManager.Refer to [Status] and [Description] for the cause of an incomplete batch process.If an error is displayed for [Status], it may be possible to retry a batch from the administratorwindow (on the web).For details, refer to Messages in Batch Logs Displayed in the NX Manager AdministratorWindow (on the Web) (page 160).
Batch ID Displays the batch ID.
Status Displays one of the following as the status of the batch.
● Error
● Accepting
● Waiting to process images
● Processing images
● Performing a QC
● Waiting to edit images
● Editing images
● Waiting to save a file
● Files are being saved
● Completed
● Cancel
Appendix
188
Item Description
● Error (Checked)
Description Displays the description of the batch.
Migrating NX Manager
1 Disconnect the computers, which NX Manager is installed on and which you migrate NX Manager fromand to, from the network.
2 Back up the data related to NX Manager and NX Manager Database from the computer in which NXManager is installed and from which you migrate NX Manager.For details, refer to Backing Up the Data Related to NX Manager (page 93) and Backing Up the Data Relatedto NX Manager Database (page 94).
3 Restore the data related to NX Manager and NX Manager Database to the computer in which NXManager is installed and to which you migrate NX Manager.For details, refer to Restoring the Data Related to NX Manager (page 94) and Restoring the Data Related toNX Manager Database (page 95).
4 Connect the computers with NX Manager, from and to which you migrated NX Manager, to the network.
Upgrading NX Manager
1 Turn on the computer and log onto Windows Server as a user with administrator privileges.
2 Obtain the installer for upgrading NX Manager.For details about how to obtain the installer for upgrading NX Manager, contact the distributor/dealer whereyou purchased this product. Refer to the contact information in the Contact List if supplied with this product,or refer to the contact information in the Contact for Inquiries section if provided in Safety Precautionssupplied with this product, and then make an inquiry.
3 Disconnect the computer in which NX Manager is installed from the network.
4 Back up the data related to NX Manager and NX Manager Database from the computer in which NXManager is installed.For details, refer to Backing Up the Data Related to NX Manager (page 93) and Backing Up the Data Relatedto NX Manager Database (page 94).
HINT
Be sure to use the data related to NX Manager and NX Manager Database that is backed up only if an erroroccurs while NX Manager is being upgraded.If an error occurs while NX Manager is being upgraded, restore the data related to NX Manager and NXManager Database.
Appendix
189

For details, refer to Restoring the Data Related to NX Manager (page 94) and Restoring the Data Relatedto NX Manager Database (page 95).
5 Start up the installer for upgrading NX Manager, which you obtained in step 2, and upgrade NXManager.
6 Connect the computer in which NX Manager is installed to the network.
ATTENTION
The existing profile for the PaperStream IP driver operates in the same way as before, even after you upgrade NXManager.To use the new functions added in NX Manager, import the profile for the PaperStream IP driver again.
Uninstalling NX Manager
1 Turn on the computer and log onto Windows Server as a user with administrator privileges.
2 Exit all running software.
3 Display the [Control Panel] window.
● Windows Server 2012Right-click the Start screen, and select [All apps] on the app bar → [Control Panel] under [WindowsSystem].
● Windows Server 2012 R2Click [↓] on the lower left side of the Start screen → [Control Panel] under [Windows System].To display [↓], move the mouse cursor.
● Windows Server 2016/Windows Server 2019Click the [Start] menu → [Windows System] → [Control Panel].
4 Select [Uninstall a program].The [Programs and Features] window appears with a list of the currently installed software.
5 Select a software to uninstall.
● When Uninstalling PaperStream NX ManagerSelect [PaperStream NX Manager].
● When Uninstalling PaperStream NX Manager DatabaseSelect [PaperStream NX Manager Database].
● When Uninstalling PaperStream IP (TWAIN x64)Select [PaperStream IP (TWAIN x64)].
6 Click the [Uninstall] button or the [Uninstall/Change] button.
7 If a confirmation message appears, click the [OK] button or the [Yes] button.The software is uninstalled.
Appendix
190
Recommended