
Microsoft® Project 2010 Step by Step
Carl Chatfield Timothy Johnson
PUBLISHED BYMicrosoft PressA Division of Microsoft CorporationOne Microsoft WayRedmond, Washington 98052-6399
Copyright © 2010 by Carl Chatfield and Timothy Johnson
All rights reserved. No part of the contents of this book may be reproduced or transmitted in any form or by any means without the written permission of the publisher.
Library of Congress Control Number: 2010928745
Printed and bound in the United States of America.
ISBN: 978-0-7356-2695-9
14 15 16 17 18 19 20 21 22 LSI 8 7 6 5 4 3
A CIP catalogue record for this book is available from the British Library.
Microsoft Press books are available through booksellers and distributors worldwide. For further infor mation about international editions, contact your local Microsoft Corporation office or contact Microsoft Press International directly at fax (425) 936-7329. Visit our Website at www.microsoft.com/mspress. Send comments to [email protected].
Microsoft, Microsoft Press, Access, Excel, Fluent, Internet Explorer, PivotChart, PivotTable, PowerPoint, SharePoint, Visio, Visual Basic, and Windows are either registered trademarks or trademarks of the Microsoft group of companies. Other product and company names mentioned herein may be the trademarks of their respective owners.
The example companies, organizations, products, domain names, e-mail addresses, logos, people, places, and events depicted herein are fictitious. No association with any real company, organization, product, domain name, e-mail address, logo, person, place, or event is intended or should be inferred.
This book expresses the author’s views and opinions. The information contained in this book is provided without any express, statutory, or implied warranties. Neither the authors, Microsoft Corporation, nor its resellers, or distributors will be held liable for any damages caused or alleged to be caused either directly or indirectly by this book.
Acquisitions Editor: Juliana AldousDevelopmental Editor: Maria GarguiloProject Editor: Rosemary CapertonEditorial Production: Custom Editorial Productions, Inc.Technical Reviewer: Thuy Le; Technical Review services provided by Content Master, a member of CM Group, Ltd.Cover: Girvin
Body Part No. X16-95365
[2013-09-27]
iii
Contents at a Glance Part 1 Simple Scheduling 1 A Guided Tour of Project 2
2 Creating a Task List 22
3 Setting Up Resources 54
4 Assigning Resources to Tasks 72
5 Formatting and Sharing Your Plan 92
6 Tracking Progress on Tasks 122
Part 2 Advanced Scheduling 7 Fine-Tuning Task Details 140
8 Fine-Tuning Resource Details 178
9 Fine-Tuning Assignment Details 188
10 Fine-Tuning the Project Plan 210
11 Organizing Project Details 232
12 Tracking Progress on Tasks and Assignments 256
13 Viewing and Reporting Project Status 278
14 Getting Your Project Back on Track 298
iv Contents at a Glance
Part 3 Special Subjects 15 Applying Advanced Formatting and Printing 316
16 Customizing Project 344
17 Sharing Project Information with Other Programs 370
18 Consolidating Projects and Resources 396
Part 4 Appendices A A Short Course in Project Management 431
B Roadmap for Developing Your Project and Project Management Skills 439
C Using the Practice Files if Connected to Project Server 443
D Using Microsoft Project 2010 Step by Step in a Classroom: Suggestions for Instructors 447
Glossary 451
Index 459
v
What do you think of this book? We want to hear from you! Microsoft is interested in hearing your feedback so we can continually improve our books and learning resources for you. To participate in a brief online survey, please visit:
microsoft.com/learning/booksurvey
ContentsIntroducing Microsoft Project 2010 . . . . . . . . . . . . . . . . . . . . . . . . . . . . . . . . . . . . . . . . . . . xv
New Features . . . . . . . . . . . . . . . . . . . . . . . . . . . . . . . . . . . . . . . . . . . . . . . . . . . . . . . . . . . . xvLet’s Get Started! . . . . . . . . . . . . . . . . . . . . . . . . . . . . . . . . . . . . . . . . . . . . . . . . . . . . . . . . xvii
Modifying the Display of the Ribbon . . . . . . . . . . . . . . . . . . . . . . . . . . . . . . . . . . . . . . . . . xixDynamic Ribbon Elements . . . . . . . . . . . . . . . . . . . . . . . . . . . . . . . . . . . . . . . . . . . . . . . . . xxChanging the Width of the Ribbon . . . . . . . . . . . . . . . . . . . . . . . . . . . . . . . . . . . . . . . . .xxiAdapting Exercise Steps . . . . . . . . . . . . . . . . . . . . . . . . . . . . . . . . . . . . . . . . . . . . . . . . . .xxiv
Features and Conventions of This Book . . . . . . . . . . . . . . . . . . . . . . . . . . . . . . . . . . . . . . . xxvUsing the Practice Files . . . . . . . . . . . . . . . . . . . . . . . . . . . . . . . . . . . . . . . . . . . . . . . . . . . . xxvii
Your Companion eBook . . . . . . . . . . . . . . . . . . . . . . . . . . . . . . . . . . . . . . . . . . . . . . . . .xxviiiGetting Help . . . . . . . . . . . . . . . . . . . . . . . . . . . . . . . . . . . . . . . . . . . . . . . . . . . . . . . . . . . . . xxix
Getting Help with This Book and Its Practice Files. . . . . . . . . . . . . . . . . . . . . . . . . . . .xxixGetting Help with Project 2010. . . . . . . . . . . . . . . . . . . . . . . . . . . . . . . . . . . . . . . . . . . .xxix
Part 1 Simple Scheduling 1 A Guided Tour of Project 3
Introducing Project . . . . . . . . . . . . . . . . . . . . . . . . . . . . . . . . . . . . . . . . . . . . . . . . . . . . . . . 5The Backstage: Managing Files and Setting Options . . . . . . . . . . . . . . . . . . . . . . . . . . . 7
Templates: Avoid Reinventing the Wheel . . . . . . . . . . . . . . . . . . . . . . . . . . . . . . . 10The Ribbon and Tabs: Finding the Features You Want . . . . . . . . . . . . . . . . . . . . . . . . . 10Views: Working with Schedule Details the Way You Want . . . . . . . . . . . . . . . . . . . . . . 15Key Points . . . . . . . . . . . . . . . . . . . . . . . . . . . . . . . . . . . . . . . . . . . . . . . . . . . . . . . . . . . . . . . 20
2 Creating a Task List 23Creating a New Project Plan . . . . . . . . . . . . . . . . . . . . . . . . . . . . . . . . . . . . . . . . . . . . . . . 24
Project Management Focus: Project Is Part of a Larger Picture. . . . . . . . . . . . . 24Entering Task Names. . . . . . . . . . . . . . . . . . . . . . . . . . . . . . . . . . . . . . . . . . . . . . . . . . . . . . 27
Project Management Focus: Defining the Right Tasks for the Deliverable . . . 29
vi Contents
Entering Durations . . . . . . . . . . . . . . . . . . . . . . . . . . . . . . . . . . . . . . . . . . . . . . . . . . . . . . . 30Project Management Focus: How Do You Come Up with Accurate Task Durations? . . . . . . . . . . . . . . . . . . . . . . . . . . . . . . . . . . . . . . . . . . . . . . . . . . . . . 33
Entering a Milestone . . . . . . . . . . . . . . . . . . . . . . . . . . . . . . . . . . . . . . . . . . . . . . . . . . . . . .34Organizing Tasks into Phases . . . . . . . . . . . . . . . . . . . . . . . . . . . . . . . . . . . . . . . . . . . . . . 35
Project Management Focus: Top-Down and Bottom-Up Planning . . . . . . . . . 36Linking Tasks. . . . . . . . . . . . . . . . . . . . . . . . . . . . . . . . . . . . . . . . . . . . . . . . . . . . . . . . . . . . . 37Switching Task Scheduling from Manual to Automatic. . . . . . . . . . . . . . . . . . . . . . . . . 43Setting Nonworking Days . . . . . . . . . . . . . . . . . . . . . . . . . . . . . . . . . . . . . . . . . . . . . . . . . 46Checking the Plan’s Duration. . . . . . . . . . . . . . . . . . . . . . . . . . . . . . . . . . . . . . . . . . . . . . . 49Documenting Tasks and the Project Plan . . . . . . . . . . . . . . . . . . . . . . . . . . . . . . . . . . . . 50Key Points . . . . . . . . . . . . . . . . . . . . . . . . . . . . . . . . . . . . . . . . . . . . . . . . . . . . . . . . . . . . . . . 53
3 Setting Up Resources 55Setting Up Work Resources . . . . . . . . . . . . . . . . . . . . . . . . . . . . . . . . . . . . . . . . . . . . . . . . 56
Equipment Resource Considerations . . . . . . . . . . . . . . . . . . . . . . . . . . . . . . . . . . . 57What Is the Best Way to Enter Resource Names?. . . . . . . . . . . . . . . . . . . . . . . . . 59
Entering Resource Capacity . . . . . . . . . . . . . . . . . . . . . . . . . . . . . . . . . . . . . . . . . . . . . . . . 59Entering Resource Pay Rates . . . . . . . . . . . . . . . . . . . . . . . . . . . . . . . . . . . . . . . . . . . . . . . 60
Project Management Focus: Getting Resource Cost Information . . . . . . . . . . . 62Adjusting Working Time for Individual Resources . . . . . . . . . . . . . . . . . . . . . . . . . . . . . 63Setting Up Cost Resources . . . . . . . . . . . . . . . . . . . . . . . . . . . . . . . . . . . . . . . . . . . . . . . . . 67Documenting Resources. . . . . . . . . . . . . . . . . . . . . . . . . . . . . . . . . . . . . . . . . . . . . . . . . . . 68Key Points . . . . . . . . . . . . . . . . . . . . . . . . . . . . . . . . . . . . . . . . . . . . . . . . . . . . . . . . . . . . . . . 71
4 Assigning Resources to Tasks 73Assigning Work Resources to Tasks . . . . . . . . . . . . . . . . . . . . . . . . . . . . . . . . . . . . . . . . . 74
The Scheduling Formula: Duration, Units, and Work. . . . . . . . . . . . . . . . . . . . . . 81Controlling Work When Adding or Removing Resource Assignments . . . . . . . . . . . 82
Project Management Focus: When Should Effort-Driven Scheduling Apply? . . . . . . . . . . . . . . . . . . . . . . . . . . . . . . . . . . . . . . . . . . . . . . . . . . . 88
Assigning Cost Resources to Tasks . . . . . . . . . . . . . . . . . . . . . . . . . . . . . . . . . . . . . . . . . . 88Key Points . . . . . . . . . . . . . . . . . . . . . . . . . . . . . . . . . . . . . . . . . . . . . . . . . . . . . . . . . . . . . . . 91
Contents vii
5 Formatting and Sharing Your Plan 93Customizing the Gantt Chart View. . . . . . . . . . . . . . . . . . . . . . . . . . . . . . . . . . . . . . . . . .94Customizing the Timeline View . . . . . . . . . . . . . . . . . . . . . . . . . . . . . . . . . . . . . . . . . . . 101
Pan and Zoom the Gantt Chart View from the Timeline View. . . . . . . . . . . . .104Drawing on a Gantt Chart . . . . . . . . . . . . . . . . . . . . . . . . . . . . . . . . . . . . . . . . . . . . . . . .104Copying Views . . . . . . . . . . . . . . . . . . . . . . . . . . . . . . . . . . . . . . . . . . . . . . . . . . . . . . . . . .106Printing Views . . . . . . . . . . . . . . . . . . . . . . . . . . . . . . . . . . . . . . . . . . . . . . . . . . . . . . . . . .109Customizing and Printing Reports . . . . . . . . . . . . . . . . . . . . . . . . . . . . . . . . . . . . . . . . .115Key Points . . . . . . . . . . . . . . . . . . . . . . . . . . . . . . . . . . . . . . . . . . . . . . . . . . . . . . . . . . . . . .121
6 Tracking Progress on Tasks 123Saving a Project Baseline . . . . . . . . . . . . . . . . . . . . . . . . . . . . . . . . . . . . . . . . . . . . . . . . .124Tracking a Project as Scheduled . . . . . . . . . . . . . . . . . . . . . . . . . . . . . . . . . . . . . . . . . . .128Entering a Task’s Completion Percentage . . . . . . . . . . . . . . . . . . . . . . . . . . . . . . . . . . .129Entering Actual Values for Tasks . . . . . . . . . . . . . . . . . . . . . . . . . . . . . . . . . . . . . . . . . . .132
Project Management Focus: Is the Project on Track? . . . . . . . . . . . . . . . . . . . .136Key Points . . . . . . . . . . . . . . . . . . . . . . . . . . . . . . . . . . . . . . . . . . . . . . . . . . . . . . . . . . . . . .137
Part 2 Advanced Scheduling 7 Fine-Tuning Task Details 141
Adjusting Task Relationships . . . . . . . . . . . . . . . . . . . . . . . . . . . . . . . . . . . . . . . . . . . . . . 142Setting Task Constraints . . . . . . . . . . . . . . . . . . . . . . . . . . . . . . . . . . . . . . . . . . . . . . . . . . 147Interrupting Work on a Task . . . . . . . . . . . . . . . . . . . . . . . . . . . . . . . . . . . . . . . . . . . . . .153Adjusting Working Time for Individual Tasks . . . . . . . . . . . . . . . . . . . . . . . . . . . . . . . . 155Changing Task Types. . . . . . . . . . . . . . . . . . . . . . . . . . . . . . . . . . . . . . . . . . . . . . . . . . . . .158
Assignment Units, Peak, Peak Units, and the Scheduling Formula . . . . . . . . . 159Task Types and Effort-Driven Scheduling . . . . . . . . . . . . . . . . . . . . . . . . . . . . . . 163
Entering Deadline Dates. . . . . . . . . . . . . . . . . . . . . . . . . . . . . . . . . . . . . . . . . . . . . . . . . .163Entering Fixed Costs . . . . . . . . . . . . . . . . . . . . . . . . . . . . . . . . . . . . . . . . . . . . . . . . . . . . . 165Setting Up a Recurring Task. . . . . . . . . . . . . . . . . . . . . . . . . . . . . . . . . . . . . . . . . . . . . . .167Viewing the Project’s Critical Path . . . . . . . . . . . . . . . . . . . . . . . . . . . . . . . . . . . . . . . . . 170Scheduling Summary Tasks Manually . . . . . . . . . . . . . . . . . . . . . . . . . . . . . . . . . . . . . . 172Inactivating Tasks. . . . . . . . . . . . . . . . . . . . . . . . . . . . . . . . . . . . . . . . . . . . . . . . . . . . . . . . 175Key Points . . . . . . . . . . . . . . . . . . . . . . . . . . . . . . . . . . . . . . . . . . . . . . . . . . . . . . . . . . . . . .177
viii Contents
8 Fine-Tuning Resource Details 179Setting Up Resource Availability to Apply at Different Times . . . . . . . . . . . . . . . . . . . . . . . . . . . . . . . . . . . . . . . . . . . . . . . 179Entering Multiple Pay Rates for a Resource . . . . . . . . . . . . . . . . . . . . . . . . . . . . . . . . .183Setting Up Pay Rates to Apply at Different Times . . . . . . . . . . . . . . . . . . . . . . . . . . . .184Setting Up Material Resources . . . . . . . . . . . . . . . . . . . . . . . . . . . . . . . . . . . . . . . . . . . .186Key Points . . . . . . . . . . . . . . . . . . . . . . . . . . . . . . . . . . . . . . . . . . . . . . . . . . . . . . . . . . . . . .187
9 Fine-Tuning Assignment Details 189Delaying the Start of Assignments . . . . . . . . . . . . . . . . . . . . . . . . . . . . . . . . . . . . . . . . .189Applying Contours to Assignments . . . . . . . . . . . . . . . . . . . . . . . . . . . . . . . . . . . . . . . . 192Applying Different Cost Rates to Assignments. . . . . . . . . . . . . . . . . . . . . . . . . . . . . . .196Assigning Material Resources to Tasks. . . . . . . . . . . . . . . . . . . . . . . . . . . . . . . . . . . . . .198
Variable Consumption Rates for Material Resources . . . . . . . . . . . . . . . . . . . . .199Viewing Resource Capacity . . . . . . . . . . . . . . . . . . . . . . . . . . . . . . . . . . . . . . . . . . . . . . .200Adjusting Assignments in the Team Planner View. . . . . . . . . . . . . . . . . . . . . . . . . . . .203Key Points . . . . . . . . . . . . . . . . . . . . . . . . . . . . . . . . . . . . . . . . . . . . . . . . . . . . . . . . . . . . . .208
10 Fine-Tuning the Project Plan 211Examining Resource Allocations over Time. . . . . . . . . . . . . . . . . . . . . . . . . . . . . . . . . . 211
Project Management Focus: Evaluating Resource Allocation . . . . . . . . . . . . .212Resolving Resource Overallocations Manually . . . . . . . . . . . . . . . . . . . . . . . . . . . . . . . 217Leveling Overallocated Resources . . . . . . . . . . . . . . . . . . . . . . . . . . . . . . . . . . . . . . . . .220Checking the Project’s Cost and Finish Date. . . . . . . . . . . . . . . . . . . . . . . . . . . . . . . . .227Key Points . . . . . . . . . . . . . . . . . . . . . . . . . . . . . . . . . . . . . . . . . . . . . . . . . . . . . . . . . . . . . .230
11 Organizing Project Details 233Sorting Project Details . . . . . . . . . . . . . . . . . . . . . . . . . . . . . . . . . . . . . . . . . . . . . . . . . . .234Grouping Project Details . . . . . . . . . . . . . . . . . . . . . . . . . . . . . . . . . . . . . . . . . . . . . . . . .238Filtering Project Details . . . . . . . . . . . . . . . . . . . . . . . . . . . . . . . . . . . . . . . . . . . . . . . . . . 242Customizing Tables . . . . . . . . . . . . . . . . . . . . . . . . . . . . . . . . . . . . . . . . . . . . . . . . . . . . . .248
Create Custom Fields Quickly . . . . . . . . . . . . . . . . . . . . . . . . . . . . . . . . . . . . . . . . 251Customizing Views . . . . . . . . . . . . . . . . . . . . . . . . . . . . . . . . . . . . . . . . . . . . . . . . . . . . . . 251Key Points . . . . . . . . . . . . . . . . . . . . . . . . . . . . . . . . . . . . . . . . . . . . . . . . . . . . . . . . . . . . . .254
12 Tracking Progress on Tasks and Assignments 257Updating a Baseline . . . . . . . . . . . . . . . . . . . . . . . . . . . . . . . . . . . . . . . . . . . . . . . . . . . . .258
Saving Interim Plans . . . . . . . . . . . . . . . . . . . . . . . . . . . . . . . . . . . . . . . . . . . . . . . .262
Contents ix
Tracking Actual and Remaining Values for Tasks and Assignments . . . . . . . . . . . . .263Entering Actual Costs Manually. . . . . . . . . . . . . . . . . . . . . . . . . . . . . . . . . . . . . . .269
Tracking Timephased Actual Work for Tasks and Assignments. . . . . . . . . . . . . . . . .269Project Management Focus: Collecting Actuals from Resources. . . . . . . . . . .273
Rescheduling Incomplete Work . . . . . . . . . . . . . . . . . . . . . . . . . . . . . . . . . . . . . . . . . . . 274Key Points . . . . . . . . . . . . . . . . . . . . . . . . . . . . . . . . . . . . . . . . . . . . . . . . . . . . . . . . . . . . . .277
13 Viewing and Reporting Project Status 279Identifying Tasks that Have Slipped . . . . . . . . . . . . . . . . . . . . . . . . . . . . . . . . . . . . . . . .280
Project Management Focus: Is Variance Ever a Good Thing? . . . . . . . . . . . . . 281Project Management Focus: Getting the Word Out . . . . . . . . . . . . . . . . . . . . .286
Examining Task Costs . . . . . . . . . . . . . . . . . . . . . . . . . . . . . . . . . . . . . . . . . . . . . . . . . . . .287Examining Resource Costs . . . . . . . . . . . . . . . . . . . . . . . . . . . . . . . . . . . . . . . . . . . . . . . .290Reporting Project Cost Variance with a Stoplight View . . . . . . . . . . . . . . . . . . . . . . .293Key Points . . . . . . . . . . . . . . . . . . . . . . . . . . . . . . . . . . . . . . . . . . . . . . . . . . . . . . . . . . . . . .297
14 Getting Your Project Back on Track 299
Troubleshooting Time and Schedule Problems . . . . . . . . . . . . . . . . . . . . . . . . . . . . . .300Reduce Task Durations by Assigning Resource Overtime Hours . . . . . . . . . . .306
Troubleshooting Cost and Resource Problems. . . . . . . . . . . . . . . . . . . . . . . . . . . . . . .307Troubleshooting Scope-of-Work Problems. . . . . . . . . . . . . . . . . . . . . . . . . . . . . . . . . . 311Key Points . . . . . . . . . . . . . . . . . . . . . . . . . . . . . . . . . . . . . . . . . . . . . . . . . . . . . . . . . . . . . . 314
Part 3 Special Subjects 15 Applying Advanced Formatting and Printing 317
Formatting a Gantt Chart View. . . . . . . . . . . . . . . . . . . . . . . . . . . . . . . . . . . . . . . . . . . . 318Formatting a Timeline View. . . . . . . . . . . . . . . . . . . . . . . . . . . . . . . . . . . . . . . . . . . . . . . 324Formatting a Network Diagram View . . . . . . . . . . . . . . . . . . . . . . . . . . . . . . . . . . . . . .327Formatting a Calendar View . . . . . . . . . . . . . . . . . . . . . . . . . . . . . . . . . . . . . . . . . . . . . . 331Printing Views: Advanced Options . . . . . . . . . . . . . . . . . . . . . . . . . . . . . . . . . . . . . . . . .334Printing Reports: Advanced Options . . . . . . . . . . . . . . . . . . . . . . . . . . . . . . . . . . . . . . .339Key Points . . . . . . . . . . . . . . . . . . . . . . . . . . . . . . . . . . . . . . . . . . . . . . . . . . . . . . . . . . . . . .342
x Contents
16 Customizing Project 345Sharing Custom Elements Between Project Plans . . . . . . . . . . . . . . . . . . . . . . . . . . . .346Recording Macros . . . . . . . . . . . . . . . . . . . . . . . . . . . . . . . . . . . . . . . . . . . . . . . . . . . . . . . 351Editing Macros . . . . . . . . . . . . . . . . . . . . . . . . . . . . . . . . . . . . . . . . . . . . . . . . . . . . . . . . . .356Customizing the Ribbon and Quick Access Toolbar . . . . . . . . . . . . . . . . . . . . . . . . . .362Key Points . . . . . . . . . . . . . . . . . . . . . . . . . . . . . . . . . . . . . . . . . . . . . . . . . . . . . . . . . . . . . .368
17 Sharing Project Information with Other Programs 371Copying Project Data to Other Programs . . . . . . . . . . . . . . . . . . . . . . . . . . . . . . . . . . .372Opening Other File Formats in Project . . . . . . . . . . . . . . . . . . . . . . . . . . . . . . . . . . . . .377Saving to Other File Formats from Project . . . . . . . . . . . . . . . . . . . . . . . . . . . . . . . . . .382
Working with File Formats from Previous Versions of Project . . . . . . . . . . . . .386Generating Visual Reports with Excel and Visio . . . . . . . . . . . . . . . . . . . . . . . . . . . . .386Guided Tour: Synchronizing Task Lists Between Project and SharePoint (Project Professional only). . . . . . . . . . . . . . . . . . . . . . . . . . . . . . . . . . . . . . . . . . . . . . . . . . . . . . . .391Key Points . . . . . . . . . . . . . . . . . . . . . . . . . . . . . . . . . . . . . . . . . . . . . . . . . . . . . . . . . . . . . .395
18 Consolidating Projects and Resources 397Creating a Resource Pool . . . . . . . . . . . . . . . . . . . . . . . . . . . . . . . . . . . . . . . . . . . . . . . . .398
Creating a Dedicated Resource Pool . . . . . . . . . . . . . . . . . . . . . . . . . . . . . . . . . .404Viewing Assignment Details in a Resource Pool . . . . . . . . . . . . . . . . . . . . . . . . . . . . .404Updating Assignments in a Sharer Plan. . . . . . . . . . . . . . . . . . . . . . . . . . . . . . . . . . . . .406Updating a Resource’s Information in a Resource Pool . . . . . . . . . . . . . . . . . . . . . . .408Updating All Plans’ Working Times in a Resource Pool . . . . . . . . . . . . . . . . . . . . . . . 411Linking New Project Plans to a Resource Pool . . . . . . . . . . . . . . . . . . . . . . . . . . . . . . . 413Opening a Sharer Plan and Updating a Resource Pool. . . . . . . . . . . . . . . . . . . . . . . . 416Consolidating Project Plans . . . . . . . . . . . . . . . . . . . . . . . . . . . . . . . . . . . . . . . . . . . . . . .420Creating Dependencies Between Projects . . . . . . . . . . . . . . . . . . . . . . . . . . . . . . . . . . 423Key Points . . . . . . . . . . . . . . . . . . . . . . . . . . . . . . . . . . . . . . . . . . . . . . . . . . . . . . . . . . . . . .428
Part 4 Appendices A A Short Course in Project Management 431
Understanding What Defines a Project . . . . . . . . . . . . . . . . . . . . . . . . . . . . . . . . . . . . . 431The Project Triangle: Viewing Projects in Terms of Time, Cost, and Scope . . . . . . . 432Time, Cost, and Scope: Managing Project Constraints . . . . . . . . . . . . . . . . . . . . . . . . 435Managing Your Projects with Project. . . . . . . . . . . . . . . . . . . . . . . . . . . . . . . . . . . . . . .438

Contents xi
What do you think of this book? We want to hear from you! Microsoft is interested in hearing your feedback so we can continually improve our books and learning resources for you. To participate in a brief online survey, please visit:
microsoft.com/learning/booksurvey
B Roadmap for Developing Your Project and Project Management Skills 439
Joining a Project Learning Community . . . . . . . . . . . . . . . . . . . . . . . . . . . . . . . . . . . . . 439Joining a Project Management Final Words. . . . . . . . . . . . . . . . . . . . . . . . . . . . . . . . . . . . . . . . . . . . . . . . . . . . . . . . . . . . .441
C Using the Practice Files if Connected to Project Server 443Changing Account Settings if Connected to Project Server. . . . . . . . . . . . . . . . . . . .443Introduction to Enterprise Project Management . . . . . . . . . . . . . . . . . . . . . . . . . . . . .444
D Using Microsoft Project 2010 Step by Step in a Classroom: Suggestions for Instructors 447
Matching Content to Instructional Needs. . . . . . . . . . . . . . . . . . . . . . . . . . . . . . . . . . .447Teaching Project Management with Project. . . . . . . . . . . . . . . . . . . . . . . . . . . . . . . . .450
Glossary . . . . . . . . . . . . . . . . . . . . . . . . . . . . . . . . . . . . . . . . . . . . . . . . . . . . . . . . . . . . . . . . . 451
Index. . . . . . . . . . . . . . . . . . . . . . . . . . . . . . . . . . . . . . . . . . . . . . . . . . . . . . . . . . . . . . . . . . . . 459

Acknowledgments xiii
AcknowledgmentsThe authors would like to thank our families for their patience and encouragement while we wrote this book. From Carl: merci big brothers Butch and George. From Tim: khawp jai Ratsamy (Mimi), Brian, and Brenda. The authors also wish to acknowledge and thank our technical reviewer, Thuy Le, PMP, EPM Solutions Architect at Microsoft, and Project program manager Adrian Jenkins, for their timely and valuable feedback and responses to our technical questions.
Finally, we thank our project editor, Rosemary Caperton, and our content editor, Susan McClung, for their outstanding work.

Introducing Microsoft Project 2010 xv
Introducing Microsoft Project 2010Microsoft Project 2010 is a powerful program that helps you plan and manage a wide range of projects. From meeting crucial deadlines and budgets to selecting the right resources, Project 2010 offers easier and more intuitive experiences to help you be more productive and realize better results. You can use Project to:
● Create project plans at the level of detail that’s right for your project. Work with summary data initially or shift to a more detailed approach when it’s convenient. Control what tasks Project can schedule automatically or that you’ll schedule manually.
● Manage tasks, costs, work, and resources at whatever level of detail is appropriate for your project’s needs.
● See your project plan data in a variety of views. Apply grouping, highlighting, sort-ing, and filtering to see your data the way that you want.
● Track and manage your project plan throughout project execution.
● Collaborate and share data with others in your organization using a variety of pro-ductivity applications.
● Use resource pools, consolidated projects, and cross-project links to extend your project management focus across multiple projects.
Project 2010 builds on previous versions to provide powerful project management tools. This introduction provides an overview of new features that we explore throughout the book.
New FeaturesIf you’re upgrading to Project 2010 from a previous version, you’re probably most inter-ested in the differences between the old and new versions and how they will affect you. The following sections list new features you will want to be aware of, depending on the version of Project you are upgrading from.
xvi Introducing Microsoft Project 2010
If You Are Upgrading from Project 2007If you have been using Project 2007, you might be wondering what new features and interface changes Microsoft has added to its desktop project management application. The list of new features includes the following:
● The Microsoft Office Fluent interface (the “ribbon”) No more hunting through menus, submenus, and dialog boxes. This new interface organizes all the com-mands that most people use in a new way, making them quickly accessible from tabs at the top of the program window.
● The Backstage view Finally, all the tools you need to work with your files are accessible from one location.
● Manually scheduled tasks Begin creating tasks with whatever information ( numeric or text data) you may have, and don’t worry about automatic scheduling of tasks until you’re ready. Manually scheduled tasks are not affected by changes in duration, start or finish dates, dependencies, or other issues that otherwise would cause Project to reschedule a task. You can then switch individual tasks or an entire project plan from manual to automatic scheduling.
● Timeline view Create a visually compelling “project at a glance” view that includes just the summary tasks, tasks, and milestones that you choose. Easily copy the Timeline view as a graphic image to paste into other applications.
● Better pasting to Excel and Word Paste Project data into Excel or Word and preserve the column headings and outline structure of your Project data.
● Customizable ribbon Create your own tabs and groups to suit the way you work.
● Custom fields Just start typing a numeric value, date value, or text string into the rightmost column in a table, and Project will identify the right data type.
● AutoFilter improvements Use Microsoft Excel–like filtering, as well as sorting and grouping, right from AutoFilter arrows on column headings.
● Save as PDF or XPS Create PDF or XPS format documents directly from Project.
● Team Planner view (Project Professional only) Perform actions like reassigning a task from one resource to another with simple dragging in the Team Planner view.
● Inactivate tasks (Project Professional only) Disable (but don’t delete) selected tasks from a project plan so they have no effect on the overall schedule but can be reactivated later if you need them.
Introducing Microsoft Project 2010 xvii
● SharePoint Task List integration (Project Professional only) Publish and synchronize tasks between Project and a new type of Microsoft SharePoint list called a Project Task List.
If You Are Upgrading from Project 2003In addition to the features listed in the previous section, if you’re upgrading from Project 2003, you’ll want to take note of the new features that were introduced in Project 2007. The 2007 upgrade included several new and improved features, including the following:
● Visual reports Export Project task, resource, or assignment details to Excel or Visio in a highly structured graphical format.
● Change highlighting See what values changed throughout a project plan immediately after you make a change to a calculated task, resource, or assignment value.
● Cost resources Assign this special type of resource to tasks to accrue categories of costs you wish to track, like travel or entertainment. Cost resources have no effect on the scheduling of tasks to which they are assigned.
● Task Inspector pane Called the Task Driver pane in Project 2007, the Task Inspector pane shows you details that affect the scheduling of a selected task.
● Multi-level Undo Back out of a series of actions when you need to.
● Calendar working time exceptions Record not just the date, but also an explana-tion of a resource or project calendar working time exception.
Let’s Get Started!We’ve been working with Project since it debuted for Windows, and each version has offered something that made project planning and management a little easier. Project 2010 is a substantial update for desktop project management, and we look forward to showing you around.

Modifying the Display of the Ribbon xix
Modifying the Display of the RibbonThe goal of the Microsoft Office working environment is to make working with Office documents, including Microsoft Project plans, Microsoft Word documents, Microsoft Excel workbooks, Microsoft PowerPoint presentations, Microsoft Outlook e-mail messages, and Microsoft Access database tables, as intuitive as possible. You work with an Office document and its contents by giving commands to the program in which the document is open. All Office 2010 programs organize commands on a horizontal bar called the ribbon, which appears across the top of each program window whether or not there is an active document.
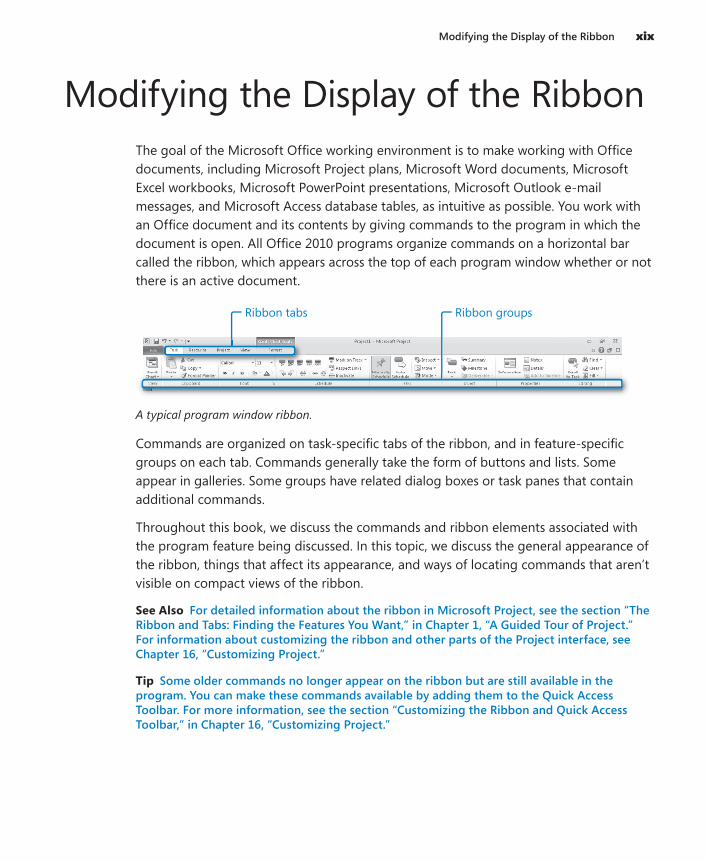
Ribbon tabs Ribbon groups
A typical program window ribbon.
Commands are organized on task-specific tabs of the ribbon, and in feature-specific groups on each tab. Commands generally take the form of buttons and lists. Some appear in galleries. Some groups have related dialog boxes or task panes that contain additional commands.
Throughout this book, we discuss the commands and ribbon elements associated with the program feature being discussed. In this topic, we discuss the general appearance of the ribbon, things that affect its appearance, and ways of locating commands that aren’t visible on compact views of the ribbon.
See Also For detailed information about the ribbon in Microsoft Project, see the section “The Ribbon and Tabs: Finding the Features You Want,” in Chapter 1, “A Guided Tour of Project.” For information about customizing the ribbon and other parts of the Project interface, see Chapter 16, “Customizing Project.”
Tip Some older commands no longer appear on the ribbon but are still available in the program. You can make these commands available by adding them to the Quick Access Toolbar. For more information, see the section “Customizing the Ribbon and Quick Access Toolbar,” in Chapter 16, “Customizing Project.”
xx Modifying the Display of the Ribbon
Dynamic Ribbon ElementsThe ribbon is dynamic, meaning that the appearance of commands on the ribbon changes as the width of the ribbon changes. A command might be displayed on the ribbon in the form of a large button, a small button, a small labeled button, or a list entry. As the width of the ribbon decreases, the size, shape, and presence of buttons on the ribbon adapt to the available space.
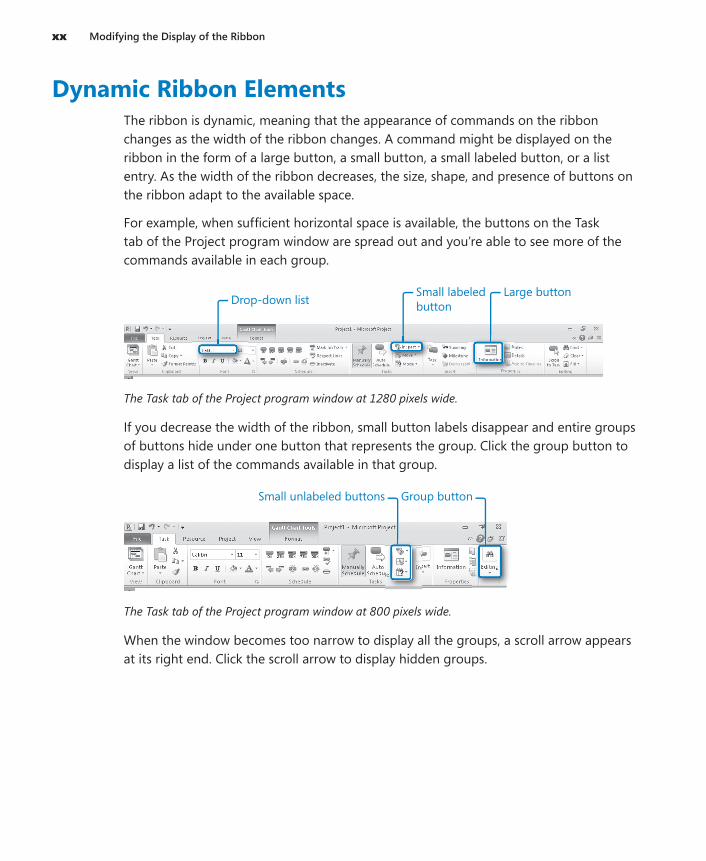
For example, when sufficient horizontal space is available, the buttons on the Task tab of the Project program window are spread out and you’re able to see more of the commands available in each group.
Drop-down listSmall labeledbutton
Large button
The Task tab of the Project program window at 1280 pixels wide.
If you decrease the width of the ribbon, small button labels disappear and entire groups of buttons hide under one button that represents the group. Click the group button to display a list of the commands available in that group.
Group buttonSmall unlabeled buttons
The Task tab of the Project program window at 800 pixels wide.
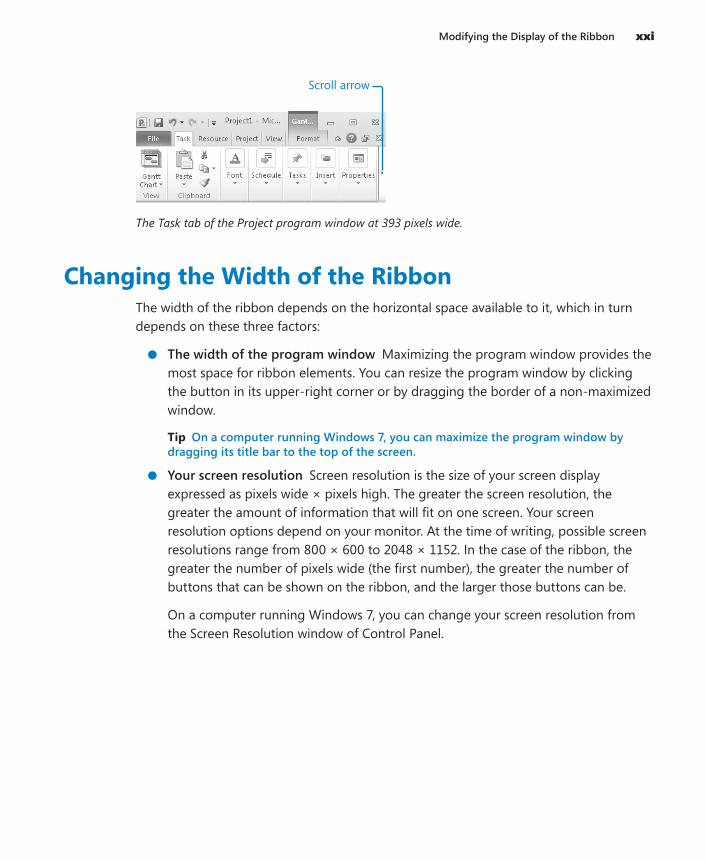
When the window becomes too narrow to display all the groups, a scroll arrow appears at its right end. Click the scroll arrow to display hidden groups.
Modifying the Display of the Ribbon xxi
Scroll arrow
The Task tab of the Project program window at 393 pixels wide.
Changing the Width of the RibbonThe width of the ribbon depends on the horizontal space available to it, which in turn depends on these three factors:
● The width of the program window Maximizing the program window provides the most space for ribbon elements. You can resize the program window by clicking the button in its upper-right corner or by dragging the border of a non-maximized window.
Tip On a computer running Windows 7, you can maximize the program window by dragging its title bar to the top of the screen.
● Your screen resolution Screen resolution is the size of your screen display expressed as pixels wide × pixels high. The greater the screen resolution, the greater the amount of information that will fit on one screen. Your screen resolution options depend on your monitor. At the time of writing, possible screen resolutions range from 800 × 600 to 2048 × 1152. In the case of the ribbon, the greater the number of pixels wide (the first number), the greater the number of buttons that can be shown on the ribbon, and the larger those buttons can be.
On a computer running Windows 7, you can change your screen resolution from the Screen Resolution window of Control Panel.
xxii Modifying the Display of the Ribbon
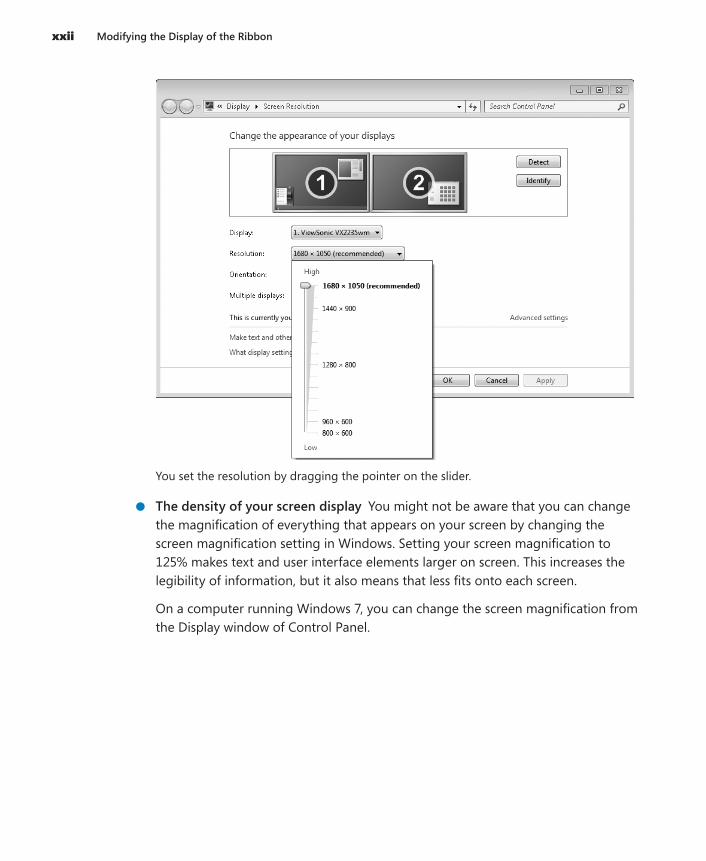
You set the resolution by dragging the pointer on the slider.
● The density of your screen display You might not be aware that you can change the magnification of everything that appears on your screen by changing the screen magnification setting in Windows. Setting your screen magnification to 125% makes text and user interface elements larger on screen. This increases the legibility of information, but it also means that less fits onto each screen.
On a computer running Windows 7, you can change the screen magnification from the Display window of Control Panel.

Modifying the Display of the Ribbon xxiii
You can choose one of the standard display magnification options or create another by setting a custom text size.
The screen magnification is directly related to the density of the text elements on screen, which is expressed in dots per inch (dpi) or points per inch (ppi). (The terms are interchangeable, and in fact, they are both used in the Windows dialog box in which you change the setting.) The greater the dpi, the larger the text and user interface elements appear on screen. By default, Windows displays text and screen elements at 96 dpi. Choosing the Medium - 125% display setting changes the dpi of text and screen elements to 120 dpi. You can choose a custom setting of up to 500% magnification, or 480 dpi, in the Custom DPI Setting dialog box.
You can choose a magnification of up to 200% from the lists or choose a greater magnification by dragging across the ruler from left to right.
xxiv Modifying the Display of the Ribbon
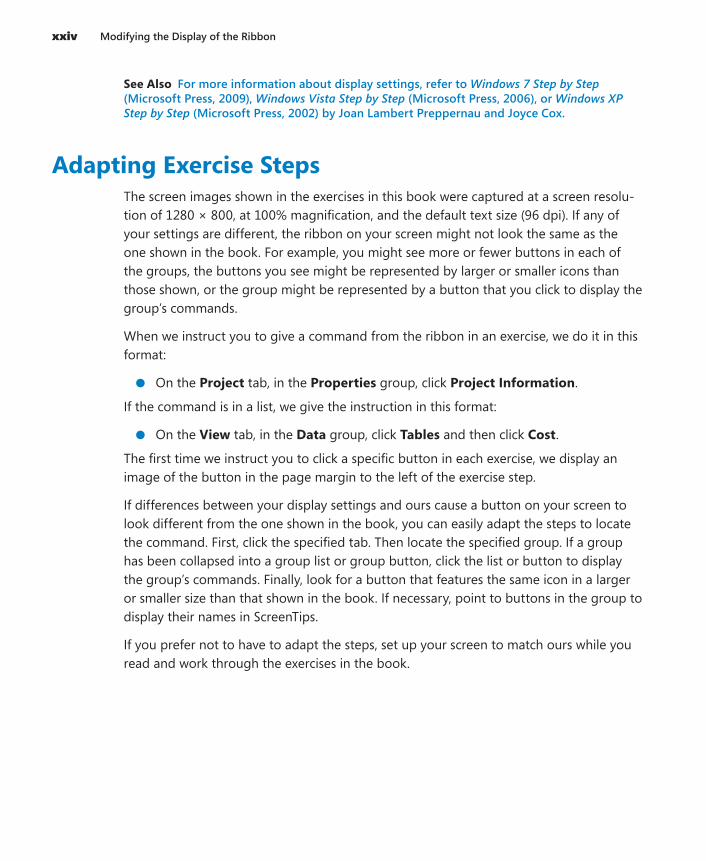
See Also For more information about display settings, refer to Windows 7 Step by Step (Microsoft Press, 2009), Windows Vista Step by Step (Microsoft Press, 2006), or Windows XP Step by Step (Microsoft Press, 2002) by Joan Lambert Preppernau and Joyce Cox.
Adapting Exercise StepsThe screen images shown in the exercises in this book were captured at a screen resolu-tion of 1280 × 800, at 100% magnification, and the default text size (96 dpi). If any of your settings are different, the ribbon on your screen might not look the same as the one shown in the book. For example, you might see more or fewer buttons in each of the groups, the buttons you see might be represented by larger or smaller icons than those shown, or the group might be represented by a button that you click to display the group’s commands.
When we instruct you to give a command from the ribbon in an exercise, we do it in this format:
● On the Project tab, in the Properties group, click Project Information.
If the command is in a list, we give the instruction in this format:
● On the View tab, in the Data group, click Tables and then click Cost.
The first time we instruct you to click a specific button in each exercise, we display an image of the button in the page margin to the left of the exercise step.
If differences between your display settings and ours cause a button on your screen to look different from the one shown in the book, you can easily adapt the steps to locate the command. First, click the specified tab. Then locate the specified group. If a group has been collapsed into a group list or group button, click the list or button to display the group’s commands. Finally, look for a button that features the same icon in a larger or smaller size than that shown in the book. If necessary, point to buttons in the group to display their names in ScreenTips.
If you prefer not to have to adapt the steps, set up your screen to match ours while you read and work through the exercises in the book.
FeaturesandConventionsofThisBook xxv
Features and Conventions of This BookThis book has been designed to lead you step by step through many of the tasks you’re most likely to want to perform in Microsoft Project Professional 2010 or Microsoft Project Standard 2010. If you start at the beginning and work your way through all the exercises, you will gain enough proficiency to be able to create and work with a wide range of Project features. However, each topic is self contained. If you have worked with a previous version of Project, or if you completed all the exercises and later need help remembering how to perform a procedure, the following features of this book will help you locate specific information:
● Detailed table of contents Search the listing of the topics and sidebars within each chapter.
● Chapter thumb tabs Easily locate the beginning of the chapter you want.
● Topic-specific running heads Within a chapter, quickly locate the topic you want by looking at the running heads at the top of odd-numbered pages.
● Glossary Look up the meaning of a word or the definition of a concept.
● Detailed index Look up specific tasks and features in the index, which has been carefully crafted with the reader in mind.
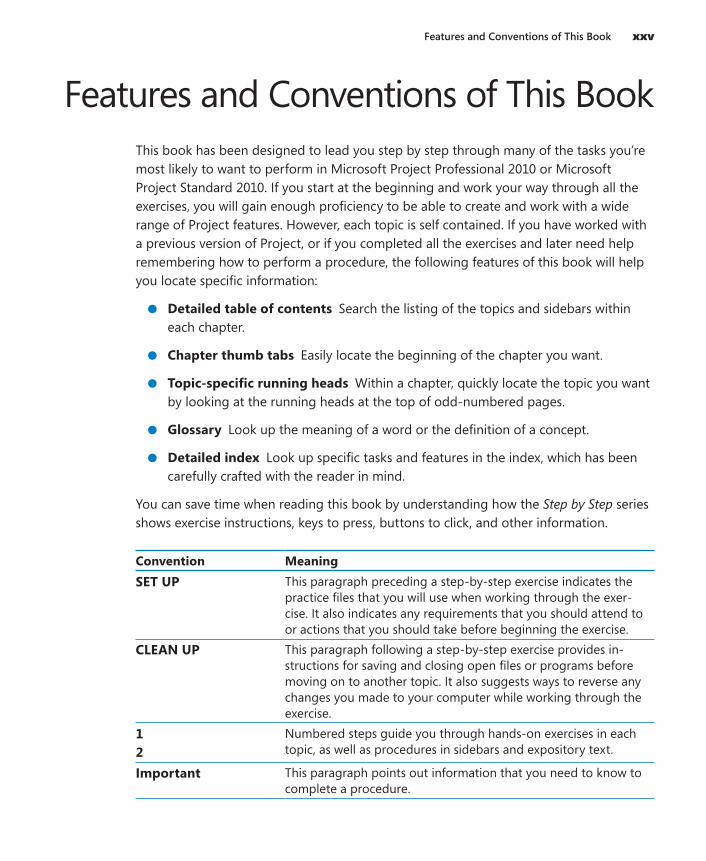
You can save time when reading this book by understanding how the Step by Step series shows exercise instructions, keys to press, buttons to click, and other information.
Convention MeaningSET UP This paragraph preceding a step-by-step exercise indicates the
practice files that you will use when working through the exer-cise. It also indicates any requirements that you should attend to or actions that you should take before beginning the exercise.
CLEAN UP This paragraph following a step-by-step exercise provides in-structions for saving and closing open files or programs before moving on to another topic. It also suggests ways to reverse any changes you made to your computer while working through the exercise.
12
Numbered steps guide you through hands-on exercises in each topic, as well as procedures in sidebars and expository text.
Important This paragraph points out information that you need to know to complete a procedure.
xxvi FeaturesandConventionsofThisBook
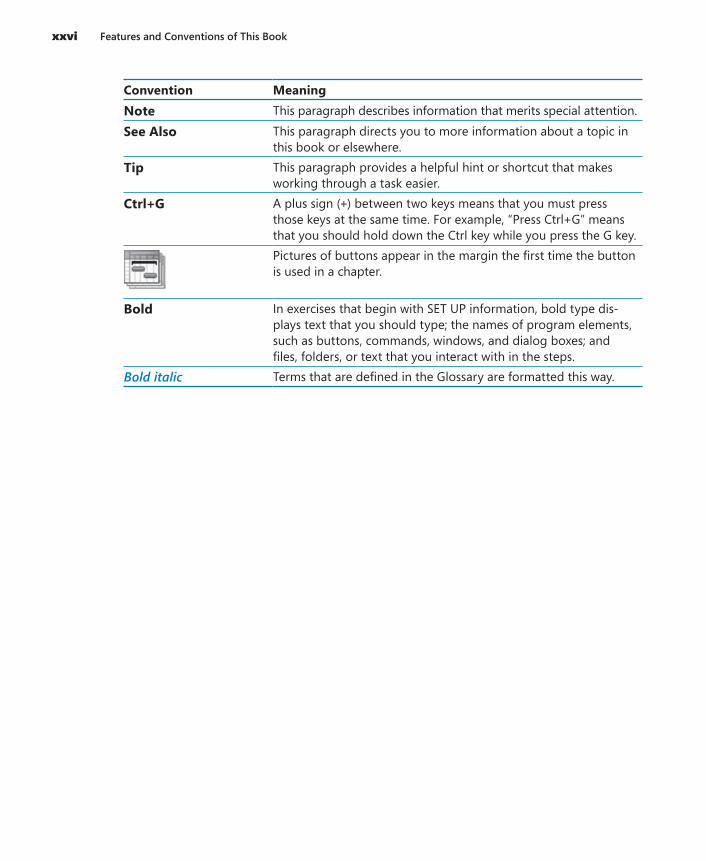
Convention MeaningNote This paragraph describes information that merits special attention.
See Also This paragraph directs you to more information about a topic in this book or elsewhere.
Tip This paragraph provides a helpful hint or shortcut that makes working through a task easier.
Ctrl+G A plus sign (+) between two keys means that you must press those keys at the same time. For example, “Press Ctrl+G” means that you should hold down the Ctrl key while you press the G key.Pictures of buttons appear in the margin the first time the button is used in a chapter.
Bold In exercises that begin with SET UP information, bold type dis-plays text that you should type; the names of program elements, such as buttons, commands, windows, and dialog boxes; and files, folders, or text that you interact with in the steps.
Bold italic Terms that are defined in the Glossary are formatted this way.
Using the Practice Files xxvii
Using the Practice FilesBefore you can complete the exercises in this book, you need to copy the book’s practice files to your computer. These practice files, as well as other information, can be down-loaded from the book’s detail page, located at:
http://go.microsoft.com/fwlink/?Linkid=191765
Display the detail page in your Web browser and follow the instructions for downloading the files.
Important The Microsoft Project 2010 program is not available from this Website. You should purchase and install that program before using this book.
The following table lists the practice files for this book.
Note The same set of practice files works with both Microsoft Project Professional 2010 and Microsoft Project Standard 2010. Differences between the two editions of Project are explained where needed throughout the book.
Chapter FileChapter 1: A Guided Tour of Project Guided Tour_Start.mppChapter 2: Creating a Task List (no initial practice file)Chapter 3: Setting Up Resources Simple Resources_Start.mppChapter 4: Assigning Resources to Tasks Simple Assignments_Start.mppChapter 5: Formatting and Sharing Your Plan Simple Formatting_Start.mppChapter 6: Tracking Progress on Tasks Simple Tracking_Start.mppChapter 7: Fine-Tuning Task Details Advanced Tasks A_Start.mpp
Advanced Tasks B_Start.mppChapter 8: Fine-Tuning Resource Details Advanced Resources_Start.mppChapter 9: Fine-Tuning Assignment Details Advanced Assignments A_Start.mpp
Advanced Assignments B_Start.mppChapter 10: Fine-Tuning the Project Plan Advanced Plan_Start.mppChapter 11: Organizing Project Details Advanced Organizing_Start.mppChapter 12: Tracking Progress on Tasks and Assignments
Advanced Tracking A_Start.mppAdvanced Tracking B_Start.mppAdvanced Tracking C_Start.mppAdvanced Tracking D_Start.mpp
Chapter 13: Viewing and Reporting Project Status
Reporting Status_Start.mpp
xxviii Using the Practice Files
Chapter FileChapter 14: Getting Your Project Back on Track Back on Track_Start.mppChapter 15: Applying Advanced Formatting and Printing
Advanced Formatting_Start.mpp
Chapter 16: Customizing Project Customizing A_Start.mppCustomizing B_Start.mpp
Chapter 17: Sharing Project Information with Other Programs
Sample Task List.xlsSharing_Start.mpp
Chapter 18: Consolidating Projects and Resources
Consolidating A_Start.mppConsolidating B_Start.mpp
Your Companion eBookThe eBook edition of this book allows you to:
● Search the full text
● Copy and paste
To download your eBook, please see the instruction page at the back of this book.
Getting Help xxix
Getting HelpEvery effort has been made to ensure the accuracy of this Microsoft Press book. If you run into problems please contact the appropriate source, listed in the following sections, for help and assistance.
Getting Help with This Book and Its Practice FilesThe practice files referred to throughout this book are available as Web downloads. For more information, see “Using the Practice Files,” at the beginning of this book.
If your question or issue concerns the content of this book or its practice files, please first consult the book’s errata page, which can be accessed at:
http://go.microsoft.com/fwlink/?Linkid=191765
This page provides information about known errors and corrections to the book. If you do not find your answer on the errata page, send your question or comment to Microsoft Press Technical Support at:
Getting Help with Project 2010If your question is about Microsoft Project 2010, not about the content of this book or its practice files, please search Microsoft Support or the Microsoft Knowledge Base at:
http://support.microsoft.com
In the United States, Microsoft software product support issues not covered by the Microsoft Knowledge Base are addressed by Microsoft Product Support Services. The Microsoft software support options available from Microsoft Product Support Services are listed at:
http://support.microsoft.com/gp/selfoverview/

Chapter at a Glance
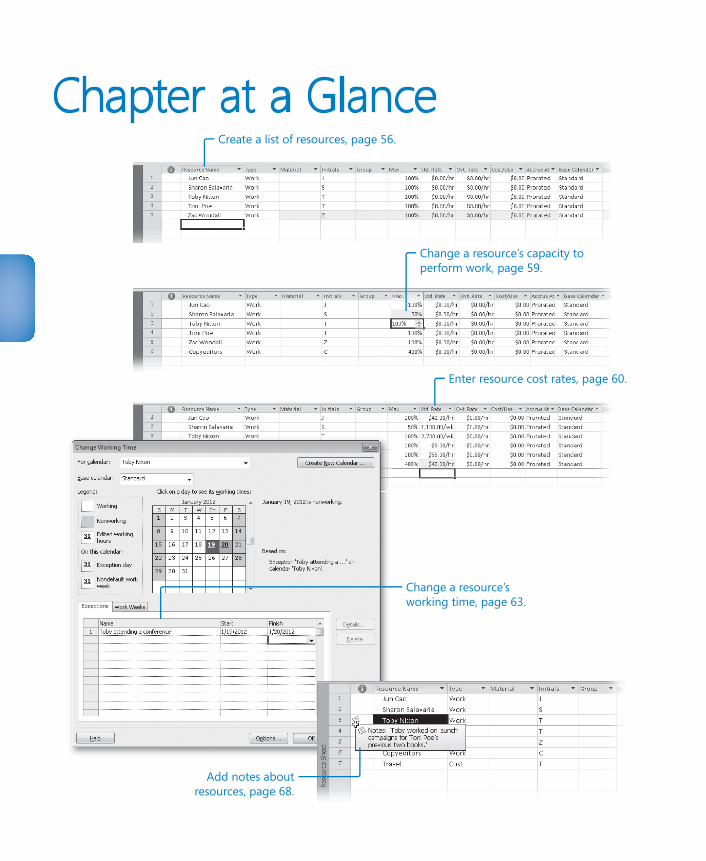
Enter resource cost rates, page 60.
Create a list of resources, page 56.
Change a resource’s capacity toperform work, page 59.
Change a resource’sworking time, page 63.
Add notes aboutresources, page 68.
55
3 Setting Up ResourcesIn this chapter, you will learn how to:
✔ Set up basic resource information for the people who work on projects.✔ Adjust the maximum capacity of a resource to do work.✔ Set up cost information for work resources.✔ Change a resource’s availability for work.✔ Enter cost resource information for financial tracking.✔ Record additional information about a resource in a note.
Microsoft Project 2010 supports three types of resources. These are work resources, as well as two special-purpose resources: cost and material. Briefly, here is how to think about the three resource types:
● Work resources include the people and equipment needed to complete the tasks in a project.
● Cost resources represent a financial cost associated with a task that you need to account for. Examples include categories of expenses like travel, entertainment, and so on.
● Material resources are consumables that you use up as the project proceeds. For example, a construction project might need to track steel or concrete as it is used throughout the project.
In this chapter you will set up work and cost resources. Material resources are described in Chapter 8, “Fine-Tuning Resource Details.”
In this chapter, you will set up the work and cost resources that you need to complete the new book launch at Lucerne Publishing. Effective resource management is one of the most powerful advantages of using Project instead of task-focused planning tools, such as paper-based organizers. You do not need to set up resources and assign them
56 Chapter 3 Setting Up Resources
to tasks in Project; however, without this information, you might be less effective in man-aging your schedule. Setting up resource information in Project takes a little effort, but the time is well spent if your project is primarily driven by time or cost constraints (and nearly all projects are driven by one, if not both, of these factors).
Practice Files Before you can complete the exercises in this chapter, you need to copy the book’s practice files to your computer. A complete list of practice files is provided in “Using the Practice Files” at the beginning of this book. For each exercise that has a practice file, simply browse to where you saved the book’s practice file folder.
Important If you are running Project Professional, you may need to make a one-time setting change. This helps ensure that the practice files you work with in this chapter do not affect your Project Server data. For more information, see Appendix C, “Using the Practice Files if Connected to Project Server.”
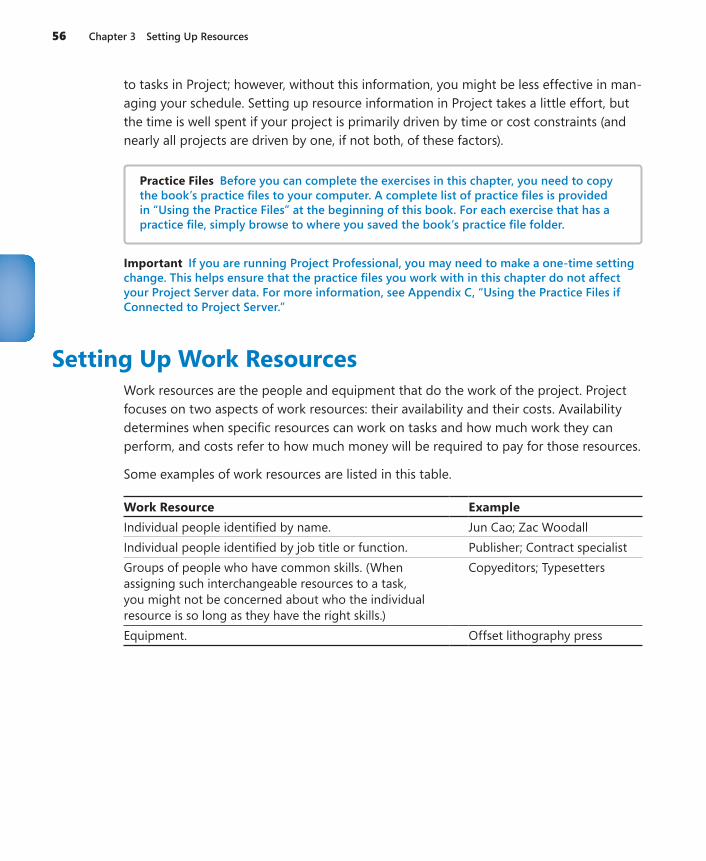
Setting Up Work ResourcesWork resources are the people and equipment that do the work of the project. Project focuses on two aspects of work resources: their availability and their costs. Availability determines when specific resources can work on tasks and how much work they can perform, and costs refer to how much money will be required to pay for those resources.
Some examples of work resources are listed in this table.
Work Resource ExampleIndividual people identified by name. Jun Cao; Zac WoodallIndividual people identified by job title or function. Publisher; Contract specialistGroups of people who have common skills. (Whenassigning such interchangeable resources to a task, you might not be concerned about who the individual resource is so long as they have the right skills.)
Copyeditors; Typesetters
Equipment. Offset lithography press

Setting Up Work Resources 57
Equipment Resource Considerations
In Project, you set up people and equipment resources in exactly the same way; they are both examples of work resources. However, you should be aware of important differences in how you can schedule these two work resources. Most people resources have a working day of typically 8 and usually no more than 12 hours, but equipment resources might have much more varied capacities for work, ranging from short durations (followed by maintenance) to around the clock without interruption. Moreover, people resources might be flexible in the tasks they can perform, but equipment resources tend to be more specialized. For example, a content editor for a book project might also act as a copyeditor in a pinch, but a desktop copy machine cannot replace a printing press.
You do not need to track every piece of equipment that will be used in your project, but you might want to set up equipment resources when
● Multiple teams or people might need a piece of equipment to accomplish different tasks simultaneously, and the equipment might be overbooked.
● You want to plan and track costs associated with the equipment.
Consider these issues if your projects involve equipment resources.
Project can help you make smarter decisions about managing work resources and monitoring financial costs.
In this exercise, you enter the names of several people resources.
SET UP Start Project if it’s not already running.
You need the Simple Resources_Start project plan located in your Chapter03 practice file folder to complete this exercise. Open the Simple Resources_Start project plan, and then follow these steps.
1. On the File tab, click Save As.
Project displays the Save As dialog box.
2. In the File name box, type Simple Resources, and then click Save.
Tip You can instruct Project to automatically save the active project plan at predefined intervals, such as every 10 minutes. On the File tab, click Options. In the Project Options dialog box, click Save, select the Auto Save Every check box, and then specify the time interval you want.
3. On the View tab, in the Resource Views group, click Resource Sheet.
58 Chapter 3 Setting Up Resources
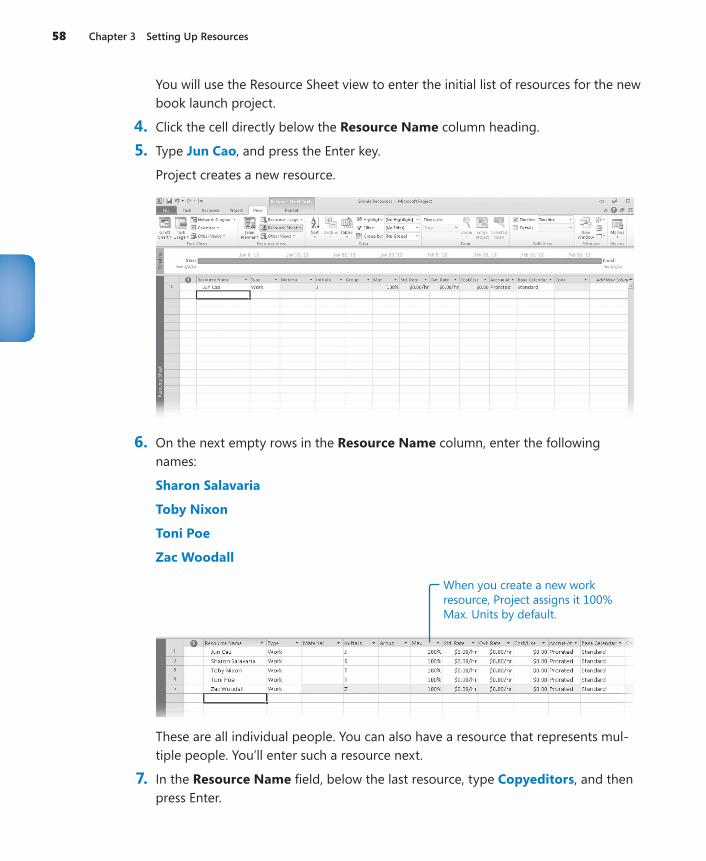
You will use the Resource Sheet view to enter the initial list of resources for the new book launch project.
4. Click the cell directly below the Resource Name column heading.
5. Type Jun Cao, and press the Enter key.
Project creates a new resource.
6. On the next empty rows in the Resource Name column, enter the following names:
Sharon Salavaria
Toby Nixon
Toni Poe
Zac Woodall
When you create a new workresource, Project assigns it 100%Max. Units by default.
These are all individual people. You can also have a resource that represents mul-tiple people. You’ll enter such a resource next.
7. In the Resource Name field, below the last resource, type Copyeditors, and then press Enter.
Entering Resource Capacity 59
What Is the Best Way to Enter Resource Names?In Project, work resource names can refer to specific people (Sharon Salavaria) or to specific job titles, such as Publisher or Contract Specialist. Use whatever naming convention makes the most sense to you and to those who will see your project plan information. The important questions are: who will see these resource names, and how will they identify the resources? The resource names that you choose will appear both in Project and in any resource information shared from Project. For example, in the default Gantt Chart view, the name of the resource appears next to the bars of the tasks to which that resource is assigned.
A resource might refer to somebody who is already on staff or to a position to be filled later. If you have not yet filled all the resource positions required, you might not have real people’s names to enter. In that case, use descriptive placeholder names or job titles when setting up resources in Project.
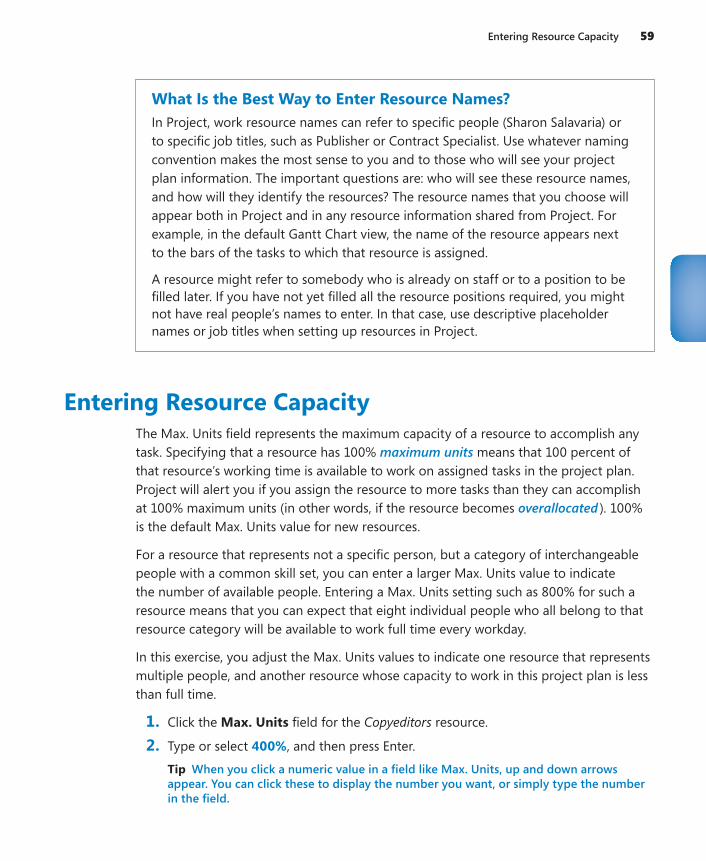
Entering Resource CapacityThe Max. Units field represents the maximum capacity of a resource to accomplish any task. Specifying that a resource has 100% maximum units means that 100 percent of that resource’s working time is available to work on assigned tasks in the project plan. Project will alert you if you assign the resource to more tasks than they can accomplish at 100% maximum units (in other words, if the resource becomes overallocated ). 100% is the default Max. Units value for new resources.
For a resource that represents not a specific person, but a category of interchangeable people with a common skill set, you can enter a larger Max. Units value to indicate the number of available people. Entering a Max. Units setting such as 800% for such a resource means that you can expect that eight individual people who all belong to that resource category will be available to work full time every workday.
In this exercise, you adjust the Max. Units values to indicate one resource that represents multiple people, and another resource whose capacity to work in this project plan is less than full time.
1. Click the Max. Units field for the Copyeditors resource.
2. Type or select 400%, and then press Enter.
Tip When you click a numeric value in a field like Max. Units, up and down arrows appear. You can click these to display the number you want, or simply type the number in the field.
60 Chapter 3 Setting Up Resources
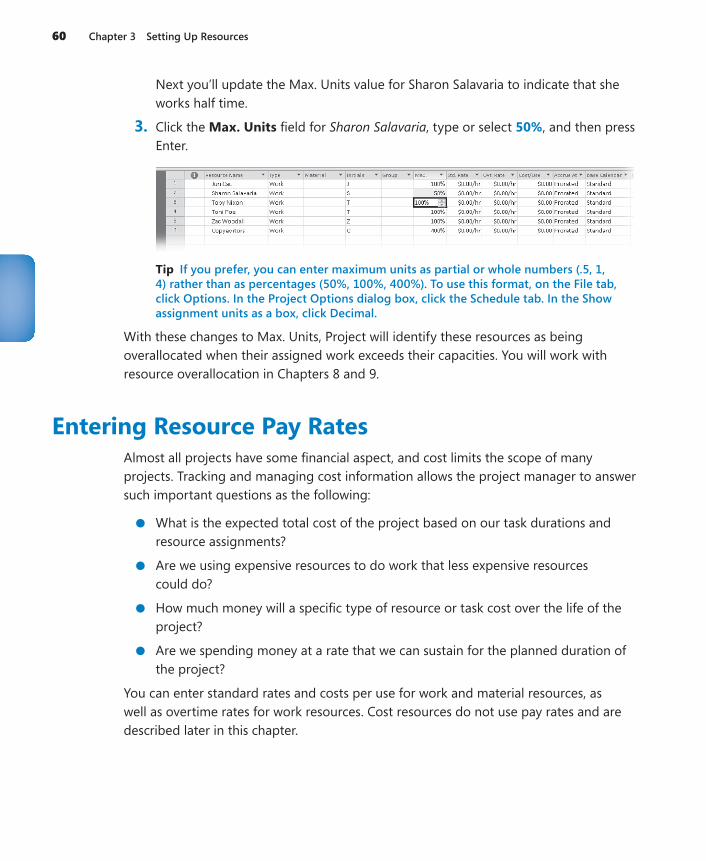
Next you’ll update the Max. Units value for Sharon Salavaria to indicate that she works half time.
3. Click the Max. Units field for Sharon Salavaria, type or select 50%, and then press Enter.
Tip If you prefer, you can enter maximum units as partial or whole numbers (.5, 1, 4) rather than as percentages (50%, 100%, 400%). To use this format, on the File tab, click Options. In the Project Options dialog box, click the Schedule tab. In the Show assignment units as a box, click Decimal.
With these changes to Max. Units, Project will identify these resources as being overallocated when their assigned work exceeds their capacities. You will work with resource overallocation in Chapters 8 and 9.
Entering Resource Pay RatesAlmost all projects have some financial aspect, and cost limits the scope of many projects. Tracking and managing cost information allows the project manager to answer such important questions as the following:
● What is the expected total cost of the project based on our task durations and resource assignments?
● Are we using expensive resources to do work that less expensive resources could do?
● How much money will a specific type of resource or task cost over the life of the project?
● Are we spending money at a rate that we can sustain for the planned duration of the project?
You can enter standard rates and costs per use for work and material resources, as well as overtime rates for work resources. Cost resources do not use pay rates and are described later in this chapter.
Entering Resource Pay Rates 61
When a work resource has a standard pay rate entered and is assigned to a task, Project calculates the cost of the assignment. Project does so by multiplying the assignment’s work value by the resource’s pay rate—both using a common increment of time (such as hours). You can then see cost per resource, cost per assignment, and cost per task (as well as costs rolled up to summary tasks and the entire project plan). You will assign resources to tasks in Chapter 4, “Assigning Resources to Tasks.”
Project handles overtime expenses differently. Project will apply the overtime pay rate only when you specifically record overtime hours for an assignment. You will find more information about working with overtime in Chapter 14, “Getting Your Project Back On Track.” Project does not automatically calculate overtime hours and associated costs be-cause there’s too great a chance that it would apply overtime when you did not intend it. In the new book launch project plan, Jun Cao’s working schedule provides a good ex-ample. In the next exercise, you will set up a working schedule of 10 hours per day, four days per week for Jun. This is still a regular 40-hour workweek, even though 2 hours per day could be mistaken for overtime with the normal assumption of an 8-hour day.
In addition to or instead of cost rates, a resource can include a set fee that Project accrues to each task to which the resource is assigned. This is called a cost per use. Unlike cost rates, the cost per use does not vary with the task’s duration or amount of work the resource performs on the task. You specify the cost per use in the Cost/Use field in the Resource Sheet view.
In this exercise, you enter standard and overtime pay rates for work resource.
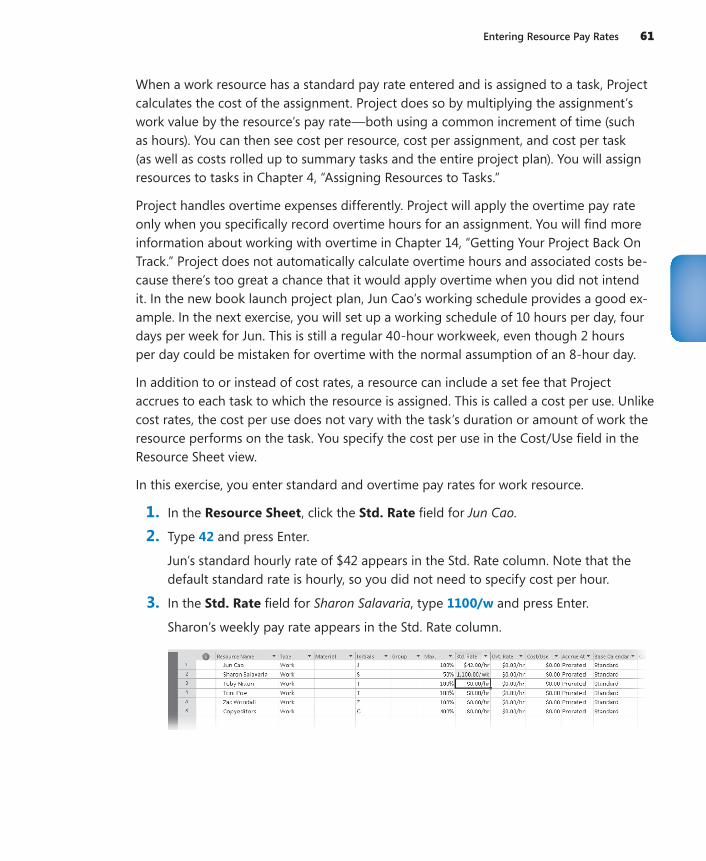
1. In the Resource Sheet, click the Std. Rate field for Jun Cao.
2. Type 42 and press Enter.
Jun’s standard hourly rate of $42 appears in the Std. Rate column. Note that the default standard rate is hourly, so you did not need to specify cost per hour.
3. In the Std. Rate field for Sharon Salavaria, type 1100/w and press Enter.
Sharon’s weekly pay rate appears in the Std. Rate column.
62 Chapter 3 Setting Up Resources
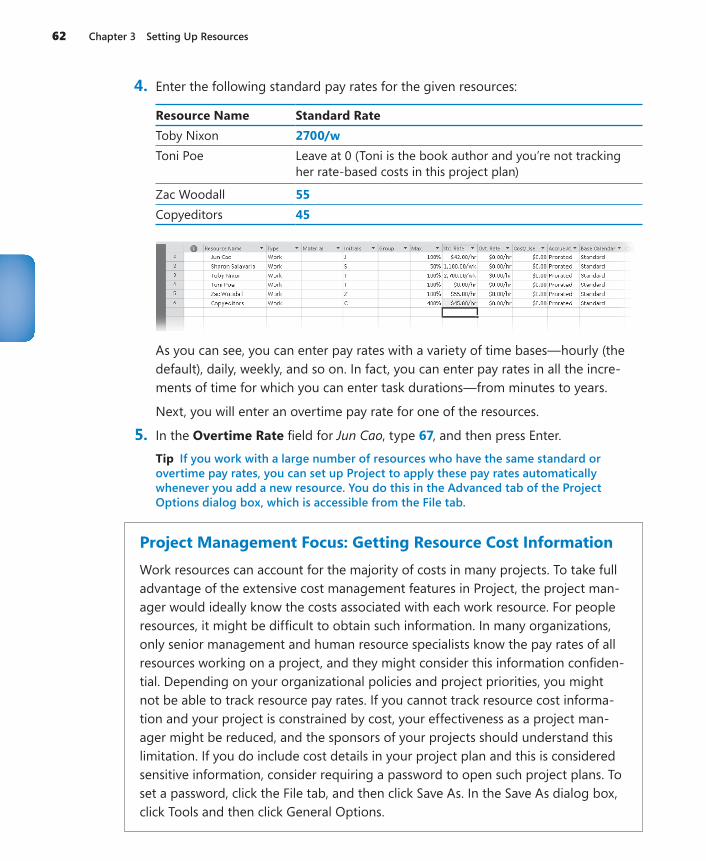
4. Enter the following standard pay rates for the given resources:
Resource Name Standard RateToby Nixon 2700/wToni Poe Leave at 0 (Toni is the book author and you’re not tracking
her rate-based costs in this project plan)
Zac Woodall 55Copyeditors 45
As you can see, you can enter pay rates with a variety of time bases—hourly (the default), daily, weekly, and so on. In fact, you can enter pay rates in all the incre-ments of time for which you can enter task durations—from minutes to years.
Next, you will enter an overtime pay rate for one of the resources.
5. In the Overtime Rate field for Jun Cao, type 67, and then press Enter.
Tip If you work with a large number of resources who have the same standard or overtime pay rates, you can set up Project to apply these pay rates automatically whenever you add a new resource. You do this in the Advanced tab of the Project Options dialog box, which is accessible from the File tab.
Project Management Focus: Getting Resource Cost InformationWork resources can account for the majority of costs in many projects. To take full advantage of the extensive cost management features in Project, the project man-ager would ideally know the costs associated with each work resource. For people resources, it might be difficult to obtain such information. In many organizations, only senior management and human resource specialists know the pay rates of all resources working on a project, and they might consider this information confiden-tial. Depending on your organizational policies and project priorities, you might not be able to track resource pay rates. If you cannot track resource cost informa-tion and your project is constrained by cost, your effectiveness as a project man-ager might be reduced, and the sponsors of your projects should understand this limitation. If you do include cost details in your project plan and this is considered sensitive information, consider requiring a password to open such project plans. To set a password, click the File tab, and then click Save As. In the Save As dialog box, click Tools and then click General Options.
Adjusting Working Time for Individual Resources 63
Adjusting Working Time for Individual ResourcesProject uses different types of calendars for different purposes. In Chapter 2, “Creating a Task List,” you modified the project calendar to specify nonworking days for the entire project. In this exercise, you will focus on the resource calendar. A resource c alendar controls the working and nonworking times of an individual resource. Project uses resource calendars to determine when work for a specific resource can be sched-uled. Resource calendars apply only to work resources (people and equipment), not to material or cost resources.
When you initially create resources in a project plan, Project creates a resource calendar for each work resource. The initial working time settings for resource calendars exactly match those of the project calendar, which by default is the Standard base calendar. The Standard base calendar is built into Project and accommodates a default work schedule from 8 A.M. to 5 P.M., Monday through Friday, with an hour off for lunch each day. If all the working times of your resources match the working time of the project calendar, you do not need to edit any resource calendars. However, chances are that some of your resources will need exceptions to the working time in the project calendar—such as
● A flex-time work schedule
● Vacation time
● Other times when a resource is not available to work on the project, such as time spent training or attending a conference
Tip If you have a resource who is available to work on your project only part time, you might be tempted to set the working time of the resource in your project to reflect a part-time schedule, such as 8 A.M. to 12 P.M. daily. However, a better approach would be to adjust the availability of the resource as recorded in the Max. Units field to 50%, as you did for the previous exercise for the resource named Sharon Salavaria. Changing the unit availability of the resource keeps the focus on the capacity of the resource to work on the project rather than on the specific times of the day when that work might occur. You set the maximum units for a resource in the Resource Sheet view.
Changes that you make to the project calendar are reflected automatically in resource calendars derived from the same project calendar. For example, in Chapter 2, you speci-fied a nonworking day for a staff morale event, and Project rescheduled all work to skip that day.
In this exercise, you specify the working and nonworking times for individual work resources.
1. On the Project tab, in the Properties group, click Change Working Time.
The Change Working Time dialog box appears.
64 Chapter 3 Setting Up Resources
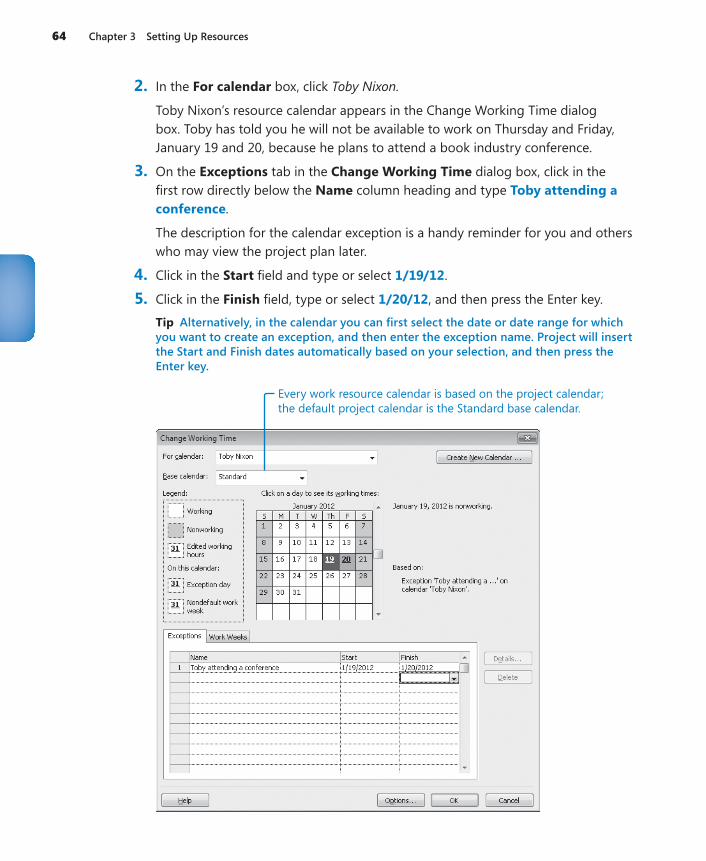
2. In the For calendar box, click Toby Nixon.
Toby Nixon’s resource calendar appears in the Change Working Time dialog box. Toby has told you he will not be available to work on Thursday and Friday, January 19 and 20, because he plans to attend a book industry conference.
3. On the Exceptions tab in the Change Working Time dialog box, click in the first row directly below the Name column heading and type Toby attending a conference.
The description for the calendar exception is a handy reminder for you and others who may view the project plan later.
4. Click in the Start field and type or select 1/19/12.
5. Click in the Finish field, type or select 1/20/12, and then press the Enter key.
Tip Alternatively, in the calendar you can first select the date or date range for which you want to create an exception, and then enter the exception name. Project will insert the Start and Finish dates automatically based on your selection, and then press the Enter key.
Every work resource calendar is based on the project calendar;the default project calendar is the Standard base calendar.

Adjusting Working Time for Individual Resources 65
Project will not schedule work for Toby on these dates.
Tip To set up a partial working time exception for a resource, such as a portion of a day when a resource cannot work, click Details. In the Details dialog box, you can also create recurring exceptions to the resource’s availability.
To conclude this exercise, you will set up a “4 by 10” work schedule (that is, 4 days per week, 10 hours per day) for a resource.
6. In the For box, click Jun Cao.
7. When prompted to save the resource calendar changes that you made for Toby Nixon, click Yes.
8. Click the Work Weeks tab in the Change Working Time dialog box.
9. Click [Default] directly under the Name column heading, and then click Details.
Next, you will modify the default working week days and times for Jun Cao.
10. Under Selected Day(s), select Monday through Thursday.
These are the weekdays Jun can normally work.
11. Click Set day(s) to these specific working times.
Next you’ll modify Jun’s regular daily schedule for the days she normally works.
12. In row 2, click 5:00 PM and replace it with 7:00 PM, and then press Enter.
Finally, you will mark Friday as a nonworking day for Jun.
13. Click Friday.
14. Click Set days to nonworking time.
Now Project can schedule work for Jun as late as 7 P.M. every Monday through Thursday, but it will not schedule work for her on Fridays.
15. Click OK to close the Details dialog box.
66 Chapter 3 Setting Up Resources
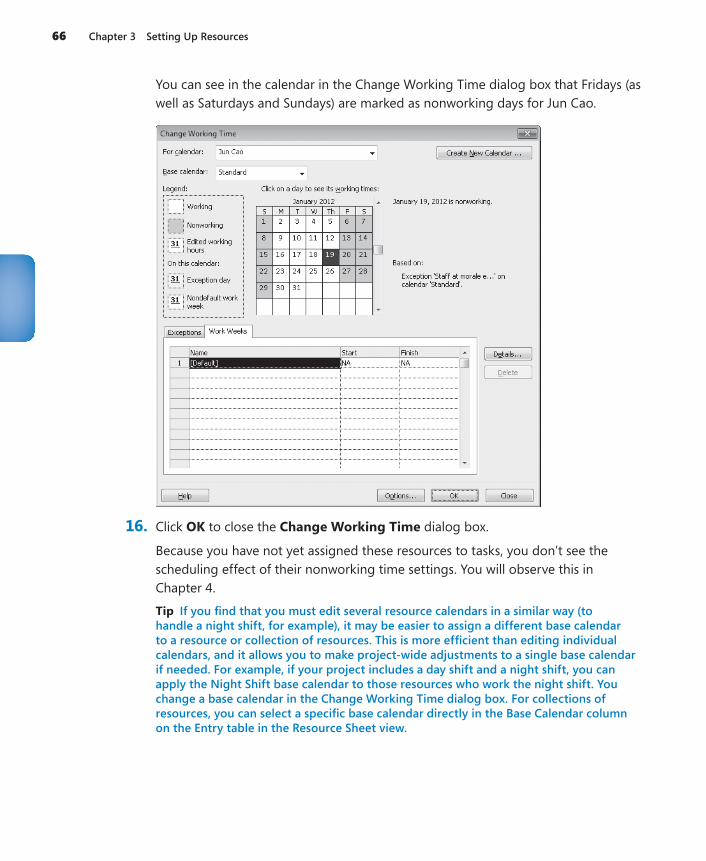
You can see in the calendar in the Change Working Time dialog box that Fridays (as well as Saturdays and Sundays) are marked as nonworking days for Jun Cao.
16. Click OK to close the Change Working Time dialog box.
Because you have not yet assigned these resources to tasks, you don’t see the scheduling effect of their nonworking time settings. You will observe this in Chapter 4.
Tip If you find that you must edit several resource calendars in a similar way (to handle a night shift, for example), it may be easier to assign a different base calendar to a resource or collection of resources. This is more efficient than editing individual calendars, and it allows you to make project-wide adjustments to a single base calendar if needed. For example, if your project includes a day shift and a night shift, you can apply the Night Shift base calendar to those resources who work the night shift. You change a base calendar in the Change Working Time dialog box. For collections of resources, you can select a specific base calendar directly in the Base Calendar column on the Entry table in the Resource Sheet view.
Setting Up Cost Resources 67
Setting Up Cost ResourcesAnother type of resource that you can use in Project is the cost resource. You can use a cost resource to represent a financial cost associated with a task in a project. While work resources (people and equipment) can have associated costs (hourly rates and fixed costs per assignment), the sole purpose of a cost resource is to associate a particular type of cost with one or more tasks. Common types of cost resources might include categories of expenses you’d want to track on a project for accounting or financial reporting pur-poses, such as travel, entertainment, or training.
Cost resources do no work and have no effect on the scheduling of a task. The Max. Units Standard and Overtime pay rates and Cost/Use fields do not apply to cost resources. After you assign a cost resource to a task and specify the cost amount per task, you can then see the cumulative costs for that type of cost resource, such as total travel costs in a project.
The way in which cost resources generate cost values differs from that of work resources. When you assign a work resource to a task, the work resource can generate a cost based on a pay rate (such at $40 per hour for the length of the assignment), a flat per-use cost (such as $100 per assignment), or both. You set up such pay rates and cost per use amounts once for the work resource, as you did in the section “Entering Resource Pay Rates” earlier in this chapter. However, you enter the cost value of a cost resource only when you assign it to a task. You can do so in the Cost field of the Assign Resources dialog box or in the Cost field of the Task Form with the Cost detail shown.
Lucerne Publishing maintains a profit and loss (P&L) sheet for every book it publishes. Travel is a major expense incurred in a book launch.
In this exercise, you’ll set up a cost resource.
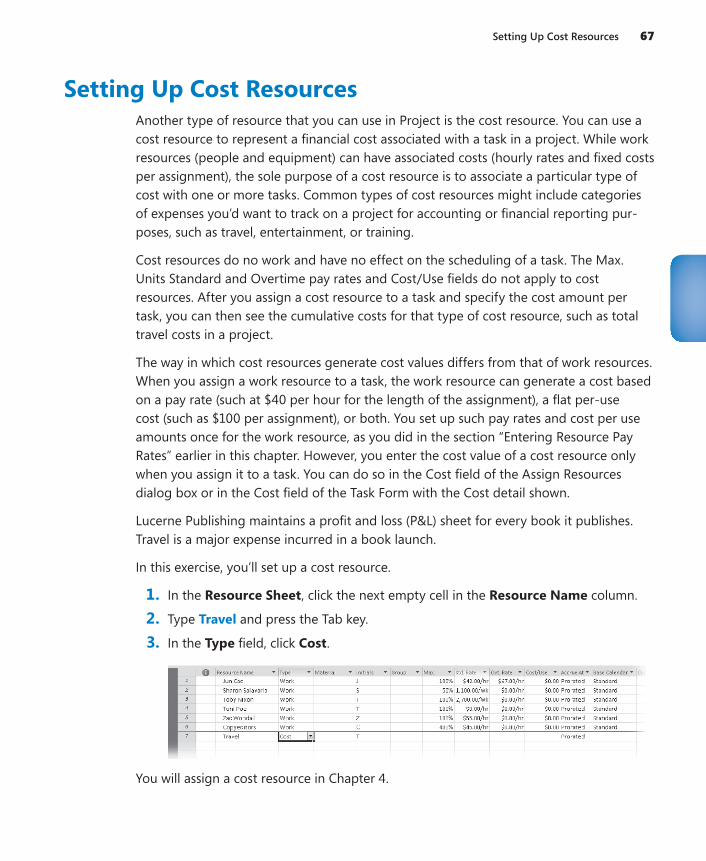
1. In the Resource Sheet, click the next empty cell in the Resource Name column.
2. Type Travel and press the Tab key.
3. In the Type field, click Cost.
You will assign a cost resource in Chapter 4.
68 Chapter 3 Setting Up Resources
Documenting ResourcesYou might recall from Chapter 2 that you can record any additional information about a task, resource, or assignment in a note. For example, if a resource has flexible skills that can help the project, it is a good idea to record this in a note. In that way, the note resides in the project plan and can be easily viewed or printed.
In this exercise, you enter resource notes relevant to the new book launch project. In Chapter 2, you entered a task note via the Notes button on the Task tab of the Properties group. You can enter resource notes in a similar way (via the Notes button on the Resource tab of the Properties group) but in this exercise, you’ll use a differ-ent method. You’ll use the Resource form, which allows you to view and edit notes for multiple resources more quickly.
In this exercise, you’ll enter notes in the Resource Form.
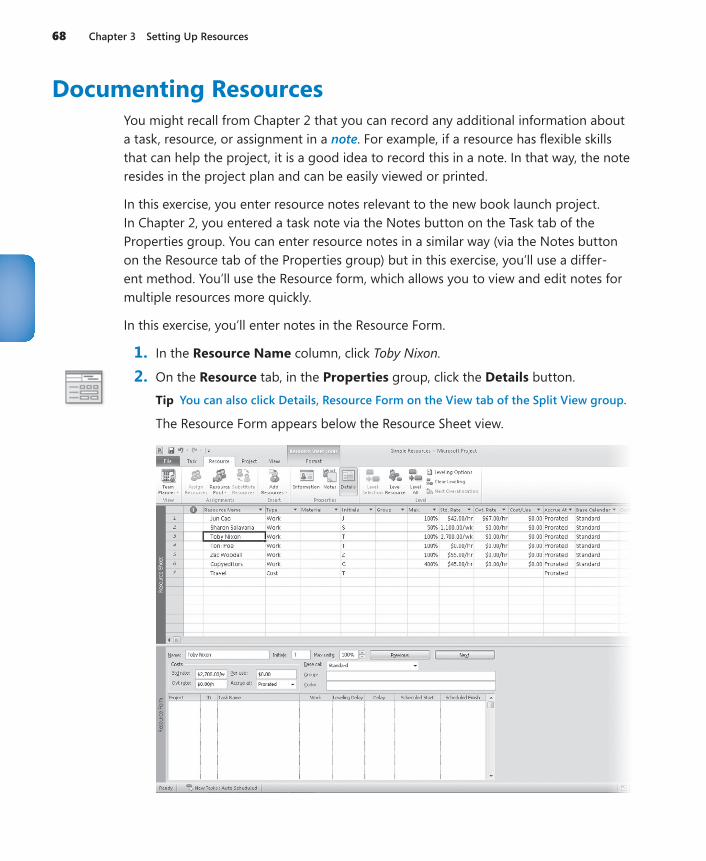
1. In the Resource Name column, click Toby Nixon.
2. On the Resource tab, in the Properties group, click the Details button.
Tip You can also click Details, Resource Form on the View tab of the Split View group.
The Resource Form appears below the Resource Sheet view.
Documenting Resources 69
In this type of split view, details about the selected item in the upper view (a resource, in this case) appear in the lower view. You can quickly change the select-ed resource name in the upper view by clicking directly on a name, using the up arrow or down arrow keys, or by clicking Previous or Next in the Resource Form.
The Resource Form can display one of several details; initially it displays the Schedule details. Next you’ll switch it to display the Notes details.
3. Click anywhere in the Resource Form.
4. On the Format tab, in the Details group, click Notes.
Tip You can also right-click in the gray background area of the Resource Form and, in the shortcut menu that appears, click Notes.
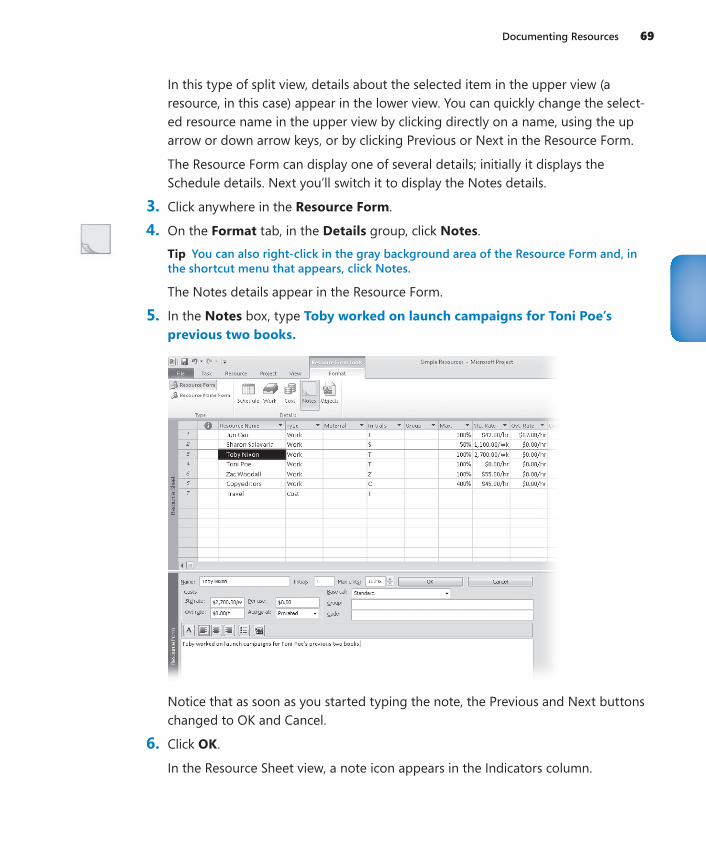
The Notes details appear in the Resource Form.
5. In the Notes box, type Toby worked on launch campaigns for Toni Poe’s previous two books.
Notice that as soon as you started typing the note, the Previous and Next buttons changed to OK and Cancel.
6. Click OK.
In the Resource Sheet view, a note icon appears in the Indicators column.
70 Chapter 3 Setting Up Resources
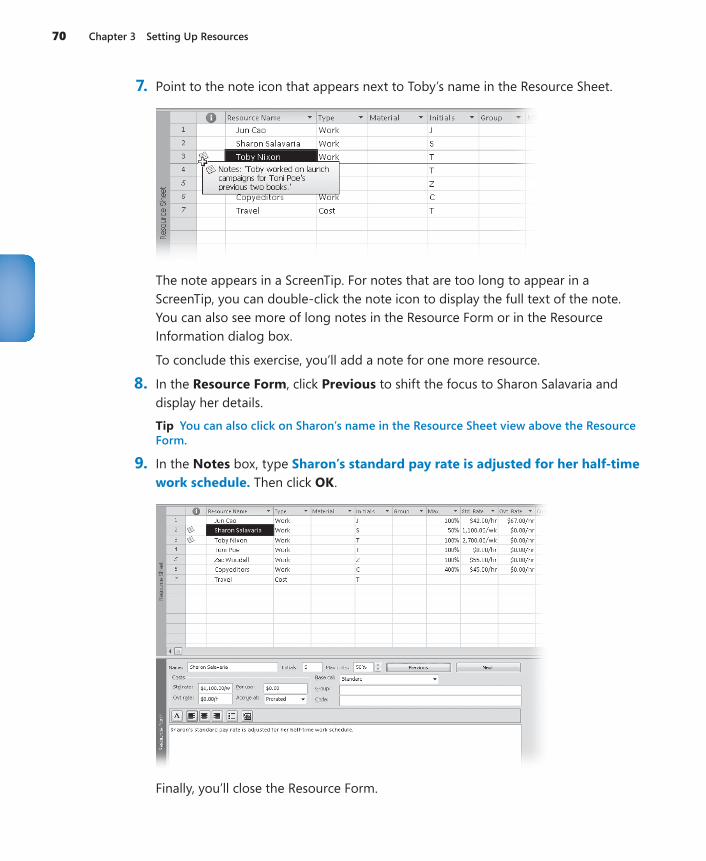
7. Point to the note icon that appears next to Toby’s name in the Resource Sheet.
The note appears in a ScreenTip. For notes that are too long to appear in a ScreenTip, you can double-click the note icon to display the full text of the note. You can also see more of long notes in the Resource Form or in the Resource Information dialog box.
To conclude this exercise, you’ll add a note for one more resource.
8. In the Resource Form, click Previous to shift the focus to Sharon Salavaria and display her details.
Tip You can also click on Sharon’s name in the Resource Sheet view above the Resource Form.
9. In the Notes box, type Sharon’s standard pay rate is adjusted for her half-time work schedule. Then click OK.
Finally, you’ll close the Resource Form.
Key Points 71
10. On the Resource tab, in the Properties group, click the Details button.
The Resource Form is closed, leaving the Resource Sheet displayed.
In this exercise, you’ve entered notes for some resources. This information is unique to those resources.
CLEAN UP Close the Simple Resources file.
Key Points● Recording resource information in your project plans helps you better control who
does what work when and at what costs.
● Work resources (people and equipment) perform the work in a project.
● Cost resources account for the types of expenses that you may wish to track across a project.

459
IndexSymbols and Numbers100% Complete command (Task tab), 13050% Complete command (Task tab), 131
AActions list, 83–87
accessing, 83, 161changing assignment values, 162increasing task durations, 85
active viewoverview, 6sorting considerations, 234View label, 6View shortcuts, 6Zoom slider, 6
actual costs, 227, 269actual values for tasks
collecting from resources, 273timephased, 258, 269–73tracking progress, 125, 132–36, 258, 263–68
Add Tasks To Timeline dialog box, 101Add To Timeline command (Task tab), 103Advanced Plan Properties dialog box, 228ALAP constraint type, 148All Programs command (Start menu), 108, 384All Subtasks command (View tab), 174, 288, 421allocations, resource. See resource allocationsASAP constraint type, 148, 163Assign Resources dialog box
adjusting resource assignments, 83assigning cost resources, 89assigning material resources, 198assigning resources to recurring tasks, 169–70assigning work resources, 75–76, 78–80, 89closing considerations, 15depicted, 11linking project plans, 415removing work resources, 84Replace button, 217resolving resource overallocations, 217troubleshooting problems, 304–305, 310Units field, 217updating assignments in sharer
plans, 406–407updating resource pool, 417–18
Assignment group (Format tab)Information, 191, 193, 197Notes button, 195
Assignment Information dialog boxaccessing, 191applying contours, 193applying different cost rates, 197delaying start of assignments, 191resolving resource overallocations, 217Units field, 217updating actual work values, 268
assignment notesdefined, 50pasting graphic images, 372resource notes and, 195
Assignment Reports dialog box, 117assignment units, 158–59assignments. See resource assignmentsAssignments group (Resource tab)
Assign Resources, 11, 75, 169, 198, 304, 406, 417
Resource Pool, 402, 415–16, 418Auto Schedule command (Task tab), 43–45AutoFilters
accessing, 235applying, 243–45functionality, 243troubleshooting problems and, 308
BBackground Color button, 98, 327Backstage view
displaying, 8, 52Help pane, 313managing files, 7–10Print Preview option, 110, 335, 341project summary tasks, 96setting options, 7–10
Bar Styles dialog boxaccessing, 14, 320formatting Calendar view, 332–33formatting Gantt bars, 95, 319–23
Bar Styles group (Format tab)Critical Tasks check box, 172Format, 99Slack check box, 172
460 base calendars
base calendarscreating, 155defined, 46Standard, 63, 155updating working times in resource pools, 411–13
baseline costs, 227baseline plans
baseline costs, 227cautions overwriting values, 261for projects, 124–27purpose, 258saving interim plans, 262–63updating, 258–62
bottom-up planning, 36Box command, 331Box Styles dialog box, 328, 330–31Browse dialog box, 354Budget Cost report, 289
CCalendar tab (Tools menu), 170Calendar view
filtering support, 243formatting, 331–33functionality, 13
calendars. See specific types of calendarscallouts, displaying tasks as, 103Change Working Time dialog box
Create New Calendar option, 155creating working time exception, 46–48Exceptions tab, 64specifying working/nonworking times, 63updating resource information, 408–10updating working times, 411–13Work Weeks tab, 65, 156
Clipboard group (Task tab)Copy, 374, 376Copy Picture dialog box, 107, 286, 354functionality, 11
Close command (File tab), 8colors
adjusting for Gantt bars, 96adjusting for milestones, 96, 99changing for task bars, 327formatting Timeline view, 327predefined styles, 14, 96–98
Columns group (Format tab)Custom Fields, 293Insert Column, 250
columns, manipulating in tables, 250commands, defined, 6confirmation messages, 355consolidating project plans, 420–23
constraintscategories of, 147entering deadline dates, 163–65removing, 152setting for tasks, 147–52types of, 148
consumption rates, 199contours, applying to resource assignments, 192–96Copy command (Task tab), 374, 376Copy group (Format tab), 108Copy Picture dialog box
copying views, 107recording macros, 354reporting project status, 286
Copy Timeline command (Format tab), 108copying
data to other programs, 372–76GIF image files, 107views, 106–09
cost rates, changing, 196–97cost resources
accruing to project costs, 166assigning to tasks, 88–90costs incurred with, 88defined, 55getting information, 62setting up, 67
Cost tableaccessing, 133, 167, 196, 228copying project data, 374entering actual costs manually, 269examining resource costs, 290–92examining task costs, 287–88reporting project cost variance, 295troubleshooting problems, 307, 312
costs, project. See project costsCreate New Base Calendar dialog box, 155critical path
defined, 170, 228highlighting, 302project finish date and, 228viewing, 170–72
Critical Task filter, 243Ctrl+F key combination, 352Ctrl+G key combination, 160, 302, 352current costs, 227Current Selection group (Format tab), 103Custom AutoFilter dialog box, 244Custom Fields dialog box, 293–95custom fields, creating, 251Custom Reports dialog box, 339, 341Custom tab, 367customizing
filters, 243, 245–46Gantt Chart view, 94–101
fields, creating custom 461
Max. Units values, 181–82Quick Access toolbar, 362–67reports, 115–20ribbon interface, 362–67tables, 248–51Timeline view, 101–103views, 251–54, 346
DData group (View tab). See also Filter button
(View tab); Tables command (View tab)Group By button, 238, 240Highlight, 302, 306Outline, 173–74, 201, 214, 288, 421Sort, 12, 236, 292
data maps, 377Data Template Definition dialog box, 329–30Data Templates dialog box, 329deadline dates, 163–65, 305dedicated resource pools, 404Define Group Interval dialog box, 241Define New View dialog box, 252deliverables
defined, 431defining tasks for, 29
Detail Gantt viewaccessing, 171free slack in, 172Gantt Chart view and, 318viewing critical path, 171viewing tasks with variance, 281
Details button (Resource tab), 68, 71Details command (View tab)
accessing Task Form, 77functionality, 19viewing assignments in resource pools, 405
Details dialog box, 156Details group (Format tab)
Actual Work, 265Add Details, 265, 293Baseline Work, 290displaying work values, 216Notes, 69Remaining Availability check box, 201Work check box, 201, 307
Details Styles dialog box, 293Display As Callout command
(Format tab), 103Document Export Options dialog box, 339documentation
copying views for, 106for project plans, 50–53for tasks, 50–53
Drawing command (Format tab)accessing, 105functionality, 104Properties, 105Text Box, 105
Drawings group (Format tab), 105–106durations. See also actual values for tasks
abbreviating, 30accurate, 33assigning overtime hours, 306checking, 49–50critical path and, 170entering, 30–33in project triangle model, 299, 433increasing for tasks, 85managing project constraints, 435–37recurring tasks, 170summary tasks, 35, 173task scheduling formula, 81, 158troubleshooting problems, 300–306
EEditing group (Task tab), 96, 107, 145–46editing macros, 356–62e-mail messages, copying views for, 106Enterprise Project Management (EPM),
4, 444–46Entire Project command (View tab)
consolidating project plans, 422scheduling summary tasks, 173viewing critical path, 171, 226
entry bar (formula bar), 7Entry table
accessing, 248as default, 235copying project data, 373modifying, 248task ID numbers, 38viewing project tasks, 340
EPM. See Enterprise Project Management (EPM)equipment resources, setting up, 57–58Excel worksheets. See Microsoft ExcelExisting Tasks command (Format tab), 101Exit command (File tab), 9export maps, 377, 382–83Export Wizard, 383–84
FFF task relationship. See finish-to-finish (FF)
task relationshipfields, creating custom, 251
462 file formats
file formatsfrom previous versions, 386legacy files, 383opening other, 377–82saving to other, 382–86task lists in other, 377
File tab. See also Project Options dialog boxClose, 8displaying Backstage view, 8, 52Exit, 9Help, 9Info, 8, 348New, 7–8, 25, 400Open, 7–9, 400Print, 8, 110Recent, 8Save, 7–8Save & Send, 8, 338Save As, 8, 10, 95, 286
filesmanaging, 7–10opening, 9
Filter button (View tab)Clear Filter, 284, 289Display AutoFilter, 235functionality, 243, 285Incomplete Tasks, 312Late Tasks, 281More Filters dialog box, 245, 283, 285, 288Slipped/Late Progress, 281Slipping Tasks, 281
Filter Definition dialog box, 245–46filter indicator, 245filtering
for delayed/slipping tasks, 281global templates and, 346project details, 242–48visual reports, 387
finish date, project, 228, 302Finish No Earlier Than (FNET) constraint type, 148Finish No Later Than (FNLT) constraint type, 148finish-to-finish (FF) task relationship, 38, 142finish-to-start (FS) task relationship, 38, 142fixed consumption rates, 199fixed costs
assigning to tasks, 167defined, 166determining accrual methods, 166examples of, 166
fixed-duration task type, 158, 194fixed-unit task type
as default, 158assigning material resources, 198defined, 87
fixed-work task type, 158
float (slack), 171Fluent user interface. See ribbon interfaceFNET constraint type. See Finish No Earlier Than
(FNET) constraint typeFNLT constraint type. See Finish No Later Than
(FNLT) constraint typeFont Color button, 327Font group (Format tab)
Background Color button, 327Font Color button, 327Italic, 326
Font group (Task tab), 11Format Bar dialog box, 99Format Bar Styles button (Format tab), 14–15Format Drawing dialog box, 105Format group (Format tab)
Bar Styles, 332Box Styles, 328Gridlines, 100, 323Layout, 154, 324Text Styles button, 324
Format tab. See also Details group (Format tab); Format group (Format tab)
Assignment group, 191, 193, 195, 197Bar Styles group, 99, 172Columns group, 250, 293Current Selection group, 103Drawings group, 105Font group, 326–27functionality, 11Gantt Chart Style group, 14, 96Insert group, 101label changes, 17Show/Hide group, 95, 422Text group, 324–25
formattingCalendar view, 331–33Gantt Chart view, 95–101, 318–24Network Diagram view, 327–31task names visually, 98–100Timeline view, 324–27Tracking Gantt view, 318–23
formula bar (entry bar), 7Formula dialog box, 294free slack, 171–72FS task relationship. See finish-to-start (FS)
task relationship
GGantt bars
attaching text boxes to, 106customizing Gantt Chart view, 94–101defined, 93
Level Resources dialog box 463
for recurring tasks, 169for summary tasks, 174identifying task slippage, 283–84nonworking time and, 131scrolling to tasks, 96
Gantt Chart Style group (Format tab)Format Bar Styles button, 14–15More button, 14, 96
Gantt Chart viewaccessing, 127, 168, 172adjusting resource assignments, 83applying Schedule table, 172as default view, 94assigning material resources, 198assigning work resources, 77, 80–81changing task default settings, 86changing timescale, 104components, 94copying, 106–109copying project data, 373creating project dependencies, 424customizing, 94–101deadline indicators, 164depicted, 19drawing considerations, 104–106filtering project details, 243–46formatting, 95–101, 318–24Gantt bars, 93highlighting critical path, 302orange vertical line, 26overview, 15, 318pan and zoom controls, 104pasting graphic images, 372Print Preview option, 110printing, 109–15printing options, 334–39project summary tasks, 95recording macros, 353rescheduling incomplete work, 275ScreenTips in, 214, 260scrolling, 104sharing custom elements, 348splitting tasks, 196task relationships, 38, 40task scheduling and, 27troubleshooting problems, 306, 309–310updating assignments in sharer plans, 406viewing project tasks, 340viewing resource names, 59
Gantt Chart with Timeline view, 15, 94, 342GIF image files
copying, 107editing macros, 356, 360macro names, 352recording macros, 355
global templatesdefined, 346elements supported, 346–47project plans and, 346–47storing macros, 352
Go To command/dialog boxadding to Quick Access toolbar, 363shortcut keys and, 160, 302, 352
Gridlines command (Format tab), 100, 323Group Definition dialog box, 240–41grouping project details, 238–42groups (ribbon interface), 6, 346
HHelp command (File tab), 9Hide Subtasks command (View tab), 201, 214highlighting
critical path, 302defined, 243
HTML. See Hypertext Markup Language (HTML)hyperlinks to tasks, 51Hypertext Markup Language (HTML), 372
Iimport maps, 377, 383Import Wizard, 378–81Inactivate command (Task tab), 176, 313Indent Task command (Task tab), 36–37Info command (File tab), 8, 348Insert Column command (Format tab), 250Insert group (Format tab), 101Insert group (Project tab), 421Insert group (Task tab)
Milestone, 34Summary, 37Task button, 168
Insert Hyperlink dialog box, 51Insert Project dialog box, 421interim plans, saving, 262
Llag time, 142–44Late/Overbudget Tasks Assigned To filter, 289Late Tasks filter, 281Layout button (Format tab), 154, 324lead time, 142–44legacy files, 383Level group (Resource tab), 223Level Resources dialog box, 220

464 Leveling Gantt view
Leveling Gantt view, 226, 318leveling, resource. See resource levelingLink Tasks command (Task tab), 39–40, 45linking
drawn objects, 104project plans to resource pools, 403, 413–15tasks, 37–42tasks between projects, 423–28
Mmacros
editing, 356–62naming conventions, 352recording, 351–56security considerations, 355storing, 352
Macros dialog box, 355, 357, 360Macros group (View tab)
Macros dialog box, 355, 357, 360Record Macro dialog box, 352Stop Recording, 354
maps, import/export, 377, 382–83manually scheduling tasks, 30–34Mark On Track button (Task tab), 134master projects, defined, 420material resources
assigning to tasks, 198–99defined, 55, 186setting up, 186–87variable consumption rates, 199
Max. Units fieldexaming resource allocations, 211functionality, 59–60, 74, 179, 181resource calendars and, 63
MCTS. See Microsoft Certified Technology Specialist (MCTS)
menus, tabs as replacements, 7MFO constraint type. See Must Finish On (MFO)
constraint typeMicrosoft Certified Technology Specialist (MCTS), 440Microsoft Excel
as editable format, 286AutoFill handle, 196AutoFilters, 243copying project data to, 372–76generating visual reports, 386–91opening file format from, 377–82Paste Special feature, 372PivotChart feature, 387PivotTable feature, 387, 389Resource Cost Summary report, 293saving supported formats, 382
Microsoft Project 2010. See Project 2010
Microsoft Project Document Object, 372Microsoft Project Server, 443–44Microsoft Project User Group (MPUG), 440Microsoft SharePoint, synchronizing task lists,
391–95Microsoft Visual Basic for Applications (VBA),
351, 356–62Microsoft Word, 372–76Milestone command (Task tab), 34milestones
adding to Timeline view, 102–103adjusting colors, 96, 99defined, 34entering, 34formatting indicator, 99on Gantt charts, 93marking tasks as, 35
mini-toolbars, 7, 98Mode command (Task tab), 45More button (Format tab), 14, 96More Filters dialog box
Cost Overbudget, 288functionality, 245, 285Late/Overbudget Tasks Assigned To, 289Slipping Tasks, 284
More Groups dialog box, 240More Tables dialog box, 248–50More Views dialog box, 226, 252MPUG. See Microsoft Project User Group (MPUG)MSO constraint type. See Must Start On (MSO)
constraint typeMultiple Baselines Gantt view, 318Must Finish On (MFO) constraint type, 148, 163Must Start On (MSO) constraint type
cautions using, 149defined, 148negative slack and, 152
My Commands group (Custom tab), 367
Nnaming conventions
for macros, 352for resource pools, 401
navigating in Gantt Chart view, 104negative slack, 152Network Diagram view
filtering support, 243formatting, 327–31functionality, 327task relationships, 38
New command (File tab)creating project plans, 25, 400functionality, 7–8
Project Information dialog box 465
New Window command (View tab), 12, 423nonworking days, 46–48, 131Notepad, 372, 384–85notes. See specific types of notes
OOLAP. See Online Analytical Processing (OLAP)OLE objects, 372ongoing operations, defined, 431Online Analytical Processing (OLAP), 387Open command (File tab)
creating resource pools, 400functionality, 7–9
openingfiles, 9other file formats, 377–82resource pools, 409, 414sharer plans, 416–19
Options command (File tab). See Project Options dialog box
Organizer featureaccessing, 348Calendars tab, 348–50depicted, 348functionality, 347–48
Outline command (View tab)All Subtasks, 174, 288, 421Hide Subtasks, 201, 214Outline Level 1, 173, 288
overallocations (resources)defined, 212evaluating, 212resolving, 216–20
Overbudget Resources report, 292Overbudget Tasks report, 289overtime hours, assigning, 306OvertimeRate field, 62Overview Reports dialog box, 116
PPage Setup dialog box, 114, 119, 335–37pan controls, 104passwords, setting, 62Paste Special feature, 372pasting data. See copyingpay rates
applying at different times, 184–85multiple, 183–84
PDF format, 286, 337–38peak units, 158–59people resources. See work resources
phases. See also summary tasksbottom-up planning, 36defined, 36organizing tasks into, 35top-down planning, 36
pivot diagrams, 331Planning Wizard, 313PMI. See Project Management Institute (PMI)predecessor tasks, 37, 142–44presentations, copying views for, 106Print command (File tab), 8, 110Print Preview window
Backstage view, 110, 335, 341Gantt Chart view, 110Multiple Pages option, 110, 113Page Right option, 113Page Setup option, 114Print Specific Dates option, 111Settings option, 111Timeline view, 110viewing reports, 115–16zoom controls, 337
printingreports, 115–20, 339–42views, 109–15, 334–39
product scope, defined, 29Project 2010
active view, 6editions supported, 4interface components, 6–7starting, 5
project baseline, saving, 124–27project calendars. See also base calendars
functionality, 46global templates and, 346
project costschecking, 227–30examining resource costs, 290–93examining task costs, 287–90in project triangle model, 299, 434managing project constraints, 435–37reporting variance in, 293–96troubleshooting problems, 307–311
project dependencies, creating, 423–28project details
filtering, 242–48grouping, 238–42sorting, 234–38
project duration. See durationsproject finish date, 228, 302Project Information dialog box
checking plan duration, 49–50checking project finish dates, 229–30creating project plans, 26depicted, 229
466 Project learning communities
identifying task slippage, 282troubleshooting problems, 301viewing statistics, 74, 90
Project learning communities, 439–40Project Management Institute (PMI), 441Project Options dialog box
accessing, 254applying pay rates automatically, 62breaking task/assignment relationships, 273changing default view, 94cross-project links, 428Customize Ribbon tab, 364–67default start/end dates, 152displaying entry bar, 7entering actual costs manually, 269functionality, 9grouping project details, 239honoring relationships over
constraints, 152identifying tasks on critical path, 172Quick Access Toolbar tab, 362–63rescheduling incomplete work, 276Trust Center dialog box, 377–78, 385–86Work Is Entered In box, 272
project plansassigning resources, 73automating task scheduling, 43–45breaking link with resource pools, 403checking cost/finish date, 227–30checking duration, 49–50consolidating, 420–23copying views, 106–109creating, 24–27, 400customizing Gantt Chart view, 94–101customizing reports, 115–20customizing Timeline view, 101–103data considerations, 93documenting, 50–53drawing on Gantt charts, 104–106entering durations, 30–33entering milestones, 34entering task names, 27–29evaluating resource allocations, 212–17examining resource allocations, 211–12Gantt charts and, 94global templates and, 346–47leveling resource allocations, 154,
217, 220–26linking to resource pools, 413–15linking tasks, 37–42organizing tasks into phases, 35printing reports, 115–20printing views, 109–15resolving overallocations, 217–20saving project baselines, 125
setting nonworking days, 46–48sharing custom elements, 346–51storing macros, 352updating baselines, 259viewing resource capacity, 200–202
project scopedefined, 29in project triangle model, 299, 434managing project constraints, 435–37task durations and, 30troubleshooting problems, 311–14viewing resource capacity, 200–202
Project Server, 443–44Project Statistics dialog box, 50, 282project status
examining resource costs, 290–93examining task costs, 287–90identifying task slippage, 280identifying variance, 281–86reporting, 286reporting variance in project costs, 293–96
Project Summary Task (Format tab), 95, 422
Project tab. See also Properties group (Project tab); Reports group (Project tab)
functionality, 11Insert group, 421Schedule group, 126, 261–63Status group, 128, 275
project trackingactual values for tasks/assignments, 125,
132–36, 263–68as scheduled, 128–29completion percentage for tasks, 125, 129–32considerations, 123remaining values for tasks/assignments,
263–68rescheduling incomplete work, 274–76saving interim plans, 262–63saving project baseline, 124–27timephased actuals, 258, 269–73updating baseline plans, 258–62
project triangle model, 299, 432–35projects, defined, 3, 431–32Properties dialog box, 52Properties group (Project tab). See also Project
Information dialog boxChange Working Time, 46, 63, 155, 408, 410–13Task Notes, 51, 68
Properties group (Resource tab)Details button, 68, 71Information, 181, 184
Properties group (Task tab)Add to Timeline, 103Information, 39, 145, 150, 152, 157, 159
resource management 467
QQuick Access toolbar
adding commands, 363customizing, 362–67overview, 6removing commands, 364
RRecent command (File tab), 8Record Macro dialog box, 352–53recording macros, 351–56Recurring Task Information dialog box, 168, 170recurring tasks, setting up, 167–70remaining costs, 227remaining values for tasks, 263–68Rename dialog box, 365–67renumbering tasks, 234Replace Resource dialog box, 310Reports dialog box
accessing Overbudget Resources report, 292accessing Slipping Tasks report, 286displaying available reports, 115, 339
Reports group (Project tab)Budget Cost report, 289Overbudget Resources report, 292Overbudget Tasks report, 289Project Summary report, 286Reports dialog box, 115, 117, 286, 292, 339Resource Cost Summary report, 293Slipping Tasks report, 286Visual Reports, 286, 289, 293, 387–91
reports/reportingcustomizing, 115–20defined, 339functionality, 115generating in Excel, 386–91global templates and, 346printing, 115–20, 339–42project status, 286stoplight reports, 293–96variance in project costs, 293–96viewing, 115–16Visio visual reports, 331, 386–91
Reset button, 367resource allocations
evaluating, 212–17examining over time, 211–12leveling, 154, 217, 220–26resolving overallocations, 217–20viewing in resource pools, 404–405
resource assignments. See also tasksadjusting, 83, 203–208
applying contours to, 192–96applying different cost rates, 196–97assigning cost resources, 88–90assigning work resources to tasks, 74–81, 89–90controlling work with, 82–87delaying start of, 191editing values, 194–95to recurring tasks, 169–70removing work resources, 84starting at specific times, 192tracking actual/remaining values, 263–68tracking timephased actuals, 269–73updating in sharer plans, 406–407variable consumption rates, 199viewing capacity, 200–202viewing in resource pools, 404–405
resource availability/capacitydefined, 212entering, 59–60setting up, 179–83viewing, 200–202
resource calendarsadjusting working time for tasks, 155defined, 63examing resource allocations, 211Max. Units field, 63work resources and, 63
resource costs, examining, 290–93Resource Form
documenting resources, 68Notes details, 69Task Form and, 78viewing assignments in resource pools, 405
Resource Graph view, 217, 221resource groups
grouping project details, 238–42sorting project details, 234–38
Resource Information dialog boxcustomizing Max. Units values, 181–82entering different pay rates, 185entering multiple pay rates, 183–84
resource levelingdelaying, 217for overallocated resources, 220–26functionality, 222split tasks and, 154
Resource Leveling dialog box, 223–26resource management. See also specific types of
resourcesadjusting working time individually, 63–66assigning resources, 73collecting actuals, 273cost information, 62documenting resources, 68–71entering fixed costs, 165–67
468 resource notes
entering resource capacity, 59–60entering resource names, 59entering resource pay rates, 60–62grouping information, 238–42Max. Units field, 59saving project baseline, 125setting up work resources, 56sorting data, 234–38troubleshooting problems, 307–11types of resources, 55
resource notesassignment notes and, 195defined, 50entering, 68–71pasting graphic images, 372
Resource Pool command (Resource tab)Share Resources, 402, 415Update Resource Pool, 416, 418
resource poolsbenefits, 399breaking link with project plans, 403creating, 398–403dedicated, 404functionality, 398linking project plans, 413–15naming conventions, 401opening, 409, 414troubleshooting problems, 416updating information in, 408–10, 416–19updating working times in, 411–13viewing assignment details, 404–405
Resource Sheet viewaccessing, 180, 222, 235copying project data, 374creating resource pools, 401depicted, 17documenting resources, 69Entry table, 235examining resource costs, 290grouping information, 239leveling resources, 222linking project plans, 414Resource Form, 68Resource Information dialog box, 183setting up cost resources, 67setting up material resources, 186–87setting up resources, 57–58sorting, 235Std. Rate field, 61troubleshooting problems, 307
Resource tab. See also Assignments group (Resource tab)
functionality, 11Level group, 223Properties group, 68, 71, 181, 184
Resource Usage viewdepicted, 18evaluating resource allocation, 213, 215examining resource costs, 293functionality, 18, 192hiding assignment details, 339linking project plans, 414Next Overallocation button, 216resolving resource overallocations, 219ScreenTips in, 214scrolling horizontally, 215tracking timephased work, 273viewing assignments in resource pools,
404–405viewing resource capacity, 201
Resource Views group (View tab). See also Resource Sheet view
Other Views, 217Resource Usage, 18, 201, 404Team Planner, 203viewing other views, 20
Respect Links command (Task tab), 42ribbon interface
as toolbar replacement, 7customizing, 362–67finding features, 11–15group divisions, 6overview, 6
SSave & Send command (File tab), 8, 338Save As command (File tab)
editable formats, 286functionality, 8, 10, 95
Save command (File tab), 7–8saving
interim plans, 262–63project baseline, 124–27to other file formats, 382–86
Schedule group (Project tab), 126, 261–63
Schedule group (Task tab)100% Complete, 13050% Complete, 131Inactivate, 176, 313Indent Task, 36–37Link Tasks, 39–40, 45Mark on Track button, 134–35Respect Links, 42Split Task, 153Update Tasks, 129, 134–35, 359
Schedule table, 172scheduling formula, 81, 158–59
tables 469
ScreenTipsassignment dates, 214calendar details, 158describing work contours, 194displaying date values in, 195, 271displaying progress, 131in Gantt Chart view, 214, 260notes displaying in, 51, 70splitting tasks, 153viewing constraint details, 150
Scroll to Task command (Task tab), 96, 107, 145–46scrolling in Gantt Chart view, 104security considerations, 355Selected Tasks command (View tab), 426Set Baseline dialog box
accessing, 261controlling baseline updates, 262depicted, 126saving interim plans, 263
SF task relationship. See start-to-finish (SF) task relationship
Share Resources dialog boxcreating resource pools, 402–403linking project plans, 415troubleshooting problems, 416
SharePoint, synchronizing task lists, 391–95sharer plans
consolidating information in, 403defined, 398opening, 416–19troubleshooting problems, 416updating assignments in, 406–407updating working times in resource pools, 411–13
shortcut menus, accessing, 7Show/Hide group (Format tab), 95, 422Simple Tracking Start project plan, 126slack (float), 171Slipped/Late Progress filter, 281Slipping Tasks filter, 281, 286SNET constraint type. See Start No Earlier Than
(SNET) constraint typeSNLT constraint type. See Start No Later Than (SNLT)
constraint typeSort dialog box
functionality, 12, 236–38re-sorting resources by ID, 292
sorting project details, 234–38Split Task command (Task tab), 153Split View group (View tab)
Details, 19, 77, 306, 405Timeline check box, 16–17, 49, 306, 327
SS task relationship. See start-to-start (SS) task relationship
Standard base calendar, 63, 155Start menu
All Programs, 108, 384starting Project 2010, 5
starting Project 2010, 5Start No Earlier Than (SNET) constraint type
defined, 148usage examples, 149–50, 167
Start No Later Than (SNLT) constraint type, 148start-to-finish (SF) task relationship, 38, 142start-to-start (SS) task relationship, 38, 142, 147Statistics dialog box, 301Status bar
functionality, 7highlighting support, 243Zoom In/Out controls, 217
Status group (Project tab), 128, 275Std. Rate field, 61–62Stop Recording command (View tab), 354stoplight reports, 293–96storing macros, 352subprojects, defined, 420subtasks
creating, 36–37defined, 35deleting, 313reports and, 339
successor tasks, 37, 142–44Summary command (Task tab), 37Summary table
accessing, 235depicted, 235modifying, 248
summary tasks. See also phasesadding to Timeline view, 102creating, 37defined, 35deleting, 313displaying, 95displaying as callouts, 103inactivating, 176linking, 41on Gantt charts, 93, 95reports and, 339scheduling, 35, 172–75
Switch Windows command (View tab), 348, 350, 406synchronizing task lists, 391–95
TTable Definition dialog box, 249–50tables
copying data to other programs, 373–76creating, 248–50customizing, 248–51defined, 248
470 Tables command (View tab)
global templates and, 346manipulating columns, 250
Tables command (View tab). See also Cost tableEntry table, 127More Tables, 248Summary table, 235Variance, 281, 284Work table, 133, 264, 290
tabs (ribbon interface)as menu replacements, 7finding features, 11–15overview, 6
task bar, changing colors, 327task calendars, 155–58task costs, examining, 287–90task durations. See durationsTask Form
assigning work resources, 77–78changing task default settings, 86depicted, 19editing values, 19Resource Form and, 78scheduling formula, 82troubleshooting problems, 307viewing task types, 159
Task Information dialog boxapplying calendars to tasks, 157applying constraints to tasks, 150changing task relationships, 145–46changing task types, 162entering deadline dates, 165entering notes in, 51linking tasks, 39manipulating lead/lag times, 143–45marking tasks as milestones, 35removing constraints, 152sharing custom elements, 351viewing task types, 159
Task Inspector paneconstraint details, 151functionality, 144scheduling details, 146
task listsin other file formats, 377synchronizing, 391–95
task namesentering, 27–29making visible, 103reformatting visually, 98–100
task notesaccessing, 50assignment notes and, 195entering, 50pasting graphic images, 372
Task Notes command (Project tab), 51, 68
Task Range filter, 243task relationships
adjusting, 142–47creating, 39critical path and, 170defined, 38, 142
Task report, 340Task Report dialog box, 341task scheduling
automatic, 30constraints and, 148, 163critical path and, 170effort-driven, 87–88, 158, 163entering deadline dates, 163–65identifying potential conflicts, 174manual, 25, 30presentation style and, 98recurring tasks, 170rescheduling incomplete work, 274–76saving project baseline and, 125scheduling formula, 81, 158–59setting nonworking days, 46–48split tasks and, 154summary tasks, 35, 172–75switching, 43–45tracking progress, 128–29troubleshooting problems, 300–306
Task Sheet viewaccessing, 126, 167, 228, 248applying Schedule table, 172creating tables, 248–50examining task costs, 287–88functionality, 18identifying task slippage, 284stoplight reports and, 293
Task tab. See also Properties group (Task tab); Schedule group (Task tab)
Clipboard group, 11, 107, 286, 354, 374, 376Editing group, 96, 107, 145–46Font group, 11functionality, 11Insert group, 34, 37, 168Tasks group, 43–45, 144View group, 11, 171, 198
task typeschanging, 158–63effort-driven scheduling and, 158, 163fixed-duration, 158, 194fixed-unit, 87, 158, 198fixed-work, 158viewing, 159
Task Usage viewaccessing, 160, 264adding columns to, 160comparing baseline and scheduled work, 290
total slack 471
examining resource costs, 293functionality, 19, 160, 190, 192hiding assignment details, 339tracking timephased work, 273vertical divider bar, 264viewing variances for assignments, 286, 290
Task Views group (View tab)Calendar, 13, 332Gantt Chart button, 13, 19, 127, 168, 172, 259Network Diagram, 328Other Views, 20, 126, 167, 226, 248, 252Task Usage, 160, 264
tasks. See also resource assignments; summary tasksActions button, 83adjusting working time, 155–58assigning cost resources to, 88–90assigning fixed costs to, 167assigning material resources to, 198–99assigning work resources to, 74–81, 89–90associating costs with, 166bottom-up planning, 36changing default settings, 86completion percentages, 125, 129–32controlling work calculations, 82–87on critical path, 171defined, 23, 27defining for deliverables, 29documenting, 50–53entering actual values, 125, 132–36entering deadline dates, 163–65filtering project details, 242–48on Gantt charts, 93grouping project details, 238hyperlinking to information, 51identifying slippage, 280inactivating, 175–76increasing durations for, 85interrupting work, 153–54linking, 37–42linking between projects, 423–28marking as milestones, 35organizing into phases, 35predecessor, 37reactivating, 176recurring, 167–70removing working resources from, 84–85renumbering, 234resassigning, 208rescheduling incomplete work, 274–76resource leveling and, 154, 221selecting quickly, 160setting constraints, 147–52setting nonworking days, 46–48sorting project details, 234–38splitting into segments, 154, 196
successor, 37top-down planning, 36, 173tracking actual/remaining values,
263–68tracking timephased actuals, 269–73updating baselines, 259
Tasks group (Task tab)Auto Schedule, 43–45Inspect, 144Mode, 45
Team Planner view, 203–208, 217templates
creating project plans, 25global, 346sources of, 10viewing available, 10
text boxesattaching to Gantt bars, 106attaching to timescale, 106
Text group (Format tab), 324–25Text Styles button (Format tab), 324–25time considerations. See durationsTimeline view
adjusting horizontal divider, 102checking plan duration, 49copying, 106–109customizing, 101–103formatting, 324–27functionality, 16, 101, 104hiding, 17, 327pan and zoom controls, 104Print Preview option, 110printing, 109–15, 337–39
timephased fieldsfunctionality, 125peak units, 158–59tracking actuals, 258, 265–73
timescaleattaching text boxes to, 106changing in Gantt Chart view, 104contouring assignments, 193graphing allocations against, 217
Timescale box (View tab)adjusting, 16Days, 208, 215, 218Months, 202, 215Thirds of Months, 353Weeks, 206, 217, 260, 272, 282, 302, 323
Timescale dialog box (Gantt Chart view), 131toolbars
Quick Access toolbar, 6, 362–67ribbons as replacements, 7
Tools menu, 170top-down planning, 36, 173total slack, 171
472 Tracking Gantt view
Tracking Gantt viewaccessing, 13, 259formatting, 318–23Gantt Chart view and, 318identifying task slippage, 282updating baselines, 259–60viewing tasks with variance, 281
tracking projects. See project trackingTracking table, accessing, 133troubleshooting problems
cost and resources, 307–311resource pools, 416scope-of-work issues, 311–14sharer plans, 416time and resource, 300–306
Trust Center dialog box, 377–78, 385–86
Uunderallocation (resources), 212Uniform Resource Locator (URL), 392units of work (scheduling formula), 81, 158–59Update Project dialog box, 128, 275Update Resource Pool command (Resource tab),
416, 418Update Tasks dialog box
accessing, 129editing macros, 359entering actual values for tasks, 134–35
URL. See Uniform Resource Locator (URL)Usage table, 213
Vvariable consumption rates, 199variance. See also troubleshooting problems
defined, 257examining resource costs, 290–93examining task costs, 287–90identifying, 281–86reporting for project costs, 293–96
Variance tableaccessing, 127, 284identifying task slippage, 284viewing tasks with variance, 281
VBA. See Microsoft Visual Basic for Applications (VBA)
VBA Editor, 357–62View Definition dialog box, 252–53View group (Task tab)
functionality, 11Gantt Chart, 198other views, 171
View label, 6View shortcuts, 6View tab. See also Data group (View tab); Resource
Views group (View tab); Split View group (View tab); Task Views group (View tab); Zoom group (View tab)
functionality, 11–12Macros group, 352, 354–55, 357, 360New Window, 12Sort, 12Split View group, 306Window group, 348, 350, 401, 406, 423
View toolbar, 16views
applying in views, 248copying, 106–109customizing, 251–54, 346customizing Gantt Chart view, 94–101customizing Timeline view, 101–103defined, 15filtering support, 243global templates and, 346grouping information, 238–42printing, 109–115, 334–39reports and, 339
Visio visual reports, 331, 386–91Visual Basic for Applications (VBA). See Microsoft
Visual Basic for Applications (VBA)visual reports
Budget Cost report, 289Excel supported, 387Resource Cost Summary report, 293status-focused, 286Visio supported, 331, 386–91
Visual Reports dialog boxBudget Cost report, 289generating reports, 387–91Resource Cost Summary report, 293status-focused reports, 286
WWBS. See Work Breakdown Structure (WBS)Window group (View tab)
Arrange All, 401New Window, 12, 423Switch Windows, 348, 350, 406
WordPad, 108, 372Work Breakdown Structure (WBS), 328–29work resources
adjusting assignments, 83–87adjusting time for, 63–66applying pay rates at different times, 184–85assigning to tasks, 74–81, 89–90
Zoom slider 473
controlling work calculations, 82–87costs incurred with, 88defined, 55, 211entering names, 59equipment resources, 57–58examing resource allocations, 211multiple pay rates, 183–84resource calendars and, 63setting nonworking days, 46–48setting up, 56updating working times in resource pools, 411–13
Work tableaccessing, 133changing details in, 264, 268components, 133displaying work variance, 290
work units (scheduling formula), 81, 158–59
XXML format, 382XPS format, 286, 337–38
Zzoom controls
accessing on View toolbar, 16in Print Preview window, 337in Timeline view, 104on Status bar, 217
Zoom dialog box, 354Zoom group (View tab). See also Timescale box
(View tab)Entire Project, 171, 173, 226, 422Gantt Chart view, 16Selected Tasks, 426Zoom, 357
Zoom slider, 6
Recommended