Maxta and Mirantis OpenStack Installation and
Configuration Run Book
Version 1.1
December 2014
Maxta Inc.
100 Mathilda Place
Suite #170
Sunnyvale, CA 94086

Page 2
MAXTA STORAGE PLATFORM ARCHITECTURE ........................................................................................................ 3
THE MXSP SOFTWARE .................................................................................................................................................... 4
MXSP KEY BENEFITS....................................................................................................................................................... 4
MAXTA AND MIRANTIS OPENSTACK CONFIGURATION DIAGRAM .......................................................................... 5
INSTALLATION ........................................................................................................................................................ 6
PREREQUISITES: ............................................................................................................................................................. 6
MIRANTIS INSTALL REQUIREMENTS .................................................................................................................................... 6
MIRANTIS FUEL INSTALL PROVIDES AN EASY WAY TO INSTALL AND MANAGE OPENSTACK. ............................................................... 6
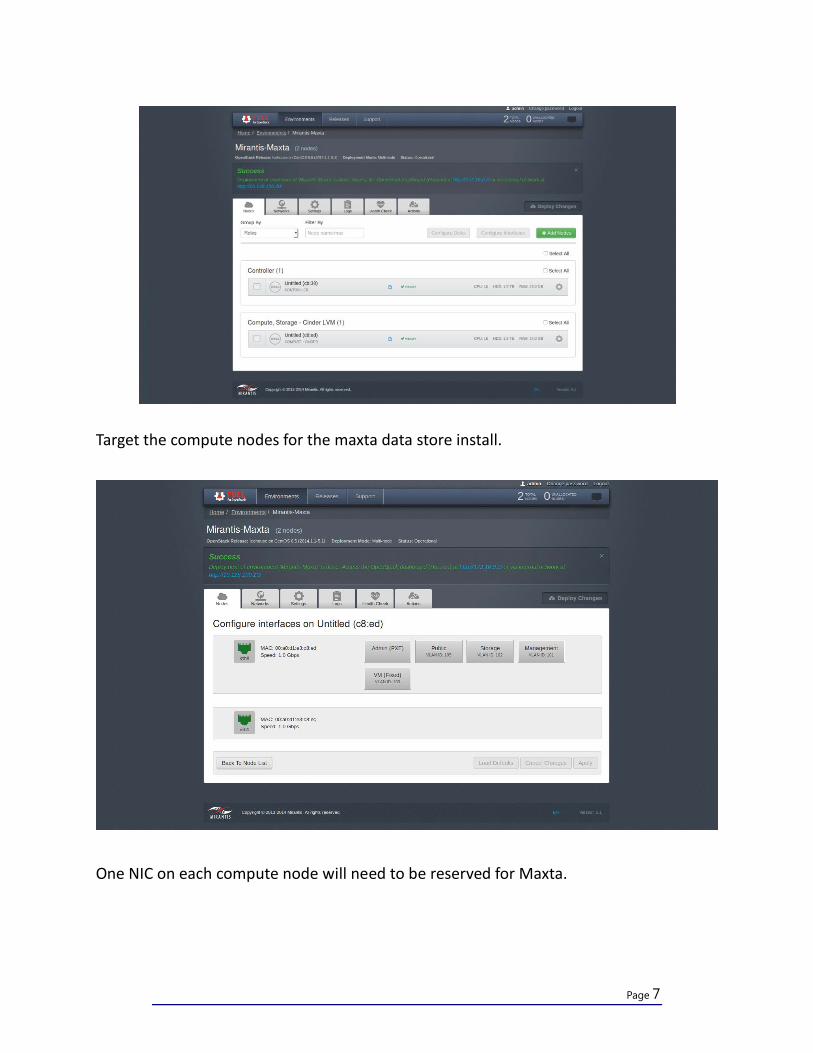
TARGET THE COMPUTE NODES FOR THE MAXTA DATA STORE INSTALL. ......................................................................................... 7
ONE NIC ON EACH COMPUTE NODE WILL NEED TO BE RESERVED FOR MAXTA. ............................................................................ 7
INSTALLING MAXTA STORAGE PLATFORM ............................................................................................................................ 8
INSTALLING MAXTA OPENSTACK DRIVERS: ......................................................................................................................... 10
CONFIGURE MIRANTIS OPENSTACK ..................................................................................................................... 11
CREATE HOST AGGREGATE ............................................................................................................................................. 11
ADMINISTERING MIRANTIS OPENSTACK AND MAXTA .......................................................................................... 11
RUNNING VM’S WITH MAXTA ........................................................................................................................................ 11
TESTING ..................................................................................................................................................................... 11

Page 3
Maxta Storage Platform Architecture
Maxta provides a distributed data store, using disk drives located on the Openstack compute hosts
themselves. This removes the necessity of having large data storage devices (JBODs), exported across the
network.
The Maxta datastore at a minimum includes a controller host, and at least two compute hosts.
Maxta Storage Platform (MxSP) is a hypervisor agnostic, software-only implementation of enterprise
storage solution for virtualized environments providing VM-level storage abstraction and full integration
into server virtualization management scheme and user interface. Maxta Storage eliminates the need for
storage arrays (either SAN or NAS) delivering shared storage by aggregating dispersed storage resources
from multiple servers. It dramatically simplifies IT by eliminating storage provisioning, storage
management and storage networking, enabling administrators to focus on high value-add initiatives.
Maxta Storage delivers VM-centric enterprise-class data services to support advanced capabilities such
as live migration of virtual machines, dynamic load balancing, high availability, data protection, and
disaster recovery.
Maxta Storage enables significant capital savings by converging compute and storage resources on
standard commodity servers, without compromising performance or scalability for virtual workloads.
Maxta Storage can coexist alongside traditional storage arrays and servers thereby providing investment
protection. The versatile architecture provides the ability to scale capacity and performance
independently, on-demand, without having to over-provision resources.
The following illustrates how the Maxta Storage Platform fits into virtualized environments.
Figure 1: Maxta Storage Platform Architecture

Page 4
The MxSP Software
As shown in Figure 1, an instance of the MxSP software is installed on each of the servers that are part of
a server virtualization cluster. MxSP creates a Maxta global namespace that all the virtual machines (that
are part of the cluster) can access. The servers running an instance of MxSP can be of two types:
1. Converged compute/storage servers – these have access to the MxSP storage pool and also contribute storage to it.
2. Compute-only servers – these have access to MxSP storage pool but do not contribute storage to it.
MxSP intelligently maps VMs to storage resources, optimizing data layout for virtual workloads. MxSP
leverages any combination of magnetic disk drives and SSDs on standard servers to deliver flash
performance and hard disk capacity at an attractive price for all storage workloads in a virtualized
environment.
MxSP supports the following options in managing the KVM and Openstack environment simplifying
storage management and minimizing the learning curve.
1. In a KVM environment MxSP can be managed though a native user interface from a web browser.
2. In an Openstack environment MxSP can be managed though the Openstack Horizon user interface. MxSP management is completely integrated into the Openstack Horizon UI though native Openstack Nova compute and Openstack Cinder storage driver plugins.
MxSP Key Benefits
The key benefits of Maxta Storage Platform are:
Dramatically Simplify IT: MxSP dramatically simplifies IT by eliminating the need for storage provisioning and storage
management. The Maxta storage and all data services such as local replication, snapshots and zero-copy
clones are configured and managed at VM-level granularity. This simplification eliminates the day-to-day
tasks of storage management and enables administrators to focus on managing applications and VMs.
Deliver Enterprise-class data services MxSP eliminates single point of failure by delivering best-in-class data resiliency, integrity and high
availability leveraging strong checksums and data replication for all stored data. Time, performance and
capacity efficient snapshots and clones provide the first layer of data protection and the ability to rapidly
provision VMs. MxSP seamlessly integrates with all the advanced capabilities of the server virtualization
software.

Page 5
Maximize Cost Savings MxSP enables significant capital savings by converging compute and storage resources on industry
standard servers, without compromising performance or scalability. This provides considerable up-front
capital savings and even greater savings on upgrades compared to the capital expenses associated with
purchasing and expanding storage arrays or storage appliances. In addition, MxSP leverages commodity
disk drives, SSD, snapshots, zero-copy clones, thin provisioning, in-line compression to increase storage
efficiency and reduce storage expenses. MxSP can coexist alongside traditional storage array and servers
thereby providing investment protection. By significantly simplifying IT, increasing IT efficiency, and
enabling administrators to focus on managing applications and VMs, MxSP enables dramatic reduction in
operating expenses.
Maxta and Mirantis OpenStack Configuration diagram
The figure below provides the configuration information of Maxta Storage Platform (MxSP) and Mirantis
OpenStack.

Page 6
Installation
Prerequisites:
Openstack installation (Icehouse)
Compute hosts with nova-compute, and cinder-volume installed
Mirantis Install Requirements
When installing Mirantis Openstack, you will need to leave one network interface card unused
for Maxta.
Maxta does not affect the Openstack Networking, so the user is free to select whatever VM
networking is best for their purpose.
Disks that are to be used for Maxta storage should be left unallocated.
As mentioned elsewhere, Maxta requires the base OS be either CentOS or Redhat (see next
section).
Mirantis Fuel install provides an easy way to install and manage Openstack.
Page 7
Target the compute nodes for the maxta data store install.
One NIC on each compute node will need to be reserved for Maxta.
Page 8
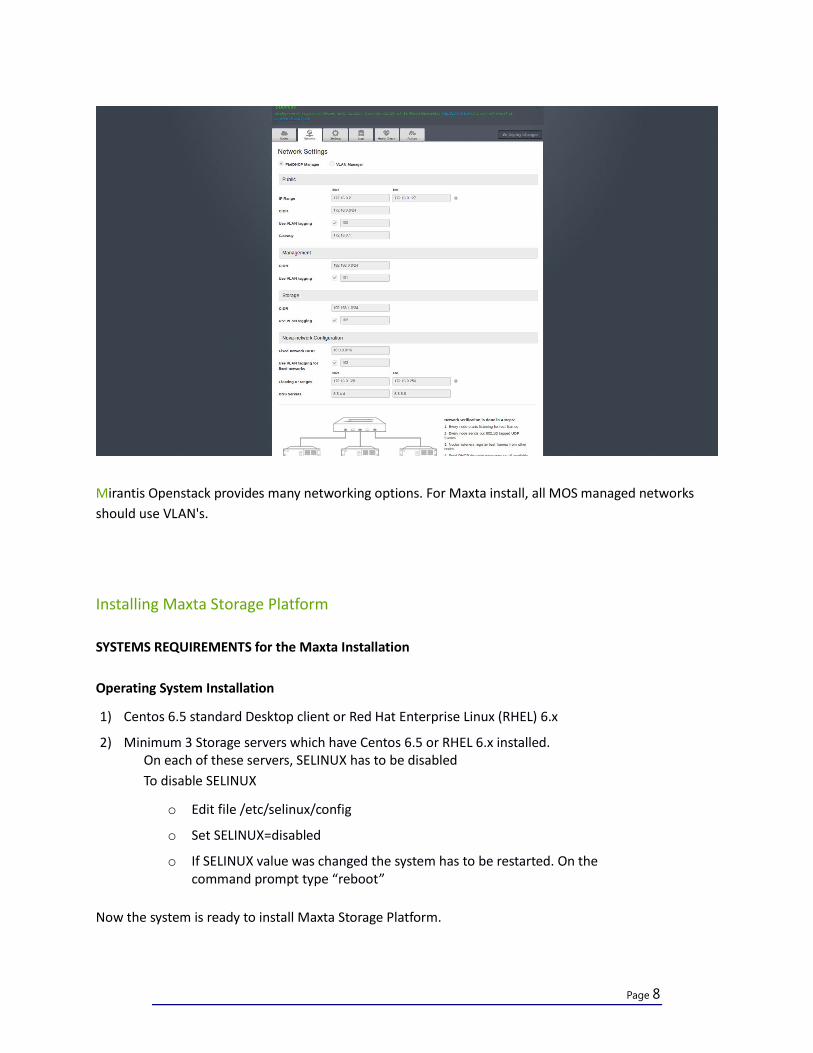
Mirantis Openstack provides many networking options. For Maxta install, all MOS managed networks
should use VLAN's.
Installing Maxta Storage Platform
SYSTEMS REQUIREMENTS for the Maxta Installation
Operating System Installation
1) Centos 6.5 standard Desktop client or Red Hat Enterprise Linux (RHEL) 6.x
2) Minimum 3 Storage servers which have Centos 6.5 or RHEL 6.x installed. On each of these servers, SELINUX has to be disabled
To disable SELINUX
o Edit file /etc/selinux/config
o Set SELINUX=disabled
o If SELINUX value was changed the system has to be restarted. On the command prompt type “reboot”
Now the system is ready to install Maxta Storage Platform.

Page 9
Maxta Installation
The Maxta Storage Platform software can be downloaded from:
https://maxtainc.box.com/s/klyxyrc4c0sh50rguopw
The Maxta software has to be installed from a Linux virtual machine of a Linux server. Install CentOS 6.5 standard Desktop client or Red Hat Enterprise Linux 6.x on the system from where Maxta software will be installed.
1. Create a new directory on the VM or system from where Maxta software will be installed.
2. Download the file from the location above to this newly created directory.
3. Extract the contents of the file in to the directory.
tar -xvf baremetalInstaller.tar
4. Change to subdir baremetalInstaller/src, where the host configuration file installer.cfg and installer.py reside
cd baremetalInstaller/src
5. Edit the host configuration file installer.cfg. The host configuration file defines the hosts where Maxta should be installed and associated parameters such as IP address, the network interface to use. The installer.cfg has sample parameters. Modify the parameters based on the network configuration.
6. Once the configuration file is modified the system is ready to install the Maxta software. The software is installed using the following command
./installer.py -c installer.cfg
Usage of the installer.py is has follows:
usage: installer.py [options]
Options:
-h, --help show this help message and exit
-c CONFIG, --config=CONFIG The configuration file to use
-n, --nokvm Do not install KVM
-j JUMP, --jump=JUMP Skip certain steps. MX, MGMT
MX=Skip to Maxta Installation
MGMT=Skip to Management Installation
The installer will perform the following steps on all the servers in parallel. On each server, the
installer acts sequentially. For example: Step B is executed only after Step A is completed and Step C
is executed only after Step A and Step B are completed.

Page 10
A. Copy and Install all needed apps.
B. Reset system and bring up Maxta cluster
C. Install the Maxta Management module
D. Install KVM (default case)
Step A is executed by default. If “-j MX or –jump=MX” is used it will jump to Step B. If “-j
MGMT or –jump=MGMT” is used it will jump to Step C. If kvm is already installed, use
the “-n or –nokvm” option (which will skip step D).
If step “B” above fails, you can reboot the system, and rerun the installer with parameter
jump to MX which will skip step “A”, and execute Step B and C.
To execute step C onwards (Maxta Management module and KVM), execute the
command “installer.py -c installer.cfg -j MGMT”
Once the process is completed without any errors Maxta Storage platform is successfully installed.
Maxta storage can be independently managed by a web browser. Point the web browser to <Server
address:8080>
For example:
http://10.1.0.101:8080/
Installing Maxta Openstack Drivers:
Extract OpenStack drivers from the Maxta source tarball. The drives can be downloaded from:
o Nova: https://maxtainc.box.com/s/8is5yth16a61ztkrvg1h
o Cinder: https://maxtainc.box.com/s/dyxxd5ya8n7t8s65v72a
Copy drivers to the Mirantis OpenStack install dir:
For example, if OpenStack is installed in /usr/lib/python2.6/site-packages, you would run:
tar -xvf nova_driver.tar -C /usr/lib/python2.6/site-packages/
tar -xvf cinder_driver.tar -C /usr/lib/python2.6/site-packages/cinder/volumes/drivers
Modify configuration files. Add:
/etc/cinder/cinder.conf:
[DEFAULT]
rootwrap_config = /etc/cinder/rootwrap.conf
volume_name_template = volume-%s
volume_backend_name = cinder-maxta
storage_availability_zone=Maxta
verbose = True
Page 11
/etc/cinder/rootwrap/volume.filters # cinder/volume/drivers/maxta.py
mkdir: CommandFilter, mkdir, root
mxTool: CommandFilter, mxTool, root
/etc/nova/nova.conf: instances_path=/var/lib/nova/instances
volume_drivers=['maxta=nova.virt.libvirt.volume.LibvirtDriver']
libvirt_images_type=maxta
libvirt_images_maxta_root=%Maxta Instances Dir%
Configure Mirantis OpenStack
Restart all openstack services on the hosts that will now use Maxta storage.
Create Host Aggregate
Through the dashboard, create a host aggregate group ‘maxta’, and add the compute hosts now running
the maxta service.
Administering Mirantis OpenStack and Maxta
Running VM’s with Maxta Maxta brings together VM’s and the supporting storage to a single host, in a way that is robust and fast.
The Maxta OpenStack drivers allow the basic OpenStack functions to take advantage of the advanced
feature set Maxta provides, including fast snapshots and local block volumes.
To use, simply add virtual machines or volumes in the ‘maxta’ host aggregate/storage zone. The vm’s and
volumes will take advantage of Maxta store natively.
Testing
For each vm spun up with ephemeral storage (ie., not backed by cinder volume), there should be a disk
file located in the %Maxta Instances Dir% specified in the nova.conf file.
For each cinder volume created, there should be a file in the volumes directory (specified in the
cinder.conf file), with a single file - the directory name and the file name should be %pre%[volume-
id]/[volume-id], where the %pre% is set in the cinder.conf file.
Recommended