p. 1
Frenzel Fattah Equalizing Workshop:
Step-by-Step Guide to Optimal Equalizing for Freedivers and Scuba Divers By Eric Fattah Copyright 2001, 2006.
(Edited by Peter Scott, 2006)
Comments, questions and suggestions for future revisions are welcome!
Please email [email protected] and let us know what you think.
Feel free to distribute or translate this document as long as it is not altered.
If you translate it, please let the author know so that the link can be added to the Liquivision website
http://www.liquivision.ca/ Frenzel.doc.
Disclaimer: All freediving, breath-holding and scuba diving training should be done in the presence of
a qualified dive buddy or instructor. Always practice the techniques described in this workshop with a
buddy! This document is for entertainment or reference purposes only.
Table of Contents 1. Forward
2. Overview of Primary Equalizing Techniques
3. Physiology of Equalizing
4. Frenzel Technique in Action
5. Frenzel Fattah mouth-fill technique step-by-step
6. Appendix A: Packing techniques
Introduction
Eric Fattah first wrote the “Frenzel Fattah Equalizing Document” to explain the Frenzel technique and
his strategies for equalizing well below residual lung volume (80m+). Since it was made available on
the internet, at least ten thousand people have benefited from his guide to Frenzel and mouth-fill
equalizing in the last five years.
The main benefit of learning the Frenzel and the Frenzel Fattah mouth-fill technique is to reduce the
effort and health risks that “pinch-and-blow” or Valsalva equalizing can create. If you learn the
techniques carefully explained in this document, you should be able to eventually equalize
unconsciously, a key to relaxed and efficient freediving.
Scuba divers can also benefit from learning the Frenzel technique. While you have more time to
equalize and a ready supply of air, pinch-and-blow can still cause trauma to the fragile tissues in the
middle ear, ear drum or lungs. Frenzel equalizing is instantaneous and much safer.
The Frenzel Fattah mouth-fill approach also makes diving on empty lungs or Functional Residual
Volume (FRV aka FRC) a practical diving style. Using the mouth-fill enables the trained freediver to
reach depths beyond recreational limits. Normally, such dives would be possible only with the more
risky technique of flooding the sinuses and inner ear with sea water or saline.
A word of caution: If your diving depth is currently limited by equalizing, the techniques explained in
this document, if properly learned, may dramatically increase your depth potential in a short time.
Please take care in your progression to new depths as all the risks normally associated with freediving
deeper without proper preparation will still apply! Forceful equalizing at depth with the diaphragm
p. 2
may increase the likelihood of ear and lung barotraumas. Diving on FRC/FRV or on empty lungs may
also result in lung barotraumas, black out, and/or death and drowning.
This revision of the equalizing document includes the following changes:
-Video demonstrations
-Additional content:
-Overview of Primary Equalizing Techniques
-Strategies for improving mouth-fill technique
Overview of Primary Equalizing Techniques
Valsalva (pinch and blow)
Description: To equalize inner ear and/or mask, pinch both nostrils closed with your fingers, and
“blow” by contracting your diaphragm (breathing out). Air is pushed into the Eustachian tube,
equalizing with the external water pressure.
Advantages: Easy to learn.
Disadvantages: Wastes lots of air. Slow to fully equalize both ears during to a fast descent. It requires
great diaphragmatic effort at deeper depths, which could result in injury.
Cautions: May cause barotraumas injury to ear or lungs at depth. Not effective at depths that are below
a diver’s residual lung volume
p. 3
Hands-Free (Voluntary Opening of Eustachian Tubes)
Description: During the descent, “open” your Eustachian tubes by flexing the muscles surrounding
them. The Eustachian tubes don’t actually open, but rather muscles prevent them from contracting with
the increasing water pressure. This encourages the movement of air from the lungs to the Eustachian
tubes, thus maintain equal air pressure.
Advantages: Ideal for streamlining and energy conservation. Safer than other techniques when
performed correctly.
Disadvantages: Requires training of muscles around Eustachian tubes. This technique is difficult or
impossible for some divers to master due to the small size of their Eustachian tubes. Slower descent
speed may be necessary for effective equalization. Not usually effective at depths that are well below a
diver’s residual lung volume.
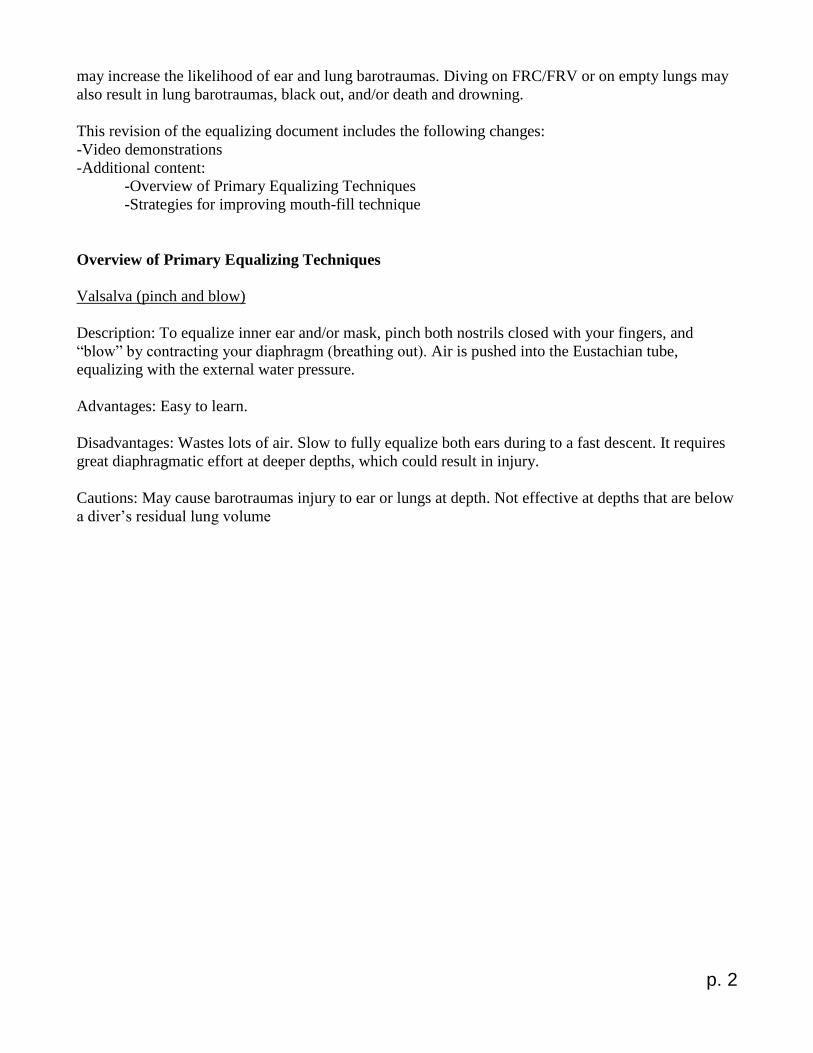
Frenzel (Diaphragmatic)
Description: By gathering air into the mouth, closing the epiglottis and opening the soft palate, air can
be forced into the Eustachian tube by generating a positive pressure with tongue, mouth and cheeks.
Advantages: Convenient. Safer than Valsalva technique and excellent for streamlining when Fluid
Goggles and a nose-clip are worn. Moderate to rapid descent speeds possible. Frenzel is effective at
depths beyond residual lung volume with proper training and adaptations of the thorax and rib cage.
p. 4
Disadvantages: Requires extensive training and
coordination of soft palate, glottis, tongue
muscles.
Cautions: Easy to go well beyond personal limit
– lung or trachea barotraumas may result.
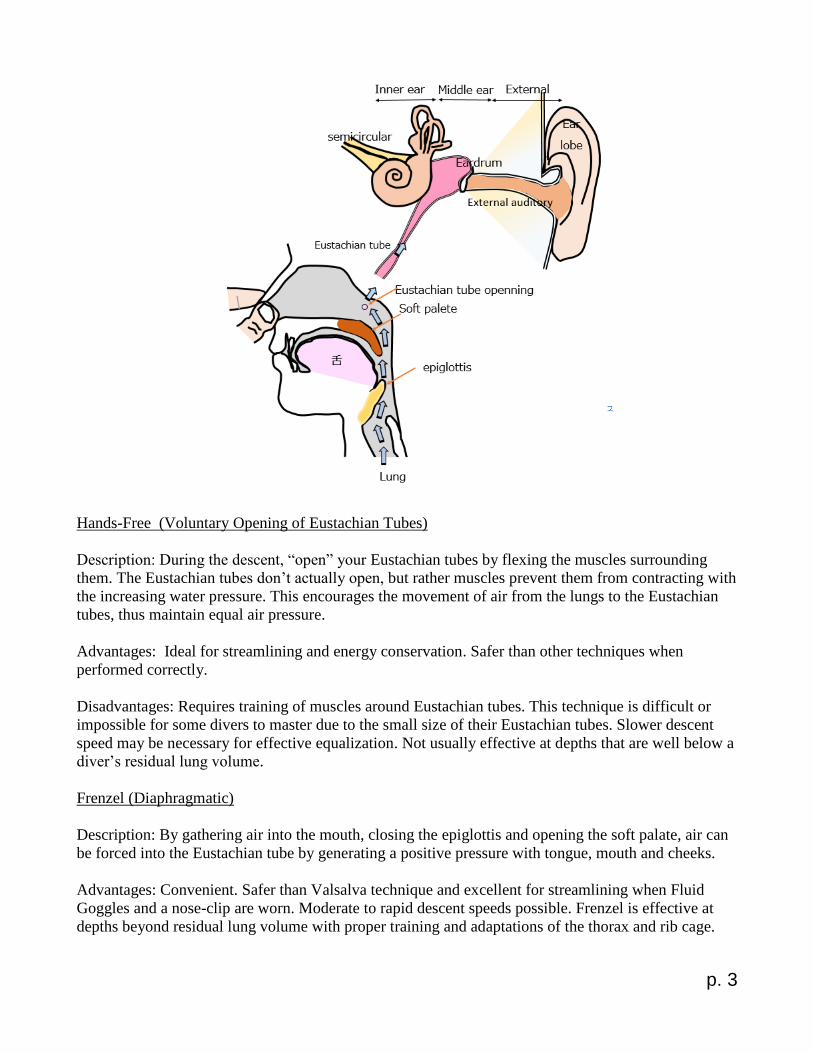
Frenzel Fattah Mouth-fill
Description: Identical to the Frenzel technique,
except that at a certain depth, the mouth-fill is
performed only once and is maintained for the
rest of the dive. An open soft palate and tongue,
jaw and cheek pressure is maintained to provide
constant equalizing pressure against the
increasing external water pressure.
Advantages: Reliable at all depths. Rapid descents are easy. Effective at depth well beyond below
residual lung volume (limit is size of mouth-fill only). Constant pressure can be maintained meaning
that a drop in Eustachian tube pressure never occurs.
Disadvantages: Requires extensive training and coordination of soft palate, glottis, tongue, and mouth
muscles.
Cautions: Easy to go well beyond personal limit – lung or trachea barotraumas may result.
Saline/Sea Water “Wet” Equalizing
Description: Typically, the diver dives with Fluid Goggles or no goggles or mask at all. If wearing a
noseclip, the diver removes it to let water flood his or her sinuses when they can no longer equalize
with air. The diver may choose to perform the Frenzel tongue piston to push water into the inner ear to
reduce the air space further. With sea water or saline solution in the sinuses and Eustachian tubes, air
space is negligible or greatly reduced, eliminating the need to equalize with air any further.
There is another variation (after Sebastian Murat): when flooding the sinuses, tilt the head back
towards the surface to prevent water from entering the Eustachian tubes. This variation is useful to
prevent the problems or irritation or infection when sea water enters the Eustachian tubes.
Advantages: Rapid descents possible. Effective at depths well below residual lung volume.
Disadavantages: Likelihood of infection of inner ear and sinuses.
Cautions: Requires training to prevent aspiration of water into lungs / drowning. Dangers also include:
vertigo from water in and around the inner ear canal; increased risk of drowning in the case of black
out / loss of motor control; very easy to go well beyond residual volume or personal limit – lung or
trachea barotraumas may result.
p. 5
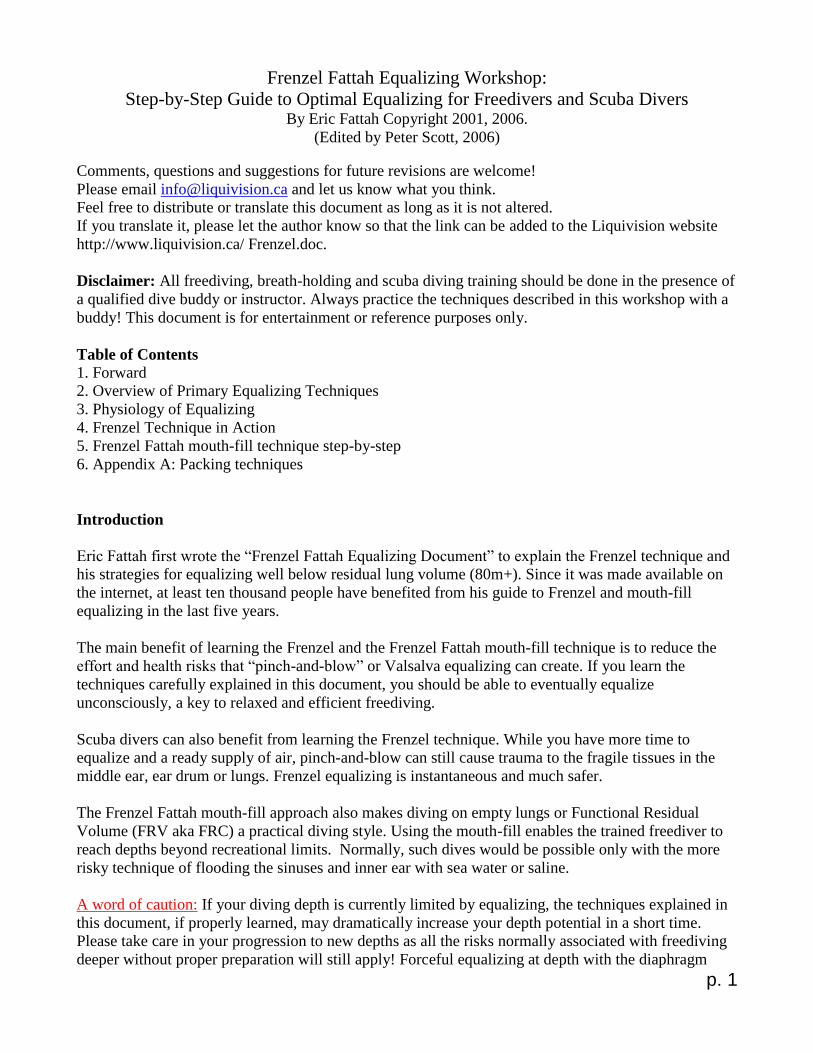
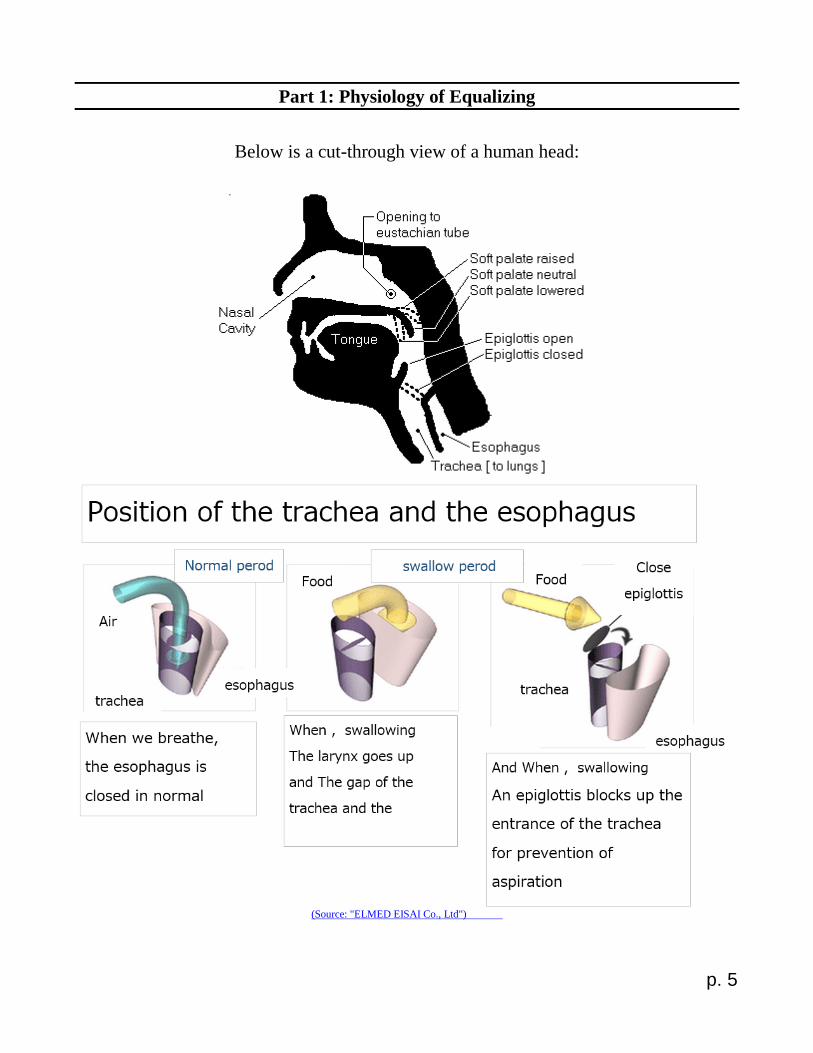
Part 1: Physiology of Equalizing
Below is a cut-through view of a human head:
(Source: "ELMED EISAI Co., Ltd")
p. 6
The passage that leads to the lungs is called the Trachea. It can be opened or closed by the
epiglottis.
The passage that leads to the stomach is called the Esophagus. It can be opened or closed, but it is
always closed except during the act of swallowing.
Air flowing in or out of the lungs can be directed by the soft palate. If the soft palate is in the
neutral position (as shown above), then air is free to flow through both the nose and the mouth.
If the soft palate is raised, the nasal cavity is sealed off, and air can flow only through the mouth.
If the soft palate is lowered, the mouth is closed off, and air can flow only through the nose.
The openings to the Eustachian tubes are in the nasal cavity. The key to equalizing the ears is to
force air into the Eustachian tubes.

p. 7
_______________________________________________________________________________
Part 2: The Frenzel Technique in Action
Below is a cut through view of a human head as the Frenzel technique is performed:
The tongue acts as a piston; by thrusting the tongue back and up, the entire volume of the throat
airspace is crushed. The air must go somewhere. It tries to go into the lungs, but the epiglottis is
closed. It tries to go into the stomach, but the esophagus is closed. It tries to exit via the nose, but the
nose is plugged by the fingers. The only place to go is into the Eustachian tubes. The pressure of air
forced into the Eustachian tubes is limited only by the strength of the tongue. The tongue is incredibly
strong. The tongue can provide enough air pressure to rupture the eardrums.
To perform the Frenzel technique:
1. Pinch your nose.
p. 8
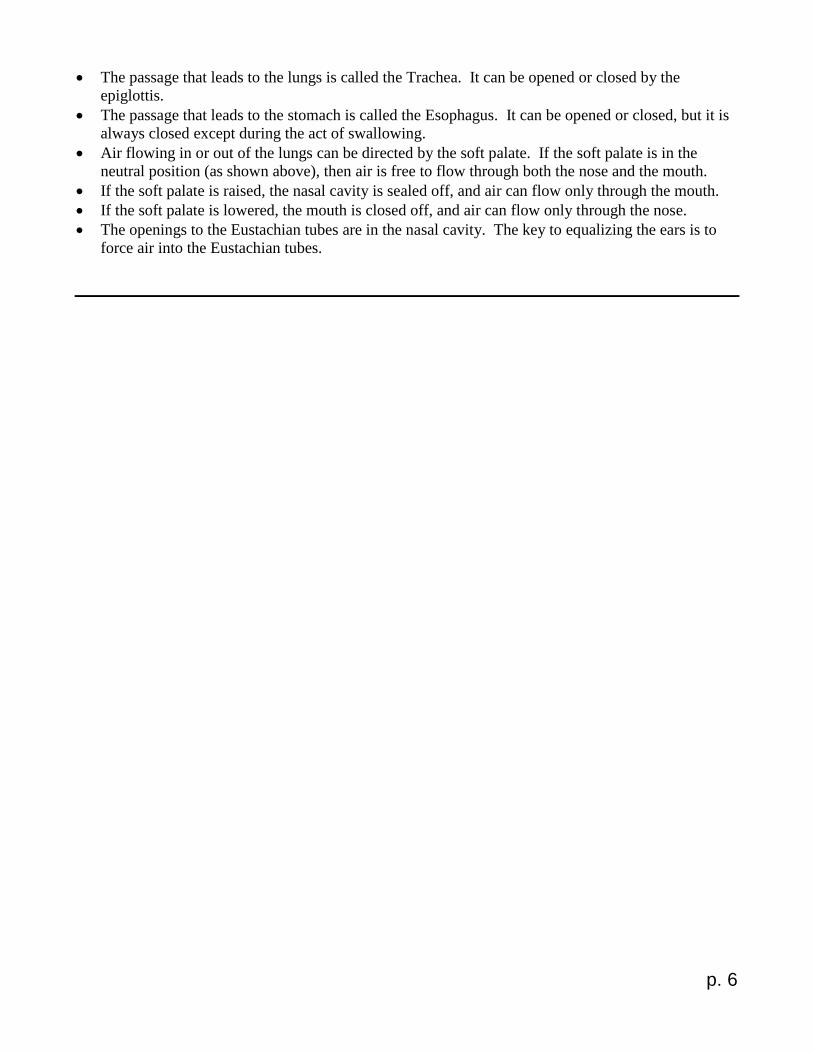
2. Fill your mouth up with a little bit of air.
3. Close the epiglottis.
“Image as swallowing”
4. Move the soft palate to the neutral position.
Image as “ phonetic symbol:/ n /”
phonetic symbol:/ n /
noon novel
Source: "English Pronunciation for Japanese”
Official Site:http://www.ace-schools.co.jp/index.html
p. 9
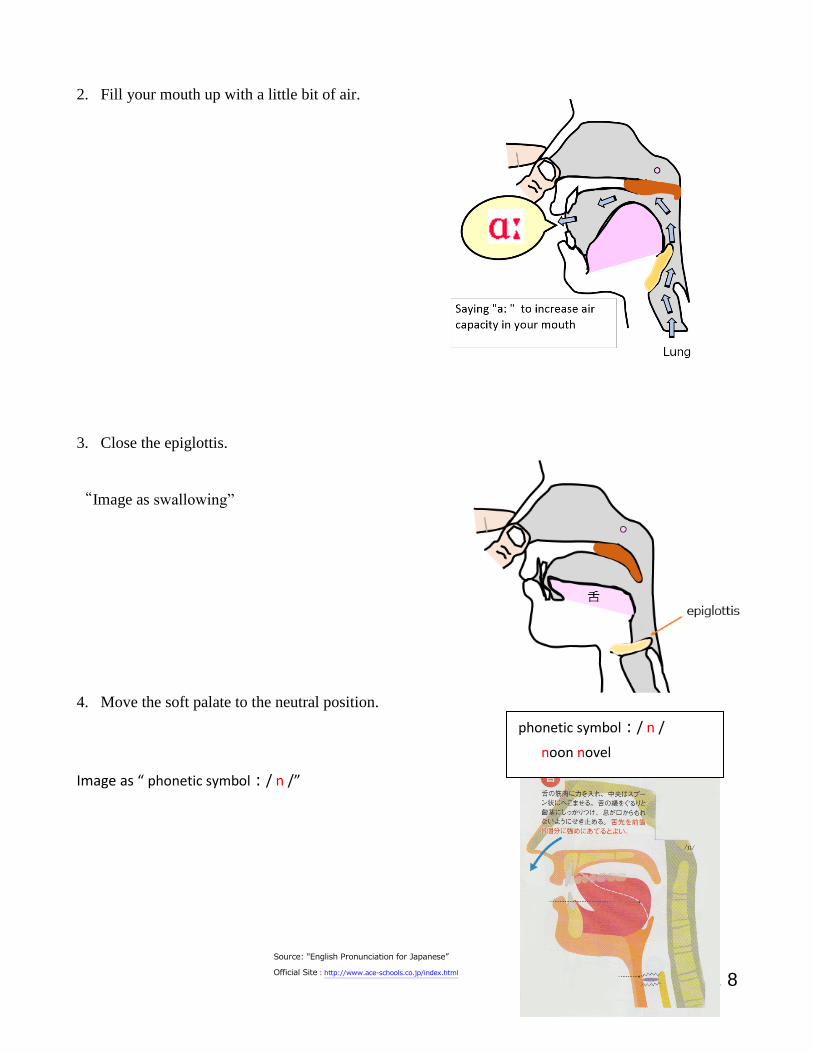
5. Use the tongue as a piston and push air towards the back of your throat.
Image as “ phonetic
symbol:/ ŋ /”
Source: "English Pronunciation for Japanese”
Official Site:http://www.ace-schools.co.jp/index.html
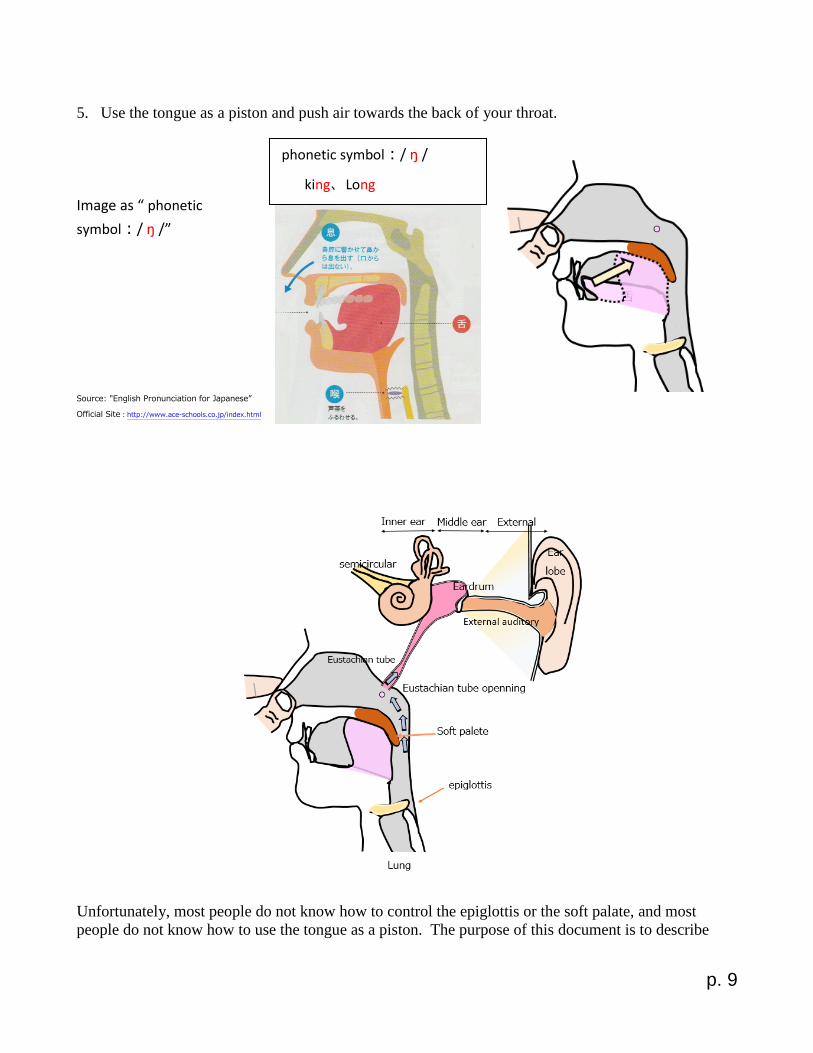
Unfortunately, most people do not know how to control the epiglottis or the soft palate, and most
people do not know how to use the tongue as a piston. The purpose of this document is to describe
phonetic symbol:/ ŋ /
king、Long
p. 10
step-by-step procedures to learn each of the above steps. As long as each individual step is mastered,
success is guaranteed.
The individual steps which must be learned can be broken down as follows:
1. Learn to fill the mouth up with air
2. Learn to control the epiglottis
3. Learn to control the soft palate
4. Learn to apply the ‘tongue block’
5. Learn to use the tongue as a piston
6. Learn to control the epiglottis and soft palate independently
7. Put it all together
8. Test it in the water
9. Learn the advanced variations
Step 1: Learn to fill the mouth up with air
Fill your cheeks up like a balloon, and hold the air there for a few seconds.
Then, using your cheeks, push the air back into your lungs.
Repeat this several times, until you can do it at will.
To do a ‘complete cheek fill’, fill your cheeks until they are bursting.
To do a ‘moderate cheek fill’, fill your cheeks until they just start to bulge.
When I say ‘Fill your mouth up with a little bit of air’, I mean do a ‘moderate cheek fill.’
Step 2: Learn to control the epiglottis
There are many ways to learn to control the epiglottis. Practice these individual exercises to assure that
you have perfect control over the muscles that control it:
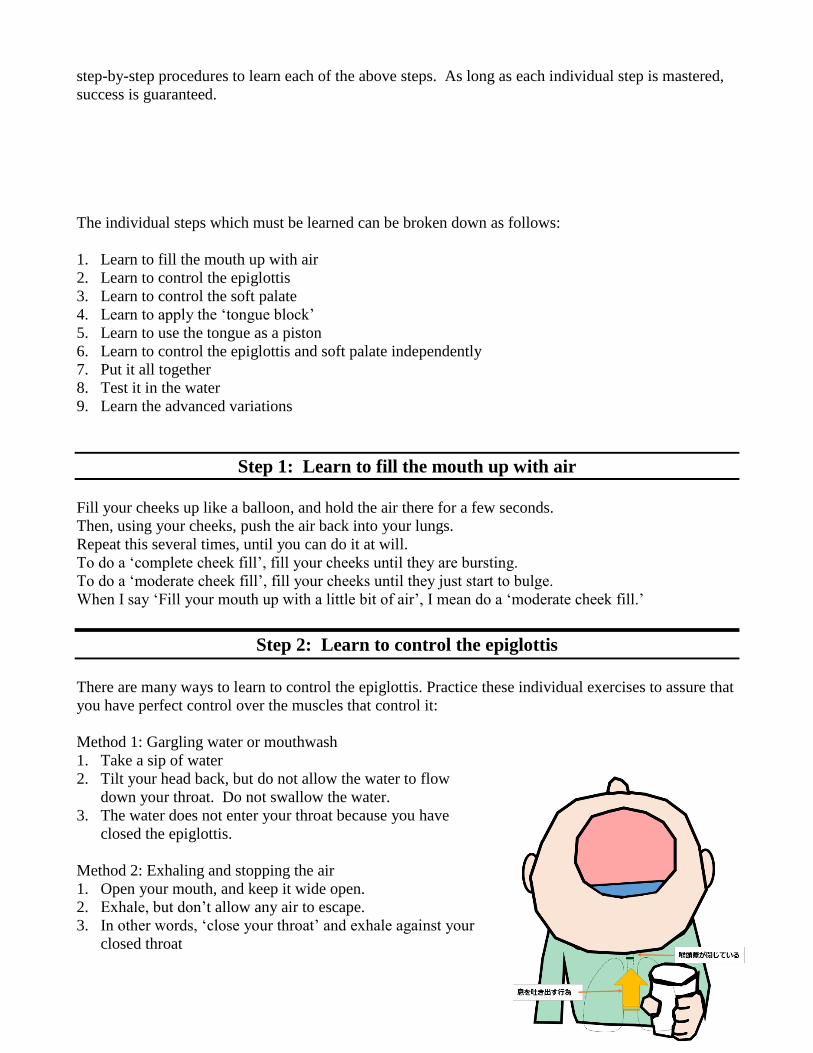
Method 1: Gargling water or mouthwash
1. Take a sip of water
2. Tilt your head back, but do not allow the water to flow
down your throat. Do not swallow the water.
3. The water does not enter your throat because you have
closed the epiglottis.
Method 2: Exhaling and stopping the air
1. Open your mouth, and keep it wide open.
2. Exhale, but don’t allow any air to escape.
3. In other words, ‘close your throat’ and exhale against your
closed throat
p. 11
4. No air comes out because you have closed the epiglottis
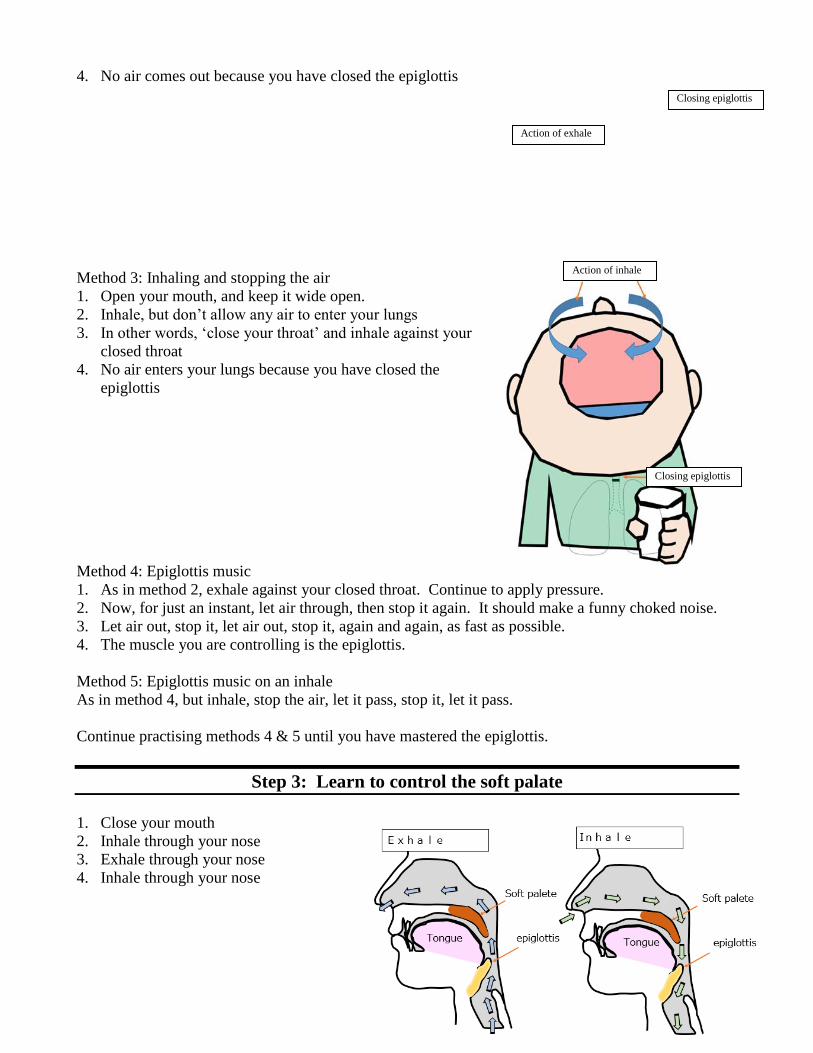
Method 3: Inhaling and stopping the air
1. Open your mouth, and keep it wide open.
2. Inhale, but don’t allow any air to enter your lungs
3. In other words, ‘close your throat’ and inhale against your
closed throat
4. No air enters your lungs because you have closed the
epiglottis
Method 4: Epiglottis music
1. As in method 2, exhale against your closed throat. Continue to apply pressure.
2. Now, for just an instant, let air through, then stop it again. It should make a funny choked noise.
3. Let air out, stop it, let air out, stop it, again and again, as fast as possible.
4. The muscle you are controlling is the epiglottis.
Method 5: Epiglottis music on an inhale
As in method 4, but inhale, stop the air, let it pass, stop it, let it pass.
Continue practising methods 4 & 5 until you have mastered the epiglottis.
Step 3: Learn to control the soft palate
1. Close your mouth
2. Inhale through your nose
3. Exhale through your nose
4. Inhale through your nose
Closing epiglottis
Action of exhale
Closing epiglottis
Action of inhale
p. 12
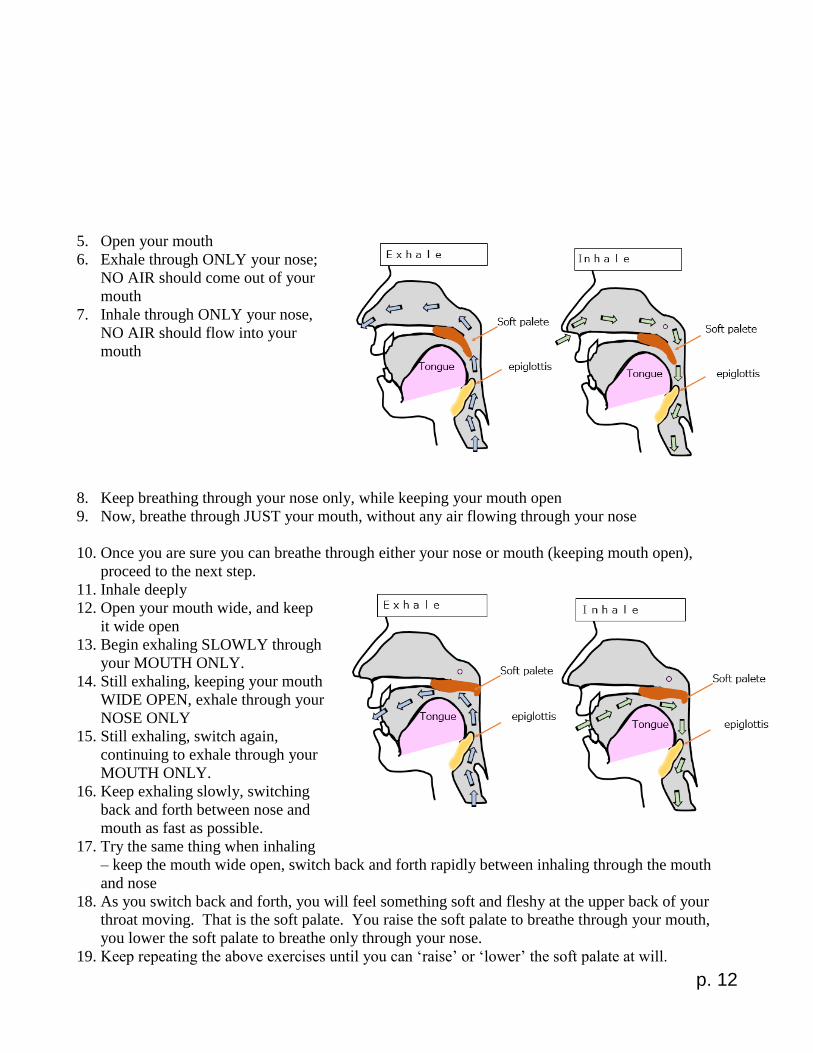
5. Open your mouth
6. Exhale through ONLY your nose;
NO AIR should come out of your
mouth
7. Inhale through ONLY your nose,
NO AIR should flow into your
mouth
8. Keep breathing through your nose only, while keeping your mouth open
9. Now, breathe through JUST your mouth, without any air flowing through your nose
10. Once you are sure you can breathe through either your nose or mouth (keeping mouth open),
proceed to the next step.
11. Inhale deeply
12. Open your mouth wide, and keep
it wide open
13. Begin exhaling SLOWLY through
your MOUTH ONLY.
14. Still exhaling, keeping your mouth
WIDE OPEN, exhale through your
NOSE ONLY
15. Still exhaling, switch again,
continuing to exhale through your
MOUTH ONLY.
16. Keep exhaling slowly, switching
back and forth between nose and
mouth as fast as possible.
17. Try the same thing when inhaling
– keep the mouth wide open, switch back and forth rapidly between inhaling through the mouth
and nose
18. As you switch back and forth, you will feel something soft and fleshy at the upper back of your
throat moving. That is the soft palate. You raise the soft palate to breathe through your mouth,
you lower the soft palate to breathe only through your nose.
19. Keep repeating the above exercises until you can ‘raise’ or ‘lower’ the soft palate at will.
p. 13
20. When you exhale through BOTH your mouth and your nose, the soft palate is in the NEUTRAL
position (neither up nor down).
Step 4: Learn to apply the ‘tongue block’
Now you must learn to stop air flow with your tongue only
1. Begin exhaling through your mouth
2. Stop the air flow by closing your mouth (your cheeks should fill momentarily)
3. Inhale again, and begin exhaling again
4. Stop the air flow by closing the epiglottis.
5. So, you already know of two ways to prevent air from flowing out of your mouth—you can either
close the epiglottis, or you can just close your mouth.
6. Now you must learn a third way to stop the air from flowing out of your mouth.
Inhale, and exhale slowly through your mouth, saying the syllable
‘th’ as in the word ‘theatre.’
7. Now, keeping your tongue in that position, touch the tip of your
tongue to the roof of your mouth, just behind your front teeth.
8. Try to stop the air from flowing past your tongue, by making a
seal with your tongue. The tip of your tongue touches the roof
of your mouth behind your front teeth; the sides of your tongue
touch the roof of your mouth just inside your molars.
9. Keep repeating the above steps until you can stop air from
flowing out of your mouth by using your tongue.
10. Make sure you are not cheating by closing the epiglottis or
closing your mouth. Your lips should remain OPEN, and your
jaw will be almost closed – it can be done with the jaw totally
closed, or only closed enough so that your front teeth (upper and
lower) touch each other.
11. Once you have mastered stopping the air with your tongue, remember what you do with your
tongue—remember the position of the tongue—that is called the ‘tongue block.’
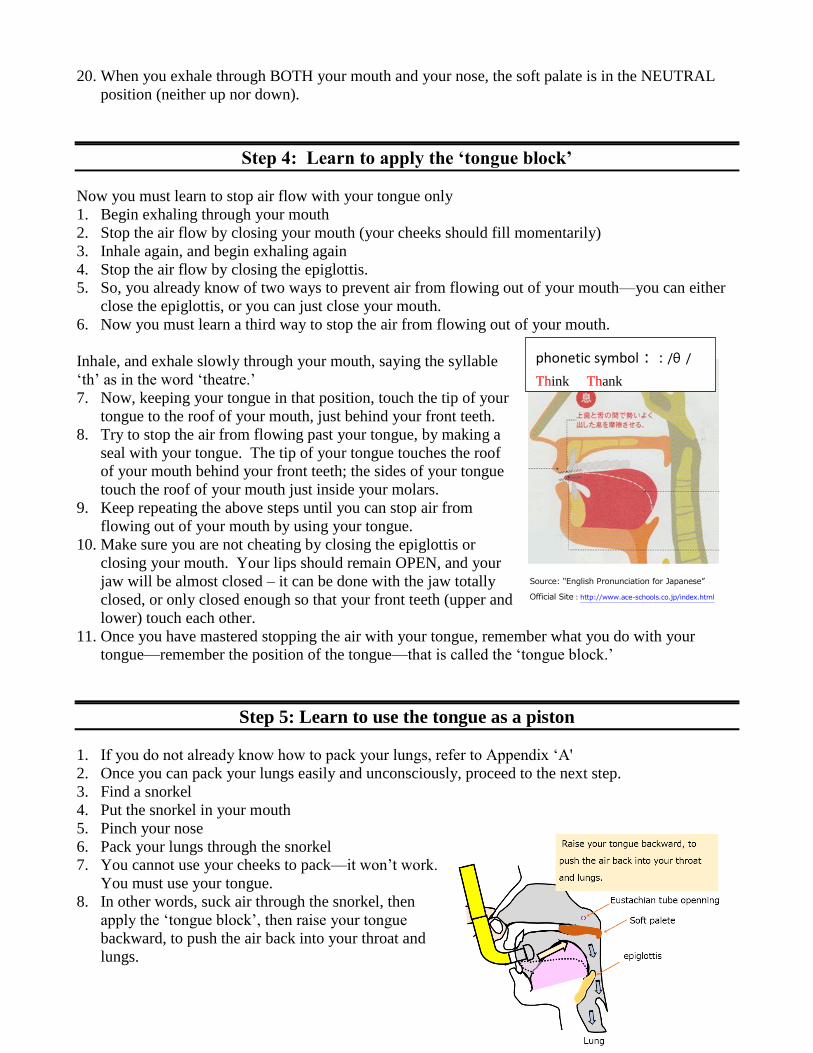
Step 5: Learn to use the tongue as a piston
1. If you do not already know how to pack your lungs, refer to Appendix ‘A'
2. Once you can pack your lungs easily and unconsciously, proceed to the next step.
3. Find a snorkel
4. Put the snorkel in your mouth
5. Pinch your nose
6. Pack your lungs through the snorkel
7. You cannot use your cheeks to pack—it won’t work.
You must use your tongue.
8. In other words, suck air through the snorkel, then
apply the ‘tongue block’, then raise your tongue
backward, to push the air back into your throat and
lungs.
phonetic symbol::/θ /
Think Thank
Source: "English Pronunciation for Japanese”
Official Site:http://www.ace-schools.co.jp/index.html
p. 14
9. When doing this, the sides of your tongue touch your gums on the roof of your mouth, by your
molars. The tip of you tongue touches the roof of your mouth. Once you have created a ‘seal’ with
your tongue, all your teeth will be in the outer ‘air chamber’, and all the air behind your tongue will
be in the ‘rear air chamber’. When your tongue is in this position, it is not possible to exhale. The
tongue blocks the air.
10. Once you can pack through your snorkel (using your tongue as described), you have mastered
‘using the tongue as a piston.’ Now you know how to push air into your lungs using your tongue.
Step 6: Learn to control the epiglottis and soft palate independently
Unfortunately, the epiglottis and soft palate are ‘coupled’, in the sense that your ears are coupled. It is
hard to move one ear and not the other. It is hard to move one eyebrow and not the other. If you can
move one eyebrow and not the other, then you have successfully ‘uncoupled’ those two muscles. You
can control those two muscles independently. The epiglottis and soft palate are coupled. When you
close the epiglottis, you almost certainly raise your soft palate (which thus prevents airflow through the
nose). This is a problem. To do the Frenzel technique, you must learn to close the epiglottis while
keeping the soft palate in the neutral position. This can be quite difficult and time consuming to learn,
and it is often the most difficult part of the entire technique.
1. Place your index finger and thumb below your nostrils, so that your nose is very gently plugged.
2. It should be possible to exhale through your nose—your nostrils should flare.
3. Fill your cheeks up completely, until they are bursting.
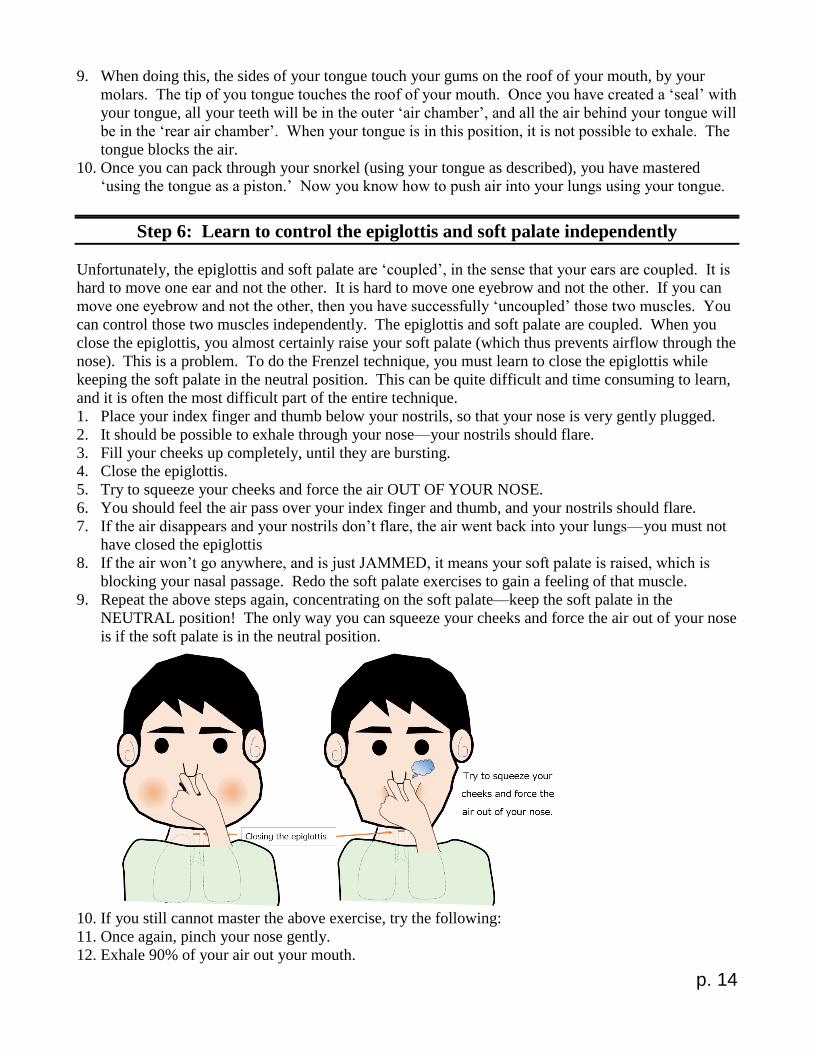
4. Close the epiglottis.
5. Try to squeeze your cheeks and force the air OUT OF YOUR NOSE.
6. You should feel the air pass over your index finger and thumb, and your nostrils should flare.
7. If the air disappears and your nostrils don’t flare, the air went back into your lungs—you must not
have closed the epiglottis
8. If the air won’t go anywhere, and is just JAMMED, it means your soft palate is raised, which is
blocking your nasal passage. Redo the soft palate exercises to gain a feeling of that muscle.
9. Repeat the above steps again, concentrating on the soft palate—keep the soft palate in the
NEUTRAL position! The only way you can squeeze your cheeks and force the air out of your nose
is if the soft palate is in the neutral position.
10. If you still cannot master the above exercise, try the following:
11. Once again, pinch your nose gently.
12. Exhale 90% of your air out your mouth.
p. 15
13. Close your mouth, and exhale the last 10% of your air into your cheeks, filling them until they are
bursting.
14. Close the epiglottis.
15. Now your lungs should be completely empty, and your cheeks should be full. The air should be
trapped in your mouth because your epiglottis is closed.
16. Now, inhale against your closed throat. Of course, no air will rush into your lungs, because the
epiglottis is closed. Instead, you create an uncomfortable vacuum in your lungs.
17. Maintain the lung vacuum. Now try to squeeze your cheeks and force the air in your cheeks out of
your nose. Concentrate on the soft palate. Relax it—keep it in the neutral position. If you succeed,
the air will come rushing out of your nose. Do not let the air rush into your lungs.
18. Keep practising the above exercises until you can fill your cheeks, close your epiglottis, squeeze
your cheeks and force the air out of your nose. When you do that, the epiglottis is closed, and the
soft palate is in the neutral position. That is the muscle state that you must remember.
Another way to learn to control the epiglottis and soft palate independently is to pack your lungs
through your nose. In other words, try to learn to pack your lungs with your mouth closed. You must
‘suck’ air through your nose.
Step 7: Put it all together
1. Plug your nose.
2. Fill your cheeks up just a tiny bit.
3. Close the epiglottis and keep the soft palate in the neutral position, as you just learned.
4. Apply the tongue block, and, force the air to the back of your throat as if packing through a snorkel.
The air cannot enter the lungs, but instead, it will flow into the nasal passages—but since your nose
is plugged, the air will be forced into the Eustachian tubes, which ‘pops’ your ears.
5. Once your ears have popped, you can continue to apply pressure with your tongue, bending your
eardrums outward. In fact, you should feel as though you could break your own eardrums
(outward), if you applied enough pressure with your tongue (of course, don’t try to break your
eardrums!)
Keep practising the Frenzel technique on land until you can pop your ears instantly, by plugging your
nose, and ‘pop’.
Step 8: Test it in the water
1. Go to a swimming pool which is at least 10 feet deep.
2. Descend to 10-12 feet, upside down, without equalizing. Your ears should hurt slightly.
3. Now, plug your nose and EQUALIZE! You should be able to pop your ears INSTANTLY.
4. Continue applying pressure with your tongue until you feel your ears stretching outward.
5. Try the same thing in a lake or ocean.
PART 3: Frenzel Fattah Mouth-Fill – Step-by-Step
p. 16
To perform the Frenzel technique, there must be an air space in the throat. The tongue must push, like
a piston, against that airspace. If there is no airspace in the throat, the technique cannot be performed.
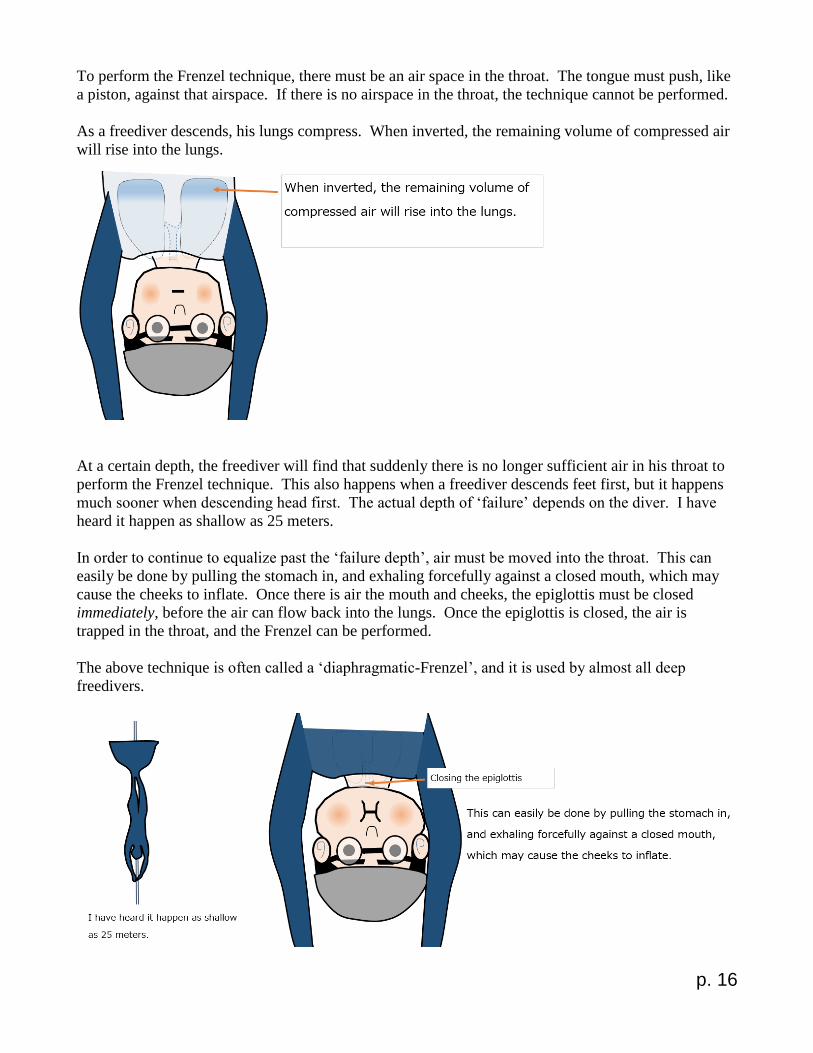
As a freediver descends, his lungs compress. When inverted, the remaining volume of compressed air
will rise into the lungs.
At a certain depth, the freediver will find that suddenly there is no longer sufficient air in his throat to
perform the Frenzel technique. This also happens when a freediver descends feet first, but it happens
much sooner when descending head first. The actual depth of ‘failure’ depends on the diver. I have
heard it happen as shallow as 25 meters.
In order to continue to equalize past the ‘failure depth’, air must be moved into the throat. This can
easily be done by pulling the stomach in, and exhaling forcefully against a closed mouth, which may
cause the cheeks to inflate. Once there is air the mouth and cheeks, the epiglottis must be closed
immediately, before the air can flow back into the lungs. Once the epiglottis is closed, the air is
trapped in the throat, and the Frenzel can be performed.
The above technique is often called a ‘diaphragmatic-Frenzel’, and it is used by almost all deep
freedivers.
p. 17
However, even with the diaphragmatic Frenzel, there will come a depth when the remaining air
volume in the lungs is so small that it is no longer possible to fill the mouth and throat. After that
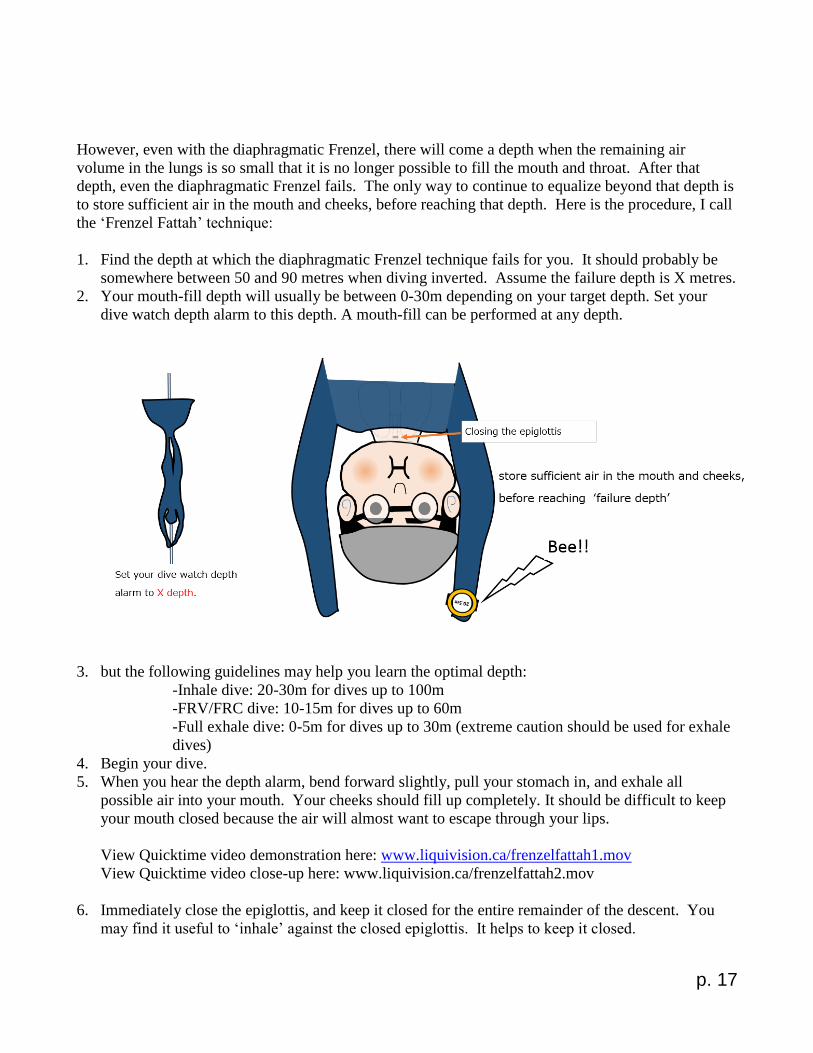
depth, even the diaphragmatic Frenzel fails. The only way to continue to equalize beyond that depth is
to store sufficient air in the mouth and cheeks, before reaching that depth. Here is the procedure, I call
the ‘Frenzel Fattah’ technique:
1. Find the depth at which the diaphragmatic Frenzel technique fails for you. It should probably be
somewhere between 50 and 90 metres when diving inverted. Assume the failure depth is X metres.
2. Your mouth-fill depth will usually be between 0-30m depending on your target depth. Set your
dive watch depth alarm to this depth. A mouth-fill can be performed at any depth.
3. but the following guidelines may help you learn the optimal depth:
-Inhale dive: 20-30m for dives up to 100m
-FRV/FRC dive: 10-15m for dives up to 60m
-Full exhale dive: 0-5m for dives up to 30m (extreme caution should be used for exhale
dives)
4. Begin your dive.
5. When you hear the depth alarm, bend forward slightly, pull your stomach in, and exhale all
possible air into your mouth. Your cheeks should fill up completely. It should be difficult to keep
your mouth closed because the air will almost want to escape through your lips.
View Quicktime video demonstration here: www.liquivision.ca/frenzelfattah1.mov
View Quicktime video close-up here: www.liquivision.ca/frenzelfattah2.mov
6. Immediately close the epiglottis, and keep it closed for the entire remainder of the descent. You
may find it useful to ‘inhale’ against the closed epiglottis. It helps to keep it closed.
p. 18
7. Now, keeping the soft palate in the neutral position, you can continue to equalize with the Frenzel
technique. You must continue to keep the epiglottis closed.
8. You should be able to equalize many more times with the air in your mouth and cheeks.
9. You can also equalize your mask with the air in your mouth. To do that, simply do the Frenzel but
don’t plug your nose.
The ‘Frenzel Fattah’ technique can be practised in a swimming pool, but it is as dangerous as
performing it in the ocean, so you must have a spotter/partner!
NOTE: Negative pressure dives in a pool or ocean may result in lung barotraumas. If you’ve never
tried this kind of dive, reduce the amount of air you exhale to 50% or 75%. The goal is not the amount
of air exhaled, but only to make sure that you are not inadvertently drawing air from your lungs. You
can also practice this on land, which is safer, although a sudden drop in lung pressure (reverse packing)
can also cause injury.
1. Go to a swimming pool which is at least 10 feet deep.
2. Relax your body and prepare yourself.
3. After a proper breathing pattern, exhale 95% of your air.
4. Close your mouth.
5. Continue to exhale the last 5% of your air into your mouth—your cheeks should fill up completely.
6. Immediately close the epiglottis.
7. Descend to the bottom of the pool.
8. Equalize with the air in your mouth.
The same technique can be practised in a lake or ocean. Make sure that your spotter follows you for
the whole dive and stays in visual contact.
Appendix A: How to pack your lungs
NOTE: Packing is a useful technique to learn to help master the Frenzel technique, however, excessive
packing may cause dizziness, loss of consciousness, lung barotraumas and physical injury. Never pack
your lungs to the point of dizziness or pain. If you feel any unusual symptoms, exhale slowly and bend
down close to the ground.
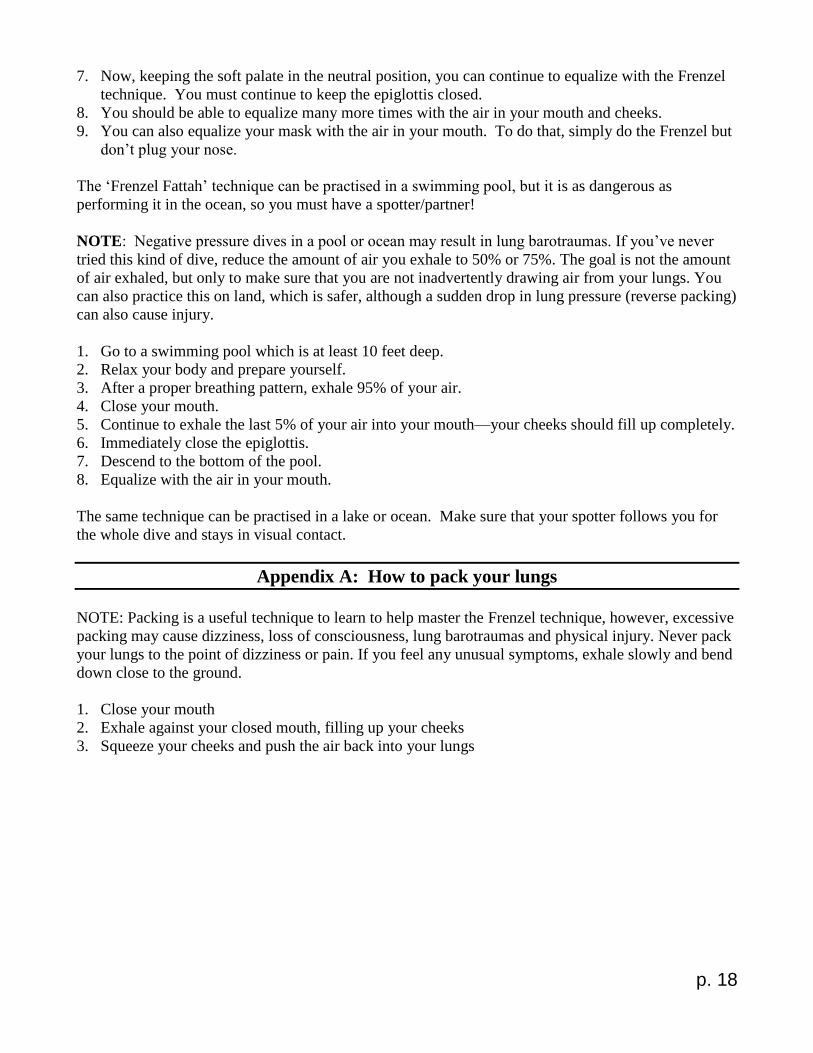
1. Close your mouth
2. Exhale against your closed mouth, filling up your cheeks
3. Squeeze your cheeks and push the air back into your lungs
p. 19
4. Repeat 1-3 again and again until you can fill your cheeks, and push the air back into your lungs
easily
5. Find a drinking straw
6. Put the straw in your mouth
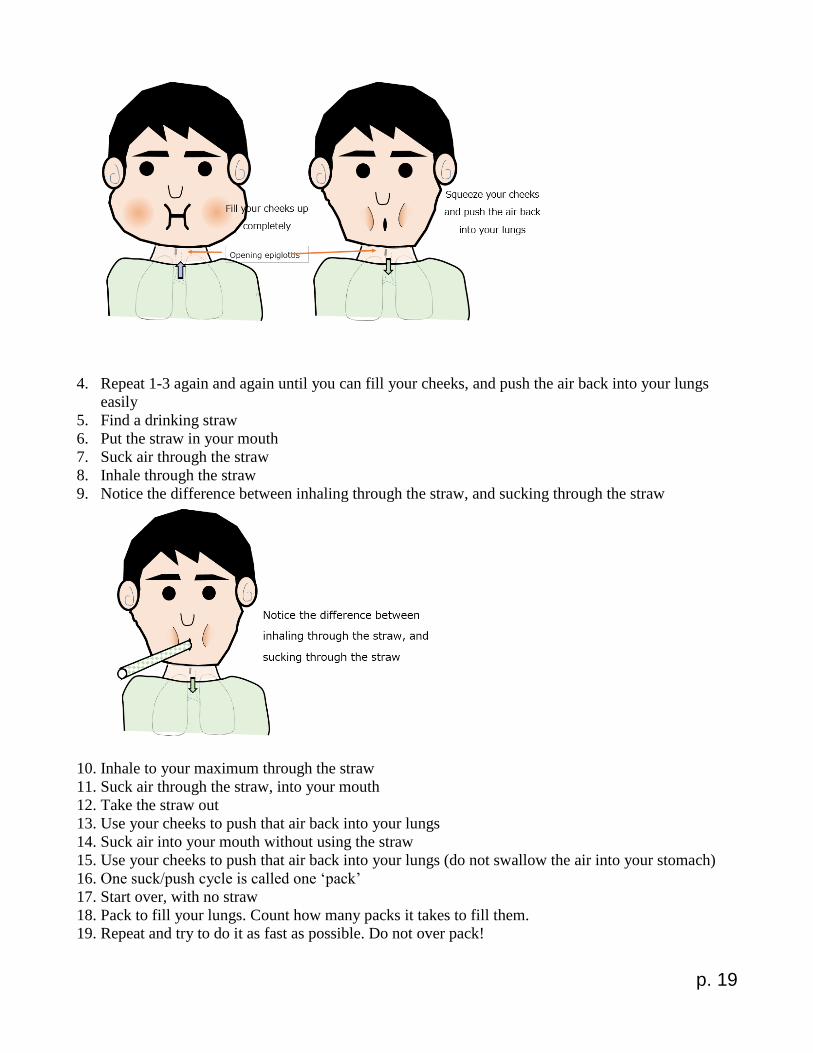
7. Suck air through the straw
8. Inhale through the straw
9. Notice the difference between inhaling through the straw, and sucking through the straw
10. Inhale to your maximum through the straw
11. Suck air through the straw, into your mouth
12. Take the straw out
13. Use your cheeks to push that air back into your lungs
14. Suck air into your mouth without using the straw
15. Use your cheeks to push that air back into your lungs (do not swallow the air into your stomach)
16. One suck/push cycle is called one ‘pack’
17. Start over, with no straw
18. Pack to fill your lungs. Count how many packs it takes to fill them.
19. Repeat and try to do it as fast as possible. Do not over pack!

p. 20
Recommended