UD06370B
iVMS-5200 Mobile Surveillance
Quick Start Guide

i
Quick Start Guide
COPYRIGHT © 2017 Hangzhou Hikvision Digital Technology Co., Ltd.
ALL RIGHTS RESERVED.
Any and all information, including, among others, wordings, pictures, graphs are the properties
of Hangzhou Hikvision Digital Technology Co., Ltd. or its subsidiaries (hereinafter referred to be
“Hikvision”). This user manual (hereinafter referred to be “the Manual”) cannot be reproduced,
changed, translated, or distributed, partially or wholly, by any means, without the prior written
permission of Hikvision. Unless otherwise stipulated, Hikvision does not make any warranties,
guarantees or representations, express or implied, regarding to the Manual.
About this Manual
This Manual is applicable to iVMS-5200 Mobile Surveillance.
The Manual includes instructions for using and managing the product. Pictures, charts, images
and all other information hereinafter are for description and explanation only. The information
contained in the Manual is subject to change, without notice, due to firmware updates or other
reasons. Please find the latest version in the company website
(http://overseas.hikvision.com/en/).
Please use this user manual under the guidance of professionals.
Trademarks Acknowledgement
and other Hikvision’s trademarks and logos are the properties of Hikvision in
various jurisdictions. Other trademarks and logos mentioned below are the properties of their
respective owners.
Legal Disclaimer
TO THE MAXIMUM EXTENT PERMITTED BY APPLICABLE LAW, THE PRODUCT DESCRIBED, WITH ITS
HARDWARE, SOFTWARE AND FIRMWARE, IS PROVIDED “AS IS”, WITH ALL FAULTS AND ERRORS, AND
HIKVISION MAKES NO WARRANTIES, EXPRESS OR IMPLIED, INCLUDING WITHOUT LIMITATION,
MERCHANTABILITY, SATISFACTORY QUALITY, FITNESS FOR A PARTICULAR PURPOSE, AND
NON-INFRINGEMENT OF THIRD PARTY. IN NO EVENT WILL HIKVISION, ITS DIRECTORS, OFFICERS,
EMPLOYEES, OR AGENTS BE LIABLE TO YOU FOR ANY SPECIAL, CONSEQUENTIAL, INCIDENTAL, OR

ii
INDIRECT DAMAGES, INCLUDING, AMONG OTHERS, DAMAGES FOR LOSS OF BUSINESS PROFITS,
BUSINESS INTERRUPTION, OR LOSS OF DATA OR DOCUMENTATION, IN CONNECTION WITH THE USE
OF THIS PRODUCT, EVEN IF HIKVISION HAS BEEN ADVISED OF THE POSSIBILITY OF SUCH DAMAGES.
REGARDING TO THE PRODUCT WITH INTERNET ACCESS, THE USE OF PRODUCT SHALL BE WHOLLY AT
YOUR OWN RISKS. HIKVISION SHALL NOT TAKE ANY RESPONSIBILITIES FOR ABNORMAL OPERATION,
PRIVACY LEAKAGE OR OTHER DAMAGES RESULTING FROM CYBER ATTACK, HACKER ATTACK, VIRUS
INSPECTION, OR OTHER INTERNET SECURITY RISKS; HOWEVER, HIKVISION WILL PROVIDE TIMELY
TECHNICAL SUPPORT IF REQUIRED.
SURVEILLANCE LAWS VARY BY JURISDICTION. PLEASE CHECK ALL RELEVANT LAWS IN YOUR
JURISDICTION BEFORE USING THIS PRODUCT IN ORDER TO ENSURE THAT YOUR USE CONFORMS THE
APPLICABLE LAW. HIKVISION SHALL NOT BE LIABLE IN THE EVENT THAT THIS PRODUCT IS USED WITH
ILLEGITIMATE PURPOSES.
IN THE EVENT OF ANY CONFLICTS BETWEEN THIS MANUAL AND THE APPLICABLE LAW, THE LATER
PREVAILS.

1
Contents 1. Overview ....................................................................................................................................... 2
1.1 Guide Content ..................................................................................................................... 2
1.2 Administrator Rights ........................................................................................................... 2
1.3 System Requirements .......................................................................................................... 2
1.3.1 System Requirements for Central Management Service ......................................... 2
1.3.2 System Requirements for Streaming Service ........................................................... 2
1.3.3 System Requirements for Control Client .................................................................. 2
2. Installation ..................................................................................................................................... 4
3. Accessing via Web Client ............................................................................................................... 7
3.1 General Login (Not First Time) ............................................................................................ 7
3.2 First Time Login for admin User .......................................................................................... 9
3.3 Function Modules ............................................................................................................. 10
4. Activating iVMS-5200 Mobile Surveillance ................................................................................. 11
4.1 Online Activation ............................................................................................................... 12
4.2 Offline Activation .............................................................................................................. 12
5. Quick Start ................................................................................................................................... 14
5.1 Resource Management and Live View .............................................................................. 14
5.1.1 Adding Mobile Video Recorder by Single ID ........................................................... 14
5.1.2 Area Management ................................................................................................. 15
5.1.3 Live View ................................................................................................................ 16
5.2 Recording Settings and Playback ....................................................................................... 18
5.2.1 Recording Settings .................................................................................................. 18
5.2.2 Remote Playback .................................................................................................... 21
5.3 Alarm Configuration .......................................................................................................... 22
5.3.1 Configuring Alarm .................................................................................................. 22
5.3.2 Checking Alarm Logs .............................................................................................. 23
5.4 Role and User Management .............................................................................................. 24
5.4.1 Role Management .................................................................................................. 24
5.4.2 User Management.................................................................................................. 26

2
1. Overview
1.1 Guide Content
This guide briefly explains how to install your iVMS-5200 Mobile Surveillance as well as how to
configure some of its basic features.
To ensure the properness of usage and stability of the iVMS-5200 Mobile Surveillance, please refer to
the contents below and read the guide carefully before installation and operation.
1.2 Administrator Rights
When you install and run the service modules, clients and software, it is important that you have
administrator rights on the PCs or servers that should run these components. Otherwise, you cannot
install and configure the iVMS-5200 Mobile Surveillance.
Consult your IT system administrator if in doubt about your rights.
1.3 System Requirements
1.3.1 System Requirements for Central Management Service
Operating System: Windows Server 2008 R2 (64-bit) / Windows Server 2012 (64-bit) / Windows 7
(64-bit) / Windows 8 (64-bit) / Windows 8.1 (64-bit) / Windows 10 (64-bit)
Processor: E5-2620 series processor with 6 cores (2.0 Ghz)
Memory: 8 GB
HDD: Enterprise-level SATA disk with 600 GB storage capacity
Network Controller: RJ45 Gigabit self-adaptive Ethernet interfaces
1.3.2 System Requirements for Streaming Service
Operating System: Windows Server 2008 R2 (32/64-bit) / Windows Server 2012 SP2 (32/64-bit) /
Windows 7 (32/64-bit) / Windows 8 (32/64-bit) / Windows 10 (32/64-bit)
Processor: E3-1230 V2 series processor (3.3 GHz)
Memory: 8 GB
HDD: Enterprise-level SATA disk with 500 GB storage capacity
Network Controller: RJ45 Gigabit self-adaptive Ethernet interfaces
1.3.3 System Requirements for Control Client
Operating System: Microsoft Windows 7 (32/64-bit), Windows 8 (32/64-bit), Windows 8.1 (32/64-bit),

3
Windows Server 2008 R2 (32/64-bit), Windows Server 2012 (32/64-bit), Windows 10 (64-bit)
CPU: Intel Core i3-530 and above
Memory: 4 GB and above
Video Card: Geforce GTX 240 and above

4
2. Installation
The program file which is provided by HIKVISION contains two service modules and one client,
including iVMS-5200 Central Management Service, iVMS-5200 Streaming Service, and iVMS-5200
Mobile Surveillance Control Client. The service modules can be installed on different servers or PCs
separately, or you can install them on the same server or PC as desired.
Perform the following steps to install the system.
Steps:
1. Double-click the program file to enter the welcome panel of the InstallShield Wizard. Click
Next to start the InstallShield Wizard.
2. Read the License Agreement. Click Print if you want to print the license agreement.
If you accept the terms of the license agreement, click I accept the terms of the license
agreement and continue.
Otherwise click I do not accept the terms of the license agreement to cancel the installation.
3. On the next panel, you are prompted to select a setup type to install.
Select Default for installing all the service modules and client, and click Next to continue.
4. Click Change… and select a proper directory as desired to install the module(s). Click Next to
continue.

5
Note: The default directory is C:\Program Files (x86)\iVMS-5200 Professional (for 64-bit OS).
5. Select the mode as Normal.
You must set the correct LAN IP address and port No. for the CMS so that the service modules and
functions can work properly.
To access the system via WAN, check the Enable WAN Access checkbox and set a static IP address
and port No. for the CMS for accessing the system via WAN.
Note: Optional, you can select Hot Spare mode to set the hot spare system. For building the hot
spare system, please contact our technical support engineer.
6. Read the pre-install information, and click Install to begin the installation.
A panel indicating progress of the installation will display.
7. Read the post-install information and click Finish to complete the installation.

6
After installing the service module(s), the Service Manager runs automatically.
The Service Manager shows as follows. The displayed items vary according to the service modules you
selected for installation.
Note: The Service Manager should be run as administrator. If not, please exit the Service Manager and
then run it as administrator. Consult your IT system administrator if in doubt about your rights.
You can click to edit the port of the corresponding server, or click to stop the server. You can
also right-click on the item and select Open File Location to go to the installation directory of the
server module.
Note: If the port No. of the server is occupied by other service, the port No. will be shown in red. You
should change the port No. to other value before the server can work properly.
You can also click Stop All to stop all the servers and click Restart All to run them again.

7
3. Accessing via Web Client
After installing the iVMS-5200 Mobile Surveillance, you can access the system via Web Client which is
a B/S client for management of iVMS-5200 Mobile Surveillance.
Running Environment
CPU: Intel(R) Core(TM) i5 and above
Memory: 1GB and above
Video Card: RADEON X700 Series
Web Browser: Internet Explorer 9/10/11 or above (32-bit), Chrome
35/36/37/38/39/40/41/42/43/44 (32-bit), Firefox 32/33/34/35/36/37/38/39/40 (32-bit)
3.1 General Login (Not First Time)
Steps:
1. In the address bar of the web browser, input the address and Port No. of the iVMS-5200 Mobile
Surveillance CMS (Central Management Service) and press the Enter key.
A login window will pop up.
Notes:
The address format is typically: http://CMS IP address:port.
Example: If the IP address of PC running CMS is 172.6.21.96 and the port No. is 80, you
should enter http://172.6.21.96:80 in the address bar.
You should configure the CMS's IP address in System > IP Address before accessing the CMS
via WAN. For details, refer to the User Manual of iVMS-5200 Mobile Surveillance Web Client.
2. (Optional) For the first time to login via Internet Explorer browser, you should install the plug-in
before you can access the functions.
1) Click OK in the pop-up dialog to download the plug-in. Or you can click Download Plug-in to
download it.
8
2) Save the plug-in file to your PC and close the web browser.
3) Find the plug-in that stores on your PC and install the plug-in according to the prompt.
4) Re-open the web browser and log in to the CMS (step 1). Please allow to run the plug-in in
the pop-up prompt.
3. Input the user name and password.
4. Click Login to log in to the system.
Notes:
If failed password attempt of current user is detected, you are required to input the
verification code. The failed password attempt from current client, other client and other
address will all require the verification code.
The failed password attempt and verification code attempt from current client, other client
(e.g., Control Client) and other address will all be accumulated. Your IP address will be locked
for a specified period of time after specific number of failed password or verification code
attempts detected. For detailed settings of failed login attempts and locking duration, refer
to User Manual of iVMS-5200 Mobile Surveillance Web Client.
The password strength can be checked by the system and should meet the system
requirements. If password strength is lower than the required minimum strength, you will be
asked to change your password. For detailed settings of minimum password strength, refer
to User Manual of iVMS-5200 Mobile Surveillance Web Client.
If your password has expired, you will be asked to change your password when login. For
detailed settings of maximum password age, refer to User Manual of iVMS-5200 Mobile
Surveillance Web Client.
5. (Optional) If you forgot the password of admin user, you can reset the password and set a new
password for admin user.
1) Click Forgot Password.
2) Input the user name as admin in the pop-up window.
3) Click Next.
4) Input the activation code, new password, and confirm password.
Note: The password strength can be checked by the system and should meet the system
requirements. If password strength is lower than the required minimum strength, you will be
asked to change your password. For detailed settings of minimum password strength, refer to
User Manual of iVMS-5200 Mobile Surveillance Web Client.

9
The password strength can be checked by the system. For your privacy, you must set the
password to something of your own choosing (using a minimum of 8 characters,
including upper case letters, lower case letters, numbers, and special characters) in order
to increase the security of your product.
Proper configuration of all passwords and other security settings is the responsibility of
the installer and/or end-user.
5) Click OK to reset the admin password.
Note: If you forgot the password of other user, contact the admin user to reset the password
and then change the password for login.
6. (Optional) Scan the corresponding QR code with your mobile terminal (e.g., mobile phone) to
download the Mobile Client.
For detailed introduction about the Mobile Client, refer to the User Manual of iVMS-5260M
Mobile Client.
Note: You can also search and download the Mobile Client in the App Store or Google Play.
3.2 First Time Login for admin User
Steps:
1. In the address bar of the web browser, input the address and Port No. of the iVMS-5200 Mobile
Surveillance CMS (Central Management Service) and press the Enter key.
A login window will pop up.
Notes:
The address format is typically: http://CMS IP address:port.
Example: If the IP address of PC running CMS is 172.6.21.96 and the port No. is 80, you
should enter http://172.6.21.96:80 in the address bar.
You should configure the CMS's IP address in System > IP Address before accessing the CMS
via WAN. For details, refer to the User Manual of iVMS-5200 Mobile Surveillance Web Client.
2. (Optional) For the first time to login via Internet Explorer browser, you should install the plug-in
before you can access the functions.
1) Click OK in the pop-up dialog to download the plug-in. Or you can click Download Plug-in to
download it.
2) Save the plug-in file to your PC and close the web browser.
3) Find the plug-in that stores on your PC and install the plug-in according to the prompt.
4) Re-open the web browser and log in to the CMS (step 1). Please allow to run the plug-in in
the pop-up prompt.
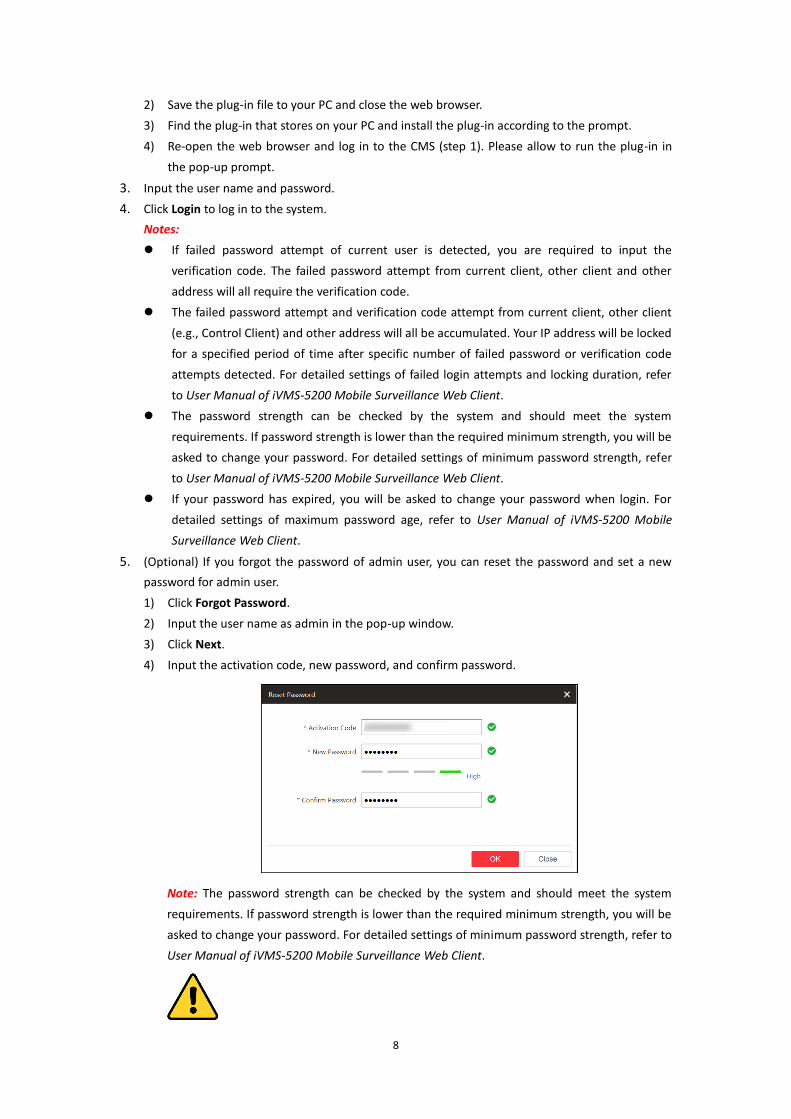
3. In the following pop-up Create Password dialog, input the password and confirm password
for the admin user.
Note: The password strength can be checked by the system and should meet the system
requirements. The default minimum password strength should be Strong. For detailed settings of
minimum password strength, refer to User Manual of iVMS-5200 Mobile Surveillance Web Client.
The password strength can be checked by the system. For your privacy, you must set the
10
password to something of your own choosing (using a minimum of 8 characters, including
upper case letters, lower case letters, numbers, and special characters) in order to increase
the security of your product.
Proper configuration of all passwords and other security settings is the responsibility of the
installer and/or end-user.
4. Click OK to create the password.
You enter the Web Client home page after you successfully create the admin password.
3.3 Function Modules
After successfully logging in, you can enter the home page of iVMS-5200 Mobile Surveillance Web
Client.
Note: The displayed modules on the home page vary with the License you purchased. For detailed
information, please contact our technical support engineers.
The iVMS-5200 Mobile Surveillance Web Client is composed of the following function modules:
Note: For detailed introduction about the Web Client, please refer to the User Manual of iVMS-5200
Mobile Surveillance Web Client.
Basic Settings You can add device to iVMS-5200 Mobile Surveillance and set the recording
schedule, event configuration, alarm setting, and user management, etc.
Wizard
The start wizard can guide you to go through the basic settings, including adding
encoding devices, setting the recording schedule, configuring the event
parameters and managing the users for the system.
Help View the user manual for the detailed settings of the Web Client.
Maintenance
Your data can be well protected and recovered when an exception occurs by
setting the database backup.
Restore the system from the database backup file.
License Check the information of the License. Activate the License, update the License or
deactivate the License.
You can achieve the following functions in the upper-right corner of the main page:
Click your login name and select Change Password to change the password.
Click your login name and select About to check the version information of the system.
Click your login name and select Logout to log out of the system.

11
4. Activating iVMS-5200 Mobile Surveillance
After you install the system, you get a temporary License for certain number of connected devices
within a certain time period. This is called the trial period. If trial period has expired and the CMS has
not been activated, you cannot login and operate the Mobile Surveillance anymore.
To ensure the proper use of the system, you should activate the CMS before the trial period ends.
Notes:
If you do not want to activate the CMS now, you can skip this chapter and perform this operation
according to actual needs.
Please log in to the system via Web Client, click License Details at the License area to check the
trial period and the manageable device number of your system.
You can click License List to check all the activated License of your system and click an activation
code to view the related authorization details.
Two types of License are available. You can choose to purchase the specific License as required.
Base: You need to purchase at least one basic License to activate the system.
Expansion: If you want to increase the capability of your system (e.g., enlarge the connectable
cameras), you can purchase expanded License to get additional features.
If you purchase the License, you will get an activation code from HIKVISION. Two ways are selectable
according to your network condition: online activation and offline activation. We introduce the
configuration of these two modes separately here.
If the CMS to be activated can properly connect to the Internet, please refer to Chapter 4.1 Online
Activation for detailed configuration.
If the CMS to be activated cannot connect to the Internet, please refer to Chapter 4.2 Offline
Activation for details.
Notes:
Only the admin user can perform the activation operation.
If you encounter any problem during activating, please send the hardware server's logs to our
technical support engineers.
For other License operations, refer to User Manual of iVMS-5200 Mobile Surveillance Web Client.

12
4.1 Online Activation
Purpose:
If the CMS to be activated can properly connect to the Internet, you can perform the following steps
to activate the License.
Steps:
1. Log in to the system via Web Client.
After successfully logging in, you enter the home page of Web Client.
2. Click Online Activation at the License area to pop up the License configuration window.
3. Input the activation code received when you purchase your License.
If you have purchased more than one License, you can click + and input other activation codes.
Note: At least one basic License is required for activating the system.
4. (Optional) Check Hot Spare checkbox and input the required parameters if you want to build a
hot spare system.
Notes:
You must select Hot Spare mode when you install the system.
For how to build the hots spare system, please contact our technical support engineers.
5. Click Activate and the License Agreement dialog pops up.
Read the License Agreement.
If you accept the terms of the license agreement, check I accept the terms of the agreement.
checkbox and click OK to continue.
If you do not accept the agreement, click Cancel to cancel the activation.
The prompt “Operation completed” will pop up when the CMS is successfully activated.
4.2 Offline Activation
Purpose:
If the CMS to be activated cannot connect to the Internet, you can perform the following steps to
activate the License.
Note: You must enter HIKVISION's website (http://overseas.hikvision.com/) and go to VMS->VMS
Support->License Management->Offline License Management page, click NEW USER and register an
account.
13
Steps:
1. Log in to the system via Web Client.
After successfully logging in, you enter the home page of Web Client.
2. Click Export the license request file at the License area to pop up the License configuration
window.
3. Input the activation code received when you purchase your License.
4. (Optional) Check Hot Spare checkbox and input the required parameters if you want to build a
hot spare system.
Notes:
You must select Hot Spare mode when you install the system.
For how to build the hots spare system, please contact our technical support engineers.
5. Click Export and save the request file to the proper directory or the removable storage medium
(e.g., USB flash disk).
6. Copy the request file to the PC that can connect to the Internet.
Note: If the PC accessing the system via Web Client can connect to the Internet, you can skip step
6.
7. Enter HIKVISION's website (http://overseas.hikvision.com/) and go to VMS->VMS
Support->License Management->Offline License Management page, and login with your account.
8. Select How to Activate Your Account and click Browse at the bottom of the page to select the
License Request Binary File.
9. In the pop-up dialog, click Download and set the name and saving path for the License Response
Binary File.
10. Save the response file to the proper directory of the PC that accesses the system via Web Client.
11. In the License configuration window, click Import the activation file to import the response file
and the License Agreement dialog pops up.
Read the License Agreement.
If you accept the terms of the license agreement, check I accept the terms of the agreement.
checkbox and click OK to continue.
If you do not accept the agreement, click Cancel to cancel the activation.
The prompt “Operation completed” will pop up when the CMS is successfully activated.

14
5. Quick Start
Here we introduce the configuration for some basic functions of the system via Web Client and
Control Client.
5.1 Resource Management and Live View
Purpose:
Before you can perform live view, playback via the Control Client or set recording schedule, alarm
configuration via Web Client, you need to add devices (including mobile video recorder and portable
device) to the iVMS-5200 Mobile Surveillance and manage them by areas.
Notes:
Make sure the devices you are going to use are correctly installed and connected to the network
as specified by the manufacturers. Such initial configuration is required in order to be able to
connect the devices to the system via network.
Here we only introduce adding mobile video recorder by single ID. For adding portable device
and other methods to add the device, please refer to the User Manual of iVMS-5200 Mobile
Surveillance Web Client.
5.1.1 Adding Mobile Video Recorder by Single ID
Purpose:
You can add one Mobile Video Recorder to the system by single device ID.
Steps:
1. Click Physical View on home page and click Mobile Video Recorder tab on the left.
2. Click Add to enter the Add Mobile Video Recorder page.
3. Select the adding mode as Single ID.
4. Input the required information.

15
Manufacturer: Select the manufacturer for the device.
Alias: Edit a name for the device as desired.
Device ID: It is the unique identification of the Mobile Video Recorder and you can get it
from the device.
5. (Optional) If you need to set the backup schedule to upload the video files stored in the devices to
the Recording Server, you should input the device's IP address, port No., user name, and
password, so that the Recording Server can connect to the device when backing up.
6. (Optional) Set the vehicle's license plate information, such as plate number, driver name, and
driver's phone number.
You can click to select the vehicle picture from local PC and upload it to the system.
7. Set the Add to Area switch to ON to add the device and its cameras to an area.
You can create a new area or select an existing area to add the device.
For details about the area management, please refer to Chapter 5.1.2 Area Management.
Note: You must add the device to an area, or the device will be offline and cannot be used in this
system.
8. (Optional) After adding the device to area, you can check Synchronize Camera Name checkbox to
get the camera name from the device.
9. (Optional) You can select Get Device’s Recording Settings to get the recording schedule from the
device.
The recording task of the cameras of the device will automatically perform according to schedule.
10. Click Add to add the device and back to the device list page.
You can also click Add and Continue to save the settings and continue to add other devices.
5.1.2 Area Management
Purpose:
You must organize the added mobile devices into areas for convenient management. You can get the
live view, play back the video files, and do some other operations of the devices after managing them
by areas.
Log in to the system via Web Client, and click Logical View to open the area management page.
Steps:
1. Click + on the area list panel to open the Add Area dialog.

16
2. Select the parent area in the Parent Area drop-down list.
3. Input an area name as you want.
4. (Optional) Select a Streaming Server for the area to get the video stream of the cameras
belonging to this area via the server.
5. Click Save to add the new area.
6. In the area tree panel, click to select an area for adding the device to.
7. Click Add to enter the adding devices to area page. You can add the devices to the area.
1) Select Mobile Video Recorder or Portable Device to add to the area.
2) Click to select the device and check the checkbox(es) to select the device to be added.
3) (Optional) Check Synchronize Camera Name checkbox to get the camera name from the
device.
4) (Optional) Check Get Device's Recording Schedule checkbox to get the recording schedule
from the device and the recording task of the cameras of the device will automatically
perform according to schedule.
5) Click Save to save the settings.
After adding the device to the area, you can perform the following operations.
Click Synchronize Camera Name and select the cameras to get the cameras' names from the
device in batch.
Click Move to Other Area to move the added device to other areas.
Check Include Sub-area checkbox to display the devices of child areas as well.
Notes:
One mobile device can only be added to one area.
Up to 100 devices can be added to one area.
5.1.3 Live View
After adding the devices and managing the area, you can start live view of the camera via Control
Client which is a C/S software providing multiple operating functionalities.

17
Login via Control Client
Two kinds of user (normal user and domain user) are supported for accessing the system via Control
Client. Here we only introduce the general normal user login (not first time), please refer to the User
Manual of iVMS-5200 Mobile Surveillance Control Client for the first time login and domain user login.
Steps:
1. Double-click on the desktop to run the Control Client.
2. Select Normal Login tab on the bottom.
3. Click Show Server Address and input the parameters.
Server Address: Input the address (IP address or domain name) of the CMS that you want
to connect to.
Port: Input the port No. of the CMS. By default, it’s 80.
4. Input the user name and password of the system.
5. (Optional) Check Remember Password checkbox to keep the password.
6. (Optional) Check Enable Auto-login checkbox to log in to the software automatically.
7. Click Login to enter the Control Client.
Notes:
If failed password attempt of current user is detected, you are required to input the
verification code before you can log in. The failed password attempt from current client,
other client and other address will all require the verification code.
The failed password attempt from current client, other client (e.g., Control Client) and other
address will all be accumulated. Your IP address will be locked for a specified period of time
after specific number of failed password or verification code attempts. For detailed settings
of failed login attempts and locking duration, refer to the User Manual of iVMS-5200 Mobile
Surveillance Web Client.
The password strength can be checked by the system and should meet the system
requirements. If password strength is lower than the required minimum strength, you will be
asked to change your password. For detailed settings of minimum password strength, refer
to the User Manual of iVMS-5200 Mobile Surveillance Web Client.

18
If your password has expired, you will be asked to change your password when login. For
detailed settings of maximum password age, refer to the User Manual of iVMS-5200 Mobile
Surveillance Web Client.
8. (Optional) Click Show QR Code to show the QR code and scan the corresponding QR code with
your mobile terminal to download the Mobile Client.
Live View
Steps:
1. After login the Control Client, click to enter the Live View interface.
2. (Optional) Click and select the window division mode for live view.
3. In the device list panel, select the area to display the mobile devices.
You can input the keyword of device name in the Search Vehicle field to search the device.
The device will display in the list as follows.
4. (Optional) You can click to filter the device according to the device online status or device
type.
5. Move the mouse to the device and click .
6. Select the cameras and click OK to start live view.
You can also click the device to expand its camera list and click after the camera to start its
live view.
Notes:
You can drag the camera video in live view to another display window if needed.
Up to 64 cameras can be played at the same time.
For detailed operations about live view, please refer to the User Manual of iVMS-5200 Mobile
Surveillance Control Client.
5.2 Recording Settings and Playback
Before you can view the video files of the camera via the Control Client, you need to set the recording
settings via Web Client.
5.2.1 Recording Settings
Purpose:
You can set the recording settings including recording schedule and backup schedule for the cameras
of Mobile Video Recorder and portable device for the continuous or alarm triggered recording.
Recording Schedule: The recorded video files can be stored in the device locally according to the
configured recording schedule.
Backup Schedule: You can back up the video files stored in the Mobile Video Recorder by
uploading them to the added Recording Server according to the configured backup schedule.
On the iVMS-5200 Mobile Surveillance Web Client, click Recording to open the recording settings
page.
Configuring Recording Settings for Cameras of Mobile Video Recorder

19
Purpose:
In recording settings, you can set the recording schedule and backup schedule for cameras of Mobile
Video Recorder.
Steps:
1. Click Recording tab on the left to enter the recording management page.
2. Click Add to enter the Adding Recording interface.
3. In the Basic Information field, select the cameras of Mobile Video Recorder.
1) Select the area and the devices added to this area will display.
2) Select the Mobile Video Recorder from the list and its cameras will display on the right.
3) Check the camera(s) for configuring the recording settings.
4. Set the Recording.
The video files recorded by the selected cameras are stored in the Mobile Video Recorder locally.
1) In the Storage Location field, the default location is Local Device and it is no editable.
2) Select the schedule template for recording.
Click View to view the details of the template.
All-day Template: All-day continuous recording of the whole week.
Weekday Template: All-day continuous recording from Monday to Friday.
Weekend Template: All-day continuous recording from Saturday to Sunday.
Template 01-08: You can edit the templates as desired. For details about setting the
schedule template, refer to User Manual of iVMS-5200 Mobile Surveillance Web Client.
5. Set the Backup.
You can upload the video files stored in the Mobile Video Recorder to the Recording Server via
Wi-Fi or 3G/4G mobile network.
1) Set the Backup switch as ON to enable the backup schedule for the selected cameras.
2) In the Camera field, select the cameras for setting the backup schedule.
By default, the channel-zero and the cameras selected in Step 4 are displayed.
3) Select the network connection for uploading the video file to Recording Server as backup.
You can set the network connection as Wi-Fi or 3G/4G mobile network.
Wi-Fi: When the device is connected to the Wi-Fi network, the backup will be available
according to the configured backup schedule template.
Mobile Network (3G/4G): When the device is connected to the 3G/4G mobile network,
the backup will be available according to the configured backup schedule template.
Notes:
For channel-zero, the video files can only be uploaded to Recording Server via 3G/4G
mobile network.
If you select the network connection as Wi-Fi, please make sure the cameras have been
configured with recording schedule during the time of backup schedule template.
4) In Recording Server field, select the added Recording Server for backing up the video files.
You can click Add New... to add a new Recording Server. For details, refer to User Manual of
iVMS-5200 Mobile Surveillance Web Client.
5) Select the schedule template for backup.
Click View to view the details of the template.
All-day Template: All-day continuous backing up of the whole week.
Weekday Template: All-day continuous backing up from Monday to Friday.
20
Weekend Template: All-day continuous backing up from Saturday to Sunday.
Template 01-08: You can edit the templates as desired. For details about setting the
schedule template, refer to User Manual of iVMS-5200 Mobile Surveillance Web Client.
6) (Optional) If you set the network connection as Mobile Network (3G/4G), you can select the
Streaming Server to get the video stream of the cameras via the server to save bandwidth.
You can click Add New... to add a new Streaming Server. For details, refer to User Manual of
iVMS-5200 Mobile Surveillance Web Client.
6. Click Add to save the recording settings and back to the recording list page.
You can also click Add and Continue to save the settings and continue to add other recording
settings.
On recording list page, after configuring the recording settings for the camera, you can click the device
to check its cameras detailed recording schedule and backup schedule.
Note: For other operations about recording settings, refer to User Manual of iVMS-5200 Mobile
Surveillance Web Client.
Configuring Recording Settings for Cameras of Portable Device
Purpose:
In recording settings, you can set the backup schedule for cameras of portable device.
Steps:
1. Click Recording tab on the left to enter the recording management page.
2. Click Add to enter the Adding Recording interface.
3. In the Basic Information field, select the cameras of portable device.
1) Select the area and the devices added to this area will display.
2) Select the portable device from the list and its cameras will display on the right.
3) Check the camera(s) for configuring the backup schedule.
4. Set the Backup Schedule.
The video files stored in the portable device can be uploaded to the Recording Server via Wi-Fi or
3G/4G mobile network.
1) Select the network connection for uploading the video file to Recording Server as backup.
You can set the network connection as Wi-Fi or 3G/4G mobile network.
Wi-Fi: When the device is connected to the Wi-Fi network, the backup will be available
according to the configured backup schedule template.
Mobile Network (3G/4G): When the device is connected to the 3G/4G mobile network,
the backup will be available according to the configured backup schedule template.
2) In Recording Server field, select the added Recording Server for backing up the video files.
You can click Add New... to add a new Recording Server. For details, refer to User Manual of
iVMS-5200 Mobile Surveillance Web Client.
3) Select the schedule template for backup.
Click View to view the details of the template.
All-day Template: All-day continuous backing up of the whole week.
Weekday Template: All-day continuous backing up from Monday to Friday.
Weekend Template: All-day continuous backing up from Saturday to Sunday.
Template 01-08: You can edit the templates as desired. For details about setting the
schedule template, refer to User Manual of iVMS-5200 Mobile Surveillance Web Client.

21
4) (Optional) If you set the network connection as Mobile Network (3G/4G), you can select the
Streaming Server to get the video stream of the cameras via the server to save bandwidth.
You can click Add New... to add a new Streaming Server. For details, refer to User Manual of
iVMS-5200 Mobile Surveillance Web Client.
5. Click Add to save the recording settings and back to the recording list page.
You can also click Add and Continue to save the settings and continue to add other recording
settings.
On recording list page, after configuring the recording settings for the camera, you can click the device
to check its cameras detailed backup schedule.
Note: For other operations about recording settings, refer to User Manual of iVMS-5200 Mobile
Surveillance Web Client.
5.2.2 Remote Playback
Purpose:
After configuring the recording settings for the camera via the Web Client, you can search and play the
video files remotely via Control Client.
Note: Here we only introduce the normal playback. For other operations about playback, please refer
to the User Manual of iVMS-5200 Mobile Surveillance Control Client.
After login the Control Client, click on the control panel to enter the Remote Playback page.
Searching Video Files for Playback
Steps:
1. (Optional) Click and select the window division mode for playback.
2. In the device list panel, select the area to display the mobile devices.
You can input the keyword of device name in the Search Vehicle field to search the device.
The device will display in the list as follows.
3. (Optional) You can click to filter the device according to the device online status or device
type.
4. Move the mouse to the device and click .
5. Select the cameras and click OK to start playback.
You can also click the device to expand its camera list and click after the camera to start its
playback.
6. Click the calendar on the toolbar to select the date and time to search the video
files.
7. Click on the playback toolbar to select the storage location of the video files for playback.
For setting the storage location of recording settings, refer to the User Manual of iVMS-5200
Mobile Surveillance Web Client.
Playing Video Files
After searching the video files for the normal playback, you can control the video playback by timeline.
The timeline indicates the time duration for the video files.
You can click or to zoom in or zoom out the timeline bar. You can also use the mouse wheel
to zoom in or zoom out on the timeline.

22
You can drag the timeline bar to go to the previous or the next time period.
5.3 Alarm Configuration
Purpose:
On iVMS-5200 Mobile Surveillance Web Client, you can set the linkage actions for the detected alarms.
The alarm details can be received by the Control Client.
Click Alarm on Web Client home page to enter the Alarm Configuration page.
5.3.1 Configuring Alarm
Purpose:
Alarm is used to notify security personnel of the particular situation which helps handle the situation
promptly. Alarm can trigger a series of linkage actions (e.g., sending email) for notification.
Example: System can send notification email to designated recipient when motion is detected.
Steps:
1. Click Alarm tab on the left to enter the Alarm Settings page.
2. Click Add to enter the Add Alarm page.
3. Set the alarm definition to specify the alarm source.
1) Triggered Event: Select the alarm source type and the alarm type to be triggered.
2) Source: Select the specified source added to the system for setting the alarm.
3) If you select the alarm as Fence Crossing Alarm for Mobile Video Recorder or portable device,
you are required to set the crossing type.
Area Entrance: The vehicle that installs the device cannot run into the specified area.
Area Exiting: The vehicle should run in the specified area.
You are also required to set the map template to specify the driving area on map. You can
click View to view the details of the template.
Note: You can click Add New... to add a new fence crossing template. For setting the fence
crossing template, refer to User Manual of iVMS-5200 Mobile Surveillance Web Client.

23
4) If you select the alarm as Deviation Alarm for Mobile Video Recorder or portable device, you
are required to set the deviation range.
Deviation Range: If you set it as 5 meters, then the alarm occurs when the vehicle that
installs the device comes to be more than 5 meters off course.
You are also required to set the map template to specify the driving area on map. You can
click View to view the details of the template.
Note: You can click Add New... to add a new fence crossing template. For setting the fence
crossing template, refer to User Manual of iVMS-5200 Mobile Surveillance Web Client.
5) Alarm Name: Input a name for the alarm.
Note: For camera alarm and alarm input alarm, the default name is Source+Triggering Event.
You can edit it manually when editing the alarm.
4. Setting the alarm properties.
Schedule Template: Select an arming schedule template for the alarm to define when the
alarm will be triggered. For settings customized template, refer to User Manual of iVMS-5200
Mobile Surveillance Web Client.
Alarm Priority: Define the priority for the alarm. Priority can be used for filtering alarms in
the Control Client.
5. Set the additional settings. It is not supported if you set the triggering event as server exception.
Related Cameras: Add the cameras for viewing the live video and playback when alarm
occurs on the Alarm Center of Control Client. .
Note: You can only relate to the camera(s) of the source device.
Trigger Pop-up Window: Select to pop up the alarm window on Control Client to display all
the alarm related cameras' live videos and playback when alarm occurs.
6. Set the alarm linkage actions: Trigger linkage actions when alarm occurs.
Trigger Audible Warning: Set the voice text for playing on the PC when alarm is triggered.
Note: You should set voice engine as the alarm sound on System page of Control Client.
Link Alarm Output: Select the alarm output (if available) and the external device connected
can be activated when alarm is triggered. You can select to automatically close the alarm
output after a specific time, or close the alarm output manually.
Note: Linking alarm output is not supported if you set the triggering event as server
exception.
Send Email: Select an email template to send the alarm information according to the
defined email settings. You can select Add New... to create a new email template. For
details, refer to User Manual of iVMS-5200 Mobile Surveillance Web Client.
Send to Mobile Client: Set the switch as ON to enable sending the alarm information to the
mobile client.
Select the user to send the alarm information to and the user can receive the alarm
information when he/she logs in to the system via Mobile Client.
7. Click Add to add the alarm and back to the alarm page.
You can also click Add and Continue to save the settings and continue to add other alarm.
5.3.2 Checking Alarm Logs
Purpose:

24
If the camera detects alarms, then you can check the alarm logs via Control Client.
Steps:
1. Log in to the system via Control Client.
2. Click on the control panel to enter the Alarm Center page.
3. Click Search tab.
4. Select the alarm source type, including triggered by camera, mobile device, alarm input, or
server.
5. Select the detailed alarm source according to the selected source type.
You can input the keyword to search.
6. Select the alarm type according to the selected alarm source.
7. Set the start time and end time for search.
8. Click Search to start searching the corresponding alarm logs.
The alarm logs will display on the right.
9. (Optional) You can click in the Linkage column to view the linkage information including video
files of related camera when alarm occurs, and device location on the map (if configured).
5.4 Role and User Management
Purpose:
The Security page allows you to add and delete users, assign user's permissions for accessing and
managing the system. Before adding users to the system, you should create roles to define the user's
access rights to system resources and then assign the role to the user for granting the permissions to
the user. A user can link with many different roles.
Click the Security on Web Client home page to open the Security Management page.
5.4.1 Role Management
Purpose:
You can assign the permissions to the roles as required, and the user can link to the role to obtain
different permissions.
Steps:
1. Open the Security Management page and click Roles tab.
The system pre-defines two kinds of default roles: administrator and operator.
Administrators: The role that has all the permission of the system.
Operators: The role that has all the permission for operating the Control Client.
You can click the role name to view the details and operations. The two default roles cannot be
edited or deleted.
2. Click Add to enter the Add Role page.

25
3. Input the role name as desired.
4. (Optional) Select the default or pre-defined role from the Copy from drop-down list to copy the
permission settings of it.
If not, please perform step 6 to assign the permissions to the role.
5. (Optional) Set the expiry date and description for the role.
6. Assign the permissions to the role.
Configuration and Control Permission: Check the checkbox to assign the configuration
permission on Web Client and the control permission on Control Client to the role.
Resource Permission: Select the resources from the left panel and select the functions from
right panel to assign the selected resources’ permissions to the role.
You can click to add or delete the resource to be displayed on the left panel.

26
7. Click Add to add the role.
You can also click Add and Continue to save the settings and continue to add roles.
5.4.2 User Management
Purpose:
Users can be added for accessing the system.
The administrator user named admin was pre-defined by default. It cannot be edited or deleted.
Steps:
1. Open the Security Management page and click Users tab.
2. Click Add to enter the Add User page.
3. Input the user name, expiry date, user status, description, and PTZ control permission as desired.
Expiry Date: The date that this user account becomes invalid.
User Status: Two kinds of status are available. If you select freeze, the user account is
inactive until you set the user status as normal.
PTZ Control Permission: Set the permission level (1~100) for PTZ control and the larger the
value is, the higher permission the user has. E.g., when user1 and user2 control the PTZ unit
at the same time, the user who has the larger PTZ control permission will take the control of

27
the PTZ movement.
4. Set the live view duration for reminding in the Live View Duration Reminding field.
You can set the duration as 30 seconds, 1 minute, 3 minutes, 5 minutes, and 10 minutes.
Live View Duration Reminding: When viewing the live video from the mobile device, the
mobile device will send the live video to the Control Client via the 3G, 4G, or Wi-Fi network.
You can enable to pop up the reminding on the Control Client when the live view duration
reaches the configured limit. When the Control Client receives the reminding, the live view
will be stopped in 10 seconds if there is no other operation.
Note: For details about live view, please refer to the User Manual of iVMS-5200 Mobile
Surveillance Control Client.
5. Check the checkboxes of the existing roles to assign the role(s) for the created user.
Note: If no role has been added, two default roles are selectable: administrator and operator.
Administrator is the role that owns all the permission of the system, and operator is the role
that owns the all the permission of the Control Client. If you want to add customized roles,
you can click Add New Role to quick enter the Add Role page. For details about adding the
role, refer to Chapter 5.4.1 Role Management.
6. Click Add to add the user.
You can also click Add and Continue to save the settings and continue to add users.
The user’s initial password is 12345 which is used for first login and you will be asked for changing
the password when logging in with initial password.
The password strength can be checked by the system. For your privacy, we strongly
recommend setting the password to something of your own choosing (using a minimum of 8
characters, including upper case letters, lower case letters, numbers, and special characters)
in order to increase the security of your product.
Proper configuration of all passwords and other security settings is the responsibility of the
installer and/or end-user.

28
Recommended