Intel® Cloud Builders Guide Intel® Xeon® Processor‐based Servers StackIQ Rocks+
Intel® Cloud Builders Guide to Cloud Design and Deployment on Intel® Platforms Creating Private Clouds from Bare Metal using Rocks+ Management Software
Audience and Purpose
This paper will discuss Rocks+, a deployment and management solution from StackIQ
that makes building highly scalable clouds simple and efficient. We will walk users
through the end‐to‐end cloud building process, starting from bare metal physical
machines, and ending with a complete cloud environment well purposed for enterprise
IT environments and service providers.
We’ll frame the discussion by using BigCorp as an example customer, which has
multiple departments with varying data center needs. First, we’ll set up a group of
LAMP nodes for BigCorp’s Web Services Department. Second, we’ll set up a Hadoop
cloud for BigCorp’s Analytics Department. In this process, we’ll show how these Virtual
Private Clouds can remain completely isolated, while retaining a central repository of
software by leveraging the Rocks Cloud Development Kit.
Using Rocks+ and the contents of this paper, which includes detailed commands and
screen shots, should significantly reduce the learning curve for building and operating
your first cloud computing infrastructure.
Intel® Xeon® Processor 5500 Series Intel® Xeon® Processor 5600 Series
StackIQ Rocks+
Intel® Cloud Builders Guide: Creating Private Clouds using Rocks+ Management Software
2
Table of Contents
Executive Summary ............................................................................................................................................................... 3
Product Overview .................................................................................................................................................................. 3
Test Bed Blueprint ................................................................................................................................................................. 4
Technical Review and Use Cases ............................................................................................................................................ 5
Use Case 1: Install and Configure Your Physical Infrastructure as a Cloud ........................................................................ 5
Use Case 2: Create an Airboss for Added Security and Control ........................................................................................ 13
Use Case 3: Setup Your First Virtual Private Cloud Inside Your Physical Cloud running BitNami LAMP Stacks ................. 14
Use Case 4: Scale Physical Cloud Up ............................................................................................................................... 17
Use Case 5: Setup Your Second Virtual Private Cloud in the same Physical Cloud running Hadoop MapReduce .............. 18
Things to Consider ................................................................................................................................................................. 20
Conclusion ............................................................................................................................................................................. 20
About StackIQ ....................................................................................................................................................................... 20
Glossary and Additional Information ..................................................................................................................................... 20

Intel® Cloud Builders Guide: Creating Private Clouds using Rocks+ Management Software
3
Executive Summary
Rocks+ is a deployment and management
solution that makes building highly scalable
clouds simple and efficient by encapsulating
and delivering the complete cloud stack in a
single Linux distribution. By using Rocks+, you
can quickly deploy a physical cloud with a
central point of management and any number
of virtual container nodes. The physical cloud
can then be used to host any number of
Virtual Private Clouds (VPCs), which gives
users and departments security and control of
their own infrastructure. The Rocks+ Cloud
Development Kit enables modular
components at each layer in the stack and
allows users to define custom appliance
types.
The Software: Rocks+
Rocks+ dramatically reduces the time and
cost of setting up and managing clusters of
cloud‐enabled servers through intelligent
multi‐server software automation (both
physical and virtual machines). The entire
cloud stack is packaged and deployed as a
monolithic yet modular Linux distribution
(based on Red Hat Enterprise Linux or
CentOS). The system provides for a single
step install, and is capable of dynamically
provisioning heterogeneous appliance types
across massive scale data centers (in parallel,
leveraging BitTorrent‐style package sharing).
A key differentiator that separates Rocks+
from other "complete stack" paradigms, is a
modular framework called Rolls, which are
optional, automatically configured, cloud‐
aware software systems.
Rocks+ Rolls
Rolls allow customers to take advantage of an
end‐to‐end packaged cloud stack and still
choose which software components are
included to meet site‐specific requirements.
Here are a few of the Rolls that will be
demonstrated in this paper:
The Xen Roll installs and configures virtual machines (VMs) on Rocks+
clouds. A physical frontend can
configure VMs on client nodes (VM
container appliances). A VM container
is a physical machine that houses and
runs VMs. The Xen Roll also supports
building virtual clusters. The frontend
can be installed as a VM server
appliance and the client nodes can be
installed as VM containers. Then a
virtual frontend can be installed on the
VM server while virtual nodes can be
installed on the VM containers. All
network traffic is encapsulated within a
unique VLAN, that is, each virtual
cluster has its own VLAN.
The Hadoop Roll is a simple to use,
highly scalable solution for deploying
Hadoop clusters of all shapes and sizes.
Typically, the installation and
management of a Hadoop cluster
requires a long, hands‐on process in
which the end‐user or a deployment
team has to install and configure each
component of their data center by
hand. The setup time for these systems
and continued management can be
burdensome, which has a direct affect
on reliability and security. As more
enterprises look to utilize Hadoop, the
need for a supported and robust
platform that is easy to deploy,
manage, and operate has become
essential. Rocks+ completely
automates this process.
The BitNami Roll enables users to
select pre‐packaged binaries from
BitNami.org and deploy them across
Rocks+ clouds. The BitNami project
has support for a number of commonly
used machine types including a LAMP
stack, which we’ll demonstrate in this
paper.
The AWS Roll enables Rocks+ users to
use StackIQ’s management solution
inside of Amazon EC2. We’ll briefly
discuss how the same Rolls used in this
paper can we leveraged in Amazon
EC2.
Product Overview
Rocks+Cloud sets up a cluster of physical
machines as a private cloud by first
provisioning a “frontend” appliance and then
provisioning the remaining servers as “vm‐
container” appliances. Rocks+Cloud
subsequently provisions, manages, and
controls VMs and virtual clusters (VCs).
Scalable Provisioning
Rocks+ provides a parallel, automated
software installation process to accelerate
your time to solution. You can network‐boot
(PXE‐boot) physical nodes or launch virtual
nodes in parallel from the command‐line. All
nodes are provisioned from the ground up
and are ready to run applications on first boot.
Rocks+ includes the Avalanche Installer to
address the bottleneck of delivering packages
from a central distribution server to multiple
simultaneously‐installing cloud nodes. When
an installing node downloads a package, the
node stores the package locally then sends a
message to an Avalanche tracker. The
package is now in a peer‐to‐peer package
cache. When a subsequent installing node
wants to download the same package, the
node sends a message to the Avalanche
tracker and the tracker responds with a list of
peers. The installing node will download the
package from a peer, not the central
distribution server. This dramatically reduces
the network pressure on the central
distribution server and enables large‐scale
simultaneous node installations.
Intel® Cloud Builders Guide: Creating Private Clouds using Rocks+ Management Software
4
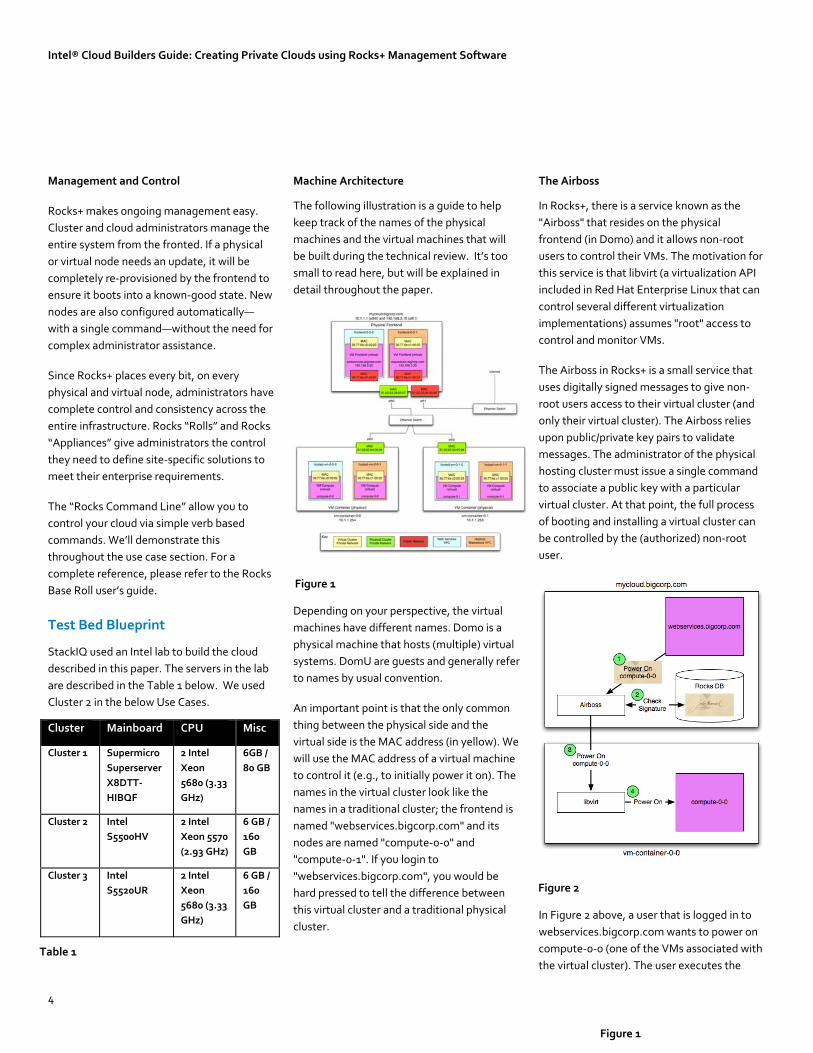
Management and Control
Rocks+ makes ongoing management easy.
Cluster and cloud administrators manage the
entire system from the fronted. If a physical
or virtual node needs an update, it will be
completely re‐provisioned by the frontend to
ensure it boots into a known‐good state. New
nodes are also configured automatically—
with a single command—without the need for
complex administrator assistance.
Since Rocks+ places every bit, on every
physical and virtual node, administrators have
complete control and consistency across the
entire infrastructure. Rocks “Rolls” and Rocks
“Appliances” give administrators the control
they need to define site‐specific solutions to
meet their enterprise requirements.
The “Rocks Command Line” allow you to
control your cloud via simple verb based
commands. We’ll demonstrate this
throughout the use case section. For a
complete reference, please refer to the Rocks
Base Roll user’s guide.
Test Bed Blueprint
StackIQ used an Intel lab to build the cloud
described in this paper. The servers in the lab
are described in the Table 1 below. We used
Cluster 2 in the below Use Cases.
Cluster Mainboard CPU Misc
Cluster 1 Supermicro
Superserver
X8DTT‐
HIBQF
2 Intel
Xeon
5680 (3.33
GHz)
6GB /
80 GB
Cluster 2 Intel
S5500HV
2 Intel
Xeon 5570
(2.93 GHz)
6 GB /
160
GB
Cluster 3 Intel
S5520UR
2 Intel
Xeon
5680 (3.33
GHz)
6 GB /
160
GB
Machine Architecture
The following illustration is a guide to help
keep track of the names of the physical
machines and the virtual machines that will
be built during the technical review. It’s too
small to read here, but will be explained in
detail throughout the paper.
Depending on your perspective, the virtual
machines have different names. Dom0 is a
physical machine that hosts (multiple) virtual
systems. DomU are guests and generally refer
to names by usual convention.
An important point is that the only common
thing between the physical side and the
virtual side is the MAC address (in yellow). We
will use the MAC address of a virtual machine
to control it (e.g., to initially power it on). The
names in the virtual cluster look like the
names in a traditional cluster; the frontend is
named "webservices.bigcorp.com" and its
nodes are named "compute‐0‐0" and
"compute‐0‐1". If you login to
"webservices.bigcorp.com", you would be
hard pressed to tell the difference between
this virtual cluster and a traditional physical
cluster.
The Airboss
In Rocks+, there is a service known as the
"Airboss" that resides on the physical
frontend (in Dom0) and it allows non‐root
users to control their VMs. The motivation for
this service is that libvirt (a virtualization API
included in Red Hat Enterprise Linux that can
control several different virtualization
implementations) assumes "root" access to
control and monitor VMs.
The Airboss in Rocks+ is a small service that
uses digitally signed messages to give non‐
root users access to their virtual cluster (and
only their virtual cluster). The Airboss relies
upon public/private key pairs to validate
messages. The administrator of the physical
hosting cluster must issue a single command
to associate a public key with a particular
virtual cluster. At that point, the full process
of booting and installing a virtual cluster can
be controlled by the (authorized) non‐root
user.
In Figure 2 above, a user that is logged in to
webservices.bigcorp.com wants to power on
compute‐0‐0 (one of the VMs associated with
the virtual cluster). The user executes the Table 1
Figure 1
Figure 1
Figure 2

Intel® Cloud Builders Guide: Creating Private Clouds using Rocks+ Management Software
5
"power on" command. The command creates
a "power on" message, signs it with a private
key, and then sends it to the Airboss that is
running on mycloud.bigcorp.com. The
Airboss verifies the message signature. If the
signature is valid, then the Airboss instructs
libvirt on vm‐container‐0‐0 to start ("power
on") compute‐0‐0.
Getting Started
Okay, let’s get started. Visit StackIQ.com and
click on the registration tab to register for
Rocks+ and request a demo license if you
would like to follow along on your own
hardware. You will need to download the
Rocks+Cloud ISO from StackIQ and a Red Hat
Enterprise Linux or CentOS Server ISO. Both
ISOs should be burned to DVD.
Intel® Cloud Builders Guide: Creating Private Clouds using Rocks+ Management Software
6
Technical Review and Use Cases
The below use cases will walk users through the end‐to‐end cloud building process, starting from bare metal physical machines, and ending with a
complete cloud environment well purposed for enterprise IT environments and service providers. We’ll frame the discussion by using BigCorp as
an example customer, which has multiple departments with varying data center needs. First, we’ll set up a group of LAMP nodes for BigCorp’s
Web Services Department. Second, we’ll set up a Hadoop cloud for BigCorp’s Analytics Department.
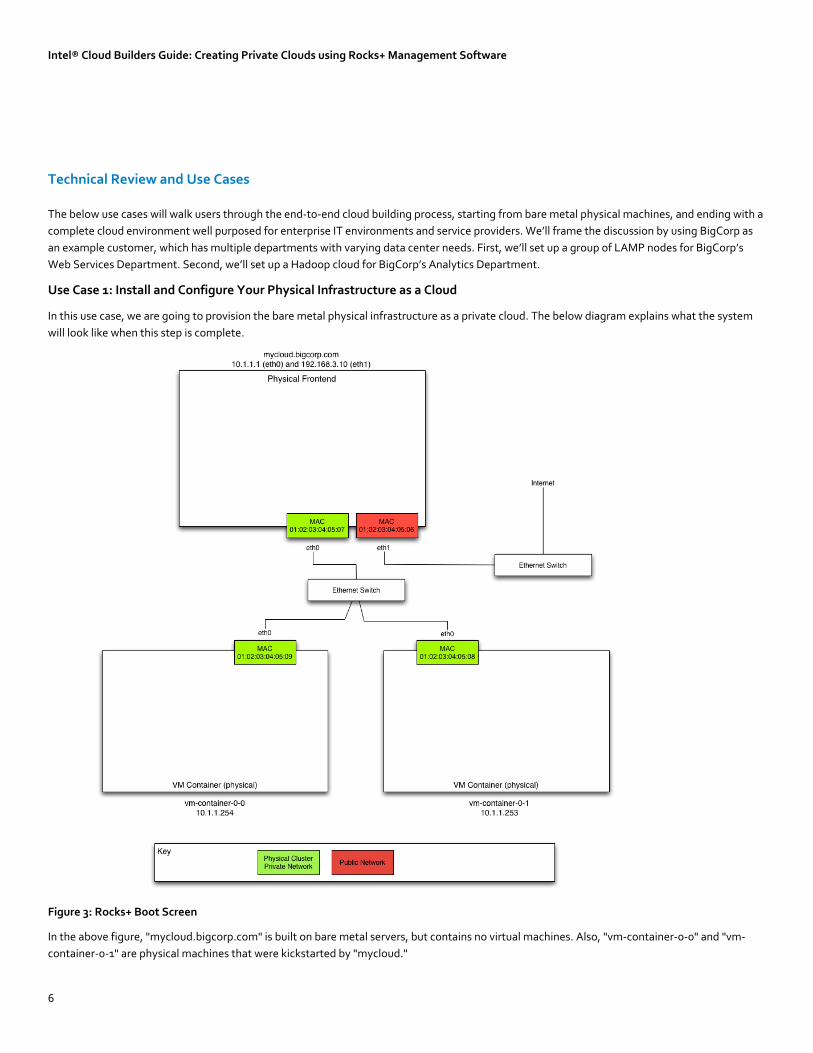
Use Case 1: Install and Configure Your Physical Infrastructure as a Cloud
In this use case, we are going to provision the bare metal physical infrastructure as a private cloud. The below diagram explains what the system
will look like when this step is complete.
Figure 3: Rocks+ Boot Screen
In the above figure, "mycloud.bigcorp.com" is built on bare metal servers, but contains no virtual machines. Also, "vm‐container‐0‐0" and "vm‐
container‐0‐1" are physical machines that were kickstarted by "mycloud."

Intel® Cloud Builders Guide: Creating Private Clouds using Rocks+ Management Software
7
Step 1: Setup your Frontend, which is the management node for your cloud.
The minimum requirement to bring up a frontend is to have the following items:
Rocks+ DVD
Red Hat Enterprise Linux 5 or CentOS 5 DVD Insert the Rocks+ DVD into your frontend machine and reset the frontend machine. After the frontend boots off the DVD, when you see the below
screen, type: “build.” (Note: if you wait too long, the machine will attempt to boot as a node and you will need to restart).
Figure 4: Rocks+ Boot Screen
If you see a blue screen titled “Configure TCP/IP,” you'll want to: 1) enable IPv4 support, 2) select manual configuration for the IPv4 support (no DHCP) and, 3) disable IPv6 support. Then hit "OK.” You'll see the "Manual TCP/IP Configuration" screen. In this screen, enter the public IP configuration, which in our test case was: 192.168.3.10.

Intel® Cloud Builders Guide: Creating Private Clouds using Rocks+ Management Software
8
Soon, you'll see a screen that looks like:
Figure 5: Rocks+ Install Screen
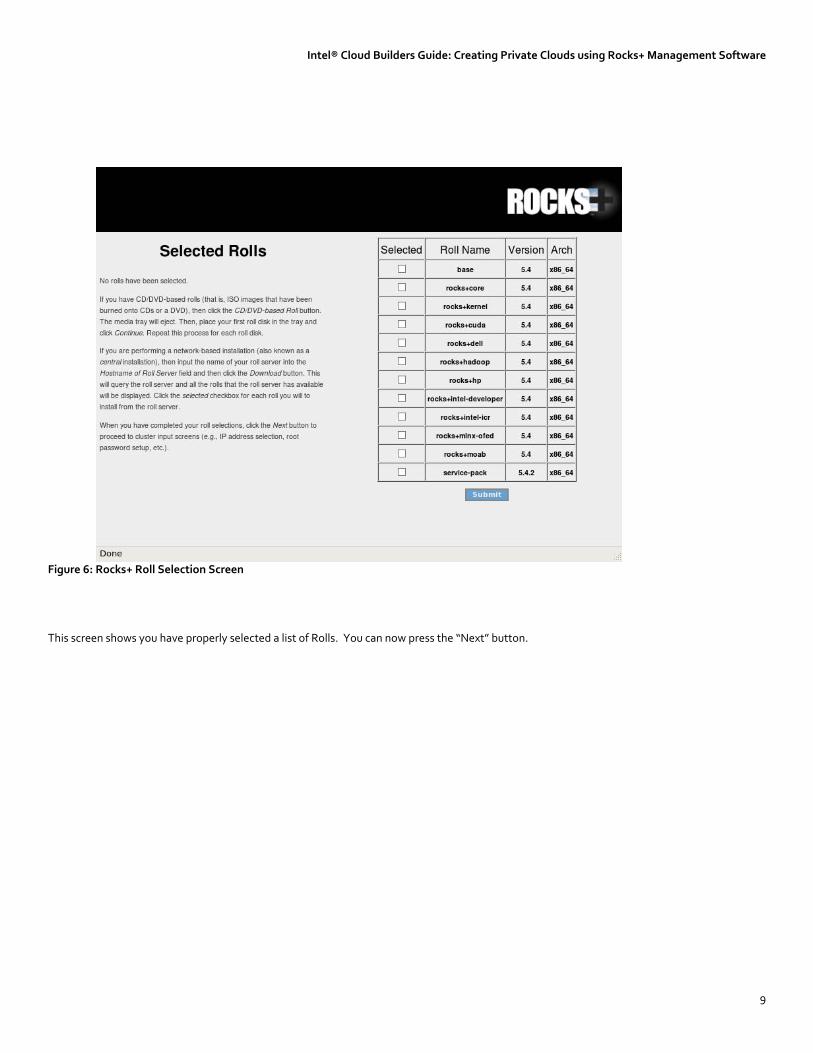
From this screen, you'll select your rolls. In this procedure, we'll only be using DVD media, so we'll only be clicking on the 'CD/DVD‐based Roll' button each time we would like to add media. The Rocks+Cloud Rolls will be discovered and display the following screen. Select base, ganglia, web‐server, service‐pack, xen, rocks+core, rocks+kernel, rocks+hadoop, rocks+bitnami, and OS, then press the 'Submit' button. Repeat for Rolls on additional DVDs (at minimum, you must use a complete Red Hat Enterprise Linux or CentOS Server DVD, which can be added during this step as a Roll). See the following two screen shots for an example of selecting Rolls and the resulting Roll list.
Intel® Cloud Builders Guide: Creating Private Clouds using Rocks+ Management Software
9
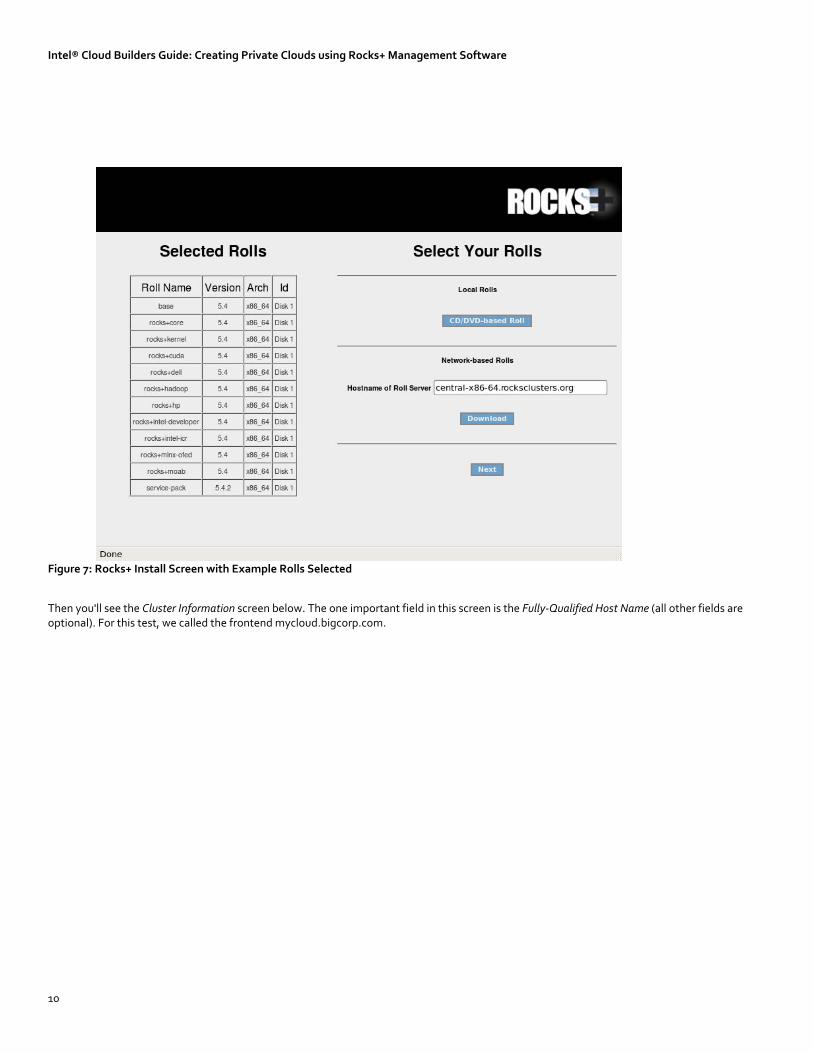
Figure 6: Rocks+ Roll Selection Screen
This screen shows you have properly selected a list of Rolls. You can now press the “Next” button.
Intel® Cloud Builders Guide: Creating Private Clouds using Rocks+ Management Software
10
Figure 7: Rocks+ Install Screen with Example Rolls Selected
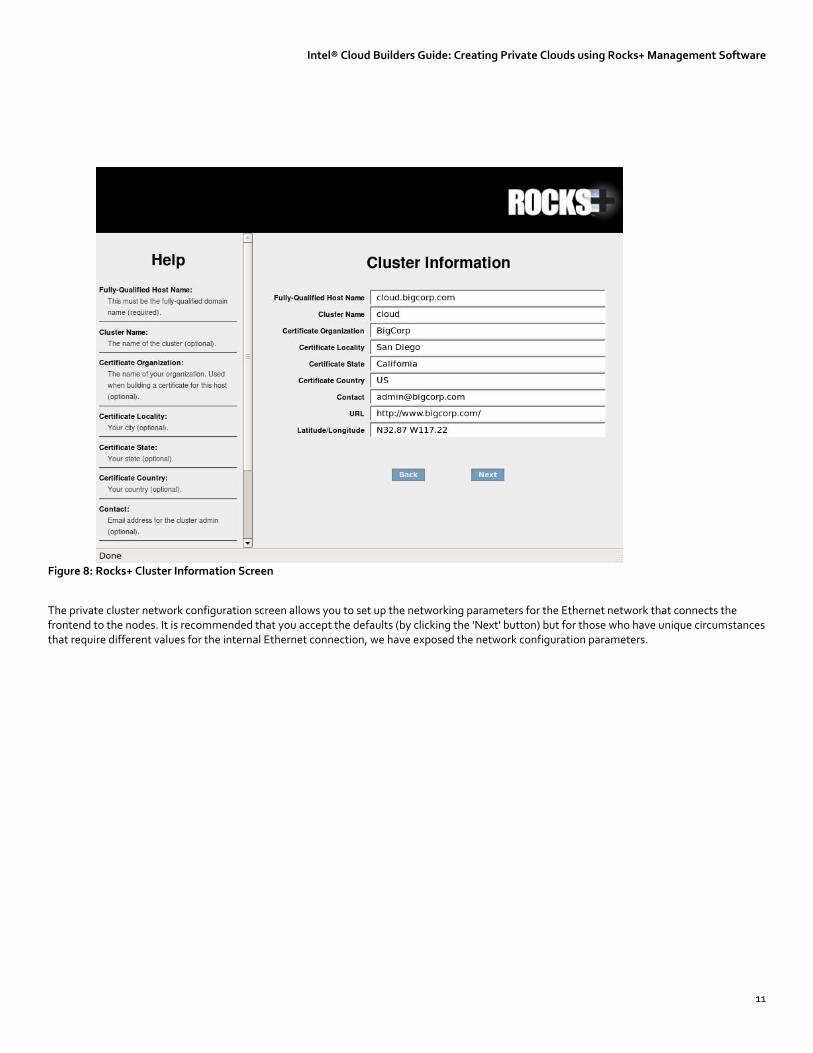
Then you'll see the Cluster Information screen below. The one important field in this screen is the Fully‐Qualified Host Name (all other fields are optional). For this test, we called the frontend mycloud.bigcorp.com.
Intel® Cloud Builders Guide: Creating Private Clouds using Rocks+ Management Software
11
Figure 8: Rocks+ Cluster Information Screen
The private cluster network configuration screen allows you to set up the networking parameters for the Ethernet network that connects the frontend to the nodes. It is recommended that you accept the defaults (by clicking the 'Next' button) but for those who have unique circumstances that require different values for the internal Ethernet connection, we have exposed the network configuration parameters.

Intel® Cloud Builders Guide: Creating Private Clouds using Rocks+ Management Software
12
Figure 9: Rocks+ Private Network Configuration
The public cluster network configuration screen allows you to set up the networking parameters for the Ethernet network that connects the frontend to the outside network (e.g., the Internet). The below window is an example of how we configured the external network on one of our frontend machines. For the Intel Cloud Builders test cluster, we used 192.168.3.10.

Intel® Cloud Builders Guide: Creating Private Clouds using Rocks+ Management Software
13
Figure 10: Rocks+ Public Network Configuration
Configure the Gateway and DNS entries for the public network.

Intel® Cloud Builders Guide: Creating Private Clouds using Rocks+ Management Software
14
Figure 11: Rocks+ Public Network Settings
On the remaining screens, you will choose your root password, configure the time, and select automatic disk partitioning. If you prefer manual partitioning, please see the Rocks+ Users Guide for information and requirements. The frontend will then format its file systems, and ask for each of the Roll DVDs you added at the beginning of the frontend installation. In this case, we only used one DVD so the installation will start automatically. After the last roll DVD is copied, the packages will be installed:

Intel® Cloud Builders Guide: Creating Private Clouds using Rocks+ Management Software
15
Figure 12: Rocks+ Installation Progress
After approximately 15 to 30 minutes, the boot loader will be installed and post configuration scripts will be run in the background. When they complete, the frontend will reboot. Step 2: Install and Configure your VM Containers
This section describes how to provision nodes in your data center as VM containers. On our test cluster, we brought up 4 VM Containers. To do this, execute the following command on the frontend as root:
# insert‐ethers
Select the 'VM Container' appliance, then hit 'OK'. Now PXE boot the physical machine that will be your VM container (these physical machines
should reside on the same private local network connected to eth0 on the Frontend). The VM container will be recognized by insert‐ethers and
installed. The default name of the node will be vm‐container‐X‐Y (e.g., vm‐container‐0‐0). You can install as many VM containers as you like, then
press F8 to close insert‐ethers when you are done (you can always run this command again to add additional nodes).
After all of your VM containers are done installing (this will take approximately 10 to 15 minutes), you will have completed your private cloud setup
and are ready to provision and manage Virtual Machines and Virtual Clusters.
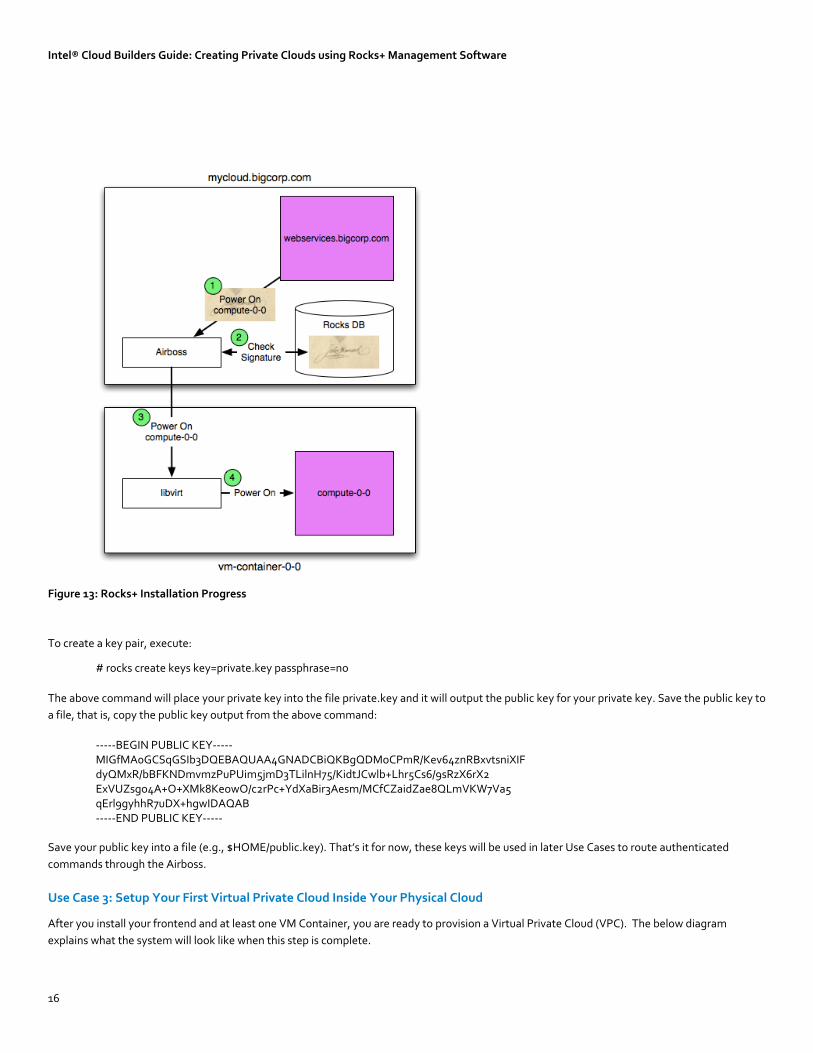
Use Case 2: Create an Airboss for Added Security and Control
Let’s set up the Airboss, which will allow us to give BigCorp’s various department system administrators access to their own Virtual Private Cluster
without root access to BigCorp’s physical cloud. First, we must create an RSA key pair. These keys will be used to authenticate Airboss commands.
Intel® Cloud Builders Guide: Creating Private Clouds using Rocks+ Management Software
16
Figure 13: Rocks+ Installation Progress
To create a key pair, execute:
# rocks create keys key=private.key passphrase=no
The above command will place your private key into the file private.key and it will output the public key for your private key. Save the public key to
a file, that is, copy the public key output from the above command:
‐‐‐‐‐BEGIN PUBLIC KEY‐‐‐‐‐ MIGfMA0GCSqGSIb3DQEBAQUAA4GNADCBiQKBgQDMoCPmR/Kev64znRBxvtsniXIF dyQMxR/bBFKNDmvmzPuPUim5jmD3TLilnH75/KidtJCwlb+Lhr5Cs6/9sRzX6rX2 ExVUZsgo4A+O+XMk8KeowO/c2rPc+YdXaBir3Aesm/MCfCZaidZae8QLmVKW7Va5 qErl9gyhhR7uDX+hgwIDAQAB ‐‐‐‐‐END PUBLIC KEY‐‐‐‐‐
Save your public key into a file (e.g., $HOME/public.key). That’s it for now, these keys will be used in later Use Cases to route authenticated
commands through the Airboss.
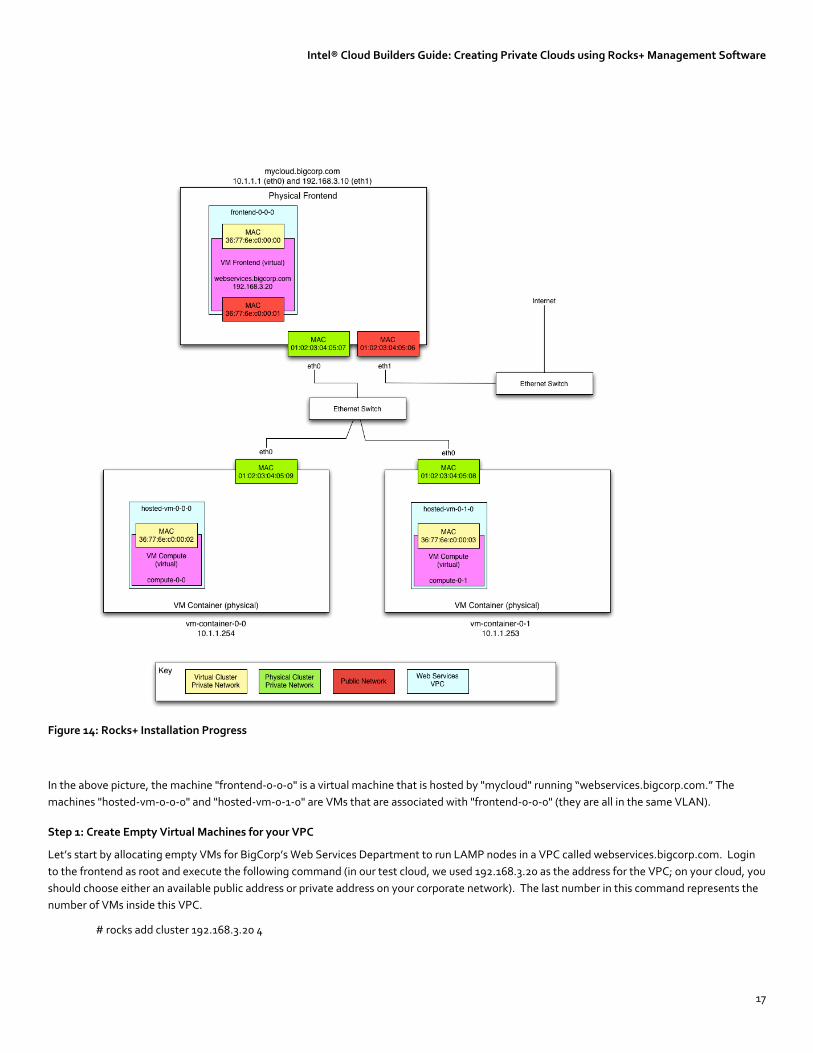
Use Case 3: Setup Your First Virtual Private Cloud Inside Your Physical Cloud
After you install your frontend and at least one VM Container, you are ready to provision a Virtual Private Cloud (VPC). The below diagram
explains what the system will look like when this step is complete.
Intel® Cloud Builders Guide: Creating Private Clouds using Rocks+ Management Software
17
Figure 14: Rocks+ Installation Progress
In the above picture, the machine "frontend‐0‐0‐0" is a virtual machine that is hosted by "mycloud" running “webservices.bigcorp.com.” The
machines "hosted‐vm‐0‐0‐0" and "hosted‐vm‐0‐1‐0" are VMs that are associated with "frontend‐0‐0‐0" (they are all in the same VLAN).
Step 1: Create Empty Virtual Machines for your VPC
Let’s start by allocating empty VMs for BigCorp’s Web Services Department to run LAMP nodes in a VPC called webservices.bigcorp.com. Login
to the frontend as root and execute the following command (in our test cloud, we used 192.168.3.20 as the address for the VPC; on your cloud, you
should choose either an available public address or private address on your corporate network). The last number in this command represents the
number of VMs inside this VPC.
# rocks add cluster 192.168.3.20 4
Intel® Cloud Builders Guide: Creating Private Clouds using Rocks+ Management Software
18
Here’s the output of the above command:
created frontend VM named: frontend‐0‐0‐0 created compute VM named: hosted‐vm‐0‐0‐0 created compute VM named: hosted‐vm‐0‐1‐0 created compute VM named: hosted‐vm‐0‐2‐0 created compute VM named: hosted‐vm‐0‐3‐0
Get the MAC addresses for the frontend VM:
rocks list host interface frontend‐0‐0‐0
Output:
SUBNET IFACE MAC IP NETMASK MODULE NAME VLAN OPTIONS CHANNEL private eth0 0a:03:a8:80:00:00 10.1.255.250 255.255.0.0 xennet frontend‐0‐0‐0 2 ‐‐‐‐‐‐‐ ‐‐‐‐‐‐‐ public eth1 0a:03:a8:80:00:01 192.168.3.20 255.255.255.0 xennet frontend‐0‐0‐0‐public 0 ‐‐‐‐‐‐‐ ‐‐‐‐‐‐‐
We now want to associate your public key with the virtual clusters you provisioned. This will allow you to use your private key to send
authenticated commands to control your cluster. To associate your public key with your virtual cluster, execute:
# rocks add host key frontend‐0‐0‐0 key=public.key
We can see the relationship by executing:
# rocks list host key HOST ID PUBLIC KEY frontend‐0‐0‐0: 2 ‐‐‐‐‐BEGIN PUBLIC KEY‐‐‐‐‐ : MIGfMA0GCSqGSIb3DQEBAQUAA4GNADCBiQKBgQDMoCPmR/Kev64znRBxvtsniXIF : dyQMxR/bBFKNDmvmzPuPUim5jmD3TLilnH75/KidtJCwlb+Lhr5Cs6/9sRzX6rX2 : ExVUZsgo4A+O+XMk8KeowO/c2rPc+YdXaBir3Aesm/MCfCZaidZae8QLmVKW7Va5 : qErl9gyhhR7uDX+hgwIDAQAB : ‐‐‐‐‐END PUBLIC KEY‐‐‐‐‐ : ‐‐‐‐‐‐‐‐‐‐‐‐‐‐‐‐‐‐‐‐‐‐‐‐‐‐‐‐‐‐‐‐‐‐‐‐‐‐‐‐‐‐‐‐‐‐‐‐‐‐‐‐‐‐‐‐‐‐‐‐‐‐‐‐
We see that the public key is associated with "frontend‐0‐0‐0" (the name of the VM in Dom0).
Step 2: Installing your VPC Frontend
In this section, we are going to provision your first virtual private cloud, in which we will launch a group of LAMP stacks configured automatically
with the BitNami Roll. We used the following settings:
Rolls: OS, base, kernel, web‐server, bitnami
Hostname: webservices.bigcorp.com
IP Address: 192.168.3.20
To install the virtual frontend, first, login to the physical frontend. To start the VM frontend install, we'll need to power on and install the VM
frontend (the action of "install" ensures that the VM will be put into install mode, then it will be powered on):
# rocks set host power frontend‐0‐0‐0 action=install key=private.key
Intel® Cloud Builders Guide: Creating Private Clouds using Rocks+ Management Software
19
Then, to connect to the VM's console, execute:
# rocks open host console frontend‐0‐0‐0 key=private.key
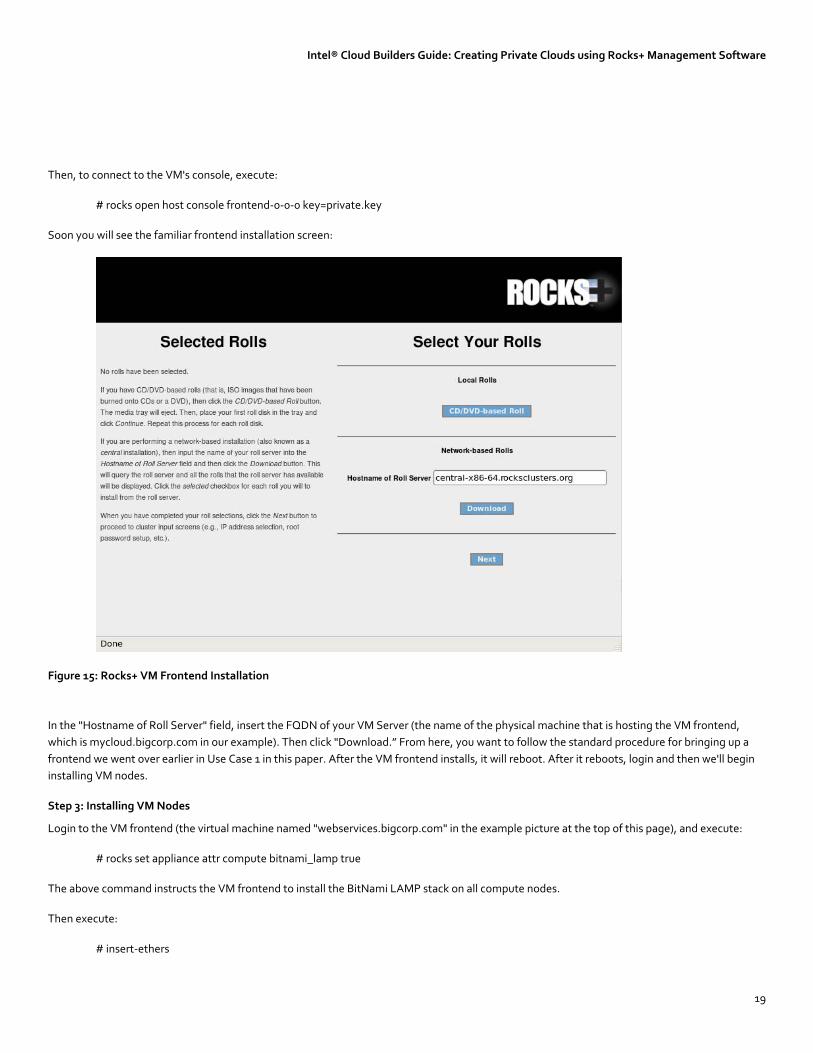
Soon you will see the familiar frontend installation screen:
Figure 15: Rocks+ VM Frontend Installation
In the "Hostname of Roll Server" field, insert the FQDN of your VM Server (the name of the physical machine that is hosting the VM frontend,
which is mycloud.bigcorp.com in our example). Then click "Download.” From here, you want to follow the standard procedure for bringing up a
frontend we went over earlier in Use Case 1 in this paper. After the VM frontend installs, it will reboot. After it reboots, login and then we'll begin
installing VM nodes.
Step 3: Installing VM Nodes
Login to the VM frontend (the virtual machine named "webservices.bigcorp.com" in the example picture at the top of this page), and execute:
# rocks set appliance attr compute bitnami_lamp true
The above command instructs the VM frontend to install the BitNami LAMP stack on all compute nodes.
Then execute:
# insert‐ethers

Intel® Cloud Builders Guide: Creating Private Clouds using Rocks+ Management Software
20
Select Compute as the Appliance type.
In another terminal session on webservices.bigcorp.com, we'll need to set up the environment to send commands to the Airboss on the physical
frontend. We'll do this by putting the RSA private key that we created earlier (e.g., private.key) on webservices.bigcorp.com.
Prior to sending commands to the Airboss, we need to establish a SSH tunnel between the virtual frontend (e.g., webservices) and the physical
frontend (e.g., mycloud, where the Airboss runs). This tunnel is used to securely pass Airboss messages. On the virtual frontend (e.g.,
webservices), execute:
# ssh ‐L 8677:localhost:8677 mycloud.bigcorp.com
Now we can securely send messages to the Airboss and we're ready to install nodes. But, there's something to consider ‐‐ when we first login to
webservices.bigcorp.com, the only machine it knows about is itself (i.e. webservices.bigcorp.com). There are no other nodes in the virtual
frontend's database. But the physical machine knows about the MAC addresses of the virtual nodes (e.g. hosted‐vm‐0‐0‐0 and hosted‐vm‐0‐1‐0)
that are associated with this virtual cluster, so we can ask the Airboss on the physical frontend for a list of MAC addresses that are assigned to our
virtual cluster:
# rocks list host macs webservices.bigcorp.com key=private.key
Which outputs:
MACS IN CLUSTER 36:77:6e:c0:00:02 36:77:6e:c0:00:00 36:77:6e:c0:00:03 36:77:6e:c0:00:04 36:77:6e:c0:00:05
The MAC address 36:77:6e:c0:00:00 is the VM frontend (webservices.bigcorp.com) and the other MACs (36:77:6e:c0:00:02 through
36:77:6e:c0:00:05) are the VM nodes that are associated with our VM frontend. We can use the MAC address of the VM nodes to power up and
install our nodes:
# rocks set host power 36:77:6e:c0:00:02 key=private.key action=install
Soon, you should see insert‐ethers discover the VM node. After the virtual node is discovered by insert‐ethers, we can open a console to the node
by executing:
# rocks open host console compute‐0‐0 key=private.key
Repeat for additional VM nodes. Let’s just add two for now, as we’ll scale the VPC up in a later step.
Step 4: Testing the LAMP stack on your VPC
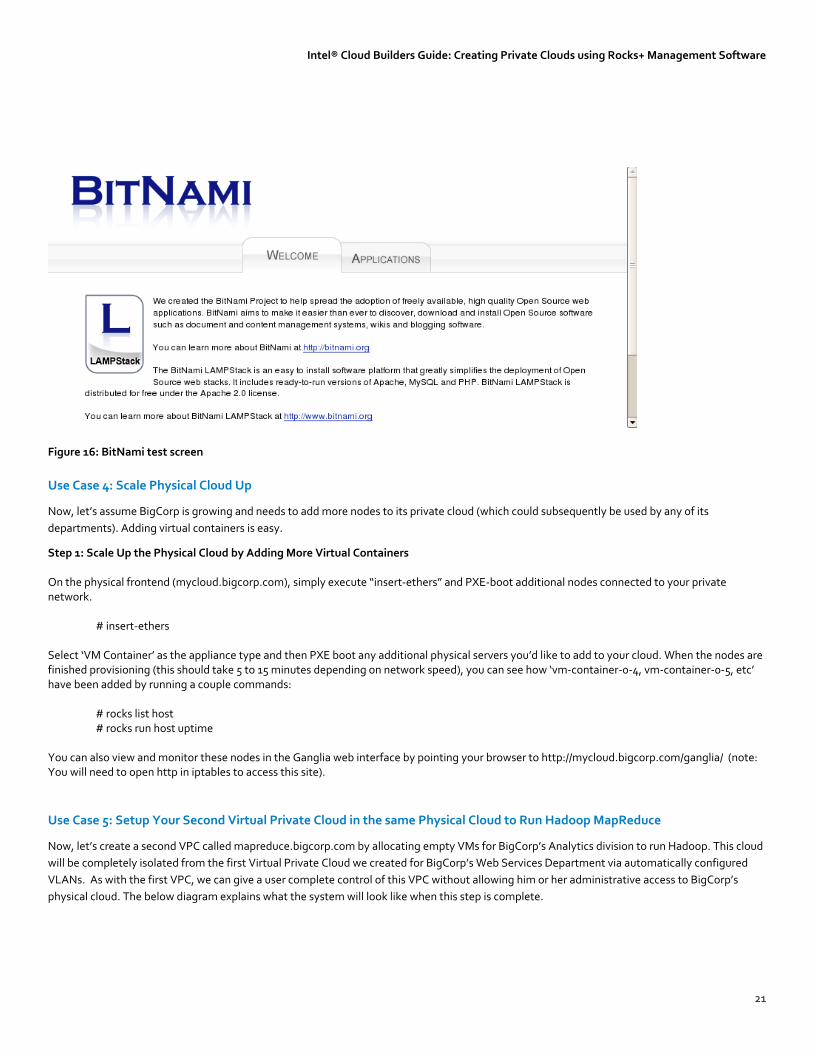
To test if the LAMP node is properly configured, point to compute‐0‐0.local or compute‐0‐1.local from your browser on webservices.bigcorp.com.
You should see the BitNami test screen.
Intel® Cloud Builders Guide: Creating Private Clouds using Rocks+ Management Software
21
Figure 16: BitNami test screen
Use Case 4: Scale Physical Cloud Up
Now, let’s assume BigCorp is growing and needs to add more nodes to its private cloud (which could subsequently be used by any of its
departments). Adding virtual containers is easy.
Step 1: Scale Up the Physical Cloud by Adding More Virtual Containers On the physical frontend (mycloud.bigcorp.com), simply execute “insert‐ethers” and PXE‐boot additional nodes connected to your private network.
# insert‐ethers
Select ‘VM Container’ as the appliance type and then PXE boot any additional physical servers you’d like to add to your cloud. When the nodes are finished provisioning (this should take 5 to 15 minutes depending on network speed), you can see how ‘vm‐container‐0‐4, vm‐container‐0‐5, etc’ have been added by running a couple commands: # rocks list host
# rocks run host uptime
You can also view and monitor these nodes in the Ganglia web interface by pointing your browser to http://mycloud.bigcorp.com/ganglia/ (note: You will need to open http in iptables to access this site).
Use Case 5: Setup Your Second Virtual Private Cloud in the same Physical Cloud to Run Hadoop MapReduce
Now, let’s create a second VPC called mapreduce.bigcorp.com by allocating empty VMs for BigCorp’s Analytics division to run Hadoop. This cloud
will be completely isolated from the first Virtual Private Cloud we created for BigCorp’s Web Services Department via automatically configured
VLANs. As with the first VPC, we can give a user complete control of this VPC without allowing him or her administrative access to BigCorp’s
physical cloud. The below diagram explains what the system will look like when this step is complete.

Intel® Cloud Builders Guide: Creating Private Clouds using Rocks+ Management Software
22
Figure 17
The machine "frontend‐0‐0‐1" is a virtual machine that is hosted by "mycloud" running “mapreduce.bigcorp.com”. The machines "hosted‐vm‐0‐0‐
1" and "hosted‐vm‐0‐1‐1" are VMs that are associated with "frontend‐0‐0‐1" (they are all in the same VLAN). Note: Rocks+ also supports building
out Hadoop (or any other Rocks appliance type) nodes on bare metal, by skipping the virtual machine steps.
Step 1: Create Empty Virtual Machines for your VPC
Follow the same instructions in Step 1 of Use Case 3. When you get to the end of step 1, continue below.
Step 2: Installing Your VPC Frontend
Continue to follow the same steps as Use Case 3, but choose the Hadoop Roll instead of the BitNami Roll when installing the virtual frontend. We
used 192.168.3.30 as the IP address for this test cloud. On your cloud, you should choose either an available public address or private address on
your corporate network.
Rolls: OS, base, kernel, web‐server, Rocks+Hadoop

Intel® Cloud Builders Guide: Creating Private Clouds using Rocks+ Management Software
23
Hostname: mapreduce.bigcorp.com
IP Address: 192.168.3.30
Step 3: Installing VM Nodes
Follow the same instructions in Step 3 of Use Case 3 and when you get to the end of step 3, continue below.
Step 4: Testing Hadoop on your VPC
On the virtual frontend, after your VM nodes come up, configure Hadoop:
# rocks add hadoop name="hadoop‐1" namenode="localhost" datanode‐servers="compute‐0‐0 compute‐0‐1" # rocks create hadoop name="hadoop‐1" # rocks start hadoop name=hadoop‐1 # export HADOOP_CONF_DIR=/var/hadoop/conf/hadoop‐1 # /opt/hadoop/bin/hadoop dfs ‐mkdir input # /opt/hadoop/bin/hadoop dfs ‐copyFromLocal /etc/*.conf input # /opt/hadoop/bin/hdfs dfs ‐ls input # /opt/hadoop/bin/hadoop jar /opt/hadoop/hadoop‐mapred‐examples‐0.21.0.jar grep input output '='
Make sure a datanode is participating:
# ssh compute‐0‐0 # tail ‐f /opt/hadoop/logs/hadoop‐root‐datanode‐compute‐0‐0.local.log
When map/reduce job completes, see output:
# /opt/hadoop/bin/hdfs dfs –ls
Get results:
# /opt/hadoop/bin/hadoop dfs ‐copyToLocal output output # cat output/part*
Intel® Cloud Builders Guide: Creating Private Clouds using Rocks+ Management Software
24
Things to Consider
We hope you’ve learned a bit about Rocks+ and how to build physical
and virtual cloud infrastructure by reading this paper. As you think
about building out your internal or external IT environment, here are a
few additional items to consider.
Rocks+ supports Red Hat Enterprise Linux or CentOS. You can
choose which version of Linux fits your needs based on budget
and support requirements.
You can find a complete list of Additional Rolls and Appliance
Types at http://www.StackIQ.com
The AWS Roll enables Rocks+ users to use StackIQ’s
management solution inside of Amazon EC2. Rocks+ instance
types are specifically designed for highly scalable applications,
where an automated, connected management solution is
important. In addition to new EC2 users, the thousands of
people currently leveraging Rocks to manage internal clusters
can now easily move their applications to the cloud and benefit
from the elasticity, flexibility and cost advantages of Amazon
EC2. To get started using Rocks+ Instances for Amazon EC2,
visit http://aws.amazon.com
Conclusion
Rocks has been the dominant Linux cluster distribution for over 10‐
years. Based on opt‐in registration lists, there are an estimated 10,000
Rocks clusters deployed around the world managing over 1,000,000
nodes. As the Rocks+ project grew in popularity in the cluster space,
enterprises began to see the same hyperscale management needs for
cloud computing. This inspired the developers from the Open Source
Rocks project to form StackIQ and build out Rocks+ and Rocks+Cloud,
which bring the rocket science of the supercomputing world to mass‐
market cloud computing.
By building and managing clouds with Rocks+, you can help to ensure
that software applications and hardware components will work
together right out of the box.
The Rocks+ Intel Cloud Builder solution enables you to accelerate the
cloud configuration process and enhance product reliability by
providing an automated and repeatable process for cloud software
deployment. Working together, Intel and StackIQ give you the tools
that you need to create a streamlined process for producing cloud
solutions at scale.
About StackIQ
StackIQ is a leading provider of multi‐server management systems for
clusters and clouds. Based on open‐source Rocks cluster software,
StackIQ’s Rocks+ product simplifies the installation and management
of highly scalable cluster and cloud computing. StackIQ is located in La
Jolla, California, adjacent to the University of California, San Diego,
where the open‐source Rocks Group was co‐founded. To learn more
visit http://www.StackIQ.com.com.
Rocks+ includes software developed by the Rocks Cluster Group at the
San Diego Supercomputer Center at the University of California, San
Diego and its contributors. Rocks® is a registered trademark of the
Regents of the University of California.
Glossary and Additional Information
For more information on Rocks+, visit http://www.StackIQ.com
This product includes software developed by the Rocks Cluster Group at
the San Diego Supercomputer Center at the University of California, San
Diego and its contributors.
For more information on the Rocks project, visit
http://www.rocksclusters.org
For more information on the BitNami project, visit
http://www.bitnami.org
For more information on Hadoop, visit http://hadoop.apache.org
For more information on the Intel Cloud Builders Program, visit
http://www.intel.com/cloudbuilders
For more information on Intel Xeon processors, visit
http://www.intel.com/xeon
For more information on Amazon Elastic Compute Cloud (EC2), visit
http://aws.amazon.com/ec2
Cloud Builders Reference Architecture Library
http://www.intel.com/itcenter/topics/cloud/cloudbuilders/referencearc
hitecture.htm
Intel® Cloud Builders Guide: Creating Private Clouds using Rocks+ Management Software
Disclaimers
∆ Intel processor numbers are not a measure of performance. Processor numbers differentiate features within each processor family, not across different processor families. See
www.intel.com/products/processor_number for details.
INFORMATION IN THIS DOCUMENT IS PROVIDED IN CONNECTION WITH INTEL® PRODUCTS. NO LICENSE, EXPRESS OR IMPLIED, BY ESTOPPEL OR OTHERWISE, TO ANY INTELLECTUAL
PROPERTY RIGHTS IS GRANTED BY THIS DOCUMENT. EXCEPT AS PROVIDED IN INTEL’S TERMS AND CONDITIONS OF SALE FOR SUCH PRODUCTS, INTEL ASSUMES NO LIABILITY WHATSOEVER,
AND INTEL DISCLAIMS ANY EXPRESS OR IMPLIED WARRANTY, RELATING TO SALE AND/OR USE OF INTEL PRODUCTS INCLUDING LIABILITY OR WARRANTIES RELATING TO FITNESS FOR A
PARTICULAR PURPOSE, MERCHANTABILITY, OR INFRINGEMENT OF ANY PATENT, COPYRIGHT OR OTHER INTELLECTUAL PROPERTY RIGHT. UNLESS OTHERWISE AGREED IN WRITING BY INTEL,
THE INTEL PRODUCTS ARE NOT DESIGNED NOR INTENDED FOR ANY APPLICATION IN WHICH THE FAILURE OF THE INTEL PRODUCT COULD CREATE A SITUATION WHERE PERSONAL INJURY OR
DEATH MAY OCCUR.
Intel may make changes to specifications and product descriptions at any time, without notice. Designers must not rely on the absence or characteristics of any features or instructions marked “reserved” or
“undefined.” Intel reserves these for future definition and shall have no responsibility whatsoever for conflicts or incompatibilities arising from future changes to them. The information here is subject to
change without notice. Do not finalize a design with this information.
The products described in this document may contain design defects or errors known as errata which may cause the product to deviate from published specifications. Current characterized errata are
available on request. Contact your local Intel sales office or your distributor to obtain the latest specifications and before placing your product order. Copies of documents which
have an order number and are referenced in this document, or other Intel literature, may be obtained by calling 1‐800‐548‐4725, or by visiting Intel’s Web site at www.intel.com.
Copyright © 2011 Intel Corporation. All rights reserved. Intel, the Intel logo, Xeon, Xeon inside, and Intel Intelligent Power Node Manager are trademarks of Intel
Corporation in the U.S. and other countries.
*Other names and brands may be claimed as the property of others.
Recommended