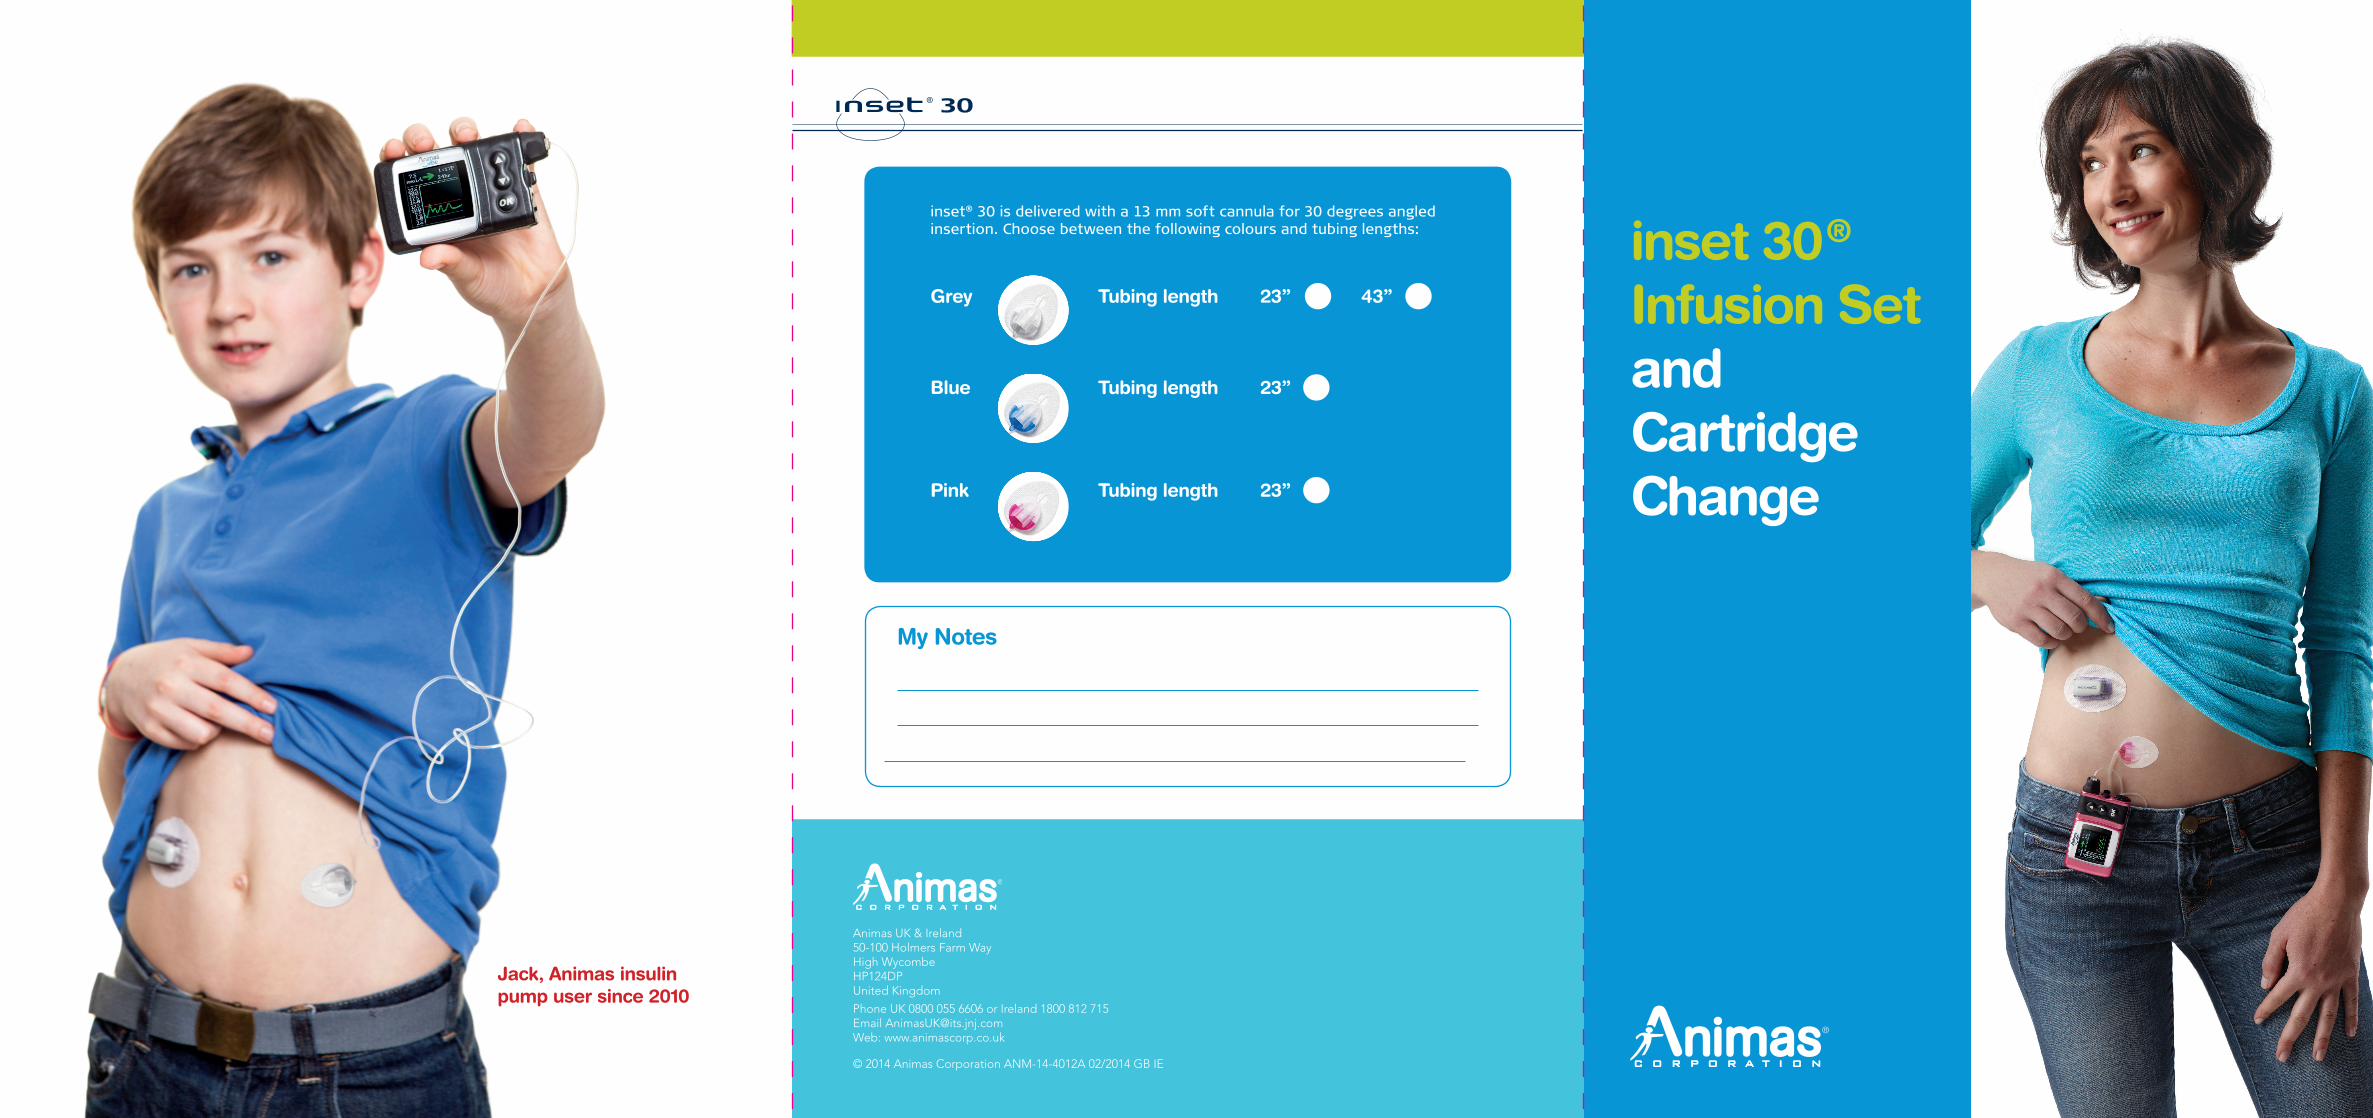
inset 30® Infusion Set and Cartridge Change
Animas UK & Ireland50-100 Holmers Farm WayHigh WycombeHP124DPUnited Kingdom
Phone UK 0800 055 6606 or Ireland 1800 812 715 Email [email protected]: www.animascorp.co.uk
© 2014 Animas Corporation ANM-14-4012A 02/2014 GB IE
My Notes
Jack, Animas insulin pump user since 2010
inset® 30 is delivered with a 13 mm soft cannula for 30 degrees angled insertion. Choose between the following colours and tubing lengths:
Grey Tubing length 23”
43”
Blue Tubing length 23”
Pink Tubing length 23”
These are not a replacement for full instructions containing precautions and warnings. Follow the instructions that came with your cartridge.
1. Preparation: Wash your hands with soap and water. Clean the rubber septum (stopper) on the top of insulin vial with alcohol wipe.
2. To build a syringe: Open the package and remove the cartridge, blue plunger handle and filling needle. Twist covered filling needle onto cartridge in a clockwise motion. Do not over cycle or twist Gently pull the blue plunger handle back to allow maximum volume of air in the cartridge, being careful not to pull the plunger out of the cartridge.
3. Fill cartridge with insulin: Insert needle into the top of of the insulin bottle with the insulin vial resting on a hard level surface. Empty all air from cartridge into the insulin vial by pushing the plunger completely in. Slowly pull back on the blue handle. Do not pull plunger out of cartridge. Fill with 2 or 3 days of insulin.
4. Inspect cartridge for air bubbles: If found, gently tap the side of the cartridge to move the bubble towards the top. Then push the plunger to force the air bubble into the vial. Repeat until all air bubbles are removed from the cartridge. (Air bubbles in the cartridge may cause under-infusion).
5. Carefully replace cover on filling needle, the twist needle counter clockwise to remove. Place small clear protective cap on cartridge tip. Pinch tabs on blue plunger handle to remove. Set filled cartridge aside. Dispose of used needles, insulin vial and other components in accordance with local requirements.
To fill cartridge
inset 30 infusion set
*Follow instructions that came with your meter.
inset® 30 contains insertion device and infusion set into a single sterile, portable unit. Simlpy follow the steps below.
>
>>
>
Small Clear Cap
Cartridge
Needle
Blue Handle
PRIMINGACTIVE
Press AND HOLDOK button
while primingtubing.
>>------>>------>>------
Insulin: 177U> > >
21
1. Remove black cartridge cap from pump.
2. Thread tubing connector through small end of black cartridge cap.
3. Unscrew small, clear cap from cartridge tip.
4. Screw tubing connector on to cartridge. Twist on tightly.
5. Set aside.
Attach tubing to cartridge
Black Cartridge Cap
>
1. Remove tubing from the package.
2. Remove black cartridge cap from pump. Discard your old tubing and cartridge.
3. Thread tubing connector through small end of black cartridge cap.
4. Unscrew small, clear cap from cartridge tip.
5. Screw tubing connector on to cartridge. Twist on tightly.
6. Set aside.
Attach tubing to cartridge
Black Cartridge Cap
>
1
Wash your hands before inserting inset® 30. Pull the red tape to remove the seal.
22
Pull off the sterile paper. Do not touch the spring at this stage.
33
Hold the lined indentations on each side of the insertion device with one hand and pull the lid off with the other hand. CAUTION: Be careful to not bend or touch the inset® 30 introducer needle. IMPORTANT: If the infusion set is not securely placed in the insertion device with the needle pointing straight ahead, pain or minor injury may occur during insertion.
44
Prepare the insertion device: Place fingers on lined indentations on each side. Pull spring back until you hear a “click”. The needle protector is auto matically lifted up. Be sure not to touch or bend the needle.
55
Immediately before insertion, carefully bend back the needle protector and remove it. Part of the adhesive on the back of the paper will automatically be removed at this step. Be sure the tape is not stuck on theintroducer needle.
= 30°
66
Place your index finger on the top release button and your thumb on the bottom release button. Position insetTM 30 with its legs level (flat) on the skin to ensure an insertion angle of 30®. Make sure to maintain a 30® angle while inserting and gently squeeze once to insert insetTM 30.
77
Make sure that the cannula stays in place. Put your finger gently on the clear window while removing the insertion device and introducer needle. Pull it gently straight back.
1010
Put the lid back on the insertion device for disposal. Infusion sets should be disposed of, as per your local Council guidelines for the disposal of sharps.
88
Secure the cannula with one finger on the clear window. Carefully remove the backing paper under the cannula housing as shown.
Remove the backing paper under the front end. Massage the adhesive thoroughly on to the skin.IMPORTANT: Do not attempt to straighten the adhesive if curled.
899
ezPrime
Main Menu
RewindLoad CartPrimeFill Cannula
nnno
To make sure new site is working, check blood glucose per local healthcare guidelines.
FILL CANNULA
Main Menu
Amount
Go
0.00 U
Use the up or down buttons to enter the amount of insulin needed to fill the cannula. Refer to the Instructions for Use included with your infusion set for details on how much insulin is required to fill the cannula.
Press “Go” is highlighted.
Press to fill the cannula.
22 23 24
If the screen has timed out, please follow steps 1 and 2 to wake up the pump.
Please wait until 5 drops of insulin comes out of end of tubing. This means your tubing is primed. Be sure the infusion set is not connected to your body until the prime is complete.
Press
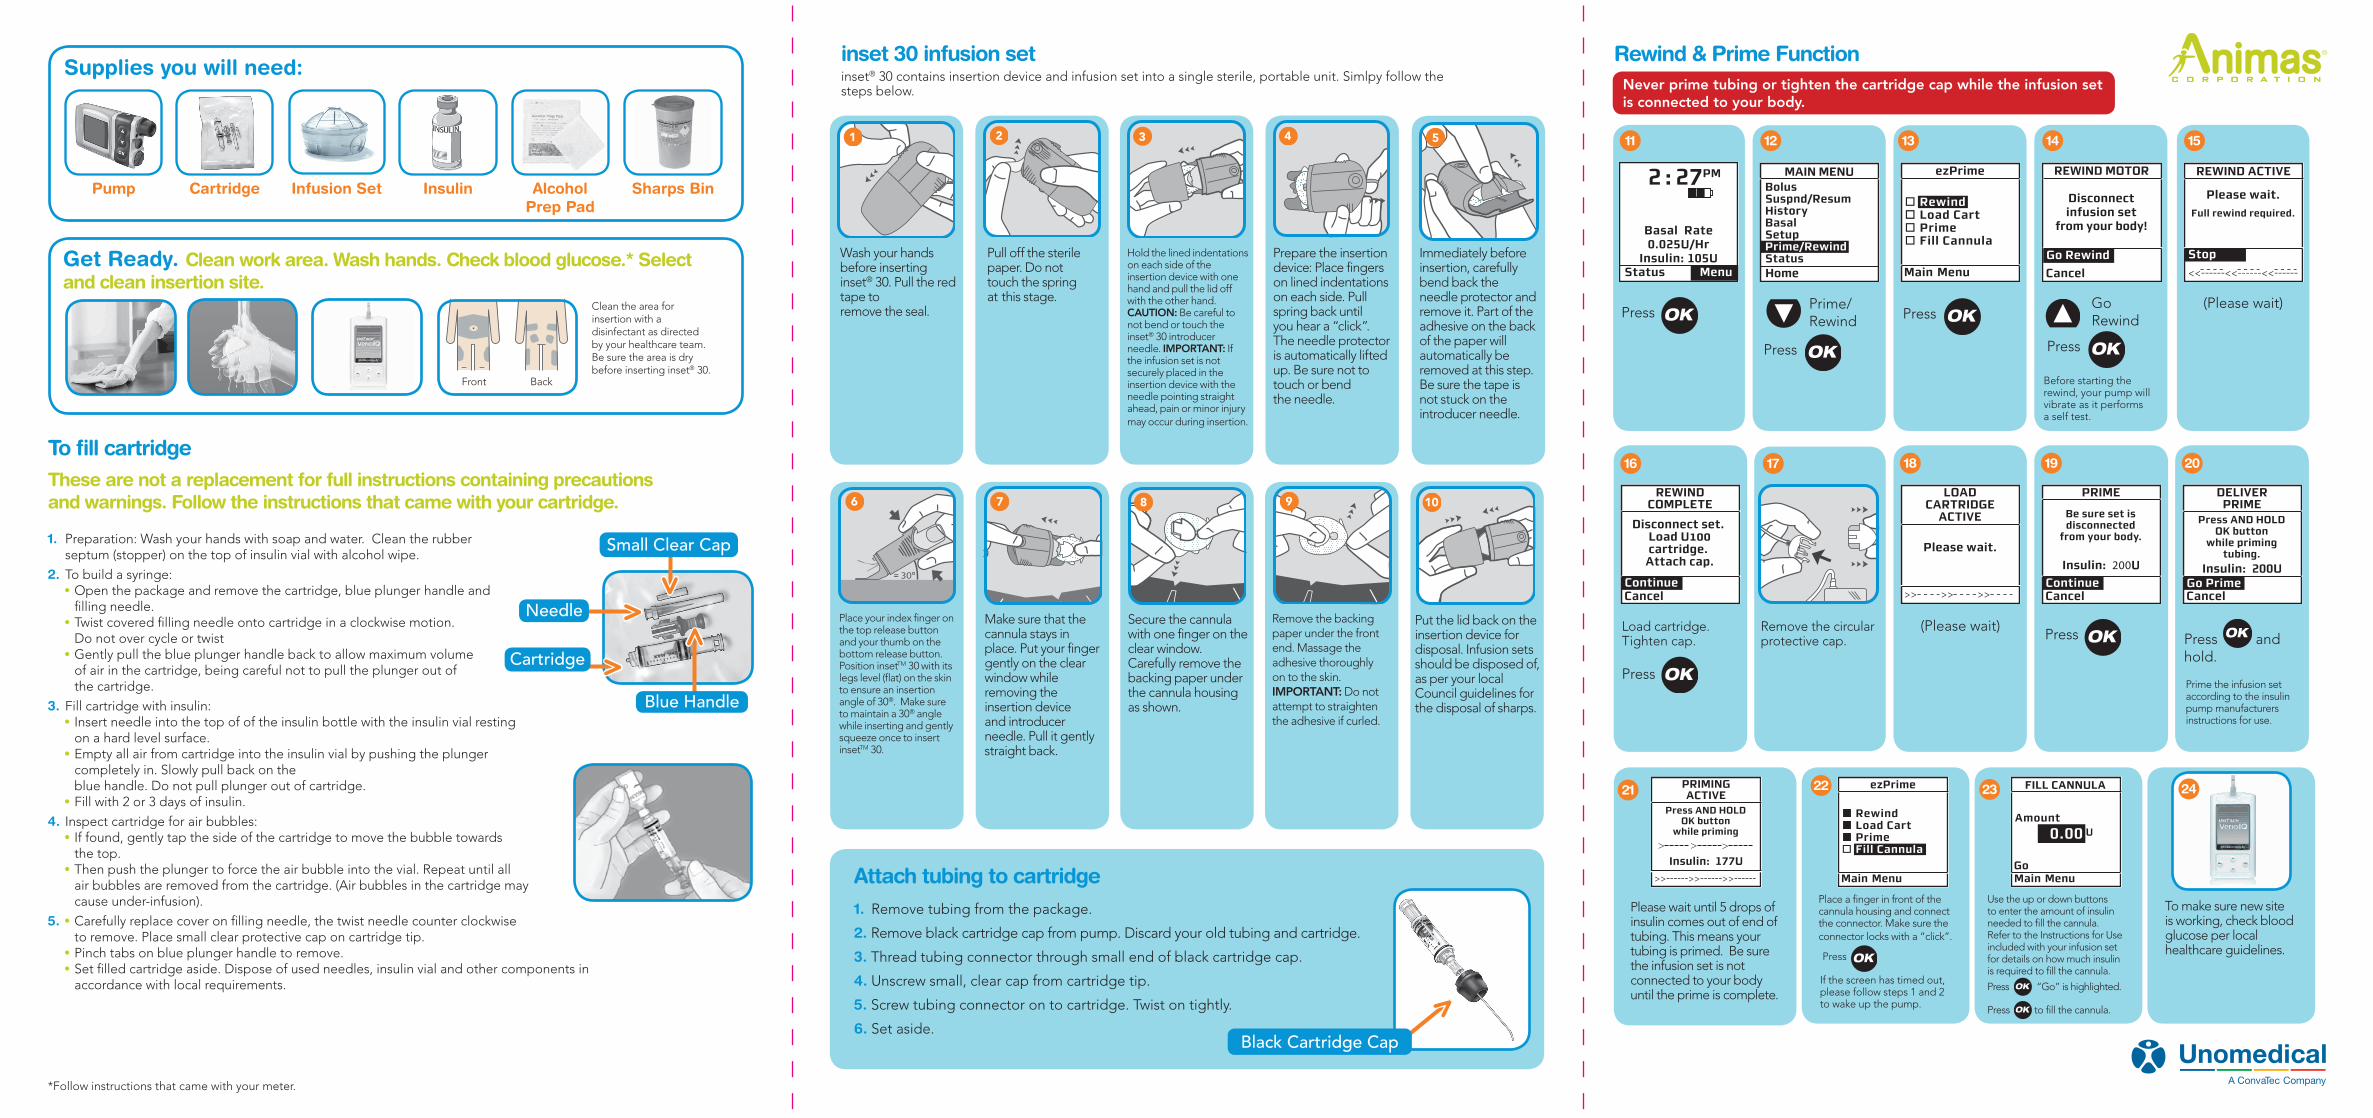
Rewind & Prime Function
MAIN MENU
Home
BolusSuspnd/ResumHistoryBasalSetupPrime/RewindStatus
ezPrime
Main Menu
RewindLoad CartPrimeFill Cannula
oooo
Go Rewind
REWIND MOTOR
Cancel
Disconnectinfusion set
from your body!
Go Rewind
Prime/ Rewind
Press
Press
Press
Before starting the rewind, your pump will vibrate as it performs a self test.
(Please wait)
REWIND ACTIVE
Please wait.
Full rewind required.
<<------<<------<<------
Stop0U
2 : 27PM
Status
Basal Rate0.025U/Hr
Insulin: 105UMenu
Press
11 12 13 14 15
(Please wait)
PRIME
Cancel
Be sure set isdisconnected
from your body.
Continue
Insulin: 200U
DELIVERPRIME
Cancel
Press AND HOLDOK button
while primingtubing.
Go PrimeInsulin: 200U
REWINDCOMPLETE
Cancel
Disconnect set. Load U100cartridge.
Attach cap.
Continue
Load cartridge.Tighten cap.
LOADCARTRIDGE
ACTIVE
>>------>>------>>------
Please wait.
Press
Press
16 18 19 20
Remove the circularprotective cap.
Prime the infusion set according to the insulin pump manufacturers instructions for use.
17
Press and hold.
Clean the area for insertion with a disinfectant as directed by your healthcare team. Be sure the area is dry before inserting inset® 30.
Place a finger in front of the cannula housing and connect the connector. Make sure the connector locks with a “click”.
Get Ready. Clean work area. Wash hands. Check blood glucose.* Select and clean insertion site.
Supplies you will need:
Pump Cartridge Infusion Set Insulin Alcohol Prep Pad
Front Back
Sharps Bin
Never prime tubing or tighten the cartridge cap while the infusion set is connected to your body.
Recommended