
GRS Advantage is a trademark or registered name of Gabriel Roeder Smith & Company
Holdings Inc. in the U.S.
© GRS. All rights reserved
GRS Advantage™ Website
User Reference Guide
This document describes how to use the GRS Advantage™ Website.
Table of Contents GRS Advantage™ Website ............................................................................................................ 2
Accessing the Website ................................................................................................................ 2
Requesting Access to the Website .............................................................................................. 2
Resetting your Password ............................................................................................................. 8
Using the GRS Advantage™ Website ...................................................................................... 10
Secure File Transfer ...................................................................................................................... 12
Accessing the Secure File Transfer Web Application .............................................................. 12
Identifying Your Active Client ................................................................................................. 12
Upload Documents to GRS ....................................................................................................... 13
Downloading Documents from GRS ........................................................................................ 15
GRS TrendLine™ ......................................................................................................................... 17
Accessing the GRS TrendLine™ Web Application ................................................................. 17
Navigating Around the GRS TrendLine™ Page ....................................................................... 18
Adjusting the Data Filter ........................................................................................................... 19
Viewing an Exhibit.................................................................................................................... 20
Software Support .......................................................................................................................... 22
Available Software Support ...................................................................................................... 22

GRS Advantage™ Website - Accessing the Website
Gabriel Roeder Smith & Company
2
GRS Advantage™ Website Revised: July 25, 2017
This document describes how to use the GRS Advantage™ website.
Accessing the Website
The GRS Advantage™ website is available at the following URL:
https://advantage.gabrielroeder.com/
Requesting Access to the Website
The GRS Advantage™ website requires that all users sign in to use the website. If this is your
first time visiting the website, you will need to request access.
Follow these simple steps to request access:
1. Under “Plan Sponsors” on the left side of the Home page, click the “Registration Page”
link.

GRS Advantage™ Website - Requesting Access to the Website
Gabriel Roeder Smith & Company
3
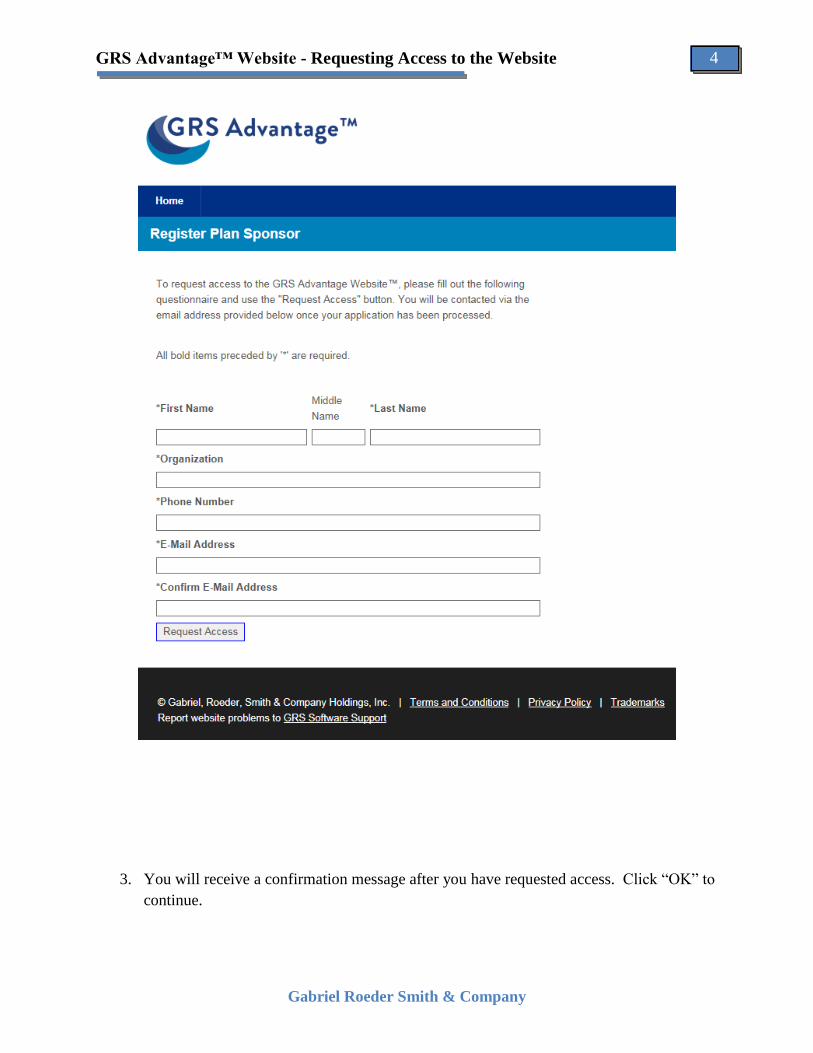
2. Complete the registration form on the “Register Plan Sponsor” page and click “Request
Access” to continue. Bold items that are preceded by “*” are required fields and must be
provided.
GRS Advantage™ Website - Requesting Access to the Website
Gabriel Roeder Smith & Company
4
3. You will receive a confirmation message after you have requested access. Click “OK” to
continue.

GRS Advantage™ Website - Requesting Access to the Website
Gabriel Roeder Smith & Company
5
4. After your registration request has been processed by GRS, you will be contacted via
email with your account credentials.
5. Return to the GRS Advantage™ website and on the left side of the page click the “Login
Page” link under the “Plan Sponsor” or click on the “Plan Sponsor” link located under
the middle image
6. Enter the provided account credentials.

GRS Advantage™ Website - Requesting Access to the Website
Gabriel Roeder Smith & Company
6
7. A message will appear indicating that your password has expired. Click “OK” to
continue.
8. The “Manage Profile” page can be used to update your account information. Enter a
personalized password into the “New Password” and “Confirm Password” fields. Click

GRS Advantage™ Website - Requesting Access to the Website
Gabriel Roeder Smith & Company
7
the “Update” button after you have reviewed your contact information and supplied your
personalized password.
9. Your account is now ready to use.

GRS Advantage™ Website - Resetting your Password
Gabriel Roeder Smith & Company
8
Resetting your Password
If at any time you forget your password, first click on the “Login Page” link on the left side of
the web page under “Plan Sponsors” or click on the “Plan Sponsor” link located under the
middle image.

GRS Advantage™ Website - Resetting your Password
Gabriel Roeder Smith & Company
9
Next, enter your email address and click on the “Forgot your password?” link.
Click “OK” on the confirmation request from the website.
A temporary password will be emailed to you. Complete steps five through seven of the
previous section to set your personalized password.

GRS Advantage™ Website - Using the GRS Advantage™ Website
Gabriel Roeder Smith & Company
10
Using the GRS Advantage™ Website
The following image identifies the important features of the GRS Advantage™ website.
1. User Account and Active Client Information
This section displays the current user information. It can be used to edit your profile, log
out or select a new active client.
If you have multiple client relationships with GRS, then you will be able to choose an
active client. Use the “Change” link in the upper right corner of the screen to switch your
active client. Your active client selection will affect the available navigation items and
client specific screens will be personalized to reflect your active client.
GRS Advantage™ Website - Using the GRS Advantage™ Website
Gabriel Roeder Smith & Company
11
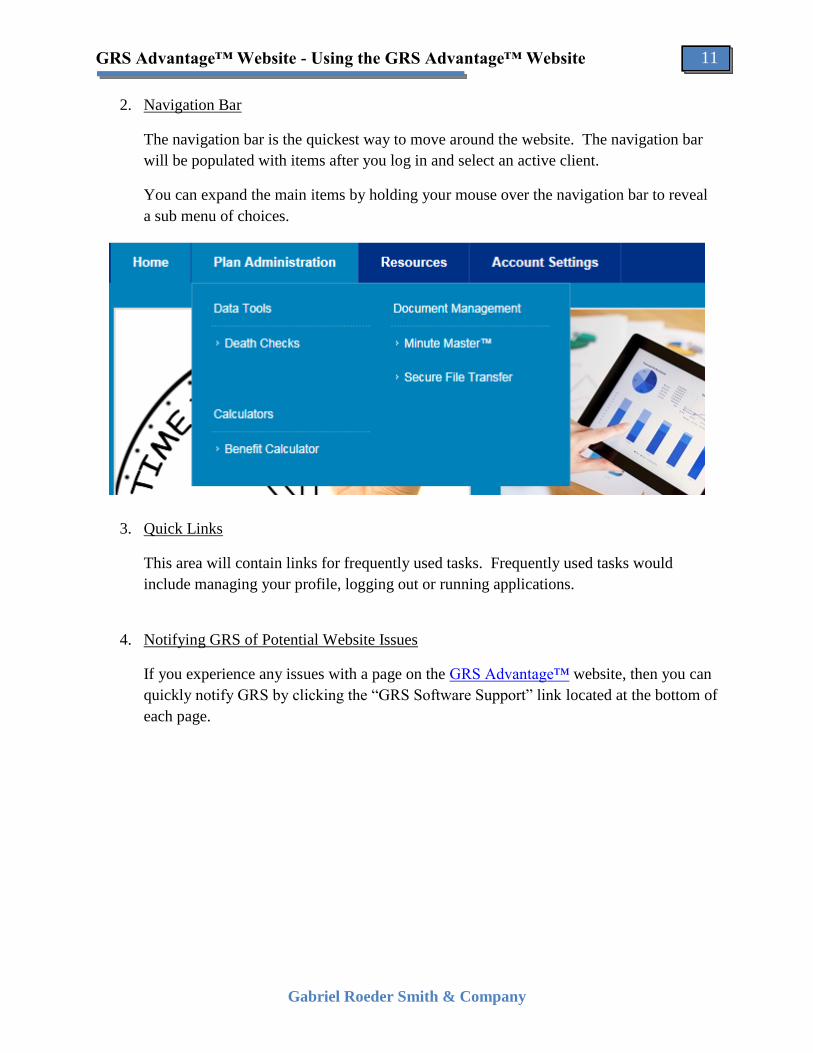
2. Navigation Bar
The navigation bar is the quickest way to move around the website. The navigation bar
will be populated with items after you log in and select an active client.
You can expand the main items by holding your mouse over the navigation bar to reveal
a sub menu of choices.
3. Quick Links
This area will contain links for frequently used tasks. Frequently used tasks would
include managing your profile, logging out or running applications.
4. Notifying GRS of Potential Website Issues
If you experience any issues with a page on the GRS Advantage™ website, then you can
quickly notify GRS by clicking the “GRS Software Support” link located at the bottom of
each page.
Secure File Transfer - Accessing the Secure File Transfer Web Application
Gabriel Roeder Smith & Company
12
Secure File Transfer Revised: July 25, 2017
The Secure File Transfer utility can be accessed on the GRS Advantage™ website.
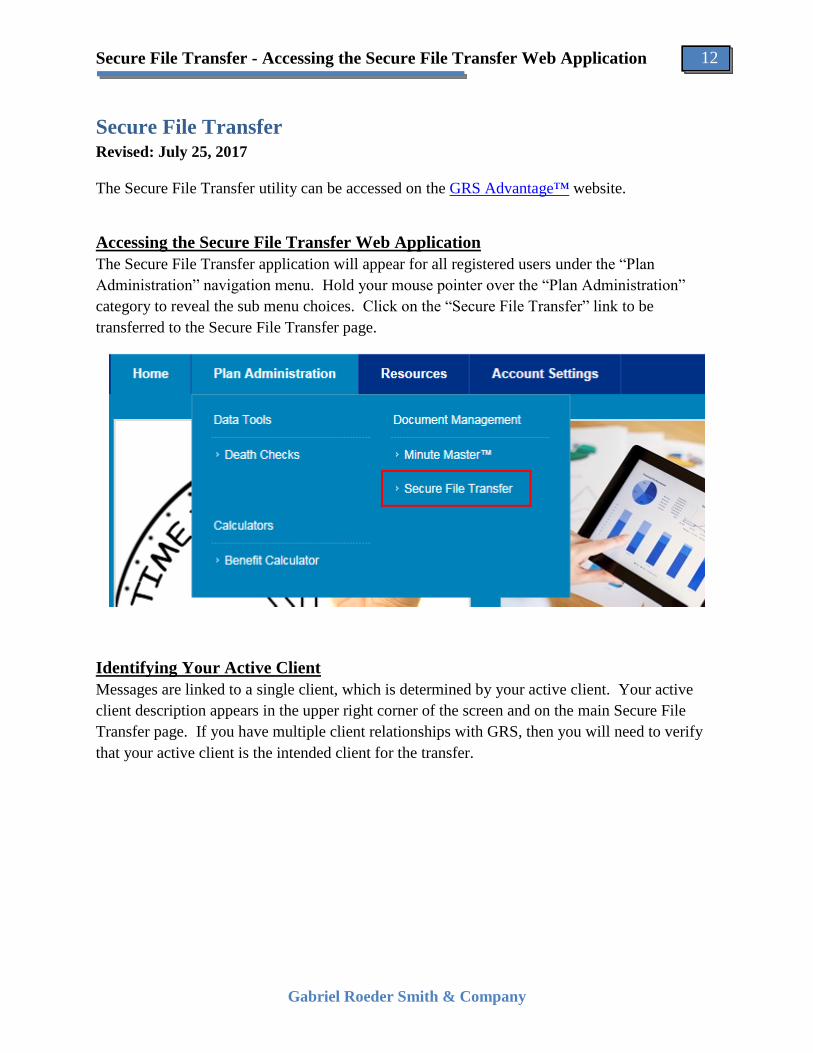
Accessing the Secure File Transfer Web Application
The Secure File Transfer application will appear for all registered users under the “Plan
Administration” navigation menu. Hold your mouse pointer over the “Plan Administration”
category to reveal the sub menu choices. Click on the “Secure File Transfer” link to be
transferred to the Secure File Transfer page.
Identifying Your Active Client
Messages are linked to a single client, which is determined by your active client. Your active
client description appears in the upper right corner of the screen and on the main Secure File
Transfer page. If you have multiple client relationships with GRS, then you will need to verify
that your active client is the intended client for the transfer.

Secure File Transfer - Upload Documents to GRS
Gabriel Roeder Smith & Company
13
Upload Documents to GRS
New messages can be created by using the following instructions:
1. Confirm your active client as described in the Identifying Your Active Client help topic.
2. Click on the “Upload File(s) to GRS” button to open the “Create New Transfer” page.
3. The “Create New Transfer” screen will collect all of the information that will be
transferred to GRS. Follow these steps to build the message and send it to GRS.

Secure File Transfer - Upload Documents to GRS
Gabriel Roeder Smith & Company
14
A. Provide a Subject
The subject field will be used as a label to describe the transfer. Try to provide a
descriptive subject to help distinguish between various file transfers.
B. Provide the File Attachments
You can attach files to the message by using the “Browse” button followed by the
“Attach File” button. Attached files will appear in the “Attachments” list and can
be removed by pushing the “Delete” button.
C. Provide the Message Body
The message body can be used to provide more information about the transfer.
D. Click on the Send to GRS Button
Click on the “Send to GRS” button to finalize the message and transmit the
information to GRS.
4. Confirm that the message now appears in your list of available messages.
5. Send a regular e-mail message to the intended GRS recipients, notifying them that the
transfer is available online.

Secure File Transfer - Downloading Documents from GRS
Gabriel Roeder Smith & Company
15
Downloading Documents from GRS
You can follow these instructions to open an existing message:
1. Confirm your active client as described in the Identifying Your Active Client help topic.
2. Click on the magnifying glass icon of the message to see more information.
3. This page displays all of the message information and includes links to the attachments.
Click on the links in the “Attachments:” section to download the files. The “Reply”
button can be used to send a follow up message to the sender.

Secure File Transfer - Downloading Documents from GRS
Gabriel Roeder Smith & Company
16

GRS TrendLine™ - Accessing the GRS TrendLine™ Web Application
Gabriel Roeder Smith & Company
17
GRS TrendLine™ Revised: July 25, 2017
The GRS TrendLine™ application can be accessed on the GRS Advantage™ website.
Accessing the GRS TrendLine™ Web Application
The GRS TrendLine™ application will appear for all registered users with an active pension
relationship with GRS under the “Resources” navigation menu. Hold your mouse pointer over
the “Resources” category to reveal the sub menu choices. Click on the “GRS TrendLine™” link
to be transferred to the GRS TrendLine™ page.

GRS TrendLine™ - Navigating Around the GRS TrendLine™ Page
Gabriel Roeder Smith & Company
18
Navigating Around the GRS TrendLine™ Page
The main page is split into four functional areas:
A. A series of buttons that allow you to either update the current filter settings or to
export all of the available exhibits to a PDF report.
B. Radio buttons that allow you to switch the category or type of exhibits to show.
Currently, you can view various exhibits from the following categories:
a. Actuarial Assumptions
b. Assets
c. Benefits
d. Contributions
e. Demographic
f. Funding
C. Checkboxes to filter what data is visible in your exhibit.
D. The exhibits that reflect the type of data you want to display and the available data
matching your filter criteria.

GRS TrendLine™ - Adjusting the Data Filter
Gabriel Roeder Smith & Company
19
Adjusting the Data Filter
The GRS TrendLine™ application allows the user to drill down through our database to find the
precise dataset of most interest to you.
We currently provide the ability to filter data by:
1. Valuation Date
2. Level of Government (i.e. State, County, City, Other)
3. Type of Employees (General, Public Safety, Teachers, Legislative/Judicial, Other)
4. Amount of Assets
5. Number of Members (Active and Retired)
6. Group Status (Open Plans, Closed Plans)
Check the boxes for the data that you want to display and click on one of the following:
1. The “Apply Filters” button located at the top of the screen.
2. The “[apply]” link located next to the “Filter Your Results” header.
Your dataset is now updated and available to view.

GRS TrendLine™ - Viewing an Exhibit
Gabriel Roeder Smith & Company
20
Viewing an Exhibit
To view a single exhibit in greater detail, click on it or the “[details]” link located next to the
name of the exhibit.
This view displays the exhibit in greater detail.
Holding the pointer over any of the bars displayed will cause a tooltip to display providing more
details about the data charted. Holding the pointer over one of the bars, we can now see that in
the exhibit above there are 76 groups in our data set with an Assumed Investment Return
between 7.00% and 7.24%.

GRS TrendLine™ - Viewing an Exhibit
Gabriel Roeder Smith & Company
21
The bottom of the chart displays information about the dataset included in the exhibit. Any
changes made to the data filter on the main screen will be noted in the disclaimer.
For some of the exhibits, we provide the ability to group your data by different metrics. This can
be accomplished by changing the selected value of the “Group By:” drop down. In the following
example, the data is now grouped by the type of employees in our dataset.

Software Support - Available Software Support
Gabriel Roeder Smith & Company
22
Software Support Revised: July 25, 2017
Available Software Support
For all questions related to the GRS Advantage™ website, contact the GRS Software Support
team by clicking on the “GRS Software Support” link located at the bottom of each page, via
[email protected] or 248.799.9000. All other questions should be directed to
a GRS consultant or analyst assigned to your account.
Recommended


