User's GuideSAP Strategy Management 10.1 External Data Loader
Target Audience ■ Technology Consultants ■ System Administrators
PUBLICDocument version: 1.0 – 2013-10-01

SAP AGDietmar-Hopp-Allee 16
69190 WalldorfGermany
T +49/18 05/34 34 34F +49/18 05/34 34 20
www.sap.com
© Copyright 2013 SAP AG. All rights reserved.
No part of this publication may be reproduced or transmitted in any form or for any purpose without the express permission of SAP AG. The information contained herein may be changed without prior notice.Some software products marketed by SAP AG and its distributors contain proprietary software components of other software vendors.
No part of this publication may be reproduced or transmitted in any form or for any purpose without the express permission of SAP AG. The information contained herein may be changed without prior notice.Some software products marketed by SAP AG and its distributors contain proprietary software components of other software vendors. National product specifications may vary.These materials are provided by SAP AG and its affiliated companies (“SAP Group”) for informational purposes only, without representation or warranty of any kind, and SAP Group shall not be liable for errors or omissions with respect to the materials. The only warranties for SAP Group products and services are those that are set forth in the express warranty statements accompanying such products and services, if any. Nothing herein should be construed as constituting an additional warranty.SAP and other SAP products and services mentioned herein as well as their respective logos are trademarks or registered trademarks of SAP AG in Germany and other countries.Please see http://www.sap.com/corporate-en/legal/copyright/index.epx#trademark for additional trademark information and notices.
DisclaimerPlease see http://www.sap.com/corporate-en/legal/copyright/index.epx for disclaimer information and notices.
2/20 PUBLIC 2013-10-01

Document History
CAUTION
Before you start the implementation, make sure you have the latest version of this document
that is available on the SAP Help Portal at http://help.sap.com/bosm101.
The following table provides an overview on the most important document changes:
Version Date Description
1.0 2013-10-01 Initial version
2013-10-01 PUBLIC 3/20

Table of Contents
Chapter 1 Introduction . . . . . . . . . . . . . . . . . . . . . . . . . . . . . . . . . . . . . . . . . . . . . . . . . . 5
1.1 External Data Loader Process . . . . . . . . . . . . . . . . . . . . . . . . . . . . . . . . . . . . . . . 5
Chapter 2 Configuring the Application to Use the External Data
Loader . . . . . . . . . . . . . . . . . . . . . . . . . . . . . . . . . . . . . . . . . . . . . . . . . . . . . . . . 7
Chapter 3 Entering Data in the Spreadsheet . . . . . . . . . . . . . . . . . . . . . . . . . . . . . . . . . 9
3.1 Obtaining the Spreadsheet and Setting Preferences . . . . . . . . . . . . . . . . . . . . . . 9
3.2 Entering Global Properties . . . . . . . . . . . . . . . . . . . . . . . . . . . . . . . . . . . . . . . . . 9
3.3 Entering Perspective Data . . . . . . . . . . . . . . . . . . . . . . . . . . . . . . . . . . . . . . . . . 10
3.4 Entering Objective Data . . . . . . . . . . . . . . . . . . . . . . . . . . . . . . . . . . . . . . . . . . 11
3.5 Entering KPI Data . . . . . . . . . . . . . . . . . . . . . . . . . . . . . . . . . . . . . . . . . . . . . . . 11
3.6 Validating the Data . . . . . . . . . . . . . . . . . . . . . . . . . . . . . . . . . . . . . . . . . . . . . 12
3.7 Saving the Data and Generating the TXT File . . . . . . . . . . . . . . . . . . . . . . . . . 13
Chapter 4 Importing the Data into Strategy Management . . . . . . . . . . . . . . . . . . . . . 15
Chapter 5 Post-Import Configuration . . . . . . . . . . . . . . . . . . . . . . . . . . . . . . . . . . . . . 17
4/20 PUBLIC 2013-10-01

1 Introduction
You can import performance management data into the SAP NetWeaver System Database and use it
in the strategy management application using a data loading function in the Transporter tool.
You can import some aspects of a context, perspectives, objectives, and KPIs into the application. You
enter data in a pre-defined spreadsheet, save the information to a TXT file, and use the External Data
Loader function in the Transporter tool to load the data into strategy management.
Use the External Data Loader function to do the following:
■ Migrate SAP Performance Manager data into the strategy management application.
■ If you are a consultant in the early stages of a strategy management implementation and you are
interviewing users at different levels of the organization to find out their perspective, objective,
and KPI requirements, use the spreadsheet to save time during data entry. Rather than record the
information during the interview process and then enter the information into the administration
application, you can record this information once in the spreadsheet during the interview process
and then import the information into strategy management. This also avoids unnecessary mistakes
that may occur when entering the same data twice.
■ If you need to support pre-configured KPIs, you can set up one spreadsheet for one KPI set, and
then use the spreadsheet to customize the information for other aspects of the organization that
need similar KPI sets.
The import includes the associations between perspectives, objectives, and KPIs. The KPIs are not fully
defined until after you load the data, specify the model, and specify the actual measure for the KPI.
NOTE
To use External Data Loader, you must be using the default scorecard hierarchy of perspectives
objectives KPIs . The scorecard hierarchy is set in the administration application during the
initial implementation in Administration Set Defaults .
1.1 External Data Loader Process
1. Configure the application to use the External Data Loader by setting certain Java System Properties.
The Java System Properties identify which type of data to import (either PM or Consulting), and
define a role for the data load user and defines the tabs and permissions available to this user in the
application.
2. Use the spreadsheet to enter data about the context, perspectives, objectives, and KPIs. Save the
spreadsheet and generate a TXT file. Optionally, you can develop a program to get exported
1 Introduction
1.1 External Data Loader Process
2013-10-01 PUBLIC 5/20

Performance Manager data into the appropriate format. The Performance Manager data is stored
in the PM repository. This information can be queried and output in flat file format using any
suitable RDBMS query too. The output is then ready to copy and paste into the spreadsheet.
3. Use the External Data Loader function in the Transporter to load and import the comma-delimited,
fixed-format data file into the SAP NetWeaver System Database.
The import process creates the role, and the tab assignments and the permissions for the data load
user. This allows the user to access and update imported data through the administration
application and the strategy management application.
4. The user who performs the data load uses the administration application to add definitions and
settings that are required by the strategy management application that are not included in the
import.
You use the External Data Loader to load content into a context just once. If you need to modify any
information that is loaded, use the administration application. Optionally, you can use the Transporter
to delete the data and then use the External Data Loader to reload the data.
1 Introduction
1.1 External Data Loader Process
6/20 PUBLIC 2013-10-01
2 Configuring the Application to Use the External Data Loader
Prerequisites
You are the administrator of SAP NetWeaver.
Procedure
1. Start the SAP NetWeaver Administrator.
2. Log on as administrator with the global password you provided when you installed SAP NetWeaver.
3. Select Configuration.
4. Click the Infrastructure tab.
5. Select Java System Properties.
6. In the Templates section, select the template that corresponds to your strategy management
installation.
7. Click the Applications tab in the Details section.
8. In the Name column, type strategy and press Enter to list the strategy applications.
9. Select the name xapps~cpm~sm~strategymanagement.
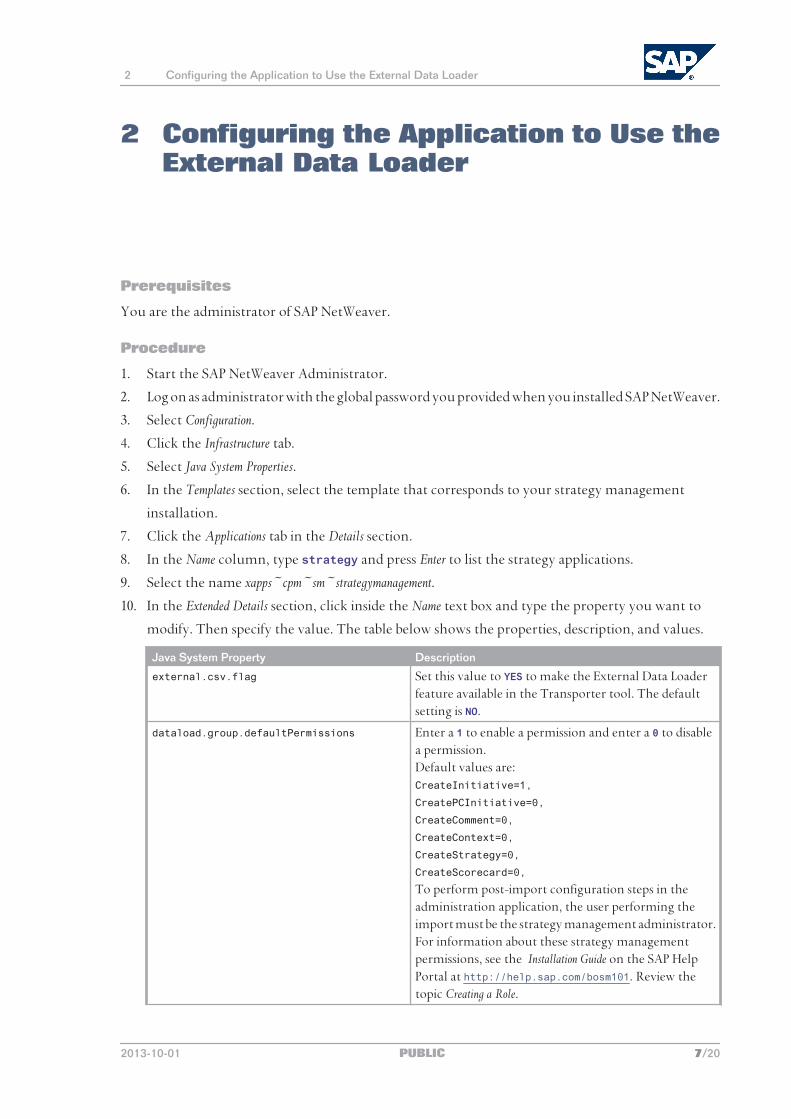
10. In the Extended Details section, click inside the Name text box and type the property you want to
modify. Then specify the value. The table below shows the properties, description, and values.
Java System Property Description
external.csv.flag Set this value to YES to make the External Data Loader feature available in the Transporter tool. The default setting is NO.
dataload.group.defaultPermissions Enter a 1 to enable a permission and enter a 0 to disable a permission.Default values are:CreateInitiative=1,
CreatePCInitiative=0,
CreateComment=0,
CreateContext=0,
CreateStrategy=0,
CreateScorecard=0,
To perform post-import configuration steps in the administration application, the user performing the import must be the strategy management administrator.For information about these strategy management permissions, see the Installation Guide on the SAP Help Portal at http://help.sap.com/bosm101. Review the topic Creating a Role.
2 Configuring the Application to Use the External Data Loader
2013-10-01 PUBLIC 7/20
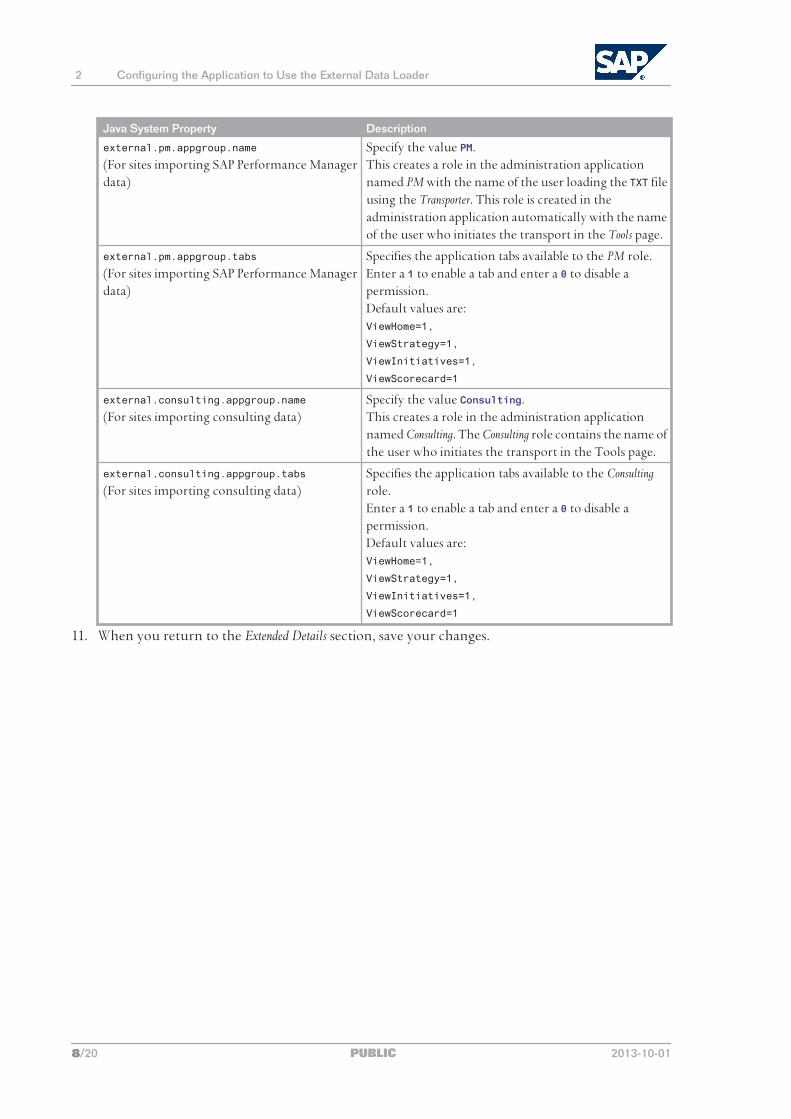
Java System Property Description
external.pm.appgroup.name
(For sites importing SAP Performance Manager data)
Specify the value PM.This creates a role in the administration application named PM with the name of the user loading the TXT file using the Transporter. This role is created in the administration application automatically with the name of the user who initiates the transport in the Tools page.
external.pm.appgroup.tabs
(For sites importing SAP Performance Manager data)
Specifies the application tabs available to the PM role.Enter a 1 to enable a tab and enter a 0 to disable a permission.Default values are:ViewHome=1,
ViewStrategy=1,
ViewInitiatives=1,
ViewScorecard=1
external.consulting.appgroup.name
(For sites importing consulting data)Specify the value Consulting.This creates a role in the administration application named Consulting. The Consulting role contains the name of the user who initiates the transport in the Tools page.
external.consulting.appgroup.tabs
(For sites importing consulting data)Specifies the application tabs available to the Consulting role.Enter a 1 to enable a tab and enter a 0 to disable a permission.Default values are:ViewHome=1,
ViewStrategy=1,
ViewInitiatives=1,
ViewScorecard=1
11. When you return to the Extended Details section, save your changes.
2 Configuring the Application to Use the External Data Loader
8/20 PUBLIC 2013-10-01

3 Entering Data in the Spreadsheet
You can collect performance management data and enter it into the spreadsheet. Later, you can import
this data into the strategy management application and use it in the Scorecard and Strategy tabs.
Prerequisites
You have Microsoft Excel 2003 or higher installed.
Process
1. Obtain the Spreadsheet and set preferences.
2. Enter global properties.
3. Enter perspective data.
4. Enter objective data.
5. Enter KPI data.
6. Validate the data.
7. Save the data and generate the TXT file.
3.1 Obtaining the Spreadsheet and Setting Preferences
Prerequisites
You are running SAP Strategy Management 10.0 or higher.
Procedure
1. Open a browser window and type the following:
http://<nw_server>:<port>/strategy/template/SMDataLoader.xls
2. From the browser menu bar, choose File Save As , and save the spreadsheet to a local directory.
3. Open the spreadsheet in Microsoft Excel.
4. (Optional) Click Check this box to wrap cell contents to wrap text in the cells.
3.2 Entering Global Properties
You enter the global properties for each context that is being loaded with performance management
data.
Prerequisites
The External Data Loader XLS file is displayed in Microsoft Excel.
3 Entering Data in the Spreadsheet
3.1 Obtaining the Spreadsheet and Setting Preferences
2013-10-01 PUBLIC 9/20

Procedure
1. Click the Perspectives tab.
2. Enter information in the fields as follows:
Field Description
Sheet Type Required. Specify PM if adding data from SAP Performance Manager. Specify Consulting if adding data as a consulting effort.This setting determines which Java System Properties are used, either external.consulting.<prop> or the external.pm.<prop>.
DB Name Required. This value is the database namespace to store in the SAP NetWeaver System Database to associate with current data record.
Context Name Required. Enter the name of the strategy management context that will be associated with the imported information.
Context Description
Enter a context description. This field is optional. If you do not enter a value in the spreadsheet, you can add it later in the Manage Contexts section of the administration application.
Template Context
Specify Y if you want to use these values as a context template. Specify N if you want to specify different values.
3.3 Entering Perspective Data
Prerequisites
The .XLS file is displayed in Microsoft Excel.
Procedure
1. Click the Perspectives tab.
2. Enter information in the fields as follows:
Field Description
Perspective Name
Required. Enter the names of the perspectives to import
Perspective Description
Enter descriptions for the perspectives.This field is optional. If you do not enter a value in the spreadsheet, you can add it later to the perspectives and objectives in the administration application.
Responsible This field is ignored.After the import, you will need to update the perspectives and objectives in the administration application.For information, see Post-Import Configuration [page 17].
Associated Links Specify the link associated with this perspective, if any, and then optionally specify the title, separated by a colon. Separate one link:title combination from another using a pipe ( | ).For example:http://service.sap.com:SMP|http://www.sap.com:SAP
3 Entering Data in the Spreadsheet
3.3 Entering Perspective Data
10/20 PUBLIC 2013-10-01

3.4 Entering Objective Data
Prerequisites
The .XLS file is displayed in Microsoft Excel.
Procedure
1. Click the Objectives tab.
2. Enter information in the fields as follows:
Field Description
Objective Name Required. Enter the names of the objectives to import
Perspective Name Required. Enter the name of the perspective associated with each objective.
Objective Description
Enter descriptions for the objectives.This field is optional. If you do not enter a value in the spreadsheet, you can add it to the perspectives and objectives in the administration application
Responsible This field is ignored.After the import, you need to update the perspectives and objectives in the administration application.For information, see Post-Import Configuration [page 17]*
Associated Links Specify the link associated with this objective, if any, and then optionally specify the title, separated by a colon. Separate one link:title combination from another using a pipe ( | ).For example:http://service.sap.com:SMP|http://www.sap.com:SAP
3.5 Entering KPI Data
Prerequisites
The .XLS file is displayed in Microsoft Excel.
Procedure
1. Click the KPIs tab.
2. Enter information in the fields as follows:
Field Description
KPI LIbrary Required. Enter N if this KPI is defined for the context only. Enter Y if this KPI is defined in the library of KPIs and also assigned to the context.
KPI Name Required. Enter the names of the KPIs to import.
Objective Name Required. Enter the names of the objectives associated with each KPI.
KPI Description Enter descriptions for the KPIs.This field is optional. If you do not enter a value in the spreadsheet, you can add it to the KPI in the administration application.
Responsible This field is ignored.After the import, you need to update the KPI in the administration application.For information, see Post-Import Configuration [page 17]*
Associated Links Specify the link associated with this KPI, if any, and then optionally specify the title, separated by a colon. Separate one link:title combination from another using a pipe ( | ).
3 Entering Data in the Spreadsheet
3.4 Entering Objective Data
2013-10-01 PUBLIC 11/20

Field DescriptionFor example:http://service.sap.com:SMP|http://www.sap.com:SAP
Index Values Enter the index values from small to large or large to small, depending on the context of your data. Separate each value with a pipe ( | ) and include the low and high trend values at the end.If implementing five status indicators, you must enter four breakpoint values and two trend values as shown in the example below. In this example, 0 and 10 are the low and high trend values:60|70|80|90|0|10
If implementing three status indicators, you must enter two breakpoint values and two trend values as shown in this example.65|85|0|10
Leading/Lagging Specify a 1 for a lagging KPI. Specify a 2 for a leading KPI.
Quantitative/Qualitative
Specify a 1 if the KPI is quantitative. Specify a 2 if the KPI is qualitative.
3.6 Validating the Data
You can validate the perspective, objective, and KPI data before you save it to a TXT file.
You can perform the following types of validation checks:
■ Review a hierarchy of the context, its perspectives, objectives, and KPIs to make sure it is set up as
intended. If the hierarchy does not look correct, you can revisit the Perspectives, Objectives, and KPIs
tabs to make corrections.
■ View any validation errors that identify any of the following:
● Perspectives that have no objectives
● Objectives that have no KPIs
● Objectives not associated with a perspective
● KPIs not associated with an objective
If you receive a validation error, you can revisit the Perspectives, Objectives, and KPIs tabs to make
corrections.
Prerequisites
■ The .XLS file is displayed in Microsoft Excel.
■ All required data is entered in the spreadsheet.
■ The current changes are saved.
Procedure
1. Click the Validation tab.
2. Click the Validate Perspectives, Objectives, and KPIs and Generate Save Sheet button.
3 Entering Data in the Spreadsheet
3.6 Validating the Data
12/20 PUBLIC 2013-10-01

NOTE
The validation saves the sheet changes to the XLS file, even if the validation fails. The validation
does not generate a TXT file. For information about the next step of generating the TXT file,
see Saving the Data and Generating the TXT File [page 13].
3.7 Saving the Data and Generating the TXT File
Now you can save the sheet in TXT format, and also in XLS format.
Prerequisites
You entered all required data into the spreadsheet.
Procedure
1. In the Excel spreadsheet, click the Save Sheet tab.
2. Click the Save Spreadsheet and TXT File button.
3 Entering Data in the Spreadsheet
3.7 Saving the Data and Generating the TXT File
2013-10-01 PUBLIC 13/20

This page is left blank for documents that are printed on both sides.
4 Importing the Data into Strategy Management
Prerequisites
You have generated a TXT data file.
The context mentioned in the XLS and TXT file is already defined in the administration application.
Procedure
1. Start the Transporter tool by issuing this URL:
http://<nw_server>:<port>/strategy/tools/transporter.jsp
2. In the section Choose a transport file in .txt format, click the Browse button to browse for the TXT file.
3. Click Import into Database. You receive a message state that the external data is loaded successfully.
4. Click Back To Transporter to return to the Transporter, or click Close to close the Transporter.
Result
The data is added to the strategy management application. Your user name is now added to the role.
Your role has the tabs and permissions assigned by the Java System Properties.
4 Importing the Data into Strategy Management
2013-10-01 PUBLIC 15/20

This page is left blank for documents that are printed on both sides.
5 Post-Import Configuration
Prerequisites
You are a strategy management administrator.
You have administrative permission to create and edit objectives, contexts, and scorecards in the strategy
management application.
Procedure
1. Start the administration application and log on if prompted using this URL in a browser:
http://<nw_server>:<port>/strategy
2. In the Launch page, you see the links to applications that your role can access. Click the appropriate
link to run the administration application.
3. Choose Context Management Manage Contexts and specify the user responsible for this context, if
it is not already specified.
4. Choose Manage Scorecards Scorecard Defaults and select a model connection for each imported
context.
5. Choose Define Scorecards to review the imported perspectives, objectives, and KPIs for this context.
6. For each KPI, do the following:
1. From the Actual drop-down list, select the Application Server measure from the dimensional
model that contains actual values for the KPI. The remaining drop-down list boxes will be
automatically populated with the correct measures.
2. Add trend values if appropriate.
3. From the Responsible drop-down list, select the responsible users for each KPI.
In role lists in the administration application, you see a default role of either PM or Consulting depending
on your data. The user who initialized the import process is assigned to the role as the default user.
You can now use the KPIs, objectives, and perspectives in the strategy management application.
5 Post-Import Configuration
2013-10-01 PUBLIC 17/20

Typographic Conventions
Example Description
< > Angle brackets indicate that you replace these words or characters with appropriate entries to make entries in the system, for example, “Enter your <User Name>”.
Arrows separating the parts of a navigation path, for example, menu options
Example Emphasized words or expressions
Example Words or characters that you enter in the system exactly as they appear in the documentation
Example Textual cross-references to an internet address, for example, http://www.sap.com
/example Quicklinks added to the internet address of a homepage to enable quick access to specific content on the Web
123456 Hyperlink to an SAP Note, for example, SAP Note 123456
Example ■ Words or characters quoted from the screen. These include field labels, screen titles, pushbutton labels, menu names, and menu options.
■ Cross-references to other documentation or published works
Example ■ Output on the screen following a user action, for example, messages ■ Source code or syntax quoted directly from a program ■ File and directory names and their paths, names of variables and parameters, and
names of installation, upgrade, and database tools
EXAMPLE Technical names of system objects. These include report names, program names, transaction codes, database table names, and key concepts of a programming language when they are surrounded by body text, for example, SELECT and INCLUDE
EXAMPLE Keys on the keyboard
18/20 PUBLIC 2013-10-01


SAP AGDietmar-Hopp-Allee 1669190 WalldorfGermanyT +49/18 05/34 34 34F +49/18 05/34 34 20www.sap.com
© Copyright 2013 SAP AG. All rights reserved.No part of this publication may be reproduced or transmitted in any form or for any purpose without the express permission of SAP AG. The information contained herein may be changed without prior notice.
Recommended