ED 107 908
TITLEINSTITUTION
DOCUMENT RESUME
CE 004 021
Vocational Carpentry Curriculum Guide.Virginia Polytechnic Inst. and State Univ.,Blacksburg. Dept. of Education.; Virginia State Dept.of Education, Richmond. Div. of VocationalEducation.
"PUB DATE Apr 73NOTE 130p.
EDRS PRICE MF-$0.76 HC-$6.97 PLUS POSTAGEDESCRIPTORS Building Trades; *Carpenters; Construction (Process);
Course Content; Course Objectives; *CurriculumGuides; Hand Tools; *Resource Materials; ResourceUnits; *Secondary Edudation; Teacher DevelopedMaterials; *Vocational Education
IDENTIFIERS *Carpentry
ABSTRACTThe carpentry curriculum guide was developed as a
basic guide to be used by instructors in formulating their owncourses of study. The material is designed for use in vocationalcarpentry classes at grade levels 10, 11, and 12. Planned as atwo-year sequence, it incorporates 1080 class hours of instructionand emphasizes light or residential type construction. A statement onvocational education philosophy, an outline of objectives, a jobdescription, and a suggested blodk time schedule are followed by 11blocks of instruction: orientation, hand and portable power tools,foundation and forms, floor and wall framing, roof framing, roofcovering, exterior wall finishes and trim, insulation and interiorwall and ceiling finishes, interior trim, stair building, andpre-employment. Instructional blocks are organized under the headingsof units of instruction, information, skill-development activities,and instructional aids. Appendixes (which provide unit guide examplesfor block two; lists of suggested films, filmstrips, slides,transparencies, film loops, books, construction illustrations;pamphlets, handout material, and wall charts; safety rules; and asuggested tool list) comprise nearly two-thirds of the guide. (JR)
***********************************************************************Documents acquired by ERIC include many informal unpublished
* materials not available from other sources. ERIC makes every effort ** to obtain the best copy available. nevertheless, items of marginal ** reproducibility are often encountered and this affects the quality *
* of the microfiche and hardcopy reproductions ERIC makes available *
* via the ERIC Document Reproduction Service (EDRS). EDRS is not* responsible for the quality of the original document. Reproductions ** supplied by EDRS are the best that can be made from the original. ************************************************************************

Vocational Carpentry.
Curriculum Guide
Trade and Industrial Education ServiceDivision of Vocational Education
State Department of EducationRichmond, Virginia 23216
in cooperation withThe department of Education
Virginia Polytechnic Institute and State UniversityBlacksburg, Virginia 24061
April 1973
L 2 =
U S OEPARTMENT OF HEALTH.EOUCATION a WELFARENATIONAL INSTITUTE OF
EOUCATIONTHIS DOCUMENT HAS BEEN REPRODUCED EXACTLY AS RECEIVED FROMTHE PERSON OR ORGANIZATION ORIGINA TiNG IT POINTS OF VIEW OR OPINIONSSTATED 00 NOT NECESSARILY REPRESENT OFF ICIAL NATIONAL INSTITUTE
OFEDUCATION POSITION OR POLICY

FORWORD
Instructors in the building trades area have possibly been inneed of curriculum materials more than most instructors in Trade andIndustrial Education. We are particularly happy, therefore, to havethis Carpentry Course Outline ready for distribution.
With the constant introduction of new building methods and newconstruction materials, the carpenter's work becomes more complicatedand the necessity for keeping abreast of these new developments isquite essential. It is hoped that this carpentry outline will assistthe teacher in keeping his instructional program updated and relevantto the times.
We express appreciation to the teachers and the Virginia Poly-technic Institute and State University Staff whn'assisted with thisoutline. They are listed og4the.f41?0ing page. We feel that theyhave done an excellent job in-itiiing:$4,':herjn outline form theessential operations and related information that must-be learned forsuccessful employment entry into the carpentry trade.
April 1973
t
George W. SwartzState SupervisorTrade and Industrial EducationState Department of EducationRichmond, Virginia 73216

PREFACE
This Carpentry Curriculum Guide has been developed for the use ofinstructors in Vocational Trade classes. Emphasis has been placed onlight or residential type construction so as to meet the objectives ofthe public secondary school carpentry curriculum.
di
This suggested curriculum guide is presented as a basic guide tobe used by instructors in rormulattng their own courses of study. The
material is designed for use in Vocational Carpentry classes at thetenth, eleventh, and twelfth grade levels. It is planned as a two yearsequence, incorporating 1080 Class hours of instruction.
This guide was developed by a group of carpentry instructors whowere participating in a curriculum development workshop at VirginiaPolytechnic Institute and State University in the summer of 1972.Those participating are listed below:
Instructors:
Bandy, Robert D.; LUcy Addison High School, RoanokeChizanskos, Joseph C.; Piedmont Vocational School, CulpeperDavis, Vernon P., Bedford Educational Center, BedfordHankins, George E.; Tazewell County Vocational Center, TazewellHudson, Paul.: Wythe County Vocational School, WythevilleHurst, Douglas Wayne; Carroll County High School, HillsvilleMoye, Everett L.; Giles County Vocational School, PearisburgParks, Garland Raymond; (Student)Phibbs, Arby H.; Pulaski High School, Pulaski'Richey, Leroy C.; Chesapeake Technical Center, ChesapeakeThomson, George M.; Floyd County High School, FloydWashington, William C.; Brunswick Jr. High School, LawrencevilleWorthen, Darrell F.; Henrico Trade Training Center, Glen Allen
Curriculum Development Coordinator:
William H. Hines
ii
Lester G. DuinkHead Vocational Industril EducationVirginia Polytechnic Institute
and Slate UniversityBlacksburg, Virginia

TABLE OF CONTENTS
FOREWORD
PREFACE
ACKNOWLEDGEMENTS
CARPENTRY
Philosophy
Objectives
Job Description
Block -Time Schedule
Suggested Units of Instruction-
'
Block 1 Orientation
Block 2 'Hand and Portable Power Tools
Block 3 Foundation and Forms _ 0 .. *
Block 4 Floor and - 0- -Block 5 Roof Framing
Block 6 Roof Covering -Block 7 Exterior Wall Finishes and T r i m . .
Block 8 Insulation, Interior Wall and Ceiling Finishes
Block 9 Interior Trim
i
ii
iii
1
Block 10 Stair Building -47
Block 11 Pre-employment 51
APPENDIXES 55
Appendix A - Unit Guide Examples - Block 2 57
Appendix B - Books and Visual Material 89
"A" Films
"B" Filmstrips and Slides
"C" Transparencies
"D" Film Loops
iii
91
95-
96

TABLE OF CONTENTS
Appendix B - Books and Visual.Material (continued)
"B" Books 97
"F" Flip Charts 101
"G" Workbooks 101
"H" Pamphlets 101
"I" Handout Material 103
"J" Wall Charts 139
Appendix C - Suggested Tool List 141
iv
6

CARPENTRY
Philosophy:
Believing that the individual student is the heart of an educa-tional program, we are dedicated to the preparation of the student tolive a successful life in a changing world and to the advancement ofthe concepts of democracy which preserve and improve our culture.
We are aware of society's need for productive, well adjusted,creative citizens and strive to provide the atmosphere and stimulationneeded for problem solving skills in all areas of human endeavor.
We believe that vocational education should provide broad, adequatetraining to prepare the student for entrance-level employment. We re-cognize the worth of each individual and believe that his training shouldbe limited only by his interest and his ability.
Objectives:
1. To develope safe work habits.
2. To acquire knowledge and skill in interpreting and using blue-prints add specifications.
3. To gain sufficient knowledge in the use of mathmatics to solveproblems applicable to carpentry.
4. To acquire the knowledge and skill in building layout, footings,and foundations.
5. To be able to construct concrete forms.
6. To gain the knowledge and skills to erect the sub-floor system,exterior walls, interior walls, and roof.
7. To acquire the knowledge of and skill'in exterior and interiorfinish work.
8. To develop an appreciation for habitual cleanliness, neatness,and orderliness in his work and personal life.
9. To develop self-confidence in acquired knowledge and skills ofthe trade and to understand the occupational opportunities available toa good craftsman.
10. To develop an attitude of cooperation toward other craftsmen.
1

CARPENTRYJob Description
The carpenter constructs, erects, installs and repairs structuresand fixtures of wood, plywood and wallboard, using carpenter's hand andpower tools, to conform to local building codes.
Studies blueprints, sketches, or building plans to determine thetype of materials, construction and measurements required.
Prepares layouts using rule, framing square and calipers.
Marks cutting and assembly lines on materials using pencil, chalkand marking gauge.
Shapes materials to prescribed measurements and shapes using saws,chisels, and planes; assembles cut and shaped materials and fastens themtogether with nails, dowel pins or glue.
Erects framework of structures and verifies trueness of structure.
Lays subflooring, covers subflooring with building paper, layshardwood, parquet and wood strip flooring by nailing to subfloor orcementing to mastic or asphalt base.
Builds stairs; lays out and installs partitions and cabinet work.Applies paneling to walls and ceiling. Fits and installs prefabricatedwindow frames, doors, door-frames, weather stripping, interior and ex-terior trim and finish hardware.
Constructs concrete forms and pouring chutes. Erects scaffolding,and ladders for assemblying structure above ground level.
The work of the carpenter is active and sometimes strenuous butexceptional physical strength is not required. Prolonged standing aswell as climbing and squatting is often necessary. Good physical con-dition, a good sense of balance and manual dexterity are important.
The carpenter works both inside and outside in heat and cold andis subject to extreme temperature change. The work may be performedunder wet or humid conditions. Job condition may be noisy.
Carpenters risk injury from slips and falls; from contact withsharp or rough material and from the use of sharp tools and power equip-ment.
2

BLOCK TIME SCHEDULE (Suggested)
BlockHours
Orientation1.12
2. Hand and Portable Power Tools 33
3. Foundations and Forms 85
4. Floor and Wall Framing 225
5. Roof Framing 194
6. Roof Covering 95
7. Exterior Wall Finishes and Trim 73
8. Insulation, Interior Wall and Ceiling Finishes 70
9. Interior Trim 165
10. Stair Building 125
11. Pre-employment 3
Total Hours 1080
3
9

SUGGESTED UNITS, INFORMATION, ACTIVITIES, AND REFERENCES FOR CARPENTRY
(INDEX CODE FOR REFERENCES ANDINETRUCTIONAL AIDS WILL HE FOUND IN THE APPENDIX)
S
10

ORIENTATION
BLOCK ONE
A. School and Class Rules
B. Stop and School Safety
C. Shop Organization
D. Purpose of the Course
E. Description of the Carpentry Trade
7
11

ORIENTATION:
Block No. 1
UNITS OF INSTRUCTION
INFORMATION
SKILL-DEVELOPMENT ACTIVITIES
INSTRUCTIONAL
AIDS
A.
School and Class Rules
B.
Shop and School Safety
Rules
Shop Organization
D.
Purpose of Course
Relate the general rules to class
Lecture
Emphasize the utmost importance
of safety in the following areas:
a.
Personal safety
1.
Clothes
2.
Masses
3.
Hair
4.
Personal cleanliness
b.
Shop safety concerning the
following:
1.
Horseplay
2.
Housekeeping
3.
Mechanical equipment
4.
Ladders
5.
Scaffolds
6.
Electricity
7,
Lifting
8.
Fire extinguishers
Explain how and why the shop is
organized
Lecture
Emphasize the importance of and
need for carpenters in our soci-
ety and explain the following:
a.
Carpentry. class philosophy
b.
Course objectives
c.
Brief description of blocks
of study
Entertain class questions and dis-
cussion
Entertain class questions and dis-
cussion
Class participation in demonstration
of safety practices
Study organizational chart and duties
of class members
Class discussion
A -8
A-10
E -1
A-9
A-10
B-5
E-1
H-4
A-9
A-11
E-1
E -18
A-6
E -1

ORIENTATION: (continued)
Block No.
1
UNITS OF INSTRUCTION
INFORMATION
SKILL-DEVELOPEMENT ACTIVITIES
INSTRUCTIONAL
AIDS
E.
Description If Trade
Lecture
Discuss the advantages and dis-
advantages of carpentry as a
vocation
a.
Working conditions
b.
Divisions of carpentry and
areas of specialization
c.
Job opportunities
d.
Physical requirements
e.
Work and social habits
Class discussion and questions
E -18
A-6

HAND AND PORTABLE POWER TOOLS
BLOCK IWO
A. Hand Tools
B. Portable Power Tools
C. Hand and Power Tool Safety
11
14

Block No.
2
UNITS OF INSTRUCTION
INFORMATION
SKILL-DEVELOPMENT ACTIVITIES
INSTRUCTIONAL
AIDS
.Hand Tools
.Portable Power Tools
Lecture and Demonstration
Explain the care and use of the
tools in the following classes.
so the student will be able to
.
choose the right tool for the job
and use it correctly.
Emphasize
safety in the use of each tool.
a.
Measuring and layout tools
b.
Saws
c.
Planes and edge cutting
tools
d.
Drilling and boring tools
e.
Fastening tools
f.
Disassembly tools
g.
Miscellaneous tools
Lecture and Demonstration
Explain the correct care and
use of each power tool and emph-
size the safety hazards inherent
in each:
a.
Electric power hand saw
b.
Sabre saw and reciprocating
saw
c.
Radial saw
d.
Electric planes
e.
Electric drills
f.
Power nailer
Class discussion and student demon-
stration of care and use of tools
Identification of tools and parts
Class discussion and student demon-
stration of use of each tool.
A-11
A-13
A-27
E-1
E-5
E-26
E-40
A-11
A-13
A -2 7
A-30
E-1
E-5
E -2 6
E-40

Block' No.
2
UNITS OF INSTRUCTION
INFORMATION
SKILL - DEVELOPMENT ACTIVITIES
INSTRUCTIONAL
AIDS
B.
Portable Power Tools
(continued)
Lecture and Demonstration (con-
tinued)
g.
Belt and finishing sanders
h.
Grinder
i.
Router
C.
Hand and Power Tool
Lecture
A-11
Safety
Review briefly safety in the
use of these specific tools and
explain the general safety rules
that apply to all hand and power
tools.
'Class discussion and review
Class practices safe use of tools
A-13
A-27
A-30
E-1
E-5
2E-26
E-40
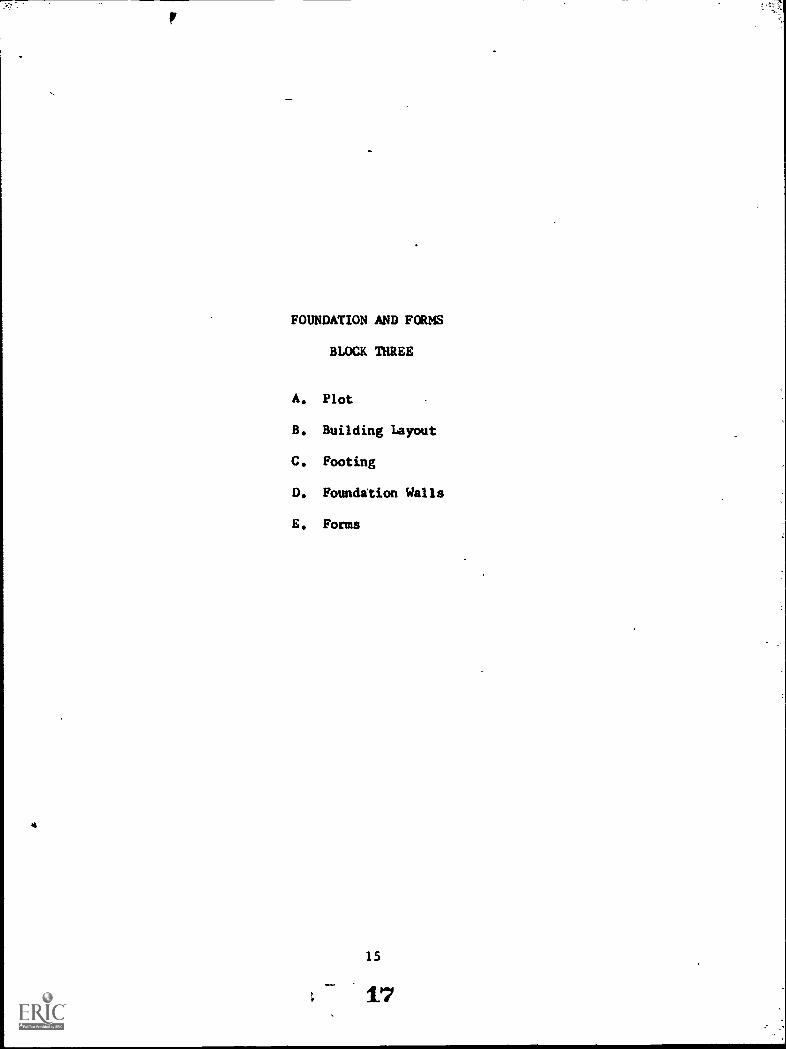
FOUNDATION AND FORMS
BLOCK THREE
S. Plot
B. Building Layout
C. Footing
D. Foundttion Walls
E. Forms
15
1."7

Block No.
UNITS OF INSTRUCTION
INFORMATION
SKILL-DEVELOPMENT ACTIVITIES
INSTRUCTIONAL
AIDS
A.
Plot
B.
Building Layout
Lecture
Explain the importance of the
plot plan.
Give information that
is generally found on plot plan
and explain how to interpret it.
Relate information concerning
the following:
a.
City or county requirements
b.
Reference points
c.
Finish elevation
d.
Contour lines
e.
Scale used on plot plan.
Lecture
Explain the importance of
building layout and the method'
and need for location of available
utility lines and underground
pipes and 'cables.
Present the following methods
for squaring a building layout:
a.
Builders transit level
b.
Diagonal method
c.
6,8,10 method
Demonstrate
Erection of batter board stakes
and methods of finding their pro-
per elevations.
Take notes and study plot plans and
elevations.
Take notes and read related informa-
tion.
Practice leveling transit and calcu-
late degrees
Sharpen stakes
Practice using tapes and lines
Construct batter boards
B-1
B-2
C-8
E-21
E-29
A-1
B-1
B-2
C-8
E-5
E-29
E-38

FOUNDATION AND FORMS: (continued)
Block No.
3
UNITS OF INSTRUCTION
INFORMATION
SKILL-DEVELOPMENT ACTIVITIES
INSTRUCTIONAL
,AIDS
.Footings
.Foundation Walls
.Forms
Lecture and Demonstration
Explain and emphasize importance
of: a.
Purpose of footings
b.
Conditions affecting size of
footings
c.
The use of steel reinforing
rods
d.
Grade stakes
e.
Frostlines
f.
Concrete mixture
g.
16" stepped footing
Lecture
Present types of foundations and
advantagesaand disadvantages of
each:
a.
Concrete
b.
Block masonry
Explain importance of and methods
of water proofing foundation walls
Lecture and Demonstration
Explain importance of erecting
straight, plumb, and well braced
forms.
Present following types of
forms and explain how to erect them
Take notes and discuss
Study and use blueprints and speci-
fications
Build form for footing
Build form for 16" stepped footing
Practice estimating material
Take notes and participate in class
discussions
Study basement blueprint
Participate in discussion
Practice building forms
A-1
B-1
B-2
C-8
E-21
E -2 9
A-1
E-9
A.7
5-10
A-23
E-14
B-1
E-19
B-2
5-20
E-2
E-24
5-4
5-38
E-5
A-4
E-8
A-5
5-9
A-18
5-10
A-24 5-19
E-2
E-20
E-4
E-24
E-5
E-38
E-7
E-41

FOUNDATION AND FORMS: (continued)
Block No.
3
UNITS OF INSTRUCTION
INFORMATION
SKILL-DEVELOPMENT ACTIVITIES
INSTRUCTIONAL
AIDS
Forms (continued)
Lecture and Demonstration (con-
tinued)
a.
Sectional form
b.
Wall form
c.
Step form
d.
Walk form

FLOOR AND WALL FRAMING
BLOCK FOUR
A. Types of Wall and Floor Framing
B. Foundation Sill
C. Girders
D. Floor Joist
E. Framing for Openings
F. Bridging
G. Sub-Flooring
H. Walls and Bearing Partitions
I. Ceiling Joist
J. Storm Siding
K. Furring and Grounds
19
21.

UNITS OF INSTRUCTION
IINFORMATION
SKILL - DEVELOPMENT ACTIVITIES
INSTRUCTIONAL
AIDS
.Types of Wall and Floor
Lecture and Demonstration
Framing
Describe following types of
framing; give advantages and dis-
advantages of each:
a.
Balloon framing
b.
Western or platform framing
c.
Plank and beam framing
Foundation Sill
Explain and demonstrate the
following:
.Girders
a.
Sill placement
1.
Function, importance,
and size of sill
2.
Measuring and cutting
sill
3.
Importance of termite
shield and how it should
be installed
4.
Drilling and anchoring
sill
b.
Sill layout
1.
How to determine and
mark center for joist
2.
How to locate girders
3.
How to locate openings
Lecture and Demonstration
Explain types of girders and
their importance.
Emphasize the
following:
Take notes, participate in class dis-
A-1
B-3
cussion, and read related material
A-2
C-7
A-34 E-4
A-9
E-7
A-29
E-18
A-1
A-2
Study blueprints and specifications
A-3
A.4
Practice laying alit sill
A-9
A -2 9
Practice drilling and anchoring sill
B-3
E-7.
S -18
E-24
A-1
B-2
E-7
A-2
B-3
E4.8
A-3
B-4
A-4 C-8
B-1
E-4
A-1
A-29
A-2
B-3
A-3
E-7
A-4

UNITS OF INSTRUCTION
INFORMATION
SKILL-D5V5LOPmENT ACTIVITIES
INSTRUCTIONAL
AIDS
C.
Girders (continued)
D.
Floor Joist
E.
Framing Openings in Sub-
Floor
Lecture and Demonstration (con-
tinued)
a.
Girder sizes
b.
Spacing of girders
c.
Construction of built -up
girders
Lecture and Demonstration
Explain and emphasize the impor-
tance of following:
a.
Joist sizes and length
b.
Laying out sill for joist
c.
Methods of framing joist to
girders
d.
Methods of framing joist to
foundation sill
e.
Nailing joists
f.
Joist hangers
Review methods of locating
open-
ings and demonstrate the special
framing needed in the joist system
for openings.
Take notes, study blueprints, esti-
mate loads, calculate materials,
practice constructing built-up gir-
ders, and practice laying out
girders on foundation sill
Take notes, study blueprints, use
proper tools to measure, layout,
cut, and install joists,
Construct "L" sill and "T" sill.
Install joist hangers
Take notes, practice laying out open-
ings and marking for identification,
practice measuring, cutting, and
installing headers, trimmers, and
tail joists
A-1
d-3
A-2
E-7
A-3
A-4
A -2 9
A-1
A-2
A-3
A-4
A-9
A-29
S-3
C-9
E-7
1-22
C -s
5-19

FLOOR AND WALL FRAMING: (continued)
Block No.
4
UNITS OF INSTRUCTION
INFORMATION
SKILL-DEVELOPMENT ACTIVITIES
INSTRUCTIONAL
AIDS
F.
Bridging
G.
Sub-Floor
H.
Walls and Bearing Parti-
tions
Lecture and Demonstration
Emphasize the purpose and types
of bridging:
a.
Cross or herringbone bridg-
ing
b.
Block bridging,
c.
Metal bridging
Demonstrate the method of cut-
ting bridging using framing
square
Discuss and demonstrate spacing
and installing,of bridging
Lecture
Discuss the various types of
materials used for sub-floors and
give advantages and disadvantages
of each.
Contrast types as to
cost of material, labor, and quali,
ty. Demonstrate the proper installa-
tion of the various types.
Lecture and Demonstration
Identify the various members of
the wall frame.
Emphasize purpose
and importance of accuracy in mea.
suring, locating, and cutting the
framing members.
Take notes, practiceLaying out, cut-
ting, and installing the various
of bridging
Take notes, estimate the cost of
material and labor for a specific
job, practice installing diagonally
laid boards for sub-floor, practice
laving plywood sub-floors
Take notes, clash discussion and
questions
A-22
C -s
E-19
A-22
C-8
E-19
A-22
C-8
E -19

FLOOR AND WALL.
FRA
MIN
G:(continued)
Block No.
4
UNITS OF INSTRUCTION
INFORMATION
SKILL - DEVELOPMENT ACTIVITIES
INSTRUCTIONAL
AIDS
N.
Walls and Bearing Parti-
tions (continued)
I.
Ceiling Joist
Explain the location of walls
and openings using the blueprints
Demonstrate determining the
location, size, cutting and
installing of the following:
a.
Sole plate
b.
Top plate
c.
Double plate
d.
Regular studs
e.
Ties
f.
Corner posts
g.
Jacks
h.
Cripple studs
i.
Headers
j.
Sills
k.
Fire stops
Demonstrate:
Safe way to raise and brace a
wall on a platform
Lecture
Explain purposes of ceiling
joists and what determines their
size and spacing.
Emphasize
safety in construction.
Demon-
strate how ceiling joists are laid
out.
Explain uses of trusses as
ceiling joists and demonstrate how
the various types are built,
Study blueprints
Work problems in calculating stud
lengths and number of studs needed
Make "Master stud plan"
Cut studs to proper length
Practice building corner posts
Practice locating openings and deter-
mining size of rough frame openings
Practice laying out sole and top
plate
Assemble walls and erect plumb and
square
Demonstrate how to tie corner and
partitions
Take notes and study blueprints
Entertain questions and class dis-
cussion
Layout top plate for ceiling joist
Layout and assemble truss according
to plan
A-4
E-5
A-5
E-7
A-7
E -t
B-3
E-11
B-4
E-23
C-7
E-25
C-8
E-27
C-9
E-31
E-2
A-4 C-9 E-25
A-5
E-2 E-27
A-7
E-5 E-31
B-3
E-7
B-4
E-8
C-7
E-11
C-8
E-23

FLOOR AND WALL FRAMING: (continued)
Block No
.' 4
UNITS OF INSTRUCTION
INFORMATION
SKILL-DEVELOMENT ACTIVITIES
INSTRUCTIONAL
AIDS
J.
Storm Siding
K.
Furring and Grounds
Lecture
Discuss various types of storm
siding, emphasizing advantages and
disadvantages as to the cost of
material, cost of labor, and qua-
lity of material.
Explain how
various types of siding are esti-
mated and installed.
Demonstrate installation of fib-
rous material, plywood, and wood
board storm siding.
Emphasize
safety as it applies to the appli-
cation of storm siding and scaf-
folding.
Lecture
Explain what is meant by furring
and grounds; where they are needed.
Explain what determines size of
furring strips and grounds.
Demonstrate measuring and instal-
ling grounds, furring strips and
lath catchers
Take notes and study specifications
for siding
Questions and discussion
Estimate amount of siding needed
according to blueprint
Practice installing the various types
of siding
Take notes
Entertain questions and class discus-
sions
Measure, cut, and install grounds,
furring strips, and lath catchers
as needed according to drawings
A-5
A-21
E -2
E-5
E-7
E-8
E-11
E -2 3
E -2 5
E-27
E-31
E-2
E-5
E-7
E-8
E-11
E-27
E-31

ROOF FRAMING
BLOCK FIVE
A. Styles of Roofs
B. Roof Framing Terms
C. Principles of Roof Framing
D. Roof Plan
E. Unequal Pitch Roof

ROOF FRAMING:
Block No.
5
UNITS OF INSTRUCTION
INFORMATION
SKILL-DEVELOPMENT ACTIVITIES
INSTRUCTIONAL
AIDS
A.
Styles of Roofs
B.
Roof Framing Terms
Lecture and Demonstration
Familiarize the student with
the following styles of roofs and
the various combinations of them
found in today's buildings:
a.
Shed roof
b.
Gable roof
c.
Gambrel roof
d.
Mansard roof
Lecture and Demonstration
Present to the student the basic
parts of a roof and their purposes.
Emphasize the following:
a.
Ridge
B.
Rafter plate
c.
Rafters
1.
Common
2.
Hip
3.
Valley
4.
Jack
5.
Cripple
6.
Overhang (tail rafter)
7.
Birdsmouth
8.
Chimney saddle
Take notes, participate in class dis-
cussion, and identify the different
styles and combinations of styles
from drawings
Take notes, read related material,
and study roof framing plan
A-3
A -2 3
E-7
E-29
A-3
C-7
C-11
E-7
E-29
E-27
E-35

UNITS OF INSTRUCTION
INFORMATION
SKILL-DEVELOPMENT ACTIVITIES
INSTRUCTIONAL
AIDS
C.
Principles of Roof Fram-
Lecture and Demonstration
A-3
ing
.Present to the student the
principles. involved in roof fram-
C-7
C-11
ing listed below:
Take notes, solve problems in roof
E-7
a.
Identify and solve for the
unalown in a right triangle
construction
E-29
E-27
b.
Run, rise, and span
c.
Length of rafter
d.
Unit of measurement
e.
Application of unit measure-
ment
f.
Pitch
g.
Plumb cut, seat cut
h.
Job safety
Entertain questions and discussion
1
E-35
D.
Roof Plan
Lecture
Solve roof problems and layout, cut
A-3
Explain the purpose and neces-
and nail in place each type of
A -23
sity of an accurate roof plan.
rafter
C-7
Demonstrate the following:
E-7
a.
Laying out rafters
Design roof braces and install
E-27
1.
Common rafter
2. Hip rafter
A-3
3.
Valley rafter
B-3
4.
Jack rafter
C-11
5.
Cripple rafter
b.
Shortening rafter at the
ridge
c.
Backing off the hip rafter
d.
Bay window roof framing
C-1
E-27
E-29
E-38

ROOF FRAMING: (continued)
Block No.
5
1011
1
UNITS OF INSTRUCTION
INFORMATION
SKILL-DEVELOPMENT ACTIVITIES
D.
Roof Plan
E.
Unequal Pitch Roof
Lecture (continued)
e.
Bracing the roof
f.
Gable end framing
g.
Marking and using a layout
tee
h.
Job safety
Lecture and Demonstration
Explain what is meant by unequal
pitch roof and give some of the
framing problems rpc.41ting
Demonstrate the following opera-
tions involved with unequal
pitch roofs:
a.
Using step-off method for
jacks
b;
Unequal pitch roof without
overhang
c.
Making a plan layout
d.. Laying out unequal pitch
hip rafter
e.
Laying out unequal pitch
valley rafter
f.
Laying out unequal pitch
hip and valley jacks
g.
Laying out unequal pitch
roof with overhang
h.
Job safety
INSTRUCTIONAL
AIDS
A-3
Take notes, questions and discussions
C-11
C-1
E-27
E-36
Draw roof plan
Lay out, cut and install the differ-
ent rafters for unequal pitch roof
according to plan

ROOF COVERING
BLOCK SIX
A. Sheathing
B. Roofing
C. Flashing
29
---: 31.

ROOF COVERING:
Block No.
6
UNITS OF INSTRUCTION
INFORMATION
SKILL - DEVELOPMENT ACTIVITIES
INSTRUCTIONAL
AIDS
A.
Sheathing
Lecture
Describe types and installation
a.
Strip sheathing
b.
Plywood (clips)
c.
Square edge SW
d.
Tongue and grooved
Estimate material
Install on structure
B-4
C-11
E-7
E-25
E-29
E-25
Demonstrate cutting and nailing
B.
Roofing
Lecture
B-4
Describe types and contrast as
to quality, cost, and ease of
construction
Estimate material
C-11
E-7
E-29
[
E-35
Explain type roof for which each
is suited:
Apply on house or practice area
'a.
Shingles
1.
Wood
2.
Asbestos
3.
Asphalt
S
4.
Fiber glass
b.
Felt
c.
Terra cotta
d.
Roll roofing
e.
Metal
f.
Slate
g.
Built-up
I

ROOF COVERING: (continued)
Block No.
6
UNITS OF INSTRUCTION
INFORMATION
SKILL-DEVELOPMENT ACTIVITIES
INSTRUCTIONAL
AIDS
B.
Roofing (continued)
Lecture (continued)
Demonstrate application:
a.
Nailing
b.
Stapling
c.
Clips
Lecture
Discuss purpose of flashing and
where needed
a.
Dripstrip
b.
Save flashihg
c.
Valley flashing
d.
Wall flashing
e.
Chimney flashing
Demonstrate application of
flashing:
a.
Nailing
b.
Mastic
Practice application of most common
type roofing
Questions and class discussion
Apply on building or practice area
B-4
E-29
C-11
E-7
B-4
C-11
E -7
E -2 9
E-35
B-4
C-11
E-7
E -2 9
E-35

EXTERIOR WALL FINISHES AND TRIM
BLOCK SEVEN
A. Windows
B. Doors
C. Cornice
D. Exterior Wall Finishes

EXTERIOR WALL FINISHES AND TRIM
Block No.
7
UNITS OF INSTRUCTION
INFORMATION
SKILL - DEVELOPMENT ACTIVITIES
INSTRUCTIONAL
AIDS
A.
Windows
B.
Doors
Lecture
Discuss the following:
a.
Types of windows
1.
Wood sash
2.
Metal sash
3.
Double hung
4.
Casement
5.
Sliding
6.
Louver
7.
Awning
8.
Fixed
b.
Dimensioning
1.
Standard sizes
Demonstrate frame construction
and installation
a.
Flashing
b.
Vapor barrier
c.
Nailing
Lecture
Describe types of doors and
standard sizes
a.
Flush
1.
Solid
2.
Hollow core
Study blueprints, specifications,
and window schedule
Class discussion
Align tops of windows
Flash, level, square, and nail in
place
Take notes
Entertain questions and class dis-
cussions
A-2
B-3
B-4
C-4
E-5
E-27
E-28
A-2
B-3
B-4
C-4
E-5
E-27
E-28

EXTERIOR WALL FINISHES AND TRIM:
(continued)
Block No.
7
UNITS OF INSTRUCTION
INFORMATION
SKILL-DEVELOPMENT ACTIVITIES
INSTRUCTIONAL
AIDS
B.
Doors (continued)
C.
Cornice
Lecture (continued)
b.
Panel
c.
Metal
d.
Glass
e.
Batten
Identify door as to right or
left hand
Demonstrate fitting and hanging
doors
Lecture
Describe the following:
a.
Open cornice
b.
Box or closed cornice
c.
Cornice return
d.
Sloping plancier
e. Cornice with sweep
f.
Vents
g.
Cornice molding
h.
Safety
Demonstrate constructing cornices
for frame and brick veneered dwell-
ings
Practice fitting and hanging doors
Take notes
Study detailed drawings of cornices
Estimate cornice material
Install cornices
A-3
C-4
E-5
E-27
E-28
H-4

EXTERIOR WALL FINISHES AND TRIM:
(continued)
Block No.
7
UNITS OF INSTRUCTION
D.
Exterior Wall Finishes
C3
INFORMATION
STILL- DEVELOPMENT ACTIVITIES
INSTRUCTIONAL
AIDS
$.
Lecture and Demons ration
Describe and demOnstrate appli-
cation of following:
a.
Types of siding
1.
Board on board
2.
Board and batten
3.
Bevel
4.
Vertical
5.
Plywood panel with
batten
12;
Water table
c.
Corner boards
d.
Porch and recess entrance
trim
e.
Belt course
f.
Vapor barrier
g.
Safety
Estimate material
Read related material
Install siding and wall trim
A-3
A-21
C-4
2-5
E-27
2-28
H-4

INSULATION, INTERIOR WALL AND CEILING FINISHES
BLOCK EIGHT
A. Insulation
B. Preparing for plaster
C. Dry wall
D. Paneling
E. Ceiling finishes
37
as

INSULATION, INTERIOR WALL AND CEILING FINISHES
UNITS OF INSTRUCTION
A.
Insulation
Block No.
8
INFORMATION
SKILL-DEVELOPMENT ACTIVITIES
INSTRUCTIONAL
AIDS
Lecture and Demonstration
iimphasize importance of properly .
Take notes
insulating a house.
Demonstrate
application of insulation.
a.
Rock wool
b.
Fiber glass
c.
Aluminum
d.
Blown in
e.
Sprayed on styrofoam
B,
Preparing for Plaster
Lecture and Demonstration
Describe and demonstrate appli-
cation of following:
a.
Rock lath
b.
Metal lath
c.
Corner right
d.
Corner bead
e.
Plaster grounds
f.
Fasteners
C.
Dry Wall
Lecture
Define dry wall construction and
emphasize advantages and disad-
vantages.
Demonstrate following:
a.
ClAtting and hanging sheet-
rock
b.
Laminating
Install insulation
Apply lath, grounds, corner right,
and corner bead
Estimate material
Install sheetrock.
Apply corner bead
Tape, finish joints, and nail heads
A-21
E -2 5
E-26
E-29
E-5
E -2 3
E -2 7
A-4
C-3
E-5
E-27
E-29
H-4

INSULATION, INTERIOR WALL ANDCEILING FINISHES: Block No.
8
(continued)
lbw
UNITS OF INSTRUCTION
INFORMATION
SKILL-DEVELOPMENT ACTIVITIES
INSTRUCTIONAL
AIDS
C.
Dry Wall (Continued)
D.
Paneling
Lecture (continued)
c.
Corner bead
d.
Finishing joints
e.
Estimating
f.
Safety
Lecture
Describe types of paneling
a.
Wood
b.
Composition
c.
Plastic
Demostrate
a.
Estimating
b.
Matching
c.
Scribing and fitting
d.
Fastening
Take notes and read related material
Apply paneling
A-4
C-3
E-5
E-27
E-29
H-4
A-4
C-3
E-5
E-27
E-29
H-4
E.
Ceiling Finishing
Lecture
A-4
Discuss the types of ceiling
finishes
a.
Plaster
C-3
E-5
E -2 7
b.
Dry wall
c.
Tile
d.
Suspended
e,
Exposed
Install tile and,suspended ceiling
E-29
H-4

INTERIOR TRIM
BLOCK NINE
A. Window Trim
B. Flooring
C. Door Trim
D. Baseboard
E. Other Trim
41
41.

INTERIOR TRIM:
Block No.
9
UNITS OF INSTRUCTION
INFORMATION
SKILL-DEVELOPMENT ACTIVITIES
INSTRUCTIONAL
AIDS
A.
Window Trim
B.
Flooring
Lecture
Describe styles of window trim
a.
Plain
b.
Moulded
c.
Back band
d.
Cabinet head
Describe members used in window
trim.
a.
Side and head casing
b.
Stool
c.
Apron
d.
Stop
Demonstrate methods of cutting
and fitting window trim.
Lecture
Describe the following:
a.
Hardwood
b.
Underlayment
1.
Tile
2.
Carpeting
c.
Tile
d.
?argue
Read related material
Questions and discussion
Fit stool for double hung and case-
ment window
Fit window stop, casing, and apron
Questions and class discussion
A-4
A-7
C-3
E-5
E-7
E-27
E-28
E-31
A-1
A-4
C-3
E-5
B-7
E-27
E-31

INTERIOR TRIM: (continued)
Block No.
9
1UNITS OF INSTRUCTION
INFORMATION
SKILL-DEVELOPMENT ACTIVITIES
INSTRUCTIONAL
AIDS
B.
Flooring (continued)
C.
Door.
Demonstrate estimating and
installing various types of floor
Lecture
Describe types:
a.
Flush
b.
Panel
c.
ti-fold
d.
e.
By-pass
f.
Double action
Describe types of door trim
a.
Plain
b.
Cabinet head
c.
Moulded casing
d.
Back band casing
e.
Door stop
Demonstrate
a.
Setting jambs
b.
Fitting door
c.
Fitting casing
d.
Fitting stop
e.
Setting hinges
f.
Installing lock assembly
g.
Installing pre-hung door
Estimate material
Install underlayment
Install flooring
Take notes
Class discussion
Install complete door assembly
Install pre-hung door
A-1
A-4
C-3
E-5
E-7
E-27
E-28
E-31

INTERIOR TRIM: (continued)
Block No.
9
UNITS OF INSTRUCTION
D.
Baseboard
E.
Other Trim
INFORMATION
SKILL-DEVELOPMENT ACTIVITIES
INSTRUCTIONAL
AIDS
Lecture
Describe different types of
baseboards
a.
Wood
1.
Plain
2.
Built-up
3.
Moulded
b.
Rubber
c.
Plastic
d.
Ceramic
Demonstrate:
a.
Estimating material
b.
Methods of installing base-
board and returns
Lecture
Describe the following:
a.
Wainscoat
b.
Chair rail
c.
Inside cornice
d.
Special millwork
e.
Crown moulding
f.
Bed moulding
g.
Cove moulding
h.
Base shoe
Take notes
Questions and class discussion
Estimate material
Cope and miter corners
Install in place
Take notes
Class discussion
A-2
A-4
C-3
E-5
E-7
E -2 7
E-28
E-31
A-4
C-3
E-5
E-7
E -2 7
E-28
E-31

INTERIOR TRIM:
(continued)
Block No.
9
UNITS OF INSTRUCTION
INFORMATION
SKILL-DEVELOPMENT ACTIVITIES
INSTRUCTIONAL
AIDS
E.
Other Trim
(continued)
Demonstrate cutting and fitting
a.
Crown moulding
b.
Bed moulding
c.
Cove moulding
d.
Base shoe
;Ph
Cut and fit moulding in building
STAIR BUILDING
BLOCK TEN
A. Introduction
B. Stairway Construction
C. Stairway Layout
D. Stairway Terms
47
46

STAIR BUILDING:
Block No.
10
UNITS OF INSTRUCTION
INFORMATION
SKILL-DEVELOPMENT ACTIVITIES
INSTRUCTIONAL
A.
Introduction
Lecture
Describe the following types of
stairs:
a.
Straight and platform
b.
Rough
c.
Closed
d.
Open
Lecture
Explain construction of the
following:
a.
Stair horses
1.
Saw out
2.
Built-up
b.
Stair stringers
1.
Plain
2.
Square cut
3.
Mitered
4.
Housed
Lecture
Define the following terms and
explain methods of determining
dimensions needed:
a.
Total rise
b.
Unit of rise
c.
Total run
d.
Tread run
e.
Riser and tread
f.
Head room
g.
Horse or stringer length
Study drawings
Entertain questions and class dis-
cussion
Solve stair layout problems
Layout stair stringers
A-4
A-7
B-3
C-12
C-2
E-27
E -2 9
A-4
A-7
8-3
C-12
C-2
E-27
E -2 9
E-36
E-39
H-2
A-4
A-7
B-3
C-12
C-2
E-27
E -2 9
E-36
U-2
E -36
E -39
H-2

STAIR BUILDING: (continued)
Block No.
10
UNITS OF INSTRUCTION
INFORMATION
VO
A
SKILL - DEVELOPMENT ACTIVITIES
INSTRUCTIONAL
AIDS
D.
Stairway Terms
1
Lecture
Describe and demonstrate with
drawings of stair assembly:
a.
Balusters
b.
Buttress Cap
c.
Fillet
d.
Glue blocks
e.
Hand rail
f.
Stair molding
g.
Newel post
h.
Nosing
i.
Riser
j.
Tread
k.
Tread projection
1.
Well hole
Take notes
Study detail drawings on blueprints
Assemble related parts
A-4
A-7
B-3
C-12
C-2
E-27
E-25:
E-36
E-39
H-2

PRE-EMPLOYMENT CLINIC
BLOCK ELEVEN
A. Employment Application
B. Employment Opportunities
C. Employer - Employee Relationship
D. Civic and Social Responsibility
51
49

PRE-EMPLOYMENT CLINIC
Block No.
11
UNITS OF INSTRUCTION
INFORMATION
SKILL-DEVELOPMENT ACTIVITIES
INSTRUCTIONAL
AIDS
A.
Employment Application
Lecture and demonstration, com-
pleting sample application.
Discuss the following:
a.
Social security
b.
Reference
c.
Work experiences
d.
Emergency information
e.
Personal appearance
f.
The interview
g.
Follow'up
Lecture
Discuss the following:
a.
Jobs available and average
wage
b.
Placement officials
c.
Apprenticeship programs
d.
Virginia Employment Commission
e.
Civil Service
f.. Armed Forces
g.
What employer expects from
employee
h. What employee should expect
from employer
i.
Workman compensation laws
j.
Unemployment insurance laws
Class discussion
Complete sample application
Practice interview with instructor
or other students
Class discussion

PRE-EMPLOYEMENT CLINIC
Block No.
11
UNITS OF INSTRUCTION
C.
Employer - Employee
Relationship
INFORMATION
SKILL-DEVELOPMENT ACTIVITIES
INSTRUCTIONAL
Lecture
Discuss the following:
a.
Employer responsibility
Working conditions
1.
Clean work area
2.
Safety equipment
3.
Reasonable work hours
4.
Vacation
5.
Adequate insurance
6.
Incentive bonus
7.
Administrative guidance
8.
Reasonable wage
b.
Employee responsibility
1.
Punctuality
2.
Knowledge and skill of
his trade
3.
Safe work habits
4.
Proper dress
5,
Good Character traits
a.
honesty
b.
dependability
c.
high morality
d.
cooperative
6.
Reasonable amount of
work per day
7.
High aspirations
Class questions and discussion

PRE-EMPLOYMENT CLINIC
Block No.
11
UNITS OF INSTRUCTION
INFORMATION
D.
Civic and Social Res-
ponsibility
Lecture
Encourage students to work to
improve home and community
a.
Clean personal property
b.
Support worthwhile civic
projects
c.
Appreciate the right to vote
d.
Learn to get along with
others
e.
Appreciate the right of
others
f.
Create interests in community
SKILL-DEVELOPMENT ACTIVITIES
INSTRUCTIONAL
AIDS
Questions and class discussion

APPENDIXES
Materials such as Teacher's Guides, Aids, Tool Lists, Etc. are
supplied only as examples. Those involved in developing this
guide believe that these examples will be helpful.
55
53

APPENDIX A
Unit Guide Example, Block 2
57
54

DESCRIPTION OF THE UNIT GUIDE
The unit guide which follows will serve as an example of the
preparation needed for teackLing the various units of instruction.
The teacher should develop unit guides for all of the eleven blocks
in the curriculum guide. Lesscn plans are included for selected
lessons only and a completed unit guide should contain a lesson
plan for each lesson title listed in the block breakdown. Each
teacher should develpp his own content and the lesson plans included
here are intended to serve only as examples.
The approach for the unit guide is suggestive only and the
teacher may elect to develop his own format.
59
55

UNIT GUIDE
COURSE Carpentry
UNIT NO. 2
NAME OF UNIT Foundation Layout and Forms
UNIT OBJECTIVES
As a result of your teaching and student learning, your students
will understand (mental)
1. The use of the transit level
2. Excavation and basement prints
3. The plot plan
4. The methods of building layout, and squaring corners
5. Steel reinforcing of concrete
6. Types of wall forms.
7. The spacing of columns
will be able to (manipulative skill)
1. Locate house corners
2. Set up transit level
3. Construct batten boards
4. Build forms for footings, walls, and piers
5. Estimate material needed for foundations
will (attitudes and appreciations)
1. Practice safety rules
2. Develop proper attitude toward fellow workers
61
56

LESSON BREAKDOWN
BLOCK NO. 2 TITLE Foundation layout and forms
Doing Lessons No. Knowing Lessons
No. HOW TO: Technical TopicsD2-1 Locate house corners K2-1 Form work safetyD2-2 Set up transit level K2-2 Use of transit levelD2-3 Construct batten boards K2-3 Excavation and basementD2-4 Set Leveling stakes blueprint readingD2-5 Set building layout lines K2-4 Plot plan readingD2-6 Build form for footing K2-5 6-8-10 method of squaringD2-7 Build 16" stepped footing K2-6 Lumber sizesD2-8 Build wall form K2-7 Concrete reinforcing steelD2-9 Build form for pier K2-8 Types of wall formsD2-10 Estimate material K2-9 Column spacing
General TopicsK2-10 Safe loads for various soilsK2-11 Frost lines and footersK2-12 Concrete mixing and curing
Guidance TopicsK2-13 Forming as a specialtyK2-14 Relationship of carpentry
and masonry
62
57

TEACHING EXPEDIENTS
1. Reference - Textbooks
Lair, E. A. Carpentry for theBuilding Trades, p. 7-28.
Wilson, J. Douglas PracticalHouse Carpentry, p. 57-83.
Ulrey, Harry F. Carpentersand Builders Library, Vol.
Carson, Arthur B. Foundation:onstruction.
2. Project-activity Materials
50-survey stakes
16 -2"x4"x8' Construction grade
8-3/4"x4"x8' Construction grade
4-Rolls of cord
16-3/4"x8"x12' Handyman
3. Demonstration Equipment
Transit level
Steel tape
Line level
Pencil
6 ft. rule
Survey stakes
Nails
63
58
4. Other materials, equipment
Opaque projector
Overhead projector
TransparenciesHouse Framing 3M Catalogue#391, Part I
5. Resource persons
Tour of house being staked out
in the area.

SUGGESTED METHOD OF APPROACH
The following method of approach for this course IL .t is sugges-tive only. However, if you have had little experience in teachingthe content of this unit, it is advisable that you follow the approachin detail for your first teaching. As you gain experience, new waysto demonstrate and make information topics dynamic will come to you andthese should be recorded in the spaces between the steps in the teachingapproach. The teaching approach below will run from the first to thelast day of the unit. You will have to decide how much to cover eachday the class meets.
SUGGESTED TEACHER APPROACH STUDENT ACTIVITY
1. Introduce unit (30 min.)A. Check attendance.B. Explain new unit progress
chart.C. Explain references avail-
able.
1. Class assemblyA. Discussion and questions.
2. Form work safety (20 min.) K2-1 2.A. Lecture.B. Show pictures of forming
hazards.C. Discussion.
3. Use of transit level K2-2(two lessons-45 min.)A. Description.B. Use opaque projector.C. Set up transit level.
4. Excavation and basementblueprint reading K2-3(45 min.)A. Lecture.B. Give out blueprint read-
ing workbooks.
5. Plot plan reading K2-4(45 min.)A. Lecture.B. Use plot plan drawing.
64
59
A. Enter into discussion.B. Student recalls accidents
from own experiences.
Activity 11/2 hoursA. Work problems in math book.
3.
A. Observe..
B. Selected students name partsof level projected on screen.
C. Questions.
Activity 1 hourA. Wolk problems in math book.
4.
A. Draw and identify variouslines.
B. Dimension drawings on hand-out sheets.
C. Work problems in workbook,pg. 12-13-14.
5. A. A discussion and questionsB. Determine elevations of
selected points on plot planprint.
C. Answer questions in workbook.

(continued)
SUGGESTED TEACHER APPROACH STUDENT ACTIVITY
6. 4-8-10 method of squaring K2-5 6.
(45 min.)
A. 20 minute lecture.B. Use chalk board to illus-
trate by right triangle.C. Assign problems in reading
workbook.
7. Administer test on materialcovered so far.
8. Locate house corners D2-1(30 min.)A. Review methods.B. Place problems on board.C. Assign student teams.
9. Set up transit level D2-2(20 min.)A. Review procedure by demon-
stration.
A. Work problems on chalk board.B. Work in workbook.C. Questions.
Activity 2 hoursA. Cut survey view of basement
wall.
7.
8.
A. Discussion following test.
A. Work out problem by teams.
Activity 2 hours and 20 minutes.A. Tool maintenance.
B. Practice layout of buildingcorners.
9.
A. Set up transit levelindividually.
Activity 1 hourA. Practice building layout.B. Work on blueprint reading
assignments.
10. Construct batter boards. D2-3 10.A. Demonstration (45 min.) A. Construct batter boardsB. Assign student teams by teams.
11. Lumber sizes K2-6 (20 min.)A. Lecture.B. Demonstrate board foot table
on a framing square.C. Work problems on board.
65
GO
Activity 3 hoursA. Set building lines by teams.
11.A. Questions.
B. Work board foot problems inworkbooks.
Activity 1 hourA. Complete layout of building
corners.

(continued)
SUGGESTED TEACHER APPROACH STUDENT ACTIVITY
12. Set leveling stakes D2-4 (30 min.) 12.A. Lecture
13. Set building layout line D2-5(45 min.)A. ReviewB. Demonstration
A. Work in groups levelingstakes.
B. Check each others workActivity - 1 hours
A. Practice leveling stakes.13.
A. ObserveB. Same as K2-4
Activity - 2 hoursA. Practice layout of
building lines.
14. Concrete reinforcing steel K2-1 14.(30 min.)
15. Build forms for footing D2-6(45 min.)A. Demonstration
16. Build 16" stepped footing D2-7(45 min.)A. Demonstration
17. Types of wall forms K2-8(20 min.)A. LectureB. Use opaque projector
A. Questions
15.A. Observe work in groups
building forms.
16.A. Same as D2-6
Activity - 3 hoursA. Work on forms
17.
18. Administer test on work covered 18.last time. (50 min.)
19. Build wall form D2-8 (45 min.) 19.A. Demonstration
20. Column spacing K2-9 (45 min.)A. LectureB. Use opaque projector
66
61.
A. Questions and discussion
A. Discuss test
A. ObserveB. Work in groups
Activity - 3 hoursA. Build wall forms in
groups20.
A. DiscussionB. Work problems on spacing
column

(continued)
SUGGESTED TEACHER APPROACH
21. Build forms for pier D2-9(30 min.)A. DemonstrationB. Assign teams
22. .Estimate material D2-10(45 min.)A. Demonstrate from founda-
tion.
23. Safe loads for various soilsK2-10 (30 min.)A. LectureB. Use opaque projector
24. Administer test (50 min.)
25. Frost lines and footers K2-11(20 min.)
26. Concrete mixing and curingK2-12 (30 min.)A. Lecture (10 min.)B. Use opaque projector to
show pictures from magazine
27. Forming as 2 specialty K2-13(10 min.)
28. Relationship of carpentryand masonry K2-16 (20 min.)A. Lecture
STUDENT ACTIVITY
21.A. Observe
B. Work in assigned teams
Activity - 2hours
A. Estimate number of piers neededin illustrations.
B. Build form for pier
22.A. Observe and follow alongB. Estimate material for print
in workbookActivity - 6 hoursA. Estimate material needed for
foundation from blueprint
23. Discussion
Activity - 2 hoursA. Work on uncompleted jobs on
progress chart
24. Discuss test
25.
A. Discussion
26.
A. DiscussionActivity - 4 hoursA. Work on incomplete items on pro-
gress chart.27.
A. Discussion28.
A. Discussion and questions
Activity - 3 hoursA. Finish items on progress chart
29. Field trip to building site 29. Questions on field tripin area
67
62

INSTRUCTOR'S LESSON PLANRelated Technical Information
INSTRUCTOR:
SUBJECT: Carpentry
Unit 2
Lesson K-2
AIM (or purpose): To describe the use and nomenclature of the transitlevel.
TEACHING AIDS: Transit level, opaque projector, text book
MATERIALS:
REFERENCES: McDonnell, L.P. Hand Woodworking Tools p.58-80Handbook of Practical Applications of the Transit Levelp. 1-22
I. PREPARATION (of the learner)
Introduction1. The transit level is a precision made optical instrument
which requires careful handling.2. In order to use the level properly one must be familar
with the parts of the instrument and their uses.3. The transit level is a versatile tool and can be useful
to a carpenter in many ways.
II. PRESENTATION (of the information)
INSTRUCTIONAL TOPICS THINGS TO REMEMBER TO DO OR SAYA. Nomenclature of transit level A.
1. Objective lens2. Focusing Knob3. Adjustable horizontal
circle4. Index vernier5. Horizontal clamp screw6. Horizontal tangent screw7. Locking lever8. Vertical clamp screw9. Vertical tangent screw10. Index pointer11. Center screw and cap
assembly12. Leveling screw
68
63

II. PRESENTATION (continued)
INSTRUCTIONAL TOPICS THINGS TO REMEMBER TO DO OR SAYMethod:
Transit level projected onscreenpoint out parts andtheir functions
B. Use of transit level for B.
leveling 1. How to measure a dif-ference in elevation.
2. Computing differencesin elevations
3. Math involved4. Turn points5. Leveling stakes6. Grade marks7. Set marks on a line
Method:
Lecture - Illustrations pro-jected on screen with opaqueprojector. Work math pro-blems.
C. Horizontal Circle scale and its C.vernier 1. UsPd to read horizontal
angles2. A complete circle-360 degrees3. Marked in degrees4. Marked in four guadrants5. "0" on the vernier is the
index6. 12 graduations on vernier
numbered from 0-607. Read to nearest five minutes
D. Reading and measuring
E. Summary
F. Ask Questions
69
64
Method:
Same as B.D.
1. Plus vertical angle measuredupward - minus downward
2. Vertical arc and vernier readas horizontal.
3. Plumb4. Rate of slope
Method same as B.
-3-
II. PRESENTATION (continued)
INSTRUCTIONAL TOPICS THINGS TO REMEMBER TO DO OR SAY
III. APPLICATION (drills, illustrations, analogies, oral questions or as-signments)
1. Students work problems2. Ask questions on illustrations
IV. TEST (final check on students' comprehension of material presented)
Test #2 on Tuesday
Suggested Reading for the student: p. 56-80 Hand Woodworking Tools
The Next lesson is: Excavation and basement blueprint reading.
70
65

INSTRUCTOR'S LESSON PLAN
Related Technical Information
INSTRUCTOR: Unit 2
Lesson K-3
SUBJECT: Carpentry
AIM (or purpose): To provide information for the student to correctlyinterpret excavation and basement blueprints.
TEACHING AIDS: Blueprints-Basement model
MATERIAL:
REFERENCES: Blueprint Reading and Sketching for Carpentry Trades -p 7-79
I. PREPARATION (of the learner)
1. The foundation of a building is one of the mf,st important parts of
a building.2. Regardless of the type of framing or how rigidly the frame is
built, if an inadequate foundation is provided the frame willprobably settle unevenly resulting in cracking of plaster, floor,
tile, and ill-fitting doors and windows.3. If foundation dimensions are not accurate, framing and finishing
problems will exist throughout the job.
II. PRESENTATION (of the information)INSTRUCTIONAL TOPICS THINGS TO REMEMBER TO DO OR SAY
A. Identification and purpose of A.
lines in drawing. 1. Object lines
2. Extension lines3. Dimension lines4. Hidden lines5. Sections - cutting
plane lines
6. Center lines
J1
66
-2-
II. PRESENTATION (continued)
INSTRUCTIONAL TOPICS THINGS TO REMEMBER 00 DO OR SAY
B. Methods of Dimensioning B. 1. Scale
2. Outside face to center ofpartition
3. Overall4. Location of openings
a. To center of openingb. To side of opening
5. Actual dimensions of material
C. Symbols C. 1. Concrete2. Cinder block3. Gravel
4. Brick5. Stone6. Windows and doors7. Plumbing8. Electrical
D. Use of lettering on basement D.. 1. Identify material
plan 2. Elevation information3. Identify rooms4. Label fixtures
E. Summary
F. Questions F. Blueprint reading workbook-pages 20-21, 57-58, 76-77.
72
67

-3-
II. PRESENTATION (continued)
INSTRUCTIONAL TOPICS THINGS TO REMEMBER TO DO OR SAY
III. APPLICATION (drills, illustrations, analogies, oral questions orassignments)
1. Students draw sectional view of a typical basement wall.2. Work problems in workbook - pages 56-57.
IV. TEST (final check on students' comprehension of material presented)
1. Test #4 on Tuesday2. Check students' drawings
Suggested Reading for Student: pages 7-79 Blueprint reading text.
The Next Lesson Is: Construct batter boards
73
6S

INSTRUCTOR'S LESSON PLANManipulative Skills
INSTRUCTOR: Unit 2
Lesson D-2JOB (or operatior): Set up transit level
AIM (or purpose): Gain skill in preparing level for use.
TOOLS AND EQUIPMENT: Transit level, tripod, plumb bob
MATERIALS: Survey stakes, 8d f;Aishing nails
TEACHING AIDS:
REFERENCES: McDomell, L.P., Hand hdodworking Tools, p. 58-80
I. PREPARATION (of the learner)
1. Leveling is the most important operation in preparing to use theinstrument.
2. Errors of leveling are costly in time and sometimes in materials.
II. PRESENTATION (of the skills):
Key Points(things to remember to do or say)
Operation or Steps
Set up level
A. Adjust tripod A. 1. Loosen wing nuts2. Spread legs about 3 ft. apart3. Push legs firmly in ground4. Unscrew tripod cap5. Level top of tripod by eye
B. Place instrument on tripod B. 1. Adjust horizontal clamp screw2. Screw instrument firmly
place
C. Set up over point C. 1. Place level over point2. Tie on plumb bob3. Push legs firmly in ground4. Adjust plumb bob 1/8"above
point5. Loosen leveling screws ,Aid
74 shift plate
69

-2-
II. PRESENTATION (of the skills)
Key Points(things to remember to do or say)
Operations or Steps
D. Level instrument D. 1. Loosen two adjacent screws2. Align telescope over a pair3. Center the bubble4. Turn telescope 90° and repeat
leveling5. Continue with alternate pairs
E. Ask Questions E. 1. Why do you place telescope overa pair of leveling screws inleveling?
2. Which way do you turn ai.levelingscrew to raise the plate?
3. Do ybu always turn two screwsat a time in leveling?
III. APPLICATION (practice by learner under close supervision)
Students work individually setting up and leveling transit level
TEST (Performance of skill to acceptable standards)
Check each student ls he completes leveling operation
Suggested Reading for Student:
The Next Lesson Is: Construct batter boards

-2-
II. PRESENTATION (of the skills):
Operations or Steps Key Points
(things to remember to do or say)
C. Construct batter boards
D. Ask Questions
C. 1. Consists of 3 stakes2. Two horizontal members3. Two braces4. Stake correctly pointed5. Level horizontal member6. Construct higher than
foundation7. Leveling by straight edge8. Leveling with transit level9. Reverse level and straight
edge
D. 1. Why are batter boards needed?2. Why are batter boards made of
heavy material?
3. Where should batter boards beplaced?
4. Why is it necessary to haveall batter boards level?
III. APPLICATION (practice by learner under close supervision)
Students work in pairs --students check work
TEST (performance of skill to acceptable standards)
1. Test #5 on Tuesday
2. Enter grades on progress chart
Suggested Reading for Student: pages 9-11, Lair - pages 61-62, Wilson
The NeAtLesson Is: The Plot Plan
77

COURSE:
TEST #1
INSTRUCTOR:
SUBJECT:
MULTIPLE CHOICE:
DATE:
SCHOOL:
SCORE:
Directions: Each of the questions or incomplete statements listedbelow is follwed by several words, phrases, or series of numbers.From these you are to choose the one which best answers the questionor completes the statements correctly. Place the letter of that wordor phrase (A,B,C,D, or E) in the numbered blank space on the answersheet.
Example:
A room has sides 10'-0" by 13'-6". The total distance of thebaseboard would be:
A A. 47 Feet
B. 78 Feet
C. 135 Feet
D. 136 Feet
E. 315 Feet
1. The three dimensions a carpenter can use to lay out a square or90 corner are:
A. l' x 2' x 3'
B. 2' x4' x 6'
C. 4' x 6' x 6'
D. 6' x 8' x 10'
E. S' x 10' x 12'
79

2. The major cause of accidents
A. Ignorance
B. Horseplay
C. Forgerfulness
D. Carelessness
E. Sickness
3. It is standard parctice to accompany each set of plans with adetailed set of written instructions called
A. Contracts
B. Sections
C. Specifications
D. Details
E. Building instructions
4. In laying out a building, the tool best suited to measure distancesis a
A. 6' folding rule
B. Steel tape
C. Pocket rule
D. Cloth tape
E. Measuring stick
5. Which of the following is not found on the plot plan?
A. Contour lines
B. Building set boch
C. Finish elevation
D. Dimensions of the lot
E. The heighths of foundation wall
80
71

6. The best wood to make a straight edge from is
A. Mahogany
B. White pine
C. Redwood
D. Hemlock
E. Douglas fir
LEVELING INSTRUMENT:
MATCHING ITEMS:
Directions: Indicate the statement in the right hand column thatmatches the part in the left hand column. Place the appropriateletter for the statement in the place provided on the answer sheet.Statements may be used only once.
7. Tangent screws
Tripod plate
A.
B.
C.
Used for making fine adjustmentsIs 4n closed position when in-strument is being used as a levelGraduated from 00 to 450
8.
9. Trivet points D. Used to firmly hold settingsE. Attaches legs firmly to tripod
10. Horizontal circle plateF. Used to level telescope
11. Horizontal vernier G. Graduated in degreesH. Serves as legs for level
12. Clamp screw I. Supports for leveling screwsJ. For protecting threads
13. Tripod cap K. Graduated in minutes
14. Vertical arc
81
74

MODIFIED TRUE-FALSE:
Directions: Some of the following statements are true and some arefalse. If the statement is true, black out the circle under the "T"column on the answer sheet and do no more. If the statement is false,black out the circle under the "F" column on the answer sheet and dotwo more things:
1. In blank "A" on the answer sheet insert the word or phrasethat makes the statement false.
2. In blank "B" insert the word or phrase that would make thestatement true. Do not use words that are underlined.
Example:
T F A square corner is 60 degrees.
A. 60
B. 90
15. If the hypotenuse of a right triangle is five feet and the baseis four feet, the altitude would be three feet.
16. The distance from the front property line to the building isfound on the basement plan.
17. Batter boards should be made of 3/4" stock.
18. You can check your building layout for squareness by measuring thediagonals.
19. The front stakes should be moved to make adjustments in squaring.
ESSAY QUESTIONS:
Directions: Answer the following questions as complete as possible inthe space provided on the answer sheet.
20-25. Describe the construction of batter boards as to location,material used and to their purpose.
-,2
75

MULTIPLE CHOICE:
ANSWER SHEETTEST # 1
ABCDE1. 0 0 0 0 0
2. 0 0 0 0 0
3. 0 0 0 0 0
4. 0 0 0 0 0
5. 0 0 0 0 0
6. 0 0 0 0 0
MATCHING ITEMS:ABCDEFGHIJK8. 0 0 0 0 0 0 0 0 0 0 0
9. 0 0 0 0 0 0 0 0 0 0 0
10. 0 0 0 0 0 '0 0 0 0 0 0
11. 0 0 0 0 0 0 0 0 0 0 0
12. 0 0 0 0 0 0 0 0 0 0 0
13. 0 0 0 0 0 0 0 0 0 0 0
14. 0 0 0 0 0 0 0 0 0 0 0
MODIFIED TRUE-FALSE:
T F
15.0 0 A. B.
16.0 0 A. B.
17. 0 0 A. B.
18.0 0 A. B.
19.0 0 A. B.
83
7i

ez 58
z ?it
5;
w
(-4
c m w
c..4
0 m z o
Locate house
corners
Set up transit level
Construct batter boards
Set leveling stakes
Set building lay-
out lines 5
Build forms for footing
6
Build 16" stepped footing
7._]
8 Build Wall form
Build.form for
pier
Estimate material 10

\ II11111111111111111M111111111111111M111111111111111111111=1111111111111111111111111111imoNNIIIIIIIIIIMME EINIIIIIIMMIIIIIIMI
,111111111111111111111111111111111111111111111111111111M1111111111111 E1111111111111111
INIIIIIMIN 11"11111111101ummommommull NummimuMMIN
,111MIIIIIIIII1111111111111111111111111111111111111111IIIMIIIMIIIIIIMIIIMIIIIIIMIIIIIII11111111111111111111111111111111111111111
-111111111111011111111 11111111111111111MIAIIIIIIMERNEEN INIENNEMNIEI-, 11111111 1111111111111111111 11111111111111111111
. INNIMMINNEHIIMMIEN 1111111MINEN111111111111111111111111111111111111111111111111111111111111=11111111111 MIIMMIIIIIIM111111111111111111111 MEM 1111111111111111111
111 MINIM= 111111111M111111111111111111111111111111111111111111 IMMUNE
111 111B111111111111111111111111111111111M
ION111111111111111111111111111111 MIMI=iNEMENEMINENENNENEEEMENNEN111111111111 1111111111101111111 1111111111111111111111
a III IIII MEI 1111111111.11.111 EMI MUM=ME MEI 11111111111111111111 Mil 11.111.11110in MB . 111011.111. MOM Min 11.11111.in IIIII IBM 111111111111 Min 1111111111.011..Ill II MIN MMINNUMMINNIIIIM11111111111111111111111111111111101111111111111111III MMIIIMINIIMIIIIIII11111111111111111111101111
,1111111111111111111111111111 MIMINIMImminumnimion MMI11111111
A
.
a

APPENDIX B
BOOKS AND VISUAL MATERIAL
CODE INDEX
A. Films
B. Filmstrips and Slides
C. Transparencies
D. Film Loops
E. Books
F. Flip Charts
G. Workbooks
H. Pamphlets
I. Handout Material
J. Wall Charts
89
79
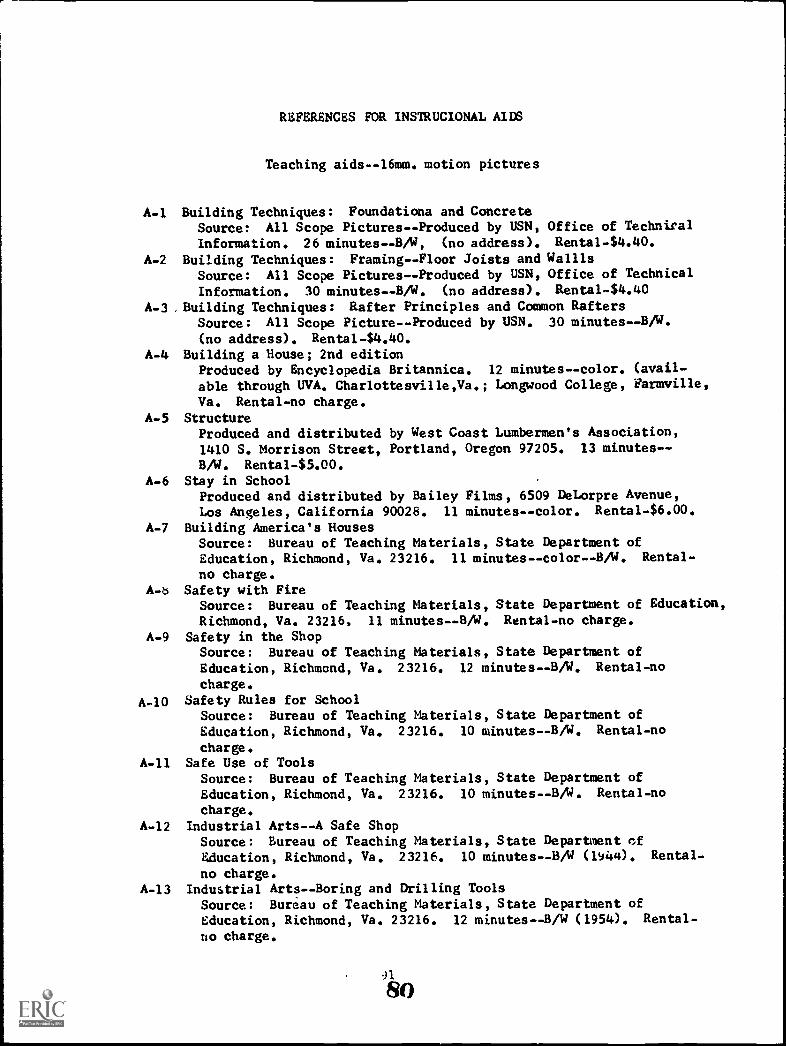
REFERENCES FOR INSTRUCIONAL AIDS
Teaching aids- -l6mm. motion pictures
A-1 Building Techniques: Foundationa and ConcreteSource: All Scope Pictures--Produced by USN, Office of Technical
Information. 26 minutesB/W, (no address). Rental-$4.40.
A-2 Building Techniques: Framing--Floor Joists and Wallis
Source: All Scope Pictures -- Produced by USN, Office of Technical
Information. 30 minutesB/W. (no address). Rental-$4.40A-3 ,Building Techniques: Rafter Principles and Common Rafters
Source: All Scope Picture--Produced by USN. 30 minutes - -B/W.
(no address). Rental-$4.40.A-4 Building a House; 2nd edition
Produced by Encyclopedia Britannica. 12 minutes--color. (avail-able through WA. Charlottesville,Va.; Longwood College, Farmville,Va. Rental-no charge.
A-5 StructureProduced and distributed by West Coast Lumbermen's Association,1410 S. Morrison Street, Portland, Oregon 97205. 13 minutes --
B/W. Rental-$5.00.A-6 Stay in School
Produced and distributed by Bailey Films, 6509 DeLorpre Avenue,Los Angeles, California 90028. 11 minutes -- color. Rental-$6.00.
A-7 Building America's HousesSource: Bureau of Teaching Materials, State Department ofEducation, Richmond, Va. 23216. 11 minutes--color--B/W. Rental-
no charge.A-ti Safety with Fire
Source: Bureau of Teaching Materials, State Department of Education,Richmond, Va. 23216, 11 minutes--B/W, Rental-no charge.
A-9 Safety in the ShopSource: Bureau of Teaching Materials, State Department ofEducation, Richmond, Va. 23216. 12 minutes--B/W, Rental-no
charge.
A-10 Safety Rules for SchoolSource: Bureau of Teaching Materials, State Department ofEducation, Richmond, Va. 23216. 10 minutesB/W. Rental-nocharge.
A-11 Safe Use of ToolsSource: Bureau of Teaching Materials, State Department ofEducation, Richmond, Va. 23216. 10 minutesB/W. Rental-nocharge.
A-12 Industrial Arts--A Safe ShopSource: Bureau of Teaching Materials, State Department ofEducation, Richmond, Va. 23216. 10 minutes--B/W (1944). Rental-
no charge.A-13 Industrial Arts--Boring and Drilling Tools
Source: Bureau of Teaching Materials, State Department ofEducation, Richmond, Va. 23216. 12 minutes--B/W (1954). Rental-
no charge.
130

REFERENCES FOR INSTRUCTIONAL AIDS (continued)
A-14 Industrial Arts -- Chisels and GaugesSource: Bureau of Teaching Materials, State Department ofEducation, Richmond, Va. 23216. 12 minutes--B/W (1945). Rental-
no charge.A-15 Industrial Arts--Handsaws
Source: Bureau of Teaching Materials, State Department ofEducation, Richmond, Va. 23216. 11 minutes--B/W (1953). Rental-no charge.
A-16 Industrial Arts: Measuring and SquaringSource: Bureau of Teaching Materials, State Department ofEducation, Richmond, Va. 23216. 11 minutes--B/W (1953). Rental-no charge.
A-17 Industrial Arts--PlanesSource: Bureau of Teaching Materials, State Department ofEducation, Richmond, Va. 23216. 11 minutes--B/W (1953). Rental-no charge.
A-18 Industrial Arts - -Using Screws and NailsSource: Bureau of Teaching Materials, State Department ofEducation, Richmond, Va. 23216. 11 minutes--B/W (1953). Rental-no charge.
A-19 Industrial Arts -- Joining and GlueingSource: Bureau of Teaching Materials, State Department ofEducation, Richmond, Va. 23216. 15 minutes--B/W (1956). Rental-no charge.
A-20 Magic of LumberSource: V.P.E. & S.U., Learning Resource Center, #104 MediaBuilding, Blacksburg, Va. 22 minutes--sound/color. Rental-no charge.
A-21 Siding SenseSource: V.P.I. & S.U., MeCia Center, Blacksburg, Va. 12 minutes- -
sound /color. Rental-no charge.A-22 Pattern
Source: V.P.I. & S. U., Media Center, Blacksburg, Va.-- Producedby West Coast Lumbermen's Association. 15 minutessound/Bt.%Rental-no charge.
A-23 Those Fabulous Pre-FabsSource: V.P.L. & S.U., Media Center, Blacksburg, Va. 15 minutes- -
sound /color. Rental-no charge.
8 mm. Motion Pictures
A-24 CarpentersSource: Encyclopedia Britannica Educational Corporation, 425North Michigan Avenue, Chicago, Illinois 60611. 4 minutes- -color (cartridge N/S).
92
81.

REFERENCES FOR INSTRUCTIONAL AIDS (continued)
A-25 Hammer Handles and FacesSource: Sterling Educational Films, P.O. Box 8497, UniversalCity, Los Angeles, California 91608. Color (cartridge N/S).
A-26 Hammer, The--How to Drive a NailSource: Walden Film Corporation, 39 East 31st Street, NewYork, New York 10016. 4 minutes--color (cartridge N /S).
A-27 Measuring Tools--Common TypesSource: Visual Instruction Productions, 295 West 4th Street,New York, New York 10016. 2 minutes--color (cartridge N/S).
A-30 Woodworking--Hand Tools--A SeriesSource: Sterling Educational Films, P.O. Box 8497, UniversalCity, Los Angeles, California 19608. Produced in 1968.Consists of the following:1. Backsaws2. Bit brace and bits3. Block plane4. Butts--joints5. Cabinet scraper6. Care and sharpening7. Clamps8. Compasses, dividers, and trammel points9. Construction of common planes10. Coping and compass saws11. Correct use of hammer12. Correct use of nails13. Cross cut saw14. Dado and groove joints15. Dowel joints16. Drilling holes17. Flat blade, screwdriver18. Gauges19. Clueing20. Grinder21. Half-lap joints22. Hammer handles and faces23. Hand drills24. Hand scraper25. Jack plane26. Lacquer27. Layout with the try square28. Nails29. Natural glue30. Oilstone, the31. Phillips screwdriver32. Preparing wood surfaces33. Rabbet joints34. Rabbet and router planes
93

REFERENCES FOR INSTRUCTIONAL AIDS(continued)
A.30 Woodworking--Hand Tools -.A Series (continued)
35. Resin glues and contact cement36. Rip saw37. Rules and Topes38. Safety with the chisel39. Sandpapers and sanding40. Selecting a hammer41. Sharpeni chisel42. Sharpening a plane iron43. Sharpening gauges44. Sharpening scrapers45. Shellac46. Smoothing and joiner planes47. Socket screwdriver48. Special purpose screwdriver49. Squares50. Stains51. ryes of chisels52. Using a chisel, pt. I53. Using a chisel, pt. II54. Using clamps55. Using the Auger bit56. Using the expansive bit and depth gauge57. Using the gauge58. Varnish59. Wax and oil60. Wood screws
A-31 Woodworking- -Hand Tool Operation, Set 2--A SeriesSource: McGraw-Hill Textfilms, 330 West 42nd.Street, New YorkNew York, 10036. 4 minutes.Consists of the following:1. Boring with Auger bit2. Boring with Forstner bit3. Chiseling tc i:nished line4. Compass saw5. Drilling6. Filing Wood7. Glueing edge to edge8. Methods of planing end grain9. Planning a chamfer
10. Scraping wood11. Sett'.ng a plane12. Squaring up stock13. Using a gauge14. Using spoke shine
A-32 Woodworking Tools--A Seri^.Source: Bailey Film Associates, 11559 Santa Monica BoulevardLos Angeles, California 10025. 4 minutes.Consists of the following:.1. Chisels, rasps, and clamps2. Hammers--woodwork
94
83

REFERENCES FOR INSTRUCTIONAL AIDS (continued)
35 mm. Filmstrips
B-1 Building the FoundationSource: Eye Gate House, 146-01 Archer Avenue, Jamaica, NewYork 11435. 25 frames--color.
B-2 Building the FoundationSource: Society for Visual Education, Incorporated, 1345Diversay Parkway, Chicago, Illinois 60614. 30 frames -- color.
B-3 Building the Frame HouseSource: Eye Gate House, 146-01 Archer Avenue, Jamaica, NewYork 11435. 25 frames -- color.
B-4 Building the ShellSource: Society for Visual Education, Incorporated, Divisionof General Precision Equipment Corporation, 1345 Diversay Park-way, C.icago, Illinois 60614. 33 framescolor.
B-5 Hand Saws for Woodworking--A SeriesSource: Encyclopedia Britannica Films, Educational Films Corp-oration, 425 North Michigan Ave., Chicago, Illinois 60611- -
Produced in 1960.Consists of the following titles:Crosscut Saw and Ripsaw 20 framesHow to Sharpen Hand Saws 14 framesHow to use Backsaw and Dovetail Saw 12 framesHow to use Compass and Keyhole Saw 10 framesHow to use Coping Saw and the Turning Saw 14 framesHow to use the Crosscut and Ripsaw 10 framesHow to use the Miter Box 24 framesHow to use the Picture Framing Miter Machine 14 framesTypes of Hand Saws 10 frames
B-6 Hand Tools 78 frames--B/WHand Tools, Hammers, Saws 67 frames--B/W
Source: Jim Handy Organization, 2821 East Grand Boulevard,Detroit, Michigan 48211.
B-7 Hand Drill--A SeriesSource: Bailey Films Association, 11559 Santa Monica Boulevard,Los Angeles, California 90025. 53 frames -- color.
Consists of the following titles:How to Select a ScrewdriverHow to use Hammers and Nail SetsHow to use the ScrewdriverInformation about Hammers and Nail SetsNailzPreparation for Driving ScrewsWood Screws
REFERENCES FOR INSTRUCTIONAL AIDS (continued)
Transparencies
C-1 Carpentry--Roof Framing, Part 2, catalogue #399Source: Minnesota Mining and Manufacturing Company, FilmLibrary, 2501 Hudson Road, St. Paul, Minnesota 55119.
C-2 Carpentry--Staircase Construction, catalogue #400Source: Minnesota Mining and Manufacturing Company, FilmLibrary, 2501 Hudson Road, St. Paul, Minnesota 55119.
C-3 Carpentry--Interior Trim, catalogue #401Source: Minnesota Mining and Manufacturing Company, FilmLibrary, 2501 Hudson Road, St. Paul, Minnesota 55119.
C-4 Carpentry--Exterior Trim, catalogue #402Source: Minnesota Mining and Manufacturing Company, FilmLibrary, 2501 Hudson Road, St. Paul, Minnesota 55119.
C-5 Coping and Compass SawsSource: Minnesota Mining and Manufacturing Company, Film.Library, 2501 Hudson Road, St. Paul, Minnesota 55119.
C-6 Cornice Construction DetailsSource: DCA Educational Products, Incorporated, Subs. of Dis-play Corporation of America, 4865 Stenton Avenue, Philadelphia,Pennsylvania 19144.
C-7 Framing ElevationsFraming Plans (Floor)Framing Plans and Details (Roof)
Source: DCA Educational Products, Incorporated, Subs. of Dis-play Corporation of America, 4865 Stenton Avenue, Philadelphia,Pennsylvania 19144.
C-8 House Framing--Part 1, catalogue #390Source; Minnesota Mining and Manufacturing Company, Film
C-9 House Framing--Part II, catalogue #391Source: Minnesota Mining and Manufacturing Company, FilmLibrary, 2501 Hudson Road, St. Paul, Minnesota 55119.
C-10 Hand Tools and Machines in the Workshop--A SeriesSource: Minnesota Mining and Manufacturing Company, FilmLibrary, 2501 Hudson Road, St. Paul, Minnesota 55119
C-11 Roof Framing, catalogue #392Source: Minnesota Mining and Manufacturing Company, FilmLibrary, 2501 Hudson Road, St. Paul, Minnesota 55119.
D-Film Loops
96 ,
85

REFERENCES FOR INSTRUCTIONAL AIDS (continued)
Books
E-1 Accident Prevention Manual for Shop TeachersWilliams, William A.
American Technical Society
E-2 Builders EncyclopediaUlrey, Harry F.Howard W. Sams & Company, Incorporated4300 West 62nd StreetIndianapolis, Indiana 46268
E-3 Cabinet Making and Millwork, Tools, Materials, Layout Construction2nd. edition
Dahl, Alf; Wilson,American TechnicalChicago, Illinois
E-4 Carpentry, BlueprintMcDonnell, Leo P.Delmar PublishersP.O. Box 5087Albany, New York 12205
E-5 Carpenters and Builders Library, 4 volumesUlrey, Harry F.Howard W. Sams & Company, Incorporated4300 West 62nd. StreetIndianapolis, Indiana 46268Volume I. Contents:
Carpentry hand tools, woodworking machines, use of the steelsquare, cabinetmaking joints and patternmaking.
Volume II Contents:
Carpenters mathematics, surveying, strength of wood, Erchi-techtural plans and specification, metal construction.
Volume III Contents:
Plot layout, foundations, concrete forms and block construction,house framing, chimneys, fireplaces, scaffolding and buildinginsulation.
Volume IV Contents:
Roofing, cornice construction, millwork, doors, windows, andsiding, flooring, interior walls and ceiling, painting andmaintenance.
E-6 Carpentry and BuildingUlrey, Harry F.Howard W. Sams & Company, Incorporated4300 West 62nd StreetIndianapolis, Indiana 46268
E-7 Carpentry for the Building Trades, 2nd. editionLair, Elbert A.McGraw-Hill Incorporated330 West 42nd. StreetNew York, !yaw York 10036
DouglasSociety60637Reading & Sketching--Residential
)
86

REFERENCES FOR INSTRUCTIONAL AIDS (continued)
E-8 CarpentryCristoford, R.J.Arco Publishing Company, Incorporated219 Park Avenue, SouthNew York, New York 10003
E-9 Concrete Form ConstructionDelmar PublishersP.O. Box 5087
Albany, New York 12205E-10 Concrete Construction Handbook
Waddell, Joseph D.McGraw-Hill Incorporated330 West 42nd StreetNew York New York 10036
E-11 Construction EstimatingJones, R.Delmar PublishersP.O. Box 5087Albany, New York 12205
E-12 Construction Estimating and Costs, 4th editionPulver, E. HarryMcGraw-Hill Incorporated330 West 42nd StreetNew York, New York 10036
E-13 Construction Estimates from Take-ofi to BidsFoster, NormanMcGraw-Hill Incorporated330 West 42nd StreetNew York, New York 10036
E-14 Construction Estimating and Job PreplanningDeatherage, George E.McGraw-Hill Incorporated330 West 42nd StreetNew York, New York 10036
E-15 Carpentered HenUpdike, JohnHarper & Row Publishers Incorporated49 East 33rd StreetNew York, New York 10016
E-16 Carpentry and JoineryDouglas, W.B.P. Shalon Publications Incorporate:;5409 lath AvenueBrooklyn, New York 11204
E-17 Carpenters Tools, Their Care and MaintenanceDrake Publishers381 Park Avenue, SouthNew York, New York 10016

REFERENCES FOR INSTRUCTIONAL AIDS (continued)
E-18 Carpenters: U.S. Safety.McElroy, Shafer, Frank; and McCormach, George R.U.S. Bureau of Labor Statistics Bulletin #1118Washington, D.C.
E-19 Design and Production of HousesKelly, BurnhamMcGraw-Hill Incorporated330 West 42nd StreetNew York, New York 10036
E-20 Design of Concrete StructuresUrquhart, George; O'Ro'irke, L.C.
McGraw-Hill Incorporated330 West 42nd StreetNew York, New York 10036
E-21 Design of Foundations for BuildingsJohnson, Sidney M.; Kavanagh, Thomas C.McGraw-Hill Incorporated330 West 42nd StreetNew York, New York 10036
E-22 Design of Prestressed Concrete BeamsConnolly, W.H.McGraw-Hill Incorporated330 West 42nd StreetNew York, New York 10036
E-23 Estimating for the Building TradesSteinburg, Joseph; Stempel, MartinAmerican Technical SocietyChicago, Illinois 60637
E-24 Foundation ConstructionCarson, Arthur B.McGraw-Hill Incorporated330 West 42nd StreetNew York, New York 10036
E-25 Framing, Sheathing, and InsulationJones, R.Delmar PublishersP.O. Box 5087Albany, New York 12205
E-26 Fundamentals of Carpentry Tools, Materials, Practices 4th editionDurbahn, Walter E.; Sunberg, Elmer W.American Technical SocietyChi.mgo, Illinois 60637
E-27 Fundamentals of Carpentry Practical Construction, 4th editionDurbahn, Walter E.; Sunberg, Elmer W.American Technical SocietyChicago, Illinois 60637
E-28 Interior and Exterior TrimDelmar PublishersP.O. Box 5087Albany, New York 12205
99
8S.

REFERENCES FOR INSTRUCTIONAL AIDS (continued)
E-29 Modern CarpentryWagner, Willis H.GoodheartWillcox123 West Taft DriveSouth Holland, Illinois 60473
E-30 Principles and Practices of Learning ConstructionSmith, Ronald C.Prentice-Hall, Incorporated680 Forest Road, NortheastAtlanta, Georgia 30312
E-31 Practical House Car.-ntr Methods for BuildinWilson, J.D.McGraw. Hill Incorporated330 West 42nd StreetNew York, New York 10036
E-32 Practical Problems in Math Carpentry TradeWilson, J.D.Delmar PublishersP.O. Box 5087Albany, New York 12205
E-33 Principles of Light ConstructionSmith, Roland C.Prentice-Hall, Incorporated680 Forest Road NortheastAtlanta, Georgia 30312
E-34 Related Mathematics for CarpentersChamberlainAmerican Technical SocietyChicago, Illinois 60637
E-35 Simplified Roof Framing, 2nd editionWeison, J.D.; Werner, S.O.McGraw-Hill Incorporated330 West 42nd StreetNew York, New York 10036
E-36 Simplified Stair LayoutWilson, J.D.; Werner,S.O.Delmar PublishersP.O. 5087Albany, New York 11205
E-37 Stair Layout Design and BuildingBradzinski, Stanley, Jr.American Technical SocietyChicago, Illinois 60637
E-38 Steel Square, 2nd editionTommend, GilbertAmeric10 Technical SocietyChicago, Illinois 60637
E-39 The Steel SquareSeigele, H.H.Drake Publishers381 Park Avenue, SouthNew York, New York 10016
100

REFERENCES FOR INSTRUMENTAL AIDS (continued)
E-40 The Use of Hand WoodworkinCoolsMcDonnell, Leo P.Delmar PublishersP.O. Box 5087albany, New York 12205
E-41 Use of Portable Power ToolsMcDonnell, Leo P.Delmar PublishersP.O. Box 5087Albany, New York 12205
F -Flip Charts
G-Workbooks
Pamphlets and Curriculum Guides
H-1 Alabama Department of: Education Curriculum GuideIncludes bibliograpaies--Ed. Lab.
H-2 Rules and Regulations Governing Construction and Demolition andAll Excavation
Commonwealth of Virginia. Virginia Department of Labor andIndustry
H-3 Minimum Property Standards for One and Two Living UnitsFederal Housing Administration
H-4 Safety Rules for the safe operation of power woodworking tools./45 Samworth Road, Clifton, New Jersey 07012
4.
101
90

REFERENCES FOR INSTRUCTIONAL AIDS (continued)
I-Handout Sheets
The following section contains handout sheets which may be usedto distribute information to students. These sheets have not beenlisted as instructional aids in the units of instruction section; how-ever, the teacher may find some of these handouts appropriate for useas instructional aids. Contained herein are only a few of a large numberof handout sheets which may be prepared by the teacher. In additionto being used as handout sheets, the following materials may be utilizedfor making transpariences to be projected on the screen.
103
91

GENERAL SAFETY RULES
1. Wear goggles when operating any machine.
2. No neckties are to be worn around a machine.
3. Unplug the electrical outlet when adjusting or carrying powerhand tools.
4. Check to be sure electrical outlet is properly grounded.
5. Check voltage of electrical equipment before connecting to makesure the right outlet is used.
6. Do not place tools or equipment where someone may fall over them.
7. Always draw nails from scrap wood before discarding.
8. Practice good house-keeping.
9. Under no condition should "horse-play" be practiced.
10. Do not place tools on anything over head height.
105
92

GENERAL SHOP SAFETY RULES
In addition to any specific safety practices, the student willcomply with the following general safety rules. The student will begiven instruction on these rules at the beginning of the school yearand they must be followed at all times while in the shop area. If theinstructor will seek to foster a good safety attitude in students, en-forcement should not be difficult.
1. No horse play at anytime.
2. Whistling or any unnecessary noises are not permitted.
3. A safe, helpful attitude toward others should be practiced.
4. Student will not start work until appropriately dressed.
5. Eye Protective Devices must be worn in compliance with Virginia Statelaw.
6. Student will enter and leave the shop in orderly manner.
7. Accidents of any nature will be reported at once to the instructor.
8. Report any defective equipment to the instructor immediately.
9. Safety hazards must be reported to the instructor.
10. No student will operate any equipment until permission has beengranted from the instructor.
11. All tools and materials must be in proper place when not in use.
12. All equipment and floor will be cleaned before leaving the shop.
13. No visitors are allowed in the shop without the imitructor's per-mission.
14. Good housekeeping rules:a. All aisles and walkways kept free from materials.b. Scrap and rubbish kept in proper containers.c. All spills wiped immediately.d. Provide proper ventilation.e. Keep all work areas clean.f. Place all materials in proper racks or carefully laid pile.g. Keep all inflammable materials properly stored.
107
MACHINE SAFETY
1. No equipment will be used until student has had proper instructions,and has passed a safety test on said equipment.
2. Never operate equipment if overly tired, ill or taking medicationwhich impairs ability.
3. Make adjustments while power is off, and machine is stopped.
4. Keep attention on work.
5. Never remove safety guards without permission or presence of theinstructor.
6. Wear safety goggles.
7. Stand clear of machine when starting.
8. Do not overtax the equipment.
9. Never clean equipment when running.
10. Have equipment properly grounded.
11. Only one person may operate any equipment at one time.
12. Do not leave running equipment unattended.
13. When job is finished, do not leave machine until it has completelystopped.
14. Machine will not be operated when instructor is absent from the shop.
15. Proper clothing will be worn at all times.
16. Floors in machine area must be kept clean at all times.
17. Never work with machinery when alone.
18. Report any defective equipment.
19. All equipment must'be checked by the instructor and student beforeoperation.
20. Never overload an electrical circuit.
108,

HAND TOOL SAFETY
1. Use the correct tool for the job at hand.
2. Tools must be clean and dry before use.
3. Defective or broken tools must be reported to the instructor.
4. Do not strike hardened steel together.
5. Mushroomed tools will not be used.
5. All tools must be sharp before use.
7. Carry tools in proper, safe manner.
8. Never throw a tool to another person.
9. Hold firmly onto all t000ls when using.
10. All tools will be stored in proper place after use.
109
95

ACKNOWLEDGMENT OF SAFETY INSTRUCTION AND PLEDGE
I have received the SAFETY INSTRUCTIONS regarding the operationof the following power driven machines. I fully understand the im-portance of these rules and regualtions and I am fully aware that theviolation of any one of them may endanger myself and others.
My teacher has demonstrated to me the proper methods of using eachmachine listed below and has pointed out the safety precautions neces-sary to avoid injury.
I have demonstrated my ability to use each machine listed belowin the presence of my teacher. I understand the safety precautionsinvolved and understand how to insure my safety through the properuse of the machines. I am confident that I can operate these machinessafely. When in doubt about the operation of any machine, or otherequipment, I will consult the teacher before proceeding.
(Name each machine to be written in by the pupil only after hehas passed the safety tests and demonstrated his ability to use it.)
Name of Machine Date
1.
student's Teacher'sSigature Initials
2.
3.
4.
5.
6.
7.
8.
I have passed the tests covering safety in the shop and the useof the above listed machines.
I promise to observe the SAFETY INSTRUCTIONS and to follow theinstructions given in the demonstration. I may use the machines onlyafter I have been properly instructed in their safe use, and have hadthe approval of the teacher. I understand that the use of machines inthis shop is voluntary cn my part.
SCHOOL SIGNED
DATEPupil
Teacher
PARENT OR GUARDIAN:
This form is being sent home for review and signature by the student'sparent or guardian to allow you to see the progress of your youth.Upon return it will be placed in the student's Permanent VocationalRecords for future reference and possible job placement.
Date
Parent or Guardian
110
ACCIDENT INSURANCE FORM
Yourtown Public SchoolsAnywhere, Virginia
Office of Supervisor ofIndustrial and Vocational Education Date
The Anywhere City School Board requires that all vocational shop
students be covered by accident and hospitalization insurance because
of the many accident possibilities associated with shop work. The
special policy sold through the school is recommended. However, if the
student is covered by another policy and the special school policy is
not desired the following information must be filed with the school.
* * * * * * * * * * * * * * * * * * * * * * * * -* * * * * * * * * * *
I cerify that is covered by accident(Student's Name)
and hospitalization insurance for the present school year with
(Name of Company) (Policy No.)
(Parent's Signature)
(Date)
97

(chick one)Schorr. Jurisdictional
0 NonSchool Junsdrchonat
School District:City, State:
RECOMMENDEDSTANDARD STUDENT ACCIDENT REPORT
(See Instructions on reverse side)
('kook One)
Recordable 13
Itsoostabto Only
1. Name 2. Address
3. School 4. Sex Male 0 5. Age 6. Grade /Special ProgramFemale U
7. Time Accident OccurredDate:
AMUDay of Week: Exact Time: RA 0
8. Nature of Injury
9. Part of Body Injured
10. Degree of Injury (chock One)Death 0 Permanent 0 Temporary nose um) 0 NonDisabling (no lost Urn') 0
11. Days LostFrom School: From Aeivities Other Than School: Total:
12. Cause of Injury
13. Accident Jurisdiction (cheek ono)School: Grounds p Budding 0 To and From 0 Other Activities Not on School Properly
NonSchool: Home p Other 0
14. Location of Accident toe specific) 15. Activity of Person hie socaici
16. Status of Activity 17. Supervision Id yes. give & nom of supervisor)
Ms 0No
18. Agency Involved 19. Unsafe Act
20. Unsafe Mechanical /Physical Condition 21. Unsafe Personal Factor
22. Corrective Action Taken or Recommended
23. Property DamageSchool $ NonSchool $ Total $
24. Description IGve s word picture of the accrdent.eiplsining who. whet. when, why and how,
325. Date of Report 26. Report Prepared by (signature 6 title)
27. Principal's Signature
This form is recommended for securing data for accident prevention and safety education. School districts may reproduce this formadding space for optional dins. Reference: Student Accident Reporting _Guidebook, National Safety Council, 425 N. Michigan Avenue,Chicago. Illinois 60611. 1966. 34 pages.
112

10d nails leapart
d nailsover eachstud
Upper Top Plate
Lower Top Plate
10d nails Toenailed
20d nails)
10d nails16" apart
10d nails
20d nails
2-10d nailstoe na il-edeach side
10d nails toenailed
DETAIL OFWINDOW NAILING
11.3
. 99

10d nailsspaced16"oport
.Upper-TopPlate
10d nails,toe nailed.
Wall Studs
10d nailstoernoilid
Sole:Plate
16d nails overeach Stud
Lower TopPlate
20dnolis
Wall Stud
10d nailstoe nailed
Sole Plate Sub Flooring
TYPICAL NAILING AT DOOR OPENINGS
114
1 00

0
FRAMED JOIST AT GIRDER STEEL 01RDER
GIRDER WITH JOIST HANGER LEDGER BOARD ON GIRDER
115
101.

64" Bridging
2"xe Stud Framing (4 "viay)
TRUSSED HEADER FRAMINGINTERIOR ARCH OPENING
116102

SOLE PLATE
JOISTHEADER
SILL
Platform framing details: AFirst floor level. BSecond floor level.
STUD
SUBFLOOR
JOIST
EXTERIOR WA' L
EXTERIOR WALL
JOISTHEADER
DOUBLEPLATE
B
A
SOLE PLATE
JOISTHEADER
117
103
SILL
STUD
SUBFLOOR
.. ..
GIRDER
EXTERIOR WALL. AT GIRDER
STUD
SUBFLOOR
JOIST
BEARING PARTITION
FIRESTOPPING
DOUBLEPLATE
STUD

Upper Top Plate
Lower Top Plate
ex4" Stud Framing
Studding
irSo I idBridging
ex 4"StudFraming
NailingBlock
ex 4"Stud s
Sole Plate
b Floor
SINGLE UNIT WINDOWOPENING IN FRAME WALL
118

Framing for stairway with a.landing.
119

>
.,..L.....

imArz
PARTIT/ON
STUDS
NATI
&TOMO
ITOOR
45fAN5
orAM
PLANK
STRUCIVRAL
FLOOR
Ø:A/4
SUPPORT
PART/T/ON
AMY:
POST
NCAOIR
PLANK
JMOCTURA
LRomJUL
POI/MOAT
IRSTPLOOR
ocAmJ'A
zA7e
COLUMN
40100z.
Aiworrrzzz!imraA
ONAL
JNEATINNO
PACE
OPsrao
11A/LISS
/J 11SIO
/AONAL
ORAC/NO
SITAVTO
ft0/,), .1/79 co,b,4)1,..100, 6%7,o9 47 Sto "vIrs
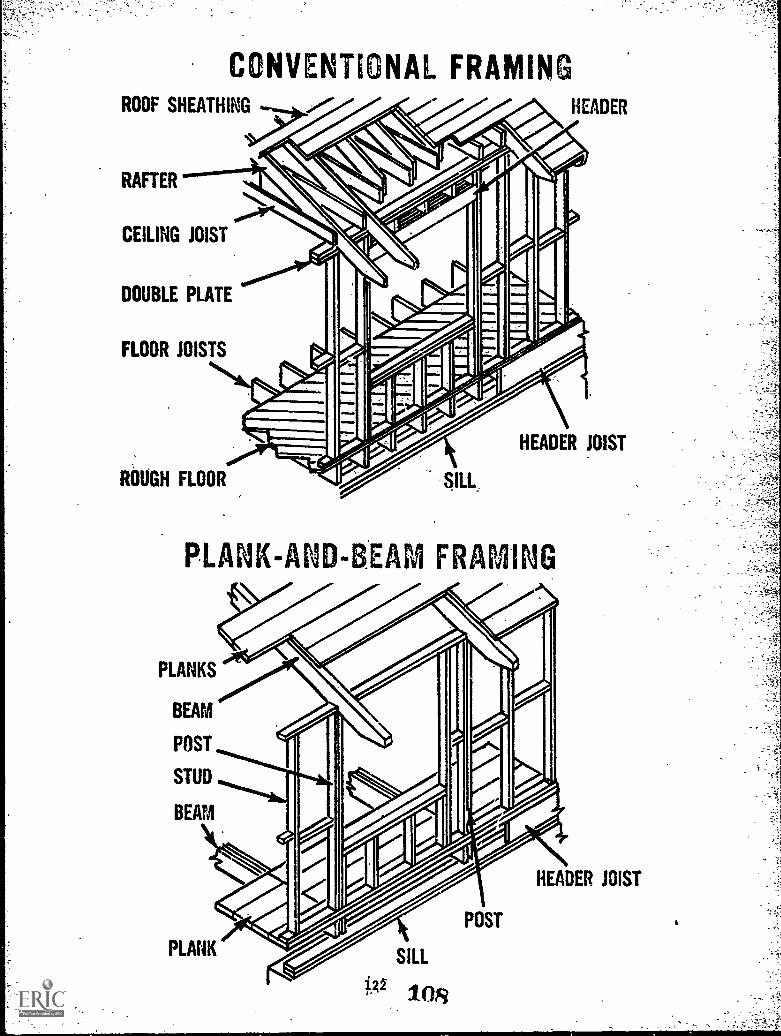
CONVENTIONAL FRAMINGROOF SHEATHING HEADER
RAFTER
CEILING JOIST
DOUBLE PLATE
FLOOR JOISTS
ROUGH FLOOR
HEADER JOIST
PLANK-AND-BEAM FRAPAINIG
PLANKS
BEAM
POST
STUD
BEAM
PLANK SILL
2-2 1O
POST
HEADER JOIST

EFFECT OF INCREASED DIMENSIONSON WOOD BEAM STRENGTH
A
er I
..1w1. 2W Ft
A. COMPARATIVE STRENGTH VALUE - 1
B. COMPARATIVE STRENGTH VALUE -
C. COMPARATIVE STRENGTH VALUE - 4
123
1 69

Floor or CeilingJoist Framing
Gypsum Lath atNormal Ceiling.
Nailing Strip
Gypsum Loth
Lenguis determineby Cabinet Dimension Cabinet set flush
DROPPED CEILINGABOVE
KITCHEN CABINETS
12411.0
PartitionFro mine
10d nailsthru Cleat
2"x 4" Cleat
x6" Furring
xitis Furring

Interior stairway frotning.

Gypsum Loth Jamb TrimmerStuds at Opening
MetalCornerBead
Ve Gypsum Plaster
Metal Corner Bead
DETAIL AT PLASTERED OPENINGS
FORMED METALLATH CORNER
. 126
112
Bathroom floor construction.for ceramic tile covering.

Stagger Nails16 "apart
anx4"Stud
ex4"Bridging
214" Upper Top Plate
2k4" Lower Top Plate
2141Stud Framing (4"way)
Stagger Nails 16 "apart
INTERIOR DOOR
FRAMINGSTUDS SET 4"WAY

Gypsum Lath and Plaster
Housed-out Wail Stringer
Stock Tread and Riser
Plaster Soffit, if Required
2" Rough Carriage set away fromWall Framing to permit placingof Wall Stringer
Housed-out Finish Wall Stringer
I Stair Nosing
11/4" Finish Tread
TeNFinish Riser
Scotia
Finish Floor
128
11_4
2" RougnCarriage
Glued Block
Sub Flooring

TYPICAL FRAMEINTERIOR WALLS
16" x 48"
GYPSUM LATH
I NFORMAT I ON SHEET
2J Minimum on each side
Formed SegmentalPerforated Metal Arch
METAL CORNERBEAD
1ST. COATSCRATCH COAT
2ND. COATBROWN COAT
3RD. COATFINISH COAT
et°1See
EXTERIORINTERIOR WALLS

It"
"
rdE
AP
PLI
CA
TIO
N O
F M
ET
AL
LAT
H A
ND
PLA
ST
ER
GR
OU
ND
SIN
TE
RIO
R W
ALL
S A
ND
OP
EN
I N
GS
2k" MINIMUM ON EACH SIDE
.1.
METAL LATH CORNER.
BEAD BENT AROUND
CURVED SEGMENT OF ARCH
METAL CORNER BEAD
16" x 48"
GYPSUM LATH
For
med
Met
al L
ath
Cor
ner
Woo
d P
last
er G
roun
ds a
t Bas
e, a
ndcu
.tuild
Doo
r A
larn
bs a
nd H
ead

6.
ASSIGNMENT SHEET
NAME STAIR PARTS
PLACE THE NAME OF THE STAIR PART IN THE COLUMN AT THE RIGHT
THAT CORRESPONDS WITH THE NUMBERED PART.
1.
17.

ASSIGNMENT SHEET
NAME PARTS OF STAIRS AND WALLS
12.
132

JOB SHEET
GENERAL INFORMATIONSTAIR CARRIAGES (Horses) should be laid out on 2 x 10 or wider plankto as to have at least 4" of solid stock between the cutout section(for risers and treads) and the edge of the plank. Accuracy is ofmajor importance insecuring a satisfactory stairway.
SPECIAL SAFETY PRECAUTIONS1. When making a partial cut with a skilsaw do not remove saw from
wood until blade stops revolving.
2. Wear safety goggles while sawing with the skilsaw.
1. Framing square2. Tape3. 6' rule4. DividersS. Pencil
TOOLS AND EQUIPMENT6.
7.
8,
9.
10.
of
PROCEDURE1. Determine total rise.2. Determine tread rise.3. Determine tread run.4. Select carriage stock.S. Layout first riser and bottom
level cut.6. Step-off balance of steps.7. Layout drop of carriage.8. Cut carriage with skilsaw.9. Finish cuts with handsaw.
QUESTIONS1. hat do we mean by the 17 rule
of tread rise and tread run?
Skilsaw8 .pt. handsaw
Stair rodSaw horsesSafety goggles
2. Upon what does the pitch of a stairway depend?
3, What degree of pitch is recommended for a comfortable stairway?
I I
D WNI I I
133
119
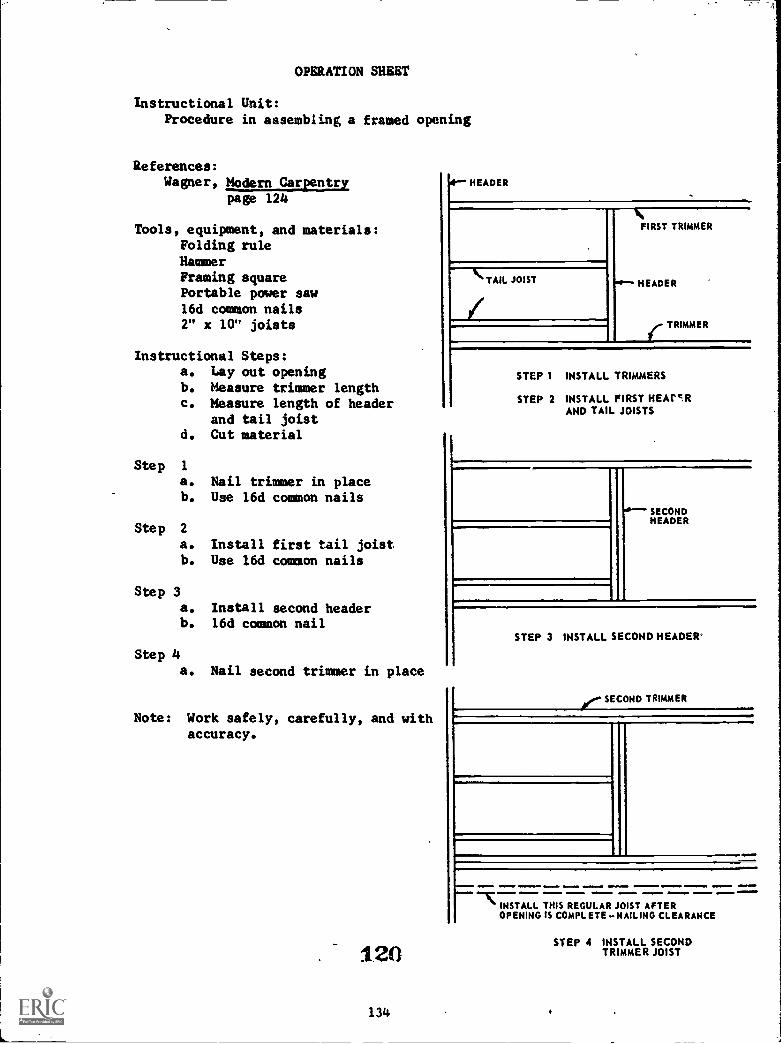
OPERATION SHEET
Instructional Unit:Procedure in assembling a framed opening
References:Wagner, smodEnclEmata
page 124
Tools, equipment, and materials:Folding ruleHammerFraming squarePortable power saw16d common nails2" x 10" joists
Instructional Steps:a. Lay out openingb. Measure trimmer lengthc. Measure length of header
and tail joistd. Cut material
Step 1
a. Nail trimmer in placeb. Use 16d common nails
Step 2
a. Install first tail joistb. Use 16d common nails
Step 3a. Install second headerb. 16d common nail
Step 4a. Nail second trimmer in place
Note: Work safely, carefully, and withaccuracy.
120
134
HEADER
\ TAIL JOIST .11.
FIRST TRIMMER
HEADER
( TRIMMER
STEP 1 INSTALL TRIMMERS
STEP 2 INSTALL FIRST HEAC9tAND TAIL JOISTS
SECONDHEADER
STEP 3 INSTALL SECOND HEADER'
je SECOND TRIMMER
.7R= tormoo ammo. ilm omM .
NON.MINIMO .111
INSTALL THIS REGULAR JOIST AFTEROPENING IS COMPLETE-NAILING CLEARANCE
STEP 4 INSTALL SECONDTRIMMER JOIST

YOU MAY EATW1TH FALSE-TEETH.
BUT YOU CAN'T SEE WITHA GLASS E.YE./ n
WEAR GOGGLES WHENNEEDED y
135
;121


GROUND IT; BEFORE//IT GROUNDS yo u
"7123

A
IF YOU LIKE HORSEPLAYGET A
HOBBY NORSE1. 124
138

REFERENCES FOR INSTRUCTIONAL AIDS (continued)
J. Wall Charts
Stanley ToolsDivision of the State WorksEducational DepartmentNew Britian, Connecticut
1;, 1 Foot Rule 22. Spiral Ratchet
2. Measuring Rules 23. How to Use Boring Tools
3. Measuring and Marking Tools 24. Hand Drill
4. Common Cuts in Wood 25. Automatic Drill
5. Common Wood Joints 26. Bit Brace
6. Common Wood Joints 27. Doweling Jig
7. Try Square 28. Sharpening Hand Scraper
8. Marking Gauge 29. Sharpening Cabinet Scraper
9. Plane 30. T-Level
10. How to Grind Plane Iron 31. Butt Gauge
11. How to Whet Plane.Iron 32.- Soldering Iron
12. Assembling Double Plane Iron 33. Ball Pein Hammer
13. Setting Plane Iron 34. Straight awl Cress Pein
14. How to Use Plane Iron 35. Flat Cold Chisel
15. Block Plane Iron 36. Cape, Round Nose, and DiamondPoint Chisels
16. Spoke Shaves37. Riveting Hammer
17. Horizontal Chiseling38. Setting Hammer
18. Vertical Chiseling
19. How to Use Hand Saws
20. Nail Hammer
21. Screwdriver
139
125

APPENDIX C
Suggested Tool List
141
126

TOOL INVENTORY
Suggested minimum for Class of 20 Students
Item Number
1. Bits - Auger - 1/4" to 1" 2 sets
2. Bits - Masonry 1/4" through 3/4" 4
3. Bits - Drill 1/16" to 1/2" in 64ths. 1 set
4. Bits - Masonry 1/4" through 3/4" 1 set
5. Brace 2
6. Brush, File 1
7. Chalk Box 2
8. Chisel, Cold 1 set
9. Chisel, Wood 1/4", 3/8", 1/2", 3/4", 1", 1 1/4", 1 1/2" 4 sets
10. Clamp "C" 8" 4
11. Dividers - 6" 2
12. Dividers - 12" 2
13. Door and Jam Butt Templet 2
14. Drill, Electric 3/8" 1
15. Drill, Electric 1/2" 1
16. Drills, Star 1/4" through 3/4" 1 set
17. Drill, Yankee 2
18. Files, Variety 18
19. Gauge, Butt 6
20, Gauge, Wood-Marking 2
21. Hammer, 16 oz. 10
22. Hammer, 13 oz. 10
23. Hammer, 3 lb. 127
142
1

TOOL INVENTORY (continued)
Item Number
24. Hammer, Sledge 2
25. Hatchet, Hand 2
26. Level, Carpenters -24", 30", 48" 2 each
27. Level, Transit
28. Line, Chalk (cotton) 2
29. Mitre Box 2
30, Nail Claws 2
31. Plane, Power 1
32. Plane, Block 2
33, Plane, Smooth, 9" 2
34. Plane, Jack, 14" 2
35. Plane, Jointer, 18" or 22"
36. Pliers, Side 2
37, Pincers, Carpenters 2
38, Router 2
39. Rod and Target 1
40, Rule, 6 ft. Extension 24
41. Saw, 8pt. Crosscut 8
42. Saw, lOpt. Crosscut 8
43. Saw, 12pt. Crosscut 3
44, Saw, Compass 2
45. Saw, Coping 2
46. Saw, Hack 1
Ins

TOOL INVENTORY (continued)
Item Number
47, Saw, Mitre, 26" 2
48. Saw, Skill 1
49, Saw, Reciprocating, (Heavy duty) 1
50, Saw, Sabre 1
51. Sash - Doorholder 2
52. Set - Saw 1
53. Set - Nail 12
54. Screwdriver - Phillips - 2 pt. 6
55. Screwdriver - Phillips - 1pt. 6
56. Screwdriver - 4" blade 6
57. Screwdriver - 6" blade 6
58. Screwdriver - 8" blade 6
59, Screwdriver - Yankee 1
60, Snips, Tin 2
61. Square, Combination 6
62. Square, Framing 20
63, Square, Sliding T Bevel 6
64. Square, Try, 12" 6
65. Square, Try 6" 6
66. Tape - 100 ft. Steel 2
67. Tape - 50 ft, Steel 1
68. Tripod, Transit 1
69. Vise, Saw 1
144
129

TOOL INVENTORY (continued)
Item Number
70, Wrecking Bar - 18" 4
71,
72,
Wrecking Bar - 24"
Wrench - Box and open end, 3/8" to 1"
4
1 set
73. Wrench - Adjustable 10" and 12" 2 each
145
13o
Recommended