Delphi for PHP
Copyright (c) 2007 CodeGear. All rights reserved.

Table of Contents
Getting Started 1What is Delphi for PHP? 1
Tour of the Delphi for PHP IDE 1
Concepts 4Overview of PHP User Interface Design 4
Overview of Editing Code 5
Overview of Debugging 5
Overview of Deploying PHP Applications 6
VCL for PHP Overview 6
IBX for PHP Overview 8
Procedures 10General 10
Accessing the Designer 10
Adding Components to a Form 10
Adding an Image Icon to a Component 10
Adding Multiple Components to an Existing Package 11
Adding and Removing Files 11
Adding Packages 12
Building Application Menus 12
Configuring the Designer 14
Creating a Form 14
Creating a Project 14
Creating and Using Code Templates 14
Creating Custom Components 15
Creating Properties for Custom Components 16
Customizing the Code Editor 16
Deploying Applications 16
Docking Tool Windows 17
Installing Custom Components 17
Localizing Applications 18
Opening a Project 18
Saving Custom Components 19
Setting Component Properties 19
Delphi for PHP
ii

Using Code Insight 19
Viewing VCL for PHP Help 20
Writing Event Handlers 20
Debugging 21
Adding a Watch 21
Setting and Modifying Source Breakpoints 21
Displaying Expanded Watch Information 22
Database 23
Creating a Database Application 23
Creating an InterBase PHP Database Application 24
Dragging an Item from the Data Explorer 24
Registering a Database 25
Reference 26General Reference 26
Default Keyboard Shortcuts 26
BRIEF Keyboard Shortcuts 28
IDE Classic Keyboard Shortcuts 29
Epsilon Keyboard Shortcuts 32
Visual Studio Keyboard Shortcuts 33
Delphi for PHP Component Writer's Guide 35
Overview of Creating Components 35
Overview of Creating Events 36
Overview of Creating Properties 37
Creating a Unit File 40
Making a Control Data Aware 41
Registering Components 41
Dialog Boxes and Wizards 41
Add New Property To Source Code 42
Breakpoint List Window 42
Code Explorer 42
Color Options 43
Customize Toolbars 44
Data Explorer 44
Deployment Wizard 45
Display Options 45
Editor Options 46
Environment Options 46
Explorer Options 46
Find 46
Delphi for PHP
iii

Find in Files 47
Global Variables Window 48
Go to Line Number 48
ImageList Editor 48
Installed Packages 48
Internationalization Wizard 49
Items Editor 49
Local Variables Window 50
Log Window 50
New Component 50
New Items 50
Notices 51
Object Inspector 51
Output 51
Page Designer Options 51
PHP Options 52
PHP Options: Internal Webserver 52
Picture Editor 53
Project Manager 53
Register Database 53
Remove from Project 54
Replace Text 54
Select Debug Desktop 55
Source Formatter: Indent/Line Breaks Options 55
Source Formatter: Spacing Options 55
Source Options 56
StringList Editor 57
Structure Window 57
Tool Palette 57
Value List Editor 57
View Unit 57
Watch Properties 58
Watches Window 58
Index a
Delphi for PHP
iv

1 Getting Started
The Delphi for PHP integrated development environment (IDE) provides many tools and features to help you build powerfulapplications quickly.
1.1 What is Delphi for PHP? Delphi for PHP is an integrated development environment (IDE) for building PHP applications. The Delphi IDE provides a setof tools that streamline and simplify the development life cycle. The following sections briefly describe these tools.
See Also
Tour of the Delphi for PHP IDE ( see page 1), Overview of Editing Code ( see page 5), Overview of Debugging ( seepage 5), Overview of PHP User Interface Design ( see page 4), Creating a Custom Component ( see page 15), Creatinga Database Application ( see page 23)
Designing User Interfaces
The Delphi for PHP visual designer surface lets you create graphical user interfaces by dragging and dropping componentsfrom the Tool Palette to a form. Using the designers, you can create forms.
Generating and Editing Code
Delphi for PHP auto-generates much of your application code as soon as you begin a project. To help you complete theremaining application logic, the text-based Code Editor provides features such as code completion. Syntax highlightingmakes your code easier to read and navigate.
Debugging Applications
The integrated debugger helps you find and fix runtime and logic errors.
1.2 Tour of the Delphi for PHP IDE When you start Delphi for PHP, the integrated development environment (IDE) launches and displays several tools andmenus. The IDE helps you visually design user interfaces, set object properties, write code, and view and manage yourapplication in various ways.
The default IDE desktop layout includes some of the most commonly used tools. You can use the View menu to display orhide certain tools. You can also customize and save the desktop layouts that work best for you.
The tools available in the IDE include the following:
• Start Page
• Forms
• Form Designer
• Tool Palette
• Object Inspector
• Project Manager
• Data Explorer
1.2 Tour of the Delphi for PHP IDE Delphi for PHP
1
1

• Structure View
• Code Editor
The following sections describe each of these tools.
Start Page
When you open Delphi for PHP, the Start Page appears with a number of links to developer resources, such as Delphi forPHP-related articles, training, and online Help. As you develop projects, you can quickly access them from the list recentprojects at the top of the page.
Forms
Typically, a form represents a window or HTML page in a user interface. At design time, a form is displayed on the Designersurface. You add components from the Tool Palette to a form to create your user interface.
Form Designer
The Form Designer, or Designer, is displayed automatically when you are using a form.
Visual Components
Visual components appear on the form at design-time and are visible to the end user at runtime. They include such things asbuttons, labels, toolbars, and listboxes.
Nonvisual Components and the Component Tray
Nonvisual components are attached to the form, but they are only visible at design-time; they are not visible to end users atruntime. You can use nonvisual components as a way to reuse groups of database and system objects or isolate the parts ofyour application that handle database connectivity and business rules.
When you add a nonvisual component to a form, it is displayed on the form as a small icon. You can select the icon to setproperties for the component.
Tool Palette
The Tool Palette contains visual and non-visual components to use on a form when developing your application. You candouble-click a control to add it to your form. If you are viewing code in the Code Editor, the Tool Palette displays codesegments that you can add to your application.
Customized Componenets
In addition to the components that are installed with Delphi for PHP, you can add customized or third party components tothe Tool Palette and save them in their own categories.
Object Inspector
The Object Inspector lets you set design-time properties and create event handlers for components. This provides theconnection between your application’s visual appearance and the code that makes the application run. The Object Inspectorcontains three tabs: Properties, Events, and JavaScript Events.
Use the Properties tab to change physical attributes of your components. Depending on your selection, some categoryoptions let you enter values in a text box while others require you to select values from a drop-down box. For Booleanoperations, you toggle between True or False. After you change your components’ physical attributes, you create eventhandlers that control how the components function.
Use the Events tab to specify the event of a selected object. If there is an existing event handler, use the drop-down box toselect it.
Use the JavaScript Events tab to specify a JavaScript event for a selected object. If there is an existing event handler, usethe drop-down box to select it.
Project Manager
A project is made up of several application files. The Project Manager lets you view and organize your project files. Withinthe Project Manager, you can add and remove files. You can also combine related projects to form project group.
1.2 Tour of the Delphi for PHP IDE Delphi for PHP
2
1

Data Explorer
The Data Explorer lets you browse database tables and fields. Using the context menus, you can create and managedatabase connections. You can also drag and drop data from a data source to most forms to build your database applicationquickly.
Code Editor
The Code Editor provides a convenient way to view and modify your source code. It is a customizable editor that providessyntax highlighting, undo capability, and more.
Code Explorer
The Code Explorer to view the functions, variables, constants, and uses in your code.
1.2 Tour of the Delphi for PHP IDE Delphi for PHP
3
1

2 Concepts
This section contains conceptual information for Delphi for PHP.
2.1 Overview of PHP User Interface Design A graphical user interface (GUI) consists of one or more windows that let users interact with your application. At design time,those windows are called forms. The Designer and forms help you create professional-looking user interfaces quickly andeasily.
Overview of the Designer
When you create an application, the IDE automatically displays the appropriate type of form on the Design tab. As you dropcomponents, such as labels and text boxes, onto the form from the Tool Palette, Delphi for PHP generates the underlyingcode to support the application. You can use the Object Inspector to modify the properties of components and the form. Theresults of those changes appear automatically in the source code on the Code tab. Conversely, as you modify code withCode Editor, the changes you make are immediately reflected on the Design tab.
The Tool Palette provides controls to simplify the creation of forms. When creating a Windows Form, for example, you canuse the MainMenu component to create a customized main menu in minutes. After placing the component on a form, youtype the main menu entries and commands in the boxes provided.
About Forms
Forms are the foundation of all applications developed using Delphi for PHP . You design the user interface for yourapplication using forms. Forms can contain menus, buttons, edit boxes, dialog boxes, or any other objects you need to makeyour application work the way you want.
You develop your application by customizing the main form, and adding and customizing forms for other parts of theinterface. You customize forms by adding components and setting properties.
You can change these features and any other properties of the form at design time using the Object Inspector.
Designing a UI for HTML Browsers
Designing a UI for a PHP application that displays in HTML browsers has some constraints that a standard application UIdoes not have. For instance, in HTML you cannot overlap one control over each other if you want your application to displayproperly on all browsers.
%note% You can using advanced browser syntax for overlap UI controls, but that will only work on some browsers
While laying out your UI in the Delphi for PHP Designer, when two or more components overlap, a yellow exclamation icon isshown on the top left corner of each component. If that happens, there will not be any errors on the execution of the script.However, the visual results are unexpected, most likely resulting in one of the components not being displayed. Therefore,the best rule of thumb for designing a UI for HTML browsers is not to execute any page that displays a yellow exclamationicon in the Designer. Rework the layout of controls so nothing overlaps.
Designer Options
You can configure the Designer by setting options that affect the appearance and behavior of the Designer. For example,you can adjust the grid settings, or show component captions. Designer options are on the Page Designer page of theEnvironment Options in the Delphi for PHP Options dialog box.
2.2 Overview of Editing Code Delphi for PHP
4
2

2.2 Overview of Editing Code The Code Editor is a customizable editor that provides syntax highlighting and multiple undo capability.
As you design the user interface for your application, Delphi for PHP generates the underlying code. When you modify objectproperties, your changes are automatically reflected in the source files.
Because all of your programs share common characteristics, Delphi for PHP auto-generates code to get you started. Youcan think of the auto-generated code as an outline that you can examine and modify to create your program.
The Code Editor provides the following features to help you write code:
• Code Insight
• Bookmarks
See Also
Tour of the Delphi for PHP IDE ( see page 1), Using Code Insight ( see page 19), Writing Event Handlers ( see page20), Creating and Using Code Templates ( see page 14), CustomizingCodeEditor.xml ( see page 16), Keyboard Mappings
Code Insight
Code Insight refers to a subset of features embedded in the Code Editor that aid in the code writing process. These featureshelp identify common statements you wish to insert into your code, and assist you in the selection of properties andmethods. Some of these features are described in more detail in the sub-sections below.
Bookmarks
Bookmarks provide a convenient way to navigate long files. You can mark a location in your code with a bookmark and jumpto that location from anywhere in the file. You can use up to ten bookmarks, numbered 0 through 9, within a file. When youset a bookmark, a book icon is displayed in the left gutter of the Code Editor.
2.3 Overview of Debugging Delphi for PHP .
The debugger lets you find and fix both runtime errors and logic errors in your Delphi for PHP application. Using thedebugger, you can step through code, set breakpoints and watches, and inspect and modify program values. As you debugyour application, the debug windows are available to help you manage the debug session and provide information about thestate of your application.
See Also
Tour of the Delphi for PHP IDE ( see page 1), Setting and Modifying Source Breakpoints ( see page 21), Adding a Watch( see page 21), Displaying Expanded Watch Information ( see page 22)
Stepping Through Code
Stepping through code lets you run your program one line of code at a time. After each step, you can examine the state ofthe program, view the program output, modify program data values, and continue executing the next line of code. The nextline of code does not execute until you tell the debugger to continue.
The Run menu provides the Trace Into and Step Over commands. Both commands tell the debugger to execute the next lineof code. However, if the line contains a function call, Trace Into executes the function and stops at the first line of code insidethe function. Step Over executes the function, then stops at the first line after the function.
2.3 Overview of Debugging Delphi for PHP
5
2
Breakpoints
Breakpoints pause program execution at a certain point in the program or when a particular condition occurs. You can thenuse the debugger to view the state of your program, or step over or trace into your code one line or machine instruction at atime. The debugger supports source breakpoints which pause execution at a specified location in your source code.
Watches
Watches let you track the values of program variables or expressions as you step over or trace into your code. As you stepthrough your program, the value of the watch expression changes if your program updates any of the variables contained inthe watched expression.
2.4 Overview of Deploying PHP Applications After you have written, tested, and debugged your application, you can make it available to others by deploying it.
See Also
Deploying Applications ( see page 16), Localizing Applications ( see page 18)
Redistributing Delphi for PHP Files
Many of the files associated with Delphi for PHP applications are subject to redistribution limitations or cannot beredistributed at all. Refer to the following documents for the legal stipulations regarding the redistribution of these files.
File Description
deploy.htm Contains deployment considerations for Delphi for PHP.
license.txt Addresses legal rights and obligations concerning Delphi for PHP.
readme.htm Contains last minute information about Delphi for PHP, possibly includinginformation that could affect the redistribution rights for Delphi for PHP files.
These files are located, by default, in the directory where the Delphi for PHP is installed, or in the root directory of the CDmedia.
Redistributing Third Party Software
The redistribution rights for third party software, such as components, utilities, and helper applications, are governed by thevendor that supplies the software. Before you redistribute any third party software with your Delphi for PHP application,consult the third party vendor or software documentation for information regarding redistribution.
2.5 VCL for PHP Overview This section introduces:
• VCL for PHP Architecture
• VCL for PHP Components
• Working With Components
See Also
Viewing VCL for PHP Help ( see page 20), Creating Custom Components ( see page 15), Installing Custom Components( see page 17), Delphi for PHP Component Writer's Guide ( see page 35)
2.5 VCL for PHP Overview Delphi for PHP
6
2

VCL for PHP Architecture
VCL is an acronym for the Visual Component Library, a set of visual components for rapid development of PHP applications.VCL for PHP contains a wide variety of visual, non-visual, and utility classes for tasks such as application building, webapplications, database applications, and console applications. All classes descend from Object. Object introduces methodsthat implement fundamental behavior like construction, destruction, and message handling.
VCL for PHP Components
VCL for PHP components are a subset of the component library that descend from the class Component. You can placecomponents on a form or data module and manipulate them at designtime. Using the Object Inspector, you can assignproperty values without writing code. Most components are either visual or nonvisual, depending on whether they are visibleat runtime. Most components appear on the Tool Palette.
Visual Components
Visual components, such as Form and Button, are called controls and descend from Control. Controls are used in GUIapplications, and appear to the user at runtime. Control provides properties that specify the visual attributes of controls, suchas their height and width.
NonVisual Components
Nonvisual components are used for a variety of tasks. For example, if you are writing an application that connects to adatabase, you can place a DataSource component on a form to connect a control and a dataset used by the control. Thisconnection is not visible to the user, so DataSource is nonvisual. At designtime, nonvisual components are represented byan icon. This allows you to manipulate their properties and events just as you would a visual control.
Other VCL for PHP Classes
Classes that are not components (that is, classes that descend from Object but not Component) are also used for a varietyof tasks. Typically, these classes are used for accessing system objects (such as a file) or for transient tasks (such asstoring data in a list). You cannot create instances of these classes at designtime, although they are sometimes created bythe components that you add in the Form Designer.
Working With Components
Many components are provided in the IDE on the Tool Palette. You select components from the Tool Palette and place themonto a form or data module. You design the user interface of an application by arranging the visual components such asbuttons and list boxes on a form. You can also place nonvisual components, such as data access components, on either aform or a data module. At first, Delphi for PHP components appear to be just like any other classes. But there are differencesbetween components in Delphi for PHP and the standard class hierarchies that many programmers work with. Somedifferences are:
• All Delphi for PHP components descend from Component.
• Components are most often used as is. They are changed through their properties, rather than serving as base classes to be subclassed to add or change functionality. When a component is inherited, it is usually to add specific code to existing event handling member functions.
• Properties of components contain runtime type information.
• Components can be added to the Tool Palette in the IDE and manipulated on a form.
Using Events
Almost all the code you write is executed, directly or indirectly, in response to events. An event is a special kind of propertythat represents a runtime occurrence, often a user action. The code that responds directly to an event, called an eventhandler, is a Delphi for PHP procedure.
The Events page of the Object Inspector displays all events defined for a given component. Double-clicking an event in theObject Inspector generates a skeleton event handling procedure, which you can fill in with code to respond to that event. Notall components have events defined for them.
2.5 VCL for PHP Overview Delphi for PHP
7
2

Some components have a default event, which is the event the component most commonly needs to handle. For example,the default event for a button is OnClick . Double-clicking on a component with a default event in the Form Designer willgenerate a skeleton event handling procedure for the default event.
You can reuse code by writing event handlers that respond to more than one event. For example, many applications providespeed buttons that are equivalent to drop down menu commands. When a button performs the same action as a menucommand, you can write a single event handler and then assign it to the OnClick event for both the button and the menuitem by setting the event handler in the Object Inspector for both the events you want to respond to. You can also createsimilar event handlers for JavaScript events.
This is the simplest way to reuse event handlers. However, action lists provide powerful tools for centrally organizing thecode that responds to user commands.
Setting Component Properties
To set published properties at design time, you can use the Object Inspector and, in some cases, property editors. To setproperties at runtime, assign their values in your application source code.
When you select a component on a form at design time, the Object Inspector displays its published properties and, whenappropriate, allows you to edit them.
When more than one component is selected, the Object Inspector displays all properties—except Name—that are shared bythe selected components. If the value for a shared property differs among the selected components, the Object Inspectordisplays either the default value or the value from the first component selected. When you change a shared property, thechange applies to all selected components.
Changing code-related properties, such as the name of an event handler, in the Object Inspector automatically changes thecorresponding source code.
2.6 IBX for PHP Overview IBX for PHP is a set of data access components that provide a means of accessing data from InterBase databases. The IBXfor PHP components are located on the InterBase tab of the Tool Palette.
IBDatabase
Use an IBDatabase component to establish connections to databases, which can involve one or more concurrenttransactions. IBX for PHP has a separate transaction component which allows you to separate transactions and databaseconnections.
To set up a database connection:
1. Drop an IBDatabase component onto a form or data module.
2. Fill out the DatabaseName property. For a local connection, this is the drive, path, and filename of the database file. Set the Connected property to true.
3. Enter a valid username and password on the Username and Password properties.
IBTable
Use an IBTable component to set up a live dataset on a table or view without having to enter any SQL statements.
IBTable components are easy to configure:
1. Add an IBTable component to your form or data module.
2. Specify the associated database components.
3. Specify the name of the relation from the TableName drop-down list.
4. Set the Active property to true.
IBQuery
2.6 IBX for PHP Overview Delphi for PHP
8
2

Use an IBQuery component to execute any InterBase DSQL statement, restrict your result set to only particular columns androws, use aggregate functions, and join multiple tables.
IBQuery components provide a read-only dataset, and adapt well to the InterBase client/server environment. To set up anIBQuery component:
1. Set up an IBDatabase connection as described above.
2. Add an IBQuery component to your form or data module.
3. Specify the associated database and transaction components.
4. Enter a valid SQL statement for the IBQuery SQL property in the String list editor.
5. Set the Active property to true
IBStoredProc
Use IBStoredProc for InterBase executable procedures: procedures that return, at most, one row of information. For storedprocedures that return more than one row of data, or "Select" procedures use the IBQuery.
See Also
Creating an InterBase PHP Database Application ( see page 24)
2.6 IBX for PHP Overview Delphi for PHP
9
2

3 Procedures
This section contains the procedures for Delphi for PHP.
3.1 General This section contains the general procedures for Delphi for PHP.
3.1.1 Accessing the Designer
To access the Designer
1. Open your project in Delphi for PHP.
2. Choose File New Form from the main menu. The designer displays a form on the middle pane of the IDE.
3.1.2 Adding Components to a Form
To add components to a form
1. Create or open a form in Delphi for PHP.
2. Click a plus icon beside a category of tools on the Tool Palette to expand the list of installed components.
3. Double-click the component you want to add to the form, or click and drag it to the form with the mouse. A visual representation of the component appears on the form.
Once a component is on the form, you can use the Object Inspector to quickly set its properties and create events.
See Also
Configuring the Designer ( see page 14), Creating Custom Components ( see page 15), Building Menus ( see page 12),Setting Component Properties ( see page 19), Writing Event Handlers ( see page 20), Installing Custom Components (see page 17)
3.1.3 Adding an Image Icon to a Component
You can add an icon to a custom component to represent it in the IDE when you install the component on the Tool Palette.
To add an image
1. Create an icon image for your component and save it as a bitmap image file with exactly the same name as your component.
%note% The IDE will not associate the bitmap with the component unless the name of the image is the same as thecomponent.
2. Create an icons subfolder in you project folder under the Delphi for PHP vcl folder.
3.1 General Delphi for PHP Adding an Image Icon to a Component
10
3

3. Copy your bitmap image file to the icons subfolder.
4. Open the package file for the component in the Code Editor.
5. Modify the path in setIconPath() to point to the icons subfolder for the project.
See Also
Creating Custom Components ( see page 15), Installing Custom Components ( see page 15), Saving CustomComponents ( see page 19)
3.1.4 Adding Multiple Components to an Existing Package
Each package can contain multiple components which can be installed on the Tool Palette in IDE. To accomplish this, simplyadd new components as needed without creating a new package file, then register them in the package file.
To add custom components to an existing package
1. Choose Component New Component and use the New Component dialog box to create each additional component for your package.
%note% Uncheck Create Package in the dialog box since the package already exists.
2. Save each new component to the same subfolder in the Delphi for PHP vcl folder as the package to which you want it to belong.
3. Open the package file <name>.package.php .
4. Add a registerComponents() method for each component you want to appear in the IDE on the Tool Palette. For example, the
//Change yourunit.inc.php to the php file which contains the component code registerComponents("Samples",array("MyLabel"),"MyCustomComponents/MyLabel.inc.php"); registerComponents("Samples",array("MyButton"),"MyCustomComponents/MyButton.inc.php"); registerComponents("Samples",array("MyCheckBox"),"MyCustomComponents/MyCheckBox.inc.php");
5. Install the package to the IDE.
See Also
Adding a Package ( see page 12), Creating Projects ( see page 14), Opening a Project ( see page 18), Adding andRemoving Files ( see page 11)
3.1.5 Adding and Removing Files
You can add and remove a variety of file types to your projects.
To add a file to a project
1. Choose Project Add to Application . The Add to Project dialog box appears.
2. Select a file to add and click Open. The file appears below the Project.exe node of the Project Manager.
To remove a file from a project
1. Choose Project Remove From Project . A Remove From Project dialog box appears.
2. Select the file or files you want to remove and click OK.
See Also
Creating Projects ( see page 14), Opening a Project ( see page 18), AddPackage ( see page 12), Adding MultipleComponents to a Package ( see page 11)
3.1 General Delphi for PHP Adding Packages
11
3

3.1.6 Adding Packages
When you create custom components, you also create a package file which you register, or install, with the Delphi for PHPIDE. A package file is simply a .php file which passes information to the IDE about that package such as which componentsto add to the Delphi for PHP Tool Palette, and it includes the VCL and a special unit containing functions for communicatingwith the IDE.
Important: You must save your package and component files in the Delphi for PHP vcl folder if you want to install yourcomponents on the Delphi for PHP Tool Palette. Putting your components into subfolders enables you to build your ownlibraries without affecting the VCL code base and makes deployment easier.
To add a package to the installed packages list in Delphi for PHP
1. Choose Component Packages to open the Installed Packages dialog box.
2. Click the Add button, then navigate to the package file for your component and click Open.
%tip% To view the list of components in the package being installed to the Tool Palette, select your new packagethen click the Components button. Click OK to return to the Installed Packages dialog box.
3. Click OK to close the Installed Packages dialog box.
Now expand the Tool Palette page on which you installed your custom components and you should see your customcomponents.
See Also
Creating Projects ( see page 14), Opening a Project ( see page 18), Adding and Removing Files ( see page 11), AddingMultiple Components to a Package ( see page 11)
3.1.7 Building Application Menus
Menus provide an easy way for your users to execute logically grouped commands. You can add or delete menu items, ordrag them to rearrange them during design time. The Tool Palette contains MainMenu and PopupMenu for building menus.
Creating menus and menu items in Delphi for PHP is different than in Delphi. The menu items are specified in an arrayinstead of being individual components with properties. Therefore, you build a menu structure using the Items Editor on theItems property for the MainMenu or PopupMenu components.
To create application menus
1. Expand the Standard category of the Tool Palette and add MainMenu or PopupMenu component to your form. A visual representation of the menu appears on the designer. Note: A MainMenu component creates a menu that is attached to the title bar of the form. A PopupMenu component creates a menu that appears when the user right-clicks in the form.
2. Click the elipsis button on the Items property for the menu component in the Object Inspector. This opens the Items Editor dialog box where you can define the menu items for the menu selected menu component.
3. Type the text string for the menu item in the Text field, for example File .
4. Type in a unique numeric tag ID in the Tag field for the menu item.
5. Click the New Item button to add a new menu item at the same level as the selected item. To add a submenu item, click New SubItem and that item will be added as a child of the selected item. To make the menu item a separator bar, place the cursor on the menu where you want a separator to appear and enter a hyphen (- ) in the Text field. Note: To build the menu structure in the Items Editor, you need to add the items sequentially at each level. You cannot insert a menu item, nor move an item up or down in the list. To change insert items or change the structure, delete the necessary items to go back to the desired location.
6. Click OK when you are finished building the menu structure.
3.1 General Delphi for PHP Building Application Menus
12
3

To display images beside menu items
1. Add the image files to your project folder on your computer.
2. Expand the Advanced category on the Tool Palette, select the ImageList component and drop it onto the form.
3. Select the Images property in the Object Inspector and click its ellipsis button. This opens the ImageList Editor where you list the required image files and assign them an identifier.
4. Type in a unique numeric identifier for the first image in the Key/ID column.
5. Type the name of the image file in the Filename column. Note: You can also click the Load button and browse to the image file. When you select the file this way, the name of the file is inserted in the Filename column. The dialog box displays the image in the box on the right.
6. Click the Add button to create a new row and add another image.
7. Add the rest of the menu images, then OK.
8. Select the menu component on the form again and open the Items Editor for the Items property.
9. Type the corresponding image Key/ID number in the Image Index field for each menu item, then click OK..
Now the menu items will be preceded by an image at runtime.
To create an event handler for a menu item
1. Select the MainMenu or PopupMenu component on the form.
2. Do one of the following:
• Double–click the event on the Events tab in the Object Inspector if you are creating a server event.
• Double–click the event on the Javascript tab if you are creating a client event. This generates the skeleton code for the event in the source code. For example, if you were to double-click an OnClick event, the generated code would be the following:
function MainMenu1Click($sender, $params){ }
The IDE switches to the Code Editor with the mouse cursor inside the event brackets, ready to start coding the event handler.
3. Type an if statement inside the event handler to specify which action to perform on each menu item in the menu.
%note% Since the menu items are an array in the MainMenu or PopupMenu component, they do not appear asindividual components in the designer with properties and events. Therefore, you must specify the events forthem in if statements in the MainMenu or PopupMenu function.
For example,
class Unit11 extends Page{ public $ImageList1 = null; public $MainMenu1 = null; function MainMenu1Click($sender, $params) { class Unit11 extends Page { public $MainMenu1 = null; function MainMenu1Click($sender, $params) { if ($params['tag']==10) { //Call here your function performOpen(); } if ($params['tag']==20) { //Call here your function performSave(); }
3.1 General Delphi for PHP Building Application Menus
13
3

} } } }
See Also
Creating a Database Application ( see page 23), Creating an Interbase Database Application ( see page 24), Dragging anItem from the Data Explorer ( see page 24)
3.1.8 Configuring the Designer
To modify Designer options
1. Choose Tools Options on the main menu. This opens the Options dialog box.
2. Select Page Designer from the Environment Options node.
3. Select or modify any options on this page, then click OK.
3.1.9 Creating a Form
To create a form
1. Open your project in Delphi for PHP.
2. Choose File New Form on the main menu.
3.1.10 Creating a Project
To create a new project
1. Choose File New Project Application . A project is created and displayed in the Project Manager with a default name. One default unit file for the form is also created.
2. Choose File Save Project As to open the Save As dialog box.
3. Browse to the location for the project files and type a name for the project file, using a .php extension. Click Save. The project is added to the Project Manager.
%note% Alternatively, you can click New on the Project Manager toolbar to create a new project. Select Applicationfrom the New Items dialog box, then save the project file as described above.
See Also
Opening a Project ( see page 18), Adding and Removing Files ( see page 11), Adding Packages ( see page 12), AddingMultiple Components to a Package ( see page 11)
3.1.11 Creating and Using Code Templates
To create a code template
1. Choose Tools Options to open the Options dialog box.
2. Select the Code Insight page under Editor Options.
3.1 General Delphi for PHP Creating and Using Code Templates
14
3

3. Click the Add button to open the Add Code Template dialog box.
4. Type a Shortcut Name and Description for the code template. Click OK to return to the Options dialog box.
5. Place your cursor in the Code edit field and type the contents of the code template.
6. Type a vertical bar character inside the template contents where you want the cursor located after the user inserts the code template.
7. Click OK when you are finished.
To edit an existing code template
1. Choose Tools Options to open the Options dialog box.
2. Select the Code Insight page under Editor Options.
3. Select a code template in the Templates list.
4. Modify the content of the source code in the Code edit field.
5. Click the Edit button to open the Add Code Template dialog box and modify the template name and description.
6. Click OK when you are finished.
To use a code template
1. Place your cursor in your code at the location where you want to insert the contents of the code template.
2. Press CTRL+J to pop up the code template list.
3. Double-click the desired code template to insert it into your source code.
%note% You can also type the template shortcut name at the cursor location, then press CTRL+J to insert the contentsof the code template.
3.1.12 Creating Custom Components
Delphi for PHP makes it very easy to create custom components and integrate them into the Delphi for PHP IDE for use indeveloping your PHP applications. While you can write PHP components from scratch, it is faster to use the NewComponent wizard to create the basic skeleton of the component which you can customize.
To create custom components
1. Choose Component New Component . This opens the New Component wizard.
2. Click the Ancestor Type drop-down arrow and choose one of the installed components on which to base your custom component.
3. Type the name for the new component in the Classname field. For example, you could create a component based on the Edit component and name it LabelEdit .
4. Click the drop-down arrow for the Palette Page field and select the page on which to install your this component.
5. Check Create Package to also create a new package for the component.
6. Click OK.
The wizard creates two source files for the component: one for the component with the extension .inc.php , and one forthe package with the extension .package.php . When you save the files, you can rename them from the default namesassigned to them bye the wizard.
A VCL for PHP component must include vcl.inc.php and the unit that controls the base class. The wizard automaticallydoes this:
//Includes require_once("vcl/vcl.inc.php"); use_unit("stdctrls.inc.php");
Now you can modify the component, save it, and install it on the Tool Palette for use in your applications.
3.1 General Delphi for PHP Creating Custom Components
15
3

%tip% Create a subfolder for your custom components in the Delphi for PHP vcl folder. That way you can build yourown libraries without affecting the VCL code base and you can more easily deploy your components to otherusers.
See Also
Installing Custom Components ( see page 17), Adding an Image Icon to a Component ( see page 10), CreatingProperties for Custom Components ( see page 16), Saving Custom Components ( see page 19), Setting ComponentProperties ( see page 19)
3.1.13 Creating Properties for Custom Components
To create a property for a custom component
1. Open the source code file in the Code Editor.
2. Choose Edit Add New Property . This opens the Add New Property to Source Code dialog box.
3. Type a name for the new property default value for the new property.
4. Click OK.
The code for the property is automatically entered into the source code. For example, a Color property with a default value ofgreen would generate the following code:
private $_color=Green; function getColor() { return $this->_color; } function setColor($value) { $this->_color=$value; } function defaultColor() { return Green; }
You can modify the property in the source code as necessary.
See Also
Installing Custom Components ( see page 15), Adding an Image Icon to a Component ( see page 10), Saving CustomComponents ( see page 19), Setting Component Properties ( see page 19)
3.1.14 Customizing the Code Editor
Delphi for PHP lets you customize your Code Editor by using the available settings to modify keystroke mappings, fonts,margin widths, colors, syntax highlighting, and indentation styles.
To customize general Code Editor options
1. Choose Tools Options .
2. Click Editor Options.
3. Select any of the customization options and make modifications.
4. Click OK to apply the modifications to the Code Editor.
3.1.15 Deploying Applications
To deploy an application
1. Choose Tools Deployment Wizard .
2. Step through the Deployment Wizard to gather the list of files necessary for your component to run on the web server.
3.1 General Delphi for PHP Deploying Applications
16
3

3. Specify a target location to which the Deployment Wizard will copy the set of files.
4. Click Finish at the end of the wizard to generate your deployment folder in the specified location.
5. Upload the target folder contents to your web server.
See Also
Overview of Deploying PHP Applications ( see page 6), Localizing Applications ( see page 18)
3.1.16 Docking Tool Windows
The Auto-Hide feature lets you undock and hide tool windows, such as the Object Inspector, Tool Palette, and ProjectManager, but still have access to them.
To use Auto-Hide to hide your tools
1. Click the push pin in the upper right corner of a tool window. The tool window is replaced by one or more tabs at the outer edge of the IDE window.
2. Position the cursor over the tab to display the tool window,. The tool window slides into view.
3. Move the cursor away from the tool window to slide the tool window out of view.
4. Click the push pin until it points down to redock the tool window.
To dock the tools with one another
1. Click the tool window title bar and drag the window into another tool window.
2. Select a location to drop the tool window and release the mouse button.
To undock the tools from one another
1. Click the tool window title bar and drag the window away from the other tool window.
2. Select a location to drop the tool window and release the mouse button.
3.1.17 Installing Custom Components
After you have created and saved a custom component, you can install it to the Tool Palette in the Delphi for PHP IDE foruse in creating applications. You will do this by editing the package file source code directly. A package file is simply a .php
file which passes information to the IDE about that package such as which components to add, and includes the VCL and aspecial unit containing functions for communicating with the IDE.
Important: You must save your package and component files in the Delphi for PHP vcl folder if you want to install yourcomponents on the Delphi for PHP Tool Palette. Putting your components into subfolders enables you to build your ownlibraries without affecting the VCL code base and makes deployment easier.
To install custom components
1. Select the <component name>.package.php file in the Delphi for PHP IDE.
2. Replace the string value in setPackageTitle(" ") with the name of the package so the IDE will now what it is named. For example,
setPackageTitle("MyMenu Package");
3. Modify the path in setIconPath() to point to the icons subfolder for the project.
4.
5. Modify registerComponents() to tell IDE to add the component to the Tool Palette, the page on which to put the component, and the name of the unit that contains that component code. For example,
3.1 General Delphi for PHP Installing Custom Components
17
3

registerComponents("Standard",array("MyMenu"),"MyMenu/MyMenu.inc.php");
6. Choose Component Packages to open the Installed Packages dialog box.
7. Click the Add button, then navigate to the package file for your component and click Open.
%tip% To view the list of components in the package being installed to the Tool Palette, select your new packagethen click the Components button. Click OK to return to the Installed Packages dialog box.
8. Click OK to close the Installed Packages dialog box.
Now expand the Tool Palette page on which you installed your custom components and you should see your customcomponents.
See Also
Creating Custom Components ( see page 15), Adding an Image Icon to a Component ( see page 10), Setting ComponentProperties ( see page 19), Saving Custom Components ( see page 19)
3.1.18 Localizing Applications
You can use the Internationalization Wizard to localize the strings in your application for translation to specific languages.The Internationalization Wizard does the following:
• Collect your project files.
• Allow you to select which languages to use for localizing your application.
• Run gettext() over your source files.
• Build the required folder structure with the generated files.
%note% You can run the Internationalization Wizard as many times as you want over your source code and it willupdate your resource strings.
To localize a custom component for specific languages
1. Choose Tools Internationalization Wizard .
2. Step through the Internationalization Wizard to step 3 to the Languages to Localize list.
3. Check each language to which you want your application translated.
4. Click Next, then Finish to run the wizard.
The wizard creates a local folder in your project folder, with subfolders containing the resource strings for each language.
%note% To localize the visual interface for your application, use the Language property on the each Form. For thiswizard to work, you must enclose the strings you want localized into a call to the gettext() or _() functionin the source code. For example,$this->Button=_("Localize this string"); .
See Also
Overview of Deploying PHP Applications ( see page 6), Deploying Applications ( see page 16)
3.1.19 Opening a Project
To open a project
1. Start Delphi for PHP.
2. Choose File Open Project on the main menu.
3.1 General Delphi for PHP Opening a Project
18
3

See Also
Creating a Project ( see page 14), Adding and Removing Files ( see page 11), Adding Packages ( see page 12), AddingMultiple Components to a Package ( see page 11)
3.1.20 Saving Custom Components
After you have created a custom component, save the component files to the Delphi for PHP vcl folder.
%note% Your custom components must be inside the Delphi for PHP vcl folder for the IDE to find them. Create asubfolder for your custom components in the vcl folder. Putting your components into subfolders enables youto build your own libraries without affecting the VCL code base and makes deployment easier.
To save custom components
1. Select the package file (<default component name>.package.php ) in Delphi for PHP and choose File Save As .
2. Navigate to the <Delphi for PHP>/vcl folder in the Save As dialog box.
3. Click the New Folder icon in the Save As dialog box and create a subfolder for your component inside the vcl folder (for example <Delphi for PHP>/vcl/MyCustomComponents ).
4. Go into the new folder and save the package file with a new name (for example, MyCustomComponents.package.php ).
5. Select the component file (<default component name>.inc.php ) and save it to the same subfolder with a new name (for example, MyMenu.inc.php ).
6. Save any additional files for the component to the same library subfolder as the first component file, renaming them as you do.
See Also
Creating Custom Components ( see page 15), Installing Custom Components ( see page 15), Adding an Image Icon to aComponent ( see page 10), Setting Component Properties ( see page 19)
3.1.21 Setting Component Properties
After you place your components on your Form in the Designer, set their properties using the Object Inspector. By setting acomponent’s properties, you can change the way a component appears and behaves in your application. Becauseproperties appear during design time, you have more control over a component’s properties and can easily modify themwithout having to write additional code.
To set component properties
1. Select a component on the Tool Palette and drop it onto the form.
2. Select the Properties tab on the Object Inspector.
3. Set the component properties by entering values in the text box or through an editor. Boolean properties like True and False can be toggled.
3.1.22 Using Code Insight
Code Insight includes Code Completion and Code Templates.
3.1 General Delphi for PHP Using Code Insight
19
3

To invoke Code Templates
1. Open your source code in the Code Editor.
2. Place your cursor at the desired location.
3. Press CTRL+J. A pop-up window displays a list of templates that are valid at the cursor location.
4. Double-click the desired code template to insert it into your source code.
%note% You can also type the template shortcut name at the cursor location, then press CTRL+J to insert the contentsof the code template.
You can create your own code templates to use with Code Insight. Choose Tools Options , and select Code Insight underEditor Options.
To invoke Code Completion
1. Open your code in the Code Editor.
2. Place your cursor at the desired location.
3. Press CTRL+SPACE. A pop-up window displays a list of symbols that are valid at the cursor location.
4. Double-click the desired code symbol to insert it into your source code.
3.1.23 Viewing VCL for PHP Help
To view VCL for PHP component help
1. Open Delphi for PHP.
2. Do one of the following:
• Choose Help VCL Help Contents .
• Press F1 having a component selected on the Tool Palette.
• Press F1 having a component selected on the Form Designer.
• Press F1 on the Object Inspector over a property, event, or Javascript event
%note% See Help PHP Help to view the “PHP Manual”.
3.1.24 Writing Event Handlers
Your source code usually responds to events that might occur to a component at runtime, such as a user clicking a button orchoosing a menu command. The code that responds to an occurrence is called an event handler. The event handler codecan modify property values and call methods.
To write an event handler
1. Click the component on your form for which you want to write an event handler.
2. Double-click the component on the form to create the default event for the component. The Code Editor generates appears with the cursor inside the event.
3. Type the body of the event code at the location of the cursor.
4. Switch back to the Design tab to add another event to the component.
5. Select that component again, then click the Events tab in the Object Inspector.
6. Locate the event in the event list in the Object Inspector and double-click the name of the event. A new skeleton event is
3.1 General Delphi for PHP Writing Event Handlers
20
3

created and the Code Editor appears again with the cursor inside the new event.
7. Type the code that will execute when the event occurs at runtime.
8. Continue adding event handlers to the components on your form using this method.
3.2 Debugging This section contains the debugging procedures for Delphi for PHP.
3.2.1 Adding a Watch
Add a watch to track the values of program variables or expressions as you step over or trace into code. Each time programexecution pauses, the debugger evaluates all the items listed in the Watch List window and updates their displayed values.
To add a watch
1. Choose Run Add Watch , or press Ctrl+F5 to display the Watch Properties dialog box.
2. In the Expression field, enter the expression you want to watch. An expression consists of constants, variables, and values contained in data structures, combined with language operators. Almost anything you can use as the right side of an assignment operator can be used as a debugging expression, except for variables not accessible from the current execution point.
3. Click OK.
The watch is added to the Watch List window.
See Also
Overview of Debugging ( see page 5), Setting and Modifying Source Breakpoints ( see page 21), Displaying ExpandedWatch Information ( see page 22)
3.2.2 Setting and Modifying Source Breakpoints
Breakpoints pause program execution at a certain location or when a particular condition occurs. You can set breakpoints inthe Code Editor before or during a debugging session. During a debugging session, any line of code that is eligible for abreakpoint is marked with a blue dot in the left gutter of the Code Editor.
To set a breakpoint
1. Click the left gutter of the Code Editor next to the line of code where you want to pause execution.
2. Choose Run Add Breakpoint Source Breakpoint to display the Add Source Breakpoint dialog box.
%tip% To widen the Code Editor gutter, choose Tools Options Editor Options Display and increase the Gutterwidth option.
3. Fill in the appropriate values and click OK.
The breakpoint icon is used in the Code Editor gutter to represent breakpoints.
Breakpoints are displayed in the Breakpoint List window.
To modify a breakpoint
1. Right-click the breakpoint icon and choose Breakpoint Properties.
3.2 Debugging Delphi for PHP Setting and Modifying Source Breakpoints
21
3

2. Set the options in the Source Breakpoint Properties dialog box to modify the breakpoint. For example, you can set a condition, create a breakpoint group, or determine what action occurs when execution reaches the breakpoint.
3. Click Help for more information about the options on the dialog box.
4. Click OK.
To create a conditional breakpoint
1. Choose Run Add Breakpoint Source Breakpoint to display the Add Source Breakpoint dialog box.
2. In the Line number field, enter the line in the Code Editor where you want set the breakpoint.
%tip% To pre-fill the Line number field, click a line in the Code Editor prior to opening the Add Source Breakpointdialog box.
3. In the Condition field, enter a conditional expression to be evaluated each time this breakpoint is encountered during program execution.
4. Click OK.
Conditional breakpoints are useful when you want to see how your program behaves when a variable falls into a certainrange or what happens when a particular flag is set.
If the conditional expression evaluates to true (or not zero), the debugger pauses the program at the breakpoint location. Ifthe expression evaluates to false (or zero), the debugger does not stop at the breakpoint location.
To change the color of the text at the execution point and breakpoints
1. Choose Tools Options Editor Options Color .
2. In the code sample window, select the appropriate language tab. For example, to change the breakpoint color for Delphi for PHP code, select the Delphi for PHP tab.
3. Scroll the code sample window to display the execution and breakpoint icons in the left gutter of the window.
4. Click anywhere on the execution point or breakpoint line that you want to change.
5. Use the Foreground Color and Background Color drop-down lists to change the colors associated with the selected execution point or breakpoint.
6. Click OK.
See Also
Overview of Debugging ( see page 5), Adding a Watch ( see page 21), Displaying Expanded Watch Information ( seepage 22)
3.2.3 Displaying Expanded Watch Information
When you debug an application, you can inspect the values of members within a watched object whose type is a complexdata object (such as a class, record, or array). These values display in the Watch List window when you expand a watchedobject. Additionally, you can expand the elements within an object, displaying its sub-elements and their values. You canexpand all levels in the object. Members are grouped by ancestor.
To display expanded watch information in the Watch List window
1. Set a breakpoint on a valid source line within your project. A breakpoint icon displays in the gutter next to the selected line.
2. Choose Run Add Watch to add a watch for an object in your application. The watch displays in the Watch List window.
3. Choose Run Run to begin running the program. If needed, use the feature of the program that will cause it to run to the breakpoint you set. The IDE automatically switches to the Debug layout and the program stops at the breakpoint.
4. Click the + next to the name of the object that you added to the watch list. The names and values of elements of the watched object display in the Watch List window.
3.2 Debugging Delphi for PHP Displaying Expanded Watch Information
22
3

See Also
Overview of Debugging ( see page 5), Setting and Modifying Source Breakpoints ( see page 21), Adding a Watch ( seepage 21)
3.3 Database This section contains the database procedures for Delphi for PHP .
3.3.1 Creating a Database Application
The instructions in this procedure describe setting up a PHP database application. This procedure is a common process forcreating any PHP database application, and you can choose the correct database driver to work with.
%note% Before you start, register your database with Delphi for PHP. Right-click the database node in the DataExplorer and choose Register Database to specify the database connection information.
To create a database application
1. Choose File New VCL for PHP Application . This creates a new form and opens it in the Designer on the Design tab.
2. Expand the Data Access category on the Tool Palette and select the Database component.
3. Click anywhere on the form to add the Database component to your application. A Database icon displays on the form grid and is selected as the active component.
4. Modify the following properties for the Database component in the Object Inspector:
• DatabaseName = server:\path\database.gdb (for instance: localhost:c:\program files\common files\codegear shared\data\employee.gdb ).
• DriverName = select the database driver from the drop down list, for example, Borland_ibase or mysql .
• User = your user name on the database server.
• Password = your password on the database server.
5. Add a Query component to the form and set the following properties in the Object Inspector:
• Database = Database1 . You can select it from the drop-down list on the property value.
• Query = SQL statement (for example select * from customer .)
• Active = true .
6. Add a DataSource component to the form and set the following property: DataSet = Query1 .
7. Expand the Data Controls category on the Tool Palette and select the DBGrid component.
8. Add the DBGrid component to the form and set the following property: DataSource = DataSource1
9. Click the Run button on the main toolbar or press F9.
You should be able to see the data being displayed in a grid in a browser at runtime.
See Also
Registering a Database ( see page 25), Creating an Interbase PHP Database Application ( see page 24), Overview ofPHP User Interface Design ( see page 4), Building Menus ( see page 12), Dragging an Item from the Data Explorer (see page 24)
3.3 Database Delphi for PHP Creating an InterBase PHP Database
23
3

3.3.2 Creating an InterBase PHP Database Application
The instructions in this procedure describe setting up a PHP database application for InterBase. The Tool Palette contains aseparate node for IBX for PHP database controls.
%note% Before you start, register your database with Delphi for PHP. Right-click the InterBase node in the DataExplorer and choose Register Database.
To create an InterBase PHP database application
1. Choose File New VCL for PHP Application . This creates a new form and opens it in the Designer on the Design tab.
2. Expand the InterBase category on the Tool Palette and select the IBDatabase component.
3. Click anywhere on the form to add the IBDatabase component to your application. A IBDatabase icon displays on the form grid and is selected as the active component.
4. Modify the following properties for the IBDatabase component in the Object Inspector a the bottom-left of the IDE:
• DatabaseName = server:\path\database.gdb (for instance: localhost:c:\program files\borland\interbase\examples\database\employee.gdb ).
• DriverName = select the database driver from the drop down list, for example, Borland_ibase .
• User = your user name on the database server.
• Password = your password on the database server.
5. Add an IBQuery component to the form and set the following properties in the Object Inspector:
• Database = Database1 . You can select it from the drop-down list on the property value.
• Query = SQL statement (for example select * from customer .)
• Active = true .
6. Add a DataSource component to the form and set the following property: DataSet = Query1 .
7. Expand the Data Controls category on the Tool Palette and select the DBGrid component.
8. Add the DBGrid component to the form and set the following property: DataSource = DataSource1
9. Click the Run button on the main toolbar or press F9.
You should be able to see the data being displayed in a grid in a browser at runtime.
See Also
Overview of PHP User Interface Design ( see page 4), Registering a Database ( see page 25), Creating a DatabaseApplication ( see page 23), Building Menus ( see page 12), Dragging an Item from the Data Explorer ( see page 24)
3.3.3 Dragging an Item from the Data Explorer
You can quickly add database components to your application by dragging items from the Data Explorer tree to theDesigner. The Data Explorer tool bar has buttons for specifying which type of item to create when you drag an item to theDesigner: Grid, Repeater, Label, Edit. The types of items you can drag to the form from the Data Explorer tree are:
• Databases
• Tables
• DBGrids
• DBRepeaters
• Labels
3.3 Database Delphi for PHP Dragging an Item from the Data Explorer
24
3

To add a database component by dragging from the Data Explorer
1. Create a new VCL for PHP application, or open an existing form to which you want to add database components.
2. Click the Data Explorer tab in the upper, right pane of the IDE.
3. Click the toolbar button for the type of component you want to create. For example, click Grid or Repeater if you are going to drag a table, or click Label or Edit if you are going to drag a field.
4. Select the item in the Data Explorer tree and drag it to the form. The IDE automatically adds the required database components, such as a Database, a Datasource, and a Table. It also sets the required properties to connect those database components to your database.
5. Set any additional properties on the components in the Object Inspector to accomplish the intended results.
See Also
Overview of PHP User Interface Design ( see page 4), Registering a Database ( see page 25), Creating a DatabaseApplication ( see page 23), Creating an InterBase PHP Database Application ( see page 24), Building Menus ( seepage 12)
3.3.4 Registering a Database
Describes how to register a database in Delphi for PHP.
To register a database
1. Click the Data Explorer tab in the top-right pane of the IDE.
2. Right-click a database under the Databases node in the Data Explorer tree.
3. Choose Register | Database. This opens the Register Database dialog box.
4. Enter the relevant information for the connection to the database and click OK.
5.
See Also
Overview of PHP User Interface Design ( see page 4), Creating a Database Application ( see page 23), Building Menus( see page 12), Dragging an Item from the Data Explorer ( see page 24)
3.3 Database Delphi for PHP Registering a Database
25
3
4 Reference
This section contains reference information for .
4.1 General Reference This section contains general reference topics.
4.1.1 Default Keyboard Shortcuts
The following table lists the Default Mapping keyboard shortcuts for the Code Editor.
%note% Keyboard shortcuts that include the CTRL+ALT key combination are disabled when the Use CTRL+ALT Keysoption is unchecked on the Tools Options Editor Options Key Mappings page.
Shortcut Action
Alt+[ Finds the matching delimiter (forward)
Alt+] Finds the matching delimiter (backward)
Alt+Page Down Goes to the next tab
Alt+Page Up Goes to the previous tab
Alt+Shift+Down Arrow Moves the cursor down one line and selects the column from the left of the starting cursor position
Alt+Shift+End Selects the column from the cursor position to the end of the current line
Alt+Shift+Home Selects the column from the cursor position to the start of the current line
Alt+Shift+Left Arrow Selects the column to the left of the cursor
Alt+Shift+Page Down Moves the cursor down one line and selects the column from the right of the starting cursorposition
Alt+Shift+Page Up Moves the cursor up one screen and selects the column from the left of the starting cursorposition
Alt+Shift+Right Arrow Selects the column to the right of the cursor
Alt+Shift+Up Arrow Moves the cursor up one line and selects the column from the left of the starting cursor position
Click+Alt+mousemove Selects column-oriented blocks
Ctrl+/ Adds or removes // to each line in the selected code block to comment the code.
Ctrl+Alt+Shift+End Selects the column from the cursor position to the end of the current file
Ctrl+Alt+Shift+Home Selects the column from the cursor position to the start of the current file
Ctrl+Alt+Shift+LeftArrow
Selects the column to the left of the cursor
Ctrl+Alt+Shift+PageDown
Selects the column from the cursor position to the top of the screen
Ctrl+Alt+Shift+PageUp
Selects the column from the cursor position to the bottom of the screen
4.1 General Reference Delphi for PHP Default Keyboard Shortcuts
26
4

Ctrl+Alt+Shift+RightArrow
Selects the column to the right of the cursor
Ctrl+Backspace Deletes the word to the right of the cursor
Ctrl+Del Deletes a currently selected block
Ctrl+Down Arrow Scrolls down one line
Ctrl+End Moves to the end of a file
Ctrl+Enter Opens file at cursor
Ctrl+Home Moves to the top of a file
Ctrl+I Inserts a tab character
Ctrl+J Templates pop-up menu
Ctrl+K+n Sets a bookmark, where n is a number from 0 to 9
Ctrl+n Jumps to a bookmark, where n is the number of the bookmark, from 0 to 9
Ctrl+Left Arrow Moves one word left
Ctrl+N Inserts a new line
Ctrl+O+C Turns on column blocking
Ctrl+O+K Turns off column blocking
Ctrl+O+O Insert compiler options
Ctrl+P Causes next character to be interpreted as an ASCII sequence
Ctrl+PgDn Moves to the bottom of a screen
Ctrl+PgUp Moves to the top of a screen
Ctrl+Right Arrow Moves one word right
Ctrl+Shift+C Invokes class completion for the class declaration in which the cursor is positioned
Ctrl+Shift K+A Expands all blocks of code
Ctrl+Shift K+C Collapses all classes
Ctrl+Shift K+E Collapses a block of code
Ctrl+Shift K+G Initializes/finalize or interface/implementation
Ctrl+Shift K+M Collapses all methods
Ctrl+Shift K+N Collapses namespace/Unit
Ctrl+Shift K+P Collapses nested procedures
Ctrl+Shift K+R Collapses all regions
Ctrl+Shift K+T Toggles the current block between collapsed and expanded
Ctrl+Shift K+U Expands a block of code
Ctrl+Shift+End Selects from the cursor position to the end of the current file
Ctrl+Shift+G Inserts a new Globally Unique Identifier (GUID)
Ctrl+Shift+Home Selects from the cursor position to the start of the current file
Ctrl+Shift+I Indents block
Ctrl+Shift+Left Arrow Selects the word to the left of the cursor
Ctrl+Shift+P Plays a recorded keystroke macro.
Ctrl+Shift+PgDn Selects from the cursor position to the bottom of the screen
Ctrl+Shift+PgUp Selects from the cursor position to the top of the screen
Ctrl+Shift+R Toggles between starting and stopping the recording of a keystroke macro.
Ctrl+Shift+Right Arrow Selects the word to the right of the cursor
4.1 General Reference Delphi for PHP Default Keyboard Shortcuts
27
4

Ctrl+Shift+space bar Code Parameters pop-up window
Ctrl+Shift+Tab Moves to the previous code page (or file)
Ctrl+Shift+Tab Moves to the previous page
Ctrl+Shift+U Outdents block
Ctrl+Shift+Y Deletes to the end of a line
Ctrl+space bar Code Completion pop-up window
Ctrl+T Deletes a word
Ctrl+Tab Moves to the next code page (or file)
Ctrl+Up Arrow Scrolls up one line
Ctrl+Y Deletes a line
F1 Displays Help for the selected fully qualified namespace
Shift+Alt+arrow Selects column-oriented blocks
Shift+Backspace Deletes the character to the left of the cursor
Shift+Down Arrow Moves the cursor down one line and selects from the right of the starting cursor position
Shift+End Selects from the cursor position to the end of the current line
Shift+Enter Inserts a new line with a carriage return
Shift+Home Selects from the cursor position to the start of the current line
Shift+Left Arrow Selects the character to the left of the cursor
Shift+PgDn Moves the cursor down one line and selects from the right of the starting cursor position
Shift+PgUp Moves the cursor up one screen and selects from the left of the starting cursor position
Shift+Right Arrow Selects the character to the right of the cursor
Shift+Space Inserts a blank space
Shift+Tab Moves the cursor to the left one tab position
Shift+Up Arrow Moves the cursor up one line and selects from the left of the starting cursor position
4.1.2 BRIEF Keyboard Shortcuts
The following table lists the BRIEF Mapping keyboard shortcuts for the Code Editor.
Shortcut Action
Alt+A Marks a non-inclusive block
Alt+B Displays a list of open files
Alt+Backspace Deletes the word to the right of the cursor
Alt+C Mark the beginning of a column block
Alt+D Deletes a line
Alt+F9 Displays the local menu
Alt+Hyphen Jumps to the previous page
Alt+I Toggles insert mode
Alt+K Deletes of the end of a line
Alt+L Marks a line
Alt+M Marks an inclusive block
4.1 General Reference Delphi for PHP BRIEF Keyboard Shortcuts
28
4

Alt+N Displays the contents of the next page
Alt+P Prints the selected block
Alt+Page Down Goes to the next tab
Alt+Page Up Goes to the previous tab
Alt+Q Causes next character to be interpreted as an ASCII sequence
Alt+R Reads a block from a file
Backspace Deletes the character to the left of the cursor
Ctrl+/ Adds or removes // to each line in the selected code block to comment the code.
Ctrl+- (dash) Closes the current page
Ctrl+B Moves to the bottom of the window
Ctrl+Backspace Deletes the word to the left of the cursor
Ctrl+C Centers line in window
Ctrl+D Moves down one screen
Ctrl+E Moves up one screen
Ctrl+Enter Inserts an empty new line
Ctrl+F1 Help keyword search
Ctrl+F5 Toggles case-sensitive searching
Ctrl+F6 Toggles regular expression searching
Ctrl+K Deletes to the beginning of a line
Ctrl+M Inserts a new line with a carriage return
Ctrl+O+A Open file at cursor
Ctrl+O+B Browse symbol at cursor
Ctrl+O+O Toggles the case of a selection
Ctrl+Q+[ Finds the matching delimiter (forward)
Ctrl+Q+] Finds the matching delimiter (backward)
Ctrl+Q+Ctrl+[ Finds the matching delimiter (forward)
Ctrl+Q+Ctrl+] Finds the matching delimiter (backward)
Ctrl+S Performs an incremental search
Ctrl+T Moves to the top of the window
Ctrl+Shift+C Invokes class completion for the class declaration in which the cursor is positioned
Del Deletes a character or block at the cursor
Enter Inserts a new line with a carriage return
Esc Cancels a command at the prompt
Shift+Backspace Deletes the character to the left of the cursor
Shift+F4 Tiles windows horizontally
Shift+F6 Repeats the last Search|Replace operation
Tab Inserts a tab character
4.1.3 IDE Classic Keyboard Shortcuts
The following table lists the IDE Classic Mapping keyboard shortcuts for the Code Editor.
4.1 General Reference Delphi for PHP IDE Classic Keyboard Shortcuts
29
4

%note% Keyboard shortcuts that include the CTRL+ALT key combination are disabled when the Use CTRL+ALT Keysoption is unchecked on the Tools Options Editor Options Key Mappings page.
Shortcut Action
Alt+[ Finds the matching delimiter (forward)
Alt+] Finds the matching delimiter (backward)
Alt+Page Down Goes to the next tab
Alt+Page Up Goes to the previous tab
Alt+Shift+Down Arrow Moves the cursor down one line and selects the column from the left of the starting cursor position
Alt+Shift+End Selects the column from the cursor position to the end of the current line
Alt+Shift+Home Selects the column from the cursor position to the start of the current line
Alt+Shift+Left Arrow Selects the column to the left of the cursor
Alt+Shift+Page Down Moves the cursor down one line and selects the column from the right of the starting cursorposition
Alt+Shift+Page Up Moves the cursor up one screen and selects the column from the left of the starting cursorposition
Alt+Shift+Right Arrow Selects the column to the right of the cursor
Alt+Shift+Up Arrow Moves the cursor up one line and selects the column from the left of the starting cursor position
Click+Alt+mousemove Selects column-oriented blocks
Ctrl+/ Adds or removes // to each line in the selected code block to comment the code.
Ctrl+Alt+Shift+End Selects the column from the cursor position to the end of the current file
Ctrl+Alt+Shift+Home Selects the column from the cursor position to the start of the current file
Ctrl+Alt+Shift+LeftArrow
Selects the column to the left of the cursor
Ctrl+Alt+Shift+PageDown
Selects the column from the cursor position to the top of the screen
Ctrl+Alt+Shift+PageUp
Selects the column from the cursor position to the bottom of the screen
Ctrl+Alt+Shift+RightArrow
Selects the column to the right of the cursor
Ctrl+Backspace Deletes the word to the right of the cursor
Ctrl+Del Deletes a currently selected block
Ctrl+Down Arrow Scrolls down one line
Ctrl+End Moves to the end of a file
Ctrl+Enter Opens file at cursor
Ctrl+Home Moves to the top of a file
Ctrl+I Inserts a tab character
Ctrl+J Templates pop-up menu
Ctrl+Left Arrow Moves one word left
Ctrl+N Inserts a new line
Ctrl+O+C Turns on column blocking
Ctrl+O+K Turns off column blocking
Ctrl+O+O Insert compiler options
Ctrl+P Causes next character to be interpreted as an ASCII sequence
4.1 General Reference Delphi for PHP IDE Classic Keyboard Shortcuts
30
4

Ctrl+PgDn Moves to the bottom of a screen
Ctrl+PgUp Moves to the top of a screen
Ctrl+Right Arrow Moves one word right
Ctrl+Shift+C Invokes class completion for the class declaration in which the cursor is positioned
Ctrl+Shift K+A Expands all blocks of code
Ctrl+Shift K+E Collapses a block of code
Ctrl+Shift K+T Toggles the current block between collapsed and expanded
Ctrl+Shift K+U Expands a block of code
Ctrl+Shift+End Selects from the cursor position to the end of the current file
Ctrl+Shift+G Inserts a new Globally Unique Identifier (GUID)
Ctrl+Shift+Home Selects from the cursor position to the start of the current file
Ctrl+Shift+I Indents block
Ctrl+Shift+Left Arrow Selects the word to the left of the cursor
Ctrl+Shift+PgDn Selects from the cursor position to the bottom of the screen
Ctrl+Shift+PgUp Selects from the cursor position to the top of the screen
Ctrl+Shift+Right Arrow Selects the word to the right of the cursor
Ctrl+Shift+space bar Code Parameters pop-up window
Ctrl+Shift+Tab Moves to the previous code page (or file)
Ctrl+Shift+Tab Moves to the previous page
Ctrl+Shift+U Outdents block
Ctrl+Shift+Y Deletes to the end of a line
Ctrl+space bar Code Completion pop-up window
Ctrl+T Deletes a word
Ctrl+Tab Moves to the next code page (or file)
Ctrl+Up Arrow Scrolls up one line
Ctrl+Y Deletes a line
F1 Displays Help for the selected fully qualified namespace
Shift+Alt+arrow Selects column-oriented blocks
Shift+Backspace Deletes the character to the left of the cursor
Shift+Down Arrow Moves the cursor down one line and selects from the right of the starting cursor position
Shift+End Selects from the cursor position to the end of the current line
Shift+Enter Inserts a new line with a carriage return
Shift+Home Selects from the cursor position to the start of the current line
Shift+Left Arrow Selects the character to the left of the cursor
Shift+PgDn Moves the cursor down one line and selects from the right of the starting cursor position
Shift+PgUp Moves the cursor up one screen and selects from the left of the starting cursor position
Shift+Right Arrow Selects the character to the right of the cursor
Shift+Space Inserts a blank space
Shift+Tab Moves the cursor to the left one tab position
Shift+Up Arrow Moves the cursor up one line and selects from the left of the starting cursor position
4.1 General Reference Delphi for PHP Epsilon Keyboard Shortcuts
31
4
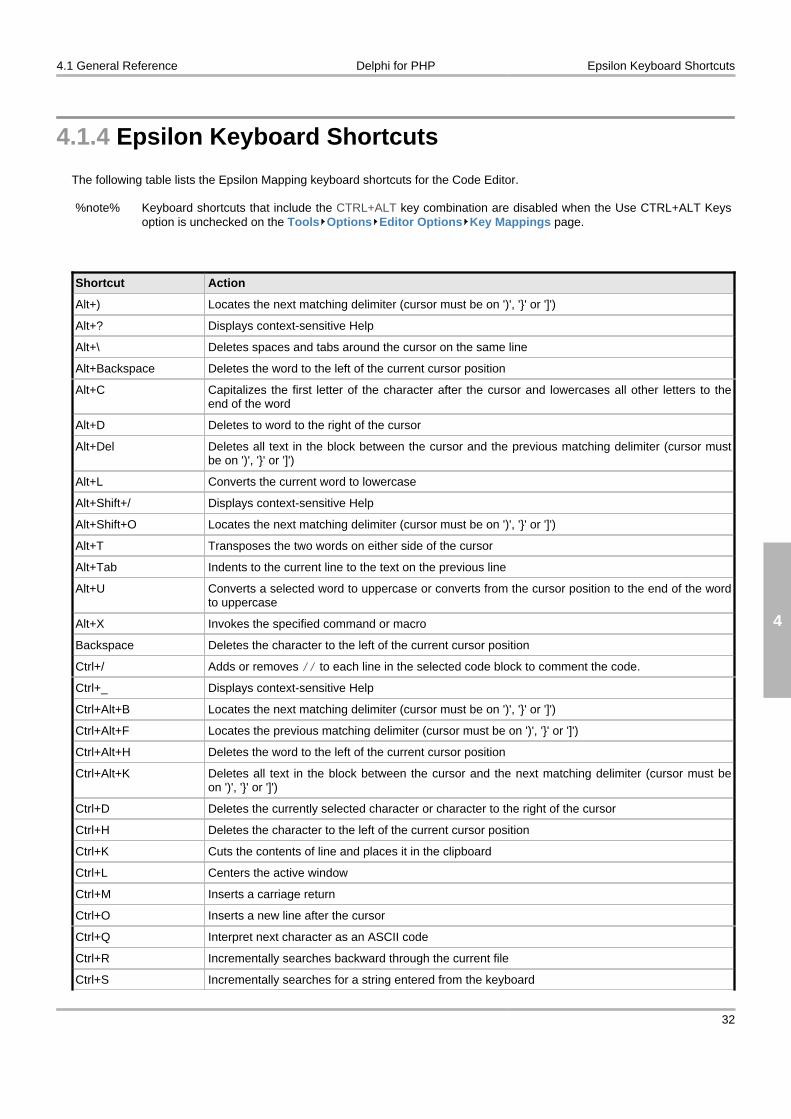
4.1.4 Epsilon Keyboard Shortcuts
The following table lists the Epsilon Mapping keyboard shortcuts for the Code Editor.
%note% Keyboard shortcuts that include the CTRL+ALT key combination are disabled when the Use CTRL+ALT Keysoption is unchecked on the Tools Options Editor Options Key Mappings page.
Shortcut Action
Alt+) Locates the next matching delimiter (cursor must be on ')', '}' or ']')
Alt+? Displays context-sensitive Help
Alt+\ Deletes spaces and tabs around the cursor on the same line
Alt+Backspace Deletes the word to the left of the current cursor position
Alt+C Capitalizes the first letter of the character after the cursor and lowercases all other letters to theend of the word
Alt+D Deletes to word to the right of the cursor
Alt+Del Deletes all text in the block between the cursor and the previous matching delimiter (cursor mustbe on ')', '}' or ']')
Alt+L Converts the current word to lowercase
Alt+Shift+/ Displays context-sensitive Help
Alt+Shift+O Locates the next matching delimiter (cursor must be on ')', '}' or ']')
Alt+T Transposes the two words on either side of the cursor
Alt+Tab Indents to the current line to the text on the previous line
Alt+U Converts a selected word to uppercase or converts from the cursor position to the end of the wordto uppercase
Alt+X Invokes the specified command or macro
Backspace Deletes the character to the left of the current cursor position
Ctrl+/ Adds or removes // to each line in the selected code block to comment the code.
Ctrl+_ Displays context-sensitive Help
Ctrl+Alt+B Locates the next matching delimiter (cursor must be on ')', '}' or ']')
Ctrl+Alt+F Locates the previous matching delimiter (cursor must be on ')', '}' or ']')
Ctrl+Alt+H Deletes the word to the left of the current cursor position
Ctrl+Alt+K Deletes all text in the block between the cursor and the next matching delimiter (cursor must beon ')', '}' or ']')
Ctrl+D Deletes the currently selected character or character to the right of the cursor
Ctrl+H Deletes the character to the left of the current cursor position
Ctrl+K Cuts the contents of line and places it in the clipboard
Ctrl+L Centers the active window
Ctrl+M Inserts a carriage return
Ctrl+O Inserts a new line after the cursor
Ctrl+Q Interpret next character as an ASCII code
Ctrl+R Incrementally searches backward through the current file
Ctrl+S Incrementally searches for a string entered from the keyboard
4.1 General Reference Delphi for PHP Epsilon Keyboard Shortcuts
32
4

Ctrl+Shift+- Displays context-sensitive Help
Ctrl+Shift+C Invokes class completion for the class declaration in which the cursor is positioned
Ctrl+T Transposes the two characters on either side of the cursor
Ctrl+X+, Browses the symbol at the cursor
Ctrl+X+0 Deletes the contents of the current window
Ctrl+X+Ctrl+E Invoke a command processor
Ctrl+X+Ctrl+T Transposes the two lines on either side of the cursor
Ctrl+X+Ctrl+X Exchanges the locations of the cursor position and a bookmark
Ctrl+X+I Inserts the contents of a file at the cursor
Ctrl+X+N Displays the next window in the buffer list
Ctrl+X+P Displays the previous window in the buffer list
Esc+) Locates the next matching delimiter (cursor must be on ')', '}' or ']')
Esc+? Displays context-sensitive Help
Esc+\ Deletes spaces and tabs around the cursor on the same line
Esc+BackSpace Deletes the word to the left of the current cursor position
Esc+C Capitalizes the first letter of the character after the cursor and lowercases all other letters to theend of the word
Esc+Ctrl+B Locates the next matching delimiter (cursor must be on ')', '}' or ']')
Esc+Ctrl+F Locates the previous matching delimiter (cursor must be on ')', '}' or ']')
Esc+Ctrl+H Deletes the word to the left of the current cursor position
Esc+Ctrl+K Deletes all text in the block between the cursor and the next matching delimiter (cursor must beon ')', '}' or ']')
Esc+D Deletes to word to the right of the cursor
Esc+Del Deletes all text in the block between the cursor and the previous matching delimiter (cursor mustbe on ')', '}' or ']')
Esc+End Displays the next window in the buffer list
Esc+Home Displays the previous window in the buffer list
Esc+L Converts the current word to lowercase
Esc+T Transposes the two words on either side of the cursor
Esc+Tab Indents to the current line to the text on the previous line
Esc+U Converts a selected word to uppercase or converts from the cursor position to the end of the wordto uppercase
Esc+X Invokes the specified command or macro
F2 Invokes the specified command or macro
4.1.5 Visual Studio Keyboard Shortcuts
The following table lists the Visual Studio Mapping keyboard shortcuts for the Code Editor.
%note% Keyboard shortcuts that include the CTRL+ALT key combination are disabled when the Use CTRL+ALT Keysoption is unchecked on the Tools Options Editor Options Key Mappings page.
4.1 General Reference Delphi for PHP Visual Studio Keyboard Shortcuts
33
4

Shortcut Action
Alt+[ Finds the matching delimiter (forward)
Alt+] Finds the matching delimiter (backward)
Alt+Backspace Edit|Undo
Alt+F12 Browse symbol at cursor (Delphi)
Alt+Page Down Goes to the next tab
Alt+Page Up Goes to the previous tab
Alt+Shift+Backspace Edit|Redo
Alt+Shift+Down Arrow Moves the cursor down one line and selects the column from the left of the starting cursor position
Alt+Shift+End Selects the column from the cursor position to the end of the current line
Alt+Shift+Home Selects the column from the cursor position to the start of the current line
Alt+Shift+Left Arrow Selects the column to the left of the cursor
Alt+Shift+Page Down Moves the cursor down one line and selects the column from the right of the starting cursorposition
Alt+Shift+Page Up Moves the cursor up one screen and selects the column from the left of the starting cursorposition
Alt+Shift+Right Arrow Selects the column to the right of the cursor
Alt+Shift+Up Arrow Moves the cursor up one line and selects the column from the left of the starting cursor position
Ctrl+Alt+Shift+End Selects the column from the cursor position to the end of the current file
Ctrl+Alt+Shift+Home Selects the column from the cursor position to the start of the current file
Ctrl+Alt+Shift+LeftArrow
Selects the column to the left of the cursor
Ctrl+Alt+Shift+PageDown
Selects the column from the cursor position to the top of the screen
Ctrl+Alt+Shift+PageUp
Selects the column from the cursor position to the bottom of the screen
Ctrl+Alt+Shift+RightArrow
Selects the column to the right of the cursor
Ctrl+F4 Closes the current page
Ctrl+J Templates pop-up menu
Ctrl+K+C Adds or removes // to each line in the selected code block to comment the code.
Ctrl+K+E Converts the word under the cursor to lower case
Ctrl+K+F Converts the word under the cursor to upper case
Ctrl+L Search|Search Again
Ctrl+P Causes next character to be interpreted as an ASCII sequence
Ctrl+Q+[ Finds the matching delimiter (forward)
Ctrl+Q+] Finds the matching delimiter (backward)
Ctrl+Q+Ctrl+[ Finds the matching delimiter (forward)
Ctrl+Q+Ctrl+] Finds the matching delimiter (backward)
Ctrl+Q+Y Deletes to the end of a line
Ctrl+Shift+C Invokes class completion for the class declaration in which the cursor is positioned
Ctrl+Shift+End Selects from the cursor position to the end of the current file
Ctrl+Shift+Home Selects from the cursor position to the start of the current file
Ctrl+Shift+Left Arrow Selects the word to the left of the cursor
4.1 General Reference Delphi for PHP Visual Studio Keyboard Shortcuts
34
4

Ctrl+Shift+PgDn Selects from the cursor position to the bottom of the screen
Ctrl+Shift+PgUp Selects from the cursor position to the top of the screen
Ctrl+Shift+Right Arrow Selects the word to the right of the cursor
Ctrl+Shift+Tab Displays the previous window in the buffer list
Ctrl+T Deletes the word to the left of the cursor
Ctrl+Tab Displays the next window in the buffer list
Ctrl+Y Deletes to the end of a line
Shift+Down Arrow Moves the cursor down one line and selects from the right of the starting cursor position
Shift+End Selects from the cursor position to the end of the current line
Shift+Enter Inserts a new line character
Shift+Home Selects from the cursor position to the start of the current line
Shift+Left Arrow Selects the character to the left of the cursor
Shift+PgDn Moves the cursor down one line and selects from the right of the starting cursor position
Shift+PgUp Moves the cursor up one screen and selects from the left of the starting cursor position
Shift+Right Arrow Selects the character to the right of the cursor
Shift+Space Inserts a blank space
Shift+Up Arrow Moves the cursor up one line and selects from the left of the starting cursor position
4.2 Delphi for PHP Component Writer's Guide This document describes how to create VCL for PHP components using Delphi for PHP.
4.2.1 Overview of Creating Components
This set of topics provides an overview of creating VCL components for PHP applications. The material here assumes thatyou are familiar with PHP and its standard components.
There are several approaches you can choose from to create components:
• Copy existing components delivered in Delphi for PHP as base classes and modify that code.
• Create entirely new components from scratch.
• Use third party scripts and wrap that code into components.
There are two types of components you can develop, visual and non-visual ones. You can inherit from the base classes,usually from the CustomXXXX ones because this allows you to decide which properties are going to be visible to thecomponent consumer at design time.
Creating Visual Components
As in PHP, there is no published section in VCL for PHP components. The same results are obtained using different gettersand setters as demonstrated in the example below.
Public properties (not shown on the OI) by using read/write:
//Caption propertyprotected function readCaption() { return $this->_caption; }protected function writeCaption($value) { $this->_caption=$value; }
4.2 Delphi for PHP Component Writer's Delphi for PHP Overview of Creating Components
35
4

function defaultCaption() { return ""; }
So you can write:
$mycomponent->Caption="this is a test";
Also, you can rewrite the previous code using set and get :
//Caption propertyprotected function getCaption() { return $this->_caption; }protected function setCaption($value) { $this->_caption=$value; }function defaultCaption() { return ""; }
You can also write the line in the same way:
$mycomponent->Caption="this is a test";
The IDE only displays and handles properties done this way. The correct way to develop components is to createCustomXXXX classes, in which the properties are written using read/write , then inherit from them, and set whichproperties will be displayed in the Object Inspector by using get/set . For example,
function getCaption() { return $this->readCaption(); }function setCaption($value) { $this->writeCaption($value); }
This calls the read/write versions of the ancestor. The defaultXXXX function allows you to specify the IDE that is thedefault value for that property, so if the value for the property matches the one returned by the default function, it is notstored.
Creating Non-visual Components
A component is not visible if it descends from Component instead of Control . The IDE will show an icon in the Designer toallow you select the component so you can setup properties and generate events. That icon does not display at runtime.
4.2.2 Overview of Creating Events
An event is a link between an occurrence in the system (such as a user action or a change in focus) and a piece of code thatresponds to that occurrence. The responding code is an event handler, and is nearly always written by the applicationdeveloper. Events let application developers customize the behavior of components without having to change the classesthemselves..
In VCL for PHP, there are two kinds of events: server events and JavaScript events. The difference between them is thatserver events are executed on the server and the code is written in PHP. JavaScript events are executed in the browser andthe code is JavaScript.
Server-side Events
Events for the most common user actions (such as mouse actions) are built into all the standard components, but you canalso define new events. Events are implemented as properties, so you should already be familiar with the material inOverview of Creating Properties ( see page 37) before you attempt to create or change a component's events.
Declaring the Event
Events are published properties enabling the IDE to handle them. They must start with On, to indicate to the IDE they areevents. For example,
protected $_onclick = null; //OnClick eventfunction getOnClick() { return $this->_onclick; }function setOnClick($value) { $this->_onclick = $value; }function defaultOnClick() { return ""; }
You store a reference to a method on the $_onclick field, and that value is accessed through the getter and setter.
To call a method from inside a component, use the following function:
$this->callEvent('onclick', array());
4.2 Delphi for PHP Component Writer's Delphi for PHP Overview of Creating Events
36
4

The callEvent( method is defined in the base Component class which takes two parameters: the name of the event youwant to fire, and an array with all the parameters you want to send to the event handler.
Triggering the Event
Triggering an event involves using the Component::callEvent() method, and passing any parameter you need
JavaScript Events
JavaScript events are handled differently than server events. You can use the same schema for JavaScript events as withserver events, but the events must start with jsOn to indicate to the IDE they are JavaScript events instead of server events.
To generate the JavaScript events for your components, you usually add attributes to your tags such asonclick="yourevent(); . in a Component , there is a method called readJsEvents() , or the JsEvent property. Forexample,
$events = $this->readJsEvents();
It returns a string with all the JavaScript event assignments made for you, ready to be dumped.
4.2.3 Overview of Creating Properties
Properties are the most visible parts of components. The application developer can see and manipulate them at design timeand get immediate feedback as the components react in the Form Designer. Well-designed properties make yourcomponents easier for others to use and easier for you to maintain.
From the application developer's standpoint, properties look like variables. Developers can set or read the values ofproperties as if they were fields. (About the only thing you can do with a variable that you cannot do with a property is pass itas a var parameter.)
Properties provide more power than simple fields because
• Application developers can set properties at design time. Unlike methods, which are available only at runtime, properties let the developer customize components before running an application. Properties can appear in the Object Inspector, which simplifies the programmer's job; instead of handling several parameters to construct an object, the Object Inspector supplies the values. The Object Inspector also validates property assignments as soon as they are made.
• Properties can hide implementation details. For example, data stored internally in an encrypted form can appear unencrypted as the value of a property; although the value is a simple number, the component may look up the value in a database or perform complex calculations to arrive at it. Properties let you attach complex effects to outwardly simple assignments; what looks like an assignment to a field can be a call to a method which implements elaborate processing.
• Properties can be virtual. Hence, what looks like a single property to an application developer may be implemented differently in different components.
A simple example is the Top property of all controls. Assigning a new value to Top does not just change a stored value; itrepositions and repaints the control. And the effects of setting a property need not be limited to an individual component; forexample, setting the Down property of a speed button to True sets Down property of all other speed buttons in its group toFalse.
Types of Properties
Below are the different types of properties you can use when creating VCL for PHP components.
Property Type
Description
Simple Numeric, strings, and so on that enable the user to edit the property directly.
Enumerated Properties that display a drop-down list in the Object Inspector allowing the user to select a value.
Object Properties that must be assigned to another component on the form of an specific class.
Subproperties Properties that are objects themselves, for example Font, and show their properties in the ObjectInspector.
4.2 Delphi for PHP Component Writer's Delphi for PHP Overview of Creating Properties
37
4

Array Complex properties to be edited by a specific editor.
Creating Properties for Subcomponents
A property for a subcomponent is created by adding an Object property with get/set , and inherits, at least, fromPersistent . You can also register property editors for the subproperties using the dot (. ). For example,
registerPropertyEditor("Control","Font.Color","ColorPropertyEditor","wclide.inc.php");
Creating Property Editors
Creating a property editor involves deriving a property-editor class. Below is the base class for PropertyEditors :
class PropertyEditor extends Object{ public $value; /** * Return specific attributes for the OI * */ function getAttributes() { } /** * If required, returns a path to become the document root for the webserver to call the property editor * */ function getOutputPath() { } /** * Executes the property editor * * @param string $current_value Current property value */ function Execute($current_value) { }}
Property editors are either modal dialogs or modeless dialogs.
Specifying Editor Attributes
To specify property editor attributes, on the getAttributes() method return the attributes as shown in the examplebelow:
$result="sizeable=0\n";$result.="width=557\n";$result.="height=314\n";$result.="caption=Color Property editor\n";
Registering the Property Editor
The following example demonstrates how to register a property editor:
registerPropertyEditor("Control","Font.Color","ColorPropertyEditor","wclide.inc.php");
This states that for all Control descendant classes, for the Font.Color property, use ColorPropertyEditor whosecode is in the wclide.inc.php file.
Setting the Valid Values for a Property
VCL for PHP components save their property values only if those values differ from the defaults. If you do not specifyotherwise, Delphi for PHP assumes a property has no default value, meaning the component always stores the property,whatever its value.
The example below demonstrates setting property values for a Chart component:
registerPropertyValues("Chart","ChartType",array('ctHorizontalChart','ctLineChart','ctPieCha
4.2 Delphi for PHP Component Writer's Delphi for PHP Overview of Creating Properties
38
4

rt','ctVerticalChart'));
This states that for the Chart component and all its descendant classes, display the values specified in the array for theChartType property in the drop-down list in the Object Inspector.
There are helpers like this:
registerBooleanProperty("Control","Visible");registerPasswordProperty("Database","Password");
Adding the Property Editor to the Component
Below is an example of how to add a property editor to a component:
/** * Base class for component editors * */class ComponentEditor extends Object{ public $component=null; /** * Return here an array of items to show when right clicking a component * */ function getVerbs() { } /** * Depending on the verb, perform any action you want * * @param integer $verb */ function executeVerb($verb) { } }
Implementing Commands
The example below demonstrates how to implement commands.
function getVerbs() { echo "Install...\n"; echo "About...\n"; } function executeVerb($verb) { switch($verb) { case 0: //TODO: Exec the setup SQL echo "The phpBB forum has been installed successfully!!\n"; break; case 1: echo "phpBB WCL wrapper component. Copyright (c) qadram software 2006.\n"; echo "phpBB2 Copyright © 2002 phpBB Group, All Rights Reserved.\n"; break; } }
Loading Components that Reference Other Components
When loading components from an .xml.php , those components can have properties that reference another component. Inthe .xml.php , that property is stored as a string which consists of the name of the component being referenced. When the
4.2 Delphi for PHP Component Writer's Delphi for PHP Overview of Creating Properties
39
4

component loads, it needs to get the correct object instance reference. That process is called fixup., and is performed bycalling the fixupProperty() method of the Component base class. Below is an example from the DBGrid component:
function setDataSource($value) { $this->_datasource=$this->fixupProperty($value); } function loaded() { parent::loaded(); $this->setDataSource($this->_datasource); }
When the DataSource property is set, it calls the Component::fixupProperty , which is responsible for finding theinstance of that object. If it cannot find it, will return $value , waiting for a better moment to find the value. When theloaded() method is called after all components have been loaded from the stream, setDataSource is called again to getthe object instance.
Registering the Component Editor
The example below demonstrates how to register the component editor:
registerComponentEditor("phpBB","phpBBEditor","thirdparty/phpBB.ide.inc.php");
This states that for the phpBB component and all its descendants, use the phpBBEditor component editor stored on thatunit.
4.2.4 Creating a Unit File
A unit is a separately compiled module of code. Delphi for PHP uses units for several purposes. Every form has its own unit,and most components (or groups of related components) have their own units as well.
Below is the basic skeleton for a new component:
<?php//You must include the unit where the ancestor residesuse_unit("controls.inc.php"); class Test extends Control{ function dumpContents() { echo "this is atest"; }}?>
And to show something, you must override the dumpContents() method. On that method, echo any contents you want tobe your component.
When you create a component, you either create a new unit for the component or add the new component to an existing unit.
To create a new unit for a component:
1. Choose either:
• File New Unit .
• File New Other . In the New Items dialog box, select Unit on the PHP page and choose OK. The IDE creates a new unit file and opens it in the Code editor.
2. Save the file with a meaningful name.
3. Derive the component class.
4.2 Delphi for PHP Component Writer's Delphi for PHP Creating a Unit File
40
4

To open an existing unit:
1. Choose File Open and select the source code unit to which you want to add your component.
%note% When adding a component to an existing unit, make sure that the unit contains only component code. Forexample, adding component code to a unit that contains a form causes errors in the Tool palette.
2. Derive the component class.
4.2.5 Making a Control Data Aware
When working with database connections, it is often convenient to have controls that are data aware. That is, the applicationcan establish a link between the control and some part of a database. Delphi for PHP includes data-aware labels, edit boxes,list boxes, combo boxes, lookup controls, and grids. You can also make your own controls data aware.
There are several degrees of data awareness. The simplest is read-only data awareness, or data browsing, the ability toreflect the current state of a database. More complicated is editable data awareness, or data editing, where the user can editthe values in the database by manipulating the control. Note also that the degree of involvement with the database can vary,from the simplest case, a link with a single field, to more complex cases, such as multiple-record controls.
VCL for PHP data aware controls must have a DataSource property. For example,
//DataSource property function getDataSource() { return $this->_datasource; } function setDataSource($value) { $this->_datasource=$this->fixupProperty($value); }
4.2.6 Registering Components
Registration works on a compilation unit basis, so if you create several components in a single compilation unit, you canregister them all at once.
%note% If you create your component by choosing Component New Component in the IDE, the code required toregister your component is added automatically.
To register components, you must create a package, and call the function registerComponents . For example,
registerComponents("System",array("Timer", "PaintBox"),"extctrls.inc.php");
This line tells the IDE to add to the System palette, the Timer and PaintBox components which are stored inextctrls.inc.php . This way, the IDE displays your component in the Tool Palette and adds the use_unit() call to therequired unit.
4.3 Dialog Boxes and Wizards This section contains help for dialog boxes and wizards in the Delphi for PHP user interface.
4.3 Dialog Boxes and Wizards Delphi for PHP Add New Property To Source Code
41
4

4.3.1 Add New Property To Source Code
Edit Add New Property
Adds the source code to create a property to the component and specify its default value.
Item Description
Property Name Specifies the name of the property.
Default Value Specifies the default value for the component which can be modified by the user.
4.3.2 Breakpoint List Window
View Debug Windows Breakpoints
Use the Breakpoint List window to display, enable, or disable breakpoints currently set in the loaded project, and to changethe condition, pass count, or group associated with a breakpoint. If no project is loaded, it shows all breakpoints set in theactive Code Editor or in the CPU window.
Column Description
Filename/Address The source file for the source breakpoint or the address for the address breakpoint. A checkboxbefore the file name indicates whether the breakpoint is enabled or disabled. Check the box toenable the breakpoint. Uncheck it to disable the breakpoint.
Line/Length The code line number for the breakpoint or the length (the number of bytes to watch) for the databreakpoint.
Condition The conditional expression that is evaluated each time the breakpoint is encountered. Click acondition value to edit it.
Action The action associated with breakpoints.
Pass Count The current pass and the total number of passes specified for the breakpoint. Click a pass countvalue to edit it.
Group The group name with which the breakpoint is associated. Click a group value to edit it.
The following icons are used to represent breakpoints in the Breakpoint List window.
Icon Description
The breakpoint is valid and enabled.
The breakpoint is valid and disabled.
The breakpoint is set at an invalid location, such as a comment, a blank line, or invaliddeclaration.
4.3.3 Code Explorer
View Code Explorer
Use the Code Explorer to navigate through your unit files. The Code Explorer contains a tree diagram that shows all of thetypes, classes, properties, methods, global variables, and global routines defined in your unit. It also shows the other unitslisted in the uses clause. Right-click an item in the Code Explorer to display its context menu.
4.3 Dialog Boxes and Wizards Delphi for PHP Code Explorer
42
4

When you select an item in the Code Explorer, the cursor moves to that item’s implementation in the Code Editor. When youmove the cursor in the Code Editor, the highlight moves to the appropriate item in the Code Explorer.
The Code Explorer uses the following icons:
Icon Description
Classes
Interfaces
Units
Constants or variables (including fields)
Methods or routines: Procedures (green)
Methods or routines: Functions (yellow)
Properties
Types
%tip% To adjust the Code Explorer settings, choose Tools Options Delphi Options Explorer .
4.3.4 Color Options
Tools Options Editor Options Color
Use this page to specify how the different elements of your code appear in the Code Editor.
Item Description
Color SpeedSetting Enables you to quickly configure the Code Editor display using predefined color combinations.Select a Color SpeedSetting from the drop-down list and look at the sample code window to seehow the settings will appear in the Code Editor.
Foreground Color Sets the foreground color for the selected code element. The foreground color changesautomatically for each element you choose in the Element list box.
Background Color Sets the background color for the selected code element.
Text Attributes: Bold Applies bold formatting to the selected element.
Text Attributes: Italic Italicizes the selected element.
Text Attributes:Underline
Underlines the selected element.
Element Specifies syntax highlighting for a particular code element. You can choose from the Element listbox or click the element in the sample Code Editor. As you change highlighting on code elements,you can see the effect in sample code window.
Use Defaults forForeground
Displays the code element using default system colors for the foreground. Unchecking this optionrestores the previously selected color or, if no color has been previously selected, sets the codeelement to the system color.
Use Defaults forBackground
Displays the code element using default system colors for the background. Unchecking this optionrestores the previously selected color or, if no color has been previously selected, sets the codeelement to the system color.
%note% The foreground color and background colors of the Modified line item in the Element list are the colors used tomark lines modified since last save and lines modified and saved in the current session, respectively.
4.3 Dialog Boxes and Wizards Delphi for PHP Customize Toolbars
43
4

4.3.5 Customize Toolbars
View Toolbars Customize
Use this dialog box to change the toolbar configuration. When this dialog box appears, you can add, remove, and rearrangebuttons on toolbars. The Toolbars page lists which toolbars you can show, hide, and reset.
Item Description
Toolbars Lists the toolbars available.
Reset Returns any selected toolbar to its default configuration.
Commands Page
The Commands page displays which menu commands you can drag and drop onto a toolbar.
Item Description
Categories Lists the menus available.
Commands Lists all the commands available for the menu selected in the Categories list box. The icon to theleft of the menu command shows the button that will appear on the toolbar.
Options Page
The Options page to show or hide toolbar button tooltips and shortcut keys.
Item Description
Menus show recentlyused commands first
Displays recently used commands only when first clicking on a menu.
Show full menus aftera short delay
Expands the menu to a full menu after a short delay. This only applies when the option is selectedto show recently used commands first.
Large Icons Displays large icons on the toolbar rather than the default small ones.
Show tooltips ontoolbars
Displays tooltips for toolbar buttons.
Show shortcut keys intooltips
Displays any toolbar button shortcut keys in the tooltip text.
Menu Animations Specifies whether to use menu animations, and if used, what type to use: Random, Unfold, Slide,or Fade.
4.3.6 Data Explorer
View Data Explorer
Use this pane to add a new connection, modify, delete, or rename your connections. You can browse databaseserver-specific schema objects including tables, fields, stored procedure definitions, triggers, and indexes. Additionally, youcan drag and drop data from a data source to a project to build your database application quickly. The Data Explorer panehas a toobar with buttons you can use to specify what type of component to create when dragging an item to the form in theDesigner.
Grid Creates a Grid component on the form when a table is dragged to the form.
Repeater Creates a Repeater component on the form when a table is dragged to the form.
Label Creates a Label component on the form when a field is dragged to the form.
4.3 Dialog Boxes and Wizards Delphi for PHP Data Explorer
44
4

Edit Creates an Edit component on the form when a field is dragged to the form.
Commands
The following commands are available when right-click in the Data Explorer:
Item Description
Register Datatabase Opens the Register Database dialog box where you can enter the information about yourdatabase server, connection information, and database name. This also adds the new connectionto the Data Explorer.
Close Database Collapses the selected database in the Data Explore tree.
Unregister Database Unregisters the selected database and removes it from the Data Explorer.
4.3.7 Deployment Wizard
Tools Deployment Wizard
The Deployment Wizard helps you isolate the files necessary for your application to run, and it copies those files to a folderon your computer to make it easy to upload it to the web server.
Item Description
Step 1 Describes what the Deployment Wizard does.
Step 2 Displays a list of the files in your project.
Step 3 Displays a list of the components used in your application.
Step 4 Displays the complete contents of the folder it is going to create for you to copy to your webserver.
Step 5 Specifies the target destination for the folder the wizard is going to create. Enter the path andfolder name, or browse to an existing folder.
4.3.8 Display Options
Tools Options Editor Options Display
Use this page to set display and font options for the Code Editor.
Item Description
Editor font Select a font type from the available screen fonts installed on your system (shown in the list). TheCode Editor displays and uses only monospaced screen fonts, such as Courier. Sample text isdisplayed in the Sample box.
Size Select a font size from the predefined font sizes associated with the font you selected in the Editorfont list box. Sample text is displayed below the Sample box.
Sample Displays a sample of the selected editor font and size.
Visible Right Margin Displays a vertical line at the right margin of the Code Editor when checked.
Visible Gutter Displays the gutter on the left edge of the Code Editor when checked.
Right Margin Sets the right margin of the Code Editor. The default is 80 characters.
Gutter width Sets the width of the gutter, default is 30.
4.3 Dialog Boxes and Wizards Delphi for PHP Display Options
45
4

Line Numbers: PaintOn Gutter
Displays all line numbers in the left margin of the Code Editor.
Line Numbers: PaintBeyond Eof
Displays all line numbers in the right margin of the Code Editor at the end of the line.
4.3.9 Editor Options
Tools Options Editor Options
Use this page to specify IDE configuration preferences.
Item Description
Use UTF-8 to createnew units and forms
When checked, specifies that Delphi for PHP should use UTF-8 character encoding when creatinga new unit or form.
4.3.10 Environment Options
Tools Options Environment Options
Use this page to specify IDE configuration preferences.
Item Description
Save Projectdesktop/open files
Saves the arrangement of your desktop when you close a project or exit the product. When youlater open the same project, all files opened when the project was last closed are opened again,regardless of whether they are used by the project.
Minimize on run Minimizes the IDE when you run an application by choosing Run Run . When you close theapplication, the IDE is restored. When you run an application without using the debugger, the IDEremains minimized.
Browsers Specifies the browsers to use with Delphi for PHP. Click Add to add a browser. Check the browseryou want to use as the default browser when running your PHP application.
4.3.11 Explorer Options
Tools Options Environment Options Explorer
Use this page to control the behavior of the Structure view and Project Manager.
Item Description
Display Explorer Disables the Code Explorer when checked. If the Code Explorer is being displayed when thisoption is checked, a shortcut link appears in the Code Explorer to the Explorer Options so you canquickly enable the Code Explorer again.
4.3.12 Find
Search Find
4.3 Dialog Boxes and Wizards Delphi for PHP Find
46
4
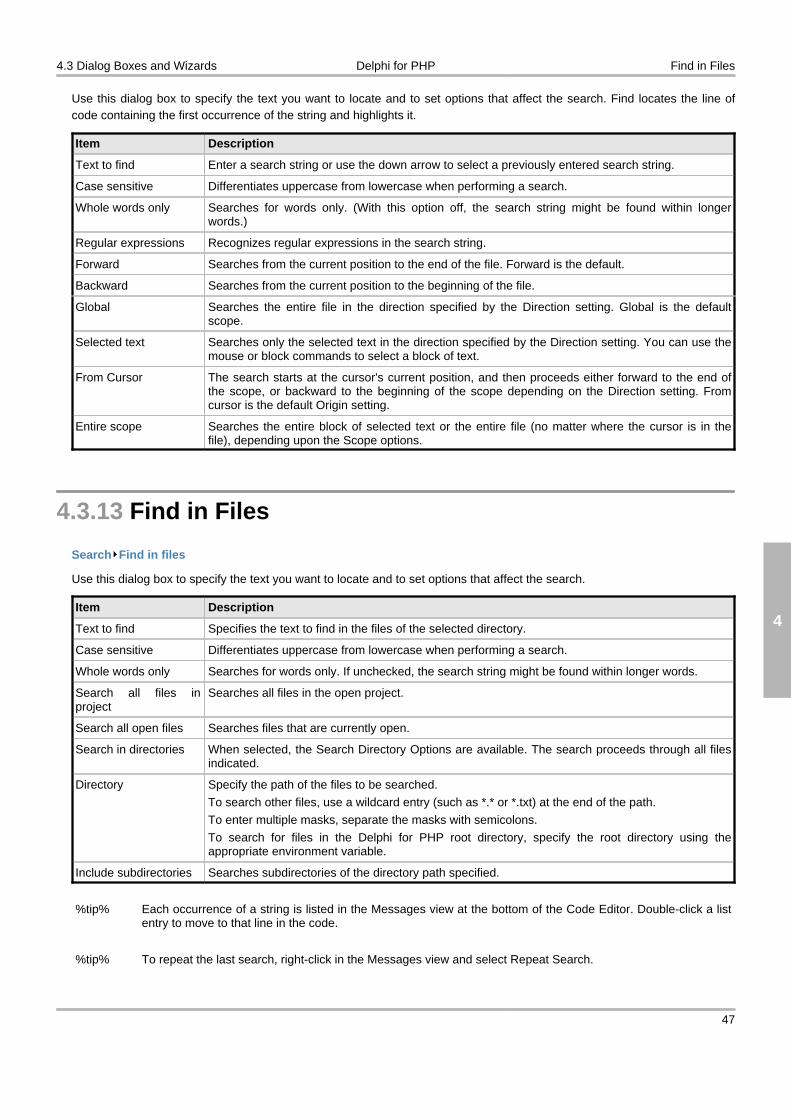
Use this dialog box to specify the text you want to locate and to set options that affect the search. Find locates the line ofcode containing the first occurrence of the string and highlights it.
Item Description
Text to find Enter a search string or use the down arrow to select a previously entered search string.
Case sensitive Differentiates uppercase from lowercase when performing a search.
Whole words only Searches for words only. (With this option off, the search string might be found within longerwords.)
Regular expressions Recognizes regular expressions in the search string.
Forward Searches from the current position to the end of the file. Forward is the default.
Backward Searches from the current position to the beginning of the file.
Global Searches the entire file in the direction specified by the Direction setting. Global is the defaultscope.
Selected text Searches only the selected text in the direction specified by the Direction setting. You can use themouse or block commands to select a block of text.
From Cursor The search starts at the cursor's current position, and then proceeds either forward to the end ofthe scope, or backward to the beginning of the scope depending on the Direction setting. Fromcursor is the default Origin setting.
Entire scope Searches the entire block of selected text or the entire file (no matter where the cursor is in thefile), depending upon the Scope options.
4.3.13 Find in Files
Search Find in files
Use this dialog box to specify the text you want to locate and to set options that affect the search.
Item Description
Text to find Specifies the text to find in the files of the selected directory.
Case sensitive Differentiates uppercase from lowercase when performing a search.
Whole words only Searches for words only. If unchecked, the search string might be found within longer words.
Search all files inproject
Searches all files in the open project.
Search all open files Searches files that are currently open.
Search in directories When selected, the Search Directory Options are available. The search proceeds through all filesindicated.
Directory Specify the path of the files to be searched.
To search other files, use a wildcard entry (such as *.* or *.txt) at the end of the path.
To enter multiple masks, separate the masks with semicolons.
To search for files in the Delphi for PHP root directory, specify the root directory using theappropriate environment variable.
Include subdirectories Searches subdirectories of the directory path specified.
%tip% Each occurrence of a string is listed in the Messages view at the bottom of the Code Editor. Double-click a listentry to move to that line in the code.
%tip% To repeat the last search, right-click in the Messages view and select Repeat Search.
4.3 Dialog Boxes and Wizards Delphi for PHP Find in Files
47
4

%tip% The Find in Files command changes to Cancel Find in Files while a lengthy search is in progress. To stop asearch in progress, right-click on the search result tab for that search and choose Close Tab or chooseSearch Cancel Find in Files .
4.3.14 Global Variables Window
View Debug Windows Globals
The Globals window to shows the current function’s global variables while in debug mode.
4.3.15 Go to Line Number
Search Go to Line Number
Use this dialog box to jump to a line number in the Code Editor.
Item Description
Enter New LineNumber
Enter the line number in the code that you want to go to, or select a number from a list ofpreviously entered line numbers.
4.3.16 ImageList Editor
The ImageList Editor provides an easy way to list the images that are going to be displayed for a component in the IDE atruntime, such as a MainMenu or a PopupMenu.
To open the ImageList Editor add an ImageList component to the form from the Advanced category on the Tool Palette.Select it and click the ellipsis button on the Items property for the component in the Object Inspector.
Item Description
Key / ID Specifies a unique numeric identifier for the image.
Filename Specifies the image filename.
Add Adds a new row in the table of images.
Delete Deletes the selected row from the table.
Load Opens a file browser for selecting the image, loads the image to the window, and automaticallyinserts the filename in the Filename column of the table.
Save Enables you to save the selected image to a different name/location.
Clear Removes the image from the display window, but does not remove the image from the table.
4.3.17 Installed Packages
Components Packages
Use this dialog box to specify the design time packages installed in the IDE and the runtime packages that you want to installon your system for use on all projects.
4.3 Dialog Boxes and Wizards Delphi for PHP Installed Packages
48
4

Item Description
Installed packages Lists the design time packages available to the IDE and all projects. Check the packages youwant to make available on a system-wide level. You do not need to have a project open to installpackages on a system-wide level.
Add Installs a design time package. The package will be available in all projects.
Remove Deletes the selected package. The package becomes unavailable in all projects.
Components Opens the Installed Components window where you can review the list of components in theselected package.
4.3.18 Internationalization Wizard
Tools Internationalization Wizard
The Internationalization Wizard localizes the strings in your application for translation to specific languages. It collects allyour project files, lets you select which languages to use for localizing your application, and runs gettext() over yoursource files to extract the strings. Then it creates a local folder in your project folder, with subfolders containing theresource strings for each language.
%note% You can run the Internationalization Wizard as many times as you want over your source code and it willupdate your resource strings.
Item Description
Step 1 Describes what the Internationalization Wizard does.
Step 2 Displays a list of the files in your project.
Step 3 Displays a list of possible languages to which you can translate your application strings. Check allthe languages you want to use.
Step 4 Displays a deployment report of resulting from the execution of gettext() over the source filesfor each language.
4.3.19 Items Editor
The Items Editor dialog box enables you to easily add menu items to a component, such as a MainMenu or a PopupMenu
after you add one to a form.
To open the Items Editor dialog box, add a component with an Items property to the form and select it. Click the ellipsisbutton on the Items property in the Object Inspector.
Item Description
Items Displays the items and sub-items for the selected component.
New Item Adds a new Item at the root of the item list and at the location of the cursor in the Items list.
New SubItem Adds a new SubItem under the selected Item in the Items list.
Delete Deletes the selected Item or SubItem from the Items list.
Load Loads a previously created item list saved to a text file.
Text Specifies the text to display for the item.
4.3 Dialog Boxes and Wizards Delphi for PHP Items Editor
49
4

Image Index Specifies by index number in the ImageList which image to display beside the selected item.
Important : To use images for items, you must add an ImageList component to the form andpopulate it with the list of images used in the application. Once that is done, you simply use theImage Index field to specify which image in the list to use.
Tag Specifies an interger which is the identifying tag ID to use for the selected item.
4.3.20 Local Variables Window
View Debug Windows Locals
Use the Local Variables window to show the current function’s local variables while in debug mode.
4.3.21 Log Window
View Debug Windows Log Window
The Log Window pane displays time-stamped messages from the IDE to the user.
4.3.22 New Component
Component New Component
The New Component dialog box creates a new component, or unit file with a default name, and the extension .inc.php .
Item Description
Ancestor Class Provides a drop-down list for selecting an existing VCL for PHP component to use as the baseclass for the new component.
Class Name Specifies the name for the new component class.
Palette Page Specifies on which Tool Palette page the new component will display in the IDE.
Create Package Creates a new package file to accompany the component when checked. When creating a newcomponent for an existing package, leave this unchecked.
4.3.23 New Items
File New Other
Use this dialog box to create a new project or other entity. The New Items dialog box displays project templates that arestored in the Delphi for PHP Object Repository.
Item Description
Item Categories Click a folder displayed in the Item Categories pane to display the types of entities that you cancreate.
4.3 Dialog Boxes and Wizards Delphi for PHP Notices
50
4

4.3.24 Notices
View Debug Windows Notices
The debug Notices pane displays notices from the debug process to the user.
4.3.25 Object Inspector
View Object Inspector
Use the Object Inspector to set the properties and events for the currently selected object.
Tab Description
Properties Displays the properties for the selected object on a form.
Events Displays the events for the selected object on a form.
JavaScript Displays JavaScript events for the selected object on a form.
4.3.26 Output
View Debug Windows Output Window
The Output pane is a debugger window that displays the output from the debug process.
4.3.27 Page Designer Options
Tools Options Environment Options Page Designer
Use this dialog box to specify preferences for Windows forms.
Item Description
Display grid Displays dots on the form to make the grid visible.
Changing this setting affects forms created after you make the change. To change this setting foran existing form, change the form's DrawGrid property in the Object Inspector.
Snap to grid Automatically aligns components on the form with the nearest grid line. You cannot place acomponent in between grid lines.
Changing this setting affects forms created after you make the change. To change this setting foran existing form, change the form's SnapToGrid property in the Object Inspector.
Grid step X Sets the grid spacing in pixels along the X axis. Specify a higher number increase grid spacing.
Changing this setting affects forms created after you make the change. To change this setting foran existing form, change the form's GridSize property in the Object Inspector.
Grid step Y Sets the grid spacing in pixels along the Y axis. Specify a higher number increase grid spacing.
Changing this setting affects forms created after you make the change. To change this setting foran existing form, change the form's GridSize property in the Object Inspector.
4.3 Dialog Boxes and Wizards Delphi for PHP Page Designer Options
51
4

Designer hints Displays a class name in a Help tooltip for a nonvisual component you drop on form or datamodule. Note that this option only affects tooltips that appear when you pause the mouse over acomponent. Help tooltips are always enabled in the Tool Palette.
Show Tag Editor Displays a tag editor pane under the form in the Designer. This pane is a text editor in which youcan edit the current tag source directly.
4.3.28 PHP Options
Tools Options PHP Options
Use this page to specify PHP options, such as the default character set, and the mbstring configuration options for dealingwith multibyte encodings in PHP.
Item Description
Default Charset Specifies the default character set to use for PHP application development. The default isISO-8859–1 .
Language Specifies the default national language setting (NLS). The default value is "neutral" .
Detect Order Specifies the default character encoding detection order. The default is NULL.
HTTP Input Specifies the default HTTP input character encoding. The default is "pass" .
HTTP Output Specifies the default HTTP output character encoding. The default is "pass" .
Internal Encoding Specifies the default internal character encoding. The default is NULL.
Script Encoding Specifies the default script encoding. The default is NULL.
Substitute Character Specifies which character encoding to substitute for invalid character encoding. The default isNULL.
Function Overload Overloads a set of singlebyte functions with the mbstring multibyte counterparts. The default is"0" .
Encoding Translation Uses a character encoding filter for incoming HTTP queries which converts input encoding to theinternal character encoding. The default is "0" .
Strict Detection Uses strict encoding detection. The default is "0" .
Set these values onphp.ini
When checked, sets the MB String options specified on this page for the php.ini file to use atruntime.
See the the “PHP Manual” for more information. Choose Help PHP Help Contents Function Reference MultibyteString Functions .
4.3.29 PHP Options: Internal Webserver
Tools Options PHP Options Internal Webserver
Use this page to specify IDE configuration preferences.
Item Description
Port Specifies which port number to use for your internal webserver.
4.3 Dialog Boxes and Wizards Delphi for PHP Picture Editor
52
4

4.3.30 Picture Editor
ThePicture Editor enables you to specify and view the image to use in the ImageSource property for a component thatdisplays an image.
To open the Picture Editor, add the component to the form and click the ellipsis button on the ImageSource property in theObject Inspector. Click Load to browse to the image file. Click Save to save the loaded image to a new file name.
Load Opens a browser for selecting the image file to use for the component. After selecting the image,it is displayed in the Picture Editor.
Save Saves the loaded file to a different file name and location.
Clear Clears the contents of the Picture Editor.
4.3.31 Project Manager
View Project Manager
Use this dialog to display and organize the contents of your current project group and any project it contains. You canperform several project management tasks, such as adding, removing, and compiling files.
Item Description
Project list box Displays the projects in the current project group.
New Displays the New Items dialog box so that you can add a new project to the current project group.
Activate Displays the selected project on top of other projects in the IDE so that you can make changes toit. You can also double-click the project to activate it. The active project is displayed in bold.
Remove Removes the selected project from the current project group.
New Opens the New Items dialog box enabling you to add create new items and add them to yourproject.
4.3.32 Register Database
Use this dialog box to set up the connection to a database and register it with the IDE.
To open the Register Database dialog box, right-click a database node in the Data Explorer and choose Register |Database.
Item Description
Database type Specifies the type of the database, for example, MySQL or Interbase.
Host Specifies the host name for the database server.
Port Specifies the port number to use to access the database on the server.
Username Specifies the user name for connecting to the database server.
Password Specifies the password to use when connecting to the database server.
Database Specifies the name of the database to connect to.
4.3 Dialog Boxes and Wizards Delphi for PHP Remove from Project
53
4
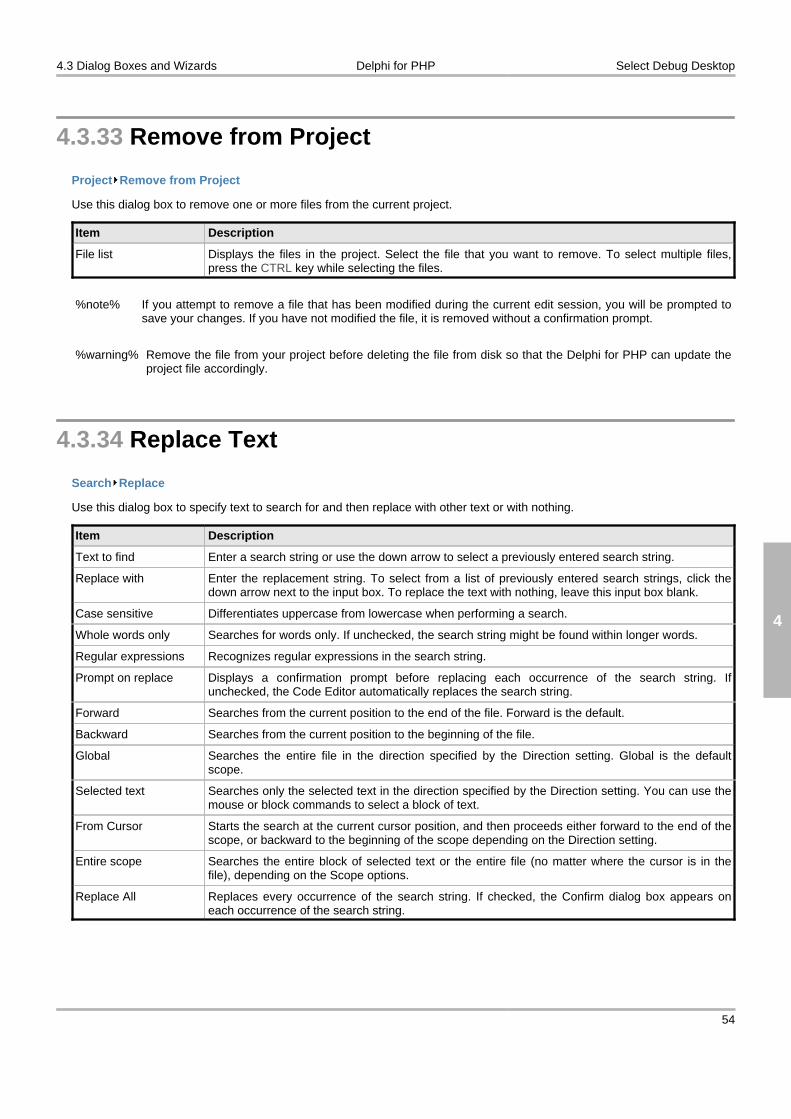
4.3.33 Remove from Project
Project Remove from Project
Use this dialog box to remove one or more files from the current project.
Item Description
File list Displays the files in the project. Select the file that you want to remove. To select multiple files,press the CTRL key while selecting the files.
%note% If you attempt to remove a file that has been modified during the current edit session, you will be prompted tosave your changes. If you have not modified the file, it is removed without a confirmation prompt.
%warning% Remove the file from your project before deleting the file from disk so that the Delphi for PHP can update theproject file accordingly.
4.3.34 Replace Text
Search Replace
Use this dialog box to specify text to search for and then replace with other text or with nothing.
Item Description
Text to find Enter a search string or use the down arrow to select a previously entered search string.
Replace with Enter the replacement string. To select from a list of previously entered search strings, click thedown arrow next to the input box. To replace the text with nothing, leave this input box blank.
Case sensitive Differentiates uppercase from lowercase when performing a search.
Whole words only Searches for words only. If unchecked, the search string might be found within longer words.
Regular expressions Recognizes regular expressions in the search string.
Prompt on replace Displays a confirmation prompt before replacing each occurrence of the search string. Ifunchecked, the Code Editor automatically replaces the search string.
Forward Searches from the current position to the end of the file. Forward is the default.
Backward Searches from the current position to the beginning of the file.
Global Searches the entire file in the direction specified by the Direction setting. Global is the defaultscope.
Selected text Searches only the selected text in the direction specified by the Direction setting. You can use themouse or block commands to select a block of text.
From Cursor Starts the search at the current cursor position, and then proceeds either forward to the end of thescope, or backward to the beginning of the scope depending on the Direction setting.
Entire scope Searches the entire block of selected text or the entire file (no matter where the cursor is in thefile), depending on the Scope options.
Replace All Replaces every occurrence of the search string. If checked, the Confirm dialog box appears oneach occurrence of the search string.
4.3 Dialog Boxes and Wizards Delphi for PHP Select Debug Desktop
54
4

4.3.35 Select Debug Desktop
Use this dialog box to determine which saved desktop layout is used when you are debugging.
To open the Select Debug Desktop dialog box, choose View Desktops to display the Desktops toolbar. Click the SelectDebug Desktop button.
Item Description
Debug desktop Select a desktop layout from the drop-down list.
4.3.36 Source Formatter: Indent/Line Breaks Options
Tools Options Editor Options Source Formatter Indent/Line Breaks
Use this page to configure Code Editor settings for indents and line breaks.
Item Description
Number of spaces perindent
Displays the number of spaces for each indent.
Indent brace Displays a brace when checked to indicate the indented line.
Extra indent before Specifies to insert an indent before the selected items: Before each open brace, and as a defaultbefore each switch block. Check the each item you want to precede with an extra indent.
Remove double blanklines
Removes extra lines when checked.
'{' Style Specifies whether or not to break before and after an open brace.
Break on single if orelse
Breaks on each if or else statement when checked.
Break single linefunctions
Breaks each line after a single function when checked.
Align simplecomments to position
Aligns simple comments to the specified character position. Select a position in the drop-down list.
4.3.37 Source Formatter: Spacing Options
Tools Options Editor Options Source Formatter Spacing Options
This page specifies how to use spaces surrounding code elements in the Code Editor.
Description Displays the name of the code element.
Operators Displays the operators used for the code element.
Options Displays where to place spaces around the operators in the selected code element. Choose anoption from the drop-down list for each element: None, Before Only, After Only, Before and After.
4.3 Dialog Boxes and Wizards Delphi for PHP Source Options
55
4

4.3.38 Source Options
Tools Options Editor Options Source Options
Use this page to configure Code Editor settings for various editing options.
Item Description
Auto indent mode Positions the cursor under the first non-blank character of the preceding non-blank line when youpress ENTER in the Code Editor.
Insert mode Uses insert typing mode when checked, replace typing mode when unchecked.
Use tab character Inserts tab characters when you press TAB in the Code Editor. If not checked, pressing TABinserts spaces. If Smart tab is enabled, this option is off. To view tab characters, select Show tabcharacter.
Smart tab Tabs to the first non-whitespace character in the preceding line. If Use tab character is enabled,this option is off.
Optimal fill Begins every auto-indented line with the minimum number of characters possible, using tabs andspaces as necessary.
Backspace unindents Aligns the insertion point to the previous indentation level (outdents it) when you pressBACKSPACE, if the cursor is on the first nonblank character of a line.
Cursor through tabs Enables the arrow keys to move the cursor to the logical spaces within each tab character.
Group undo Undoes multiple changes.
Cursor beyond EOF Allows the cursor to go beyond the end of the file.
Cursor beyond EOL Allows the cursor to go beyond the end of a line.
Undo after Save Allows you to undo an action after you have saved the file.
Keep trailing blanks Prevents trailing blanks from being truncated.
Persistent blocks Keeps marked blocks selected even when the cursor is moved, until a new block is selected.
Overwrite blocks Replaces a marked block of text with whatever is typed next. If Persistent Blocks is also selected,text you enter is appended following the currently selected block.
Enable Selection Allows selection of text in the editor. When unchecked, you cannot select anything in the CodeEditor.
Enable Dragging Enables dragging and dropping of selected text in the editor.
Enable SearchHighlight
Highlights search results when checked.
Double-click line Highlights the line when you double-click any character in the line. If disabled, only the selectedword is highlighted.
Find text at cursor Places the text at the cursor into the Text To Find list box in the Find Text dialog box.
Force cut and copyenabled
Enables cut/copy operations when checked, even if there is no text currently selected. It clears theclipboard if the user tries to perform the cut/copy operation having not selected any text.
Triple-click line Enables whole line selecting when user triple clicks the mouse button.
Key Mapping Specifies the type of key mapping keystrokes to use in the Code Editor.
Block indent Specifies the number of spaces to indent a marked block. The default is 2; the upper limit is 16.
Tab stops Set tabs stops that the cursor will move to when you press TAB. Enter one or more integersseparated by spaces. If multiple tab stops are specified, the numbers indicate the columns inwhich the tab stops are placed. Each successive tab stop must be larger than the previous tabstop. If a single tab stop is specified, it indicates the number of spaces to jump each time you tab.
4.3 Dialog Boxes and Wizards Delphi for PHP StringList Editor
56
4

4.3.39 StringList Editor
TheString List Editor provides an easy way to list the strings that are going to be displayed in a component such as a Memo,RadioGroup, or Query.
To open the String List Editor add a component to the form that displays a string list. Select the component and click theellipsis button on the Items or Lines property for the component in the Object Inspector.
Type the list of strings in the edit box in theString List Editor. Press Enter to add new string line.
4.3.40 Structure Window
View Structure
Use the Structure window to see the hierarchy of source code or HTML displayed in the Code Editor, or componentsdisplayed on the Designer. When displaying the structure of source code or HTML, you can double-click an item to jump toits declaration or location in the Code Editor. When displaying components, you can double-click a component to select it onthe form.
If your code contains syntax errors, they are displayed in the Errors node in the Structure window. You can double-click anerror to locate the corresponding source in the Code Editor.
4.3.41 Tool Palette
View Tool Palette
The Tool Palette contains default VCL for PHP visual and non-visual components you can add to a form. You can alsocreate custom components based on the VCL for PHP components and install them on the palette for future use in yourapplication development. To use a component from the palette, expand the palette page containing the component you wantto use, then double-click the component to add it to your form.
4.3.42 Value List Editor
TheValue List Editor provides an easy way to list the key value pairs that are required for a component such as a ListBox orComboBox.
To open the Value List Editor add the component to the form and click the ellipsis button on the Items property for thecomponent in the Object Inspector. Click Add to add new row to the table.
Key Specifies the unique Key identifier for the key/value pair.
Value Specifies the default value for the key/value pair.
4.3.43 View Unit
View Units
4.3 Dialog Boxes and Wizards Delphi for PHP View Unit
57
4

Use this dialog box to view the project file or any unit in the current project. When you open a unit, it becomes the activepage in the Code Editor.
4.3.44 Watch Properties
The Watch Properties dialog box enables you to enter a watch expression.
To view the Watch Properties dialog box, right-click in the Watches window and choose Add Watch (Ctrl+F5).
%tip% To enable or disable a watch expression quickly, use the check box next to the watch in the Watches window.
Item Description
Expression Specifies the watch expression..
4.3.45 Watches Window
View Debug Windows Watches
The Watches window displays the current value of the watch expression based on the scope of the execution point.
%tip% To enable or disable a watch expression quickly, use the check box next to the watch.
Item Description
Watch Name Shows the expression entered as a watch.
Value Lists the current value of the expression entered.
4.3 Dialog Boxes and Wizards Delphi for PHP Watches Window
58
4

5 topics_not_in_toc
5.1 Reference
5.2 Key Mappings Tools Options Editor Options Key Mappings
Use this page to enable or disable key binding enhancement modules and change the order in which they are initialized.
Item Description
Key mapping modules Lists the available key bindings.
To set the default key binding, use the Editor Options page Editor SpeedSettings option.
Enhancement modules Enhancement modules are special packages that are installed and registered and use thekeyboard binding features that can be developed using the Open Tools API. You can createenhancement modules that contain new keystrokes or apply new operations to existingkeystrokes.
Once installed, the enhancement modules are displayed in the Enhancement modules list box.Clicking the check box next to the enhancement module enables it and unchecking it disables it.Key mapping defined in an installed and enabled enhancement module overrides any existing keymapping defined for that key in the key mapping module which is currently in effect.
Move Up Moves the selected enhancement module up one level in the list.
Move Down Moves the selected enhancement module down one level in the list.
Use CTRL+ALT Keys If checked, the CTRL+ALT key combination is used in shortcuts throughout the IDE. If unchecked,those shortcuts are disabled and CTRL+ALT can be used to perform other functions, such asentering accent characters.
See Also
Default Key Mapping ( see page 26), IDE Classic Key Mapping ( see page 29), BRIEF Emulation Key Mapping ( seepage 28), Epsilon Emulation Key Mapping ( see page 32), Visual Studio Key Mapping ( see page 33)
5.2 Key Mappings Delphi for PHP
59
5

6 Symbol Reference
6.1 Files The following table lists files in this documentation.
Files
Name Description
Command Prompt.lnk ( see page 60) This is file Command Prompt.lnk.
6.1.1 Command Prompt.lnk
This is file Command Prompt.lnk.
6.1 Files Delphi for PHP Command Prompt.lnk
60
6

Index
AAccessing the Designer 10
Add New Property To Source Code 42
Adding a Watch 21
Adding an Image Icon to a Component 10
Adding and Removing Files 11
Adding Components to a Form 10
Adding Multiple Components to an Existing Package 11
Adding Packages 12
BBreakpoint List Window 42
BRIEF Keyboard Shortcuts 28
Building Application Menus 12
CCode Editor
customizing 16
Code Explorer 42
Code Insight 14, 19
Color Options 43
Command Prompt.lnk 60
components 35
Concepts 4
Configuring the Designer 14
controls
data-aware 41
Creating a Database Application 23
Creating a Form 14
Creating a Project 14
Creating a Unit File 40
Creating an InterBase PHP Database Application 24
Creating and Using Code Templates 14
Creating Custom Components 15
Creating Properties for Custom Components 16
Customize Toolbars 44
Customizing the Code Editor 16
DData Explorer 44
database
creating database application 23, 24, 25
Database 23
debugging
adding a watch 21
breakpoints 21
overview 5
Debugging 21
Default Keyboard Shortcuts 26
Delphi for PHP Component Writer's Guide 35
Deploying Applications 16
deployment 16
overview 6
Deployment Wizard 45
Designer 14
Dialog Boxes and Wizards 41
Display Options 45
Displaying Expanded Watch Information 22
docking
tools 17
Docking Tool Windows 17
Dragging an Item from the Data Explorer 24
EEditor Options 46
Environment Options 46
Epsilon Keyboard Shortcuts 32
events
creating 36
writing event handlers 20
Explorer Options 46
FFiles 60
Find 46
Find in Files 47
form 10, 14
7 Delphi for PHP
a

GGeneral 10
General Reference 26
getting started
adding files to a project 11
creating projects 14
docking tool windows 17
installing custom components 11, 12, 15, 17, 19
Getting Started 1
Global Variables Window 48
Go to Line Number 48
IIBX for PHP Overview 8
icon
adding icon to component 10
ide
Code Editor 1
design surface 1
forms 1
Object Inspector 1
Project Manager 1
welcome page 1
IDE Classic Keyboard Shortcuts 29
ImageList Editor 48
Installed Packages 48
Installing Custom Components 17
Internationalization Wizard 49
Items Editor 49
KKey Mappings 59
LLocal Variables Window 50
localization
internationalization 18
Localizing Applications 18
Log Window 50
MMaking a Control Data Aware 41
NNew Component 50
New Items 50
Notices 51
OObject Inspector 51
Opening a Project 18
Output 51
Overview of Creating Components 35
Overview of Creating Events 36
Overview of Creating Properties 37
Overview of Debugging 5
Overview of Deploying PHP Applications 6
Overview of Editing Code 5
Overview of PHP User Interface Design 4
PPage Designer Options 51
PHP Options 52
PHP Options: Internal Webserver 52
Picture Editor 53
Procedures 10
Project Manager 53
projects 14, 16, 18
properties
component properties 19
component writing 37
creating properties 16
RReference 26, 59
Register Database 53
Registering a Database 25
registering components
Tool palette 41
Registering Components 41
7 Delphi for PHP
b

Remove from Project 54
Replace Text 54
SSaving Custom Components 19
Select Debug Desktop 55
Setting and Modifying Source Breakpoints 21
Setting Component Properties 19
Source Formatter: Indent/Line Breaks Options 55
Source Formatter: Spacing Options 55
Source Options 56
StringList Editor 57
Structure Window 57
TTool Palette 57
topics_not_in_toc 59
Tour of the Delphi for PHP IDE 1
UUsing Code Insight 19
VValue List Editor 57
VCL
Architecture 6
components 6
VCL for PHP Overview 6
View Unit 57
Viewing VCL for PHP Help 20
Visual Studio Keyboard Shortcuts 33
WWatch Properties 58
Watches Window 58
What is Delphi for PHP? 1
Writing Event Handlers 20
7 Delphi for PHP
c
Recommended