Creating AnimationPertemuan 06-07
Matakuliah : L0182 / Web & Animation Design
Tahun : 2008

Bina Nusantara
Learning Outcomes
Pada akhir pertemuan ini, diharapkan mahasiswa akan
mampu :• Membuat animasi sederhana dengan menggunakan
tools pada Adobe Flash CS3

Bina Nusantara
Outline Materi
• What is Flash?• Flash vs Animated Images and
Java Applets• General Flash Workflow• Drawing Tools• Stage• Timelines• Property Inspector• Library Panel• Action Panel• Color Panel
• Graphic Objects• Symbol• Creating Animation• Motion Tweening• Shape Tweening• Motion Guide• Masking• Filter• Using a Sound• Simple Action Script

Bina Nusantara
What is Flash?
• Flash is a multimedia graphics program specially for use on the Web
• Flash enables you to create interactive "movies" on the Web
• Flash uses vector graphics, which means that the graphics can be scaled to any size without losing clarity/quality
• Flash does not require programming skills and is easy to learn

Bina Nusantara
Flash vs Animated Images and Java Applets
• Animated images and Java applets are often used to create dynamic effects on Web pages.
• The advantages of Flash are :– Flash loads much faster than animated images – Flash allows interactivity, animated images do not – Flash does not require programming skills, java applets do

Bina Nusantara
General Flash Workflow
• To build a Flash application, you typically perform the following basic steps :– Plan the application.– Add media elements.– Arrange the elements.– Apply special effects.– Use ActionScript to control behavior. – Test and publish your application.

Bina Nusantara
Drawing Tools
• The drawing tools in Flash let you create and modify shapes for the artwork in your movies.
Bina Nusantara
Stage
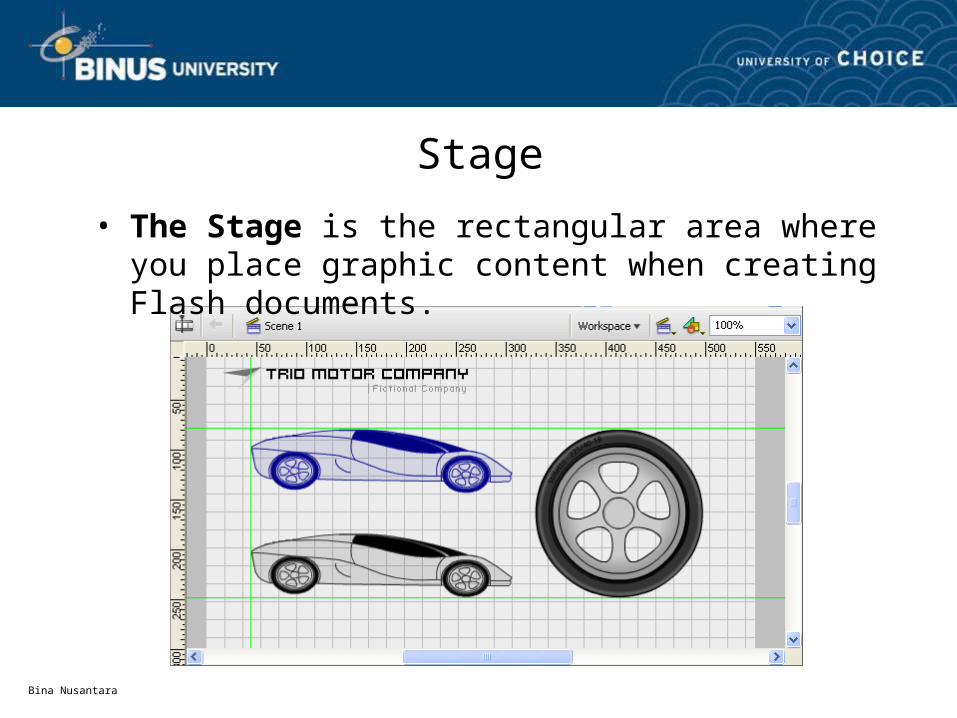
• The Stage is the rectangular area where you place graphic content when creating Flash documents.

Bina Nusantara
Timelines
• The Timeline organizes and controls a document’s content over time in layers and frames.
• Like films, Flash documents divide lengths of time into frames.
• Layers are like multiple film strips stacked on top of one another, each containing a different image that appears on the Stage.
• The major components of the Timeline are layers, frames, and the playhead.

Bina Nusantara
Timelines (cont..)
• A. Playhead • B. Empty keyframe • C. Timeline header • D. Guide layer icon • E. Frame View pop‑up menu • F. Frame-by-frame animation
• G. Tweened animation • H. Scroll To Playhead button • I. Onion-skinning buttons • J .Current Frame indicator • K Frame Rate indicator • L Elapsed Time indicator

Bina Nusantara
Property Inspector
• The Property inspector provides easy access to the most commonly used attributes of the current selection.
• Depending on what is currently selected, the Property inspector displays information and settings for the current document, text, symbol, shape, bitmap, video, group, frame, or tool.
• Example : the property inspector for the text tool

Bina Nusantara
Library Panel
• The Library panel is where you store and organize symbols created in Flash, as well as imported files, including bitmap graphics, sound files, and video clips.
• The Library panel lets you organize library items in folders, see how often an item is used in a document, and sort items by type.

Bina Nusantara
Action Panel
• The Actions panel lets you create and edit ActionScript code for an object or frame.
• The Actions panel title changes to Button Actions, Movie Clip Actions, or Frame Actions, depending on what is selected.

Bina Nusantara
Color Panel
• The Color panel lets you change the color of strokes and fills.

Bina Nusantara
Graphic Objects
• In Flash, graphic objects are items on the Stage. Flash lets you move, copy, delete, transform, stack, align, and group graphic objects.
• Shape are one type of graphic object you can create in Flash. When you draw shapes that overlap each other in the same layer, the topmost shape cuts away the part of the shape underneath it that it overlaps.
• Arranging Objects– Stack objects– Align objects– Group objects– Break apart groups and objects

Bina Nusantara
Symbol
• A symbol is a graphic, button, or movie clip that you create once in the Flash authoring environment.
• Each symbol has a unique Timeline and Stage, complete with layers.
• You can add frames, keyframes, and layers to a symbol Timeline, just as you can to the main Timeline.
• Use graphic symbols for static images and to create reusable pieces of animation that are tied to the main Timeline.
• Use button symbols to create interactive buttons that respond to mouse clicks, rollovers, or other actions.
• Use movie clip symbols to create reusable pieces of animation. Movie clips have their own multiframe Timeline that is independent from the main Timeline

Bina Nusantara
Button Symbol• The first frame is the Up state,
representing the button whenever the pointer is not over the button.
• The second frame is the Over state, representing the button’s appearance when the pointer is over the button.
• The third frame is the Down state, representing the button’s appearance as it is clicked.
• The fourth frame is the Hit state, defining the area that responds to the mouse click.

Bina Nusantara
Creating Animation
• Keyframe– Changes in the animation are defined in a keyframe. – When you create frame-by-frame animation, every frame is a
keyframe.
• Tweening– Tweening is an effective way to create movement and changes
over time. – In tweened animation, you define keyframes at significant points
in the animation and Flash creates the contents of frames between.
– Flash can create two types of tweened animation :• Motion tweening• Shape tweening

Bina Nusantara
Motion Tweening
• In motion tweening, you define properties such as position, size, and rotation for an instance, group, or text block at one specific time, and change those properties at another specific time.
• A black dot at the beginning keyframe indicates motion tweens; a black arrow with a light blue background indicates intermediate tweened frames.
Bina Nusantara
Shape Tweening
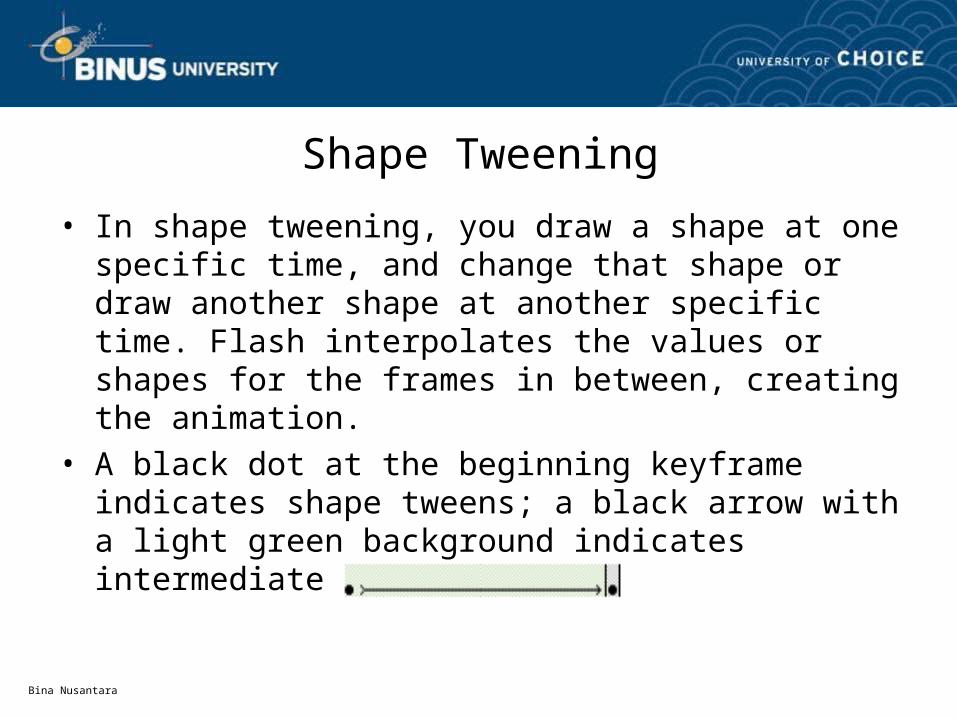
• In shape tweening, you draw a shape at one specific time, and change that shape or draw another shape at another specific time. Flash interpolates the values or shapes for the frames in between, creating the animation.
• A black dot at the beginning keyframe indicates shape tweens; a black arrow with a light green background indicates intermediate frames.

Bina Nusantara
Motion Guide
• Motion guide layers let you draw paths along which tweened instances, groups, or text blocks can be animated.
• You can link multiple layers to a motion guide layer to have multiple objects follow the same path.
• Use the Pen, Pencil, Line, Circle, Rectangle, or Brush tool to draw the desired path.

Bina Nusantara
Motion Guide (cont..)

Bina Nusantara
Masking
• You can use mask layers to reveal portions of a picture or graphic in the layer below.
• To create a mask, you specify that a layer is a mask layer, and either draw or place a filled shape on that layer.
• You can use any filled shape, including groups, text, and symbols, as a mask.
• The mask layer reveals the area of linked layers beneath the filled shape.

Bina Nusantara
Masking (cont..)

Bina Nusantara
Filter
• Filters (graphic effects) let you add interesting visual effects to text, buttons, and movie clips.
• A feature unique to Flash is that you can animate the filters you apply using motion tweens.
• Filter :– Drop Shadow– Blur– Glow– Bevel– Gradient Glow– Gradient Bevel– Adjust Color

Bina Nusantara
Using Sound• You place sound files into Flash by importing them into the library
for the current document.• You can import the following sound file formats into Flash :
– WAV (Windows only)– AIFF (Macintosh only)– mp3 (Windows or Macintosh)
• If you have QuickTime 4 or later installed on your system, you can import these additional sound file formats :– AIFF (Windows or Macintosh)– Sound Designer II (Macintosh only)– Sound Only QuickTime Movies (Windows or Macintosh)– Sun AU (Windows or Macintosh)– System 7 Sounds (Macintosh only) – WAV (Windows or Macintosh)

Bina Nusantara
Import a Sound
• Select File > Import > Import To Library. • In the Import dialog box, locate and open the desired
sound file. • With the new sound layer selected, drag the sound from
the Library panel onto the Stage. The sound is added to the current layer.
• You can place multiple sounds on one layer or on layers containing other objects. However, it is recommended that each sound be placed on a separate layer.

Bina Nusantara
Import a Sound (cont..)

Bina Nusantara
Simple Action Script• The ActionScript scripting language lets you add complex
interactivity, playback control, and data display to your application.
Method
play()
stop()
gotoAndStop()
gotoAndPlay()
nextFrame()
prevFrame()
_parent
_root
fscommand()
Recommended