Digital Graphics – using Krita (free software)
Ghazala Iffat MooICT.com April 2016
Creating a line drawing using Krita
Krita is a free sketching and painting program used for the creation of digital graphics. You can
download this software from https://krita.org/
In this tutorial we will be covering:
1. Creating a new file
2. Key brushes to use – storing brushes
3. Creating the image
a. Template
b. Line drawing
4. Applying details
5. Exporting your image
Creating a new file
As with most software, to create a new file to start working on click File -> New
Digital Graphics – using Krita (free software)
Ghazala Iffat MooICT.com April 2016
There are many options to choose from here. Type a suitable name for your file. You can then select
a predefined size for the image; here we will create an A4 image of 300 ppi (pixels per inch). We do
not need to use any higher at this stage as it will not affect the quality of the image much. You can
leave the rest as the default options (below).
Digital Graphics – using Krita (free software)
Ghazala Iffat MooICT.com April 2016
Your next screen will look similar to this. This is the main screen you will be using to create you
image.
1. On the left you have your tools to use.
2. In the centre in the canvas you will be painting on.
3. On the right you have
a. the colour selector
b. layers
c. brush presets
There are more advanced features in Krita, but these are the ones we will be using.
1.
2.
3a.
3b.
3c.

Digital Graphics – using Krita (free software)
Ghazala Iffat MooICT.com April 2016
Key brushes to use – storing brushes
There are a variety of brushes to use in Krita. To make things easy we will store the key ones we will
use in a custom tag called favourites. In the Brush presets section, click on the ‘+’ symbol and type
‘favourites’ as the name of the new tag.
To add a brush to your new tag, simply right click on a brush, select ‘assign to tag’ and click on the
‘favourites’ tag. To create our drawing we will be using the following brush presets:
1. Bristles_hairy
2. Fill_circle
3. Eraser_circle
4. Ink_gpen_25
5. Smudge_textured
6. Airbrush_eraser

Digital Graphics – using Krita (free software)
Ghazala Iffat MooICT.com April 2016
Now we can access these brushes from your tag by selecting ‘favourites’ from the drop down list.
Creating the image – template
We will create a tree in this example, but you can use the following techniques to create almost any
drawing of your choice. To start with ensure you have a new layer to work on in the layers section of
the page. Below you can see Layer 1 is the layer with the entire A4 white page, a new layer has been
added which has been called Layer 3 by default (the name of the layer is not important, but you can
rename this if it helps you).
Why we use layers
Layers allow you to produce various parts of the image separately. This allows you to restructure the
image by placing layers on top of other layers, move these parts around to modify the image, or if
you make a mistake you can delete just the layer that contains the mistake. There are various
reasons why you would use layers, you can also create you entire image in one layer but this is not
recommended.

Digital Graphics – using Krita (free software)
Ghazala Iffat MooICT.com April 2016
Ensure your new layer is active (will show highlighted) and select the fill_circle tool from your
favourites tag. Ensure you have the brush tool selected and a black colour selected from the colour
selector triangle. To change colours, select the base colour from the ring, then select the colour
variation from the triangle. You will notice previous colours you have selected will be stored on the
right.
In this case we will just use black for now. Draw a template for the tree onto the canvas. If you find
that the thickness of the brush is too thick, you can change the size from the size selector at the top.
Previously selected colours

Digital Graphics – using Krita (free software)
Ghazala Iffat MooICT.com April 2016
Creating the image – line drawing
Once you are happy with the template, create a new layer. Ensure this is above the previous layer.
This means anything drawn on the new layer will show on top of the previous layer.
Before you start drawing on this layer, we will want to adjust the colour of the previous layer (in this
case Layer 3). We do this because we will not be able to see the new lines over the previous black
lines (even though they are on separate layers). To adjust the colour, select the layer (Layer 3), select
the colour adjuster, for the layer, and deselect the blue active channel and reduce the opacity to
approximately 50%.

Digital Graphics – using Krita (free software)
Ghazala Iffat MooICT.com April 2016
This will give the following result.
Select your new layer (Layer 4), and the ink_gpen_25 tool . Go over the tree template but this time
apply extra detail where needed. Again, we will just use black to get the basic drawing done. WE will
add further detail later. Make use of the zoom/rotate features of image to help with this. This can be
found under the image tab across the top toolbar. Any mistakes can be erased using the eraser
mode across the top
Digital Graphics – using Krita (free software)
Ghazala Iffat MooICT.com April 2016
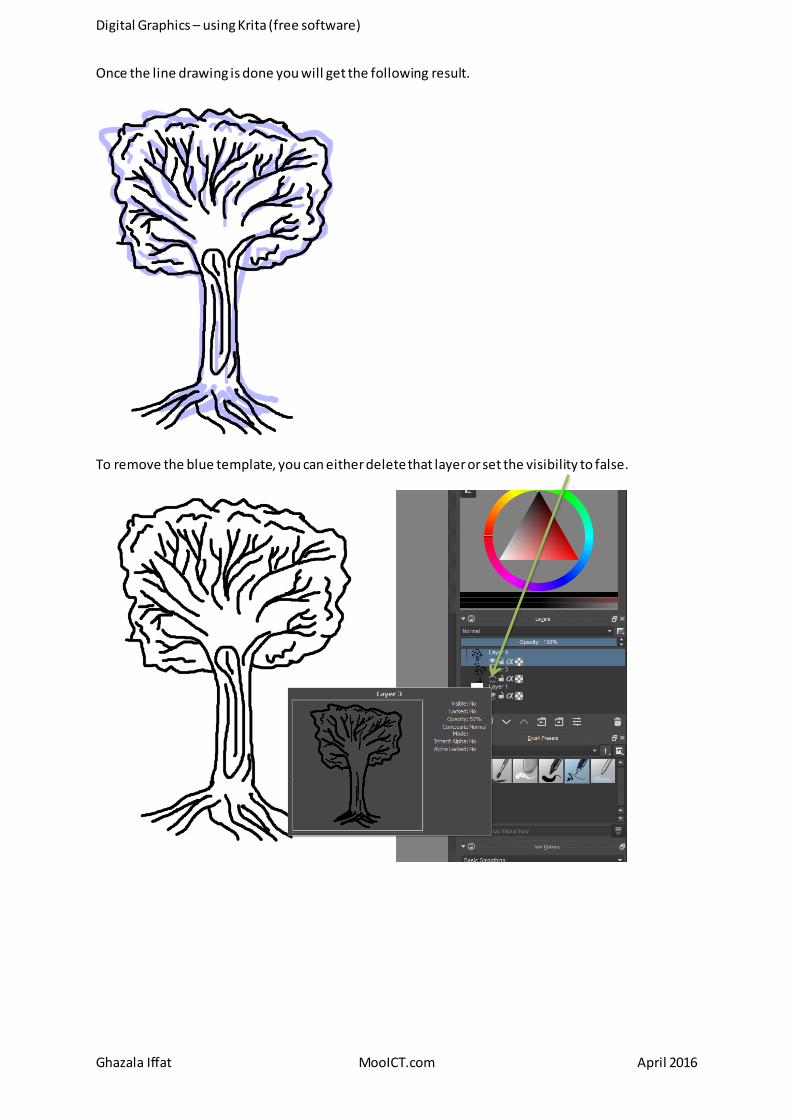
Once the line drawing is done you will get the following result.
To remove the blue template, you can either delete that layer or set the visibility to false.

Digital Graphics – using Krita (free software)
Ghazala Iffat MooICT.com April 2016
Applying details
Now that the line drawing is ready, we will apply colour and detail to the image . This will also be
done on a new layer (you can use as many layers as you’d like to do this). Ensure the new layers are
below the line drawing layer. The following tools will be used:
Fill_circle – to apply the main colour/paint the image
Airbrush_eraser – to gently erase areas to apply light shading
Bristles_hairy – to apply darker shading
Eraser_circle – to erase any mistakes (same function as the eraser mode mentioned earlier)
Smudge_textured – to blend colours as needed
To apply colour, use the fill_circle tool and select the necessary colours from the colour selector
triangle.

Digital Graphics – using Krita (free software)
Ghazala Iffat MooICT.com April 2016
We will now apply dark and light shading using the Airbrush_eraser and the Bristles_hairy tools.
When using the Bristles_hairy tool, select a darker shade of the original colour to shade with.
After doing this, the picture may look a bit messy, but now we will apply the blending with the
Smudge_textured tool.

Digital Graphics – using Krita (free software)
Ghazala Iffat MooICT.com April 2016
Exporting your image
The default file type when using Krita is a .kra file. However this file cannot be used for other uses
other than for editing the image in Krita. To use the image elsewhere it needs to be exported using a
suitable format. The format you choose will depend on the use for the image. In this case we will
export it as a .png file. This file type is well recognised and is widely used.
Select File, then Export.

Digital Graphics – using Krita (free software)
Ghazala Iffat MooICT.com April 2016
From the dropdown list select the .png file type and click save.
The default export options are fine here, but you can make changes if you wish. Click OK.
This will save your image as a PNG file.
Use these methods to create more drawings and experiment with other tools available in Krita.
Recommended