
Connections and Quickstart GuideConnexions et Guide de démarrage rapide
SchnellstartanleitungAansluitingen en snelstartgids
Conexiones y Guía de Inicio RápidoКраткое руководство по подключению и использованию
Connessione e Guida introduttiva连接和快速入门指南


Engl
ish
Connections and Quickstart Guide

1. Read these instructions
2. Keep these instructions
3. Heed all warnings
4. Follow all instructions
5. Do not use this apparatus near water
6. Clean only with dry cloth
7. Do not block any ventilation openings. Install in accordance with the manufacturer’s instructions
8. Do not install near any heat sources such as radiators, heat registers, stoves, or other apparatus (including
amplifiers) that produce heat
9. Do not defeat the safety purpose of the polarized or grounding-type plug. A polarized plug has two blades
with one wider than the other. A grounding type plug has two blades and a third grounding prong. The wide
blade or the third prong are provided for your safety. If the provided plug does not fit into your outlet, consult
an electrician for replacement of the obsolete outlet
10. Protect the power cord from being walked on or pinched particularly at plugs, convenience receptacles, and
the point where they exit from the apparatus
11. Only use attachments/accessories specified by the manufacturer
12. Use only with the cart, stand, tripod, bracket, or table specified by the manufacturer, or sold with the
apparatus. When a cart is used, use caution when moving the cart/apparatus combination to avoid injury from
tip-over
13. Unplug this apparatus during lightning storms or when unused for long periods of time
14. Refer all servicing to qualified service personnel. Servicing is required when the apparatus has been damaged in
any way, such as power-supply cord or plug is damaged, liquid has been spilled or objects have fallen into the
apparatus, the apparatus has been exposed to rain or moisture, does not operate normally, or has been dropped
15. The apparatus shall not be exposed to dripping or splashing and that objects filled with liquid, such as vases,
shall not be placed on apparatus
16. The apparatus should be connected to a mains socket outlet with a protective earthing connection
Important Safety Instructions

E-1
Engl
ish
Welcome……and thank you for purchasing the Arcam rPlay wireless music receiver.
Arcam has been producing high-quality audio components for over thirty-five years. During that time we have amassed a wealth of knowledge on both the design and construction of audio components in order to give the best sound performance for the price.
This handbook provides guidance for connecting and using your rPlay.
We hope that your rPlay will give you years of trouble-free operation. In the unlikely event of any fault, or if you simply require further information about Arcam products, our network of dealers will be happy to help you. Further
information can be found on the Arcam website at www.arcam.co.uk.
The rPlay development team

E-2
Click!
UK
1 2
3
EU US AU
Power Supply Setup

E-3
Engl
ish
Variable LevelAudio Output
1 0NET
12V 2.0APOWER
SETUP RESETDIG.OUTFIXED VARIABLE
R
L
LINE OUT
UPGRADE
ANT
Fixed LevelAudio Output
PowerConnector
Coaxial DigitalOutput
WirelessSetup
Ethernet
PowerSwitch
Connectors and Controls
Wi-Fi AntennaConnector
ResetUSB Service Ports(Software upgrade only)
NET STATUS
Volume +Volume –
Volume Control and Mute
The variable line output volume is adjusted by pressing the volume up (+) and down (-) buttons on the top panel. Pressing both volume buttons at the same time will cause the output to mute and the front panel STATUS LED will change to orange.
Note: The volume control does not affect the fixed line and S/PDIF outputs of the rPlay.

E-4
1 0NET
12V 2.0APOWER
SETUP RESETDIG.OUTFIXED VARIABLE
R
L
LINE OUT
UPGRADE
ANT
POWER
1 0COAX USBFIXED VARIABLE OPT2 OPT1
R
L
2
1 12V DC2.0A
ANT
LAN
VOLTAGE SELECT
AUDIO OUT
L
R
1 2
L
R
AUXIN
REMOTEIN
220 - 240V~50Hz
110 -120V~60Hz
L
R
VOLTAGE SELECT
PREIN
REMOTEIN
220 - 240V~50Hz
110 -120V~60Hz
L
R
DAC
Connections
Integrated Amplifier
Power Amplifier
Network Router
Wi-Fi Antenna
Power Supply
rPlay

E-5
Engl
ish
Before You Begin...1. When setting up the rPlay using a wireless connection, always wait for the front LEDs to stop flashing after the
unit is switched on. This will allow the rPlay to boot up. The rPlay is ready when the STATUS LED turns red and
the NET LED starts pulsing blue.
2. When setting up the rPlay using a wired connection, always connect the Ethernet cable before the unit is
switched on. Power on the unit and allow the rPlay to boot up. Once a wired connection is established, the
NET LED will turn off and the STATUS LED will turn purple.
Android™ UsersOption 1: My Router Supports Wi-Fi Protected Setup™
1. Press and hold the SETUP button located on the rear panel of your rPlay for approximately 4 seconds. The NET
LED will blink twice at regular intervals.
2. Press the Wi-Fi Protected Setup button on your router.
3. The rPlay will now connect to your network and the NET LED will stop blinking and stay on.
4. Download the DTS Play-Fi® app from the Google Play™ store or the Amazon app store.
5. Connect your mobile device to the same network that the rPlay is connected to.
6. Launch the DTS Play-Fi app and follow the on-screen instructions.
Option 2: My Router Does Not Support Wi-Fi Protected Setup
1. Download the DTS Play-Fi app from the Google Play store or the Amazon app store.
2. Launch the app and you will be prompted to set up the new device. Follow the on-screen instructions and
complete the set-up.
3. The rPlay is now set-up and ready for use.
Option 3: Wired Connection To A Network
1. Download the DTS Play-Fi app from the Google Play store or the Amazon app store.
2. Using the supplied Ethernet cable, connect the rPlay to your router.
3. Turn on the rPlay.
4. Connect your mobile device to the same network that you want the rPlay to be connected to.
5. Launch the DTS Play-Fi app and wait for the app to automatically detect the rPlay and connect it to your home
network.
6. The rPlay is now set-up and ready for use.
Setup

E-6
iOS UsersOption 1: AirPlay Speaker Setup
1. Press and hold the SETUP button located on the rear panel of your rPlay for approximately 8 seconds.
2. Select the wireless network settings on your iOS device.
3. Go to the Wi-Fi settings on your mobile device and navigate to "SET UP NEW AIRPLAY SPEAKER..."
4. Select the speaker called "rPlay-XXXXXX" (where XXXXXX is a unique number assigned to the rPlay).
5. Select the network you want the rPlay to connect to and press "Next".
6. Follow the on-screen instructions to complete the rPlay setup as an AirPlay speaker.
Option 2: My Router Supports Wi-Fi Protected Setup
1. Press and hold the SETUP button located on the rear panel of your rPlay for approximately 4 seconds. The NET
LED will blink twice at regular intervals.
2. Press the Wi-Fi Protected Setup button on your router.
3. The rPlay will now connect to your network and the NET LED will stop blinking and stay on.
4. Download the DTS Play-Fi app from the Apple App Store.
5. Connect your mobile device to the same network that the rPlay is connected to.
6. Launch the DTS Play-Fi app and follow the on-screen instructions.
Option 3: My Router Does Not Support Wi-Fi Protected Setup
1. Download the DTS Play-Fi app from the Apple App Store.
2. Launch the app and you will be prompted to set up the new device. Follow the on-screen instructions and
complete the set-up.
3. Exit the app and access the settings on your mobile device.
4. Go to the Wi-Fi settings on your mobile device, select the wireless network called "PlayFi2DeviceXXXXXX" and
connect to it (where XXXXXX is a unique number assigned to the rPlay).
5. Exit the Wi-Fi settings and launch the DTS Play-Fi app again. Select your home wireless network and allow the
rPlay to connect to it. Once connected the NET LED will stop blinking and stay on.
6. The rPlay is now set-up and ready for use.
Option 4: Wired Connection To A Network
1. Download the DTS Play-Fi app from the Apple App Store.
2. Using the supplied Ethernet cable, connect the rPlay to your router and turn on the rPlay.
3. Connect your mobile device to the same network that you want the rPlay to be connected to.
4. Launch the DTS Play-Fi app and wait for the app to automatically detect the rPlay and connect it to your
home network.
5. The rPlay is now set-up and ready for use.

E-7
Engl
ish
Windows® PC UsersOption 1: My Router Supports Wi-Fi Protected Setup
1. Press and hold the SETUP button located on the rear panel of your rPlay for approximately 4 seconds. The NET
LED will blink twice at regular intervals.
2. Press the Wi-Fi Protected Setup button on your router.
3. The rPlay will now connect to your network and the NET LED will stop blinking and stay on
4. Download the DTS Play-Fi app from https://play-fi.com/apps/windows/.
5. Connect your Windows device to the same network that the rPlay is connected to.
6. Launch the DTS Play-Fi app and follow the on-screen instructions.
Option 2: My Router Does Not Support Wi-Fi Protected Setup
1. Download the DTS Play-Fi software from https://play-fi.com/apps/windows/ and install it on your PC.
2. Once the installation is complete, click on the Settings icon and choose "Set-Up Play-Fi Device".
3. The app will automatically find your device and it will guide you through the set-up procedure.
4. The rPlay is now set-up and ready for use.
Option 3: Wired Connection To A Network
1. Download the DTS Play-Fi app from https://play-fi.com/apps/windows/.
2. Using the supplied Ethernet cable, connect the rPlay to your router.
3. Turn on the rPlay.
4. Connect your mobile device to the same network that you want the rPlay to be connected to.
5. Launch the DTS Play-Fi app and wait for the app to automatically detect the rPlay and connect it to your home
network.
6. The rPlay is now set-up and ready for use.
NOTEOnce the rPlay is fully configured, make sure that the rPlay is selected as the default Windows playback device.

E-8
OperationUsing the DTS Play-Fi app on your Android1. Download the DTS Play-Fi app from the Google Play store or the Amazon app store.
2. Launch the DTS Play-Fi app installed on your device.
3. The app will automatically find all connected Play-Fi speakers on your network.
4. Select the speaker(s) you want to connect to.
5. Select your music and start playing
Using the DTS Play-Fi app on your iOS device1. Download the DTS Play-Fi app from the Apple App Store.
2. Launch the DTS Play-Fi app installed on your device.
3. The app will automatically find all connected Play-Fi speakers on your network.
4. Select the speaker(s) you want to connect to.
5. Select your music and start playing
Using AirPlay on your iOS device1. Locate and press the AirPlay icon on your iOS device
2. Choose the rPlay as the AirPlay speaker
3. Select your music and start playing
Using the DTS Play-Fi app on your Windows PC1. Download the DTS Play-Fi app from https://play-fi.com/apps/windows/.
2. Launch the DTS Play-Fi app installed on your Windows PC or open the DTS Play-Fi app from the Windows
system tray
3. Select any one of the available Play-Fi devices
4. Select your music and start playing

E-9
Engl
ish
Device UsageDevice App Content Multi-Room
AndroidPlay-Fi
Select music services
Music stored on device
Up to eight rPlay devices
Multiple simultaneous users
Speakers can be zoned
UPnP All audio content One to one only
iOS
AirPlayiTunes
All iOS music appsOne to one only
Play-FiSelect music services
iTunes, music stored on device
Up to eight rPlay devices
Multiple simultaneous users
Speakers can be zoned
UPnP All audio content One to one only
WindowsPlay-Fi All audio content
Up to eight rPlay devices
Multiple simultaneous users
Speakers can be zoned
UPnP All audio content One to one only
NET LEDPulsing BLUE The rPlay is waiting to be configured for a wireless connection
Flashing BLUE The rPlay is initializing or a firmware update is in progress or
the rPlay is attempting to connect to a wireless network
Flashing BLUE (twice at regular intervals) Wireless setup is enabled
Solid BLUE The unit is connected to a wireless network
Off A wired network is connected or
unit is booting up
STATUS LEDSolid BLUE The rPlay is on, connected to a network and playing
Solid PURPLE The rPlay is on, connected to a network, but not playing
Solid RED The rPlay is on and not connected to a network
Solid ORANGE The rPlay is muted
Flashing ORANGE The rPlay is initializing or a firmware update is in progress
Flashing RED An error has occurred

E-10
SpecificationsDAC Texas Instruments PCM5102
Frequency response 20Hz–20kHz
Total Harmonic Distortion + Noise 0.0007%
Signal-to-noise ratio (A-weighted) 117dB
Output level Fixed level 2.15V RMS
Variable level 0–2.15V RMS
Supported audio file formats mp3 (MPEG Layer III)
m4a, aac (Advanced Audio Coding / Apple Lossless)
flac (Free Lossless Audio Codec)
wav (Waveform Audio File)
File quality (see note below) Up to 24-bit/192kHz
Power requirements (max) 12V DC, 2.0A
Dimensions (WxHxD) 194 x 44 x 124mm
Net weight 1.1Kg
Supplied accessories Power supply with interchangeable plugs
Wi-Fi antenna
Stereo phono–phono cable
Digital phono cable
Ethernet cable
User manual and registration card
E&OE. All specification values are typical unless otherwise stated
Compatibility and System Requirements• A Windows PC running Windows 7 or higher (32 or 64 bit)
• An Android device running Android 2.2 or higher
• Supports iOS 7 or later for setup using Wireless Accessory Configuration
• AirPlay works with iPhone, iPad, and iPod touch with iOS 4.3.3 or later, Mac with OS X Mountain Lion or later, and
PC with iTunes 10.2.2 or later
• For optimal Play-Fi streaming experience, a wireless router rated at least N600 is recommended
NOTE:Files up to 16-bit/48 kHz are streamed without compression or transcoding. High resolution audio files (24-bit/192kHz), are down-sampled to 16-bit/48kHz for transmission. This allows for the most reliable streaming experience over Wi-Fi to multiple speakers.
For those who wish to hear high resolution audio as originally intended, Critical Listening mode in the DTS Play-Fi app will enable native rendering of high resolution files up to 24/96, without down-sampling or network synchronization adjustment. In this way, audio files retain their original audio integrity. For more details regarding the Critical Listening mode please refer to https://play-fi.com/faq/entry/critical-listening-mode.

E-11
Engl
ish
This entitles you to have the unit repaired free of charge for two years after purchase, provided that it was originally purchased from an authorised Arcam dealer. The manufacturer can take no responsibility for defects arising from accident, misuse, abuse, wear and tear, neglect or through unauthorised adjustment and/or repair, neither can they accept responsibility for damage or loss occurring during transit to or from the person claiming under the guarantee.
The warranty covers:Parts and labour costs for two years from the purchase date. After two years you must pay for both parts and labour costs. The warranty does not cover transportation costs at any time.
Claims under guaranteeThis equipment should be packed in the original packing and returned to the dealer from whom it was purchased, or failing this, directly to the Arcam distributor in the country where the product was purchased.
It should be sent carriage prepaid by a reputable carrier – not by post. No responsibility can be accepted for the unit whilst in transit to the dealer or distributor and customers are therefore advised to insure the unit against loss or damage whilst in transit.
For further details contact Arcam at [email protected].
Problems?If your Arcam dealer is unable to answer any query regarding this or any other Arcam product please contact Arcam Customer Support at the above address and we will do our best to help you.
Correct disposal of this product This marking indicates that this product should not be disposed with other household waste throughout the EU.
To prevent possible harm to the environment or human health from uncontrolled waste disposal and to conserve material resources, this product should be recycled responsibly.
To dispose of your product, please use your local return and collection systems or contact the retailer where the product was purchased.
Technology LicensingAmazon is a trademarks of Amazon.com, Inc. or its affiliates.
Android and Google Play are trademarks of Google Inc.
Apple, AirPlay and iTunes are trademarks of Apple Inc., registered in the U.S. and other countries. App Store is a service mark of Apple Inc.
IOS is a trademark or registered trademark of Cisco in the U.S. and other countries and is used under license.
The Spotify software is subject to third party licenses found here: www.spotify.com/connect/third-party-licenses
Windows is either registered trademark or trademark of Microsoft Corporation in the United States and/or other countries.
For DTS patents, see http://patents.dts.com. Manufactured under license from DTS Licensing Limited. DTS, Play-Fi, the Symbol, and Play-Fi together in combination with the Symbol are trademarks of DTS, Inc. DTS and Play-Fi are registered trademarks of DTS, Inc. © DTS, Inc. All Rights Reserved.
Wi-Fi Protected Setup is a trademark of Wi-Fi Alliance®.
Worldwide Guarantee

E-12
FCC Information (for US customers)
1. PRODUCT
This product complies with Part 15 of the FCC Rules. Operation is subject to the following two conditions: (1) this device may not cause harmful
interference, and (2) this device must accept any interference received, including interference that may cause undesired operation.
2. IMPORTANT NOTICE: DO NOT MODIFY THIS PRODUCT
This product, when installed as indicated in the instructions contained in this manual, meets FCC requirements. Modification not expressly approved by
ARCAM may void your authority, granted by the FCC, to use the product.
3. NOTE
This product has been tested and found to comply with the limits for a Class B digital device, pursuant to Part 15 of the FCC Rules. These limits are
designed to provide reasonable protection against harmful interference in a residential installation.
This product generates, uses and can radiate radio frequency energy and, if not installed and used in accordance with the instructions, may cause
harmful interference to radio communications. However, there is no guarantee that interference will not occur in a particular installation. If this product
does cause harmful interference to radio or television reception, which can be determined by turning the product OFF and ON, the user is encouraged
to try to correct the interference by one or more of the following measures:
• Reorient or relocate the receiving antenna.
• Increase the separation between the equipment and receiver.
• Connect the product into an outlet on a circuit different from that to which the receiver is connected.
• Consult the local retailer authorized to distribute this type of product or an experienced radio/TV technician for help.
This equipment complies with FCC RF radiation exposure limits set forth for an uncontrolled environment. This equipment should be installed and
operated with minimum distance 20cm between the antenna and your body.
INDUSTRY CANADA Information (for CANADIAN customers)
This Class B digital apparatus complies with Canadian ICES-003
1. "This device complies with Industry Canada licence-exempt RSS standard(s). Operation is subject to the following two conditions: (1) this device
may not cause interference, and (2) this device must accept any interference, including interference that may cause undesired operation of the
device.
Le présent appareil est conforme aux CNR d'Industrie Canada applicables aux appareils radio exempts de licence. L'exploitation est autorisée
aux deux conditions suivantes : (1) l'appareil ne doit pas produire de brouillage, et (2) l'utilisateur de l'appareil doit accepter tout brouillage
radioélectrique subi, même si le brouillage est susceptible d'en compromettre le fonctionnement"
2. "This radio transmitter 11138A-CAPRICA2L has been approved by Industry Canada to operate with the antenna types listed below with the
maximum permissible gain and required antenna impedance for each antenna type indicated. Antenna types not included in this list, having a
gain greater than the maximum gain indicated for that type, are strictly prohibited for use with this device.
Le présent émetteur radio 11138A-CAPRICA2L a été approuvé par Industrie Canada pour fonctionner avec les types d'antenne énumérés
ci-dessous et ayant un gain admissible maximal et l'impédance requise pour chaque type d'antenne. Les types d'antenne non inclus dans cette
liste, ou dont le gain est supérieur au gain maximal indiqué, sont strictement interdits pour l'exploitation de l'émetteur."
Wanshih WSS002, Antenna Gain +2dBi
3. "This equipment complies with IC RSS102 radiation exposure limits set forth for an uncontrolled environment. This equipment should be installed
and operated with minimum distance 20 cm between the antenna and your body.
Cet équipement est conforme aux limites IC RSS102 d'exposition aux rayonnements définies pour un environnement non contrôlé. Cet
équipement doit être installé et utilisé à distance minimale de 20 cm entre l'antenne et votre corps."
IMPORTANT ANTENNA INFORMATION
The rPlay is only designed to operate with the supplied antenna. Any other antenna is strictly prohibited for use with the rPlay.

Fran
çaisConnexions et Guide de démarrage rapide


F-1
Fran
çais
Bienvenue…... et merci d’avoir choisi le récepteur de musique sans fil Arcam rPlay.
Arcam produit des composants audio de haute qualité depuis plus de trente-cinq ans. Pendant ce temps, nous avons accumulé de vastes connaissances autant sur la conception que sur la construction des composants audio afin d’obtenir la meilleure performance audio pour le prix.
Ce manuel fournit des instructions pour connecter et utiliser votre rPlay.
Nous espérons que votre rPlay vous assurera des années de fonctionnement sans le moindre problème. Dans l’éventualité, peu probable, où une panne surviendrait, ou si vous recherchez simplement des informations supplémentaires sur les produits Arcam, les représentants de notre réseau de revendeurs se feront un plaisir de
vous aider. D’autres informations sont disponibles sur notre site web d’Arcam à l’adresse www.arcam.co.uk.
L’équipe de développement rPlay

F-2
Click!
UK
1 2
3
EU US AU
Installation de l’alimentation

F-3
Fran
çais
Sortie audio de niveau variable
1 0NET
12V 2.0APOWER
SETUP RESETDIG.OUTFIXED VARIABLE
R
L
LINE OUT
UPGRADE
ANT
Sortie audio de niveau fixe
Connexion de l’alimentation
Sortie numérique coaxiale Configurationsans fil
Ethernet
Bouton de l’alimentation
Connecteurs et contrôles
Connecteur d’antenne Wi-Fi
Réinitial-isation
Ports d’accès USB (uniquement pour la mise à jour de logiciel)
NET STATUS
Volume +Volume –
Contrôle du volume et sourdine
Le volume de sortie de la ligne variable est ajusté en appuyant sur les touches de volume haut (+) et bas (-) situées sur le panneau supérieur. Appuyer simultanément sur les deux touches de volume met la sortie en sourdine et le VOYANT D’ÉTAT du panneau avant devient orange.
Remarque : Le contrôle du volume n’altère pas la ligne fixe et les sorties S/PDIF du rPlay.

F-4
1 0NET
12V 2.0APOWER
SETUP RESETDIG.OUTFIXED VARIABLE
R
L
LINE OUT
UPGRADE
ANT
POWER
1 0COAX USBFIXED VARIABLE OPT2 OPT1
R
L
2
1 12V DC2.0A
ANT
LAN
VOLTAGE SELECT
AUDIO OUT
L
R
1 2
L
R
AUXIN
REMOTEIN
220 - 240V~50Hz
110 -120V~60Hz
L
R
VOLTAGE SELECT
PREIN
REMOTEIN
220 - 240V~50Hz
110 -120V~60Hz
L
R
DAC
Connexions
Amplificateur intégré
Amplificateur de puissance
Routeur réseau
Antenne Wi-Fi
Alimentation
rPlay

F-5
Fran
çais
Avant de commencer...1. En configurant le rPlay en utilisant une connexion sans fil, attendez toujours que les témoins arrêtent de
clignoter après avoir allumé l’appareil. Cela permettra au rPlay de s’initialiser. Le rPlay est prêt lorsque le
TÉMOIN D’ÉTAT devient rouge et que le TÉMOIN DU RÉSEAU commence à pulser en bleu.
2. En configurant le rPlay en utilisant une connexion filaire, branchez toujours le câble Ethernet avant d’allumer
l’appareil. Allumez l’appareil et laissez le rPlay s’initialiser. Une fois qu’une connexion filaire est établie, le
TÉMOIN DU RÉSEAU s’éteint et le TÉMOIN D’ÉTAT devient mauve.
Utilisateurs d’Android™Option 1: Mon routeur est compatible avec Wi-Fi Protected Setup
1. Maintenez enfoncée la touche SETUP située sur le panneau arrière de votre rPlay pendant environ 4 secondes.
Le TÉMOIN DU RÉSEAU clignote deux fois à des intervalles réguliers.
2. Appuyez sur la touche Wi-Fi Protected Setup de votre routeur.
3. Le rPlay va maintenant se connecter à votre réseau et le TÉMOIN DU RÉSEAU cessera de clignoter pour
rester allumé.
4. Télécharger l’application DTS Play-Fi du magasin Google Play ™ ou d’Amazon Appstore.
5. Connectez votre appareil mobile au même réseau que celui du rPlay.
6. Lancez l’application DTS Play-Fi et suivez les instructions à l’écran.
Option 2: Mon routeur n’est pas compatible avec Wi-Fi Protected Setup
1. Télécharger le DTS Play-Fi application sur le Google Play Store ou l’App Store Amazon.
2. Lancez l’application et vous serez invité à configurer le nouveau dispositif. Suivez les instructions à l’écran et
terminez la configuration.
3. Le rPlay est maintenant configuré et prêt à l’emploi.
Option 3: Connexion filaire à un réseau
1. Télécharger le DTS Play-Fi application sur le Google Play Store ou l’App Store Amazon.
2. En utilisant le câble Ethernet fourni, connectez le rPlay à votre routeur.
3. Allumez le rPlay.
4. Connectez votre appareil mobile au même réseau que celui sur lequel vous souhaitez connecter le rPlay.
5. Lancez l’application DTS Play-Fi et attendez que l’application détecte automatiquement le rPlay et la connecte
à votre réseau domestique.
6. Le rPlay est maintenant configuré et prêt à l’emploi.
Configuration

F-6
Utilisateurs d’iOSOption 1: Configuration du haut-parleur AirPlay
1. Maintenez enfoncée la touche SETUP située sur le panneau arrière de votre rPlay pendant environ 8 secondes.
2. Sélectionnez les paramètres de réseau sans fil de votre appareil iOS.
3. Accédez aux paramètres Wi-Fi de votre appareil mobile et accédez à « CONFIGURATION D’UN NOUVEAU
HAUT-PARLEUR AIRPLAY... »
4. Sélectionnez le haut-parleur dénommé « rPlay-XXXXXX » (où XXXXXX est un numéro unique attribué au rPlay).
5. Sélectionnez le réseau où vous souhaitez connecter le rPlay et appuyez sur « Suivant ».
6. Suivez les instructions à l’écran pour terminer l’installation du rPlay en tant que haut-parleur AirPlay.
Option 2: Mon routeur est compatible avec Wi-Fi Protected Setup
1. Maintenez enfoncée la touche SETUP située sur le panneau arrière de votre rPlay pendant environ 4 secondes.
Le TÉMOIN DU RÉSEAU clignote deux fois à des intervalles réguliers.
2. Appuyez sur la touche Wi-Fi Protected Setup de votre routeur.
3. Le rPlay va maintenant se connecter à votre réseau et le TÉMOIN DU RÉSEAU cessera de clignoter pour rester allumé.
4. Téléchargez l’application DTS Play-Fi® de l’App Store d’Apple.
5. Connectez votre appareil mobile au même réseau que celui du rPlay.
6. Lancez l’application DTS Play-Fi et suivez les instructions à l’écran.
Option 3: Mon routeur n’est pas compatible avec Wi-Fi Protected Setup
1. Téléchargez l’application DTS Play-Fi de l’App Store d’Apple.
2. Lancez l’application et vous serez invité à configurer le nouveau dispositif. Suivez les instructions à l’écran et
terminez la configuration.
3. Quittez l’application et accédez aux paramètres de votre appareil mobile.
4. Accédez aux paramètres Wi-Fi de votre appareil mobile, sélectionnez le réseau sans fil dénommé
« PlayFi2DeviceXXXXXX » et connectez-y vous (XXXXXX est un numéro unique attribué au rPlay).
5. Sortez des paramètres Wi-Fi et lancez de nouveau l’application DTS Play-Fi. Sélectionnez votre réseau
domestique sans fil et laissez le rPlay s’y connecter. Une fois la connexion effectuée, le TÉMOIN DU RÉSEAU
cessera de clignoter pour rester allumé.
6. Le rPlay est maintenant configuré et prêt à l’emploi.
Option 4: Connexion filaire à un réseau
1. Téléchargez l’application DTS Play-Fi de l’App Store d’Apple.
2. En utilisant le câble Ethernet fourni, connectez le rPlay à votre routeur puis allumez-le.
3. Connectez votre appareil mobile au même réseau que celui sur lequel vous souhaitez connecter le rPlay.
4. Lancez l’application DTS Play-Fi et attendez que l’application détecte automatiquement le rPlay et la connecte
à votre réseau domestique.
5. Le rPlay est maintenant configuré et prêt à l’emploi.

F-7
Fran
çais
Utilisateurs d’ordinateurs sous Windows®Option 1: Mon routeur est compatible avec Wi-Fi Protected Setup
1. Maintenez enfoncée la touche SETUP située sur le panneau arrière de votre rPlay pendant environ 4 secondes.
Le TÉMOIN DU RÉSEAU clignote deux fois à des intervalles réguliers.
2. Appuyez sur la touche Wi-Fi Protected Setup de votre routeur.
3. Le rPlay va maintenant se connecter à votre réseau et le TÉMOIN DU RÉSEAU cessera de clignoter pour rester allumé
4. Téléchargez l’application DTS Play-Fi du site https://play-fi.com/apps/windows/.
5. Connectez votre appareil sous Windows au même réseau que celui du rPlay.
6. Lancez l’application DTS Play-Fi et suivez les instructions à l’écran.
Option 2: Mon routeur n’est pas compatible avec Wi-Fi Protected Setup
1. Téléchargez le logiciel DTS Play-Fi du site https://play-fi.com/apps/windows/ et installez-le sur votre PC.
2. Une fois l’installation terminée, cliquez sur l’icône Paramètres et choisissez « Configuration de votre
dispositif Play-Fi ».
3. L’application trouvera automatiquement votre appareil et vous guidera à travers la procédure d’installation.
4. Le rPlay est maintenant configuré et prêt à l’emploi.
Option 3: Connexion filaire à un réseau
1. Téléchargez l’application DTS Play-Fi du site https://play-fi.com/apps/windows/.
2. En utilisant le câble Ethernet fourni, connectez le rPlay à votre routeur.
3. Allumez le rPlay.
4. Connectez votre appareil mobile au même réseau que celui sur lequel vous souhaitez connecter le rPlay.
5. Lancez l’application DTS Play-Fi et attendez que l’application détecte automatiquement le rPlay et la connecte
à votre réseau domestique.
6. Le rPlay est maintenant configuré et prêt à l’emploi.
REMARQUEUne fois que le rPlay est entièrement configuré, assurez-vous qu’il est sélectionné comme périphérique de lecture par défaut de Windows.

F-8
Guide d’utilisationUtilisation de l’application DTS Play-Fi sur votre appareil Android 1. Télécharger le DTS Play-Fi application sur le Google Play Store ou l’App Store Amazon.
2. Lancez l’application DTS Play-Fi installée sur votre appareil.
3. L’application trouvera automatiquement tous les haut-parleurs Play-Fi connectés à votre réseau.
4. Sélectionnez le ou les haut-parleurs auxquels vous souhaitez vous connecter.
5. Sélectionnez votre musique et lancez la lecture
Utilisation de l’application DTS Play-Fi sur votre appareil iOS1. Téléchargez l’application DTS Play-Fi de l’App Store d’Apple.
2. Lancez l’application DTS Play-Fi installée sur votre appareil.
3. L’application trouvera automatiquement tous les haut-parleurs Play-Fi connectés à votre réseau.
4. Sélectionnez le ou les haut-parleurs auxquels vous souhaitez vous connecter.
5. Sélectionnez votre musique et lancez la lecture
Utilisation d’AirPlay sur votre appareil iOS1. Cherchez et appuyez sur l’icône AirPlay de votre appareil iOS
2. Choisissez le rPlay comme haut-parleur AirPlay
3. Sélectionnez votre musique et lancez la lecture
Utilisation de l’application DTS Play-Fi sur votre ordinateur sous Windows1. Téléchargez l’application DTS Play-Fi du site https://play-fi.com/apps/windows/.
2. Lancez l’application DTS Play-Fi installée sur votre ordinateur sous Windows ou lancez l’application DTS Play-fi
de la barre d’état système de Windows
3. Sélectionnez l’un des dispositifs Play-Fi disponibles
4. Sélectionnez votre musique et lancez la lecture

F-9
Fran
çais
Utilisation du dispositifAppareil Application Contenu Multipièce
AndroidPlay-Fi
Services de musique choisisMusique stockée sur l’appareil
Jusqu’à huit périphériques rPlayPlusieurs utilisateurs simultanésLes haut-parleurs peuvent être répartis par zone
UPnP Tous les contenus audio Un à un uniquement
iOS
AirPlayiTunesToutes les applications audio d’iOS
Un à un uniquement
Play-FiServices de musique choisisiTunes, musique stockée sur l’appareil
Jusqu’à huit périphériques rPlayPlusieurs utilisateurs simultanésLes haut-parleurs peuvent être répartis par zone
UPnP Tous les contenus audio Un à un uniquement
WindowsPlay-Fi Tous les contenus audio
Jusqu’à huit périphériques rPlayPlusieurs utilisateurs simultanésLes haut-parleurs peuvent être répartis par zone
UPnP Tous les contenus audio Un à un uniquement
TÉMOIN DU RÉSEAUPulsation BLEU Le rPlay attend d’être configuré pour une connexion sans fil
Clignotement BLEU Le rPlay s’initialise ou une mise à jour du logiciel est en cours ou le rPlay tente de se connecter à un réseau sans fil
Clignotement BLEU (deux fois à intervalles réguliers)
Configuration sans fil est activé
BLEU fixe L’appareil est connecté à un réseau sans fil
Inactif Un réseau câblé est connecté ou
un appareil s’initialise
TÉMOIN D’ÉTATBLEU fixe Le rPlay est allumé, connecté à un réseau et en lecture
VIOLET fixe Le rPlay est allumé, connecté à un réseau, mais n’est pas en lecture
ROUGE fixe Le rPlay est allumé mais non connecté à un réseau
ORANGE fixe Le rPlay est mis en sourdine
ORANGE clignotant Le rPlay s’initialise ou une mise à jour du logiciel est en cours
ROUGE clignotant Une erreur est survenue

F-10
SpécificationsDAC Texas Instruments PCM5102
Réponse en fréquence 20 Hz–20 kHz
Distorsion harmonique totale + bruit 0,0007%
Rapport signal-bruit (pondéré en A) 117 dB
Niveau de sortie Niveau fixe 2,15 V RMS
Niveau variable 0–2,15 V RMS
Formats de fichiers audio compatible mp3 (MPEG Layer III)
m4a, aac (Advanced Audio Coding/Apple Lossless)
Flac (Codec Audio sans perte gratuit)
wav (Waveform Audio File)
Qualité du fichier (voir la note ci-dessous) Jusqu’à 24 bits/192 kHz
Besoins en alimentation (max.) 12 V CC, 2,0 A
Dimensions (l x h x d) 194 x 44 x 124 mm
Poids net 1,1 Kg
Accessoires fournis Alimentation avec prises interchangeables
Antenne Wi-Fi
Câble phono-phono stéréo
Câble phono numérique
Câble Ethernet
Mode d’emploi et carte d’enregistrement
E&OE toutes les valeurs techniques sont typiques sauf mention contraire
Compatibilité et configuration requise• Un ordinateur sous Windows 7 ou ultérieur (32 ou 64 bits)
• Un appareil Android fonctionnant sous Android 2.2 ou ultérieur
• Compatibilité avec la version iOS 7 ou ultérieure pour l’installation en utilisant la configuration d’accessoires sans fil
• AirPlay fonctionne avec iPhone, iPad et iPod touch avec iOS 4.3.3 ou version ultérieure, Mac avec OS X Mountain
Lion ou ultérieur, et PC avec iTunes 10.2.2 ou version ultérieure
• Pour optimiser l’expérience de diffusion Play-Fi, un routeur sans fil ayant une vitesse d’au moins N600 est
recommandé
REMARQUE :Les fichiers jusqu’à 16 bits/48 kHz sont diffusés sans compression ou transcodage. Des fichiers audio haute résolution (24 bits/192 kHz), sont sous-échantillonné à 16 bits/48 kHz pour la transmission. Cela permet une expérience de diffusion plus fiable par Wi-Fi vers plusieurs haut-parleurs.
Pour ceux qui souhaitent entendre une audio haute résolution comme prévue à l’origine, le mode d’Écoute critique dans l’application DTS Play-Fi permettra un rendu natif des fichiers audio haute résolution jusqu’à 24/96, sans sous-échantillonnage ou ajustement de synchronisation réseau. De cette façon, les fichiers audio conservent leur intégrité audio d’origine. Pour plus de détails concernant le mode d’Écoute critique, veuillez vous reporter au site https://play-fi.com/faq/entry/critical-listening-mode.

F-11
Fran
çais
Cette garantie vous donne droit à des réparations gratuites de l’appareil pendant deux ans à compter de la date d’achat, si l’achat a été fait auprès d’un revendeur Arcam agréé. Le fabricant ne peut être tenu responsable de défauts provoqués par un accident, une mauvaise utilisation, une utilisation abusive, une usure normale, de la négligence ou des réglages et/ou réparations non autorisés, et n’accepte pas non plus la responsabilité des dommages et pertes encourus durant le transport vers ou à partir de la personne réclamant les réparations sous garantie.
Cette garantie couvre :Les frais de pièces et main d’œuvre pendant deux ans à compter de la date d’achat. Au bout de deux ans, il vous faut payer les frais de pièces et de main d’œuvre. La garantie ne couvre en aucun cas les frais de transport.
Réclamations sous garantieCet équipement doit être emballé dans l’emballage d’origine et retourné au revendeur auprès duquel il a été acheté, ou à défaut, directement auprès du distributeur Arcam dans le pays où le produit a été acheté.
Il doit être expédié par l’intermédiaire d’un transporteur réputé – pas par la poste. Aucune responsabilité ne peut être acceptée durant le transit de l’appareil vers le revendeur ou le distributeur et il est donc conseillé aux clients d’assurer l’appareil contre toute perte ou tout dommage durant le transport.
Pour en savoir plus, veuillez contacter Arcam à l’adresse [email protected].
Des problèmes ?Si votre revendeur Arcam n’est pas en mesure de répondre à vos questions sur cet appareil ou tout autre appareil Arcam, veuillez vous adresser au service après-vente d’Arcam à l’adresse ci-dessus. Nous ferons de notre mieux pour vous aider.
Mise au rebut adéquate de cet appareil Les plaques signalétiques indiquent que cet appareil ne doit pas être jeté avec le reste des déchets ménagers, et ce dans toute l’Union européenne.
Pour protéger l’environnement et la santé en évitant une mise au rebut des déchets non contrôlée et pour conserver les ressources de matériaux, cet appareil doit être recyclé de manière responsable.
Si vous devez jeter votre appareil, veuillez le faire conformément aux systèmes de renvoi et de collecte locaux, ou contactez le revendeur ayant vendu cet appareil.
Garantie internationale

F-12

Deu
tsch
Schnellstartanleitung


D-1
Deu
tsch
Willkommen……vielen Dank, dass Sie sich für den Kauf des drahtlosen Musikempfängers rPlay von Arcam entschieden haben.
Arcam stellt seit mehr als 35 Jahren hochwertige Audiokomponenten her. Während dieser Zeit haben wir viel Wissen und Erfahrung über das Design und den Bau von Audiokomponenten gesammelt, auf deren Grundlage wir Ihnen beste Soundleistung zu einem guten Preis bieten können.
Dieses Handbuch enthält eine Anleitung zum Anschließen und zum Gebrauch Ihres rPlay.
Wir hoffen, dass Ihnen Ihr rPlay viele Jahre lang Freude bereiten wird. Im unwahrscheinlichen Fall eines Produktfehlers bzw. wenn Sie Interesse an zusätzlichen Informationen über Arcam Produkte haben, steht Ihnen unser Händlernetz gerne zur Verfügung. Weitere Informationen finden Sie auch auf der Website von Arcam unter www.arcam.co.uk.
Das rPlay-Entwicklungsteam

D-2
Click!
UK
1 2
3
EU US AU
Einrichten des Netzadapters
D-3
Deu
tsch
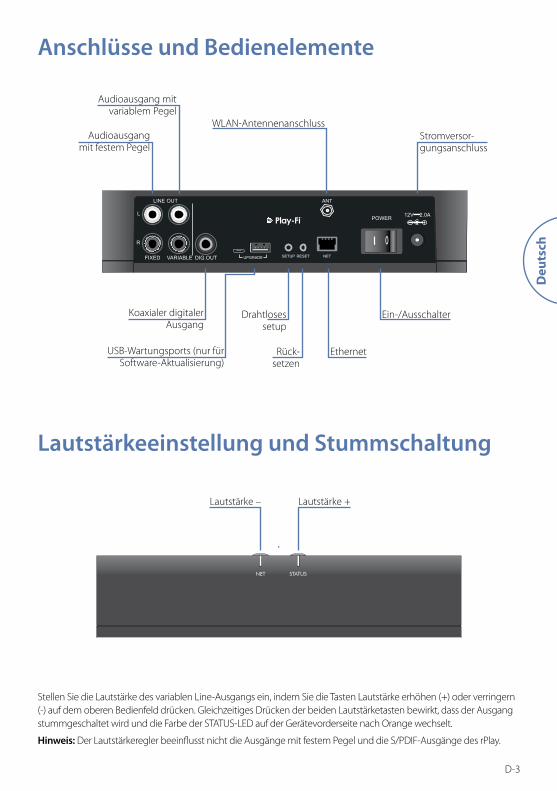
Audioausgang mit variablem Pegel
1 0NET
12V 2.0APOWER
SETUP RESETDIG.OUTFIXED VARIABLE
R
L
LINE OUT
UPGRADE
ANT
Audioausgang mit festem Pegel
Stromversor-gungsanschluss
Koaxialer digitaler Ausgang
Drahtlosessetup
Ethernet
Ein-/Ausschalter
Anschlüsse und Bedienelemente
WLAN-Antennenanschluss
Rück-setzen
USB-Wartungsports (nur für Software-Aktualisierung)
NET STATUS
Lautstärke +Lautstärke –
Lautstärkeeinstellung und Stummschaltung
Stellen Sie die Lautstärke des variablen Line-Ausgangs ein, indem Sie die Tasten Lautstärke erhöhen (+) oder verringern (-) auf dem oberen Bedienfeld drücken. Gleichzeitiges Drücken der beiden Lautstärketasten bewirkt, dass der Ausgang stummgeschaltet wird und die Farbe der STATUS-LED auf der Gerätevorderseite nach Orange wechselt.
Hinweis: Der Lautstärkeregler beeinflusst nicht die Ausgänge mit festem Pegel und die S/PDIF-Ausgänge des rPlay.

D-4
1 0NET
12V 2.0APOWER
SETUP RESETDIG.OUTFIXED VARIABLE
R
L
LINE OUT
UPGRADE
ANT
POWER
1 0COAX USBFIXED VARIABLE OPT2 OPT1
R
L
2
1 12V DC2.0A
ANT
LAN
VOLTAGE SELECT
AUDIO OUT
L
R
1 2
L
R
AUXIN
REMOTEIN
220 - 240V~50Hz
110 -120V~60Hz
L
R
VOLTAGE SELECT
PREIN
REMOTEIN
220 - 240V~50Hz
110 -120V~60Hz
L
R
DAC
Anschlüsse
Integrierter Verstärker
Leistungsverstärker
Netzwerk-Router
WLAN-Antenne
Stromversorgung
rPlay

D-5
Deu
tsch
Bevor Sie beginnen...1. Warten Sie beim Einrichten des rPlay über eine drahtlose Verbindung nach dem Einschalten des Geräts stets
darauf, dass die LEDs auf der Vorderseite aufhören zu blinken. Danach kann der rPlay starten. Der rPlay ist betriebsbereit, wenn die STATUS-LED rot leuchtet und die blaue NETZ-LED beginnt zu blinken.
2. Schließen Sie beim Einrichten des rPlay über eine drahtgebundene Verbindung stets zuerst das Ethernet-Kabel an, bevor Sie das Gerät einschalten. Schalten Sie das rPlay ein und lassen Sie ihn starten. Sobald eine drahtgebundene Verbindung hergestellt wurde, erlischt die NETZ-LED und die STATUS-LED leuchtet violett.
Android™-BenutzerVerfahren 1: Mein Router unterstützt Wi-Fi Protected Setup
1. Halten Sie die Taste SETUP auf der Rückseite des rPlay für etwa 8 Sekunden gedrückt.
2. Drücken Sie die Taste Wi-Fi Protected Setup am Router.
3. Der rPlay stellt jetzt eine Verbindung mit Ihrem Netzwerk her und die NETZ-LED hört auf zu blinken und
leuchtet konstant.
4. Laden Sie die App DTS Play-Fi aus dem Google Play™ Store oder dem Amazon App Store herunter.
5. Verbinden Sie das mobile Gerät mit dem gleichen Netzwerk, mit dem der rPlay verbunden ist.
6. Starten Sie die App DTS Play-Fi und befolgen Sie die Anweisungen auf dem Bildschirm.
Verfahren 2: Mein Router unterstützt kein Wi-Fi Protected Setup
1. Laden Sie die App DTS Play-Fi aus dem Google Play Store oder dem Amazon App Store herunter.
2. Rufen Sie die App auf. Sie werden aufgefordert, das neue Gerät einzurichten. Befolgen Sie die Anweisungen
auf dem Bildschirm um die Einrichtung abzuschließen.
3. Der rPlay ist nun eingerichtet und betriebsbereit.
Verfahren 3: Kabelgebundene Verbindung mit einem Netzwerk
1. Laden Sie die App DTS Play-Fi aus dem Google Play Store oder dem Amazon App Store herunter.
2. Schließen Sie den rPlay mit dem mitgelieferten Ethernet-Kabel an Ihrem Router an.
3. Schalten Sie den rPlay ein.
4. Verbinden Sie das mobile Gerät mit dem gleichen Netzwerk, an das Sie den rPlay anschließen möchten.
5. Starten Sie die App DTS Play-Fi und warten Sie, bis die App den rPlay automatisch erkennt und verbinden Sie
ihn mit Ihrem Heimnetzwerk.
6. Der rPlay ist nun eingerichtet und betriebsbereit.
Instellingen

D-6
iOS-BenutzerVerfahren 1: AirPlay-Lautsprecher einrichten
1. Halten Sie die Taste SETUP auf der Rückseite des rPlay für etwa 8 Sekunden gedrückt.
2. Wählen Sie die WLAN-Einstellungen auf Ihrem iOS-Gerät.
3. Gehen Sie zu den WLAN-Einstellungen auf Ihrem mobilen Gerät und navigieren Sie zu „NEUEN AIRPLAY-LAUTSPRECHER EINRICHTEN ...“
4. Wählen Sie den Lautsprecher mit der Bezeichnung „rPlay-XXXXXX“ (wobei XXXXXX eine eindeutige Nummer ist, die dem rPlay zugeordnet wurde).
5. Wählen Sie das gewünschte Netzwerk, mit dem Sie den rPlay verbinden möchten, und drücken Sie „Weiter“.
6. Befolgen Sie die Anweisungen auf dem Bildschirm zum Abschließen der Einrichtung des rPlay als AirPlay-
Lautsprecher.
Verfahren 2: Mein Router unterstützt Wi-Fi Protected Setup1. Halten Sie die Taste SETUP auf der Rückseite des rPlay für etwa 4 Sekunden gedrückt. Die NETZ-LED blinkt
zweimal in regelmäßigen Abständen.
2. Drücken Sie die Taste Wi-Fi Protected Setup am Router.
3. Der rPlay stellt jetzt eine Verbindung mit Ihrem Netzwerk her und die NETZ-LED hört auf zu blinken und leuchtet konstant.
4. Laden Sie die App DTS Play-Fi® aus dem Apple App Store herunter.
5. Verbinden Sie das mobile Gerät mit dem gleichen Netzwerk, mit dem der rPlay verbunden ist.
6. Starten Sie die App DTS Play-Fi und befolgen Sie die Anweisungen auf dem Bildschirm.
Verfahren 3: Mein Router unterstützt kein Wi-Fi Protected Setup
1. Laden Sie die App DTS Play-Fi aus dem Apple App Store herunter.
2. Rufen Sie die App auf. Sie werden aufgefordert, das neue Gerät einzurichten. Befolgen Sie die Anweisungen auf dem Bildschirm um die Einrichtung abzuschließen.
3. Verlassen Sie die App und rufen Sie die Einstellungen auf Ihrem mobilen Gerät auf.
4. Gehen Sie zu den WLAN-Einstellungen auf Ihrem mobilen Gerät, wählen Sie das drahtlose Netzwerk mit der Bezeichnung „rPlay-XXXXXX“ und verbinden Sie sich mit ihm (wobei XXXXXX eine eindeutige Nummer ist, die dem rPlay zugeordnet wurde).
5. Verlassen Sie die WLAN-Einstellungen und starten Sie erneut die App DTS Play-Fi. Wählen Sie Ihr drahtloses Heimnetzwerk aus und lassen Sie den rPlay eine Verbindung mit ihm herstellen. Sobald er verbunden ist, hört die NETZ-LED auf zu blinken und leuchtet konstant.
6. Der rPlay ist nun eingerichtet und betriebsbereit.
Verfahren 4: Kabelgebundene Verbindung mit einem Netzwerk
1. Laden Sie die App DTS Play-Fi aus dem Apple App Store herunter.
2. Schließen Sie den rPlay mit dem mitgelieferten Ethernet-Kabel an Ihrem Router an und schalten Sie den rPlay ein.
3. Verbinden Sie das mobile Gerät mit dem gleichen Netzwerk, an das Sie den rPlay anschließen möchten.
4. Starten Sie die App DTS Play-Fi und warten Sie, bis die App den rPlay automatisch erkennt und verbinden Sie ihn mit Ihrem Heimnetzwerk.
5. Der rPlay ist nun eingerichtet und betriebsbereit.

D-7
Deu
tsch
Windows® PC-BenutzerVerfahren 1: Mein Router unterstützt Wi-Fi Protected Setup (WPS)
1. Halten Sie die Taste SETUP auf der Rückseite des rPlay für etwa 4 Sekunden gedrückt. Die NETZ-LED blinkt
zweimal in regelmäßigen Abständen.
2. Drücken Sie die Taste Wi-Fi Protected Setup am Router.
3. Der rPlay stellt jetzt eine Verbindung mit Ihrem Netzwerk her. Die NETZ-LED hört auf zu blinken und
leuchtet konstant.
4. Laden Sie die App DTS Play-Fi von https://play-fi.com/apps/windows/ herunter.
5. Verbinden Sie den Windows-PC mit dem gleichen Netzwerk, mit dem der rPlay verbunden ist.
6. Starten Sie die App DTS Play-Fi und befolgen Sie die Anweisungen auf dem Bildschirm.
Verfahren 2: Mein Router unterstützt kein Wi-Fi Protected Setup
1. Laden Sie die Software DTS Play-Fi von https://play-fi.com/apps/windows/ herunter und installieren Sie sie auf Ihrem PC.
2. Sobald die Installation abgeschlossen ist, klicken Sie auf das Symbol „Einstellungen“ und wählen Sie „Play-Fi
Gerät einrichten“.
3. Die App sucht automatisch nach Ihrem Gerät und führt Sie durch den Einrichtungsvorgang.
4. Der rPlay ist nun eingerichtet und betriebsbereit.
Verfahren 3: Kabelgebundene Verbindung mit einem Netzwerk
1. Laden Sie die App DTS Play-Fi von https://play-fi.com/apps/windows/ herunter.
2. Schließen Sie den rPlay mit dem mitgelieferten Ethernet-Kabel an Ihrem Router an.
3. Schalten Sie den rPlay ein.
4. Verbinden Sie das mobile Gerät mit dem gleichen Netzwerk, an das Sie den rPlay anschließen möchten.
5. Starten Sie die App DTS Play-Fi und warten Sie, bis die App den rPlay automatisch erkennt und verbinden Sie
ihn mit Ihrem Heimnetzwerk.
6. Der rPlay ist nun eingerichtet und betriebsbereit.
HINWEISAchten Sie nach der vollständigen Konfiguration des rPlay darauf, dass er als standardmäßiges Windows-Wiedergabegerät ausgewählt wurde.

D-8
BetriebGebrauch der App DTS Play-Fi auf Ihrem Android Gerät1. Laden Sie die App DTS Play-Fi aus dem Google Play Store oder dem Amazon App Store herunter.
2. Starten Sie die auf Ihrem Gerät installierte App DTS Play-Fi.
3. Die App sucht in Ihrem Netzwerk automatisch alle angeschlossenen Play-Fi-Lautsprecher.
4. Wählen Sie den(die) Lautsprecher aus, mit dem Sie sich verbunden möchten.
5. Wählen Sie Ihre Musik und starten Sie die Wiedergabe
Gebrauch der App DTS Play-Fi auf Ihrem iOS-Gerät1. Laden Sie die App DTS Play-Fi aus dem Apple App Store herunter.
2. Starten Sie die auf Ihrem Gerät installierte App DTS Play-Fi.
3. Die App sucht in Ihrem Netzwerk automatisch alle angeschlossenen Play-Fi-Lautsprecher.
4. Wählen Sie den(die) Lautsprecher aus, mit dem Sie sich verbunden möchten.
5. Wählen Sie Ihre Musik und starten Sie die Wiedergabe
AirPlay auf Ihrem iOS-Gerät verwenden1. Suchen das AirPlay-Symbol auf Ihrem iOS-Gerät und tippen Sie es an
2. Wählen Sie den rPlay als AirPlay-Lautsprecher
3. Wählen Sie Ihre Musik und starten Sie die Wiedergabe
Gebrauch der App DTS Play-Fi auf Ihrem Windows-PC1. Laden Sie die App DTS Play-Fi von https://play-fi.com/apps/windows/ herunter.
2. Starten Sie die auf Ihrem Windows-PC installierte App DTS Play-Fi oder öffnen Sie die App DTS Play-Fi über die
Windows-Taskleiste
3. Wählen Sie ein verfügbares Play-Fi-Gerät
4. Wählen Sie Ihre Musik und starten Sie die Wiedergabe

D-9
Deu
tsch
GeräteverwendungGerät App Inhalte Multi-Raum
AndroidPlay-Fi
Musikservice auswählenAuf dem Gerät gespeicherte Musik
Bis zu acht rPlay GeräteMehrere Benutzer gleichzeitigDie Lautsprecher können in Zonen aufgeteilt werden
UPnP Alle Audioinhalte Nur Eins-zu-Eins
iOS
AirPlayiTunesAlle iOS Musik-Apps
Nur Eins-zu-Eins
Play-FiMusikservice auswählenITunes, auf dem Gerät gespeicherte Musik
Bis zu acht rPlay GeräteMehrere Benutzer gleichzeitigDie Lautsprecher können in Zonen aufgeteilt werden
UPnP Alle Audioinhalte Nur Eins-zu-Eins
WindowsPlay-Fi Alle Audioinhalte
Bis zu acht rPlay GeräteMehrere Benutzer gleichzeitigDie Lautsprecher können in Zonen aufgeteilt werden
UPnP Alle Audioinhalte Nur Eins-zu-Eins
NETZ-LEDBLAU an- und abschwellend Der rPlay wartet auf die Konfiguration einer drahtlosen Verbindung
Blinkt BLAU Der rPlay wird initialisiert, eine Firmware-Aktualisierung läuft oder der rPlay versucht eine Verbindung mit einem drahtlosen Netzwerk herzustellen
Blinkt BLAU (zweimal in regelmäßigen Abständen)
Drahtloses setup ist aktiviert
Leuchtet konstant BLAU Das Gerät ist mit einem drahtlosen Netzwerk verbunden
Aus Ein kabelgebundenes Netzwerk wurde angeschlossen oder
das Gerät startet
STATUS-LEDLeuchtet konstant BLAU Der rPlay ist eingeschaltet, mit einem Netzwerk verbunden und er ist
bei der Wiedergabe
Leuchtet konstant VIOLETT Der rPlay ist eingeschaltet, mit einem Netzwerk verbunden und er gibt nicht wiedergabe
Leuchtet konstant ROT Der rPlay ist eingeschaltet und er ist mit keinem Netzwerk verbunden.
Leuchtet konstant ORANGE Der rPlay ist stummgeschaltet.
Blinkt ORANGE Der rPlay wird initialisiert oder eine Firmware-Aktualisierung läuft
Blinkt ROT Es ist ein Fehler aufgetreten

D-10
Technische DatenDAC PCM5102 von Texas Instruments
Frequenzgang 20 Hz – 20 kHz
Harmonische Gesamtverzerrung und Rauschen 0,0007 %
Signal-Stör-Verhältnis (A–gewertet) 117 dB
Ausgangspegel Fester Pegel 2,15 V RMS
Variabler Pegel 0 – 2,15 V RMS
Unterstützte Audio-Dateiformate mp3 (MPEG Layer III)
m4a, aac (Advanced Audio Coding/Apple Lossless)
flac (Free Lossless Audio Codec)
wav (Wellenform-Audiodatei)
Dateiqualität (siehe Hinweis unten) Bis zu 24 Bit/192 kHz
Anforderungen an die Stromversorgung (max.) 12 V DC, 2,0 A
Abmessungen (B x H x T) 194 x 44 x 124 mm
Nettogewicht 1,1 kg
Mitgeliefertes Zubehör Netzadapter mit austauschbaren Steckern
WLAN-Antenne
Stereo Cinch-Kabel
Digitales Cinch-Kabel
Ethernet-Kabel
Benutzerhandbuch und Registrierungskarte
Fehler und Auslassungen vorbehalten Alle Spezifikationen sind typische Werte falls nicht abweichend angegeben.
Kompatibilität und Systemanforderungen• Ein Windows-PC mit Windows 7 oder höher (32 oder 64 Bit)
• Ein Android-Gerät, auf dem Android 2.2 oder höher läuft
• Unterstützt iOS 7 oder höher für die Einrichtung mit der drahtlosen Zubehörkonfiguration
• AirPlay funktioniert auf iPhone, iPad und iPod touch mit iOS 4.3.3 oder höher, Mac mit OS X Mountain Lion oder
höher und einem PC mit iTunes 10.2.2 oder höher.
• Für ein optimales Play-Fi-Streaming-Erlebnis wird ein WLAN-Router mit einer Bewertung von mindestens
N600 empfohlen
HINWEIS:Dateien bis zu 16 Bit/48 kHz werden ohne jegliche Kompression oder Transkodierung gestreamt. Audiodateien mit hoher Auflösung (24 Bit/192 kHz) werden für die Übertragung auf 16 Bit/48 kHz heruntergemischt. Dies ermöglicht das zuverlässigste Streaming-Erlebnis über WLAN an mehrere Lautsprecher.
Für diejenigen, die Audio mit hoher Auflösung hören möchten, als ursprünglich vorgesehen, aktiviert der kritische Hörmodus in der App DTS Play-Fi die native Wiedergabe von Dateien mit hoher Auflösung bis zu 24/96 ohne Heruntermischen oder Anpassen der Netzwerk-Synchronisation. Auf diese Weise behalten Audiodateien ihre ursprüngliche Audiointegrität bei. Für weitere Details bezüglich des kritischen Hörmodus gehen Sie auf https://play-fi.com/faq/entry/critical-listening-mode.

D-11
Deu
tsch
Sie sind berechtigt, das Gerät zwei Jahre nach Kaufdatum bei einem autorisierten Arcam-Fachhändler kostenlos reparieren zu lassen, unter der Voraussetzung, dass es ursprünglich bei einem Arcam-Händler erworben wurde. Der Hersteller übernimmt keine Verantwortung für Schäden, die durch Unfall, Missbrauch, Verschleiß, Vernachlässigung oder unzulässige Veränderungen bzw. Reparaturen entstehen. Außerdem wird keinerlei Verantwortung für Schäden oder Verlust des Gerätes während des Transports zum oder vom Garantienehmer übernommen.
Die Garantie umfasst Folgendes:Teile- und Arbeitsstundenkosten bis zu zwei Jahre nach dem Kaufdatum. Nach Ablauf von zwei Jahren müssen Sie die vollen Kosten für Ersatzteile und Arbeitsstunden tragen. Versandkosten werden nicht übernommen.
Inanspruchnahme der GarantieDas Gerät sollte in der Originalverpackung an den Händler zurückgegeben werden, bei dem es erworben wurde. Sie können es auch direkt an den Arcam-Händler in dem Land schicken, in dem das Produkt gekauft wurde.
Der Versand muss frei Haus durch einen angesehenen Kurier erfolgen – nicht mit der Post. Da keine Verantwortung für Schäden oder Verlust während des Transports zum Händler oder Distributor übernommen wird, sollten Sie das Gerät entsprechend versichern.
Weitere Informationen erhalten Sie von Arcam unter [email protected].
Probleme?Kann Ihr Arcam-Händler Fragen zu diesem oder einem anderen Arcam-Produkt nicht beantworten, wenden Sie sich an den Arcam-Kundendienst, und wir versuchen unser Möglichstes, um Ihnen zu helfen.
Sachgemäße Entsorgung des Produkts Diese Kennzeichnung zeigt an, dass das Produkt in der gesamten EU nicht mit anderem Haushaltsmüll entsorgt werden darf.
Zur Vermeidung möglicher Umwelt- oder Gesundheitsschäden durch unkontrollierte Entsorgung und zur Materialerhaltung sollte dieses Produkt verantwortungsvoll entsorgt werden.
Zur Entsorgung Ihres Produkts verwenden Sie bitte Ihre örtlichen Entsorgungssysteme oder kontaktieren Sie den Händler, bei dem Sie das Produkt erstanden haben.
Weltweite Garantie

D-12

Ned
erla
nds
Aansluitingen en snelstartgids


N-1
Ned
erla
nds
Welkom…...en hartelijk dank voor de aanschaf van de Arcam rPlay draadloze muziekontvanger.
Arcam produceert al meer dan vijfendertig jaar audiocomponenten van hoge kwaliteit. Gedurende die tijd hebben we een schat aan kennis over zowel het ontwerp en de bouw van audiocomponenten vergaard om de beste geluidsprestaties voor de prijs te kunnen bieden.
Dit handboek biedt een leidraad voor het aansluiten en het gebruik van uw rPlay.
We hopen dat uw rPlay u jarenlang probleemloos gebruik zal geven. In het onwaarschijnlijke geval dat het systeem defect raakt of indien u meer informatie wilt ontvangen over producten van Arcam, dan zijn de dealers van ons
netwerk u graag van dienst. Meer informatie is te vonden op de Arcam website op www.arcam.co.uk.
Het ontwikkelingsteam van rPlay

N-2
Click!
UK
1 2
3
EU US AU
Instellingen voedingsspanning

N-3
Ned
erla
nds
Audio-uitgang op variabel niveau
1 0NET
12V 2.0APOWER
SETUP RESETDIG.OUTFIXED VARIABLE
R
L
LINE OUT
UPGRADE
ANT
Audio-uitgang op vast niveau
Voedingsconnector
Coaxiale digitale uitgangen
Draadlozeinstallatie
Ethernet
Aan/Uit-schakelaar
Aansluitingen en bedieningsknoppen
Wi-Fi-antenne-aansluiting
ResettenUSB-servicepoorten (Alleen voor software-upgrade)
NET STATUS
Volume +Volume –
Volumeknop en Dempen
Het volume van de variabele lijnuitvoer kan worden aangepast door op de volumeknoppen omhoog (+) en omlaag (-) op het bovenpaneel te drukken. Door beide volumeknoppen tegelijkertijd in te drukken, wordt de uitvoer gedempt en zal het STATUSLAMPJE op het voorpaneel oranje worden.
Opmerking: De volumeknop heeft geen invloed op de vaste lijn en de S/PDIF-uitgangen van de rPlay.

N-4
1 0NET
12V 2.0APOWER
SETUP RESETDIG.OUTFIXED VARIABLE
R
L
LINE OUT
UPGRADE
ANT
POWER
1 0COAX USBFIXED VARIABLE OPT2 OPT1
R
L
2
1 12V DC2.0A
ANT
LAN
VOLTAGE SELECT
AUDIO OUT
L
R
1 2
L
R
AUXIN
REMOTEIN
220 - 240V~50Hz
110 -120V~60Hz
L
R
VOLTAGE SELECT
PREIN
REMOTEIN
220 - 240V~50Hz
110 -120V~60Hz
L
R
DAC
Aansluitingen
Geïntegreerde versterker
Eindversterker
Netwerkrouter
WiFi-antenne
Voedingsspanning
rPlay

N-5
Ned
erla
nds
Voordat u begint...1. Wacht bij het instellen van de rPlay met een draadloze verbinding altijd tot het lampje aan de voorzijde is
gestopt met knipperen nadat het apparaat aangezet is. Dit geeft de rPlay de tijd om op te starten. De rPlay is klaar voor gebruik wanneer het STATUSLAMPJE rood is en het NETLAMPJE blauw begint te knipperen.
2. Sluit bij het instellen van de rPlay met een bedrade verbinding altijd de Ethernet-kabel aan voordat het apparaat aangezet wordt. Zet het apparaat aan en geef de rPlay de tijd om op te starten. Zodra er een bedrade verbinding tot stand is gekomen, zal het NETLAMPJE uitgaan en het STATUSLAMPJE paars worden.
Android™-gebruikersKeuze 1: Mijn router ondersteunt Wi-Fi Protected Setup
1. Houd de SETUP-toets aan het achterpaneel van uw rPlay ongeveer 4 seconden ingedrukt. Het NETLAMPJE zal
regelmatig twee keer knipperen.
2. Druk op de Wi-Fi Protected Setup-toets op uw router.
3. De rPlay zal nu verbinding maken met uw netwerk en het NETLAMPJE zal stoppen met knipperen en aan blijven.
4. Download de DTS Play-Fi-app uit de Google Play™ Store of uit de Amazon app store.
5. Verbind uw mobiele apparaat met hetzelfde netwerk waarop de rPlay is verbonden.
6. Start de DTS Play-Fi-app en volg de aanwijzingen op het scherm.
Keuze 2: Mijn router ondersteunt Wi-Fi Protected Setup niet
1. Download de DTS Play-Fi-app uit de Google Play Store of uit de Amazon app store.
2. Start de app en u zult worden verzocht om het nieuwe apparaat in te stellen. Volg de aanwijzingen op het
scherm en voltooi de installatie.
3. De rPlay is nu geïnstalleerd en klaar voor gebruik.
Keuze 3: Bedrade verbinding met een netwerk
1. Download de DTS Play-Fi-app uit de Google Play Store of uit de Amazon app store.
2. Verbind de rPlay met uw router met behulp van de meegeleverde Ethernet-kabel.
3. Zet de rPlay aan.
4. Verbind uw mobiele apparaat met hetzelfde netwerk waarop u de rPlay wilt verbinden.
5. Start de DTS Play-Fi-app en wacht totdat de app de rPlay automatisch herkent en verbind deze met uw
thuisnetwerk.
6. De rPlay is nu geïnstalleerd en klaar voor gebruik.
Instellen

N-6
iOS-gebruikersKeuze 1: Instellen van de AirPlay-luidspreker
1. Houd de SETUP-toets aan het achterpaneel van uw rPlay ongeveer 8 seconden ingedrukt.
2. Selecteer de draadloze netwerkinstellingen op uw iOS-apparaat.
3. Ga naar de Wi-Fi-instellingen op uw mobiele apparaat en navigeer naar "NIEUWE AIRPLAY-LUIDSPREKER
INSTELLEN..."
4. Selecteer de luidspreker met de naam "rPlay-XXXXXX" (waar XXXXXX een uniek nummer is dat is toegewezen
aan de rPlay).
5. Selecteer het netwerk waarop u de rPlay wilt verbinden en druk op "Volgende".
6. Volg de aanwijzingen op het scherm om de rPlay-instelling als een AirPlay-luidspreker te voltooien.
Keuze 2: Mijn router ondersteunt Wi-Fi Protected Setup
1. Houd de SETUP-toets aan het achterpaneel van uw rPlay ongeveer 4 seconden ingedrukt. Het NETLAMPJE zal
regelmatig twee keer knipperen.
2. Druk op de Wi-Fi Protected Setup-toets op uw router.
3. De rPlay zal nu verbinding maken met uw netwerk en het NETLAMPJE zal stoppen met knipperen en aan blijven.
4. Download de DTS Play-Fi®-app uit de Apple App Store.
5. Verbind uw mobiele apparaat met hetzelfde netwerk waarop de rPlay is verbonden.
6. Start de DTS Play-Fi-app en volg de aanwijzingen op het scherm.
Keuze 3: Mijn router ondersteunt Wi-Fi Protected Setup niet
1. Download de DTS Play-Fi-app uit de Apple App Store.
2. Start de app en u zult worden verzocht om het nieuwe apparaat in te stellen. Volg de aanwijzingen op het
scherm en voltooi de installatie.
3. Sluit de app af en open de instellingen op uw mobiele apparaat.
4. Ga naar de Wi-Fi-instellingen op uw mobiele apparaat, selecteer het draadloze netwerk met de naam "
PlayFi2DeviceXXXXXX" en maak er verbinding mee (waar XXXXXX een uniek nummer is dat is toegewezen aan
de rPlay).
5. Sluit de Wi-Fi-instellingen af en start opnieuw de DTS Play-Fi-app. Selecteer uw draadloze thuisnetwerk en
verbind de rPlay ermee. Zodra deze is verbonden, zal het NETLAMPJE stoppen met knipperen en aanblijven.
6. De rPlay is nu geïnstalleerd en klaar voor gebruik.
Keuze 4: Bedrade verbinding met een netwerk
1. Download de DTS Play-Fi-app uit de Apple App Store.
2. Verbind de rPlay met uw router met behulp van de meegeleverde Ethernet-kabel en zet de rPlay aan.
3. Verbind uw mobiele apparaat met hetzelfde netwerk waarop u de rPlay wilt verbinden.
4. Start de DTS Play-Fi-app en wacht totdat de app de rPlay automatisch herkent en verbind deze met uw
thuisnetwerk.
5. De rPlay is nu geïnstalleerd en klaar voor gebruik.

N-7
Ned
erla
nds
Windows® PC-gebruikersKeuze 1: Mijn router ondersteunt Wireless Protected Setup
1. Houd de SETUP-toets aan het achterpaneel van uw rPlay ongeveer 4 seconden ingedrukt. Het NETLAMPJE zal
regelmatig twee keer knipperen.
2. Druk op de Wi-Fi Protected Setup-toets op uw router.
3. De rPlay zal nu verbinding maken met uw netwerk en het NETLAMPJE zal stoppen met knipperen en aan blijven.
4. Download de DTS Play-Fi app via https://play-fi.com/apps/windows/.
5. Verbind uw Windows-apparaat met hetzelfde netwerk waarop de rPlay is verbonden.
6. Start de DTS Play-Fi-app en volg de aanwijzingen op het scherm.
Keuze 2: Mijn router ondersteunt Wi-Fi Protected Setup niet
1. Download de DTS Play-Fi software via https://play-fi.com/apps/windows/ en installeer deze op uw PC.
2. Klik zodra de installatie voltooid is op het pictogram Instellingen en kies "Installatie Play-Fi-apparaat".
3. De app zal uw apparaat automatisch vinden en u door het installatieproces begeleiden.
4. De rPlay is nu geïnstalleerd en klaar voor gebruik.
Keuze 3: Bedrade verbinding met een netwerk
1. Download de DTS Play-Fi app via https://play-fi.com/apps/windows/.
2. Verbind de rPlay met uw router met behulp van de meegeleverde Ethernet-kabel.
3. Zet de rPlay aan.
4. Verbind uw mobiele apparaat met hetzelfde netwerk waarop u de rPlay wilt verbinden.
5. Start de DTS Play-Fi-app en wacht totdat de app de rPlay automatisch herkent en verbind deze met uw
thuisnetwerk.
6. De rPlay is nu geïnstalleerd en klaar voor gebruik.
OPMERKINGZorg ervoor dat de rPlay is geselecteerd als het standaard Windows-afspeelapparaat, nadat de rPlay volledig geconfigureerd is.

N-8
GebruikDe DTS Play-Fi-app op uw Android-apparaat gebruiken1. Download de DTS Play-Fi-app uit de Google Play Store of uit de Amazon app store.
2. Start de DTS Play-Fi-app die op uw apparaat is geïnstalleerd
3. De app zal automatisch alle verbonden Play-Fi-luidsprekers op uw netwerk vinden.
4. Selecteer de luidspreker(s) die u wilt verbinden.
5. Selecteer uw muziek en speel af
De DTS Play-Fi-app op uw iOS-apparaat gebruiken1. Download de DTS Play-Fi-app uit de Apple App Store.
2. Start de DTS Play-Fi-app die op uw apparaat is geïnstalleerd.
3. De app zal automatisch alle verbonden Play-Fi-luidsprekers op uw netwerk vinden.
4. Selecteer de luidspreker(s) die u wilt verbinden.
5. Selecteer uw muziek en speel af
AirPlay gebruiken op uw iOS-apparaat1. Vind en druk op het AirPlay-pictogram op uw iOS-apparaat.
2. Selecteer de rPlay als de AirPlay-luidspreker
3. Selecteer uw muziek en speel af
De DTS Play-Fi-app op uw Windows PC gebruiken1. Download de DTS Play-Fi app via https://play-fi.com/apps/windows/.
2. Start de DTS Play-Fi-app die op uw Windows PC is geïnstalleerd of open de DTS Play-Fi-app vanaf het
systeemvak van Windows.
3. Selecteer een van de beschikbare Play-Fi-apparaten
4. Selecteer uw muziek en speel af

N-9
Ned
erla
nds
ApparaatgebruikApparaat App Inhoud Multi-Room
AndroidPlay-Fi
Selecteer muziekservices
Muziek op het apparaat opgeslagen
Tot maximaal acht rPlay-apparaten
Meerdere gebruikers tegelijkertijd
Luidsprekers kunnen gezoneerd worden
UPnP Alle audio-inhoud Alleen één op één
iOS
AirPlayiTunes
Alle iOS muziek-appsAlleen één op één
Play-Fi
Selecteer muziekservices
iTunes, muziek op het apparaat opgeslagen
Tot maximaal acht rPlay-apparaten
Meerdere gebruikers tegelijkertijd
Luidsprekers kunnen gezoneerd worden
UPnP Alle audio-inhoud Alleen één op één
WindowsPlay-Fi Alle audio-inhoud
Tot maximaal acht rPlay-apparaten
Meerdere gebruikers tegelijkertijd
Luidsprekers kunnen gezoneerd worden
UPnP Alle audio-inhoud Alleen één op één
NETLAMPJEAdemend BLAUW De rPlay is klaar om geconfigureerd te worden voor een
draadloze verbinding
Knipperend BLAUW De rPlay is bezig met initialiseren of er wordt een firmware-update uitgevoerd of de rPlay probeert verbinding te maken met een draadloos netwerk
Knipperend BLAUW (regelmatig twee keer) Draadloze installatie is ingeschakeld
Permanent BLAUW Het apparaat is verbonden met een draadloos netwerk
Uit Een bedraad netwerk is verbonden of
het apparaat is bezig met opstarten
STATUSLAMPJEPermanent BLAUW De rPlay staat aan, is verbonden met een netwerk en speelt af
Permanent PAARS De rPlay staat aan, is verbonden met een netwerk, maar speelt niet af
Permanent ROOD De rPlay staat aan en is niet verbonden met een netwerk
Constant ORANJE Het geluid van de rPlay is gedempt
Knipperend ORANGE De rPlay is bezig met initialiseren of er wordt een firmware-update uitgevoerd
Knipperend ROOD Er is een fout opgetreden

N-10
SpecificatiesDAC Texas Instruments PCM5102
Frequentiebereik 20 Hz–20 kHz
Totale harmonische vervorming + ruis 0,0007%
Signaal/ruis-verhouding (A-weging) 117dB
Uitvoerniveau Vast niveau 2,15 V RMS
Variabel niveau 0–2,15 V RMS
Ondersteunde audiobestandsformaten mp3 (MPEG Layer III)
m4a, aac (Geavanceerde audiocodering/Apple Lossless)
Flac (Free Lossless Audio CODEC)
wav (Waveform-audiobestand)
Bestandskwaliteit (zie opmerking hieronder) Tot 24-bit/192 kHz
Stroomvoorziening (max) 12 V DC, 2,0 A
Afmetingen (BxHxD) 194 x 44 x 124 mm
Netto gewicht 1,1 kg
Meegeleverde accessoires Voeding met verwisselbare stekkers
WiFi-antenne
Stereo phono-phono-kabel
Digitale phono-kabel
Ethernet-kabel
Gebruikershandleiding en registratiebewijs
E&OE De waarden van alle specificaties zijn kenmerkend, tenzij anders vermeld
Compatibiliteit en systeemvereisten• Een Windows PC met Windows 7 of nieuwer (32 of 64 bit)
• Een Android-apparaat met Android 2.2 of nieuwer
• Ondersteunt iOS 7 of nieuwer voor het instellen met gebruik van Wireless Accessory Configuration
• AirPlay werkt met iPhone, iPad en iPod touch met iOS 4.3.3 of nieuwer, Mac met OS X Mountain Lion of nieuwer
en PC met iTunes 10.2.2 of nieuwer
• Voor optimale Play-Fi-streaming wordt een draadloze router met een rating van ten minste N600 aanbevolen
Opmerking:Bestanden tot 16-bit/48 kHz worden gestreamd zonder compressie of transcodering. Audiobestanden met een hoge resolutie (24-bit/192 kHz) worden voor transmissie gedownsampled tot 16-bit/48 kHz. Dit zorgt voor de meest betrouwbare streaming via Wi-Fi naar meerdere luidsprekers.
Voor degenen die naar de originele audio met hoge resolutie willen luisteren, zal de modus Kritisch luisteren in de DTS Play-Fi-app de originele transmissie van bestanden met een hoge resolutie tot 24/96 inschakelen zonder downsampling of aanpassing van de netwerksynchronisatie. Zo behouden de audiobestanden hun originele audio-integriteit. Voor meer informatie over de modus Kritisch luisteren, kunt u terecht op https://play-fi.com/faq/entry/critical-listening-mode.

N-11
Ned
erla
nds
Dit verleent u het recht het apparaat kosteloos te laten repareren voor een periode van twee jaar vanaf de aankoopdatum, vooropgesteld dat het origineel was aangeschaft van een geautoriseerde Arcam dealer. De fabrikant kan niet aansprakelijk worden gesteld voor gebreken als gevolg van ongeval, verkeerd gebruik, misbruik, slijtage, verwaarlozing of door ongeoorloofde aanpassing en/of reparatie, noch kan de fabrikant aansprakelijk worden gesteld voor schade of verlies ontstaan tijdens het transport van of naar de persoon die een garantieclaim indient.
De garantie dekt:Onderdelen en arbeidskosten voor twee jaar vanaf de aankoopdatum. Na twee jaar moet u voor zowel de onderdelen als de arbeidskosten betalen. De garantie dekt op geen enkel moment transportkosten.
GarantieclaimsDeze apparatuur moet worden verpakt in de originele verpakking en teruggestuurd naar de leverancier bij wie deze werd aangeschaft of rechtstreeks naar de Arcam-distributeur in het land waar het product werd aangeschaft.
Het moet franco vervoer via een gerenommeerde vervoerder worden toegezonden – niet per post. Er kan tijdens transport naar de dealer of distributeur geen verantwoordelijkheid voor het apparaat worden aanvaard en klanten worden daarom geadviseerd om het apparaat te verzekeren tegen verlies of beschadiging tijdens transport.
Neem voor meer informatie contact op met Arcam via [email protected].
Problemen?Als uw Arcam-dealer geen enkele vraag met betrekking tot dit of enig ander Arcam-product kan beantwoorden, neem contact op met Arcam Customer Support op het hierboven vermelde adres en we zullen ons best doen om u te helpen.
Dit product correct afvoeren Deze markering geeft aan dat dit product nergens in de Europese Unie met ander huishoudelijk afval mag worden afgevoerd.
Om mogelijke schade aan het milieu of de volksgezondheid door ongecontroleerde afvalverwijdering te voorkomen en grondstoffen te behouden, dient dit product op verantwoorde wijze gerecycled te worden.
Om uw apparaat te verwijderen, maak gebruik van uw plaatselijke inlever- en inzamelsystemen of neem contact op met de winkelier waar het product was aangeschaft.
Wereldwijde garantie

N-12

Espa
ñol
Conexiones y Guía de Inicio Rápido


ES-1
Espa
ñol
Bienvenido……y gracias por adquirir el receptor de música inalámbrico rPlay de Arcam.
Arcam ha estado produciendo componentes de alta calidad durante más de treinta y cinco años. Durante ese tiempo hemos acumulado una riqueza de conocimientos tanto en el diseño como en la construcción de componentes de audio a fin de ofrecer el mejor desempeño de sonido por el precio.
Este manual ofrece una guía para la conexión y uso de su rPlay.
Esperamos que su rPlay le proporcione años de operación sin problemas. En el caso poco probable de darse algún fallo, o simplemente si requiere más información sobre los productos Arcam, nuestra red de distribuidores estará encantada de ayudarle. Se puede encontrar más información en el sitio web de Arcam en www.arcam.co.uk.
El equipo de desarrollo rPlay

ES-2
Click!
UK
1 2
3
EU US AU
Ajuste de la fuente de alimentación

ES-3
Espa
ñol
Salida de audio de nivel variable
1 0NET
12V 2.0APOWER
SETUP RESETDIG.OUTFIXED VARIABLE
R
L
LINE OUT
UPGRADE
ANT
Salida de audio de nivel fijo
Conector de alimentación
Salida digital coaxial Configuracióninalámbrica
Ethernet
Interruptor de encendido
Conectores y controles
Conector de antena Wi-Fi
ReinicioPuertos de servicio USB (exclusivos para actualización de software)
NET STATUS
Volumen +Volumen –
Control de volumen y silencio
El volumen de salida de línea variable se ajusta al pulsar los botones subir (+) y bajar (-) volumen en el panel superior. Si se pulsan ambos botones de volumen al mismo tiempo esto provocará que la salida se silencie y que el LED DE ESTADO del panel frontal cambie a color naranja.
Nota: El control de volumen no afecta las salidas línea fija y S/PDIF del rPlay.

ES-4
1 0NET
12V 2.0APOWER
SETUP RESETDIG.OUTFIXED VARIABLE
R
L
LINE OUT
UPGRADE
ANT
POWER
1 0COAX USBFIXED VARIABLE OPT2 OPT1
R
L
2
1 12V DC2.0A
ANT
LAN
VOLTAGE SELECT
AUDIO OUT
L
R
1 2
L
R
AUXIN
REMOTEIN
220 - 240V~50Hz
110 -120V~60Hz
L
R
VOLTAGE SELECT
PREIN
REMOTEIN
220 - 240V~50Hz
110 -120V~60Hz
L
R
DAC
Conexiones
Amplificador integrado
Amplificador de potencia
Enrutador de red
Antena Wi-Fi
Fuente de alimentación
rPlay

ES-5
Espa
ñol
Antes de empezar...1. Al configurar el rPlay usando una conexión inalámbrica, siempre espere a que los LED frontales dejen de
parpadear después de que la unidad se encienda. Esto permitirá que el rPlay arranque. El rPlay está listo cuando el LED de ESTADO cambia a rojo y el LED de RED comienza a pulsar en color azul.
2. Si configura el rPlay usando una conexión alámbrica, siempre conecte el cable de Ethernet antes de que se encienda la unidad. Encienda la unidad y permita que el rPlay arranque. Una vez que se establezca una conexión alámbrica, el LED de RED se apagará y el LED de ESTADO cambiará a color púrpura.
Usuarios Android™Opción 1: MI enrutador es compatible con Wi-Fi Protected Setup
1. Pulse y mantenga pulsado el botón SETUP ubicado en el panel posterior de su rPlay durante
aproximadamente 4 segundos. El LED de RED parpadeará dos veces a intervalos regulares.
2. Pulse el botón Wi-Fi Protected Setup en su enrutador.
3. Ahora el rPlay se conectará a su red y el LED RED dejará de parpadear y permanecerá encendido.
4. Descargue la aplicación DTS Play-Fi de la tienda Google Play™ o la tienda de aplicaciones de Amazon.
5. Conecte su dispositivo móvil a la misma red a la que el rPlay esté conectado.
6. Inicie la aplicación DTS Play-Fi y siga las instrucciones en pantalla.
Opción 2: Mi enrutador no es compatible con Wi-Fi Protected Setup
1. Descargue la aplicación DTS Play-Fi de la tienda Google Play o la tienda de aplicaciones de Amazon.
2. Inicie la aplicación y se le pedirá que configure el nuevo dispositivo. Siga las instrucciones en pantalla y
complete la configuración.
3. Ahora el rPlay está configurado y listo para usarse.
Opción 3: Conexión alámbrica a una red
1. Descargue la aplicación DTS Play-Fi de la tienda Google Play o la tienda de aplicaciones de Amazon.
2. Usando el cable Ethernet suministrado, conecte el rPlay a su enrutador.
3. Encienda el rPlay.
4. Conecte su dispositivo móvil a la misma red a la desea que el rPlay esté conectado.
5. Inicie la aplicación DTS Play-Fi y espere a que la aplicación detecte automáticamente el rPlay y conéctelo a su
red doméstica.
6. Ahora el rPlay está configurado y listo para usarse.
Configuración

ES-6
Usuarios iOSOpción 1: Configuración de altavoces AirPlay
1. Pulse y mantenga pulsado el botón SETUP ubicado en el panel posterior de su rPlay durante
aproximadamente 8 segundos.
2. Seleccione la configuración de red inalámbrica en su dispositivo iOS.
3. Acceda a la configuración Wi-Fi en su dispositivo móvil y navegue a "CONFIGURAR NUEVO ALTAVOZ AIRPLAY..."
4. Seleccione el altavoz denominado "rPlay-XXXXXX" (donde XXXXXX es un número único asignado al rPlay).
5. Seleccione la red a la que desee que el rPlay se conecte y pulse "Siguiente".
6. Siga las instrucciones en pantalla para completar la configuración del rPlay como altavoz AirPlay.
Opción 2: MI enrutador es compatible con Wi-Fi Protected Setup
1. Pulse y mantenga pulsado el botón SETUP ubicado en el panel posterior de su rPlay durante
aproximadamente 4 segundos. El LED de RED parpadeará dos veces a intervalos regulares.
2. Pulse el botón Wi-Fi Protected Setup en su enrutador.
3. Ahora el rPlay se conectará a su red y el LED RED dejará de parpadear y permanecerá encendido.
4. Descargue la aplicación DTS Play-Fi® de la Apple App Store.
5. Conecte su dispositivo móvil a la misma red a la que el rPlay esté conectado.
6. Inicie la aplicación DTS Play-Fi y siga las instrucciones en pantalla.
Opción 3: Mi enrutador no es compatible con Wi-Fi Protected Setup
1. Descargue la aplicación DTS Play-Fi de la Apple App Store.
2. Inicie la aplicación y se le pedirá que configure el nuevo dispositivo. Siga las instrucciones en pantalla y
complete la configuración.
3. Salga de la aplicación y acceda a la configuración en su dispositivo móvil.
4. Vaya a la configuración Wi-Fi en su dispositivo móvil, seleccione la red inalámbrica denominada "
PlayFi2DeviceXXXXXX" y conéctelo (donde XXXXXX es un número único asignado al rPlay).
5. Salga de la configuración Wi-Fi y vuelva a iniciar la aplicación DTS Play-Fi. Seleccione su red inalámbrica
doméstica y permita que el rPlay se conecte a la misma. Una vez conectado el LED de RED dejará de
parpadear y permanecerá encendido.
6. Ahora el rPlay está configurado y listo para usarse.
Opción 4: Conexión alámbrica a una red
1. Descargue la aplicación DTS Play-Fi de la Apple App Store.
2. Usando el cable Ethernet suministrado, conecte el rPlay a su enrutador y encienda el rPlay.
3. Conecte su dispositivo móvil a la misma red a la desea que el rPlay esté conectado.
4. Inicie la aplicación DTS Play-Fi y espere a que la aplicación detecte automáticamente el rPlay y conéctelo a su
red doméstica.
5. Ahora el rPlay está configurado y listo para usarse.

ES-7
Espa
ñol
Usuarios de PC Windows®Opción 1: MI enrutador es compatible con Wi-Fi Protected Setup)
1. Pulse y mantenga pulsado el botón SETUP ubicado en el panel posterior de su rPlay durante
aproximadamente 4 segundos. El LED de RED parpadeará dos veces a intervalos regulares.
2. Pulse el botón Wi-Fi Protected Setup en su enrutador.
3. Ahora el rPlay se conectará a su red y el LED RED dejará de parpadear y permanecerá encendido
4. Descargue la aplicación DTS Play-Fi de https://play-fi.com/apps/windows/.
5. Conecte su dispositivo Windows a la misma red a la que el rPlay esté conectado.
6. Inicie la aplicación DTS Play-Fi y siga las instrucciones en pantalla.
Opción 2: Mi enrutador no es compatible con Wi-Fi Protected Setup
1. Descargue el software DTS Play-Fi de https://play-fi.com/apps/windows/ e instálelo en su PC.
2. Una vez que la instalación esté completa, haga clic en el icono Configuración y seleccione "Configurar
dispositivo Play-Fi".
3. La aplicación encontrará automáticamente su dispositivo y le guiará a través del procedimiento de
configuración.
4. Ahora el rPlay está configurado y listo para usarse.
Opción 3: Conexión alámbrica a una red
1. Descargue la aplicación DTS Play-Fi de https://play-fi.com/apps/windows/.
2. Usando el cable Ethernet suministrado, conecte el rPlay a su enrutador.
3. Encienda el rPlay.
4. Conecte su dispositivo móvil a la misma red a la desea que el rPlay esté conectado.
5. Inicie la aplicación DTS Play-Fi y espere a que la aplicación detecte automáticamente el rPlay y conéctelo a su
red doméstica.
6. Ahora el rPlay está configurado y listo para usarse.
NOTAUna vez que el rPlay esté completamente configurado, asegúrese de que el rPlay esté seleccionado como el dispositivo de reproducción Windows predeterminado.

ES-8
FuncionamientoUso de la aplicación DTS Play-Fi en su dispositivo Android1. Descargue la aplicación DTS Play-Fi de la tienda Google Play o la tienda de aplicaciones de Amazon.
2. Inicie la aplicación DTS Play-Fi instalada en su dispositivo.
3. La aplicación encontrará automáticamente todos los altavoces Play-Fi conectados a su red.
4. Seleccione el(los) altavoz(es) a los que se desea conectar.
5. Seleccione su música e inicie la reproducción
Uso de la aplicación DTS Play-Fi en su dispositivo iOS1. Descargue la aplicación DTS Play-Fi de la Apple App Store.
2. Inicie la aplicación DTS Play-Fi instalada en su dispositivo.
3. La aplicación encontrará automáticamente todos los altavoces Play-Fi conectados a su red.
4. Seleccione el(los) altavoz(es) a los que se desea conectar.
5. Seleccione su música e inicie la reproducción
Uso de AirPlay en su dispositivo iOS1. Localice y pulse el icono AirPlay en su dispositivo iOS
2. Elija el rPlay como el altavoz AirPlay
3. Seleccione su música e inicie la reproducción
Uso de la aplicación DTS Play-Fi en su PC Windows1. Descargue la aplicación DTS Play-Fi de https://play-fi.com/apps/windows/.
2. Inicie la aplicación DTS Play-Fi instalada en su PC Windows o abra la aplicación DTS Play-Fi desde la bandeja de
sistema Windows
3. Seleccione cualquiera de los dispositivos Play-Fi disponibles
4. Seleccione su música e inicie la reproducción

ES-9
Espa
ñol
Uso del dispositivoDispositivo Aplicación Contenido Habitaciones múltiples
AndroidPlay-Fi
Seleccionar servicios de música
Música almacenada en dispositivo
Hasta ocho dispositivos rPlay
Usuarios simultáneos múltiples
Altavoces pueden ser asignados a zonas
UPnP Todo el contenido de audio Exclusivo uno a uno
iOS
AirPlayiTunes
Todas las aplicaciones de música iOSExclusivo uno a uno
Play-Fi
Seleccionar servicios de música
iTunes, música almacenada en dispositivo
Hasta ocho dispositivos rPlay
Usuarios simultáneos múltiples
Altavoces pueden ser asignados a zonas
UPnP Todo el contenido de audio Exclusivo uno a uno
WindowsPlay-Fi Todo el contenido de audio
Hasta ocho dispositivos rPlay
Usuarios simultáneos múltiples
Altavoces pueden ser asignados a zonas
UPnP Todo el contenido de audio Exclusivo uno a uno
LED REDAZUL respirando El rPlay está esperando a ser configurado para una conexión inalámbrica
AZUL parpadeante El rPlay se está inicializando o una actualización de firmware está en curso o el rPlay está intentando conectarse a una red inalámbrica
AZUL parpadeando (dos veces a intervalos regulares)
Configuración inalámbrica está habilitada
AZUL sólido La unidad está conectada a una red inalámbrica
Desactivado Una red alámbrica está conectada o
la unidad está unidad está arrancando
LED ESTADOAZUL sólido El rPlay está encendido, conectado a una red o reproduciendo
PÚRPURA constante El rPlay está encendido, conectado a una red, pero no reproduciendo
ROJO constante El rPlay está encendido y no conectado a una red
NARANJA constante El rPlay está silenciado
NARANJA parpadeante El rPlay está inicializando o una actualización de firmware está en curso
ROJO parpadeante Ocurrió un error

ES-10
EspecificacionesDAC Texas Instruments PCM5102
Respuesta de frecuencia 20 Hz a 20 kHz
Distorsión armónica total + ruido 0,0007%
Relación señal a ruido (ponderada A) 117 dB
Nivel de salida Nivel fijo 2,15 V RMS
Nivel variable 0 a 2,15 V RMS
Formatos de archivos de audio compatibles mp3 (MPEG capa III)
m4a, aac (codificación de audio avanzada/Apple sin pérdida)
Flac (Codec de audio libre sin pérdida de datos)
wav (archivo de audio de forma de onda)
Calidad de archivo (véase nota a continuación) Hasta 24 bit/192 kHz
Requisitos de potencia (máx.) 12 V CC, 2,0 A
Dimensiones (An x Al x Pr) 194 x 44 x 124 mm
Peso neto 1,1 Kg
Accesorios incluidos Fuente de alimentación con enchufes intercambiables
Antena Wi-Fi
Cable audio-audio estéreo
Cable de audio digital
Cable Ethernet
Manual del usuario y tarjeta de registro
E&OE Todos los valores especificados son típicos a menos que se indique otra cosa.
Compatibilidad y requisitos de sistema• Una PC Windows PC con Windows 7 o superior (32 o 64 bits)
• Un dispositivo Android con Android 2.2 o superior
• Compatible con iOS 7 o posterior para configuración usando la Configuración de accesorios inalámbricos
• AirPlay funciona con iPhone, iPad, y iPod touch con iOS 4.3.3 o posterior, Mac con OS X Mountain Lion o posterior, y PC con iTunes 10.2.2 o posterior
• Para experiencia de transmisión Play-Fi óptima se recomienda un enrutador inalámbrico con clasificación de por lo menos N600
NOTA:Archivos hasta 16 bits/48 kHz son transmitidos sin compresión o transcodificar. Archivos de audio de alta resolución (24 bits/192 kHz), se muestrean con tamaño reducido a 16 bits/48 kHz para transmisión. Esto permite la experiencia de transmisión más confiable a través de Wi-Fi a altavoces múltiples.
Para los que desean escuchar audio de alta resolución como se pretendió originalmente, el modo Critical Listening en la aplicación DTS Play-Fi habilitar la renderización nativa de archivos de alta resolución hasta 24/96, sin reducir el tamaño de muestreo o el ajuste de sincronización de red. De esta manera, los archivos de audio conservan su integridad de audio original. Para más detalles respecto al modo Critical Listening consulte https://play-fi.com/faq/entry/critical-listening-mode.

ES-11
Espa
ñol
Esto le asegura la reparación de la unidad de forma gratuita durante dos años después de la compra, siempre y cuando haya sido adquirido con un distribuidor autorizado Arcam. El fabricante no se hace responsable de los defectos derivados de ningún accidente, uso inadecuado, abuso, desgaste, ajuste y/o reparación negligente o no autorizado, ni puede aceptar la responsabilidad por daños o pérdidas durante el transporte hasta o desde la persona reclamante en el marco de la garantía.
La garantía cubre:Costos de piezas y mano de obra durante dos años a partir de la fecha de compra. Transcurridos los dos años usted correrá con los costos de piezas y de mano de obra. La garantía no cubre los costos de transporte en ningún momento.
Reclamaciones en el marco de la garantíaEste equipo deberá ser embalado en el empaque original y devuelto al vendedor con el cual se adquirió, o si esto no es posible, directamente con el distribuidor Arcam en el país donde el producto se adquirió.
Debe ser enviado en un transporte ya pagado, por un transportista reconocido – no por correo. No se acepta responsabilidad sobre la unidad mientras se está transportando al distribuidor o clientes y por eso aconsejamos asegurar la unidad contra pérdida o daños durante el transporte.
Para más detalles contacte a Arcam en [email protected].
¿Problemas?Si su distribuidor de Arcam es incapaz de responderle a alguna duda respecto a este o a otro producto Arcam, contacte al Servicio de Atención al Cliente de Arcam, en la dirección anterior y haremos todo lo posible por ayudarle.
Forma correcta de deshacerse de este producto Esta marca indica que este producto no debe disponerse con otros desperdicios domésticos en ningún lugar de los EE.UU.
Para evitar posibles daños al medio ambiente o a la salud humana debido a la eliminación no controlada de desechos y para conservar los recursos materiales, este producto debe reciclarse de manera responsable.
Para eliminar su producto, utilice sus sistemas locales de devolución y recolección o contacte al distribuidor al que le compró el producto.
Garantía Mundial

ES-12

Русс
кий
Краткое руководство по подключению и использованию


R-1
Русс
кий
Добро пожаловать……и благодарим вас за покупку беспроводного аудиоресивера Arcam rPlay.
Arcam производит высококачественную аудиотехнику уже более тридцати пяти лет. Знания, накопленные нами за этот период в области проектирования и конструирования аудиотехники, реализованы в аудиоустройствах с высочайшим качеством звучания, которые можно приобрести по разумной цене.
В этом руководстве содержатся инструкции по подключению и использованию вашего rPlay.
Надеемся, что rPlay будет надежно служить вам долгие годы. В случае непредвиденных обстоятельств, сбоев или при необходимости получения информации о продуктах Arcam наши дилеры будут рады
помочь вам. Более подробную информацию можно найти на веб-сайте Arcam www.arcam.co.uk.
Команда разработчиков rPlay

R-2
Click!
UK
1 2
3
EU US AU
Подключение к источнику электропитания

R-3
Русс
кий
Регулируемый уровень выходного аудиосигнала
1 0NET
12V 2.0APOWER
SETUP RESETDIG.OUTFIXED VARIABLE
R
L
LINE OUT
UPGRADE
ANT
Выход фиксированного уровня аудиосигнала
Разъем питания
Коаксиальный цифровой выход
настройкабеспроводной
сети
Сеть Ethernet
Выключатель питания
Соединители и средства управления
Соединитель антенны Wi-Fi
Разъем обратной
связи
Сервисный USB-порт (только для обновления ПО)
NET STATUS
Громкость +Громкость –
Управление громкостью звука и беззвучный режим
Громкость звука регулируется клавишами увеличения (+) и уменьшения (-) на верхней панели устройства. При одновременном нажатии клавиш управления громкостью включится беззвучный режим, при этом цвет СВЕТОДИОДА СОСТОЯНИЯ изменится на оранжевый.
Примечание. Регулировка громкости не влияет на линейный выход с фиксированным уровнем и выход S/PDIF устройства rPlay.

R-4
1 0NET
12V 2.0APOWER
SETUP RESETDIG.OUTFIXED VARIABLE
R
L
LINE OUT
UPGRADE
ANT
POWER
1 0COAX USBFIXED VARIABLE OPT2 OPT1
R
L
2
1 12V DC2.0A
ANT
LAN
VOLTAGE SELECT
AUDIO OUT
L
R
1 2
L
R
AUXIN
REMOTEIN
220 - 240V~50Hz
110 -120V~60Hz
L
R
VOLTAGE SELECT
PREIN
REMOTEIN
220 - 240V~50Hz
110 -120V~60Hz
L
R
Цифро-аналоговый преобразователь (DAC)
Соединения
Встроенный усилитель
Усилитель мощности
Сетевой маршрутизатор
Антенна Wi-Fi
Источник электропитания
rPlay

R-5
Русс
кий
Прежде чем начать...1. Прежде чем настроить rPlay через беспроводное соединение, после его включения подождите, пока
перестанут мигать светодиоды. Это позволит rPlay загрузиться. rPlay готов к работе, когда СВЕТОДИОД СОСТОЯНИЯ загорится красным светом, а СЕТЕВОЙ СВЕТОДИОД начнет мигать синим светом.
2. При настройке rPlay через проводное соединение, прежде чем включить устройство, необходимо подключить к нему Ethernet-кабель. Включите rPlay в сеть и дайте ему загрузиться. После установки проводного соединения цвет СЕТЕВОГО СВЕТОДИОДА изменится на пурпурный.
Пользователям Android™Вариант 1: Используемый маршрутизатор поддерживает стандарт безопасной настройки беспроводной сети Wi-Fi
1. Нажмите и удерживайте клавишу SETUP на задней панели устройства rPlay около 4 секунд. СЕТЕВОЙ
СВЕТОДИОД мигнет два раза с равными интервалами.
2. Нажмите клавишу WPS на маршрутизаторе.
3. rPlay подключится к сети, СЕТЕВОЙ СВЕТОДИОД перестанет мигать и будет гореть постоянно.
4. Загрузите приложение DTS Play-Fi из магазина приложений Google Play™ или Amazon.
5. Подключите мобильное устройство к сети подключения rPlay.
6. Запустите приложение DTS Play-Fi и следуйте указаниям на дисплее.
Вариант 2: Используемый маршрутизатор не поддерживает стандарт WPS
1. Загрузите приложение DTS Play-Fi из магазина приложений Google Play или Amazon.
2. Запустите приложение - появится подсказка о необходимости настроить новое устройство. Выполните
настройку согласно указаниям на экране.
3. rPlay настроен и готов к работе.
Вариант 3: Проводное подключение к сети
1. Загрузите приложение DTS Play-Fi из магазина приложений Google Play или Amazon.
2. Подключите rPlay к маршрутизатору с помощью комплектного Ethernet-кабеля.
3. Включите rPlay.
4. Подключите мобильное устройство к сети, к которой необходимо подключить rPlay.
5. Запустите приложение DTS Play-Fi и подождите, пока приложение автоматически не обнаружит rPlay,
затем подключите устройство к домашней сети.
6. rPlay настроен и готов к работе.
Настройка

R-6
Пользователям iOSВариант 1: Настройка громкоговорителя AirPlay
1. Нажмите и удерживайте кнопку «SETUP» на задней панели устройства rPlay около 8 секунд.
2. Выберите параметры настройки беспроводной сети на вашем устройстве iOS.
3. Перейдите к настройкам Wi-Fi на вашем мобильном устройстве, а затем к параметру «НАСТРОИТЬ НОВЫЙ ГРОМКОГОВОРИТЕЛЬ AIRPLAY...»
4. Выберите громкоговоритель «rPlay-XXXXXX» (где XXXXXX - уникальный номер, присвоенный rPlay).
5. Выберите сеть, к которой необходимо подключить rPlay, и нажмите кнопку «Далее».
6. Для завершения настройки rPlay в качестве громкоговорителя AirPlay следуйте инструкциям на экране.
Вариант 2: Используемый маршрутизатор поддерживает стандарт безопасной настройки беспроводной сети Wi-Fi
1. Нажмите и удерживайте клавишу SETUP на задней панели устройства rPlay около 4 секунд. СЕТЕВОЙ СВЕТОДИОД мигнет два раза с равными интервалами.
2. Нажмите клавишу WPS на маршрутизаторе.
3. rPlay подключится к сети, СЕТЕВОЙ СВЕТОДИОД перестанет мигать и будет гореть постоянно.
4. Загрузите приложение DTS Play-Fi® из магазина приложений Apple App Store.
5. Подключите мобильное устройство к сети подключения rPlay.
6. Запустите приложение DTS Play-Fi и следуйте указаниям на дисплее.
Вариант 3: Используемый маршрутизатор не поддерживает стандарт WPS
1. Загрузите приложение DTS Play-Fi из магазина приложений Apple App Store.
2. Запустите приложение - появится подсказка о необходимости настроить новое устройство. Выполните настройку согласно указаниям на экране.
3. Выйдите из приложения и перейдите к параметрам настройки на вашем мобильном устройстве.
4. Перейдите к параметрам настройки Wi-Fi на вашем мобильном устройстве, выберите беспроводную сеть
«PlayFi2DeviceXXXXXX» (где XXXXXX - уникальный номер, присвоенный rPlay) и подключитесь к ней.
5. Выйдете из меню настройки Wi-Fi и снова запустите приложение DTS Play-Fi. Выберите домашнюю беспроводную сеть и дайте rPlay подключиться к ней. После подключения СЕТЕВОЙ СВЕТОДИОД прекратит мигать и будет гореть постоянно.
6. rPlay настроен и готов к работе.
Вариант 4: Проводное подключение к сети
1. Загрузите приложение DTS Play-Fi из магазина приложений Apple App Store.
2. Подключив rPlay к маршрутизатору с помощью комплектного Ethernet-кабеля, включите устройство.
3. Подключите мобильное устройство к сети, к которой необходимо подключить rPlay.
4. Запустите приложение DTS Play-Fi и подождите, пока приложение автоматически не обнаружит rPlay, затем подключите устройство к домашней сети.
5. rPlay настроен и готов к работе.

R-7
Русс
кий
Пользователям Windows® PCВариант 1: Используемый маршрутизатор поддерживает стандарт безопасной настройки беспроводной сети Wi-Fi
1. Нажмите и удерживайте клавишу SETUP на задней панели устройства rPlay около 4 секунд. СЕТЕВОЙ
СВЕТОДИОД мигнет два раза с равными интервалами.
2. Нажмите клавишу WPS на маршрутизаторе.
3. rPlay теперь подключится к сети, СЕТЕВОЙ СВЕТОДИОД перестанет мигать и будет гореть постоянно
4. Загрузите приложение DTS Play-Fi, перейдя по ссылке https://play-fi.com/apps/windows/.
5. Подключите устройство Windows к той же сети, к которой подключен ресивер rPlay.
6. Запустите приложение DTS Play-Fi и следуйте указаниям на дисплее.
Вариант 2: Используемый маршрутизатор не поддерживает стандарт WPS
1. Загрузите приложение DTS Play-Fi, перейдя по ссылке https://play-fi.com/apps/windows/, и установите его на ваш ПК.
2. После завершения установки щелкните по пиктограмме параметров установки и выберите параметр
«Настроить устройство Play-Fi».
3. Приложение автоматически обнаружит устройство, на дисплее будут отображаться пошаговые
инструкции по установке.
4. rPlay настроен и готов к работе.
Вариант 3: Проводное подключение к сети
1. Загрузите приложение DTS Play-Fi, перейдя по ссылке https://play-fi.com/apps/windows/.
2. Подключите rPlay к маршрутизатору с помощью комплектного Ethernet-кабеля.
3. Включите rPlay.
4. Подключите мобильное устройство к сети, к которой необходимо подключить rPlay.
5. Запустите приложение DTS Play-Fi и подождите, пока приложение автоматически не обнаружит rPlay,
затем подключите устройство к домашней сети.
6. rPlay настроен и готов к работе.
ПРИМЕЧАНИЕПосле того, как устройство rPlay полностью настроено, удостоверьтесь, что оно по умолчанию выбрано в качестве устройства воспроизведения Windows.
R-8
РаботаИспользование приложения DTS Play-Fi на устройствах Android1. Загрузите приложение DTS Play-Fi из магазина приложений Google Play или Amazon.
2. Запустите приложение DTS Play-Fi, установленное на ваше устройство.
3. Приложение автоматически обнаружит все подключенные к сети громкоговорители Play-Fi.
4. Выберите громкоговорители, к которым необходимо подключиться.
5. Выберите музыкальную композицию и включите воспроизведение
Использование приложения DTS Play-Fi на устройствах iOS1. Загрузите приложение DTS Play-Fi из магазина приложений Apple App Store.
2. Запустите приложение DTS Play-Fi, установленное на ваше устройство.
3. Приложение автоматически обнаружит все подключенные к сети громкоговорители Play-Fi.
4. Выберите громкоговорители, к которым необходимо подключиться.
5. Выберите музыкальную композицию и включите воспроизведение
Использование AirPlay на устройствах iOS1. Найдите и нажмите пиктограмму AirPlay на вашем устройстве iOS
2. Выберите rPlay в качестве громкоговорителя AirPlay
3. Выберите музыкальную композицию и включите воспроизведение
Использование приложения DTS Play-Fi на ПК с операционной системой Windows1. Загрузите приложение DTS Play-Fi, перейдя по ссылке https://play-fi.com/apps/windows/.
2. Запустите приложение DTS Play-Fi, установленное на ваш ПК с операционной системой Windows, и
откройте приложение DTS Play-Fi, щелкнув по соответствующей пиктограмме на панели задач Windows
3. Выберите любое из доступных устройств Play-Fi
4. Выберите музыкальную композицию и включите воспроизведение

R-9
Русс
кий
Использование устройстваУстройство Приложение Контент Мультирум
AndroidPlay-Fi
Выбрать музыкальный сервисiTunes, аудиозаписи, сохраненные на устройство
До восьми устройств rPlayНесколько пользователей одновременноВозможность зонирования громкоговорителей
UPnP Весь аудиоконтент Только одиночный
iOS
AirPlayiTunesВсе музыкальные приложения iOS
Только одиночный
Play-FiВыбрать музыкальный сервисiTunes, аудиозаписи, сохраненные на устройстве
До восьми устройств rPlayНесколько пользователей одновременноВозможность зонирования громкоговорителей
UPnP Весь аудиоконтент Только одиночный
WindowsPlay-Fi Весь аудиоконтент
До восьми устройств rPlayНесколько пользователей одновременноВозможность зонирования громкоговорителей
UPnP Весь аудиоконтент Только одиночный
СЕТЕВОЙ СВЕТОДИОДСветодиод пульсирует СИНИМ цветом Ожидание устройством rPlay настройки
беспроводного подключения
Светодиод мигает СИНИМ цветом Инициализация rPlay, выполнение обновления ПО или попытка подключения rPlay к беспроводной сети
Светодиод мигает СИНИМ цветом (два раза с одинаковыми интервалами)
Настройка беспроводной сети включена
Светодиод постоянно светится СИНИМ цветом Устройство подключено к беспроводной сети
Выкл. Подключение к проводной сети или
загрузка устройства
СВЕТОДИОД СОСТОЯНИЯСветодиод постоянно светится СИНИМ цветом rPlay включен, подключен к сети и воспроизводит
аудиозапись
Светодиод постоянно светится ПУРПУРНЫМ цветом rPlay включен, подключен к сети, но не воспроизводит аудиозапись
Светодиод постоянно светится КРАСНЫМ цветом rPlay включен, но не подключен к сети
Светодиод постоянно светится ОРАНЖЕВЫМ светом rPlay в беззвучном режиме
Светодиод мигает ОРАНЖЕВЫМ цветом Выполняется инициализация или обновление ПО rPlay
Светодиод мигает КРАСНЫМ светом Произошла ошибка

R-10
Технические характеристикиЦифро-аналоговый преобразователь (DAC) Графическая архитектура Texas Instruments PCM5102
Частотная характеристика 20 Гц–20 кГц
Суммарный коэффициент гармонических искажений + шум
0,0007%
Отношение сигнал-шум (взвешенный по кривой A) 117 дБ
Выходной уровень Фиксированный уровень 2,15 В ср. квадр.Регулируемый уровень 0–2,15 В ср. квадр.
Поддерживаемые форматы аудиофайлов mp3 (MPEG Layer III)m4a, aac (усовершенствованное звуковое кодирование/Apple Lossless)flac (Free Lossless Audio Codec)wav (формат файла-контейнера для хранения записи оцифрованного аудиопотока)
Качество файла (см. примечание ниже) До 24 бит/192 кГц
Требования по электропитанию (макс.) 12 В пост. тока, 2,0 A
Габариты (Ш x В x Г) 194 x 44 x 124 мм
Масса нетто 1,1 кг
Аксессуары в комплекте Электропитание с помощью универсальных переходниковАнтенна Wi-FiСтерео фоно–фоно кабельЦифровой фоно кабельКабель EthernetРуководство пользователя и регистрационная карта
Исключая ошибки и пропуски. Если не указано иное, в спецификации приведены типовые значения
Совместимость и системные требования• ПК с операционной системой Windows 7 или выше (32 или 64 бит)
• Устройство Android с операционной системой Android 2.2 или выше
• Для настройки с использованием функции Wireless Accessory Configuration устройство поддерживает iOS 7
или более поздние версии
• AirPlay работает с iPhone, iPad и iPod touch на базе iOS 4.3.3 или более поздней версии, Mac на базе OS X
Mountain Lion или более поздней версии и ПК с iTunes 10.2.2 или более поздней версии
• Для оптимальной передачи с помощью Play-Fi рекомендуется использовать маршрутизатор модели не ниже N600
ПРИМЕЧАНИЕ.Файлы до 16 бит/48 кГц передаются без сжатия или транскодирования. При передаче аудиофайлов с высоким разрешением (24 бит/192 кГц) применяется цифровое сжатие до разрешения 16 бит/48 кГц. Это позволяет обеспечить надежность передачи аудиосигнала по сети Wi-Fi к нескольким громкоговорителям.
При желании прослушивать аудиозаписи с высоким оригинальным разрешением можно воспользоваться режимом «Критическое прослушивание» в приложении DTS Play-Fi, который позволяет воспроизводить аудиофайлы с высоким оригинальным разрешением до 24 бит/96 кГц без сжатия и настроек синхронизации сети. Это позволяет сохранить целостность оригинальных аудиофайлов. Для получения дополнительных сведений о режиме «Критическое прослушивание» перейдите по ссылке https://play-fi.com/faq/entry/critical-listening-mode.

R-11
Русс
кий
Это дает вам право отремонтировать аппарат бесплатно в течение первых двух лет после покупки, при условии, что он был первоначально приобретен у официального дилера Arcam. Производитель не несет ответственности за дефекты, возникшие вследствие несчастного случая, неправильного обращения, износа, несанкционированных настроек и/или ремонта, а также за повреждения или утерю изделия во время доставки или обратной транспортировки от лица, предъявляющего гарантийные претензии.
Гарантия распространяется на:Запчасти и сборку в течение двух лет с даты покупки. По окончании двух лет запчасти и услуги по их замене оплачиваются владельцем изделия. Гарантия не покрывает затраты, связанные с транспортировкой товара.
Претензии по гарантииДанное устройство должно быть упаковано в оригинальную упаковку и возвращено дилеру, у которого оно приобреталось, или (при несоблюдении данных требований) непосредственно дистрибьютору Arcam в стране приобретения продукта.
Изделие должно быть отправлено курьерской службой с оплатой доставки – не почтой. Компания не несет ответственности за оборудование, отправленное дилеру или дистрибьютору, и рекомендует своим заказчикам застраховать устройство от потери и повреждения во время транспортировки.
Для получения более подробной информации свяжитесь с компанией Arcam по электронной почте [email protected].
Проблемы?Если дилер компании Arcam не может ответить на вопрос, касающийся этого или любого другого продукта, свяжитесь с нашей службой поддержки по указанному выше адресу, и мы сделаем все возможное, чтобы помочь вам.
Утилизация этого устройства Эта маркировка означает, что данное изделие нельзя утилизировать вместе с бытовыми отходами на всей территории Европейского союза.
Данное устройство подлежит утилизации в соответствии с утвержденным регламентом, что позволяет предотвратить загрязнение окружающей среды и причинение вреда здоровью человека, а также сохранить материальные ресурсы.
Для утилизации устройства, воспользуйтесь местной системой сбора и утилизации отходов или обратитесь к поставщику устройства.
Гарантия по всему миру

R-12

Ital
iano
Connessione e Guida introduttiva


IT-1
Ital
iano
Benvenuti……e grazie per aver acquistato il ricevitore audio wireless Arcam rPlay.
Arcam produce componenti audio di alta qualità da oltre trentacinque anni. Durante questo periodo abbiamo consolidato la nostra vasta conoscenza sia del design sia della costruzione di componenti audio, per garantire la migliore resa sonora in rapporto al prezzo.
Questa guida fornisce le istruzioni per collegare e usare l'unità rPlay.
Ci auguriamo che rPlay le offra anni di funzionamento senza problemi. Nel caso improbabile di un guasto, o anche solo per ricevere ulteriori informazioni sui prodotti Arcam, la nostra rete di rivenditori sarà lieta di offrire supporto agli utenti. Ulteriori informazioni sono disponibili sul sito Arcam www.arcam.co.uk.
Il team di sviluppo rPlay

IT-2
Click!
UK
1 2
3
EU US AU
Installazione dell’alimentatore

IT-3
Ital
iano
Uscita audio a livello variabile
1 0NET
12V 2.0APOWER
SETUP RESETDIG.OUTFIXED VARIABLE
R
L
LINE OUT
UPGRADE
ANT
Uscita audio a livello fisso
Alimentatore
Uscita digitale coassiale
Configurazionewireless
Ethernet
Interruttore corrente
Connettori e comandi
Connettore antenna WI-FI
RipristinaPorte servizi USB (solo per aggiornamenti software)
NET STATUS
Volume +Volume –
Controllo volume e disinserimento audio
Il volume dell'uscita di linea variabile è regolabile premendo i tasti volume su (+) e giù (-) sul pannello superiore. Premendo simultaneamente i tasti di controllo volume, l'uscita sarà disinserita e il LED di STATO sul pannello anteriore diventa arancione.
Nota: I controlli di volume non influenzano le uscite di linea fissa e S/PDIF dell'unità rPlay.

IT-4
1 0NET
12V 2.0APOWER
SETUP RESETDIG.OUTFIXED VARIABLE
R
L
LINE OUT
UPGRADE
ANT
POWER
1 0COAX USBFIXED VARIABLE OPT2 OPT1
R
L
2
1 12V DC2.0A
ANT
LAN
VOLTAGE SELECT
AUDIO OUT
L
R
1 2
L
R
AUXIN
REMOTEIN
220 - 240V~50Hz
110 -120V~60Hz
L
R
VOLTAGE SELECT
PREIN
REMOTEIN
220 - 240V~50Hz
110 -120V~60Hz
L
R
DAC
Connessioni
Amplificatore integrato
Amplificatore di potenza
Router di rete
Antenna WI-FI
Alimentatore elettrico
rPlay

IT-5
Ital
iano
Prima di iniziare...1. Durante la configurazione dell'unità rPlay tramite connessione wireless, attendere che i LED anteriori finiscano
di lampeggiare dopo l'accensione dell'unità. Questo consente l'inizializzazione dell'unità rPlay. L'unità rPlay è pronta quando il LED di STATO diventa rosso e quello di RETE inizia a lampeggiare in blu.
2. Durante la configurazione dell'unità rPlay tramite connessione fissa, connettere sempre il cavo Ethernet prima dell'accensione dell'unità. Accendere l'unità rPlay e attendere la fine dell'inizializzazione. Dopo il completamento della connessione fissa, il LED di RETE si spegne e quello di STATO diventa viola.
Utenti Android™Opzione 1: Il router supporta la Wi-Fi Protected Setup
1. Tenere premuto il tasto SETUP situato sul pannello posteriore dell'unità rPlay per circa 4 secondi. Il LED di RETE
lampeggia due volte a intervalli regolari.
2. Premere il tasto Wi-Fi Protected Setup sul router.
3. L'unità rPlay si collega alla propria rete e il LED di RETE smette di lampeggiare restando acceso.
4. Scaricare l'app DTS Play-Fi da Google Play™ o dall'App Store Amazon.
5. Connettere il proprio dispositivo mobile alla stessa rete cui è connessa l'unità rPlay.
6. Lanciare l'app DTS Play-Fi e seguire le istruzioni a video.
Opzione 2: Il router non supporta WiFi Protected Setup
1. Scaricare l'app DTS Play-Fi da Google Play o dall'App Store Amazon.
2. Lanciando l'app, sarà possibile configurare il nuovo dispositivo. Seguire le istruzioni a video per completare la
configurazione.
3. L'unità rPlay è ora configurata e pronta all'uso.
Opzione 3: Connessione a una rete fissa
1. Scaricare l'app DTS Play-Fi da Google Play o dall'App Store Amazon.
2. Usando il cavo Ethernet in dotazione, collegare l'unità rPlay al router.
3. Accendere l'unità rPlay.
4. Connettere il proprio dispositivo mobile alla stessa rete cui si intende connettere l'unità rPlay.
5. Lanciare l'app DTS Play-Fi e attendere che l'app individui automaticamente l'unità rPlay e la connetta alla
rete domestica.
6. L'unità rPlay è ora configurata e pronta all'uso.
Configurazione

IT-6
Utenti iOSOpzione 1: Configurazione altoparlanti AirPlay
1. Tenere premuto il tasto SETUP situato sul pannello posteriore dell'unità rPlay per circa 8 secondi.
2. Definire le impostazioni di rete wireless sul proprio dispositivo iOS.
3. Aprire le impostazioni Wi-Fi del proprio dispositivo mobile e posizionarsi sulla voce "CONFIGURA NUOVO
ALTOPARLANTE AIRPLAY..."
4. Selezionare l'altoparlante di nome "rPlay-XXXXXX" (dove XXXXXX è un numero unico assegnato all'unità rPlay).
5. Selezionare la rete cui si intende collegare l'unità rPlay e premere "Avanti".
6. Seguire le istruzioni a video per completare la configurazione dell'unità rPlay come altoparlante AirPlay.
Opzione 2: Il router supporta la Wi-Fi Protected Setup
1. Tenere premuto il tasto SETUP situato sul pannello posteriore dell'unità rPlay per circa 4 secondi. Il LED di RETE
lampeggia due volte a intervalli regolari.
2. Premere il tasto Wi-Fi Protected Setup sul router.
3. L'unità rPlay si collega alla propria rete e il LED di RETE smette di lampeggiare restando acceso.
4. Scaricare l'app DTS Play-Fi® dall'App Store Apple.
5. Connettere il proprio dispositivo mobile alla stessa rete cui è connessa l'unità rPlay.
6. Lanciare l'app DTS Play-Fi e seguire le istruzioni a video.
Opzione 3: Il router non supporta Wi-Fi Protected Setup
1. Scaricare l'app DTS Play-Fi dall'App Store Apple.
2. Lanciando l'app, sarà possibile configurare il nuovo dispositivo. Seguire le istruzioni a video per completare la
configurazione.
3. Uscire dall'app e accedere alle impostazioni sul proprio dispositivo mobile.
4. Posizionarsi sulle impostazioni Wi-Fi del proprio dispositivo mobile, selezionare la rete wireless di nome
"PlayFi2DeviceXXXXXX" e connettersi a essa (dove XXXXXX è un numero unico assegnato all'unità rPlay).
5. Uscire dalle impostazioni Wi-Fi e lanciare di nuovo l'app DTS Play-Fi. Selezionare la propria rete wireless domestica e
connettere a essa l'unità rPlay. Dopo la connessione, il LED di RETE smette di lampeggiare restando acceso.
6. L'unità rPlay è ora configurata e pronta all'uso.
Opzione 4: Connessione a una rete fissa
1. Scaricare l'app DTS Play-Fi dall'App Store Apple.
2. Usando il cavo Ethernet in dotazione, collegare l'unità rPlay al router e accenderla.
3. Connettere il proprio dispositivo mobile alla stessa rete cui si intende connettere l'unità rPlay.
4. Lanciare l'app DTS Play-Fi e attendere che l'app individui automaticamente l'unità rPlay e la connetta alla rete
domestica.
5. L'unità rPlay è ora configurata e pronta all'uso.

IT-7
Ital
iano
Utenti PC Windows®Opzione 1: Il router supporta la Wi-Fi Protected Setup
1. Tenere premuto il tasto SETUP situato sul pannello posteriore dell'unità rPlay per circa 4 secondi. Il LED di RETE
lampeggia due volte a intervalli regolari.
2. Premere il tasto Wi-Fi Protected Setup sul router.
3. L'unità rPlay si collega alla propria rete e il LED di RETE smette di lampeggiare restando acceso
4. Scaricare l'app DTS Play-Fi dal sito https://play-fi.com/apps/windows/.
5. Connettere il proprio dispositivo Windows alla stessa rete cui è connessa l'unità rPlay.
6. Lanciare l'app DTS Play-Fi e seguire le istruzioni a video.
Opzione 2: Il router non supporta Wi-Fi Protected Setup
1. Scaricare il software DTS Play-Fi dal sito https://play-fi.com/apps/windows/ e installarlo sul PC.
2. Dopo l'installazione, fare clic sull'icona Impostazioni e selezionare la voce "Configura dispositivo Play-Fi".
3. L'app trova automaticamente il dispositivo e guida l'utente nella procedura di installazione.
4. L'unità rPlay è ora configurata e pronta all'uso.
Opzione 3: Connessione a una rete fissa
1. Scaricare l'app DTS Play-Fi dal sito https://play-fi.com/apps/windows/.
2. Usando il cavo Ethernet in dotazione, collegare l'unità rPlay al router.
3. Accendere l'unità rPlay.
4. Connettere il proprio dispositivo mobile alla stessa rete cui si intende connettere l'unità rPlay.
5. Lanciare l'app DTS Play-Fi e attendere che l'app individui automaticamente l'unità rPlay e la connetta alla rete
domestica.
6. L'unità rPlay è ora configurata e pronta all'uso.
NOTAAl termine della configurazione dell'unità rPlay, assicurarsi che essa sia selezionata come dispositivo predefinito di riproduzione sul sistema Windows.

IT-8
FunzionamentoUso dell'unità AirPlay su dispositivi iOS1. Individuare e premere l'icona AirPlay sul dispositivo iOS
2. Selezionare l'unità rPlay come altoparlante AirPlay
3. Selezionare il brano preferito e avviare la riproduzione
Uso dell'app DTS Play-Fi su dispositivi Android o iOS1. Lanciare l'app DTS Play-Fi installata sul dispositivo.
2. L'app localizzerà automaticamente tutti gli altoparlanti Play-Fi collegati alla propria rete.
3. Selezionare uno o più altoparlanti da connettere.
4. Selezionare il brano preferito e avviare la riproduzione
Uso dell'app DTS Play-Fi su PC Windows1. Lanciare l'app DTS Play-Fi installata sul proprio PC Windows o aprirla dalla barra delle applicazioni Windows
2. Selezionare uno dei dispositivi Play-Fi disponibili
3. Selezionare il brano preferito e avviare la riproduzione
Uso di UPnP su dispositivi Android e iOS o PC Windows1. Lanciare il proprio client multimediale UPnP
2. Selezionare l'unità rPlay come dispositivo di uscita
3. Selezionare il brano preferito e avviare la riproduzione

IT-9
Ital
iano
Uso del dispositivoDispositivo App Contenuti Multi-stanza
AndroidPlay-Fi
Scelta servizi musicali
Musica memorizzata sul dispositivo
Fino a otto dispositivi rPlay
Più utenti simultanei
Gli altoparlanti possono essere divisi in zone
UPnP Tutti i contenuti audio Solo uno alla volta
iOS
AirPlayiTunes
Tutte le app musicali iOSSolo uno alla volta
Play-Fi
Scelta servizi musicali
iTunes, musica memorizzata sul dispositivo
Fino a otto dispositivi rPlay
Più utenti simultanei
Gli altoparlanti possono essere divisi in zone
UPnP Tutti i contenuti audio Solo uno alla volta
WindowsPlay-Fi Tutti i contenuti audio
Fino a otto dispositivi rPlay
Più utenti simultanei
Gli altoparlanti possono essere divisi in zone
UPnP Tutti i contenuti audio Solo uno alla volta
LED di RETELED BLU a intermittenza lenta L'unità rPlay è in attesa di essere configurata per una
connessione wireless
LED BLU lampeggiante L'unità rPlay è in fase di inizializzazione o sta tentando una connessione a una rete wireless, oppure è in corso un aggiornamento firmware
LED BLU lampeggiante (due volte a intervalli regolari) Configurazione wireless attiva
LED BLU fisso L'unità è collegata a una rete wireless
Spento Connessione a una rete fissa o
unità in fase di avvio
LED di STATOLED BLU fisso L'unità rPlay è accesa, connessa a una rete e in fase di riproduzione
LED VIOLA fisso L'unità rPlay è accesa, connessa a una rete ma non in fase di riproduzione
LED ROSSO fisso L'unità rPlay è accesa, ma non connessa a una rete
LED ARANCIONE fisso L'unità rPlay è muta
LED ARANCIONE lampeggiante L'unità rPlay è in fase di inizializzazione o è in corso un aggiornamento del firmware
LED ROSSO lampeggiante Si è verificato un errore

IT-10
SpecificheDAC Texas Instruments PCM5102
Risposta in frequenza 20 Hz–20 kHz
Distorsione armonica totale + Rumore 0,0007%
Rapporto segnale/rumore (A-wtd) 117 dB
Livello di uscita Livello fisso 2,15 V RMS
Livello variabile 0–2,15 V RMS
Formati file audio supportati mp3 (MPEG Layer III)
m4a, aac (Advanced Audio Coding/Apple Lossless)
Flac (Free Lossless Audio CODEC)
wav (Waveform Audio File)
Qualità file (vedi nota sotto) Fino a 24-bit/192 kHz
Consumo di energia (max) 12 V CC, 2,0 A
Dimensioni (L x A x P) 194 x 44 x 124 mm
Peso netto 1,1 Kg
Accessori in dotazione Alimentatore con spine intercambiabili
Antenna WI-FI
Cavo stereo fono–fono
Cavo fono digitale
Cavo Ethernet
Manuale utente e scheda di registrazione
E&OE Tutti i valori delle specifiche sono tipici se non diversamente indicato
Compatibilità e requisiti di sistema• Un PC Windows che gira su sistema Windows 7 o successivi (a 32 o 64 bit)
• Un dispositivo Android che gira su sistema Android 2.2 o successivi
• È necessario il supporto di iOS 7 o versioni successive per la configurazione di accessori Wireless
• AirPlay funziona con iPhone, iPad e iPod touch con iOS 4.3.3 o versioni successive, nonché su Mac con OS X
Mountain Lion o versioni successive e PC con iTunes 10.2.2 o versioni successive
• Per garantire la massima qualità dello streaming tramite Play-Fi, si suggerisce l'uso di un router wireless marcato
almeno N600
NOTA:I file fino a 16-bit/48 kHz sono trasmessi senza compressione o transcodifica. I file audio ad alta risoluzione (24-bit/192 kHz) sono sottocampionati a 16-bit/48 kHz per la trasmissione. Questo consente la massima qualità di streaming tramite Wi-Fi verso più altoparlanti.
Per chi preferisce ascoltare musica nella versione originale in alta risoluzione, la modalità di Ascolto critico offerta dall'app DTS Play-Fi permetterà di effettuare la riproduzione dei file originali in alta risoluzione fino a 24/96, senza sottocampionamenti o regolazioni alla sincronizzazione di rete. In tal modo, i file audio mantengono la loro originale qualità. Per ulteriori informazioni sulla modalità di Ascolto critico consultare la pagina https://play-fi.com/faq/entry/critical-listening-mode.

IT-11
Ital
iano
Questa garanzia dà diritto all'utente di far riparare l’unità gratuitamente per i due anni successivi all’acquisto, sempre che sia stata acquistata originariamente presso un distributore autorizzato Arcam. Il produttore non si assume alcuna responsabilità per difetti derivanti da incidenti, uso improprio, abuso, usura, negligenza o da modifiche e/o riparazioni non autorizzate. Inoltre, il produttore non accetta alcuna responsabilità per danni o perdite che si verifichino durante il trasporto da o verso la persona che invoca la garanzia.
La garanzia copre:Parti e costo del lavoro per due anni dalla data di acquisto. Dopo due anni devono essere pagate sia le parti che il costo del lavoro. La garanzia non copre mai i costi di trasporto.
Richieste in garanziaQuesto strumento dovrebbe essere restituito nella confezione originale al distributore presso cui è stato acquistato, o se non fosse possibile, direttamente al distributore Arcam del paese in cui il prodotto è stato acquistato.
Dovrebbe essere inviato tramite spedizione prepagata con un vettore affidabile e non per posta. Nessuna responsabilità può essere accettata per l'unità mentre è in transito verso il rivenditore o il distributore e i clienti sono pertanto invitati ad assicurare l'unità contro smarrimenti o danni durante il trasporto.
Per ulteriori dettagli contattare Arcam all'indirizzo [email protected].
Problemi?Se il rivenditore Arcam non è in grado di rispondere a una domanda per quanto riguarda questo o qualsiasi altro prodotto Arcam, si prega di contattare il supporto clienti all'indirizzo Arcam di cui sopra e noi faremo del nostro meglio per aiutarvi.
Smaltimento corretto di questo prodotto Questo marchio indica che il prodotto non dovrebbe essere smaltito con altri rifiuti domestici all'interno dell'UE.
Per evitare eventuali danni all'ambiente o alla salute umana causati da smaltimento errato dei rifiuti e per risparmiare le risorse materiali, il prodotto deve essere riciclato in modo responsabile.
Per smaltire il prodotto, utilizzare i sistemi locali di restituzione e raccolta o contattare il rivenditore presso il quale il prodotto è stato acquistato.
Garanzia in tutto il mondo

IT-12

简体中文
连接和快速入门指南


SC-1
简体中文
欢迎………感谢您购买 Arcam rPlay 无线音乐接收器。
Arcam 致力于生产优质音频组件已经长达三十五年。在此过程中,我们在设计和制造最高性价比音频组
件方面积累了丰富的经验。
本手册提供有关连接和使用 rPlay 的指导。
我们希望 rPlay 能够长期让您省心省力。如果您的产品发生任何故障(这种情况很罕见),或者您只是想
要了解有关 Arcam 产品的更多信息,我们的经销商网络将很乐意为您效劳。如欲了解更多信息,请访问 Arcam 网站:www.arcam.co.uk。
rPlay 研发团队

SC-2
Click!
UK
1 2
3
EU US AU
电源安装

SC-3
简体中文
可变电平
音频输出
1 0NET
12V 2.0APOWER
SETUP RESETDIG.OUTFIXED VARIABLE
R
L
LINE OUT
UPGRADE
ANT
固定电平
音频输出
电源连接器
同轴数字输出 无线设置
以太网
电源开关
连接器和控制
Wi-Fi 天线接口
重置USB 服务端口(仅用于软件升级)
NET STATUS
增大音量降低音量
音量控制和静音
按顶部面板上的“增大音量 (+)”和“降低音量 (-)”按钮来调整可变线路输出音量。同时按下两个音量按钮会导
致输出静音,前面板状态 LED 会变为橙色。注:音量控制不会影响 rPlay 的固定线路和 S/PDIF 输出。

SC-4
1 0NET
12V 2.0APOWER
SETUP RESETDIG.OUTFIXED VARIABLE
R
L
LINE OUT
UPGRADE
ANT
POWER
1 0COAX USBFIXED VARIABLE OPT2 OPT1
R
L
2
1 12V DC2.0A
ANT
LAN
VOLTAGE SELECT
AUDIO OUT
L
R
1 2
L
R
AUXIN
REMOTEIN
220 - 240V~50Hz
110 -120V~60Hz
L
R
VOLTAGE SELECT
PREIN
REMOTEIN
220 - 240V~50Hz
110 -120V~60Hz
L
R
DAC(数模转换器)
连接
集成放大器
功率放大器
网络路由器
Wi-Fi 天线
电源
rPlay

SC-5
简体中文
开始之前……1. 使用无线连接设置 rPlay 时,打开设备之后请等待,直到正面 LED 停止闪烁。由此 rPlay 得以启动。状态
LED 变为红色而网络 LED 开始呈绿色闪亮时 rPlay 已就绪。
2. 使用有线连接,打开设备之前请始终连接以太网线缆。打开设备电源使得 rPlay 得以启动。有线连接建立
之后,网络 LED 会熄灭而状态 LED 会变成紫色。
Android™(安卓)用户
选项 1: 路由器支持无线保护设置 (WPS)
1. 按住位于 rPlay 后面板上的 SETUP 按钮大约 4 秒。网络 LED 会以固定时间间隔闪烁两次。
2. 按下路由器上的 WPS 按钮。
3. 此时 rPlay 会连接到网络,网络 LED 会停止闪烁并保持长亮。
4. 从 Google Play™(谷歌商店)或亚马逊应用程序商店下载 DTS Play-Fi APP。
5. 将移动设备连接到 rPlay 所连接的相同网络。
6. 启动 DTS Play-Fi APP 并按照屏幕指令进行操作。
选项 2:路由器不支持 WPS
1. 从谷歌商店或亚马逊应用程序商店下载 DTS Play-Fi APP。
2. 启动 APP,会提示您设置新设备。按照屏幕指令进行操作并完成设置。
3. 此时 rPlay 已准备就绪,可供使用了。
选项 3:以有线方式连接到网络
1. 从谷歌商店或亚马逊应用程序商店下载 DTS Play-Fi APP。
2. 使用随附的以太网线缆将 rPlay 连接到路由器。
3. 打开 rPlay。
4. 将移动设备连接到 rPlay 所要连接的相同网络。
5. 启动 DTS Play-Fi APP,等待 APP 自动检测到 rPlay 并将其连接到家庭网络。
6. 此时 rPlay 已准备就绪,可供使用了。
设置

SC-6
iOS 用户
选项 1: AirPlay 音箱设置
1. 按住位于 rPlay 后面板上的 SETUP 按钮大约 8 秒。
2. 在 iOS 设备上选择无线网络设置。
3. 进入移动设备的 Wi-Fi 设置并导航到“设置新的 AIRPLAY 音箱......”
4. 选择名为“rPlay-XXXXXX”(XXXXXX 是分配给 rPlay 唯一编号)的音箱。
5. 选择 rPlay 所要连接的网络并按“下一步”。
6. 按照屏幕指令进行操作,完成 rPlay 作为 AirPlay 音箱的设置。
选项 2: 路由器支持无线保护设置 (WPS)
1. 按住位于 rPlay 后面板上的 SETUP 按钮大约 4 秒。网络 LED 会以固定时间间隔闪烁两次。
2. 按下路由器上的 WPS 按钮。
3. 此时 rPlay 会连接到网络,网络 LED 会停止闪烁并保持长亮。
4. 从苹果应用程序商店下载 DTS Play-Fi® APP。
5. 将移动设备连接到 rPlay 所连接的相同网络。
6. 启动 DTS Play-Fi APP 并按照屏幕指令进行操作。
选项 3: 路由器不支持 WPS
1. 从苹果应用程序商店下载 DTS Play-Fi APP。
2. 启动 APP,会提示您设置新设备。按照屏幕指令进行操作并完成设置。
3. 退出 APP 并在移动设备设置上访问这些设置。
4. 进入移动设备的 Wi-Fi 设置,选择名为“PlayFi2DeviceXXXXXX”的无线网络并连接到该网络(XXXXXX 是分
配给 rPlay 唯一编号)。
5. 退出 Wi-Fi 设置并再次启动 DTS Play-Fi APP。选择家庭无线网络并允许 rPlay 连接到该网络。连接之后网络
LED 会停止闪烁并保持长亮。
6. 此时 rPlay 已准备就绪,可供使用了。
选项 4: 以有线方式连接到网络
1. 从苹果应用程序商店下载 DTS Play-Fi APP。
2. 使用随附的以太网线缆将 rPlay 连接到路由器并打开 rPlay。
3. 将移动设备连接到 rPlay 所要连接的相同网络。
4. 启动 DTS Play-Fi APP,等待 APP 自动检测到 rPlay 并将其连接到家庭网络。
5. 此时 rPlay 已准备就绪,可供使用了。

SC-7
简体中文
Windows® 电脑用户
选项 1: 路由器支持无线保护设置 (WPS)
1. 按住位于 rPlay 后面板上的 SETUP 按钮大约 4 秒。网络 LED 会以固定时间间隔闪烁两次。
2. 按下路由器上的 WPS 按钮。
3. 此时 rPlay 会连接到网络,网络 LED 会停止闪烁并保持长亮。
4. 从网址 https://play-fi.com/apps/windows/ 下载 DTS Play-Fi APP。
5. 将 Windows 设备连接到 rPlay 所连接的相同网络。
6. 启动 DTS Play-Fi APP 并按照屏幕指令进行操作。
选项 2: 路由器不支持 WPS
1. 从网址 https://play-fi.com/apps/windows/ 下载 DTS Play-Fi 软件并安装到电脑上。
2. 安装完成之后,点击设置图标 并选择“设置 Play-Fi 设备”。
3. APP 会自动找到您的设备并指导您完成设置过程。
4. 此时 rPlay 已准备就绪,可供使用了。
选项 3: 以有线方式连接到网络
1. 从网址 https://play-fi.com/apps/windows/ 下载 DTS Play-Fi APP。
2. 使用随附的以太网线缆将 rPlay 连接到路由器。
3. 打开 rPlay。
4. 将移动设备连接到 rPlay 所要连接的相同网络。
5. 启动 DTS Play-Fi APP,等待 APP 自动检测到 rPlay 并将其连接到家庭网络。
6. 此时 rPlay 已准备就绪,可供使用了。
注
rPlay 完全配置之后,确保选择 rPlay 作为默认的 Windows 播放设备。

SC-8
操作
在 Android 设备上使用 DTS Play-Fi APP1. 从谷歌商店或亚马逊应用程序商店下载 DTS Play-Fi APP。
2. 启动设备上安装的 DTS Play-Fi APP。
3. APP 会自动在网络上查找所有已连接的 Play-Fi 音箱。
4. 选择想要连接的音箱。
5. 选择音乐并开始播放
在 iOS 设备上使用 DTS Play-Fi APP1. 从苹果应用程序商店下载 DTS Play-Fi APP。
2. 启动设备上安装的 DTS Play-Fi APP。
3. APP 会自动在网络上查找所有已连接的 Play-Fi 音箱。
4. 选择想要连接的音箱。
5. 选择音乐并开始播放
在 iOS 设备上使用 AirPlay1. 在 iOS 设备上找到并按 AirPlay 图标
2. 选择 rPlay 作为 AirPlay 音箱
3. 选择音乐并开始播放
在 Windows 电脑上使用 DTS Play-Fi APP1. 从网址 https://play-fi.com/apps/windows/ 下载 DTS Play-Fi APP。
2. 启动 Windows 电脑上所安装的 DTS Play-Fi APP,或者从 Windows 系统托盘打开 DTS Play-Fi APP
3. 选择任意一个可用的 Play-Fi 设备
4. 选择音乐并开始播放

SC-9
简体中文
设备使用
设备 APP 内容 多房间
AndroidPlay-Fi
选择音乐服务
存储在设备上的音乐
多达 8 个 rPlay 设备
多个用户同时使用
可对音箱进行分区
UPnP 所有音频内容 仅限一对一
iOS
AirPlayiTunes
所有 iOS 音乐 APP仅限一对一
Play-Fi选择音乐服务
iTunes、存储在设备上的音乐
多达 8 个 rPlay 设备
多个用户同时使用
可对音箱进行分区
UPnP 所有音频内容 仅限一对一
WindowsPlay-Fi 所有音频内容
多达 8 个 rPlay 设备
多个用户同时使用
可对音箱进行分区
UPnP 所有音频内容 仅限一对一
网络 LED呼吸灯呈蓝色 rPlay 正在等待配置为无线连接
蓝色闪烁 rPlay 正在进行初始化、或固件更新正在进行中、或 rPlay 正在
尝试连接到无线网络
蓝色闪烁(以固定时间间隔闪烁两次) 无线设置已启用
纯蓝色 设备已连接到无线网络
熄灭 已连接有线网络,或
设备正在启动
状态 LED纯蓝色 rPlay 已打开,已连接到网络并正在播放
纯紫色 rPlay 已打开,已连接到网络但未播放
纯红色 rPlay 已打开,但未连接到网络
纯橙色 rPlay 已静音
橙色闪烁 rPlay 正在进行初始化或固件更新正在进行中
红色闪烁 发生错误

SC-10
规格
DAC(数模转换器) 德州仪器 PCM5102
频率响应 20Hz–20kHz
总谐波失真 + 噪声 0.0007%
信噪比(A 计权) 117dB
输出电平 固定电平 2.15V RMS
可变电平 0–2.15V RMS
支持的音频文件格式 mp3 (MPEG Layer III)
m4a、aac(高级音频编码/苹果无损音频编码)Flac(自由无损音频编解码器)wav(波形音频文件)
文件质量(请参阅下面的注释) 高达 24 位/192kHz
电源要求(最大) 12V 直流电源,2.0A
尺寸(宽×高×深) 194 x 44 x 124mm
净重 1.1Kg
随附件 配可互换插头的电源
Wi-Fi 天线
立体声唱机互连线缆
数字唱机线缆
以太网线缆
用户手册和注册卡
E&OE除非另有说明,否则所有规格值均为典型值。
兼容性和系统要求• 一台运行 Windows 7 或更高版本(32 位或 64 位)的 Windows 电脑
• 一部运行 Android 2.2 或更高版本的 Android 设备
• 支持 iOS 7 或更高版本,以便使用无线配件配置进行设置
• AirPlay 可在安装了 iOS 4.3.3 或更高版本的 iPhone、iPad 和 iPod Touch,安装了 OS X Mountain Lion 或更高版
本的苹果电脑以及安装了 iTunes 10.2.2 或更高版本的个人电脑上使用
• 为了获得最佳 Play-Fi 流媒体体验,建议使用至少为 N600 级的无线路由器
注:
16 位/48 kHz 以下的文件以流媒体形式传送时不进行压缩或转码。高分辨率音频文件(24 位/192kHz)下采样
为 16 位/48kHz 进行传输。从而可通过 Wi-Fi 实现到多个音箱最可靠的流媒体体验。
对于那些希望按最初预期听到高分辨率音频的用户,DTS Play-Fi APP 中的鉴定聆听模式会对 24 位/96kHz
以下的高分辨率文件启用原始渲染,不进行下采样或网络同步调整。通过这种方式,音频文件可保留其
原始音频完整性。有关鉴定聆听模式的更多详细信息,请参阅以下网
址:https://play-fi.com/faq/entry/critical-listening-mode。

SC-11
简体中文
在购买本设备后的两年内,您享有免费保修权,但前提是您的设备是从授权的 Arcam 经销商那里原装购买
的。对于由于意外、误用、滥用、磨损、疏忽、未经授权的调校和/或维修而导致的缺陷,制造商可以不承担任
何责任,此外,对于在运输期间发生的损坏或丢失,制造商可以不履行保修义务。
保修范围:
2 年期(从购买日期开始算起)部件与人工费用。2 年后,您必须支付部件和人工费用。无论何时,保修都不包括运输费用。
保修免责声明应该使用原有包装将本设备退回到销售本设备的经销商;否则,应将设备直接退回到购买本产品所在国家
的Arcam分销商。
应该在预付运费的情况下通过快递公司发货 ̶ 请勿邮寄。如果设备在发往经销商或分销商的途中出现问
题,我们不承担责任;因此,客户需确保设备在运输途中不会发生丢失或损坏。
如欲了解更多详细信息,请联系 Arcam,电子邮箱:[email protected]。
问题解决如果您的 Arcam 经销商无法解答有关本设备或其他任何 Arcam 产品的咨询,请通过上述地址联系 Arcam 客
户支持部,我们将尽力为您提供帮助。
请正确处置本产品
此标记指示在整个欧盟范围内,不应该将本产品当作普通的家庭废弃物进行处置。
为防止非受控的废弃物处置方式对环境或人类健康造成危害以及为了节省物料资源,应该
以负责任的态度回收本产品。
要处置您的产品,请利用本地的回收系统,或者与销售本产品的零售商联系。
全球联保

SC-12


SH283 Issue 2 +44 (0) 1223 203200
www.arcam.co.uk
WATERBEACH, CAMBRIDGE, CB25 9PB, ENGLANDTHE WEST WING, STIRLING HOUSE
Recommended


