© 2014 Cisco and/or its affiliates. All rights reserved. This document is Cisco Public Information. Page 1 of 16
White Paper
Cisco Application Policy Infrastructure Controller: Managed Objects, REST APIs, and Software Development Kit
What You Will Learn
Speed is the key to keeping ahead in the modern IT industry. Processor clock cycles, storage and network
bandwidth, and the speed of operations all play pivotal roles in keeping ahead of the competition. Automation
enables operations teams to rapidly deploy, manage, and monitor large-scale systems more quickly than ever.
With Cisco® Application Centric Infrastructure (ACI), automation is built in at the foundation, using extremely
powerful APIs to provide access to every aspect of the system in a quick and efficient way.
This document explains the basic concepts necessary to begin effectively using the programmatic features of
Cisco ACI. It begins with an overview of the Cisco ACI object model, which describes how the system interprets
configuration and represents state to internal and external entities. The Representational State Transfer (REST)
API provides the means necessary to manipulate the object store, which contains the configured state of the Cisco
Application Policy Infrastructure Controller (APIC) using the object model as the metadata definition. The Cisco
APIC software development kit (SDK) uses the REST API to read and write the configuration of Cisco APIC, using
the object model to describe the current and desired states.
Introduction
Cisco ACI provides a new approach to data center connectivity, innovative and different from the standard
approach taken today, but astonishingly simple in its elegance and capacity to describe complete application
topologies and holistically manage varying components of the data center. With the fabric behaving as a single
logical switch, operations to manage scale, enable application mobility, collect uniform telemetry points, and
configure automation, among others, can all be performed in a straightforward way. With the controller acting as a
single point of management, but not a single point of failure, clustering offers the advantages of management
solutions for large data centers but without the associated challenges of fragmented management.
The controller is responsible for all aspects of configuration including these main areas:
● Policy: Defines the way that applications communicate, security zoning rules, quality-of-service (QoS)
attributes, service insertion, and routing and switching
● Operation: Defines protocols in the fabric for management and monitoring, integration with Layer 4 through
7 services, and virtual networking
● Hardware: Maintains the fabric switch inventory and both the physical and virtual interfaces
● Software: Configures firmware revisions on switches and controllers
With these pieces natively reflected in the object model, you can change them through the REST API, further
simplifying the process by using the SDK.

© 2014 Cisco and/or its affiliates. All rights reserved. This document is Cisco Public Information. Page 2 of 16
Cisco ACI Object Model
Data modeling is a methodology used to define and analyze the data requirements needed to support a process in
relation to information systems. The Cisco ACI object model (Figure 1) contains a modeled representation of
applications, network constructs, services, virtualization, and management, and the relationships between all the
building blocks. Essentially, the object model is an abstracted version of the configuration and operation state that
is applied individually to independent network entities.
For example, a switch may have interfaces, and those interfaces can have characteristics, such as the mode of
operation (Layer 2 or Layer 3), speed, and connector type. Some of these characteristics are configurable, and
others are read-only; however, all of them are still properties of an interface. The object model takes this analytical
breakdown of what defines a “thing” in the data center and carefully determines how it can exist and how to
represent that. Furthermore, because all these “things” do not merely exist, but rather interact with one another,
there can be relationships within the model, which includes containment hierarchy and references. An interface
belongs to a switch, and therefore is “contained” by the switch; however, a virtual PortChannel (vPC) can
“reference” it. A vPC does not necessarily belong to a single switch.
The objects in the model can also use a concept called inheritance, through which an interface can be a more
generic concept, and specific definitions can inherit characteristics from a base class. For example, a physical
interface can be a data port or a management port; however, both of these still have the same basic properties, so
they can inherit from a single interface base class. Rather than redefine the same properties many times, you can
use inheritance to define them in one base class, and then specialize them for a specific child class.
Figure 1. Example of the Object Model
All these configurable entities and their structure are represented as classes. The classes define the entities that
are instantiated as managed objects (MOs) and stored in the management information tree (MIT). The general
concept is similar to the tree-based hierarchy of a file system or the Simple Network Management Protocol (SNMP)
management information base (MIB) tree. All classes have a single parent and can contain multiple children. The
exception to this rule is the root of the tree, which is a special class called topRoot. Within the model, there are
different packages that act as logical groupings of classes, with similar entities placed into the same package for
easier navigation of the model. Each class has a name, which is composed of the package name and a class
name. For example, top is the package and Root is the class in the name topRoot, and fv is the package

© 2014 Cisco and/or its affiliates. All rights reserved. This document is Cisco Public Information. Page 3 of 16
(fabric virtualization) and Tenant is the class in the name fvTenant. A more generic form of this naming structure
is:
Package:ClassName == PackageClassName
Managed objects make up the management information tree, and everything that can be configured in Cisco ACI is
an object. MOs have relative names (Rn), which are built according to well-defined rules in the model. For the most
part, the Rn is a prefix prepended to some naming properties, so for example the prefix for an fvTenant is tn- and
the naming property for an fvTenant would be the name, Cisco. Combining these results in an Rn of tn-Cisco for
a particular MO. Relative names are unique in their namespaces, meaning that within the local scope of an MO,
there can only ever be one Rn using that name. By using this rule paired with the tree-based hierarchy of the MIT,
you can concatenate the relative names of objects to derive the distinguished name (Dn), providing a unique
address in the MIT for a specific object. For example, an fvTenant is contained by policy Universe (polUni), and
polUni is contained by topRoot. Concatenating the Rns for each of these from the top down yields a Dn of
uni/tn-Cisco. Note that topRoot is always implied and does not appear in the Dn (Figure 2).
Figure 2. MIT Dn Resolution
Queries
With all this information neatly organized, you can perform a number of tree-based operations, including searching,
traversal, insertion, and deletion. One of the most common operations is a search to query information from the
MIT.
The following types of queries are supported:
● Class-level query: Search the MIT for objects of a specific class.
● Object-level query: Search the MIT for a specific Dn.
Each of these query types supports numerous filtering and subtree options, but the primary difference among them
is the way that each type is used.
A class-based query is useful for searching for a specific type of information without knowing the details, or not all
the details. Because a class-based query can return zero or many results, it can be a helpful means of querying the
fabric for information when the full details are not known. A class-based query combined with filtering can be a
powerful tool for extracting data from the MIT. For example, a class-based query can be used to find all fabric
nodes that are functioning as leaf nodes and extract their serial numbers, for a quick way to obtain a fabric
inventory.
© 2014 Cisco and/or its affiliates. All rights reserved. This document is Cisco Public Information. Page 4 of 16
An object-based (Dn-based) query returns zero matches or one match, and the full Dn for an object must be
provided for a match to be found. Combined with an initial class query, a Dn query can be helpful for finding more
details about an object referenced from another object, or for updating a local copy of information.
Both query types support tree-level queries with scope and filtering criteria. Thus, you can query the MIT for all
objects of a specific class or Dn and then retrieve the children or complete subtree for the returned objects.
Furthermore, the data sets can be filtered to return only specific information of interest for the current purpose.
The next section, which discusses the REST API, provides more information about how to build and run these
queries.
Cisco APIC REST API
This section provides a brief overview of the REST API. For a more comprehensive description, see the
Cisco APIC REST API User Guide on Cisco.com.
The Cisco APIC REST API is a programmatic interface for Cisco APIC that uses REST architecture. The API
accepts and returns HTTP or HTTPS messages that contain JavaScript Object Notation (JSON) or Extensible
Markup Language (XML) documents. You can use any programming language to generate the messages and the
JSON or XML documents that contain the API methods or MO descriptions.
The REST API is the interface into the MIT and allows manipulation of the object model state. The same REST
interface is used by the Cisco APIC command-line interface (CLI), GUI, and SDK, so that whenever information is
displayed, it is read through the REST API, and when configuration changes are made, they are written through the
REST API. The REST API also provides an interface through which other information can be retrieved, including
statistics, faults, and audit events, and it even provides a means of subscribing to push-based event notification, so
that when a change occurs in the MIT, an event can be sent through a web socket.
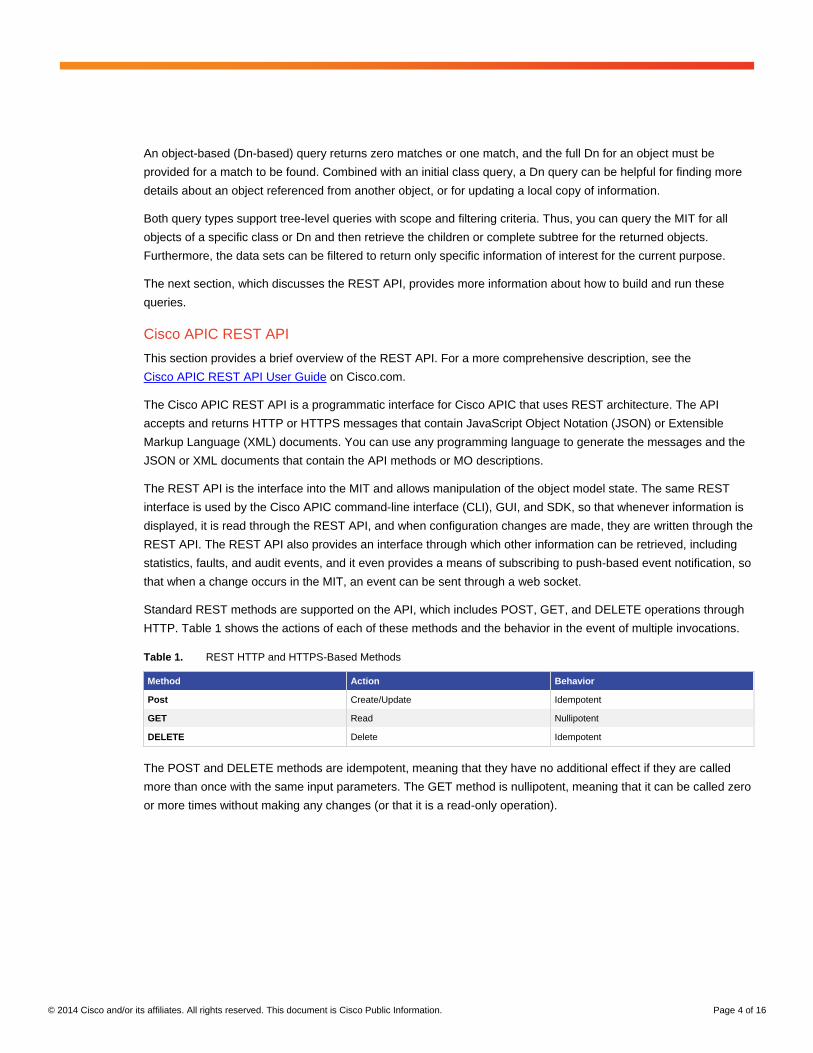
Standard REST methods are supported on the API, which includes POST, GET, and DELETE operations through
HTTP. Table 1 shows the actions of each of these methods and the behavior in the event of multiple invocations.
Table 1. REST HTTP and HTTPS-Based Methods
Method Action Behavior
Post Create/Update Idempotent
GET Read Nullipotent
DELETE Delete Idempotent
The POST and DELETE methods are idempotent, meaning that they have no additional effect if they are called
more than once with the same input parameters. The GET method is nullipotent, meaning that it can be called zero
or more times without making any changes (or that it is a read-only operation).

© 2014 Cisco and/or its affiliates. All rights reserved. This document is Cisco Public Information. Page 5 of 16
Payload Encapsulation
Payloads to and from the REST interface can be encapsulated through either XML or JSON encoding. In the case
of XML, the encoding operation is simple: the element tag is the name of the package and class, and any
properties of that object are specified as attributes of that element. Containment is defined by creating child
elements. The following example shows a simple XML body that defines a tenant, application profile, endpoint
group (EPG), and static port attachment.
Figure 3. XML Tenant Creation
For JSON, encoding requires definition of certain entities to reflect the tree-based hierarchy; however, the definition
is repeated at all levels of the tree, so it is fairly simple to implement after it is initially understood.
● All objects are described as JSON dictionaries, in which the key is the name of the package and class, and
the value is another nested dictionary with two keys: attribute and children.
● The attribute key contains a further nested dictionary describing key-value pairs that define attributes on the
object.
● The children key contains a list that defines all the child objects. The children in this list are dictionaries
containing any nested objects, which are defined as described here.
The following example shows the XML defined previously presented in JSON format.

© 2014 Cisco and/or its affiliates. All rights reserved. This document is Cisco Public Information. Page 6 of 16
Figure 4. JSON Tenant Creation

© 2014 Cisco and/or its affiliates. All rights reserved. This document is Cisco Public Information. Page 7 of 16
Both the XML and JSON have been formatted to simplify visual understanding. Practically, it would make sense to
compact both definitions before exchanging them with the REST interface; however, doing so has no functional
impact. In the object examples shown here, the compacted XML results in 213 bytes of data, and the compacted
JSON results in 340 bytes of data.
Read Operations
After the object payloads are properly encoded as XML or JSON, they can be used in create, read, update, or
delete operations on the REST API (Figure 5).
Figure 5. Read Operations
Because the REST API is HTTP based, defining the universal resource identifier (URI) to access a certain
resource type is important. The first two sections of the request URI simply define the protocol and access details
of Cisco APIC. Next in the request URI is the literal string/api, indicating that the API will be invoked. Generally,
read operations are for an object or class, as discussed earlier, so the next part of the URI specifies whether the
operation will be for an MO or class. The next component defines either the fully qualified Dn being queried for
object-based queries, or the package and class name for class-based queries. The final mandatory part of the
request URI is the encoding format: either.xml or.json. This is the only method by which the payload format is
defined (Cisco APIC ignores Content-Type and other headers).
The next, optional, part of the request URI consists of the query options. These can specify various types of
filtering and are explained extensively in the REST API User Guide.
In the example in Figure 5, first an object-level query is shown in which an EPG named Download is queried. The
second example shows how a query for all objects with class l1PhysIf can be queried and the results filtered to
show only those the results in which the speed attribute is equal to 10 Gbps (10G). For a complete reference to the
various objects and their properties and possible values, please refer to the Cisco APIC API model documentation.

© 2014 Cisco and/or its affiliates. All rights reserved. This document is Cisco Public Information. Page 8 of 16
Write Operations
Create and update operations in the REST API are both implemented using the POST method, so that if an object
does not already exist, it will be created, and if it does already exist, it will be updated to reflect any changes
between its existing state and desired state.
Both create and update operations can contain complex object hierarchies, so that a complete tree can be defined
in a single command so long as all objects are within the same context root and are under the 1-MB limit for data
payloads for the REST API. This limit is in place to guarantee performance and protect the system under high load.
The context root helps defines a method by which Cisco APIC distributes information to multiple controllers and
helps ensure consistency. For the most part, the configuration should be transparent to the user, though very large
configurations may need to be broken into smaller pieces if they result in a distributed transaction. Figure 6 shows
an example of write operations.
Figure 6. Write Operations
Create and update operations use the same syntax as read operations, except that they always are targeted at an
object level, because you cannot make changes to every object of a specific class (nor would you want to). The
create or update operation should target a specific managed object, so the literal string/mo indicates that the Dn of
the managed will be provided, followed next by the actual Dn. Filter strings can be applied to POST operations; if
you want to retrieve the results of your POST operation in the response, for example, you can pass the
rsp-subtree=modified query string to indicate that you want the response to include any objects that have been
modified by your POST operation.
The payload of the POST operation will contain the XML or JSON encoded data representing the managed object
the defines the Cisco API command body.

© 2014 Cisco and/or its affiliates. All rights reserved. This document is Cisco Public Information. Page 9 of 16
Authentication
REST API username- and password-based authentication uses a special subset of request URIs, including
aaaLogin, aaaLogout, and aaaRefresh as the Dn targets of a POST operation. Their payloads contain a simple
XML or JSON payload containing the MO representation of an aaaUser object with the attribute name and pwd
defining the username and password: for example, <aaaUser name='admin' pwd='insieme'/>. The response to
the POST operation will contain an authentication token as both a Set-Cookie header and an attribute to the
aaaLogin object in the response named token, for which the XPath is/imdata/aaaLogin/@token if the encoding is
XML. Subsequent operations on the REST API can use this token value as a cookie named APIC-cookie to
authenticate future requests.
Filters
The REST API supports a wide range of flexible filters, useful for narrowing the scope of your search to allow
information to be located more quickly. The filters themselves are appended as query URI options, starting with a
question mark (?) and concatenated with an ampersand (&). Multiple conditions can be joined together to form
complex filters.
The Cisco APIC REST API User Guide discusses in detail how to use filters and filter syntax and provides
examples. Using some of the tools discussed in the following sections, you can build your own query strings; you
can also uncover those being used by the native Cisco APIC interface and build on top of them to create your own
advanced filters.
Browser
The MIT contains a multitude of valuable data points, and the capability to browse that data can expose new ways
to use the data, aid in troubleshooting, and allow you to inspect the current state of the object store. One of the
available tools for browsing the MIT is called Visore, and it is available on Cisco APIC. Visore supports querying by
class and object and lets you easily navigate the hierarchy of the tree.
To access Visore, you can open https://<apic>/visore.html in your web browser and then authenticate with your
credentials for Cisco APIC. After you are logged in, an initial set of data will be visible; you will also be able to
search for information using filtered fields at the top of the screen. In the Class or DN text input field, enter the
name of a class, such as fabricNode or topology/pod-1/node-1, and click the Run Query button. Click OK when
you are asked whether you want to continue without a filter. The results will provide either a list of nodes on the
fabric or information for the first Cisco APIC, depending on the input string.
In the list of attributes for the objects, the Dn will have a set of icons next to it, as shown in Figure 7.
Figure 7. Visore Tool Navigation Interface
You can use the green arrows in the tool to navigate up and down the tree; clicking the left arrow brings you to the
parent of the object, and clicking the right arrow brings you to a list of all children of the current object. The black
staggered bars display any statistics that are available for the object. If none are available, the resulting page will
not contain any data. The red octagon with an exclamation point shows any faults that are present for the current
object, and the blue circle with the letter H shows the health score for the object, if one is available.

© 2014 Cisco and/or its affiliates. All rights reserved. This document is Cisco Public Information. Page 10 of 16
With these tools you can access all types of information in your MIT, and additionally you can use Visore to
structure query strings. For example, you can enter fabricNode as the class, id as the property, and 1 as the value
in the Val1 field, leaving the Op value set to ==, and run the query to filter the class results to see only those results
with an ID value equal to 1. Note that Visore does not contain the complete list of filters supported by the REST
API; however, it can be a useful starting point.
Visore provides the URI of the last query and the response body, so you can see the data not only in a tabular
format, but also as the natively encoded payload. This presentation allows quick access to determine the request
URI for a class- or Dn-based query and also shows you how the XML body of the response looks.
API Inspector
All operations that are performed the GUI invoke REST calls to fetch and commit the information being accessed.
The API Inspector further simplifies the process of examining what is taking place on the REST interface as the
GUI is navigated by displaying in real time the URIs and payloads. When a new configuration is committed, the API
Inspector displays the resulting POST requests, and when information is displayed on the GUI, the GET request is
displayed.
To get started with the API Inspector, you can access it from the Account menu, visible at the top right of the Cisco
APIC GUI. Click Welcome, <username> and then choose the Show API Inspector option, as shown in Figure 8.
Figure 8. Launching API Inspector
After the API Inspector is brought up, you will see time stamps along with the REST method, URIs, and payloads.
You may also notice occasional updates in the list as the GUI refreshes subscriptions to data being shown on the
screen (Figure 9).

© 2014 Cisco and/or its affiliates. All rights reserved. This document is Cisco Public Information. Page 11 of 16
Figure 9. API Inspector Output
From the sample output shown in Figure 9, you can see that the last logged item has a POST request with the
JSON payload containing a tenant named Cisco and some attributes defined on that object.
Figure 10. POST Request Extracted from API Inspector
Cisco ACI SDK
The Cisco ACI Python SDK is named Cobra. It is a Python implementation of the API that provides native bindings
for all the REST functions and also has a complete copy of the object model so that data integrity can be ensured.
Cobra provides methods for performing lookups and queries and object creation, modification, and deletion that
match the REST methods used by the GUI and those that can be found using API Inspector. As a result, policy
created in the GUI can be used as a programming template for rapid development.
The installation process for Cobra is straightforward, and you can use standard Python distribution utilities. Cobra
is currently distributed as an.egg file and can be installed using easy_install. Please refer to the Cisco APIC Python
API documentation for full details for installing Cobra on a variety of operating systems.

© 2014 Cisco and/or its affiliates. All rights reserved. This document is Cisco Public Information. Page 12 of 16
Establishing a Session
The first step in any code that uses Cobra is establishing a login session. Cobra currently supports username- and
password-based authentication, as well as certificate-based authentication. The example here uses username- and
password-based authentication.
import cobra.mit.access
import cobra.mit.session
apicUri = 'https://10.0.0.2'
apicUser = 'username'
apicPassword = 'password'
ls = cobra.mit.session.LoginSession(apicUri, apicUser, apicPassword)
md = cobra.mit.access.MoDirectory(ls)
md.login()
This example provides an MoDirectory object named md, which is logged in to and authenticated for Cisco APIC.
If for some reason authentication fails, Cobra will display a cobra.mit.request.CommitError exception message.
With the session logged in, you are ready to proceed.
Working with Objects
Use of the Cobra SDK to manipulate the MIT generally follows this workflow:
1. Identify the object to be manipulated.
2. Build a request to change attributes or add or remove children.
3. Commit the changes made to the object.
For example, if you want to create a new tenant, you must first identify where the tenant will be placed in the MIT,
where in this case it will be a child of the policy Universe managed object (polUniMo):
import cobra.model.pol
polUniMo = cobra.model.pol.Uni('')
With the polUniMo object defined, you can create a tenant object as a child of polUniMo:
import cobra.model.fv
tenantMo = cobra.model.fv.Tenant(polUniMo, 'cisco')
All these operations have resulted only in the creation of Python objects. To apply the configuration, you must
commit it. You can do this using an object called a ConfigRequest. ConfigRequest acts as a container for MO-
based classes that fall into a single context, and they can all be committed in a single atomic POST operation.
import cobra.mit.request
config = cobra.mit.request.ConfigRequest()
config.addMo(tenantMo)
md.commit(config)

© 2014 Cisco and/or its affiliates. All rights reserved. This document is Cisco Public Information. Page 13 of 16
The ConfigRequest object is created, then the tenantMo object is added to the request, and then you commit the
configuration through the MoDirectory object.
For the preceding example, the first step builds a local copy of the polUni object. Because it does not have any
naming properties (reflected by the empty double single quotation marks), you don’t need to look it up in the MIT to
figure out what the full Dn for the object is; it is always known as uni.
If you wanted to post something deeper in the MIT, where the object has naming properties, you would need to
perform a lookup for that object. For example, if you wanted to post a configuration to an existing tenant, you could
query for that tenant and create objects beneath it.
tenantMo = md.lookupByClass('fvTenant', propFilter='eq(fvTenant.name, "cisco")')
tenantMo = tenantMo[0] if tenantMo else None
The resulting tenantMo object will be of class cobra.model.fv.Tenant and will contain properties such as .dn,
.status, and .name, all describing the object itself. The lookupByClass() entry returns an array, because it can
return more than one object. In this case, the command is specific and is filtering on an fvTenant object with a
particular name. For a tenant, the name attribute is a special type of attribute called a naming attribute. The naming
attribute is used to build the relative name, which must be unique in its local namespace. As a result, you can be
assured that lookupByClass on an fvTenant object with a filter on the name always returns either an array of
length 1 or None, meaning that nothing was found. You can find the specific naming attributes and other attributes
in the Cisco APIC Model Reference document.
To entirely avoid a lookup, you can build a Dn object and make an object a child of that Dn. This method works
only in cases in which the parent object already exists.
topDn = cobra.mit.naming.Dn.fromString('uni/tn-cisco')
fvAp = cobra.model.fv.Ap(topMo, name='AppProfile')
These fundamental methods for interacting with Cobra provide the building blocks necessary to create more
complex workflows that can help automate network configuration, perform troubleshooting, and manage the
network.
Cisco APIC REST to Python Adapter
The process of building a request can be time consuming, because you must represent the object data payload as
Python code reflecting the object changes that you want to make. Because the Cobra SDK is directly modeled on
the Cisco ACI object model, you should be able to generate code directly from what resides in the object model. As
expected, you can do this using a tool developed by Cisco Advanced Services. The tool is the Cisco APIC REST to
Python Adapter, known as Arya (Figure 11).

© 2014 Cisco and/or its affiliates. All rights reserved. This document is Cisco Public Information. Page 14 of 16
Figure 11. Using Arya
Figure 8 clearly shows how the input that might come from the API Inspector, Visore, or even the output of a REST
query and can then be quickly converted into Cobra SDK code, tokenized, and reused in more advanced ways.
Installation of Arya is relatively simple, and the tool has few external dependencies. To install Arya, you must have
Python 2.7.5 and git installed. Use the following quick installation steps to install it and place it in your system
Python.
git clone https://github.com/datacenter/ACI.git
cd ACI/arya
sudo python setup.py install
After Arya has been installed, you can take XML or JSON representing Cisco ACI modeled objects and convert it
to Python code quickly. For example, enter:
arya.py -f /home/palesiak/simpletenant.xml
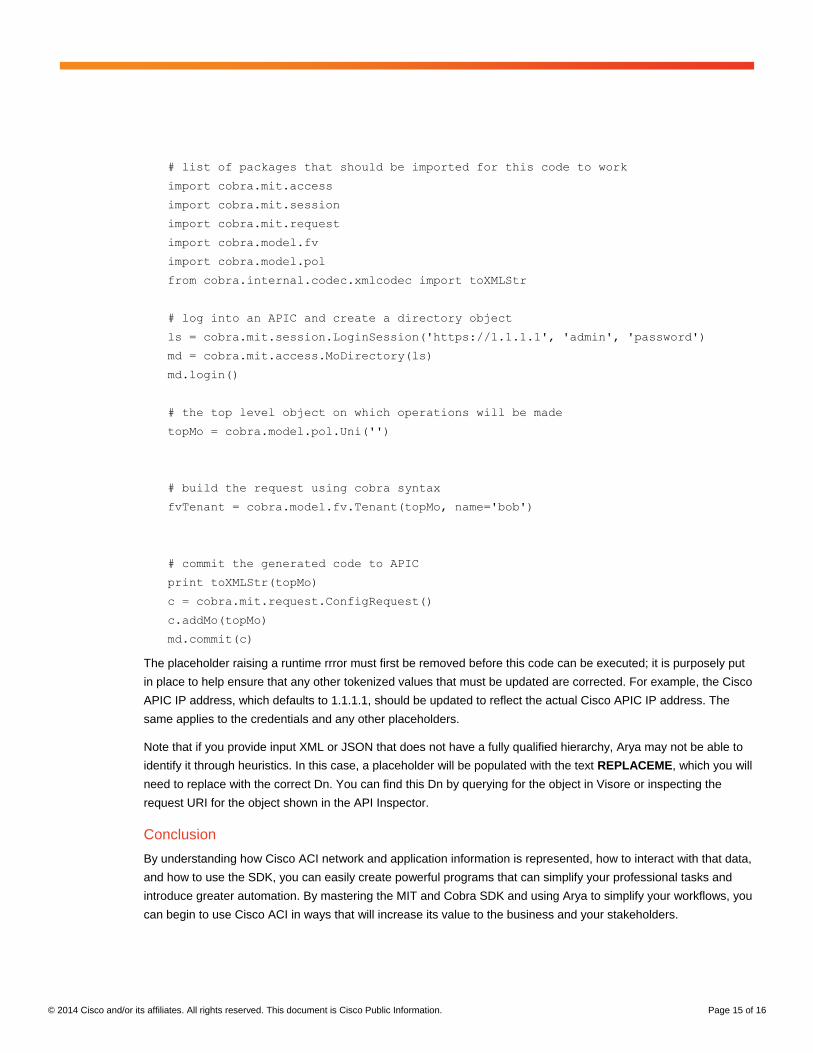
The entry will yield the following Python code:
#!/usr/bin/env python
'''
Autogenerated code using /private/tmp/ACI/arya/lib/python2.7/site-packages/arya-
1.0.0-py2.7.egg/EGG-INFO/scripts/arya.py
Original Object Document Input:
<fvTenant name='bob'/>
'''
raise RuntimeError('Please review the auto generated code before ' +
'executing the output. Some placeholders will ' +
'need to be changed')
© 2014 Cisco and/or its affiliates. All rights reserved. This document is Cisco Public Information. Page 15 of 16
# list of packages that should be imported for this code to work
import cobra.mit.access
import cobra.mit.session
import cobra.mit.request
import cobra.model.fv
import cobra.model.pol
from cobra.internal.codec.xmlcodec import toXMLStr
# log into an APIC and create a directory object
ls = cobra.mit.session.LoginSession('https://1.1.1.1', 'admin', 'password')
md = cobra.mit.access.MoDirectory(ls)
md.login()
# the top level object on which operations will be made
topMo = cobra.model.pol.Uni('')
# build the request using cobra syntax
fvTenant = cobra.model.fv.Tenant(topMo, name='bob')
# commit the generated code to APIC
print toXMLStr(topMo)
c = cobra.mit.request.ConfigRequest()
c.addMo(topMo)
md.commit(c)
The placeholder raising a runtime rrror must first be removed before this code can be executed; it is purposely put
in place to help ensure that any other tokenized values that must be updated are corrected. For example, the Cisco
APIC IP address, which defaults to 1.1.1.1, should be updated to reflect the actual Cisco APIC IP address. The
same applies to the credentials and any other placeholders.
Note that if you provide input XML or JSON that does not have a fully qualified hierarchy, Arya may not be able to
identify it through heuristics. In this case, a placeholder will be populated with the text REPLACEME, which you will
need to replace with the correct Dn. You can find this Dn by querying for the object in Visore or inspecting the
request URI for the object shown in the API Inspector.
Conclusion
By understanding how Cisco ACI network and application information is represented, how to interact with that data,
and how to use the SDK, you can easily create powerful programs that can simplify your professional tasks and
introduce greater automation. By mastering the MIT and Cobra SDK and using Arya to simplify your workflows, you
can begin to use Cisco ACI in ways that will increase its value to the business and your stakeholders.
© 2014 Cisco and/or its affiliates. All rights reserved. This document is Cisco Public Information. Page 16 of 16
For More Information
Cisco DevNet for ACI https://developer.cisco.com/site/apic-dc/
APIC Documentation http://www.cisco.com/c/en/us/support/cloud-systems-management/application-policy-
infrastructure-controller-apic/tsd-products-support-series-home.html.
Printed in USA C11-733105-00 11/14
Recommended