Please read carefully and completely before operating unit.
Cavitron® SPS™
Ultrasonic Scaler G98AInstallation and Service Manual

FORWARDDENTSPLY®ProfessionalisanISO13485registeredcompany.
TheDENTSPLY®Cavitron®SPS™ScalerSystemisclassifiedbyUnderwritersLaboratoriesInc.withrespecttoelectricshock,fire,andmechanicalhazardsinaccordancewithUL60601-1andCSAC22.2no.601.1.
TheCavitronSPSUltrasonicScalerisequippedwithaSustainedPerformanceSystem™(SPS),whichoffersaconstantbalancebetweenscalingefficiencyandpatientcomfortbymaintainingtheunit‘spowerlevelwhentheinserttipencounterstenaciousdepositsallowingthecliniciantoeffectivelyscaleevenatadecreased/lowerpowersetting.
TheSystemoperatesbyconvertinganSELVsourcecurrentintohighfrequencycurrent.Theultrasonicsystemconsistsoftwoparts:thehandpiece/insertcombinationandtheSPS™electronicsystem.TheSPS™systemincorporatestwoclosedloops.Oneloopprovidesautomatictuning(operatingfrequencyisadjustedtobeatresonanceforeachinsert),thesecondloopautomaticallycontrolsthetipstrokeoverdifferentworkingconditions.TheDENTSPLY®Cavitron®SPS™scalerproduces30,000microscopicallysmallstrokespersecondattheinsert’sworkingtip.This,combinedwithacousticeffectsofthecoolantwater,producesasynergisticactionthatliterally“powersaway”theheaviestcalculusdepositswhileprovidingexceptionaloperatorandpatientcomfort.

TABLE OF CONTENTSSpECiFiCATiONS . . . . . . . . . . . . . . . . . . . . . . . . . . . . . . . . . . 4OpErATiNg CONdiTiONS . . . . . . . . . . . . . . . . . . . . . . . . . . . . 4STOrAgE & ShippiNg CONdiTiONS . . . . . . . . . . . . . . . . . . . . . . 4CLASSiFiCATiONS . . . . . . . . . . . . . . . . . . . . . . . . . . . . . . . . . 4iNTENdEd USE . . . . . . . . . . . . . . . . . . . . . . . . . . . . . . . . . . 5TEChNiCAL SUppOrT . . . . . . . . . . . . . . . . . . . . . . . . . . . . . . . 5SUppLiES & rEpLACEmENT pArTS . . . . . . . . . . . . . . . . . . . . . . . . 5diSpOSAL OF UNiT . . . . . . . . . . . . . . . . . . . . . . . . . . . . . . . . 5WArrANTY . . . . . . . . . . . . . . . . . . . . . . . . . . . . . . . . . . . . 5
SECTiON 1: iNdiCATiONS 1.1UltrasonicProcedures . . . . . . . . . . . . . . . . . . . . . . . . . . . . . . . . . . 5
SECTiON 2: CONTrAiNdiCATiONS & WArNiNgS 2.1Contraindications. . . . . . . . . . . . . . . . . . . . . . . . . . . . . . . . . . . . 5 2.2Warnings . . . . . . . . . . . . . . . . . . . . . . . . . . . . . . . . . . . . . . .5-6
SECTiON 3: prECAUTiONS 3.1SystemPrecautions . . . . . . . . . . . . . . . . . . . . . . . . . . . . . . . . . . 6 3.2PrecautionsforUltrasonicProphylaxisProcedures . . . . . . . . . . . . . . . . . . . 6
SECTiON 4: iNFECTiON CONTrOL 4.1InfectionControlInformationReferenceBooklet . . . . . . . . . . . . . . . . . . . 6 4.2GeneralInfectionControlInformation. . . . . . . . . . . . . . . . . . . . . . . . . 6 4.3WaterSupplyRecommendations . . . . . . . . . . . . . . . . . . . . . . . . . . 6-7
SECTiON 5: WATEr LiNE rEQUirEmENTS . . . . . . . . . . . . . . . . . . . . 7SECTiON 6: iNSTALLATiON iNSTrUCTiONS 6.1Installation,Removal&ServiceInstructions . . . . . . . . . . . . . . . . . . . . . . . 7 6.2PostInstallationInstructionCheck. . . . . . . . . . . . . . . . . . . . . . . . . . 7-8 6.3InstallationNotes . . . . . . . . . . . . . . . . . . . . . . . . . . . . . . . . . . . 8 6.4InstallationTemplates . . . . . . . . . . . . . . . . . . . . . . . . . . . . . . . . . 9 6.5InstallationDiagram. . . . . . . . . . . . . . . . . . . . . . . . . . . . . . . . . . 11 6.6InstallationandOperationTables. . . . . . . . . . . . . . . . . . . . . . . . . . . 12
SECTiON 7: CAViTrON® SpS™ ULTrASONiC SCALEr SYSTEm dESCripTiON 7.1SystemControls . . . . . . . . . . . . . . . . . . . . . . . . . . . . . . . . . . . . 13 7.2Steri-Mate™Handpiece/Cable . . . . . . . . . . . . . . . . . . . . . . . . . . . . 14 7.3Cavitron®30KUltrasonicInserts . . . . . . . . . . . . . . . . . . . . . . . . . . . 15 7.4FootControlandOperation . . . . . . . . . . . . . . . . . . . . . . . . . . . . . . 15
SECTiON 8: ACCESSOriES . . . . . . . . . . . . . . . . . . . . . . . . . . . . 16SECTiON 9: TEChNiQUES FOr USE 9.1PatientPositioning . . . . . . . . . . . . . . . . . . . . . . . . . . . . . . . . . . 16 9.2PerformingUltrasonicScalingProcedures. . . . . . . . . . . . . . . . . . . . . . . 16 9.3PatientComfortConsiderations . . . . . . . . . . . . . . . . . . . . . . . . . . . . 16
SECTiON 10: SYSTEm CArE 10.1DailyProtocol. . . . . . . . . . . . . . . . . . . . . . . . . . . . . . . . . . . . 17
SECTiON 11: TrOUBLEShOOTiNg & ANALYSiS / gUidE . . . . . . . . . . 18-24SECTiON 12: SErViCE pArTS . . . . . . . . . . . . . . . . . . . . . . . . . 25-31

4
SpECiFiCATiONSElectricalInput Voltage 24VACSELVsource Current 2.5Amps Frequency 50/60Hz Power 60VA Pneumatic WaterPressure 25–60psi(172–414kPa) WaterTemperature 41ºF–77ºF(5ºC–25ºC) AirPressure(yellowline) 0–125psi(0–862kPa) AirPressure(orangeline) 0–125psi(0–862kPa) Output Frequency 30kHznominal Power 3–30watts Waterflowrate 10<flow<60ml/min Dimensions Height 2.0inches(5.1cm) Width 3.7inches(9.4cm) Length 6.0inches(15.3cm) Weight-Module 24.0ounces(694g) -Modulew/cable+Steri-Mate 27.4ounces(792g)
OpErATiNg CONdiTiONSAmbienttemperature:15–40°CHumidity:30–75%RH
STOrAgE ANd ShippiNg CONdiTiONSAmbienttemperature:-40°C–70°CHumidity:10–95RH(non-condensing)Atmosphericpressurerange:7–15psi(50–106kPa)
CLASSiFiCATiONS
InputVoltage SuppliedbySELVpowersource Degreeofprotectionagainstelectricshock TypeB Degreeofprotectionagainstharmfulingressofwater Ordinary Modeofoperation ContinuousMedicalDeviceDirectiveClassification IIaEquipmentisnotsuitableforuseinthepresenceofflammablemixtures
RecognizedbyUnderwritersLaboratoriesInc.withrespecttoelectricshock,fire,EMCandmechanical hazardsonlyinaccordancewithUL60601-1andCSAC22.2no.601.1
TypeBEquipment
ReadUsersManual
FootswitchIPX1
ACpower(AC24~)OR

iNTENdEd USEThisproductisintendedforinstallationintoanexistingdentalhandpiecedeliverysystem.Theendusersaredentalprofessionals.Thedevicesareusedtodebridelighttoheavycalculusdepositsfromthetoothandrootsurfaces.OtherapplicationsspecialtiesincludePeriodontics,Orthodontics,andEndodontics.
TEChNiCAL SUppOrTFortechnicalsupportandrepairassistanceintheU.S.,callaCavitronCareSMrepresentativeat1-800-989-8826or717-767-8502MondaythroughFriday,8:00AMto5:00PM(EasternTime).Forotherareas,contactyourlocalDENTSPLYrepresentative.
SUppLiES &rEpLACEmENT pArTSToordersuppliesorreplacementpartsintheU.S.,contactyourlocalDENTSPLYProfessionalDistributororcall1-800-989-8826or717-767-8502,MondaythroughFriday,8:00A.M.to5:00P.M.(EasternTime).Forotherareas,contactyourlocalDENTSPLYProfessionalRepresentative.
diSpOSAL OF UNiTDisposalofunitshallbeinaccordancewithlocalregulations.
rx Only
WArrANTYTheCavitron®SPS™G98UltrasonicScaleriswarrantedforTWOYEARSfromdateofpurchase.TheSteri-MateHandpieceenclosedwithyoursystemiswarrantedforSIXMONTHSfromdateofpurchase.RefertotheWarrantyStatementSheetfurnishedwithyoursystemforfullwarrantyStatementandTerms.
SECTiON 1: indications For Use 1 .1 Ultrasonic procedures
Allgeneralsupra-andsubgingivalscalingapplications.
Periodontaldebridementforalltypesofperiodontal diseases.
Endodonticprocedures.
•
•
•
SECTiON 2: Contraindications & Warnings 2 .1 Contraindications
UltrasonicSystemsshouldnotbeusedforrestorative proceduresinvolvingcondensationofamalgam.
Foroptimumperformanceuseonlywithinserts manufacturedbyDENTSPLYProfessional.2 .2 Warnings
Personsfittedwithcardiacpacemakers,defibrillators andotheractiveimplantedmedicaldevices,havebeen cautionedthatsometypesofelectronicequipmentmight interferewiththeoperationofthedevice.Althoughno instanceofinterferencehaseverbeenreportedto DENTSPLY,werecommendthatthehandpieceand cablesbekeptatleast6to9inches(15to23cm)away fromanydeviceandtheirleadsduringuse.
Thereareavarietyofpacemakersandothermedically implanteddevicesonthemarket.Cliniciansshould contactthedevicemanufacturerorthepatient’s physicianfordetailedinformationaboutthedevice.
DentalHealthcareProfessionalsareresponsiblefor readingtheDirectionsforUse,understandingthe capabilitiesoftheCavitronultrasonicscalerandmaking appropriatechoicesforuseofthisinstrumentconsistent withtheirknowledge,training,andexperience.
DirectionsforusearenotintendedtoadviseDental HealthcareProfessionalsonthepracticeofdentistry.
Thisproductisdesignedtoassistineliminating susceptibilitytoretractionoforalfluids.Toensure adequateprotectionfromcross-contaminationfrom otherdevicesconnectedtotheDentalUnit,itishighly recommendedthattheDentalUnitbeinstalledwithanti- retractionfeatures.Additionally,theDentalUnit,including theanti-retractionfeatures,mustbeproperlymaintained andperiodicallytested.Formoreinformation,please contactyourDentalUnitmanufacturer.
Failuretofollowtherecommendationsforenvironmental operatingconditions,includinginputwatertemperature, couldresultininjurytopatientsorusers.
TheuseofHighVolumeSalivaEvacuationtoreduce thequantityofaerosolsreleasedduringtreatmentis highlyrecommended.
ItistheresponsibityoftheDentalHealthcare Professionaltodeterminetheappropriateusesofthis productandtounderstandthehealthofeachpatient, thedentalproceduresbeingundertaken,andindustryand governmentalagencyrecommendations,requirements, andregulationsforsafepracticeofdentistry.
•
•
•
•
•
•
•
•
•
•
5

Whereasepsisisrequiredordeemedappropriatein thebestprofessionaljudgementoftheDentalHealthcare Professional,thisproductshouldnotbeused.
Duringboil-wateradvisories,thisproductshouldnot beoperatedasanopenwatersystem(e.g.connected toapublicwatersystem).ADentalHealthcare Professionalshoulddisconnectthesystemfromthe centralwatersource.TheCavitronDualSelect™system canbeattachedtothisunitandoperatedasaclosed systemuntiltheadvisoryiscancelled.Whentheadvisory iscancelled,flushallincomingwaterlinesfromthepublic watersystem(e.g.faucets,waterlinesanddental equipment)inaccordancewiththemanufacturer‘s instructionsforaminimumof5minutes.
Priortobeginningtreatment,patientsshouldrinsewith anantimicrobialsuchasChlorhexidineGluconate0.12%. Rinsingwithanantimicrobialreducesthechanceof infectionandreducesthenumberofmicroorganisms releasedintheformofaerosolsduringtreatment.
SECTiON 3: precautions 3 .1 System precautions
Equipmentflushinganddentalwatersupplysystem maintenancearestronglyrecommended.
Closemanualshut-offvalveonthedentalofficewater supplyeverynightbeforeleavingtheoffice.
Theuseofanin-linewaterfilterisrecommended.
Neveroperatesystemwithoutfluidflowingthrough handpiece. 3 .2 precautions for Ultrasonic prophylaxis procedures
Likeatoothbrush,ultrasonicinserts“wearout”with use.Insertswithjust2mmofwearloseabout50%of theirscalingefficiency.Ingeneral,itisrecommended thatultrasonicinsertsbediscardedandreplacedafter 90days,undernormaluse,tomaintainoptimal efficiencyandavoidbreakage.ACavitron®Insert EfficiencyIndicatorisenclosedforyouruse.
Discardtheinsertimmediatelyifexcessivewear isnoted,ortheinsertshowssignsofdamagethrough mishandling.
Ultrasonicinserttipsthathavebeenbent,damaged,or reshapedaresusceptibletoin-usebreakageandshould bediscardedandreplacedimmediately.
Retractthelips,cheeks,andtonguetopreventcontact withtheinserttipwheneveritisplacedinthepatient’s mouth.
•
•
•
•
•
•
•
•
•
•
•
Watershouldbeusedforallscalingprocedures.Water flowisadjustablefromlessthan10togreaterthan 60mlperminute.
TheCavitronunitworkswithCavitroninsertsasa system,andwasdesignedandtestedtodeliver maximumperformanceforallcurrentlyavailable CavitronandCavitronBellissima™brandultrasonic inserts.Companiesthatmanufacture,repairormodify insertscarrythesoleresponsibilityforprovingthe efficacyandperformanceoftheirproductswhenused asapartofthissystem.Usersarecautionedto understandtheoperatinglimitsoftheirinsertsbefore usinginaclinicalsetting.
Onlyadjustthesystem’spoweradjustmentknobwiththe insertoutsidethepatientsmouth.
SECTiON 4: infection Control4 .1 infection Control information reference Booklet
Foryourconvenience,anInfectionControlInformation ReferenceBooklethasbeenincludedwithyourCavitron®
SPS™System.Additionalbookletscanbeobtainedby callingCustomerServiceat1-800-989-8826or 717-767-8502MondaythroughFriday,8:00AMto 5:00PM(EasternTime).Forotherareas,contact yourlocalDENTSPLYrepresentative.Insertsterilization informationisincludedineachinsertpackage.
4 .2 general infection Control information
Usestandardpersonalprotectionequipment(i.e.,wear facemask,eyewear,orfaceshield,glovesand protectivegown).
Formaximumoperatorandpatientsafety,carefully followtheInfectionControlInformationprocedures detailedonthereferencecardsaccompanyingyour System.
Thecombinationofwaterandultrasonicvibrationwill createaerosols.Withpropertechnique,muchofthe aerosolscanbeeffectivelycontrolledandminimized. Pleasecarefullyfollowtheproceduralguidelines regardingtheuseofyourSystem.4 .3 Water Supply recommendations
Itishighlyrecommendedthatalldentalwatersupply systemsconformtoapplicableCDC(Centersfor DiseaseControlandPrevention)andADA(American DentalAssociation)standards,andthatall recommendationsbefollowedintermsofflushing, andgeneralinfectioncontrolprocedures.Knowledge
•
•
•
•
•
•
•
•
6

ofandcompliancewithagencyguidelines,standards andrecommendationsisthesoleresponsibilityofthe DentalHealthcareProfessional.
Asamedicaldevice,Cavitron®productsneedtobe installedinaccordancewithlocalornationalregulations, includingguidelinesforwaterquality(e.g.drinkingwater). Asanopenwatersystem,suchregulationmayrequire yourCavitronproducttobeconnectedtoacentralized watercontroldevicethatpreventswatercontaining contaminatesfromback-flowintothewatersupply.
SECTiON 5: Water Line requirements
Incomingwatersupplylinepressuretotheultrasonic scalermustbe25psi(172kPa)minimumto60psi (414kPa)maximum.Ifyourdentalwatersystem's supplylinepressureisabove60psi,installawater pressureregulatoronthewatersupplylinetoyour UltrasonicScaler.
Amanualshut-offvalveonthedentalwatersystem supplylineshouldbeusedsothatthewatercanbe completelyshut-offwhentheofficeisunoccupied.
Afilterinthedentalwatersystemsupplylineis recommendedsothattheparticlesinthewatersupply willbetrappedbeforereachingtheultrasonicscaler.
Aftertheaboveinstallationsarecompleteonthedental watersupplysystem,thedentalofficewaterlineshould bethoroughlyflushedpriortoconnectiontothe ultrasonicsystem.
Afterflushingsystemverifytherearenoleaks.
SECTiON 6: installation instructions
6 .1 installation / removal / Service instructions
TheCavitron®SPS™IntegratedScalermustbeinstalledbyatrainedtechnician.TheInstallationDiagramshowsallconnectionstotheDentalControlUnit.ThepowersourcemustbeadoubleinsulatedSELV-typedeviceandqualifiedtoIEC601.1.ALLPOWER,WATERANDAIRINPUTSTOTHEDENTALCONTROLUNITMUSTBEOFFDURINGTHEINSTALLATIONANDREMOVALOFTHECAVITRONSYSTEM.
Installation:PurgethemainwaterandairlinestotheDentralControlUnitbeforeconnectingtheCavitronmodule.
1.RemovetheCavitronUltrasonicScaler,thehandpiececableassembly,Steri-Mate®handpiece,andmountingkitP/N80918fromtheshippingcartonandsetaside formounting.
•
•
•
•
•
•
2. RemovethecoveroftheDentalControlUnit.
3. Removethemountingtemplatefromthismanualandcut outasdescribed(therearetwotemplates).
4. PlacethetemplateonthebottomoftheDentalControl Unitandpositiontomarkthemountingholes.
5. ChecktobesuretheCavitronmodulewillbeproperly placedandthatthepowercontroliseasilyaccessible.
6. Carefullymarkanddrillthemountingholes.
7. Invertthemodule,routethecablethroughthelarge diameterhole,alignthetwomountingstudsandsecure themodule.
8. LocatethepilotairinsidetheDentalControlUnit,cutthe tubeandinserttheteefittingontheyellowadapter assemblyinthemountingkit.
9. Secureallfittingswiththesuppliedtubingretainers.
10.Securetheotherendoftheadapterassemblytothe yellowtubingfromtheCavitronmodulecable.
11.Securetheairlinefromthehandpieceholdervalvetothe remainingbarbontheadapterassembly.
12.LocatetheinputwaterlineintheDentalControlUnit.Cut thelineandinsertandsecureasmallteefitting.
13.Connectandsecuretheredtubingfromthemodule cabletotheremainingbarbonthesmallteefitting.
14.LocatetheinputdriveairlineintheDentalControlUnit. Cutline,insertandsecurethelargeteefitting.
15.ConnectandsecuretheorangetubingfromtheCavitron modulecabletotheremainingbarbonthelargetee fitting.
16.Connectthetwo(2)electricalwiresfromthemodule cabletothe24VACterminalsintheDentalControlUnit.
17.Thesystemisreadyforpostinstallationsystemcheck.
6 .2 post installation Check
TurnonallwaterandairinputstotheDentalControlUnit.Verifythatallconnectionsmadeduringinstallationdonotleakandaresecuredwiththesuppliedtubingretainers.
PreliminarySet-up
• TurnontheDentalControlUnit(refertoinstructionmanual).
• SetthepoweradjustmenttothetopoftheBlueZone.
• Plugthehandpieceintothereceptacleontherearofthe Cavitronmodule.
7

• ConnectSteri-Mate®handpiecetothecableconnector assembly.
• Adjustthebluelavagecontrolatthebackofthe handpiecetomaximum(fullyclockwise).
PerformanceCheck:PowerandLavageFlow
• Activatefootcontrolandpurgethewatersystemfor 2minutes.
• Holdthehandpiece(withoutaninsertinstalled)inan uprightpositionoverasinkordrain.
• Activatefootswitchtofillthehandpiecewithwater.
• Lubricatetherubbero-ringontheinsertwithwaterbefore placingitintothehandpiece.Fullyseatinsertwithagentle push-twistmotion.DONOTFORCE.
• Adjustthelavagecontrolattheendofthehandpiecefor amoderateflow.
• Verifyoperationbyadjustingthepowercontrolbetween minimumandmaximumontheCavitronmoduleand observeachangeinthewaterspray.
8
6 .3 installation Notes_____________________________________________________________________________
_____________________________________________________________________________
_____________________________________________________________________________
_____________________________________________________________________________
_____________________________________________________________________________
_____________________________________________________________________________
_____________________________________________________________________________
_____________________________________________________________________________
_____________________________________________________________________________
_____________________________________________________________________________
_____________________________________________________________________________
_____________________________________________________________________________
_____________________________________________________________________________
_____________________________________________________________________________
_____________________________________________________________________________
PerformanceCheck:PowerBoost(available only with variable pressure foot controls)
• AdjustpowercontrolontheCavitronmoduletothetopof theBlueZone.
• Fullydepressfootcontrolandobservesoundandspray.
• Reducepressureonthefootcontroluntilachangein sprayandsoundisnoticeable.
• Varypressureonthefootcontroltotogglebetween standardandboostmodes.
InstallationCheck:InterfaceTest
• Placehandpieceinholderanddepressfootcontrol.
• VerifyCavitronmoduledoesnotactivate.
• InspecttheinsideoftheDentalControlUnitandverify thatallconnectionsdonotleak.
TheCavitronmodulehasbeensuccessfullyinstalled.ReplacethecovertotheDentalControlUnit.

9
6 .4 installation Templates

Page10intentionallyleftblank--backsideoftemplates

6 .5 installation diagram
11

6 .6 installation and Operation Tables
12
Cavitron SpS g-98A Connection dental Control Unit head
BROWN & YELLOW WIRES24VoltsAC Power
Connecttoterminalstrip.24VoltAC,300WattPowerSupply
RED TUBEScaler Water Supply
TeeintoREDControlBlockManifoldwatertube25–60psiWaterSupply
YELLOW TUBEHandpieceSelectionPilot Air
UseinstallationtubingkittoTeeintoYELLOW-REDtubeonControlBlockManifold–PilotAir..005RestrictorBarbinstalledinseries.Unusedhandpieceholderorhandpiecewhippositionrequired.
ORANGE TUBEFootControlDrive Air
TeeintoORANGE-BROWNtubeonControlBlockManifold–DriveAir.
SCALEr 24 VAC pOWEr ACTiVATiON – Yellow Tube
1.CavitronSteri-MateScalerHandpieceINHolder.
2.CavitronSteri-MateScalerHandpiecewhipRELEASED.
Scaler24VACPower–OFF
Air–Electricswitch–CIRCUITOPEN
1.>20psiairpressuretoYellowtube.HPHolderWhiskervalvesealed.
2.>20psiairpressuretoYellowtube.Handpiecewhipbleedvalvesealed.
1.CavitronSteri-MateScalerHandpieceselectedandREMOVEDfromHolder.
2.CavitronSteri-MateScalerHandpiecewhipselectedandPULLED FORWARD.
Scaler24VACPower–ON
Air–Electricswitch–CIRCUITCLOSED
1.2–20psiairpressuretoYellowtube.HPHolderWhiskervalvebleedsairpressureoff.
2.2–20psiairpressuretoYellowtube.Handpiecewhipbleedreleasesairpressure.
NOrmAL & BOOST ULTrASONiC SCALiNg pOWEr – Orange Tube
ProportionalFootControldepressedpartially.
CavitronSPS™UltrasonicscalingpoweractivatedinNORMALmode.
DualAir-ElectricSwitch,S1CLOSES(S1=Blue&BlackLeads)
2–12psiairpressuretoOrangetube.
ProportionalFootControldepressedtoalower position or completely.
CavitronSPS™UltrasonicscalingpowerwillswitchfromNORMALmodetoBOOSTmode.
DualAir-ElectricSwitch,S1andS2CLOSE(S1=Blue&BlackLeads,S2=White&BlackLeads)
40–80psiairpressuretoOrangetube.

13
SECTiON 7: SpS™ Ultrasonic Scaler System description7 .1 System Controls
TheCavitron®SPS™moduleisenabledwhenevertheclinicianremovesthehandpiecefromthehandpieceholder.
ON/OFF Function
TheUltrasonicscalingactivationisswitchedONandOFFusingthetreatmentunit‘sfootswitch.
power Adjustment
Turnknobtoselectultrasonicpowerlevelforoperation:clockwiseincreasessystempower,counterclockwisedecreasessystempower.
TheBlueZone™isanextendedlow-powerrangeprovidingeffectivesubgingivaldebridementandgreaterpatientcomfortduringdefinitivetherapy.
Foot Controlled power Boost Function
Asecondpositiononthefootswitch(fullydepressedfootswitch)providesthecapabilitytobrieflyincreasetheunit’spoweroutputforquick,efficientremovaloftenaciousdepositsusingonlythefootcontrolwithouttouchingtheunit.
Note: Foot controlled power boost function requires a variable pressure/proportional footswitch.
Lavage Flow AdjustmentWaterflowthroughthehandpieceisadjustedbyrotatingacontrolelementonthecableconnector(blue).
TYpiCAL iNSTALLATiON

14
7 .2 Steri-mate handpiece / Cable
ThehandpieceacceptsallCavitron®30K™UltrasonicInserts.
Date Codes (MMYY)Priortoconnecting,alignHandpieceandCableAssemblyelectricalconnections.IfCableAssemblydoesnotseatintoHandpiece,gentlyrotatehandpieceuntilcontactsalign.
DONOTTWISTWHILEPUSHINGCONNECTORINTOHANDPIECE.
Cable Assembly
Insert Port
Handpiece Connector(Handpiece&MatingAssemblyareKeyed)
Steri-Mate® Handpiece
Date Codes (MMYY)
AUTOCLAVE SYMBOL- Sterilizable up to temperature specified
BLUE Lavage Knob
Lavage Control
TurntheLavageControltoselectflowrateduringsystemoperation.Clockwiseincreasesflowatinserttip,counterclockwisedecreasesflow.Theflowratethroughthehandpiecealsodeterminesthetemperatureofthelavage.Lowerflowratesproducewarmerlavage.Higherflowratesproducecoolerlavage.
Ifthehandpiecebecomeswarm,increasetheflowrate.Withexperience,theDentalHealthcareProfessionalwillbeabletodeterminethebestflowratesettingforoptimumoperatingefficiencyandpatientcomfort.
Swivel Feature
Reducescabledragashandpiecerotatesduringprocedures.
Steri-mate grip Accessory (not shown)TheSteri-MateGripprovidesanergonomicandcomfortablegraspofthehandpiece.ThegripissterilizableandisavailableinseveraldifferentcolorsasanaccessoryforyourSteri-MateHandpiece.Seeinstallationinstructionsprovidedwiththegrip.
Steri-Mate®
Handpiece

7 .4 Foot Control information & Operation
TheFootControlactivatesbothultrasonicenergy andLavageFlowattheinserttip.Lightlydepressing thefootswitchwheneverthehandpieceisremovedfrom thehandpieceholderwillactivatetheultrasonicsand lavageflow.
Aboostfunctionisactivatedbyfullydepressingthe footswitch.Thisfeatureisactiveinthelowtomidrange ofthepowercontrol.Thepowerlevelwillreturntothe controlsettingwhenthefootswitchisreturnedtoit’s slightlydepressedposition.Themomentaryincreasein powerisindicatedbyaslightincreaseinnoiseleveland achangeinspraypattern.
Practicingoutsidethemouthisrecommendedforthe operatortofamilarizethemselveswiththeboostfeature.
•
•
•
15
7 .3 Cavitron® 30K™ Ultrasonic inserts
ThemanystylesofDENTSPLYCavitron®UltrasonicInsertsareeasilyinterchangeableforvariousproceduresandapplications.
Insert TipShapeandsizeoftipdetermineaccessandadaptation.Preheatedlavageisdirectedtothetip.
O-Ring Providessealforhandpiececoolant.
Connecting BodyTransfersandamplifiesmechanicalmotionofthestacktoinserttip.
Magnetostrictive StackConvertsenergyprovidedbythehandpieceintomechanicaloscillationsusedtoactivatetheinserttip.
Holdthehandpieceinanuprightposition.Depressfootswitchtofillthehandpiecewithwater.LubricatetherubberO-Ringontheinsertwithwaterbeforeplacingitintothehandpiece.Fullyseatinsertwithagentlepush-twistmotion.DONOTFORCE.
Insert MarkingManufacturer,Date(YDDD=singledigityearandthreedigitdayofyear)Frequency,andType(e.g.,DENTSPLY730530KFSI-SLI-10S)
Finger Grip

SECTiON 8: Accessories
Steri-Mate®DetachableSterilizableHandpiece
Steri-Mate®HandpieceGrips
DetachableHandpieceCableAssemblywithSwivel
Cavitron®UltrasonicInserts
SECTiON 9: Techniques For Use 9 .1 patient positioning
Thebackrestofthechairshouldbeadjustedforoptimal accesstoboththeupperandlowerarches.Thisassures patientcomfortandclinicianvisibility.
Havethepatientturnheadtotherightorleft.
Positionchinupordowndependingonthequadrantand surfacebeingtreated.
EvacuateirrigantusingeitherasalivaejectororHigh VacuumEvacuator(HVE).
9 .2 performing Ultrasonic Scaling procedures Note: Refer to the Infection Control Information booklet supplied with your system for general procedures to be followed at the beginning of each day and between patients.
TheedgesofCavitron®UltrasonicInsertsareintentionally roundedsothereisminimaldangeroftissuelaceration withproperultrasonicscalingtechniques.Whereverthe inserttipisplacedinthepatient‘smouth,thelips,cheek andtongueshouldberetractedtopreventaccidental (prolonged)contactwiththeactivatedtip.
TurnPowerLevelControltoselectultrasonicpowerlevel foroperation.Clockwiseincreasessystempower.Power levelwillincreasethroughoutthefullrangeofthecontrol. Holdthehandpieceoverasinkordrain.Pressthefoot controltoactivatethesystem.Checkspraytoverify fluidisreachingtheworkingendoftheinserttip.Adjust theLavageControltoensureadequateflowforthe selectedpowersetting.Greaterflowsettingsprovide coolerirrigation.
Itmaybenecessarytoadjustlavagewiththesystemin “Boost
„mode(FootControlfullydepressed)soadequate
fluidwillbeavailabletocooltiptotoothinterface.
•
•
•
•
•
•
•
•
•
•
•
Ingeneral,itissuggestedthata“feather-light-touch” beusedforultrasonicscaling.Themotionofthe activatedtipandacousticeffectsoftheirrigating fluid,inmostcases,areadequatetoremoveeventhe mosttenaciouscalculus.
PeriodicallychecktheCavitronUltrasonicInsertforwear withtheCavitronInsertEfficiencyIndicator.
TheuseofasalivaejectororHighVolumeEvacuator (HVE)isrecommendedduringallprocedures.
Setthesystem’sPowerLevelControltothelowest efficientpowersettingfortheapplicationandthe selectedinsert.
9 .3 patient Comfort Considerations
Reasons for sensitivity
Incorrecttipplacement.Pointshouldbedirectedaway fromrootsurfaces.
Notkeepingthetipinmotiononthetooth.Donotallow theinserttoremaininastaticpositiononanyonearea ofthetooth.Changetheinsert’spathofmotion.
Applyingexcessivepressure.Useextremelylightgrasp andpressure,especiallyonexposedcementum.
Ifsensitivitypersists,decreasepowersettingand/or movefromthesensitivetoothtoanotherandthenreturn.
•
•
•
•
•
•
•
•
16

SECTiON 10: System CareItisrecommendedthatyouperformthefollowingmaintenanceprocedurestohelpmaximizewaterqualityandtobeincompliancewithCDCguidelinesforinfectioncontrol.
10 .1 daily protocol
STaRT-UPPROCeDUReSaTTHeBeGINNINGOFTHeDay:
1. SwitchONthedentaltreatmentunit(refertoinstruction manualoftreatmentunit).2. RemovetheCavitron®cableconnectorassemblyfrom handpieceholderandsetpoweradjustmenttotopof BlueZone.3. ConnectasterilizedSteri-Mate®handpiecetothecable connectorassembly.(RefertotheInfectionControl informationbookletforsterilizinginstructions.)4. Adjustthelavagecontroltomaximum.5. Holdthehandpiece(withoutaninsertinstalled)over asinkordrain.Activatethefootcontrolandflushwater throughhandpiecefortwominutes.6. Placeasterilizedinsertintothehandpieceusingagentle push-twistmotion.(RefertotheCavitronUltrasonic InsertsDirectionsforuseforcleaningandsterilizing instructions.)7. Activatetheultrasonicsandadjustthepowerand lavagecontroltoyourpreferredoperatingpositions.BeTWeeNPaTIeNTS:
1. RemoveanyultrasonicinsertsandtheSteri-Mate® handpiece.Cleanandsterilizethehandpieceandall insertsusedduringtheprocedure.(RefertotheInfection ControlInformationbookletandtheCavitronUltrasonic InsertsDirectionsforUseforcleaningandsterilizing instructions.)2. Cleananddisinfectthehandpiececableassemblyby applyingawater-baseddisinfectantsolution*, carefullyfollowingtheinstructionsprovidedbythe solutionmanufacturer.Tocleanthecable,generously spraydisinfectantsolutiononacleantowelandwipe thecableandconnector.Discardusedtowel.To disinfectthesystem,generouslyspraydisinfectanton acleantowelandwipethecableandconnector.Allow thedisinfectantsolutiontoairdry.3. Cleananddisinfectallsurfacesofthedentaltreatment controlheadaccordingtothemanufacturer’s instructions.4. ConnectasterilizedSteri-Mate®handpieceontoits matingcableconnector.Setpoweradjustmenttotop oftheBlueZone,adjustthelavagecontrolto maximum.5. Holdthehandpiece(withoutaninsertinstalled)over asinkordrain.Activatethefootcontrolandflushwater throughhandpieceforatleastthirtyseconds.6. Placeasterilizedinsertintothehandpiece.
17
SHUT-DOWNPROCeDUReSaTTHeeNDOFTHeDay:
1. FlushtheCavitron®ultrasonicsystemaccordingtothe dentaltreatmentunitmanufacturer’sinstructions.2. RemoveanyultrasonicinsertsandtheSteri-Mate® handpiece.Cleanandsterilizethehandpieceandall insertsusedduringtheprocedure.(RefertotheInfection ControlInformationbookletandtheCavitronUltrasonic InsertsDirectionsforUseforcleaningandsterilizing instructions.)3. Cleananddisinfectthehandpiececableassemblyby applyingawater-baseddisinfectantsolution*, carefullyfollowingtheinstructionsprovidedbythe solutionmanufacturer.Tocleanthecable,generously spraydisinfectantsolutiononacleantowelandwipethe cableandconnector.Discardusedtowel.Todisinfectthe system,generouslyspraydisinfectantonacleantowel andwipethecableandconnector.Allowthedisinfectant solutiontoairdry.4. Cleananddisinfectallsurfacesofthedentaltreatment controlheadaccordingtothemanufacturer’s instructions.5. Placethecableconnectorintothehandpieceholderfor storage.6. TurnOFFthepowerandwatertothedentaltreatment unit.
*NOTE: Water-based disinfection solutions are preferred. Some alcohol-based disinfectant solutions may discolor the handpiece cable and connector.
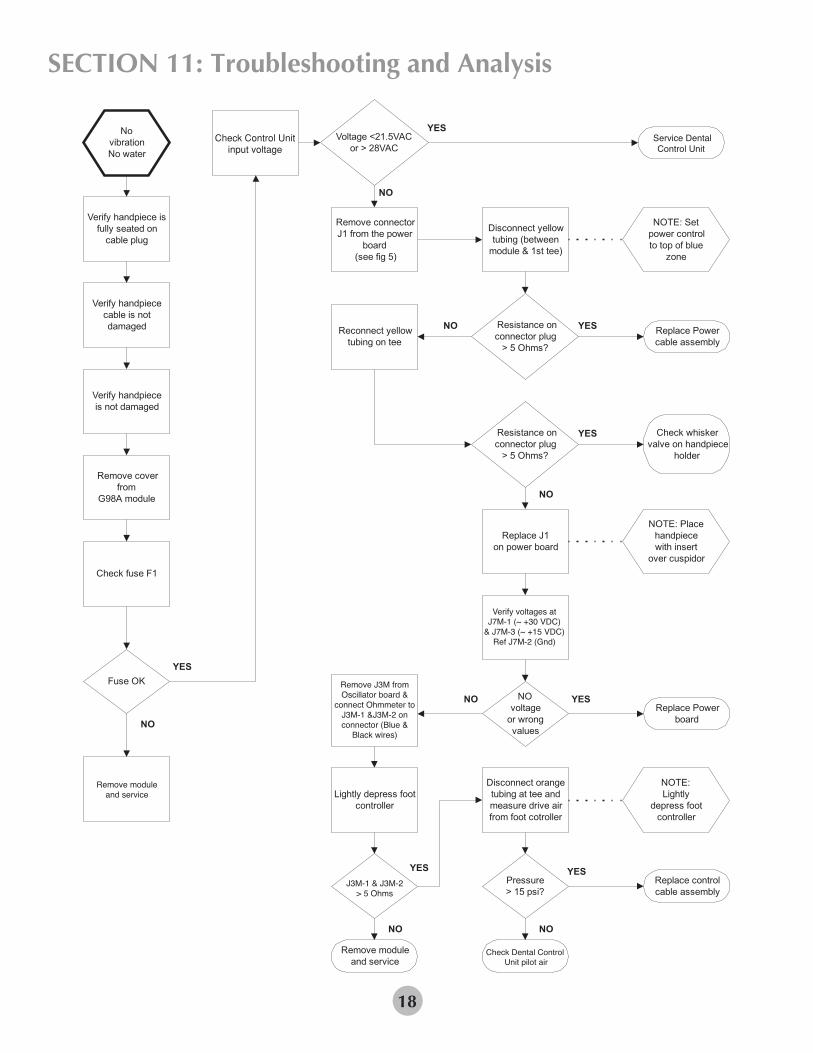
SECTiON 11: Troubleshooting and Analysis
18

19
SECTiON 11: Troubleshooting and Analysis, continued

20
SECTiON 11: Troubleshooting and Analysis, continued

SECTiON 11: Troubleshooting guideThistroubleshootingsectionismeantforusebyqualifiedCavitron®ServiceTechnicians.
21
SYmpTOmS CAUSES COrrECTiVE mEASUrESLowinsertscalingpowerorinsertstopsvibratingwhencontactingtoothsurface.
1.Insertmalfunction.
2.Insertisnotpushedinfarenoughforautomaticpick-up.
3.Unitimproperlycalibrated.
1.TestwithanotherCavitron®insert.Iftestinsertworksproperly,discardtheoriginalinsert.
2.a.Checkifinsertisfullyseatedinthehandpiece.
b.Ifahandpiecesoftgripisbeingused,verifythatthegripisflushwiththehardplasticoftheinsertport.RefertotheInstallationInstructionsprovidedwiththesoftgripforcorrectinstallation.
3.a.ReturnscalertoDENTSPLY®forfactorycertifiedservice.
b.RefertoDENTSPLY®ProfessionalDivision-ProductServiceSOPPS-00135.
Intermittentscalingpowerornoscalingpower.
(continuedonnextpage)
1.Insertmalfunction.
2.Insertisnotpushedinfarenoughforautomaticpick-up.
3.MalfunctioninSteri-Mate™Handpiece.
4.BentormissingelectricalpininSteri-Mate™Handpiece.
5.Openorintermittentwiresinhandpiececableassembly.
(continuedonnextpage)
1.TestwithanotherCavitron®insert.Iftestinsertworksproperly,discardtheoriginalinsert.
2.a.Checkifinsertisfullyseatedinthehandpiece.
b.Ifahandpiecesoftgripisbeingused,verifythatthegripisflushwiththehardplasticoftheinsertport.RefertotheInstallationInstructionsprovidedwiththesoftgripforcorrectinstallation.
3.ReplaceSteri-Mate™Handpiece.
4.ReplaceSteri-Mate™Handpiece.
5.InstallaworkingSteri-Mate™Handpieceonthecable.UnplugtheHandpiececableconnectoratJ3ofthePowerDrivePCBoardandcheckthecontinuityofthewires.a.ConnecttheohmmeterbetweenRED-GRNwireterminals.Flexthehandpiececableandchecktheintermittentreadings.Iftheohmmeterreadingisnotconsistentoritisindicatinganopencircuit,thehandpiececableassemblyislikelytobedamagedandshouldbereplaced.b.ConnecttheohmmeterbetweenWHT-GRNwireterminalsandrepeattheprocedureabove.
(continuedonnextpage)

SECTiON 11: Troubleshooting guide, continuedThistroubleshootingsectionismeantforusebyqualifiedCavitron®ServiceTechnicians.
22
SYmpTOmS CAUSES COrrECTiVE mEASUrESIntermittentscalingpowerornoscalingpower.
(Continued)
6.Loosewiringordefectivesolderjointintheunitwiring.
7.Nopowertotheunit.
8.FaultyAirSwitch.
6.Troubleshoottheunitwiringandconnectors.
7.a.Verify21.6to26.4VoltsACsupplytotheunit.
b.ReplacethePowerDrivePCboard.
8.Replacethecomponent.
Handpieceheatsup. 1.Insufficientwatertocoolhandpiece.
2.Airtrappedinthehandpiece.
3.Insertwaterpassagewayclogged.
4.Handpiececablenotsupportedduringprocedure.
5.Worninsertbeingused.
1.Increasethesettingonthehandpiecelavagecontroluntilhandpiecerunscool.
2.Whentheinsertsarechanged,holdthehandpieceinanuprightpositionuntilthetrappedairisremovedandthewaterflowsproperly.
3.ReplacetheCavitron®insertandcheckoperation.
4.Loophandpiececablearoundarmorsupportwithfingertopreventwaterrestriction.
5.ReplacewithanewCavitron®insert.Worninsertsrequirehigherpowersettingsproducingmoreheat.

SECTiON 11: Troubleshooting guide, continuedThistroubleshootingsectionismeantforusebyqualifiedCavitron®ServiceTechnicians.
23
SYmpTOmS CAUSES COrrECTiVE mEASUrESInsertvibratesbutnowaterorinsufficientwaterflowsfromthehandpiece.
1.Lowincomingdentalofficewaterpressure.
2.Impropersettingofthewaterregulator.
3.Handpiececablewatertubingandwirestwisted.
4.DamagedhandpiececableFlowControl.
5.Obstructionormineraldepositsinthewatersystemintheunit.
1.Measurewaterpressureatdentaloffice.Adjustincomingsourcewaterpressuretospecification.Waterpressureshouldbe25-60psi.
2.Adjustthewaterregulatorfor24psi.
3.Removerestrictionifpossibleorreplacehandpiececableassembly.
4.Replacehandpiececableassembly.
5.a.Removetheinsertandturnthewatervalvefullopen.Observethewaterflow.Iftheflowisgoodthentheobstructionisintheinsert.
b.Iftheobstructionisnotintheinsert,thenremovethehandpiecewaterlineatsolenoidandcheckthewaterflow.Ifflowisgood,thentheobstructionisinhandpiecesupplyline.
Watersprayfrominsertisnotproperlycoveringtheoperatingareaoftheactivatedtip.
1.Improperwaterflowadjustment.
2.P-styleinsertwatertubeincorrectlyaimed.
3.Insertispartiallyclogged.
1.Referto“DirectionsforUseforCavitron®SPS™UltrasonicScaler„forinstructionsonwaterflowadjustment.
2.Usesmallsmoothpliers,repositionthewatertubeanddirectthesprayatthebackoftheinserttip.
3.Replacetheinsert.
Waterdripsfromthehandpiecewhennotoperating.
1.Watersolenoidvalveleakingduetotrappeddebris.
1.Replacethewatersolenoidassembly.
Waterleakfromthehandpiecewhileinoperation.
1.O-ringwornoninsert.
2.WaterleakinplasticwaterlineathandpieceorinsidetheSteri-Mate™Handpiece.
1.ReplacetheO-ringwithgenuineCavitron®O-rings.O-ringsareavailableinpacksof12:GreenO-RingsP/N62605BlackO-RingsP/N62351
2.a.UnplugtheSteri-Mate™handpiecefromthecableandreplacethesmallO-ringontheconnector.PartNo.79357(12-Pack)
b.ReplacetheSteri-Mate™handpieceand/orcableassembly.

SECTiON 11: Troubleshooting guide, continuedThistroubleshootingsectionismeantforusebyqualifiedCavitron®ServiceTechnicians.
24
SYmpTOmS CAUSES COrrECTiVE mEASUrESWaterflownotcontrollablebyturningthehandpieceflowcontrolknob.
1.Malfunctionofwaterregulator. 1.Replacethewaterregulatorassembly.Adjustthewaterregulatorto25psi.
Insertscannotbeinstalledinthehandpieceproperly.
1.O-ringontheinsertisdry.
2.IncorrectordamagedO-ringinstalledontheinsert.
1.LubricatetheO-ringwithwater.IftheO-ringisworn,replaceit.
2.ReplacetheinsertO-ringwithCavitron®O-rings.O-ringsareavailableinpacksof12:GreenO-RingsP/N62605BlackO-RingsP/N62351
Boostmodedoesnotfunction. 1.Verifyunitoperation.
2.Powersettoohigh.
3.Insertisdamagedorworn.
4.Controlunitdriveairpressureisnotvarying.
5.Faultyairpressureswitch.
1.Fullydepressthefootcontrol,slowlyreducepressureuntiladecreaseinspraypatternisobserved.
2.Reducethepowersettingbelowthemid-pointandverifytheoperation.
3.InstallanewCavitron30Kinsertandverifytheoperation.
4.Removetheorangetubeandverifypressurechangesfrom0to80psiwhiledepressingthefootcontrol.
5.Replacethecomponent.
Unitactivateswiththescalerhandpieceintheholder.
1.Faultyairswitch.
2.Stickingorfaultywhiskervalve.
1.Removetheyellowtube,iftheairpresent,replacethehandpieceholderswitch.
2.Repairthecontrolunit.

3 4
5
2
1
2X
2X2X
2X
28
ITEM QUANTITY PART NO. DESCRIPTION1 2 586037005 SCREW, COVER2 1 574247007 SIL-PAD, PINK INSULATING3 2 6297501 SCREW, SOLENOID4 2 62852 SCREW, PC BOARD MOUNTING5 2 594002020 STANDOFF, HEX PC BOARD MOUNTING
G98A Cavitron® Scaler Module Assembly
SECTiON 12: Service parts
25

3 45
1
2
6
29
ITEM QUANTITY PART NO. DESCRIPTION1 1 63770 CLIP, AIR SWITCH (LARGE)2 1 562096001 CLIP, WATER REGULATOR (GREY)3 1 61631 TUBING, RED, .062" ID (PER FOOT)4 1 625036011 TUBING, ORANGE, .062" ID (PER FOOT)5 1 625036012 TUBING, YELLOW, .062" ID (PER FOOT)6 2 776030230 CLIP, DUAL AIR SWITCH (SMALL)
G98A Cavitron® Scaler Module Assembly
SECTiON 12: Service parts, continued
26

30
321
21
BLUE
WHITE
BLACK
BLACK
RED
GREEN
BLACK
S1 S2
PIN 1
BROWN
BROWN
YELLOW
WHITEWIRE
REDWIRE
GREENWIRE
REDTUBING
ITEM 3
ITEM 2
ITEM 1
ITEM QUANTITY PART NO. DESCRIPTION1 1 80949 CONTROL CABLE ASSEMBLY2 1 80950 POWER CABLE ASSEMBLY3 1 80951 HANDPIECE CABLE HARNESS
G98A Cavitron® Scaler Harness Assemblies
SECTiON 12: Service parts, continued
27

31
1
2
ITEM QUANTITY PART NO. DESCRIPTION1 1 79924 SOLENOID ASSEMBLY (WITH FITTINGS)2 1 629195002 WATER REGULATOR ASSEMBLY (WITH FITTINGS)
G98A Cavitron® Scaler Water Solenoid and Regulator
WATER
SECTiON 12: Service parts, continued
28

ITEM 2
ITEM 1
32
ITEM QUANTITY PART NO. DESCRIPTION1 1 81020-3 UNIVERSAL SPS CONTROL PC BOARD ASSEMBLY2 1 81101 POWER DRIVE PC BOARD ASSEMBLY
G98A Cavitron® Scaler PC Board Assemblies
SECTiON 12: Service parts, continued
29

33
SPSCAVITRONPower 21
43
65
ITEM QUANTITY PART NO. DESCRIPTION1 1 80502 KNOB, MOLDED BLUE2 1 80843 COVER, DECORATED3 1 78688 30K STERI-MATETM HANDPIECE, DECORATED 1-PACK
1 78703 30K STERI-MATETM HANDPIECE, DECORATED 3-PACK
4 1 812794-FOOT HANDPIECE CABLE, DECORATED SURF WITH SWIVEL AND FLOW CONTROL
812776.5-FOOT HANDPIECE CABLE, DECORATED BLACK WITH SWIVEL AND FLOW CONTROL
812790111-FOOT HANDPIECE CABLE, DECORATED SURF WITH SWIVEL AND FLOW CONTROL
5 1 79357 O-RING, STERI-MATETM HP CABLE, 12 PACK6 1 776030267 O-RING, HANDPIECE PLUG
G98A Cavitron® Scaler Housing and Handpiece Assemblies
SECTiON 12: Service parts, continued
30

SECTiON 12: Service parts, continued
31 34
2
3
4
5
ITEM 1
ITEM QUANTITY PART NO. DESCRIPTION1 1 80918 INSTALLATION KIT (W/UNIT MOUNTING HARDWARE)2 2 625036012 TUBING, YELLOW, .062" ID (PER FOOT)3 1 623068001 RESTRICTOR ORIFICE, .005"4 3 623067001 TEE, FITTING, .062" ID5 12 80777 TUBING CLAMP, .19" ID
1 623066001 TEE, FITTING, .125" ID3 562098001 TUBING CLAMP, .25" ID3 587092001 LOCKNUT, NYLON INSERT3 588072010 WASHER, FLAT NYLON #6
G98A Cavitron® Scaler Installation Kit

Manufactured by:DENTSPLY ProfessionalDENTSPLY International1301 Smile WayYork, PA 17404-1785
Distributed by:DENTSPLY CanadaWoodbridge, OntarioL4L 4A3
Worldwide Service Centers
U n i te d S t a te s o f A m e ri c a
DENTSPLY ProfessionalTechnical Service and Repair Department1301 Smile WayYork, PA 17404-1785Phone: (800) 989-8826 or (717) 767-8502
D e u t s ch l a n d Fra n c e Au s t ra l i a
DENTSPLY DeTrey GmbH DENTSPLY DeTrey DENTSPLY (Australia) Pty. LtdDe-Trey-Strasse 1 17 Michael FARADAY 11-21 Gilby Road78467 Konstanz 78380 Montigny Le Bretonneux Mount Waverley, Victoria 3149Germany France AustraliaPhone: 7531 583 0 Phone: (1) 30 14 77 77 Phone: (61) 3-9538-8280
U n i te d K i n g d o m I t a l i a C a n a d a
DENTSPLY Ltd. DENTSPLY DeTrey Italia s.r.l. DENTSPLY CanadaHamm Moor Lane Via A. Cavaglieri, 26 161 Vinyl CourtAddlestone, Weybridge I-00173 Roma Woodbridge, OntarioSurrey KT15 2SE Italia L4L 4A3 CanadaEngland Phone: (06) 723 3626 Phone: (905) 851-6060Phone: (0) 1932 853422
Sw i s s R e p re s e n t a t i ve
DENTSPLY DeTrey SàrlBaar OfficeOberdorfstr. 116342 BaarSwitzerland
DENTSPLY DeTrey GmbHDe-Trey-Str. 178467 KonstanzGermany
FormNo.80839Rev.2.0(11/07)
Recommended