
RAINGARDENSYour Personal Contribution
to Cleaner Water
A HOW-TO MANUAL FOR HOMEOWNERS
PRODUCTION CREDITSThis manual is a product of the TAPP (Think About Personal Pollution) Campaign, which is funded by a Section 319 Nonpoint Source Management grant from the U.S. Environmental Protection Agency to the City of Tallahassee through the Florida Department of Environmental Protection and administered by the City of Tallahassee Stormwater Management Division.
John M. Buss, DirectorBlas J. Gomez, Grant Manager
Original concept and illustrations for this manual were derived from Rain Gardens – A how-to manual for homeowners, produced by the University of Wisconsin Extension Service. Material has been revised and edited for application to the North Florida and Gulf Coastal climes by Nancy Miller; Yasmeen Barnes-Nkrumah; John Cox; Master Gardeners Pam Sawyer, Dr. Paul Elliott and Dr. Ed Schroeder; and Florida Department of Environmental Protection Project Manager Patti Sanzone. Document design by Maria BalingitDesign. Photographs by Nancy Miller, Jesse Van Dyke and Maria Balingit.
TAPPmanual_1-28.indd 1 3/19/07 12:07:44 PM

TABLE OF CONTENTSINTRODUCTION ................................................ 3
Why Are Rain Gardens Important?
Facts about rain gardens ....................................... 4
Rain garden FAQs ............................................... 5
STEP ONE: Siting and Sizing the Rain Garden
Where should the garden be located? ......................... 6
What size and shape should the garden be? ................... 7
What type of soil makes up your rain garden site? ............ 8
How large is the area draining to your rain garden? ........... 8
How deep should the rain garden be? .......................... 10
Finding the slope of your yard .................................. 11
How much land should the rain garden take? .................. 12
How long and wide should the rain garden be? ................. 14
STEP TWO: Building the Rain Garden
Remember to call before you dig! .............................. 15
Digging the rain garden ......................................... 17
Leveling the rain garden ........................................ 18
Building the rain garden berm .................................. 18
STEP THREE: Planting and Maintenance
Planting the garden ............................................. 19
Maintaining your rain garden ................................... 19
HELPFUL TIPS: Rain Garden Design and Planting ............. 20
APPENDICES: Plant Lists and Soil Tests
Ground Covers and Perennials .................................. 22
Trees and Shrubs ............................................... 24
Percolation Test ................................................ 26
Test for Clay .................................................... 26
WORK SHEETS .................................................. 27
2 Rain Gardens: A How-to Manual for Homeowners
TAPPmanual_1-28.indd 2 3/19/07 12:07:50 PM
INTRODUCTION
Rain Gardens:A how-to manual for homeowners
“A rain garden allows approximately 30 percent more water to soak into the ground compared toa conventional lawn.”
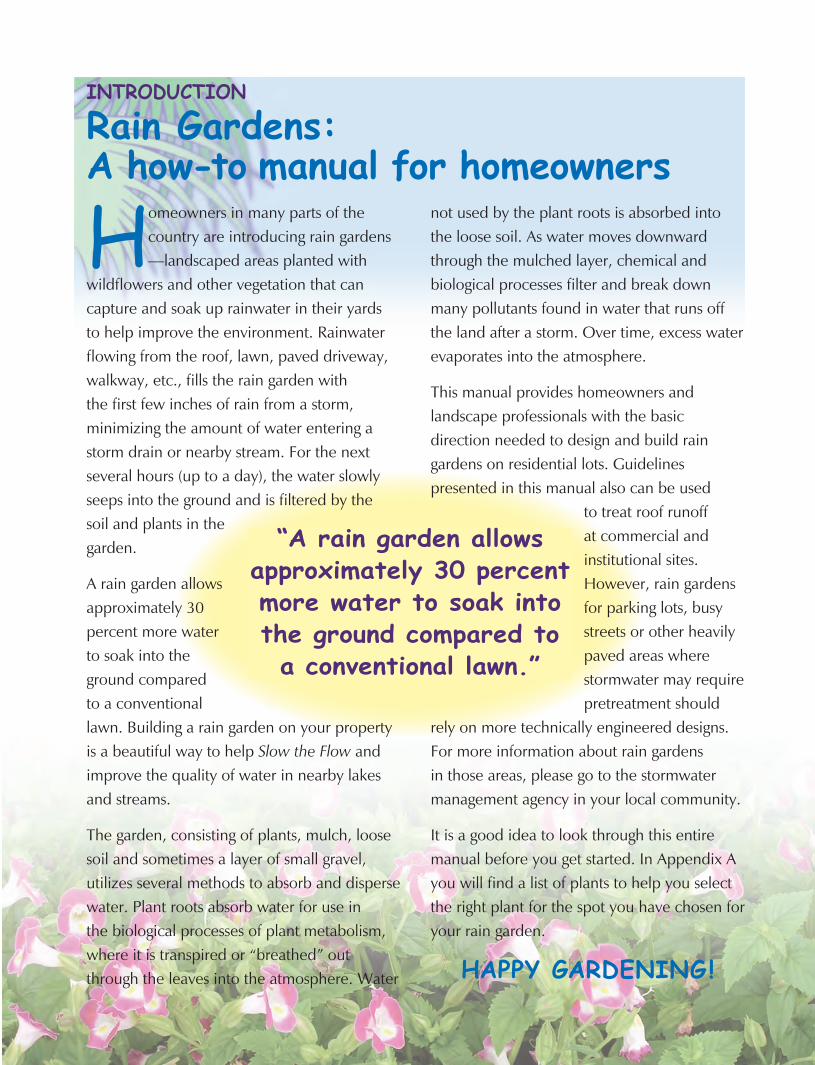
not used by the plant roots is absorbed into the loose soil. As water moves downward through the mulched layer, chemical and biological processes fi lter and break down many pollutants found in water that runs off the land after a storm. Over time, excess water evaporates into the atmosphere.
This manual provides homeowners and landscape professionals with the basic direction needed to design and build rain gardens on residential lots. Guidelines presented in this manual also can be used
to treat roof runoff at commercial and institutional sites. However, rain gardens for parking lots, busy streets or other heavily paved areas where stormwater may require pretreatment should
rely on more technically engineered designs. For more information about rain gardens in those areas, please go to the stormwater management agency in your local community.
It is a good idea to look through this entire manual before you get started. In Appendix A you will fi nd a list of plants to help you select the right plant for the spot you have chosen for your rain garden.
HAPPY GARDENING!
Homeowners in many parts of the country are introducing rain gardens —landscaped areas planted with
wildfl owers and other vegetation that can capture and soak up rainwater in their yards to help improve the environment. Rainwater fl owing from the roof, lawn, paved driveway, walkway, etc., fi lls the rain garden with the fi rst few inches of rain from a storm, minimizing the amount of water entering a storm drain or nearby stream. For the next several hours (up to a day), the water slowly seeps into the ground and is fi ltered by the soil and plants in the garden.
A rain garden allows approximately 30 percent more water to soak into the ground compared to a conventional lawn. Building a rain garden on your property is a beautiful way to help Slow the Flow and improve the quality of water in nearby lakes and streams.
The garden, consisting of plants, mulch, loose soil and sometimes a layer of small gravel, utilizes several methods to absorb and disperse water. Plant roots absorb water for use in the biological processes of plant metabolism, where it is transpired or “breathed” out through the leaves into the atmosphere. Water
TAPPmanual_1-28.indd 3 3/19/07 12:07:53 PM

Why are rain gardens important?
As cities and suburbs continue to displace forests, wetlands, and open spaces, increased stormwater runoff
from impervious (non-absorptive) surfaces, such as roofs and pavement, has become problematic. Stormwater runoff increases fl ooding and carries pollutants from streets, parking lots and lawns into local lakes and streams. Local municipalities are challenged to fund costly stormwater treatment facilities in order to clean the water. This “personal pollution” from our lawns and property contributes to the pollution of local waterways.
Rain gardens can help improve the quality of our local waters and the environmental health of our communities by reducing the amount of stormwater leaving our yards. While an individual rain garden may seem like a small thing, collectively several rain gardens can produce substantial neighborhood and community environmental benefi ts.
Facts about rain gardens» Rain gardens increase the amount
of water that filters into the ground, recharging the groundwater supplies from which we draw our drinking water.
» Rain gardens help provide protection from flooding and aid in solving drainage problems.
» Rain gardens help protect our streams, lakes and rivers from pollutants such as lawn fertilizers, pesticides, oil and other substances that wash off lawns, roofs, and paved areas that are carried in stormwater. The rain garden can collect and filter most of these pollutants, protecting and cleaning the water.
» Rain gardens help protect structures and other vegetation in your yard from flowing water.
» Rain gardens enhance the beauty of yards and neighborhoods.
» Rain gardens provide valuable habitats for birds, butterflies and many beneficial insects.
» Rain gardens are fairly simple to build and yield lots of benefits.
“Rain gardens increasethe amount of water that filtersinto the ground, recharging the groundwatersupplies from which we draw our drinking water.”
4 Rain Gardens: A How-to Manual for Homeowners
TAPPmanual_1-28.indd 4 3/19/07 12:07:56 PM

Rain garden FAQs
Does a rain garden form a pond?NO. The rainwater should soak into the ground and be utilized by the vegetation so that the garden is dry between rainfalls. (Note: Some rain gardens can be designed to include a permanent pond, but that type of rain garden is not addressed in this publication.)
Will a rain garden provide a breeding ground for mosquitoes?NO, the opposite. Mosquitoes need several days to lay and hatch eggs. Standing water in the garden should last for only a few hours after most storms. Mosquitoes are more likely to lay eggs in birdbaths, plant pots, and old tires than in a rain garden. Also, rain gardens attract dragonflies, and dragonflies eat mosquitoes.
Does a rain garden require a lot of maintenance?NO. Rain gardens can be maintained with little effort once the plants are established. As with any garden, some weeding and watering will be necessary in the first two years and perhaps some thinning in later years as plants mature.
Is a rain garden expensive?It doesn’t have to be. The cost is site specific and will vary depending on who does the work and what plants you select. To keep costs down you can invite family and friends to help build the garden or start with smaller planted areas.
Storm drain and street
The rain garden is placed to receive roof water from the downspout. A shallow
swale helps channel water from the house to the garden.
The middle of the rain garden will hold water during a heavy downpour, so that runoff can gradually soak into the ground.
Minimum of one percent slope to garden.
Rain garden
Illustration by M. Balingit
Your Personal Contribution to Cleaner Water 5
TAPPmanual_1-28.indd 5 3/19/07 12:08:00 PM
STEP ONE
Siting and Sizing the Rain GardenThis section covers rain garden placement, size, depth, length, width, soils and slopes. The best way to ensure a successful rain garden project is to follow the instructions in this section.
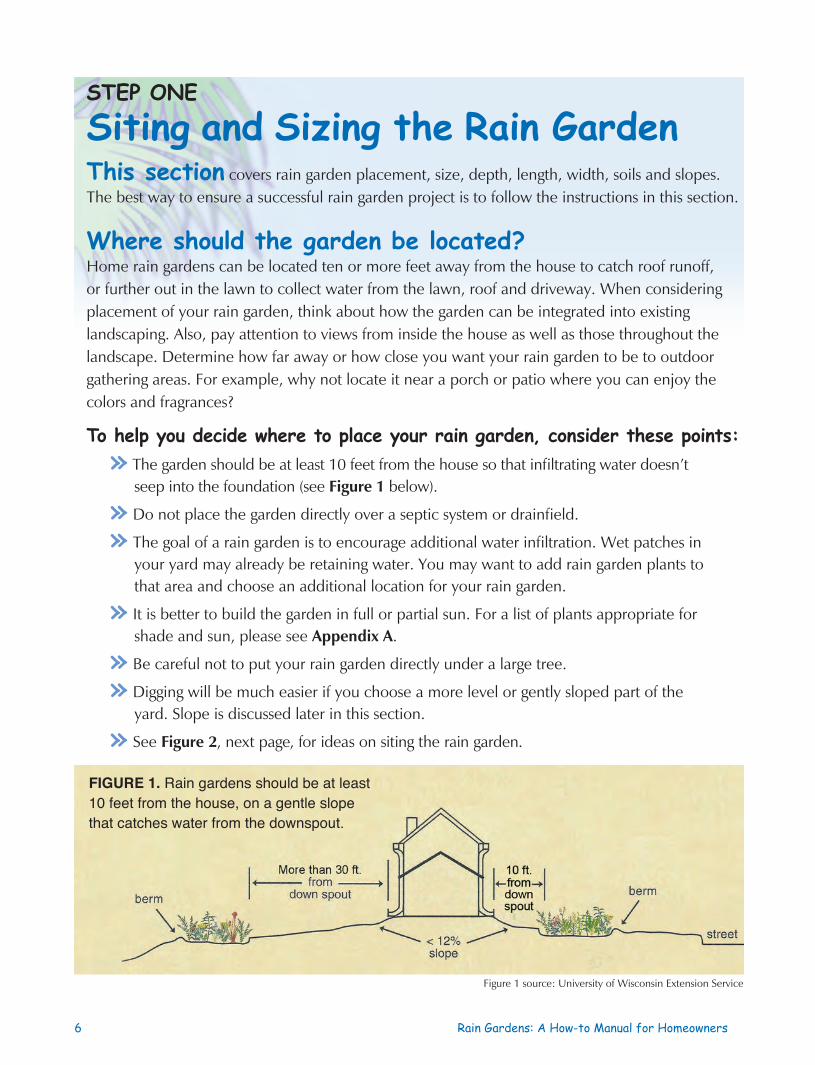
Where should the garden be located?Home rain gardens can be located ten or more feet away from the house to catch roof runoff, or further out in the lawn to collect water from the lawn, roof and driveway. When considering placement of your rain garden, think about how the garden can be integrated into existing landscaping. Also, pay attention to views from inside the house as well as those throughout the landscape. Determine how far away or how close you want your rain garden to be to outdoor gathering areas. For example, why not locate it near a porch or patio where you can enjoy the colors and fragrances?
To help you decide where to place your rain garden, consider these points:» The garden should be at least 10 feet from the house so that infi ltrating water doesn’t
seep into the foundation (see Figure 1 below).
» Do not place the garden directly over a septic system or drainfi eld.
» The goal of a rain garden is to encourage additional water infi ltration. Wet patches in your yard may already be retaining water. You may want to add rain garden plants to that area and choose an additional location for your rain garden.
» It is better to build the garden in full or partial sun. For a list of plants appropriate for shade and sun, please see Appendix A.
» Be careful not to put your rain garden directly under a large tree.
» Digging will be much easier if you choose a more level or gently sloped part of the yard. Slope is discussed later in this section.
» See Figure 2, next page, for ideas on siting the rain garden.
FIGURE 1. Rain gardens should be at least 10 feet from the house, on a gentle slope that catches water from the downspout.
Figure 1 source: University of Wisconsin Extension Service
6 Rain Gardens: A How-to Manual for Homeowners
TAPPmanual_1-28.indd 6 3/19/07 12:08:02 PM
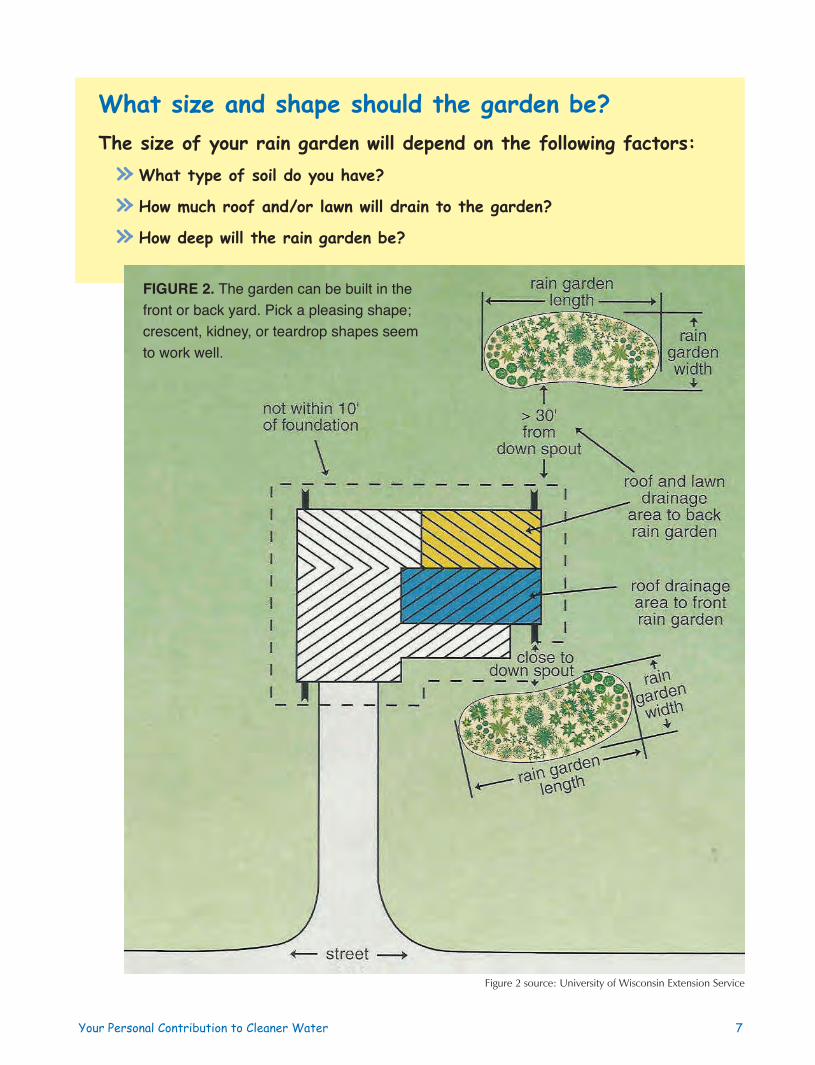
What size and shape should the garden be?The size of your rain garden will depend on the following factors:
» What type of soil do you have?
» How much roof and/or lawn will drain to the garden?
» How deep will the rain garden be?
FIGURE 2. The garden can be built in the front or back yard. Pick a pleasing shape; crescent, kidney, or teardrop shapes seem to work well.
Figure 2 source: University of Wisconsin Extension Service
Your Personal Contribution to Cleaner Water 7
TAPPmanual_1-28.indd 7 3/19/07 12:08:03 PM

What type of soil makes up yourrain garden site?It is very important to identify your soil type: sandy, silty, or clay. Sandy soils provide the fastest infiltration; clay soils have the slowest. Since clay soils take longer to absorb water, rain gardens in clay soils must be larger than rain gardens in sandy or silty soils. If the soil feels gritty and coarse, you probably have sandy soil. If your soil is smooth, but not sticky, you have silty soil. If it is very sticky and clumpy, you probably have clay soil.
Refer to APPENDIX Bfor two simple soil tests to determine your soil type. If you have questions about your soil, call the Leon County Agricultural Extension Office at850-606-5202.
How large is the area draining to your rain garden?In choosing your rain garden site, determine the size of the area draining into the garden. The larger the drainage area, the larger the size of the rain garden. There is a little guesswork in determining the size of a drainage area, especially if a large part of the lawn is uphill from the proposed garden site. Use the suggestions below to estimate the drainage area. See Example next page.
For rain gardens located 10 to 30 feet from a downspout:
1 When the rain garden is closer to the house, almost all of the water will come from the roof and downspout. Walk around the house and estimate what percent of the roof feeds to that downspout. Many houses have four downspouts, each taking about 25 percent of the roof’s runoff.
2 Next, to determine the size of your roof, find your home’s footprint: the area (square footage) of the first floor. If you don’t already know it, use a tape measure to find your home’s length and width. Multiply the length and width together to find the approximate square footage (area) of your roof. You don’t have to be exact, just get a good idea of the size of your roof.
3 Finally, multiply the approximate roof area by that part (percentage) of the roof that feeds to the downspout draining to the rain garden (Step 1). This is the roof area that drains to the rain garden.
8 Rain Gardens: A How-to Manual for Homeowners
TAPPmanual_1-28.indd 8 3/19/07 12:08:04 PM

EXAMPLE
Calculating the roof area draining to your rain gardenYour house is 60 feet long x 40 feet wide.
To calculate the roof area, multiply 60 x 40 = 2,400.
Your roof area is 2,400 square feet.
You estimate that a certain downspout collects water from 25 percent of the 2,400 square foot roof. To calculate the drainage area, multiply 2,400 x 0.25 = 600 square feet.
A 600 square foot portion of the roof drains into the rain garden.
NOTE: If your lawn is sloped, also note the Example on page 11.
For rain gardens more than 30 feet from the downspout:
1 If there is a significant area of lawn uphill that also will drain to the rain garden, this lawn area should be added to the roof drainage area. First, determine the roof drainage area using Steps 1-3 for a rain garden 10-30 feet from the downspout.
2 Next, find the area of the lawn that will drain to the rain garden. Stand where your garden will be and look up toward the house. Identify the part of the lawn sloping into the rain garden.
3 Measure the length and width of the uphill lawn. Multiply these two figures to find the lawn area in square feet.
4 Add the lawn area to the roof drainage area to find the total drainage area that will be directed to your rain garden. If your patio or driveway also drains to the rain garden, be sure to measure them as well and add that square footage to your total area.
Your Personal Contribution to Cleaner Water 9
TAPPmanual_1-28.indd 9 3/19/07 12:08:05 PM
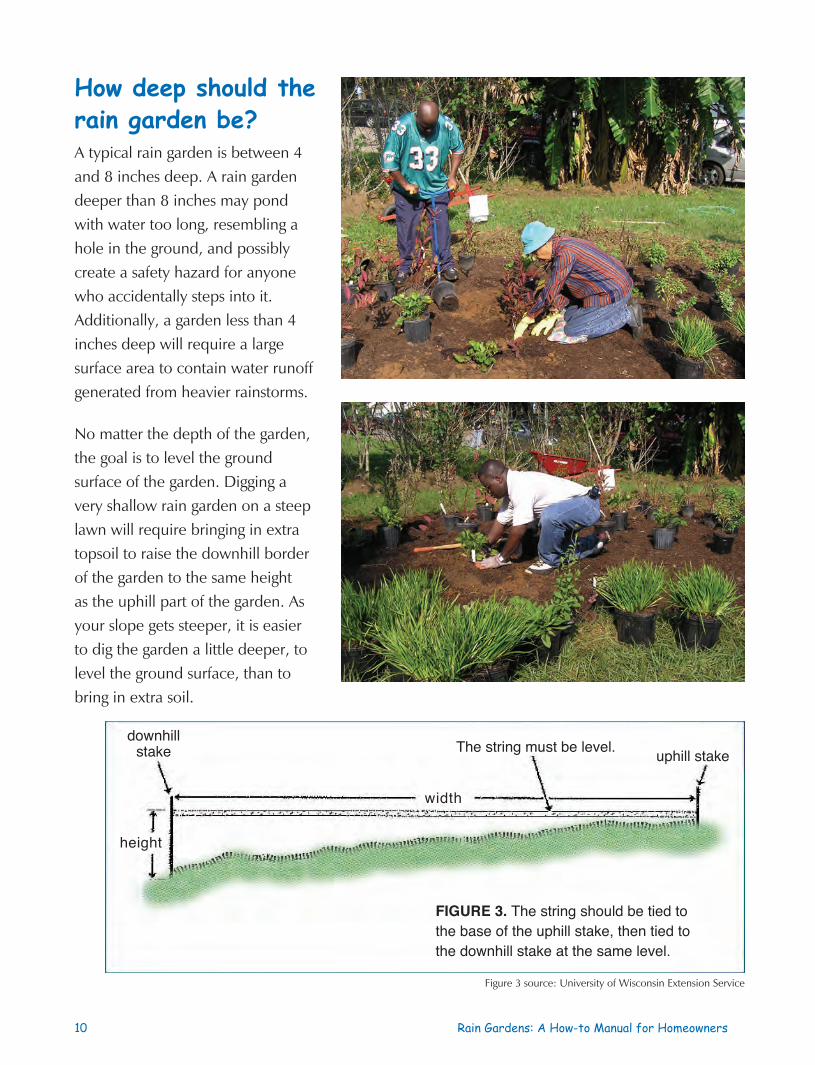
How deep should the rain garden be?A typical rain garden is between 4 and 8 inches deep. A rain garden deeper than 8 inches may pond with water too long, resembling a hole in the ground, and possibly create a safety hazard for anyone who accidentally steps into it. Additionally, a garden less than 4 inches deep will require a large surface area to contain water runoff generated from heavier rainstorms.
No matter the depth of the garden, the goal is to level the ground surface of the garden. Digging a very shallow rain garden on a steep lawn will require bringing in extra topsoil to raise the downhill border of the garden to the same height as the uphill part of the garden. As your slope gets steeper, it is easier to dig the garden a little deeper, to level the ground surface, than to bring in extra soil.
FIGURE 3. The string should be tied to the base of the uphill stake, then tied to the downhill stake at the same level.
downhillstake
width
height
uphill stakeThe string must be level.
Figure 3 source: University of Wisconsin Extension Service
10 Rain Gardens: A How-to Manual for Homeowners
TAPPmanual_1-28.indd 10 3/19/07 12:08:09 PM

Finding the slope of your yard(See Figure 3, preceding page.) The slope of the lawn should determine the depth of the garden. Follow these six steps to fi nd the slope of your lawn.
1 Pound one stake into the ground at the uphill end of your rain garden site, and pound a second stake in at the downhill end, about 15 feet away.
2 Tie a string to the bottom of the uphill stake and run the string horizontally across the garden site to the downhill stake.
3 Using a carpenter’s or string level, make the string level and tie the string to the downhill stake at that height.
EXAMPLE
How to Calculate Slope and DepthThe horizontal distance of the string between the stakes is 180 inches. The string’s vertical height on the downhill stake is 9 inches. Divide the height by the (horizontal) distance between stakes and multiply by 100 to find your lawn’s percentage slope.
9 inch height 1
180 inch width 20
0.05 X 100 = 5 percent slope
PERCENT of your slope Recommended DEPTH
Less than 5 percent 5 inches deep
5 to 7 percent 6 to 7 inches deep
7 to 12 percent about 8 inches deep
MATERIALS LIST
String and ruler
Carpenter’s level
or string level
Two wooden stakes
Calculator (optional)
4 Measure along the string between the two stakes for the horizontal width.
5 Now measure the vertical height on the downhill stake between the ground and the string.
6 Divide the vertical height by the horizontal width and multiply the result by 100 to fi nd the lawn’s percent slope (see Example below). If the slope is more that 12 percent, it’s best to fi nd a more gently sloped site, or talk to a professional landscaper.
Using the slope of your lawn, select the depth of the rain garden, e.g., based on a 5 percent slope, build the rain garden 6 to 7 inches deep.
= 0.05=
Your Personal Contribution to Cleaner Water 11
TAPPmanual_1-28.indd 11 3/19/07 12:08:19 PM

How much land should the rain garden take?
The surface area or square footage of the rain garden can be almost any size, but time and cost will always be important considerations in sizing decisions. Any reasonably sized garden will capture some stormwater runoff, and every bit you capture helps.
A typical residential rain garden ranges from 100 to 300 square feet. Gardens smaller than 100 square feet will limit the number of plants you can plant. The larger the rain garden, the more opportunity you have to plant a variety of plants. A large garden of more than 300 square feet will take longer to dig and will be more difficult to make level.
The sizing guidelines described in this manual are based on a goal of controlling 100 percent of the runoff from your determined drainage area for the average rainfall, while keeping the rain garden size reasonable. A goal of retaining all of the water that falls on your roof, yard and driveway helps compensate for any error that may creep into the design and construction of the project.
If you follow the guidelines presented in this manual and decide the calculated surface area is just too large, it is perfectly okay to make the garden smaller or create a series of rain gardens. The rain garden can be up to 30 percent smaller and still control up to 90 percent of the annual runoff. On the other hand, it is fine to make the garden bigger than the guidelines indicate. Any actions you take will help reach the ultimate goal of slowing the flow and reducing the amount of water that drains from your property.
Now that you have estimated the drainage area, soil type and depth for your garden, use Table 1 or 2 (next page) to help determine the garden’s surface area. Use Table 1 if the garden is 10 to 30 feet from the downspout; use Table 2 if it is more than 30 feet from the downspout. Next, follow the steps below to size the garden.
1 To find the size factor for the soil type and rain garden depth, refer to Table 1 or 2.
2 Multiply the size factor by the drainage area you calculated above. This number is the recommended rain garden area.
3 If the recommended garden surface area is much more than 300 square feet, distribute the area requirement into two or more smaller rain gardens.
Choose a size that is best for your yard. Remember that these are only guidelines. The size of the garden also depends on how much room you have in your yard, how much runoff you wish to contain and how much you want to spend.
12 Rain Gardens: A How-to Manual for Homeowners
TAPPmanual_1-28.indd 12 3/19/07 12:08:20 PM
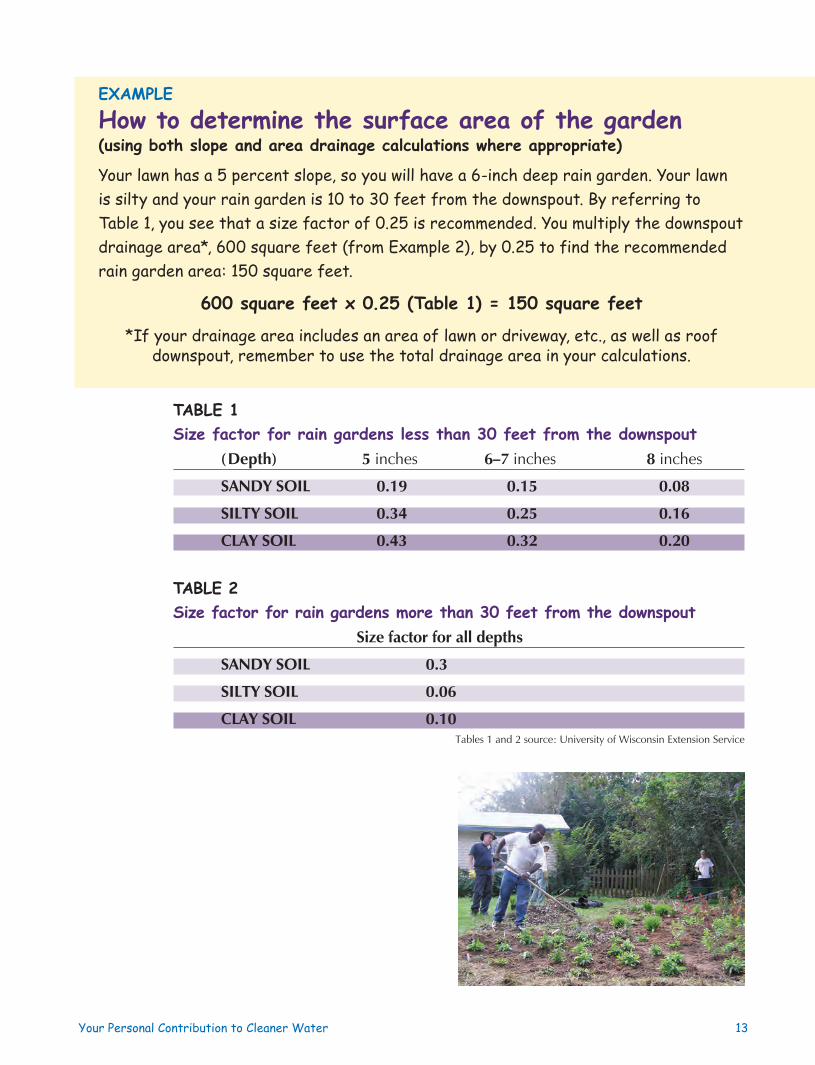
TABLE 1Size factor for rain gardens less than 30 feet from the downspout
(Depth) 5 inches 6–7 inches 8 inches
SANDY SOIL 0.19 0.15 0.08
SILTY SOIL 0.34 0.25 0.16
CLAY SOIL 0.43 0.32 0.20
TABLE 2Size factor for rain gardens more than 30 feet from the downspout
Size factor for all depths
SANDY SOIL 0.3
SILTY SOIL 0.06
CLAY SOIL 0.10Tables 1 and 2 source: University of Wisconsin Extension Service
EXAMPLE
How to determine the surface area of the garden(using both slope and area drainage calculations where appropriate)
Your lawn has a 5 percent slope, so you will have a 6-inch deep rain garden. Your lawn is silty and your rain garden is 10 to 30 feet from the downspout. By referring to Table 1, you see that a size factor of 0.25 is recommended. You multiply the downspout drainage area*, 600 square feet (from Example 2), by 0.25 to find the recommended rain garden area: 150 square feet.
600 square feet x 0.25 (Table 1) = 150 square feet
*If your drainage area includes an area of lawn or driveway, etc., as well as roof downspout, remember to use the total drainage area in your calculations.
Your Personal Contribution to Cleaner Water 13
TAPPmanual_1-28.indd 13 3/19/07 12:08:21 PM

Before building the rain garden, think about how it will catch water. Runoff will flow out of a downspout and should spread evenly across the entire uphill (top) border of the garden. The base of the garden must be as level as possible so water doesn’t pool at one end or spill out before it has a chance to infiltrate (Figure 4).
The longer side of the garden should face uphill —that is, the top edge of the garden should be perpendicular to the slope and the downspout. This way the garden catches as much water as possible. Still, the garden should be wide enough for the water to spread evenly over the whole bottom surface and provide enough space to plant a variety of plants.
A good rule of thumb is that the rain garden should be much longer than it is wide.
When deciding the width of the garden, remember the slope of the lawn. Wide rain gardens and those on steep slopes will need to be dug deeper at the top end in order to be level. If the garden is too wide, you may need to bring in additional soil to fill in the downhill portion of the rain garden to make it level. Experience shows that making a rain garden about 10 feet wide is a good compromise between the effect of slope and how deep the garden should be.
The rain garden’s maximum width should be about 15 feet, especially for lawns with more than an 8 percent slope. See the Example below.
How long and wide should the rain garden be?
EXAMPLE
How to determine the length of the garden1. Choose a rain garden width suitable for your lawn and landscaping—
for example, ten feet.
2. Divide the square footage of your garden by its width to find your garden’s length.
You want a rain garden that is 10 feet wide, so divide 150 square feet(page 13 Example) by the 10-foot width to calculate your rain garden’s length.
The length in this example is 15 feet.
FIGURE 4. The top of the downhill part of the berm should come up to the same elevation as the entry to the rain garden at the uphill end.
Length = 15 feet
Wid
th =
10
feet
Figure 4 source: University of Wisconsin Extension Service
14 Rain Gardens: A How-to Manual for Homeowners
TAPPmanual_1-28.indd 14 3/19/07 12:08:23 PM
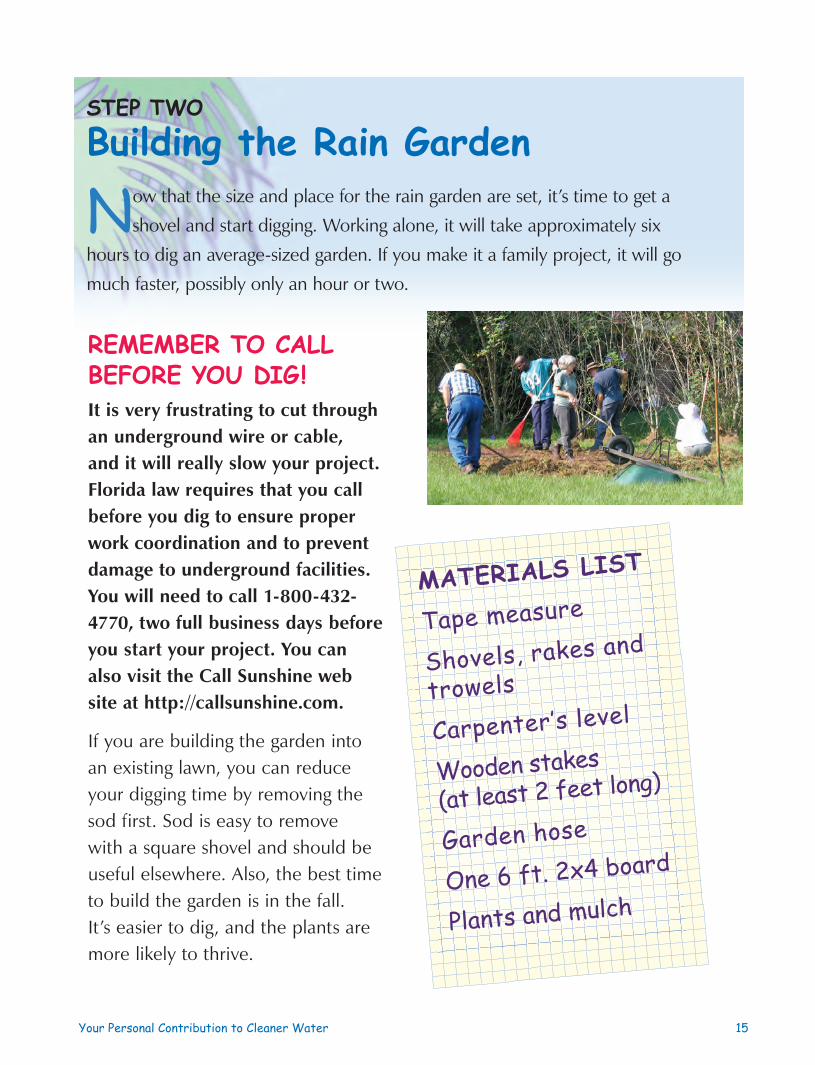
STEP TWO
Building the Rain Garden
Now that the size and place for the rain garden are set, it’s time to get a
shovel and start digging. Working alone, it will take approximately six
hours to dig an average-sized garden. If you make it a family project, it will go
much faster, possibly only an hour or two.
REMEMBER TO CALL BEFORE YOU DIG!It is very frustrating to cut through an underground wire or cable, and it will really slow your project. Florida law requires that you call before you dig to ensure proper work coordination and to prevent damage to underground facilities. You will need to call 1-800-432-4770, two full business days before you start your project. You can also visit the Call Sunshine web site at http://callsunshine.com.
If you are building the garden into an existing lawn, you can reduce your digging time by removing the sod first. Sod is easy to remove with a square shovel and should be useful elsewhere. Also, the best time to build the garden is in the fall. It’s easier to dig, and the plants are more likely to thrive.
MATERIALS LIST
Tape measure
Shovels, rakes and
trowels
Carpenter’s level
Wooden stakes
(at least 2 feet long)
Garden hose
One 6 ft. 2x4 board
Plants and mulch
Your Personal Contribution to Cleaner Water 15
TAPPmanual_1-28.indd 15 3/19/07 12:08:43 PM
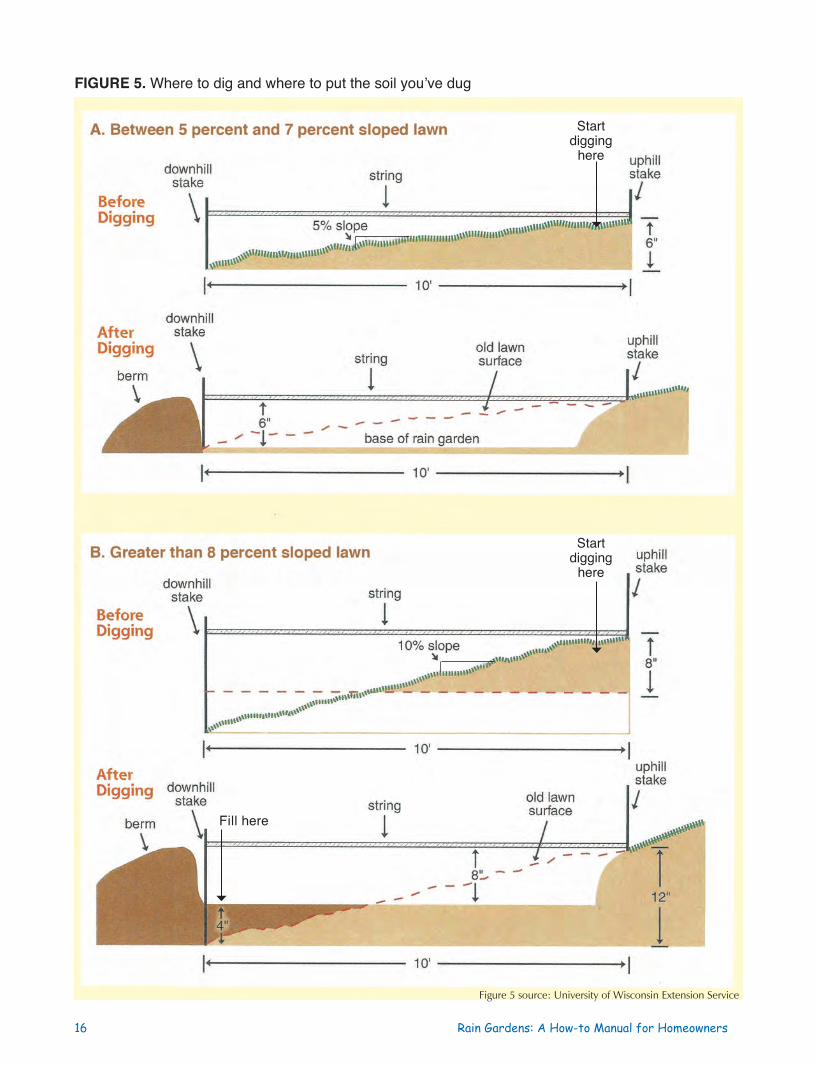
FIGURE 5. Where to dig and where to put the soil youʼve dug
Startdigging
here
Startdigging
here
Fill here
Figure 5 source: University of Wisconsin Extension Service
16 Rain Gardens: A How-to Manual for Homeowners
TAPPmanual_1-28.indd 16 3/19/07 12:08:49 PM
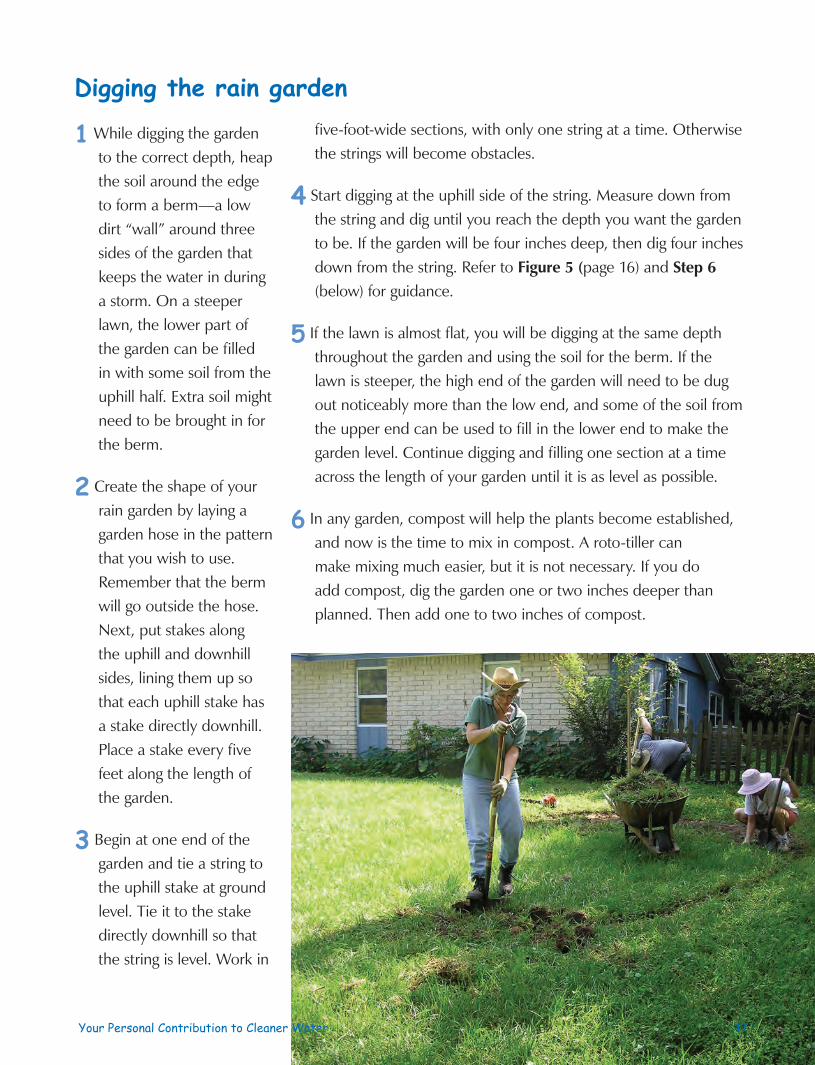
Digging the rain garden
1 While digging the garden to the correct depth, heap the soil around the edge to form a berm—a low dirt “wall” around three sides of the garden that keeps the water in during a storm. On a steeper lawn, the lower part of the garden can be filled in with some soil from the uphill half. Extra soil might need to be brought in for the berm.
2 Create the shape of your rain garden by laying a garden hose in the pattern that you wish to use. Remember that the berm will go outside the hose. Next, put stakes along the uphill and downhill sides, lining them up so that each uphill stake has a stake directly downhill. Place a stake every five feet along the length of the garden.
3 Begin at one end of the garden and tie a string to the uphill stake at ground level. Tie it to the stake directly downhill so that the string is level. Work in
five-foot-wide sections, with only one string at a time. Otherwise the strings will become obstacles.
4 Start digging at the uphill side of the string. Measure down from the string and dig until you reach the depth you want the garden to be. If the garden will be four inches deep, then dig four inches down from the string. Refer to Figure 5 (page 16) and Step 6 (below) for guidance.
5 If the lawn is almost flat, you will be digging at the same depth throughout the garden and using the soil for the berm. If the lawn is steeper, the high end of the garden will need to be dug out noticeably more than the low end, and some of the soil from the upper end can be used to fill in the lower end to make the garden level. Continue digging and filling one section at a time across the length of your garden until it is as level as possible.
6 In any garden, compost will help the plants become established, and now is the time to mix in compost. A roto-tiller can make mixing much easier, but it is not necessary. If you do add compost, dig the garden one or two inches deeper than planned. Then add one to two inches of compost.
Your Personal Contribution to Cleaner Water 17
TAPPmanual_1-28.indd 17 3/19/07 12:08:51 PM

Water flowing into the garden will naturally try to escape over the downhill edge. A berm is critical to help hold the water inside the garden. See Figure 5, page 16, and Figure 6, right.
The berm is a “wall” across the lower border and along the sides of the garden. The berm will need to be the highest at the downhill edge and should be as high as, or slightly higher than, the uphill edge. Moving along the sides up toward the front (top) edge of the garden, the berm will gradually become lower and finally taper off by the time it reaches the top of the garden.
On a more gradual slope there should be plenty of soil from excavating the garden to use for a berm. On a steeper slope, most of the soil from the uphill part of the garden will be used to fill the downhill half and additional soil may have to be brought in for the berm. After shaping the berm into a smooth ridge about a foot across, tamp it down to compact the soil. It is important to
have a strong, well-compacted berm, so tamp hard. The berm should have very gently sloping sides; this helps to smoothly integrate the garden with the surrounding lawn and also makes the berm much less susceptible to erosion.
To prevent erosion, cover the berm with mulch, lay sod, or plant a ground cover. You can also use straw or erosion control matting to protect the berm while the grass becomes established. If you don’t want to lay sod or mulch over the berm, you can also plant drought tolerant vegetation or winterize the berm with rye grass.
Building the rain garden berm
FIGURE 6. A berm is critical to help hold the water inside the rain garden.
Leveling the rain gardenOne way to check the level of the garden is to just “eyeball” it. For more accuracy, follow these steps:
1 When the whole area has been excavated to about the right depth, lay the 2x4 board in the garden with the carpenter’s level sitting on top. Find the spots that aren’t flat. Fill in the low places and dig out the high places.
2 Move the board to different places and different directions, filling and digging as necessary to make the surface level.
3 Once the garden is as level as you can make it, rake the soil smooth.
18 Rain Gardens: A How-to Manual for Homeowners
TAPPmanual_1-28.indd 18 3/19/07 12:08:52 PM
Weeding will probably be necessary for the fi rst year or two, as with any new garden. Remove by hand only those plants you are certain are weeds. Try to take the weeds out roots and all. Weeds may not be a problem in the second season, depending on the variety and tenacity of the type of weeds present. By year three and beyond, your rain garden plants will begin to mature and will
out-compete the weeds, although weeding isolated patches might still be needed occasionally.
After each growing season, the stems and seed heads can be left on for winter interest, wildlife cover, bird food and reseeding. Once spring arrives and new growth is 4 to 6 inches tall, cut back all tattered plants.
Maintaining your rain garden
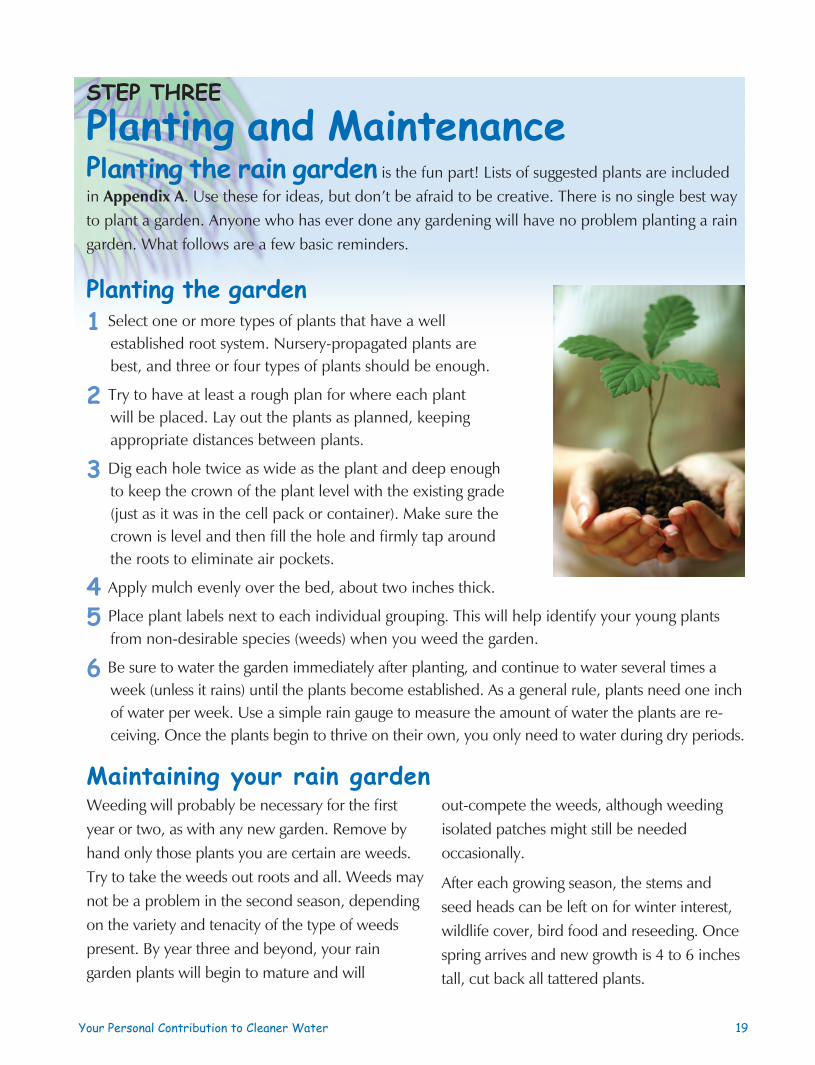
Planting the garden1 Select one or more types of plants that have a well
established root system. Nursery-propagated plants are best, and three or four types of plants should be enough.
2 Try to have at least a rough plan for where each plant will be placed. Lay out the plants as planned, keeping appropriate distances between plants.
3 Dig each hole twice as wide as the plant and deep enough to keep the crown of the plant level with the existing grade (just as it was in the cell pack or container). Make sure the crown is level and then fi ll the hole and fi rmly tap around the roots to eliminate air pockets.
4 Apply mulch evenly over the bed, about two inches thick.
5 Place plant labels next to each individual grouping. This will help identify your young plants from non-desirable species (weeds) when you weed the garden.
6 Be sure to water the garden immediately after planting, and continue to water several times a week (unless it rains) until the plants become established. As a general rule, plants need one inch of water per week. Use a simple rain gauge to measure the amount of water the plants are re-ceiving. Once the plants begin to thrive on their own, you only need to water during dry periods.
STEP THREE
Planting and MaintenancePlanting the rain garden is the fun part! Lists of suggested plants are included in Appendix A. Use these for ideas, but don’t be afraid to be creative. There is no single best way to plant a garden. Anyone who has ever done any gardening will have no problem planting a rain garden. What follows are a few basic reminders.
Your Personal Contribution to Cleaner Water 19
TAPPmanual_1-28.indd 19 3/19/07 12:08:56 PM
» Try incorporating a diverse mixture of sedges, rushes and grasses with your flowering species. This creates necessary root competition that will allow plants to follow their normal growth patterns and not outgrow or out-compete other species. In natural areas, a diversity of plant types not only adds beauty, but also creates a thick underground root matrix that keeps the entire plant community in balance. Once the rain garden has matured and your plants have established a deep, thick root system, there will be little change in species from year to year and weeds will naturally decline.
» Don’t forget to mulch. Composted yard debris and leaves are best. Mulch helps keep your soil moist, sup-presses weed growth, stabilizes soil temperatures, and reduces erosion and soil compaction.
» Finally, consider enhancing the garden by using local stone, ornamental fencing, garden benches or additional flower plantings. This will help give the new garden an intentional and cohesive look and provide a finished appearance that the neighbors will appreciate.
HELPFUL TIPS
Rain Garden Design and Planting» While rain gardens offer a
highly functional way to help protect water quality and prevent flooding, they are also gardens and should become an attractive part of your yard and neighborhood. Think of the rain garden in the context of your home’s overall landscape design.
» When choosing plants for the garden, it’s important to consider the height of each plant, bloom time and color, and the garden’s overall texture. Use plants that bloom at different times to create a long flowering season. Mix heights, shapes and textures to give the garden depth and dimension. This will keep the garden looking interesting even when few flowers are in bloom. Native plants make good choices because they are accustomed to the regional climate and rainfall patterns and will easily acclimate to the rain garden.
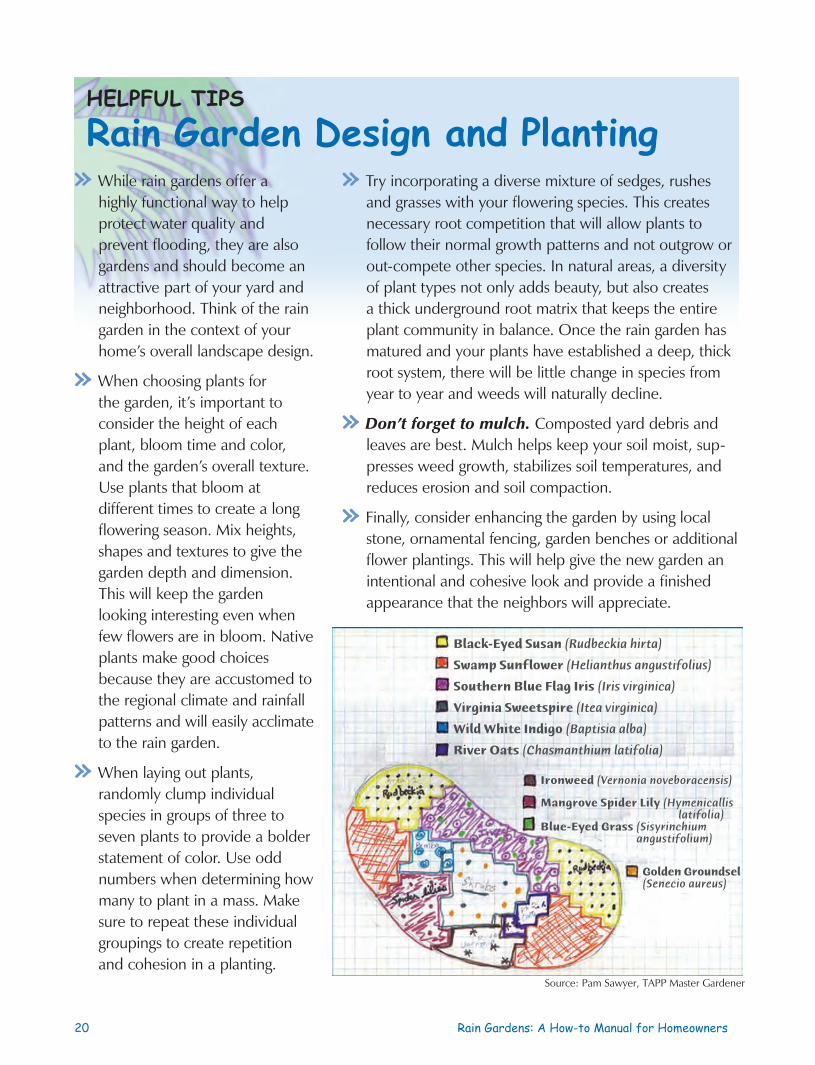
» When laying out plants, randomly clump individual species in groups of three to seven plants to provide a bolder statement of color. Use odd numbers when determining how many to plant in a mass. Make sure to repeat these individual groupings to create repetition and cohesion in a planting.
Source: Pam Sawyer, TAPP Master Gardener
Black-Eyed Susan (Rudbeckia hirta)
Swamp Sunflower (Helianthus angustifolius)
Southern Blue Flag Iris (Iris virginica)
Virginia Sweetspire (Itea virginica)
Wild White Indigo (Baptisia alba)
River Oats (Chasmanthium latifolia)
Ironweed (Vernonia noveboracensis)
Mangrove Spider Lily (Hymenicallislatifolia)
Blue-Eyed Grass (Sisyrinchiumangustifolium)
Golden Groundsel (Senecio aureus)
20 Rain Gardens: A How-to Manual for Homeowners
TAPPmanual_1-28.indd 20 3/19/07 12:08:58 PM

APPENDICES:
PLANT LISTS
and
SOIL TESTS
Your Personal Contribution to Cleaner Water 21
TAPPmanual_1-28.indd 21 3/19/07 12:09:02 PM
APP
ENDI
X A
: SUGGE
STED
PLA
NTS
FOR
YOUR
RAIN
GARD
EN
GROUND C
OVE
RS a
nd P
EREN
NIA
LSN
AME
TYPE
LI
GH
T RE
Q.
BLO
OM
SEA
SON
BLO
OM
CO
LOR
HEI
GH
TM
OIS
TURE
REQ
.C
OM
MEN
TS a
nd r
efer
ence
sou
rce
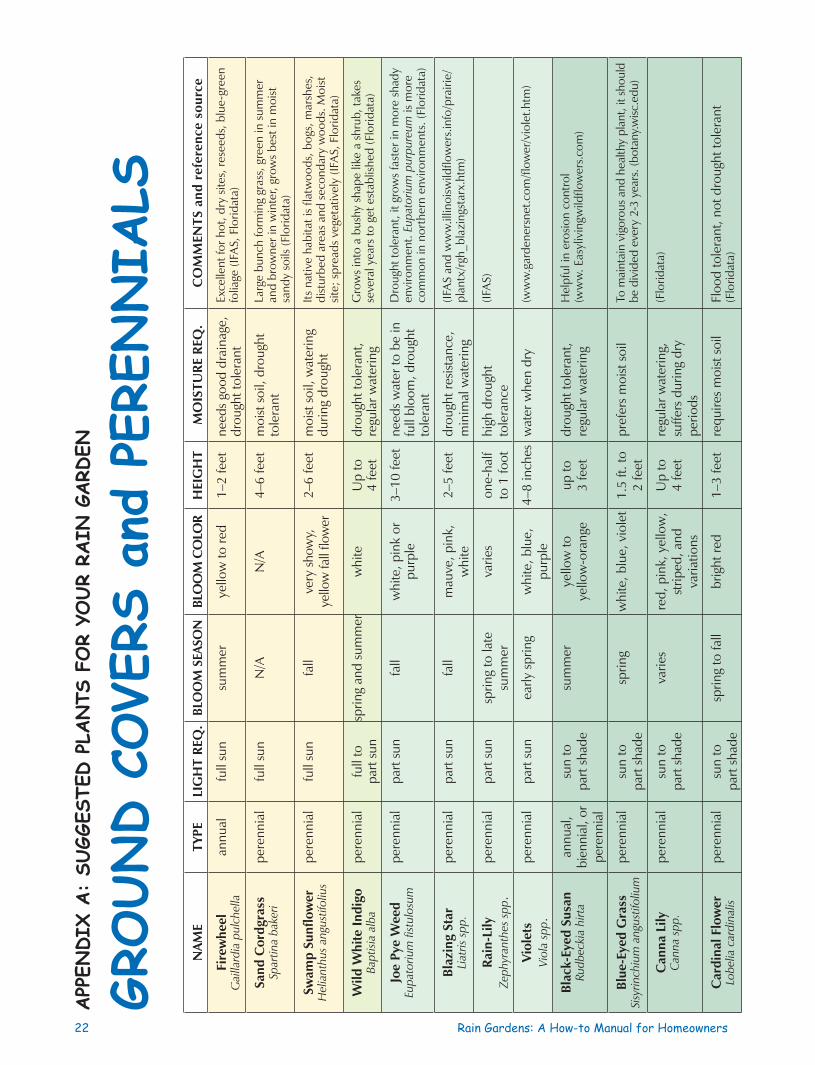
Fire
whe
elG
ailla
rdia
pul
chel
laan
nual
full
sun
sum
mer
yello
w to
red
1–2
feet
need
s go
od d
rain
age,
dr
ough
t tol
eran
tEx
celle
nt fo
r hot
, dry
site
s, re
seed
s, b
lue-
gree
n fo
liage
(IFA
S, F
lorid
ata)
Sand
Cor
dgra
ssSp
artin
a ba
keri
pere
nnia
lfu
ll su
n N
/AN
/A4–
6 fe
etm
oist
soi
l, dr
ough
t to
lera
ntLa
rge
bunc
h fo
rmin
g gr
ass,
gre
en in
sum
mer
an
d br
owne
r in
win
ter,
grow
s be
st in
moi
st
sand
y so
ils (F
lorid
ata)
Swam
p Su
nflo
wer
Hel
iant
hus
angu
stifo
lius
pere
nnia
lfu
ll su
n fa
llve
ry sh
owy,
yello
w fa
ll flo
wer
2–6
feet
moi
st s
oil,
wat
erin
g du
ring
drou
ght
Its n
ativ
e ha
bita
t is
flatw
oods
, bog
s, m
arsh
es,
dist
urbe
d ar
eas
and
seco
ndar
y w
oods
. Moi
st
site;
spr
eads
veg
etat
ivel
y (IF
AS,
Flo
ridat
a)
Wild
Whi
te In
digo
Bapt
isia
alba
pere
nnia
lfu
ll to
part
sun
sprin
g an
d su
mm
erw
hite
Up
to4
feet
drou
ght t
oler
ant,
regu
lar w
ater
ing
Gro
ws
into
a b
ushy
sha
pe li
ke a
shr
ub, t
akes
se
vera
l yea
rs to
get
est
ablis
hed
(Flo
ridat
a)
Joe
Pye
Wee
dEu
pato
rium
fist
ulos
umpe
renn
ial
part
sun
fall
whi
te, p
ink
or
purp
le3–
10 fe
etne
eds
wat
er to
be
in
full
bloo
m, d
roug
ht
tole
rant
Dro
ught
tole
rant
, it g
row
s fa
ster
in m
ore
shad
y en
viro
nmen
t. Eu
pato
rium
pur
pure
um i s
mor
e co
mm
on in
nor
ther
n en
viro
nmen
ts. (
Flor
idat
a)
Blaz
ing
Star
Liat
ris s
pp.
pere
nnia
lpa
rt su
nfa
llm
auve
, pin
k,
whi
te2–
5 fe
etdr
ough
t res
istan
ce,
min
imal
wat
erin
g(IF
AS
and
ww
w.il
linoi
swild
flow
ers.i
nfo/
prai
rie/
plan
tx/r
gh_b
lazi
ngst
arx.
htm
)
Rain
-Lily
Zeph
yran
thes
spp
.pe
renn
ial
part
sun
sprin
g to
late
su
mm
erva
ries
one-
half
to 1
foot
high
dro
ught
to
lera
nce
(IFA
S)
Viol
ets
Viol
a sp
p.pe
renn
ial
part
sun
early
spr
ing
whi
te, b
lue,
pu
rple
4–8
inch
esw
ater
whe
n dr
y(w
ww
.gar
dene
rsne
t.com
/flow
er/v
iole
t.htm
)
Blac
k-Ey
ed S
usan
Rudb
ecki
a hi
rta
annu
al,
bien
nial
, or
pere
nnia
l
sun
topa
rt sh
ade
sum
mer
yello
w to
yello
w-o
rang
eup
to3
feet
drou
ght t
oler
ant,
regu
lar w
ater
ing
Hel
pful
in e
rosio
n co
ntro
l(w
ww
. Eas
yliv
ingw
ildflo
wer
s.com
)
Blue
-Eye
d G
rass
Sisy
rinch
ium
ang
ustif
oliu
mpe
renn
ial
sun
topa
rt sh
ade
sprin
gw
hite
, blu
e, v
iole
t1.
5 ft.
to2
feet
pref
ers
moi
st s
oil
To m
aint
ain
vigo
rous
and
hea
lthy
plan
t, it
shou
ld
be d
ivid
ed e
very
2-3
yea
rs. (
bota
ny.w
isc.e
du)
Can
na L
ilyC
anna
spp
.pe
renn
ial
sun
topa
rt sh
ade
varie
sre
d, p
ink,
yel
low
, st
riped
, and
va
riatio
ns
Up
to4
feet
regu
lar w
ater
ing,
su
ffers
dur
ing
dry
perio
ds
(Flo
ridat
a)
Car
dina
l Flo
wer
Lobe
lia c
ardi
nalis
pere
nnia
lsu
n to
part
shad
e sp
ring
to fa
llbr
ight
red
1–3
feet
requ
ires
moi
st s
oil
Floo
d to
lera
nt, n
ot d
roug
ht to
lera
nt
(Flo
ridat
a)
22 Rain Gardens: A How-to Manual for Homeowners
TAPPmanual_1-28.indd 22 3/19/07 12:09:03 PM

Cut
leaf
Con
eflo
wer
Rudb
ecki
a la
cini
ata
pere
nnia
lsu
n to
part
shad
esu
mm
erye
llow
Up
to6
feet
regu
lar w
ater
ing,
dr
ough
t tol
eran
t(N
RCS
Plan
t Dat
abas
e, D
aves
gard
en.c
om)
Dix
ie B
lue
Iris
Iris
hexa
gona
pere
nnia
lsu
n to
part
shad
esp
ring
and
sum
mer
blue
to v
iole
t, w
hite
(rar
e)U
p to
3 fe
etpr
efer
s m
oist
soi
lTh
is pl
ant c
an g
row
in s
tand
ing
wat
er.
(Flo
ridat
a)
Gol
denr
odSo
lidag
o sp
p.pe
renn
ial
sun
topa
rt sh
ade
fall
gold
en y
ello
w2–
5 fe
etre
gula
r wat
erin
g, v
ery
drou
ght t
oler
ant
This
plan
t will
com
pete
for n
utrie
nts
in th
e so
il.
(Flo
ridat
a)
Man
grov
e Sp
ider
Lily
Hym
enoc
allis
latif
olia
pere
nnia
lsu
n to
part
shad
esu
mm
ersn
ow w
hite
1–3
feet
high
dro
ught
to
lera
nce
(IFA
S)
Mea
dow
Bea
uty
Rhex
ia s
pp.
pere
nnia
lsu
n to
part
shad
esu
mm
erpi
nk, p
urpl
e,
yello
w1–
2 fe
etca
n gr
ow in
sta
ndin
g w
ater
(coo
p.co
.pin
ella
s.fl.u
s/fy
n/pu
blic
atio
ns/K
-AQ
UA
.htm
)
Muh
ly G
rass
Muh
lenb
ergi
a ca
pilla
rispe
renn
ial
sun
topa
rt sh
ade
late
sum
mer
purp
le h
aze
3 fe
etne
eds
very
littl
e w
ater
ing
Dro
ught
tole
rant
(Flo
ridat
a)
Soft
Rus
hJu
ncus
effu
sus
pere
nnia
lsu
n to
part
shad
esu
mm
ergr
een-
brow
n flo
wer
s2–
5 fe
etdr
ough
t tol
eran
t, an
d ca
n gr
ow in
wat
er(F
lorid
ata)
Sout
hern
Blu
e Fl
ag Ir
isIri
s vi
rgin
ica
pere
nnia
lsu
n to
part
shad
ela
te s
prin
g an
d su
mm
erpu
rple
3–7
feet
grow
s in
sha
llow
w
ater
Mod
erat
e dr
ough
t tol
eran
ce
(USD
A N
RCS
Plan
t Dat
abas
e, IF
AS)
Milk
wee
dAs
clep
ias
pere
nnis
pere
nnia
lsu
n to
part
shad
eth
roug
hout
yea
rw
hite
,ne
ar w
hite
1.5–
2 fe
etre
quire
s co
nsist
ently
m
oist
soi
l(D
aves
gard
en.c
om)
Tick
seed
Cor
eops
is nu
data
pere
nnia
lsu
n to
part
shad
esp
ring
pink
2–4
feet
pref
ers
moi
st s
ite(IF
AS)
Cin
nam
on F
ern
Osm
unda
cin
nam
omea
pere
nnia
lsh
ade
topa
rt sh
ade
N/A
N/A
3 –
5 ft.
requ
ires
frequ
ent
wat
erin
gPr
efer
s sh
ade,
how
ever
, with
ple
nty
of w
ater
, th
is pl
ant c
an s
urvi
ve in
full
sun.
(Flo
ridat
a)
Jack
-in-t
he-P
ulpi
tAr
isaem
a tr
iphy
llum
pere
nnia
lsh
ade
topa
rt sh
ade
sprin
ggr
een
to p
urpl
e1.
5 fe
etlo
w d
roug
ht to
lera
nce
Red
berr
ies
appe
ar in
the
fall.
(USD
A N
RCS
Plan
t Dat
abas
e)
Roya
l Fer
n O
smun
da re
galis
pere
nnia
lsh
ade
topa
rt sh
ade
N/A
N/A
Up
to6
feet
low
dro
ught
tole
ranc
e(U
SDA
NRC
S Pl
ant D
atab
ase)
Com
mon
Lad
y Fe
rnAt
hyriu
m fi
lix-fe
min
ape
renn
ial
sha
de to
part
shad
e N
/AN
/A3
feet
low
dro
ught
tole
ranc
e (U
SDA
NRC
S Pl
ant D
atab
ase)
Sout
hern
Woo
d Fe
rnD
ryop
teris
ludo
vici
ana
pere
nnia
lsh
ade
topa
rt sh
ade
N/A
N/A
3 fe
etlo
w d
roug
ht to
lera
nce
Con
sider
ed a
trop
ical
fern
(USD
A N
RCS
Plan
t Dat
abas
e)
Litt
le B
row
n Ju
g/Ar
row
Le
af W
ild G
inge
rH
exas
tylis
arif
olia
pere
nnia
lsh
ade
topa
rt sh
ade
sprin
gbr
own,
jug-
shap
ed b
loom
6 in
ches
low
dro
ught
tole
ranc
eW
hen
you
crus
h th
e le
aves
, the
y sm
ell l
ike
ging
er. T
hrea
tene
d sp
ecie
s (F
lorid
ata
and
ww
w.
bria
rtec
h.co
m/e
arly
sprin
g/gi
nger
/gin
.htm
)
Wak
e Ro
bin
Trill
ium
spp
.pe
renn
ial
shad
eea
rly s
prin
ggr
eeni
sh-m
aroo
n,
brow
n or
yel
low
1 fo
otpr
efer
s m
oist
soi
l; dr
ough
t tol
eran
t(F
lorid
ata
and
ww
w.n
atur
epar
k.co
m/tr
ilinf
o.ht
m)
Your Personal Contribution to Cleaner Water 23
TAPPmanual_1-28.indd 23 3/19/07 12:09:04 PM

APP
ENDIX
A:
SUGGES
TED
PLA
NTS
FOR
YOUR
RAIN
GARD
EN
TRE
ES a
nd S
HRU
BSN
AME
TYPE
LI
GH
T RE
Q.
BLO
OM
SEA
SON
BLO
OM
CO
LOR
HEI
GH
TM
OIS
TURE
REQ
.C
OM
MEN
TS
Red
Buck
eye
Aesc
ulus
pav
iash
rub
to s
mal
l tre
e,
deci
duou
ssu
n to
part
shad
esp
ring
red
6–35
feet
moi
st to
dry
or
gani
c so
ilsFl
ower
s at
tract
hum
min
gbird
s.
Rive
r Bi
rch
Betu
la n
igra
larg
e tre
e,
deci
duou
ssu
n to
pa
rt sh
ade
late
win
ter t
oea
rly s
prin
ggr
eeni
sh, t
iny
40-8
0 fe
etm
oist
Hea
t-to
lera
nt; f
ast-
grow
ing
Beau
tybe
rry
Cal
licar
pa a
mer
ican
asm
all s
hrub
, de
cidu
ous
sun
to
part
shad
esp
ring
tosu
mm
erpa
le p
urpl
e4–
8 fe
etm
oist
to d
ryC
olor
ful f
ruit;
attr
acts
bird
Butt
onbu
sh
Cep
hala
nthu
s oc
cide
ntal
isla
rge
shru
b,
deci
duou
ssu
n to
pa
rt sh
ade
sum
mer
whi
te6–
20 fe
etw
et to
moi
stVe
ry h
ardy
East
ern
Redb
udC
erci
s ca
nade
nsis
smal
l tre
e,
deci
duou
ssu
n to
part
shad
eea
rly s
prin
gpi
nk15
–30
feet
moi
st to
dry
Beau
tiful
whe
n flo
wer
ing
Frin
ge T
ree
Chi
onan
thus
virg
inic
ussm
all t
ree,
de
cidu
ous
sun
topa
rt sh
ade
sprin
gsh
owy
whi
te
clus
ters
15–3
0 fe
etm
oist
to d
ryBe
autif
ul w
hen
flow
erin
g;dr
ough
t-to
lera
nt
Swee
t Pep
perb
ush
Cle
thra
aln
ifolia
shru
b,de
cidu
ous
sun
topa
rt sh
ade
sum
mer
whi
te to
pin
k3–
10 fe
etm
oist
to d
ryFr
agra
nt fl
ower
s at
tract
but
terfl
ies;
lik
es a
cid
soils
Lobl
olly
Bay
G
ordo
nia
lasi
anth
ussm
all t
ree,
ev
ergr
een
sun
topa
rt sh
ade
sprin
g to
sum
mer
whi
te30
–60
feet
wet
to m
oist
Frag
rant
sho
wy
flow
ers;
som
ewha
t sen
sitiv
e
Scar
let H
ibis
cus
Hib
iscus
coc
cine
ushe
rbac
eous
pere
nnia
lsu
n to
part
shad
esu
mm
ersh
owy
red
4–6
feet
wet
to m
oist
Die
s ba
ck in
a c
old
win
ter
Rose
Mal
low
Hib
iscus
mos
cheu
tos
herb
aceo
uspe
renn
ial
sun
topa
rt sh
ade
sum
mer
show
y w
hite
with
re
ddish
cen
ter
3–6
feet
moi
st to
wet
Die
s ba
ck in
a c
old
win
ter
Dah
oon
Hol
lyIle
x ca
ssin
esm
all t
ree,
ever
gree
nsu
n to
part
shad
esp
ring
whi
te20
–40
feet
wet
to m
oist
Attra
ctiv
e fru
it; e
rect
sha
pe s
uita
ble
for s
mal
l spa
ces;
attr
acts
bird
s
Virg
inia
Sw
eets
pire
Itea
virg
inic
asm
all s
hrub
, de
cidu
ous
sun
topa
rt sh
ade
late
spr
ing
toea
rly s
umm
erw
hite
3–8
feet
moi
st to
dry
Win
ter c
olor
Frag
rant
flow
ers
Spic
ebus
hLi
nder
a be
nzoi
nla
rge
shru
b,de
cidu
ous
sun
topa
rt sh
ade
late
win
ter t
oea
rly s
prin
gye
llow
15 fe
etw
et to
moi
stFr
uit a
ttra
cts
bird
s
Swee
tbay
Mag
nolia
Mag
nolia
virg
inia
nasm
all t
ree,
ever
gree
nsu
n to
part
shad
esp
ring
tosu
mm
ersh
owy
whi
te
25–6
0 fe
etw
et to
moi
stAt
tract
ive
flow
ers
and
colo
rful f
ruit;
acid
soi
ls
24 Rain Gardens: A How-to Manual for Homeowners
TAPPmanual_1-28.indd 24 3/19/07 12:09:04 PM

Sout
hern
Cra
b Ap
ple
Mal
us a
ugus
tifol
iasm
all t
ree,
dec
iduo
ussu
n to
part
shad
eea
rly s
prin
gpi
nk15
–25
feet
moi
st to
dry
Frag
rant
flow
ers
Wax
Myr
tle
Myr
ica
cerif
era
shru
b to
sm
all t
ree,
ev
ergr
een
sun
topa
rt sh
ade
sprin
gtin
y w
hite
4–20
feet
wet
tow
ell-d
rain
edFa
st g
row
ing;
goo
d sc
reen
Flor
ida
Azal
eaRh
odod
endr
on a
ustr
inum
shru
b, d
ecid
uous
sun
topa
rt sh
ade
sprin
gsh
owy
yello
w3–
10 fe
etw
et to
moi
stFr
agra
nt; a
cid
soils
Pinx
ter
Azal
eaRh
odod
endr
on c
anes
cens
shru
b, d
ecid
uous
sun
topa
rt sh
ade
sprin
gw
hite
to p
ink
10–1
5 fe
etm
oist
to d
ryFr
agra
nt; a
cid
soils
Cab
bage
Pal
mSa
bal p
alm
etto
palm
sun
topa
rt sh
ade
sum
mer
whi
te20
–60
feet
moi
st to
dry
Frag
rant
flow
ers;
ver
y ha
rdy
Bald
Cyp
ress
Taxo
dium
dist
ichu
mla
rge
tree,
dec
iduo
ussu
n to
part
shad
esp
ring
gree
nish
50–8
0 fe
etw
et to
dry
Stab
le a
nd s
trong
; goo
d fa
ll co
lor
Win
ged
Elm
Ulm
us a
lata
smal
l tre
e, d
ecid
uous
sun
topa
rt sh
ade
late
win
ter
tiny
redd
ish-
gree
n40
–70
feet
moi
st to
dry
Del
icat
e fo
liage
; dro
ught
-tol
eran
t
Poss
umha
w V
ibur
num
Vibu
rnum
nud
umsm
all t
ree,
dec
iduo
ussu
n to
part
shad
esp
ring
tiny
whi
te18
feet
wet
to m
oist
Und
erst
ory
tree
Wal
ter’
s Vi
burn
umVi
burn
um o
bova
tum
smal
l tre
e, d
ecid
uous
sun
topa
rt sh
ade
sprin
gtin
y w
hite
6–30
feet
wet
to m
oist
Goo
d sc
reen
; attr
acts
bird
s
Blue
beec
h, H
ornb
eam
Car
pinu
s ca
rolin
iana
smal
l tre
e,
deci
duou
ssh
ade
to p
art
shad
eea
rly s
prin
ggr
eeni
sh, t
iny
30 fe
etm
oist
Dee
ply
rippl
ed s
inew
y tru
nk;
smoo
th, b
lue-
gray
bar
k
Oak
leaf
Hyd
rang
eaH
ydra
ngea
que
rcifo
liasm
all s
hrub
, de
cidu
ous
shad
e to
par
t sh
ade
late
spr
ing
toea
rly s
umm
ersh
owy
whi
teto
pin
k4–
8 fe
etm
oist
to d
ryRi
ch a
cid
soils
, lar
ge fl
ower
s,ni
ce fa
ll co
lor
Yaup
on H
olly
Ilex
vom
itoria
larg
e sh
rub
to s
mal
l tre
e, d
ecid
uous
shad
e to
par
t sh
ade
sprin
gtin
y w
hite
8–25
feet
wet
to d
ryC
olor
ful f
ruit;
attr
acts
bird
s
Flor
ida
Anis
e Ill
iciu
m fl
orid
anum
shru
b, e
verg
reen
shad
e to
par
t sh
ade
sprin
gm
aroo
n6–
20 fe
etm
oist
to w
etLi
coric
e sc
ent;
good
scr
een
Nee
dle
Palm
Rhap
idop
hyllu
m h
ystr
ixsh
rub-
like
palm
shad
e to
par
t sh
ade
sprin
gtin
y ye
llow
or p
urpl
e3–
8 fe
etm
oist
to d
ryVe
ry h
ardy
Snow
bell
Styr
ax a
mer
ican
ussh
rub
shad
e to
par
t sh
ade
sprin
gw
hite
6–10
feet
wet
to m
oist
Acid
soi
l
Swam
p Az
alea
Rhod
oden
dron
ser
rula
tum
shru
b, d
ecid
uous
part
shad
esu
mm
erw
hite
to p
ink
9–16
feet
wet
to m
oist
Frag
rant
; aci
d so
ils
NO
TE: A
ll pl
ants
wer
e re
sear
ched
at:
Nel
son,
G. (
2003
), Fl
orid
a’s
best
nat
ive
land
scap
e pl
ants
, Uni
vers
ity o
f Flo
rida
Pres
s, G
aine
svill
e, F
L; R
ushi
ng, F
. (20
05),
Toug
h pl
ants
for F
lorid
a ga
rden
s, C
ool S
prin
gs P
ress
, N
ashv
ille,
TN
; Tob
e, J.
D.,
et a
l. (1
998)
, Flo
rida
wet
land
pla
nts:
an
iden
tifica
tion
man
ual,
Flor
ida
Dep
artm
ent o
f Env
ironm
enta
l Pro
tect
ion,
Tal
laha
ssee
, FL;
Hae
hle,
R. G
. and
J. B
rook
wel
l (20
04),
Nat
ive
Flor
ida
plan
ts, T
aylo
r Tra
de P
ublis
hing
, New
Yor
k; G
odfre
y, R
.K. (
1988
), Tr
ees,
shr
ubs,
and
woo
dy v
ines
of N
orth
ern
Flor
ida
and
adja
cent
Geo
rgia
and
Ala
bam
a,Th
e U
nive
rsity
of G
eorg
ia P
ress
, Ath
ens,
GA
; ww
w.fl
orid
ata.
com
. In
addi
tion,
the
follo
win
g co
ntrib
uted
exp
ertis
e: D
r. Pa
mel
a H
all,
Plan
t Eco
logi
st; D
r. Pa
ul E
lliot
t, Pr
ofes
sor E
mer
itus
from
Flo
rida
Stat
e U
nive
rsity
and
Mas
ter G
arde
ner;
John
Cox
, Tal
laha
ssee
Sto
rmw
ater
M
anag
emen
t Div
ision
; Pam
Saw
yer,
Mas
ter G
arde
ner;
Dr.
Ed S
chro
eder
, Mas
ter G
arde
ner;
and
Sta
n Ro
sent
hal,
Leon
Cou
nty
Fore
ster
.
Your Personal Contribution to Cleaner Water 25
TAPPmanual_1-28.indd 25 3/19/07 12:09:04 PM

PERCOLATION TESTThis simple procedure can determine your soil’s porosity, or infiltration rate–how fast water drains into your soil.
• Remove both ends from a 46 oz. can (like a large juice can). Mark a line 2 inches from the bottom end.
• Pound the can 2 inches deep into the soil, so that the line is level with the ground’s surface.
• Pour one quart of water into the can. Time how long it takes the water to drain into the soil.
• Refer to this table to determine your soil’s porosity and drainage conditions.
DRAINAGE TIME SOIL POROSITY DRAINAGE CONDITIONS
Less than 2 minutes Excellent percolation This soil offers the BEST drainage conditions and air circulation for planting a rain garden.
2 to 8 minutes Somewhat compact ACCEPTABLE drainage for a rain garden, or dense soil but slower than in less compact soil.
More than 8 minutes Overly compact or Very slow, POOR drainage. This soil offers the dense soil most challenging conditions for a rain garden.
TEST FOR CLAYThe amount of clay in your soil can also affect drainage.Take a handful of soil and dampen it with a few drops of water. After kneading the soil in your fingers, squeeze the soil into a ball. If it remains in a ball, then work the soil between your forefinger and thumb, squeezing it upward into a ribbon of uniform thickness. Allow the ribbon to emerge and extend over your forefinger until it breaks from its own weight. If the soil forms a ribbon more than an inch long before it breaks, and it also feels more smooth than gritty, the soil has too much clay for a rain garden. You should consider that the area will drain poorly and should plan for more permanent ponding or select a more porous site.
APPENDIX B: SOIL TESTSTwo simple soil tests to determine your soil type
26 Rain Gardens: A How-to Manual for Homeowners
TAPPmanual_1-28.indd 26 3/19/07 12:09:05 PM

WORK SHEET
Your Personal Contribution to Cleaner Water 27
TAPPmanual_1-28.indd 27 3/19/07 12:09:08 PM

WORK SHEET
28 Rain Gardens: A How-to Manual for Homeowners
TAPPmanual_1-28.indd 28 3/19/07 12:09:11 PM
Recommended


