9/18/2012
1
Chapter 6
Airway
2
Learning Objectives
Identify and label major structures of the respiratory system on a diagram
List signs of adequate & inadequate breathing
Describe steps in performing a head-tilt/chin lift
Relate MOI to opening the airway
Describe steps in performing a jaw thrust
3
Learning Objectives
State the importance of having a suction unit ready for immediate use when providing emergency care
Describe techniques of suctioning
Describe how to measure and insert an OPA & an NPA
Describe how to ventilate with a pocket mask
Copyright © 2013 by Jones & Bartlett Learning, LLC, an Ascend Learning Company

9/18/2012
2
4
Learning Objectives
List steps in performing mouth-to-mouth artificial ventilation
Describe steps in ventilating a patient with a bag-mask device while using the jaw thrust
List parts of a bag-mask system
Describe steps in artificially ventilating a patient with a bag-mask device
5
Learning Objectives
Describe signs of adequate & inadequate ventilation using the bag-mask device
Describe the steps in ventilating with a flow-restricted, oxygen-powered ventilation device
Define components of an O2 delivery system
Identify nonrebreather face mask; state the O2 flow requirements for its use
6
Learning Objectives
Indicate when to use nasal cannula vs. nonrebreather face mask
Identify nasal cannula; state flow requirements
List steps in performing mouth-to-stoma artificial ventilation for adult, child, infant
Demonstrate O2 delivery for infant & child
Describe signs of FBAO
Copyright © 2013 by Jones & Bartlett Learning, LLC, an Ascend Learning Company

9/18/2012
3
7
Introduction
Assess ABCs on every call
Airway, ventilation, oxygenation management First priority
Must be able to clear, maintain airway via: Manual techniques
Suctioning
Mechanical techniques
8
Introduction
Inadequate breathing Assist with positive-pressure ventilation
• Mouth-to-mask device
• Bag-mask device
• Flow-restricted, O2-powered ventilator
Give supplemental O2 via:• Nasal cannula
• Nonrebreather masks
• Positive-pressure ventilation devices
9
Introduction
Inadequate breathing Get a general impression
• Respiratory distress
Supplemental O2
Possible medication
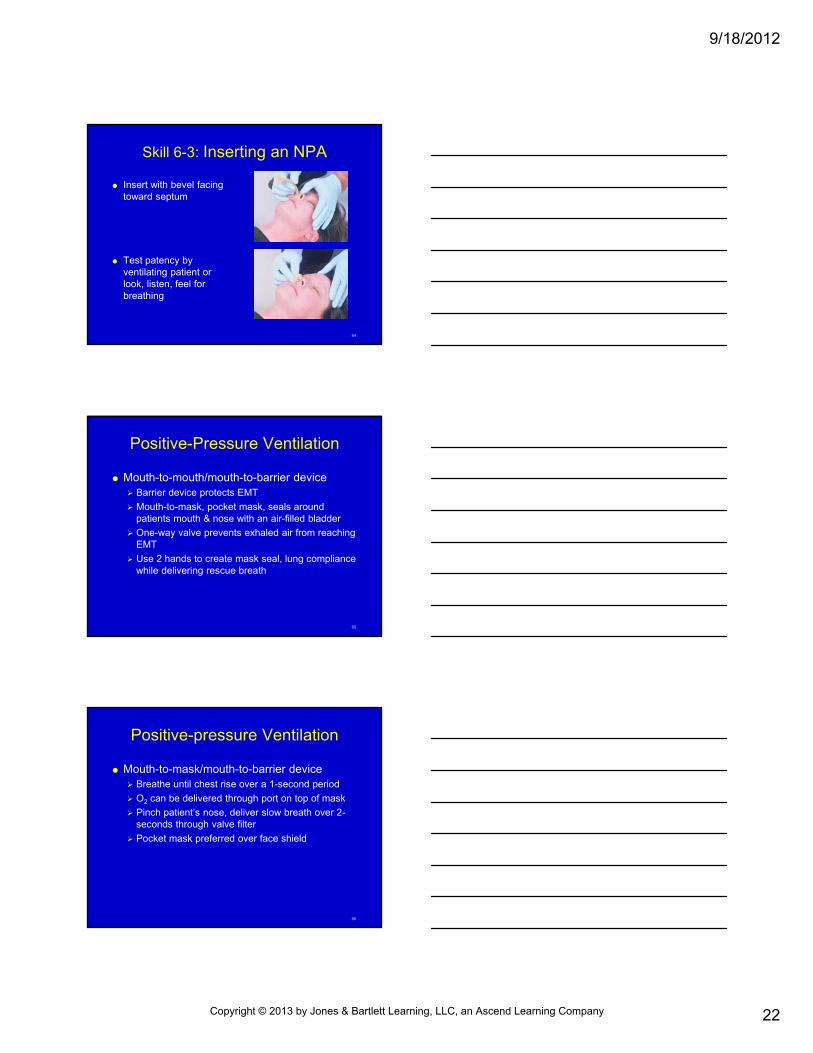
Patient positioning
Rapid transport
Ongoing assessment for signs of respiratory failure
• Respiratory failure:
Ensure open airway
Provide positive-pressure ventilations
Copyright © 2013 by Jones & Bartlett Learning, LLC, an Ascend Learning Company

9/18/2012
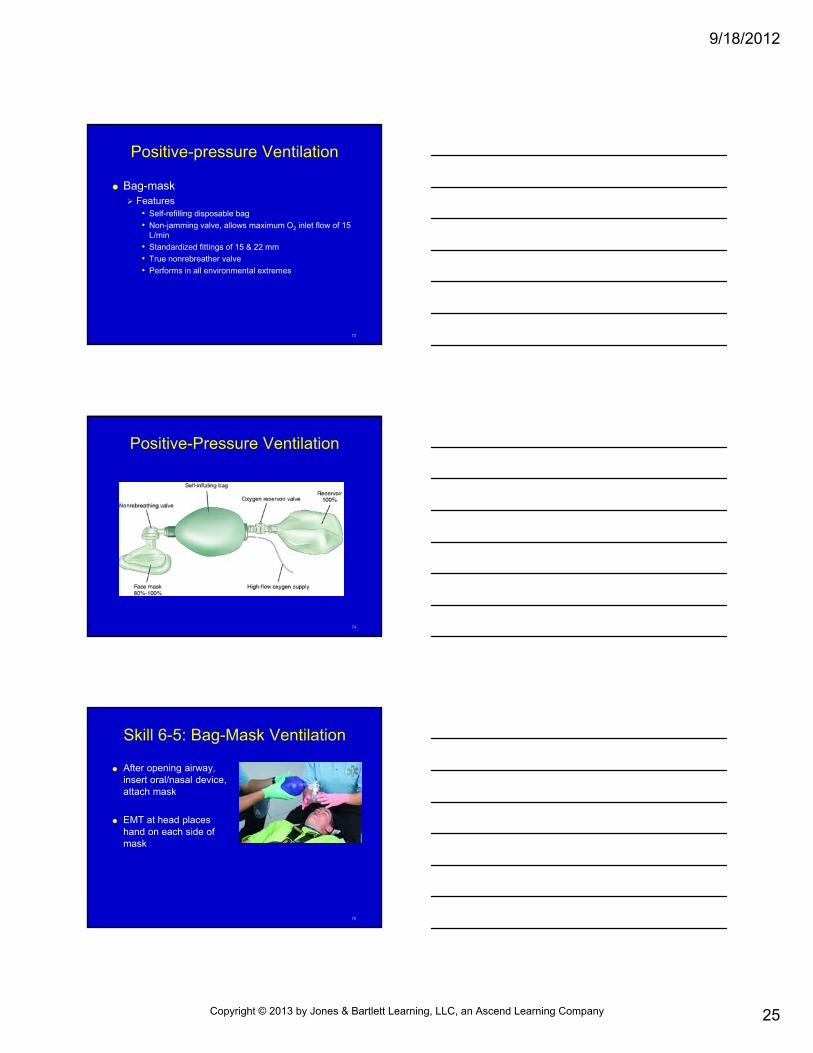
4
10
Anatomy & Physiology
Respiratory system - 3 main functions: O2 from atmosphere to blood
CO2 from blood
Voice creation
11
Anatomy & Physiology
12
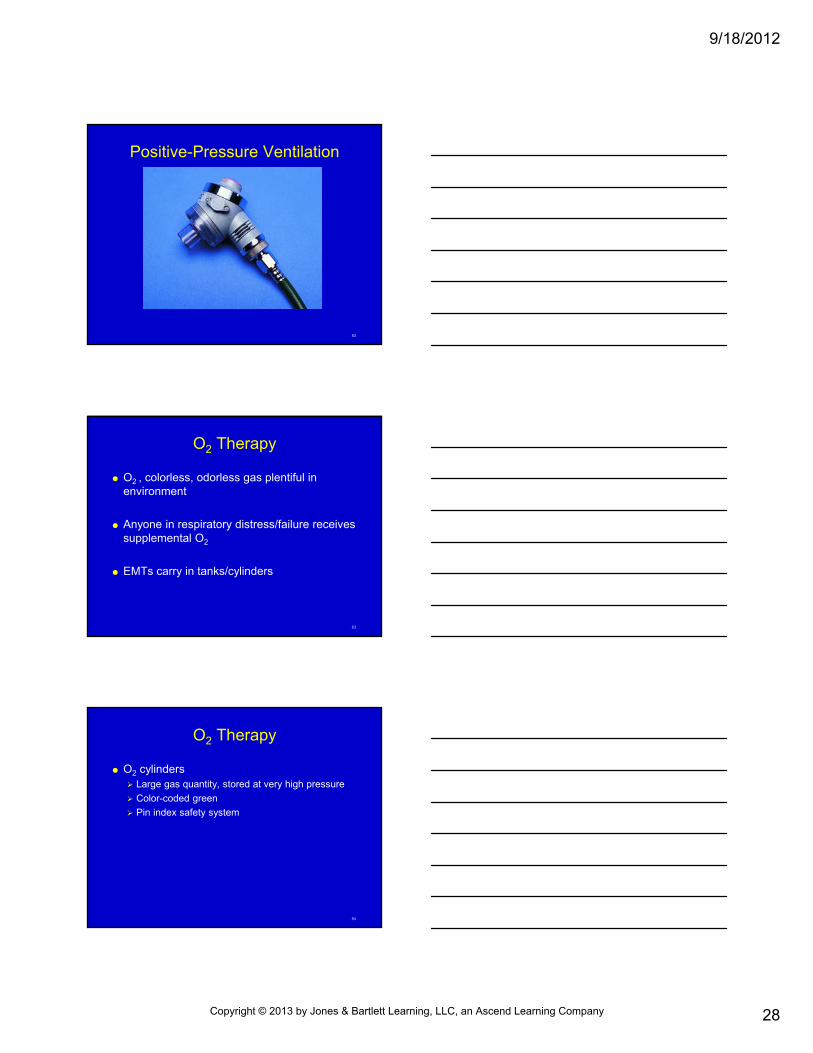
Anatomy & Physiology
Airway & alveoli Nose
• Nasal passage – 1st portion of airway
• Divided into 2 compartments by nasal septum
• Functions:
Filtering
Moistening
Warming air before it enters lungs
Copyright © 2013 by Jones & Bartlett Learning, LLC, an Ascend Learning Company

9/18/2012
5
13
Anatomy & Physiology
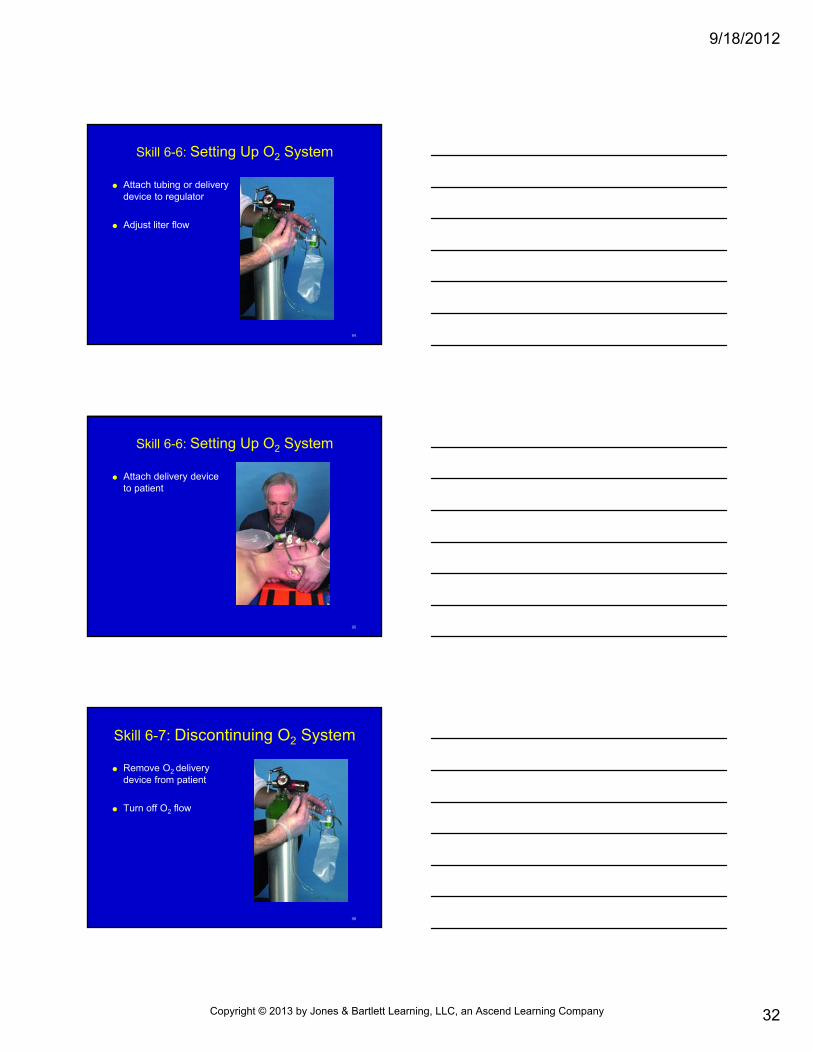
Airway & alveoli Pharynx
• Passage extending from back of nasal airway down to esophagus, larynx
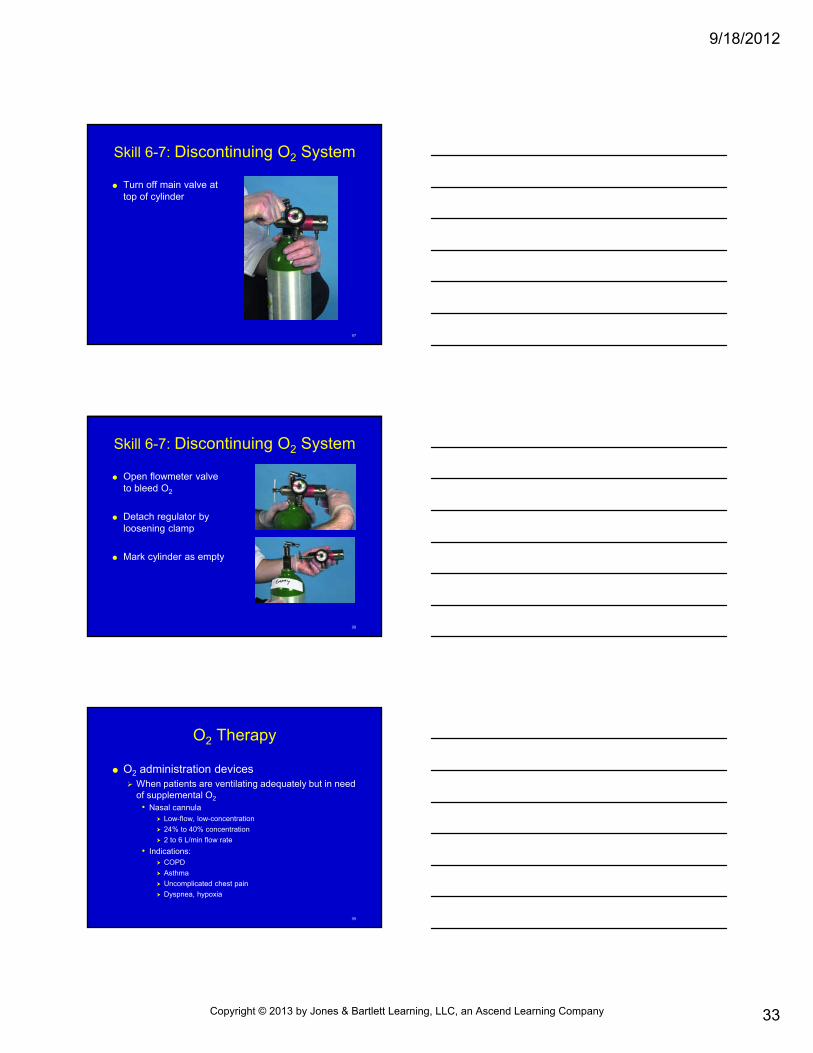
Nasopharynx
Oropharynx
Laryngopharynx
14
Anatomy & Physiology
15
Anatomy & Physiology
Airway & alveoli Epiglottis & larynx
• Epiglottis - flap of cartilage that covers larynx during swallowing
• Larynx - contains vocal cords
Thyroid cartilage
Cricoid cartilage
Copyright © 2013 by Jones & Bartlett Learning, LLC, an Ascend Learning Company

9/18/2012
6
16
Anatomy & Physiology
Airway & alveoli Trachea
• Extends down from larynx
• Hollow tube with horseshoe-shaped cartilage rings anteriorly that give support
• Posterior surface - muscular wall
17
Anatomy & Physiology
18
Anatomy & Physiology
Airway & alveoli Bronchi & bronchioles
• Bronchi Trachea subdivides into 2 tubes
Bronchi subdivide into smaller bronchi
• Bronchioles Smallest type of airway tube
Tubes change diameter as muscle constrict/dilate
Copyright © 2013 by Jones & Bartlett Learning, LLC, an Ascend Learning Company

9/18/2012
7
19
Anatomy & Physiology
Alveoli Microscopic air sacs within lung where gas
exchange takes place
20
Anatomy & Physiology
Lungs & muscles of breathing Lungs
• Formed by bronchi, bronchioles, alveoli
• Suspended in thoracic cavity
• Separated by mediastinum
• Ribs, thoracic spine, scapula, muscles surround & provide protection, function
• Clavicle, neck - superior
• Diaphragm – inferior
• Pleurae
21
Anatomy & Physiology
Lungs & muscles of breathing Muscles of respiration
• Change diameter of chest cavity as they contract, relax & cause air to move in/out of lungs
• Diaphragm - main muscle of respiration, aided by external intercostals muscles
Copyright © 2013 by Jones & Bartlett Learning, LLC, an Ascend Learning Company

9/18/2012
8
22
Anatomy & Physiology
Lungs & muscles of breathing Accessory muscles of respiration
• When more air exchange needed, gives added volume with each breath
• Muscles of inspiration
• Muscles of expiration
23
Anatomy & Physiology
24
Anatomy & Physiology
Physiology of respiration Minute volume
• Adequate air amount inhaled/exhaled each minute
• Normal adult: 6 to 10 L/min
Alveolar, capillary, cellular exchange• Diffusion - movement of molecules from area of higher
concentration to area of lower concentration
• O2 – alveoli → capillaries
• CO2 – capillaries → alveoli
Copyright © 2013 by Jones & Bartlett Learning, LLC, an Ascend Learning Company
9/18/2012
9
25
Adequate vs. Inadequate Breathing
Dyspnea Difficulty breathing, shortness of breath
Common symptom with respiratory emergency
Brain most O2-dependent organ Change in mental status needs positive-pressure
ventilation, high O2 concentration
26
Adequate vs. Inadequate Breathing
Respiratory emergencies Require O2
Positive-pressure ventilation
27
Adequate vs. Inadequate Breathing
Respiratory distress Patient works harder to breathe
Signs:• ↑ respiratory rate
• ↑ accessory muscle use
• Nasal flaring
• Tripod or bolt upright position
• Difficulty speaking in complete sentences
• Agitation or restlessness
Copyright © 2013 by Jones & Bartlett Learning, LLC, an Ascend Learning Company

9/18/2012
10
28
Adequate vs. Inadequate Breathing
29
Adequate vs. Inadequate Breathing
Respiratory failure Inadequate ventilation to support life
Not able to maintain mental status, display muscle tone
Inadequate amount of air to lungs
30
Adequate vs. Inadequate Breathing
Copyright © 2013 by Jones & Bartlett Learning, LLC, an Ascend Learning Company

9/18/2012
11
31
Adequate vs. Inadequate Breathing
Respiratory arrest Complete cessation of breathing
Can progress to cardiac arrest
Can occur from• Electrocution
• Lightning strikes
• Spinal cord injury
32
Adequate vs. Inadequate Breathing
33
Adequate vs. Inadequate Breathing
Signs of adequate & inadequate breathing Determine whether respiratory distress or
respiratory failure• Treatment differs
All patients need supplemental O2
Patients in respiratory failure/arrest need positive-pressure ventilation
Copyright © 2013 by Jones & Bartlett Learning, LLC, an Ascend Learning Company

9/18/2012
12
34
Adequate vs. Inadequate Breathing
Signs of adequate & inadequate breathing Rate of breathing
• Normal
Adult: 12 to 20 breaths/min
Child: 15 to 30 breaths/min
Infant: 25 to 50 breaths/min
35
Adequate vs. Inadequate Breathing
Signs of adequate & inadequate breathing Rhythm of breathing
• Regular
Consistent rise & fall of chest
• Irregular
Increasing & decreasing rates, tidal volumes interspersed with periods of no breathing
36
Adequate vs. Inadequate Breathing
Copyright © 2013 by Jones & Bartlett Learning, LLC, an Ascend Learning Company

9/18/2012
13
37
Adequate vs. Inadequate Breathing
Signs of adequate & inadequate breathing Quality of breathing
• Assessment
Look for chest/abdominal movements
Look for use of accessory muscles
Listen for breath sounds
Feel air movement through mouth, nose
Inspect skin
Evaluate mental status
38
Adequate vs. Inadequate Breathing
39
Opening the Airway
Airway management goals Establish, maintain patent airway
Ensure adequate ventilation
Ensure adequate oxygenation
Copyright © 2013 by Jones & Bartlett Learning, LLC, an Ascend Learning Company

9/18/2012
14
40
Opening the Airway
Manual techniques 1st step in opening airway
Use in conjunction with mechanical techniques
Techniques routinely used• Head-tilt/chin-lift
• Jaw thrust
41
Opening the Airway
42
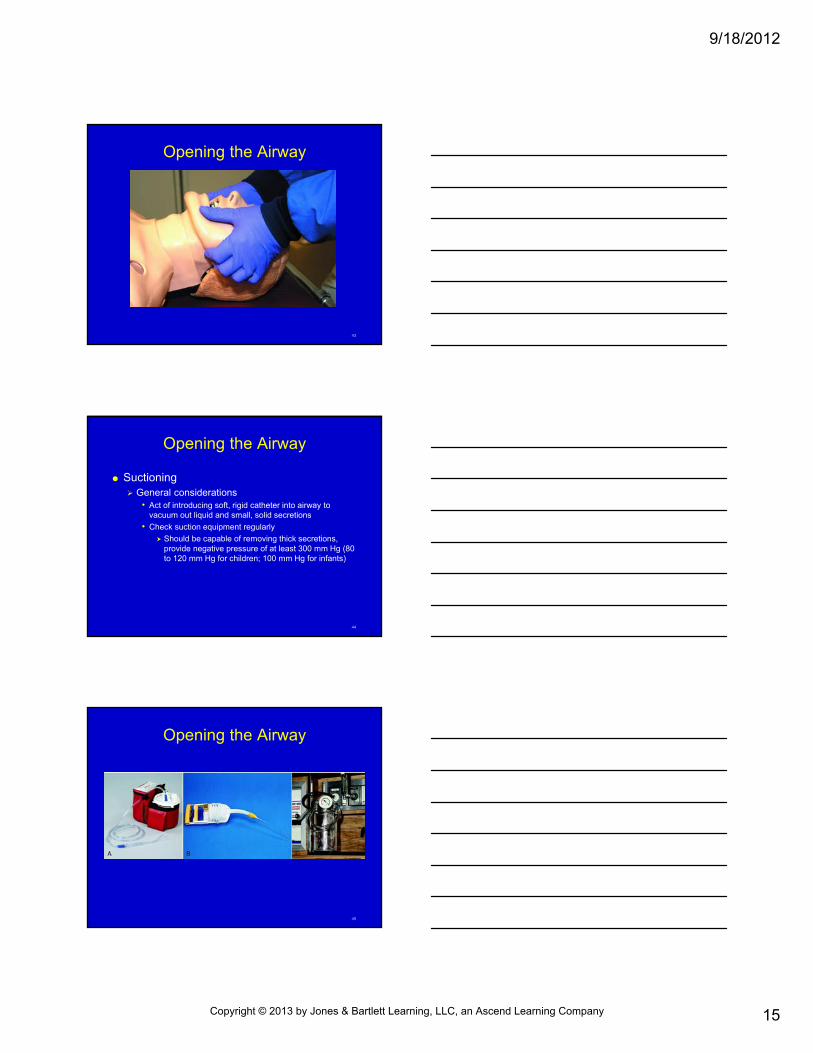
Opening the Airway
Copyright © 2013 by Jones & Bartlett Learning, LLC, an Ascend Learning Company
9/18/2012
15
43
Opening the Airway
44
Opening the Airway
Suctioning General considerations
• Act of introducing soft, rigid catheter into airway to vacuum out liquid and small, solid secretions
• Check suction equipment regularly
Should be capable of removing thick secretions, provide negative pressure of at least 300 mm Hg (80 to 120 mm Hg for children; 100 mm Hg for infants)
45
Opening the Airway
Copyright © 2013 by Jones & Bartlett Learning, LLC, an Ascend Learning Company

9/18/2012
16
46
Skill 6-1: Suctioning—Rigid Catheter
Connect rigid catheter to suction line
Turn on suction unit; ensure presence of negative pressure
47
Skill 6-1: Suctioning—Rigid Catheter
Open mouth by cross-finger technique
Place catheter tip into posterior pharynx
48
Skill 6-1: Suctioning—Rigid Catheter
Initiate suctioning by closing hole of rigid catheter or turning on suction device
Suction from side to side no more than 15 seconds
Copyright © 2013 by Jones & Bartlett Learning, LLC, an Ascend Learning Company

9/18/2012
17
49
Skill 6-1: Suctioning—Soft Catheter
Attach soft catheter
Measure from corner of mouth to earlobe
50
Skill 6-1: Suctioning—Soft Catheter
Insert catheter into oral cavity without suction
Insert only to base of tongue
51
Skill 6-1: Suctioning—Soft Catheter
Apply suction
Move catheter tip from side to side with twisting motion
Suction no more than 15 seconds
Copyright © 2013 by Jones & Bartlett Learning, LLC, an Ascend Learning Company

9/18/2012
18
52
Opening the Airway
Suctioning Infants & children
• Use rigid catheter to suction upper airway
• Do not touch back of airway
• Become hypoxic with prolonged suctioning
• Nasal suctioning, use bulb suction device/small, soft catheter with low to medium vacuum
53
Opening the Airway
54
Opening the Airway
Mechanical techniques OPA
• Elevates tongue away from oropharynx in unconscious patients without gag reflex
• Curved plastic extends just anterior to lips down to tongue base in oropharynx
Copyright © 2013 by Jones & Bartlett Learning, LLC, an Ascend Learning Company

9/18/2012
19
55
Opening the Airway
56
Skill 6-2: Inserting an OPA
Measure airway from corner of mouth to angle of jaw
57
Skill 6-2: Inserting an OPA
Place index finger of one hand on top teeth, thumb on lower teeth
Apply pressure in opposite directions
Insert device into mouth with tip pointing toward roof
Copyright © 2013 by Jones & Bartlett Learning, LLC, an Ascend Learning Company
9/18/2012
20
58
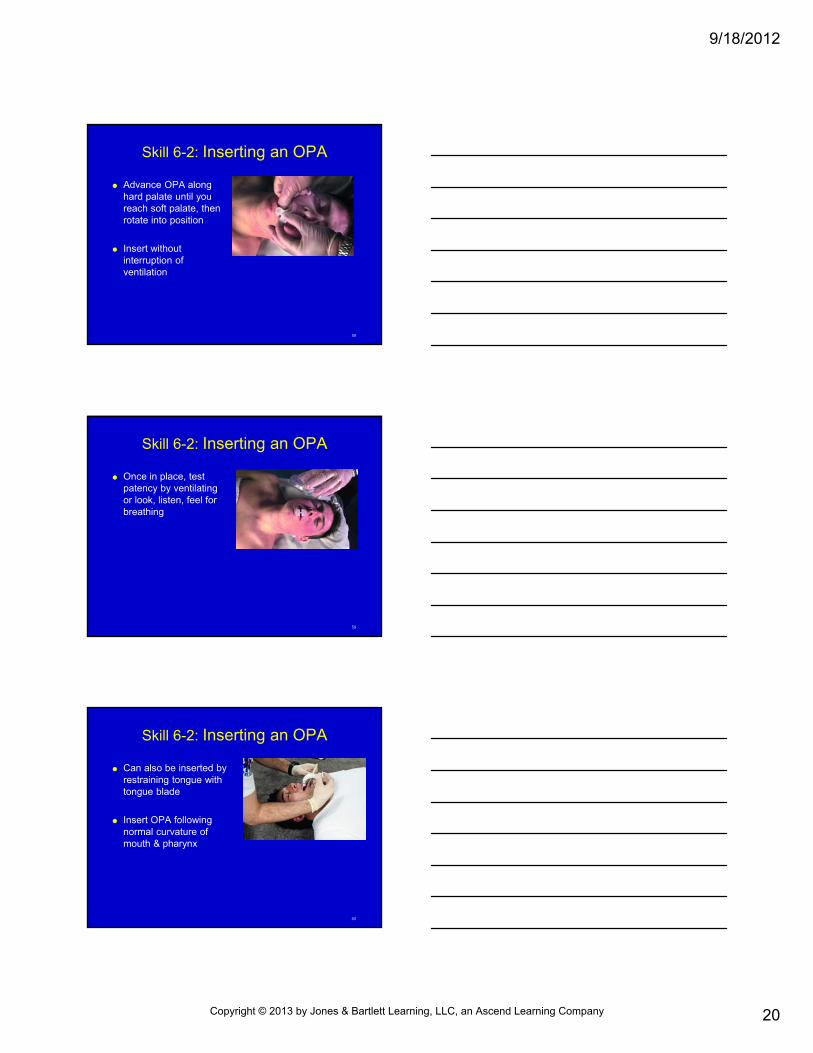
Skill 6-2: Inserting an OPA
Advance OPA along hard palate until you reach soft palate, then rotate into position
Insert without interruption of ventilation
59
Skill 6-2: Inserting an OPA
Once in place, test patency by ventilating or look, listen, feel for breathing
60
Skill 6-2: Inserting an OPA
Can also be inserted by restraining tongue with tongue blade
Insert OPA following normal curvature of mouth & pharynx
Copyright © 2013 by Jones & Bartlett Learning, LLC, an Ascend Learning Company

9/18/2012
21
61
Opening the Airway
Mechanical techniques NPA
• Same purpose as OPA, used when OPA not tolerated
Gag reflex present
Mouth cannot open from trauma/clenching teeth
• Do not use with severe, direct facial injury, possible skull fracture
• Extends from nares down to oropharynx
62
Opening the Airway
63
Skill 6-3: Inserting an NPA
Measure airway from nose to angle of jaw
Lubricate outside of tube with water soluble gel
Copyright © 2013 by Jones & Bartlett Learning, LLC, an Ascend Learning Company
9/18/2012
22
64
Skill 6-3: Inserting an NPA
Insert with bevel facing toward septum
Test patency by ventilating patient or look, listen, feel for breathing
65
Positive-Pressure Ventilation
Mouth-to-mouth/mouth-to-barrier device Barrier device protects EMT
Mouth-to-mask, pocket mask, seals around patients mouth & nose with an air-filled bladder
One-way valve prevents exhaled air from reaching EMT
Use 2 hands to create mask seal, lung compliance while delivering rescue breath
66
Positive-pressure Ventilation
Mouth-to-mask/mouth-to-barrier device Breathe until chest rise over a 1-second period
O2 can be delivered through port on top of mask
Pinch patient’s nose, deliver slow breath over 2-seconds through valve filter
Pocket mask preferred over face shield
Copyright © 2013 by Jones & Bartlett Learning, LLC, an Ascend Learning Company

9/18/2012
23
67
Positive-Pressure Ventilation
68
Skill 6-4:Mouth-to-Mask – No Suspected Spinal Injury
Position adjacent to head
Apply mask to face using nose bridge as guide
69
Skill 6-4:Mouth-to-Mask – No Suspected Spinal Injury
Place index finger, thumb of hand closer to top of head along mask border Place thumb of other
hand along lower mask margin
Place remaining fingers along bony margin of jaw
Copyright © 2013 by Jones & Bartlett Learning, LLC, an Ascend Learning Company

9/18/2012
24
70
Skill 6-4:Mouth-to-Mask – Suspected Spinal Injury
Position directly above head
Apply mask to face using nose bridge as guide
Use thumb, heel to make complete seal
71
Skill 6-4:Mouth-to-Mask – Suspected Spinal Injury
While lifting jaw, squeeze mask with thumbs, hand heels
Give slow breaths by blowing exhaled air into valve attached to mask
72
Positive-Pressure Ventilation
Bag-mask Most common
Most unreliable if used improperly
O2 inlet provides increased concentration to patient
O2-collecting reservoir delivers 90% to 100% O2
Copyright © 2013 by Jones & Bartlett Learning, LLC, an Ascend Learning Company
9/18/2012
25
73
Positive-pressure Ventilation
Bag-mask Features
• Self-refilling disposable bag
• Non-jamming valve, allows maximum O2 inlet flow of 15 L/min
• Standardized fittings of 15 & 22 mm
• True nonrebreather valve
• Performs in all environmental extremes
74
Positive-Pressure Ventilation
75
Skill 6-5: Bag-Mask Ventilation
After opening airway, insert oral/nasal device, attach mask
EMT at head places hand on each side of mask
Copyright © 2013 by Jones & Bartlett Learning, LLC, an Ascend Learning Company

9/18/2012
26
76
Skill 6-5: Bag-Mask Ventilation
Maintaining head-tilt/chin-lift position, EMT at head places mask on patient’s face Creating a seal around
nose & mouth
77
Skill 6-5: Bag-Mask Ventilation
Connect bag-mask to high-flow O2
2nd EMT squeezes bag, watching for chest rise
If neck injury, use jaw thrust
78
Skill 6-5: Bag-Mask Ventilation
If only 1 EMT, use 1 hand to grasp mask, with thumb & index finger, place mask on patient’s face Use other fingers to bring
jaw up to mask
With other hand, squeeze bag
Copyright © 2013 by Jones & Bartlett Learning, LLC, an Ascend Learning Company

9/18/2012
27
79
Positive-Pressure Ventilation
Cricoid pressure Air can enter esophagus and cause gastric
inflation, increase vomiting/aspiration risk• Use Sellick maneuver
Compress esophagus between cricoid cartilage & thoracic spine
80
Positive-Pressure Ventilation
81
Positive-Pressure Ventilation
Flow-restricted, O2 -powered ventilation device Provides highest delivered O2 concentration
• 100%
Copyright © 2013 by Jones & Bartlett Learning, LLC, an Ascend Learning Company
9/18/2012
28
82
Positive-Pressure Ventilation
83
O2 Therapy
O2 , colorless, odorless gas plentiful in environment
Anyone in respiratory distress/failure receives supplemental O2
EMTs carry in tanks/cylinders
84
O2 Therapy
O2 cylinders Large gas quantity, stored at very high pressure
Color-coded green
Pin index safety system
Copyright © 2013 by Jones & Bartlett Learning, LLC, an Ascend Learning Company

9/18/2012
29
85
O2 Therapy
86
O2 Therapy
O2 cylinders Cylinder sizes
• Smaller - D or E
• Larger, - M, G, H
87
O2 Therapy
O2 cylinders Regulators
• Reduces high gas pressure in cylinder
• Single-staged
• Double-staged
• Pressure gauge
• Flowmeter records flow rate
Copyright © 2013 by Jones & Bartlett Learning, LLC, an Ascend Learning Company

9/18/2012
30
88
O2 Therapy
89
O2 Therapy
O2 cylinders Cylinder calculations
Time (min) = (Tank pressure [psi] -200 psi) x Constant
Flow rate (L/min)
90
Skill 6-6: Setting Up O2 System
Confirm cylinder contains O2
Identify color & pin index grouping
Ensure rubber washer in place at cylinder opening or regulator opening
Copyright © 2013 by Jones & Bartlett Learning, LLC, an Ascend Learning Company

9/18/2012
31
91
Skill 6-6: Setting Up O2 System
Open main valve at cylinder top slowly until gas comes out; then immediately close valve
92
Skill 6-6: Setting Up O2 System
Attach regulator Align pin index from
regulator into cylinder holes
Tighten clamp
93
Skill 6-6: Setting Up O2 System
Open valve 2 full turns
Check pressure gauge – should read approximately 2000 psi
If cylinder leaks, turn off main valve
Copyright © 2013 by Jones & Bartlett Learning, LLC, an Ascend Learning Company
9/18/2012
32
94
Skill 6-6: Setting Up O2 System
Attach tubing or delivery device to regulator
Adjust liter flow
95
Skill 6-6: Setting Up O2 System
Attach delivery device to patient
96
Skill 6-7: Discontinuing O2 System
Remove O2 delivery device from patient
Turn off O2 flow
Copyright © 2013 by Jones & Bartlett Learning, LLC, an Ascend Learning Company
9/18/2012
33
97
Skill 6-7: Discontinuing O2 System
Turn off main valve at top of cylinder
98
Skill 6-7: Discontinuing O2 System
Open flowmeter valve to bleed O2
Detach regulator by loosening clamp
Mark cylinder as empty
99
O2 Therapy
O2 administration devices When patients are ventilating adequately but in need
of supplemental O2
• Nasal cannula Low-flow, low-concentration
24% to 40% concentration
2 to 6 L/min flow rate
• Indications: COPD
Asthma
Uncomplicated chest pain
Dyspnea, hypoxia
Copyright © 2013 by Jones & Bartlett Learning, LLC, an Ascend Learning Company

9/18/2012
34
100
Skill 6-8: Applying a Nasal Cannula
Place nasal cannula prongs into nares
Guide tubing around ears, under chin
Adjust fit under chin
101
O2 Therapy
O2 administration devices Nonrebreather mask
• High-flow, high-concentration
• Up to 90% concentration
• 10-15 L/min
• Indications: Respiratory distress
Shock
Poor tissue oxygenation
102
O2 Therapy
Copyright © 2013 by Jones & Bartlett Learning, LLC, an Ascend Learning Company

9/18/2012
35
103
Skill 6-9: Applying a Nonrebreather Mask
Prefill reservoir bag with O2 by placing 2 fingers inside mask and closing off valve
104
Skill 6-9: Applying a Nonrebreather Mask
Extend elastic strap
Place mask over patient’s head
Cinch metal band on nose, adjust strap
105
O2 Therapy
O2 administration devices Pulse oximetry
Monitors O2 saturation
Colorimeter
Normal hemoglobin saturation: 93% to 100%
More than 95% - good saturation
Less than 95% - hypoxia
Copyright © 2013 by Jones & Bartlett Learning, LLC, an Ascend Learning Company

9/18/2012
36
106
O2 Therapy
O2 administration devices Pulse oximetry
Accuracy affected by:– Excessive ambient light
– Conditions that reduce circulation to peripheral arteries:
– Cardiac arrest
– Hypotension
– Hypothermia
– Vasoconstriction drugs
– CO poisoning
107
O2 Therapy
108
O2 Therapy
O2 administration devices Humidification
• Moisturizes inspired O2
• Loosens secretions, prevents airway drying
• Useful in smoke inhalation
• Prevent contamination of device
Copyright © 2013 by Jones & Bartlett Learning, LLC, an Ascend Learning Company

9/18/2012
37
109
Special Patient Populations
Patients with stomas Permanent/temporary breathing tube or
tracheostomy or laryngectomy
Obstructed stoma requires suctioning
110
Special Patient Populations
Patients with stomas If positive-pressure ventilation required:
• Breathe directly through opening/tube
• Place infant/child mask directly over stoma
• Extension of head, neck not necessary
• Squeeze bag, observe chest rise
• If you are unable to ventilate through stoma, attempt to breathe through upper airway
• If patient has a tube coming out of stoma, attach bag-mask device directly to tube
111
Special Patient Populations
Copyright © 2013 by Jones & Bartlett Learning, LLC, an Ascend Learning Company

9/18/2012
38
112
Special Patient Populations
113
Special Patient Populations
Infants & children Airway differs from adults
• Internal diameter - smaller at all levels
• Tongue larger in relation to airway; greater obstruction risk
• Narrowest part of airway - ring formed by cricoid cartilage
• Larynx, trachea cartilage softer
• Chest wall softer; diaphragmatic breathing
114
Special Patient Populations
Infants & children• Differences have practical implications
• Infants - head placed in sniffing, neutral position
• Toddlers, small children - neck extended slightly
• Keep tongue from obstructing airway
• Small obstructions may cause significant blockage
Copyright © 2013 by Jones & Bartlett Learning, LLC, an Ascend Learning Company
9/18/2012
39
115
Special Patient Populations
Patients with facial injuries Because of rich blood supply to face, blunt injuries
cause severe bleeding• Makes airway management difficult
• Have suctioning readily available
• Bleeding in cheek, mouth controlled with direct pressure
• Turn head to aid drainage
116
Special Patient Populations
Patients with dental appliances Dentures remain in place during airway
management• Give form to face, help create better seal with mask
device
• If loose, may obstruct airway
• If dislodged, remove, continue ventilation
117
Special Patient Populations
Patients with COPD Patients with COPD
• Ordinary control of ventilatory drive is CO2 level in blood
• Have chronic CO2 buildup from lung disease; brain desensitized to CO2
• When patients are severely hypoxic, in shock, or respiratory arrest:
Administer high-concentration O2; monitor for possible respiratory depression/arrest
Copyright © 2013 by Jones & Bartlett Learning, LLC, an Ascend Learning Company

9/18/2012
40
118
Airway Obstruction
Perform BLS procedures
If unsuccessful × 3 - rapid transport, continue efforts en route
119
Airway Obstruction
Choking Death within minutes
Tongue obstructs pharynx from lower jaw muscle relaxation
Epiglottis blocks airway in unconscious patients
Head/facial injury bleeding, vomiting may cause obstruction
120
Skill 6-10: Adult Choking
Ask, “Are you choking?”
Copyright © 2013 by Jones & Bartlett Learning, LLC, an Ascend Learning Company

9/18/2012
41
121
Skill 6-10: Adult Choking
Move behind choking victim, place 1 hand on abdomen above umbilicus, below ribs
Reach around with other hand, grab 1st
hand, hold firmly
122
Skill 6-10: Adult Choking
Give abdominal thrusts
Repeat until object expelled or victim becomes unresponsive
123
Skill 6-10: Adult Choking
If victim becomes unconscious, help safely to ground
Perform tongue-jaw lift
Copyright © 2013 by Jones & Bartlett Learning, LLC, an Ascend Learning Company

9/18/2012
42
124
Skill 6-10: Adult Choking
Ventilate patient
If unsuccessful, start CPR
Repeat tongue-jaw lift, ventilation, CPR
125
Airway Obstruction
Recognition of airway obstruction• Mild obstruction
Responsive patients cough forcefully with wheezing between coughs
Encourage coughing, monitor patient
126
Airway Obstruction
Recognition of airway obstruction• Severe obstruction
Weak, ineffective cough
High-pitched noises while inhaling
↑ respiratory difficulty
Inability to talk
Possible cyanosis
May clutch neck
Provide abdominal thrusts
Copyright © 2013 by Jones & Bartlett Learning, LLC, an Ascend Learning Company

9/18/2012
43
127
Airway Obstruction
Relief of choking Abdominal thrust with victim standing/sitting
• Stand behind victim, wrap around waist
• Make first with 1 hand
• Grasp fist with other hand
• Press into victim’s abdomen with quick upward thrusts
128
Airway Obstruction
Relief of obstruction Abdominal thrusts with responsive victim lying
down• Kneel astride thighs
• Place heel of hand against abdomen, midline slightly above navel, below tip of xiphoid
• Place other hand directly on top of fist
• Press with quick upward thrusts
129
Airway Obstruction
Relief of obstruction Chest thrusts with victim standing/sitting
• For late pregnancy, obese patient
• Stand behind victim, arms directly under armpits, encircle chest
• Place thumb side of 1 fist on lower half of sternum, avoid xiphoid process, margins of rib cage
• Grab fist with other hand, administer backwards thrusts
Copyright © 2013 by Jones & Bartlett Learning, LLC, an Ascend Learning Company

9/18/2012
44
130
Airway Obstruction
Relief of obstruction Chest thrusts with responsive victim lying down
• For late pregnancy, unconscious obese patient
• Place patient on back, kneel close to side
• Hand placement & technique same as CPR chest compressions
131
Airway Obstruction
Relief of obstruction Finger sweep & tongue-jaw lift
• Finger sweep not used with seizures
• Open mouth, grasp tongue & lower jaw between thumb, fingers lifting mandible
• Draws tongue/foreign body away from back of throat
• If you see an object, insert index finger along side cheek deeply into throat to tongue base
• Use hooking action to dislodge
132
Airway Obstruction
Relief of foreign body airway obstruction in unresponsive victim CPR
Open airway using tongue-jaw lift, look for object
If object seen, remove using finger sweep
If object not seen, give rescue breaths & chest compressions
If you feel resistance to airflow and have no chest rise:• Reopen airway, try again
• If air does not go in, start CPR
• Each time you open airway, look for object
Copyright © 2013 by Jones & Bartlett Learning, LLC, an Ascend Learning Company

9/18/2012
45
133
Summary
Respiratory system brings O2 into body, rids CO2
Respiratory system composed of: Nose
Mouth
Nasopharynx
Oropharynx
Larynx
Epiglottis
Trachea
Bronchi
Bronchioles
Alveoli
Lungs
134
Summary
Diaphragm, chest muscles cause thoracic cavity TO expand/contract, create airflow during ventilation Inhalation when diaphragm, intercostal muscles contract,
enlarge thoracic cavity
Exhalation when diaphragm, intercostals relax, decrease thoracic cavity size
O2 & CO2 exchange occurs at alveoli & capillaries through diffusion
Accessory muscles help increase respiratory volumes during exercise, respiratory disease
135
Summary
Inadequate breathing - respiratory rate outside of normal, irregular rhythm, abnormal breathing quality Pale, cool, cyanotic skin
Retractions
Nasal flaring
Seesaw breathing
Agonal respirations
Copyright © 2013 by Jones & Bartlett Learning, LLC, an Ascend Learning Company

9/18/2012
46
136
Summary
Respiratory distress requires increased work of breathing Increased respiratory rate
Accessory muscle use
Nasal flaring
Position to aid breathing (tripod or bolt upright)
Respiratory failure - inadequate ventilation to support life & cannot maintain mental status/muscle tone; needs positive-pressure ventilation
Respiratory arrest - complex cessation of breathing Can progress to respiratory/cardiac arrest
137
Summary
Airway opened by using head-tilt/chin-lift/jaw thrust
Suctioning used to clear liquid, small solid secretions with soft/rigid catheter Never suction >15 sec
OPA used for unconscious patient with no gag reflex
NPA for patients who will not tolerate OPA
138
Summary
Mouth-to-mask ventilation reliable, allows EMT to create mask seal with 2 hands, feel chest wall compliance, administer supplemental O2
Bag-mask ventilation most common
Cricoid pressure used to compress esophagus, prevent gastric inflation during positive-pressure ventilation
Copyright © 2013 by Jones & Bartlett Learning, LLC, an Ascend Learning Company

9/18/2012
47
139
Summary
Positive-pressure ventilation provided using: Mouth-to-mask
Bag-mask
Flow-restricted, O2-powered ventilation device
O2 stored in green steel/aluminum cylinders, used with regulators
2 most common free-flow O2 devices include nasal cannula & nonrebreather mask
140
Summary
Pulse oximetry assesses O2 saturation in blood
When delivering O2 with COPD, prepare to assist with ventilations
Laryngectomy/stoma ventilated directly through opening in neck
BLS airway obstruction procedures used to clear foreign object
141
Summary
Choking in adults usually occurs during eating
Severe airway obstruction signs: Weak, ineffective cough
High-pitched noises while inhaling
Increased respiratory difficulty
Inability to talk
Possible cyanosis
Copyright © 2013 by Jones & Bartlett Learning, LLC, an Ascend Learning Company

9/18/2012
48
142
Summary
Abdominal thrusts recommend for choking relief
When treating COPD patients, administer O2, closely monitor ventilations
143
Questions?
Copyright © 2013 by Jones & Bartlett Learning, LLC, an Ascend Learning Company
Recommended


![Chapter 12 LO - Jones & Bartlett Learningems.jbpub.com/chapleau/emt/docs/PPT_lectures/Chap… · · 2014-05-05Title: Microsoft PowerPoint - Chapter_12_LO [Compatibility Mode] Author:](https://img.dokumen.tips/doc/110x75/5af12e897f8b9abc788e1b9b/chapter-12-lo-jones-bartlett-2014-05-05title-microsoft-powerpoint-chapter12lo.jpg)