JBoss Enterprise Application Platform6.3
Installation Guide
For use with Red Hat JBoss Enterprise Application Platform 6
Last Updated: 2017-10-17

JBoss Enterprise Application Platform 6.3 Installation Guide
For use with Red Hat JBoss Enterprise Application Platform 6
Legal Notice
Copyright © 2014 Red Hat, Inc..
This document is licensed by Red Hat under the Creative Commons Attribution-ShareAlike 3.0Unported License. If you distribute this document, or a modified version of it, you must provideattribution to Red Hat, Inc. and provide a link to the original. If the document is modified, all RedHat trademarks must be removed.
Red Hat, as the licensor of this document, waives the right to enforce, and agrees not to assert,Section 4d of CC-BY-SA to the fullest extent permitted by applicable law.
Red Hat, Red Hat Enterprise Linux, the Shadowman logo, JBoss, OpenShift, Fedora, the Infinitylogo, and RHCE are trademarks of Red Hat, Inc., registered in the United States and othercountries.
Linux ® is the registered trademark of Linus Torvalds in the United States and other countries.
Java ® is a registered trademark of Oracle and/or its affiliates.
XFS ® is a trademark of Silicon Graphics International Corp. or its subsidiaries in the UnitedStates and/or other countries.
MySQL ® is a registered trademark of MySQL AB in the United States, the European Union andother countries.
Node.js ® is an official trademark of Joyent. Red Hat Software Collections is not formally relatedto or endorsed by the official Joyent Node.js open source or commercial project.
The OpenStack ® Word Mark and OpenStack logo are either registered trademarks/service marksor trademarks/service marks of the OpenStack Foundation, in the United States and othercountries and are used with the OpenStack Foundation's permission. We are not affiliated with,endorsed or sponsored by the OpenStack Foundation, or the OpenStack community.
All other trademarks are the property of their respective owners.
Abstract
This book is a guide to the installation of Red Hat JBoss Enterprise Application Platform 6 and itspatch releases.
. . . . . . . . . . . . . . . . . . . . . . . . . . . . . . . . . . . . . . . . . . . . . . . . . . . . . . . . . . . . . . . . . . . . . . . . . . . . . . . . . . . . . . . . . . . . . . . . . . . . . . . . . . . . . . . . . . . . . . . . . . . . . . . . . . . . . . . . . . . . . . . . . . . . . . . . . . . . . . . . . . . . . . . . . . . . . . . . . . . . . . . . . . . . . . . . . . . . . . . . . . . . . . . . . . . . . . . . . . . . . . . . . . . . . . . . . . . . . . . . . . . . . . . . . . . . . . . . . . . . . . . . . . . . . . . . . . . . . . . .
. . . . . . . . . . . . . . . . . . . . . . . . . . . . . . . . . . . . . . . . . . . . . . . . . . . . . . . . . . . . . . . . . . . . . . . . . . . . . . . . . . . . . . . . . . . . . . . . . . . . . . . . . . . . . . . . . . . . . . . . . . . . . . . . . . . . . . . . . . . . . . . . . . . . . . . . . . . . . . . . . . . . . . . . . . . . . . . . . . . . . . . . . . . . . . . . . . . . . . . . . . . . . . . . . . . . . . . . . . . . . . . . . . . . . . . . . . . . . . . . . . . . . . . . . . . . . . . . . . . . . . . . . . . . . . . . . . . . . . . .
. . . . . . . . . . . . . . . . . . . . . . . . . . . . . . . . . . . . . . . . . . . . . . . . . . . . . . . . . . . . . . . . . . . . . . . . . . . . . . . . . . . . . . . . . . . . . . . . . . . . . . . . . . . . . . . . . . . . . . . . . . . . . . . . . . . . . . . . . . . . . . . . . . . . . . . . . . . . . . . . . . . . . . . . . . . . . . . . . . . . . . . . . . . . . . . . . . . . . . . . . . . . . . . . . . . . . . . . . . . . . . . . . . . . . . . . . . . . . . . . . . . . . . . . . . . . . . . . . . . . . . . . . . . . . . . . . . . . . . . .
. . . . . . . . . . . . . . . . . . . . . . . . . . . . . . . . . . . . . . . . . . . . . . . . . . . . . . . . . . . . . . . . . . . . . . . . . . . . . . . . . . . . . . . . . . . . . . . . . . . . . . . . . . . . . . . . . . . . . . . . . . . . . . . . . . . . . . . . . . . . . . . . . . . . . . . . . . . . . . . . . . . . . . . . . . . . . . . . . . . . . . . . . . . . . . . . . . . . . . . . . . . . . . . . . . . . . . . . . . . . . . . . . . . . . . . . . . . . . . . . . . . . . . . . . . . . . . . . . . . . . . . . . . . . . . . . . . . . . . . .
. . . . . . . . . . . . . . . . . . . . . . . . . . . . . . . . . . . . . . . . . . . . . . . . . . . . . . . . . . . . . . . . . . . . . . . . . . . . . . . . . . . . . . . . . . . . . . . . . . . . . . . . . . . . . . . . . . . . . . . . . . . . . . . . . . . . . . . . . . . . . . . . . . . . . . . . . . . . . . . . . . . . . . . . . . . . . . . . . . . . . . . . . . . . . . . . . . . . . . . . . . . . . . . . . . . . . . . . . . . . . . . . . . . . . . . . . . . . . . . . . . . . . . . . . . . . . . . . . . . . . . . . . . . . . . . . . . . . . . . .
Table of Contents
CHAPTER 1. PRODUCT OVERVIEW1.1. ABOUT RED HAT JBOSS ENTERPRISE APPLICATION PLATFORM 61.2. FEATURES OF JBOSS EAP 6
CHAPTER 2. INTRODUCTION2.1. ABOUT THE RED HAT CUSTOMER PORTAL
CHAPTER 3. SYSTEM REQUIREMENTS3.1. JBOSS EAP 6 INSTALLATION PREREQUISITES
CHAPTER 4. INSTALL INSTRUCTIONS4.1. JBOSS EAP 6 INSTALLATION METHODS4.2. ZIP INSTALLATION
4.2.1. Download JBoss EAP 6 (Zip Installation)4.2.2. Install JBoss EAP 6 (ZIP Installation)4.2.3. Uninstall JBoss EAP 6 (Zip Installation)
4.3. INSTALLER4.3.1. Download JBoss EAP 6 (Installer)4.3.2. Run the JBoss EAP Installation Program4.3.3. Uninstall JBoss EAP 6 (Installer)
4.4. GRAPHICAL RPM INSTALLATION4.4.1. Install JBoss EAP 6 (Graphical RPM Installation)
4.5. TEXT-BASED RPM INSTALLATION4.5.1. Install JBoss EAP 6 (Text-based RPM Installation)
4.6. AUTOMATED INSTALLATION4.6.1. Install Multiple Instances of JBoss EAP 6 (Installer)4.6.2. Use Automatic Installation Script (auto.xml) from Different Sources for Installing JBoss EAP 6
4.7. AUTOMATED INSTALLATION APPROACHES4.7.1. About Automated Installation Approaches4.7.2. Install JBoss EAP 6 by Pre-setting the Key/Password Values in the Automatic Installation Variable File
4.7.3. Install JBoss EAP 6 automatically by Specifying the Key Values/Passwords During Install Time4.8. INSTALLING NATIVE COMPONENTS AND UTILITIES
4.8.1. Install Native Components and Native Utilities (Zip, Installer)4.8.2. Install Native Components and Native Utilities (RPM Installation)
4.9. SERVICE CONFIGURATION4.9.1. Configure JBoss EAP 6 as a Service in Red Hat Enterprise Linux (RPM Method)4.9.2. Configure JBoss EAP 6 as a Service in Red Hat Enterprise Linux (Zip, Installer)4.9.3. Configure JBoss EAP 6 as a Service in Microsoft Windows Server (Zip, Installer)
CHAPTER 5. PATCHING AND UPGRADING JBOSS EAP 65.1. ABOUT PATCHES AND UPGRADES5.2. PATCHING JBOSS EAP 6
5.2.1. About Patching Mechanisms5.2.2. Patching a Zip/Installer Installation
5.2.2.1. The Patch Management System5.2.2.2. Installing Patches in Zip Form Using the Patch Management System5.2.2.3. Rollback the Application of a Patch in Zip Form Using the Patch Management System
5.2.3. Patching an RPM Installation5.2.4. Subscribe to Patch Mailing Lists5.2.5. Severity and Impact Rating of JBoss Security Patches
5.3. UPGRADING JBOSS EAP 6
444
66
77
88889
10101011
14151516161717181818
1919
20202122222325
292929293030313335363738
Table of Contents
1
. . . . . . . . . . . . . . . . . . . . . . . . . . . . . . . . . . . . . . . . . . . . . . . . . . . . . . . . . . . . . . . . . . . . . . . . . . . . . . . . . . . . . . . . . . . . . . . . . . . . . . . . . . . . . . . . . . . . . . . . . . . . . . . . . . . . . . . . . . . . . . . . . . . . . . . . . . . . . . . . . . . . . . . . . . . . . . . . . . . . . . . . . . . . . . . . . . . . . . . . . . . . . . . . . . . . . . . . . . . . . . . . . . . . . . . . . . . . . . . . . . . . . . . . . . . . . . . . . . . . . . . . . . . . . . . . . . . . . . . .
. . . . . . . . . . . . . . . . . . . . . . . . . . . . . . . . . . . . . . . . . . . . . . . . . . . . . . . . . . . . . . . . . . . . . . . . . . . . . . . . . . . . . . . . . . . . . . . . . . . . . . . . . . . . . . . . . . . . . . . . . . . . . . . . . . . . . . . . . . . . . . . . . . . . . . . . . . . . . . . . . . . . . . . . . . . . . . . . . . . . . . . . . . . . . . . . . . . . . . . . . . . . . . . . . . . . . . . . . . . . . . . . . . . . . . . . . . . . . . . . . . . . . . . . . . . . . . . . . . . . . . . . . . . . . . . . . . . . . . . .
. . . . . . . . . . . . . . . . . . . . . . . . . . . . . . . . . . . . . . . . . . . . . . . . . . . . . . . . . . . . . . . . . . . . . . . . . . . . . . . . . . . . . . . . . . . . . . . . . . . . . . . . . . . . . . . . . . . . . . . . . . . . . . . . . . . . . . . . . . . . . . . . . . . . . . . . . . . . . . . . . . . . . . . . . . . . . . . . . . . . . . . . . . . . . . . . . . . . . . . . . . . . . . . . . . . . . . . . . . . . . . . . . . . . . . . . . . . . . . . . . . . . . . . . . . . . . . . . . . . . . . . . . . . . . . . . . . . . . . . .
5.3.1. Upgrade the JBoss EAP 6 ZIP Installation5.3.2. Upgrade the JBoss EAP 6 RPM Installation5.3.3. Upgrade JBoss EAP Cluster from 6.2 to 6.3
APPENDIX A. REFERENCE MATERIALA.1. AVAILABLE DOWNLOADS FOR JBOSS EAP 6A.2. DIRECTORY STRUCTURE OF JBOSS EAP 6A.3. RPM PACKAGE LIST FOR JBOSS EAP 6A.4. RPM INSTALLATION CONFIGURATION FILES FOR JBOSS EAP 6
APPENDIX B. INSTALLER SCREENSHOTSB.1. LANGUAGE SELECTIONB.2. END USER LICENSE AGREEMENTB.3. INSTALLATION PATHB.4. SELECT THE PACKS TO INSTALLB.5. ADMINISTRATIVE USER CREATIONB.6. QUICKSTART INSTALLATIONB.7. MAVEN REPOSITORY SETUPB.8. SOCKET BINDING SETUPB.9. CUSTOM SOCKET BINDINGS FOR STANDALONE CONFIGURATIONSB.10. CUSTOM SOCKET BINDINGS FOR DOMAIN CONFIGURATIONSB.11. SERVER LAUNCHB.12. CONFIGURE LOGGING LEVELSB.13. CONFIGURE RUNTIME ENVIRONMENTB.14. PASSWORD VAULT CONFIGURATIONB.15. CONFIGURE SSL SECURITYB.16. CONFIGURE LDAPB.17. INFINISPAN CONFIGURATIONB.18. SECURITY DOMAIN CONFIGURATIONB.19. JDBC DRIVER SETUPB.20. DATASOURCE SETUPB.21. REVIEW INSTALLATION COMPONENTSB.22. INSTALLATION PROGRESSB.23. INSTALLATION PROCESSING FINISHEDB.24. CREATE SHORTCUTSB.25. GENERATE INSTALL SCRIPT
APPENDIX C. REVISION HISTORY
384041
4242434647
494949505152535455586267686971
7273747577777879808182
84
Installation Guide
2

Table of Contents
3
CHAPTER 1. PRODUCT OVERVIEW
1.1. ABOUT RED HAT JBOSS ENTERPRISE APPLICATION PLATFORM 6
Red Hat JBoss Enterprise Application Platform 6 (JBoss EAP 6) is a middleware platform built on openstandards and compliant with the Java Enterprise Edition 6 specification. It integrates JBossApplication Server 7 with high-availability clustering, messaging, distributed caching, and othertechnologies.
JBoss EAP 6 includes a new, modular structure that allows service enabling only when required,improving start-up speed.
The Management Console and Management Command Line Interface make editing XML configurationfiles unnecessary and add the ability to script and automate tasks.
In addition, JBoss EAP 6 includes APIs and development frameworks for quickly developing secure andscalable Java EE applications.
Report a bug
1.2. FEATURES OF JBOSS EAP 6
Table 1.1. JBoss EAP 6.3.0 Features
Feature Description
Java Certification Java Enterprise Edition 6 Full Profile and Web Profilecertified.
Managed DomainCentralized management of multiple serverinstances and physical hosts, while astandalone server allows for a single serverinstance.
Per-server group management ofconfiguration, deployment, socket bindings,modules, extensions and system properties.
Centralized and simplified management ofapplication security (including securitydomains).
Management Console and Management CLI New domain or standalone server managementinterfaces. XML configuration file editing is nolonger required. The Management CLI also includesa batch mode that can script and automatemanagement tasks.
Installation Guide
4
Simplified directory layout The modules directory now contains all applicationserver modules. The common and server-specific lib directories are deprecated. The domain and standalone directories contain the artifacts andconfiguration files for domain and standalonedeployments respectively.
Modular classloading mechanism Modules are loaded and unloaded on demand. Thisimproves performance, has security benefits andreduces start-up and restart times.
Streamlined Data source management Database drivers are deployed just like otherservices. In addition, datasources are created andmanaged directly in the Management Console orManagement CLI.
Reduced and more efficient resource use. JBoss EAP 6 uses fewer system resources and usesthem more efficiently than previous versions.Among other benefits, JBoss EAP 6 starts and stopsfaster than JBoss EAP 5.
Feature Description
Report a bug
CHAPTER 1. PRODUCT OVERVIEW
5
CHAPTER 2. INTRODUCTION
2.1. ABOUT THE RED HAT CUSTOMER PORTAL
The Red Hat Customer Portal is the centralized platform for Red Hat knowledge and subscriptionresources. Use the Red Hat Customer Portal to do the following:
Manage and maintain Red Hat entitlements and support contracts.
Download officially-supported software.
Access product documentation and the Red Hat Knowledgebase.
Contact Global Support Services.
File bugs against Red Hat products.
The Customer Portal is available here: https://access.redhat.com.
Report a bug
Installation Guide
6
CHAPTER 3. SYSTEM REQUIREMENTS
3.1. JBOSS EAP 6 INSTALLATION PREREQUISITES
Each installation process for JBoss EAP 6 has a number of prerequisites. This section covers thecommon requirements, as well as those that are installation specific.
Common Prerequisites
Set up an account on the Red Hat Customer Portal at https://access.redhat.com. For moreinformation, refer here: Section 2.1, “About the Red Hat Customer Portal” .
Review the supported configurations and ensure your system is supportable:https://access.redhat.com/site/articles/111663.
Ensure that your system is up to date with Red Hat issued updates and errata.
ZIP/Installer Prerequisites
Administration privileges for the installation directory.
Ensure that the chosen JDK has been extracted (or installed). Refer to the JDK'sdocumentation for information on how to do this.
On Microsoft Windows Server, ensure that the JAVA_HOME and PATH environment variableshave been set, otherwise shortcuts will not work.
On Hewlett-Packard HP-UX, ensure that an unzip utility has been installed.
RPM Prerequisites
Register the server on the Red Hat Network.
Subscribe to the Red Hat Enterprise Linux Server base software channel appropriateto your Red Hat Enterprise Linux version.
Subscribe to the JBoss Application Platform for Server sub-channel, in the JBoss Enterprise Platform group.
On Red Hat Enterprise Linux 5, JDK 6 must be installed, even if JDK 7 only is to be used. OnRed Hat Enterprise Linux 6 and higher, only a JDK 7 is required. This can be obtained bysubscribing to the supplementary software channel for your Red Hat Enterprise Linuxinstallation. For example; the channel for Red Hat Enterprise Linux version 6 installed on i386architecture is rhel-i386-server-supplementary-6.
ppc64 Prerequisites
On Red Hat Enterprise Linux 6, subscribe to the rhel-ppc64-server-optional-6 channel.
On Red Hat Enterprise Linux 7, subscribe to the rhel-7-server-optional-rpms-7Serverrepository.
Report a bug
CHAPTER 3. SYSTEM REQUIREMENTS
7
CHAPTER 4. INSTALL INSTRUCTIONS
4.1. JBOSS EAP 6 INSTALLATION METHODS
There are several different ways to install JBoss EAP 6. Each method is best used in certain situations.This topic provides a brief overview for each type of installation, and links to the sections that coverthe relevant installation processes.
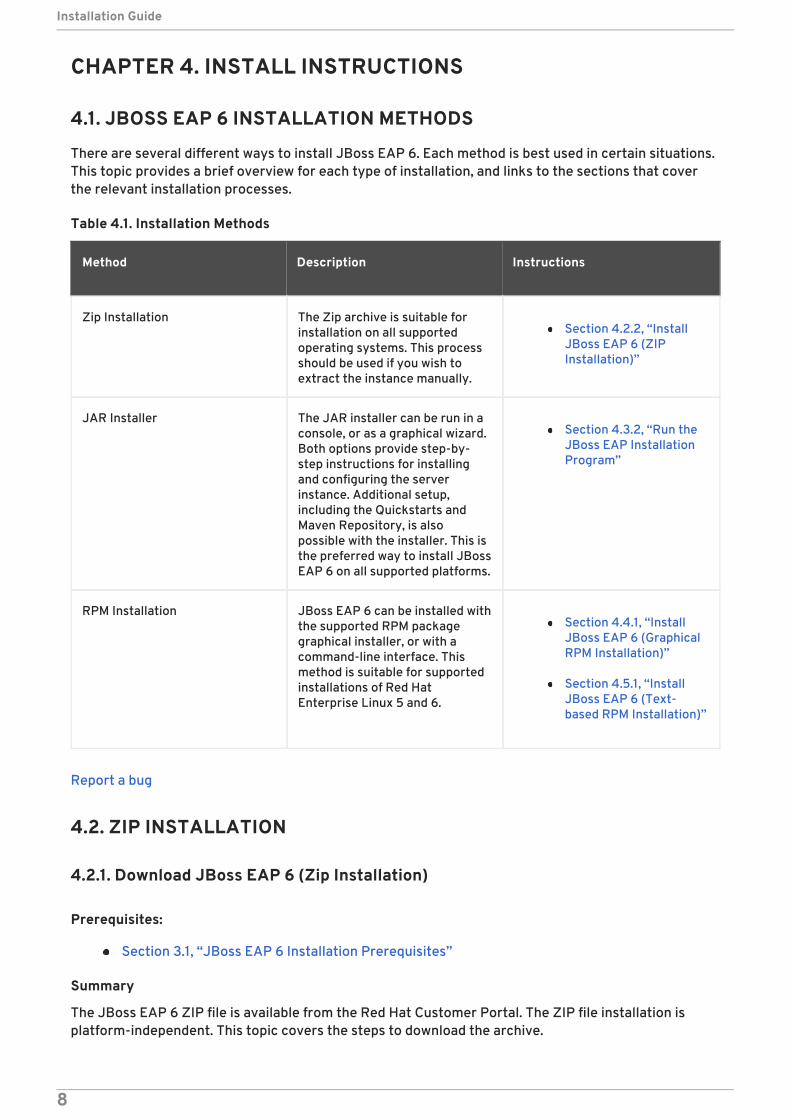
Table 4.1. Installation Methods
Method Description Instructions
Zip Installation The Zip archive is suitable forinstallation on all supportedoperating systems. This processshould be used if you wish toextract the instance manually.
Section 4.2.2, “InstallJBoss EAP 6 (ZIPInstallation)”
JAR Installer The JAR installer can be run in aconsole, or as a graphical wizard.Both options provide step-by-step instructions for installingand configuring the serverinstance. Additional setup,including the Quickstarts andMaven Repository, is alsopossible with the installer. This isthe preferred way to install JBossEAP 6 on all supported platforms.
Section 4.3.2, “Run theJBoss EAP InstallationProgram”
RPM Installation JBoss EAP 6 can be installed withthe supported RPM packagegraphical installer, or with acommand-line interface. Thismethod is suitable for supportedinstallations of Red HatEnterprise Linux 5 and 6.
Section 4.4.1, “InstallJBoss EAP 6 (GraphicalRPM Installation)”
Section 4.5.1, “InstallJBoss EAP 6 (Text-based RPM Installation)”
Report a bug
4.2. ZIP INSTALLATION
4.2.1. Download JBoss EAP 6 (Zip Installation)
Prerequisites:
Section 3.1, “JBoss EAP 6 Installation Prerequisites”
Summary
The JBoss EAP 6 ZIP file is available from the Red Hat Customer Portal. The ZIP file installation isplatform-independent. This topic covers the steps to download the archive.
Installation Guide
8
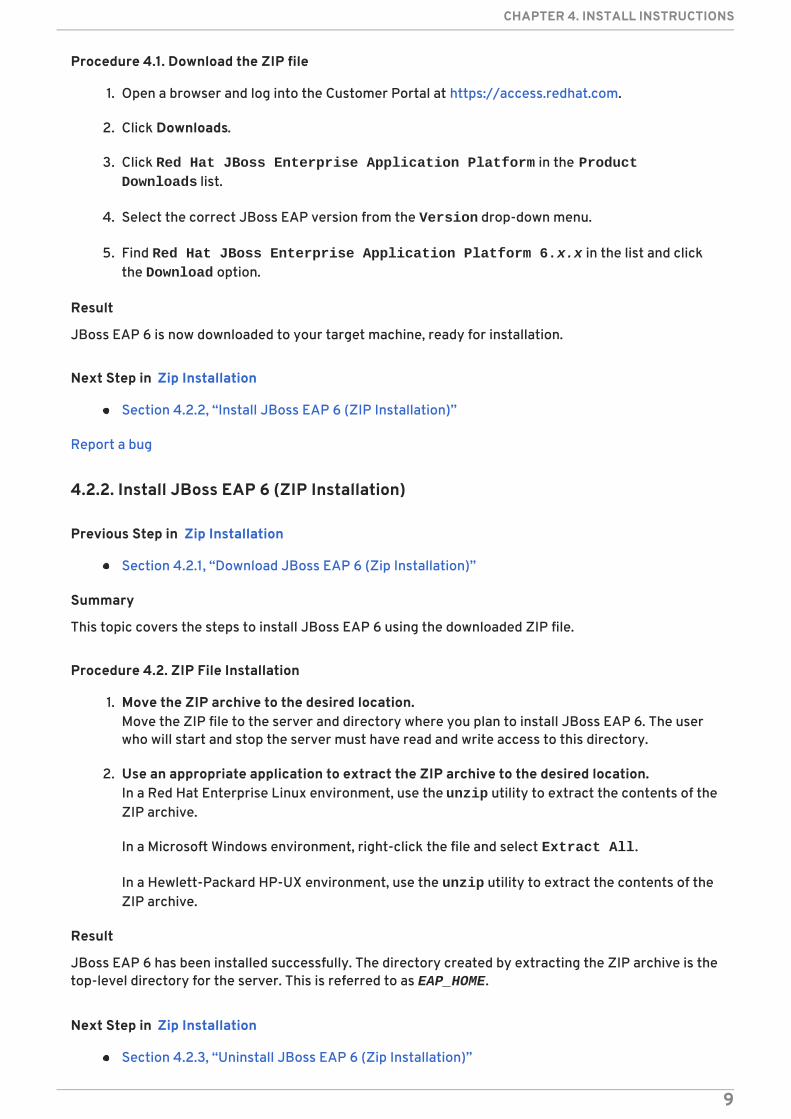
Procedure 4.1. Download the ZIP file
1. Open a browser and log into the Customer Portal at https://access.redhat.com.
2. Click Downloads.
3. Click Red Hat JBoss Enterprise Application Platform in the Product Downloads list.
4. Select the correct JBoss EAP version from the Version drop-down menu.
5. Find Red Hat JBoss Enterprise Application Platform 6.x.x in the list and clickthe Download option.
Result
JBoss EAP 6 is now downloaded to your target machine, ready for installation.
Next Step in Zip Installation
Section 4.2.2, “Install JBoss EAP 6 (ZIP Installation)”
Report a bug
4.2.2. Install JBoss EAP 6 (ZIP Installation)
Previous Step in Zip Installation
Section 4.2.1, “Download JBoss EAP 6 (Zip Installation)”
Summary
This topic covers the steps to install JBoss EAP 6 using the downloaded ZIP file.
Procedure 4.2. ZIP File Installation
1. Move the ZIP archive to the desired location.Move the ZIP file to the server and directory where you plan to install JBoss EAP 6. The userwho will start and stop the server must have read and write access to this directory.
2. Use an appropriate application to extract the ZIP archive to the desired location.In a Red Hat Enterprise Linux environment, use the unzip utility to extract the contents of theZIP archive.
In a Microsoft Windows environment, right-click the file and select Extract All.
In a Hewlett-Packard HP-UX environment, use the unzip utility to extract the contents of theZIP archive.
Result
JBoss EAP 6 has been installed successfully. The directory created by extracting the ZIP archive is thetop-level directory for the server. This is referred to as EAP_HOME.
Next Step in Zip Installation
Section 4.2.3, “Uninstall JBoss EAP 6 (Zip Installation)”
CHAPTER 4. INSTALL INSTRUCTIONS
9
Report a bug
4.2.3. Uninstall JBoss EAP 6 (Zip Installation)
Previous Step in Zip Installation
Section 4.2.2, “Install JBoss EAP 6 (ZIP Installation)”
Prerequisites
Backup any modified configuration files and deployments that may be reused in a later instance.
Summary
This section covers the steps required to uninstall a Zip installation of JBoss EAP 6.
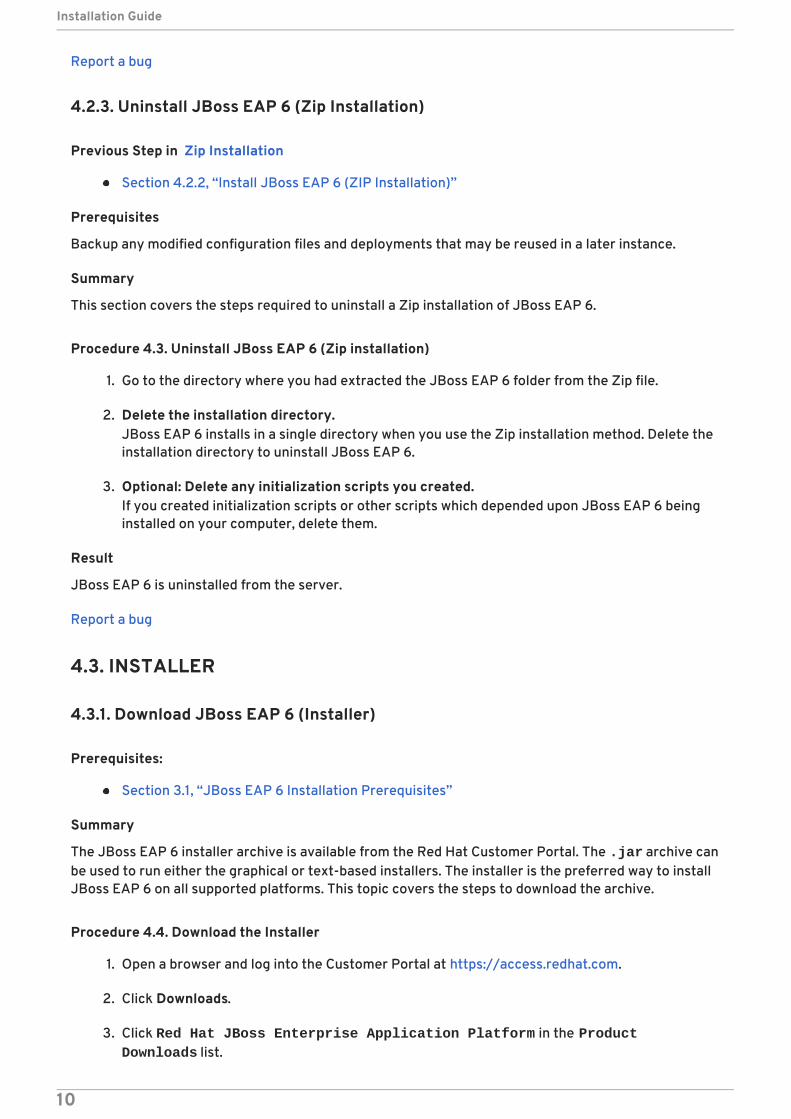
Procedure 4.3. Uninstall JBoss EAP 6 (Zip installation)
1. Go to the directory where you had extracted the JBoss EAP 6 folder from the Zip file.
2. Delete the installation directory.JBoss EAP 6 installs in a single directory when you use the Zip installation method. Delete theinstallation directory to uninstall JBoss EAP 6.
3. Optional: Delete any initialization scripts you created.If you created initialization scripts or other scripts which depended upon JBoss EAP 6 beinginstalled on your computer, delete them.
Result
JBoss EAP 6 is uninstalled from the server.
Report a bug
4.3. INSTALLER
4.3.1. Download JBoss EAP 6 (Installer)
Prerequisites:
Section 3.1, “JBoss EAP 6 Installation Prerequisites”
Summary
The JBoss EAP 6 installer archive is available from the Red Hat Customer Portal. The .jar archive canbe used to run either the graphical or text-based installers. The installer is the preferred way to installJBoss EAP 6 on all supported platforms. This topic covers the steps to download the archive.
Procedure 4.4. Download the Installer
1. Open a browser and log into the Customer Portal at https://access.redhat.com.
2. Click Downloads.
3. Click Red Hat JBoss Enterprise Application Platform in the Product Downloads list.
Installation Guide
10
4. Select the correct JBoss EAP version from the Version drop-down menu.
5. Find Red Hat JBoss Enterprise Application Platform 6.x.x Installer in thelist and click the Download option.
Result
JBoss EAP 6 is now downloaded to your target machine, ready for installation.
Next Step in Installer
Section 4.3.3, “Uninstall JBoss EAP 6 (Installer)”
Report a bug
4.3.2. Run the JBoss EAP Installation Program
The JBoss EAP installation program can be run in either graphical or text mode. This topic covers thecommand to run the installation program in graphical mode.
Procedure 4.5. Run the JBoss EAP Installation Program
1. Open a terminal and navigate to the directory containing the downloaded installation programJAR.
2. Type the following command:
java -jar jboss-eap-6.3.0-installer.jar
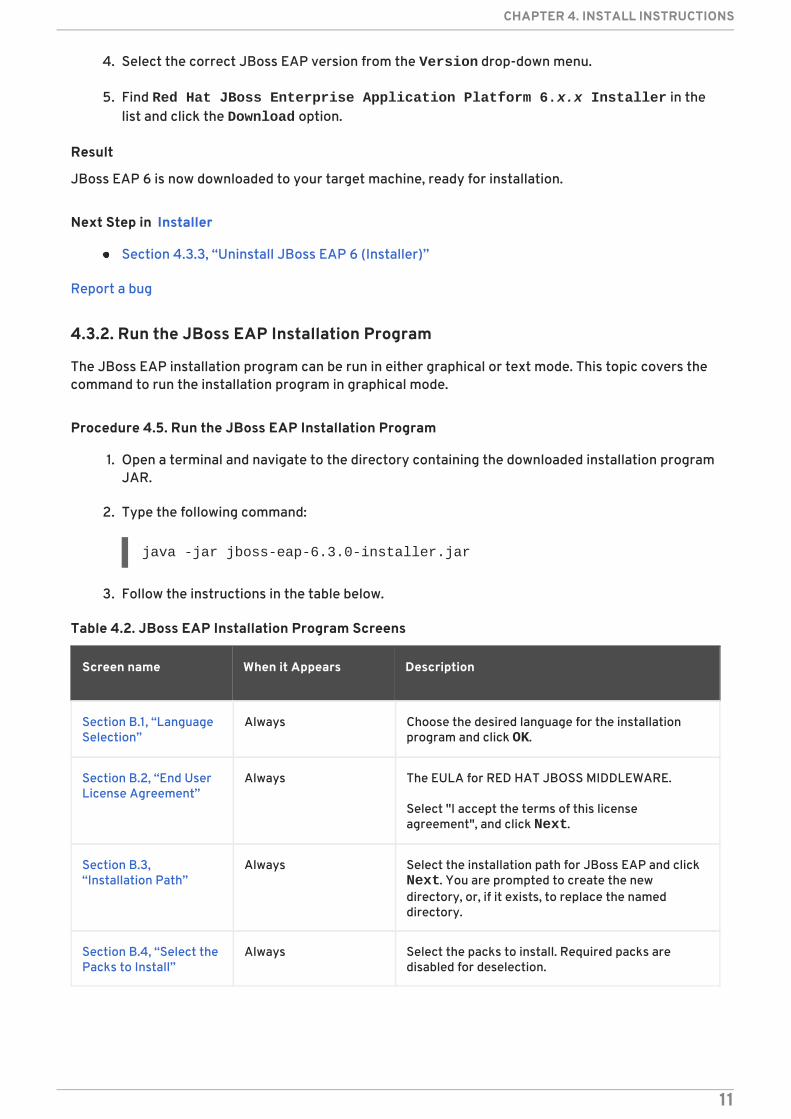
3. Follow the instructions in the table below.
Table 4.2. JBoss EAP Installation Program Screens
Screen name When it Appears Description
Section B.1, “LanguageSelection”
Always Choose the desired language for the installationprogram and click OK.
Section B.2, “End UserLicense Agreement”
Always The EULA for RED HAT JBOSS MIDDLEWARE.
Select "I accept the terms of this licenseagreement", and click Next.
Section B.3,“Installation Path”
Always Select the installation path for JBoss EAP and click Next. You are prompted to create the newdirectory, or, if it exists, to replace the nameddirectory.
Section B.4, “Select thePacks to Install”
Always Select the packs to install. Required packs aredisabled for deselection.
CHAPTER 4. INSTALL INSTRUCTIONS
11
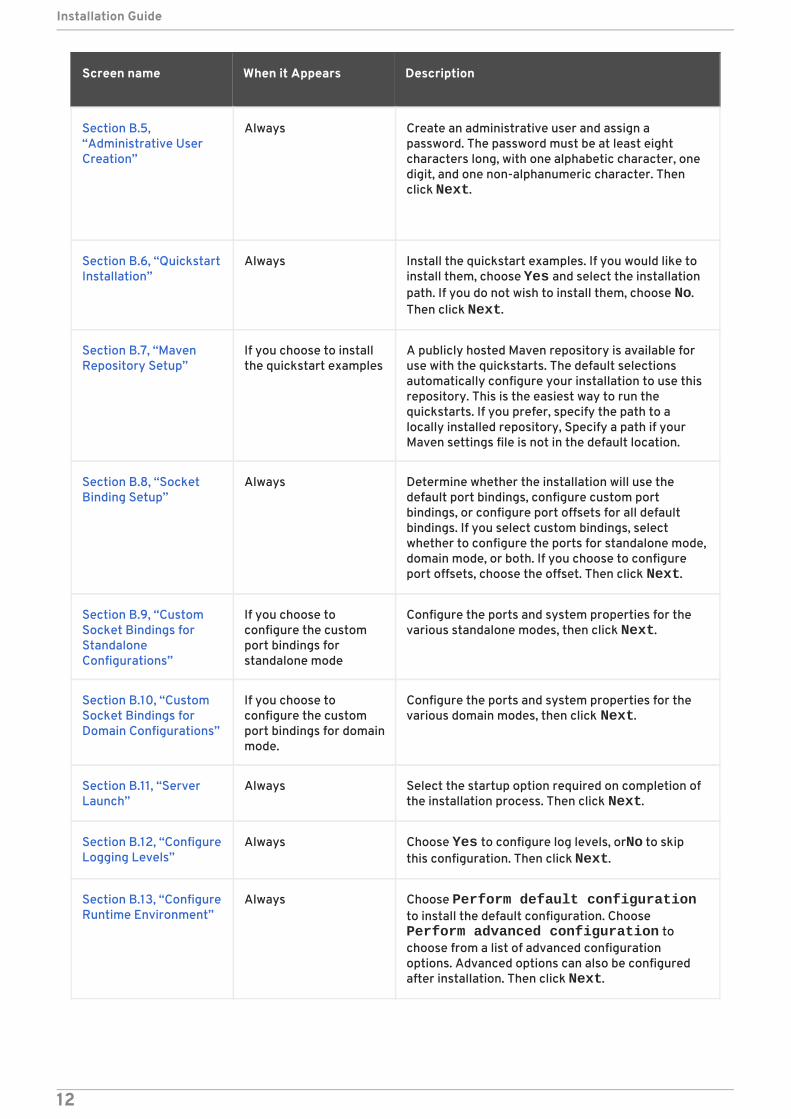
Section B.5,“Administrative UserCreation”
Always Create an administrative user and assign apassword. The password must be at least eightcharacters long, with one alphabetic character, onedigit, and one non-alphanumeric character. Thenclick Next.
Section B.6, “QuickstartInstallation”
Always Install the quickstart examples. If you would like toinstall them, choose Yes and select the installationpath. If you do not wish to install them, choose No.Then click Next.
Section B.7, “MavenRepository Setup”
If you choose to installthe quickstart examples
A publicly hosted Maven repository is available foruse with the quickstarts. The default selectionsautomatically configure your installation to use thisrepository. This is the easiest way to run thequickstarts. If you prefer, specify the path to alocally installed repository, Specify a path if yourMaven settings file is not in the default location.
Section B.8, “SocketBinding Setup”
Always Determine whether the installation will use thedefault port bindings, configure custom portbindings, or configure port offsets for all defaultbindings. If you select custom bindings, selectwhether to configure the ports for standalone mode,domain mode, or both. If you choose to configureport offsets, choose the offset. Then click Next.
Section B.9, “CustomSocket Bindings forStandaloneConfigurations”
If you choose toconfigure the customport bindings forstandalone mode
Configure the ports and system properties for thevarious standalone modes, then click Next.
Section B.10, “CustomSocket Bindings forDomain Configurations”
If you choose toconfigure the customport bindings for domainmode.
Configure the ports and system properties for thevarious domain modes, then click Next.
Section B.11, “ServerLaunch”
Always Select the startup option required on completion ofthe installation process. Then click Next.
Section B.12, “ConfigureLogging Levels”
Always Choose Yes to configure log levels, or No to skipthis configuration. Then click Next.
Section B.13, “ConfigureRuntime Environment”
Always Choose Perform default configurationto install the default configuration. Choose Perform advanced configuration tochoose from a list of advanced configurationoptions. Advanced options can also be configuredafter installation. Then click Next.
Screen name When it Appears Description
Installation Guide
12
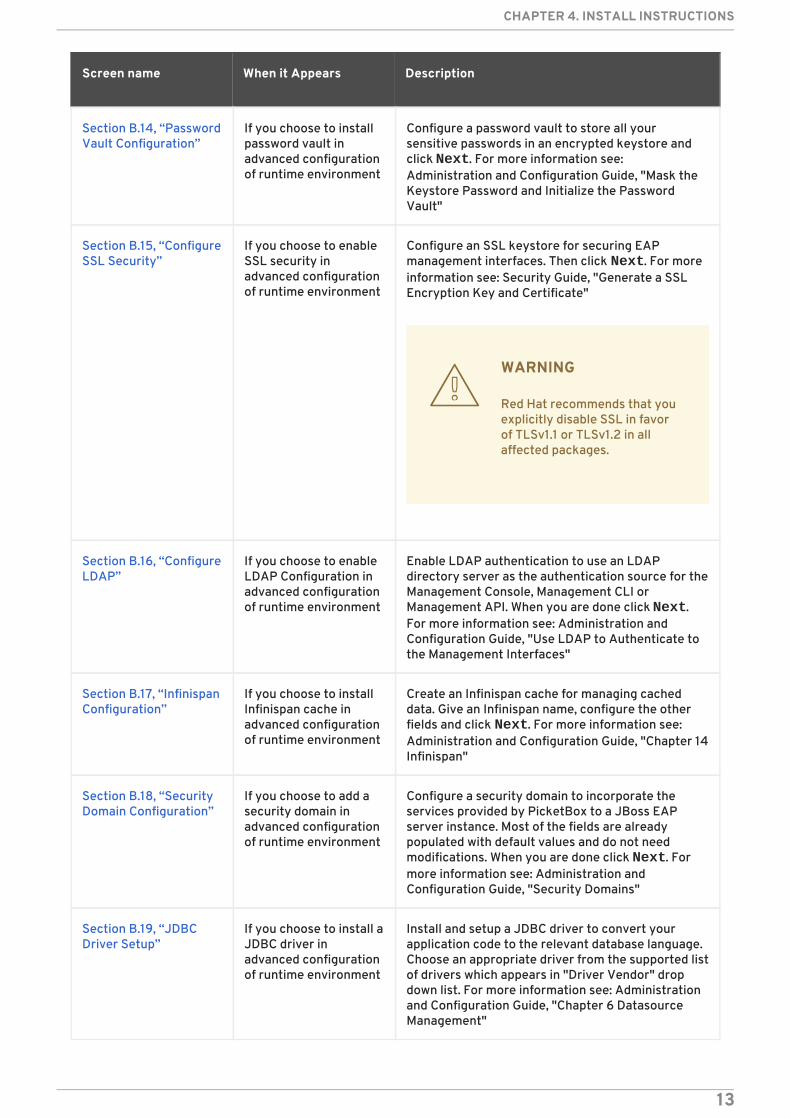
Section B.14, “PasswordVault Configuration”
If you choose to installpassword vault inadvanced configurationof runtime environment
Configure a password vault to store all yoursensitive passwords in an encrypted keystore andclick Next. For more information see:Administration and Configuration Guide, "Mask theKeystore Password and Initialize the PasswordVault"
Section B.15, “ConfigureSSL Security”
If you choose to enableSSL security inadvanced configurationof runtime environment
Configure an SSL keystore for securing EAPmanagement interfaces. Then click Next. For moreinformation see: Security Guide, "Generate a SSLEncryption Key and Certificate"
WARNING
Red Hat recommends that youexplicitly disable SSL in favorof TLSv1.1 or TLSv1.2 in allaffected packages.
Section B.16, “ConfigureLDAP”
If you choose to enableLDAP Configuration inadvanced configurationof runtime environment
Enable LDAP authentication to use an LDAPdirectory server as the authentication source for theManagement Console, Management CLI orManagement API. When you are done click Next.For more information see: Administration andConfiguration Guide, "Use LDAP to Authenticate tothe Management Interfaces"
Section B.17, “InfinispanConfiguration”
If you choose to installInfinispan cache inadvanced configurationof runtime environment
Create an Infinispan cache for managing cacheddata. Give an Infinispan name, configure the otherfields and click Next. For more information see:Administration and Configuration Guide, "Chapter 14Infinispan"
Section B.18, “SecurityDomain Configuration”
If you choose to add asecurity domain inadvanced configurationof runtime environment
Configure a security domain to incorporate theservices provided by PicketBox to a JBoss EAPserver instance. Most of the fields are alreadypopulated with default values and do not needmodifications. When you are done click Next. Formore information see: Administration andConfiguration Guide, "Security Domains"
Section B.19, “JDBCDriver Setup”
If you choose to install aJDBC driver inadvanced configurationof runtime environment
Install and setup a JDBC driver to convert yourapplication code to the relevant database language.Choose an appropriate driver from the supported listof drivers which appears in "Driver Vendor" dropdown list. For more information see: Administrationand Configuration Guide, "Chapter 6 DatasourceManagement"
Screen name When it Appears Description
CHAPTER 4. INSTALL INSTRUCTIONS
13
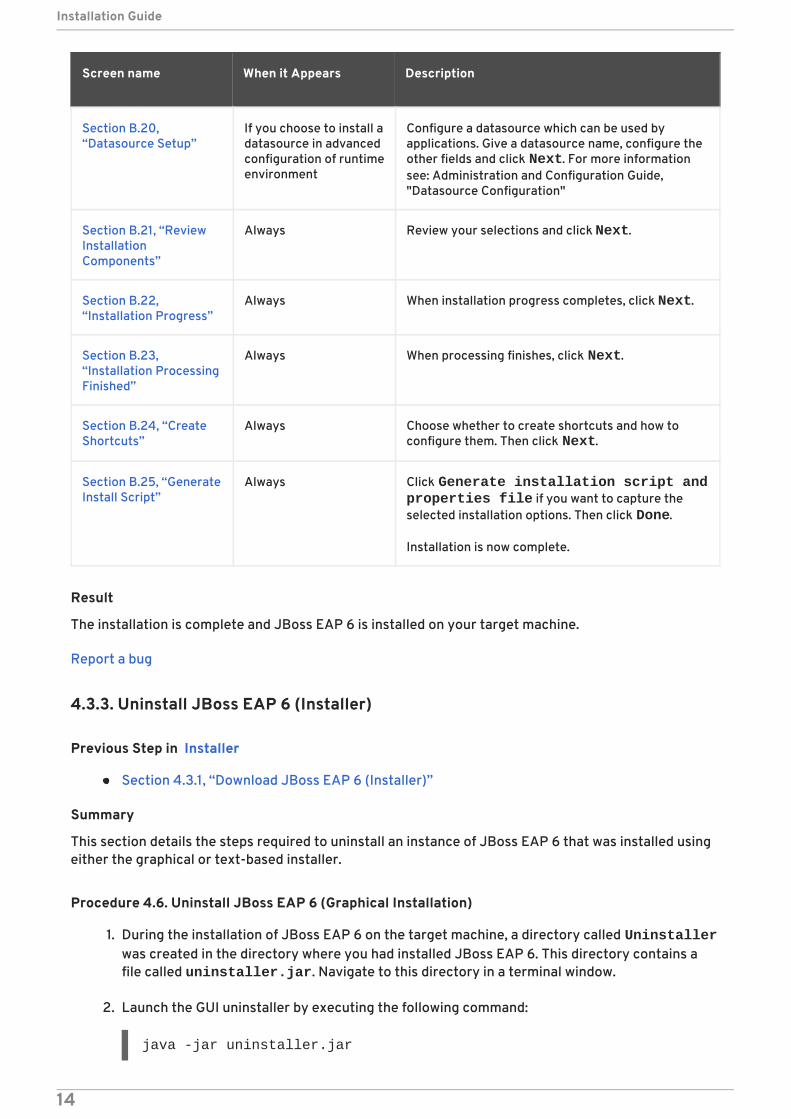
Section B.20,“Datasource Setup”
If you choose to install adatasource in advancedconfiguration of runtimeenvironment
Configure a datasource which can be used byapplications. Give a datasource name, configure theother fields and click Next. For more informationsee: Administration and Configuration Guide,"Datasource Configuration"
Section B.21, “ReviewInstallationComponents”
Always Review your selections and click Next.
Section B.22,“Installation Progress”
Always When installation progress completes, click Next.
Section B.23,“Installation ProcessingFinished”
Always When processing finishes, click Next.
Section B.24, “CreateShortcuts”
Always Choose whether to create shortcuts and how toconfigure them. Then click Next.
Section B.25, “GenerateInstall Script”
Always Click Generate installation script and properties file if you want to capture theselected installation options. Then click Done.
Installation is now complete.
Screen name When it Appears Description
Result
The installation is complete and JBoss EAP 6 is installed on your target machine.
Report a bug
4.3.3. Uninstall JBoss EAP 6 (Installer)
Previous Step in Installer
Section 4.3.1, “Download JBoss EAP 6 (Installer)”
Summary
This section details the steps required to uninstall an instance of JBoss EAP 6 that was installed usingeither the graphical or text-based installer.
Procedure 4.6. Uninstall JBoss EAP 6 (Graphical Installation)
1. During the installation of JBoss EAP 6 on the target machine, a directory called Uninstallerwas created in the directory where you had installed JBoss EAP 6. This directory contains afile called uninstaller.jar. Navigate to this directory in a terminal window.
2. Launch the GUI uninstaller by executing the following command:
java -jar uninstaller.jar
Installation Guide
14
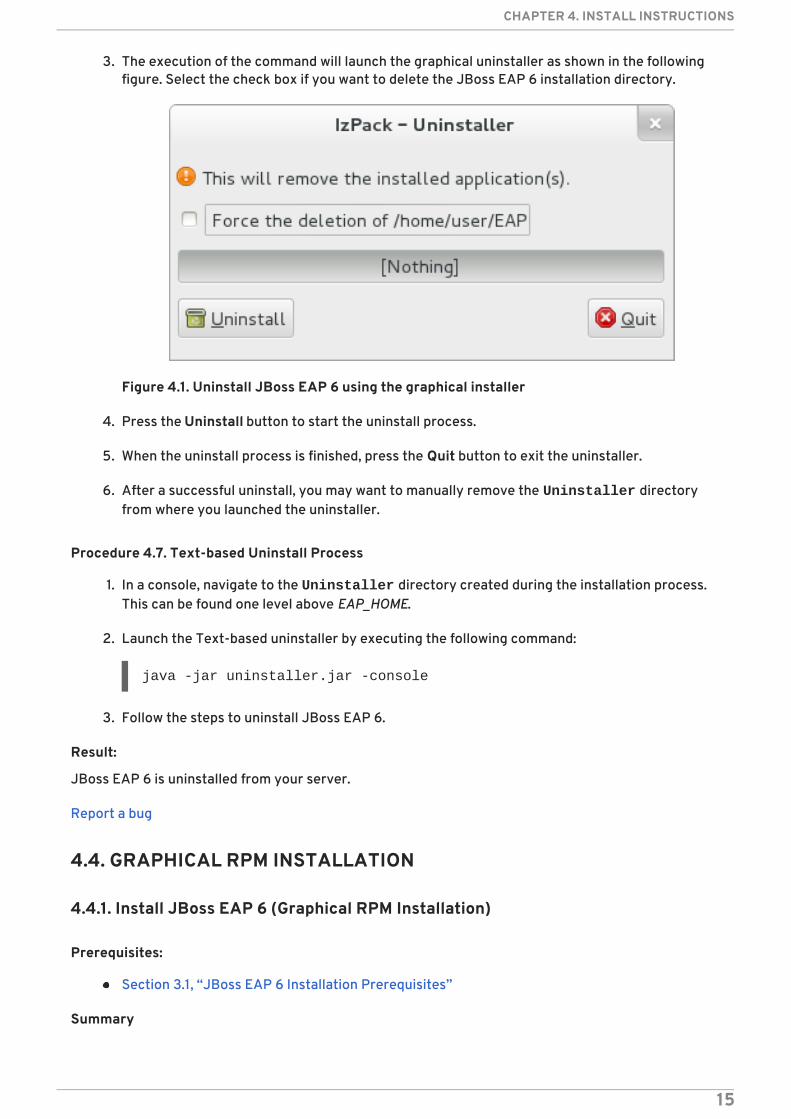
3. The execution of the command will launch the graphical uninstaller as shown in the followingfigure. Select the check box if you want to delete the JBoss EAP 6 installation directory.
Figure 4.1. Uninstall JBoss EAP 6 using the graphical installer
4. Press the Uninstall button to start the uninstall process.
5. When the uninstall process is finished, press the Quit button to exit the uninstaller.
6. After a successful uninstall, you may want to manually remove the Uninstaller directoryfrom where you launched the uninstaller.
Procedure 4.7. Text-based Uninstall Process
1. In a console, navigate to the Uninstaller directory created during the installation process.This can be found one level above EAP_HOME.
2. Launch the Text-based uninstaller by executing the following command:
java -jar uninstaller.jar -console
3. Follow the steps to uninstall JBoss EAP 6.
Result:
JBoss EAP 6 is uninstalled from your server.
Report a bug
4.4. GRAPHICAL RPM INSTALLATION
4.4.1. Install JBoss EAP 6 (Graphical RPM Installation)
Prerequisites:
Section 3.1, “JBoss EAP 6 Installation Prerequisites”
Summary
CHAPTER 4. INSTALL INSTRUCTIONS
15
The Graphical RPM package method of installing JBoss EAP 6 is available for Red Hat Enterprise Linux5 and Red Hat Enterprise Linux 6. This topic covers the steps required to complete the installation.
Procedure 4.8. Install JBoss EAP 6 (Graphical RPM Installation)
Use PackageKit to graphically install JBoss EAP 6 on your target machine.
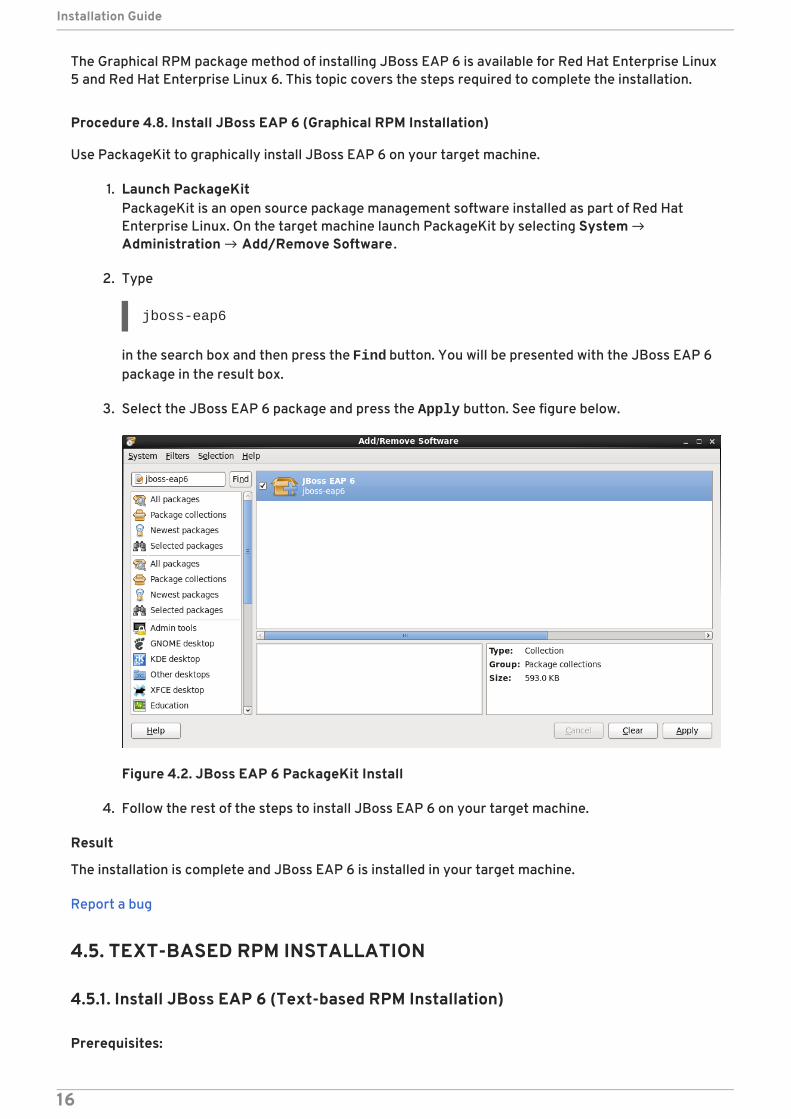
1. Launch PackageKitPackageKit is an open source package management software installed as part of Red HatEnterprise Linux. On the target machine launch PackageKit by selecting System →Administration → Add/Remove Software .
2. Type
jboss-eap6
in the search box and then press the Find button. You will be presented with the JBoss EAP 6package in the result box.
3. Select the JBoss EAP 6 package and press the Apply button. See figure below.
Figure 4.2. JBoss EAP 6 PackageKit Install
4. Follow the rest of the steps to install JBoss EAP 6 on your target machine.
Result
The installation is complete and JBoss EAP 6 is installed in your target machine.
Report a bug
4.5. TEXT-BASED RPM INSTALLATION
4.5.1. Install JBoss EAP 6 (Text-based RPM Installation)
Prerequisites:
Installation Guide
16
Section 3.1, “JBoss EAP 6 Installation Prerequisites”
Summary
The RPM package method of installing JBoss EAP 6 is appropriate for Red Hat Enterprise Linux 5, RedHat Enterprise Linux 6, and Red Hat Enterprise Linux 7. This topic covers the steps required to installan instance using the command line.
Procedure 4.9. Text-based Installation Steps
Access and install the RPM package by using the YUM install via the Red Hat Network.
1. Install the RPM package by using YUM and the Red Hat NetworkUse YUM to install the default JBoss EAP 6 group package by using the groupinstallcommand.
[user@host ~]$ yum groupinstall jboss-eap6
2. Configure init options.The RPM install contains init scripts for launching the server. The configuration for the initscripts are contained in several additional files. Refer to Section A.4, “RPM InstallationConfiguration Files for JBoss EAP 6” for details about these files and the options containedwithin.
Result
The installation is complete. The default EAP_HOME path for the RPM installation is /usr/share/jbossas. Refer to Section A.3, “RPM Package List for JBoss EAP 6” for a complete listof all the packages installed.
Report a bug
4.6. AUTOMATED INSTALLATION
4.6.1. Install Multiple Instances of JBoss EAP 6 (Installer)
Prerequisites
Generate an automatic installation script using the Graphical or Text-based Installer:
. Section 4.3.2, “Run the JBoss EAP Installation Program”
Summary
Multiple identical instances of JBoss EAP 6 can be installed using an automatic installation script,generated during the installation process, using either the Graphical or Text-based installer. This topiccovers the steps required to install JBoss EAP 6 using a generated script.
Procedure 4.10. Automated Installation
In a terminal, run the following command to install JBoss EAP 6 using the automaticinstallation script:
java -jar jboss-eap-6.3.0-installer.jar auto.xml
CHAPTER 4. INSTALL INSTRUCTIONS
17

NOTE
When you use the automatic installation script (auto.xml) for automatedinstallation the installer by default will generate a prompt for entering allpasswords.
Result
An identical instance of JBoss EAP 6 has been installed, based on the automatic installation script.
Report a bug
4.6.2. Use Automatic Installation Script (auto.xml) from Different Sources forInstalling JBoss EAP 6
The installer can use the automatic installation script (auto.xml) from any of the network locationsirrespective of where it is being run. Thus the installer (jboss-eap-6.3.0-installer.jar) and theautomatic installation script (auto.xml) can be located on different machines. This topic covers thesteps to install JBoss EAP 6.3 automatically from a different network location.
In a terminal type either of the following commands to specify the automatic installation script(present at a different network location) to your current network location:
Result
JBoss EAP 6 is installed on your machine.
Report a bug
4.7. AUTOMATED INSTALLATION APPROACHES
4.7.1. About Automated Installation Approaches
Prerequisites
Run the installer and generate an automatic installation script using Graphical or Text-based installer:Section 4.3.2, “Run the JBoss EAP Installation Program”
Summary
You may use two approaches to install JBoss EAP 6 automatically using the automatic installationscript generated by the installer:
The first approach is to specify all the key/password values needed for automatic installationin the automatic installation variable file
The second approach is to specify the key/password values during install time
Report a bug
java -jar jboss-eap-6.3.0-installer.jar http://network-host/auto.xml (For HTTP)
java -jar jboss-eap-6.3.0-installer.jar ftp://network-host/auto.xml (For FTP)
Installation Guide
18
4.7.2. Install JBoss EAP 6 by Pre-setting the Key/Password Values in theAutomatic Installation Variable File
Use the following procedure for automatically installing JBoss EAP 6 by pre-setting the key/passwordvalues in the automatic installation variable file.
Procedure 4.11.
1. Enter key values in variable fileJBoss EAP 6 installer creates an automatic installation script and an automatic installationvariable file. The automatic installation variable file contains a list of keys/passwordparameters needed for automatic installation. To enter key values open the automaticinstallation variable file. Fill in a valid key/password value against each key parameter. Forexample:
2. Run the installer with the variablefile filename argument to begin automated installationYou can begin fully automated EAP installation by running the installer with variablefile auto.xml.variablefile argument. This argument supplies the variable file key/passwordvalues (step 1) to the installer.To begin fully automated installation open a terminal and enterthe following command with relevant filenames:
Result
JBoss EAP 6 is installed on your machine.
Report a bug
4.7.3. Install JBoss EAP 6 automatically by Specifying the Key Values/PasswordsDuring Install Time
Use the following procedure for automatically installing JBoss EAP 6.3 by specifying the keyvalues/passwords during install time.
Procedure 4.12.
Run the installer with variables argumentYou can initiate automated installation by running the installer with variables argument andthen specifying a variable list. This variables argument will help you define variables along withthe key/password values during install time. To initiate the installation process open a terminaland enter the following command with relevant filenames:
adminPassword = password#2vault.keystorepwd = vaultkeystorepwssl.password = user12345
java -jar jboss-eap-6.3.0-installer.jar auto.xml -variablefile auto.xml.variablefile
java -jar jboss-eap-6.3.0-installer.jar auto.xml -variables adminPassword=password#2,vault.keystorepwd=vaultkeystorepw,ssl.password=user12345
CHAPTER 4. INSTALL INSTRUCTIONS
19
NOTE
It is important to specify the variable names (adminPassword, keystorepwd andssl.password) without any empty space for successful installation.
Report a bug
4.8. INSTALLING NATIVE COMPONENTS AND UTILITIES
Native Components are optional components which have been compiled to be optimized for a specificoperating system and architecture. In some cases, using the native components may provideperformance improvements. Native Components include native support for HornetQ (AIO), and theTomcat Native Library. For more information, see Section 4.9.2, “Configure JBoss EAP 6 as a Servicein Red Hat Enterprise Linux (Zip, Installer)” and the Jsvc section of the Administration and ConfigurationGuide.
Native Utilities are optional utilities specific to each supported operating system and architecture.These include scripts and utilities for installing JBoss EAP 6 as a service in your operating system, andgenerating SSL encryption keys and certificates.
In addition to Native Components and Native Utilities, Webserver Connector Natives are used for loadbalancing and clustering. See the Administration and Configuration Guide to configure WebserverConnector Natives.
Report a bug
4.8.1. Install Native Components and Native Utilities (Zip, Installer)
Prerequisites
Install JBoss EAP 6 using the Zip installation, Graphical Installer, or Text-based Installer:
Section 4.2.2, “Install JBoss EAP 6 (ZIP Installation)” .
Section 4.3.2, “Run the JBoss EAP Installation Program”
Access to the Management CLI or the Management Console for the JBoss EAP 6 server. Referto Launch the Management CLI or Log in to the Management Console in the Administration andConfiguration Guide.
For Native Components:
In Red Hat Enterprise Linux 6 and 7 environments, ensure that the Apache PortabilityRuntime (APR) and OpenSSL libraries are installed. If you intend to use the Tomcat NativeLibrary which is part of the JBoss EAP Native Components, the operating system package tomcatjss must be removed before installation.
In a HP-UX environment, OpenSSL must be installed.
Procedure 4.13. Download and Install Native Components
1. Download the Native Components package for your operating system and architecture fromthe Red Hat Customer Portal. You can download the packages from the same locationspecified in Section 4.2.1, “Download JBoss EAP 6 (Zip Installation)” .
Installation Guide
20
2. Extract the downloaded Native Components zip archive over your JBoss EAP 6 installation.
You can verify a successful extraction by checking if there is a new folder for your operatingsystem and architecture in EAP_HOME/modules/system/layers/base/org/jboss/as/web/main/lib/.
3. Using the Management CLI, activate the native components for the web subsystem with thefollowing command:
[standalone@localhost:9999 /] /subsystem=web:write-attribute(name=native,value=true)
4. Restart the JBoss EAP 6 server to apply the changes.
Procedure 4.14. Download and Install Native Utilities
1. Download the Native Utilities package for your operating system and architecture from theRed Hat Customer Portal. You can download the packages from the same location specified inSection 4.2.1, “Download JBoss EAP 6 (Zip Installation)” .
2. Extract the downloaded Native Components zip archive over your JBoss EAP 6 installation.
You can verify a successful extraction by checking if there is native directory in EAP_HOME/modules/system/layers/base/.
3. Refer to procedures in the JBoss EAP documentation suite and on the Red Hat CustomerPortal to configure specific native utilities features.
Report a bug
4.8.2. Install Native Components and Native Utilities (RPM Installation)
You can use the RPM installation method to install native components, utilities and all thecorresponding dependencies only if you have installed EAP using RPM installation method. The RPMpackage method of installing natives is appropriate for Red Hat Enterprise Linux 5, 6 and 7. This topiccovers the steps required to install the native components and utilities using the command line.
Prerequisites
Section 3.1, “JBoss EAP 6 Installation Prerequisites”
Procedure 4.15. Install Native Components and Native Utilities
1. Install native components and utilitiesTo install native components and utilities in Red Hat Enterprise Linux 5, 6 and 7 (with theirdependencies) run the following command using your administration account replacing package_name with name of the native component which you need to install:
You can install these native components: mod_cluster-native, mod_jk, mod_rt, mod_snmp, apache-commons-daemon-jsvc-eap6, httpd, httpd-devel, jbossas-hornetq-native, jbossas-jbossweb-native.
yum install package_name
CHAPTER 4. INSTALL INSTRUCTIONS
21
IMPORTANT
The native components jbossas-hornetq-native and jbossas-jbossweb-native are installed by default when you run the yum groupinstall jboss-eap6 command to install JBoss EAP 6 group package.If you have used Section 4.4.1, “Install JBoss EAP 6 (Graphical RPMInstallation)” or Section 4.5.1, “Install JBoss EAP 6 (Text-based RPMInstallation)” for JBoss EAP 6 installation you need not install jbossas-hornetq-native and jbossas-jbossweb-native.
NOTE
It is important to give the correct package name in order to install a specificnative component. Package names are case sensitive. In Red Hat EnterpriseLinux 7 the name of the httpd package is httpd22. Therefore the package httpd must be replaced with httpd22 when you run yum install package_name command for installing Apache HTTP server in Red HatEnterprise Linux 7.
2. Restart the serverRestart the JBoss EAP 6 server to apply the changes
Report a bug
4.9. SERVICE CONFIGURATION
4.9.1. Configure JBoss EAP 6 as a Service in Red Hat Enterprise Linux (RPMMethod)
Prerequisites
Install JBoss EAP 6 using the RPM Method (Graphical or Text Based).
Section 4.4.1, “Install JBoss EAP 6 (Graphical RPM Installation)”
Section 4.5.1, “Install JBoss EAP 6 (Text-based RPM Installation)”
Administrator privileges on the server are required.
Summary
Use the following procedure to install JBoss EAP 6 as a service on Red Hat Enterprise Linux when theinstallation has been done using the RHN (RPM) method.
Procedure 4.16. Configure JBoss EAP 6 as a Service using the RPM Method in Red Hat EnterpriseLinux
1. Install JBoss EAP 6Install JBoss EAP 6 via the RPM method using one of the steps listed in the prerequisitesections listed above.
2. Enable the service
Installation Guide
22
The RPM install method for JBoss EAP 6 installs the requisite service files in their correctlocations. All you need to do to set it up as service is issue the following command:
To set it up as a service in domain mode, issue the following command:
Result
JBoss EAP 6 starts automatically when the Red Hat Enterprise Linux reaches its default run-level, andstops automatically when the operating system goes through its shutdown routine.
Report a bug
4.9.2. Configure JBoss EAP 6 as a Service in Red Hat Enterprise Linux (Zip,Installer)
Prerequisites
Install JBoss EAP 6 using the Zip installation, Graphical Installer, or Text-based Installer:
Section 4.2.2, “Install JBoss EAP 6 (ZIP Installation)” .
Section 4.3.2, “Run the JBoss EAP Installation Program” .
Administrator privileges on the server are required.
Summary
Use the following procedure to install JBoss EAP 6 as a service on Red Hat Enterprise Linux when theinstallation has been done with either the zip, text, or graphical methods. This process does not applywhen the installation has been done using the RHN (RPM) method.
Procedure 4.17. Set Up the Service
NOTE
The steps below describe running JBoss EAP 6 as a service in standalone mode. In orderto run JBoss EAP 6 as a service in domain mode, use the same steps but replace jboss-as-standalone.sh with jboss-as-domain.sh.
1. Locate the start-up script and configuration fileThe start-up script and an associated configuration file are located in the EAP_HOME/bin/init.d/ directory. Open the configuration file jboss-as.conf to edit it.
2. Customize the start-up options in the jboss-as.conf fileThere are several options within the jboss-as.conf file. At the minimum, specify the correctvalues for JBOSS_HOME and the JBOSS_USER variables. If these variables are absent, addthem.
3. Copy files into system directories
chkconfig jbossas on
chkconfig jbossas-domain on
CHAPTER 4. INSTALL INSTRUCTIONS
23
a. Copy the modified configuration file to the /etc/jboss-as directory.
[user@host init.d]$ sudo mkdir /etc/jboss-as
[user@host init.d]$ sudo cp jboss-as.conf /etc/jboss-as/
b. Copy the start-up script to the /etc/init.d directory.
[user@host init.d]$ sudo cp jboss-as-standalone.sh /etc/init.d
4. Add the start-up script as a service.Add the new jboss-as-standalone.sh service to list of automatically started services,using the chkconfig service management command.
[user@host init.d]$ sudo chkconfig --add jboss-as-standalone.sh
5. Start the service.Test that the service has been installed correctly by using one of the following commands forRed Hat Enterprise Linux.
For Red Hat Enterprise Linux 5 and 6:
[user@host bin]$ sudo service jboss-as-standalone.sh start
For Red Hat Enterprise Linux 7:
[user@host bin]$ sudo service jboss-as-standalone start
If everything has gone correctly, you should get a green [OK]. If you get an error, check theerror logs and make sure your paths are correct in the configuration file.
NOTE
The green [OK] does not appear for Red Hat Enterprise Linux 7.
6. Make the service start automatically when you restart your server.To add the service to the list of services which start automatically when your server restarts,issue the following command.
[user@host init.d]$ sudo chkconfig jboss-as-standalone.sh on
Result
JBoss EAP 6 starts automatically when the Red Hat Enterprise Linux reaches its default run-level, andstops automatically when the operating system goes through its shutdown routine.
Procedure 4.18. Uninstall the JBoss EAP 6 service from Red Hat Enterprise Linux
Installation Guide
24
NOTE
The steps below describe uninstalling the JBoss EAP 6 service in standalone mode. Inorder to uninstall the JBoss EAP 6 service in domain mode, use the same steps butreplace jboss-as-standalone.sh with jboss-as-domain.sh.
1. If the service is running, first open a terminal and stop the service by executing the stopcommand with the name of the service:
sudo service jboss-as-standalone.sh stop
2. Remove JBoss EAP from the list of services:
sudo chkconfig --del jboss-as-standalone.sh
3. Remove the system directory files.
a. Remove the service start-up script:
sudo rm /etc/init.d/jboss-as-standalone.sh
b. Remove the service configuration file:
sudo rm /etc/jboss-as/jboss-as.conf
IMPORTANT
/etc/jboss-as is not a standard system directory. Only if there are noother files being used there, also remove the directory itself:
sudo rm -rf /etc/jboss-as/
Result
JBoss EAP 6 service is uninstalled from the server.
Report a bug
4.9.3. Configure JBoss EAP 6 as a Service in Microsoft Windows Server (Zip,Installer)
Prerequisites
Install JBoss EAP 6 using the Zip installation, Graphical Installer, or Text-based Installer:
Section 4.2.2, “Install JBoss EAP 6 (ZIP Installation)” .
Section 4.3.2, “Run the JBoss EAP Installation Program”
Administrator privileges on the server are required.
CHAPTER 4. INSTALL INSTRUCTIONS
25
The JAVA_HOME system environment variable must be set.
The JBoss EAP 6 server instance must not be running.
IMPORTANT
When setting system environment variables, using the set command at a WindowsServer command prompt will not permanently set the environment variable. You mustuse either the setx command, or the System interface in the Control Panel.
Summary
Use the following procedures to configure JBoss EAP 6 as a service on Microsoft Windows Server.
Procedure 4.19. Configure a Service for JBoss EAP 6 in Microsoft Windows Server
1. Create system environment variablesCreate two system environment variables:
JBOSS_HOME pointing to the JBoss EAP 6 installation directory.
NOPAUSE=1
2. If not already configured, download and extract the Native Utilities package for yourarchitectureIf the Native Utilities for Windows Server package has not been installed as part of the JBossEAP 6 installation, download the relevant 32-bit or 64-bit package from the Red Hat CustomerPortal at https://access.redhat.com. Extract the Native Utilities zip archive over the JBossEAP 6 installation.
This will result in a native directory in the following location in the JBoss EAP 6 installation: EAP_HOME\modules\system\layers\base\
3. Install the serviceOpen a terminal, and change directories to EAP_HOME\modules\system\layers\base\native\sbin
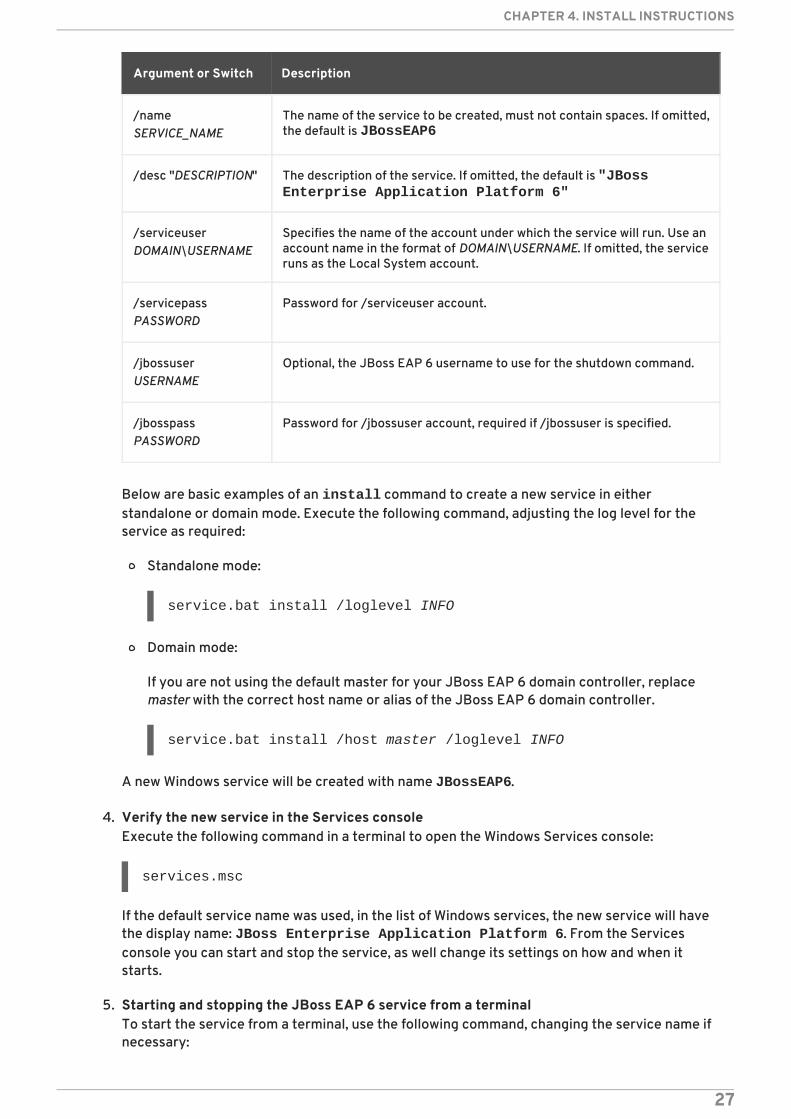
A new service can be created with the service install command, with the availableoptions shown in the following table.
Table 4.3. service install options
Argument or Switch Description
/controllerHOST:PORT
The host and port of the management interface. If omitted, the default is localhost:9999.
/host[DOMAIN_HOST]
Indicates that domain mode is to be used, optionally specifying the nameof the domain controller. If the domain controller name is omitted, thedefault name is master.
/loglevel LEVEL The log level for the service, either: ERROR, INFO, WARN or DEBUG. Ifomitted, the default is INFO
Installation Guide
26
/nameSERVICE_NAME
The name of the service to be created, must not contain spaces. If omitted,the default is JBossEAP6
/desc "DESCRIPTION" The description of the service. If omitted, the default is "JBoss Enterprise Application Platform 6"
/serviceuserDOMAIN\USERNAME
Specifies the name of the account under which the service will run. Use anaccount name in the format of DOMAIN\USERNAME. If omitted, the serviceruns as the Local System account.
/servicepassPASSWORD
Password for /serviceuser account.
/jbossuserUSERNAME
Optional, the JBoss EAP 6 username to use for the shutdown command.
/jbosspassPASSWORD
Password for /jbossuser account, required if /jbossuser is specified.
Argument or Switch Description
Below are basic examples of an install command to create a new service in eitherstandalone or domain mode. Execute the following command, adjusting the log level for theservice as required:
Standalone mode:
service.bat install /loglevel INFO
Domain mode:
If you are not using the default master for your JBoss EAP 6 domain controller, replacemaster with the correct host name or alias of the JBoss EAP 6 domain controller.
service.bat install /host master /loglevel INFO
A new Windows service will be created with name JBossEAP6.
4. Verify the new service in the Services consoleExecute the following command in a terminal to open the Windows Services console:
services.msc
If the default service name was used, in the list of Windows services, the new service will havethe display name: JBoss Enterprise Application Platform 6. From the Servicesconsole you can start and stop the service, as well change its settings on how and when itstarts.
5. Starting and stopping the JBoss EAP 6 service from a terminalTo start the service from a terminal, use the following command, changing the service name ifnecessary:
CHAPTER 4. INSTALL INSTRUCTIONS
27
net start JBossEAP6
To stop the service from a terminal, use the following command, changing the service name ifnecessary:
net stop JBossEAP6
Result
A JBoss EAP 6 service is configured in Microsoft Windows Server.
Procedure 4.20. Uninstall the JBoss EAP 6 service from Microsoft Windows Server
If the service is running, first open a terminal and stop the service by executing the net stopcommand with the name of the service:
net stop JBossEAP6
In a terminal, change directories to EAP_HOME\modules\system\layers\base\native\sbin and execute the followingcommand:
service uninstall
Result
The JBoss EAP 6 service has been removed from Microsoft Windows Server.
Report a bug
Installation Guide
28
CHAPTER 5. PATCHING AND UPGRADING JBOSS EAP 6
5.1. ABOUT PATCHES AND UPGRADES
Patching in JBoss EAP 6 applies updates which are made available to a specific minor version of JBossEAP 6, for example JBoss EAP 6.2. Patches can contain individual or cumulative updates.
Upgrading is the process of moving to a newer major version (for example, from 5.0 to 6.0) or newerminor version (for example, from 6.1 to 6.2), and cannot be done via patching.
See Also:
Section 5.2, “Patching JBoss EAP 6”
Section 5.3, “Upgrading JBoss EAP 6”
Report a bug
5.2. PATCHING JBOSS EAP 6
5.2.1. About Patching Mechanisms
JBoss patches are distributed in two forms: zip (for all products) and RPM (for a subset of products).
IMPORTANT
A JBoss product installation must always only be updated using one patch method:either zip or RPM patches. Only security and cumulative patches will be available viaRPM, and customers using an RPM installation will not be able to update using zippatches.
JBoss patches can be either an asynchronous update, or a planned update:
Asynchronous updates: individual patches which are released outside the normal update cycleof the existing product. These may include security patches, as well as other individual patchesprovided by Red Hat Global Support Services (GSS) to fix specific issues.
Planned updates: These include cumulative patches, as well as micro, minor or major upgradesof an existing product. Cumulative patches include all previously developed updates for thatversion of the product.
Deciding whether a patch is released as part of a planned update or an asynchronous update dependson the severity of the issue being fixed. An issue of low impact is typically deferred, and is resolved inthe next cumulative patch or minor release of the affected product. Issues of moderate or higherimpact are typically addressed in order of importance as an asynchronous update to the affectedproduct, and contain a fix for only a specific issue.
Security updates for JBoss products are provided by an erratum (for both zip and RPM methods). Theerratum encapsulates a list of the resolved flaws, their severity ratings, the affected products, textualdescription of the flaws, and a reference to the patches. Bug fix updates are not announced via anerratum.
CHAPTER 5. PATCHING AND UPGRADING JBOSS EAP 6
29
IMPORTANT
It is important to note that after a patch has been applied, the jars picked up at runtimeare picked up from the EAP_HOME/modules/system/layers/base/.overlays/$PATCH_ID/$MODULEdirectory. The original files are left in EAP_HOME/modules/system/layers/base/$MODULE. The patching mechanismcripples the original jar files for security reasons. This means that if you apply a patchwhich updates a module, the original module's jar files are altered to be unusable. If thepatch is rolled back, the original files will be reverted back to a usable state. This alsomeans that the proper rollback procedure must be used to rollback any applied patch.See Section 5.2.2.3, “Rollback the Application of a Patch in Zip Form Using the PatchManagement System” for the proper rollback procedure.
For more information on how Red Hat rates JBoss security flaws, refer to: Section 5.2.5, “Severity andImpact Rating of JBoss Security Patches”
Red Hat maintains a mailing list for notifying subscribers about security related flaws. SeeSection 5.2.4, “Subscribe to Patch Mailing Lists”
Report a bug
5.2.2. Patching a Zip/Installer Installation
5.2.2.1. The Patch Management System
The JBoss EAP 6 patch management system is used to apply downloaded zip patches to a single JBossEAP 6 server. It can be accessed either through the Management CLI by using the patch command, orthrough the Management Console. The patch management system cannot be used to automaticallypatch JBoss EAP 6 server instances across a managed domain, but individual server instances in amanaged domain can be patched independently.
IMPORTANT
JBoss EAP 6 server instances which have been installed using the RPM method cannotbe updated using the patch management system. Refer to Section 5.2.3, “Patching anRPM Installation” to update RPM-installed JBoss EAP 6 servers.
NOTE
The patch management system can only be used with patches produced for versions ofJBoss EAP 6.2 and later. For patches for versions of JBoss EAP prior to 6.2, you shouldinstead refer to the relevant version's documentation available athttps://access.redhat.com/site/documentation/.
In addition to applying patches, the patch management system can provide basic information on thestate of installed patches, and also provides a way to immediately rollback the application of a patch.
When applying or rolling back a patch, the patch management system will check the modules and othermiscellaneous files that it is changing for any user modifications. If a user modification is detected, anda conflict-handling switch has not been specified, the patch management system will abort the
Installation Guide
30
operation and warn that there is a conflict. The warning will include a list of the modules and other filesthat are in conflict. To complete the operation, it must be retried with a switch specifying how toresolve the conflict: either to preserve the user modifications, or to override them.
The table below lists the arguments and switches for the Management CLI patch command.
Table 5.1. patch Command Arguments and Switches
Argument or Switch Description
apply Applies a patch.
--override-all If there is a conflict, the patch operation overridesany user modifications.
--override-modules If there is a conflict as a result of any modifiedmodules, this switch overrides those modificationswith the contents of the patch operation.
--override=path(,path) For specified miscellaneous files only, this willoverride the conflicting modified files with the filesin the patch operation.
--preserve=path(,path) For specified miscellaneous files only, this willpreserve the conflicting modified files.
--host=HOST_NAME Available in domain mode, this specifies the hostthat the patch operation will be performed on.
info Returns information on currently installed patches.
history Returns information on the patching history.
rollback Rollsback the application of a patch.
--patch-id=PATCH_ID Required for rollback, the ID of the patch to rollback.
--reset-configuration=TRUE|FALSE Required for rollback, this specifies whether torestore the server configuration files as part of therollback operation.
--rollback-to If the patch to rollback is an individual (one-off)patch, using this argument specifies that therollback operation will also rollback all other one-offpatches that have been applied on top of thespecified patch.
Report a bug
5.2.2.2. Installing Patches in Zip Form Using the Patch Management System
CHAPTER 5. PATCHING AND UPGRADING JBOSS EAP 6
31
Prerequisites:
Section 3.1, “JBoss EAP 6 Installation Prerequisites”
Summary
Patches that are in the zip format can be installed using the JBoss EAP 6 patch management systemvia either the Management CLI or the Management Console.
IMPORTANT
The patch management system is a feature that was added in JBoss EAP 6.2. Forversions of JBoss EAP prior to 6.2, the process to install patches in zip form is different,and you should instead refer to the relevant version's documentation available athttps://access.redhat.com/site/documentation/.
Prerequisites
Valid access and subscription to the Red Hat Customer Portal.
A current subscription to a JBoss product installed in zip format.
Access to the Management CLI or the Management Console for the JBoss EAP 6 server to beupdated. Refer to Launch the Management CLI or Log in to the Management Console in theAdministration and Configuration Guide.
WARNING
Before installing a patch, you should backup your JBoss product along with allcustomized configuration files.
Procedure 5.1. Apply a zip patch to a JBoss EAP 6 server instance using the Management CLI
1. Download the patch zip file from the Customer Portal athttps://access.redhat.com/downloads/
2. From the Management CLI, apply the patch with the following command including theappropriate path to the patch file:
[standalone@localhost:9999 /] patch apply /path/to/downloaded-patch.zip
The patch tool will warn if there are any conflicts in attempting the apply the patch. Refer toSection 5.2.2.1, “The Patch Management System” for available patch command switches tore-run the command to resolve any conflicts.
3. Restart the JBoss EAP 6 server for the patch to take effect:
[standalone@localhost:9999 /] shutdown --restart=true
Installation Guide
32
Procedure 5.2. Apply a zip patch to a JBoss EAP 6 server instance using the Management Console
1. Download the patch zip file from the Customer Portal athttps://access.redhat.com/downloads/
2. In the Management Console:
For a standalone server: click on the Runtime tab at the top of the screen, then click Patch Management.
For a managed domain: click on the Domain tab at the top of the screen, select the hostyou want to patch from the Host drop-down menu, then click Patch Management.
3. Click Apply a New Patch.
a. If you are patching a managed domain host, on the next screen select whether toshutdown the servers on the host, and click Next.
4. Click the Browse button, select the downloaded patch you want to apply, and then click Next.
a. If there are any conflicts in attempting to apply the patch, a warning will be displayed. ClickView error details to see the detail of the conflicts. If there is a conflict, you caneither cancel the operation, or select the Override all conflicts check box andclick Next. Overriding conflicts will result in the content of the patch overriding any usermodifications.
5. After the patch has been successfully applied, select whether to restart the JBoss EAP 6server now for the patch to take effect, and click Finish.
Result
The JBoss EAP 6 server instance is patched with the latest update.
Report a bug
5.2.2.3. Rollback the Application of a Patch in Zip Form Using the Patch ManagementSystem
Summary
The JBoss EAP 6 patch management system can be used to rollback the application of a previouslyapplied zip patch, via either the Management CLI or the Management Console.
WARNING
Rolling back the application of a patch using the patch management system is notintended as a general uninstall functionality. It is only intended to be usedimmediately after the application of a patch which had undesirable consequences.
CHAPTER 5. PATCHING AND UPGRADING JBOSS EAP 6
33
IMPORTANT
The patch management system is a feature that was added in JBoss EAP 6.2. Forversions of JBoss EAP prior to 6.2, the process to rollback patches in zip form isdifferent, and you should instead refer to the relevant version's documentation availableat https://access.redhat.com/site/documentation/.
Prerequisites
A patch that was previously applied using the JBoss EAP 6 patch management system.
Access to the Management CLI or the Management Console for the JBoss EAP 6 server. Referto Launch the Management CLI or Log in to the Management Console in the Administration andConfiguration Guide.
WARNING
When following either procedure, use caution when specifying the value of the Reset Configuration option:
If set to TRUE, the patch rollback process will also rollback the JBoss EAP 6 serverconfiguration files to their pre-patch state. Any changes that were made to theJBoss EAP 6 server configuration files after the patch was applied will be lost.
If set to FALSE, the server configuration files will not be rolled back. In thissituation, it is possible that the server will not start after the rollback, as the patchmay have altered configurations, such as namespaces, which may no longer bevalid and have to be fixed manually.
Procedure 5.3. Rollback a patch from a JBoss EAP 6 server instance using the Management CLI
1. From the Management CLI, use the patch info command to find the ID of the patch that is tobe rolled back.
For cumulative patches, the patch ID is the value of the first cumulative-patch-idshown in the patch info output.
Individual security or bug fix patch IDs are listed as the value of the first patches shown inthe patch info output, with the most recently applied individual patch listed first.
2. From the Management CLI, rollback the patch with the appropriate patch ID from the previousstep.
[standalone@localhost:9999 /] patch rollback --patch-id=PATCH_ID --reset-configuration=TRUE
The patch tool will warn if there are any conflicts in attempting the rollback the patch. Referto Section 5.2.2.1, “The Patch Management System” for available patch command switches tore-run the command to resolve any conflicts.
Installation Guide
34
3. Restart the JBoss EAP 6 server for the patch rollback to take effect:
[standalone@localhost:9999 /] shutdown --restart=true
Procedure 5.4. Rollback a patch from a JBoss EAP 6 server instance using the ManagementConsole
1. In the Management Console:
For a standalone server: click on the Runtime tab at the top of the screen, then click Patch Management.
For a managed domain: click on the Domain tab at the top of the screen, select therelevant host from the Host drop-down menu, then click Patch Management.
2. In the Recent Patch History table, select the patch that you want to rollback, then click Rollback.
a. For a managed domain host, on the next screen select whether to shutdown the servers onthe host, and click Next.
3. Choose your options for the rollback process, then click Next.
4. Confirm the options and the patch to be rolled back, then click Next.
a. If the Override all option was not selected and there are any conflicts in attempting torollback the patch, a warning will be displayed. Click View error details to see thedetail of the conflicts. If there is a conflict, you can either cancel the operation, or click Choose Options and try the operation again with the Override all check boxselected. Overriding conflicts will result in the rollback operation overriding any usermodifications.
5. After the patch has been successfully rolled back, select whether to restart the JBoss EAP 6server now for the changes to take effect, and click Finish.
Result
The patch, and optionally also the server configuration files, are rolled back on the JBoss EAP 6 serverinstance.
Report a bug
5.2.3. Patching an RPM Installation
Prerequisites:
Section 3.1, “JBoss EAP 6 Installation Prerequisites”
Summary
JBoss patches are distributed in two forms: ZIP (for all products) and RPM (for a subset of products).This task describes the steps you need to take to install the patches via the RPM format.
Prerequisites
CHAPTER 5. PATCHING AND UPGRADING JBOSS EAP 6
35
A valid subscription to the Red Hat Network.
A current subscription to a JBoss product installed via an RPM package.
Procedure 5.5. Apply a patch to a JBoss product via the RPM method
Security updates for JBoss products are provided by errata (for both zip and RPM methods). Theerrata encapsulates a list of the resolved flaws, their severity ratings, the affected products, textualdescription of the flaws, and a reference to the patches.
For RPM distributions of JBoss products, the errata include references to the updated RPM packages.The patch can be installed by using yum.
WARNING
Before installing a patch, you must backup your JBoss product along with allcustomized configuration files.
1. Get notified about the security patch either via being a subscriber to the JBoss watch mailinglist or by browsing the JBoss watch mailing list archives.
2. Read the errata for the security patch and confirm that it applies to a JBoss product in yourenvironment.
3. If the security patch applies to a JBoss product in your environment, then follow the link todownload the updated RPM package which is included in the errata.
4. Use
yum update
to install the patch.
IMPORTANT
When updating an RPM installation, your JBoss product is updated cumulativelywith all RPM-released fixes.
Result
The JBoss product is patched with the latest update using the RPM format.
Report a bug
5.2.4. Subscribe to Patch Mailing Lists
Summary
The JBoss team at Red Hat maintains a mailing list for security announcements for Red Hat JBossMiddleware products. This section covers what you need to do to subscribe to this list.
Installation Guide
36
Prerequisites
None
Procedure 5.6. Subscribe to the JBoss Watch List
1. Click the following link to go to the JBoss Watch mailing list page: JBoss Watch Mailing List .
2. Enter your email address in the Subscribing to Jboss-watch-list section.
3. [You may also wish to enter your name and select a password. Doing so is optional butrecommended.]
4. Press the Subscribe button to start the subscription process.
5. You can browse the archives of the mailing list by going to: JBoss Watch Mailing List Archives .
Result
After confirmation of your email address, you will be subscribed to receive security relatedannouncements from the JBoss patch mailing list.
Report a bug
5.2.5. Severity and Impact Rating of JBoss Security Patches
To communicate the risk of each JBoss security flaw, Red Hat uses a four-point severity scale of low,moderate, important and critical, in addition to Common Vulnerability Scoring System (CVSS) version2 base scores which can be used to identify the impact of the flaw.
Table 5.2. Severity Ratings of JBoss Security Patches
Severity Description
Critical This rating is given to flaws that could be easilyexploited by a remote unauthenticated attacker andlead to system compromise (arbitrary codeexecution) without requiring user interaction. Theseare the types of vulnerabilities that can be exploitedby worms. Flaws that require an authenticatedremote user, a local user, or an unlikelyconfiguration are not classed as critical impact.
Important This rating is given to flaws that can easilycompromise the confidentiality, integrity, oravailability of resources. These are the types ofvulnerabilities that allow local users to gainprivileges, allow unauthenticated remote users toview resources that should otherwise be protectedby authentication, allow authenticated remote usersto execute arbitrary code, or allow local or remoteusers to cause a denial of service.
CHAPTER 5. PATCHING AND UPGRADING JBOSS EAP 6
37
Moderate This rating is given to flaws that may be moredifficult to exploit but could still lead to somecompromise of the confidentiality, integrity, oravailability of resources, under certaincircumstances. These are the types of vulnerabilitiesthat could have had a critical impact or importantimpact but are less easily exploited based on atechnical evaluation of the flaw, or affect unlikelyconfigurations.
Low This rating is given to all other issues that have asecurity impact. These are the types ofvulnerabilities that are believed to require unlikelycircumstances to be able to be exploited, or where asuccessful exploit would give minimal consequences.
Severity Description
The impact component of a CVSS v2 score is based on a combined assessment of three potentialimpacts: Confidentiality (C), Integrity (I) and Availability (A). Each of these can be rated as None (N),Partial (P) or Complete (C).
Because the JBoss server process runs as an unprivileged user and is isolated from the host operatingsystem, JBoss security flaws are only rated as having impacts of either None (N) or Partial (P).
Example 5.1. CVSS v2 Impact Score
The example below shows a CVSS v2 impact score, where exploiting the flaw would have no impacton system confidentiality, partial impact on system integrity and complete impact on systemavailability (that is, the system would become completely unavailable for any use, for example, via akernel crash).
C:N/I:P/A:C
Combined with the severity rating and the CVSS score, organizations can make informed decisions onthe risk each issue places on their unique environment and schedule upgrades accordingly.
For more information about CVSS2, please see: CVSS2 Guide.
Report a bug
5.3. UPGRADING JBOSS EAP 6
5.3.1. Upgrade the JBoss EAP 6 ZIP Installation
Prerequisites
Ensure that the base operating system is up to date.
Determine which files have been modified since JBoss EAP 6 was installed.
Back up any modified configuration files, deployments, and all user data.
Installation Guide
38
Section 4.2.1, “Download JBoss EAP 6 (Zip Installation)” .
Summary
This procedure covers upgrading a JBoss EAP 6 ZIP installation between minor versions (for example,from JBoss EAP 6.1 to 6.2). For installing patches for a specific minor version, refer to the PatchInstallation section. Upgrading to the latest release of JBoss EAP 6 requires some initial work to backup the existing installation.
WARNING
For managed domains, the master Host Controller (or Domain Controller) instanceshould be upgraded first, before each Host Controller is upgraded.
Procedure 5.7. Upgrade to the latest JBoss EAP 6 version
1. Move the downloaded ZIP archive to the desired location. It is recommended that this is adifferent location to the existing JBoss EAP 6 installation.
IMPORTANT
If you wish to install the latest version of JBoss EAP 6 to the same directorylocation as the existing installation, you will need to move the existinginstallation to a different location before proceeding. This is to prevent modifiedconfiguration files, deployments, and upgrades from being lost.
2. Unzip the archive. This step installs a clean instance of the latest JBoss EAP 6 release.
3. Copy the EAP_HOME/domain/ and EAP_HOME/standalone/ directories from the previousinstallation over the new installation directories.
NOTE
New features in the new release, such as new subsystems, may not be activatedif configuration files are copied from an older JBoss EAP 6 installation. To usethese new features, it is necessary to compare and update the old configurationfiles with the ones from the new version.
4. Review the changes made to the bin directory of the previous installation, and make theequivalent modifications to the new directory.
CHAPTER 5. PATCHING AND UPGRADING JBOSS EAP 6
39
WARNING
Files in the bin directory should not be overwritten by the files fromprevious versions. Changes should be made manually.
5. Review the remaining modified files from the previous installation, and move these changesinto the new installation. These files may include:
The welcome-content directory.
Custom modules in the modules directory.
Custom bundles in the bundles directory.
6. Optional: If JBoss EAP 6 was previously configured to run as a service, remove the existingservice and configure a new service for the upgraded installation.
Result
The JBoss EAP 6 ZIP installation has been successfully upgraded to the latest release.
Report a bug
5.3.2. Upgrade the JBoss EAP 6 RPM Installation
Prerequisites
Ensure that the base operating system is up to date and that the system is subscribed andenabled to get updates for the Base OS channel.
Ensure that the correct JBoss EAP 6 RHN channel is enabled. For example, on a x86, 64 bitarchitecture, this will be the JBoss Application Platform (v 6) for 6Server x86_64 channel(jbappplatform-6-x86_64-server-6-rpm).
Back up any modified configuration files, deployments, and all user data.
Summary
Upgrading to the latest release of JBoss EAP 6 requires some initial work to back up the existinginstallation. This topic covers upgrading the RPM installation via the Red Hat Network (RHN).
WARNING
For managed domains, the master Host Controller (or Domain Controller) instanceshould be upgraded first, before each Host Controller is upgraded.
Installation Guide
40
Procedure 5.8. Upgrade to the latest JBoss EAP 6 release
1. Run the following command in a terminal to upgrade the installation:
[user@host] yum update
2. Manually merge each created *.rpmnew file that contains changes into the productionconfiguration files.
Result
JBoss EAP 6 has been successfully upgraded.
Report a bug
5.3.3. Upgrade JBoss EAP Cluster from 6.2 to 6.3
Prerequisites
None
Summary
JBoss EAP 6.3 does not support the creation of clusters where the different nodes are made up ofdifferent versions of JBoss EAP servers. Thus, a mixed cluster based on different versions is notsupported and all nodes within a cluster must be the same version - 6.3.
WARNING
The upgrade process for migrating traffic from a 6.2 cluster to a 6.3 cluster istherefore based on transferring all traffic to the 6.3 cluster and then shutting downthe servers or nodes in the 6.2 cluster.
Procedure 5.9. Setup a JBoss EAP Cluster in 6.3
1. Refer to the HTTP Clustering and Load Balancing chapter of the JBoss EAP 6.3 Administration andConfiguration Guide for instructions on how to setup a JBoss EAP cluster in 6.3.
2. Migrate all traffic to this new cluster using the steps outlined in the Migrate Traffic betweenClusters chapter of the JBoss EAP 6.3 Administration and Configuration Guide
Result
Your JBoss EAP 6.2 cluster has been migrated to a cluster based on JBoss EAP 6.3.
Report a bug
CHAPTER 5. PATCHING AND UPGRADING JBOSS EAP 6
41
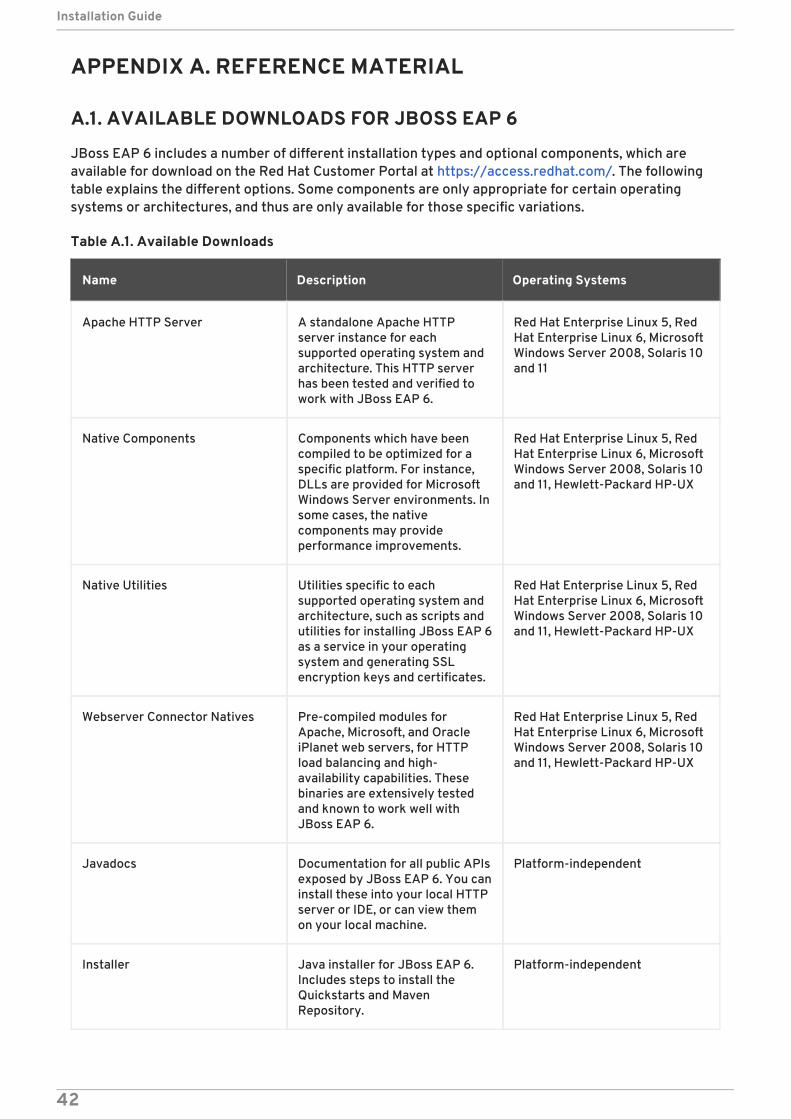
APPENDIX A. REFERENCE MATERIAL
A.1. AVAILABLE DOWNLOADS FOR JBOSS EAP 6
JBoss EAP 6 includes a number of different installation types and optional components, which areavailable for download on the Red Hat Customer Portal at https://access.redhat.com/. The followingtable explains the different options. Some components are only appropriate for certain operatingsystems or architectures, and thus are only available for those specific variations.
Table A.1. Available Downloads
Name Description Operating Systems
Apache HTTP Server A standalone Apache HTTPserver instance for eachsupported operating system andarchitecture. This HTTP serverhas been tested and verified towork with JBoss EAP 6.
Red Hat Enterprise Linux 5, RedHat Enterprise Linux 6, MicrosoftWindows Server 2008, Solaris 10and 11
Native Components Components which have beencompiled to be optimized for aspecific platform. For instance,DLLs are provided for MicrosoftWindows Server environments. Insome cases, the nativecomponents may provideperformance improvements.
Red Hat Enterprise Linux 5, RedHat Enterprise Linux 6, MicrosoftWindows Server 2008, Solaris 10and 11, Hewlett-Packard HP-UX
Native Utilities Utilities specific to eachsupported operating system andarchitecture, such as scripts andutilities for installing JBoss EAP 6as a service in your operatingsystem and generating SSLencryption keys and certificates.
Red Hat Enterprise Linux 5, RedHat Enterprise Linux 6, MicrosoftWindows Server 2008, Solaris 10and 11, Hewlett-Packard HP-UX
Webserver Connector Natives Pre-compiled modules forApache, Microsoft, and OracleiPlanet web servers, for HTTPload balancing and high-availability capabilities. Thesebinaries are extensively testedand known to work well withJBoss EAP 6.
Red Hat Enterprise Linux 5, RedHat Enterprise Linux 6, MicrosoftWindows Server 2008, Solaris 10and 11, Hewlett-Packard HP-UX
Javadocs Documentation for all public APIsexposed by JBoss EAP 6. You caninstall these into your local HTTPserver or IDE, or can view themon your local machine.
Platform-independent
Installer Java installer for JBoss EAP 6.Includes steps to install theQuickstarts and MavenRepository.
Platform-independent
Installation Guide
42
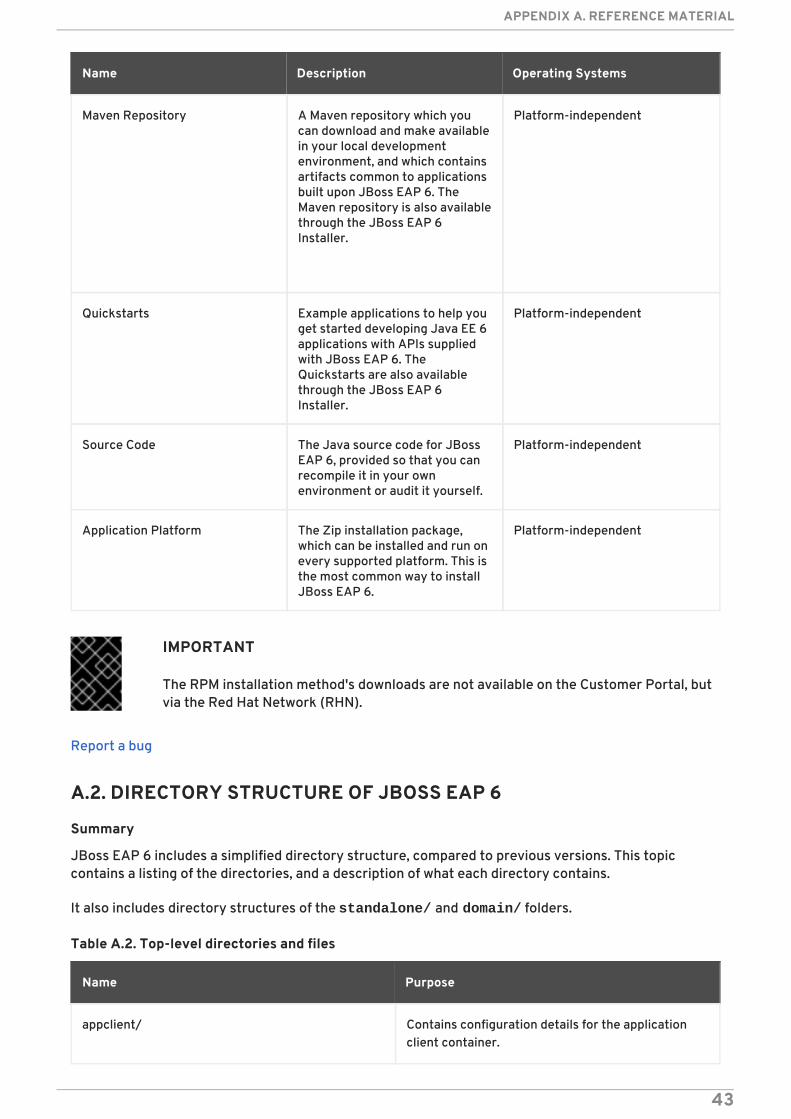
Maven Repository A Maven repository which youcan download and make availablein your local developmentenvironment, and which containsartifacts common to applicationsbuilt upon JBoss EAP 6. TheMaven repository is also availablethrough the JBoss EAP 6Installer.
Platform-independent
Quickstarts Example applications to help youget started developing Java EE 6applications with APIs suppliedwith JBoss EAP 6. TheQuickstarts are also availablethrough the JBoss EAP 6Installer.
Platform-independent
Source Code The Java source code for JBossEAP 6, provided so that you canrecompile it in your ownenvironment or audit it yourself.
Platform-independent
Application Platform The Zip installation package,which can be installed and run onevery supported platform. This isthe most common way to installJBoss EAP 6.
Platform-independent
Name Description Operating Systems
IMPORTANT
The RPM installation method's downloads are not available on the Customer Portal, butvia the Red Hat Network (RHN).
Report a bug
A.2. DIRECTORY STRUCTURE OF JBOSS EAP 6
Summary
JBoss EAP 6 includes a simplified directory structure, compared to previous versions. This topiccontains a listing of the directories, and a description of what each directory contains.
It also includes directory structures of the standalone/ and domain/ folders.
Table A.2. Top-level directories and files
Name Purpose
appclient/ Contains configuration details for the applicationclient container.
APPENDIX A. REFERENCE MATERIAL
43
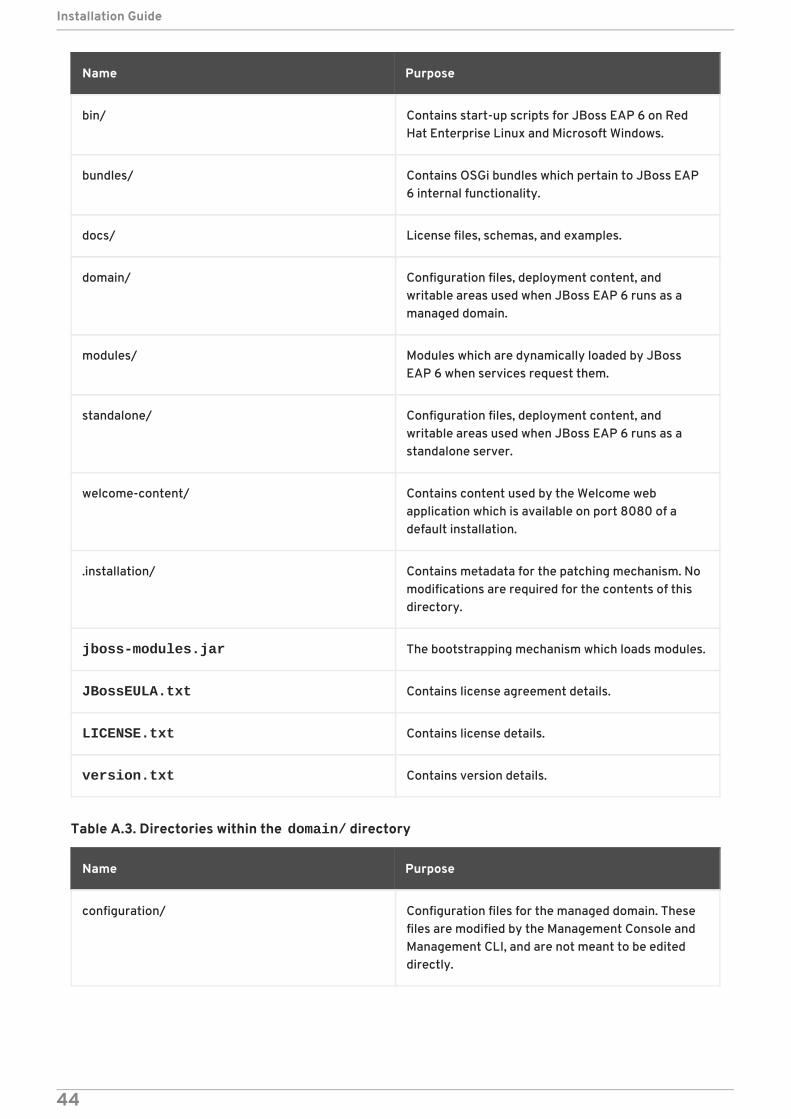
bin/ Contains start-up scripts for JBoss EAP 6 on RedHat Enterprise Linux and Microsoft Windows.
bundles/ Contains OSGi bundles which pertain to JBoss EAP6 internal functionality.
docs/ License files, schemas, and examples.
domain/ Configuration files, deployment content, andwritable areas used when JBoss EAP 6 runs as amanaged domain.
modules/ Modules which are dynamically loaded by JBossEAP 6 when services request them.
standalone/ Configuration files, deployment content, andwritable areas used when JBoss EAP 6 runs as astandalone server.
welcome-content/ Contains content used by the Welcome webapplication which is available on port 8080 of adefault installation.
.installation/ Contains metadata for the patching mechanism. Nomodifications are required for the contents of thisdirectory.
jboss-modules.jar The bootstrapping mechanism which loads modules.
JBossEULA.txt Contains license agreement details.
LICENSE.txt Contains license details.
version.txt Contains version details.
Name Purpose
Table A.3. Directories within the domain/ directory
Name Purpose
configuration/ Configuration files for the managed domain. Thesefiles are modified by the Management Console andManagement CLI, and are not meant to be editeddirectly.
Installation Guide
44
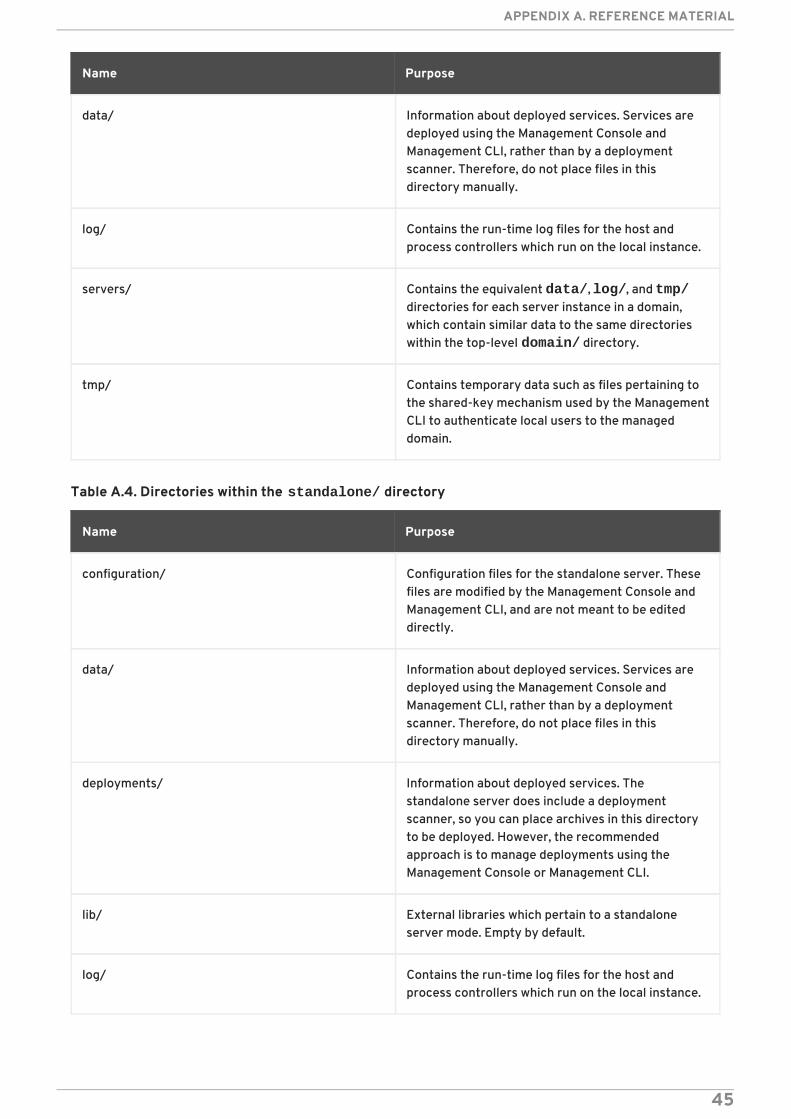
data/ Information about deployed services. Services aredeployed using the Management Console andManagement CLI, rather than by a deploymentscanner. Therefore, do not place files in thisdirectory manually.
log/ Contains the run-time log files for the host andprocess controllers which run on the local instance.
servers/ Contains the equivalent data/, log/, and tmp/directories for each server instance in a domain,which contain similar data to the same directorieswithin the top-level domain/ directory.
tmp/ Contains temporary data such as files pertaining tothe shared-key mechanism used by the ManagementCLI to authenticate local users to the manageddomain.
Name Purpose
Table A.4. Directories within the standalone/ directory
Name Purpose
configuration/ Configuration files for the standalone server. Thesefiles are modified by the Management Console andManagement CLI, and are not meant to be editeddirectly.
data/ Information about deployed services. Services aredeployed using the Management Console andManagement CLI, rather than by a deploymentscanner. Therefore, do not place files in thisdirectory manually.
deployments/ Information about deployed services. Thestandalone server does include a deploymentscanner, so you can place archives in this directoryto be deployed. However, the recommendedapproach is to manage deployments using theManagement Console or Management CLI.
lib/ External libraries which pertain to a standaloneserver mode. Empty by default.
log/ Contains the run-time log files for the host andprocess controllers which run on the local instance.
APPENDIX A. REFERENCE MATERIAL
45
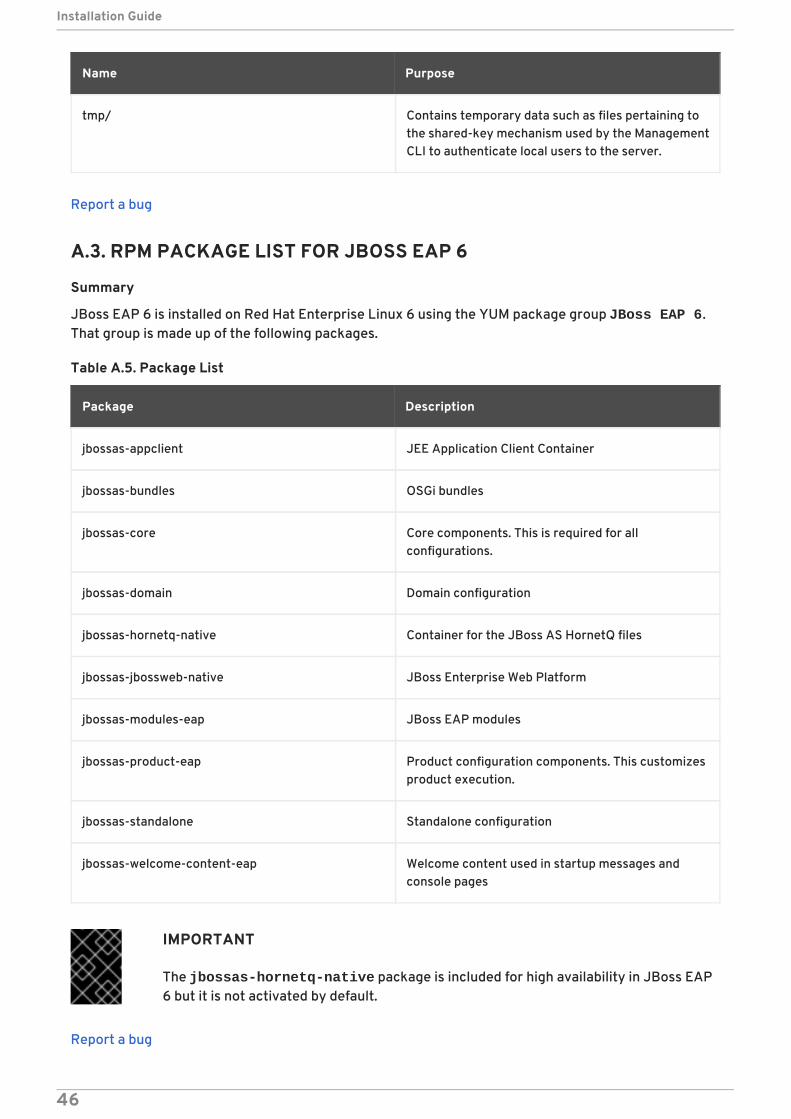
tmp/ Contains temporary data such as files pertaining tothe shared-key mechanism used by the ManagementCLI to authenticate local users to the server.
Name Purpose
Report a bug
A.3. RPM PACKAGE LIST FOR JBOSS EAP 6
Summary
JBoss EAP 6 is installed on Red Hat Enterprise Linux 6 using the YUM package group JBoss EAP 6.That group is made up of the following packages.
Table A.5. Package List
Package Description
jbossas-appclient JEE Application Client Container
jbossas-bundles OSGi bundles
jbossas-core Core components. This is required for allconfigurations.
jbossas-domain Domain configuration
jbossas-hornetq-native Container for the JBoss AS HornetQ files
jbossas-jbossweb-native JBoss Enterprise Web Platform
jbossas-modules-eap JBoss EAP modules
jbossas-product-eap Product configuration components. This customizesproduct execution.
jbossas-standalone Standalone configuration
jbossas-welcome-content-eap Welcome content used in startup messages andconsole pages
IMPORTANT
The jbossas-hornetq-native package is included for high availability in JBoss EAP6 but it is not activated by default.
Report a bug
Installation Guide
46
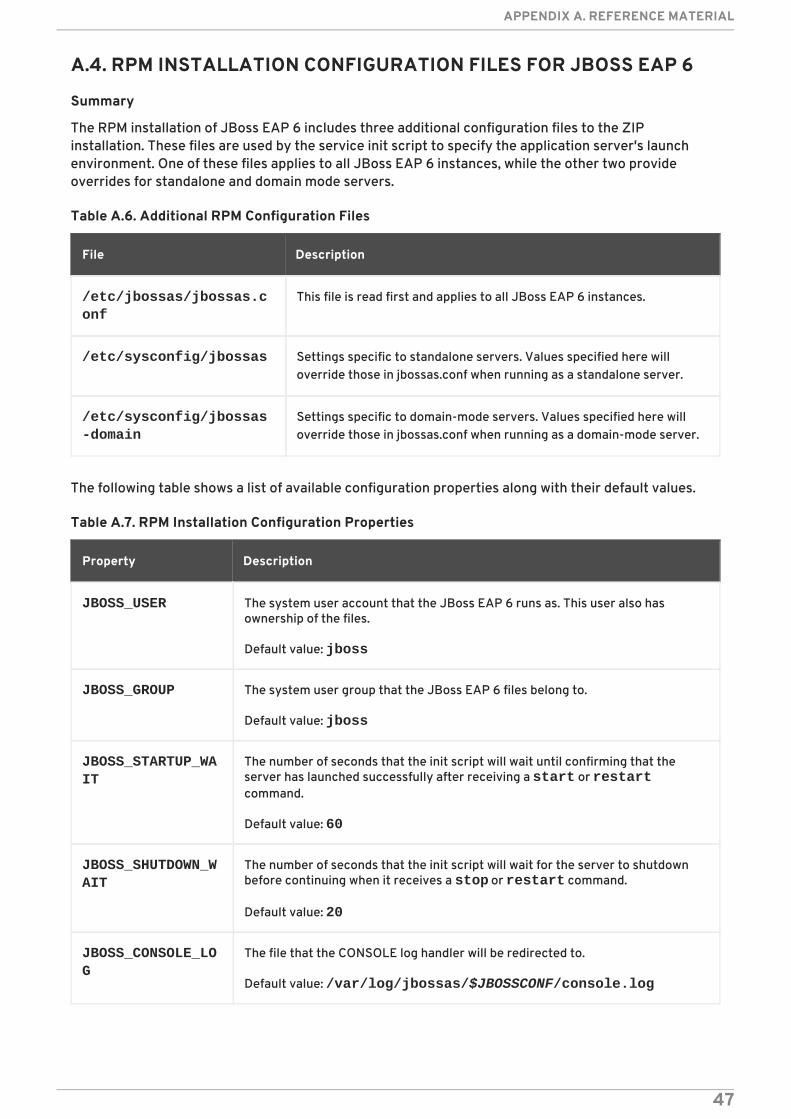
A.4. RPM INSTALLATION CONFIGURATION FILES FOR JBOSS EAP 6
Summary
The RPM installation of JBoss EAP 6 includes three additional configuration files to the ZIPinstallation. These files are used by the service init script to specify the application server's launchenvironment. One of these files applies to all JBoss EAP 6 instances, while the other two provideoverrides for standalone and domain mode servers.
Table A.6. Additional RPM Configuration Files
File Description
/etc/jbossas/jbossas.conf
This file is read first and applies to all JBoss EAP 6 instances.
/etc/sysconfig/jbossas Settings specific to standalone servers. Values specified here willoverride those in jbossas.conf when running as a standalone server.
/etc/sysconfig/jbossas-domain
Settings specific to domain-mode servers. Values specified here willoverride those in jbossas.conf when running as a domain-mode server.
The following table shows a list of available configuration properties along with their default values.
Table A.7. RPM Installation Configuration Properties
Property Description
JBOSS_USER The system user account that the JBoss EAP 6 runs as. This user also hasownership of the files.
Default value: jboss
JBOSS_GROUP The system user group that the JBoss EAP 6 files belong to.
Default value: jboss
JBOSS_STARTUP_WAIT
The number of seconds that the init script will wait until confirming that theserver has launched successfully after receiving a start or restartcommand.
Default value: 60
JBOSS_SHUTDOWN_WAIT
The number of seconds that the init script will wait for the server to shutdownbefore continuing when it receives a stop or restart command.
Default value: 20
JBOSS_CONSOLE_LOG
The file that the CONSOLE log handler will be redirected to.
Default value: /var/log/jbossas/$JBOSSCONF/console.log
APPENDIX A. REFERENCE MATERIAL
47
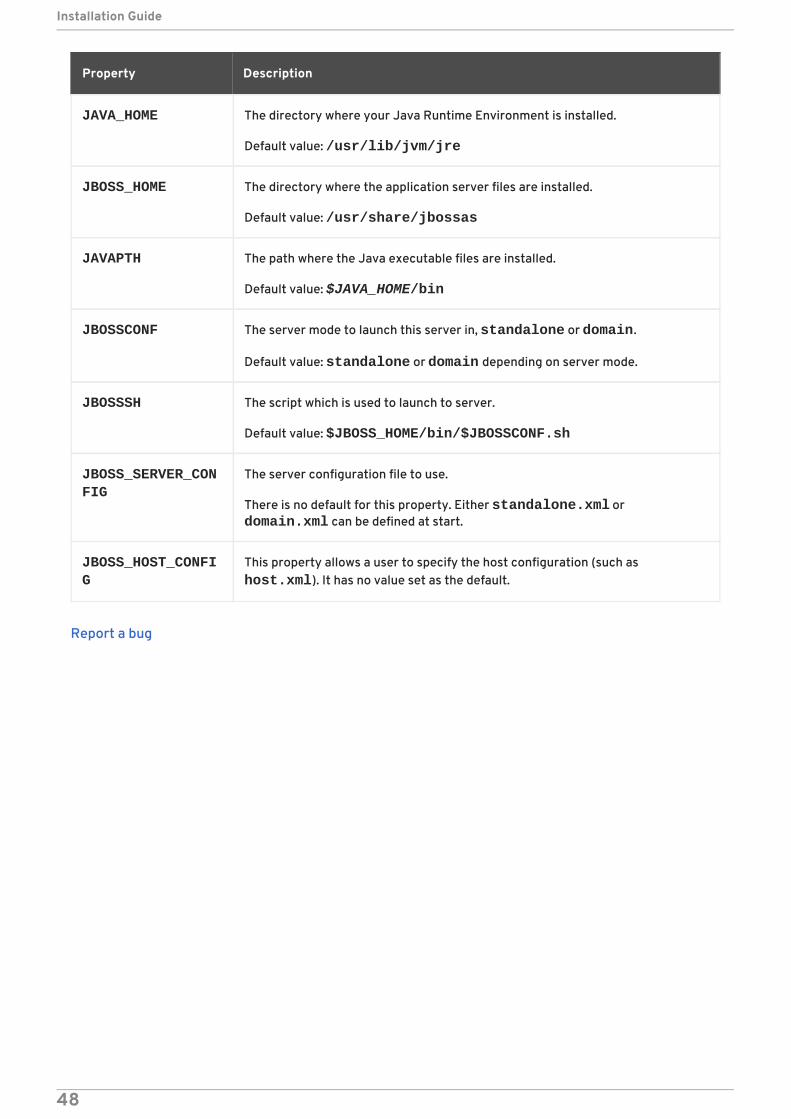
JAVA_HOME The directory where your Java Runtime Environment is installed.
Default value: /usr/lib/jvm/jre
JBOSS_HOME The directory where the application server files are installed.
Default value: /usr/share/jbossas
JAVAPTH The path where the Java executable files are installed.
Default value: $JAVA_HOME/bin
JBOSSCONF The server mode to launch this server in, standalone or domain.
Default value: standalone or domain depending on server mode.
JBOSSSH The script which is used to launch to server.
Default value: $JBOSS_HOME/bin/$JBOSSCONF.sh
JBOSS_SERVER_CONFIG
The server configuration file to use.
There is no default for this property. Either standalone.xml or domain.xml can be defined at start.
JBOSS_HOST_CONFIG
This property allows a user to specify the host configuration (such as host.xml). It has no value set as the default.
Property Description
Report a bug
Installation Guide
48
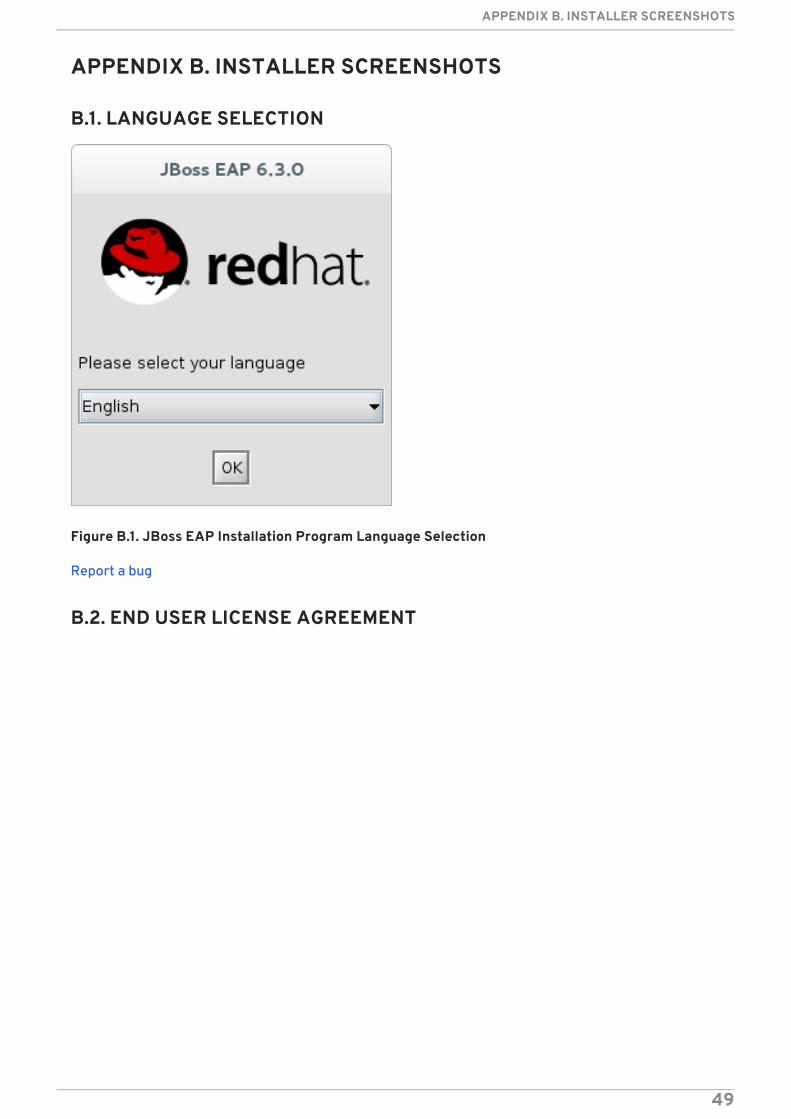
APPENDIX B. INSTALLER SCREENSHOTS
B.1. LANGUAGE SELECTION
Figure B.1. JBoss EAP Installation Program Language Selection
Report a bug
B.2. END USER LICENSE AGREEMENT
APPENDIX B. INSTALLER SCREENSHOTS
49
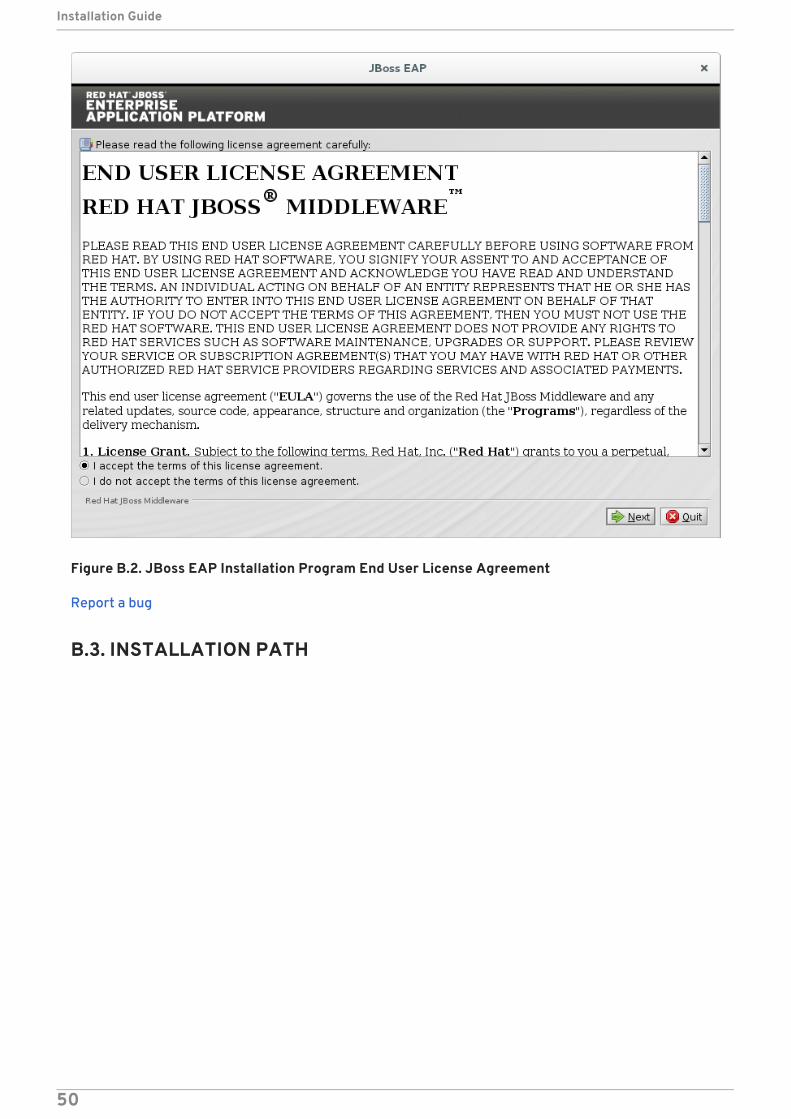
Figure B.2. JBoss EAP Installation Program End User License Agreement
Report a bug
B.3. INSTALLATION PATH
Installation Guide
50
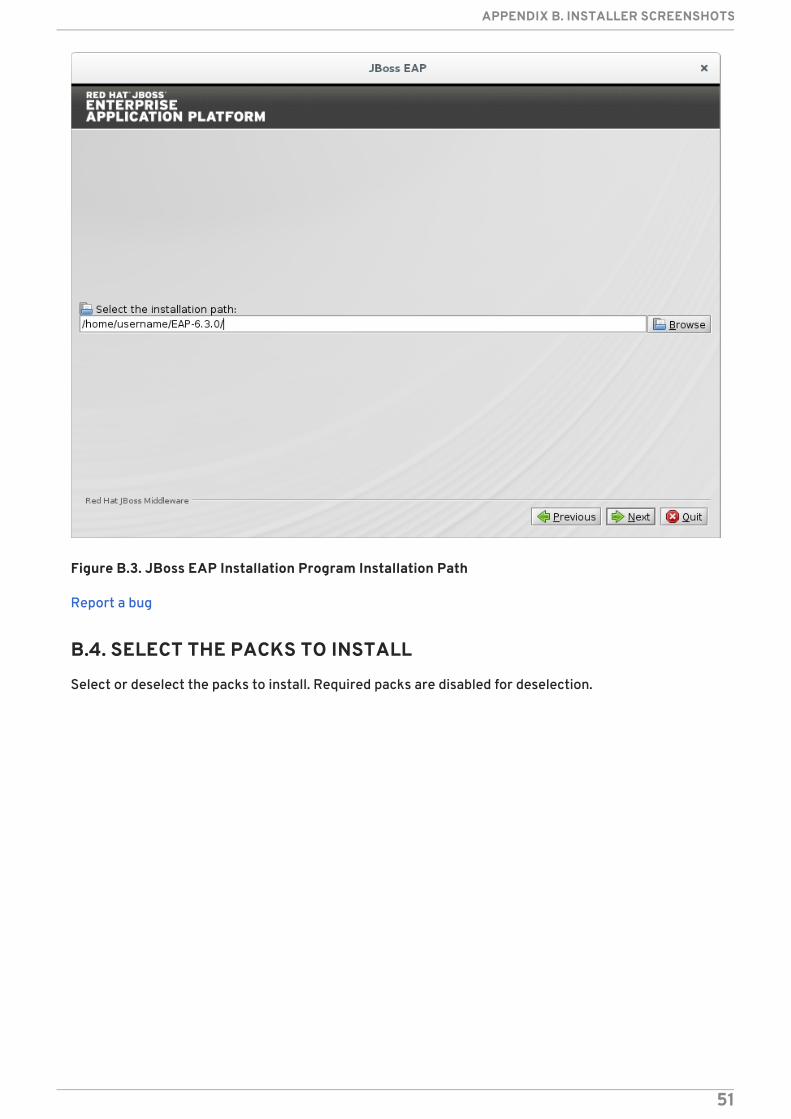
Figure B.3. JBoss EAP Installation Program Installation Path
Report a bug
B.4. SELECT THE PACKS TO INSTALL
Select or deselect the packs to install. Required packs are disabled for deselection.
APPENDIX B. INSTALLER SCREENSHOTS
51
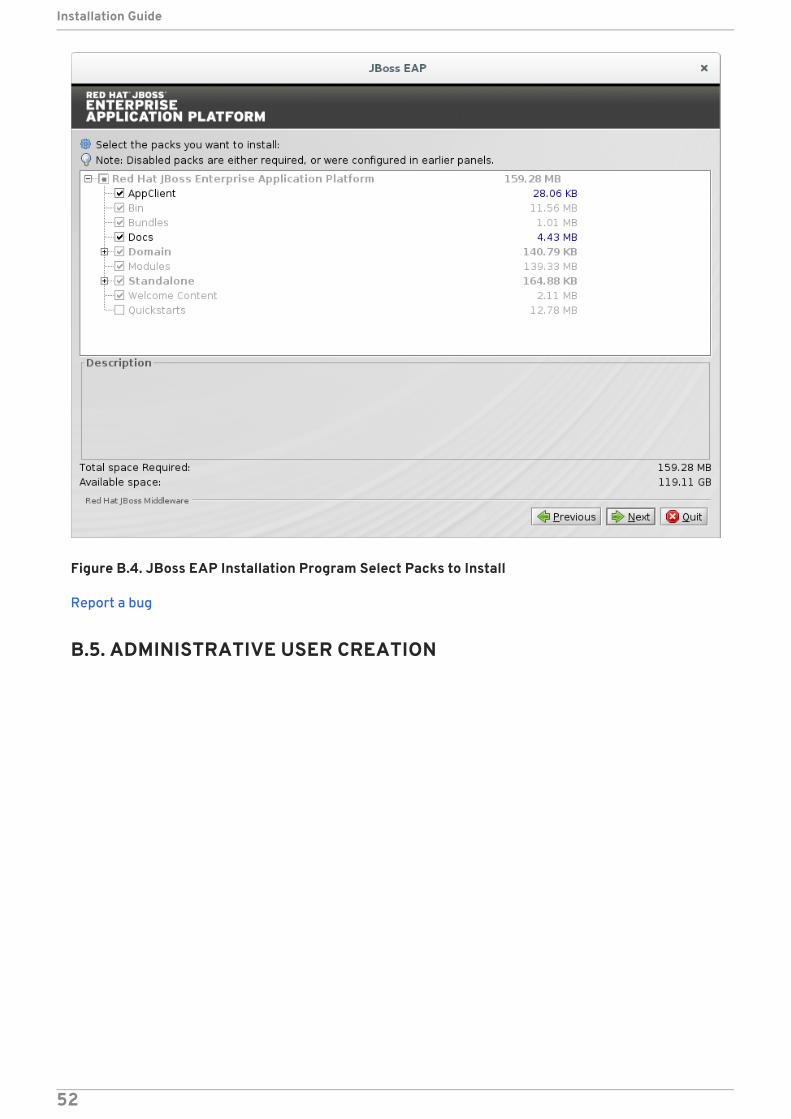
Figure B.4. JBoss EAP Installation Program Select Packs to Install
Report a bug
B.5. ADMINISTRATIVE USER CREATION
Installation Guide
52
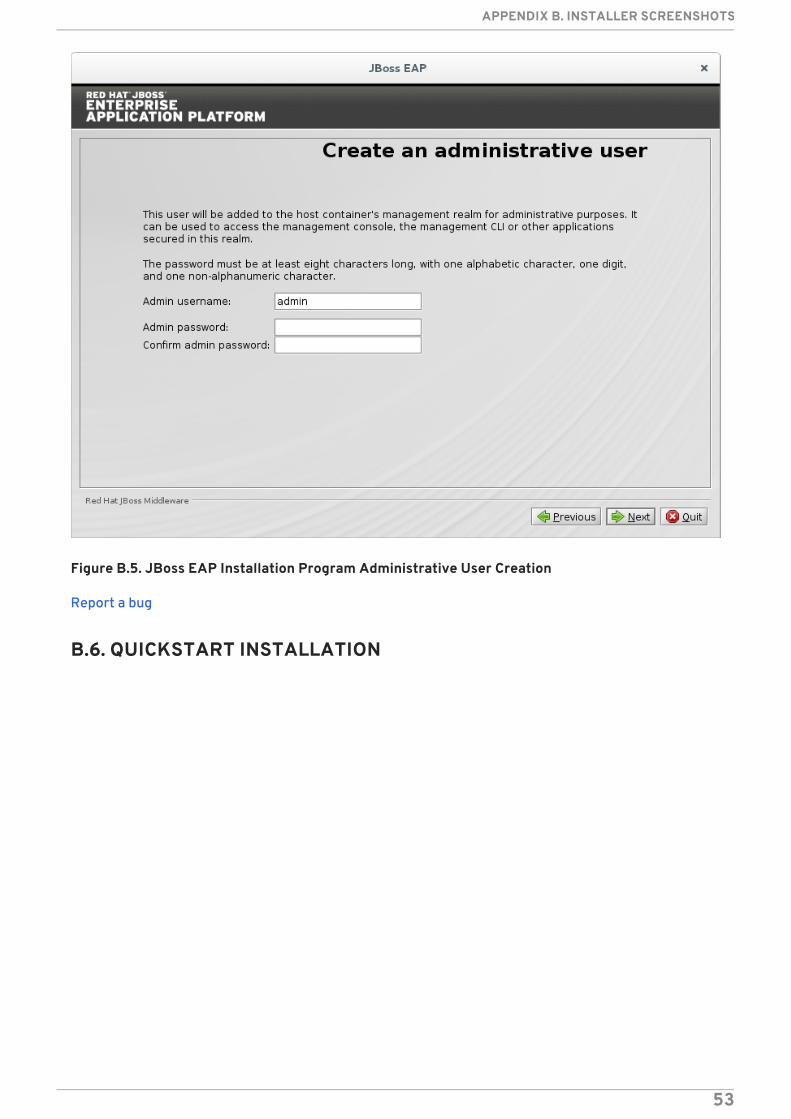
Figure B.5. JBoss EAP Installation Program Administrative User Creation
Report a bug
B.6. QUICKSTART INSTALLATION
APPENDIX B. INSTALLER SCREENSHOTS
53
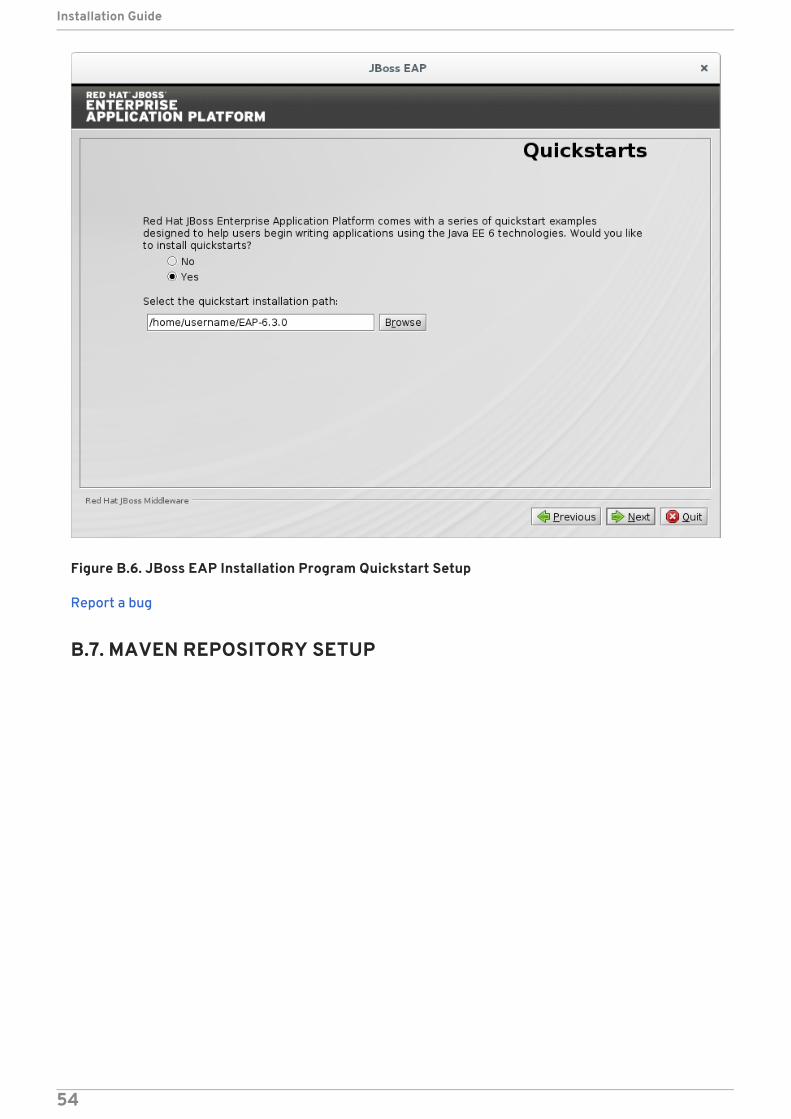
Figure B.6. JBoss EAP Installation Program Quickstart Setup
Report a bug
B.7. MAVEN REPOSITORY SETUP
Installation Guide
54
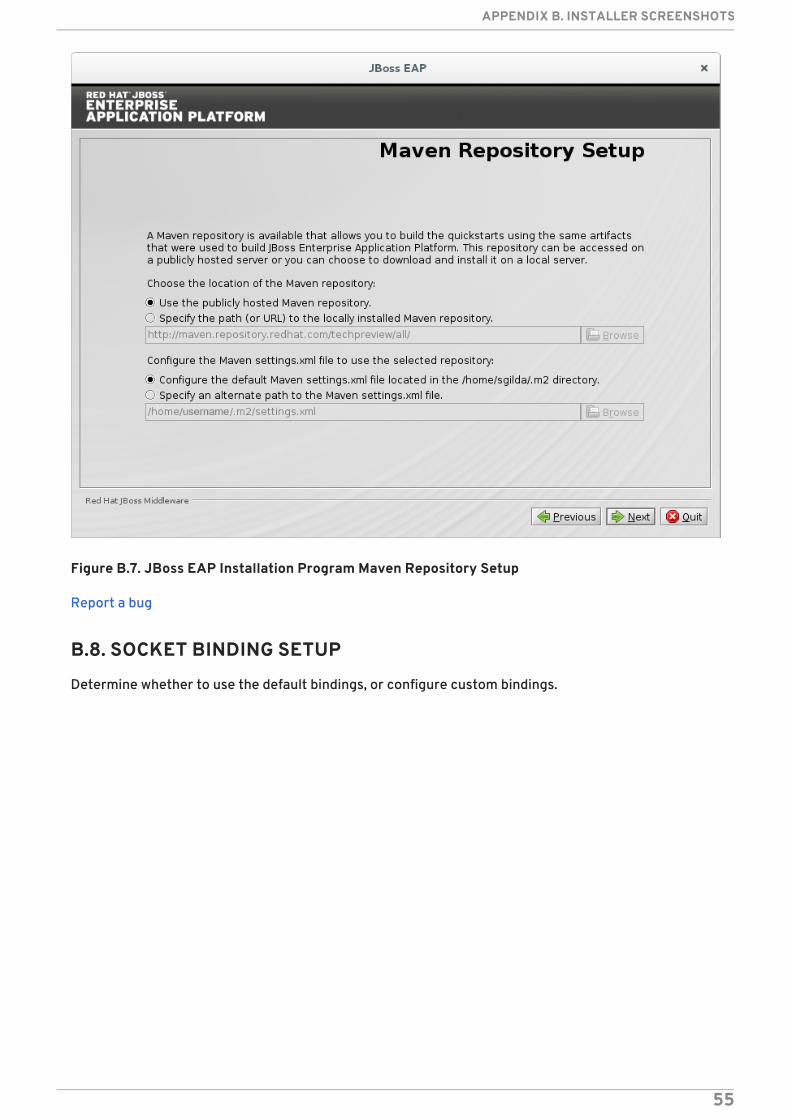
Figure B.7. JBoss EAP Installation Program Maven Repository Setup
Report a bug
B.8. SOCKET BINDING SETUP
Determine whether to use the default bindings, or configure custom bindings.
APPENDIX B. INSTALLER SCREENSHOTS
55
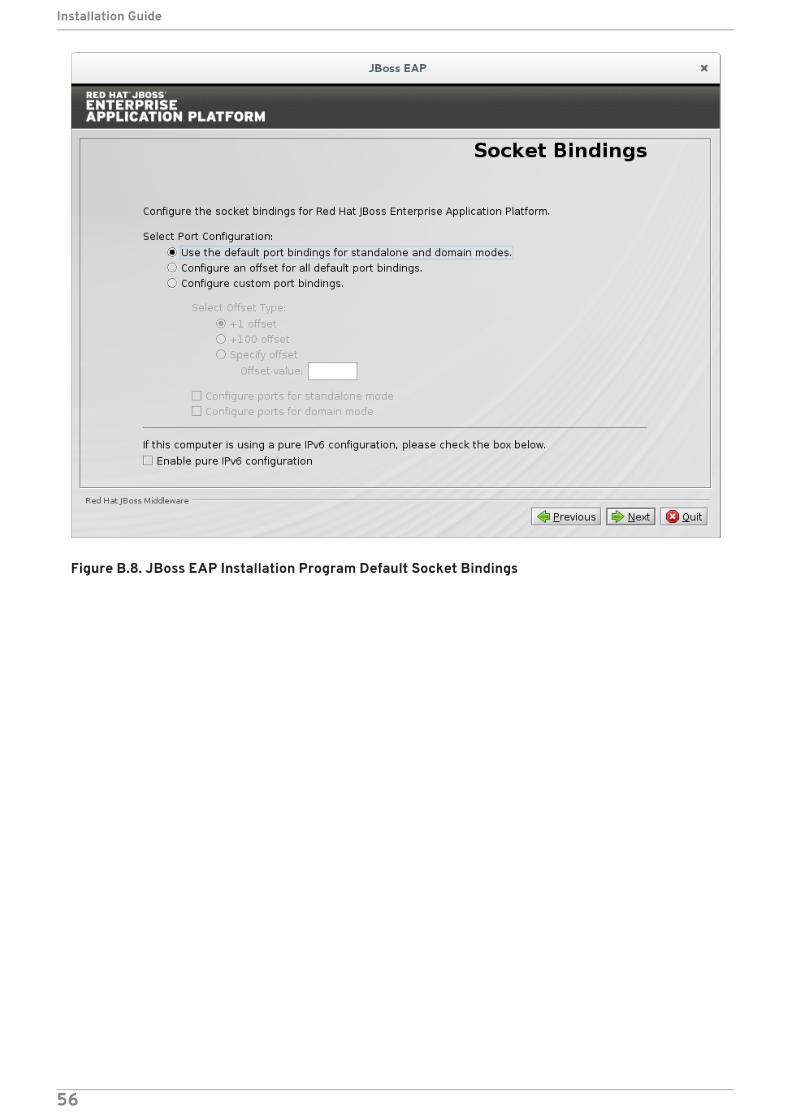
Figure B.8. JBoss EAP Installation Program Default Socket Bindings
Installation Guide
56
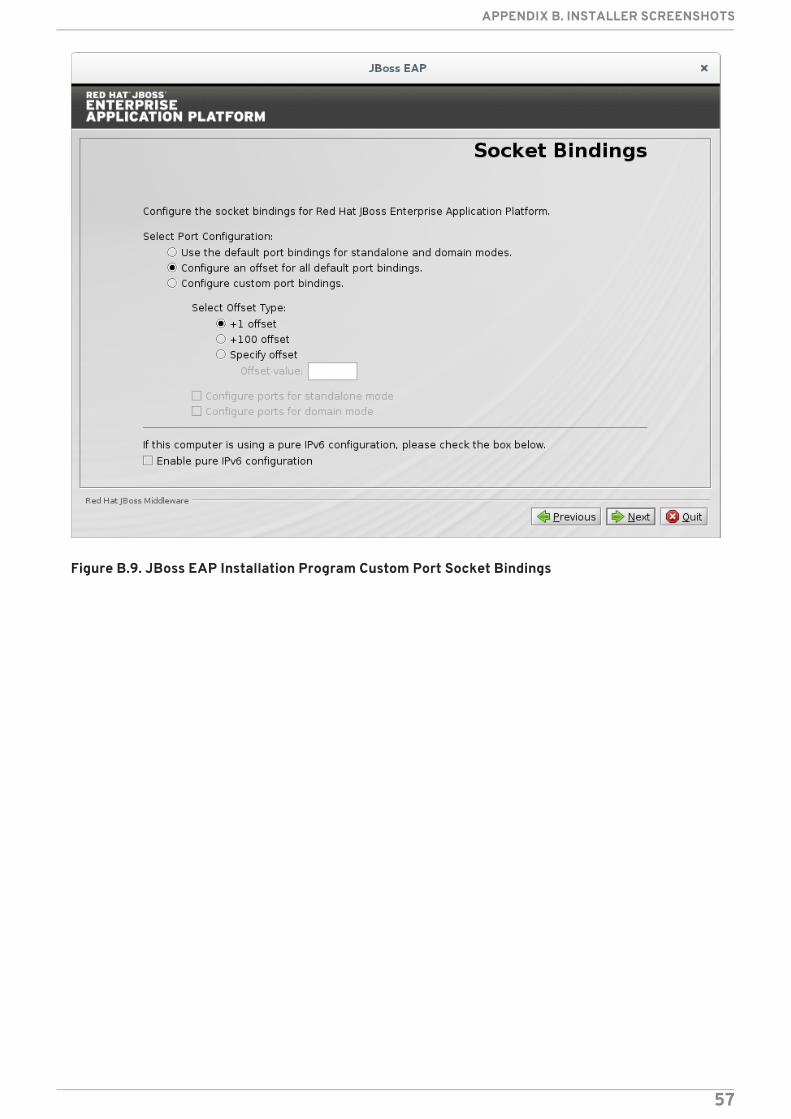
Figure B.9. JBoss EAP Installation Program Custom Port Socket Bindings
APPENDIX B. INSTALLER SCREENSHOTS
57
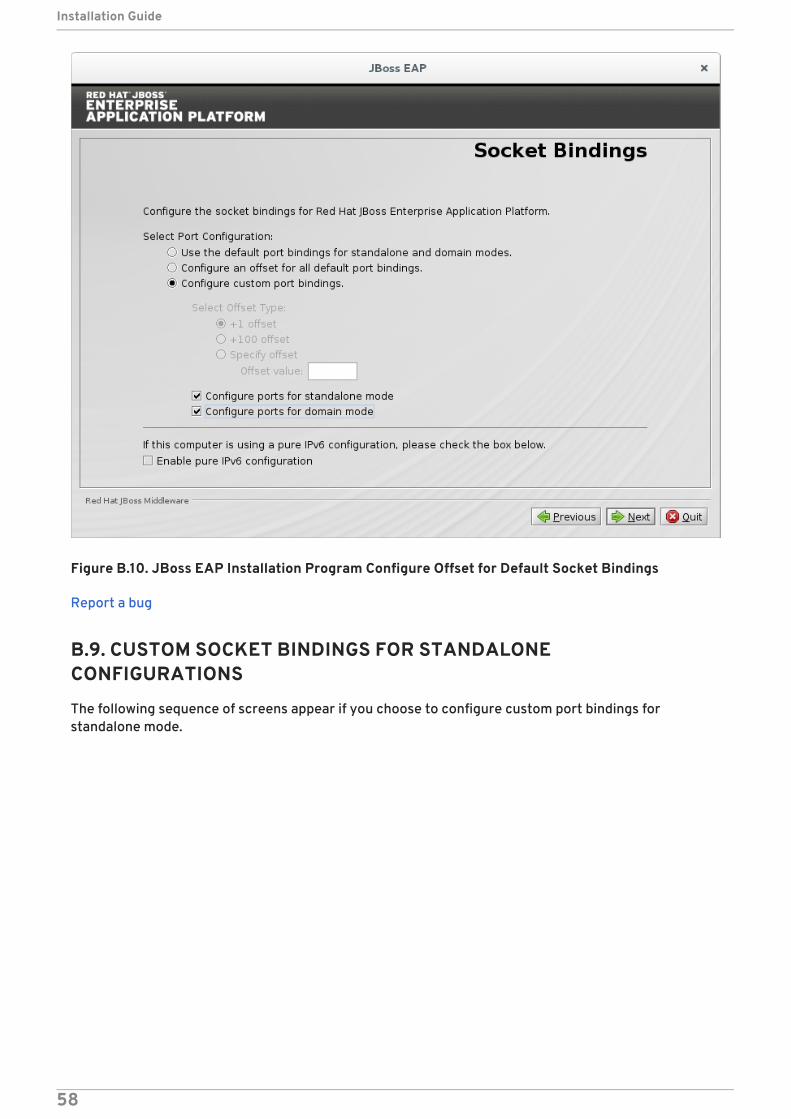
Figure B.10. JBoss EAP Installation Program Configure Offset for Default Socket Bindings
Report a bug
B.9. CUSTOM SOCKET BINDINGS FOR STANDALONECONFIGURATIONS
The following sequence of screens appear if you choose to configure custom port bindings forstandalone mode.
Installation Guide
58
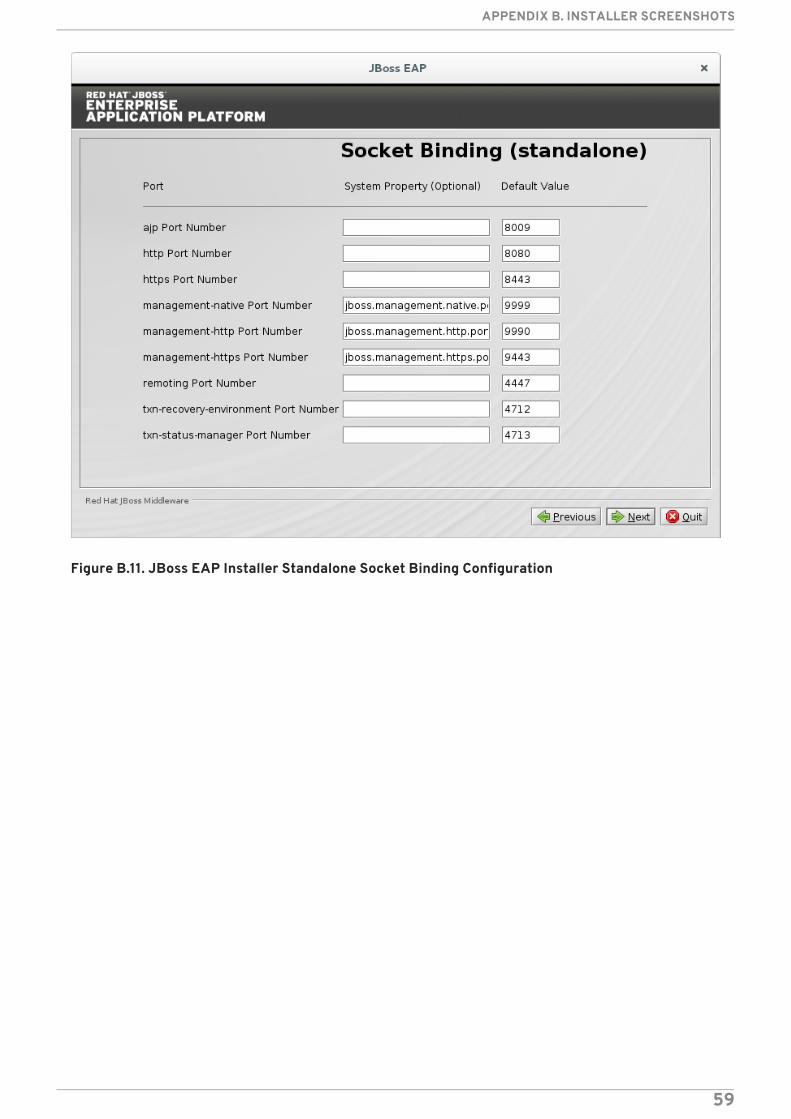
Figure B.11. JBoss EAP Installer Standalone Socket Binding Configuration
APPENDIX B. INSTALLER SCREENSHOTS
59
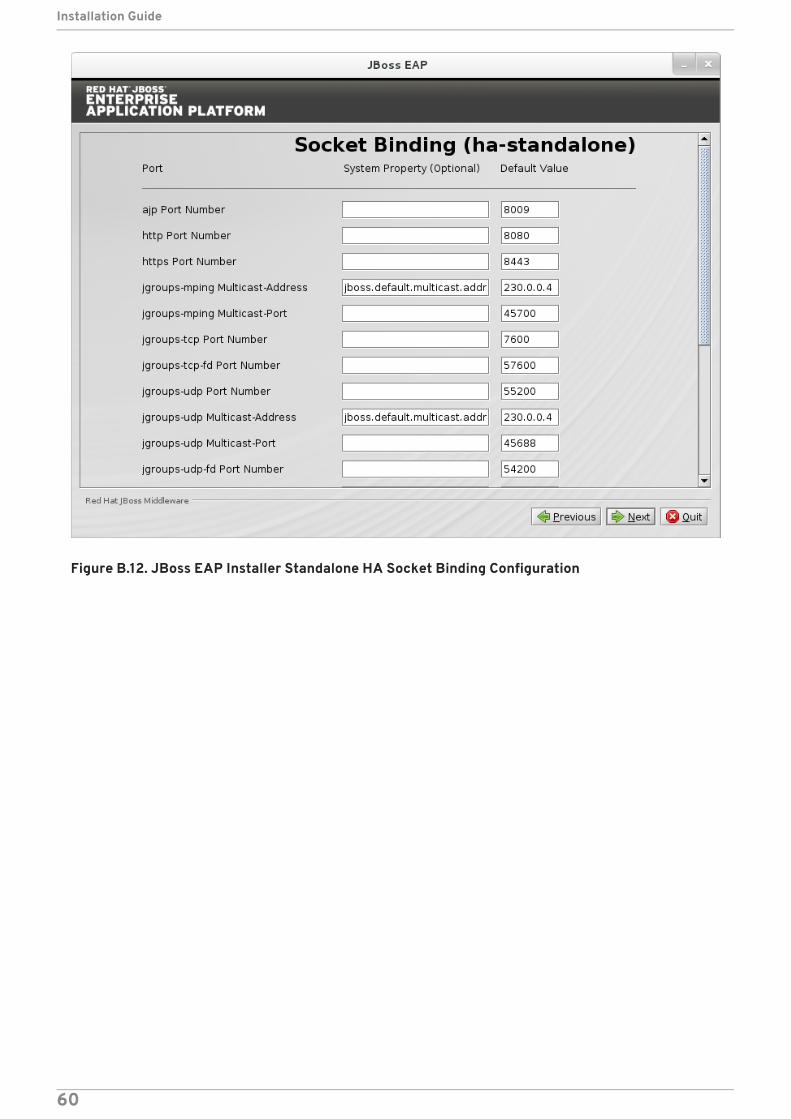
Figure B.12. JBoss EAP Installer Standalone HA Socket Binding Configuration
Installation Guide
60
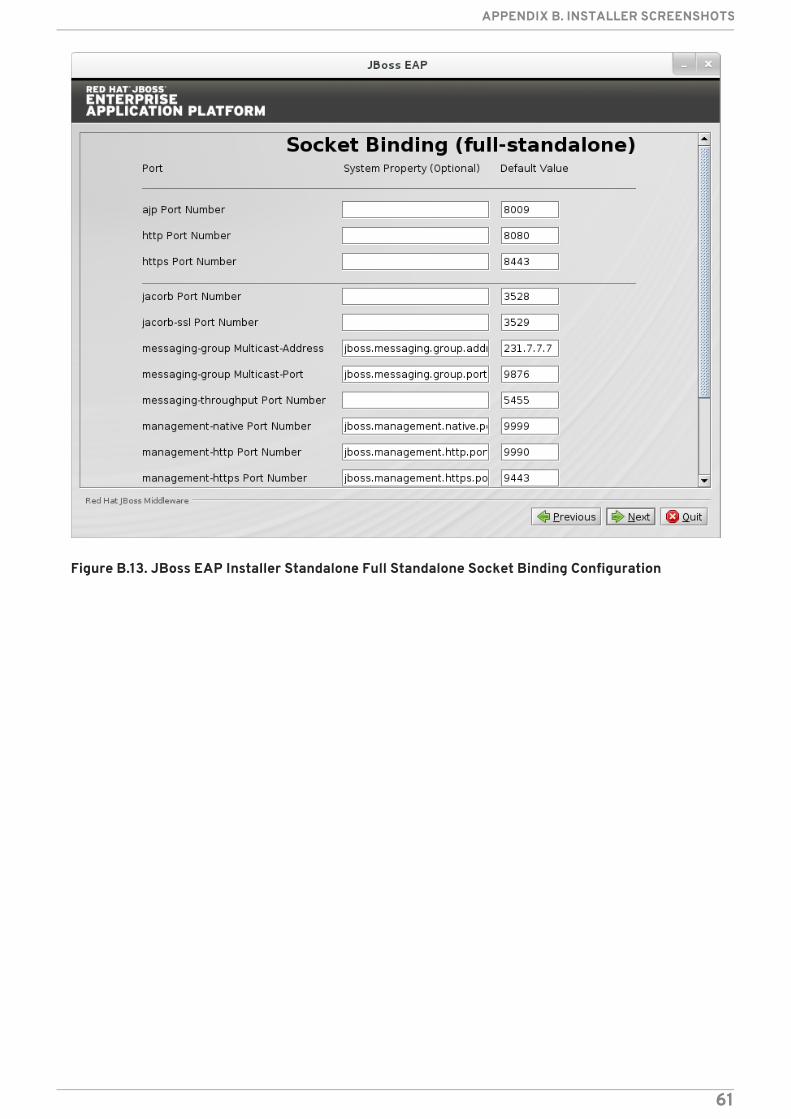
Figure B.13. JBoss EAP Installer Standalone Full Standalone Socket Binding Configuration
APPENDIX B. INSTALLER SCREENSHOTS
61
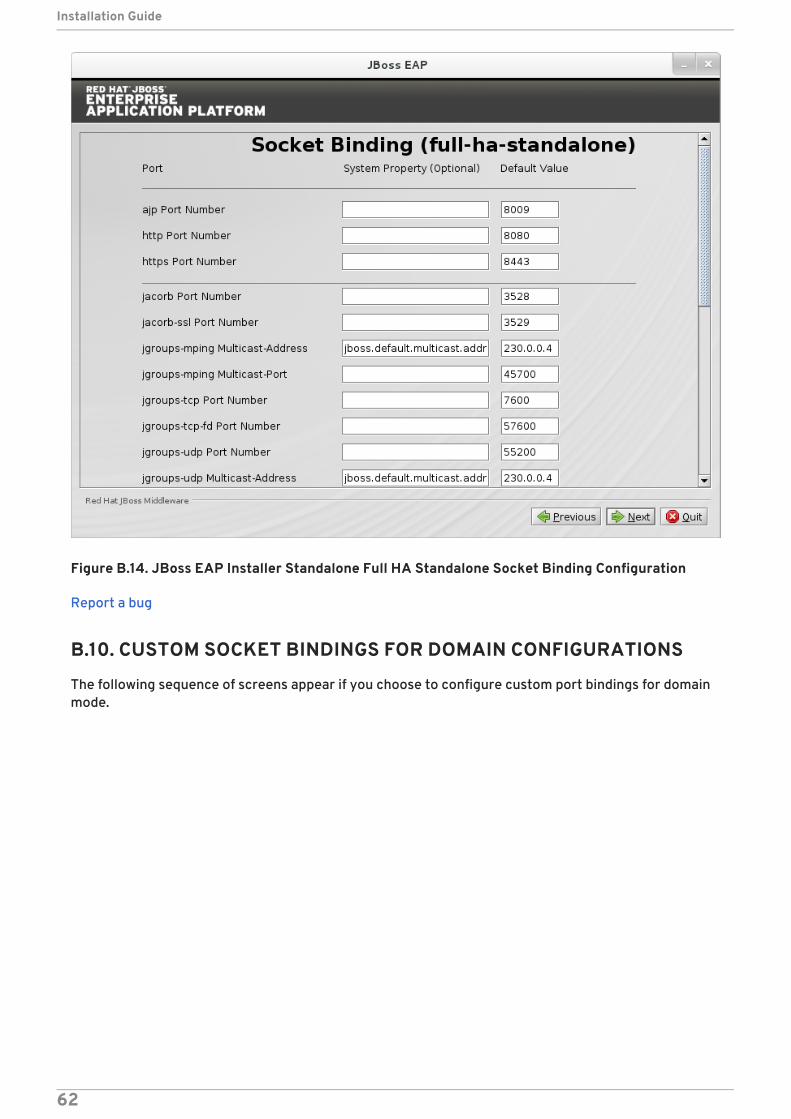
Figure B.14. JBoss EAP Installer Standalone Full HA Standalone Socket Binding Configuration
Report a bug
B.10. CUSTOM SOCKET BINDINGS FOR DOMAIN CONFIGURATIONS
The following sequence of screens appear if you choose to configure custom port bindings for domainmode.
Installation Guide
62
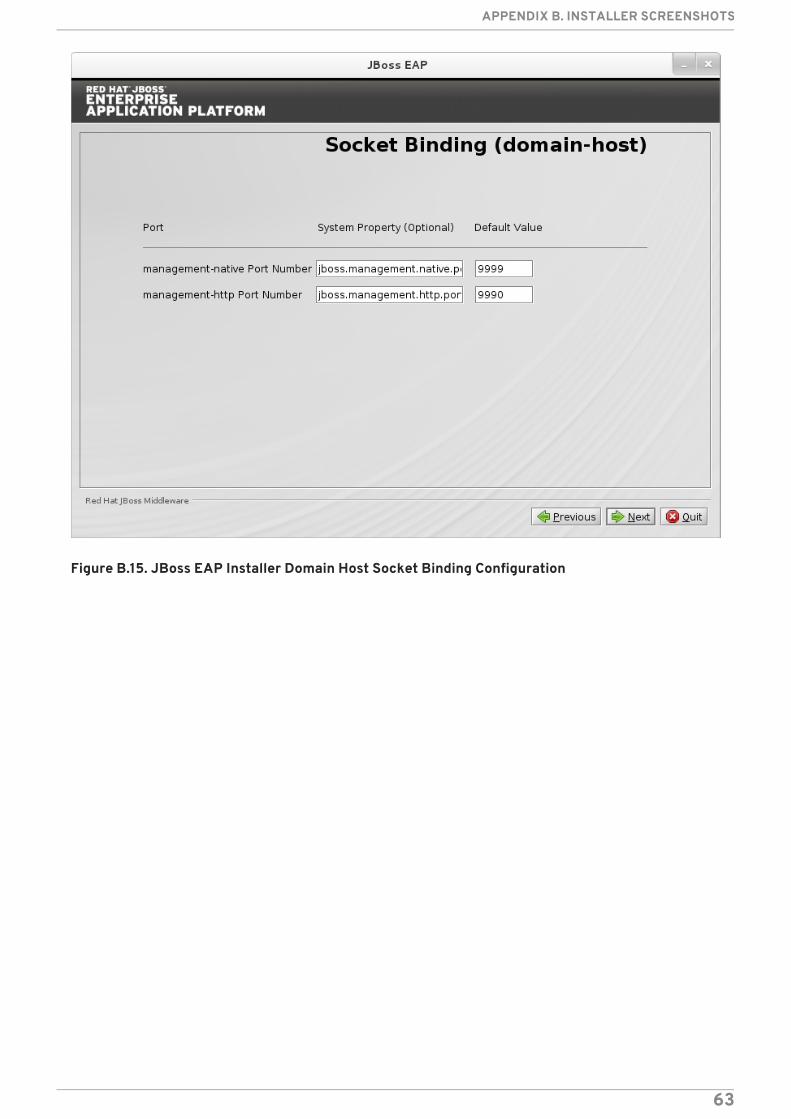
Figure B.15. JBoss EAP Installer Domain Host Socket Binding Configuration
APPENDIX B. INSTALLER SCREENSHOTS
63
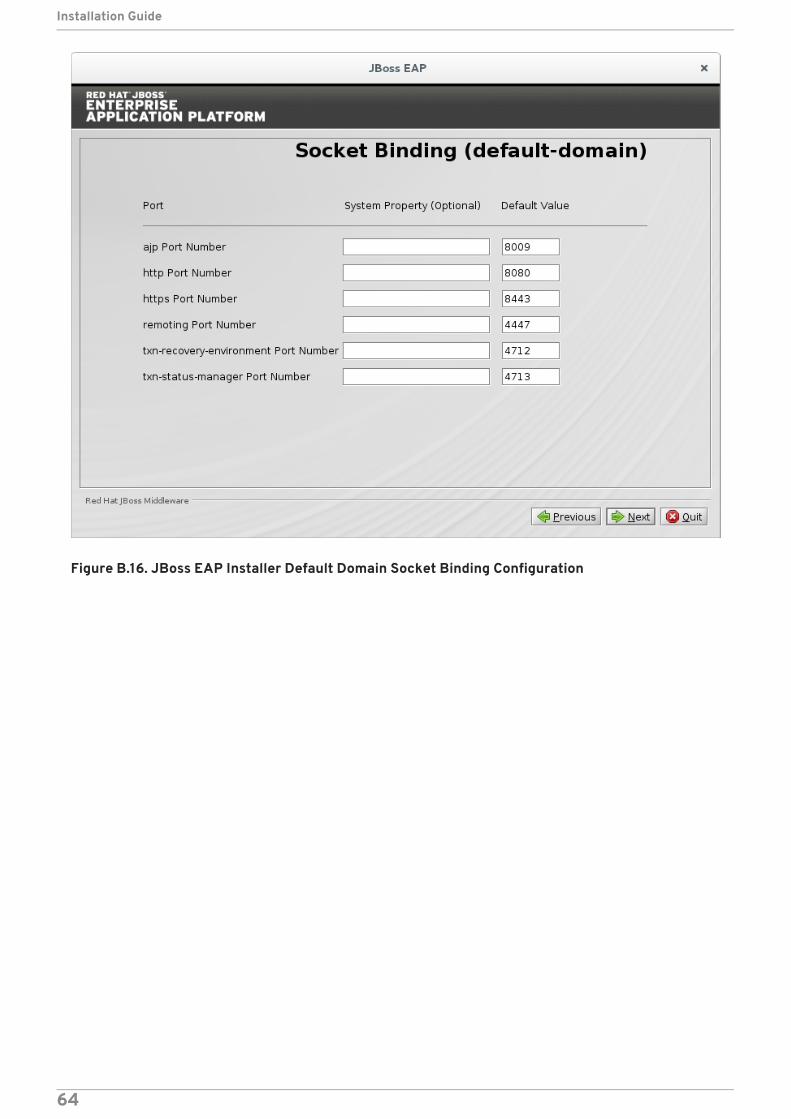
Figure B.16. JBoss EAP Installer Default Domain Socket Binding Configuration
Installation Guide
64
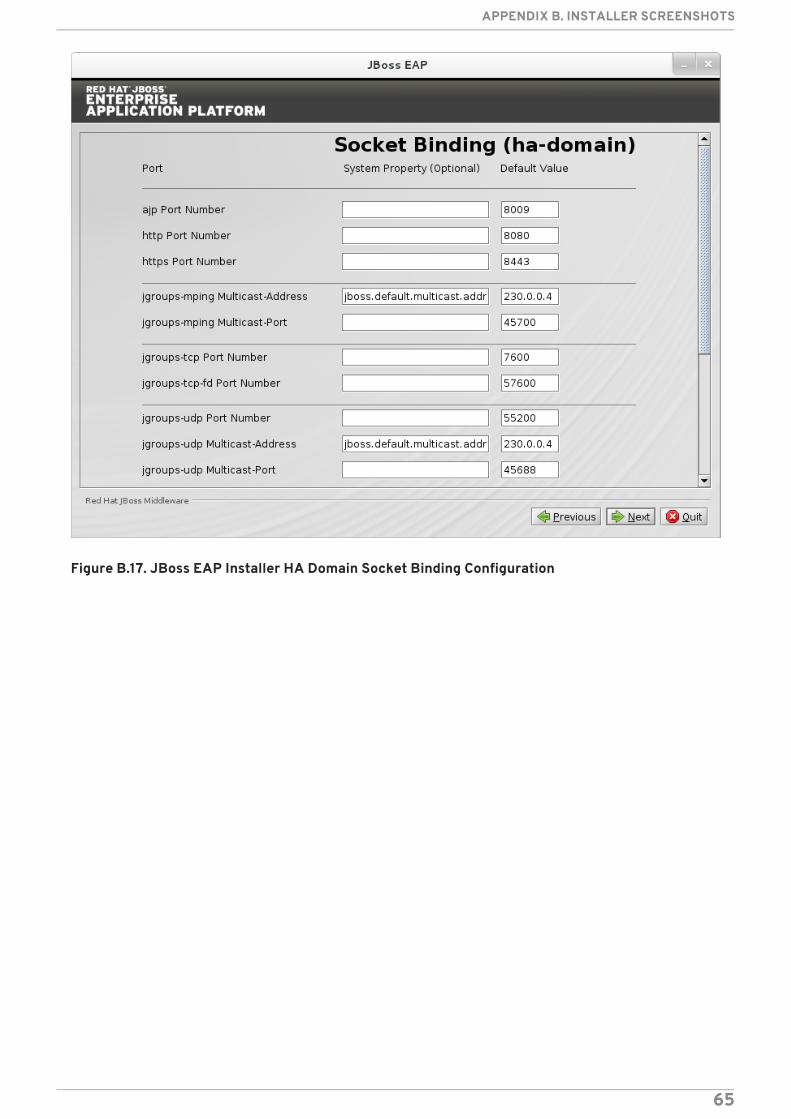
Figure B.17. JBoss EAP Installer HA Domain Socket Binding Configuration
APPENDIX B. INSTALLER SCREENSHOTS
65
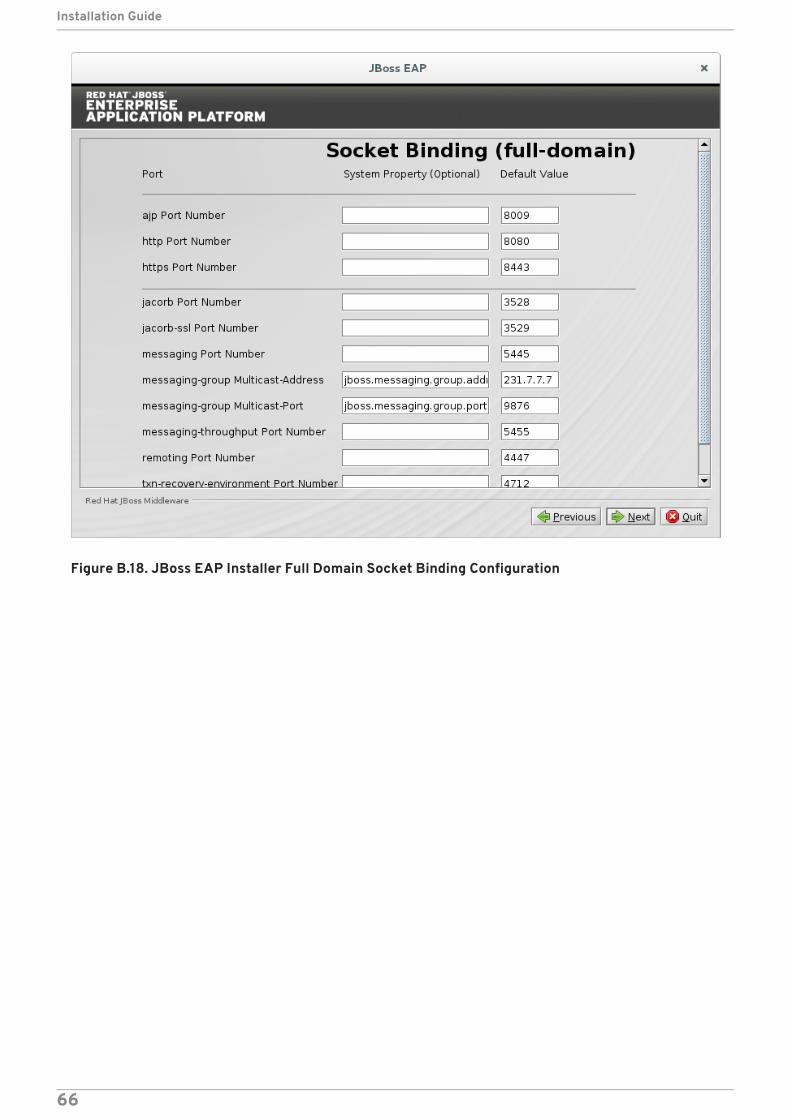
Figure B.18. JBoss EAP Installer Full Domain Socket Binding Configuration
Installation Guide
66
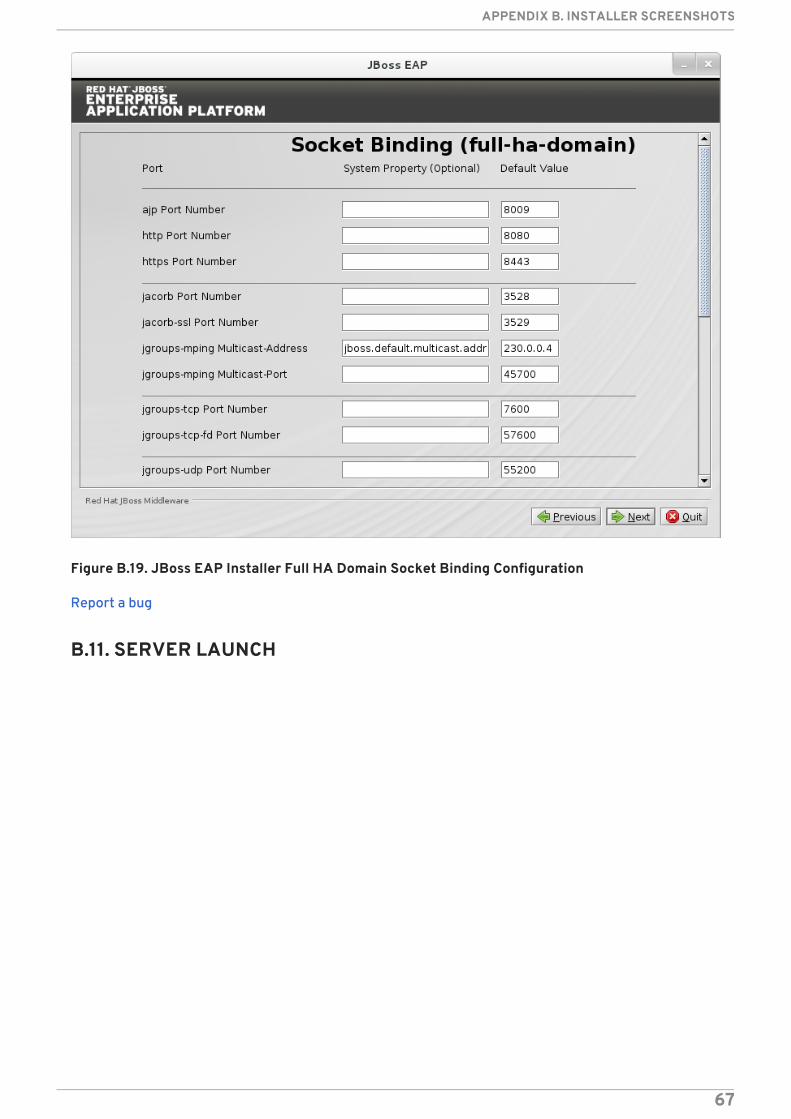
Figure B.19. JBoss EAP Installer Full HA Domain Socket Binding Configuration
Report a bug
B.11. SERVER LAUNCH
APPENDIX B. INSTALLER SCREENSHOTS
67
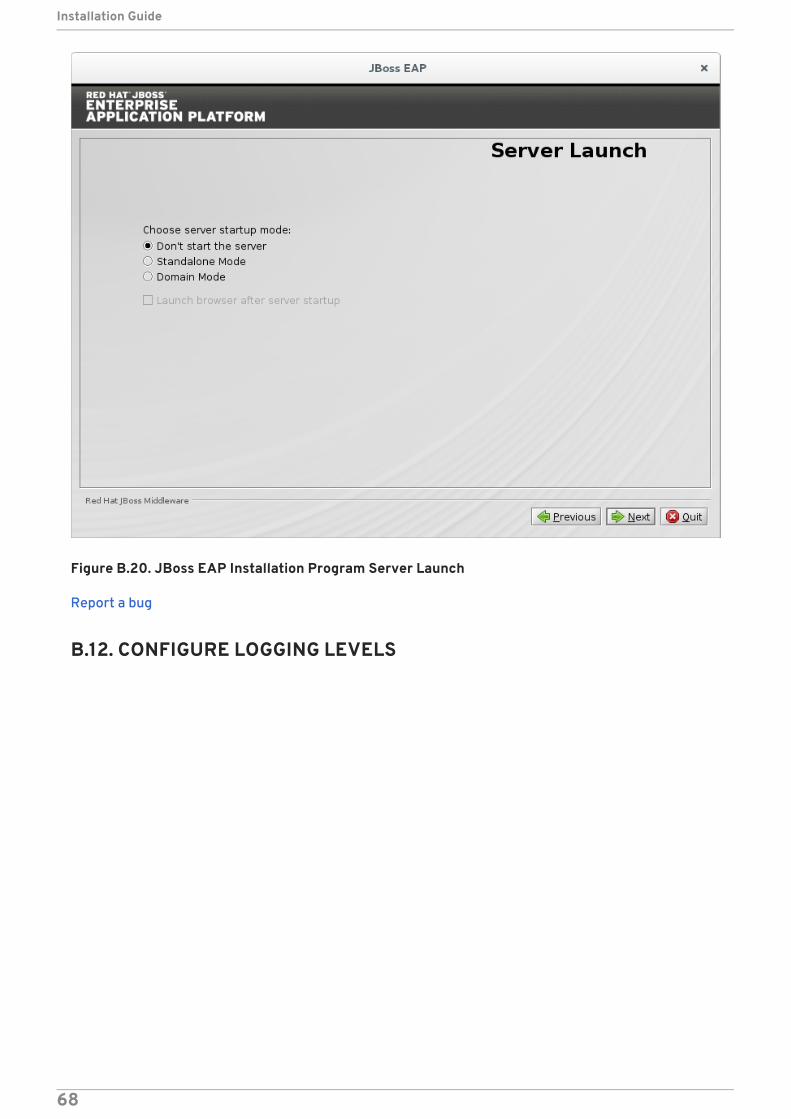
Figure B.20. JBoss EAP Installation Program Server Launch
Report a bug
B.12. CONFIGURE LOGGING LEVELS
Installation Guide
68
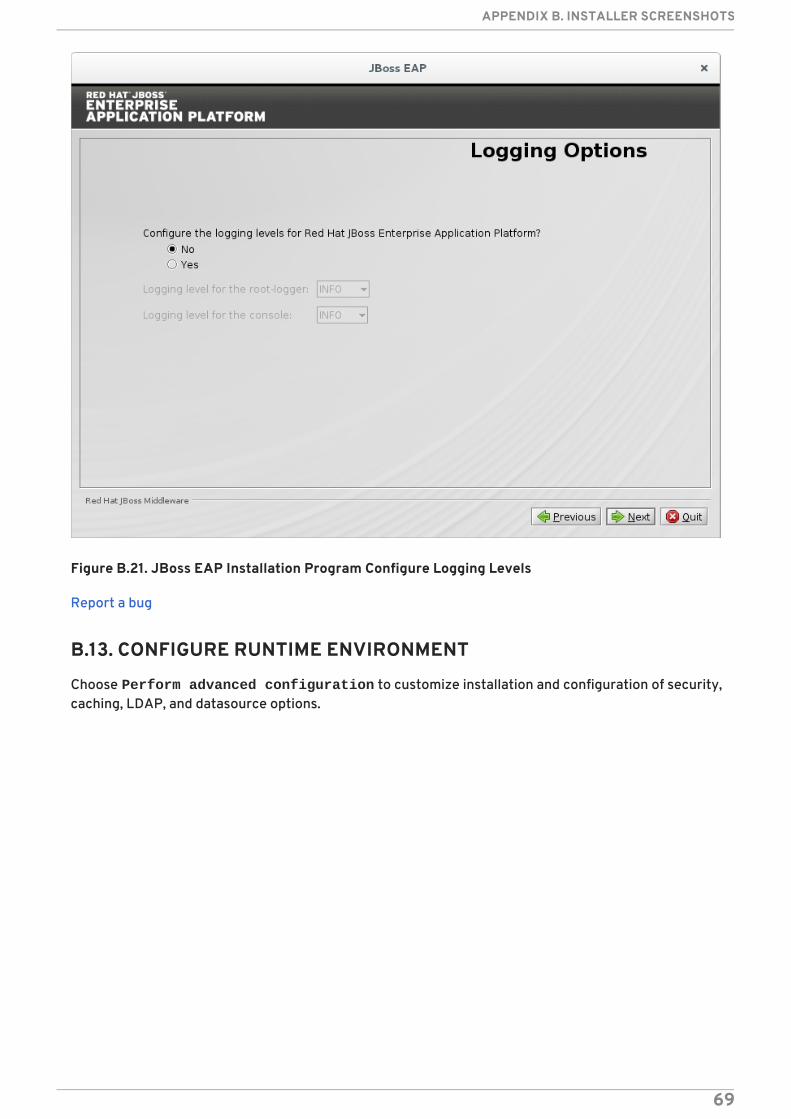
Figure B.21. JBoss EAP Installation Program Configure Logging Levels
Report a bug
B.13. CONFIGURE RUNTIME ENVIRONMENT
Choose Perform advanced configuration to customize installation and configuration of security,caching, LDAP, and datasource options.
APPENDIX B. INSTALLER SCREENSHOTS
69
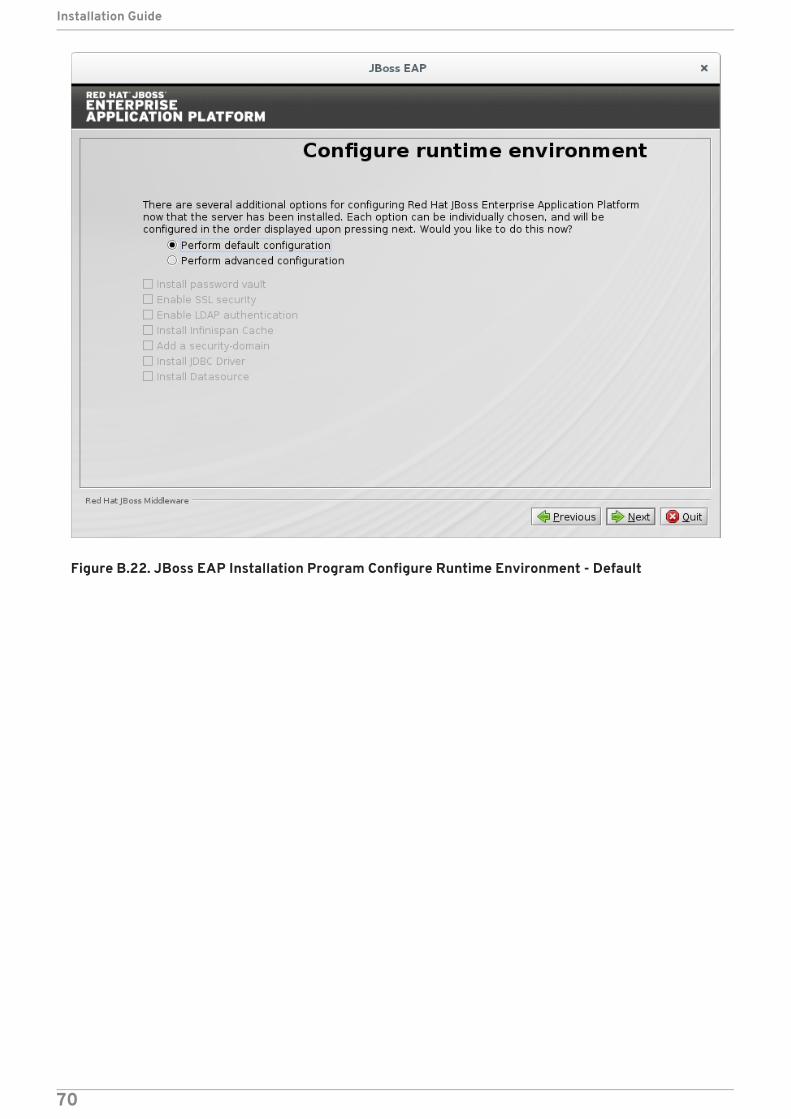
Figure B.22. JBoss EAP Installation Program Configure Runtime Environment - Default
Installation Guide
70
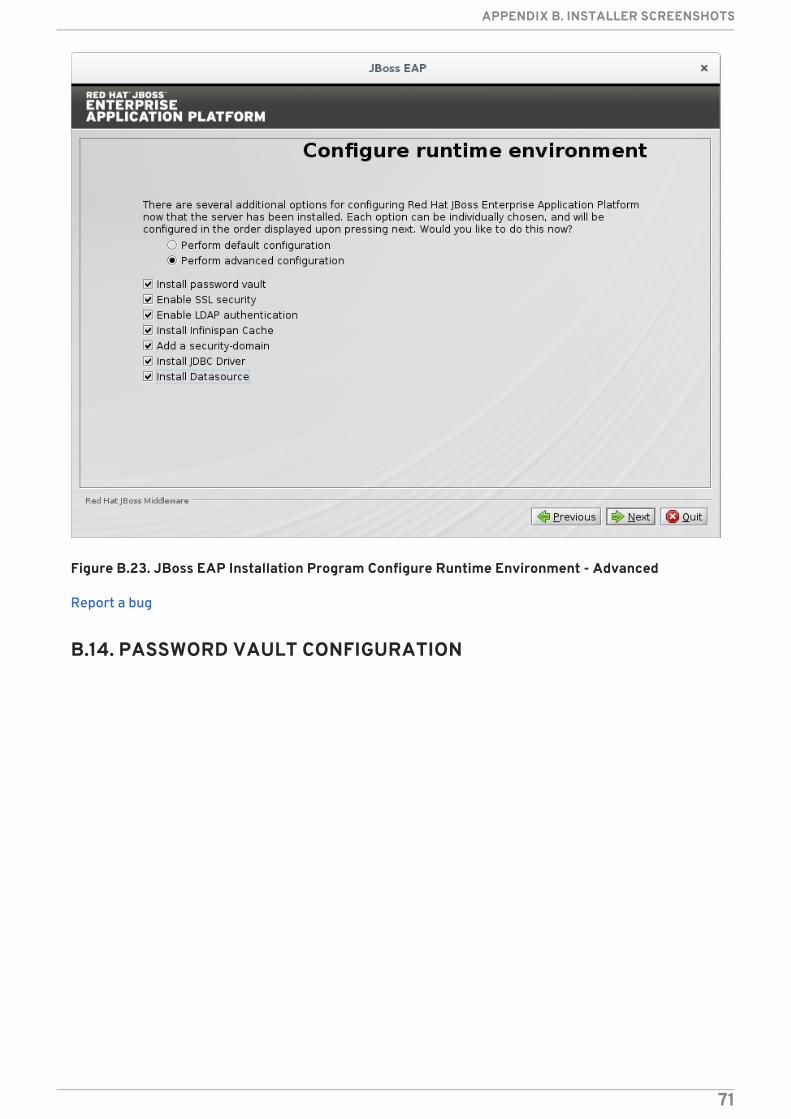
Figure B.23. JBoss EAP Installation Program Configure Runtime Environment - Advanced
Report a bug
B.14. PASSWORD VAULT CONFIGURATION
APPENDIX B. INSTALLER SCREENSHOTS
71
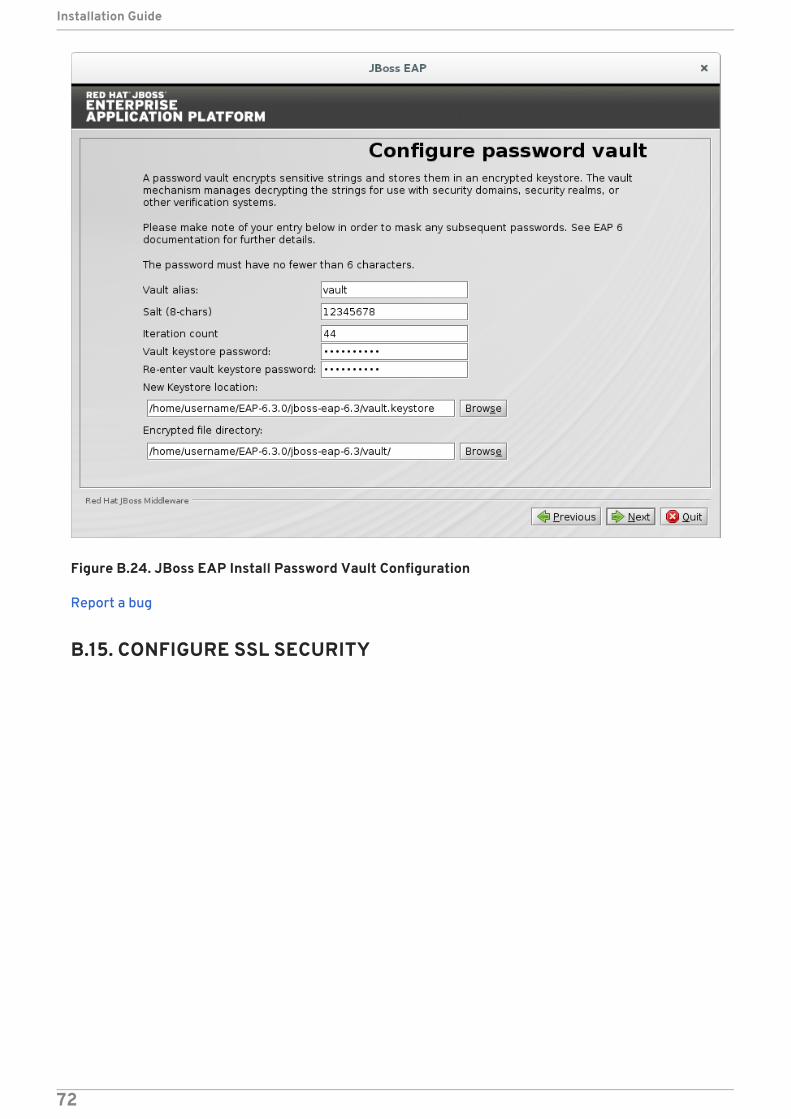
Figure B.24. JBoss EAP Install Password Vault Configuration
Report a bug
B.15. CONFIGURE SSL SECURITY
Installation Guide
72
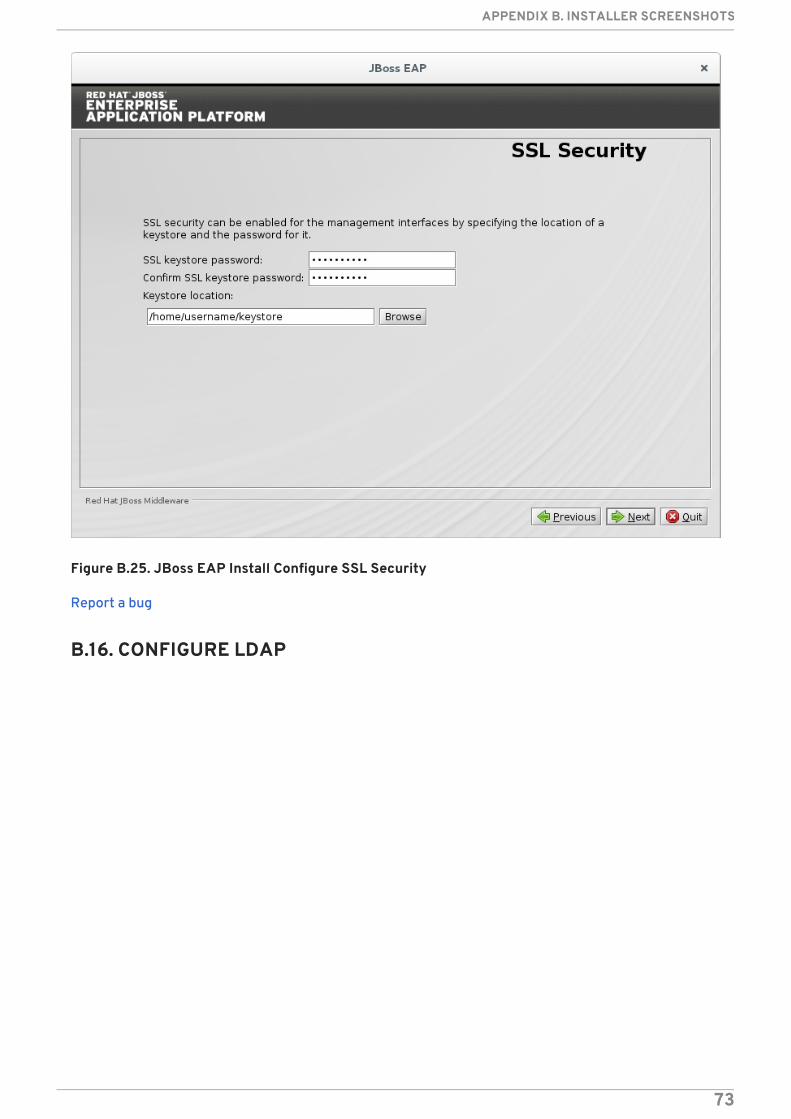
Figure B.25. JBoss EAP Install Configure SSL Security
Report a bug
B.16. CONFIGURE LDAP
APPENDIX B. INSTALLER SCREENSHOTS
73

Figure B.26. JBoss EAP Install LDAP Configuration
Report a bug
B.17. INFINISPAN CONFIGURATION
Installation Guide
74
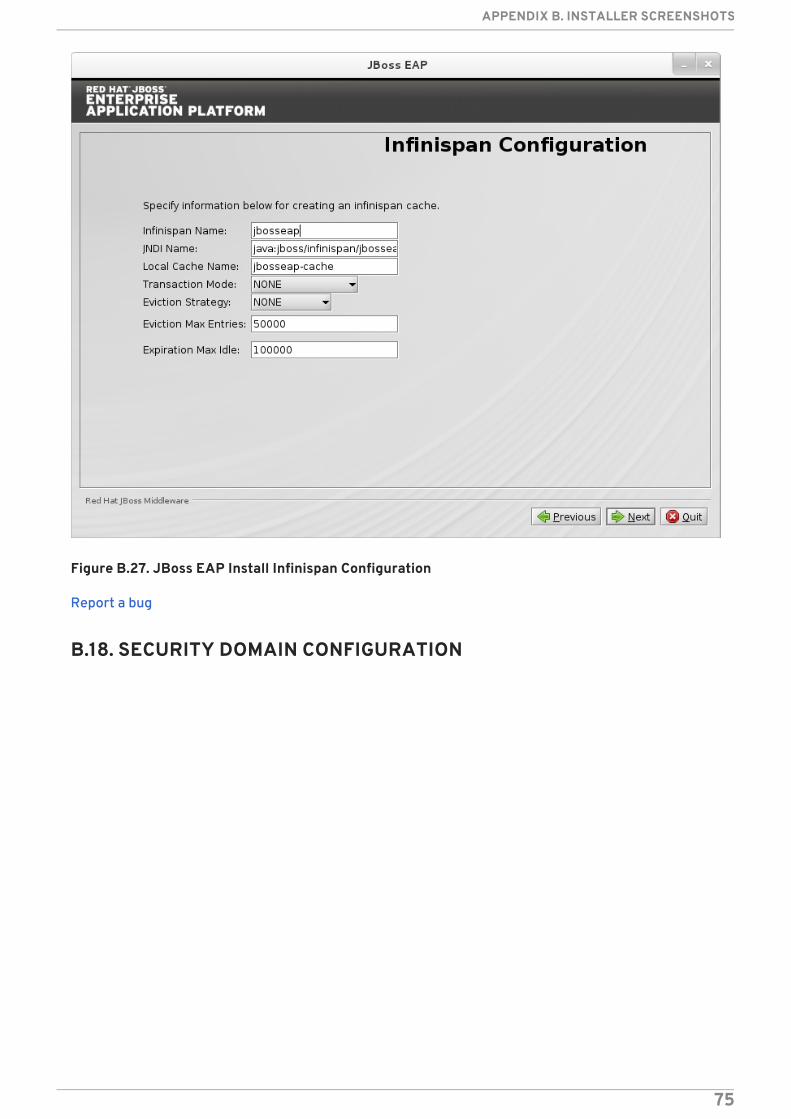
Figure B.27. JBoss EAP Install Infinispan Configuration
Report a bug
B.18. SECURITY DOMAIN CONFIGURATION
APPENDIX B. INSTALLER SCREENSHOTS
75
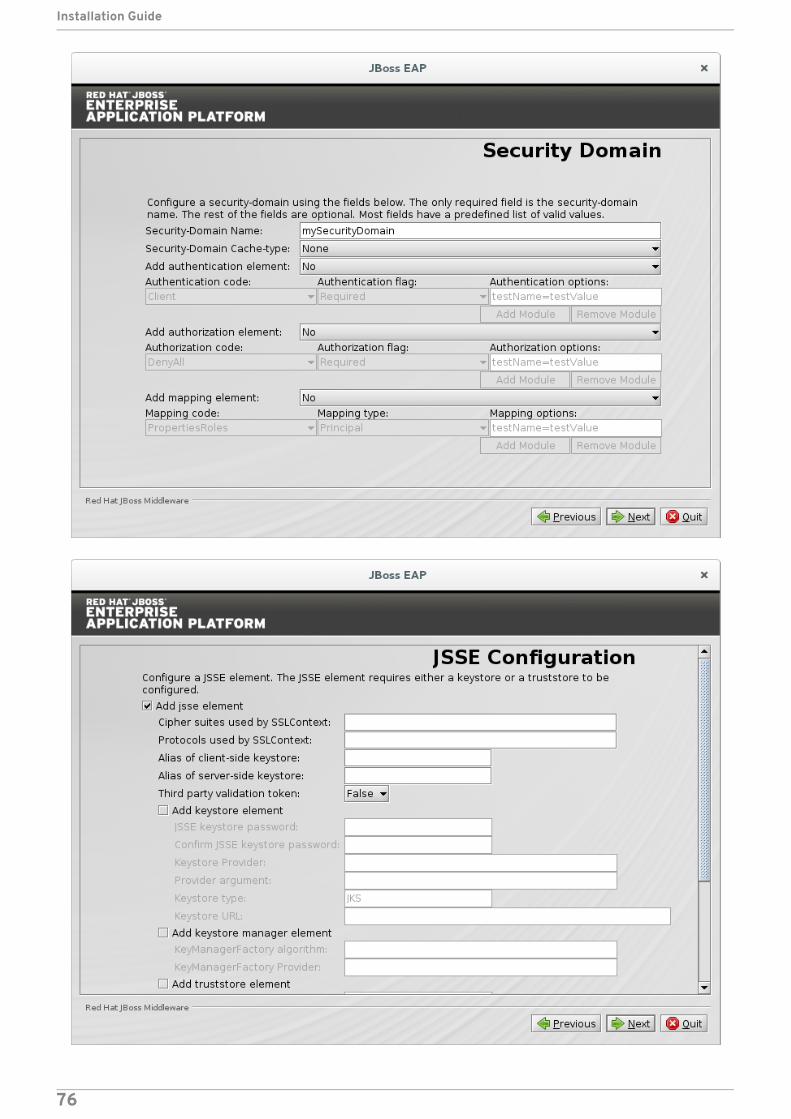
Installation Guide
76
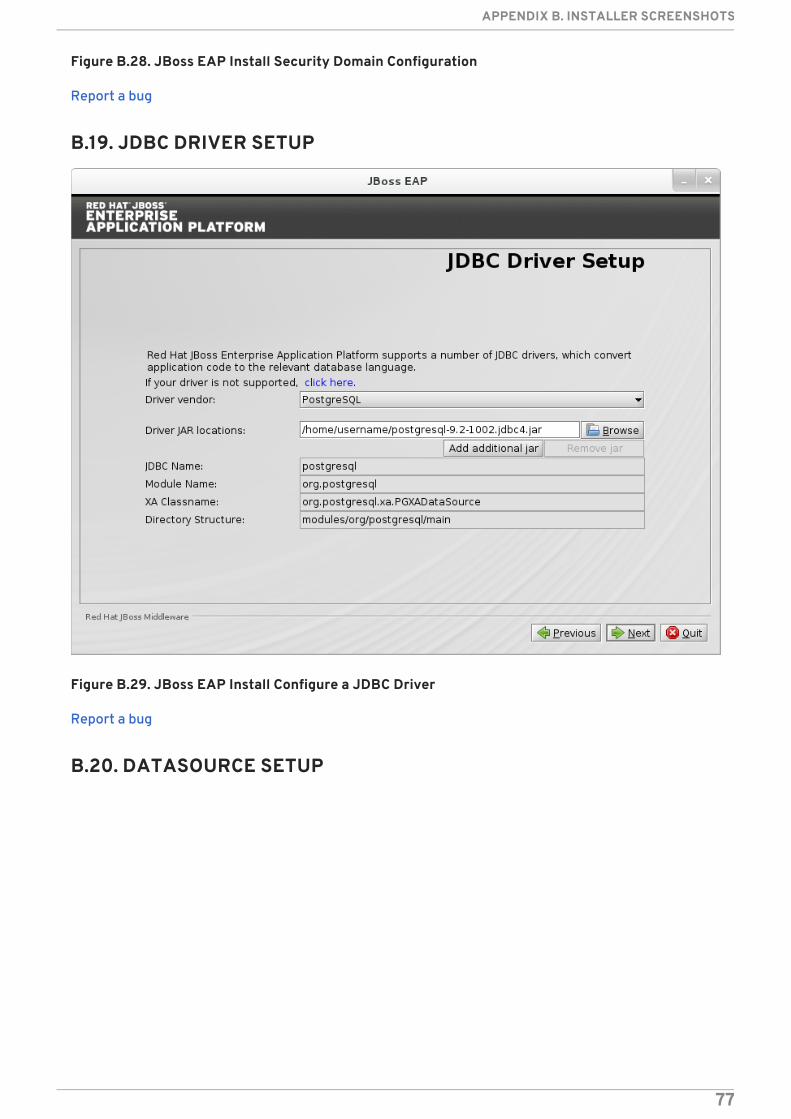
Figure B.28. JBoss EAP Install Security Domain Configuration
Report a bug
B.19. JDBC DRIVER SETUP
Figure B.29. JBoss EAP Install Configure a JDBC Driver
Report a bug
B.20. DATASOURCE SETUP
APPENDIX B. INSTALLER SCREENSHOTS
77
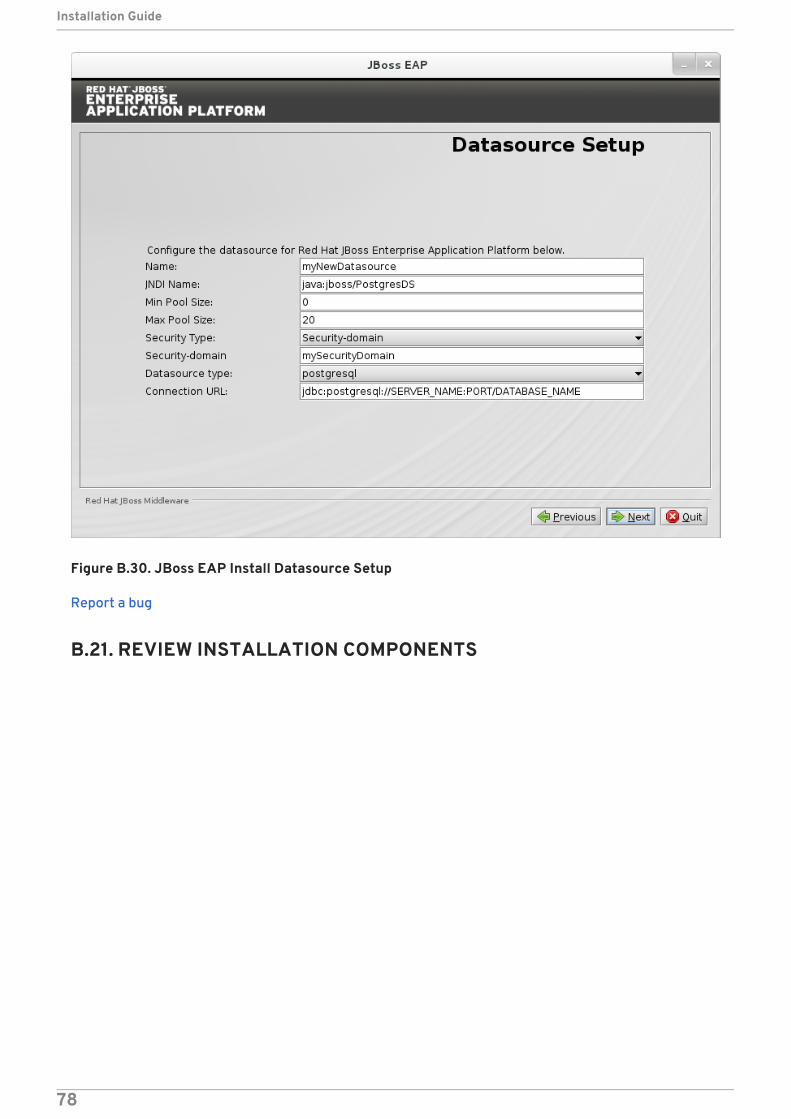
Figure B.30. JBoss EAP Install Datasource Setup
Report a bug
B.21. REVIEW INSTALLATION COMPONENTS
Installation Guide
78
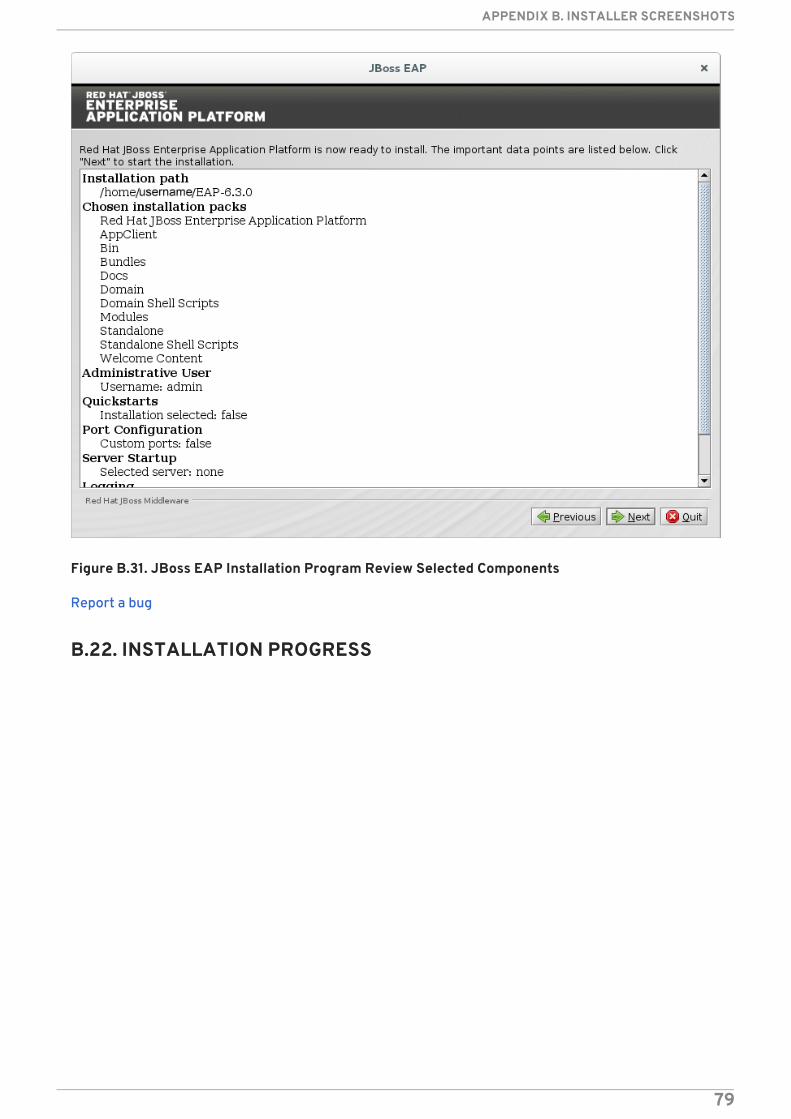
Figure B.31. JBoss EAP Installation Program Review Selected Components
Report a bug
B.22. INSTALLATION PROGRESS
APPENDIX B. INSTALLER SCREENSHOTS
79
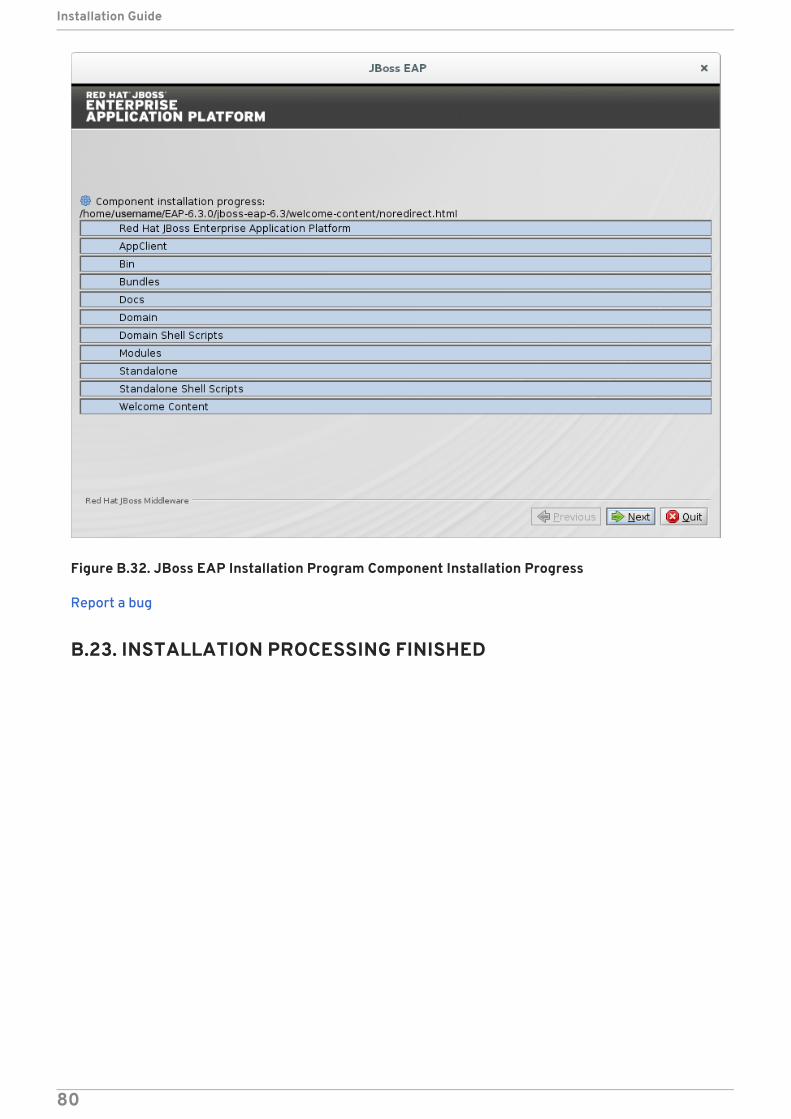
Figure B.32. JBoss EAP Installation Program Component Installation Progress
Report a bug
B.23. INSTALLATION PROCESSING FINISHED
Installation Guide
80
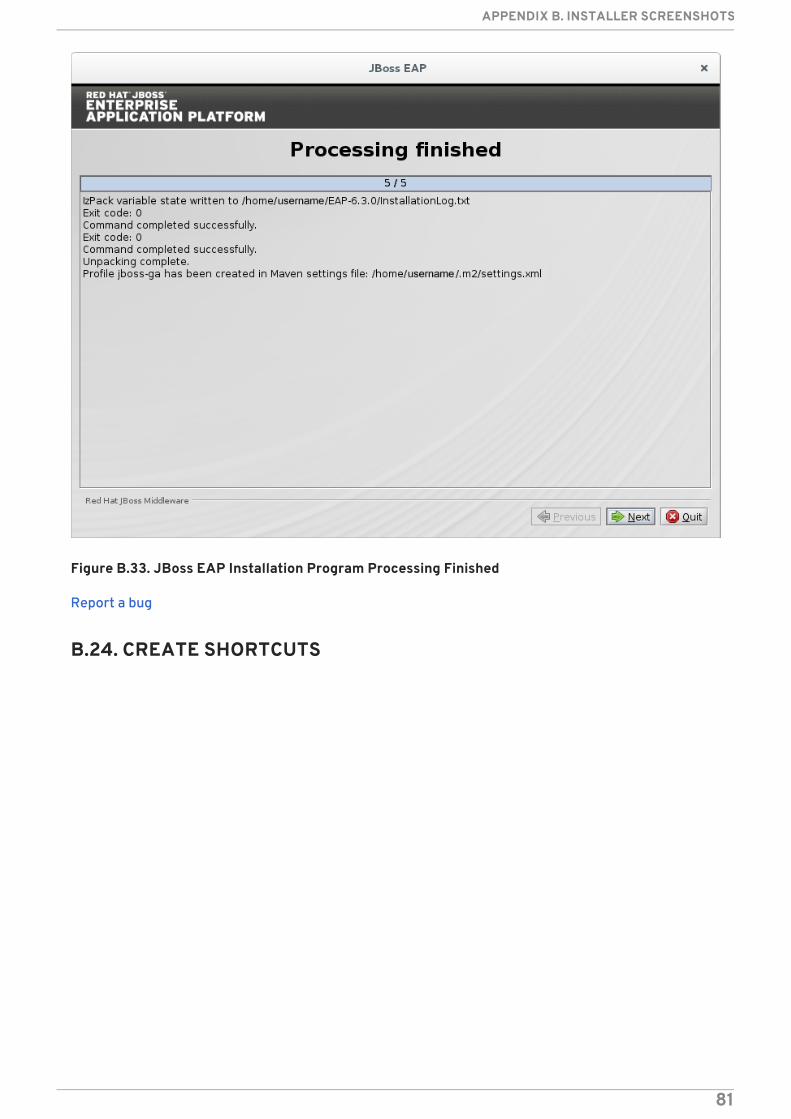
Figure B.33. JBoss EAP Installation Program Processing Finished
Report a bug
B.24. CREATE SHORTCUTS
APPENDIX B. INSTALLER SCREENSHOTS
81
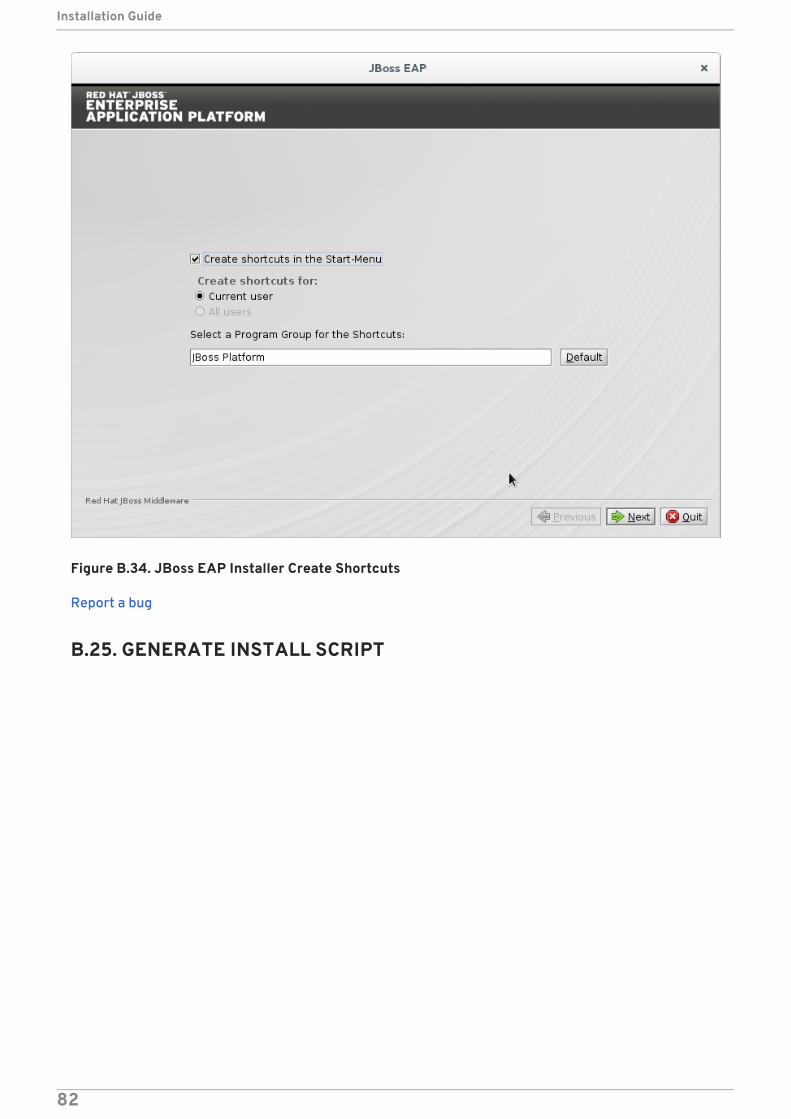
Figure B.34. JBoss EAP Installer Create Shortcuts
Report a bug
B.25. GENERATE INSTALL SCRIPT
Installation Guide
82
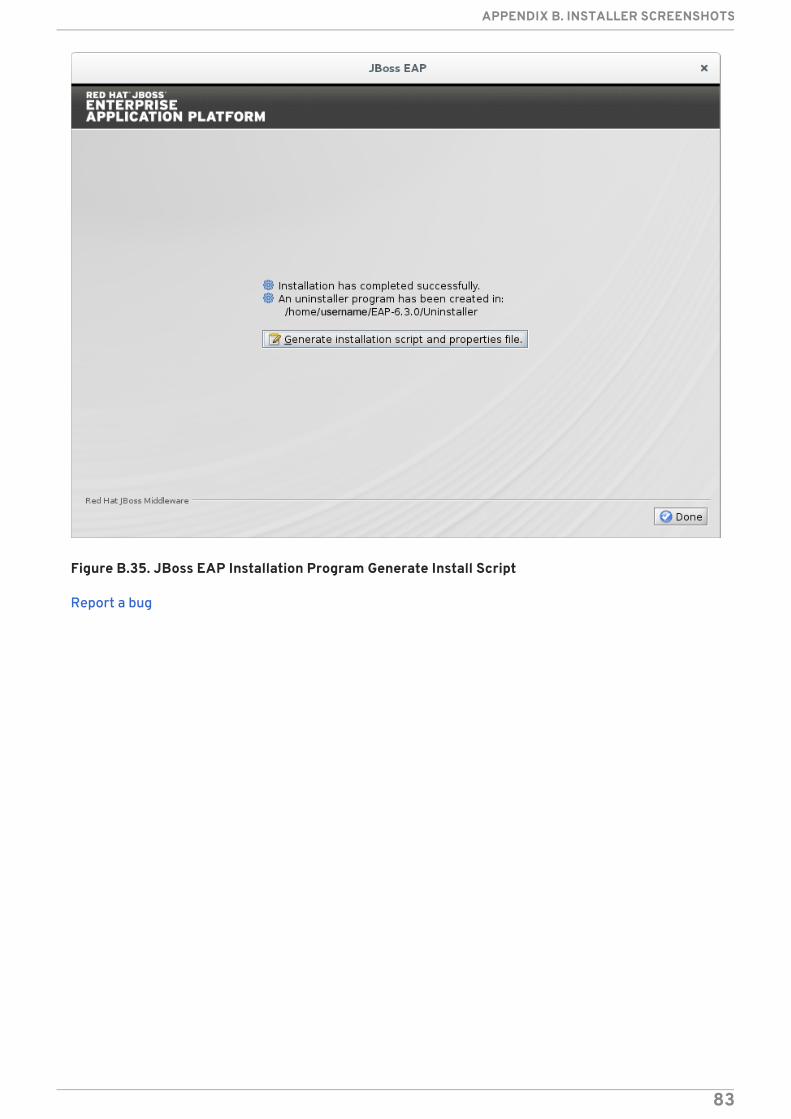
Figure B.35. JBoss EAP Installation Program Generate Install Script
Report a bug
APPENDIX B. INSTALLER SCREENSHOTS
83
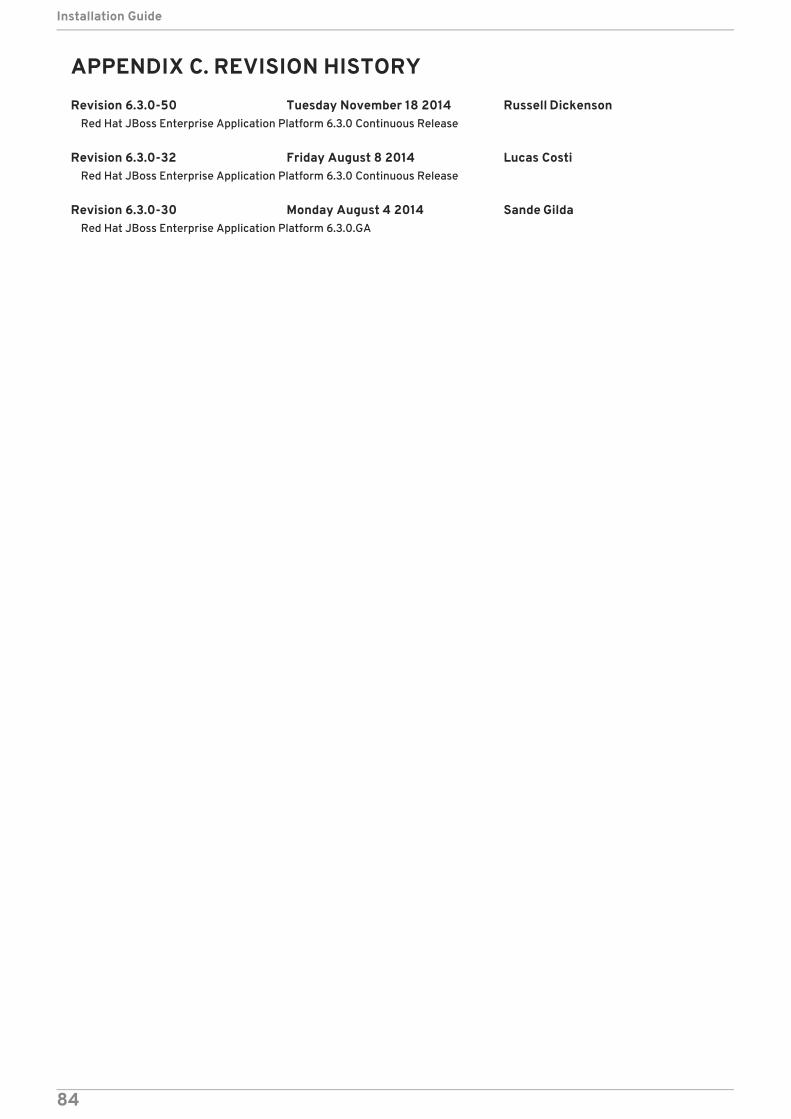
APPENDIX C. REVISION HISTORY
Revision 6.3.0-50 Tuesday November 18 2014 Russell DickensonRed Hat JBoss Enterprise Application Platform 6.3.0 Continuous Release
Revision 6.3.0-32 Friday August 8 2014 Lucas CostiRed Hat JBoss Enterprise Application Platform 6.3.0 Continuous Release
Revision 6.3.0-30 Monday August 4 2014 Sande GildaRed Hat JBoss Enterprise Application Platform 6.3.0.GA
Installation Guide
84
Recommended