3-Point Balancing
Version 1.00VMI AB 04 September 2006
with X-Viber

3-point Balancing2

3-point Balancing 3
Press firmly the ON/OFF or ESCAPE or OK buttons until the instrument starts.
Move the black line with the Up or Down buttons to Measurements and press theOK button.
Move the black line with the Up or Down buttons to 3-Point balaning and press theOK button.
Before we start to balance we have to make some settings in the Set Up window.
While still in this window press the Settings button

3-point Balancing4
Move the black line with the Up or Downbuttons to Backlight:
Press the side arrow buttons to select theIf the light should be OFF or ON.
Move the black line to Contrast:
Press the side arrow buttons to select thebest visibility of the display.The contrast might change slightly with theenvironment temperature.
Move the black line with the Up or Downbuttons to Unit:
Press the side arrow buttons to select thepreferred unit.METRIC: mm/s, um, mm, m/s, gIMPERIAL: in/s, mils, thou, g
Move the black line to Frequency:
Press the side arrow buttons to select thepreferred unit RPM or HZ.
Move the black line to Auto-save:
Press the side arrow buttons toselect ENABLE or DISABLE. In Enable modethe X-Viber will automatically finish and storethe measured value.
Press the Settings button when finished.
Press the side arrow buttons toincrease or decrease the value. The weightcan also be changed at a later stage.

3-point Balancing 5
Hardware installation
The 3-Point Balancing method does not need any additional hardware exept the X-Viberinstrument and the vibration transducer.
1. Mount the vibration transducer on the bearing and in the direction where youhave the highest vibration caused by unbalance.
2. Use this measuring point for all following measurements. If you need to leavethe place during the balancing procedure disconnect the BNC connector fromthe instrument and take all other equipment with you if necessary. If this is notpossible, then mark the position with a pen or paint!
3. It is important that it is only the trial weights that will influence the vibrations andnot the change in vibrations due to a different position of the transducer.
Mark with a pen orpaint 3 positions in therotor 0, 120 and 240degrees apart but onthe same radius. Youmust later place a trialweight on thesepositions. The anglehas to be measured inthe direction againstthe rotation.

3-point Balancing6
Move the line to New balancing
and press the OK button.
Note!This message will appear.If you answer NO you cannot starta new balancing.
Press the side arrow buttonsto change from NO to YES thenpress the OK button.
Note! When you select YES theexisting ongoing balancing will bedeleted.
The new balancing round has started.
Place the transducer on the measuringpoint and start the machine and selectyour balancing speed.
Press the OK button and
X-Viber starts to measure.
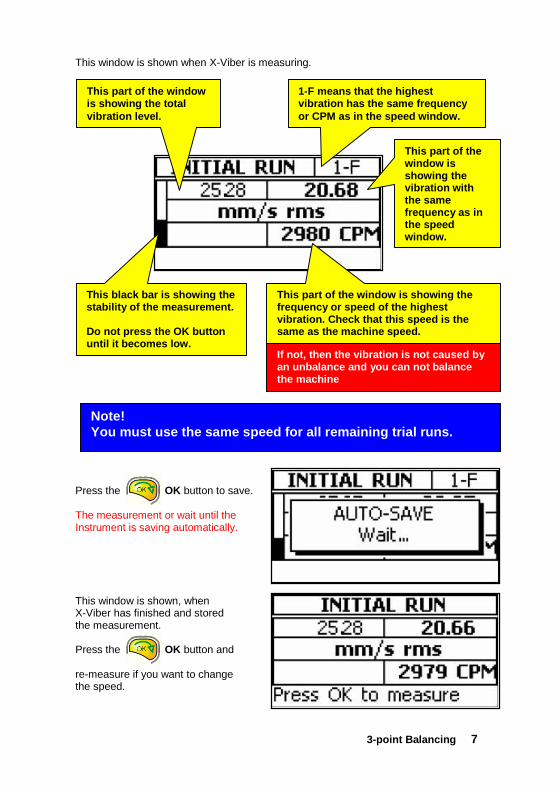
This window is shown when X-Viber is measuring.
Press the OK button to save.
The measurement or wait until theInstrument is saving automatically.
This window is shown, whenX-Viber has finished and storedthe measurement.
Press the OK button and
re-measure if you want to changethe speed.
This black bar is showing thestability of the measurement.
Do not press the OK buttonuntil it becomes low.
1-F means that the highestvibration has the same frequencyor CPM as in the speed window.
This part of the windowis showing the totalvibration level.
This part of thewindow isshowing thevibration withthe samefrequency as inthe speedwindow.
This part of the window is showing thefrequency or speed of the highestvibration. Check that this speed is thesame as the machine speed.
Note!You must use the same spee
If not, then the vibration is not caused byan unbalance and you can not balance
3-point Balancing 7
the machine
d for all remaining trial runs.

3-point Balancing8
Now we must add a trial weight in the machine.To select a proper trial weight is always a sort of guesswork because we do not know thevibration sensitivity if we have not balanced this machine before.
Use this formula to calculate the size of the trial weight.
rpmmm
kg
gramsSR
WT
*
180000*
Use the Up or Down buttons to
increase or decrease the value.
Start the machine with the trial weightmounted in 0 degree angle.
Press the OK button to start
the measuremen,t when the speed isthe same as in the initial run.
Note!This calculation is only to givweight.If for example your calculatiouse 120 or 100 or 80 grams.
Note!Enter the weight of trial weighmachine and not the calculat
WhereWkg = The rotor weight in kgRmm = The radius for the trial weight
Srpm = The balancing speede you a hint of the size of the trial
n gives 134,5 grams, then you can
t you actually mount in theed value.

3-point Balancing 9
This window is shown when the measurement is finished.
Change to YES with the Side arrow
buttons and press the
OK button, if you want to re-measure.
Otherwise just press the right Side arrow button, if you want to continue balancing.
Remove the weight at 0 degrees andmount it in 120 degrees.
Note!Use the same radius.
Press the OK button.
Start the machine with the trial weightmounted in 120 degrees angle.
Press the OK button to start
the measurement, when the speed isthe same as in the initial run.
Check that the speed isapproximately the sameas in the initial run.
If not you have to adjustthe speed and re-measure by presing theOk button.

3-point Balancing10
This window is shown while X-Viber isstill measuring
Remove the weight at 120 degree andmount it in 240 degrees.
Note!Use the same radius.
Press the OK button.
This window is shown when themeasurement is finished.
Press the right Side arrow buttonIf, you want to continue balancing.
Here comes the balancing result.Remove the trial weight at 240 degreesand mount the balancing weight a theindicated angle starting from the 0 degreemark and counted against rotation.
Press the right Side arrow buttonif you want to continue balancing.
Press the OK button if you want to repeat this measurement.
Actual speedSpeed at Initial run
The prognosis is a measurement of the stability of the measurementsand how well this balancing will succeed.
It can be problematic to balance a machine, if the prognosis is below60-70%. This is usually caused by resonance amplifications or lostbolts and joints.
3-point Balancing 11
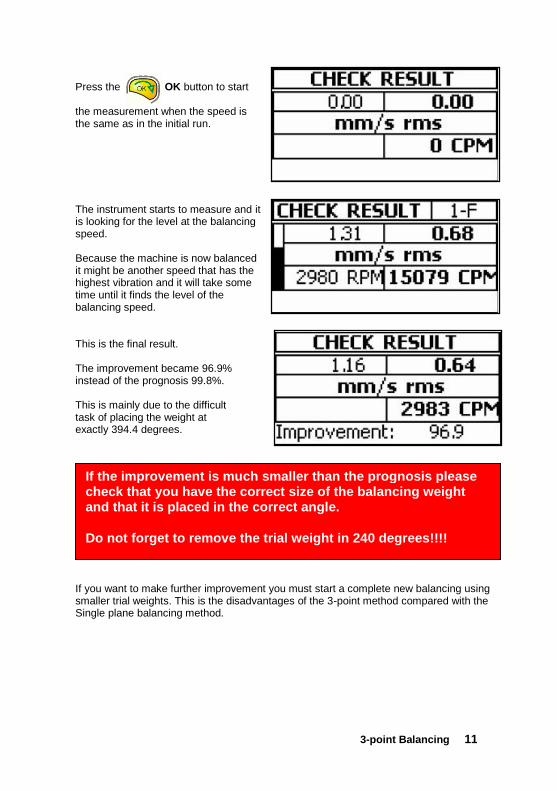
Press the OK button to start
the measurement when the speed isthe same as in the initial run.
The instrument starts to measure and itis looking for the level at the balancingspeed.
Because the machine is now balancedit might be another speed that has thehighest vibration and it will take sometime until it finds the level of thebalancing speed.
This is the final result.
The improvement became 96.9%instead of the prognosis 99.8%.
This is mainly due to the difficulttask of placing the weight atexactly 394.4 degrees.
If you want to make further improvement you must start a complete new balancing usingsmaller trial weights. This is the disadvantages of the 3-point method compared with theSingle plane balancing method.
If the improvement is much smaller than the prognosis pleasecheck that you have the correct size of the balancing weightand that it is placed in the correct angle.
Do not forget to remove the trial weight in 240 degrees!!!!

3-point Balancing12
Saving the balancing
Press the Escape button to
exit the balancing function
Move the black marker line to Files and
press the OK button.
There are 10 memory locations 0-9 whereyou can save a balancing round.X-Viber is automatically selecting thefirst available free location in the memory.
You can change to another number with
the Side arrow buttons.
Press the OK button to save thebalancing.
This information shows that theselected location is free for storage.
This information shows the date and timewhen this balancing round was stored.
This mark ® showsthat this location isreserved andcontains balancinginformation.
Note!When storing a new balancing on an ocupied location the old balancing will be lost.

3-point Balancing 13
Viewing a stored balancing
Move the black marker line to Files and
press the OK button.
Move the black marker line to Restore.
You can change to another number with
the Side arrow buttons.
Press the OK button to view thebalancing.
Change to Yes with one of the
Side arrow buttons and
press the OK button
Go back to Ongoing balancing toview details in the selected balancingprocedure.
You can only view locations marked with an ®.
Note!All information about theexisting Ongoing balancingwill be lost if it is notpreviusly stored.
3-point Balancing14
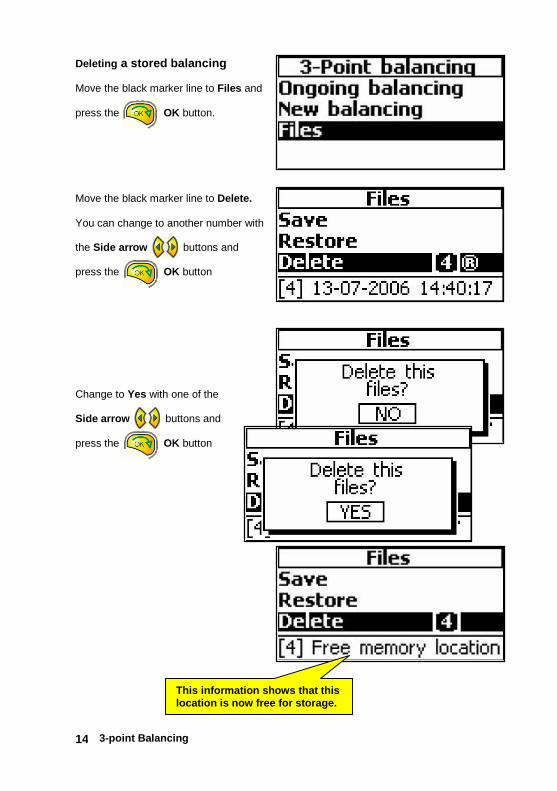
Deleting a stored balancing
Move the black marker line to Files and
press the OK button.
Move the black marker line to Delete.
You can change to another number with
the Side arrow buttons and
press the OK button
Change to Yes with one of the
Side arrow buttons and
press the OK button
This information shows that thislocation is now free for storage.

3-point Balancing 15
SAVING A BALANCING FILE IN THE X-TREND SOFTWARE
Transferring a Balancing file to the X-TREND software
Select the “Communication” menu in the X-VIBER Instrument
Start the X-TREND software and select the command “Transfer / X-VIBER”.
Click the line “Show Balancing” on the lower part of the virtual “X-VIBER” instrument
and a new window will appear:
Click here

3-point Balancing16
Both “Single Plane Balancing” and “3-Point Balancing” files will appear in the list but withdifferent icons.
A “Balancing report” will appear on the right side of the window.
Now you can:- send the contents of the “Balancing Report” to the X-TREND machine database.
The destination will be a Notepad associated with the machine.- send the “Balancing Report” to a MS Word document where you can edit the
content.- print the “Balancing Report” directly to the system printer.
Select the balancingyou want to transferby clicking on the line
You will then seeinformation about thebalancing.by clicking on the line

3-point Balancing 17

3-point Balancing18

3-point Balancing 19

3-point Balancing20
Recommended