Embed Size (px)
Citation preview

Carl Zeiss AGConsumer Products73446 OberkochenGermanywww.zeiss.com/automatedimaginglenses DE
_10_
070_
0006
I DE
/EN
/FR/
ES/IT
/RUS
/JP/C
HN 2
W 0
4/20
18
Subj
ect t
o ch
ange
4 Deutsch D
18 English US
32 Français F
46 Español E
60 Italiano I
74 Русский RUS
88 日本語 JP
102 中文 CHNZEISS Dimension GebrauchsanweisungInstruction ManualManuel d‘utilisationManual de instrucciones
Manuale d‘Istruzioni Инструкцияпоприменению取扱説明書
使用手册

2 115
D
C-mount Herzlichen Glückwunsch zum Kauf dieses Objektivs. Wir freuen uns, dass wir mit unserem Objektiv einen Beitrag zu Ihrem Erfolg leisten dürfen.
ZEISS stellt seit 1846 Präzisionsgeräte in Spitzenqualität her und ist heute führender Anbieter der weltweit modernsten Objektive: Lithographie-Optiken für die Herstellung von Mikrochips. Darüber hinaus ist ZEISS Weltmarktführer bei Objektiven für die Filmproduktion, wo die Bilder auf der Leinwand oft tausendfach vergrößert werden und die Qualität der Farbreproduktion entscheidend ist. Heute profitieren auch technische und industrielle Anwendungen von der weltbekannten, hochmodernen Technologie und der Fachkenntnis von ZEISS.
Das Ergebnis ist eine Familie von Hochleistungsobjektiven für den industriellen Einsatz.
ZEISS Dimension Objektive
CHN
5
D
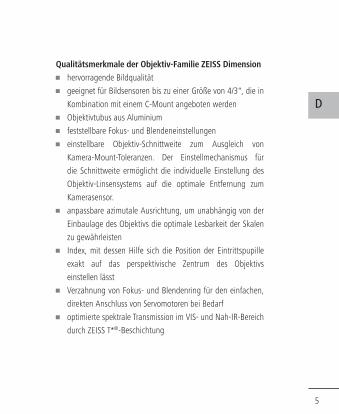
Qualitätsmerkmale der Objektiv-Familie ZEISS Dimension • hervorragende Bildqualität• geeignet für Bildsensoren bis zu einer Größe von 4/3", die in
Kombination mit einem C-Mount angeboten werden• Objektivtubus aus Aluminium• feststellbare Fokus- und Blendeneinstellungen• einstellbare Objektiv-Schnittweite zum Ausgleich von
Kamera-Mount-Toleranzen. Der Einstellmechanismus für die Schnittweite ermöglicht die individuelle Einstellung des Objektiv-Linsensystems auf die optimale Entfernung zum Kamerasensor.
• anpassbare azimutale Ausrichtung, um unabhängig von der Einbaulage des Objektivs die optimale Lesbarkeit der Skalen zu gewährleisten
• Index, mit dessen Hilfe sich die Position der Eintrittspupille exakt auf das perspektivische Zentrum des Objektivs einstellen lässt
• Verzahnung von Fokus- und Blendenring für den einfachen, direkten Anschluss von Servomotoren bei Bedarf
• optimierte spektrale Transmission im VIS- und Nah-IR-Bereich durch ZEISS T*®-Beschichtung

6
D
Komponenten des Objektivs1 Außen: Gewinde für die Anbringung einer optionalen
StörlichtblendeInnen: Gewinde für die Anbringung eines Filters
2 Positionsgravur der Eintrittspupille (EnP) 3 Fixierschrauben für Fokuseinstellungen4 Ring zur Einstellung der azimutalen Ausrichtung5 Ring zur Einstellung der Objektiv-Schnittweite6 Objektiv-Mount7 Blendenring mit Fixierschrauben für Blendeneinstellungen8 Fokusring mit Entfernungsskala in Meter und Fuß
Eine Störlichtblende ist im Standardlieferumfang nicht enthalten.

7
D
Hinterer und vorderer SchutzdeckelDer hintere Schutzdeckel und der Objektivdeckel werden entfernt bzw. angebracht, indem der betreffende Deckel am äußeren Rand gehalten und vom Objektiv abgezogen bzw. auf das Objektiv gedrückt wird.
Anbringen und Abnehmen des ObjektivsDas Objektiv ist mit einem C-Mount-Gewindeanschluss versehen 6). Setzen Sie das Objektiv auf den Kamera-Mount auf und drehen Sie es im Uhrzeigersinn, bis Wider stand zu spüren ist. Um das Objektiv abzunehmen, drehen Sie es gegen den Uhrzeigersinn.
Handhabung

8
D
Anbringen und Abnehmen von Filtern und StörlichtblendenFilter mit Standardgewinde lassen sich vorne am Objektiv anbringen (1). Falls Sie mehr als einen Filter gleichzeitig verwenden, kann es zu einer Vignettierung (Verdunklung in den Bildecken) kommen. Wir empfehlen die Verwendung der T*®-Filter von ZEISS. Störlichtblenden mit Schraubgewinde können ebenfalls vorne am Objektiv (1) angebracht werden.
Einstellung von Fokus und BlendeZEISS Dimension Objektive sind manuelle Objektive, d.h. Fokus und Blende werden direkt am Objektiv eingestellt. Nutzen Sie den jeweiligen Einstellring des Objektivs (8 und 7). Die Fixierschrauben (3 und 7) können Sie verwenden, um die festgelegten Fokus- und Blendeneinstellungen zu fixieren und um unbeabsichtigtes Verstellen zu verhindern. Die Fokus- und Blenden einstellungen sind zwischen den angegebenen Extremwerten stufenlos verstellbar.
9
D
Einstellung der Objektiv-Schnittweite
ZEISS Dimension Objektive haben bei der Auslieferung ein Nominal-Anlagemaß (= Abstand zwischen der Objektivanlagefläche und dem Bildsensor) von rund 17,53 mm in Luft bei unendlicher Objektentfernung. Um eine optimale Bildqualität zu erreichen, ist es nötig die Kameratoleranzen des Kamera-Mount durch Einstellung der Objektiv-Schnittweite zu kompensieren.
• Stellen Sie ein ebenes, kontrastreiches Testbild senkrecht zur optischen Achse vor dem Objektiv / Kamerasystem auf. Wir empfehlen die Verwendung des ZEISS Dimension Testcharts (Bestell-Nr.: 2267-884).

10
D
• Befestigen Sie die Kamera auf einem Stativ oder einer stabilen Unterlage und richten Sie sie auf die Mitte des Testbilds aus.
• Stellen Sie sicher, dass das Testbild gleichmäßig und ausreichend beleuchtet ist.
• Stellen Sie die Blende so groß wie möglich ein, am besten auf volle Öffnung.
• Stellen Sie die Entfernung zwischen dem Testbild und dem Bildsensor je nach Brennweite ein.
Brennweite 2.8/8 2/12 2/18 2/25 2/35 2/50
Abstand Testbild – Bildsensor [mm]
308 425 616 836 1156 1616
Abstand Testbild – Bildsensor [ft] 1’ 0.1” 1’ 4.7” 2’ 0.3” 2‘ 8.9” 3’ 9.5” 5’ 3.6”

11
D
• Stellen Sie den Fokus auf die betreffende Entfernung ein. Zu diesem Zweck befindet sich am Objektivgehäuse ein roter, eingravierter Punkt, der diese Entfernung markiert. Wir empfehlen Ihnen, den Fokusring mit Hilfe der Fixierschrauben in seiner eingestellten Position zu fixieren.
• Betrachten und beurteilen Sie die Bildschärfe auf einem Display oder Bildschirm.
• Lockern Sie die drei Madenschrauben des Rings (5) mit dem beiliegenden Inbusschlüssel.

12
D
• Drehen Sie den vorderen Teil des Objektivs, um die Einstellung der Objektiv-Schnittweite anzupassen und beobachten Sie dabei das Bild auf dem Display oder Bildschirm, um maximale Bildschärfe zu gewährleisten. Ausgehend von der Werkseinstellung kann das Objektiv sowohl mit dem Uhrzeigersinn als auch gegen den Uhrzeigersinn gedreht werden. Die Grenzen des Verstellbereichs sind durch mechanische Anschläge deutlich festgelegt.
• Nach der Einstellung der Objektiv-Schnittweite zur Erreichung einer maximalen Bildschärfe ziehen Sie die drei Madenschrauben mit dem Inbusschlüssel handfest an.

13
D
Anpassung der azimutalen Ausrichtung
ZEISS Dimension Objektive haben einen Ring zur Anpassung der azimutalen Ausrichtung. Es ist also möglich, das Objektiv so einzustellen, dass unabhängig von der Einbaulage eine optimale Lesbarkeit der Skalen gewährleistet ist.
Lockern Sie die drei Madenschrauben des Rings (4) mit dem beiliegenden Inbusschlüssel und drehen Sie den vorderen Teil des Objektivs in die optimale Position. Um den Ring wieder zu befestigen, ziehen Sie die drei Madenschrauben mit dem Inbusschlüssel handfest an.

14
D
Eintrittspupille (EnP)Die Position der Eintrittspupille (2) ist auf jedem ZEISS Dimension Objektiv angegeben. Dadurch kann das Objektiv auf Verwendungen eingestellt werden, bei denen das perspektivische Zentrum exakt ausgerichtet sein muss. Die genaue Position wird, je nach Brennweite, durch eine Linie oberhalb oder unterhalb von „EnP“ oder eine zusätzliche Entfernungsangabe angegeben, die den Abstand der Position von der eingravierten Linie kenntlich macht.
ZEISS Dimension 2/12:
ZEISS Dimension 2/35:
15
D
Pflegehinweise für das ObjektivUm zu gewährleisten, dass sich Ihr Objektiv immer in perfektem Zustand befindet, sollten Sie verhindern, dass Schmutz oder Feuchtigkeit auf die Glasoberfläche gelangt. Staub auf dem Objektiv lässt sich mit einem weichem Pinsel vorsichtig entfernen. Flecken und Fingerabdrücke können mit einem weichen, trockenen und sauberen Mikrofasertuch beseitigt werden. Um hartnäckige Verschmutzungen zu entfernen, empfehlen wir darüber hinaus die Verwendung der Reinigungsflüssigkeit von ZEISS.
Kunden-SupportIhren nächstgelegenen Fachhändler können Sie auf unserer Website finden: www.zeiss.com/automatedimaginglenses
Die Carl Zeiss AG behält sich das Recht vor, diese Spezifikationen ohne vorherige Ankündigung zu ändern.Alle Rechte vorbehalten. Dieses Handbuch darf ohne die vorherige schriftliche Genehmigung der Carl Zeiss AG weder im Ganzen noch auszugsweise vervielfältigt, in Bereitstellungssystemen gespeichert oder in irgendeiner Form (elektronisch, mechanisch, per Fotokopie, Aufnahme oder über sonstige Medien) übertragen werden. Copyright 2018, Carl Zeiss AG

16
D
Achtung:Um eine sachgerechte und sichere Nutzung zu gewährleisten, empfehlen wir Ihnen, vor der Inbetriebnahme des Produkts zunächst diese Sicherheits- und Bedienungshinweise zu lesen und sie dann an einem sicheren Ort aufzubewahren. Die Nichtbeachtung dieser Anweisungen könnte Verletzungen oder Schäden zur Folge haben.
Sicherheit und HandhabungRichten Sie das Objektiv niemals direkt auf die Sonne, da dies Ihre Augen ernsthaft schädigen könnte. Setzen Sie den Objektivdeckel auf, wenn das Objektiv nicht genutzt wird. Andernfalls besteht Brandgefahr.
EntsorgungEntsorgen Sie das Produkt nicht im Hausmüll. Halten Sie sich bitte an die geltenden gesetzlichen Regelungen Ihres Landes. Kontaktieren Sie bei Bedarf die örtlichen Behörden, um sich über die Möglichkeiten für Entsorgung und Recycling zu informieren.
Sicherheitshinweise
!

17
D
Vorgesehene NutzungNutzen Sie das Produkt nur im Temperaturbereich von –20 °C bis +55 °C.
Schützen Sie das Objektiv bei widrigen Umgebungsbedingungen angemessen vor Staub und Feuchtigkeit. Falls das Objektiv Feuchtigkeit ausgesetzt wurde, nehmen Sie es anschließend von der Kamera ab und lassen Sie es vor dem erneuten Gebrauch vollständig trocknen. Versuchen Sie nicht, das Produkt mit Hilfe einer externen Wärmequelle zu trocknen.
Service und ReparaturNehmen Sie keine Reparaturen oder Änderungen an dem Produkt vor, die über den Umfang des beschriebenen Funktionsspektrums hinausgehen. Durch die Demontage des Produkts können Schäden entstehen, die nicht unter den Garantieschutz fallen. Falls Reparatur bedarf besteht, wenden Sie sich bitte an Ihren autorisierten Fach händler. Weitere Informationen finden Sie auf unserer Website: www.zeiss.com/automatedimaginglenses

18
US
Congratulations on your purchase of this lens. We are looking forward to partly contribute to your success with our lens.
ZEISS has been producing top-quality precision engineering products since 1846, and is now the leading manufacturer of the most advanced lenses in the world: lithography optics for microchip fabrication. ZEISS is also a world market leader for lenses used in movie production where the images on the screen are often magnified thousands of times and color reproduction quality is critical. Now, technical and industrial applications can also benefit from the world-renowned cutting-edge technology and expertise of ZEISS.
The result is a family of high-performance lenses for industrial applications.
ZEISS Dimension Lenses

19
US
Highlights of the ZEISS Dimension family• excellent image quality• covers sizes of camera sensors up to 4/3", which are offered
in combination with a C mount• aluminium barrel• fixable focus and aperture settings• Possibility to adjust the back focal distance to compensate
for tolerances of camera mounts. The back focus mechanism enables the individual adjustment of the lens system to the camera sensor to achieve the optimal distance.
• possibility to adjust the azimuthal position to ensure the optimal readability of the scales regardless of the installation position
• index for the position of the entrance pupil to be able to exactly align the center of perspectivity of the lens
• interlocking of the focus and aperture ring to easily and directly attach servo units, if required
• optimized spectral transmission in both VIS and near IR range through ZEISS T*® coating

20
US
Lens components1 Outside: thread for attaching an optional lens shade Inside: thread for attaching a filter2 Position index of the entrance pupil (EnP) 3 Fixing screws for focus settings4 Ring for adjusting the azimuthal position5 Ring for adjusting the back focal distance6 Lens mount7 Aperture ring with fixing screws for aperture settings8 Focus ring with distance scale in meters and feet
A lens shade is not included in the standard scope of supply.

21
US
Rear protection cover and lens capThe rear protection cover as well as the lens cap can be removed and attached by holding the outer rim of the lid and pulling it from or pushing it onto the lens.
Mounting and removing the lensThe lens is fitted with a C mount (6). Mount the lens into the camera mount and turn it clockwise until you feel it engage with resistance. To remove it, turn the lens anticlockwise.
Mounting and removing filters and lens shadesStandard threaded filters can be attached to the front of the lens (1). lf you use more than one filter at a time, vignetting (shading of the image corners) can occur. We recommend the use of T*® filters from ZEISS. Lens shades with a screw thread can be attached to the front of the lens (1) as well.
Handling

22
US
Adjusting focus and apertureZEISS Dimension lenses are manual lenses, meaning focus and aperture are adjusted directly at the lens. Use the respective adjustment ring on the lens (8 and 7). Use the included fixing screws (3 and 7) to lock the adjusted focus and aperture settings to prevent inadvertent adjustment. Focus and aperture settings are infinitely variable between the indicated extreme values.
Adjusting the back focal distance
ZEISS Dimension lenses have a nominal flange focal distance (= distance between the lens mounting surface and the camera sensor) of about 17.53 mm in air with infinite object distance at delivery. To ensure the optimal image quality, it is necessary to compensate the tolerances of camera bayonets by adjusting the back focal distance.

23
US
• Place a flat, high-contrast test image perpendicular to the optical axis in front of the lens/camera system. We recommend the use of the ZEISS Dimension Test Chart (Order no.: 2267-884).
• Place the camera on a tripod or a stable surface and center it on the middle of the test image.
• Make sure that the test image is evenly and sufficiently illuminated.
• Set the aperture as wide as possible, preferably to full stop.• Set the distance between the test image and the
camera sensor depending on the focal length.
Focal length 2.8/8 2/12 2/18 2/25 2/35 2/50
Distance test image – camera sensor [mm]
308 425 616 836 1156 1616
Distance test image – camera sensor [ft]
1’ 0.1” 1’ 4.7” 2’ 0.3” 2‘ 8.9” 3’ 9.5” 5’ 3.6”

24
US
• Set the focus to the respective distance. For this purpose, a red dot indicating this distance is engraved into the lens barrel. It is recommended to lock the focus ring with the fixing screws.
• Observe and assess the image sharpness using a display or monitor image.
• Loosen the three grub screws of the ring (5) with the included hex key.

25
US
• Turn the front part of the lens to adjust the back focal distance and observe the image on the display or monitor to ensure maximum image sharpness. The lens can be turned clockwise and anticlockwise, starting from the factory setting. Mechanical stops clearly indicate the limits of the adjustment range.
• After adjusting the back focal distance to achieve maximum image sharpness, tighten the three grub screws finger-tight with the hex key.

26
US
Adjusting the azimuthal position
ZEISS Dimension lenses have a ring for adjusting the azimuthal position. Thus, it is possible to adjust the lens to ensure optimal readability of the scales regardless of the installation position.Loosen the three grub screws of the the ring (4) with the included hex key and turn the front part of the lens into the optimal position. To fasten the ring again, tighten the three grub screws finger-tight with the hex key.

27
US
Entrance pupil (EnP)The position of the entrance pupil (2) is indicated on each ZEISS Dimension lens. Thus, it is possible to position the lens for uses in which the center of perspectivity has to be exactly aligned. The exact position is, depending on the focal length, indicated by a line above or under «EnP» or by an additional distance specification indicating how far the position is located from the engraved line.
ZEISS Dimension 2/12:
ZEISS Dimension 2/35:

28
US
Lens care tipsTo ensure that your lens is always in perfect condition, you should prevent any form of dirt or moisture on the surface of the glass. Dust on the lens can be removed carefully with a soft brush; marks and fingerprints with a soft, dry and clean microfibrer cloth.To remove stubborn dirt, we additionally recommend the use of the ZEISS cleaning fluid.

29
US
Customer SupportYour can find your nearest distributor at our website www.zeiss.com/automatedimaginglenses
Carl Zeiss AG reserves the right to amend these specifications without prior notice.All rights reserved. This manual, or parts thereof, may not be reproduced without prior written permission from Carl Zeiss AG, nor be stored in retrieval systems, nor transmitted in any form, whether electronically, mechanically, by photocopy, recording or other media. Copyright 2018, Carl Zeiss AG

30
US
Caution:To ensure proper and safe use, we recommend that you read these safety and operating instructions first before using the product and then keep them in a safe place. Non-observance of these instructions could lead to injury or damage.
Safety and handlingNever point the lens directly towards the sun, as this may seriously damage your eyesight. Attach the lens cap when the lens is not in use. Otherwise, there is risk of fire.
DisposalDo not dispose of the product as household waste, but please adhere to the applicable statutory regulations of the relevant country. Consult local authorities about the options for disposal and recycling if necessary.
Safety tips
!

31
US
Indented useUse the product only in temperatures ranging between –20 °C and +55 °C.
Protect the lens appropriately against dust and moisture in adverse environments. Should the lens be exposed to moisture, remove it from the camera. Allow the device to dry completely before using it again. Do not attempt to dry the product with the aid of an external heat source.
Service and repairDo not undertake any repairs or changes on the product yourself which go beyond the scope of the described range of functions. By disassembling it, damage may be caused which is not covered by the warranty. If there is need of repair, please contact your authorized dealer or distributor. For this purpose, please visit our website www.zeiss.com/automatedimaginglenses

32
F
Nous vous remercions pour l'achat de cet objectif. Nous nous réjouissons de l'occasion de participer à votre réussite via notre matériel.
ZEISS produit depuis 1846 des produits de qualité supérieure dans le domaine de l’ingénierie de précision. Aujourd'hui, le groupe s'impose comme le leader de la production des objectifs les plus sophistiqués du monde : les optiques de lithographie utilisés pour la fabrication de micropuces. ZEISS est également l'un des leaders mondiaux du marché des objectifs utilisés pour la production cinématographique, domaine dans lequel les images sont souvent agrandies des milliers de fois à l’écran et où la fidélité des couleurs est cruciale. Les applications techniques et industrielles peuvent désormais bénéficier de la technologie de pointe et de l’expertise de renommée internationale de ZEISS.
C’est ainsi qu’est née une gamme d’objectifs hautes performances destinée aux applications industrielles.
Les objectifs Dimension de ZEISS

33
F
Les atouts de la gamme Dimension de ZEISS• excellente qualité d’image• pour capteurs d'appareils photos jusqu’à 4/3", proposés
avec une monture C• barillet en aluminium• réglages de mise au point et d’ouverture ajustables• ajustement possible de la distance focale postérieure pour
la compensation des tolérances des montures. Le mécanisme de mise au point arrière permet d’ajuster le système d’objectif au capteur de l’appareil photo, afin d’obtenir la distance optimale.
• ajustement possible de la position azimutale, afin de garantir une lisibilité optimale des échelles indépendamment de l'emplacement d’installation
• repère de position de la pupille d’entrée permettant d’aligner avec précision le point de fuite de l’objectif
• verrouillage de la mise au point et molette d’ouverture pour la fixation facile et directe de servomoteurs, au besoin
• transmission spectrale optimisée à la fois dans le spectre VIS et proche IR grâce au revêtement ZEISS T*®

34
F
Composants de l’objectif1 Extérieur : filet de fixation d’un pare-soleil en option
Intérieur : filet de fixation pour filtre2 Repère de position de la pupille d’entrée (EnP) 3 Vis de fixation pour le réglage de la mise au point4 Bague d’ajustement de la position azimutale5 Bague d’ajustement de la distance focale postérieure6 Monture de l’objectif7 Molette avec vis de fixation pour le réglage de l’ouverture8 Bague de mise au point avec échelle en mètres et pieds
Le pare-soleil n’est pas fourni de série.

35
F
Couvre-objectif arrière et couvre-objectifPour retirer et replacer le couvre-objectif arrière et le couvre-objectif, tenir le bord extérieur de l’opercule et tirer ou enclencher l'élément correspondant sur l'objectif.
Montage et démontage de l’objectifL’objectif est équipé d’une monture C (6). Monter l’objectif dans la monture et le tourner dans le sens horaire jusqu’à son enclenchement. Pour retirer l’objectif, le tourner dans le sens antihoraire.
Montage et démontage des filtres et des pare-soleilLes filtres au filetage standard peuvent être fixés à l’avant de l’objectif (1). Si vous utilisez plus d’un filtre en même temps, vous pourrez observer un vignettage (assombrissement des coins de l’image). Nous vous recommandons l’utilisation des filtres T*® de ZEISS. Les pare-soleil en option avec filetage peuvent également être fixés à l’avant de l’objectif (1).
Manipulation

36
F
Ajustement de la mise au point et de l’ouvertureLes objectifs Dimension de ZEISS sont des objectifs manuels, ce qui signifie que la mise au point et l’ouverture s’ajustent directement au niveau de l’objectif. Utiliser la bague d’ajustement correspondante de l’objectif (8 et 7). Utiliser les vis de fixation incluses (3 et 7) pour verrouiller la mise au point ajustée et les réglages d’ouverture, afin de prévenir toute modification involontaire de l’ajustement. Les réglages de mise au point et d’ouverture s’adaptent en continu entre les deux valeurs extrêmes indiquées.

37
F
Ajuster la distance focale postérieure
Les objectifs ZEISS Dimension sont fournis avec un tirage mécanique nominal (= distance entre la surface de la monture de l’objectif et le capteur de l’appareil photo) d’environ 17,53 mm dans l’air et une distance d’objet infinie. Afin d’assurer une qualité d’image optimale, il est nécessaire de compenser les tolérances des montures en ajustant la distance focale postérieure.
• Placer une image de test plate et à contraste élevé devant l’objectif / le système photographique, perpendiculairement à l’axe optique. Nous vous recommandons d’utiliser la mire Dimension de ZEISS (réf. : 2267-884).
• Placer l’appareil photo sur un trépied ou une surface stable et le centrer sur le milieu de l’image de test.
• Assurer l'éclairage uniforme et suffisant de l’image de test.

38
F
• Définir l’ouverture la plus large possible, de préférence avec un indice de lumination maximal.
• Définir la distance entre l’image de test et le capteur de l’appareil photo en fonction de la distance focale.
Distance focale 2,8/8 2/12 2/18 2/25 2/35 2/50
Distance image de test – capteur de l'appareil photo [mm]
308 425 616 836 1 156 1 616
Distance image de test – capteur de l'appareil photo [ft]
1’ 0,1” 1’ 4,7” 2’ 0,3” 2‘ 8,9” 3’ 9,5” 5’ 3,6”

39
F
• Régler la mise au point à la distance voulue. Pour ce faire, un point rouge indiquant cette distance est gravé sur le barillet de l’objectif. Il est recommandé de verrouiller la bague de mise au point à l’aide de vis de fixation.
• Observer et évaluer la netteté des images à l’aide d’un affichage ou d'image de moniteur.
• Desserrer les trois vis sans tête de la bague (5) avec la clé hexagonale fournie.

40
F
• Tourner la partie avant de l’objectif pour ajuster la distance focale postérieure et observer l’image sur l’affichage ou le moniteur pour confirmer une netteté optimale. L’objectif peut être tourné dans le sens horaire et antihoraire, à partir du réglage d’usine. Les butées mécaniques indiquent clairement les limites de la plage de réglage.
• Après avoir ajusté la distance focale postérieure pour atteindre une netteté d’image optimale, serrer à la main les trois vis sans tête à l’aide de la clé hexagonale.
41
F
Ajustement de la position azimutale
Les objectifs Dimension de ZEISS sont équipés d'une bague d'ajustement de la position azimutale. Il est ainsi possible d’ajuster l’objectif afin de garantir une lisibilité optimale des échelles, indépendamment de l'emplacement d’installation.
Desserrer les trois vis sans tête de la bague (4) à l’aide de la clé hexagonale fournie et tourner la partie avant de l’objectif en position optimale. Pour fixer la bague à nouveau, serrer à la main les trois vis sans tête avec la clé hexagonale.
42
F
Pupille d’entrée (EnP)La position de la pupille d’entrée (2) est indiquée sur chaque objectif Dimension de ZEISS. Il est donc possible de positionner l’objectif de manière à pouvoir l’utiliser dans des situations où le point de fuite doit être parfaitement aligné. En fonction de la distance focale, la position exacte est indiquée par une ligne au-dessus ou au-dessous de l’« Enp » ou par une indication supplémentaire informant de la distance séparant cette position de la ligne gravée.
ZEISS Dimension 2/12 :
ZEISS Dimension 2/35 :
43
F
Conseils d'entretien de l’objectifPour maintenir votre objectif en parfait état de fonctionnement, protéger la surface de verre de toute forme de saleté ou d’humidité. Éliminer soigneusement, avec une brosse souple, toute poussière présente sur l’objectif ; le cas échéant, utiliser un chiffon en microfibre doux, sec et propre pour éliminer les marques et empreintes de doigts.Pour les saletés les plus tenaces, nous vous recommandons d’utiliser, en plus, le liquide de nettoyage ZEISS.
Service clientèlePour localiser le distributeur le plus proche de chez vous, rendez-vous sur notre site www.zeiss.com/automatedimaginglenses
Carl Zeiss AG se réserve le droit de modifier ces caractéristiques sans notification préalable.Tous droits réservés. Sauf autorisation écrite préalable de Carl Zeiss AG, il est strictement interdit de reproduire le présent manuel, en tout ou partie, de le sauvegarder dans des systèmes de stockage ou de le transmettre à un tiers, sous quelque forme que ce soit (électronique, mécanique, photocopie, enregistrement ou tout autre support). Copyright 2018, Carl Zeiss AG

44
F
Attention :Pour l'utilisation conforme et sûre de ce produit, veuillez d'abord lire les présentes instructions de sécurité et de fonctionnement. Par la suite, conservez-les dans un endroit sûr. Le non-respect de ces instructions pourrait engendrer des blessures ou des dommages.
Sécurité et manipulationNe jamais pointer directement l’objectif vers le soleil : risque de lésions oculaires graves. Utiliser le couvre-objectif lorsque l’objectif n’est pas utilisé : risque d’incendie.
ÉliminationNe pas jeter le produit avec les ordures ménagères. Veuillez respecter les règlements statutaires en vigueur dans le pays d'utilisation. Si nécessaire, consulter les autorités locales pour déterminer vos options d’élimination et de recyclage.
Conseils de sécurité
!

45
F
Utilisation conformeCe produit peut être utilisé à des températures comprises entre –20 °C et +55 °C.
En environnements défavorables, protéger correctement l’objectif de la saleté et de l’humidité. En cas d'exposition de l’objectif à l’humidité, le détacher de l'appareil photo. Laisser sécher complètement l’appareil avant toute nouvelle utilisation. Ne pas essayer de sécher le produit au moyen d’une source de chaleur externe.
Maintenance et réparationNe pas procéder à des réparations ou modifications du produit, dépassant l’étendue de la série de fonctions décrite. Des dommages non couverts par la garantie peuvent être engendrés lors du démontage. Si une réparation est nécessaire, veuillez contacter votre concessionnaire ou distributeur agréé. Pour ce faire, veuillez consulter notre site internet www.zeiss.com/automatedimaginglenses

46
E
Felicidades por la compra de este objetivo. Esperamos poder contribuir parcialmente a que tenga éxito con nuestro objetivo.
ZEISS lleva fabricando productos de ingeniería de precisión de alta calidad desde 1846 y actualmente es el fabricante líder de los objetivos más avanzados del mundo: óptica litográfica para la fabricación de microchips. ZEISS también es líder mundial en los objetivos utilizados para la producción de películas, donde las imágenes de la pantalla suelen estar aumentadas miles de veces y la calidad de reproducción del color es crítica. Ahora, las aplicaciones técnicas e industriales también pueden beneficiarse de los conocimientos y la tecnología de vanguardia y de prestigio mundial de ZEISS.
El resultado es una familia de objetivos de grandes prestaciones para aplicaciones industriales.
Objetivos ZEISS Dimension

47
E
Aspectos destacados de la familia ZEISS Dimension• Excelente calidad de imagen.• Abarca sensores de cámara de hasta 4/3" de tamaño, que se
ofrecen en combinación con una montura C.• Cañón de aluminio.• Ajustes de enfoque y apertura fijables.• Posibilidad de ajustar la distancia focal para compensar las
tolerancias de las monturas de la cámara. El mecanismo de ajuste de la distancia focal permite ajustar individualmente el sistema del objetivo al sensor de la cámara para conseguir la distancia óptima.
• Posibilidad de ajustar la posición acimutal para asegurar una legibilidad óptima de las escalas independientemente de la posición de instalación.
• Índice de posición para que la pupila de entrada pueda alinear con exactitud el centro de perspectividad del objetivo.
• Interbloqueo del enfoque y anillo de apertura para acoplar servomotores de forma fácil y directa, si fuera necesario.
• Transmisión espectral optimizada tanto en el rango VIS como IR cercano mediante un revestimiento T*® de ZEISS.
48
E
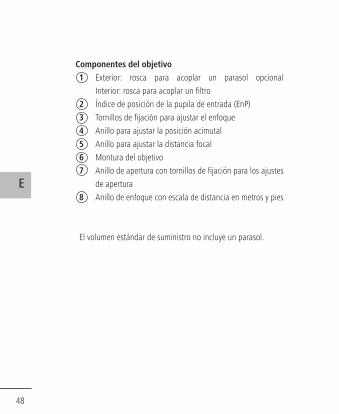
Componentes del objetivo1 Exterior: rosca para acoplar un parasol opcional
Interior: rosca para acoplar un filtro2 Índice de posición de la pupila de entrada (EnP) 3 Tornillos de fijación para ajustar el enfoque4 Anillo para ajustar la posición acimutal5 Anillo para ajustar la distancia focal6 Montura del objetivo7 Anillo de apertura con tornillos de fijación para los ajustes
de apertura8 Anillo de enfoque con escala de distancia en metros y pies
El volumen estándar de suministro no incluye un parasol.

49
E
Tapa posterior y tapaLa tapa posterior y la tapa pueden quitarse y ponerse sujetando el borde exterior de la tapa y tirando de ella o presionándola sobre el objetivo.
Montaje y desmontaje del objetivoEl objetivo se encaja con una montura C (6). Monte el objetivo en la montura de la cámara y gírelo en sentido horario hasta que escuche cómo encaja con resistencia. Para desmontarlo, gire el objetivo en sentido antihorario.
Montaje y desmontaje de filtros y parasolesEn la parte frontal del objetivo pueden montarse filtros roscados estándar (1). Si se utiliza más de un filtro a la vez, es posible que se produzca un viñeteado (sombreado de las esquinas de la imagen). Recomendamos utilizar los filtros T*® de ZEISS. También es posible montar parasoles opcionales con rosca en la parte frontal del objetivo (1).
Manejo

50
E
Ajuste del enfoque y la aperturaLos objetivos ZEISS Dimension son objetivos manuales, es decir, el enfoque y la apertura se ajustan directamente en el objetivo. Utilice el anillo de ajuste correspondiente en el objetivo (8 y 7). Utilice los tornillos de fijación incluidos (3 y 7) para bloquear los ajustes del enfoque y la apertura y evitar así que se desajusten involuntariamente. Los ajustes de enfoque y apertura pueden regularse gradualmente entre los valores límite indicados.
Ajuste de la distancia focal
Los objetivos ZEISS Dimension tienen una distancia de registro nominal (= distancia entre la superficie de montaje del objetivo y el sensor de la cámara) de unos 17,53 mm en aire con una distancia de objeto infinita a la entrega. Con el fin de garantizar una calidad de imagen óptima, es necesario compensar las tolerancias de las monturas de la cámara ajustando la distancia focal.

51
E
• Coloque una imagen de prueba plana de alto contraste en posición perpendicular al eje óptico delante del objetivoo el sistema de la cámara. Recomendamos utilizar el Gráfico de Prueba ZEISS Dimension (n.º de pedido: 2267-884).
• Coloque la cámara sobre un trípode o una superficie estable y céntrela en medio de la imagen de prueba.
• Asegúrese de que la imagen de prueba tiene una iluminación homogénea y suficiente.
• Ajuste la apertura al ancho máximo posible, preferentemente al punto final.
• Ajuste la distancia entre la imagen de prueba y el sensor de la cámara en función de la longitud focal.
Longitud focal 2,8/8 2/12 2/18 2/25 2/35 2/50
Imagen de prueba de distancia – sensor de la cámara [mm]
308 425 616 836 1156 1616
Imagen de prueba de distancia – sensor de la cámara [ft]
1’ 0.1” 1’ 4.7” 2’ 0.3” 2’ 8.9” 3’ 9.5” 5’ 3.6”
52
E
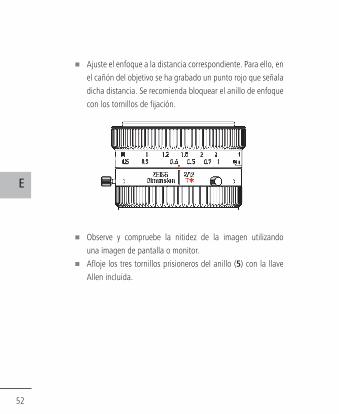
• Ajuste el enfoque a la distancia correspondiente. Para ello, en el cañón del objetivo se ha grabado un punto rojo que señala dicha distancia. Se recomienda bloquear el anillo de enfoque con los tornillos de fijación.
• Observe y compruebe la nitidez de la imagen utilizando una imagen de pantalla o monitor.
• Afloje los tres tornillos prisioneros del anillo (5) con la llave Allen incluida.

53
E
• Gire la parte frontal del objetivo para ajustar la distancia focal y observe la imagen en la pantalla o en el monitor para garantizar la nitidez máxima de la misma. El objetivo puede girarse en sentido horario y antihorario, empezando por el ajuste de fábrica. Los topes mecánicos indican claramente los límites del rango de ajuste.
• Después de ajustar la distancia focal para conseguir la nitidez máxima de la imagen, apriete firmemente los tres tornillos prisioneros con la llave Allen.

54
E
Ajuste de la posición acimutal
Los objetivos ZEISS Dimension tienen un anillo para ajustar la posición acimutal. De este modo, es posible ajustar el objetivo de forma que se garantice la legibilidad óptima de las escalas independientemente de la posición de instalación.
Afloje los tres tornillos prisioneros del anillo (4) con la llave Allen incluida y gire la parte frontal del objetivo hasta la posición óptima. Para fijar otra vez el anillo, apriete firmemente los tres tornillos prisioneros con la llave Allen.

55
E
Pupila de entrada (EnP)La posición de la pupila de entrada (2) está marcada en cada objetivo ZEISS Dimension. Esto permite posicionar el objetivo para usos en los que el centro de perspectividad tiene que estar exactamente alineado. En función de la longitud focal, la posición exacta está marcada con una línea encima o debajo de “EnP” o mediante una especificación de distancia adicional que señala la distancia de la posición con respecto a la línea grabada.
ZEISS Dimension 2/12:
ZEISS Dimension 2/35:

56
E
Consejos de cuidado del objetivoPara garantizar que el objetivo esté siempre en perfectas condiciones, debería evitar que se deposite suciedad o humedad en la superficie del cristal. El polvo depositado sobre el objetivo puede eliminarse con cuidado con un cepillo suave; las marcas y huellas con un paño de microfibra suave, seco y limpio.Para eliminar la suciedad resistente, recomendamos utilizar también el líquido de limpieza ZEISS.

57
E
Asistencia al clienteEncontrará el distribuidor más cercano a su población en nuestra página web www.zeiss.com/automatedimaginglenses.
Carl Zeiss AG se reserva el derecho de modificar estas especificaciones sin previo aviso.Reservados todos los derechos. El presente manual, o partes del mismo, no deben reproducirse sin el consentimiento previo por escrito de Carl Zeiss AG; tampoco deben guardarse en sistemas de recuperación ni transmitirse de cualquier otra forma, ya sea electrónica, mecánica, por fotocopia, grabación u otros medios. Copyright 2018, Carl Zeiss AG

58
E
Precaución:Con el fin de garantizar un uso adecuado y seguro, recomendamos leer estas instrucciones de seguridad y operación antes de utilizar el producto por primera vez y guardarlas en un lugar seguro. Si no se cumplen estas instrucciones podrían producirse lesiones o daños.
Seguridad y manejoNo dirija nunca el objetivo hacia el sol, pues su vista podría quedar gravemente dañada. Ponga la tapa cuando no utilice el objetivo. En caso contrario, existe peligro de incendio.
EliminaciónNo tire el producto al contenedor de residuos domésticos; respete las normativas legales aplicables del país en cuestión. Consulte con las autoridades locales las opciones de eliminación y reciclaje, si fuera necesario.
Consejos de seguridad
!
59
E
Uso previstoUtilice el producto únicamente en temperaturas comprendidas entre –20 °C y +55 °C.
Proteja adecuadamente el objetivo del polvo y la humedad en entornos adversos. Si el objetivo quedara expuesto a la humedad, desmóntelo de la cámara. Deje que se seque por completo antes de volver a utilizarlo. No intente secar el producto con una fuente de calor externa.
Servicio y reparaciónNo realice usted mismo ningún tipo de reparación ni modificación en el producto que vaya más allá del alcance de funciones descritas. Si intenta desmontarlo, pueden ocasionarse daños que no están cubiertos por la garantía. Si se requiere una reparación, póngase en contacto con el representante o distribuidor autorizado. Para encontrarlo, visite nuestra página web www.zeiss.com/automatedimaginglenses.

60
I
Complimenti per aver acquistato questo obiettivo. Siamo certi che vi darà grandi soddisfazioni.
Dal 1846 ZEISS realizza prodotti tecnici di precisione di straordinaria qualità ed oggi è il produttore leader degli obiettivi più avanzati del mondo: ottiche per litografia per la produzione di microchip. ZEISS è leader mondiale anche nel mercato degli obiettivi per la produzione cinematografica, in cui le immagini vengono spesso ingrandite migliaia di volte sullo schermo e la qualità della riproduzione dei colori è fondamentale. Ora anche le applicazioni tecniche e industriali possono usufruire della tecnologia all’avanguardia e delle competenze di ZEISS.
Il risultato è una gamma di obiettivi ad alte prestazioni per applicazioni industriali.
Obiettivi ZEISS Dimension

61
I
Caratteristiche della gamma ZEISS Dimension• Eccellente qualità dell’immagine.• Include sensori fotocamera di dimensioni fino a 4/3",
proposti in combinazione con un adattatore C-mount.• Barilotto in alluminio.• Possibilità di fissare le impostazioni di messa a fuoco e
diaframma.• Possibilità di regolare la distanza focale posteriore per
compensare le tolleranze degli attacchi della fotocamera. Il meccanismo di messa a fuoco posteriore consente la regolazione individuale dell’obiettivo rispetto al sensore fotocamera per ottenere la distanza ottimale.
• Possibilità di regolare la posizione azimutale per garantire una migliore leggibilità delle scale indipendentemente dalla posizione di installazione.
• Indicatore di posizione della pupilla di entrata per poter allineare con precisione il centro ottico dell’obiettivo.
• Blocco dell’anello di messa a fuoco e del diaframma per agevolare il montaggio diretto di ottiche motorizzate, se necessario.
• Trasmissione spettrale ottimizzata sia per VIS che vicino alla gamma IR attraverso il trattamento T*® ZEISS.

62
I
Componenti dell’obiettivo1 Esterno: ghiera filettata per paraluce opzionale
Interno: ghiera filettata per filtro2 Indicatore di posizione della pupilla di entrata (EnP) 3 Viti di fissaggio per impostazioni della messa a fuoco4 Anello per la regolazione della posizione azimutale5 Anello per la regolazione della distanza focale posteriore6 Attacco obiettivo7 Anello del diaframma con viti di fissaggio per impostazione
del diaframma8 Anello di messa a fuoco con scala delle distanze in metri
e piedi
La dotazione standard non include un paraluce.
63
I
Tappo di protezione posteriore e tappo di protezione dell'obiettivoIl tappo di protezione posteriore e il tappo di protezione dell'obiettivo possono essere rimossi e applicati trattenendoli per il bordo esterno e tirandoli o premendoli sull’obiettivo.
Montaggio e rimozione dell’obiettivoL’obiettivo è dotato di un adattatore C-mount (6). Montare l’obiettivo nell'attacco della fotocamera e ruotarlo in senso orario fino a che scatta in posizione opponendo resistenza. Per rimuoverlo, ruotare l’obiettivo in senso antiorario.
Applicazione e rimozione di filtri e paraluceI filtri filettati standard possono essere applicati sul lato anteriore dell’obiettivo (1). Utilizzando contemporaneamente più filtri può verificarsi il fenomeno della vignettatura (ombreggiatura degli angoli dell’immagine). Raccomandiamo l’utilizzo di filtri T*® di ZEISS. Sul lato anteriore dell’obiettivo possono essere applicati anche paraluce opzionali con attacco a vite (1).
Uso

64
I
Regolazione di messa a fuoco e diaframmaGli obiettivi ZEISS Dimension sono di tipo manuale, quindi messa a fuoco e diaframma vengono regolati direttamente sull’obiettivo. Utilizzare il relativo anello di regolazione specifico sull’obiettivo (8 e 7). Utilizzare le viti di fissaggio incluse (3 e 7) per bloccare le impostazioni regolate per la messa a fuoco e il diaframma in modo da evitare di modificarle inavvertitamente. Le impostazione di messa a fuoco e diaframma sono dotate di regolazione a variazione continua tra gli estremi indicati.
Regolazione della distanza focale posteriore
Alla consegna, gli obiettivi ZEISS Dimension presentano una distanza focale-flangia nominale (= distanza tra la superficie di attacco dell’obiettivo e il sensore fotocamera) di circa 17,53 mm in aria con una distanza infinita dell’oggetto. Per garantire una qualità ottimale dell’immagine, è necessario compensare le tolleranze degli attacchi della fotocamera regolando la distanza focale posteriore.

65
I
• Collocare un’immagine di prova piana ad alto contrasto in perpendicolare rispetto all’asse ottico davanti all’obiettivo / macchina fotografica. Consigliamo di utilizzare il grafico di prova ZEISS Dimension (cod. ord.: 2267-884).
• Collocare la fotocamera su uno stativo o una superficie stabile e puntarla sul centro dell’immagine di prova.
• Assicurarsi che l’immagine di prova sia piana e sufficientemente illuminata.
• Impostare l’apertura sul valore massimo possibile, preferibilmente fino all’arresto completo.
• Impostare la distanza tra l’immagine di prova e il sensore fotocamera in funzione della distanza focale.
Distanza focale 2.8/8 2/12 2/18 2/25 2/35 2/50
Distanza immagine di prova – sensore fotocamera [mm]
308 425 616 836 1156 1616
Distanza immagine di prova – sensore fotocamera [ft]
1’ 0.1” 1’ 4.7” 2’ 0.3” 2‘ 8.9” 3’ 9.5” 5’ 3.6”

66
I
• Impostare la messa a fuoco sulla distanza corrispondente. Sul barilotto dell’obiettivo viene riportato un pallino rosso che indica il valore richiesto. Si consiglia di bloccare l’anello di messa a fuoco con le viti di fissaggio.
• Osservare e valutare la nitidezza dell’immagine utilizzando un display o un monitor.
• Allentare i tre grani dell’anello (5) con la chiave a brugola in dotazione.

67
I
• Ruotare la parte anteriore dell’obiettivo per regolare la distanza focale posteriore e osservare l’immagine sul display o monitor per garantirne la massima nitidezza. L’obiettivo può essere ruotato in senso orario e antiorario, a partire dall’impostazione di fabbrica. Gli arresti meccanici indicano chiaramente i limiti dell’intervallo di regolazione.
• Dopo aver regolato la distanza focale posteriore per raggiungere la massima nitidezza dell’immagine, serrare a mano i tre grani con la chiave a brugola.

68
I
Regolazione della posizione azimutale
Gli obiettivi ZEISS Dimension hanno una ghiera per regolare la posizione azimutale. In questo modo è possibile regolare l’obiettivo per garantire leggibilità delle scale indipendentemente dalla posizione di installazione.
Allentare i tre grani della ghiera (4) con la chiave a brugola inclusa e ruotare la parte anteriore dell’obiettivo nella posizione ottimale. Per fissare nuovamente la ghiera, stringere manualmente i tre grani con la chiave a brugola.

69
I
Pupilla di entrata (EnP)La posizione della pupilla di entrata (2) è indicata su ogni obiettivo ZEISS Dimension. Questa consente di predisporre l’obiettivo per situazioni che richiedono un allineamento preciso del centro ottico. La posizione esatta, a seconda della distanza focale, è indicata da una linea sopra o sotto la dicitura «EnP» o da una specificazione aggiuntiva della distanza che indica lo spazio presente tra la posizione e la linea incisa.
ZEISS Dimension 2/12:
ZEISS Dimension 2/35:
70
I
Consigli per la cura dell’obiettivoPer mantenere l’obiettivo sempre in perfetto stato è necessario evitare la formazione di sporcizia e umidità di qualsiasi genere sulle superfici di vetro. Per rimuovere delicatamente la polvere dall’obiettivo, usare un pennellino morbido; per le macchie e le ditate usare un panno in microfibra morbido, asciutto e pulito.Per rimuovere lo sporco ostinato, raccomandiamo inoltre l’uso del liquido detergente ZEISS.
71
I
Supporto clientiPer trovare il rivenditore più vicino consultare il sito Web www.zeiss.com/automatedimaginglenses.
Carl Zeiss AG si riserva il diritto di modificare le presenti specifiche senza preavviso.Tutti i diritti riservati. Senza il preventivo consenso scritto di Carl Zeiss AG è vietato riprodurre le presenti istruzioni o parti di esse, archiviarle in sistemi di recupero o divulgarle in qualsiasi forma o con qualsiasi tipo di mezzo elettronico, meccanico, tramite fotocopia, registrazione o altro sistema. Copyright 2018, Carl Zeiss AG

72
I
Attenzione:Per garantire un uso corretto e sicuro, raccomandiamo prima del primo utilizzo del prodotto di leggere le avvertenze di sicurezza e le istruzioni per l’uso e di conservarle con cura. La mancata osservanza di queste istruzioni può causare lesioni o danni.
Sicurezza e usoNon puntare mai l’obiettivo direttamente verso il sole per evitare il rischio di gravi danni alla vista. Applicare sempre il tappo di protezione dell’obiettivo quando non viene utilizzato. Pericolo d’incendio.
SmaltimentoNon smaltire il prodotto insieme ai rifiuti domestici, bensì attenersi alle disposizioni di legge in vigore nei diversi paesi. Se necessario, consultare le autorità locali in merito alle possibilità di smaltimento e riciclaggio.
Consigli di sicurezza
!

73
I
Destinazione d’usoUtilizzare il prodotto solo a temperature comprese tra –20 °C e +55 °C.
Proteggere adeguatamente l’obiettivo da polvere e umidità in ambienti ostili. Se il prodotto dovesse essere esposto all’umidità, rimuoverlo dalla fotocamera. Fare asciugare completamente l’apparecchio prima di riutilizzarlo. Non provare ad asciugare il prodotto con l’ausilio di una fonte di calore esterna, ad esempio in un forno a microonde o con un asciugacapelli.
Assistenza e riparazioniNon effettuare autonomamente riparazioni del prodotto che vadano oltre l’ambito della gamma di funzioni descritta. Lo smontaggio può causare danni che non sono coperti dalla garanzia. Per eventuali riparazioni, rivolgersi al rivenditore o al distributore autorizzato. Allo scopo consultare la pagina web www.zeiss.com/automatedimaginglenses.

74
RUS
Благодарим вас за покупку этого объектива! Мы уверены, что с его помощью вы сможете делать превосходные снимки.
Компания ZEISS выпускает высококлассные прецизионные приборы с 1846 года и на сегодняшний день является ведущим производителем самых современных объективов, используемых в фотолитографии для изготовления микросхем. Также ZEISS – мировой лидер в производстве объективов для киноиндустрии, где изображения на экране часто увеличиваются в тысячи раз и качество цветопередачи имеет решающее значение. Сегодня передовые технологии и огромный опыт компании ZEISS с успехом применяются в промышленности и самых разных областях техники.
Познакомьтесь с модельным рядом высококачественных объективов для промышленного использования.
Объективы Dimension компании ZEISS
75
RUS
Основные преимущества модельного ряда ZEISS Dimension• Превосходное качество изображения.• Размеры светочувствительной матрицы камеры до
4/3 дюйма при оснащении креплением C.• Алюминиевая оправа.• Регулируемые настройки фокусировки и диафрагмы.• Возможность регулировки заднего фокусного расстояния
для компенсации допусков креплений камеры. Механизм регулировки заднего фокуса позволяет настроить систему объектива с учетом конкретной светочувствительной матрицы камеры для обеспечения оптимального расстояния.
• Возможность регулировки азимутального положения для обеспечения четкой видимости шкал независимо от положения установки.
• Указатель положения входного зрачка позволяет точно выровнять центр перспективы объектива.
• Возможность блокировки кольца фокусировки и диафрагмы для простого непосредственного крепления сервоприводов.
• Покрытие ZEISS T*® обеспечивает оптимальное спектральное пропускание как в видимом, так и в ближнем ИК-диапазоне.
76
RUS
Компоненты объектива1 Внешняя сторона: резьба для крепления
дополнительной светозащитной бленды Внутренняя сторона: резьба для крепления фильтра
2 Указатель положения входного зрачка (EnP) 3 Крепежные винты для установки фокусного расстояния4 Кольцо для регулировки азимутального положения5 Кольцо для регулировки заднего фокусного
расстояния6 Крепление объектива7 Кольцо диафрагмы с крепежными винтами для
установки диафрагмы8 Кольцо фокусировки со шкалой расстояния в метрах
и футах
Светозащитная бленда не входит в стандартный комплект поставки.

77
RUS
Задняя защитная крышка и крышка объективаЧтобы снять заднюю защитную крышку и крышку объектива, удерживайте внешний край крышки и потяните за него. Чтобы установить крышки, выполните процедуру в обратном порядке.
Установка и снятие объективаОбъектив оснащен креплением C (6). Установите объектив на крепление камеры и поворачивайте его по часовой стрелке, пока не почувствуете, что соединение надежно затянуто. Чтобы снять объектив, поворачивайте его против часовой стрелки.
Установка и снятие фильтров и светозащитных блендСтандартные резьбовые фильтры крепятся к передней части объектива (1). При одновременном использовании нескольких фильтров может возникнуть виньетирование (затенение углов изображения). Рекомендуется использовать светофильтры с просветляющим покрытием ZEISS T*®. Дополнительные светозащитные бленды с винтовой резьбой также крепятся к передней части объектива (1).
Порядок применения

78
RUS
Настройка фокусного расстояния и диафрагмыZEISS Dimension – объективы с ручным управлением, то есть фокусное расстояние и диафрагма устанавливаются непосредственно на них. Для регулировки используйте соответствующее кольцо на объективе (8 и 7). Затяните прилагаемые крепежные винты (3 и 7), чтобы зафиксировать фокусное расстояние и диафрагму и случайно не сбить настройки. Настройки фокусного расстояния и диафрагмы можно плавно изменять между указанными крайними значениями.

79
RUS
Регулировка заднего фокусного расстояния
Номинальный рабочий отрезок (т. е. расстояние между плоскостью крепления объектива и светочувствительной матрицей камеры) для поставляемых компанией ZEISS объективов Dimension составляет около 17,53 мм в воздухе при установке фокусного расстояния на бесконечность. Для обеспечения оптимального качества изображения необходимо компенсировать допуски креплений камеры, отрегулировав заднее фокусное расстояние.
• Поместите плоскую высококонтрастную миру перпендику-лярно оптической оси перед системой объектива и камеры. Рекомендуется использовать миру ZEISS Dimension (номер для заказа: 2267-884).
• Установите камеру на штатив или устойчивую поверхность и выровняйте ее относительно центра миры.

80
RUS
• Убедитесь, что мира освещена равномерно и достаточно хорошо.
• Максимально откройте диафрагму, желательно до упора.
• Установите расстояние между мирой и светочувствительной матрицей камеры в зависимости от фокусного расстояния.
Фокусное расстояние 2,8/8 2/12 2/18 2/25 2/35 2/50
Расстояние между мирой и светочув-ствительной матри-цей камеры (мм)
308 425 616 836 1156 1616
Расстояние между мирой и светочув-ствительной матри-цей камеры (футы)
1’ 0,1” 1’ 4,7” 2’ 0,3” 2‘ 8,9” 3’ 9,5” 5’ 3,6”

81
RUS
• Сфокусируйте объектив на соответствующее расстояние. Для этого на оправу объектива нанесена красная точка, указывающая это расстояние. Рекомендуется зафиксировать кольцо фокусировки с помощью крепежных винтов.
82
RUS
• Оцените резкость изображения на дисплее или мониторе.• С помощью прилагаемого шестигранного ключа
ослабьте три винта без головки на кольце (5).• Поверните переднюю часть объектива и отрегулируйте
заднее фокусное расстояние таким образом, чтобы добиться максимальной резкости изображения на дисплее или мониторе. Объектив можно поворачивать как по часовой стрелке, так и против нее, начиная с установленного на заводе положения. Механические упоры четко обозначают пределы диапазона регулировки.
• После достижения максимальной резкости изображения за счет регулировки заднего фокусного расстояния слегка затяните три винта без головки с помощью шестигранного ключа.

83
RUS
Регулировка азимутального положения
Объективы ZEISS Dimension оснащены кольцом для регулировки азимутального положения. С его помощью вы можете обеспечить наиболее четкую видимость шкал независимо от положения установки.
Ослабьте три винта без головки на кольце (4) с помощью прилагаемого шестигранного ключа и поверните переднюю часть объектива в оптимальное положение. Чтобы повторно закрепить кольцо, шестигранным ключом затяните три винта без головки.

84
RUS
Входной зрачок (EnP)На каждом объективе ZEISS Dimension указано положение входного зрачка (2). При помощи этого указателя вы сможете точно выравнивать центр перспективы объектива. Точное положение, в зависимости от фокусного расстояния, обозначается линией, расположенной под или над надписью «EnP», или определяется на основе дополнительной спецификации, указывающей, насколько далеко находится точное положение от выгравированной линии.
ZEISS Dimension 2/12:
ZEISS Dimension 2/35:
85
RUS
Советы по уходу за объективомЧтобы объектив всегда находился в идеальном состоянии, не допускайте попадания загрязнений и влаги на стеклянные поверхности. Пыль на стекле объектива можно осторожно удалять мягкой кисточкой, а пятна и отпечатки пальцев – сухой, чистой и мягкой салфеткой из микрофибры. Для удаления устойчивых загрязнений рекомендуется использовать чистящую жидкость ZEISS.
Служба поддержки покупателейАдрес ближайшего дистрибьютора можно найти на нашем сайте: www.zeiss.com/automatedimaginglenses
Carl Zeiss AG сохраняет за собой право вносить изменения в эти характеристики без предварительного уведомления.Все права защищены. Настоящее руководство запрещается воспроизводить, полностью или частично, без предварительного письменного разрешения компании Carl Zeiss AG, а также сохранять в информационно-поисковых системах и передавать в электронном виде, механическим способом, путем фотокопирования, записи или при помощи каких-либо иных способов и носителей данных. © Carl Zeiss AG, 2018

86
RUS
Внимание!Перед первым использованием изделия рекомендуется прочесть эти указания по надлежащему применению и технике безопасности и хранить их в надежном месте. Несоблюдение этих указаний может стать причиной травмы или повреждения.
Безопасность и правила обращенияНе направляйте объектив прямо на солнце, так как это может привести к серьезному повреждению органов зрения. Если объектив не используется, закройте его крышкой. В противном случае существует опасность возникновения пожара.
УтилизацияНе выбрасывайте изделие вместе с бытовыми отходами, соблюдайте соответствующие нормативы, действующие в вашей стране. Получить сведения о возможностях утилизации и вторичной переработки можно в местных органах власти.
Указания по технике безопасности
!

87
RUS
Надлежащее использованиеИспользуйте изделие только при температуре от –20 до +55 °С.
При использовании в неблагоприятных условиях обеспечьте надлежащую защиту объектива от пыли и влаги. Если объектив подвергся воздействию влаги, отсоедините его от камеры. Прежде чем снова использовать объектив, дайте ему полностью высохнуть. Не пытайтесь высушить изделие при помощи внешнего источника тепла.
Обслуживание и ремонтЗапрещается самостоятельно ремонтировать изделие или вносить в него изменения, если это выходит за рамки описанных действий. В результате разборки изделия могут возникнуть повреждения, на которые не распространяется действие гарантии. Для выполнения ремонта обращайтесь к авторизованному дилеру и дистрибьютору. Их адреса приведены на нашем веб-сайте: www.zeiss.com/automatedimaginglenses

88
JP
本レンズのご購入ありがとうございます。レンズ
を通して皆様のすばらしい写真に貢献できれば幸
いに思います。
ZEISS は、1846 年以来、精密工学に基づいたトップ
クオリティの製品を生産し、今では、世界最先端
のレンズ、すなわちマイクロチップを製造するた
めの光リソグラフィーの大手メーカーです。ZEISS
は、映画製作に使用するレンズの世界的市場リー
ダーでもあります。この分野では、映像がスクリー
ン上に何千倍にも拡大されることが多く、色の正
確な再現が必須です。現在、ZEISS の世界的に知ら
れた高度な技術と専門知識は、技術用途、産業用
途にも幅広く活用されています。
こうして、産業用途に適した高性能レンズのファ
ミリーが誕生しました。
ZEISS Dimension レンズ

89
JP
ZEISS Dimension ファミリーの特長
• �卓越したイメージクオリティー
• 4/3" までのセンサーの C マウントカメラに対応
• �アルミニウム鏡胴
• �フォーカスリングと絞りリングを固定可能
• �カメラマウントの寸法許容差を補正するバック
フォーカス調節機構があり、レンズシステムと
カメラセンサーの距離を最適に保つ事が可能
• �方位角位置の調節により、取り付け位置に関係
なく目盛を読み易い位置に調節可能
• �入射瞳の位置指標により、レンズのパースペク
ティブの中心を正確に調節可能
• フォーカスリング、絞りリングともサーボユ
ニットと各々簡単に直接取り付け可能
• ZEISS T*® コーティングにより、可視および近赤
外の両方の波長域でスペクトル透過率を最適化
90
JP
レンズの構成要素
1� �外側:別売りのレンズシェード取り付け用の
ねじ溝
内側:フィルター取り付け用のねじ溝
2� �入射瞳(EnP)の位置指標�
3� �フォーカスリングの固定ねじ
4� �方位角位置調節リング
5� �バックフォーカス距離調節リング
6� �レンズマウント
7� �絞りリングと絞り設定固定ねじ
8� �フォーカスリング ( メートルとフィートの距
離目盛を備える )
レンズシェードは別売りになります。

91
JP
リア保護カバーとレンズキャップ
リア保護カバーとレンズキャップは、蓋の外側を
持ち、レンズから引っ張るまたは押し込むことで
取り外しと取り付けが可能です。
レンズの取り付けと取り外し
レンズには C マウント(6)が付属します。レン
ズをカメラバヨネットにはめ、時計方向に回して
固定します。取り外すにはレンズを反時計方向に
回します。
フィルターとレンズシェードの取り付けと取り外
しレンズの全面には標準的なねじ溝付きのフィル
ターを取り付けられます(1)。1 回に複数のフィ
ルターを使用するとケラレ(画像の周辺が暗くな
る)が生じます。ZEISS の T*® フィルターをお勧め
します。オプションのレンズシェードも、ねじ溝
があればレンズの前(1)に取り付け可能です。
取り扱い

92
JP
焦点と絞りの調節
ZEISS Dimension レンズはマニュアルレンズ、つ
まり焦点と絞りをレンズで直接調節します。レン
ズ上のそれぞれの調節リングを使用してください
(8、7)。付属の固定ねじ(3、7)を使用し、調節
した焦点と絞りの設定をロックすれば、意図しな
い変更を防ぐことができます。
焦点と絞りの設定は所定の範囲で無段階に変更可能
です。

93
JP
バックフォーカス距離の調節
ZEISS Dimension レンズのバックフォーカス距離
(= レンズ取り付け面とカメラセンサーの距離)は
約 17.53 mm(空気換算長)で、納品時には物体距
離が無限になっています。最適なイメージクオリ
ティーを得るには、バックフォーカス距離の調節
によってカメラマウントの寸法許容差を補正する
必要があります。
• レンズ / カメラシステムの前に、コントラス
トの高い平面のテストイメージを光軸と垂直
に置きます。ZEISS Dimension テストチャート
(注文番号:2267-884)の使用をお勧めしま
す。• カメラを三脚または安定した面の上に置き、テ
ストイメージの中央を撮影画面の中心を合わせ
ます。
94
JP
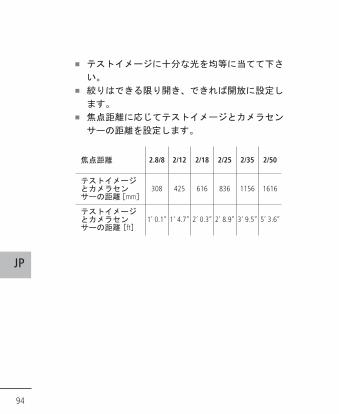
• テストイメージに十分な光を均等に当てて下さ
い。
• 絞りはできる限り開き、できれば開放に設定し
ます。
• 焦点距離に応じてテストイメージとカメラセン
サーの距離を設定します。
焦点距離 2.8/8 2/12 2/18 2/25 2/35 2/50
テストイメージとカメラセンサーの距離[mm]
308 425 616 836 1156 1616
テストイメージとカメラセンサーの距離 [ft]
1’ 0.1” 1’ 4.7” 2’ 0.3” 2’ 8.9” 3’ 9.5” 5’ 3.6”

95
JP
• フォーカスをそれぞれの距離に設定します。こ
の作業の為に上記の距離はフォーカスリング上
に赤い点で彫刻されています。フォーカスリン
グを固定ねじでロックすることをお勧めします。
• ディスプレイ又はモニターでイメージのシャー
プネス (鮮明度 )を判断して下さい。
• 六角レンチでバックフォーカス距離調節リング
(5)の 3 本のねじを緩めます。

96
JP
• バックフォーカス距離調節リング(5)に対し
て方位角位置調節リング(4)から前側部分を
手で回して、ディスプレイ又はモニターで観察
しながらイメージのシャープネスを最も高くし
ます。方位角位置調節リング(4)から前側部
分は、時計回りにも反時計回りにも回すことが
出来ます。機械的端点が調節範囲の限界を示し
ます。
• バックフォーカス距離を調節してイメージの
シャープネスを最も高くした後、六角レンチ
を使ってバックフォーカス距離調節リング(5)の 3 つのねじを締めます。

97
JP
方位角位置の調節
ZEISS Dimension レンズには方位角位置の調節リング
があります。これにより取り付け位置に関係なく、
目盛が読み易い位置に調節可能です。
六角レンチで方位角位置調節リング(4)のねじ 3
本を緩めて、絞りリング(7)から前側部分を回し
て最適な位置に合わせます。再びリングを締める
際は、六角レンチを使って 3 本のねじを締めます。

98
JP
入射瞳(EnP)入射瞳(EnP)の位置(2)は、各 ZEISS Dimension レ
ンズに表示されています。これにより、パースペ
クティブの中心を正確に一致させる必要がある場
合にレンズ位置を合わせやすくなります。正確な
位置は、焦点距離に応じて「EnP」の上または下に
表示されています。または、刻印された線からそ
の位置までの距離が表示されています。
ZEISS Dimension 2/12:
ZEISS Dimension 2/35:

99
JP
レンズのお手入れ
レンズを常に最良な状態に保つには、ガラス表面
に汚れや水分が付着しないようご注意ください。
レンズ表面のゴミは柔らかい刷毛で、汚れや指紋
は乾いた清潔で柔らかいマイクロファイバーの布
で除去します。
落ちにくい汚れには ZEISS クリーニング液の使用を
お勧めします。
カスタマーサポート
最寄りの販売店は以下のウェブサイトをご覧くだ
さい:www.zeiss.com/automatedimaginglenses
Carl Zeiss AG は、予告なく本仕様を変更する権利を留保します。
著作権所有。本マニュアルまたはその一部を、事前に Carl Zeiss AG から書面による許可を得ずに複製することは禁じら
れています。電子的または機械的な方法、コピー、録画、
他の媒体を問わず、いかなる形でも、検索システムに保存
または送信してはなりません。�
Copyright 2018, Carl Zeiss AG

100
JP
注意:
製品を適切かつ安全にご使用いただくため、この
安全上の注意と取扱説明書を最初に読み、安全な
場所に保管することをお勧めします。取扱説明書
に従わないご使用は、けがや損傷につながる場合
があります。
安全と取り扱い
決してレンズで直接太陽を見ないでください。視
力を著しく損なう場合があります。レンズを使用
していないときは、火災を生じる危険があるため、
必ずレンズキャップをはめてください。
廃棄
製品を家庭ごみとして廃棄せず、各国で適用さ
れる法的規制に従ってください。必要であれば、
廃棄とリサイクルの方法を現地当局にご相談くだ
さい。
安全上の注意
!
101
JP
使用環境
製品の使用温度範囲は –20 °Cから +55 °Cです。
ほこりや水分の多い環境では、レンズを適切に保
護してください。レンズに水分が付着したときは
カメラから取り外し、完全に乾燥させてから使用
を再開してください。外部の熱源を使用して製品
を乾燥させることはお避けください。
サービスと修理
記載したお手入れや取り扱い以外に、ご自身で
製品の修理や改造を行わないでください。分
解によって生じた損傷は保証の対象となりま
せん。修理の必要がある場合は、認定ディー
ラーや販売店にお問い合わせください。ウェ
ブサイトからもお問い合わせいただけます:
www.zeiss.com/automatedimaginglenses

102
CHN
祝贺您选购此款镜头。希望我们的镜头能为您的成功贡献绵薄之力。
ZEISS 自 1846 年开始生产质量顶尖的精密工程产品,如今已成为全球最先进镜头——用于微芯片制造的光刻系统——之领先制造商。ZEISS 也是电影制作所用镜头的全球市场领导者。电影屏幕上的图像往往会被放大数千倍,且对色彩再现质量的要求极高。现在,技术和工业应用也能受益于 ZEISS 享誉全球的尖端技术与专业知识。
在这种背景下,针对工业应用的高性能镜头系列应运而生。
ZEISS Dimension 镜头

103
CHN
ZEISS Dimension 系列的亮点 • �出色的图像质量 • 通过组合使用 C 卡口,相机传感器的覆盖尺寸达 4/3"
• 铝合金镜筒 • �可固定对焦和光圈设置 • �可调节后焦距,以补偿相机卡口公差。使用后焦点装置可根据相机传感器个性化调节镜头系统,从而获得最优距离。
• 可调节方位角位置,以确保无论安装在何处均能获得刻度的最佳可读性
• �入射光瞳位置带标记,用于精确对准镜头视角的中心
• 对焦环和光圈环联锁,以便在必要时便捷地直接安装伺服单元
• 通过 ZEISS T*® 镀膜对可见光和近红外范围内的光谱传输进行了优化

104
CHN
镜头组件1� �外侧:用于安装选装遮光罩的螺纹
内部:用于安装滤镜的螺纹2� �入射光瞳 (EnP) 的位置标记�3� �用于对焦设置的固定螺丝4� �用于调节方位角位置的环5� �用于调节后焦距的环6� �镜头卡口7� �光圈环,包括用于光圈设置的固定螺丝8� �对焦环,拥有以米和英尺为单位的距离刻度
遮光罩不包含在标准供货范围内。

105
CHN
后保护盖和镜头盖后保护盖和镜头盖可通过握住盖子的外缘并将其拉出或推到镜头上以取下或装上盖子。
安装和取下镜头此款镜头配有一个 C 卡口 (6)。将镜头装进相机卡口中并顺时针旋镜头,直至感觉到阻力。取下镜头时,逆时针旋转。
安装和取下滤镜与遮光罩标准螺纹滤镜可安装在镜头前面 (1)。如果同时使用多个滤镜,可能会出现渐晕(图像边角区的阴影)。建议使用 ZEISS T*® 滤镜。带螺纹的选装遮光罩也可安装在镜头前面 (1)。
调节对焦和光圈ZEISS Dimension 镜头为手动式镜头,也就是说在镜头处可直接调节对焦和光圈。使用镜头上各自的调节环(8 和 7)。使用附带的固定螺丝(3 和 7)固定已调节的对焦和光圈设置,避免误调节。对焦和光圈设置可在指示的极值之间无级调节。
操作

106
CHN
调节后焦距
供货时,ZEISS Dimension 镜头在空气中无限物距的情况下的标称法兰焦距(=�镜头安装面与相机传感器之间的距离)为约 17.53 mm。为确保最佳的图像质量,需要通过调节后焦距补偿相机卡口的公差。
• 在镜头 / 相机系统前方放置一个垂直于光
轴的、平整的高对比度测试图像。建议使用 ZEISS Dimension 测试图(订货号 :2267-884)。
• 将相机放在三脚架或稳固的表面上,使其对准测试图像的中心。
• 确保测试图像表面平坦且照明充足。• 将光圈调得尽可能宽,最好达到最大限度。

107
CHN
• 根据焦距长度设置测试图像与相机传感器之间的距离。
• 按照相应的距离设置对焦。为此,镜筒上标有一个红点,用以表示这一距离。建议使用固定螺丝固定对焦环。
焦距长度 2.8/8 2/12 2/18 2/25 2/35 2/50
距离测试图像 – 照相机传感器 [mm]
308 425 616 836 1156 1616
距离测试图像 – 照相机传感器 [ft]
1' 0.1" 1' 4.7" 2' 0.3" 2' 8.9" 3' 9.5" 5' 3.6"

108
CHN
• 用显示器或监视器图像观察并评估图像清晰度。 • 使用附带的内六角扳手松开环 (5) 的三颗无头 螺丝。
• 旋转镜头的前部,以调节后焦距并观察显示器或监视器上的图像,确保图像的最大清晰度。可在出厂设置的基础上顺时针和逆时针旋镜头。机械止挡明确表明了调节幅度的极限。
• 调节后焦距获得最大图像清晰度后,使用内六角扳手按照用手能拧紧的程度拧紧三颗无头螺丝。

109
CHN
调节方位角位置
ZEISS Dimension 镜头配有用于调节方位角位置的环。因此可对镜头进行调节,以确保无论安装在何处均能获得刻度的最佳可读性。
使用附带的内六角扳手松开环 (4) 的三颗无头螺丝,将镜头前部旋至最佳位置。需重新固定环时,使用内六角扳手按照用手能拧紧的程度拧紧三颗无头 螺丝。
110
CHN
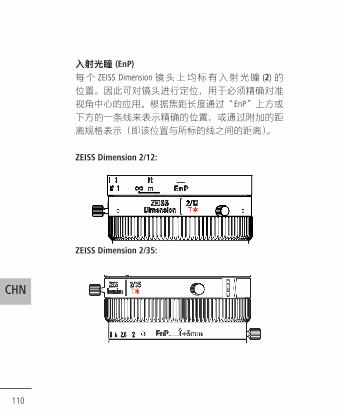
入射光瞳 (EnP)
每个 ZEISS Dimension 镜头上均标有入射光瞳 (2) 的 位置。因此可对镜头进行定位,用于必须精确对准视角中心的应用。根据焦距长度通过“EnP”上方或下方的一条线来表示精确的位置,或通过附加的距离规格表示(即该位置与所标的线之间的距离)。
ZEISS Dimension 2/12:
ZEISS Dimension 2/35:

111
CHN
镜头保养提示为确保您的镜头始终保持最佳状态,需防止玻璃表面出现任何形式的污垢或湿气。使用软刷小心地清除镜头上的灰尘;使用柔软、干净的干微纤维布除去各种痕迹和指纹。此外,我们建议使用 ZEISS 的清洁液清除顽固污渍。
客户支持您可访问我们的网站 www.zeiss.com/automatedimaginglenses 查找距您最近的经销商
Carl Zeiss AG 保留修改本说明书的权利,恕不先行通知。保留所有权利。如未事先获得 Carl Zeiss AG 的书面许可,禁止将本手册或本手册的部分内容存储在检索系统中或以任何形式进行传播,包括通过电子方式、机械方式、影印、录制或其他媒介。版权所有 2018,Carl Zeiss AG

112
CHN
注意 :为确保正确和安全使用,建议在使用产品前先阅读安全和操作说明,并妥善保存说明。如不遵守这些说明,可能会导致人身伤害或财产损失。�
安全与操作切勿将镜头直接对准太阳,因为可能会造成视力严重受损。不用时请盖上镜头盖。否则可能会引起 火灾。
废弃处理切勿将本产品当做生活垃圾处理,请遵守有关国家的适用法定条例。必要时咨询当地官方部门如何进行处理和回收。
安全提示
!

113
CHN
预期用途仅可在 –20 °C至 +55 °C的温度范围内使用本产品。
适当地为镜头提供各类环境中的防尘和防潮保护。如果镜头暴露于潮湿环境中,将其从相机上取下。再次使用前,使设备完全干燥。切勿尝试使用外部热源来为产品进行干燥处理。
服务与维修切勿自行对产品进行超出了上述的产品功能使用范围的维修或改动。拆卸产品时,可能会造成损坏,这类损坏不包含在质保范围中。如需维修,请联系您的授权经销商或分销商。为此,请访问我们的网站�www.zeiss.com/automatedimaginglenses

114
CHN
产品中有毒有害物质或元素的名称及含量
部件名称 有毒有害物质或元素
铅�(Pb)
汞(Hg)
镉(Cd)
六价铬(Cr(6))
(Cr(VI))
多溴联苯(PBB)
多溴联苯(PBDE)
本体
金属部件
树脂部件
光学部件
基板部件
备注� :�表示该有毒有害物质在该部件所有均质材料中
的含量均在 SJ/T11363-2014 标准规定的限量要求
以下。
:�表示该有毒有害物质至少在该部件的某一均质
材料中的含量超出 SJ/T11363-2014 标准规定的限
量要求。