Embed Size (px)
Citation preview

YOUR
HOME MAINTENANCE
MANUAL

2
Dear Homeowner,
Congratulations on the purchase of your new home! You are the owner of a home
that was built using leading edge building industry technology.
We at New Tradition Homes have partnered with consultants that conduct independent,
third party verification of our processes for compliance to rigorous standards. The end
product is a high performance home that is comfortable, durable, and energy efficient.
We hope you will enjoy your new home. Proper care and maintenance will allow you to
fully enjoy the benefits of this investment.
We have designed ―Your Home Maintenance Manual‖ to smoothly guide you through
some of the important details involved with properly maintaining your new home. We’ve
done the research for you.
On the pages that follow, you will find answers to questions like: What should I do? Why
should I do it? And when should I do it? So take a moment and review this manual, as we
take you on a maintenance tour of your new home! Mark your calendar for 30 days after
moving in and review this helpful manual, which includes monthly maintenance tips and
suggestions.
Keep this manual, your home warranty booklet, manufacturers’ warranties and insurance
documents together for easy access and review. Remember to check your 2-10 Home
Buyers Warranty® booklet for possible warranty coverage prior to hiring a contractor
to perform any corrective work.
The maintenance outline included in this manual is a suggested schedule only. The
manufacturer’s maintenance guidelines should be followed instead of our suggestions if a
discrepancy occurs.
Thank you for purchasing a home built by New Tradition Homes!

3
TABLE OF CONTENTS
I. BEFORE THE MOVE ......................................................................................... 4
II. AFTER THE MOVE ............................................................................................ 4
III. APPLIANCE AND SYSTEMS CATALOG ....................................................... 5
IV. HOME MAINTENANCE REPAIR CONTACTS ............................................. 6
V. MAINTENANCE CALENDAR .......................................................................... 7
VI. NOTES ................................................................................................................... 8
VII. EXTERIOR OF HOME ....................................................................................... 9
a. Yard ..................................................................................................................... 9
b. Fencing .............................................................................................................. 10
c. Concrete ............................................................................................................ 10
d. Siding ................................................................................................................. 11
e. Paint .................................................................................................................. 11
f. Gutters ............................................................... Error! Bookmark not defined. g. Roof ................................................................................................................... 11
h. Windows............................................................................................................ 12
i. Vents .................................................................................................................. 12
j. Faucets .............................................................................................................. 12
VIII. INTERIOR OF HOME ...................................................................................... 13
a. Interior Finishes ............................................................................................... 13
b. Doors ................................................................................................................. 14
c. Flooring and Countertops ............................................................................... 15
d. Plumbing ........................................................................................................... 17
e. Electrical ........................................................................................................... 19
f. Lighting ............................................................................................................. 20
g. HVAC System................................................................................................... 20
h. Gas Systems ...................................................................................................... 21
i. Appliances ......................................................................................................... 22
j. Attic ................................................................................................................... 22
IX. SPECIAL INTEREST ........................................................................................ 22
a. Mold Prevention ............................................................................................... 22
b. Extreme Weather Conditions ......................................................................... 24
X. HOME WARRANTY ......................................................................................... 25
4
I. BEFORE THE MOVE
Establish the following utilities in your name:
● Power company
● Water/Sewer service
● Gas company
● Telephone service
● Security company
● Cable or Satellite
●Trash collection
● Internet service
Notify the following of your new address:
● Place of employment
● Post office
● Insurance companies
● Credit card companies
● Social Security Administration
● Health and Benefits plans
● Investment accounts
● Magazine subscriptions
● Professional organizations
● Family
● Friends
II. AFTER THE MOVE
■ Find a secure place to store all of the following:
● Instruction manuals and manufacturer’s warranties
● 2-10 Home Buyers Warranty® booklet
● Home insurance documents
● This home maintenance manual
■ Change the address on your driver’s license and vehicle registration
■ Register your children in school
■ Register to vote if moving to a new district
■ Fill out and mail in any applicable manufacturer’s warranty information
cards
■ Purchase fire extinguishers for each floor of the home and a separate one for
the kitchen and garage
■ Locate main water and gas shut-offs
■ Locate electrical service and main breaker
■ Familiarized yourself with the operation of all appliances and equipment
■ Install floor protector pads on the bottom of furniture legs where needed
■ Apply grout sealer to ceramic tile grout
■ Start a basic tool kit for hanging blinds, curtain rods, pictures, reassembling
furniture, installing shelves, etc.
■ Identify any CC&R property improvement deadlines
■ Introduce yourself to the new neighbors
■ Take lots of pictures and video of your new home to show friends, family
and co-workers
5
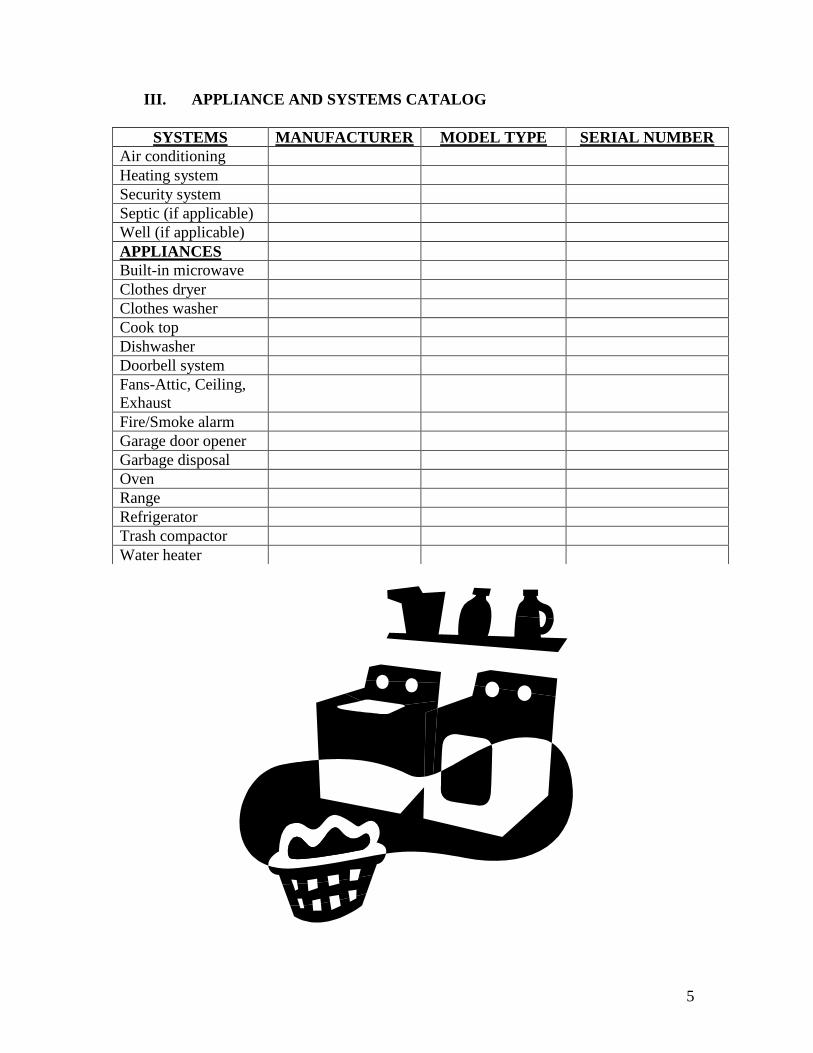
III. APPLIANCE AND SYSTEMS CATALOG
SYSTEMS MANUFACTURER MODEL TYPE SERIAL NUMBER
Air conditioning
Heating system
Security system
Septic (if applicable)
Well (if applicable)
APPLIANCES
Built-in microwave
Clothes dryer
Clothes washer
Cook top
Dishwasher
Doorbell system
Fans-Attic, Ceiling,
Exhaust
Fire/Smoke alarm
Garage door opener
Garbage disposal
Oven
Range
Refrigerator
Trash compactor
Water heater

6
IV. HOME MAINTENANCE REPAIR CONTACTS
SYSTEMS NAME PHONE NUMBER E-MAIL
Air conditioning
Heating system
Intercom system
Security system
Septic (if applicable)
Well (if applicable)
APPLIANCES
Built-in microwave
Clothes dryer
Clothes washer
Cook top
Dishwasher
Doorbell system
Fans-Attic, Ceiling,
Exhaust
Fire/Smoke alarm
Garage door opener
Garbage disposal
Oven
Range
Refrigerator
Trash compactor
Water heater
INSIDE HOME
Cabinetry
Doors, windows & trim
Flooring
Carpet
Wood floors
Insulation
Painting
Plumbing fixtures
OUTSIDE HOME
Siding
Gutters & downspouts
Landscaping
Roofing

7
V. MAINTENANCE CALENDAR
Home maintenance includes regular, seasonal, and one-time tasks. The
following suggested maintenance schedule identifies some of the more
common maintenance tasks that may be performed on a weekly,
monthly, semi-annual, or annual basis. Tailor it to fit your own situation,
adding or deleting items as required.
As a homeowner, you have normal maintenance responsibilities for your new home.
Establishing a maintenance schedule is the best way to manage your maintenance budget.
These suggested maintenance tasks and schedules should not replace the manufacturer’s
recommendations. We suggest the use of licensed contractors for any tasks you may feel
unprepared to complete. Remember, safety first! What seems like a simple plumbing or
electrical repair can cost you many times what you think you might save if you don’t do
it correctly.
The Following is Suggested Monthly Maintenance:
● Smoke Detectors – Check operation by pushing test button. Check and replace
battery if necessary.
● Check Ground Fault Circuit Interrupter (GFCI) to ensure proper protection.
● Clean garbage disposal blades by grinding ice cubes with hot water.
● Clean or replace filter in range hood.
● Check for evidence of leaks around toilets, under sinks and around dishwasher.
● Clean and freshen sink drains by flushing hot water and baking soda.
● Monitor and maintain floor coverings on an as-required basis. Regular vacuuming
will reduce wear of carpets and other floor coverings. Repair tears and remove
stains as soon as possible.
Twice-a-Year Maintenance:
● Inspect roof for broken or missing shingles, identifying anything that might cause
leaks or problems.
● Inspect and clean gutters and downspouts. If applicable, check and clean rain drain
catch basin filter.
● Inspect outside of home and condition of siding, paint and wood trim.
● Inspect doors and windows for proper operation and weather-resistance. Clean
tracks of windows and sliding glass doors before applying a clear silicone
lubricant.
● Inspect main service panel, circuit breakers, and all GFCI outlets.
● Complete seasonal maintenance on heating and air conditioning by a licensed
HVAC contractor.
● Inspect and replace caulking and grout around tubs, showers, and sinks as needed.
● Inspect and replace the furnace filter as needed.
● Inspect attic and make sure air vents are unobstructed. Check to see if animals are
nesting in insulation.
● Clean out lint and any other obstructions inside dryer vent to prevent clogging of
vent.

8
Annual Maintenance:
● Examine caulking around windows, doors, and other applicable areas.
● Complete annual furnace and air conditioning maintenance by a licensed HVAC
contractor.
● Schedule professional inspection of major appliances especially if fueled by
natural gas.
● If applicable, check condition of septic tank and drain field. Consult with septic
tank pumping service.
● Visually inspect your hot water heater for any signs of rust or deterioration.
● In the fall, winterize your sprinkler system by having the lines blown out.
VI. NOTES
_____________________________________________________________________
_____________________________________________________________________
_____________________________________________________________________
_____________________________________________________________________
_____________________________________________________________________
_____________________________________________________________________
_____________________________________________________________________
_____________________________________________________________________
_____________________________________________________________________
_____________________________________________________________________
_____________________________________________________________________
_____________________________________________________________________
_____________________________________________________________________
_____________________________________________________________________
_____________________________________________________________________
_____________________________________________________________________
_____________________________________________________________________
_____________________________________________________________________
_____________________________________________________________________
_____________________________________________________________________
_____________________________________________________________________

9
VII. EXTERIOR OF HOME
a. Yard
● Property Boundaries: See plot map for detailed description of property. A steel peg with a yellow cap indicates
a property boundary in the rear yards. Along streets, a small steel pin is embedded in the
sidewalk or street.
● Final Grade: The final grade surrounding the home should not be modified. It is designed to drain
water away from the home, into back yard area drains or along the swales in the side
yards to the street. Modifying the final grade may void the warranty related to moisture
in the crawlspace of your home.
Most homes come with front yard landscaping only. The rear and side yards are the
responsibility of the homeowner. See CC&R’s for landscaping guidelines.
● Grass, Shrubs, and Trees: All grass, shrubs and trees will require care and maintenance. Immediately upon taking
possession of the home it becomes the homeowner responsibility to maintain these items.
● Sprinkler Systems: Some homes are equipped with sprinkler systems. See the operator’s manual for detailed
instructions on setting the timer.
The timer control box is mounted in the garage on the exterior wall. Take a few moments
to familiarize yourself with the controls.
If your lawn is watered with city water, the main control valve for your sprinkler system
is located in the yard near the sidewalk. It is encased in a black plastic conduit with a
circular green lid or a rectangular box. Inside, you will find the
main shut off valve for the sprinkler system. If your lawn is
watered with irrigation water, the filter and shutoff valve are
located above ground or in a rectangular box. Seasonal
maintenance would include shutting off the sprinkler control
valve and blowing out the sprinkler lines while not in use during
the winter months. The rectangular boxes with the green lids are
the valve stations.
Avoid over-watering plants and shrubs which are next to the foundation. Adjust sprinkler
systems to avoid over-spraying the house or causing puddles near the foundation.
● Septic System (when applicable) Know the location of your septic tank and drain field. Have your tank inspected regularly
by a licensed contractor or health department official. Inspection will reveal problems
before they become serious, and tell you when the tank needs to be pumped.
Periodically check the drain field for a foul odor, excessive wetness, or overly lush grass
10
growth, which may be warning signs of a failing system. Never park or drive over any
part of the system. Do not plant anything but grass over or near the drain field, as tree and
shrub roots may clog the drain field. If the septic system has pump alarms, become
familiar with the location and operation of them.
● Water Meter: The water meter and main water shut-off are located next to the sidewalk inside a
protective concrete enclosure. This is typically near one of the property boundaries. A
wrench is required to turn the water valve.
b. Fencing
● Fence Type: Fencing that is provided as a standard item varies by community. Your community may
have cedar, vinyl or iron fencing. If your home did not have fencing included, verify
that placement and type is in accordance with the specific CC&R’s for your community
prior to installation.
● Fence Color: Please refer to CC&R’s for required colors.
c. Concrete
● Concrete Driveways & Patio: The concrete used on the driveways and patios or any other exterior slab is broom
finished. Should you have chosen to upgrade, you may also have concrete that is
exposed aggregate (exposed rock), stamped concrete, or any combination of finish types.
Concrete is a very durable building material but is also very rigid when dry. It is very
common for concrete to crack soon after it is poured and to continue throughout the life
of the concrete. Expansion joints are placed in the driveway and patios to attempt to
diminish the amount and/or magnitude of any cracking. Due to the porous nature of
concrete, normal homeowner maintenance would include applying a good quality
concrete sealer. Depending on the sealer used, it would need to be reapplied every 1-5
years.
One additional special feature of your home worth noting is that a 3‖ conduit PVC pipe
has been placed underneath your driveway. The conduit is placed to aide each
homeowner with any future plans for exterior low voltage wiring or a front yard sprinkler
system.
● Concrete Garage: The concrete in your garage has the same qualities as the driveway and patio concrete but
has a smooth finish. Expansion joints are placed in the floor in an effort to control
cracking. These joints may be in the form of a saw cut in a straight line or a plastic or
metal strip that is placed in the concrete just below the surface when it is poured.
Expansion joints will ultimately open up to typically 1/16‖ to 1/8‖. See the 2-10 HBW®
warranty booklet for allowable tolerances.
Normal homeowner maintenance would include periodic sweeping or washing off the

11
concrete with water.
d. Siding
● Fiber Cement: Cement-fiber siding is also a low-maintenance product that would need periodic pressure
washing or use of a soft bristle brush to clean and re-application of paint (based on the
siding and paint manufacturers recommendations) to keep it looking its best. Please
follow the manufacturer’s recommendations regarding any pressure washing you may
perform.
You may have noticed that your siding is not caulked at the joints (where two boards
meet). This is by design and is an approved method of installation. Instead of caulking, a
4‖ piece of pan flashing is placed behind each of the joints to ensure proper water
management.
All other caulking around windows, doors, and corners needs to be maintained over time.
This is a homeowner responsibility. Caulking deterioration is wholly dependent on
climatic conditions and exposure to the elements.
Related website: www.jameshardie.com
e. Paint
● General Painting: The expected life of painted surfaces varies greatly due to several
factors. One factor is the orientation of painted surfaces to the climatic
conditions that prevail in the area, such as exposure to sun and rain.
Fading of paint is normal and not considered a deficiency.
Caulking is to be touched up where necessary prior to any application
of paint to trim or siding.
● Wood Trim: It is recommended to re-paint wood trim initially at 3 years.
● Hardi-Plank Siding: It is recommended to re-paint Hardi-Plank siding initially at about 5 years.
For further information, see www.sherwinwilliams.com.
f. Roof
● Shingles: The asphalt roofing installed on your home has a Lifetime Limited Warranty. After any
extreme weather or storm, visually inspect the roof for damage. Notify your homeowners
insurance if there is storm damage.
Periodically visually inspect valleys on roofs for debris build-up on the shingle surface.

12
Exercise caution if walking on roofs, particularly near valleys, to eliminate the possibility
of damage to the shingles.
For more information see www.iko.com.
g. Windows
● Windows: The vinyl windows in your home are fixed (do not open), or
have a unit that slides up and down (single hung style), or side to
side (slider or vent style), or a casement style (uses a handle or
crank to swing open). To help ease in the operation of either
type of window, try spraying silicone on a rag and wipe both
tracks with the silicone spray. Both the single hung windows
(up and down) and the slider windows (side to side) do have the
ability to be removed to aid in cleaning hard to reach areas,
especially if you are trying to clean second-floor windows.
Keep in mind that casement windows, if left open for long
periods of time, can experience sagging. They can also be
damaged in high winds if left open.
Condensation is typical (based on humidity) on either the
interior portion of the inside pane or exterior portion of the
outside window pane of your home and should not be a basis for concern. If you see
condensation developing on the inside between the inner and outer panes service should
be requested.
Related websites www.plygem.com or www.parr.com.
h. Vents
● Foundation Vents: The foundation vents located in the foundation around the home help to keep air
circulating in your crawlspace under the home. Please keep an eye on the grade of your
yard if you are altering it from its original grade. Please ensure that the grade is sloping
away from the vents and is not level with the bottom of the vents. By taking these steps,
you are ensuring that water can not enter the crawlspace through the vents.
A seasonal concern during winter is frozen pipes. To help guard against this during
prolonged cold weather (several days below 32 degrees) Styrofoam vent covers can be
added to the foundation vents. The covers can be purchased at any hardware store.
Please be sure to remove the covers once the temperature has risen above freezing to
keep air circulating under the home.
i. Faucets
● Exterior Faucets: Typically, two hose bibs (faucets/water spigots) are included on your new home, one in
the rear near the patio and one in front on a garage wall.
13
Each water faucet is equipped with an anti-siphon device attached to the threaded portion
on which a hose is attached. This will typically drip water when it is first turned on and
again when the water is shut off. This is normal.
It is important to properly winterize the hose bibs. Prior to periods of extremely cold
weather, remove hoses from all hose bibs. It is recommended to shut off the water supply
to the water faucet in the garage wall and then drain the water out of the line from the
faucet. To do this, shut off the valve, open the hose bib and then open the air bleeding
valve found on the side of the shut off valve. After all water is drained out, close the
faucet. This will prevent the faucet from freezing.
The water faucet near the patio typically does not have a shut-off, nor does it need one. It
is in a wall that is in the heated portion of the home and is not subject to freezing. A
Styrofoam dome-shaped cover can be placed over that faucet if weather is extremely
cold.
VIII. INTERIOR OF HOME
a. Interior Finishes
● Expansion and Contraction: Most building materials will expand and contract subject to changes in temperature and
humidity.
Not all materials expand and contract at the same rate and the result may be small cracks
in the drywall and paint and small separations of other materials. This is very normal in a
new home, even with the highest quality construction. Shrinkage of the wood and drywall
items in your home is inevitable and will be most noticeable during the first year
following completion of construction.
The ceiling is attached to the roof trusses. The trusses will move at a different rate than
the walls and cracking may occur where the wall joins the ceiling. These cracks can open
and close with the seasons. This is because the attic is not a temperature controlled
environment.
● Walls and Ceilings: All walls in the home are covered with a satin paint. Ceilings are either painted the same
as the walls or finished with a flat white coat depending on the paint package that was
chosen.
If walls need to be cleaned of dirt or debris, use a damp rag and wash lightly. A paint
touch up kit was provided with your home which included all the interior and exterior
paint colors. Use this touch up kit for areas that are not able to be washed clean.
For more information on Sherwin Williams products go to www.sherwinwilliams.com.
● Trim and Doors: In premium paint packages, the doors and trim are painted with a white semi-gloss

14
enamel (commonly referred to as Sherwin Williams Southwest Builders semi-gloss
latex).
Related Website: www.sherwinwilliams.com
Natural wood trim, doors, and railings are covered with a pre-catalyzed lacquer. Touch
up can be accomplished by using Minwax polyurethane or a similar clear finish (satin
sheen).
Scuffs and scrapes can be repaired by using a white cotton cloth with lacquer thinner, and
wiping the woodwork lightly. Wipe only once or twice to avoid removing the lacquer
entirely.
● Cabinets: The cabinets in your home are a natural wood
product. Discoloration may occur over time as the
wood is exposed to the ultra-violet rays of sunlight.
This is to be expected and is not a flaw in the wood
or finish. More variation can be expected in darker
species of wood. Cleaning of wood cabinets can be
accomplished using a damp sponge or rag and a
mild, non-abrasive detergent. Scratches can be filled using a matching touch-up crayon
available at most hardware or home improvement stores.
b. Doors
● General Door Maintenance
Doors can be affected by a number of elements including minor settling, wear and tear,
expansion and contraction, and general weathering. Replace any weather-stripping that
becomes loose or damaged. Make sure door latches and dead bolts engage properly. Door
thresholds can often be adjusted by loosening or tightening the threshold screws. Adjust,
tighten and lubricate where necessary.
■ Exterior doors – check weather stripping for damage and proper operation of the
deadbolt and door handle. Adjust threshold if needed.
■ Patio doors – use a silicone spray in the track system and use a lubricant in the
latch mechanism for easier operation.
■ Patio screen doors – ensure that the door is not binding under normal usage.
Occasional adjustment of the rollers and lubrication of the rollers and track may
be needed. This door is easily damaged so exercise caution during use.
■ Garage rollup doors – periodically lubricate the rollers and track for smoother
operation and to minimize wear.
■ Garage fire door – check weather stripping for damage and proper operation of
door handle. Adjust threshold if needed.
■ Interior doors – check for adjustment and proper operation of door handles.
● Bi-Pass Closet Doors
To protect the closet doors and the door jambs and enable the bi-pass doors to close more
quietly, install 3-4 felt or rubber bumpers on the edge of the door where it meets the wall

15
when it closes.
● Doorknobs/Hinges: All doorknobs and door hinges will require some lubrication over time. A very small
amount of household oil, graphite or silicone lubricant will suffice.
For doorknobs, remove the knobs with a screwdriver and lubricate the moving parts
inside the knob and the latch in the door.
For hinges, remove the hinge pin with a hammer and a small screwdriver or nail setting
tool. Put a few drops of lubricant on the pin and then wipe off all excess before re-
installing.
● Master Keyed Door Locks (not applicable to all homes): On initial installation, the entry doors are master keyed on your home
to allow access during construction. This includes the front entry
door, the garage fire door, and (if applicable) the side garage service
door. Prior to homeowner taking occupancy, all doors are re-keyed to
the home’s specific keys.
c. Flooring and Countertops
● Floor Coverings The flooring in your home may come in many different types, styles, and colors, but all
have one thing in common. Proper care and maintenance of your flooring surfaces can
keep them looking great well after you have moved in.
Our trade contractors in the flooring industry will be able to assist you in purchasing any
products you may need for the care and maintenance of each type of surface.
● Vinyl: As with all flooring surfaces, special care needs to be taken to ensure that water is not
allowed to stand on the flooring surface. Please see the care and maintenance tips in the
warranty manual provided at orientation. Please also note that not all retail floor cleaning
products are acceptable for use on vinyl flooring.
● Hardwood: Wood flooring, being a natural product, has some water in it at all times. The moisture
content in wood will naturally change with the moisture changes that occur in our
environment. When ambient air dries out, the wood dries out and begins to shrink. This
causes the ―cracking‖ or ―gaps‖ between the boards.
When the temperature drops we turn on our heating systems and keep our doors and
windows tightly sealed. This heat dries out the home and sucks the moisture out of the
air and wood, causing the wood to shrink and cracks or gaps to appear. This can be
somewhat minimized by having a humidifier attached to the heating system.

16
As temperature and humidity changes occur in
summer, seasonal cracking should remedy itself.
As moisture is replaced back into the air, moisture
is also absorbed back into the wood. Expansion
occurs and wood floors return to the state in which
they were before the winter season.
It is recommended that you do not use wood filler
on your wood floor during the winter months in an
attempt to remove the cracks and gaps. When the
wood expands again in summer, it will either force out the excess fill or the boards will
warp. The wood must have somewhere to go as it expands and returns to its natural
position.
It is important to remember that this seasonal shrinkage is not a flaw in the wood or an
installation related problem. We recommend that the homeowner wait until spring or
summer before determining whether any repairs are needed.
The ideal humidity for hardwood flooring is between 45% and 55%. Keeping it within
this range throughout the year will greatly minimize any expanding and contracting.
● Laminate Flooring: Even though laminate flooring is a durable product, it is susceptible to damage from
water like all of the other flooring products you may have in your home. Please see our
flooring trade contractors’ information for more detailed information regarding care and
maintenance.
One special item to note regarding laminate flooring is that it is installed as a floating
floor system, so any noises that would be heard while walking on the floor may be
attributed to the movement of the floor itself.
● Ceramic Tile: The tile grout in your home has not been sealed following installation. A grout sealer is
highly recommended at the time of move-in. This product is readily available at most
home improvement stores. See application instructions that come with the product. Some
minor cracking in the grout lines may occur as your new home settles and dries. A special
caulk is available for repairing tile grout joints. As a floor covering, tile is one of the
easiest to care for, simply vacuum and wet mop.
● Carpet: Please see the information our flooring contractor has provided regarding care and
maintenance of your carpet flooring. Keep in mind different types of carpets may show
wear and seam lines differently.
● Laminate Countertops: Verify that caulking joints are in good condition along the backsplash. Avoid placing hot
items such as pots, pans, and irons on laminate – heat can liquefy the underlying glue. Do
not cut on your countertops; rather, use a cutting board. Clean with a mild, non-abrasive

17
detergent on a damp sponge or wash rag—do not use scrub pads. Please refer to the
instructions for care and maintenance provided by the flooring and hard surface supplier
for further information.
Countertops that have an exposed wood edge will require
periodic maintenance. Also, wood backsplashes and
natural wood cabinets may need occasional maintenance
as well. A white filmy or milky appearance generally
indicates water has penetrated the finish and needs to be
touched up. The recommended product to use is
Minwax polyurethane or similar clear finish (satin
sheen). This product is compatible with all exposed
wood surfaces with a natural finish.
For more information on Minwax® products go to www.minwax.com.
● Tile Countertops: It is recommended that the grout on tile countertops be sealed upon move-in to your
home. Similar to tile flooring, cracks in the grout on tile countertops can be touched up
with a color matched caulking.
● Caulk: Maintaining the caulking is the responsibility of the homeowner. All interior caulking
should be inspected annually for cracking and separation. If necessary, remove loose
caulk and re-caulk. If you need to paint the caulk, be sure the caulk you use is able to be
painted. On backsplashes, use a clear silicone caulk.
If an icemaker is installed on the refrigerator, it is a good idea to caulk the gap along the
floor and baseboard in the refrigerator bay area.
● Drywall: Accidents do happen, and sometimes drywall will get damaged. It
is a good idea to have some drywall spackle in the house for those
situations. Use it to fill in scratches, dents, and nail holes in your
drywall. Once the spackle has dried, use drywall texture (in a
spray can) to bring the texture back. When it is dry you may
repaint the damaged area.
These products are available at hardware or home improvement stores (read product
instructions before using).
d. Plumbing
● Inspecting the Plumbing System: Simultaneously turn on the water at all sinks, bathtubs, and showers; operate dishwasher
and washing machine; and flush all toilets. Check on all drains first to make sure nothing
overflows. Then, look for any leaks in the water and sewer pipes. Look in cabinets,
closets, on the floor, under lower level ceilings and in crawl spaces. Water supply lines
are plastic (PEX) or copper. Sewer lines will be black (ABS) plastic. If any water line

18
leaks are found, locate the shut-off valve nearest to the leak and turn the handle clockwise
or pull out knob to stop the flow of water. If any sewer line leaks are found, try to trace
the piping back to the area it serves, and discontinue use of those fixtures until repairs are
made. Consult with a qualified plumber as necessary.
● Sinks: If water pressure is low, unscrew the piece (aerator) at
the end of the spigot, and inspect the filter screen. Wash
out any trapped pieces of debris, then re-install. If the
sink is slow to drain, you may try some drain cleaner to
see if that helps. Avoid spilling cleaner acid on the basin
surface. Drain cleaners should not be used if the home is
on a septic system. Another option to clear a clogged
drain would be to disassemble the trap (U-shaped pipe)
under the sink and physically clear out any obstruction.
To clean sink surfaces, use a non-abrasive cleanser and warm water on a damp sponge or
rag.
● Bathtubs and Showers: If water pressure is low on shower heads, unscrew the shower head and flush it out,
against the direction of normal flow, to clear any debris. A rubber plunger can usually
unclog any drain obstructions in tubs and showers—do not use drain cleaner if the home
is on a septic system. Clean surfaces with a non-abrasive cleanser and warm water on a
damp sponge or rag.
● Spas or Jetted Tubs: To avoid motor damage, never operate jets unless the outlet ports are covered by at least
three inches of water. If the jets do not work, check to see if GFCI outlet or breaker is
tripped.
● Toilets: All the toilets in your home are low water usage, 1.6 gallons
per flush. Clean often using a non-abrasive cleanser. If the
toilet clogs and begins to overflow, turn off the water supply
at the shut off valve behind the toilet. If toilet runs constantly,
try adjusting the float mechanism in the tank to shut off water
sooner. Never flush baby wipes, sanitary napkins, dental
floss, hair, paper towels or diapers. Condensation on the
outside of the tank is not a leak. Try purchasing a tank cover if desired.
● Garbage Disposal: Always use cold water when operating. Avoid putting fruit peels or vegetable peels down
the disposal as this may clog the unit and/or also clog the drain trap. If disposal unit will
not operate, unplug unit and manually try to rotate the inner chamber from the bottom
with the included Allen wrench. After you have given the chamber a few turns, plug it
back in, press the reset switch on the bottom of the unit, and try it again.
● Water Heater:

19
Please refer to the manual that came with the water heater for proper use and care.
Always shut off the electric or gas supply before turning off the water supply. If your
home has a tank style water heater, when away from home for an extended period of
time, turn the temperature down to its lowest setting. Never store combustible materials
near a natural gas unit!
Test the pressure relief valve once a year by briefly pulling up on the lever and
confirming water discharge. Stay away from end of discharge pipe when performing this
test. Consult with a qualified plumber as necessary.
● Water Shut-offs: The shut off for the whole house is typically located
in the entry closet, under stair closet, laundry room,
or in the garage next to the water heater. This shut-
off is a standard faucet that needs to be turned
clockwise to close. A shut-off for the front (garage
wall) hose bib is typically located near the water
heater.
e. Electrical
● Panel: Your electric panel has a main circuit breaker that shuts off the entire panel and house.
Under this main breaker are smaller size breakers that control the individual appliance or
circuit. These circuit breakers have three positions on them, ON, OFF and TRIPPED.
They are designed to allow only a certain amount of electrical current to pass through the
wires – usually 15 to 20 amps. Circuit breakers will trip if that amount of current is
exceeded.
● Re-Setting Breakers: If any breakers trip, re-set them by switching them to ―off‖ then back to ―on.‖ Switching
the breaker directly from the ―tripped‖ position to ―on‖ will not restore electrical power.
If the breaker trips again, unplug all devices on that circuit. If this corrects the problem,
then there are too many devices plugged in to this circuit or one of the devices or cords is
faulty, unsafe and leaking electrical current.
● GFCI (Ground Fault Circuit Interrupter): These outlets have the ―test‖ and ―reset‖ buttons on them and are ultra-sensitive to protect
you from accidental electrocution if you are exposed to water and an electrical device.
Push the ―test‖ button at least once a month to trip the circuit. If the ―reset‖ button does
not pop out, consult with a qualified electrician as necessary to replace the GFCI switch.
If it does pop out, push it back in and repeat the following month.
These are generally located in three locations in each home. You will
have two GFCI outlets around your kitchen that will control the outlets
around the kitchen. There will be one GFCI outlet in one of the
bathrooms that controls all the other bathrooms. There will also be one
GFCI outlet in the garage that controls garage outlets as well as the

20
exterior outlets.
When using GFCI outlets for refrigerators, freezers, or other high amp/large load
appliances, take care to not overload and trip the circuit. We recommend using dedicated
circuits for such appliances.
● Exterior Electrical Outlets: The exterior electrical outlets on your home should not require homeowner maintenance,
but if you find that one or more exterior outlets are not working please try the following
solutions:
The exterior outlets are on the same circuit as the GFCI plugs. Please check that GFCI
plugs do not need to be reset. (See section on GFCI plugs for more information)
Check the main electrical junction box in the garage for any circuits that may need to be
reset.
● Smoke Detectors: Smoke detectors need some maintenance. Annual maintenance consists of changing the 9
volt battery and vacuuming each smoke detector. This keeps it clean of dust particles that
can set it off. If one or all smoke detectors start chirping, it is a sign to change the
batteries in ALL smoke detectors.
Related website: www.prairielectric.com
f. Lighting
● Light Bulbs and Fixtures: When changing light bulbs, please do not use a higher wattage then
what is recommended by the fixture manufacturer. If changing
exterior bulbs, try to avoid doing so in the rain.
Compact fluorescent lighting is part of your home lighting package.
Other fixtures in your home that contain standard incandescent type bulbs can be
exchanged with fluorescent if you prefer. Fluorescent lights are a great feature that
reduce energy consumption and may last up to 10 times longer than traditional bulbs.
Related websites: www.prairelectric.com www.northwestenergystar.com
g. HVAC System
● Furnace: The furnace installed in your home is built to be a reliable,
low-maintenance unit.
It is recommended to change the furnace air filter every six
to nine months or as the filter appears dirty.
If you have an electrostatic system they will require you to
clean the filter every 30-60 days.

21
The damper located in the main air duct next to the furnace (if applicable) is also a good
tool to maintain peak heating and cooling efficiency. The air duct transfers air to the
second floor and the damper within allows the homeowner to seasonally regulate the flow
of cool and warm air.
The home has been equipped with an air exchange system. It is controlled by a timer that
is located at the furnace. The timer will automatically turn the system on for a few hours
2 or 3 times during the day. The fan that it controls is usually located in the hall
bathroom and the timer will override the wall switch. As the timer cycles, each time it
gets to one of the pre-selected tabs, the fresh air intake is opened via a mechanical
damper. The furnace fan then starts up and begins to circulate the air in the home.
Simultaneously, the dedicated exhaust fan for the home will come on and begin to
exhaust stale air. The proper amount (minimum 3 hours) of fresh air exchange is
very critical in controlling indoor air quality.
● Air Conditioning: Whether your home has an electric heat pump or an air conditioner, you will notice
several lines running out of the base of the furnace and out of the home to the exterior
condenser unit for the air conditioning system. No maintenance should be required but
under normal operating conditions water will come out of the condensate lines and
should not be an area of concern.
The most important maintenance item to ensure everything works properly is to
regularly change the furnace filter.
It may be beneficial to purchase a maintenance contract with a licensed HVAC
professional to maintain the efficiency of your system.
Related website: www.callcampbell.com
h. Gas Systems
● Gas Shut-offs:
All gas shut-offs are in the open or on position when the
valve is in line with (parallel to) the gas line. When it is
turned 90 degrees, (perpendicular) it is off.
■ Main Shut-off—The main natural gas shut-off is located on the exterior of the
garage side wall. The shut-off valve is on the gas line between the gas meter and the line
entry into the home. This valve requires a wrench to turn it.
■ Gas Range Shut-off—The shut-off for the range is located at the inside back of
the lower cabinet on one side, or behind the range in some cases.
■ Furnace & Water Heater Shut-off—The gas shut-off for each of these units is
located on the gas supply line that is readily visible in front of each unit. The shut-off
valve is typically colored red.
22
■ Fireplace Shut-off—At the bottom of the fireplace, a removable panel covers
the controls and the gas shut-off. This is typically a red colored valve. There may also
be a dante valve in the wall or floor near the fireplace with a key for turning the gas on
and off.
■ Other Gas Supply Line Shut-offs—Your home may be equipped with a gas
supply line for a clothes dryer, patio barbeque grill, or hot tub. There should be a shut-off
valve just prior to the capped off gas supply stub.
i. Appliances
● Appliance Warranty Information:
The appliances in your home are not covered by the warranty provided through New
Tradition Homes. Any warranty or service concerns should be routed through the
appropriate manufacturer.
Whirlpool Customer Service: (800) 253-1301
Information regarding your warranty with the manufacturer, as well as contact
information in case service is needed is located in the owner’s manuals supplied with
each appliance.
Related websites: www.insideadvantage.com, www.kitchenaide.com,
www.insinkerator.com (garbage disposal)
j. Attic
Access to the attic is through a trap door/scuttle hole generally located in one of the
upstairs bedroom closets or laundry room. Additionally, some models have access to a
small attic area directly above the garage.
Caution: If walking in the attic, do not step on the drywall ceiling! Due to the blown-
in attic insulation, it is difficult to move about safely. Also, watch out for nails protruding
through roof sheathing.
Do not store items in the attic unless the attic was designed for that purpose (i.e. load
bearing attic trusses). Inspect the attic for any obstructions to air vents, and look for signs
of animals making nests in the insulation.
IX. SPECIAL INTEREST
a. Mold Prevention
● Requirements for Mold Growth
Mold is a type of fungus that spreads through the air in microscopic spores. Mold occurs
naturally and is found everywhere that life can be supported. Over 100,000 kinds exist in
the world and 1,000 of these are found in the U.S. In order to grow, mold requires food,
air, water, and a temperature between 40° and 100° Fahrenheit.

23
While not all molds are harmful, growth of mold within a home is inappropriate and can
potentially cause serious side effects, such as allergic reactions and infections for the
occupants, in addition to damaging the material on which it grows. Experts are studying
whether more serious side effects are possible. At this point, no agency has been able to
set guidelines on how much exposure is harmful because each of us reacts to mold
differently.
Designing or building homes that exclude mold spores is impossible. If conditions are
right, mold can grow in your home. Items commonly found in all homes such as wood,
carpet, drywall, fabric, and insulation (to name a few), can supply a food source.
Likewise, air and temperature in most homes meet the needs of mold spores. If moisture
is present and remains on a mold food source, mold can develop.
Moisture is the only mold growth factor that can be controlled in a home. By minimizing
moisture, you reduce or eliminate mold growth. Moisture in your home comes from
many sources. The activities of daily living, spills, leaks, overflows, condensation, and
high humidity all can play a role in providing moisture for mold growth.
Good housekeeping and a good home maintenance program are essential in your effort to
prevent mold growth.
The following page outlines some routine inspections and maintenance to help prevent
potential mold growth.
● Measures to Help Prevent Mold Growth
Caulking
Maintain all caulking around such areas as windows, doors, sinks, and tubs.
Cleaning
Mold grows well on dust and dirt. Therefore, vacuum and dust regularly. Clean or replace
filters in accordance to the manufacturer’s recommendations. Keep weep holes for brick
and on windows clear. Most bath tile cleaning products contain chemicals that remove
and help protect against mold growth. Wipe up any spills immediately.
Condensation
Condensation on surfaces inside your home is a sign of high humidity. If you notice
condensation, wipe it up and take steps to reduce the humidity level in your home.
Humidifier
If your home includes a humidifier, operate it in accordance with the manufacturer’s
instructions and clean it as recommended in the manufacturer’s literature. If condensation
develops, turn the humidifier down or off.
Inspections
Check your home regularly for signs of water intrusion. These might include musty odor,
staining, or actual standing moisture. Remember to check inside cabinets, under all sinks,
and behind toilets, as well as in seldom-used closets. If applicable, confirm your sump
pump functions correctly. Check weather stripping, caulking, grout, weep holes,
refrigerator icemaker water line, and air conditioning condensation line for signs of mold

24
growth.
Landscaping and Drainage
Maintain positive drain around your home. Avoid changes to the grade or exterior
additions that interfere with drainage away from the home; this includes edging or
borders that dam water near the home. Regularly inspect any sprinkler system for correct
function. Adjust sprinkler heads to avoid spraying the home and correct any leaks
immediately. Keep splash blocks or downspout extensions in place to channel roof water
away from your home. Clean gutters as needed to prevent overflow.
Leaks
Immediately report any leak to New Tradition Homes. This includes roof, window, or
plumbing leaks. Failure to report leak promptly increases your risk and responsibility for
repairs.
Purchases and Stored Items
Carefully inspect items you bring into your home such as boxes that have been in storage
or new house plants for any sign of mold, including musty odors.
Tile Grout:
Inspect and maintain grout as a seal to keep moisture from reaching the wall behind the
tile.
Valves:
Be familiar with the shut off valves for all water supply lines in your home. In the event
of a leak, immediately shut off the water at the appropriate valve to minimize the amount
of water that is released. Clean up the water immediately.
Ventilation:
Your daily habits can help keep your home well ventilated:
■ Avoid covering or interfering with the fresh air supply to your furnace.
■ Develop the habit of running the hood fan when you are cooking.
■ Turn the bath fan on when a bathroom is in use. Continue to run the exhaust
fan after use of showers for a minimum of 15 minutes to remove excess
moisture from the bathroom.
■ Connect your clothes dryer exhaust to the vent pipe. Clean the exhaust tube as
needed.
■ Air your house by opening windows for a time when weather permits.
Weather Stripping:
Weather stripping on doors may need occasional adjustment to prevent moisture from
getting in around the door as well as to reduce air infiltration.
b. Extreme Weather Conditions
● Winter Weather: When it is that time of year when the temperature (or wind chill) drops below freezing,
here are some things you will need to remember to do:
■ Disconnect garden hoses from exterior faucets.

25
■ Shut off water supply to garage side hose bib and drain faucet.
■ As an additional precaution, cover exterior faucets with insulation or Styrofoam
faucet cover.
■ Keep overhead garage door closed as much as possible. This should keep the
garage above freezing.
■ Plug foundation vents with fiberglass insulation or commercially made
Styrofoam vent covers. Be sure to remove covers as soon as weather is
warmer to retain adequate crawl space ventilation.
■ In extreme cold, it is helpful to leave cabinet doors open under sinks that are on
exterior walls. This will keep warm air circulating close to the pipes.
■ You may also need to leave interior faucets dripping when not in use to prevent
lines from freezing.
■ Do not use salt or any type of deicer on concrete driveway, porches, or
sidewalks. This will cause damage to the concrete surface.
■ In times of heavy snow, remove as much as you can reach from the eaves of the
house to prevent ice damming when the snow begins to melt.
X. HOME WARRANTY
Your new home is covered by America’s Choice® 2-10
Home Buyers Warranty®. This warranty covers the
builder’s one year workmanship, the two year systems, and
the ten year structural warranty.
Please refer to the 2-10 Home Buyers Warranty® booklet for details on covered items.
Shortly after closing and moving in to your new home, you will receive your copy of this
booklet along with the actual warranty certificate outlining coverage on your home.
In addition to the standard one year builder’s warranty, New Tradition Homes has
provided an additional year, for a total of two years workmanship warranty. To report
covered defective items under the two year builders or the two year systems warranty,
read the section below.
All non-emergency service work is to be done during normal business hours.
If you believe your home has a defect that is covered under the Builder’s two year
workmanship or two year mechanical systems warranty during the applicable Warranty
Term, please follow the procedures listed here. Locate the specific area of deficiency
listed in the Construction Performance Guidelines section of the 2-10 Home Buyers

26
Warranty® booklet. Determine if the item in question is a covered item, excluded item,
or homeowner responsibility. If the item is covered, please bring it to the attention of
your New Tradition Homes office through one of the following methods.
● Methods for Sending in a Service Request
Preferred Method If the item is a covered item, submit a request to the builder using the Homeowner Portal.
In your web browser, type in: http://newtraditionhome.punchlistmanager.net. This will
take you to the login screen where you will enter the Login and Password that were
emailed to you.
Alternate Methods
You may also email [email protected].
● Emergency Requests Service work that needs attention immediately (such as a water leak or major electrical
failure) should be handled by contacting the New Tradition Homes office (509-542-8476)
during normal business hours and talking with a Warranty Department representative. If
the emergency request is on a weekend or after hours, or if you are unable to reach
the Warranty Department, please contact a subcontractor directly. Refer to the
supplied emergency contact phone numbers in your homeowner’s manual or on the
information sticker typically located in your kitchen cabinet.
In the event of an emergency where neither New Tradition Homes nor the responsible
subcontractor is available, it is the homeowner’s responsibility to contact a qualified
subcontractor on their own. New Tradition Homes will reimburse such charges only if an
attempt has been made to contact both New Tradition Homes and the responsible
subcontractor first, and the deficiency falls within the respective warranty coverage
periods.

27
● Emergency Trade Partner Contacts
● Emergency Utility Contacts
Prairie Electric (Electrician)…...………………………......…...(360) 798-8411
Campbell & Co (HVAC)...………………………...……......…(509) 545-9848
Waterways Inc (Plumber).……………………..........................(509) 431-5077
Woody’s Roofing….……………………………………......….(509) 547-3913
Cascade Natural Gas …………………………………………. (888) 522-1130
City of West Richland ........……………..……......................…(509) 967-3431
Power Companies:
Big Bend Electric …………………………………………….. (509) 265-4221
Franklin PUD ………………………………………………… (509) 547-5591
City of Richland …………………..………………………….. (509) 942-7760
Benton PUD ………………………………………………….. (509) 582-2175
Benton REA ………………………………………………….. (509) 967-2921
Phone Companies: Verizon ……………………………………………………….. (800) 483-1000
Qwest …………………………………………………………. (800) 244-1111