Embed Size (px)
Citation preview

Yealink VC Cloud ManagementService User Guide V2.4.0.0

| Contents | ii
Contents
About This Guide..................................................................................................... 5Introduction of Yealink VC Cloud Management Service....................................................................................5Targeted Audiences...............................................................................................................................................5Basic Concepts......................................................................................................................................................5Browser Requirement........................................................................................................................................... 5Icons Introduction................................................................................................................................................. 6In This Guide........................................................................................................................................................7Summary of Changes........................................................................................................................................... 7
Changes for Release 24, Guide Version 2.4.0.0...................................................................................... 7Changes for Release 23, Guide Version 2.3.0.0...................................................................................... 7Changes for Release 22, Guide Version 2.2.0.0...................................................................................... 7
Basic Operations....................................................................................................... 8Logging into Yealink VC Cloud Management Service....................................................................................... 8
Logging into Yealink VC Cloud Management Service via Browser....................................................... 8Logging into Yealink VC Cloud Management Service via Microsoft Outlook....................................... 9
Updating Microsoft Outlook Plugin...................................................................................................................10Introduction of the Home Page.......................................................................................................................... 11Managing Account Information......................................................................................................................... 11
Viewing the Account Information..........................................................................................................12Editing the Login Password................................................................................................................... 12Editing the Registered Mailbox..............................................................................................................12Linking Your Cell Phone to Your Account............................................................................................12Editing the Linked Cell Phone Number.................................................................................................12Unlinking Your Cell Phone Number to Your Account.......................................................................... 13
Logging out of Yealink VC Cloud Management Service..................................................................................13
Managing Conferences........................................................................................... 13Scheduled Conferences, Meeting Now Conferences and Virtual Meeting Rooms (VMR)............................... 14Discussion Mode and Training Mode................................................................................................................ 15Education Mode.................................................................................................................................................. 16The Interactive Party and the Broadcasting Party in the Broadcasting Interactive Conference.........................17Scheduling Meeting Rooms................................................................................................................................18
Scheduling Meeting Rooms via Browser...............................................................................................18Scheduling Meeting Rooms via Microsoft Outlook.............................................................................. 19Configuring Meeting Room Parameters.................................................................................................19
Scheduling Video Conferences...........................................................................................................................20Scheduling Video Conferences via Browser..........................................................................................21Scheduling Video Conferences via Microsoft Outlook..........................................................................23Configuring the Parameters of Discussion/Training Mode Conference.................................................23Configuring Parameters of Education Mode Conference...................................................................... 25
Going to the Conference Detail Page................................................................................................................ 28Going to the Conference Detail Page via Browser................................................................................28Going to the Conference Detail Page via Microsoft Outlook................................................................28
Editing the Conference....................................................................................................................................... 29Cancelling the Conference..................................................................................................................................29

| Contents | iii
Controlling Conferences.........................................................................................30Going to the Conference Control page.............................................................................................................. 31
Going to the Conference Control Page via Browser............................................................................. 31Going to the Conference Control Page via Microsoft Outlook............................................................. 31
Configuring the Layout of Discussion Mode or Meet Now Conferences......................................................... 31Configuring the Layout of Training Mode Conferences................................................................................... 34
Configuring the Global Parameters........................................................................................................34Configuring Layout Template.................................................................................................................35Enabling the Layout Template............................................................................................................... 37
Sending Messages...............................................................................................................................................38Sending the Conference Banner.............................................................................................................38Sending the Conference Subtitle............................................................................................................ 38Sending the Conference Agenda............................................................................................................ 39
Calling Participants.............................................................................................................................................39Calling Participants from the Call History........................................................................................................ 40Inviting Contacts.................................................................................................................................................40Inviting Third Parties..........................................................................................................................................40Inviting Participants by Email............................................................................................................................41Sharing the Conference Information.................................................................................................................. 41Searching for Participants...................................................................................................................................41Allowing/Rejecting the Participant Application for Speaking...........................................................................42Removing Participants........................................................................................................................................ 43Moving Participants to the Lobby......................................................................................................................44Allowing/Refusing the Participants to Join the Conference.............................................................................. 45Muting/Unmuting Participants............................................................................................................................45Turning on/off the Video Image.........................................................................................................................46Blocking/Unblocking the Audio.........................................................................................................................46Enabling RTMP Live..........................................................................................................................................47Switching the Roles Between the Moderators and Guests................................................................................ 49Switching the Roles Between the Lecturer and the Moderator/Guest...............................................................50Controlling the Remote Camera.........................................................................................................................50Locking/Unlocking Conferences........................................................................................................................ 51Making the Roll Call..........................................................................................................................................52Exporting the Roll Call Records........................................................................................................................ 53Leaving/Ending Conferences..............................................................................................................................53
Controlling the Education Mode Conferences.....................................................53Configuring the Conference Layout of Education Mode.................................................................................. 54Removing Participants........................................................................................................................................ 56Switching the Roles Between the Teacher and Student.....................................................................................56Switching the Speaking Mode between the Free and the Raise Hand.............................................................. 57Searching for Participants...................................................................................................................................57Allowing/Refusing the Application for Speaking..............................................................................................57Moving the Participant into the Waiting Center................................................................................................ 58Muting/Unmuting Participants............................................................................................................................58Turning on/off the Video Image.........................................................................................................................59Blocking/Unblocking the Audio.........................................................................................................................59Enabling RTMP Live..........................................................................................................................................59Locking/Unlocking Conferences........................................................................................................................ 61Answering........................................................................................................................................................... 62
Troubleshooting....................................................................................................... 64

Viewing Call Statistics........................................................................................................................................64Common Problems..............................................................................................................................................64
Invited Participants Do Not Receive Emails......................................................................................... 65Participants See Messy Codes in the Email...........................................................................................65
Appendix-Time Zones............................................................................................ 66

| About This Guide | 5
About This Guide
This guide provides instructions for enterprise users to use Yealink VC Cloud Management Service.
• Introduction of Yealink VC Cloud Management Service• Targeted Audiences• Basic Concepts• Browser Requirement• Icons Introduction• In This Guide• Summary of Changes
Introduction of Yealink VC Cloud Management ServiceYealink VC Cloud Management Service (VCMS), as a server platform, is based on cloud structure and supportsmulti-party video conference. VCMS brings the MCU, the register server, the traversal server, the meetingmanagement server, the device management server and so on together, and it supports full series of videoconferencingproducts. VCMS offers significant convenience and cost-savings to integrators and business customers in terms ofdeployment, configuration and usage.
Targeted AudiencesThis guide is mainly intended for the following audiences.
• Endpoint users• Distributors
Basic ConceptsWhen you read this guide, you will find some reused concepts. Please familiarize yourself with these concepts first.
Yealink Cloud Directory: this concept refers to the directory which includes the user accounts, the room systemaccounts, and other accounts.
Yealink Videoconferencing Device: this concept refers to endpoints that support Yealink Cloud, including VC880/VC800/VC500/VC200/PVT980/PVT950/VC400/VC120/VC110 videoconferencing system, SIP VP-49G phone, VCDesktop & VC Mobile.
Content: this concept refers to contents shared by participants including the documents, the graphics, or the videos ontheir desktop.
Browser RequirementYealink VC Cloud Management Service supports the following browsers.
Table 1:
Browser Version
Firefox 52 or later

| About This Guide | 6
Browser Version
Google Chrome 52 or later
360 9 or later
Internet Explorer 11 or later
Safari 11 or later
Icons IntroductionIcons on the Yealink VC Cloud Management Service are described in the following table.
Table 2:
Icon Description
The general meeting room
The video meeting room
The conference time
The conference location
The conference organizer (displayed on the Calendarpage)
The conference ID
The conference password
The periodic conference
RTMP live
Control the conference
This participant is offline
This participant is online or has attended theconference
The moderator
The moderator is set as a lecture
The guest
The guest is set as a lecturer
The participant is sharing contents

| About This Guide | 7
In This GuideThis guide contains the following chapters.
• Chapter 1 Basic Operations• Chapter 2 Managing Conferences• Chapter 3 Controlling Conferences• Chapter 4 Controlling the Education Mode Conferences• Chapter 5 Troubleshooting• Chapter 6 Appendix-Time Zones
Summary of Changes
• Changes for Release 24, Guide Version 2.4.0.0• Changes for Release 23, Guide Version 2.3.0.0• Changes for Release 22, Guide Version 2.2.0.0
Changes for Release 24, Guide Version 2.4.0.0
The following section is new for this version:
• Answering
Changes for Release 23, Guide Version 2.3.0.0
The following sections are new for this version:
• Education Mode• Configuring Parameters of Education Mode Conference• Controlling the Education Mode Conferences
Major updates have occurred to the following section:
• Sending Messages
Changes for Release 22, Guide Version 2.2.0.0
The following sections are new for this version:
• The Interactive Party and the Broadcasting Party in the Broadcasting Interactive Conference• Configuring the Layout of Discussion Mode or Meet Now Conferences• Configuring the Layout of Training Mode Conferences• Calling Participants• Calling Participants from the Call History• Moving Participants to the Lobby• Allowing/Refusing the Participants to Join the Conference• Blocking/Unblocking the Audio• Enabling RTMP Live• Controlling the Remote Camera• Making the Roll Call• Exporting the Roll Call Records
Major updates have occurred to the following sections:

| Basic Operations | 8
• Scheduled Conferences, Meeting Now Conferences and Virtual Meeting Rooms (VMR)• Configuring the Parameters of Discussion/Training Mode Conference• Sending Messages
Basic Operations
This guide provides basic operations for users to use Yealink VC Cloud Management Service.
• Logging into Yealink VC Cloud Management Service• Updating Microsoft Outlook Plugin• Introduction of the Home Page• Managing Account Information• Logging out of Yealink VC Cloud Management Service
Logging into Yealink VC Cloud Management ServiceYou can use Yealink Cloud accounts to log into Yealink VC Cloud Management Service. You can get the accountinformation from the enterprise administrator.
• Logging into Yealink VC Cloud Management Service via Browser• Logging into Yealink VC Cloud Management Service via Microsoft Outlook
Logging into Yealink VC Cloud Management Service via BrowserYou can use Yealink Cloud accounts to log into Yealink VC Cloud Management Service via browser.
Procedure
1. Open a web browser.2. Enter https://www.ylyun.com/ in the address bar to visit the Login page of Yealink VC Cloud Management
Service.3. Click Login in the top-right corner of Yealink VC Cloud Management Service official website.4. Select a language from the drop-down menu of Language in the top-right corner.5. Select Account login.6. Enter your Yealink Cloud account and password.
If you link your cell phone number to your account, you can also enter your cell phone number and password.

| Basic Operations | 9
7. Click Login.
Note: If you have entered wrong passwords for 10 times, your account will be locked for 5 minutes.Please try again later. If you forget the password, click Forgot password and reset the password accordingto prompts.
If you want to join conferences from a web browser, click Join With Browser in the top-right corner. Formore information, refer to Yealink Web App User Guide.
Logging into Yealink VC Cloud Management Service via Microsoft OutlookYou can use Yealink Cloud accounts to log into Yealink VC Cloud Management Service.
Before you begin
• Microsoft Outlook is installed on your computer. Outlook 2010, Outlook 2013 or later are supported.• The Microsoft Outlook plugin is installed on your computer. Get the installation package from Yealink technical
support.
Procedure
1. Open Microsoft Outlook software.2. Click Home > Meeting Management > Log Out.3. Select Yealink VC Cloud Management Service, and enter the account number, the password and the server
address in the corresponding area.

| Basic Operations | 10
4. Optional: If you use the same account next time, you can select the Remember password checkbox so that youdo not need to enter the password again.
5. Click Log In.
Updating Microsoft Outlook PluginIf there is a new plugin version and you log into Yealink VC Cloud Management Service, the updating notificationwill pop up when you open Microsoft Outlook. If you ignore it, the notification will not pop up again. You can alsomanually update the plugin later.
Procedure
1. Open Microsoft Outlook software.2. Click Home > Meeting Management > About.3. Click Update Now to download the latest plugin version to your computer.4. Double click to install Yealink Outlook Plugin.5. Follow the default installation processes to install Microsoft Outlook plugin.

| Basic Operations | 11
Introduction of the Home PageAfter you log into Yealink VC Cloud Management Service, you will enter the Home page. In order to familiarizeyourself with various operation interface, you can know the layout of the Home page.
Table 3:
Number Description
1 Go to the Home page quickly.
2 Go to the Schedule Meeting Room page.
3 Go to the Schedule Video Conference page.
4 The entrance of Conference Control.
5 Join the conference by browser. For more information about Joining With Browser, refer to YealinkWeb App User Guide.
6 Display 3 upcoming conferences. Click More to enter My Schedule page.
Managing Account Information
• Viewing the Account Information• Editing the Login Password• Editing the Registered Mailbox• Linking Your Cell Phone to Your Account• Editing the Linked Cell Phone Number• Unlinking Your Cell Phone Number to Your Account
| Basic Operations | 12
Viewing the Account InformationYou can view the account number, the username, and the registered email.
Procedure
Click the account name in the top-right corner.
Editing the Login PasswordFor account security, we recommend that you can change your password periodically.
Procedure
1. Click the account name in the top-right corner.2. In the Password field, click Edit.3. Enter the current password, and enter the new password twice.4. Click Confirm.
Editing the Registered MailboxYou can edit the mailbox linked to Yealink Cloud account. This mailbox is used to receive information such asresetting passwords, conference invitations and so on.
Procedure
1. Click the account name in the top-right corner.2. In the Email field, click Edit.3. Enter the new email address.4. Click Confirm.
Linking Your Cell Phone to Your AccountYou can link your cell phone to your account to receive messages of system notifications. For example, if theenterprise administrator changes your account information, you can receive the new one on your cell phone.
Procedure
1. Click the account name in the top-right corner.2. In the Bundling phone field, click Bundling.3. Enter your cellphone number, the captcha, and the SMS authentication code.4. Click Confirm.
Editing the Linked Cell Phone NumberIf you have changed your cell phone number, you can edit the linked cell phone number.
Procedure
1. Click the account name in the top-right corner.2. In the Phone number field, click Edit.3. Enter the new cell phone number, the captcha, and SMS authentication code.4. Click Confirm.

| Managing Conferences | 13
Unlinking Your Cell Phone Number to Your AccountIf you do not want to receive messages, you can unlink your cell phone to your account.
Procedure
1. Click the account name in the top-right corner.2. In the Phone number field, click Unbundling.3. Enter the password.4. Click Confirm.
Logging out of Yealink VC Cloud Management ServiceIf you want to use other Yealink Cloud accounts to log into Yealink VC Cloud Management Service, you can log outof the current account.
Procedure
• Logging out of Yealink VC Cloud Management Service via browser:a) Click Exit in the top-right corner.
Note: Note that if the system has been idle on either page for more than 30 minutes, the system will logout of your account automatically and return to the Login page.
• Logging out of Yealink VC Cloud Management Service via Microsoft Outlook plugin:a) Click Home > Meeting Management > Log Out.
Managing Conferences
You can manage conference including scheduling conferences, viewing conference details, controlling conferencesand so on. You can use Yealink VC products to join conferences, applying for speaking and so on. Read the YealinkProducts Regulatory Notices guide for all regulatory and safety guidance.
• Scheduled Conferences, Meeting Now Conferences and Virtual Meeting Rooms (VMR)• Discussion Mode and Training Mode• Education Mode• The Interactive Party and the Broadcasting Party in the Broadcasting Interactive Conference• Scheduling Meeting Rooms• Scheduling Video Conferences• Going to the Conference Detail Page• Editing the Conference• Cancelling the Conference

| Managing Conferences | 14
Scheduled Conferences, Meeting Now Conferences and Virtual MeetingRooms (VMR)
Conferences are divided into scheduled conferences, meeting now conferences and VMRs.
Table 4: Differences
Difference Scheduled Conference Meet NowConference
VMR
Definition They are scheduled in advance. They are initiatedby devices withoutany reservations.
They are addedby the enterpriseadministrator. Thedevices can call intothe VMR at anytime without anyreservations.
GeneralConferences
You can scheduleentity meetingrooms to initiategeneral conferences.
The entity meetingrooms containgeneral meetingrooms and videomeeting rooms. Thedifference betweenthem is that videomeeting roomshave devices, butgeneral meetingrooms do not have.The entity meetingrooms are createdby the enterpriseadministrator.
Classification
Video Conferences You can scheduleentity meetingrooms to initiatevideo conferences.If you do not selectentity meetingrooms, devices cancall into VMRsto join the videoconferences.
No No
Whether theconference hasConference ID
GeneralConferences
No
Video Conferences Yes
Yes
After the conferencefinishes, theconference ID willbe released.
Yes
It is set bythe enterpriseadministrator.

| Managing Conferences | 15
Difference Scheduled Conference Meet NowConference
VMR
Whether theconference hasConferencePassword
GeneralConferences
No
Video Conferences Yes
No Yes
It is set bythe enterpriseadministrator.
Discussion Mode and Training ModeThe mode of the video conference can be divided into the discussion mode and the training mode.
Table 5: Differences
Difference Discussion Mode Training Mode
Moderator
The conference organizeris the moderator by default.The conference organizercan also set any participantas moderators.
Moderator
The conference organizer isthe moderator by default. Theconference organizer can also setany participant as moderators.
If the broadcasting interactivefeature is enabled, moderators arethe interactive parties by default.
LecturerModerators can set any participantas a lecturer during the scheduledconferences.
Mode
Guest
Other participants exceptmoderators.
Guest
Other participants exceptmoderators.
If the broadcasting interactivefeature is enabled, the guests arethe broadcasting parties by default.
Moderators can do the following thingduring the conference: Configuring theLayout of Discussion Mode or Meet NowConferences .
Moderators can do the following things duringthe conference: Configuring the Layout ofTraining Mode Conferences , Allowing/Rejecting the Participant Application forSpeaking , Making the Roll Call, Exporting theRoll Call Records , Switching the Roles Betweenthe Lecturer and the Moderator/Guest .
FeaturePrivilege
Moderators can do the following things during the conference: Editing the Conference ,Cancelling the Conference , Sending Messages , Calling Participants , Calling Participantsfrom the Call History , Inviting Contacts , Inviting Third Parties , Inviting Participantsby Email , Sharing the Conference Information , Searching for Participants , RemovingParticipants , Moving Participants to the Lobby , Allowing/Refusing the Participants to Jointhe Conference , Muting/Unmuting Participants , Controlling the Remote Camera , Blocking/Unblocking the Audio , Enabling RTMP Live , Switching the Roles Between the Moderatorsand Guests , Controlling the Remote Camera , Locking/Unlocking Conferences , and Leaving/Ending Conferences .

| Managing Conferences | 16
Difference Discussion Mode Training Mode
Other participants can only view the conference details.
Layout
Moderators and guests can view allparticipants. The default layout dependson the default layout set by the enterpriseadministrator in Yealink VC CloudManagement Service.
• Moderators can view all participants bydefault. The default layout depends onthe default layout set by the enterpriseadministrator in Yealink VC CloudManagement Service.
If the broadcasting interactive feature isenabled, the moderator can see all theinteractive parties by default.
• For guests, the video images of all lecturersare displayed in equal parts in the layout bydefault. If there is no lecturer, all guests canview the reminder of waiting for the lecturer.
If broadcasting interactive feature is enabled,the broadcasting parties will see that thevideo images of all lecturers are displayed inequal parts in the layout by default. If thereare no lecturers, all broadcasting parties canview the reminder of waiting for the lecturer.
Speakingrule Free speaking.
All guests and moderators are muted bydefault. Moderators can speak after unmutingthemselves. Guests can speak only when themoderators allow their application for speaking.
Contents All moderators and guests can sharecontents by default.
Only moderators and lecturers can sharecontents. Guests cannot share contents.
Education ModeAccording to the service subscribed by the enterprise administrator, you can schedule education mode conference,which is specially designed for the education industry.
Table 6: Education Mode
Difference Description
TeacherThe conference organizer is the teacher by default. Theconference organizer can also set any participant as ateacher.Role
Student Other participants except the teachers.

| Managing Conferences | 17
Difference Description
The teacher can do the following: Editing the Conference , Cancelling theConference , Configuring the Conference Layout of Education Mode , SendingMessages , Calling Participants , Calling Participants , Inviting Contacts ,Inviting Third Parties , Inviting Participants by Email , Sharing the ConferenceInformation , Removing Participants , Switching the Roles Between the Teacherand Student , Switching the Speaking Mode between the Free and the Raise Hand, Searching for Participants , Allowing/Refusing the Application for Speaking, Moving the Participant into the Waiting Center , Allowing/Refusing theParticipants to Join the Conference , Muting/Unmuting Participants , Turningon/off the Video Image , Blocking/Unblocking the Audio , Enabling RTMP Live, Controlling the Remote Camera , Locking/Unlocking Conferences , Leaving/Ending Conferences , and Answering .
Feature Privilege
Other participants can only view the conference details.
With 60-frameforwarding off
• Teachers can see the video images of other participants(except themselves) displayed in equal parts by default.
• Students can see the video images of all teachersdisplayed in equal parts by default.
Layout
With 60-frameforwarding modeon
• The forwarded teacher can see the video images of theother participants displayed in equal parts by default.
• Other teachers can see the video images of theother participants (except the forwarded teacher andthemselves) displayed in equal parts by default.
• Students can see the video images of the forwardedteacher displayed in a full screen by default.
Speaking rule• Whether or not teachers can speak is set by the conference organizer.• Whether or not students can speak is set by the conference organizer.
Contents• Teachers can share contents.• Students cannot share contents.
The Interactive Party and the Broadcasting Party in the BroadcastingInteractive Conference
In the broadcasting interactive conference, the participants are divided into the interactive party and the broadcastingparty.
Table 7: Differences
Difference Interactive party Broadcasting party
Definition Participants who send the video oraudio.
Participants who only receive thevideo or audio.

| Managing Conferences | 18
Difference Interactive party Broadcasting party
Moderators.
Guests who are unmuted.
Guests whose application forspeaking are allowed.
Guests who turn the camera on.
The lecturer.
Role
Guests who are pinned in thelayout in the training modeconference.
Guests who are muted, whosecameras are closed, who are notas lecturers, and who are notpinned in the layout in the trainingmode conference. All the aboveconditions must be met at the sametime.
Scheduling Meeting RoomsYou can schedule entity meeting rooms to initiate conferences.
Note: The enterprise administrator can disable the feature of scheduling entity meeting rooms.
• Scheduling Meeting Rooms via Browser• Scheduling Meeting Rooms via Microsoft Outlook• Configuring Meeting Room Parameters
Scheduling Meeting Rooms via BrowserYou can schedule entity meeting rooms via browser.
Procedure
1. Click Schedule Meeting Room.2. Configure the parameters.3. Click Preview to view the scheduled information.4. Click Submit and send email to complete scheduling.
If the participants you invite are associated with email, they will receive your emails. The following is an exampleof the email:

| Managing Conferences | 19
Related tasksConfiguring Meeting Room Parameters
Scheduling Meeting Rooms via Microsoft OutlookYou can schedule entity meeting rooms via Microsoft Outlook.
Procedure
1. Click Home > Meeting Management > Schedule Meeting Room.2. Configure the parameters.3. Click Confirm, and the page will automatically go to the window of sending email invitation, and then you can
send emails of conference information to invite participants.
Related tasksConfiguring Meeting Room Parameters
Configuring Meeting Room ParametersWhen scheduling meeting rooms, you can configure the conference location, the time, the subject, the participantand so on. You can also choose to inform the invited participants by SMS. SMS notification is set by the enterpriseadministrator.
Before you beginGo to the Schedule Meeting Room page.
Procedure
1. Select the date in the Meeting room field, and select a meeting room.

| Managing Conferences | 20
2. Configure the parameters.
Table 8: Parameters of Conference Details
Parameter Description
Start Time, End Time Select the time. The start time of scheduledconferences should be at least 5 minutes later thanthe current time.
Recurrence The recurrence pattern and the recurrence range.
Default: one-off conference.
Expand-Time zone Your time zone.
For more information about time zones, refer toAppendix-Time Zones .
Subject The conference's subject.
Participants Add participants from your organization or otherorganizations.
3. Select Notify the participants to attend the meeting on time by SMS, and the participants will receive themessage about the scheduled conference.
4. Add information in the Description field, and the participants will see it in the email.
Related tasksScheduling Meeting Rooms via BrowserScheduling Meeting Rooms via Microsoft Outlook
Scheduling Video ConferencesYou can schedule entity meeting rooms to initiate video conferences. If you do not select entity meeting rooms,devices can call into VMRs to join video conferences.
Note: The enterprise administrator can disable the feature of scheduling entity meeting rooms.
• Scheduling Video Conferences via Browser• Scheduling Video Conferences via Microsoft Outlook

| Managing Conferences | 21
• Configuring the Parameters of Discussion/Training Mode Conference• Configuring Parameters of Education Mode Conference
Scheduling Video Conferences via Browser
Procedure
1. Click Schedule Video Conference.2. Configure the parameters.3. Click Preview to view the scheduled information.4. Click Submit and send email to complete scheduling.
If the participants you invite are associated with email, they will receive your emails. The following is an exampleof the email:

| Managing Conferences | 22

| Managing Conferences | 23
Related tasksConfiguring the Parameters of Discussion/Training Mode ConferenceConfiguring Parameters of Education Mode Conference
Scheduling Video Conferences via Microsoft Outlook
Procedure
1. Click Home > Meeting Management > Schedule Video Conference, and enter the Schedule Video Conferencepage.
2. Configure the parameters.3. Click Confirm, and the page will automatically go to the window of sending emails, and then you can send the
conference information to invite participants.
Related tasksConfiguring the Parameters of Discussion/Training Mode ConferenceConfiguring Parameters of Education Mode Conference
Configuring the Parameters of Discussion/Training Mode ConferenceWhen scheduling video conferences, you can configure the conference location, the time, the subject, the participantand so on. You can also choose to inform the invited participants by SMS. SMS notification is set by the enterpriseadministrator.
Before you beginGo to the Schedule Video Conference page.
Procedure
1. In the Mode field, select Discussion mode or Training mode.2. Optional: Select the date in the Location field, and select the desired meeting room.
Note: According to the services subscribed by the enterprise administrator, click to configure theoccupied server resource of video conferences.
3. Configure the parameters.

| Managing Conferences | 24
Table 9: Parameters of Conference Details
Parameter Description
Start Time, End Time Select the time. The start time of scheduledconferences should be at least 5 minutes later thanthe current time.
Recurrence The recurrence pattern and the recurrence range.
Default: one-off conference.
Expand-Time zone Your time zone.
For more information about time zones, refer toAppendix-Time Zones .
Subject The conference's subject.
Participants Add participants from your organization or otherorganizations.
4. Click the icon of invited participant to set the participant as a moderator or a guest.
Note: If the participant is added from external email address, you cannot set him as a moderator.
5. If you choose training mode, you can enable Broadcasting interactive to initiate a training conference with alarge number of participants.
6. Select Notify the participants to attend the meeting on time by SMS checkbox, and the participants willreceive messages about this scheduled conference.
7. In the More field, click Advanced Settings, and configure the parameters.
Table 10:
Feature Discussion Mode Training Mode
Auto dialing When the scheduled conference begins, the system will automatically sendan invitation call to devices with the invited accounts logged in.
Default: disabled.
Auto redialing During the conference, if the account registered in a device is offline and itlogs in again, the system will redial this account to join the conference.
Default: disabled.
RTMP live Definition It refers to the video resolution that the MCU sends to the public streamingservices.
The supported video resolution is as follows:
• HD: 720p.• SD: 360p.
Default: HD.

| Managing Conferences | 25
Feature Discussion Mode Training Mode
Videooptions
The supported video options are as follows:
• Receive video and content: when the participants share contents, theLive page will be displayed in 1+4 layout with the contents displayed ina large screen and the video images of all participants displayed in smallscreens, and the video images of all participants take part in carousel inthe small screen.
When there are no contents, the Live page is the same as Receive videoonly.
• Receive video only: when in discussion mode conferences, the videoimages of all participants are displayed in the Live page by default butthe contents are not displayed. This layout depends the video layoutset by you. For more information, refer to Configuring the Layout ofDiscussion Mode or Meet Now Conferences .
When in training mode conferences, the video images of all lecturers aredisplayed in equal parts in the Live page by default but the contents arenot displayed. This layout depends the video layout set by you. For moreinformation, refer to Enabling the Layout Template .
• Receive content only: the Live page of the conference only displays thecontent.
Default: Receive video and content.
Eventdetails
It refers to the text displayed on the Live page of the conference.
Ignore participantslimit cap
When the participants exceed the maximum limit, the extra people can stilljoin the conference.
8. Add information in the Description field, and the participants can the information in the email.
Note: Broadcasting interactive, Auto dialing, Auto redialing, RTMP live and Ignore participants limit capare set by the enterprise administrator.
Related tasksScheduling Video Conferences via BrowserScheduling Video Conferences via Microsoft OutlookEnabling RTMP Live
Configuring Parameters of Education Mode ConferenceWhen scheduling education mode conferences, you can configure the time, the subject, the participants and so on, youcan also inform the invited participants by SMS. SMS notification is set by the enterprise administrator.
Before you beginGo to the Schedule Video Conference page.
Procedure
1. In the Mode field, select Education mode.2. Optional: Select the date in the Location field, and select the desired meeting room.

| Managing Conferences | 26
3. Configure the parameters.
Table 11: Parameters of Conference Details
Parameter Description
Class time, Quitting time Select the time. The start time of scheduledconferences should be at least 5 minutes later thanthe current time.
Recurrence The recurrence pattern and the recurrence range.
Default: one-off conference.
Expand-Time zone Your time zone.
For more information about time zones, refer toAppendix-Time Zones .
Name The subject.
Members Add participants from your organization or otherorganizations.
4. Click the icon of the invited participant to set him as a teacher/student.
Note: If the participant is added from external email address, you cannot set him as a teacher.
5. Select the Text members to attend the course on time checkbox, and the participants will receive messagesabout this conference.
6. In the More field, click Advanced Settings, and configure the parameters.
Table 12:
Feature Description
60-frame forwardingmode
If the bandwidth is sufficient, the video image of the first teacher who jointhe conference can reach 1080P60 frame, which can improve the videofluency.
Default: disabled. This mode need at least 2M bandwidth.

| Managing Conferences | 27
Feature Description
Default speaking mode The supported modes are as follows:
• Free: the teachers and students can speak freely by default.• Raise Hand: the teachers and students are muted by default, the teachers
can speak after unmuting themselves. The students can speak only whenthe teacher agrees their application for speaking.
Default: Free.
Auto dialing When the scheduled conference begins, the system will automatically sendan invitation call to devices with the invited accounts registered.
Default: disabled.
Auto redialing During the conference, if the account registered in a device is offline and itlogs in again, the system will redial this account to join the conference.
Default: disabled.
Definition It refers to the video resolution that the specified MCU sends to publicstreaming services when the 60-frame forwarding mode is disabled.
The supported video resolution is as follows:
• HD: 720p.• SD: 360p.
Default: HD.
Videooptions
The supported video options are as follows:
• Receive video and content: when the teacher shares contents, the Livepage will be displayed in 1+4 layout with the contents displayed in alarge screen and the video images of all participants displayed in smallscreens, and the video images of all participants take part in carousel insmall screen.
When there are no contents, the Live page is the same as Receive videoonly.
• Receive video only: the video images of all teachers are displayedin equal parts in the Live page (in 60-frame forwarding mode, theforwarder is displayed in a full screen). This layout is not affected by thevideo layout set by the teacher.
• Receive content only: the Live page of the conference only displays thecontent.
Default: Receive video and content.
RTMP live
Eventdetails
It refers to the text displayed on the Live page of the conference.
Ignore participantslimit cap
When the participants exceed the maximum limit, the extra people can stilljoin the conference.
7. Optional: Add information in the Description field, and the participants will see this information in the email.
Note: Auto dialing, 60-frame forwarding mode, Auto redialing, RTMP live and Ignore participants limitcap are set by the enterprise administrator.

| Managing Conferences | 28
Related tasksScheduling Video Conferences via BrowserScheduling Video Conferences via Microsoft Outlook
Going to the Conference Detail PageIf you want edit or cancel the conference, you need to go to the Conference Detail page first.
• Going to the Conference Detail Page via Browser• Going to the Conference Detail Page via Microsoft Outlook
Going to the Conference Detail Page via Browser
Procedure
Do one of the following:
• In the Recent Meetings module, click the desired conference to go to the Conference Detail page.• Click More to go to My Schedule page, and then click the desired conference to go to the Conference Detail
page.
Related tasksEditing the ConferenceCancelling the Conference
Going to the Conference Detail Page via Microsoft OutlookYou can view all conferences from My Schedule page.
Procedure
1. Click Home > Meeting Management > Calendar.2. Click the desired conference to view details.
Related tasksEditing the ConferenceCancelling the Conference

| Managing Conferences | 29
Editing the ConferenceYou can edit the details of the upcoming conferences.
Before you beginGo to the Conference Control Page.
Procedure
1. Click Edit conference.
• If the conference you edit is one-off conference, edit the desired parameters.• f the conference you want to edit is a periodic conference, select Edit occurrence/Edit series from the pop-up
dialogue, and edit the desired parameters.
2. Click Confirm.
Related tasksGoing to the Conference Detail Page via BrowserGoing to the Conference Detail Page via Microsoft Outlook
Cancelling the ConferenceIf you do not need hold the conference, you can cancel it.
Before you beginGo to the Conference Control Page.
Procedure
1. Click Cancel.2. If you want to cancel the periodic conferences, Delete occurrence/Delete series.
3. Click Confirm.If the enterprise administrator enables SMS, you can select Notify the participants to attend the meeting ontime by SMS checkbox.If the participants you invite are associated with emails, they will receive emails of canceling conferences. Thefollowing is an example of the email:

| Controlling Conferences | 30
Related tasksGoing to the Conference Detail Page via BrowserGoing to the Conference Detail Page via Microsoft Outlook
Controlling Conferences
The moderator can control the conference to realize the desired conference effect.
• Going to the Conference Control page• Configuring the Layout of Discussion Mode or Meet Now Conferences• Configuring the Layout of Training Mode Conferences• Sending Messages• Calling Participants• Calling Participants from the Call History• Inviting Contacts• Inviting Third Parties• Inviting Participants by Email• Sharing the Conference Information• Searching for Participants• Allowing/Rejecting the Participant Application for Speaking• Removing Participants• Moving Participants to the Lobby• Allowing/Refusing the Participants to Join the Conference• Muting/Unmuting Participants• Turning on/off the Video Image• Blocking/Unblocking the Audio• Enabling RTMP Live• Switching the Roles Between the Moderators and Guests• Switching the Roles Between the Lecturer and the Moderator/Guest• Controlling the Remote Camera• Locking/Unlocking Conferences

| Controlling Conferences | 31
• Making the Roll Call• Exporting the Roll Call Records• Leaving/Ending Conferences
Going to the Conference Control pageIf you want to control conferences, such as configuring the video layout and inviting participants, you need go to theConference Control page first.
• Going to the Conference Control Page via Browser• Going to the Conference Control Page via Microsoft Outlook
Going to the Conference Control Page via Browser
About this taskThe moderator or teacher can control the ongoing conferences, the scheduled conferences that can join in advancedand VMRs.
Note: The moderator or teacher of VMR is set by the enterprise administrator.
Procedure
1. Click Conference Management.2. According to the type of the conference you want to control, click Ongoing/Scheduled/VMR.3. Click on the right side of desired conference.
Going to the Conference Control Page via Microsoft Outlook
About this taskThe moderator or teacher can control the ongoing conferences, the scheduled that can join in advanced.
Procedure
1. Click Home > Meeting Management > Conference Control.2. Select the desired conference from the drop-down menu of Conference Control.
Configuring the Layout of Discussion Mode or Meet Now ConferencesModerators can change the video layout of the conference.
Before you beginGo to the Conference Control page.
Procedure
1. Configure the layout parameter on the right side.

| Controlling Conferences | 32
Table 13:
Parameter Description
Select layout Selected speaker The selected participant isdisplayed in the full screen.
Equal N×N Participants are displayed inequal images. The maximumnumber of video images perscreen in the Equal N×N.
• 2*2• 3*3• 4*4• 5*5• 6*6• 7*7
Note: the number of videoimages per screen is set by theadministrator.

| Controlling Conferences | 33
Parameter Description
OnePlusN The video image of the firstparticipant who joins theconference is displayed in largescreen, and the video images ofother participants are displayedin small screens around the firstparticipant.
The maximum number of smallvideo images per screen in the1+N mode.
• 1+0• 1+4• 1+7• 1+9• 1+12• 1+16• 1+20
Note: the number of videoimages per screen is set by theadministrator.
Video carousel In 1+N and Equal N×N modes, if the number of the currentparticipants exceeds the maximum number, the video images of theconference layout will be switched according to the interval and thevideo images per cycle.
Note: it is enabled by default.
Select a speaker In 1+N mode, if this feature is enabled, you can select a speaker tobe displayed in the large pane.
Note: if this feature is enabled, only in 1+0 mode are the videocarousel feature and the voice-activated feature disabled and theycannot be configured. Selecting a speaker and the video carouselcan be enabled simultaneously in any mode except for 1+0 mode.
Activated speaker In 1+N mode, you can enable the voice-activated feature toautomatically recognize the video image of the speaking participantwith yellow frame. When the participant continues speaking for awhile, his video image will be displayed in large window, the videoimage of other participants will be displayed in small windows.
Note: it is enabled by default. The voice-activated time is 2 secondby default.
Displaying the ParticipantName
If the enterprise administrator enables this feature, you can chooseto display the participant name on the video image or not.
Note: it is enabled by default.

| Controlling Conferences | 34
Parameter Description
Displaying Participant Status If the enterprise administrator enables this feature, you can enableit and the icons of the participant status, such as muting, blocking,applying for speaking, are displayed in the video image.
Note: it is enabled by default.
Displaying the ParticipantName
In Selected speaker mode, the participants are displayed in a fullscreen.
2. Click Apply and the setting will takes effect to all participants.
Related tasksGoing to the Conference Control Page via BrowserGoing to the Conference Control Page via Microsoft Outlook
Configuring the Layout of Training Mode Conferences
• Configuring the Global Parameters• Configuring Layout Template• Enabling the Layout Template
Configuring the Global ParametersThe moderator can configure the time of the video carousel, the voice-activated time and whether to display theparticipants name.
Before you beginGo to the Conference Control page.
Procedure
1.Click on the right side.
2. Configure the corresponding parameters.

| Controlling Conferences | 35
Table 14:
Parameter Description
The duration of video carousel In the Equal N×N , 1+N and 2+N modes, if thevideo carousel is enabled in the current conferenceor in the enabled layout template and when thenumber of participants exceeds the maximumnumber, the system will switch the video imagesof participants according to the duration.
Voice-activated time In the OnePlusN and TwoPlusN layout, whenthe voice-activated feature is enabled in currentconference or layout template, you can usevoice-activated feature, so that the system willautomatically identity the speaking participant.Additionally, when the speaker is speakinguninterruptedly during the preconfigured voiced-activated duration, his video image will be giventhe prominence with the largest pane, while thevideo images of other participants are displayed insmall panes.
Display participant name If the enterprise administrator enables this feature,you can choose to display the participant name onthe video image or not.
Note: it is enabled by default.
Display participant status If the enterprise administrator enables this feature,you can enable it and the icons of the participantstatus, such as muting, blocking, applying forspeaking, are displayed in the video image.
Note: it is enabled by default.
3. Click Save, and the global parameters take effect to the current conference or the enabled layout immediately.
Related tasksGoing to the Conference Control Page via BrowserGoing to the Conference Control Page via Microsoft Outlook
Configuring Layout TemplateIn training mode conference, the moderator can preconfigure the layout template which will be saved, and be used atany time if needed.
Before you beginGo to the Conference Control page.
Procedure
1. Select a template, and double click the template to edit the name.

| Controlling Conferences | 36
2. Select the 1+N, Equal N×N, 2+N, and Selected speaker.3. Click Set Display Parties and select the desired participants to be displayed in this template.4. Optional: Click the corresponding position in the template, and select the desired participant to be pinned in this
position.
Note: If the selected conference participants are absent, other participants will view the reminder ofwaiting for the selected conference participants. If the selected participant did not attend the conferenceyet, other participants will see the reminder of waiting for the participant.
If you do not select participants to be displayed in a position, other participants view the position in blackscreen.
If the participants are pinned to all the large video images, the voice-activated feature is disabledautomatically.
5. If the layout you selected is 1+N, Equal N×N or 2+N mode, configure the following parameters:
Table 15:
Parameter Description
Mode Equal N×N The maximum number of video images per screenin the Equal N×N mode are described as follows:
• 2*2• 3*3• 4*4• 5*5• 6*6• 7*7
Note: the number of video images per screen is setby the administrator.

| Controlling Conferences | 37
Parameter Description
1+N The number of small video images per screen in1+N mode.
• 1+0• 1+4• 1+7• 1+9• 1+12• 1+16• 1+20
Note: the number of video images per screen is setby the administrator.
2+N In 2+N mode, the maximum number of videoimages per screen is 2+8 and it is not configurable.
Video carousel If the number of participants exceeds the maximum number, the system will switchthe video images of participants according to the video images per cycle.
Note: It is enabled by default.
Activatedspeaker
In 1+N and 2+N mode, you can enable the voice-activated feature to automaticallyrecognize the video image of the speaking participant with yellow frame. Whena participant continues speaking for a while (refer to Configuring the GlobalParameters), his video image will be given the prominence with the largest pane,the video images of other participants will be displayed in small panes.
Note: It is enabled by default.
6. Click Set Application Parties, and select the desired participants.
Related tasksGoing to the Conference Control Page via BrowserGoing to the Conference Control Page via Microsoft Outlook
Enabling the Layout TemplateIn training mode conference, the moderator can enable multiple templates and apply them to different participantsaccording to different conference needs.
Before you begin
• Go to the Conference Control page.• Configuring Layout Template is done.
Procedure
1. Select a template.2. Select the Enable template checkbox, and the template takes effect for all selected parties.
If you have changed the edited template, click Apply after editing to apply changes to this template.
Related tasksGoing to the Conference Control Page via BrowserGoing to the Conference Control Page via Microsoft OutlookSwitching the Roles Between the Lecturer and the Moderator/Guest

| Controlling Conferences | 38
Sending MessagesThe moderator or the teacher can inform the participants about the conference information or the agenda by sendingmessages.
• Sending the Conference Banner• Sending the Conference Subtitle• Sending the Conference Agenda
Related tasksGoing to the Conference Control Page via BrowserGoing to the Conference Control Page via Microsoft Outlook
Sending the Conference BannerThe moderator or teacher can convey the conference subject by displaying the banner on the conference video image.
Before you beginGo to the Conference Control page.
About this taskYou can configure the content and the position of the banner.
Procedure
1. Click Message in the top-right corner of the Conference Control page.2. Select Banner.3. Edit the content and select the position.4. Click DisplayBanner, click Send, and the participants can see the banner on their screens immediately.
Sending the Conference SubtitleLike the note on the blackboard, the subtitle can be used to convey the information for the participants to write down.
Before you beginGo to the Conference Control page.
About this taskThe moderator or teacher can configure the content, the position, the type (for example: the dynamic subtitle) and theparticipants who the subtitle is applied to.
Procedure
1. Click Message in the top-right corner of the Conference Control page.2. Select Subtitle.3. Configure the parameters.4. Click DisplaySubtitle, and click Send, and the participants(who the subtitle is applied to) can see the subtitle on
their screen immediately.
| Controlling Conferences | 39
Sending the Conference AgendaThe moderator or teacher can send the conference agenda to the participant.
Before you beginGo to the Conference Control page.
Procedure
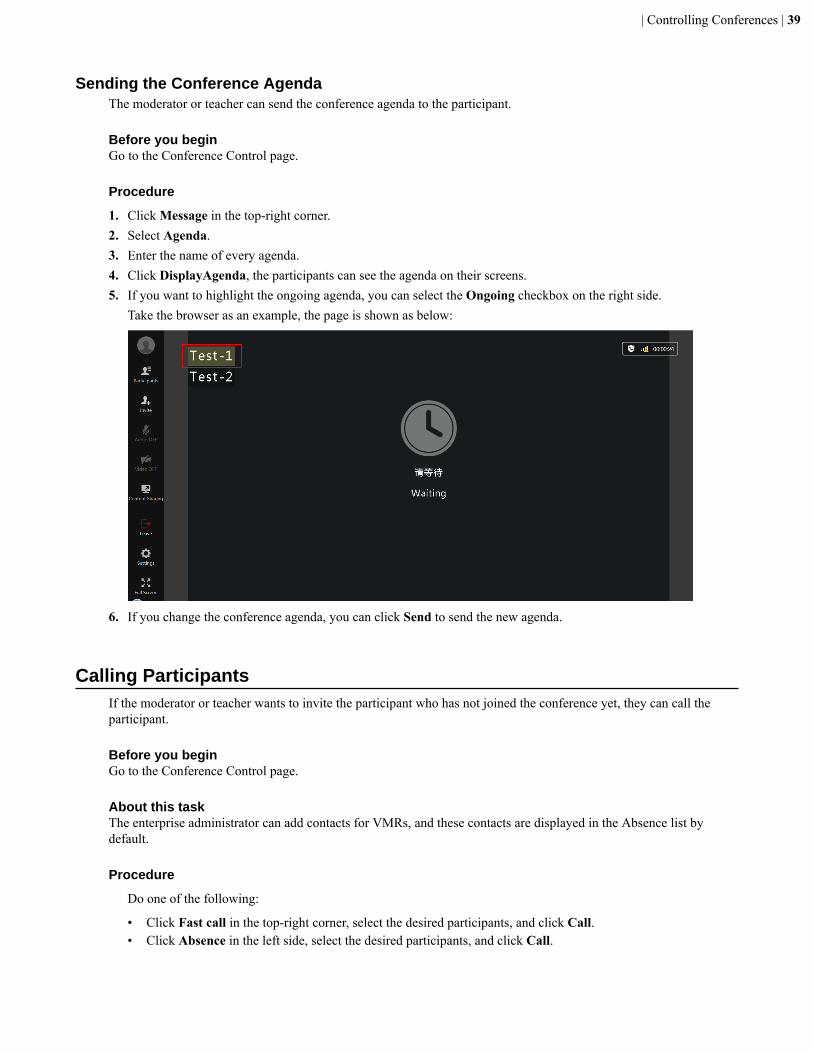
1. Click Message in the top-right corner.2. Select Agenda.3. Enter the name of every agenda.4. Click DisplayAgenda, the participants can see the agenda on their screens.5. If you want to highlight the ongoing agenda, you can select the Ongoing checkbox on the right side.
Take the browser as an example, the page is shown as below:
6. If you change the conference agenda, you can click Send to send the new agenda.
Calling ParticipantsIf the moderator or teacher wants to invite the participant who has not joined the conference yet, they can call theparticipant.
Before you beginGo to the Conference Control page.
About this taskThe enterprise administrator can add contacts for VMRs, and these contacts are displayed in the Absence list bydefault.
Procedure
Do one of the following:
• Click Fast call in the top-right corner, select the desired participants, and click Call.• Click Absence in the left side, select the desired participants, and click Call.

| Controlling Conferences | 40
Related tasksGoing to the Conference Control Page via BrowserGoing to the Conference Control Page via Microsoft Outlook
Calling Participants from the Call History
Before you beginGo to the Conference Control page.
Procedure
1. Click Call History on the left side.2. On the right side of the desired participant, click Redial.
Related tasksGoing to the Conference Control Page via BrowserGoing to the Conference Control Page via Microsoft Outlook
Inviting ContactsThe moderator or teacher can call the desired contact in Yealink Cloud directory directly.
Before you beginGo to the Conference Control page.
Procedure
1. Click Invite the top-right corner.2. Select Invite Contacts.3. Select the desired contact in the enterprise directory.4. Click OK.
Related tasksGoing to the Conference Control Page via BrowserGoing to the Conference Control Page via Microsoft Outlook
Inviting Third PartiesThe moderator or teacher can invite participants via the H.323 or SIP protocol or by calling the external YealinkCloud accounts.
Before you beginGo to the Conference Control page.
About this taskYou can contact Yealink to subscribe to the service of third-party devices connected to the Yealink server.
Procedure
1. Click Invite the top-right corner.2. Select Email Others.

| Controlling Conferences | 41
3. Select a protocol from the drop-down menu of Protocol, and then do one of following:
• For H.323/SIP, enter the URL or the IP address.• For Yealink Cloud Number, enter the account number.
4. Click Call.
Related tasksGoing to the Conference Control Page via BrowserGoing to the Conference Control Page via Microsoft Outlook
Inviting Participants by EmailThe moderator or teacher can use the system mailbox to invite participants.
Before you beginGo to the Conference Control page.
Procedure
1. Click Invite the top-right corner.2. Select Email Invitation.3. Click System mailbox.4. Click Send.
Related tasksGoing to the Conference Control Page via BrowserGoing to the Conference Control Page via Microsoft Outlook
Sharing the Conference InformationThe moderator or teacher can invite participants by sharing the conference information with others.
Before you beginGo to the Conference Control page.
Procedure
1. Click Invite the top-right corner.2. Select Email Invitation.3. Click Copy COFN infor and then send the information to participants you want to invite.
Related tasksGoing to the Conference Control Page via BrowserGoing to the Conference Control Page via Microsoft Outlook
Searching for ParticipantsModerators can search for all participants.
Before you beginGo to the Conference Control page.

| Controlling Conferences | 42
Procedure
1. Enter the participant name or the account number in the Search box to perform the search.2. Select the participant type below the search box, and the search result will be displayed in the Participant list.3. Select the desired group from the drop-menu of Group, and the participants of this group will be displayed in the
Participant list.
Related tasksGoing to the Conference Control Page via BrowserGoing to the Conference Control Page via Microsoft OutlookAllowing/Rejecting the Participant Application for SpeakingRemoving ParticipantsMoving Participants to the LobbyAllowing/Refusing the Participants to Join the ConferenceTurning on/off the Video ImageBlocking/Unblocking the AudioMuting/Unmuting ParticipantsSwitching the Roles Between the Moderators and GuestsSwitching the Roles Between the Lecturer and the Moderator/GuestControlling the Remote Camera
Allowing/Rejecting the Participant Application for SpeakingIn the training mode conference, moderators can allow or refuse the participant application for speaking to keep theconference order.
Before you beginGo to the Conference Control page.
Procedure
1. Click Applying in left side.2. Select the corresponding participants, and click Allow/Refuse.

| Controlling Conferences | 43
Tip: In the Attendance list, click , and click Allow/Refuse on the right side of the participant.
Related tasksGoing to the Conference Control Page via BrowserGoing to the Conference Control Page via Microsoft Outlook
Removing ParticipantsModerators can remove participants.
Before you beginGo to the Conference Control page.
Procedure
Do one of the followings:
•If you want to remove a single participant, click beside the desired participant.
• If you want to remove several participants, do the following:
In the Participant List field, select participants.
Click at the top, and select Remove from the drop-down menu.

| Controlling Conferences | 44
Related tasksGoing to the Conference Control Page via BrowserGoing to the Conference Control Page via Microsoft Outlook
Moving Participants to the LobbyIn order to keep the conference order, the moderator can move the participant who has attended the conference to thelobby.
Before you beginGo to the Conference Control page.
Procedure
Do one of the following:
• If you want to move a single participant to the lobby, click beside the desired participant.
Select Set as on hold from the drop-down menu.• If you want to move several participants to the lobby, select them.
Click at the top, and select Set as on hold from the drop-down menu.

| Controlling Conferences | 45
Related tasksGoing to the Conference Control Page via BrowserGoing to the Conference Control Page via Microsoft Outlook
Allowing/Refusing the Participants to Join the ConferenceFor the participant in the conference lobby, the moderator or teacher can allow or refuse him to join the conference.
Before you beginGo to the Conference Control page.
Procedure
1. Click Hobby on the left side.2. In the Participant list, click Allow/Refuse.
Related tasksGoing to the Conference Control Page via BrowserGoing to the Conference Control Page via Microsoft Outlook
Muting/Unmuting ParticipantsThe moderators can mute or unmute a participant to control whether or not other participants can hear thisparticipant’s voice.
Before you beginGo to the Conference Control page.
Procedure
Do one of the following:
•If you want to mute/unmute a single participant, select the desired participant, and then click / .

| Controlling Conferences | 46
•If you want to mute/unmute all participants, click / in the Global Operation field.
Related tasksGoing to the Conference Control Page via BrowserGoing to the Conference Control Page via Microsoft Outlook
Turning on/off the Video ImageThe moderator can turn on/off the video image of a participant to control whether or not other participants can see thevideo image of this participant.
About this taskGo to the Conference Control page.
Procedure
Click / beside the desired participant.
Related tasksGoing to the Conference Control Page via BrowserGoing to the Conference Control Page via Microsoft Outlook
Blocking/Unblocking the AudioThe moderator can block/unblock the audio of a participant to control whether or not this participant can hear thevoice of other participants.
Before you beginGo to the Conference Control page.
Procedure
Do one of the following:
• If you want to block the audio of a single participant, click the beside the desired participant, and selectBlock Audio/Unblock Audio from the drop-down menu.
• If you want to block the audio of several participants, select them, click , and then select BlockAudio/Unblock Audio from the drop-down menu.

| Controlling Conferences | 47
Related tasksGoing to the Conference Control Page via BrowserGoing to the Conference Control Page via Microsoft Outlook
Enabling RTMP LiveThe moderators can enable RTMP live, but the audience who watch the live broadcast of the conference are notdisplayed on the video image. After turning on RTMP live, the moderators can stop the live broadcast, change thedefinition, configure the video settings and so on.
Before you begin
• Go to the Conference Control page.• For scheduled conferences, you need enable RTMP live when scheduling conferences.• For VMRs, the enterprise administrator need enable RTMP live first.
Procedure
1. Click Live in the top-right corner.2. Configure the RTMP live parameter.
Parameter Description
Definition It refers to the video resolution that the specifiedMCU sends to public streaming services when the60-frame forwarding mode is disabled.
The supported video resolution is as follows:
• HD: 720p.• SD: 360p.
Default: HD.
| Controlling Conferences | 48
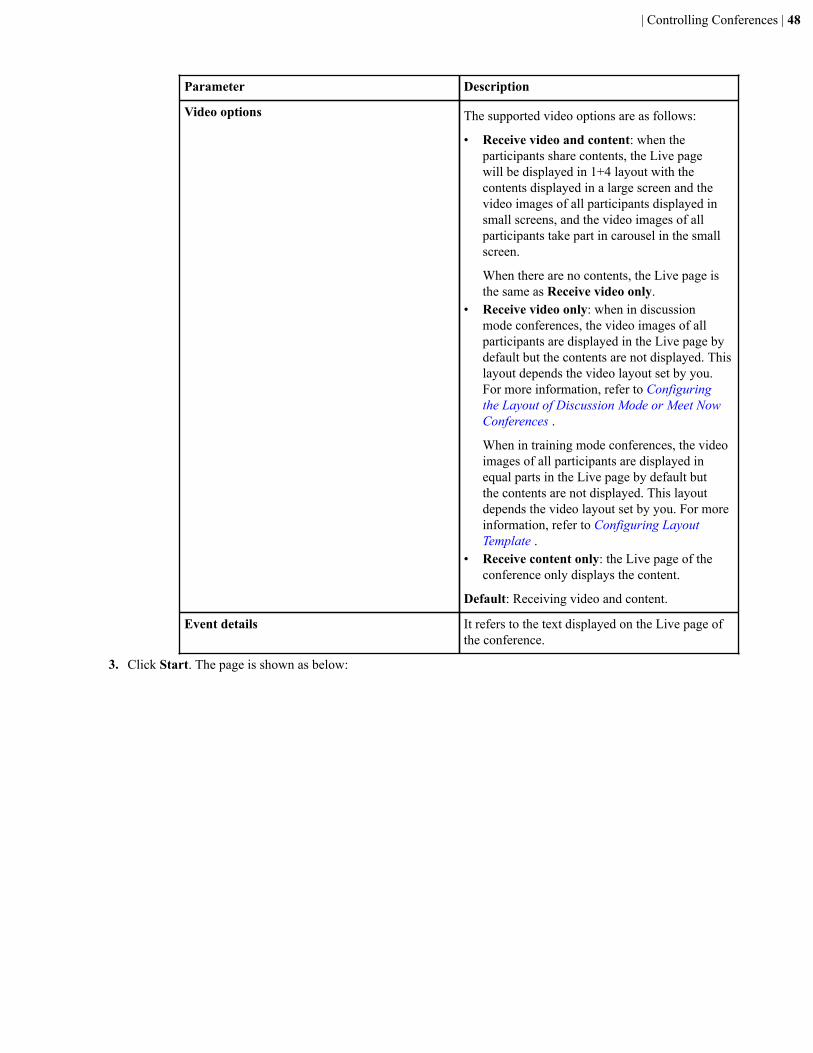
Parameter Description
Video options The supported video options are as follows:
• Receive video and content: when theparticipants share contents, the Live pagewill be displayed in 1+4 layout with thecontents displayed in a large screen and thevideo images of all participants displayed insmall screens, and the video images of allparticipants take part in carousel in the smallscreen.
When there are no contents, the Live page isthe same as Receive video only.
• Receive video only: when in discussionmode conferences, the video images of allparticipants are displayed in the Live page bydefault but the contents are not displayed. Thislayout depends the video layout set by you.For more information, refer to Configuringthe Layout of Discussion Mode or Meet NowConferences .
When in training mode conferences, the videoimages of all participants are displayed inequal parts in the Live page by default butthe contents are not displayed. This layoutdepends the video layout set by you. For moreinformation, refer to Configuring LayoutTemplate .
• Receive content only: the Live page of theconference only displays the content.
Default: Receiving video and content.
Event details It refers to the text displayed on the Live page ofthe conference.
3. Click Start. The page is shown as below:

| Controlling Conferences | 49
4. Do one of the following:
• Click to end the live broadcast of the conference.• Scan the QR code or click the link to watch the live broadcast of the conference.• Click Copy link to share the link with people who wants to watch the live broadcast of the conference.• Configure the definition and the video settings and click Save.
Related tasksGoing to the Conference Control Page via BrowserGoing to the Conference Control Page via Microsoft OutlookConfiguring the Parameters of Discussion/Training Mode Conference
Switching the Roles Between the Moderators and GuestsThe moderator can set a guest as a moderator. If the participant does not want to be a moderator anymore, you cancancel his role as a moderator. The organizer cannot be set as a guest.
Before you beginGo to the Conference Control page.
Procedure
On the right side of desired participant, click , and select Set as moderator/Set as guest he drop-down menu.
Related tasksGoing to the Conference Control Page via BrowserGoing to the Conference Control Page via Microsoft Outlook

| Controlling Conferences | 50
Switching the Roles Between the Lecturer and the Moderator/GuestIf you are a moderator in training mode conference, you can set the moderator/guest as a lecturer. When the lecturerdoes not want to be a lecturer, the moderator can cancel his role as a lecturer.
Before you beginGo to the Conference Control page.
About this taskIn the training mode conference, only the video images of the lecturers can be seen by other guests and only thelecturers can speak or share contents. Other guests are muted and cannot share contents.
Procedure
On the right side of desired participant, click , and select Set as lecturer/Cancel the lecturer from the drop-down menu.
Related tasksGoing to the Conference Control Page via BrowserGoing to the Conference Control Page via Microsoft OutlookEnabling the Layout Template
Controlling the Remote CameraThe moderator or teacher can control the camera of the participant, including turn it up/down/left/right, zoom it in/out.
Before you begin
• Go to the Conference Control page.• The device of the participant should support the function of controlling the far-end camera.
Procedure
1. Click beside the desired participants, and select FECC from the drop-down menu.2. In the pop-up dialogue, do the corresponding operations:
Related tasksGoing to the Conference Control Page via Browser

| Controlling Conferences | 51
Going to the Conference Control Page via Microsoft Outlook
Locking/Unlocking ConferencesThe moderators can lock or unlock conferences. After locking the conference, the moderators can select the desiredperson who can still join the conference.
Before you beginGo to the Conference Control page.
About this taskIf the conference is locked by default, other person except for the moderator and the invited participants will go to theconference lobby when they call into the conference.
Procedure
1. Click / in the Global Operation field.2. If you want to lock the conference, select the desired person.
3. Click OK.
When the conference is locked/unlocked, the icon will appear/disappear in the top-left corner.
Related tasksGoing to the Conference Control Page via BrowserGoing to the Conference Control Page via Microsoft Outlook

| Controlling Conferences | 52
Making the Roll CallIf you are the moderator in the training mode conference, you can call the roll to check whether everyone attends theconference.
Before you beginGo to the Conference Control page.
Procedure
1. Click Roll Call in the top-right corner of the Conference Control page.2. Select the desired participants.
3. Do one of the following:
• Click Auto roll call.
Enter the desired value in the Set the frequency of automatic roll call (range:1~3600s) field. Be fault, thesystem calls the roll every 5 seconds.
Click Start roll call.• Click Manual roll call.
On the right side of the desired participants, click Roll Call.
After the roll call, you can manually modify the status of the roll call as the following: Absence, Attendanceor Parties uncalled.
4. Click End.5. Click OK, and the result of the roll call will be saved in the attendance records.
Note: During the roll call, the moderator and the participant (whose name was called out on the list) areunmuted by default. Whether or not the participant (whose name was called out on the list) is muted isset by the enterprise administrator. All participants will enter the Roll call image. The participant (whosename was called out on the list) is displayed in a full screen to the moderator, while the moderator isdisplayed in a full screen to the guests. When there are several moderators, the voice-activated feature isenabled by default.
Related tasksGoing to the Conference Control Page via Browser

| Controlling the Education Mode Conferences | 53
Going to the Conference Control Page via Microsoft Outlook
Exporting the Roll Call RecordsIf you want to back up the roll call result, you can export the roll call records to the local.
Before you beginGo to the Conference Control page.
Procedure
1. Click Roll Call in the top-right corner of the Conference Control page.2. Click Attendance records > Export records.
The exported file of the roll call is displayed as below:
Related tasksGoing to the Conference Control Page via BrowserGoing to the Conference Control Page via Microsoft Outlook
Leaving/Ending ConferencesThe moderator or teacher can choose to leave or to end conferences. When the moderator or teacher leaves theconference, the conference still continues; when the moderator or teacher ends the conference, the conference ends.
Before you beginGo to the Conference Control page.
Procedure
1. Click End in the top-right corner.2. Select End conference or Leave, others keep going.
Related tasksGoing to the Conference Control Page via BrowserGoing to the Conference Control Page via Microsoft Outlook
Controlling the Education Mode Conferences
The teacher can control the conference realize a good class performance.
• Configuring the Conference Layout of Education Mode• Removing Participants• Switching the Roles Between the Teacher and Student• Switching the Speaking Mode between the Free and the Raise Hand

| Controlling the Education Mode Conferences | 54
• Searching for Participants• Allowing/Refusing the Application for Speaking• Moving the Participant into the Waiting Center• Muting/Unmuting Participants• Turning on/off the Video Image• Blocking/Unblocking the Audio• Enabling RTMP Live• Locking/Unlocking Conferences• Answering
Configuring the Conference Layout of Education ModeThe teacher can change the video layout.
Before you beginGo to the Conference Control page.
About this taskThe conference layout of education mode conference has effect on the layout seen by the teacher rather than thelayout seen by the student.
Procedure
1. Click Layout adjustment in the top-right corner .2. Configure the corresponding parameters. The layout takes effect immediately after configuring.
Table 16:
Parameter Description
Select layout Selected speaker The selected participant isdisplayed in the full screen.
Equal N×N Participants are displayed inequal image. The maximumvideo images per screen in theEqual N×N mode are describedas follows:
• 2*2• 3*3• 4*4• 5*5• 6*6• 7*7
Note: the video images perscreen are set by the enterpriseadministrator by default.

| Controlling the Education Mode Conferences | 55
Parameter Description
1+N The video image of the firstparticipant who joins theconference is displayed in largescreen, and the video images ofother participants are displayedin small screens around the firstparticipant.
The maximum small videoimages per screen in the 1+Nmode are described as follows:
• 1+0• 1+4• 1+7• 1+9• 1+12• 1+16• 1+20
Note: the video images perscreen are set by the enterpriseadministrator by default.
Video carousel In 1+N and Equal N×N modes, if the number of the currentparticipants exceeds the maximum number, the video images of theconference participants will be switched according to the intervaland the video images per cycle.
Note: it is enabled by default.
Set a speaker In 1+N mode, if this feature is enabled, you can select a speaker tobe displayed in the large pane.
Note: if this feature is enabled, only in 1+0 mode are the videocarousel feature and the voice-activated feature disabled and theycannot be configured. Selecting a speaker and the video carouselcan be enabled simultaneously in any mode except for 1+0 mode.
Activated speaker In 1+N mode, you can enable the voice-activated feature toautomatically recognize the video image of the speaking participantwith yellow frame. When the participant continues speaking fora while, his video image will be displayed in large screen, thevideo image of other participants will be displayed in small screensaround the speaking participant.
Note: it is enabled by default. The voice-activated time is 2 secondsby default.
Display participant name If the enterprise administrator enables this feature, you can chooseto display the participant name on the video image or not.
Note: it is enabled by default.

| Controlling the Education Mode Conferences | 56
Parameter Description
Display Participant Status If the enterprise administrator enables this feature, you can enableit and the icons of the participant status, such as muting, blocking,applying for speaking, are displayed in the video image.
Note: it is enabled by default.
Display parties In the Selected Speaker mode, the selected participant is displayedin the full screen.
3. Click Apply and it takes effect to all participants.
Related tasksGoing to the Conference Control Page via BrowserGoing to the Conference Control Page via Microsoft Outlook
Removing ParticipantsThe teachers can remove participants.
Before you beginGo to the Conference Control page.
Procedure
Click beside the desired participant.
Related tasksGoing to the Conference Control Page via BrowserGoing to the Conference Control Page via Microsoft Outlook
Switching the Roles Between the Teacher and StudentThe teacher can set a student as a teacher. The teacher has more rights on controlling conference than the students. Ifthe participant does not want to be a teacher anymore, the teacher can set him as a student.
Before you beginGo to the Conference Control page.
About this task
• But the organizer cannot be set as the student.• If the 60-frame forwarding mode is enabled, the participants (joining the conference via Yealink web app, joining
by IP call, or the third parties) cannot be set as teachers.
Procedure
Click of the desired participants, and select Set as teacher/Set as student from the drop-down menu.
Related tasksGoing to the Conference Control Page via BrowserGoing to the Conference Control Page via Microsoft Outlook

| Controlling the Education Mode Conferences | 57
Switching the Speaking Mode between the Free and the Raise HandThe teacher can switch the speaking mode according to the actual demand.
Before you beginGo to the Conference Control page.
Procedure
Click Free speaking mode/Raise Hand speaking mode in the bottom-left corner.
Related tasksGoing to the Conference Control Page via BrowserGoing to the Conference Control Page via Microsoft Outlook
Searching for ParticipantsThe teachers can search for participants.
Before you beginGo to the Conference Control page.
Procedure
1. Enter the participant name or the account number in the Search box to perform the search.2. Select the participant type below the search box, and the search result will be displayed on the right side.
Related tasksGoing to the Conference Control Page via BrowserGoing to the Conference Control Page via Microsoft OutlookRemoving ParticipantsSwitching the Roles Between the Teacher and StudentAllowing/Refusing the Application for SpeakingMoving the Participant into the Waiting CenterAllowing/Refusing the Participants to Join the ConferenceMuting/Unmuting ParticipantsTurning on/off the Video ImageBlocking/Unblocking the AudioControlling the Remote Camera
Allowing/Refusing the Application for SpeakingThe teacher can allow or refuse the participant application for speaking to keep the conference order.
Before you begin
• The speaking mode is Raise Hand. For more information, refer to Configuring Parameters of EducationMode Conference . During the conference, the teacher can switch the speaking mode to Raise Hand. For moreinformation, refer to Switching the Speaking Mode between the Free and the Raise Hand .
• Go to the Conference Control page.

| Controlling the Education Mode Conferences | 58
Procedure
1. In the left side of the page, click Applying.2. Select the desired participant, and click Allow/Refuse.
Tip: In the Attendance list, click beside the desired applying participant, and click Allow/Refuse.
Related tasksGoing to the Conference Control Page via BrowserGoing to the Conference Control Page via Microsoft Outlook
Moving the Participant into the Waiting CenterIn order to keep the class order, the teacher can move the participant who has attended the conference into theconference lobby.
Before you beginGo to the Conference Control page.
Procedure
1. Click of the desired participant.2. Select Set as on hold from the drop-down menu.
Related tasksGoing to the Conference Control Page via BrowserGoing to the Conference Control Page via Microsoft Outlook
Muting/Unmuting ParticipantsThe teachers can mute or unmute a participant to control whether or not other participants can hear this student’svoice.
Before you beginGo to the Conference Control page.
Procedure
Do one of the following:

| Controlling the Education Mode Conferences | 59
•If you want to mute/unmute a participant, select the desired participant, and then click / .
• If you want to mute/unmute all participants, click Mute All/ Unmute All.• If you want to mute/unmute all students, click Mute All/ Unmute .
Related tasksGoing to the Conference Control Page via BrowserGoing to the Conference Control Page via Microsoft Outlook
Turning on/off the Video ImageThe teacher can turn on/off the video image of a participant to control whether or not other participants can see thevideo image of this participant.
Before you beginGo to the Conference Control page.
Procedure
1. Click on the right side of the desired participant.2. Select Camera OFF/Camera ON from the drop-down menu.
Related tasksGoing to the Conference Control Page via BrowserGoing to the Conference Control Page via Microsoft Outlook
Blocking/Unblocking the AudioThe teacher can block/unblock the audio of a participant to control whether or not this participant can hear the voiceof other participants.
About this taskGo to the Conference Control page.
Procedure
1. Click of the desired participant.2. Select Block Audio/Unblock Audio from the drop-down menu.
Related tasksGoing to the Conference Control Page via BrowserGoing to the Conference Control Page via Microsoft Outlook
Enabling RTMP LiveThe teachers can turn on RTMP live, but the audience who watch the live broadcast of the conference are notdisplayed on the video image. After turning on RTMP live, the teachers can stop the live broadcast, change thedefinition, set the video settings and so on.
Before you begin
• Go to the Conference Control page.

| Controlling the Education Mode Conferences | 60
• For scheduled conferences, you need enable RTMP live when scheduling conferences.• For VMRs, the enterprise administrator need enable RTMP live first.
Procedure
1. Click Live in the top-right corner.2. Optional: Configure the RTMP live parameter.
Table 17: RTMP live parameters
Parameter Description
Definition It refers to the video resolution that the specifiedMCU sends to public streaming services when the60-frame forwarding mode is disabled.
The supported video resolution is as follows:
• HD: 720p.• SD: 360p.
Default: HD.
Video options The supported video options are as follows:
• Receive video and content: when theteacher shares contents, the Live pagewill be displayed in 1+4 layout with thecontents displayed in a large screen and thevideo images all participants displayed insmall screens, and the video images of allparticipants take part in carousel in smallscreen.
When there are no contents, the Live page isthe same as Receive video only.
• Receive video only: the video images of allteachers are displayed in equal parts in theLive page (in 60-frame forwarding mode, theforwarder is displayed in a full screen). Thislayout is not affected by the video layout setby the teacher.
• Receive content only: the Live page of theconference only displays the content.
Default: Receiving video and content.
Event details It refers to the text displayed on the Live page ofthe conference.
3. Click Start.The page is shown as below:

| Controlling the Education Mode Conferences | 61
4. Do one of the following:
• Click to end the live broadcast of the conference.• Scan the QR code or click the link to watch the live broadcast of the conference.• Click Copy link to share the link with people who wants to watch the live broadcast of the conference.• Configure the definition (60-frame forwarding mode is not enabled)and the video settings, and click Save.
Related tasksGoing to the Conference Control Page via BrowserGoing to the Conference Control Page via Microsoft Outlook
Locking/Unlocking ConferencesThe teachers can lock or unlock conferences. After locking the conference, the teachers can select the desiredparticipants that can still call into the conference.
Before you beginGo to the Conference Control page.
About this taskIf you lock the conference by default, other person except the teacher and the invited participants will go to theconference lobby when they call into the conference.
Procedure
1. Click Lock Conference/ Unlock Conference at the bottom-left corner.2. If you want to lock the conference, select the desired participants.

| Controlling the Education Mode Conferences | 62
3. Click OK.
When the conference is locked/unlocked, the icon will appear/disappear in the top-left corner.
Related tasksGoing to the Conference Control Page via BrowserGoing to the Conference Control Page via Microsoft Outlook
AnsweringIn the class, the teacher can have quizzes to test whether or not the student comprehends what he taught.
Before you begin
• The device supports the Q&A feature.• Yealink Cloud account is registered on the device and you upload the class file to the device.
Note: The class file, which can be obtained from Yealink technical support, is CSV format and providedby Yealink.
• The device joins the conference.
Note: If there is new class information, you should upload the new class file to the device again and thedevice should re-join the conference, so that the updated information can take effect.
• The answering device is connected to the device.• The teacher should go to the Conference Control page first.
Procedure
1. Click Q&A at the top.

| Controlling the Education Mode Conferences | 63
Go to the Home page of the Q&A System.
2. Select the question type, set the timing, and click Begin.The student can answer the question on the answering device according to the prompt.
3. After the student finishes answering, the teacher can announce the answer, and click Save.
The teacher can see the accuracy about the student answers.
4. Click Finish.5. Repeat the steps from 2 to 4, and go to the next question.
The teacher can review the student performance from the previous results.
Related tasksGoing to the Conference Control Page via BrowserGoing to the Conference Control Page via Microsoft Outlook

| Troubleshooting | 64
Troubleshooting
This chapter provides general troubleshooting methods to help you solve problems that you might encounter whenusing Yealink VC Cloud Management Service. For more information about troubleshooting, you can contact Yealinkdistributors or Yealink technical support engineers.
• Viewing Call Statistics• Common Problems
Viewing Call StatisticsDuring the conference, if the call quality is poor, the moderator can see the call statistics of every participant to findout the reason. Call statistics covers the statistics about the audio, the video, the content and so on. You can know thecall quality by seeing the codec, the bandwidth, the packets lost and so on. For example, when the call has a delay orthere is a mosaic in the video, you can see the package lost rate.
Before you beginGo to the Conference Control page.
Procedure
Check the desired participant, click , and then select Call Statistics.The detailed call statistics are displayed as below:
Related tasksGoing to the Conference Control Page via BrowserGoing to the Conference Control Page via Microsoft Outlook
Common Problems
• Invited Participants Do Not Receive Emails• Participants See Messy Codes in the Email

| Troubleshooting | 65
Invited Participants Do Not Receive Emails
Situation:
The invited participants do not receive invitation emails.
Cause:
• The emails may be in the spam folders.• The emails may be intercepted by the back-end server.
Solution:
Procedure
1. Remind users to check the spam folder.2. Contact the enterprise IT staff to check the back-end server.
Participants See Messy Codes in the Email
Situation:
When you schedule conferences via Microsoft Outlook, the conference participants you invited will receive emails.But the email is shown as messy codes to the conference participants.
Cause:
If you log into Microsoft Outlook software by POP/SMTP protocol, you send emails in iCalendar format by default.
Solution:
Procedure
1. Open Microsoft Outlook software.2. Click File > Optional > Calendar.3. Clear When sending meeting requests outside of your organization, use the iCalendar format checkbox.

| Appendix-Time Zones | 66
4. Click OK.
Appendix-Time Zones
Time zone
(UTC-11:00) Coordinated Universal Time-11
(UTC-11:00) Samoa
(UTC-10:00) Hawaii
(UTC-09:00) Alaska
(UTC-08:00) Baja California
(UTC-08:00) Pacific Time (US & Canada)
(UTC-07:00) Arizona
(UTC-07:00) Chihuahua, La Paz, Mazatlan

| Appendix-Time Zones | 67
Time zone
(UTC-07:00) Mountain Time (US & Canada)
(UTC-06:00) Central America
(UTC-06:00) Central Time (US & Canada)
(UTC-06:00) Guadalajara, Mexico City, Monterrey
(UTC-06:00) Saskatchewan
(UTC-05:00) Bogota, Lima, Quito
(UTC-05:00) Eastern Time (US & Canada)
(UTC-05:00) Indiana (East)
(UTC-04:00) Asuncion
(UTC-04:00) Atlantic Time (Canada)
(UTC-04:00) Cuiaba
(UTC-04:00) Georgetown, La Paz, Manaus, San Juan
(UTC-04:00) Santiago
(UTC-03:30) Newfoundland
(UTC-03:00) Brasilia
(UTC-03:00) Buenos Aires
(UTC-03:00) Cayenne, Fortaleza
(UTC-03:00) Greenland
(UTC-03:00) Montevideo
(UTC-02:00) Coordinated Universal Time-02
(UTC-02:00) Mid-Atlantic
(UTC-01:00) Azores
(UTC-01:00) Cape Verde Is.
(UTC) Casablanca
(UTC) Coordinated Universal Time
(UTC) Dublin, Edinburgh, Lisbon, London
(UTC) Monrovia, Reykjavik
(UTC+01:00) Amsterdam, Berlin, Bern, Rome, Stockholm, Vienna
(UTC+01:00) Belgrade, Bratislava, Budapest, Ljubljana, Prague
(UTC+01:00) Brussels, Copenhagen, Madrid, Paris
(UTC+01:00) Sarajevo, Skopje, Warsaw, Zagreb
(UTC+01:00) West Central Africa
(UTC+01:00) Windhoek
(UTC+02:00) Amman

| Appendix-Time Zones | 68
Time zone
(UTC+02:00) Athens, Bucharest, Istanbul
(UTC+02:00) Beirut
(UTC+02:00) Cairo
(UTC+02:00) Damascus
(UTC+02:00) Harare, Pretoria
(UTC+02:00) Helsinki, Kyiv, Riga, Sofia, Tallinn, Vilnius
(UTC+02:00) Jerusalem
(UTC+02:00) Minsk
(UTC+03:00) Baghdad
(UTC+03:00) Kuwait, Riyadh
(UTC+03:00) Moscow, St. Petersburg, Volgograd
(UTC+03:00) Nairobi
(UTC+03:30) Tehran
(UTC+04:00) Abu Dhabi, Muscat
(UTC+04:00) Baku
(UTC+04:00) Port Louis
(UTC+04:00) Tbilisi
(UTC+04:00) Yerevan
(UTC+04:30) Kabul
(UTC+05:00) Ekaterinburg
(UTC+05:00) Islamabad, Karachi
(UTC+05:00) Tashkent
(UTC+05:30) Chennai, Kolkata, Mumbai, New Delhi
(UTC+05:30) Sri Jayewardenepura
(UTC+05:45) Kathmandu
(UTC+06:00) Astana
(UTC+06:00) Dhaka
(UTC+06:00) Novosibirsk
(UTC+06:30) Yangon (Rangoon)
(UTC+07:00) Bangkok, Hanoi, Jakarta
(UTC+07:00) Krasnoyarsk
(UTC+08:00) Beijing, Chongqing, Hong Kong, Urumqi
(UTC+08:00) Irkutsk
(UTC+08:00) Kuala Lumpur, Singapore

| Appendix-Time Zones | 69
Time zone
(UTC+08:00) Perth
(UTC+08:00) Taipei
(UTC+08:00) Ulaanbaatar
(UTC+09:00) Osaka, Sapporo, Tokyo
(UTC+09:00) Seoul
(UTC+09:00) Yakutsk
(UTC+09:30) Adelaide
(UTC+09:30) Darwin
(UTC+10:00) Brisbane
(UTC+10:00) Canberra, Melbourne, Sydney
(UTC+10:00) Guam, Port Moresby
(UTC+10:00) Hobart
(UTC+10:00) Vladivostok
(UTC+11:00) Magadan
(UTC+11:00) Solomon Is., New Caledonia
(UTC+12:00) Auckland, Wellington
(UTC+12:00) Coordinated Universal Time+12
(UTC+12:00) Fiji
(UTC+13:00) Nuku'alofa