Embed Size (px)
Citation preview

Yam in vitro genebanking
International Institute of Tropical Agriculture – Institut international d’ agriculture tropicale – www.iita.org

Contents
Introduction 1
A Explant production 3
B Germplasm in vitro introduction 5
C Germplasm in vitro multiplication 13
D Germplasm gene banking 14
D1 Transfer to genebank 15 D2 Germplasm regeneration 16 D3 Germplasm monitoring 16 D4 Germplasm inventory 18
E Germplasm acclimatization 19
F Basic equipments and items required for 22 yam gene banking
G Media and stock solutions preparation and storage 23
H Generalrecommendationsforlaminarflowroom, 29 growth room and genebank maintenance and use

1
Introduction
This manual describes the yam in vitro genebanking process setupbyIITA.Withinthelast3years,thisprocesshasbeensuccessfully used to duplicate over 1000 accessions of yam from fieldtoinvitroculture.Researchisstillgoingontooptimiseyaminvitrogenebanking,especiallyatmeristeminglevel.
The manual also describes minimum requirements in terms of equipment and consumables for yam in vitro propagation and genebanking.
Compilation: Dominique Dumet, Abigael Adeyemi, and Omena Ojuederie
Intended use:• Best practice reference manual for genebank staff• Provides the frame for further development of an ISO normalization (quality control of in vitro germplasm) for yam genebanking • Support capacity building in in vitro culture and gene banking.
This is accessible on IITA website and available in hard copy (upon request).
Intendedusers:Genebankmanagers,supervisors,andstaffandtrainees

2

3
Explant production
A

4
Figure 2. Yam in screen house
Explant production
Priortostartinginvitrogenebanking,itisnecessarytoselectadequateplantpartsthatwillbeintroducedinvitro,i.e.explants.Inthecaseofyam,preferredexplantsareapicaloraxillarybudsgenerallytakenfromfield-orscreenhouse-plantedgermplasm(fig.1and2).IITAgenebankispresentlytestingtheuseofdry tuber sprouts (non planted tubers) as source of apical and axillarybuds(fig.3).Thisapproachispromisingasthelaterexplants show little bacterial contamination in comparison to the former ones.
Figure 1. Yam field bank
Figure 3. Direct shooting from dry tubers

5
Germplasm in vitrointroduction
B

6
2.1Micro-cutting
Each technician is advised to treat 10 accessions maximum at a time; 10 cuttings per accession.
1 Foreachaccession,select10cuttings(eithernodal cutting = 1 bud + 1 cm stem maximum on each side of the bud or apical cutting = apical shoot on 1 cm stem)(fig.4).Cutthemwithscissorsorscalpelandkeep them dry in a clean container; record accession (number/name) on each container. Explants are then sterilized as follows:2 Back in the laboratory; soak the shoots in 70% alcohol for 5 minutes.3 Replacealcoholwith5–10%sodiumhypochlorite (NaClO)1 solution containing a few drops of a wetting agente.g.,Tween20;andsoakfor10–20(fig.5) minutes(fig.5).Useonlyfreshlymadehypochlorite solution.Whenworkingwithnewexplanttype,itisbetter to run preliminary cleaning tests to determine the longest exposure time sustained by explants. It is sometimes necessary to repeat the sterilization. 1Commercial bleach titration ranges between 10 to 30% NaClO.
Figure 4. Dioscorea alata vines, axillary bud and micro-cutting (black arrows indicate where to cut the stem to obtain a nodal cutting)
VinesNodal cutting
Apical bud Axillary budsApical cutting

7
Figure 5. Nodal cuttings
in cleaning process
Steps 4 to 9 have to be performed under laminar flow (sterile conditions)
4 Usingsterilizedforceps,transfercuttingsintoasterile container and rinse them 3 times with sterile distilled water (fig.6).5 Withthehelpofascalpel(withsterileblade),cutthe whitening edge of the stems (hypochlorite effect) (fig.7).Inordertoavoidexplantmiss-orientationinvitro, allow the upper part of the stem to be shorter than the lowerone(fig.7).6 Transfer into a sterile container and soak in 1% fungicide solution (benlate or mencozeb) for 5 minutes (this step is optional and is only applied when explants show fungus contaminations).7 Removefromthesolutionanddryonfilterpaper.8 Withsterileforceps,plantthelongerpartofeachexplant intoagar(oneshootpertube)(fig.8).9 Covereachtubewithaplasticcapandsealwithparafilm.10 Labeleachtubewithanaccessionnumber,thedateof introduction and line number2 (record by writing on parafilmusinglonglastingmarker)(Fig.8).11 Transfer tubes to a growth chamber (temperature 28±30oC,photoperiod12/12).
Figure 6. Nodal cutting
rinse after exposure to sodium
hypochlorite

8
T: All IITA accessions start with T for TropicalDa: Dioscorea alata
L(1): meristem 1 excised on 110707110707: Date of last subculture
In the present case =date of in vitro introduction
TDa 4142L(1) 110707110707
Figure 8. Labelling
Nodal cutting showing growth
Newly introduced nodal cutting
Figure 7. Nodal cutting after cleaning (double black arrow indicates where to cut to obtain a micro cutting)
Nodal cutting
Whitening edge (bleach effect)
Longer side for orientation

9
2A line number is created as follows: Shoot number + date of firstinvitrointroduction;Example:(1)1/12/2006=Firstshootintroduced on the 1 December 2006.Obvious signs of growth are visible within 2 weeks following in vitrointroduction(fig.9).Onceseedlingshavedeveloped2to6buds,theyaresenttomultiplication(seebelow).
2.2 Meristem in vitro introduction
(First 3 steps below are as described above in 1–3).
1 Foreachaccession,select10cuttings(eithernodal cutting = 1 bud + 1 cm stem maximum on each side or apical cutting = 1 apical shoot on 1 cm stem) (Fig. 4). Cut them with scissors or scalpel and keep them dryinacleancontainer.Recordtheaccession(number/ name) on each container.
Explants are then sterilized as follows:
2 Backinthelaboratory,soaktheshootsin70%alcohol for 5 minutes.3 Replacealcoholwith5–10%sodiumhypochlorite (NaClO)1 solution containing a few drops of a wetting agente.g.,Tween20;andsoakfor10–20minutes (Fig. 5). Useonlyfreshlymadehypochloritesolution.When workingwithnewexplanttype,itisbettertorun preliminary cleaning tests to determine the longest exposure time sustained by explants. It is sometimes necessary to repeat the sterilization.
Figure 9. Yam nodal
cuttings 6 weeks
after in vitro introduction
Figure 10. Meristem excision
with stereo microscope
under laminar flow
9 10
1Commercial bleach titration ranges between 10 to 30% NaClO.
10
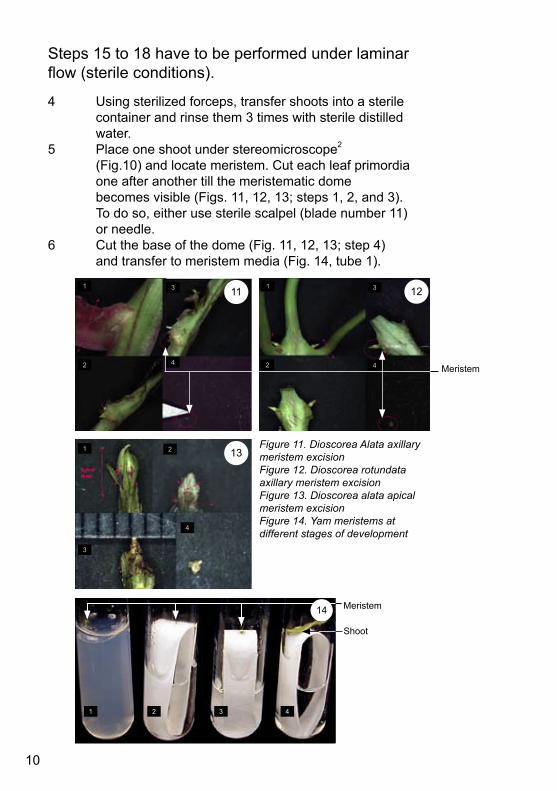
Steps 15 to 18 have to be performed under laminar flow(sterileconditions).
4 Usingsterilizedforceps,transfershootsintoasterile container and rinse them 3 times with sterile distilled water.5 Place one shoot under stereomicroscope2 (Fig.10) and locate meristem. Cut each leaf primordia one after another till the meristematic dome becomesvisible(Figs.11,12,13;steps1,2,and3). Todoso,eitherusesterilescalpel(bladenumber11) or needle. 6 Cutthebaseofthedome(Fig.11,12,13;step4) andtransfertomeristemmedia(Fig.14,tube1).
Figure 11. Dioscorea Alata axillary meristem excisionFigure 12. Dioscorea rotundata axillary meristem excisionFigure 13. Dioscorea alata apical meristem excisionFigure 14. Yam meristems at different stages of development
Meristem
11 12
13
Meristem
Shoot
13
121
2
3
4
1
2
1
2
3
4
3
4
14
11
1 2 3 4

11
7 Cover each tube with a plastic cap and seal with parafilm.8 Labeleachtubewithanaccessionnumber,date ofintroduction,andlinenumber(recordbywriting onparafilmusinglonglastingmarker).9 Transfer tubes to growth chamber (temperature 28±30oC,Fig.period12/12). 2
The stereomicroscope must be sprayed and clean with 70% alcohol prior placingitonthelaminarflowbench.
Obvious signs of growth are visible within 2–3 weeks following meristemexcision(greeningofmeristem)(Fig.14,3testtubesontheleft).Inmanycases,thetimerequiredtoinduceshootelongation(Fig.14,righttesttube4)variesbetween3to16months.Moreover,directmorphogenesisisnotalwaysobserved and shoots often rise from a clump of callus/somatic embryogenis tissues type (Fig. 15). Media optimization is still under investigation.
Figure 15. Shoot formation on callus/somatic embryo like clumps
Shoot

12
Germplasm multiplication(propagation)
C

13
Germplasm multiplication (propagation)
Steps 1 to 6 of the following procedure are performed under laminarflow(sterileconditions)andallinstrumentsusedmustbesterilized.
1 Open test tube. 2 Withthehelpofforceps,pulltheseedlingoutofthe tube(Fig.16,step1).3 Transfertheseedlingonsterilefilterpaperseton sterilealuminumpaperfoil(Fig.16,step2).4 Holdingseedlingwithforcepscutthesteminmicro- cutting with the help of a scalpel (blade number 10). Eachmicro-cuttingmustcarry,atleast,onebud. Toavoidmissorientation,allowtheupperpartofthe stem to be shorter than the lower one (Fig.16,step3).5 Open a test tube containing fresh multiplication medium and plant the longer part of the stem into it.6 Close each tube with a plastic cap and seal with parafilm.7 Label each tube with corresponding line number and date of subculture.8 Transfer tubes to growth chamber (temperature 28±30oC,Fig.period12/12). Nodal cuttings produce roots and shoots within 2 to 3 weeks (Fig. 17).
Figure 16. Yam in vitro
multiplication
Figure 17. Yam micro-cuttings at
different development
stage
1 2 3

14
D
Germplasm gene banking

15
D1 Transfer to genebank.
Fourtosixweeksfollowingmultiplication,fullydevelopedseedlings(i.e.,seedlingshowingsomerootsandatleast2nodes) (Fig. 18) are transferred to the genebank (Fig. 19). Genebank culture conditions are as follows: 16±20oC and 12/12 photoperiod.
Germplasm is observed weekly in order to eliminate and record any contaminated or necrosed seedlings (Fig. 20.)
Figure 18. Yam
subculture ready to be
transferred to genebank
Figure 19. Yam in vitro
genebank
Figure 20. Contaminated
(2 left) and necrosed
(right) in vitro seedlings

16
D2 Germplasm regeneration.
Dependingonaccessions,yamgermplasmmaintainedinthegenebank conditions requires subculturing every 10 to 24 months.Ideally,10seedlingsofeachaccessionaremaintainedin the genebank. All in vitro stored accessions are screened every 6 weeks. Accessions showing obvious sign of deterioration (dryingleaves,drymedium,etc.)and/orwhichstockislow(lessthan 4 seedlings) are sent for multiplication (see section 3).
D3 Germplasm monitoring
Germplasm in introduction phase. Newly introduced meristem ornodalcuttingsareprocessedinbatches.Foreachbatch,arecordtablewiththefieldslistedbelowiscreated.Atthatstage,data are recorded manually. Only data related to successful introductions are then computerized:
• Batch number• Accession number• Date of in vitro introduction• Number of explants introduced• Contamination• Necrosis• Operator• Send to multiplication 1• Contamination while in multi 1• Necrosis while in multi 1 etc.• Number of seedlings sent to the bank
Germplasm in genebank. Once an accession is newly introducedinthebank,itsnumberisaddedtothedatabase.Foreach accession the following data is recorded:
• Accession number Date of introduction in vitro (in case of replacement all previous entries are discarded)• Type of explant (meristem/nodal cutting)• Virus-freelinescertified(yes/no)• In the bank at the time of last inventory (Insert date of last inventory)• In subculture at the time of last inventory (insert date of last inventory)

17
• Contamination in bank (number of tubes eliminated be cause of contamination)• Necrosis in bank (number of tube eliminated because of necrosis)• Out 1 (number of tubes sent to subculture 1)• Date out 1 (date of subculture 1)• Obtained1(numberofmicro-cuttingsobtainedafter subculture 1)• Out 2 (number of tubes sent to subculture 2)• Date out 2 (date of subculture 2)• Obtained2(numberofmicro-cuttingsobtainedafter subculture 2)• Subcontamination (number of tubes eliminated from subculture due to contamination)• Subnecrosis (number of tubes eliminated from subculture due to necrosis)• Back 1 to bank (number of tubes sent back to the bank from subculture 1)• Date back 1 (date when subculture 1 are sent back to the bank)• Back 2 to bank (number of tubes sent back to the bank from subculture 2)• Date back 2 (date when subculture 2 are sent back to the bank)• Old cuttings discard (number of cuttings in the bank discarded during replacement)• Extra subculture discard (tubes from subculture discarded)• Nodal cutting from the bank sent to acclimatization • Nodal cutting from the bank sent for other experimentation• Nodal cutting from subculture sent for safe duplication in Cotonou• Nodal cutting from the bank sent for multiplication for distribution
The computerization of this data allows us to know
1 Present number of seedlings in subculture2 Seedlings potential (= in the bank + in subculture)3 Present number of seedlings in subculture

18
Figure 21. In vitro culture monitoring with pocket PC
Computerization of all data is advisable to facilitate germplasm management. The use of pocket PC speeds up data collection andreducesrecordmistakes(Fig.21).Ultimately,barcodinginin vitro collections will further improve genebank management in terms of cost and data reliability. IITA is presently setting up such system.
Pocket PC
D4 Germplasm inventory.An inventory of all germplasm is performed once a year.

19
Germplasm acclimatization(postflaskmanagement)
E
20
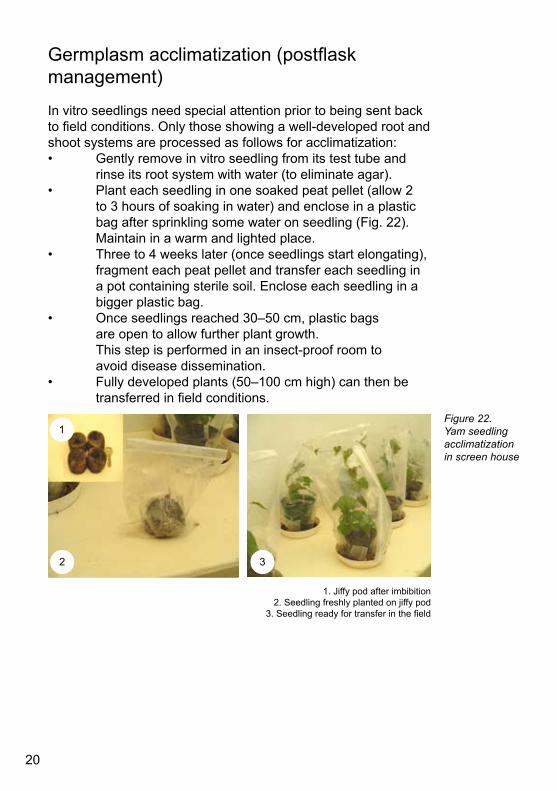
Germplasmacclimatization(postflaskmanagement)
In vitro seedlings need special attention prior to being sent back tofieldconditions.Onlythoseshowingawell-developedrootandshoot systems are processed as follows for acclimatization: • Gently remove in vitro seedling from its test tube and rinse its root system with water (to eliminate agar).• Plant each seedling in one soaked peat pellet (allow 2 to 3 hours of soaking in water) and enclose in a plastic bag after sprinkling some water on seedling (Fig. 22). Maintain in a warm and lighted place.• Threeto4weekslater(onceseedlingsstartelongating), fragment each peat pellet and transfer each seedling in a pot containing sterile soil. Enclose each seedling in a bigger plastic bag.• Onceseedlingsreached30–50cm,plasticbags are open to allow further plant growth. Thisstepisperformedinaninsect-proofroomto avoid disease dissemination. • Fully developed plants (50–100 cm high) can then be transferredinfieldconditions.
Figure 22. Yam seedling acclimatization in screen house
1. Jiffy pod after imbibition2. Seedling freshly planted on jiffy pod
3.Seedlingreadyfortransferinthefield
2 3
1

21
Basic equipments and items required
for Yam gene banking
F

22
Basic equipment/items required for yam genebanking
Aluminium foil Autoclavable plastic containers for sterilization (optional)Autoclavablerecipient(bottle,erlen)andclosuresystemAutoclaveAutoclave control tapeBalance (for g and mg)Beads sterilizer or burnerBecher Computer + excel/access software + pocket PC (optional)ErlensFilter papersForceps (long and short)Fridge/freezerHot plateInstrument holderLaminarflowcabinetLightfittedstereomicroscopeLong lasting markersMagneticstirrerandflea(optional)Measuring cylinderMedia dispenser (optional)Paper towelParafilmpH meterPipetteSpoon,spatula,andweighingboatsScalpels and surgical blades (number 10 and 11)ScissorsSpray bottleTest tubes (16 x 125 mm) and capThermometer Tube racksWater distiller/deionizer/water tank

23
Media and stock solutionspreparation and storage
G

24
Mediacomposition,preparationanddistribution
Media composition
MurashigeandSkoogmediumpowder:PurchasedfromDuchefaBiochemie,productnumber(M0222).
Product Chemical Molecular Meristems Cuttings Multiplication formula weight (g) culture** from plants g.I-1
g.I-1 g.I-1
Murashige and Skoog / / 4.43 2.215– 4.43 Mineral and vitamins (1962) 4.43 Inositol C
6H
12O
6 180.2 0.1 0 0.1
Saccharose C
12H
22O
11 342 30 15–30 30
Adenine sulfate C
10H
12N
10O
4S 368.37 0.08 0 0
L-cystein C3H
7NO
2S 121.6 0.02 0 0.02
Agar / / 4–7 7 4–7
NAA (Naphthalene Acetic Acid) C12
H10
O2 186.2 0.0002 0 0
(1.07 µM)
BAP (Benzyl Amino Purine) C12
H11
N5 225.3 0.00015 0 0
(0.666 µM) GA3 (Gibberellic acid) C
19H
22O
6 346.4 0.00008) 0 0
(0.2312 µM
Kinetin C10
H9N
5O 215.2 0 0 0.001
(0.476 µM)
Mineral and organic compounds of culture media.
* For Adenine hemisulfate preparation: Dissolve 1 g in 200 ml with heat.
Storage Solvent Rangeof concentrations used Powder Liquid (mg.ml-1) Auxins NAA Roomtemperature Fridge 1NNaOH 1-0.1-0.01
CytokininsBAP Roomtemperature Fridge 1NNaOH 1-0.1-0.01
Adenine Hemisulfate* Roomtemperature Fridge Water 5
Others GA3 Roomtemperature Fridge Ethanol 1/0.1/0.01
Stock solution preparation and storageGrowth regulators storage

25
Growth regulation solutions preparation
Target concentrations Quantity of growth Volume of water regulator
1 mg.ml-1= Solution A 50 mg 50 ml0.1 mg.ml-1 = Solution B 5 ml solution A 45 ml0.01 mg.ml-1 = Solution C 5 ml solution B 45 ml
Other solutions storage and preparation
Storage conditions Quantity Powder Liquid Water (ml) Product Concentration
Ascorbicacid Room Fridge 100 1g 0.01g.ml-1
temperature
Ethanolsolution Room 70 30ml 30% temperature
Fungicide* Room Nostorage 100(hot) 1g 1%powder temperature
Commercial Room Nostorage Varieswithcommercial 3–5%bleach (NaClO) temperature bleach titration in NaClO
*Usemasktopreparethesolution

26
Media preparationMedia preparation steps:
1. Prepare a checklist of all compounds needed for media preparation and sort them as well as all other necessary items(glassware,spatula,tubesonracks,pen, etc.) (Fig. 23). 2. Dispense number of tubes required on racks.3. Foronelitremediumpreparation,dispense approximately 200 ml distilled water in a glass container (suchasbecher,bottle,erlen…),adda‘magneticflea’in water and place on a magnetic stirrer. 4. Weigh adequate quantity of MS powder.5. Add MS powder to the water and turn on the magnetic stirrer at low speed. 6. OnceMSpowderisdissolved,weight/measureandadd all remaining products one after another except agar. Tick all listed products as they are added in the media. Make sure all products are properly dissolved. 7. Adjustvolumeto900ml(iffinalvolume=1liter)with distilled water.8. AdjustthepHat5,7±0,1(with0.5MNaOHor0.5MHCl) andadjustfinalvolumeto1liter.
AfteradjustingthepH,performsteps10–13,ifyourlaboratoryisequippedwithamediadispenserorsteps14–15,ifmediaisdispensed manually.
10. Add agar.11. Heat and stir media on a hot plate (or in microwave after removingtheflea/stirrer)tillagarisdissolved.Makesure not to overheat/boil the media (heating should be stopped before boiling point).
Figure 23. Basic equipment and products needed for media preparation

27
12. Onceagarisfullydissolved,useamediadispenser to distribute 5 ml of media per tubes. Cover each tube with a plastic cap.
13. Autoclave at 121 0Cfor15minutes-allowslowcooling. Go to step16.
In a case where your laboratory is not equipped with an automaticmediadispenser,step14–15isaprocessingalternative.
14. Transfer the media to an autoclavable recipient (bottle or erlen) with a capacity of at least 200 ml larger than the quantity of liquid it contains. This will prevent media loss/splash in the autoclave chamber during the autoclavecycle.Whenusingabottle,closethe cap loosely (to avoid pressurization). 15. Oncetheautoclavecycleiscompleted,takeoutthe recipient and dispense the media into tubes while still hot (still liquid). Note that adequate number of tubes plus caps must be autoclaved prior media distribution. Distribution is performed underlaminarflow(sterileconditions) using sterile pipette. This step can be semi automatized by using an automatic pipetter. Distribute 5 ml per tube. 16. Allow media to cool off and preferably store in a cool environment (ideally at 8–10 oC).Usewithin1–2weeks following preparation.
Miscellaneous recommendations for media culture preparation • Autoclavecontrol:Itisadvisabletostickautoclave- control tape to all items entering a sterilization cycle (Testtubes,bottlecontainingmedia,dissection instruments,etc...).Iftapecolorfailsto confirmsterilization,mediaisdiscarded whileotheritemscanbere-autoclaved.• Autoclavecycle:Allitems(forceps,filterpapers,etc.) entering the autoclave are either wrapped in aluminium foil or enclosed in autoclavable container.• Autoclave is cleaned at least once a week.• Weighing:Useacleanspatulaforeachproduct.Clean the balance after use.

28
• Measuring: Do not directly pipette in stock solution. Dispense a small quantity of the solution in a clean container and pipette the exact amount needed. Discard the remaining stock.• Each staff must clean the bench surface they used once media preparation is completed.

29
General recommendationsforlaminarflowroom,
growth room and genebank maintenance and use
H

30
8. General recommendations for laminar flowroom,growthroom,andgenebankmaintenance and use
Laminarflowroomaccessanduse• Food and beverage not allowed• Lab coat compulsory• Onlystaffworkingunderlaminarflowallowed• Floorandshelvesmustbevacuum-cleanandwipedaily.• Regularlyfumigatetheroom(every3to6months).
UseofLaminarflowcabinet
• Switch on at least 15 minutes prior to use • Turn on bead sterilizer at least 10 minutes prior to start and only use when the “sterilizing” indicator is on. • Spray the bench with alcohol (70%) and wipe prior and afterusingthelaminarflow.Donotspraythefilterarea.• Donotleaveanydisposableitemsonlaminarflow bench after use.• Keepawayanyitemfromthegridprotectingthefilter.• Onlykeepitemsinuseinthesterilespace.Usethe trolleytokeepextraitemssuchasrack,bottle,etc.• Spray alcohol (70%) on any item entering the sterile space.• Autoclave all dissecting instruments regularly (ideally every day). Either wrap Instrument in aluminum foil or enclose in autoclavable polyethylene containers) prior autoclave.• Clean all dissecting instruments with liquid soap every day.
Genebank and growth rooms’ access and use (Figs. 33 and 34)
• Only authorized person allowed• Only working staff allowed• Fumigate all in vitro culture rooms regularly (every 3 to 6 months).• Regularlycleantheshelveswithbleach.• Regularlycheckroomtemperature(usetemperature dataloggerwhenpossibletodetectfluctuations).

31


![In vitro plant production through apical meristem culture ... · regeneration from callus cultures [7]. Meristem-tip culture is an important technique for the production of disease](https://img.dokumen.tips/doc/110x75/5ea00a71a584c3433161b086/in-vitro-plant-production-through-apical-meristem-culture-regeneration-from.jpg)