Embed Size (px)
Citation preview

Datacard® XPS Card Printer Driver™
User’s Guide
October 2015
Part No. 527280-001, Rev. G

NoticePlease do not attempt to operate or repair this equipment without adequate training.
Any use, operation or repair you perform that is not in accordance with the information
contained in this documentation is at your own risk.
Trademark AcknowledgmentsDatacard is a registered trademark and service mark of Entrust Datacard Corporation in
the United States and other countries.
MasterCard is a registered trademark of MasterCard International Incorporated.
Visa is a registered trademark of Visa International Service Association.
All other product names are the property of their respective owners.
Proprietary NoticeThe design and information contained in these materials are protected by US and
international copyright laws.
All drawings and information herein are the property of Entrust Datacard Corporation. All
unauthorized use and reproduction is prohibited.
Entrust Datacard1187 Park PlaceShakopee, MN 55379Phone: 952‐933‐1223Fax: 952‐933‐7971
www.entrustdatacard.com
Copyright © 2012–2015 Entrust Datacard Corporation. All rights reserved.
ii

Compliance Statements Liability
The WARNING and CAUTION labels have been placed on the equipment for your safety. Please do
not attempt to operate or repair this equipment without adequate training. Any use, operation,
or repair in contravention of this document is at your own risk.
Safety All Datacard® products are built to strict safety specifications in accordance with CSA/UL60950‐1
requirements and the Low Voltage Directive 2006/95/EC.
Therefore, safety issues pertaining to operation and repair of Datacard® equipment are primarily
environmental and human interface.
The following basic safety tips are given to ensure safe installation, operation, and maintenance
of Datacard equipment.
• Connect equipment to a grounded power source. Do not defeat or bypass the ground lead.
• Place the equipment on a stable surface (table) and ensure floors in the work area are dry and
non‐slip.
• Know the location of equipment branch circuit interrupters or circuit breakers and how to turn
them on and off in case of emergency.
• Know the location of fire extinguishers and how to use them. ABC type extinguishers may be
used on electrical fires.
• Know local procedures for first aid and emergency assistance at the customer facility.
• Use adequate lighting at the equipment location.
• Maintain the recommended temperature and humidity range in the equipment area.
iii
Regulatory ComplianceNotice for USA (FCC notice)
This equipment has been tested and found to comply with the limits for Class A computing
devices, pursuant to Part 15 of FCC rules. These limits are designed to provide reasonable
protection against harmful interference when the equipment is operated in a commercial
environment. This equipment generates, uses, and can radiate radio frequency energy. If this
equipment is not installed and used in accordance with this instruction manual, it may cause
harmful interference to radio communications. Operation of this equipment in a residential area
is likely to cause harmful interference in which case the user will be required to correct the
interference at their own expense. Changes or modifications not expressly approved by the party
responsible for compliance could void the user's authority to operate the equipment.
Notice for Canada
Industry Canada
This digital apparatus does not exceed the Class A limits for radio noise for digital apparatus set
out in the Radio Interference Regulations of the Canadian Department of Communications.
Le présent appareil numérique n'émet pas de bruits radioélectriques dépassant les limites
applicables aux appareils numériques de la classe A prescrites dans le Règlement sur le brouillage
radioélectrique édicté par le ministère des Communications du Canada.
RSS‐Gen, Issue 3, December 2010, Section 7.1.3 User Manual Notice
This Device complies with Industry Canada License‐exempt RSS standard(s). Operation is subject
to the following two conditions: 1) this device may not cause interference, and 2) this device
must accept any interference, including interference that may cause undesired operation of the
device.
Cet appareil est conforme avec Industrie Canada RSS standard exemptes de licence(s). Son
fonctionnement est soumis aux deux conditions suivantes: 1) ce dispositif ne peut causer des
interférences, et 2) cet appareil doit accepter toute interférence, y compris les interférences qui
peuvent causer un mauvais fonctionnement du dispositif.
Notice for Europe
The EU Declaration of Conformity can be found on Datacard.com
We hereby certify that this printer complies with EMC Directive 2004/108/EC, R&TTE Directive
1999/5/EC, and the EU RoHS Directive EU Directive 2011/65/EC. This printer conforms to Class A of
EN 55022 and to EN 301 489‐5. Operation of this equipment in a residential environment may
possibly cause interference. In the event of interference, the users, at their own expense, will be
required to take whatever measures are necessary to correct the problem.
iv

Notice for Europe and Australia
This is a Class A product. In a domestic environment this product may cause radio interference, in
which case the user may be required to take adequate measures.
Notice for China (Simplified Chinese)
警告
此为 A级产品,在生活环境中,该产品可能会造成无线电干扰。在这种情况下,可能需要用户对干扰采取切实可行的措施。
Notice for Taiwan (Traditional Chinese)
Notice for Japan
Japanese Voluntary Control Council for Interference (VCCI) class A statement
Korea Communications Commission (KCC) statement
v

California Proposition 65 Compliance WARNING: This product contains chemicals, including lead, known to the State of California to
cause cancer, and birth defects or other reproductive harm. Wash hands after handling.
Datacard Group believes that its products are not harmful when used as designed. However, the
above warning is made in compliance with the State of California Safe Drinking Water and Toxic
Enforcement Act of 1986, which requires warning labels on products that may contain elements
that the State of California considers harmful.
vi

Revision LogXPS Card Printer Driver User’s Guide
Revision Date Description of Changes
A June 2012 First release of this document
B November 2012 Updated for version 4.0 release
C April 2013 Updated for version 4.1 release
D March 2014 Updated for version 5.0 release
E February 2015 Updated for version 6.0 release
F May 2015 Updated for version 6.1 release
G October 2015 Updated for version 6.2 release
vii

viii
Contents
Chapter 1: About the Printer Driver . . . . . . . . . . . . . . . . . . . . . . . . . . . . . . . . . . . . . . . . . . . 1Supported Operating Systems. . . . . . . . . . . . . . . . . . . . . . . . . . . . . . . . . . . . . . . . . . . . . . . . . . . . 1Driver Task Overview . . . . . . . . . . . . . . . . . . . . . . . . . . . . . . . . . . . . . . . . . . . . . . . . . . . . . . . . . . . 2Printer/Driver Communication. . . . . . . . . . . . . . . . . . . . . . . . . . . . . . . . . . . . . . . . . . . . . . . . . . . . 2
Printer/Driver Communications Over a Network . . . . . . . . . . . . . . . . . . . . . . . . . . . . . . . . . . 3Printer/Driver Communications Using a USB Connection . . . . . . . . . . . . . . . . . . . . . . . . . . . 3
Chapter 2: XPS Card Printer Driver Installation . . . . . . . . . . . . . . . . . . . . . . . . . . . . . . . . . . 5Before You Install . . . . . . . . . . . . . . . . . . . . . . . . . . . . . . . . . . . . . . . . . . . . . . . . . . . . . . . . . . . . . . 5Installation Overview . . . . . . . . . . . . . . . . . . . . . . . . . . . . . . . . . . . . . . . . . . . . . . . . . . . . . . . . . . . 5Identify Your Installation Requirements . . . . . . . . . . . . . . . . . . . . . . . . . . . . . . . . . . . . . . . . . . . . 6Prepare to Install the Card Printer Driver . . . . . . . . . . . . . . . . . . . . . . . . . . . . . . . . . . . . . . . . . . . 7
Download the Installation File (Optional) . . . . . . . . . . . . . . . . . . . . . . . . . . . . . . . . . . . . . . . . 7Start the Installation . . . . . . . . . . . . . . . . . . . . . . . . . . . . . . . . . . . . . . . . . . . . . . . . . . . . . . . . . . 8
Install the Driver. . . . . . . . . . . . . . . . . . . . . . . . . . . . . . . . . . . . . . . . . . . . . . . . . . . . . . . . . . . . . . . . 9Update the Card Printer Driver. . . . . . . . . . . . . . . . . . . . . . . . . . . . . . . . . . . . . . . . . . . . . . . . . . . 16
Update Restrictions . . . . . . . . . . . . . . . . . . . . . . . . . . . . . . . . . . . . . . . . . . . . . . . . . . . . . . . . . 17Update the Driver . . . . . . . . . . . . . . . . . . . . . . . . . . . . . . . . . . . . . . . . . . . . . . . . . . . . . . . . . . 18Update a Shared Printer Client . . . . . . . . . . . . . . . . . . . . . . . . . . . . . . . . . . . . . . . . . . . . . . . 21
Update a Client PC Manually . . . . . . . . . . . . . . . . . . . . . . . . . . . . . . . . . . . . . . . . . . . . . 21Verify the Client Update. . . . . . . . . . . . . . . . . . . . . . . . . . . . . . . . . . . . . . . . . . . . . . . . . . 22
Install Support Files . . . . . . . . . . . . . . . . . . . . . . . . . . . . . . . . . . . . . . . . . . . . . . . . . . . . . . . . . . . . 23Install User Documentation . . . . . . . . . . . . . . . . . . . . . . . . . . . . . . . . . . . . . . . . . . . . . . . . . . . . . 24Advanced Setup. . . . . . . . . . . . . . . . . . . . . . . . . . . . . . . . . . . . . . . . . . . . . . . . . . . . . . . . . . . . . . 24Connect More Than One Printer . . . . . . . . . . . . . . . . . . . . . . . . . . . . . . . . . . . . . . . . . . . . . . . . . 25
Print to More Than One Printer From One PC. . . . . . . . . . . . . . . . . . . . . . . . . . . . . . . . . . . . 25Install Additional USB Printers . . . . . . . . . . . . . . . . . . . . . . . . . . . . . . . . . . . . . . . . . . . . . . . . . 25
Use the Card Printer Driver for Secure Printing . . . . . . . . . . . . . . . . . . . . . . . . . . . . . . . . . . . . . . 27Secure Printing Overview . . . . . . . . . . . . . . . . . . . . . . . . . . . . . . . . . . . . . . . . . . . . . . . . . . . . 27Use Printer Manager to Set Up Secure Printing . . . . . . . . . . . . . . . . . . . . . . . . . . . . . . . . . . 28
Use Printer Sharing . . . . . . . . . . . . . . . . . . . . . . . . . . . . . . . . . . . . . . . . . . . . . . . . . . . . . . . . . . . . 29Printer Sharing Requirements . . . . . . . . . . . . . . . . . . . . . . . . . . . . . . . . . . . . . . . . . . . . . . . . . 29Supported Operating Systems . . . . . . . . . . . . . . . . . . . . . . . . . . . . . . . . . . . . . . . . . . . . . . . . 30Tips for Host PC and Client PC Users . . . . . . . . . . . . . . . . . . . . . . . . . . . . . . . . . . . . . . . . . . . 31Configure PC Printing Preferences for Sharing. . . . . . . . . . . . . . . . . . . . . . . . . . . . . . . . . . . 33Set Up Group Accounts for Using Shared Printers . . . . . . . . . . . . . . . . . . . . . . . . . . . . . . . . 34Use Windows Print Manager. . . . . . . . . . . . . . . . . . . . . . . . . . . . . . . . . . . . . . . . . . . . . . . . . . 34
Use Printer Pooling . . . . . . . . . . . . . . . . . . . . . . . . . . . . . . . . . . . . . . . . . . . . . . . . . . . . . . . . . . . . 35Printer Pooling Requirements . . . . . . . . . . . . . . . . . . . . . . . . . . . . . . . . . . . . . . . . . . . . . . . . . 35Operating Systems Supported for Printer Pooling . . . . . . . . . . . . . . . . . . . . . . . . . . . . . . . . 36Tips for Printer Pooling . . . . . . . . . . . . . . . . . . . . . . . . . . . . . . . . . . . . . . . . . . . . . . . . . . . . . . . 37Set Up a Printer Pool . . . . . . . . . . . . . . . . . . . . . . . . . . . . . . . . . . . . . . . . . . . . . . . . . . . . . . . . 38
ix

Chapter 3: Card Printer Driver Management Tasks . . . . . . . . . . . . . . . . . . . . . . . . . . . . . 41The Printer Properties Window . . . . . . . . . . . . . . . . . . . . . . . . . . . . . . . . . . . . . . . . . . . . . . . . . . . 41
General Tab . . . . . . . . . . . . . . . . . . . . . . . . . . . . . . . . . . . . . . . . . . . . . . . . . . . . . . . . . . . . . . . 42Sharing Tab . . . . . . . . . . . . . . . . . . . . . . . . . . . . . . . . . . . . . . . . . . . . . . . . . . . . . . . . . . . . . . . . 42Ports Tab . . . . . . . . . . . . . . . . . . . . . . . . . . . . . . . . . . . . . . . . . . . . . . . . . . . . . . . . . . . . . . . . . . 43
View Network Information . . . . . . . . . . . . . . . . . . . . . . . . . . . . . . . . . . . . . . . . . . . . . . . . 43Change a Network IP Address. . . . . . . . . . . . . . . . . . . . . . . . . . . . . . . . . . . . . . . . . . . . . 43
Advanced Tab . . . . . . . . . . . . . . . . . . . . . . . . . . . . . . . . . . . . . . . . . . . . . . . . . . . . . . . . . . . . . 47Color Management Tab . . . . . . . . . . . . . . . . . . . . . . . . . . . . . . . . . . . . . . . . . . . . . . . . . . . . . 47Security Tab . . . . . . . . . . . . . . . . . . . . . . . . . . . . . . . . . . . . . . . . . . . . . . . . . . . . . . . . . . . . . . . 48Printer Status Tab . . . . . . . . . . . . . . . . . . . . . . . . . . . . . . . . . . . . . . . . . . . . . . . . . . . . . . . . . . . 50
Printer Status . . . . . . . . . . . . . . . . . . . . . . . . . . . . . . . . . . . . . . . . . . . . . . . . . . . . . . . . . . . . 51Port Type . . . . . . . . . . . . . . . . . . . . . . . . . . . . . . . . . . . . . . . . . . . . . . . . . . . . . . . . . . . . . . . 52Printer Information . . . . . . . . . . . . . . . . . . . . . . . . . . . . . . . . . . . . . . . . . . . . . . . . . . . . . . . 52Print a Driver Sample Card . . . . . . . . . . . . . . . . . . . . . . . . . . . . . . . . . . . . . . . . . . . . . . . . 52
Card Counts Tab . . . . . . . . . . . . . . . . . . . . . . . . . . . . . . . . . . . . . . . . . . . . . . . . . . . . . . . . . . . 55Supplies Tab . . . . . . . . . . . . . . . . . . . . . . . . . . . . . . . . . . . . . . . . . . . . . . . . . . . . . . . . . . . . . . . 57About Tab . . . . . . . . . . . . . . . . . . . . . . . . . . . . . . . . . . . . . . . . . . . . . . . . . . . . . . . . . . . . . . . . . 59
Uninstall the Card Printer Driver . . . . . . . . . . . . . . . . . . . . . . . . . . . . . . . . . . . . . . . . . . . . . . . . . . 60Uninstall the Driver with the Driver Installation CD or Downloaded File. . . . . . . . . . . . . . . 60Uninstall the Card Printer Driver Without the Driver Installation Media . . . . . . . . . . . . . . . 64
Chapter 4: Card Design Tasks. . . . . . . . . . . . . . . . . . . . . . . . . . . . . . . . . . . . . . . . . . . . . . . 67Change a Card Design. . . . . . . . . . . . . . . . . . . . . . . . . . . . . . . . . . . . . . . . . . . . . . . . . . . . . . . . . 68Design Tasks in Windows Printing Preferences . . . . . . . . . . . . . . . . . . . . . . . . . . . . . . . . . . . . . . 69
Layout Tab . . . . . . . . . . . . . . . . . . . . . . . . . . . . . . . . . . . . . . . . . . . . . . . . . . . . . . . . . . . . . . . . 69Print on Both Sides of the Card . . . . . . . . . . . . . . . . . . . . . . . . . . . . . . . . . . . . . . . . . . . . 69Set Up Duplex Printing . . . . . . . . . . . . . . . . . . . . . . . . . . . . . . . . . . . . . . . . . . . . . . . . . . . . 70
Advanced Options . . . . . . . . . . . . . . . . . . . . . . . . . . . . . . . . . . . . . . . . . . . . . . . . . . . . . . . . . 71Paper Size . . . . . . . . . . . . . . . . . . . . . . . . . . . . . . . . . . . . . . . . . . . . . . . . . . . . . . . . . . . . . . 71Print More Than One Copy of a Card. . . . . . . . . . . . . . . . . . . . . . . . . . . . . . . . . . . . . . . 71Disable Printing. . . . . . . . . . . . . . . . . . . . . . . . . . . . . . . . . . . . . . . . . . . . . . . . . . . . . . . . . . 72Disable Printing Examples . . . . . . . . . . . . . . . . . . . . . . . . . . . . . . . . . . . . . . . . . . . . . . . . . 73Print Bar Codes Using Monochrome . . . . . . . . . . . . . . . . . . . . . . . . . . . . . . . . . . . . . . . . 75Print Black Image Pixels Using Monochrome . . . . . . . . . . . . . . . . . . . . . . . . . . . . . . . . . 75Rotate the Card Image . . . . . . . . . . . . . . . . . . . . . . . . . . . . . . . . . . . . . . . . . . . . . . . . . . 77Print Cards Using Split-Ribbon Color Printing . . . . . . . . . . . . . . . . . . . . . . . . . . . . . . . . . 78Input Hopper . . . . . . . . . . . . . . . . . . . . . . . . . . . . . . . . . . . . . . . . . . . . . . . . . . . . . . . . . . . 81Text Clipping. . . . . . . . . . . . . . . . . . . . . . . . . . . . . . . . . . . . . . . . . . . . . . . . . . . . . . . . . . . . 81Impress Card . . . . . . . . . . . . . . . . . . . . . . . . . . . . . . . . . . . . . . . . . . . . . . . . . . . . . . . . . . . 82
Print Area Tab . . . . . . . . . . . . . . . . . . . . . . . . . . . . . . . . . . . . . . . . . . . . . . . . . . . . . . . . . . . . . . 83Print and Topcoat Blocking . . . . . . . . . . . . . . . . . . . . . . . . . . . . . . . . . . . . . . . . . . . . . . . 83Select a Preset Mask . . . . . . . . . . . . . . . . . . . . . . . . . . . . . . . . . . . . . . . . . . . . . . . . . . . . . 84Use a User-Defined Topcoat Bitmap . . . . . . . . . . . . . . . . . . . . . . . . . . . . . . . . . . . . . . . . 85
x

Select a User-Defined Bitmap . . . . . . . . . . . . . . . . . . . . . . . . . . . . . . . . . . . . . . . . . . . . . 87Select an Erase Pattern . . . . . . . . . . . . . . . . . . . . . . . . . . . . . . . . . . . . . . . . . . . . . . . . . . 88
Color Adjustment Tab . . . . . . . . . . . . . . . . . . . . . . . . . . . . . . . . . . . . . . . . . . . . . . . . . . . . . . . 90Brightness . . . . . . . . . . . . . . . . . . . . . . . . . . . . . . . . . . . . . . . . . . . . . . . . . . . . . . . . . . . . . . 90Contrast . . . . . . . . . . . . . . . . . . . . . . . . . . . . . . . . . . . . . . . . . . . . . . . . . . . . . . . . . . . . . . . 91Color Balance . . . . . . . . . . . . . . . . . . . . . . . . . . . . . . . . . . . . . . . . . . . . . . . . . . . . . . . . . . 92
Print Mode Tab. . . . . . . . . . . . . . . . . . . . . . . . . . . . . . . . . . . . . . . . . . . . . . . . . . . . . . . . . . . . . 93Select the Print Resolution . . . . . . . . . . . . . . . . . . . . . . . . . . . . . . . . . . . . . . . . . . . . . . . . 93Select the Rewrite Feature. . . . . . . . . . . . . . . . . . . . . . . . . . . . . . . . . . . . . . . . . . . . . . . . 94
Lamination Tab . . . . . . . . . . . . . . . . . . . . . . . . . . . . . . . . . . . . . . . . . . . . . . . . . . . . . . . . . . . . 95Apply an Overlay . . . . . . . . . . . . . . . . . . . . . . . . . . . . . . . . . . . . . . . . . . . . . . . . . . . . . . . 95Debow the Card . . . . . . . . . . . . . . . . . . . . . . . . . . . . . . . . . . . . . . . . . . . . . . . . . . . . . . . . 96
About Tab. . . . . . . . . . . . . . . . . . . . . . . . . . . . . . . . . . . . . . . . . . . . . . . . . . . . . . . . . . . . . . . . . 96Printer Setup for Rewritable Cards. . . . . . . . . . . . . . . . . . . . . . . . . . . . . . . . . . . . . . . . . . . . . . . . 97
Set Up the Printer . . . . . . . . . . . . . . . . . . . . . . . . . . . . . . . . . . . . . . . . . . . . . . . . . . . . . . . . . . . 97Set Up Printer Manager. . . . . . . . . . . . . . . . . . . . . . . . . . . . . . . . . . . . . . . . . . . . . . . . . . . . . . 97Set Up the Card Printer Driver . . . . . . . . . . . . . . . . . . . . . . . . . . . . . . . . . . . . . . . . . . . . . . . . 98
Card Design for UV Ribbon . . . . . . . . . . . . . . . . . . . . . . . . . . . . . . . . . . . . . . . . . . . . . . . . . . . . 100Set Up a UV Card Design . . . . . . . . . . . . . . . . . . . . . . . . . . . . . . . . . . . . . . . . . . . . . . . . . . . 101Print UV Design Elements. . . . . . . . . . . . . . . . . . . . . . . . . . . . . . . . . . . . . . . . . . . . . . . . . . . . 102
Escapes . . . . . . . . . . . . . . . . . . . . . . . . . . . . . . . . . . . . . . . . . . . . . . . . . . . . . . . . . . . . . . . . . . . . 103Print Blocking Escapes. . . . . . . . . . . . . . . . . . . . . . . . . . . . . . . . . . . . . . . . . . . . . . . . . . . . . . 104
About Non-Printing Areas. . . . . . . . . . . . . . . . . . . . . . . . . . . . . . . . . . . . . . . . . . . . . . . . 104Print Blocking Syntax . . . . . . . . . . . . . . . . . . . . . . . . . . . . . . . . . . . . . . . . . . . . . . . . . . . . 105Escape Support for Rewritable Cards. . . . . . . . . . . . . . . . . . . . . . . . . . . . . . . . . . . . . . 107
Magnetic Stripe Escapes . . . . . . . . . . . . . . . . . . . . . . . . . . . . . . . . . . . . . . . . . . . . . . . . . . . 108Supported Escapes. . . . . . . . . . . . . . . . . . . . . . . . . . . . . . . . . . . . . . . . . . . . . . . . . . . . . 108Set Up Magnetic Stripe Escapes . . . . . . . . . . . . . . . . . . . . . . . . . . . . . . . . . . . . . . . . . . 109
Input Hopper Selection Escape . . . . . . . . . . . . . . . . . . . . . . . . . . . . . . . . . . . . . . . . . . . . . . 110Laminator Escape . . . . . . . . . . . . . . . . . . . . . . . . . . . . . . . . . . . . . . . . . . . . . . . . . . . . . . . . . 111Impresser Escape. . . . . . . . . . . . . . . . . . . . . . . . . . . . . . . . . . . . . . . . . . . . . . . . . . . . . . . . . . 112Embosser Escape. . . . . . . . . . . . . . . . . . . . . . . . . . . . . . . . . . . . . . . . . . . . . . . . . . . . . . . . . . 113
Embosser Escape Syntax . . . . . . . . . . . . . . . . . . . . . . . . . . . . . . . . . . . . . . . . . . . . . . . . 113Escape Preamble . . . . . . . . . . . . . . . . . . . . . . . . . . . . . . . . . . . . . . . . . . . . . . . . . . . . . . 113Embosser Font Number. . . . . . . . . . . . . . . . . . . . . . . . . . . . . . . . . . . . . . . . . . . . . . . . . . 114Emboss/Indent Position. . . . . . . . . . . . . . . . . . . . . . . . . . . . . . . . . . . . . . . . . . . . . . . . . . 114Emboss Data Restrictions . . . . . . . . . . . . . . . . . . . . . . . . . . . . . . . . . . . . . . . . . . . . . . . . 115Emboss Example . . . . . . . . . . . . . . . . . . . . . . . . . . . . . . . . . . . . . . . . . . . . . . . . . . . . . . . 116
Magnetic Stripe Fonts . . . . . . . . . . . . . . . . . . . . . . . . . . . . . . . . . . . . . . . . . . . . . . . . . . . . . . . . . 117
Chapter 5: Installation Troubleshooting. . . . . . . . . . . . . . . . . . . . . . . . . . . . . . . . . . . . . . 119Troubleshoot the Card Printer Driver Installation . . . . . . . . . . . . . . . . . . . . . . . . . . . . . . . . . . . 119
USB Installation Troubleshooting. . . . . . . . . . . . . . . . . . . . . . . . . . . . . . . . . . . . . . . . . . . . . . 120Network Installation Troubleshooting . . . . . . . . . . . . . . . . . . . . . . . . . . . . . . . . . . . . . . . . . 122
Use Advanced Troubleshooting Tools. . . . . . . . . . . . . . . . . . . . . . . . . . . . . . . . . . . . . . . . . . . . 122
xi

Appendix A: Windows Printer Sharing . . . . . . . . . . . . . . . . . . . . . . . . . . . . . . . . . . . . . . A-1Installation . . . . . . . . . . . . . . . . . . . . . . . . . . . . . . . . . . . . . . . . . . . . . . . . . . . . . . . . . . . . . . . . . . A-1
Set Up the Host PC for Printer Sharing . . . . . . . . . . . . . . . . . . . . . . . . . . . . . . . . . . . . . . . . . A-1Install the Card Printer Driver on the Client PC . . . . . . . . . . . . . . . . . . . . . . . . . . . . . . . . . . A-5
Appendix B: Windows Server 2008 and 2012 Printer Sharing . . . . . . . . . . . . . . . . . . . . B-1Windows Server 2008 or 2012, 64-bit Installation . . . . . . . . . . . . . . . . . . . . . . . . . . . . . . . . . . . B-1
Set Up the Host PC for Printer Sharing . . . . . . . . . . . . . . . . . . . . . . . . . . . . . . . . . . . . . . . . . B-1Install the Card Printer Driver on the Client PC . . . . . . . . . . . . . . . . . . . . . . . . . . . . . . . . . . B-6
Appendix C: Tactile Identifier Mark Conversion . . . . . . . . . . . . . . . . . . . . . . . . . . . . . . C-1
xii

Chapter 1: About the Printer Driver
The Card Printer Driver uses Microsoft XPS print technology to support
printing from currently available applications. This chapter provides a
task overview of what the Card Printer Driver does, and a description of
the communication between the Card Printer Driver and the card printer.
Supported Operating SystemsThe following operating systems are supported by the Card Printer Driver (the latest service pack
is recommended):
Windows 7, 32‐ and 64‐bit
Windows 8.1, 32‐ and 64‐bit
Windows 10, 32‐ and 64‐bit
Windows Server 2008 R2, 64‐bit
Windows Server 2012 R2
For more information on PC and operating system requirements, refer to the printer’s Installation
and Administrator’s Guide.
Because the Card Printer Driver supports multiple Windows operating systems, the procedures in this Guide assume you can navigate to the appropriate Windows panels for your system. The Guide describes how to set up and use the Card Printer Driver from the appropriate window (for example, Printer Properties). Operating system‐specific exceptions are noted, where necessary.
XPS Card Printer Driver User’s Guide 1
Driver Task OverviewRefer to “Install the Driver” on page 9 for the steps to follow to install the printer and driver.
After the Card Printer Driver has been installed, it does the following:
1. Receives card data from an application.
2. Processes it for personalizing a card.
3. Optionally, encrypts data transactions with the printer for secure printing.
4. Sends the prepared data to the printer.
5. Checks the printer for card completion.
6. Displays any conditions (messages) associated with the card job.
Printer/Driver Communication The printer communicates with the PC via the Card Printer Driver using either a USB cable or an
Ethernet cable. For both connection types, the printer treats communication as if the PC is
connected over a network.
You can update printer settings using the Printer Manager web interface. Refer to the
printer’s Installation and Administrator’s Guide for information about using Printer Manager.
You can customize applications to control card personalization features through the Card
Printer Driver. If you use a customized application, follow the instructions in your application.
Secure printing is available on current models of SD, CD, and CE series printers. Print jobs are
secured with data protection automatically when the printer is configured to communicate
securely. For more information, refer to “Use the Card Printer Driver for Secure Printing” on
page 27.
The information included in this Guide does not apply to all printers supported by the Card Printer Driver. Check your printer configuration label to verify your printer model and the features and options it includes.
2 About the Printer Driver
Printer/Driver Communications Over a NetworkThe Card Printer Driver requires the current printer IP address when it is connected to the printer
over a network. Refer to the printer’s User’s Guide for information on how to retrieve the
printer’s IP address.
When both the printer and the PC use an organization's network, the network affects the speed
of data transmission, and can affect who can use the printer. The network printer can have many
PCs connected to it, and each PC can be connected to multiple printers over the network.
Printer/Driver Communications Using a USB ConnectionConnecting the printer and a PC using a USB cable automatically creates a local network. Each
time another printer is connected to the PC, it creates a new local network for the new printer.
You can connect up to eight printers to a PC using USB cables.
The printer requires a USB 2.0 connection.
XPS Card Printer Driver User’s Guide 3

4 About the Printer Driver

Chapter 2: XPS Card Printer Driver Installation
This chapter provides information about how to install the Card Printer
Driver.
Before You InstallThe Card Printer Driver typically is installed using the installation CD shipped with the printer. You
also can install it using a downloaded installation file.
Be aware of the following as you plan to install the Card Printer Driver.
Prepare the printer before installing the Card Printer Driver. Load the printer supplies and
cards as described in your printer’s Quick Install Guide or Installation and Administrator’s
Guide.
The Card Printer Driver installation assigns a default printer name. Each printer must have a
different name. The installation automatically creates a unique name.
If your site plans to implement printer sharing, have a printer naming plan in place before
installing the Card Printer Driver. You cannot rename a printer after sharing is enabled. Refer
to “Use Printer Sharing” on page 29 for more information.
Installation OverviewBasic installation includes the following steps:
1. Identify Your Installation Requirements on page 6
2. Prepare to Install the Card Printer Driver on page 7
3. Install the driver based on the printer/PC communication method you are using, either USB
or a network connection. Refer to “Install the Driver” on page 9.
4. Update your existing driver installation if your driver version is 4.0 or newer. Refer to “Update
the Card Printer Driver” on page 16.
XPS Card Printer Drive User’s Guide 5

Advanced printer setup consists of:
Connect More Than One Printer on page 25
Use the Card Printer Driver for Secure Printing on page 27
Use Printer Sharing on page 29
Use Printer Pooling on page 35
Identify Your Installation RequirementsHow you install and set up the Card Printer Driver depends on how many users print to the card
printer, the operating system you use to send card data, and other decisions specific to your
environment.
Refer to the following table to locate the information you need to install and use the Card Printer
Driver.
Use the Driver Installation CD
The printer ships with the installation CD in the printer carton. In most cases, you use the CD to install the Card Printer Driver. Refer to “Start the Installation” on page 8.
Download the Driver
If the installation CD is not available, you can download the Card Printer Driver installation file from the website. Refer to “Download the Installation File (Optional)” on page 7.
Use a USB Connection
Refer to “Install the Driver” on page 9.
Use a Network Connection
Refer to “Install the Driver” on page 9.
Update an Existing Driver
If the Card Printer Driver version 4.0 or newer is installed on your PC, you can update the Driver to the current version without uninstalling the previous version. Refer to “Update the Card Printer Driver” on page 16.
Use Secure Printing
Refer to “Use the Card Printer Driver for Secure Printing” on page 27.
Connect to More Than One Printer
Refer to “Connect More Than One Printer” on page 25.
6 XPS Card Printer Driver Installation
Prepare to Install the Card Printer DriverThis section provides information about installing the Card Printer Driver on a PC running a
supported Windows operating system. Refer to “Supported Operating Systems” on page 1 and
the printer's Installation and Administrator's Guide for complete information about installation
requirements.
You can install the driver either from the CD that ships with the printer or from a downloaded file.
Most of the installation process is the same whether you install from a downloaded file or from
the CD.
Download the Installation File (Optional)You typically install the Card Printer Driver using the CD shipped with the printer. However, if you
do not have access to the installation CD, you can install the driver from the downloaded Card
Printer Driver installation file.
Obtain the downloaded driver installation file on a portable storage medium and save it to your
hard drive.
Or, download the installation file from the website:
http://www.datacard.com
1. Browse to the Downloads area of the website (or the Products page for the printer) and
select the Card Printer Driver .exe file.
2. When the File Download dialog displays, click Save As.
3. Select a location on your PC, such as C:\Temp, and click Save. The file has a name similar to
XPSCardPrinter_x.x.x.exe, where x.x.x is the version number.
4. Continue with “Start the Installation” on page 8.
Use Printer Sharing
Printer sharing allows one or more PCs (clients) to print cards to a printer installed on a different PC (host). Refer to “Use Printer Sharing” on page 29.
Use Printer Pooling
A printer pool is a group of printers that act as one printer. Print jobs are sent to the pool and are distributed among the available printers.
Refer to “Use Printer Pooling” on page 35 and “Set Up a Printer Pool” on page 38.
Your network security configuration might prevent the download or installation of the Card Printer Driver installation file. Ask your network support personnel if you need assistance downloading the file and installing the Card Printer Driver.
XPS Card Printer Drive User’s Guide 7

Start the Installation1. Log on to the PC as a user with administrator access.
2. Do one of the following:
Insert the Driver Installation CD in the PC’s drive.
OR
Browse to the location on the PC where you saved the downloaded file. Double‐click the
downloaded file.
3. If the Autoplay dialog box displays, click Run autorun.exe.
4. Click Yes on the User Account Control dialog box if it displays.
5. When the driver installer Welcome page displays, you can select to install the printer based
on the printer/PC communication method you are using, either a USB or a network
connection. Continue with “Install the Driver” on page 9.
If you are installing the Card Printer Driver on a system running Windows 8 or newer, and the computer has pending Windows updates, the driver installation stops and the following message displays. Finish installing the Windows updates, restart the computer, and then start the driver installation again.
8 XPS Card Printer Driver Installation

Install the DriverThe following instructions describe how to install the driver using either a USB or a network
connection. Most of the installation procedure is the same for either method; differences are
noted where necessary.
1. Plug in and power on the printer. Make sure that the cards and ribbon are loaded correctly.
The LCD panel displays Ready when the printer is completely powered on.
Caution: If you are installing the driver with a USB connection, do not connect the USB cable to the printer until instructed. If you start this procedure with the USB cable connected, problems can result.
XPS Card Printer Drive User’s Guide 9

2. On the driver installer Welcome page, click Install a Network Printer or Install a USB Printer.
3. The Card Printer Driver installer displays the license agreement. Read the license agreement
and click Accept.
If you are installing multiple copies of the driver, you only have to accept the license agreement once.
10 XPS Card Printer Driver Installation

The Card Printer Driver begins loading.
4. When prompted, connect the printer to the PC with a USB cable, as shown on your screen.
If you are using a USB connection, continue with step 4.
If you are using a network connection, skip to step 5.
USB Installation:
XPS Card Printer Drive User’s Guide 11

The Card Printer Driver searches for the printer and connects the PC and printer. The
Installing USB Driver page displays.
Continue with step 9.
5. Connect the printer to the network with an Ethernet cable.
6. Use the printer LCD screen menu system to retrieve the printer’s IP address. Refer to your
printer’s User’s Guide for details about how to obtain the IP address.
Network Installation:
The Card Printer Driver supports both IPv4 and IPv6 addresses for network‐connected printers. Refer to your printer’s User’s Guide for complete information about obtaining an IPv6 address.
12 XPS Card Printer Driver Installation

7. Enter the IP address.
a. Exit the menu system on the printer.
The Installing Network Driver window displays on your PC.
Make sure that Ready displays and the USER button on the front panel glows green.
XPS Card Printer Drive User’s Guide 13

b. When the installer displays the Printer Properties Ports tab, click Configure Port and
type the IP address in the Printer Name or IP Address field on the Port Settings window.
8. Click OK on the Port Settings window to save your settings and close the window. Then, click
Close on the Ports tab to close the Printer Properties window.
Continue with step 9.
If you are entering an IPv6 address, make sure that you enter the complete address. An IPv6 address requires square brackets at the beginning and end of the address. The Card Printer Driver automatically corrects an IPv6 address that is entered without the brackets.
Contact your network administrator if you need more information about the address mode being used.
14 XPS Card Printer Driver Installation
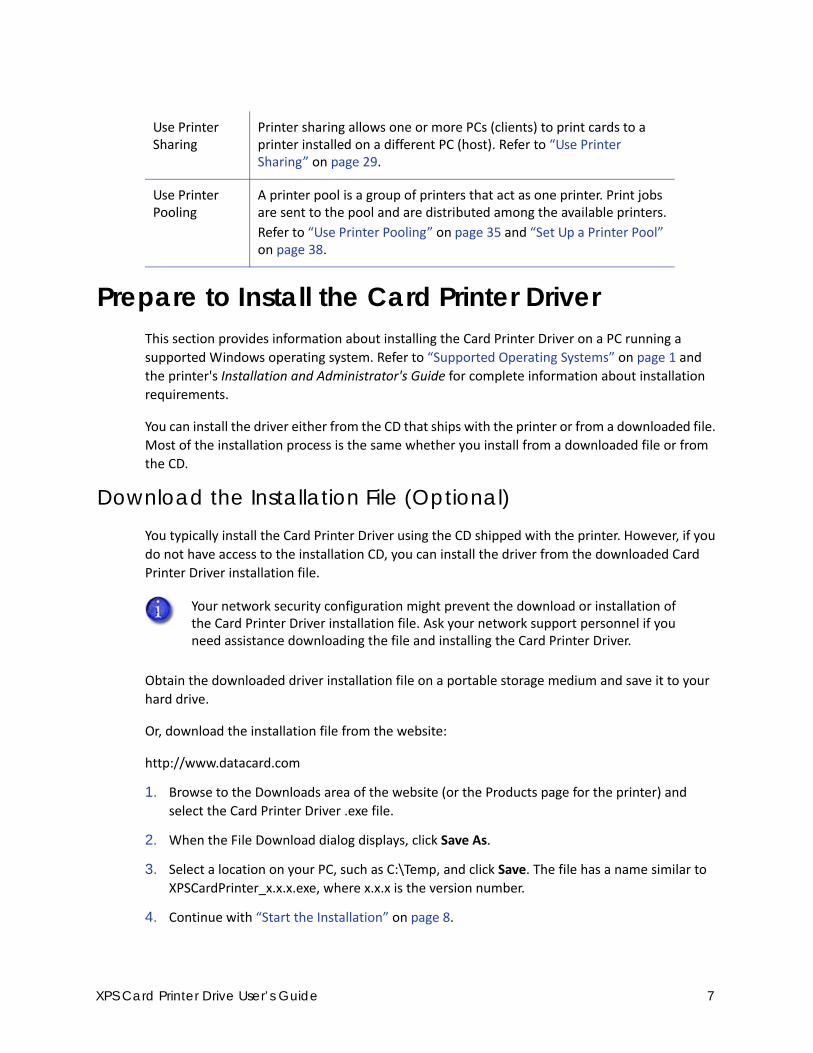
9. If you have ID software installed on your computer, the Install the Plug‐In screen displays as
part of the Card Printer Driver installation. Click Yes and follow the installation instructions to
install the XPS Card Printer plug‐in.
When the Card Printer Driver and any plug‐in software are installed, the Installation
Complete page displays.
XPS Card Printer Drive User’s Guide 15

10. Test your printer by printing a sample card. Make sure that Ready displays on the LCD screen,
and click Print Sample Card.
For information about how to print a printer test card, refer to the printer’s User’s Guide.
11. If necessary, you can install additional support files. Click the second icon (upper left) on the Welcome page, and select the items you want to install
(such as legacy support files for enhanced backward compatibility). Refer to
“Install Support Files” on page 23 for more information.
Update the Card Printer DriverIf the currently installed Card Printer Driver is version 4.0 or newer, you can update to the latest
driver version without having to remove all installed printers and reinstall the new driver. Use the
Card Printer Driver update process to install the new version. The updated Card Printer Driver
retains your printing preferences and selections from the previous version. In addition to
individual installed printers, you can update the Card Printer Driver in the following cases:
You have a number of printers set up as a printer pool.
If your configuration consists of a host system with shared clients, you can update the Card
Printer Driver on the host system. Refer to “Update a Shared Printer Client” on page 21 for
information about updating the client systems.
Printers that do not have a printhead installed cannot print a sample card to verify driver operation.
Card printers that support rewritable card printing cannot print the driver sample card to a rewritable card at this time. You can, however, print the sample card to verify that the computer and printer are able to communicate. Refer to “Printer Setup for Rewritable Cards” on page 97 for complete information about printing rewritable cards.
16 XPS Card Printer Driver Installation

Update RestrictionsYou cannot update the driver—and the Update the Driver option does not display—if any of the
following are true.
You are installing the Card Printer Driver for the first time.
The installed Card Printer Driver is:
Older than version 4.0
To find the Card Printer Driver version installed on your computer, open the XPS Card
Printer Properties window and click the About tab. Refer to “About Tab” on page 59.
The same version or newer than the version to which you are trying to update
If you select Install a USB Printer or Install a Network Printer from the installer Welcome
page, a message displays stating that you must remove the current driver, and then run the
installation again. Refer to “Uninstall the Card Printer Driver” on page 60 for more
information.
The current Card Printer Driver has already been uninstalled.
The Card Printer Driver is installed on a shared client PC.
If you need to remove the current Card Printer Driver from your PC, click the
Remove the Driver icon and follow the instructions (refer to “Uninstall the Driver
with the Driver Installation CD or Downloaded File” on page 60). The installer
Welcome page then displays with the Install options enabled.
XPS Card Printer Drive User’s Guide 17
Update the Driver
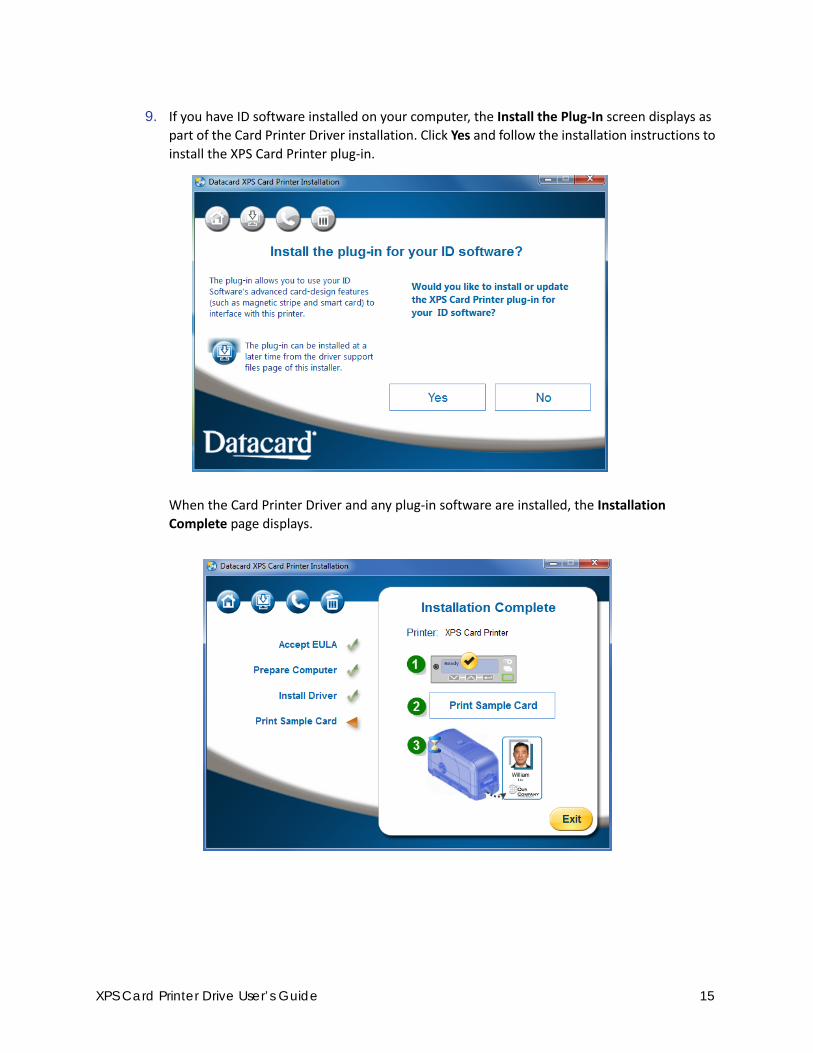
To update the Card Printer Driver:
1. Log on to the PC where the Card Printer Driver is installed.
2. Insert the Driver Installation CD or double‐click the downloaded installation file.
The Card Printer Driver Installer Welcome page displays.
The Card Printer Driver update requires that you restart your computer. Plan to perform the update when no cards are printing and at a time that does not interfere with your production schedule.
18 XPS Card Printer Driver Installation

3. Click Update the Driver.
The Update the Driver page displays.
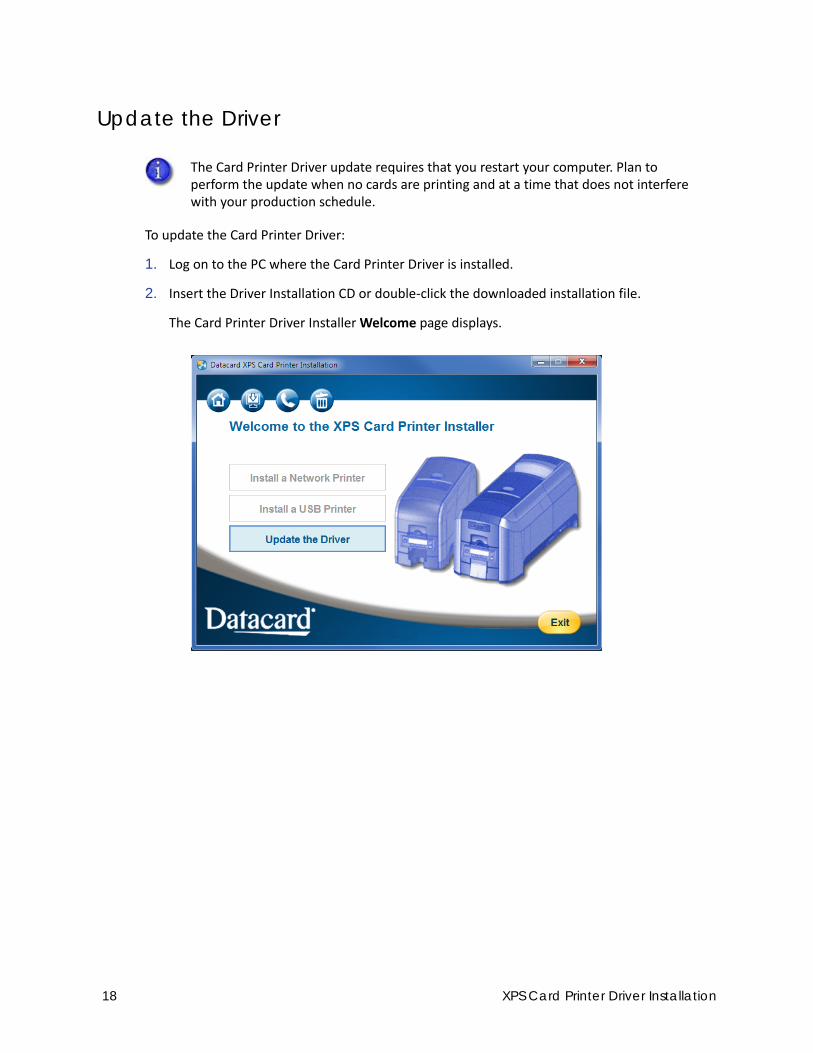
4. Click Update Now to start the update process.
If you have ID software installed on your computer, and the XPS Card Printer plug‐in requires updating, the Install the Plug‐In for your ID software? check box displays.
XPS Card Printer Drive User’s Guide 19
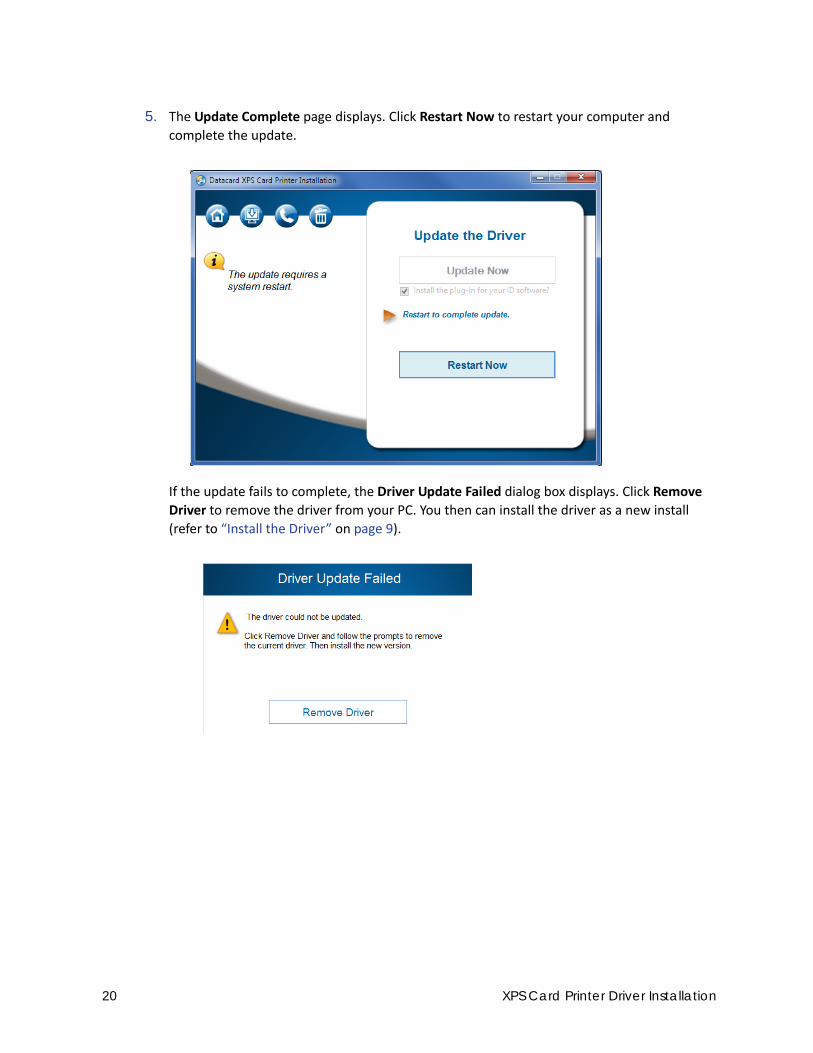
5. The Update Complete page displays. Click Restart Now to restart your computer and
complete the update.
If the update fails to complete, the Driver Update Failed dialog box displays. Click Remove
Driver to remove the driver from your PC. You then can install the driver as a new install
(refer to “Install the Driver” on page 9).
20 XPS Card Printer Driver Installation

Update a Shared Printer ClientIf you use printer sharing, the host PC and all client PCs must be at the same version of the Card
Printer Driver to work properly.
You must update the Card Printer Driver on each client PC manually.
Update a Client PC Manually
To update the Card Printer Driver on a client system, do the following.
1. Make sure that the host computer has been updated. Refer to “Update the Card Printer
Driver” on page 16.
2. Open the Devices and Printers window on the client PC.
3. Right‐click the printer name and select Update driver from the menu. The text “Needs new
driver” also displays as a Status message.
4. If the Do you trust this printer dialog box displays, click Install Driver.
The updated Card Printer Driver is installed on the client PC.
5. Restart the client PC to complete the Card Printer Driver update.
Update each shared client computer using these steps.
You may need to restart the client PC before proceeding with the following steps. If the Update driver option displays when you select the printer, you do not need to restart the PC.
If Update driver does not appear in the menu, send a card to the printer. A message to install the driver will display.
XPS Card Printer Drive User’s Guide 21

Verify the Client Update
After the client PC has been updated with the new Card Printer Driver version, verify that the
update completed properly and that your settings and preferences were not changed.
1. Open the Devices and Printers window on the client PC and right‐click the printer icon.
2. Select either Printer properties or Printing preferences and select the About tab.
3. Verify that the driver version is correct.
4. Review your printer properties settings and printing preferences and verify that they are
correct. Refer to “Configure PC Printing Preferences for Sharing” on page 33 for more
information.
5. Print sample cards to confirm that cards print successfully.
22 XPS Card Printer Driver Installation

Install Support Files1. Display the Card Printer Installation Welcome window. Refer to “Start the Installation” on
page 8.
2. Select the Install driver support items icon at the top of the installation
window (see right).
The support options window displays.
3. Select from the following support options and click Install Now.
Shared Printer Client Support:
Magnetic stripe fonts—Select this option if the shared printer client PC will process
magnetic stripe cards using magnetic stripe fonts.
Custom masking bitmaps—Select this option if you plan to use custom user‐defined
bitmaps on the client system. The bitmaps are installed automatically on a host
system, but you must select this option to install them on a shared client system.
Refer to “Use a User‐Defined Topcoat Bitmap” on page 85 and “Select an Erase
Pattern” on page 88 for more information.
Legacy Application Support—Select Legacy magnetic stripe fonts if you have an
application that uses magnetic stripe fonts from older generation desktop printers.
ID Software Support—Select XPS Card Printer Plug‐in to install the XPS Card Printer
plug‐in for your ID software. A wizard guides you through the plug‐in installation.
4. After you install the needed support files, close the Card Printer Installation window.
You can use the Driver Installation CD or the file downloaded from the website.
XPS Card Printer Drive User’s Guide 23

Install User DocumentationInstall the card printer documentation files from the separate documentation CD. The document
set consists of the following user manuals:
Quick Install Guide
XPS Card Printer Driver Guide
User’s Guide
Installation and Administrator’s Guide
OpenCard Data Format Guide
Software Development Kit (SDK) Programmer’s Reference Guide
XPS Card Printer Plug‐in User’s Guide
Advanced SetupAdvanced setup options help you set up your installation to fit your operation’s needs. Advanced
setup includes the following:
Connect More Than One Printer on page 25
Use the Card Printer Driver for Secure Printing on page 27
Use Printer Sharing on page 29
Use Printer Pooling on page 35
24 XPS Card Printer Driver Installation

Connect More Than One PrinterThere are several options for connecting more than one printer to a PC. You can connect to
several printers installed on an Ethernet network, or connect multiple printers to a PC with USB
cables.
Print to More Than One Printer From One PCWhen you print to more than one printer from one PC, keep the following in mind:
Keep track of the printer names. When messages display, the title bar of the message displays
the name of the printer that issued the message.
Select the printer to use from within the card production application. Card jobs are sent to
the selected printer even if more than one card printer is attached to the PC.
Each printer has its own icon in the Printers window, and each printer has separate
Properties and Printing Preferences windows. Settings are not shared among printers.
Do not mix non‐secure and secure printers on PCs that require secure printing.
Install Additional USB PrintersUse the following guidelines to install more than one printer with USB cables:
Connect and install one printer at a time. The PC cannot run more than one installation
program at a time.
You can connect up to eight printers to a PC with USB cables.
If you need to connect two card printers to a PC with one USB port, use an independently
powered, high‐speed USB hub (USB 2.0) to which both printers can connect. Do not daisy‐
chain multiple hubs. (Self‐powered hubs are recommended.)
Each printer must remain powered on and in the Ready state during installation.
For each USB printer installed after the initial USB installation, do the following:
1. Load supplies and power on the printer before starting the installation. Refer to the printer’s
User’s Guide for the steps to load cards and ribbon.
2. Log on to the PC as a user with administrator access.
3. Connect the Ready printer to the PC with a USB cable.
XPS Card Printer Drive User’s Guide 25

4. The operating system detects the new device and begins installation. What you see during
the installation process varies depending on your system’s current setup.
A pop‐up window may display during installation.
If the operating system does not display a pop‐up window within a few minutes, check all
cables and connections to the printer, and then look at the PC’s Printers window to
determine whether the icon for the new printer displays. The software sometimes
installs without displaying the pop‐up window.
The operating system usually uses the existing Card Printer Driver files to install the
driver for the new printer. Insert the Driver Installation CD only if you are prompted for it.
26 XPS Card Printer Driver Installation
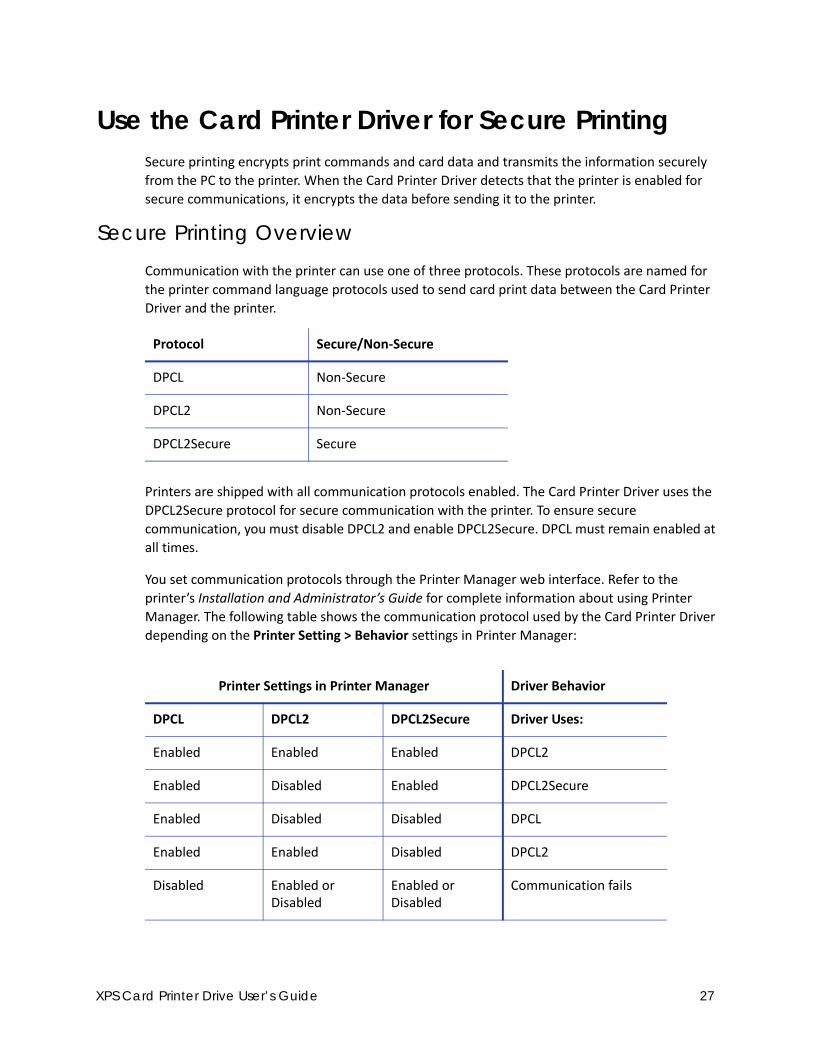
Use the Card Printer Driver for Secure PrintingSecure printing encrypts print commands and card data and transmits the information securely
from the PC to the printer. When the Card Printer Driver detects that the printer is enabled for
secure communications, it encrypts the data before sending it to the printer.
Secure Printing OverviewCommunication with the printer can use one of three protocols. These protocols are named for
the printer command language protocols used to send card print data between the Card Printer
Driver and the printer.
Printers are shipped with all communication protocols enabled. The Card Printer Driver uses the
DPCL2Secure protocol for secure communication with the printer. To ensure secure
communication, you must disable DPCL2 and enable DPCL2Secure. DPCL must remain enabled at
all times.
You set communication protocols through the Printer Manager web interface. Refer to the
printer’s Installation and Administrator’s Guide for complete information about using Printer
Manager. The following table shows the communication protocol used by the Card Printer Driver
depending on the Printer Setting > Behavior settings in Printer Manager:
Protocol Secure/Non‐Secure
DPCL Non‐Secure
DPCL2 Non‐Secure
DPCL2Secure Secure
Printer Settings in Printer Manager Driver Behavior
DPCL DPCL2 DPCL2Secure Driver Uses:
Enabled Enabled Enabled DPCL2
Enabled Disabled Enabled DPCL2Secure
Enabled Disabled Disabled DPCL
Enabled Enabled Disabled DPCL2
Disabled Enabled or Disabled
Enabled or Disabled
Communication fails
XPS Card Printer Drive User’s Guide 27

Use Printer Manager to Set Up Secure PrintingDo the following to set up secure printing:
1. Install a printer that supports secure printing. Refer to the printer’s Installation and
Administrator’s Guide for a list of hardware and software requirements.
2. Install and set up the Card Printer Driver. Refer to “Install the Driver” on page 9.
3. Use the Printer Manager web interface to enable secure printing. Sign on as a WebAdmin and
select Printer Setting > Behavior. Set DPCL2 to Disabled, and make sure that DPCL2Secure is
set to Enabled. Refer to the printer’s Installation and Administrator’s Guide for complete
information about using Printer Manager. Click Set Current to save your changes.
4. Restart the printer and computer for the settings to take effect.
5. Connect your secure printers to the host and client PCs.
After secure printing is set up, the Card Printer Driver automatically detects and uses secure
printing during card production.
28 XPS Card Printer Driver Installation

Use Printer SharingYou can share a printer over a network using Microsoft File and Printer Sharing.
Shared printing includes a host PC and up to 10 client PCs. The printer is connected to a host PC
that has the Card Printer Driver installed. Client PCs then print to the shared printer over a
network. Client PCs do not have the same level of access to the Card Printer Driver as the host PC.
Printer Sharing RequirementsBefore sharing a printer over a network, make sure that the following requirements are met:
Each PC that uses the printer must be connected to the same network, workgroup, or
domain.
The host and the client PC must be using the same type of processor, either 32‐ or 64‐bit.
The host PC must be configured and enabled for sharing.
The host PC must remain on at all times with the Windows operating system running.
The host PC must grant permissions for users that print to the shared printer.
When multiple user accounts are configured on a shared printer client, we recommend that
users log on and off when switching from one account to another. Using the Windows
“Switch User” feature keeps multiple user accounts logged on and may cause the same
message from the printer to display several times.
Change the host printer name to meet the following requirements:
The name of a shared (host) printer is the name you assign plus the server name (which is
added by Windows). The server name is the network name of the host PC.
For best results, use a name with eight or fewer characters. The printer name, including
the server name, cannot be longer than 30 characters.
The printer name cannot contain special characters. Follow Windows guidelines for
allowed characters and naming restrictions.
If you need to rename a printer, do it before you enable printer sharing.
Caution: Renaming shared printers is not supported. Do not change printer names after sharing is enabled. If you rename a shared printer, print requests may fail and reinstallation may be necessary.
XPS Card Printer Drive User’s Guide 29

Supported Operating SystemsThe Card Printer Driver supports the following host and client operating system combinations.
See the appropriate appendix for printer sharing setup information for your host and client
systems.
Host Client Refer to
64‐bit:
Windows 7
Windows 8.1
Windows 10
64‐bit:
Windows 7
Windows 8.1
Windows 10
Appendix A: "Windows Printer Sharing”
64‐bit:
Windows Server 2008
Windows Server 2012
64‐bit:
Windows 7
Windows 8.1
Windows 10
Appendix B: "Windows Server 2008 and 2012 Printer Sharing”
30 XPS Card Printer Driver Installation
Tips for Host PC and Client PC UsersThe user at the host PC has more control over the printer. The host PC typically is located near the
printer and is used by administrator‐level users.
The following table describes some of the tasks that can be performed at the host and client PCs.
Understanding these tips for setting up and managing shared printers can help you install and
modify your printer setup for your operation’s unique needs.
Feature Printer Sharing Tips
Host PC Users:
Manage print queue Use the Windows Print Manager to manage print jobs.
Secure printing To ensure secure printing, make sure that:
The printer you install and share supports secure printing.
Secure printing is enabled in Printer Manager.
Refer to “Use the Card Printer Driver for Secure Printing” on page 27.
Security permissions for shared printers
Set up a Windows group account with the users who have the same printer security permissions.
For more information, refer to: “Set Up Group Accounts for Using Shared Printers” on page 34.
View messages To set up accounts to view messages:
Enable printer sharing on the Windows Printer Properties Sharing tab.
Set up applicable user accounts on the Windows Printer Properties Security tab. Select the Print and the Manage this printer permissions for each user or group. Selecting both of these settings lets individual users or groups print and view messages from their PCs, except in the following case:
View printer status, supplies, and card counts
For more information, refer to the following topics:
Printer Status Tab on page 50
Card Counts Tab on page 55
Supplies Tab on page 57
XPS Card Printer Drive User’s Guide 31
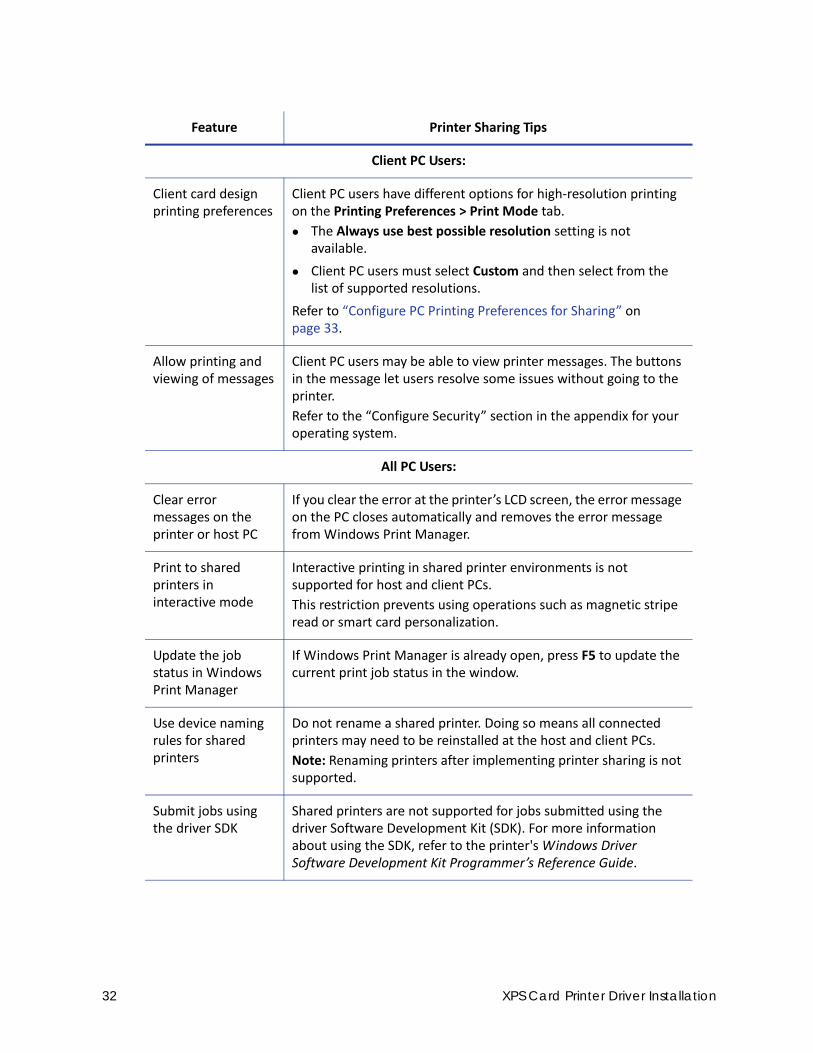
Client PC Users:
Client card design printing preferences
Client PC users have different options for high‐resolution printing on the Printing Preferences > Print Mode tab.
The Always use best possible resolution setting is not available.
Client PC users must select Custom and then select from the list of supported resolutions.
Refer to “Configure PC Printing Preferences for Sharing” on page 33.
Allow printing and viewing of messages
Client PC users may be able to view printer messages. The buttons in the message let users resolve some issues without going to the printer.
Refer to the “Configure Security” section in the appendix for your operating system.
All PC Users:
Clear error messages on the printer or host PC
If you clear the error at the printer’s LCD screen, the error message on the PC closes automatically and removes the error message from Windows Print Manager.
Print to shared printers in interactive mode
Interactive printing in shared printer environments is not supported for host and client PCs.
This restriction prevents using operations such as magnetic stripe read or smart card personalization.
Update the job status in Windows Print Manager
If Windows Print Manager is already open, press F5 to update the current print job status in the window.
Use device naming rules for shared printers
Do not rename a shared printer. Doing so means all connected printers may need to be reinstalled at the host and client PCs.
Note: Renaming printers after implementing printer sharing is not supported.
Submit jobs using the driver SDK
Shared printers are not supported for jobs submitted using the driver Software Development Kit (SDK). For more information about using the SDK, refer to the printer's Windows Driver Software Development Kit Programmer’s Reference Guide.
Feature Printer Sharing Tips
32 XPS Card Printer Driver Installation
Configure PC Printing Preferences for SharingWhen you use printer sharing, settings on the client PC must be configured to match the settings
of the host PC. Print quality from the client PC may be affected if the Windows printing
preferences are not the same on the host PC and the client PC.
Use the Printing Preferences window to set up your printing preferences. Refer to “Design Tasks
in Windows Printing Preferences” on page 69 for complete information about how to set up
printing preferences.
Consider the following when you use printer sharing:
When you set up the host PC, write down the settings you specify in the Printing Preferences
window. You use these settings when you set up each client PC’s printing preferences.
The host PC automatically detects the ribbon type that is installed in the printer and displays
it on the Printer Properties Supplies tab. The client PC does not automatically detect the type
of ribbon in the printer. Instead, it defaults to YMCKT ribbon and 300 x 300 dpi resolution.
Select the same ribbon type as the host on the client Printing Preferences Advanced Options
window.
Select the same topcoat and print blocking options for the front side and back side print
areas. Refer to “Print Area Tab” on page 83.
Set the print resolution on the client PC to use the same setting you selected for the host PC
print resolution. Refer to “Print Mode Tab” on page 93.
XPS Card Printer Drive User’s Guide 33

Set Up Group Accounts for Using Shared PrintersIf you want to define which users can both print cards and view messages, we recommend that
you create a group account. Assign the client user accounts allowed to use the printer to the
group account. Then, using the shared printer’s Printer Properties Security tab, select the Print
and Manage this printer permissions to allow the group to print and display messages.
For more information, refer to the Microsoft documentation on setting up group accounts and
printer security permissions, and the following instructions for your configuration:
Appendix A: "Windows Printer Sharing”
Appendix B: "Windows Server 2008 and 2012 Printer Sharing”
Use Windows Print ManagerWindows Print Manager is one tool available for managing print jobs across your host and client
systems. Do not confuse Windows Print Manager (shown) with the printer’s Printer Manager
web interface.
If Windows Print Manager is already open, press F5 to update the current print job status in the
Print Manager window.
34 XPS Card Printer Driver Installation

Use Printer PoolingPrinter pooling is used in card production environments in which an application prints to a group
of printers. The user chooses to print to the pool and the pool distributes the print jobs to the
next available printer.
Printer Pooling Requirements
Operating Systems Supported for Printer Pooling on page 36
Tips for Printer Pooling on page 37
Set Up a Printer Pool on page 38
Printer Pooling RequirementsPrinter pooling requires that you set up all printers in a pool with the same basic setup, except as
noted below. The setup includes connecting printers using an Ethernet cable only, using the same
ribbons, and setting up for non‐interactive printing.
All printers in a printer pool must have the same: With:
Model number
For example, a pool includes:
Only SD260L models OR Only SD360 modelsOR Only CD800 models
The same printing features installed, as outlined in this table.
Note: Do not place non‐secure printers in pools where secure printing is needed. For more information about secure printing, refer to “Use the Card Printer Driver for Secure Printing” on page 27.
Supplies The same settings applied. For information about defining printer ribbon settings, resolution, and other print settings, refer to “Design Tasks in Windows Printing Preferences” on page 69.
Network cable type—Ethernet only
No USB‐connected printers. Printer pooling is not supported for USB‐connected printers.
XPS Card Printer Drive User’s Guide 35

For instructions to set up printer pooling, refer to “Set Up a Printer Pool” on page 38.
Operating Systems Supported for Printer PoolingPrinter pooling is supported on all Card Printer Driver‐supported operating systems. For more
information about supported operating systems, refer to the printer's Installation and
Administrator's Guide.
Non‐interactive printing requirements
No direct, printer‐to‐PC processing is permitted. Interactive print processing requires a connection to a printer, which is not possible when using a pooled printer.
Note: Smart card and magnetic stripe read commands cannot be processed on printers in a pool.
Printer Manager settings and magnetic stripe values
Refer to the printer's Installation and Administrator's Guide for more information.
All printers in a printer pool must have the same: With:
36 XPS Card Printer Driver Installation
Tips for Printer Pooling
Feature Tip for Printer Pooling
Error messages Messages display the name of the main printer named during the Card Printer Driver installation, rather than the name of the specific printer in error.
To locate the printer with the error condition, look at each printer in the pool for warning indicators or LCD messages.
Card jobs are held at the printer with the error condition. All subsequent card jobs print to other printers in the pool. The printer with the error is not used by the pool until the error condition is corrected.
After correcting the error at the printer, resume or cancel the print job using the error message on the PC.
Printer Pooling information Printer status, card count, and supplies information typically shown in the Windows Printer Properties window is not available to printers belonging to a printer pool.
For these printers, the Printer Status tab displays the status as “Printer pooling,” which indicates that the printer belongs to a printer pool.
Use Printer Manager to view card counts, supply information, and the status of individual printers in the pool. Refer to the printer’s Installation and Administrator's Guide for information about using Printer Manager.
Shared Printers Shared printers can be part of a printer pool.
Print Sample Card and Magstripe Test Card are not available
The Print Sample Card and Magstripe Test Card buttons on the Printer Properties window Status tab are not available for a printer belonging to a printer pool. Print sample cards or test cards from the LCD panel on each printer.
XPS Card Printer Drive User’s Guide 37

Set Up a Printer PoolThe following steps describe how to set up printer pooling for all supported Windows operating
systems. Operating system‐specific differences are noted, where necessary. The screens shown
may differ slightly from those on your system
1. Install the first network printer on the host PC. Refer to “Install the Driver” on page 9.
2. Connect each additional printer you want to include in the pool to the network using an
Ethernet cable.
3. Write down the IP address of each printer. Refer to your printer’s User’s Guide for details
about how to obtain the IP address.
Printer pool print queues A printer that cannot process jobs continues to have jobs assigned to it by the pool controller. The Card Printer Driver does not determine if each printer in the pool is ready to receive card jobs.
Remove printers that are not available from the pool until they are functioning and ready to receive print jobs:
1. To remove a printer from the pool, open the Printer Properties window and click the Ports tab.
2. Remove the check mark from the port assigned to the printer.
Some software, such as Microsoft Office (for example, Word, Excel, Access), sends multiple‐card (batch) files as a single print job. In this case, the pool sends all cards in the batch to the same printer. Software designed specifically for card production sends each card in the batch as a separate print job. The printer pool distributes these print jobs among the available printers.
Multiple active jobs Pooled printers process only the current active job, so only one job is sent to the printer at a time. Pooled printers pause briefly between jobs.
Feature Tip for Printer Pooling
38 XPS Card Printer Driver Installation

4. Configure the network printers for printer pooling.
a. Display the Devices and Printers window for your operating system.
b. Right‐click the card printer icon and select Printer properties to display the Printer Properties window.
Windows Server 2008 and Windows Server 2012: Select the printer and click Print server
properties on the menu bar.
c. Select the Ports tab.
Windows Server 2008 and Windows Server 2012: On the Print Server Properties Ports
tab, scroll down and highlight the printer to add to the pool. Click Change Port Settings.
d. Click Add Port.
The Printer Ports window displays.
e. Select Standard TCP/IP Port, and click
New Port. The Add Standard TCP/IP
Printer Port Wizard page displays.
f. Follow the instructions in the wizard to
add the port. Click Next to display each
step in the wizard.
g. In the Printer Name or IP Address
field, enter the name or IP address of
the printer you are adding.
h. In the Port Name field, enter a name,
such as Pooled Printer 2.
i. Click Next.
If the Additional Port Information
Required page displays, select
Custom and click Next.
j. When the last page of the wizard
displays, click Finish.
k. Repeat these steps for each printer you want to add to the pool.
l. Close the Printer Ports window.
XPS Card Printer Drive User’s Guide 39

m. Disable SNMP for each added printer.
i. On the Ports tab, select a printer that you want to add to the pool and click Configure
Port.
ii. On the Configure Standard TCP/IP Port Monitor window, make sure that SNMP
Status Enabled is not checked.
iii. Click OK to close the Configure Standard TCP/IP Port Monitor window.
iv. Select the next printer that you want to add to the pool and repeat steps i through iii.
n. Click Apply on the Ports tab after all printers and ports have been added and configured.
Windows Server 2008 and Windows Server 2012: Close the Print Server Properties
window.
5. Enable printer pooling.
a. On the Devices and Printers window, right‐ click the printer icon
and select Printer properties.
b. Select the Ports tab. The list of printer ports displays.
c. Select the Port check box for the
printer that you want to represent
the pool. (This is the printer that
users select when printing to the
pool.)
d. Select Enable printer pooling.
e. Select the Port check box next to each port that you added and that you want to be part
of the printer pool.
f. Click Apply to save the settings.
6. Click OK to close the Printer Properties window.
40 XPS Card Printer Driver Installation

Chapter 3: Card Printer Driver Management Tasks
Card Printer Driver managements tasks are accessed through the Printer
Properties window.
This chapter provides information about the Card Printer Driver, including:
The Printer Properties Window
Uninstall the Card Printer Driver on page 60
The Printer Properties WindowThe Printer Properties window allows you to view the settings and values that Windows uses to
communicate with and manage the printer. You also can modify some of the settings.
To open the Printer Properties window, display the Devices and Printers window on your system.
Right‐click the icon for the card printer and select Printer properties. Use the Printer Properties
tabs to define your printer to the PC.
XPS Card Printer Driver User’s Guide 41

General TabThe General tab displays when you first open the Printer Properties window. It contains basic
information about the printer. Click Preferences to display the Printing Preferences window.
Refer to “Design Tasks in Windows Printing Preferences” on page 69 for complete information
about using the Printing Preferences window.
Sharing TabUse the Sharing tab to set up printer sharing using a host PC and up to ten client PCs. Refer to
“Use Printer Sharing” on page 29 and the appropriate appendix for your operating system for
complete information about setting up printer sharing.
If you rename the printer on the General tab, all settings on all Printing Preferences tabs are reset to their default values. If you have specified preference settings, your changes will be lost. Windows does not issue a warning message to indicate that the preferences will be changed. If you do rename the printer, make sure to check your Printing Preferences settings and reset them, as needed. Refer to “Design Tasks in Windows Printing Preferences” on page 69 for a complete discussion of the printing preferences settings.
The Print Test Page button prints a Windows test page to verify PC communication with the printer. On some operating systems, the card printer prints only a small portion of the test page. We recommend that you use the “Printer Status Tab” on page 50 to print a sample card.
42 Card Printer Driver Management Tasks
Ports TabUse the Ports tab to define the IP address of your printer to the PC. Refer to “Install the Driver” on
page 9 and “Set Up a Printer Pool” on page 38 for information about defining a port during
installation or when setting up a printer pool.
View Network Information
When the printer and PC using the Card Printer Driver are connected using a network, the
network settings on the PC and the printer must match.
Use the Ports tab on the Card Printer Driver Printer Properties window to enter the printer’s IP
address. Refer to the Port Type section of “Printer Status Tab” on page 50 to see the current IP
address setting.
If the printer is set to use DHCP (Dynamic Host Configuration Protocol), the IP address of the
printer can change when the printer is powered off and powered back on. If this occurs, the Card
Printer Driver issues error message 500.
If the printer IP address changes often, consider using static IP addressing to provide a more
reliable connection. Work with your network support group to identify the IP address, subnet
mask, and gateway address (if used). Then, refer to the printer’s Installation and Administrator’s
Guide for information about setting a static IP address.
Change a Network IP Address
If you are connecting your PC to a new network printer or if the printer IP address has changed,
you need to change the IP address that is defined in the Printer Properties Ports tab.
Follow the procedure to change the port settings based on the operating system you are using:
Windows 7, Windows 8.1, and Windows 10 on page 44
Windows Server 2008 and Windows Server 2012 on page 45
The Ports tab of the Printer Properties window includes the Enable Bidirectional Support check box. The Card Printer Driver always uses bidirectional communication with the printer. Make sure that this option is selected. Otherwise, all printing from the Card Printer Driver is disabled.
The Card Printer Driver supports both IPv4 and IPv6 addresses for network‐connected printers. Refer to your printer’s User’s Guide for complete information about obtaining an IPv6 address.
XPS Card Printer Driver User’s Guide 43

Windows 7, Windows 8.1, and Windows 10
1. Open the Printer Properties
window and select the Ports tab.
2. Select the installed network
printer you want to change and
click Configure Port.
3. On the Configure Standard TCP/IP
Port Monitor dialog, enter the new IP
address for the printer.
4. Click OK to save the new settings and
then click Close on the Printer
Properties window.
44 Card Printer Driver Management Tasks

Windows Server 2008 and Windows Server 2012
1. Open the Devices and Printers window
and click the network printer you want to
change. Print server properties displays in
the menu bar.
2. Click Print server properties and select
the Ports tab on the Print Server Properties
window.
3. Scroll down and select the printer whose IP
address you want to change. Click Change Port
Settings.
4. The Print Server Properties window displays
again. Select the printer again and click Configure
Port.
XPS Card Printer Driver User’s Guide 45

5. On the Configure Standard TCP/IP Port Monitor
dialog, enter the new IP address for the printer.
6. Click OK to save the settings, and then click
Close to exit the Print Server Properties window.
46 Card Printer Driver Management Tasks
Advanced TabThe Advanced tab contains additional printer settings. We recommend you keep the defaults set
when you install the Card Printer Driver.
Color Management TabRefer to the Printing Preferences window “Color Adjustment Tab” on page 90 and the “Color
Printing” section of your printer’s Installation and Administrator’s Guide for more information.
The Card Printer Driver does not support the following options on the Advanced tab:
The New Driver button. Use the update process to update the Card Printer Driver to a newer version. Refer to “Update the Card Printer Driver” on page 16 for complete information.
The Keep printed documents option.
The Print directly to the printer option. The Card Printer Driver always uses print spooling.
XPS Card Printer Driver User’s Guide 47
Security TabUse the Security tab to set printer permissions. If the PC to which the printer is attached has
more than one user, set permissions that:
Give users access to all features of the printer and Card Printer Driver, including messages.
Display messages to inform users when they need to change the ribbon, load cards, or fix
problems.
Prevent access to the printer by unauthorized users.
1. Log in to the PC as the Creator/Owner.
2. On the Printer Properties window, select the Security tab.
a. Review the Group or User Names list. If the names for which you want to specify
permissions do not appear in the list, add the names.
b. Click Add to open the Users and Groups dialog box.
c. Select a name and click Add. Repeat for each name you want to add. When you are done
adding names, click OK to close the Users and Groups dialog box.
3. In the Names list, select the name for which you want to specify permissions.
48 Card Printer Driver Management Tasks

4. From the Permissions list, select the access for each user or group:
To enable printing, select Allow permission for Print, Manage this printer, and Manage
documents.
To prevent a user from printing to the card printer, select Deny for all permissions.
5. Click Apply to save the changes.
6. Repeat steps 3 through 5 to grant access to the printer for other users or groups.
7. Click OK to close the Printer Properties window.
XPS Card Printer Driver User’s Guide 49
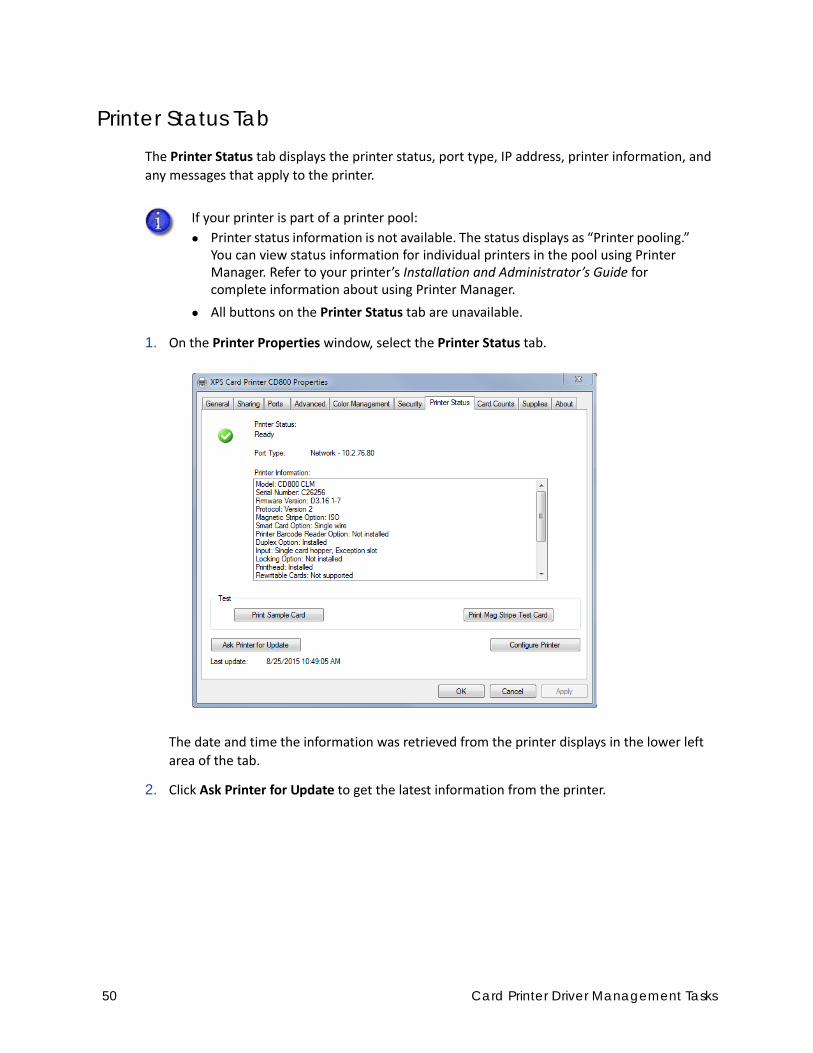
Printer Status TabThe Printer Status tab displays the printer status, port type, IP address, printer information, and
any messages that apply to the printer.
1. On the Printer Properties window, select the Printer Status tab.
The date and time the information was retrieved from the printer displays in the lower left
area of the tab.
2. Click Ask Printer for Update to get the latest information from the printer.
If your printer is part of a printer pool:
Printer status information is not available. The status displays as “Printer pooling.” You can view status information for individual printers in the pool using Printer Manager. Refer to your printer’s Installation and Administrator’s Guide for complete information about using Printer Manager.
All buttons on the Printer Status tab are unavailable.
50 Card Printer Driver Management Tasks

3. You can view and update printer settings using the printer’s Printer Manager web interface.
Click Configure Printer to log into Printer Manager. Refer to your printer’s Installation and
Administrator’s Guide for complete information about using Printer Manager.
Printer Status
The printer status can display as one of the following:
If a shared printer client PC is connected to the host computer with a USB cable, the Configure Printer button on the client is unavailable and cannot be used to start Printer Manager. You must configure the printer settings from the host computer.
Windows 10 Users: The Configure Printer button on a USB‐connected printer cannot launch Printer Manager using the Edge browser that is shipped with Windows 10 as the default browser. The Card Printer Driver automatically uses Internet Explorer to start Printer Manager on Windows 10 systems. If you have removed Internet Explorer from your system, the Configure Printer button does not function.
Icon Printer Status
Ready
The printer is not processing a card and is available to print.
Suspended
The printer was paused or it is processing a card from another PC that has an error.
Busy
The printer is processing a card or a command, or the printer menu system is being used.
If the printer is connected to a laminator, a message displays when the laminator is warming up indicating the percent complete. Click Ask Printer for Update to update the warm‐up percentage.
Message
The printer has issued a message for a card sent from this PC. The message text displays.
Initializing
The printer is powering on.
Unavailable
The printer is off, is shutting down, or is not connected.
XPS Card Printer Driver User’s Guide 51

Port Type
The Port Type displays the connection type and the printer IP address:
USB—The printer is connected locally via USB.
Network—The printer is connected using a network connection. The network IP address can
be either IPv4 or IPv6.
Printer Information
The Printer Information box shows the following:
Print a Driver Sample Card
You can print sample cards from the Printer Status tab to verify that the Card Printer Driver and
the printer are communicating.
The Printer sample card shows a basic ID card that can be printed with any ribbon that the printer
supports. The test card images and text do not change.
The magnetic stripe test card is available when the printer includes a magnetic stripe option. The
magnetic stripe test card verifies that the Card Printer Driver sends magnetic stripe data to the
printer and that the printer encodes it. The test data cannot be changed.
The Card Printer Driver includes the following sample cards:
Printer Sample Card
Model Model name of the printer
Serial Number Printer serial number assigned at the factory
Firmware Version Version of the firmware currently running in the printer
Protocol DPCL protocol used by the driver to communicate with the printer
Option Information The options or features included in this printer
52 Card Printer Driver Management Tasks

3‐Track ISO Magnetic Stripe
JIS Magnetic Stripe
HINTS & TIPS
The Card Printer Driver sample cards use the settings specified in the Printing Preferences
Layout window, except for the following: Orientation, Print on Both Sides, and Rotate front
side card image 180 degrees. Refer to“Design Tasks in Windows Printing Preferences” on
page 69 for information about specifying printing preferences.
The magnetic stripe data sent by the Card Printer Driver requires that the printer be set to
encode the three‐track ISO format for a three‐track module, or the JIS‐II format for the single‐
track module. The magnetic stripe card that prints is determined by the printer settings.
The name of the magnetic stripe sample card prints on the card.
If you are printing the sample card to a rewritable card (for card printers that support rewrite
only), make sure that the Card Printer Driver, printer, and Printer Manager are configured
correctly. Refer to “Printer Setup for Rewritable Cards” on page 97.
XPS Card Printer Driver User’s Guide 53

To print a sample card:
1. Open the Printer Properties window.
2. Select the Printer Status tab. If the printer status is something other than Ready or Busy,
determine why the printer is unavailable.
3. Do one of the following:
Click Print Sample Card.
OR
Click Print Mag Stripe Test Card.
The printer picks the card and prints it. If the card does not print, refer to the “Troubleshooting”
section of the printer’s User’s Guide to determine the cause of the problem and try to print the
sample card again.
54 Card Printer Driver Management Tasks

Card Counts TabThe Card Counts tab of the Printer Properties window shows the number of cards that have been
processed by the printer.
1. On the Printer Properties window, click the Card Counts tab. The tab displays current and
total counts.
2. Click Ask Printer for Update to see the most recent card counts.
If your printer is part of a printer pool:
Card count information is not available. You can view card count information for individual printers in the pool using Printer Manager. Refer to your printer’s Installation and Administrator’s Guide for complete information about using Printer Manager.
The Ask Printer for Update button is unavailable.
XPS Card Printer Driver User’s Guide 55

The Card Counts tab provides the following information:
The printer updates the card count information when you first display the Card Counts tab or
click Ask Printer for Update.
The printer includes cards used for test cards and cleaning cards in the Picked count, but not
in Completed count.
You can select the hopper for which you want to see the card count information.
Total All the cards the printer has processed.
Current All cards printed since the last time the count was reset. Current counts can be reset using Printer Manager.
Completed The number of cards that completed successfully.
Rejected The number of cards that did not process correctly.
Lost The number of cards that were picked but did not exit the printer (for example, a jammed card that had to be removed).
Since last cleaned The number of cards processed since the last time the printer was cleaned.
56 Card Printer Driver Management Tasks

Supplies TabThe Supplies tab of the Printer Properties window shows the supplies installed in the printer,
including the type of supply, the estimated percentage remaining, the part number, and a
description of the supply.
1. Open the Printer Properties window and click the Supplies tab.
2. The date and time the information was retrieved from the printer displays in the lower‐left
area of the tab. To get the latest information from the printer, click Ask Printer for Update.
If your printer is part of a printer pool:
Supply information is not available. You can view supply information for individual printers in the pool using Printer Manager. Refer to your printer’s Installation and Administrator’s Guide for complete information about using Printer Manager.
The Ask Printer for Update button is unavailable.
XPS Card Printer Driver User’s Guide 57
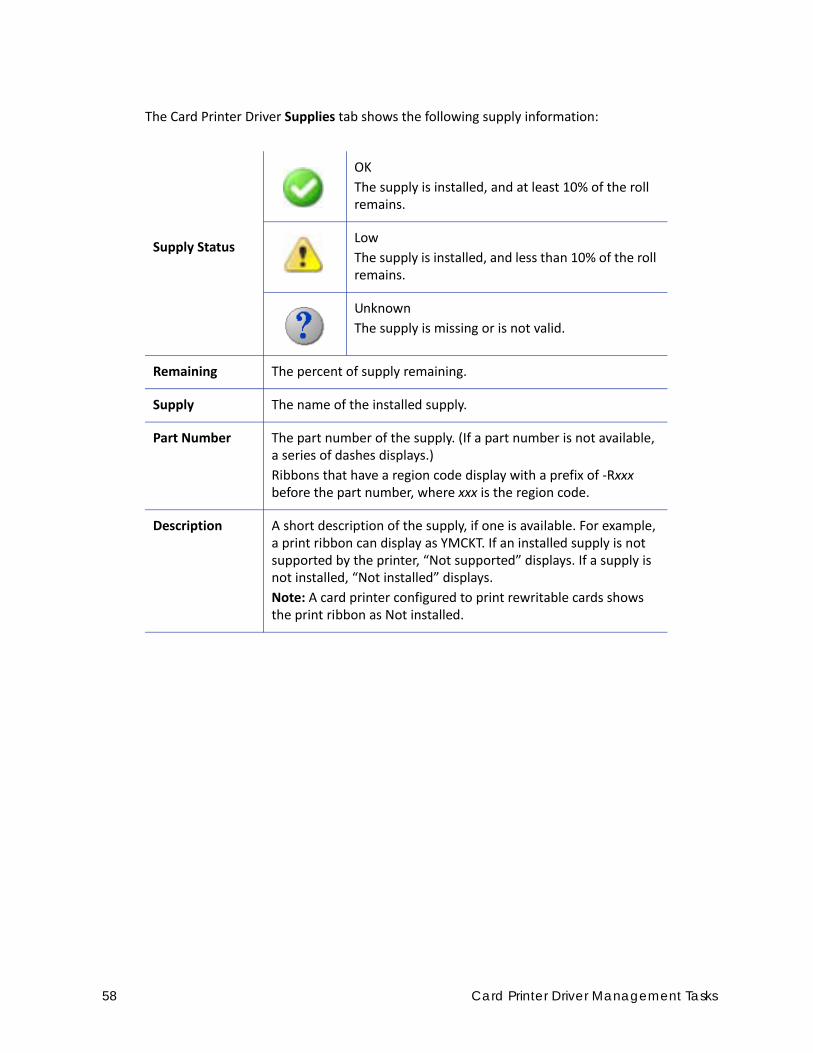
The Card Printer Driver Supplies tab shows the following supply information:
Supply Status
OK
The supply is installed, and at least 10% of the roll remains.
Low
The supply is installed, and less than 10% of the roll remains.
Unknown
The supply is missing or is not valid.
Remaining The percent of supply remaining.
Supply The name of the installed supply.
Part Number The part number of the supply. (If a part number is not available, a series of dashes displays.)
Ribbons that have a region code display with a prefix of ‐Rxxx before the part number, where xxx is the region code.
Description A short description of the supply, if one is available. For example, a print ribbon can display as YMCKT. If an installed supply is not supported by the printer, “Not supported” displays. If a supply is not installed, “Not installed” displays.
Note: A card printer configured to print rewritable cards shows the print ribbon as Not installed.
58 Card Printer Driver Management Tasks
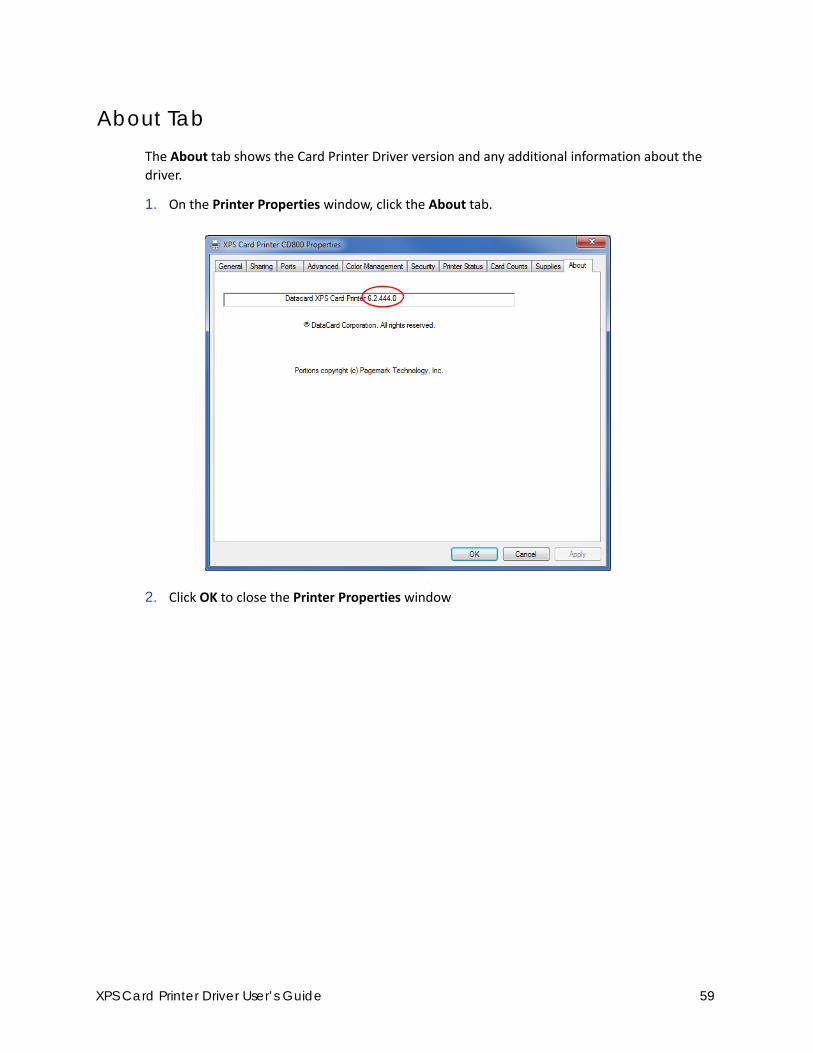
About TabThe About tab shows the Card Printer Driver version and any additional information about the
driver.
1. On the Printer Properties window, click the About tab.
.
2. Click OK to close the Printer Properties window
XPS Card Printer Driver User’s Guide 59

Uninstall the Card Printer DriverYou can uninstall the Card Printer Driver using either of the following methods:
Uninstall the Driver with the Driver Installation CD or Downloaded File
Uninstall the Card Printer Driver Without the Driver Installation Media on page 64
Uninstall the Driver with the Driver Installation CD or Downloaded File
1. Log on to the PC as a user with administrator access.
2. Do one of the following:
Insert the Driver Installation CD in the PC’s drive.
OR
Double‐click the XPSCardPrinter_x.x.x.exe downloaded file.
The Card Printer Driver install Welcome page displays. (If the AutoPlay window displays, click
Run autorun.exe.)
3. Click the wastebasket icon to start the uninstall process.
If you have multiple user accounts configured on a shared printer client, only one account should be logged on when removing the driver. The Card Printer Driver uninstall process removes the printer from all configured accounts on the PC.
You must restart your computer after uninstalling the Card Printer Driver.
60 Card Printer Driver Management Tasks

4. The Remove the Printer Driver from the PC window displays. Click Remove the Driver.
5. The XPS Card Printer Uninstall dialog box displays. If the printer is connected via a USB cable,
make sure that the cable is connected to the PC. If the printer connects to a network via
Ethernet, you can continue with the uninstall. Click OK to continue.
XPS Card Printer Driver User’s Guide 61

An activity indicator displays as the Card Printer Driver is being removed.
The Driver removed screen displays.
6. Click Restart Now.
62 Card Printer Driver Management Tasks

If the printer was connected via USB, a message displays reminding you to unplug the USB
cable.
a. Click OK after you disconnect the USB cable.
b. Click Restart Now again to complete the driver removal.
XPS Card Printer Driver User’s Guide 63

Uninstall the Card Printer Driver Without the Driver Installation Media
If you do not have access to the Driver Installation CD:
1. Remove the device.
From the Windows Devices and Printers window, right‐click the icon for the XPS Card Printer
and select Remove device from the menu. The XPS Card Printer icon is removed from the list
of printers.
2. Remove the driver from your system. From the Windows Start menu, select
All Programs > Datacard Printers and click XPS Card Printer Uninstall.
64 Card Printer Driver Management Tasks

3. The XPS Card Printer Uninstall dialog box displays. If the printer is connected via USB, make
sure that the cable is connected to the PC. If the printer connects to an Ethernet network,
you can continue with the uninstall. Click OK to continue.
4. The XPS Card Printer Uninstall dialog box displays a warning that no printer activity occurs
while the driver files are removed. Click OK to continue.
Windows 8.1 users: Display the Apps screen and click XPS Card Printer Uninstall.
Click Yes when asked if you want to allow the program to make changes to your computer.
XPS Card Printer Driver User’s Guide 65
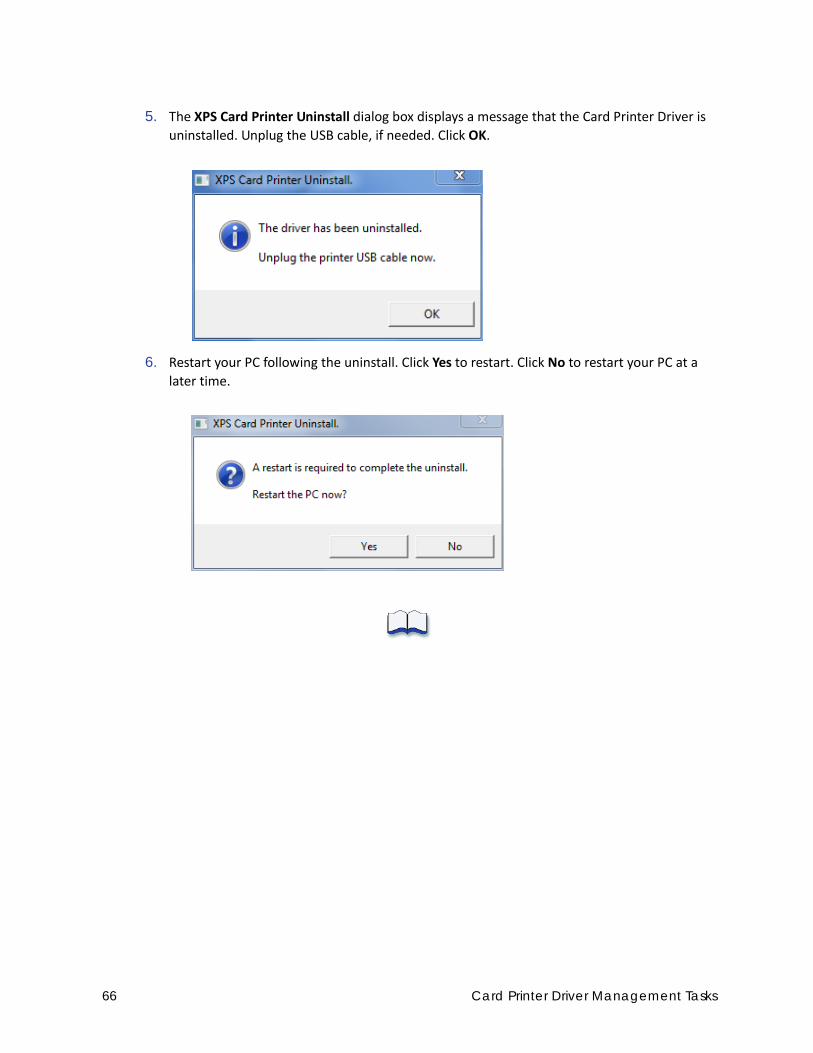
5. The XPS Card Printer Uninstall dialog box displays a message that the Card Printer Driver is
uninstalled. Unplug the USB cable, if needed. Click OK.
6. Restart your PC following the uninstall. Click Yes to restart. Click No to restart your PC at a
later time.
66 Card Printer Driver Management Tasks
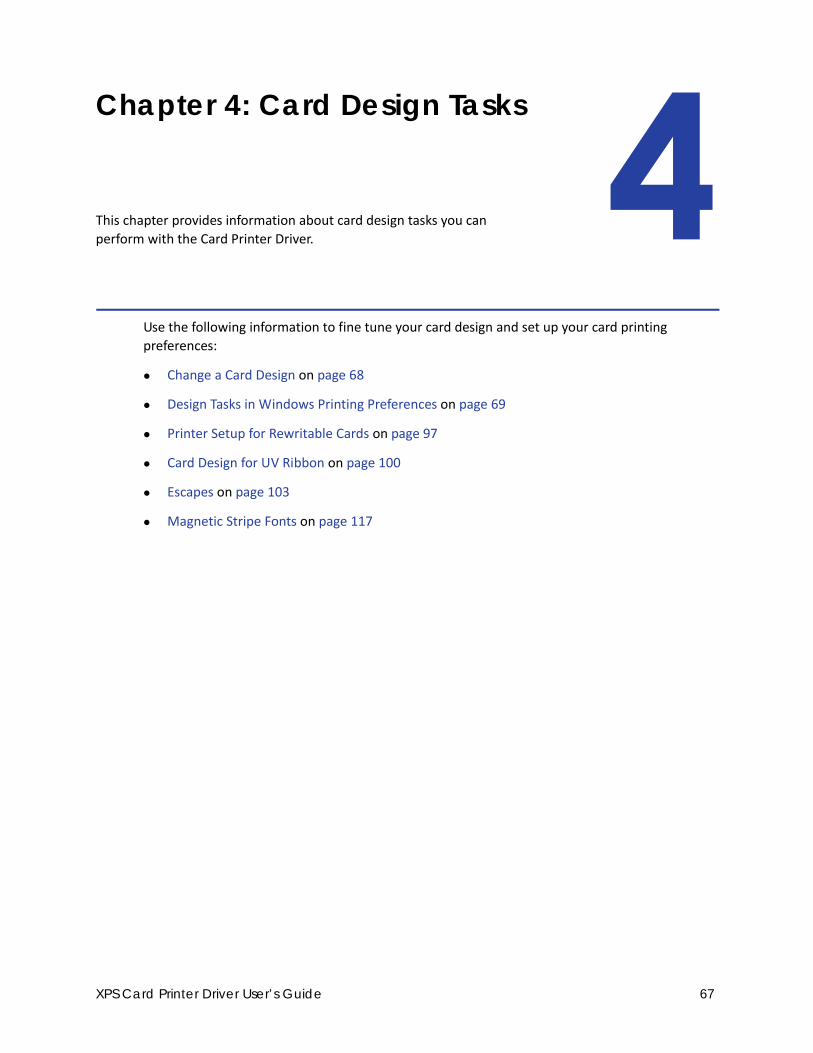
Chapter 4: Card Design Tasks
This chapter provides information about card design tasks you can
perform with the Card Printer Driver.
Use the following information to fine tune your card design and set up your card printing
preferences:
Change a Card Design on page 68
Design Tasks in Windows Printing Preferences on page 69
Printer Setup for Rewritable Cards on page 97
Card Design for UV Ribbon on page 100
Escapes on page 103
Magnetic Stripe Fonts on page 117
XPS Card Printer Driver User’s Guide 67

Change a Card DesignCard design is the name given to the combined features of the printed cards.
An organization can change:
The arrangement of card components, such as moving a photo from the center to the left
side of the card.
The source for card components, such as using a different camera for taking photos, or using
a new file for a logo.
The components on the card, such as adding a magnetic stripe, a logo, or a bar code.
Whenever the card design changes, review the settings used for the card. Use this checklist to
guide your changes. Always:
Use high‐quality (300 dpi) photos and graphics.
Print several samples of the updated card design.
Use cards with a magnetic stripe or bar code in a reader to verify that the data works as
expected.
Check the Color Adjustment settings if you change a graphic on the card, change the camera
for taking photos, or change the location where photos are taken. Refer to “Color Printing” in
your printer’s Installation and Administrator’s Guide for information about how to improve
the appearance on one element on a card.
Refer to your printer’s Installation and Administrator’s Guide if you are changing a bar code
or magnetic stripe.
68 Card Design Tasks

Design Tasks in Windows Printing PreferencesThe Printing Preferences window allows you to specify default settings that define how your card
prints. The values set in the Printing Preferences window are used for all cards printed using the
Card Printer Driver unless they are overridden by your card design application or by using an
escape.
To open the Printing Preferences window, display the Devices and Printers window on your
system. Right‐click the icon for the card printer and select Printing preferences. Use the Printing
Preferences tabs to set up your printing preferences.
Layout TabThe Layout tab displays when you select
Printing preferences. Use the Layout tab
to select the orientation of the card
(either Portrait or Landscape) and specify
whether to print on both sides of the
card.
The Advanced button displays the
Advanced Options window, which allows
you to define additional printing settings.
Refer to “Advanced Options” on page 71
for complete information about
specifying additional options.
Print on Both Sides of the Card
You can print on both sides of the card using the Card Printer Driver. The method for printing on
both sides depends on the printer model.
Printers that include a duplex printing module automatically turn the card to print on both
sides. Check the configuration label located on the printer swingarm to determine whether
your printer includes a duplex module. Refer to your printer’s User’s Guide for more
information about reading the configuration label.
Simplex printers support manual duplex printing. The printer prints one side of the card,
places the card in the card output hopper, and displays the message Insert same card side 2
up. Insert the card into the hopper or manual‐feed slot to print on the second side.
XPS Card Printer Driver User’s Guide 69

Set Up Duplex Printing
Use card production software or another PC application to create a card design
1. Set up your printing preferences.
a. Open the printer’s Printing Preferences window.
b. On the Layout tab, select Flip on Short Edge for the Print on Both Sides
setting.
c. Click Apply.
2. Start your application and select the card
printer as the current printer.
3. Use the application’s page setup options to set the paper
size to ISO ID‐1. Set the margin settings to 0.
4. Format the text and graphics to print on the card.
Refer to the printer’s Installation and Administrator’s
Guide for more information about card design.
Your PC application’s Print settings may override the settings in the Card Printer Driver. Make sure that your application’s Print settings specify “Print on both sides.”
70 Card Design Tasks
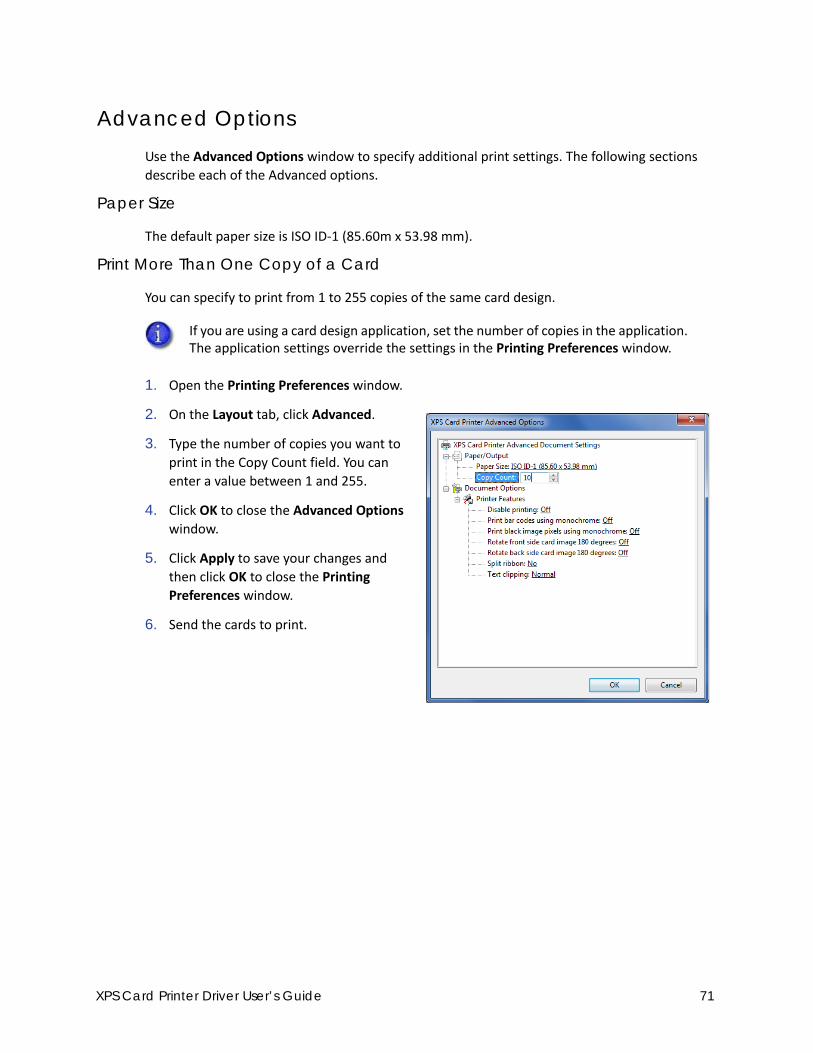
Advanced OptionsUse the Advanced Options window to specify additional print settings. The following sections
describe each of the Advanced options.
Paper Size
The default paper size is ISO ID‐1 (85.60m x 53.98 mm).
Print More Than One Copy of a Card
You can specify to print from 1 to 255 copies of the same card design.
1. Open the Printing Preferences window.
2. On the Layout tab, click Advanced.
3. Type the number of copies you want to
print in the Copy Count field. You can
enter a value between 1 and 255.
4. Click OK to close the Advanced Options
window.
5. Click Apply to save your changes and
then click OK to close the Printing
Preferences window.
6. Send the cards to print.
If you are using a card design application, set the number of copies in the application. The application settings override the settings in the Printing Preferences window.
XPS Card Printer Driver User’s Guide 71

Disable Printing
The Disable printing option allows you to send a card through the printer without printing on the
card. Use this option to:
Encode a magnetic stripe or smart card chip. Refer to “Encode the Magnetic Stripe Without
Printing” on page 73. For smart card encoding, refer to the documentation for your smart
card application.
Laminate or impress a preprinted card. Lamination provides extra security and durability for
a card. Refer to “Lamination Tab” on page 95 and “Impress Card” on page 82 for information
about specifying lamination and impresser options.
Emboss and indent a preprinted card. Refer to “Embosser Escape” on page 113 or your card
production software documentation for information about specifying emboss and indent
data.
Print only on one side of a card. Some card designs require printing on only one side of the
card. Refer to “Disable Card Side Printing for Special Card Designs” on page 74.
To specify a Disable printing option:
1. Open the Printing Preferences window.
2. Select the Layout tab and click
Advanced.
3. Click Disable printing and select an
option from the drop‐down list:
Off—Printing is not disabled. The
card design prints normally. This is
the default.
All—Disables all printing. Nothing
prints on the card.
Front—Disables printing on the
front side of the card. Side 2 of the
card design prints on the back of
the card.
Back—Disables printing on the
back side of the card. Side 1 of the
card design prints on the front of
the card.
Datacard ID software overrides the Disable printing preference. Use your card design and production printing options to control card printing.
72 Card Design Tasks
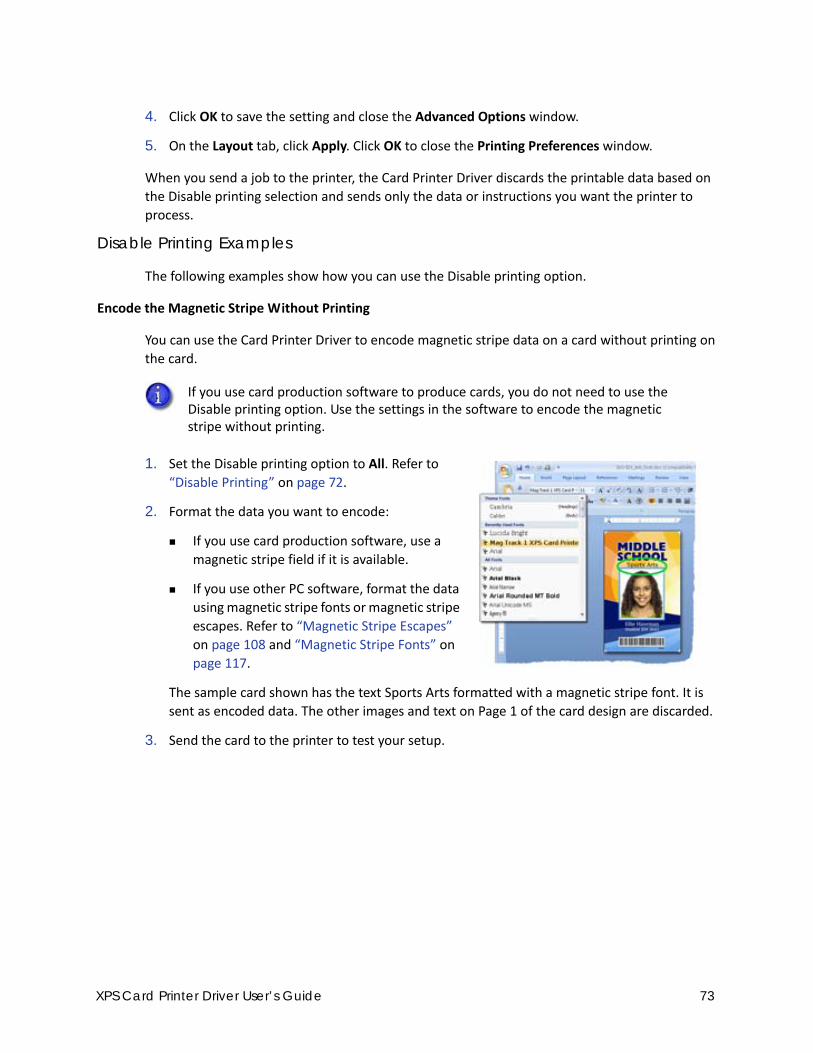
4. Click OK to save the setting and close the Advanced Options window.
5. On the Layout tab, click Apply. Click OK to close the Printing Preferences window.
When you send a job to the printer, the Card Printer Driver discards the printable data based on
the Disable printing selection and sends only the data or instructions you want the printer to
process.
Disable Printing Examples
The following examples show how you can use the Disable printing option.
Encode the Magnetic Stripe Without Printing
You can use the Card Printer Driver to encode magnetic stripe data on a card without printing on
the card.
1. Set the Disable printing option to All. Refer to
“Disable Printing” on page 72.
2. Format the data you want to encode:
If you use card production software, use a
magnetic stripe field if it is available.
If you use other PC software, format the data
using magnetic stripe fonts or magnetic stripe
escapes. Refer to “Magnetic Stripe Escapes”
on page 108 and “Magnetic Stripe Fonts” on
page 117.
The sample card shown has the text Sports Arts formatted with a magnetic stripe font. It is
sent as encoded data. The other images and text on Page 1 of the card design are discarded.
3. Send the card to the printer to test your setup.
If you use card production software to produce cards, you do not need to use the Disable printing option. Use the settings in the software to encode the magnetic stripe without printing.
XPS Card Printer Driver User’s Guide 73
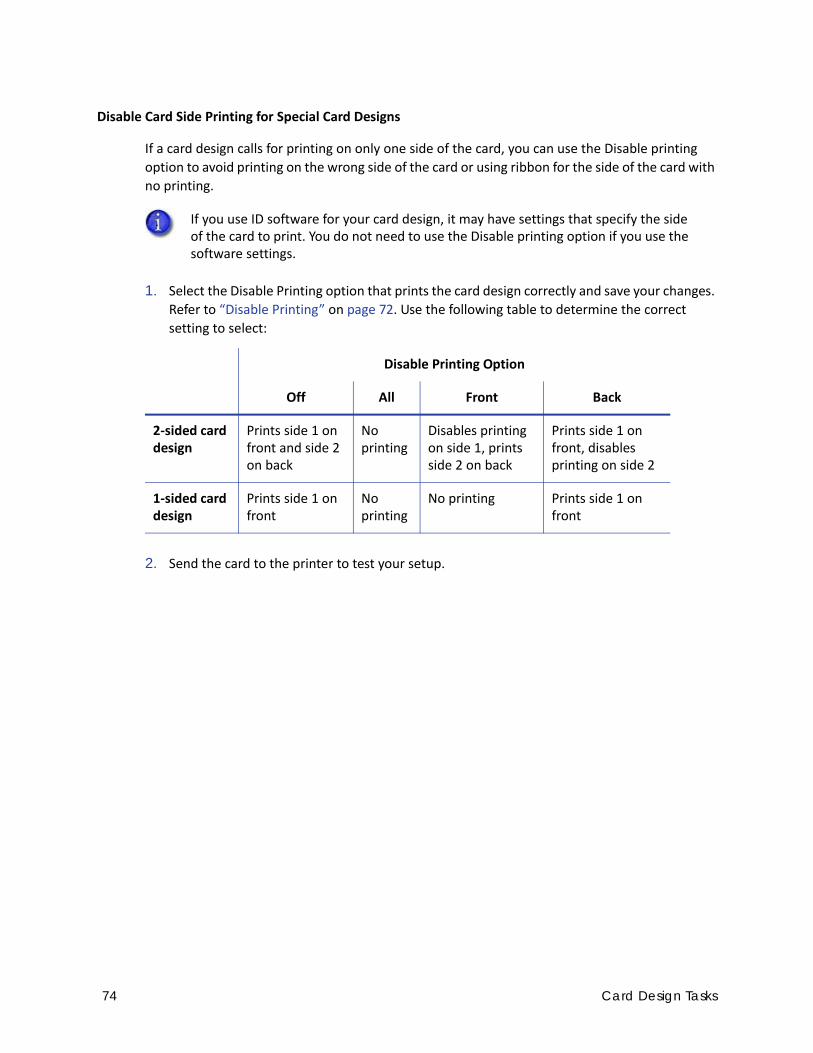
Disable Card Side Printing for Special Card Designs
If a card design calls for printing on only one side of the card, you can use the Disable printing
option to avoid printing on the wrong side of the card or using ribbon for the side of the card with
no printing.
1. Select the Disable Printing option that prints the card design correctly and save your changes.
Refer to “Disable Printing” on page 72. Use the following table to determine the correct
setting to select:
2. Send the card to the printer to test your setup.
If you use ID software for your card design, it may have settings that specify the side of the card to print. You do not need to use the Disable printing option if you use the software settings.
Disable Printing Option
Off All Front Back
2‐sided card design
Prints side 1 on front and side 2 on back
No printing
Disables printing on side 1, prints side 2 on back
Prints side 1 on front, disables printing on side 2
1‐sided card design
Prints side 1 on front
No printing
No printing Prints side 1 on front
74 Card Design Tasks

Print Bar Codes Using Monochrome
The Print bar codes using monochrome setting was used by the Card Printer Driver to identify and
print bar code images using the K (black) panel of color print ribbon. Refer to the printer's
Installation and Administrator's Guide for guidelines for printing bar codes.
Print Black Image Pixels Using Monochrome
When you use a ribbon that has both color and monochrome, such as YMCKT, the Card Printer
Driver evaluates each image to determine if it should be printed as color or monochrome. If the
image is pure black on a white background, the Card Printer Driver processes it using the black (K)
panel of the print ribbon. If the image contains a pixel of color other than pure black or pure
white, it processes the image (including any black portions) using the color (YMC) panels of the
print ribbon.
If the card design requires that the black in images prints using the K panel, such as with a bar
code, the Print black image pixels using monochrome option changes the way the data is
processed.
When you set the Print black image pixels using monochrome option to On, the Card Printer
Driver prints the seven black‐most shades (from a palette of 256 shades) using the K panel. This
allows the printer to use the K panel to print the bars of a bar code embedded in a color image so
that the bar code can be read by a scanner.
The Print bar codes using monochrome setting is being replaced by the Print black image pixels using monochrome setting. Future versions of the Card Printer Driver will remove the Print bar codes using monochrome option. Refer to “Print Black Image Pixels Using Monochrome”.
XPS Card Printer Driver User’s Guide 75

The following examples show a card design submitted to the driver with the option enabled, and
the K‐panel image created by the driver and sent to the printer.
When printing a card design with the Print black image pixels using monochrome option
enabled:
The black pixels are not removed from the color image. They print with the YMC panels and
also with the K panel.
The option applies only to the card side that is being printed in color, for example, the
front side for a YMCKT ribbon. It is not needed for KT or K ribbons, or for the back side of a
YMCKT‐KT ribbon.
The option is ignored if color is not used in the card design.
To specify the Print black image pixels using monochrome option:
1. Open the Printing Preferences
window.
2. Click Advanced.
3. Set Print black image pixels using
monochrome to On.
4. Click OK to close the Advanced
Options window.
5. Click Apply on the Printing
Preferences window.
6. Click OK to close the window.
Design submitted to the driver K‐panel image created by the driver
76 Card Design Tasks

Rotate the Card Image
1. Open Printing Preferences.
2. On the Layout tab, click Advanced.
3. Select the side of the card you want to
rotate 180 degrees, and select On.
Make sure that if you rotate the back
of the card that the text in your card
design prints below the magnetic
stripe, not on top of it (see the
example card shown).
4. Click OK to save the setting, and then click Apply on
the Layout tab.
5. Send the card to print.
If you are using a card production software, the application settings override the settings in Printing Preferences. Make sure to verify that your settings are correct.
XPS Card Printer Driver User’s Guide 77

Print Cards Using Split-Ribbon Color Printing
Two‐sided, split‐ribbon color printing uses a single ribbon panel set to print both sides of a card.
This lets you use less ribbon to print cards in color. The ribbon can be a full‐panel or short‐panel
color ribbon.
Most types of cards, including cards with magnetic stripes and smart cards, can be printed using
split‐ribbon printing.
The order in which the color, black, and topcoat sections of the panel set are used to print the
card depends on the type of ribbon installed in the printer and the split‐ribbon option selected
on the Printing Preferences window. The Card Printer Driver supports the following ribbon types
and split‐ribbon printing options.
Before using split‐ribbon color printing, become familiar with the use of card printer color printing. Refer to the printer’s Installation and Administrator’s Guide for complete information about color printing.
Ribbon Type Split Option Description
YMCKT YMCT‐K color (YMC) + topcoat (T) front
black (K) back
YMCKT YMC‐KT color (YMC) front
black (K) + topcoat (T) back
Note: This option does not apply topcoat to the color printing. Color printing fades over time if it lacks a topcoat. Select this option if you are using a laminator, which can apply an overlay to the front of the card.
YMCKT K‐YMCT black (K) front
color (YMC) + topcoat (T) back
YMCK YMC‐K color (YMC) front
black (K) back
Note: This ribbon type does not include a topcoat panel and is meant to be used with a laminator, which can apply an overlay to one or both sides of the card.
YMCK K‐YMC black (K) back
color (YMC) back
Note: This ribbon type does not include a topcoat panel and is meant to be used with a laminator, which can apply an overlay to one or both sides of the card.
78 Card Design Tasks
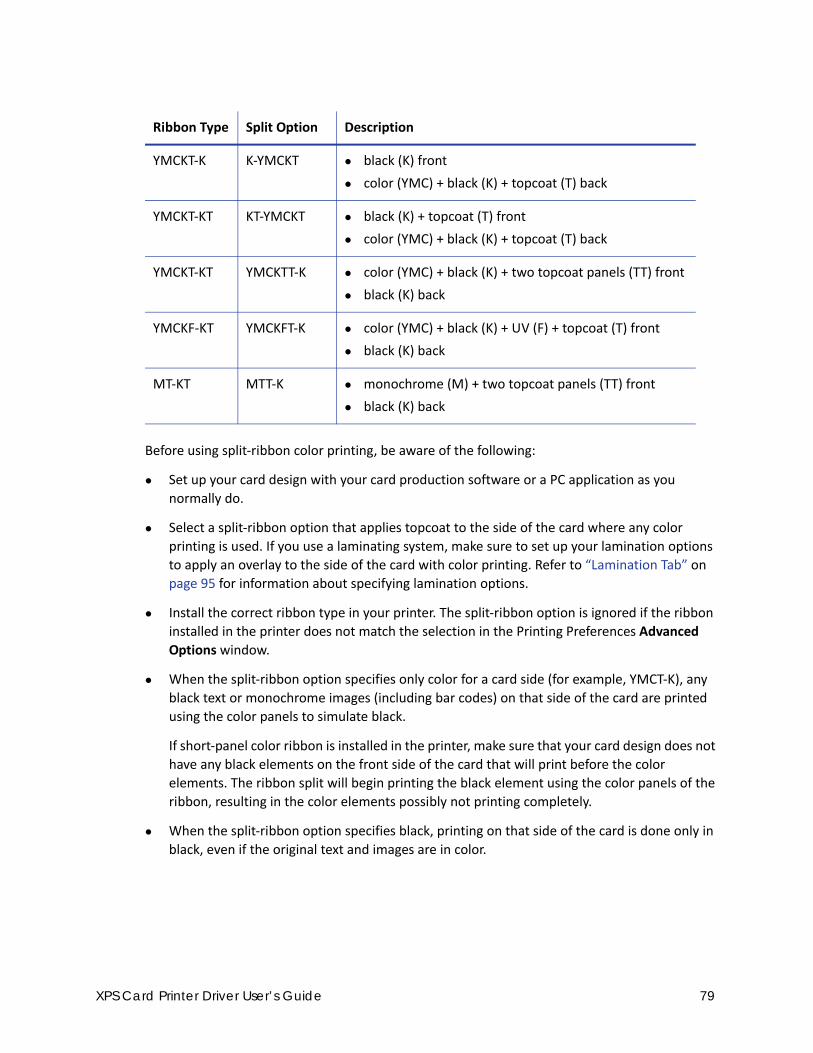
Before using split‐ribbon color printing, be aware of the following:
Set up your card design with your card production software or a PC application as you
normally do.
Select a split‐ribbon option that applies topcoat to the side of the card where any color
printing is used. If you use a laminating system, make sure to set up your lamination options
to apply an overlay to the side of the card with color printing. Refer to “Lamination Tab” on
page 95 for information about specifying lamination options.
Install the correct ribbon type in your printer. The split‐ribbon option is ignored if the ribbon
installed in the printer does not match the selection in the Printing Preferences Advanced
Options window.
When the split‐ribbon option specifies only color for a card side (for example, YMCT‐K), any
black text or monochrome images (including bar codes) on that side of the card are printed
using the color panels to simulate black.
If short‐panel color ribbon is installed in the printer, make sure that your card design does not
have any black elements on the front side of the card that will print before the color
elements. The ribbon split will begin printing the black element using the color panels of the
ribbon, resulting in the color elements possibly not printing completely.
When the split‐ribbon option specifies black, printing on that side of the card is done only in
black, even if the original text and images are in color.
YMCKT‐K K‐YMCKT black (K) front
color (YMC) + black (K) + topcoat (T) back
YMCKT‐KT KT‐YMCKT black (K) + topcoat (T) front
color (YMC) + black (K) + topcoat (T) back
YMCKT‐KT YMCKTT‐K color (YMC) + black (K) + two topcoat panels (TT) front
black (K) back
YMCKF‐KT YMCKFT‐K color (YMC) + black (K) + UV (F) + topcoat (T) front
black (K) back
MT‐KT MTT‐K monochrome (M) + two topcoat panels (TT) front
black (K) back
Ribbon Type Split Option Description
XPS Card Printer Driver User’s Guide 79
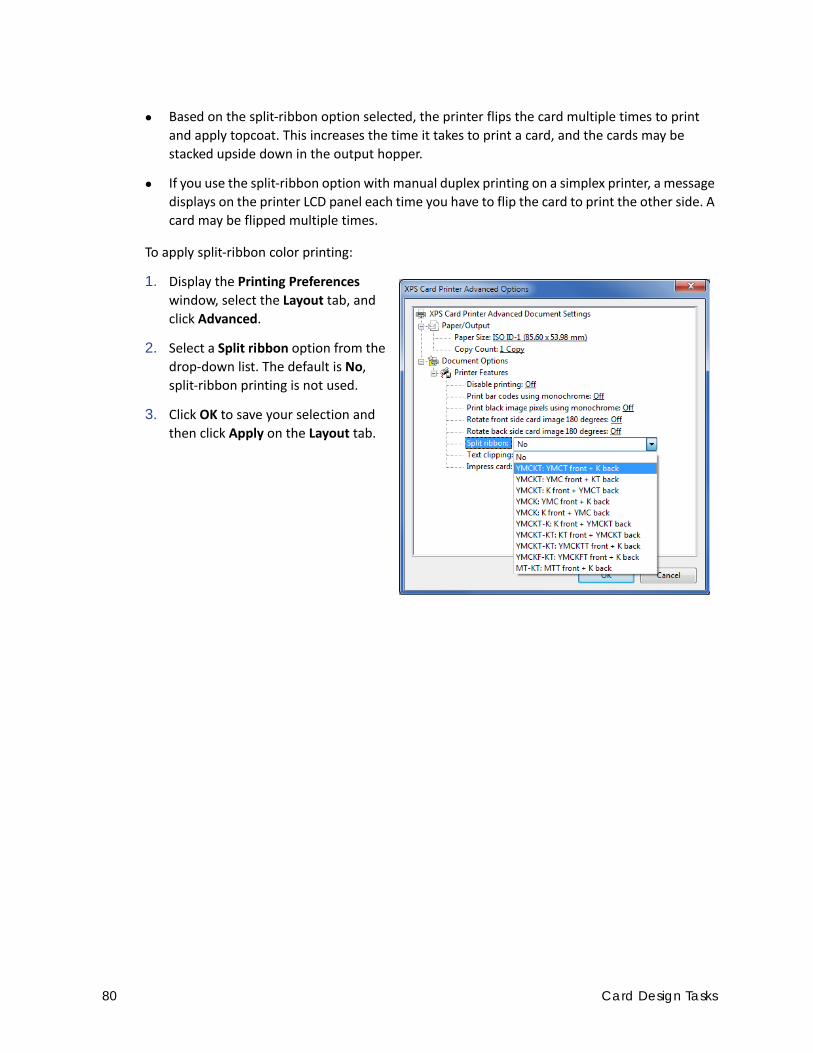
Based on the split‐ribbon option selected, the printer flips the card multiple times to print
and apply topcoat. This increases the time it takes to print a card, and the cards may be
stacked upside down in the output hopper.
If you use the split‐ribbon option with manual duplex printing on a simplex printer, a message
displays on the printer LCD panel each time you have to flip the card to print the other side. A
card may be flipped multiple times.
To apply split‐ribbon color printing:
1. Display the Printing Preferences
window, select the Layout tab, and
click Advanced.
2. Select a Split ribbon option from the
drop‐down list. The default is No,
split‐ribbon printing is not used.
3. Click OK to save your selection and
then click Apply on the Layout tab.
80 Card Design Tasks

Input Hopper
For printers that have an optional multi‐hopper, the Input Hopper setting allows you to select the
hopper to use when you print a card. This setting does not display for single hopper printers. You
also can use an escape to specify the input hopper to use. Refer to “Input Hopper Selection
Escape” on page 110 for more information.
1. Display the Printing Preferences
window, select the Layout tab, and click
Advanced.
2. Click Input hopper and select the
hopper number. The default is hopper 1.
3. Click OK to save your selection and then
click Apply on the Layout tab.
Text Clipping
You may experience an issue with the clipping of some text characters on your printed cards. Set
Text clipping to Remove to eliminate character clipping.
1. Display the Printing Preferences
window, select the Layout tab, and click
Advanced.
2. Click Text clipping and select Remove.
3. Click OK to save your selection and then
click Apply on the Layout tab.
XPS Card Printer Driver User’s Guide 81
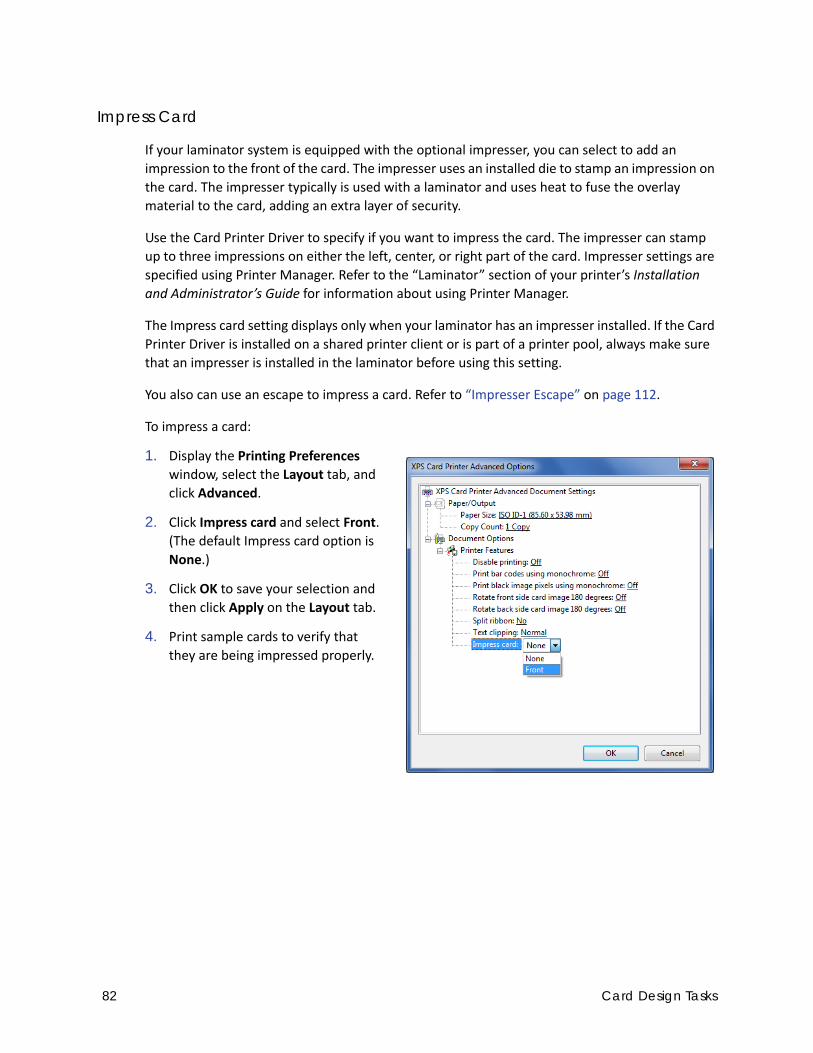
Impress Card
If your laminator system is equipped with the optional impresser, you can select to add an
impression to the front of the card. The impresser uses an installed die to stamp an impression on
the card. The impresser typically is used with a laminator and uses heat to fuse the overlay
material to the card, adding an extra layer of security.
Use the Card Printer Driver to specify if you want to impress the card. The impresser can stamp
up to three impressions on either the left, center, or right part of the card. Impresser settings are
specified using Printer Manager. Refer to the “Laminator” section of your printer’s Installation
and Administrator’s Guide for information about using Printer Manager.
The Impress card setting displays only when your laminator has an impresser installed. If the Card
Printer Driver is installed on a shared printer client or is part of a printer pool, always make sure
that an impresser is installed in the laminator before using this setting.
You also can use an escape to impress a card. Refer to “Impresser Escape” on page 112.
To impress a card:
1. Display the Printing Preferences
window, select the Layout tab, and
click Advanced.
2. Click Impress card and select Front.
(The default Impress card option is
None.)
3. Click OK to save your selection and
then click Apply on the Layout tab.
4. Print sample cards to verify that
they are being impressed properly.
82 Card Design Tasks
Print Area TabThe Print Area tab allows you to specify printing and topcoat application areas on the card.
For card printers that support printing to rewritable cards, you use the Print Area tab to specify
erase options. Refer to “Select an Erase Pattern” on page 88.
Print and Topcoat Blocking
The Card Printer Driver can prevent printing and topcoat application on specific areas of the card.
This includes the magnetic stripe, smart card chip, signature panel, or another area that must
remain unprinted or without topcoat.
The Print Area tab provides a selection of standard blocking patterns that use a driver preset
mask, which automatically applies the proper dimensions and locations of a smart card chip and
magnetic stripes for print blocking. For more information about non‐printing areas of a card, refer
to the printer’s Installation and Administrator’s Guide.
If the predefined blocking selections offered by the Card Printer Driver do not fit the card design,
you can use escapes to define custom rectangular areas for printing and topcoat application,
including defining more than one blocking area per side of a card. Refer to “Print Blocking
Escapes” on page 104
You also can create a custom topcoat blocking pattern that is not possible with the topcoat
settings offered by the Card Printer Driver or by using escapes. This can be a non‐rectangular
shape or another shape based on a graphic image bitmap, such as a logo. Refer to “Use a User‐
Defined Topcoat Bitmap” on page 85.
To return the Print Area tab to the default settings, click Restore Defaults. The default print and
topcoat settings are:
Front Side Print Area: Print and topcoat entire side of card
Back Side Print Area: Print and topcoat entire side of card
Custom bitmap is not selected
Printing rewritable cards requires several settings in Printer Manager and in the Card Printer Driver. Refer to “Printer Setup for Rewritable Cards” on page 97 for a complete discussion of how to set up your system to use the rewritable feature.
If you are using YMCK or YMCK‐K ribbon (ribbons without a topcoat panel), the topcoat blocking preferences are ignored. Print blocking preferences function normally.
XPS Card Printer Driver User’s Guide 83

Select a Preset Mask
To select a preset mask for magnetic stripe or smart card areas, do the following:
1. Open the Printing Preferences window.
2. Select the Print Area tab.
3. For the side of the card with the non‐
printing area, select Block printing and
topcoat over this area, and then select
the area from the list.
The Print Blocking and Topcoat Blocking
icons display the location of the card
element.
The example shown blocks printing and
topcoat application on the ISO 3‐Track
Magnetic Stripe area on the back of the card.
The text shown on the back of the card
design is formatted with a magnetic stripe
font and is encoded.
4. Click Apply to save the setting, and then click
OK.
5. Send the card to print.
The back of the completed card looks like the following:
The narrow white area above and below the magnetic stripe indicates the non‐printing area. It is slightly larger than the feature, in this case the magnetic stripe.
84 Card Design Tasks

Use a User-Defined Topcoat Bitmap
User‐defined bitmaps allow you to apply topcoat to a card in a pattern that is not available in the
predefined selections on the Print Area tab or with the rectangular shapes created with print
blocking and topcoat escapes. The bitmap files are installed as part of the Card Printer Driver
Installation. The files are installed in the C:\CardPrinter folder. If you previously used an older‐
generation desktop printer, the bitmap files may already be on your PC.
The topcoat bitmap used depends on the card side and orientation you specify.
Side Orientation Bitmap File
1 Portrait CRDPortTopcoatFront.bmp
2 Portrait CRDPortTopcoatBack.bmp
1 Landscape CRDLandTopcoatFront.bmp
2 Landscape CRDLandTopcoatBack.bmp
If the bitmap files are already installed on your computer, a new driver installation or update does not overwrite the existing files.
XPS Card Printer Driver User’s Guide 85

Modify a User‐Defined Bitmap
Creating a custom bitmap is not recommended. Instead, modify the bitmap files provided with
the driver. The bitmap files are black‐and‐white, one‐bit‐per‐pixel files that contain the
specifications for blocking. The white areas of the bitmap represent the topcoat blocking area,
and the black area represents the topcoat areas. Each bitmap has a sample image that illustrates
the card orientation. Use a graphics editing program, such as Microsoft Paint, to modify the
driver‐provided bitmap.
1. Open the driver‐provided bitmap that describes the card side and orientation of your card
design.
2. Draw a black shape over any sample images you want to remove.
If the card design includes more than one blocking area, you must create all blocking areas in
the bitmap file, including smart card chip or magnetic stripe areas. Refer to your printer’s
Installation and Administrator’s Guide for the dimensions of non‐printing areas for magnetic
stripes and smart card chips.
The Card Printer Driver looks for the original bitmap file name when using the bitmap to apply the topcoat. If you want to retain the installed bitmap files as reference, rename each file using a name that indicates it is the original file. Copy the file you want to modify and save it using the bitmap name noted above.
CRDLandTopcoatBack CRDLandTopcoatFront
CRDPortTopcoatBack CRDPortTopcoatFront
86 Card Design Tasks
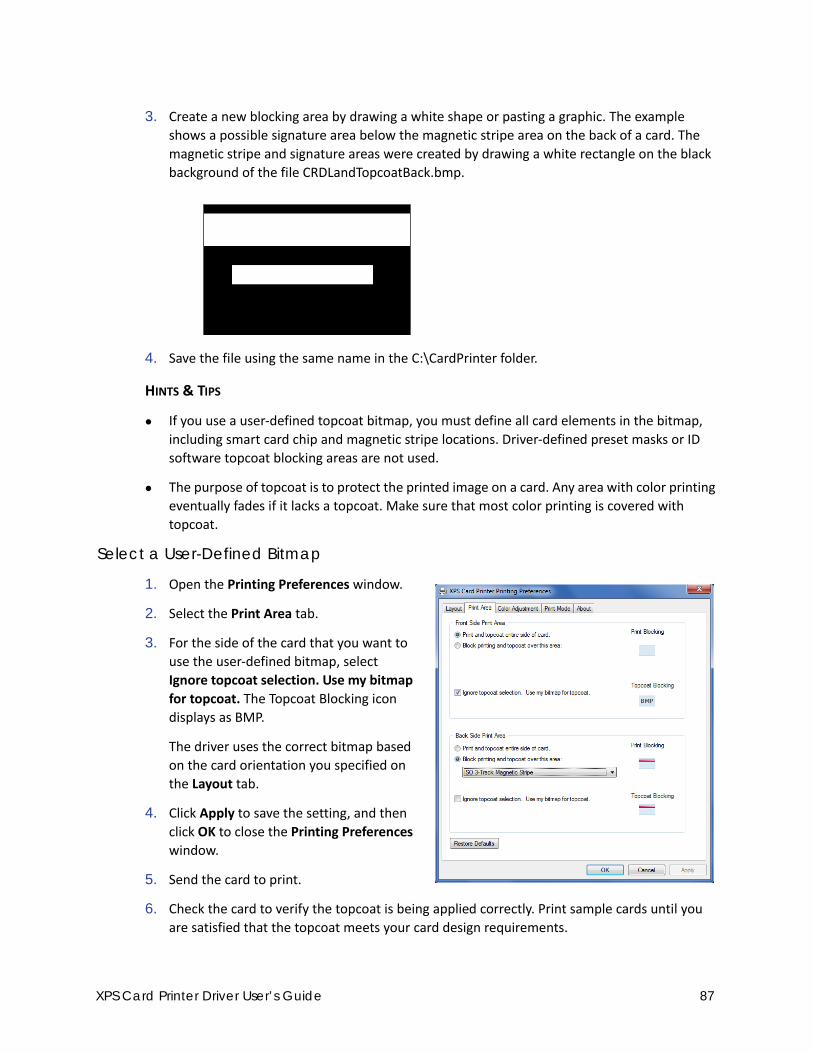
3. Create a new blocking area by drawing a white shape or pasting a graphic. The example
shows a possible signature area below the magnetic stripe area on the back of a card. The
magnetic stripe and signature areas were created by drawing a white rectangle on the black
background of the file CRDLandTopcoatBack.bmp.
4. Save the file using the same name in the C:\CardPrinter folder.
HINTS & TIPS
If you use a user‐defined topcoat bitmap, you must define all card elements in the bitmap,
including smart card chip and magnetic stripe locations. Driver‐defined preset masks or ID
software topcoat blocking areas are not used.
The purpose of topcoat is to protect the printed image on a card. Any area with color printing
eventually fades if it lacks a topcoat. Make sure that most color printing is covered with
topcoat.
Select a User-Defined Bitmap
1. Open the Printing Preferences window.
2. Select the Print Area tab.
3. For the side of the card that you want to
use the user‐defined bitmap, select
Ignore topcoat selection. Use my bitmap
for topcoat. The Topcoat Blocking icon
displays as BMP.
The driver uses the correct bitmap based
on the card orientation you specified on
the Layout tab.
4. Click Apply to save the setting, and then
click OK to close the Printing Preferences
window.
5. Send the card to print.
6. Check the card to verify the topcoat is being applied correctly. Print sample cards until you
are satisfied that the topcoat meets your card design requirements.
XPS Card Printer Driver User’s Guide 87
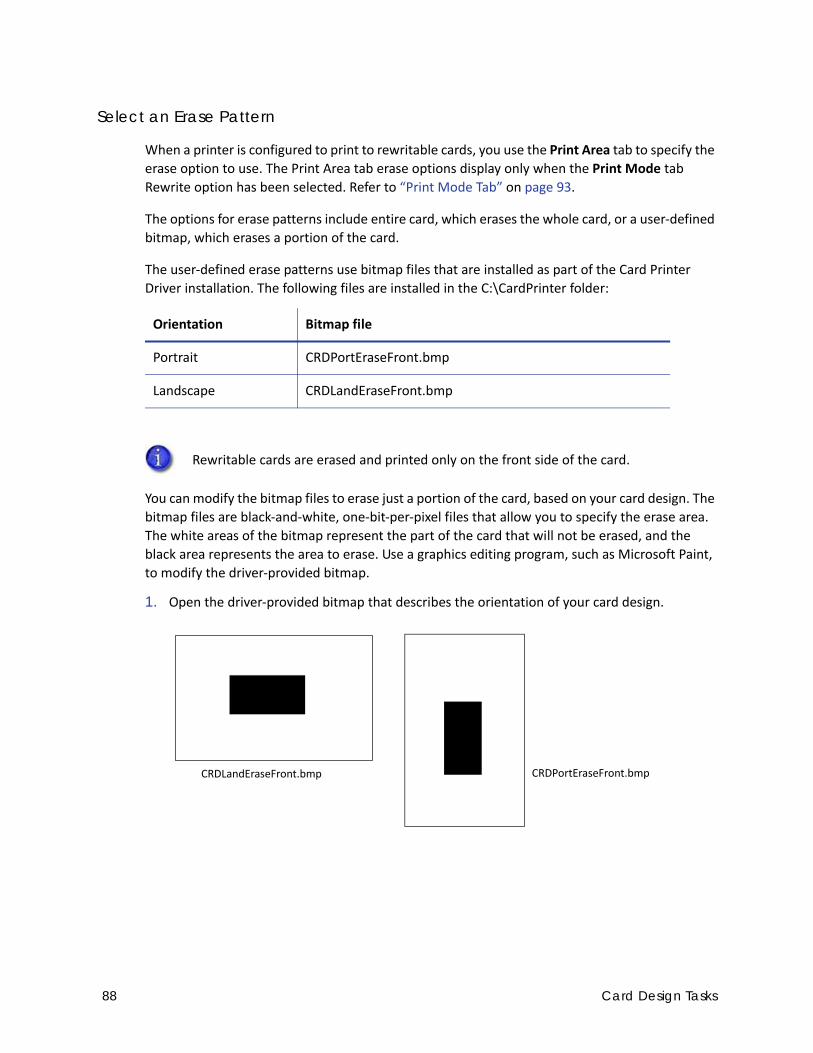
Select an Erase Pattern
When a printer is configured to print to rewritable cards, you use the Print Area tab to specify the
erase option to use. The Print Area tab erase options display only when the Print Mode tab
Rewrite option has been selected. Refer to “Print Mode Tab” on page 93.
The options for erase patterns include entire card, which erases the whole card, or a user‐defined
bitmap, which erases a portion of the card.
The user‐defined erase patterns use bitmap files that are installed as part of the Card Printer
Driver installation. The following files are installed in the C:\CardPrinter folder:
You can modify the bitmap files to erase just a portion of the card, based on your card design. The
bitmap files are black‐and‐white, one‐bit‐per‐pixel files that allow you to specify the erase area.
The white areas of the bitmap represent the part of the card that will not be erased, and the
black area represents the area to erase. Use a graphics editing program, such as Microsoft Paint,
to modify the driver‐provided bitmap.
1. Open the driver‐provided bitmap that describes the orientation of your card design.
Orientation Bitmap file
Portrait CRDPortEraseFront.bmp
Landscape CRDLandEraseFront.bmp
Rewritable cards are erased and printed only on the front side of the card.
CRDLandEraseFront.bmp CRDPortEraseFront.bmp
88 Card Design Tasks

2. Create a new erase pattern by drawing a shape that corresponds
to the erase area of the card. The example shows a custom erase
area that erases just the middle portion of a portrait‐oriented
card.
3. Save the file with the same name and in the same location
(C:\CardPrinter).
To select an erase pattern on the Print Area tab:
1. Open the Printing Preferences
window.
2. Select the Print Area tab.
3. Select one of the following options:
Erase and print entire side of
card—The entire front of the card
is erased before writing.
Use my bitmap for erasing the
card—The driver uses the correct
custom bitmap to erase the card,
based on the card orientation
specified on the Layout tab.
The Print Blocking icon displays as
BMP.
4. Click Apply to save the setting, and
then click OK to close the Printing
Preferences window.
Printing rewritable cards requires several settings in Printer Manager and in the Card Printer Driver. Refer to “Printer Setup for Rewritable Cards” on page 97 for a complete discussion of how to set up your system to use the rewritable feature.
XPS Card Printer Driver User’s Guide 89

Color Adjustment TabThe Card Printer Driver allows you to adjust the color printing on a card using the Printing
Preferences window.
Using the Color Adjustment tab, you can change the following:
The brightness of color printing on the card
The contrast of color printing on the card
The color balance of color printing on the
card
1. On the Printing Preferences window, select
the Color Adjustment tab.
The tab contains the Original image and the
Adjusted image. They show how your
changes might look on a card.
2. Select Enable Color Adjustment to adjust the
settings.
Brightness
The Brightness setting changes the overall
lightness or darkness of the card.
1. Click the Up arrow to make the image
lighter, or the Down arrow to make the
image darker.
The Adjusted image shows the effect of
the new setting.
2. Click Apply after each change to save it.
3. To verify changes, do one of the
following:
Print one or more cards from your
card production software.
Print a sample card from the Printer Properties > Printer Status page.
90 Card Design Tasks

4. Evaluate the appearance of the cards.
5. Repeat these steps until the cards meet your requirements.
6. Click Apply to save the new values.
Contrast
The Contrast setting changes the degree of
difference between the light and dark
values of an image.
1. Click the Up arrow to increase
contrast, or the Down arrow to
decrease contrast.
The Adjusted image shows the effect
of the new setting.
2. Click Apply after each change to save
it.
3. To verify changes, do one of the
following:
Print one or more cards from your
card production software.
Print a sample card from the Printer Properties > Printer Status page.
4. Evaluate the appearance of the cards.
5. Repeat these steps until the cards meet your requirements.
6. Click Apply to save the new values.
XPS Card Printer Driver User’s Guide 91
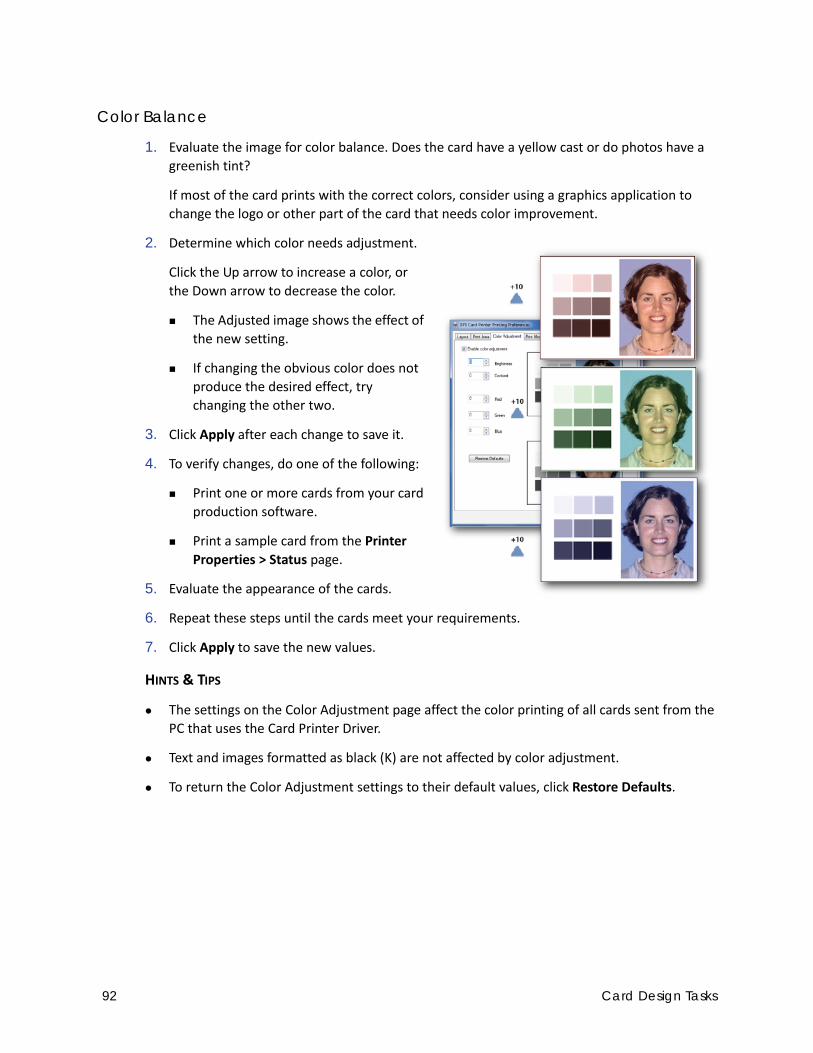
Color Balance
1. Evaluate the image for color balance. Does the card have a yellow cast or do photos have a
greenish tint?
If most of the card prints with the correct colors, consider using a graphics application to
change the logo or other part of the card that needs color improvement.
2. Determine which color needs adjustment.
Click the Up arrow to increase a color, or
the Down arrow to decrease the color.
The Adjusted image shows the effect of
the new setting.
If changing the obvious color does not
produce the desired effect, try
changing the other two.
3. Click Apply after each change to save it.
4. To verify changes, do one of the following:
Print one or more cards from your card
production software.
Print a sample card from the Printer
Properties > Status page.
5. Evaluate the appearance of the cards.
6. Repeat these steps until the cards meet your requirements.
7. Click Apply to save the new values.
HINTS & TIPS
The settings on the Color Adjustment page affect the color printing of all cards sent from the
PC that uses the Card Printer Driver.
Text and images formatted as black (K) are not affected by color adjustment.
To return the Color Adjustment settings to their default values, click Restore Defaults.
92 Card Design Tasks

Print Mode TabThe Print Mode tab allows you to specify the print resolution to use when printing a card.
For card printers that support printing to rewritable cards, use the Print Mode tab to tell the
printer to use the rewrite feature. Refer to “Select the Rewrite Feature” on page 94.
Select the Print Resolution
1. Open the Printing Preferences window.
2. Select the Print Mode tab.
3. Select the desired print resolution. The
Print Mode tab has the following three
options.
Always use standard resolution
(300x300 dpi)—this is the default
value
Always use best resolution (This
option is not available at a shared
printer client PC.)
Custom
If the Custom option is available and you select it,
select the resolutions from the Color and
Monochrome drop‐down lists.
4. Click Apply to save your changes, and then click OK to
close the Printing Preferences window.
All options may not be available for all printers.
XPS Card Printer Driver User’s Guide 93
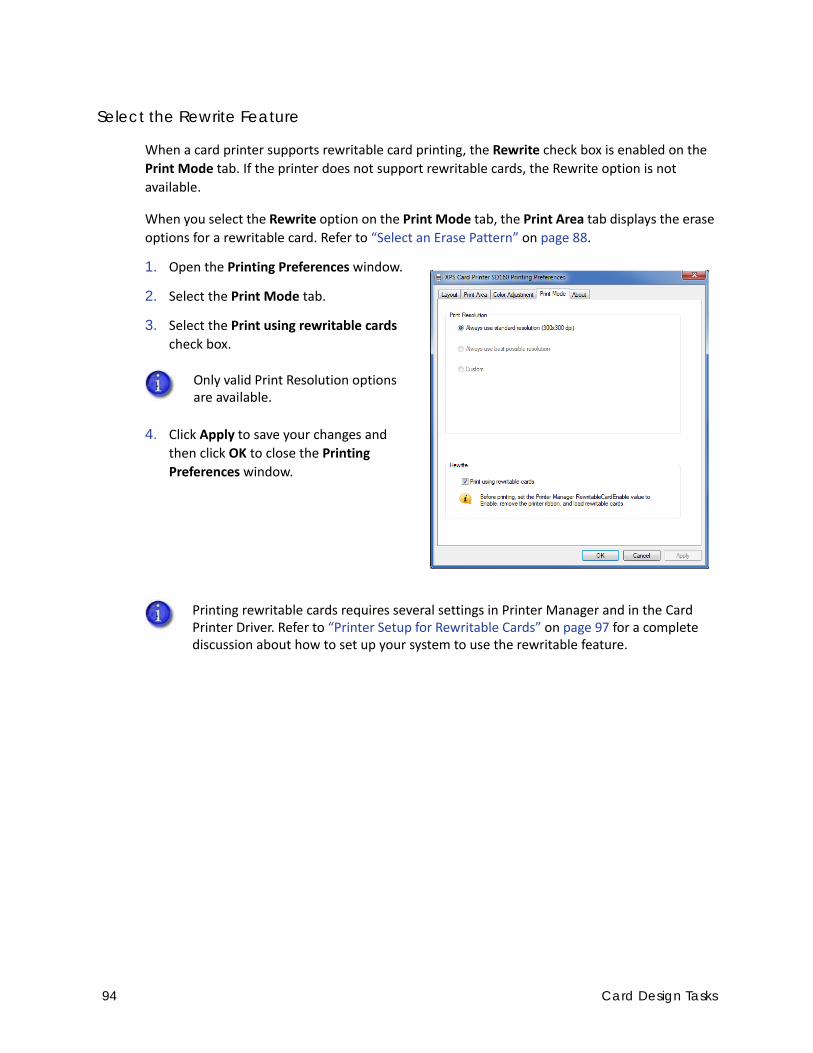
Select the Rewrite Feature
When a card printer supports rewritable card printing, the Rewrite check box is enabled on the
Print Mode tab. If the printer does not support rewritable cards, the Rewrite option is not
available.
When you select the Rewrite option on the Print Mode tab, the Print Area tab displays the erase
options for a rewritable card. Refer to “Select an Erase Pattern” on page 88.
1. Open the Printing Preferences window.
2. Select the Print Mode tab.
3. Select the Print using rewritable cards
check box.
4. Click Apply to save your changes and
then click OK to close the Printing
Preferences window.
Only valid Print Resolution options are available.
Printing rewritable cards requires several settings in Printer Manager and in the Card Printer Driver. Refer to “Printer Setup for Rewritable Cards” on page 97 for a complete discussion about how to set up your system to use the rewritable feature.
94 Card Design Tasks

Lamination TabThe Lamination tab displays only if your printer is part of a laminator system. It allows you to
specify how you want to apply overlay material to your card.
The laminator system can have one or two laminators (labeled L1 and L2) that can apply a patch
or topcoat overlay to one or both sides of a card. Refer to your printer’s User’s Guide and
Installation and Administrator’s Guide for complete information about setting up a laminator
system.
You can use escapes to override the printing preferences set on the Lamination tab on a card‐by‐
card basis. Refer to “Laminator Escape” on page 111.
Apply an Overlay
To specify lamination settings:
1. Open the Printing Preferences window.
2. Select the Lamination tab.
3. Select a Laminate card option for each
laminator. You can select from the
following options:
Do not apply—No overlay material is
applied.
Front side only—Applies the overlay
to the front of the card.
Back side only—Applies the overlay
to the back of the card.
Both sides—Applies the overlay
material to both sides of the card.
Twice on front side—Applies two
layers of the overlay material to the
front of the card. Use this option only with a topcoat overlay.
4. Click Apply to save your changes, and then click OK to close the Printing Preferences window.
The default Laminate card setting for both L1 and L2 is Do not apply. You must specify a lamination option on the Lamination tab or no overlay material is applied to the card.
If an L2 laminator is not installed, Not installed displays and the L2 options are not available.
XPS Card Printer Driver User’s Guide 95
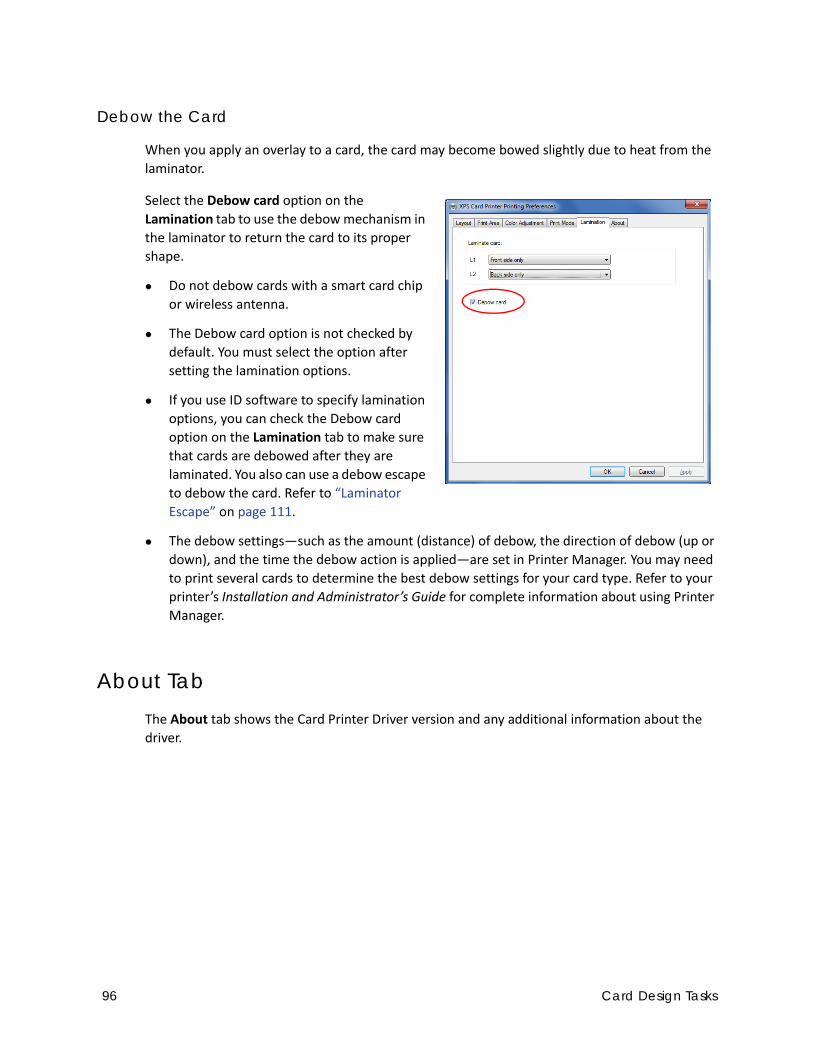
Debow the Card
When you apply an overlay to a card, the card may become bowed slightly due to heat from the
laminator.
Select the Debow card option on the
Lamination tab to use the debow mechanism in
the laminator to return the card to its proper
shape.
Do not debow cards with a smart card chip
or wireless antenna.
The Debow card option is not checked by
default. You must select the option after
setting the lamination options.
If you use ID software to specify lamination
options, you can check the Debow card
option on the Lamination tab to make sure
that cards are debowed after they are
laminated. You also can use a debow escape
to debow the card. Refer to “Laminator
Escape” on page 111.
The debow settings—such as the amount (distance) of debow, the direction of debow (up or
down), and the time the debow action is applied—are set in Printer Manager. You may need
to print several cards to determine the best debow settings for your card type. Refer to your
printer’s Installation and Administrator’s Guide for complete information about using Printer
Manager.
About TabThe About tab shows the Card Printer Driver version and any additional information about the
driver.
96 Card Design Tasks

Printer Setup for Rewritable CardsPrinting rewritable cards on a printer that supports the rewrite option requires that the printer,
Printer Manager, and the Card Printer Driver all are set up properly.
Set Up the Printer Do the following to prepare the printer to print rewritable cards:
1. Open the printer cover and remove the print ribbon cartridge.
2. Remove the print ribbon from the cartridge and set it aside.
Make sure that the cleaning roller with the replaceable cleaning sleeve is installed.
3. Return the print ribbon cartridge to the printer.
4. Close the printer cover.
5. Have rewritable cards available to insert into the printer.
Refer to your printer’s User’s Guide for complete information about each of these steps.
Set Up Printer Manager Use Printer Manager to enable rewritable printing. Do the following to access Printer Manager
and specify rewritable settings:
1. Open the Windows Devices and Printers window.
2. Right‐click the XPS Card Printer icon
and select Printer properties.
3. Select the Printer Status tab.
4. Confirm that the Printer Information
list shows that the printer supports
Rewritable Cards.
5. Click Configure Printer to launch
Printer Manager.
6. Log in as WebAdmin.
XPS Card Printer Driver User’s Guide 97

7. Select Print from the Printer Setting menu.
8. On the Print page, change the RewritableCardEnable setting to Enabled.
Change any of the other Rewritable settings, as needed. Refer to the Printer Manager Print
settings section in your printer’s Installation and Administrator’s Guide for more information
about the Rewritable card settings.
9. Scroll to the bottom of the page and click Set Current.
10. Log out of Printer Manager and close the browser window.
Set Up the Card Printer Driver To set up the Card Printer Driver to print rewritable cards, do the following:
1. Open the Windows Devices and Printers window.
2. Right‐click the XPS Card Printer icon and select Printing preferences.
3. Select the Print Mode tab.
98 Card Design Tasks
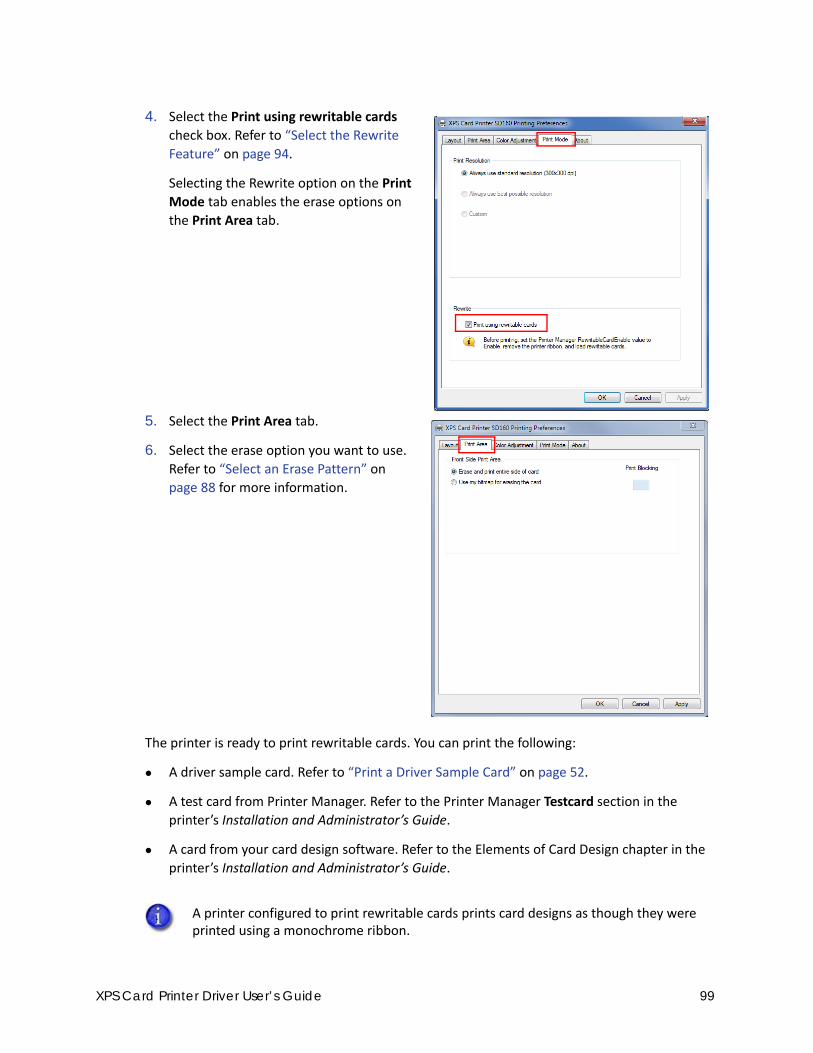
4. Select the Print using rewritable cards
check box. Refer to “Select the Rewrite
Feature” on page 94.
Selecting the Rewrite option on the Print
Mode tab enables the erase options on
the Print Area tab.
5. Select the Print Area tab.
6. Select the erase option you want to use.
Refer to “Select an Erase Pattern” on
page 88 for more information.
The printer is ready to print rewritable cards. You can print the following:
A driver sample card. Refer to “Print a Driver Sample Card” on page 52.
A test card from Printer Manager. Refer to the Printer Manager Testcard section in the
printer’s Installation and Administrator’s Guide.
A card from your card design software. Refer to the Elements of Card Design chapter in the
printer’s Installation and Administrator’s Guide.
A printer configured to print rewritable cards prints card designs as though they were printed using a monochrome ribbon.
XPS Card Printer Driver User’s Guide 99

Card Design for UV RibbonFull‐color print ribbons with a UV fluorescing (F) panel are supported by the Card Printer Driver.
The UV printing is undetectable under normal lighting and is meant to provide an additional form
of security.
The Card Printer Driver supports UV printing from multiple applications. The driver detects when
a UV ribbon is installed in the printer and determines the text and graphics to print with the UV
panel.
To identify the card design elements to print in UV,
the driver looks for the color R:217, G:217, B:217.
This is a light gray color and is a standard selection
from the Microsoft Office color chooser.
If you use Datacard ID software, it allows you to specify the card elements to print using the UV panel, so that you don’t need to use the defined RGB color. The XPS Card Printer plug‐in translates those settings and sends the information to the printer.
100 Card Design Tasks

Set Up a UV Card DesignWhen a UV element is placed over the top of a color or black (K) element, these elements print as
though the UV element isn’t there. Although the UV element cannot be seen under normal
lighting, be aware of the following when creating your card design:
Text with a UV shadow prints so that the text characters display under normal lighting and a
UV shadow appears below and to the right of each character under a UV light source. The UV
ink prints only where the shadow appears (it does not print over the text).
UV printed over other colors does not block those colors. Non‐UV text or images behind the
UV element print as though no UV element exists.
UV printed over other colors does not fluoresce with the same intensity. Design your card to
place UV elements where there is no other printing so that it appears over the white card
background.
UV text and images printed behind non‐UV elements are punched out where the color or K
element overlaps the UV element.
Gold dashed line prints over K black UV dashed line shows two intensities
UV dashed line behind black rectangle UV dashed line on top of black rectangle
XPS Card Printer Driver User’s Guide 101

A laminating system prints UV elements only on the front side of the card. The SD160 and
SD260 printers can print UV elements on both the front and the back of the card. A two‐sided
card design with UV on both the front and back uses two panel sets of the ribbon.
If the card design contains the UV color, but UV ribbon is not detected in the printer, UV
elements are treated as normal color elements.
Do not print an entire card using the UV panel.
Print UV Design ElementsThe following will print with the UV panel:
Text set to the UV color.
Vector graphics set to the UV color. Vector graphics have components such as lines and fills
that the driver processes into a shape.
Raster images (or bitmaps), such as photographs, with the pixel color set to the UV color or
white.
You cannot print color photographs with the UV panel directly. To print an image using
the UV panel, the application must create a two‐color image with white as one color and
the UV color as the other color.
UV raster images always print over other card elements even if they are placed behind
the element in the card design.
Card Design:UV raster image placed behind text
Printed Card:UV raster image prints over text
102 Card Design Tasks

EscapesEscapes are formatted text that the Card Printer Driver converts to printer commands to support
a number of operations, including:
Block printing
Apply topcoat
Erase and write rewritable cards
Encode magnetic stripe data
Select an input hopper
Laminate a card
Impress a card
Debow a card
Emboss/indent a card
Escapes override printing preferences set in the Card Printer Driver or in a card design
application. You can use escapes to change printing controls on a card‐by‐card basis without
having to reset your printing preferences.
HINTS & TIPS
For each escape, make sure that the text is consistent (same font, size, color). Use a common
font that is easy to see, and is different from, the text you want to print on the card.
Each escape must be on a single line with no formatting. Use a small font size to make sure
that there is enough room for long escapes.
Do not align escape text to be on the same horizontal line as printed text.
Make each escape its own line of text on the card design.
XPS Card Printer Driver User’s Guide 103

Print Blocking EscapesThe Card Printer Driver provides several methods to prevent printing and topcoat on specific
areas of the card. Refer to “Non‐Printing Areas” in your printer’s Installation and Administrators
Guide and “Print Area Tab” on page 83 for more information.
By default, the entire surface of the card is available for printing and topcoating. But when cards
have a magnetic stripe, a smart card chip, or another non‐printable area, such as a signature
panel or hologram, you must define those areas so that the printer does not print or apply
topcoat to them.
To block non‐standard areas, or for more than one blocking area per side of a card, use escapes to
define the print areas. Escapes are specific sequences of characters that mark data with a special
purpose. The Card Printer Driver recognizes the following types of print blocking and topcoat
escapes:
Block Print
Topcoat Add
Topcoat Remove
About Non-Printing Areas
If the card has more than one non‐printing area on a side, define all non‐printing areas using
print blocking escapes. An escape applies to the side of the card where it appears in the card
design.
Non‐printing areas defined using print blocking escapes always override the driver Printing
Preferences settings.
Each print blocking area defined by an escape is a rectangular shape.
If you use YMCK or YMCK‐K ribbon (ribbons without a topcoat panel), the topcoat escapes are ignored. Print blocking escapes function normally.
104 Card Design Tasks

Print Blocking Syntax
The syntax or structure of each print blocking escape is ~XX%n1n2n3n4? where:
~ is the beginning of the escape.
XX represents the type of action—Block
Print (PB), Topcoat Add (TA), or Topcoat
Remove (TR).
% indicates the start of values.
All of the following values are in mm:
n1 is the distance from the top of the
card to the start of the area.
n2 is the distance from the left edge of
the card to the start the area.
n3 is the width of the area.
n4 is the height of the area.
? is the end of the escape.
The card in the example shows the dimensions of a three‐track magnetic stripe area.
The escape can specify more than one area of the same type by placing a semicolon (;) character
between each set of values.
Blocking typically extends 0.1 inch (2.54 mm) beyond the edges of a feature. The dimensions listed include the extended blocking region.
XPS Card Printer Driver User’s Guide 105
Block Print Escape
A block print escape begins with ~PB%.
Examples:
Topcoat Add Escape
The topcoat add escape applies topcoat only in the area defined in the escape. Topcoat is not
applied to other areas of the card. All full‐color printing should be covered with topcoat, so use
this option with care.
The topcoat add escape begins with ~TA%.
Examples:
Topcoat Remove Escape
With a topcoat remove escape, the topcoat is not applied to the areas defined by the escape. All
other areas of the card have topcoat.
The topcoat remove escape begins with ~TR%.
Full‐Card Topcoat Options
Use the escape ~TR%? to override the Card Printer Driver preset masks and topcoat the
entire card side.
Use the escape ~TA%? to override the Card Printer Driver preset masks and apply no topcoat
to the entire card side.
Print several cards using your card design and application to verify that printing and topcoat are
applied as you intend.
~PB%10 10 55 15? Printing is blocked in one area.
~PB%10 10 5 5;30.5 45.23 15 15? Printing is blocked in two areas.
~PB%? No printing is blocked.
~TA%0 0 85.6 37? Topcoat is applied to one large area of the card.
~TA%16.8 0 37.1 5;30.5 45.23 15 15? Topcoat is applied in two areas.
106 Card Design Tasks

Escape Support for Rewritable Cards
When rewritable printing is enabled, you can use print blocking and topcoat escapes to specify
the write and erase areas.
Use topcoat escapes to control the erase area. The areas where topcoat would be applied is
where the card is erased.
Examples:
Use print blocking escapes to control rewritable printing just as you would standard printing.
~TA%? The card is not erased.
~TR% Erases the entire card.
~TA%0 0 50 38? Erases the top half of a portrait‐oriented card.
XPS Card Printer Driver User’s Guide 107

Magnetic Stripe EscapesUse magnetic stripe escapes when an application cannot format magnetic stripe data or if an
application does not allow you to select the driver’s magnetic stripe fonts. The data to encode on
a magnetic stripe is entered as text and can look like data to print. The Card Printer Driver uses
the magnetic stripe escapes to identify the data to encode. Data contained within the escape is
not printed.
Supported Escapes
The escape defines the track for the data. Because the data format for each track is set in the
printer, you must enter the type of data the format requires. The Card Printer Driver supports
several escape systems that allow compatibility with card designs defined for various card
printers. The table below shows the default ISO data format for each track. The Syntax column
shows the general escape format for providing data to the printer. The Example column shows
how the data looks when formatted.
Syntax Track Example
~<track#> <Start Sentinel> <data> <End Sentinel>
The only Start Sentinel permitted for tracks 2 and 3 is a semicolon (;)
Used by Datacard, JVC, and Fargo printers
1 (IATA) ~1%ENCODING WITH ESCAPES?
2 (ABA) ~2;1234567890?
3 (TTS) ~3;1234567890?
~<track#><data>
Used by Eltron/Zebra printers
1 (IATA) ~1ENCODING WITH ESCAPES
2 (ABA) ~21234567890
3 (TTS) ~31234567890
~<track#>=<data>
Used by Atlantek printers
1 (IATA) ~1=ENCODING WITH ESCAPES
2 (ABA) ~2=1234567890
3 (TTS) ~3=1234567890
108 Card Design Tasks
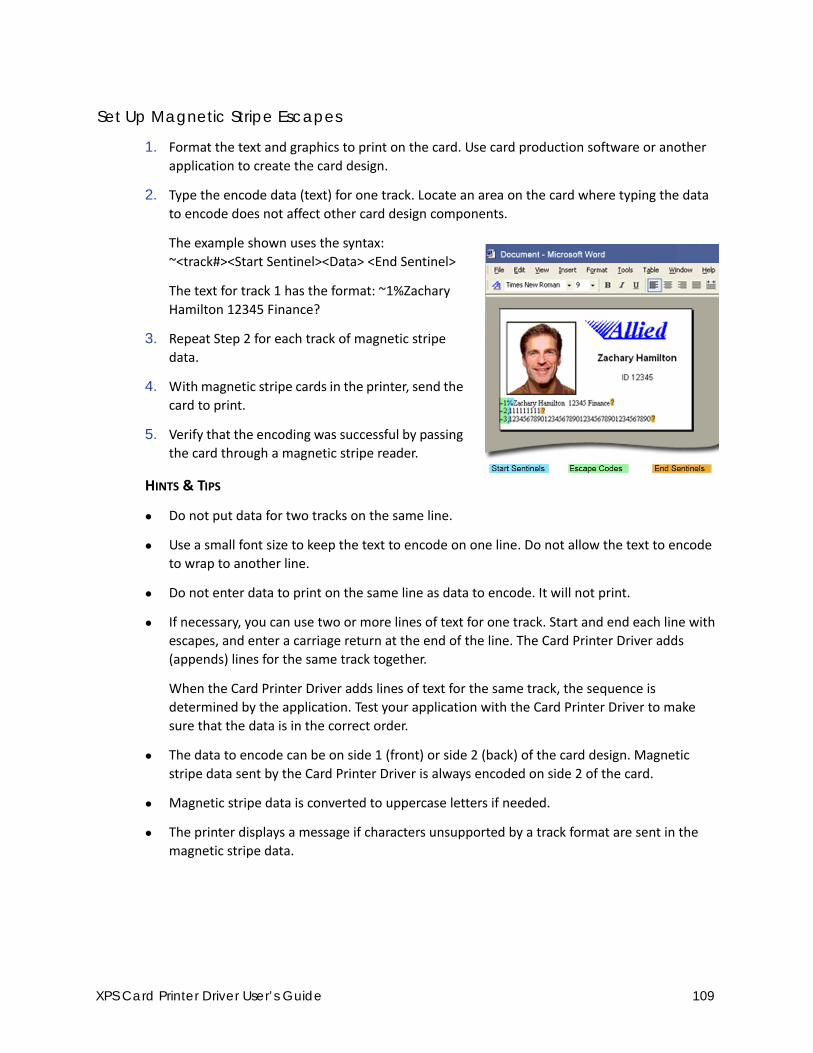
Set Up Magnetic Stripe Escapes
1. Format the text and graphics to print on the card. Use card production software or another
application to create the card design.
2. Type the encode data (text) for one track. Locate an area on the card where typing the data
to encode does not affect other card design components.
The example shown uses the syntax:
~<track#><Start Sentinel><Data> <End Sentinel>
The text for track 1 has the format: ~1%Zachary
Hamilton 12345 Finance?
3. Repeat Step 2 for each track of magnetic stripe
data.
4. With magnetic stripe cards in the printer, send the
card to print.
5. Verify that the encoding was successful by passing
the card through a magnetic stripe reader.
HINTS & TIPS
Do not put data for two tracks on the same line.
Use a small font size to keep the text to encode on one line. Do not allow the text to encode
to wrap to another line.
Do not enter data to print on the same line as data to encode. It will not print.
If necessary, you can use two or more lines of text for one track. Start and end each line with
escapes, and enter a carriage return at the end of the line. The Card Printer Driver adds
(appends) lines for the same track together.
When the Card Printer Driver adds lines of text for the same track, the sequence is
determined by the application. Test your application with the Card Printer Driver to make
sure that the data is in the correct order.
The data to encode can be on side 1 (front) or side 2 (back) of the card design. Magnetic
stripe data sent by the Card Printer Driver is always encoded on side 2 of the card.
Magnetic stripe data is converted to uppercase letters if needed.
The printer displays a message if characters unsupported by a track format are sent in the
magnetic stripe data.
XPS Card Printer Driver User’s Guide 109
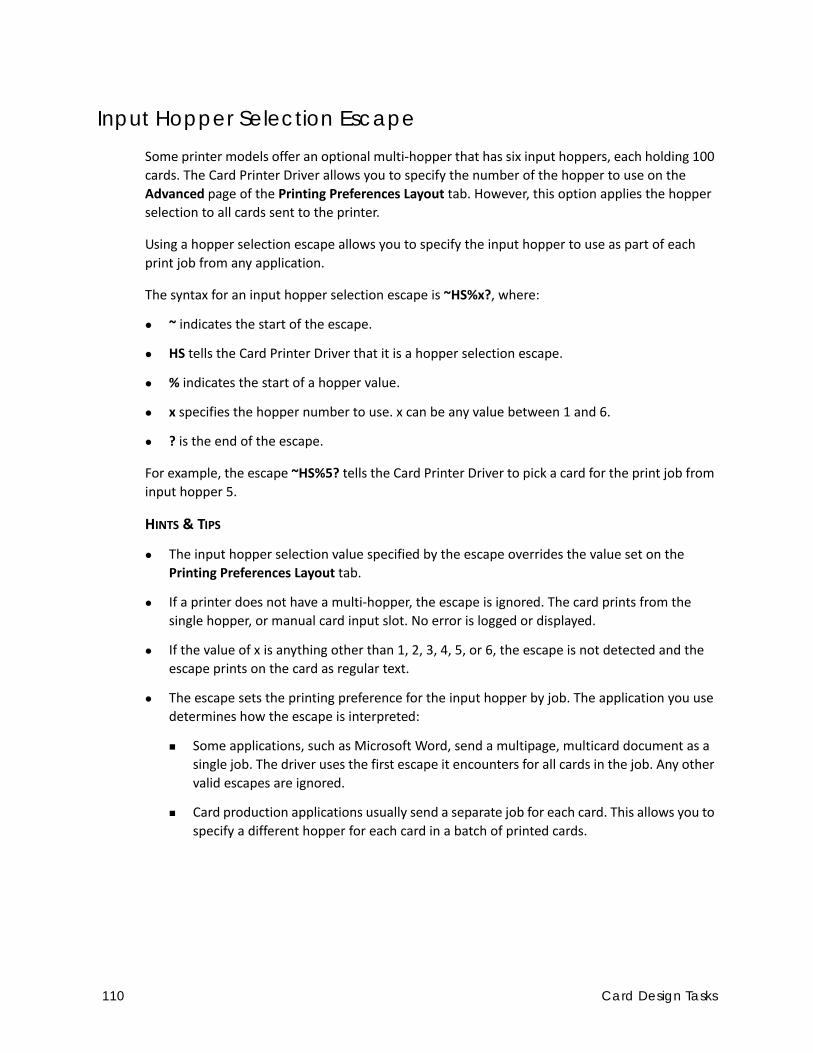
Input Hopper Selection EscapeSome printer models offer an optional multi‐hopper that has six input hoppers, each holding 100
cards. The Card Printer Driver allows you to specify the number of the hopper to use on the
Advanced page of the Printing Preferences Layout tab. However, this option applies the hopper
selection to all cards sent to the printer.
Using a hopper selection escape allows you to specify the input hopper to use as part of each
print job from any application.
The syntax for an input hopper selection escape is ~HS%x?, where:
~ indicates the start of the escape.
HS tells the Card Printer Driver that it is a hopper selection escape.
% indicates the start of a hopper value.
x specifies the hopper number to use. x can be any value between 1 and 6.
? is the end of the escape.
For example, the escape ~HS%5? tells the Card Printer Driver to pick a card for the print job from
input hopper 5.
HINTS & TIPS
The input hopper selection value specified by the escape overrides the value set on the
Printing Preferences Layout tab.
If a printer does not have a multi‐hopper, the escape is ignored. The card prints from the
single hopper, or manual card input slot. No error is logged or displayed.
If the value of x is anything other than 1, 2, 3, 4, 5, or 6, the escape is not detected and the
escape prints on the card as regular text.
The escape sets the printing preference for the input hopper by job. The application you use
determines how the escape is interpreted:
Some applications, such as Microsoft Word, send a multipage, multicard document as a
single job. The driver uses the first escape it encounters for all cards in the job. Any other
valid escapes are ignored.
Card production applications usually send a separate job for each card. This allows you to
specify a different hopper for each card in a batch of printed cards.
110 Card Design Tasks
Laminator EscapeLamination systems can use escapes to control the application of overlay on a card and to debow
the card.
The syntax for a laminator escape is ~LM%Lxy;D? where:
~ is the beginning of the escape.
LM indicates it is a laminator escape.
% indicates the start of laminator values.
L indicates a laminator action.
x is the laminator number to use, where x = 1 or 2.
y is the card side: F (front), B (back), A (both sides), T (front side twice), or N (do not apply).
; is a separator character that allows you to specify more than one lamination option in the
escape.
D debows the card.
? is the end of the escape.
Examples:
HINTS & TIPS
The order of the escape Lxy elements is not important. The Card Printer Driver orders the L1
and L2 lamination and debow actions in the proper sequence.
The escape control characters are not case‐sensitive.
~LM%L1F;L2B;D? Laminate front side using L1, back side using L2, debow the card
~LM%L1A;D? Laminate both sides using L1, debow the card
~LM%L1T? Laminate front side twice using L1; the card is not debowed
~LM%D? Debow the card only (no overlay is applied)
~LM%L1N;L2N? Do not laminate the card. Use this escape to override the Laminate card settings in the Printing Preferences Lamination tab, for example, for a single card.
XPS Card Printer Driver User’s Guide 111

Only one escape is used.
If more than one escape is entered in the same text string, only the first escape is used.
Subsequent escapes, even if they are valid, are not processed.
If multiple escapes are entered separately, only the last escape is used.
Do not debow cards with a smart card chip or wireless antenna.
Leading and trailing spaces in the escape string are removed by the Card Printer Driver.
Embedded spaces in the escape string make the escape invalid.
Invalid escapes print on the card as regular text. This provides a record of what went wrong
and lets you know that the card was not laminated. The following can invalidate an escape:
A missing laminator number or any character other than 1 or 2.
A missing laminator action or any character other than F, B, A, T, or N.
More than one instance of a laminator number (for example, ~LM%L1F;L1B? has two L1
actions).
If a laminator is not installed, the escape is ignored and the card prints using other valid job
options. No error messages are issued.
Impresser EscapeYou can use an impresser escape to stamp an impression on the card (if your system is equipped
with an impresser).
The syntax for an impresser escape is ~IM%? where:
~ is the beginning of the escape.
IM indicates it is an impresser escape.
% tells the Card Printer Driver to send the impresser action.
N disables the impresser and overrides the Impress card printing preference, if it is enabled.
? is the end of the escape.
Examples:
If an impresser is not installed, the escape is ignored and the card prints using other valid job
options. No error messages are issued.
~IM%? Impresses the card.
~IM%N? Does not impress the card.
112 Card Design Tasks

Embosser EscapeUse an embosser escape to specify the font and position of embossed and indented data. An
embosser escape is made up of the following elements:
Escape preamble—Tells the Card Printer Driver that the text characters following are part of
an embosser escape and not text for rendering on the card.
Embosser font number—CE Series systems use a font number to specify the emboss or
indent character set, the front or back of the card, and in some cases the supply to use.
Emboss/Indent position—Two values that specify the starting location of the emboss/indent
operation.
Emboss data—The text to be embossed or indented at a given location using the font
number specified.
Embosser Escape Syntax
The embosser escape syntax is: ~EM%font#;horz_offset;vert_offset;data
Use a semicolon (;) character to separate embosser escape elements.
Escape Preamble
In the preamble, the characters ~EM% identify the beginning of an emboss escape.
XPS Card Printer Driver User’s Guide 113
Embosser Font Number
The usable font numbers are based on the emboss wheel installed in CE Series systems. Several
fonts from the following list typically are supported by a given wheel:
Emboss/Indent Position
The emboss/indent position indicates the start of the emboss or indent data.
1 Emboss Standard Gothic [front 10 cpi]
2 Emboss Farrington 7B [front 7 cpi]
3 Indent OCRB [back 10 cpi]
4 Indent Master Card Slanted [back 14 cpi]
5 Indent OCRB Size IV [front 7 cpi]
6 Indent Master Card Slanted [front 14 cpi]
7 Indent OCRB Front [front 10 cpi]
8 Indent Master Card Inverted [back 7 cpi]
9 Indent Helvetica [front 14 cpi white ribbon]*
10 Indent Helvetica [front 14 cpi black ribbon]*
11 Tactile Identifier Mark (refer to Appendix C: "Tactile Identifier Mark Conversion”)
* Note: Add 20 (decimal) to override default side.
horz_offset Whole number in mils (1/1000 of an inch) from left edge of card to center of first character
vert_offset Whole number in mils (1/1000 of an inch) from bottom edge of card to the vertical midpoint of the characters
114 Card Design Tasks

The following restrictions apply to the horizontal and vertical offsets.
Horizontal Offset Limits
Vertical Offset Limits
Emboss Data Restrictions
CE Series systems have restrictions for the characters allowed.
The emboss data range is from 20 hex to FF hex.
Reserved XML characters (3c hex and 3e hex) are not allowed as emboss characters.
For data greater than 127 ASCII, you must use an escape (for example, µ is used to
emboss a Katakana character [B5 hex]).
Topping Maximum Value Minimum Value
on 3025 280
off 3275 100
Topping Maximum Value Minimum Value
on 860 135
off 1460 135
XPS Card Printer Driver User’s Guide 115

Emboss Example
~EM%2;401;843;0001 3416 7890 1286~EM%10;401;650;0001~EM%1;800;480;2007~EM%1;1600;480;10/17~EM%1;401;328;Janice Holloway
The embosser escapes define emboss and indent data to produce the following card. The sample card shows the location of each embossed element. The escapes can be placed anywhere on the card design that does not contain data to be printed.
116 Card Design Tasks

Magnetic Stripe FontsThe Card Printer Driver provides fonts to format magnetic stripe data. Use these fonts when
magnetic stripe escapes cannot be used.
1. Use the application’s page setup feature to set the
paper size to ISO ID‐1. Reduce the page margins to
match the card design.
2. Format the text and graphics to print on the card.
3. Type the data to encode using a standard font, such
as Arial.
Use a small font size to minimize the amount of
space used for encoded data.
Do not put data for two tracks on the same line.
Do not allow text to encode to wrap to another
line.
Data to encode can be on side 1 (front) or
side 2 (back) of the card.
4. Add an extra space character to the end of the data.
5. Select a line of data up to, but not including, the
extra space character and apply one of the following
fonts:
Mag Track 1 XPS Card Printer
Mag Track 2 XPS Card Printer
Mag Track 3 XPS Card Printer
Mag Track JIS XPS Card Printer
6. Repeat Steps 3 through 5 for each line of text to
encode.
7. Send the card to print.
8. Verify that the encoding was successful by passing the card through a card reader.
XPS Card Printer Driver User’s Guide 117

HINTS & TIPS
Do not use character formatting, such as kerning.
Do not use smart quotes.
Use a small font size to shorten lines of text to encode.
Keep text to print on a different line from text to encode.
When the Card Printer Driver adds lines of text for the same track, the sequence is
determined by the application. Test your application with the Card Printer Driver to make
sure that the data is in the correct order.
Magnetic stripe data sent by the Card Printer Driver is always encoded on side 2 of the card.
Magnetic stripe data is converted to uppercase letters if needed.
If characters unsupported by a track format are sent within the magnetic stripe data, the
printer displays a message.
If you have an existing application that uses magnetic stripe fonts from older generation printers,
the Card Printer Driver recognizes these fonts. If the fonts are not installed on your computer, use
the “Legacy Application Support” option on the driver installation Support Files screen to install
them. Refer to “Install Support Files” on page 23 for more information.
118 Card Design Tasks

Chapter 5: Installation Troubleshooting
This section describes how to:
Troubleshoot the Card Printer Driver Installation
Use Advanced Troubleshooting Tools on page 122
The Card Printer Driver Installation CD is provided in the CD folder included in the shipping
carton. If the CD is not available, you can download the driver from http://www.datacard.com.
Select Support & Drivers > Drivers & Downloads from the menu. Enter your printer model in the
Enter Product Name or Number area, and click Go.
Troubleshoot the Card Printer Driver InstallationThis section describes issues that could prevent a successful installation and provides
recommended solutions to those issues. Select from the following topics:
USB Installation Troubleshooting on page 120
Network Installation Troubleshooting on page 122
XPS Card Printer Driver User’s Guide 119

USB Installation Troubleshooting
Problem Solution
The cable is loose. Reconnect the USB cable to the ports on the PC and the printer. Power the printer off, and then back on. If the PC and printer still do not communicate, restart the PC.
The data cable is damaged or frayed.
Power off the printer. Replace the cable if you have a spare. Contact your service provider to order a new data cable.
The system has a temporary communication problem.
Check the following:
USB extension cables can cause communication problems. The recommended USB cable is 6‐ft. (2 meters) long. Make sure that the cable is rated for USB 2.0 data transmission.
If you are using a USB hub, a self‐powered hub is recommended.
The card printer does not install when the USB cable is connected.
If a previous printer installation attempt was unsuccessful, Device Manager might still show an entry for the printer.
Remove the printer entry from Device Manager before reinstalling the printer:
1. Disconnect the printer from the PC.
2. Open the Windows Device Manager.
3. Locate the device to delete. The device might be called “Unknown device” or it might be located under the Printers or Network Adapters folder. The device might be marked with a yellow question mark or exclamation point.
4. Select the device, and right‐click to display a pop‐up menu.
5. Select Remove device from the pop‐up menu.
6. Click Yes or OK to confirm removal of the device.
7. Close the Device Manager. Close any other windows.
8. Reinstall the printer.
Error message states the USB is not detected.
The USB installer timed out before a printer was detected.
Remove the Card Printer Driver from the Device Manager before reinstalling the printer.
The USB cable is connected before the Card Printer Driver is installed.
The first printer installed on a PC using a USB connection must be installed from the driver CD or downloaded Card Printer Driver.
Connect the USB cable to the printer when you are prompted. Do not connect the cable before starting the installation.
120 Installation Troubleshooting

The Print Sample Card button is not available.
The Print Sample Card button in Printer Properties is enabled when the printer and Card Printer Driver communicate normally. If Print Sample Card is not available, make sure that the USER button on the printer front panel is steady green and that Ready displays on the LCD panel.
Note: The Print Sample Card button is not available when printer pooling is enabled.
The PC USB port does not communicate with the printer USB port.
Power management on the PC has shut down USB communication. Check the following:
Open the Windows Device Manager and display the list of USB devices. Disable shutdown for each hub in the list. Restart the PC for the changes to take effect, if necessary.
Hibernation on a laptop PC requires several moments to enable USB communication. Unplug the USB printer port and then connect it again.
Replace the PC port or the PC. Contact your PC or port vendor if you need assistance.
The printer does not install or print on the PC when the PC is connected to a remote network using VPN Client software.
VPN Client software can prevent the installation and use of other devices. Choose one of the following solutions:
Configure your VPN software to allow local network connections.
Disconnect the VPN Client software from the network. Then, install the USB printer and Card Printer Driver, or resume printing.
Problem Solution
XPS Card Printer Driver User’s Guide 121
Network Installation Troubleshooting
Use Advanced Troubleshooting ToolsFor additional troubleshooting topics, refer to the printer’s User’s Guide.
Printer Manager also provides access to additional troubleshooting tools. Refer to the your
printer’s Installation and Administrator’s Guide for information about using Printer Manager.
Problem Solution
The network cable is loose.
Reconnect the data cable to the network port and the printer, making sure that it is snapped in. Restart the printer.
The Status page of Printer Properties shows the printer is not available, but the printer displays Ready on the LCD screen.
Follow your network troubleshooting procedures to isolate and test each component of the computer‐to‐printer communication link.
Suggestions:
Check the computer‐to‐network connection by accessing a network resource, such as a network drive.
Have the network administrator test communication between a server and the printer.
Make sure that the user is logged in to the network.
The printer is not configured with the correct network address.
Make sure that the server name or IP address has been entered correctly in the Port Settings or Configure Port dialog box on the computer. For information about retrieving the printer’s IP address, refer to the card printer’s User’s Guide.
Make sure that Ready displays on the printer's LCD panel.
122 Installation Troubleshooting

Appendix A: Windows Printer Sharing
This appendix provides information about how to install and share the
Card Printer Driver on a host and client PC running the Windows 7,
Windows 8.1, or Windows 10 64‐bit operating system.
InstallationPrinter sharing involves setting up the host PC for sharing, then installing and setting up the Card
Printer Driver on each client system that prints to the printer.
Set Up the Host PC for Printer Sharing1. Install the XPS Card Printer Driver on the host PC. Refer to “Install the Driver” on page 9.
2. Configure the host PC for printer sharing.
a. From the Windows Control Panel, select Network and Internet > Network and Sharing
Center.
b. Select Change advanced sharing settings from the left column. The Advanced sharing
settings window or the Network profile options display. If the Advanced sharing settings
list displays, select the network profile you want to work with.
c. On the Network profile options page, select the following options (these are the default
settings).
d. If you selected (turned on) any options in this step, click Save changes. Close the Network and Sharing Center window.
The Advanced sharing settings display varies depending on a system’s setup. In addition, based on its setup, a system may open one of the profiles and display the options shown in step 2c.
Field Select option
Network discovery Turn on network discovery
File and printer sharing Turn on file and printer sharing
Password protected sharing
Turn on password protected sharing
XPS Card Printer Driver User’s Guide A-1

3. Enable printer sharing.
a. Open the Devices and Printers window and right‐click the card printer icon. Select Printer properties to display the Printer Properties window.
b. Allow printer sharing.
i. On the Printer Properties window, select the Sharing tab.
ii. Select Share this printer. The printer name displays in the Share name field. Write
down the printer name. Refer to “Printer Sharing Requirements” on page 29 for
more information about naming the host printer.
iii. Select Render print jobs on
client computers.
iv. Click Apply to store these settings.
c. Find the host PC full computer name and write it down.
i. From the Windows Control Panel, select System and Security > System.
ii. Write down the name of the computer found in the Full computer name field on the
System window.
iii. Close the System window.
Remember to record the printer name and host PC name. You need these names to install the Card Printer Driver on the client PC. For more about printer names, refer to “Use device naming rules for shared printers” on page 32.
Keep the Printer Properties window open while you find the full computer name in step 3c.
A-2 Windows Printer Sharing
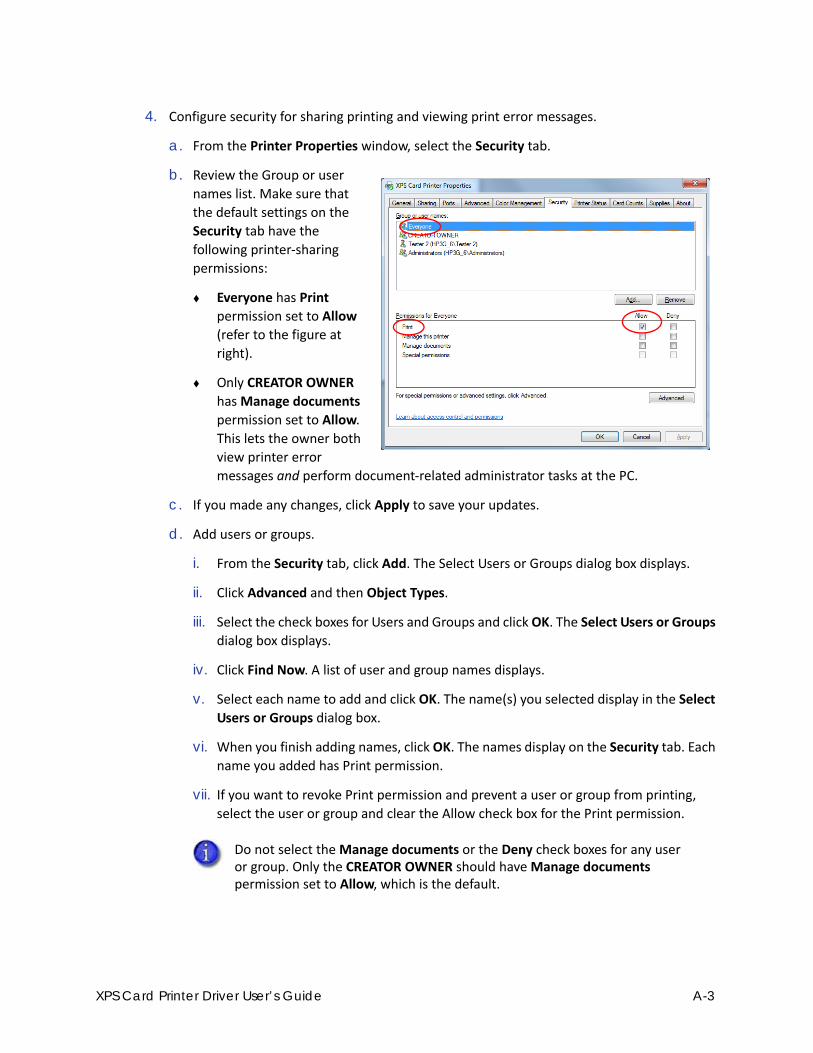
4. Configure security for sharing printing and viewing print error messages.
a. From the Printer Properties window, select the Security tab.
b. Review the Group or user names list. Make sure that
the default settings on the
Security tab have the
following printer‐sharing
permissions:
Everyone has Print
permission set to Allow
(refer to the figure at
right).
Only CREATOR OWNER
has Manage documents
permission set to Allow.
This lets the owner both
view printer error
messages and perform document‐related administrator tasks at the PC.
c. If you made any changes, click Apply to save your updates.
d. Add users or groups.
i. From the Security tab, click Add. The Select Users or Groups dialog box displays.
ii. Click Advanced and then Object Types.
iii. Select the check boxes for Users and Groups and click OK. The Select Users or Groups
dialog box displays.
iv. Click Find Now. A list of user and group names displays.
v. Select each name to add and click OK. The name(s) you selected display in the Select
Users or Groups dialog box.
vi. When you finish adding names, click OK. The names display on the Security tab. Each
name you added has Print permission.
vii. If you want to revoke Print permission and prevent a user or group from printing,
select the user or group and clear the Allow check box for the Print permission.
Do not select the Manage documents or the Deny check boxes for any user or group. Only the CREATOR OWNER should have Manage documents permission set to Allow, which is the default.
XPS Card Printer Driver User’s Guide A-3

e. Allow users or groups to view printing error messages.
i. From the Security tab, select a user or group and select Allow for the Manage this
printer permission.
ii. Repeat for each user or group.
iii. Click Apply to save changes for each name.
f. Set up Windows printing for card design.
g. From the Printer Properties window, select the Supplies tab.
h. Write down the ribbon type installed in the printer.
i. Click OK to close the Printer Properties window.
j. On the Devices and Printers window, right‐click the card printer icon and select Printing
preferences. The Printing Preferences window displays.
k. Specify your printing preferences. Refer to “Design Tasks in Windows Printing
Preferences” on page 69.
l. Write down the printing preferences settings for topcoat and print blocking, and print
resolution.
m. Click OK to close the Printing Preferences window.
These settings are not set automatically at the client PC to match the host. You must enter these settings manually on each client PC when you set up printing preferences. For an overview, refer to “Configure PC Printing Preferences for Sharing” on page 33.
A-4 Windows Printer Sharing
Install the Card Printer Driver on the Client PCThe client PC must be running the Windows 7, Windows 8.1, or Windows 10 64‐bit operating
system. Refer to “Printer Sharing Requirements” on page 29 for a list of supported host/client
operating system combinations.
The following instructions may vary slightly based on the operating system of the client PC.
1. Make sure that the Card Printer Driver is installed and set up on the host PC.
2. Log on to the client PC with a user account that has administrator privileges and matches an
account and password on the host PC.
Start at the Login screen of the client PC and review the user names displayed. Look for a
user with administrator access that matches a user name on the host PC. If one is not
listed, set up a user account and password on the client PC to match an administrator
account from the host PC.
OR
Log on to the host PC from the client PC using a network access as follows:
Use Windows File Explorer or My Computer to locate the host PC.
Select the host PC. The Enter Network Password dialog box displays.
Enter your password and click OK. The host PC desktop displays.
You must log on to the host PC across the network by using a different user account than was used to install the printer on the host.
After you log on to the host PC using the network, keep the window open until the installation completes.
XPS Card Printer Driver User’s Guide A-5
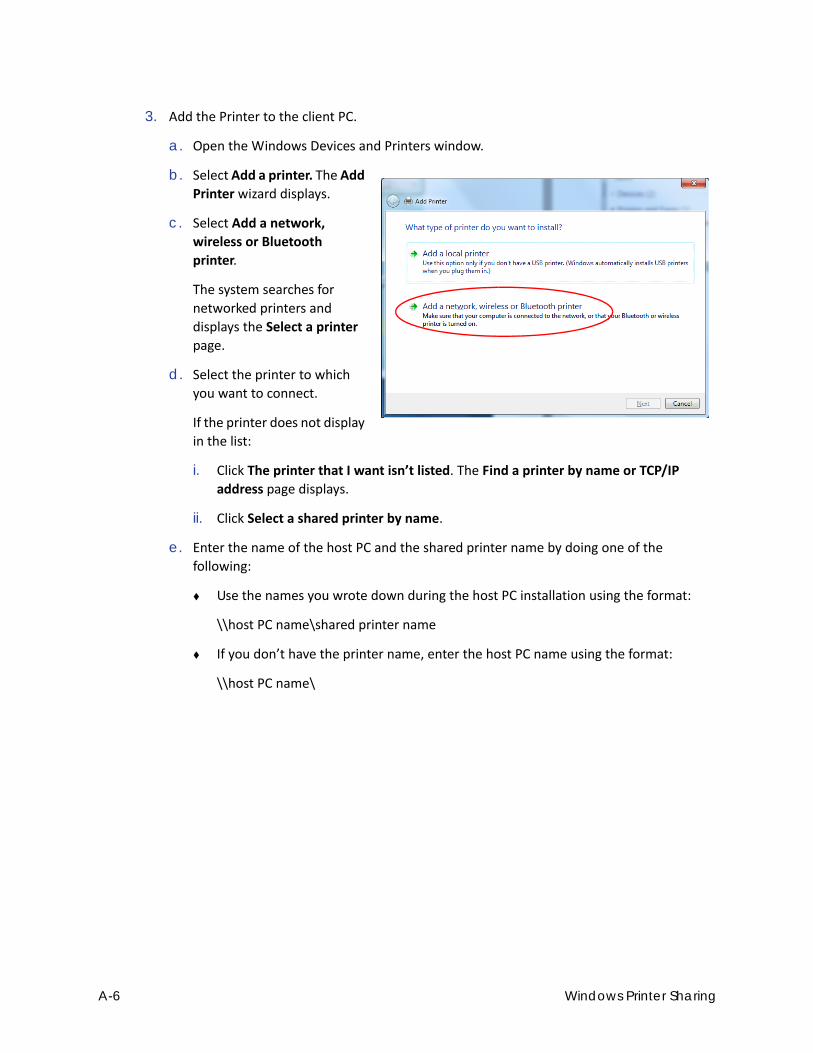
3. Add the Printer to the client PC.
a. Open the Windows Devices and Printers window.
b. Select Add a printer. The Add Printer wizard displays.
c. Select Add a network,
wireless or Bluetooth
printer.
The system searches for
networked printers and
displays the Select a printer
page.
d. Select the printer to which you want to connect.
If the printer does not display
in the list:
i. Click The printer that I want isn’t listed. The Find a printer by name or TCP/IP
address page displays.
ii. Click Select a shared printer by name.
e. Enter the name of the host PC and the shared printer name by doing one of the
following:
Use the names you wrote down during the host PC installation using the format:
\\host PC name\shared printer name
If you don’t have the printer name, enter the host PC name using the format:
\\host PC name\
A-6 Windows Printer Sharing

When you type the last
backslash without a
printer name, a list of
host printers displays in
a drop‐down list.
Select the shared printer
from the drop‐down list.
f. Click Next. If the Do you
trust this printer? dialog box
displays, click Install Driver.
Windows installs the Card
Printer Driver. The message
“You’ve successfully added
printer name” displays when the installation is complete. Click Next.
g. Close any open windows.
h. Click Finish to end the Add Printer wizard.
4. If card production software is installed on this computer, or if you need other support files,
such as magnetic stripe fonts, install the Printer Plug‐in or support files from the Driver
Installation CD. For instructions, refer to “Install Support Files” on page 23.
5. Configure the client PC printing preferences.
a. Get the print settings you wrote down at the host PC for ribbon type, topcoat and print blocking, and print resolution.
These settings are not set automatically at the client PC to match the host, so you must
enter them manually.
b. From the Devices and Printers window, right‐click the card printer icon and select
Printing preferences. The Printing Preferences window displays.
c. Enter the required printing preferences. Refer to “Configure PC Printing Preferences for
Sharing” on page 33 and “Design Tasks in Windows Printing Preferences” on page 69.
d. Click OK to close the Printing Preferences window.
XPS Card Printer Driver User’s Guide A-7

A-8 Windows Printer Sharing

Appendix B: Windows Server 2008 and 2012 Printer Sharing
This appendix provides information about how to install and share the
Card Printer Driver on a host PC running either the Windows Server 2008
or Windows Server 2012, 64‐bit operating systems.
Windows Server 2008 or 2012, 64-bit InstallationPrinter sharing involves setting up the host PC for sharing, then installing and setting up the Card
Printer Driver on each client system that prints to the printer.
Set Up the Host PC for Printer Sharing1. Install the XPS Card Printer Driver on the host PC. Refer to “Install the Driver” on page 9.
2. Configure the host PC for printer sharing.
a. From the Windows Control Panel, select Network and Internet > Network and Sharing
Center.
b. Select Change advanced sharing settings from the left column. The Advanced sharing
settings window or the Network profile options display. If the Advanced sharing settings
list displays, select the network profile you want to work with.
c. On the network profile options page, select the following options:
d. Click Save changes to close the Advanced sharing settings window.
The Advanced sharing settings display varies depending on a system’s setup. In addition, based on its setup, the system may open one of the profiles and display the options shown in step 2c.
Field Select option
Network discovery Turn on network discovery
File and printer sharing Turn on file and printer sharing
Password protected sharing
Turn on password protected sharing
XPS Card Printer Driver User’s Guide B-1

3. Write down the printer name and host PC name.
a. Display the Devices and Printers window. Select the card printer icon and click Print server properties in the menu bar. The Printer Properties window displays.
b. Select the General tab on the Printer Properties window to display the printer device name.
c. Write down the name of the printer.
d. Display the System properties window for your computer.
e. Write down the host PC name found in the Full Computer Name field.
f. Close the System properties window.
4. Enable printer sharing.
a. Select the Sharing tab on the Printer Properties window.
b. Click Change Sharing Options. The shaded fields become active.
c. Select Share this printer.
Make sure that a printer name displays in the Share name field. Refer to “Printer Sharing
Requirements” on page 29 for more information about naming the host printer.
d. Select Render print jobs on client computers.
e. Click Apply to apply these settings.
Remember to record the printer device name. You need this printer name to install the Card Printer Driver on the client PC.
The printer Share name is assigned by the Windows operating system. This displays as the same printer name (or an abbreviated version of the printer name) you wrote down earlier.
B-2 Windows Server 2008 and 2012 Printer Sharing
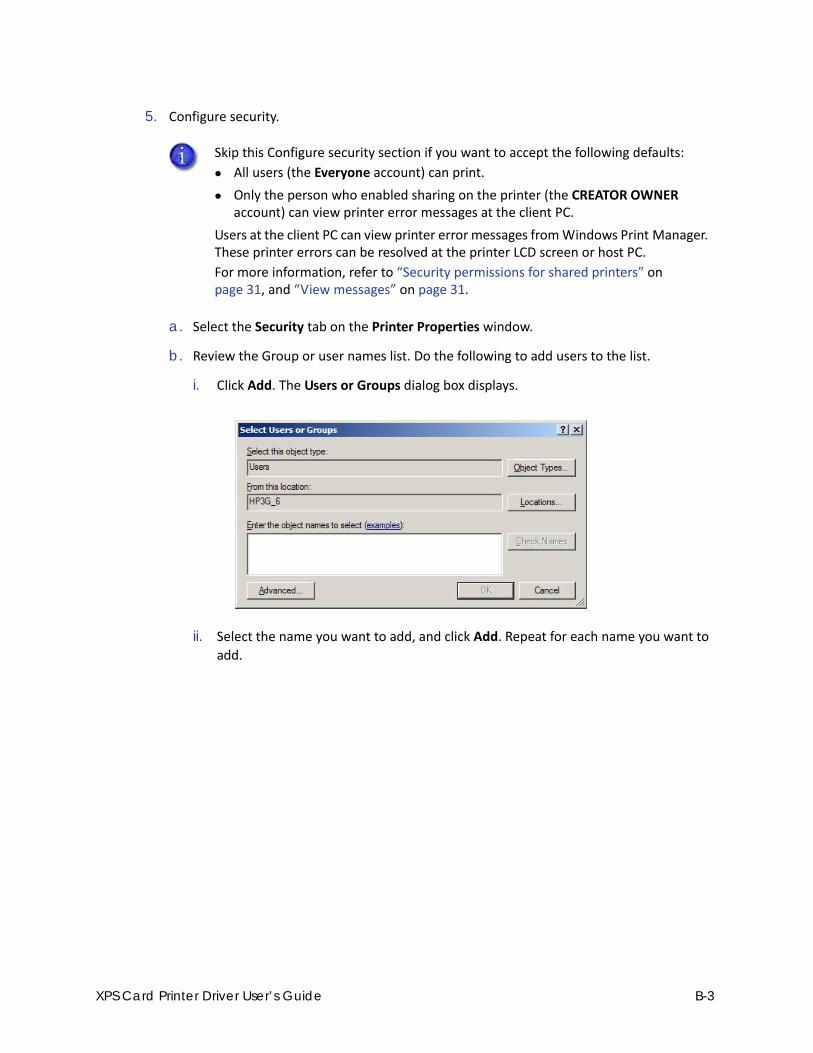
5. Configure security.
a. Select the Security tab on the Printer Properties window.
b. Review the Group or user names list. Do the following to add users to the list.
i. Click Add. The Users or Groups dialog box displays.
ii. Select the name you want to add, and click Add. Repeat for each name you want to
add.
Skip this Configure security section if you want to accept the following defaults:
All users (the Everyone account) can print.
Only the person who enabled sharing on the printer (the CREATOR OWNER account) can view printer error messages at the client PC.
Users at the client PC can view printer error messages from Windows Print Manager. These printer errors can be resolved at the printer LCD screen or host PC.
For more information, refer to “Security permissions for shared printers” on page 31, and “View messages” on page 31.
XPS Card Printer Driver User’s Guide B-3
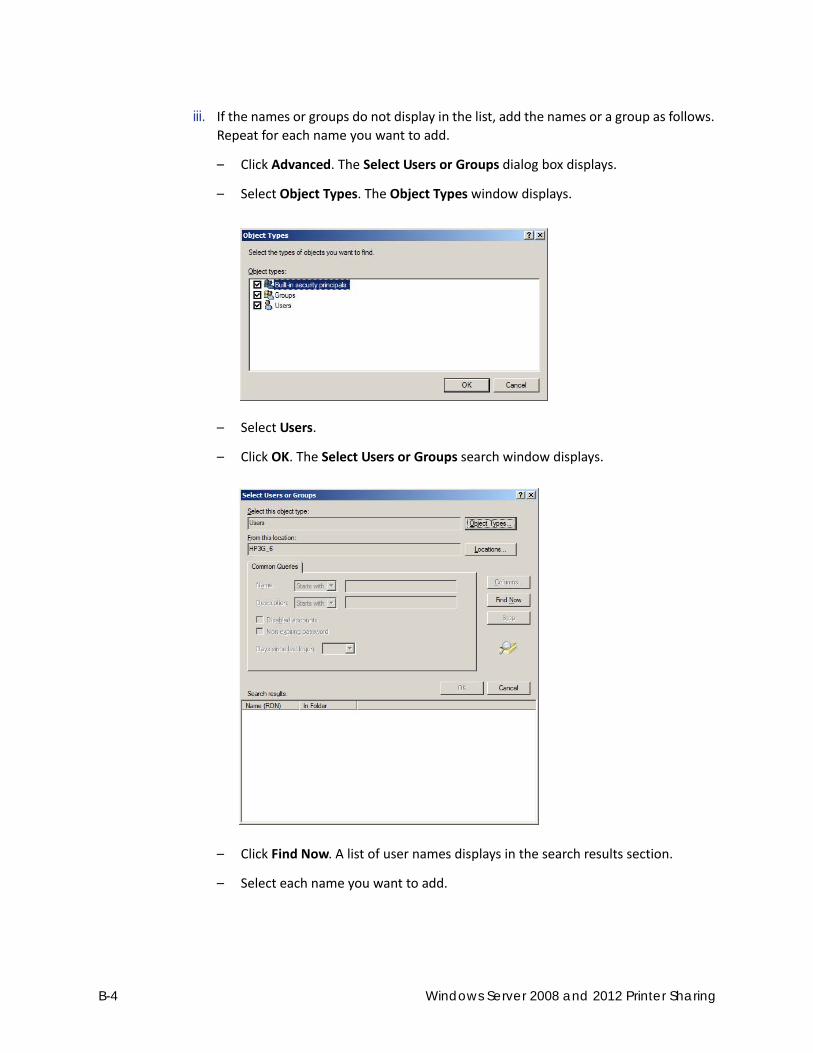
iii. If the names or groups do not display in the list, add the names or a group as follows.
Repeat for each name you want to add.
– Click Advanced. The Select Users or Groups dialog box displays.
– Select Object Types. The Object Types window displays.
– Select Users.
– Click OK. The Select Users or Groups search window displays.
– Click Find Now. A list of user names displays in the search results section.
– Select each name you want to add.
B-4 Windows Server 2008 and 2012 Printer Sharing

– Click OK. The Select Users or Groups window displays the names you selected.
iv. When you finish adding names, click OK to close the Users and Groups dialog box.
c. In the Names list, select the name or group to set up.
i. Select Allow for permissions you want to apply to the user or group.
ii. Clear the Allow check box for permissions you want to deny the user or group.
iii. Click Apply to save your changes. Make sure that you save changes for each name.
6. Configure the host PC printing preferences.
a. From the Printer Properties window, select the Supplies tab.
b. Write down the ribbon type installed in the printer.
c. Click OK to close the Printer Properties window.
d. On the Devices and Printers window, right‐click the card printer icon and select Printing preferences. The Printing Preferences window displays.
e. Specify your printing preferences. Refer to “Design Tasks in Windows Printing
Preferences” on page 69.
f. Write down the printing preferences settings for topcoat and print blocking, and print
resolution.
g. Click OK to close the Printing Preferences window.
Do not select the Manage documents or the Deny check boxes for any user or group. Select Allow for Manage Printer if you want a user or group to view messages.
These settings are not set automatically at the client PC to match the host. You must enter these settings manually on each client PC when you set up printing preferences. For an overview, refer to “Configure PC Printing Preferences for Sharing” on page 33.
XPS Card Printer Driver User’s Guide B-5

Install the Card Printer Driver on the Client PC The client PC must be running the Windows 7, Windows 8.1, or Windows 10 64‐bit operating
system. See “Printer Sharing Requirements” on page 29 for a list of supported host/client
operating system combinations.
Differences between operating systems are noted, as needed.
1. Make sure that the Card Printer Driver is installed and set up on the host PC.
2. Log in to the client PC with a user account that has administrator privileges and matches an
account and password on the host PC.
3. Add the printer to the client PC.
a. Display the Devices and Printers window.
b. Select Add a printer. The Add Printer wizard displays.
c. Select Add a network, wireless, or Bluetooth printer.
The system searches for networked printers and displays the Select a printer page.
d. Select the printer to which you want to connect.
If the printer does not display in the list:
i. Click The printer that I want isn’t listed. The Find a printer by name or TCP/IP
address page displays.
ii. Click Select a shared printer by name.
e. Enter the name of the host PC and the shared printer name by doing one of the
following:
Use the names you wrote down during the host PC installation using the format:
\\host PC name\shared printer name
If you don’t have the printer name, enter the host PC name. Use the format:
\\host PC name\
When you type the last backslash without the printer name, a list of host printers
displays in a drop‐down list.
Select the shared printer from the drop‐down list.
f. Click Next. A series of messages display and you are asked to install the printer driver.
Before you log on to the client PC, look for a user account that matches an account on the host PC. If one is not listed, set up the user account and password on the client PC.
B-6 Windows Server 2008 and 2012 Printer Sharing

g. Click Install driver. When a message displays that you successfully added the printer, click
Next.
h. Close any open windows.
i. Click Finish to close the wizard. The shared card printer icon displays in the Devices and
Printers window of the client PC.
4. If card production software is installed on this computer, or if you need other support files,
such as magnetic stripe fonts, install the XPS Card Printer Plug‐in or support files from the
Driver Installation CD. For instructions, refer to “Install Support Files” on page 23.
5. Configure the client PC printing preferences.
a. Get the print settings you wrote down at the host PC for ribbon type, topcoat and print blocking, and print resolution.
These settings are not set automatically at the client PC to match the host, so you must
enter them manually.
b. From the Devices and Printers window, right‐click the card printer icon and select
Printing preferences.
c. Enter the required printing preferences. Refer to “Configure PC Printing Preferences for
Sharing” on page 33 and “Design Tasks in Windows Printing Preferences” on page 69.
d. Click OK to close the Printing Preferences window.
XPS Card Printer Driver User’s Guide B-7

B-8 Windows Server 2008 and 2012 Printer Sharing

Appendix C: Tactile Identifier Mark Conversion
Embosser font 11 allows you to emboss up to three Braille (Tactile Identifier Mark or TIM)
characters on a card. Braille uses a 6‐dot format to represent letters, numbers, and combinations
of sounds.
The Braille characters are expressed as a sequence of numbers that indicate the position of the
dots, with dots 1–3 in the left column, and dots 4–6 in the right column.
The CE system uses a single emboss character to form each dot. Up to three 6‐dot characters can
be embossed in any allowed location on the card.
The vertical and horizontal spacing between the embossed dots is 0.091 in (2.3 mm). The
distance between characters is 0.240 in (6.1 mm).
Because there isn’t a one‐to‐one correlation between the ASCII value and the Braille character,
use the following conversion table to map your ASCII data to the Braille characters. The table
includes the dot sequence for each character and its binary representation.
Some characters must be sent as an ASCII sequence because they are reserved XML characters. In addition, some characters have more than one valid value. All are shown in the following table.
XPS Card Printer Driver User’s Guide C-1

ASCII (dec) ASCII (hex)ASCII (char)
Braille Dots (dec)
Braille Dots (bin) Cell Meaning
32 20 (space) (none) 00000000 (space)
33 21 ! 2‐3‐4‐6 00101110 the
38‐113‐117‐111‐116‐59
26‐71‐75‐6F‐74‐3B
" 5 00010000 (contraction)
35 23 # 3‐4‐5‐6 00111100 (number prefix)
36 24 $ 1‐2‐4‐6 00101011 ed
37 25 % 1‐4‐6 00101001 sh
38‐97‐109‐112‐59
26‐61‐6D‐70‐3B
& 1‐2‐3‐4‐6 00101111 and
38‐97‐112‐111‐115‐59
26‐97‐70‐6F‐73‐3B
' 3 00000100 ‘
40 28 ( 1‐2‐3‐5‐6 00110111 of
41 29 ) 2‐3‐4‐5‐6 00111110 with
42 2A * 1‐6 00100001 ch
43 2B + 3‐4‐6 00101100 ing
44 2C , 6 00100000 (uppercase prefix)
45 2D ‐ 3‐6 00100100 ‐
46 2E . 4‐6 00101000 (italic prefix)
47 2F / 3‐4 00001100 st
48 30 0 3‐5‐6 00110100 “
49 31 1 2 00000010 ,
50 32 2 2‐3 00000110 ;
51 33 3 2‐5 00010010 :
52 34 4 2‐5‐6 00110010 .
C-2 Tactile Identifier Mark Conversion

53 35 5 2‐6 00100010 en
54 36 6 2‐3‐5 00010110 !
55 37 7 2‐3‐5‐6 00110110 ( or )
56 38 8 2‐3‐6 00100110 “ or ?
57 39 9 3‐5 00010100 in
58 3A : 1‐5‐6 00110001 wh
59 3B ; 5‐6 00110000 (letter prefix)
124 7C | 1‐2‐6 00100011 gh
61 3D = 1‐2‐3‐4‐5‐6 00111111 for
126 7E ~ 3‐4‐5 00011100 ar
63 3F ? 1‐4‐5‐6 00111001 th
64 40 @ 4 00001000 (accent prefix)
65 or 97 41 or 61 A or a 1 00000001 a
66 or 98 42 or 62 B or b 1‐2 00000011 b
67 or 99 43 or 63 C or c 1‐4 00001001 c
68 or 100 44 or 64 D or d 1‐4‐5 00011001 d
69 or 101 45 or 65 E or e 1‐5 00010001 e
70 or 102 46 or 66 F or f 1‐2‐4 00001011 f
71 or 103 47 or 67 G or g 1‐2‐4‐5 00011011 g
72 or 104 48 or 68 H or h 1‐2‐5 00010011 h
73 or 105 49 or 69 I or i 2‐4 00001010 i
74 or 106 4A or 6A J or j 2‐4‐5 00011010 j
75 or 107 4B or 6B K or k 1‐3 00000101 k
ASCII (dec) ASCII (hex)ASCII (char)
Braille Dots (dec)
Braille Dots (bin) Cell Meaning
XPS Card Printer Driver User’s Guide C-3

76 or 108 4C or 6C L or l 1‐2‐3 00000111 l
77 or 109 4D or 6D M or m 1‐3‐4 00001101 m
78 or 110 4E or 6E N or n 1‐3‐4‐5 00011101 n
79 or 111 4F or 6F O or o 1‐3‐5 00010101 o
80 or 112 50 or 70 P or p 1‐2‐3‐4 00001111 p
81 or 113 51 or 71 Q or q 1‐2‐3‐4‐5 00011111 q
82 or 114 52 or 72 R or r 1‐2‐3‐5 00010111 r
83 or 115 53 or 73 S or s 2‐3‐4 00001110 s
84 or 116 54 or 74 T or t 2‐3‐4‐5 00011110 t
85 or 117 55 or 75 U or u 1‐3‐6 00100101 u
86 or 118 56 or 76 V or v 1‐2‐3‐6 00100111 v
87 or 119 57 or 77 W or w 2‐4‐5‐6 00111010 w
88 or 120 58 or 78 X or x 1‐3‐4‐6 00101101 x
89 or 121 59 or 79 Y or y 1‐3‐4‐5‐6 00111101 y
90 or 122 5A or 7A Z or z 1‐3‐5‐6 00110101 z
91 5B [ 2‐4‐6 00101010 ow
92 5C \ 1‐2‐5‐6 00110011 ou
93 5D ] 1‐2‐4‐5‐6 00111011 er
94 5E ^ 4‐5 00011000 (contraction)
95 5F _ 4‐5‐6 00111000 (contraction)
ASCII (dec) ASCII (hex)ASCII (char)
Braille Dots (dec)
Braille Dots (bin) Cell Meaning
C-4 Tactile Identifier Mark Conversion