Embed Size (px)
Citation preview

XC4100 Series
User's Guide
January 2016 www.lexmark.com
Machine type(s):
7528
Model(s):
598, 196

ContentsSafety information........................................................................................ 6
Conventions.......................................................................................................................................................... 6
Learning about the printer...........................................................................9Finding information about the printer.............................................................................................................9
Selecting a location for the printer................................................................................................................ 10
Printer configurations......................................................................................................................................... 11
Attaching cables................................................................................................................................................. 12
Using the control panel.....................................................................................................................................14
Understanding the status of the power button and indicator light....................................................... 15
Using the home screen.....................................................................................................................................15
Printing a menu settings page........................................................................................................................ 16
Menus list..............................................................................................................................................................17
Setting up and using the home screen applications..............................19Customizing the home screen........................................................................................................................ 19
Using Display Customization.......................................................................................................................... 19
Setting up Forms and Favorites..................................................................................................................... 19
Setting up Card Copy.......................................................................................................................................20
Using Shortcut Center..................................................................................................................................... 20
Setting up Scan Center....................................................................................................................................20
Using Customer Support..................................................................................................................................21
Setting up Device Quotas................................................................................................................................21
Using QR Code Generator...............................................................................................................................21
Using Google Drive.......................................................................................................................................... 22
Configuring Eco‑Settings................................................................................................................................ 22
Loading paper and specialty media......................................................... 23Setting the size and type of the specialty media......................................................................................23
Configuring Universal paper settings.......................................................................................................... 23
Loading trays...................................................................................................................................................... 23
Loading the multipurpose feeder................................................................................................................. 25
Linking trays........................................................................................................................................................26
Contents 2

Printing.........................................................................................................28Printing from a computer.................................................................................................................................28
Printing forms..................................................................................................................................................... 28
Printing from a flash drive............................................................................................................................... 28
Supported flash drives and file types.......................................................................................................... 29
Configuring confidential jobs......................................................................................................................... 30
Printing held jobs...............................................................................................................................................30
Printing a font sample list................................................................................................................................30
Printing a directory list.......................................................................................................................................31
Canceling a print job..........................................................................................................................................31
Copying........................................................................................................32Making copies.................................................................................................................................................... 32
Copying photos..................................................................................................................................................32
Copying on letterhead..................................................................................................................................... 32
Copying on both sides of the paper (two‑sided)...................................................................................... 32
Reducing or enlarging copies........................................................................................................................ 33
Collating copies................................................................................................................................................. 33
Placing separator sheets between copies................................................................................................. 33
Copying multiple pages onto a single sheet..............................................................................................33
Creating a copy shortcut................................................................................................................................. 33
E-mailing...................................................................................................... 34Setting up the e‑mail function........................................................................................................................ 34
Configuring e‑mail settings.............................................................................................................................34
Sending an e-mail..............................................................................................................................................34
Creating an e-mail shortcut............................................................................................................................ 35
Faxing...........................................................................................................36Setting up the printer to fax............................................................................................................................36
Sending a fax......................................................................................................................................................48
Scheduling a fax................................................................................................................................................ 49
Creating a fax destination shortcut...............................................................................................................49
Changing the fax resolution........................................................................................................................... 49
Adjusting the fax darkness............................................................................................................................. 49
Viewing a fax log............................................................................................................................................... 49
Contents 3
Blocking junk faxes...........................................................................................................................................50
Holding faxes..................................................................................................................................................... 50
Forwarding a fax................................................................................................................................................50
Scanning.......................................................................................................51Scanning to an FTP server...............................................................................................................................51
Creating an FTP shortcut................................................................................................................................. 51
Scanning to a flash drive.................................................................................................................................. 51
Sending scanned documents to a computer.............................................................................................52
Securing the printer................................................................................... 53Erasing printer memory................................................................................................................................... 53
Erasing printer hard disk memory.................................................................................................................53
Configuring printer hard disk encryption....................................................................................................53
Restoring factory default settings................................................................................................................. 53
Statement of Volatility...................................................................................................................................... 54
Maintaining the printer.............................................................................. 55Networking..........................................................................................................................................................55
Setting up serial printing (Windows only)....................................................................................................56
Cleaning printer parts.......................................................................................................................................57
Ordering parts and supplies...........................................................................................................................58
Replacing parts and supplies.........................................................................................................................60
Moving the printer.............................................................................................................................................85
Saving energy and paper................................................................................................................................86
Recycling..............................................................................................................................................................87
Clearing jams.............................................................................................. 88Avoiding jams.....................................................................................................................................................88
Identifying jam locations..................................................................................................................................89
Paper jam in trays..............................................................................................................................................90
Paper jam behind door E..................................................................................................................................91
Paper jam in the multipurpose feeder.......................................................................................................... 91
Paper jam in the standard bin........................................................................................................................92
Paper jam in door A.......................................................................................................................................... 93
Troubleshooting..........................................................................................98Network connection problems...................................................................................................................... 98
Contents 4

Hardware options problems......................................................................................................................... 100
Paper feed problems...................................................................................................................................... 102
Printing problems.............................................................................................................................................105
Color quality problems................................................................................................................................... 123
Faxing problems.............................................................................................................................................. 126
Scanning problems......................................................................................................................................... 129
Contacting customer support....................................................................................................................... 132
Upgrading and migrating.........................................................................133Hardware............................................................................................................................................................133
Software..............................................................................................................................................................147
Firmware............................................................................................................................................................. 147
Notices........................................................................................................149
Index........................................................................................................... 153
Contents 5

Safety information
ConventionsNote: A note identifies information that could help you.
Warning: A warning identifies something that could damage the product hardware or software.
CAUTION: A caution indicates a potentially hazardous situation that could injure you.
Different types of caution statements include:
CAUTION—POTENTIAL INJURY: Indicates a risk of injury.
CAUTION—SHOCK HAZARD: Indicates a risk of electrical shock.
CAUTION—HOT SURFACE: Indicates a risk of burn if touched.
CAUTION—TIPPING HAZARD: Indicates a crush hazard.
CAUTION—POTENTIAL INJURY: To avoid the risk of fire or electrical shock, connect the power cord toan appropriately rated and properly grounded electrical outlet that is near the product and easilyaccessible.
CAUTION—POTENTIAL INJURY: To avoid the risk of fire or electrical shock, use only the power cordprovided with this product or the manufacturer's authorized replacement.
CAUTION—POTENTIAL INJURY: Do not use this product with extension cords, multioutlet power strips,multioutlet extenders, or UPS devices. The power capacity of these types of accessories can be easilyoverloaded by a laser printer and may result in a risk of fire, property damage, or poor printerperformance.
CAUTION—POTENTIAL INJURY: Only a Lexmark Inline Surge Protector that is properly connectedbetween the printer and the power cord provided with the printer may be used with this product. Theuse of non-Lexmark surge protection devices may result in a risk of fire, property damage, or poorprinter performance.
CAUTION—SHOCK HAZARD: To avoid the risk of electrical shock, do not place or use this product nearwater or wet locations.
CAUTION—SHOCK HAZARD: To avoid the risk of electrical shock, do not set up this product or makeany electrical or cabling connections, such as the power cord, fax feature, or telephone, during alightning storm.
CAUTION—POTENTIAL INJURY: Do not cut, twist, bind, crush, or place heavy objects on the powercord. Do not subject the power cord to abrasion or stress. Do not pinch the power cord between objectssuch as furniture and walls. If any of these things happen, a risk of fire or electrical shock results. Inspectthe power cord regularly for signs of such problems. Remove the power cord from the electrical outletbefore inspecting it.
CAUTION—SHOCK HAZARD: To avoid the risk of electrical shock, make sure that all externalconnections (such as Ethernet and telephone system connections) are properly installed in their markedplug-in ports.
Safety information 6

CAUTION—SHOCK HAZARD: To avoid the risk of electrical shock, if you are accessing the controllerboard or installing optional hardware or memory devices sometime after setting up the printer, then turnthe printer off, and unplug the power cord from the electrical outlet before continuing. If you have anyother devices attached to the printer, then turn them off as well, and unplug any cables going into theprinter.
CAUTION—SHOCK HAZARD: To avoid the risk of electrical shock, do not use the fax feature during alightning storm.
CAUTION—SHOCK HAZARD: To avoid the risk of electrical shock when cleaning the exterior of theprinter, unplug the power cord from the electrical outlet and disconnect all cables from the printer beforeproceeding.
CAUTION—POTENTIAL INJURY: The printer weight is greater than 18 kg (40 lb) and requires two ormore trained personnel to lift it safely.
CAUTION—POTENTIAL INJURY: When moving the printer, follow these guidelines to avoid personalinjury or printer damage:
• Make sure that all doors and trays are closed.
• Turn off the printer, and then unplug the power cord from the electrical outlet.
• Disconnect all cords and cables from the printer.
• If the printer has a caster base, then carefully roll it to the new location. Use caution when passing overthresholds and breaks in flooring.
• If the printer does not have a caster base but is configured with optional trays, then lift the printer off thetrays. Do not try to lift the printer and the trays at the same time.
• Always use the handholds on the printer to lift it.
• Any cart used to move the printer must have a surface able to support the full footprint of the printer.
• Any cart used to move the hardware options must have a surface able to support the dimensions of theoptions.
• Keep the printer in an upright position.
• Avoid severe jarring movements.
• Make sure that your fingers are not under the printer when you set it down.
• Make sure that there is adequate clearance around the printer.
CAUTION—TIPPING HAZARD: Installing one or more options on your printer or MFP may require acaster base, furniture, or other feature to prevent instability causing possible injury. For more informationon supported configurations, see www.lexmark.com/multifunctionprinters.
CAUTION—TIPPING HAZARD: To reduce the risk of equipment instability, load each tray separately.Keep all other trays closed until needed.
CAUTION—HOT SURFACE: The inside of the printer might be hot. To reduce the risk of injury from a hotcomponent, allow the surface to cool before touching it.
CAUTION—POTENTIAL INJURY: This product uses a laser. Use of controls or adjustments orperformance of procedures other than those specified in the User’s Guide may result in hazardousradiation exposure.
CAUTION—POTENTIAL INJURY: The lithium battery in this product is not intended to be replaced.There is a danger of explosion if a lithium battery is incorrectly replaced. Do not recharge, disassemble,or incinerate a lithium battery. Discard used lithium batteries according to the manufacturer's instructionsand local regulations.
This equipment is not suitable for use in locations where children are likely to be present.
Safety information 7

This product is designed, tested, and approved to meet strict global safety standards with the use of specificmanufacturer's components. The safety features of some parts may not always be obvious. The manufactureris not responsible for the use of other replacement parts.
Refer service or repairs, other than those described in the user documentation, to a service representative.
This product uses a printing process that heats the print media, and the heat may cause the media to releaseemissions. You must understand the section in your operating instructions that discusses the guidelines forselecting print media to avoid the possibility of harmful emissions.
This product may produce small amounts of ozone during normal operation, and may be equipped with a filterdesigned to limit ozone concentrations to levels well below the recommended exposure limits. To avoid highozone concentration levels during extensive usage, install this product in a well-ventilated area and replacethe ozone and exhaust filters if instructed to do so in the product maintenance instructions. If there are noreferences to filters in the product maintenance instructions, then there are no filters requiring replacement forthis product.
Use only the telecommunications (RJ‑11) cord provided with this product or a 26 AWG or larger replacementwhen connecting this product to the public switched telephone network.
SAVE THESE INSTRUCTIONS.
Safety information 8

Learning about the printer
Finding information about the printerWhat are you looking for? Find it here
Initial setup instructions:
• Connecting the printer
• Installing the printer software
Setup documentation—The setup documentationcame with the printer and is also available athttp://support.lexmark.com.
Additional setup and instructions for using the printer:
• Selecting and storing paper and specialty media
• Loading paper
• Configuring printer settings
• Viewing and printing documents and photos
• Setting up and using the printer software
• Configuring the printer on a network
• Caring for and maintaining the printer
• Troubleshooting and solving problems
Information Center—Authoritative online resourcefor the latest product tips, instructions, andreference material.
Go to http://infoserve.lexmark.com/ids/ and selectyour product.
Help Menu Pages—The guides may be available onthe printer firmware and athttp://support.lexmark.com.
Information on setting up and configuring the accessibilityfeatures of your printer
Lexmark Accessibility Guide—The guide isavailable at http://support.lexmark.com.
Help using the printer software Help for Microsoft® Windows® or Macintoshoperating systems—Open a printer softwareprogram or application, and then click Help.
Click ? to view context‑sensitive information.
Notes:
• Help is automatically installed with the printersoftware.
• The printer software is located in the printerprogram folder or on the desktop, dependingon the operating system.
Learning about the printer 9

What are you looking for? Find it here
The latest supplemental information, updates, and customersupport:
• Documentation
• Driver downloads
• Live chat support
• E‑mail support
• Voice support
http://support.lexmark.com
Note: Select your country or region, and thenselect your product to view the appropriatesupport site.
Support contact information for your country orregion can be found on the support Web site or onthe printed warranty that came with the printer.
Have the following information (located on the storereceipt and at the back of the printer) ready whenyou contact customer support:
• Machine type number
• Serial number
• Date purchased
• Store where purchased
• Safety information
• Regulatory information
• Warranty information
Warranty information varies by country or region:
• In the U.S.—See the Statement of LimitedWarranty included with the printer, or go tohttp://support.lexmark.com.
• In other countries and regions—See theprinted warranty that came with the printer.
Product Information Guide—This documentcontains basic safety, environmental, andregulatory information for your product. For moreinformation, see the documentation that came withthe printer or go to http://support.lexmark.com.
Selecting a location for the printerWhen selecting a location for the printer, leave enough room to open trays, covers, and doors and to installhardware options.
• Set up the printer near an electrical outlet.
CAUTION—POTENTIAL INJURY: To avoid the risk of fire or electrical shock, connect the power cordto an appropriately rated and properly grounded electrical outlet that is near the product and easilyaccessible.
CAUTION—SHOCK HAZARD: To avoid the risk of electrical shock, do not place or use this productnear water or wet locations.
• Make sure that airflow in the room meets the latest revision of the ASHRAE 62 standard or the CEN TechnicalCommittee 156 standard.
• Provide a flat, sturdy, and stable surface.
• Keep the printer:
– Clean, dry, and free of dust.
– Away from stray staples and paper clips.
– Away from the direct airflow of air conditioners, heaters, or ventilators.
– Free from direct sunlight and humidity extremes.
Learning about the printer 10

• Observe the recommended temperatures and avoid fluctuations:
Ambient temperature 10 to 32.2°C (50 to 90°F)
Storage temperature -40 to 40°C (-40 to 104°F)
• Allow the following recommended amount of space around the printer for proper ventilation:
1 Top 229 mm (9 in.)
2 Right side 178 mm (7 in.)
3 Front 508 mm (20 in.)
4 Left side 127 mm (5 in.)
5 Rear 101.6 mm (4 in.)
Printer configurationsCAUTION—TIPPING HAZARD: Installing one or more options on your printer or MFP may require acaster base, furniture, or other feature to prevent instability causing possible injury. For more informationon supported configurations, see www.lexmark.com/multifunctionprinters.
CAUTION—TIPPING HAZARD: To reduce the risk of equipment instability, load each tray separately.Keep all other trays closed until needed.
You can configure your printer by adding three optional 550‑sheet trays.
Learning about the printer 11

1 Automatic document feeder (ADF)
2 ADF tray
3 ADF bin
4 Control panel
5 650‑sheet duo tray
6 Optional 550‑sheet trays
7 Standard bin
Attaching cablesCAUTION—SHOCK HAZARD: To avoid the risk of electrical shock, do not set up this product or makeany electrical or cabling connections, such as the power cord, fax feature, or telephone, during alightning storm.
Learning about the printer 12

CAUTION—POTENTIAL INJURY: To avoid the risk of fire or electrical shock, connect the power cord toan appropriately rated and properly grounded electrical outlet that is near the product and easilyaccessible.
CAUTION—POTENTIAL INJURY: To avoid the risk of fire or electrical shock, use only the power cordprovided with this product or the manufacturer's authorized replacement.
Use only the telecommunications (RJ‑11) cord provided with this product or a 26 AWG or larger replacementwhen connecting this product to the public switched telephone network.
Warning—Potential Damage: Do not touch the USB cable, any wireless network adapter, or the printer in thearea shown while actively printing. Loss of data or malfunction can occur.
Use the To
1 EXT port Connect additional devices (telephone or answering machine) to the printer and thetelephone line. Use this port if you do not have a dedicated fax line for the printer andif this connection method is supported in your country or region.
Note: Remove the plug to access the port.
2 LINE port Connect the printer to an active telephone line through a standard wall jack (RJ‑11), DSLfilter, or VoIP adapter, or any other adapter that allows you to access the telephone lineto send and receive faxes.
3 Ethernet port Connect the printer to a network.
4 USB port Attach a keyboard or any compatible option.
5 USB printer port Connect the printer to a computer.
6 Printer power cordsocket
Connect the printer to a properly grounded electrical outlet.
Learning about the printer 13

Using the control panel
Use the To
1 Display • View the printer messages and supply status.
• Set up and operate the printer.
2 Home button Go to the home screen.
3 Power button • Turn on or turn off the printer.
Note: To turn off the printer, press and hold the power button for fiveseconds.
• Set the printer to Sleep or Hibernate mode.
• Wake the printer from Sleep or Hibernate mode.
4 Keypad Enter numbers or symbols in an input field.
5 Pause button Place a dial pause in a fax number.
6 Start button Start a job, depending on which mode is selected.
7 Clear all or Reset button Reset the default settings of a function such as copying, faxing, or scanning.
8 Stop or Cancel button Stop the current job.
9 Backspace button Move the cursor backward and delete a character in an input field.
10 Indicator light Check the status of the printer.
11 Volume buttons Adjust the volume of the headset or speaker.
12 Headset or speaker port Attach a headset or speaker.
Learning about the printer 14

Understanding the status of the power button andindicator lightIndicator light Printer status
Off The printer is off or in Hibernate mode.
Blue The printer is ready or processing data.
Red The printer requires user intervention.
Power button light Printer status
Off The printer is off, ready, or processing data.
Solid amber The printer is in sleep mode.
Blinking amber The printer is in hibernate mode.
Using the home screenNote: Your home screen may vary depending on your home screen customization settings, administrativesetup, and active embedded solutions.
Touch To
1 Copy Make copies.
2 E‑mail Send e‑mails.
3 Change Language Change the language on the printer display.
4 Fax Send fax.
5 Settings Access the printer menus.
6 Held Faxes Show all the current held fax jobs.
Note: If Held Faxes is hidden, then Release Held Faxes appears.
7 Shortcut Center Organize all shortcuts.
Learning about the printer 15

Touch To
8 Status/Supplies • Show a printer warning or error message whenever the printer requires interventionto continue processing.
• View more information on the printer warning or message, and on how to clear it.
Note: You can also access this setting by touching the top section of the homescreen.
9 Address Book Access, create, and organize contacts.
10 Scan Profiles Scan and save documents directly to the computer.
11 FTP Scan and save documents directly to an FTP server.
12 Bookmarks Organize all bookmarks.
13 Held Jobs Show all the current held print jobs
14 USB Drive View, select, or print photos and documents from a flash drive.
15 Job Queue Show all the current print jobs.
Note: You can also access this setting by touching the top section of the homescreen.
These settings may also appear on the home screen
Touch To
App Profiles Access application profiles.
Lock Device Prevent users from accessing any printer functions from the home screen.
Printing a menu settings pageFrom the home screen, touch Settings > Reports > Menu Settings Page.
Learning about the printer 16

Menus listDevice Print Paper Copy Fax
Preferences
Notifications
Group Lists
Alert Types
Anti‑Spam Logic Description
Suppressing Duplicate Alerts
Power Management
Information Sent to Lexmark
Accessibility
Restore Factory Defaults
Maintenance
Remote Operator Panel
Visible Home Screen Icons
Site Map
Update Firmware
About This Printer
Layout
Setup
Quality
Job Accounting
Image
XPS
HTML
PostScript
PCL
PPDS
Tray Configuration
Media Configuration
Bin Configuration
Copy Defaults Fax Mode
Analog Fax Setup
Fax Server Setup
E‑mail FTP Network/Ports USB Drive Security
E‑mail Defaults
E‑mail Setup
Web Link Setup
FTP Defaults Network Overview
Wireless
AirPrint
Ethernet
TCP/IP
IPv6
SNMP
802.1x
IPSec
LPD Configuration
HTTP/FTP Settings
ThinPrint
USB
Parallel [x]
Serial
Wi‑Fi Direct
Flash Drive Scan
Flash Drive Print
Login Methods
CertificateManagement
Schedule USB Devices
Security Audit Log
Login Restrictions
Confidential Print Setup
Disk Encryption
Erase Temporary DataFiles
Solutions LDAPSettings
Miscellaneous
Learning about the printer 17

Option Card Menu Reports Help
Note: This setting appearsonly when an optional cardis installed.
Menu SettingsPage
Print Quality Pages
Device
Shortcuts
Fax
Network
Print All Guides
Color Quality Guide
Connection Guide
Copy Guide
E‑mail Guide
Information Guide
Media Guide
Moving Guide
Print Quality Guide
Scan Guide
Supplies Guide
Learning about the printer 18
Setting up and using the home screenapplications
Customizing the home screen1 Open a Web browser, and then type the printer IP address in the address field.
Notes:
• View the printer IP address on the printer home screen. The IP address appears as four sets ofnumbers separated by periods, such as 123.123.123.123.
• If you are using a proxy server, then temporarily disable it to load the Web page correctly.
2 Click Settings > Device > Visible Home Screen Icons.
3 Select the icons that you want to appear on the home screen.
4 Apply the changes.
Using Display Customization1 From the home screen, touch Change Background.
2 Select a background to use.
3 Apply the changes.
Setting up Forms and Favorites1 Open a Web browser, and then type the printer IP address in the address field.
Notes:
• View the printer IP address on the printer home screen. The IP address appears as four sets ofnumbers separated by periods, such as 123.123.123.123.
• If you are using a proxy server, then temporarily disable it to load the Web page correctly.
2 Click Apps > Forms and Favorites > Configure.
3 Click Add, and then customize the settings.
Notes:
• To make sure that the location settings of the bookmark are correct, type the IP address of the hostcomputer where the bookmark is located.
• Make sure that the printer has access rights to the folder where the bookmark is located.
4 Apply the changes.
Setting up and using the home screen applications 19

Setting up Card Copy1 Open a Web browser, and then type the printer IP address in the address field.
Notes:
• View the printer IP address on the printer home screen. The IP address appears as four sets ofnumbers separated by periods, such as 123.123.123.123.
• If you are using a proxy server, then temporarily disable it to load the Web page correctly.
2 Click Apps > Card Copy > Configure.
3 Configure the output options and scan settings.
Notes:
• When scanning a card, make sure that the scan resolution does not exceed 200 dpi for color and400 dpi for black and white.
• When scanning multiple cards, make sure that the scan resolution does not exceed 150 dpi for colorand 300 dpi for black and white.
• You need a printer hard disk to scan multiple cards.
• Make sure that the printer network and e‑mail settings are configured.
4 Apply the changes.
Using Shortcut Center1 From the home screen, touch Shortcut Center, and then select a printer function.
2 Touch Create Shortcut, and then configure the settings.
3 Touch Save, and then type a unique shortcut name.
4 Apply the changes.
Setting up Scan Center1 From the home screen, touch Scan Center.
2 Select and create a destination, and then configure the settings.
Notes:
• When creating a network destination, make sure to validate and adjust the settings until no errorsoccur.
• Only destinations created from the Embedded Web Server are saved. For more information, see thedocumentation that came with the solution.
3 Apply the changes.
Setting up and using the home screen applications 20

Using Customer Support1 From the home screen, touch Customer Support.
2 Print or e‑mail the information.
Note: For information on configuring the application settings, see the Customer Support Administrator’sGuide.
Setting up Device QuotasYou may need administrative rights to access the application.
1 Open a Web browser, and then type the printer IP address in the address field.
Notes:
• View the printer IP address on the printer home screen. The IP address appears as four sets ofnumbers separated by periods, such as 123.123.123.123.
• If you are using a proxy server, then temporarily disable it to load the Web page correctly.
2 Click Apps > Device Quotas > Configure.
3 From the User Accounts section, add or edit a user, and then set the user quota.
4 Apply the changes.
Note: For information on how to configure the application and its security settings, see the Device QuotasAdministrator’s Guide.
Using QR Code GeneratorYou may need administrative rights to access the application.
1 Open a Web browser, and then type the printer IP address in the address field.
Notes:
• View the printer IP address on the printer home screen. The IP address appears as four sets ofnumbers separated by periods, such as 123.123.123.123.
• If you are using a proxy server, then temporarily disable it to load the Web page correctly.
2 Click Apps > QR Code Generator > Configure.
3 Do either of the following:
• Select a default QR code value.
• Type a QR code value.
4 Apply the changes.
Setting up and using the home screen applications 21

Using Google Drive
Scanning a document
Notes:
• Make sure that the printer is connected to your Google account.
• Make sure that you have installed a printer hard disk.
1 Load an original document into the ADF tray or on the scanner glass.
2 From the home screen, touch Google Drive.
3 If prompted, type your user credentials.
4 Select a destination folder.
5 Scan the document, and then follow the instructions on the display.
Printing a document
Note: Make sure that the printer is connected to your Google account.
1 From the home screen, touch Google Drive.
2 If prompted, type your user credentials.
3 Touch beside the document.
4 Print the document.
Note: For information on how to configure the printer for the application, see the Google DriveAdministrator’s Guide.
Configuring Eco‑Settings1 From the home screen, touch Eco‑Settings.
2 Configure the settings.
3 Apply the changes.
Setting up and using the home screen applications 22

Loading paper and specialty media
Setting the size and type of the specialty mediaThe trays automatically detect the size of plain paper. For specialty media like labels, card stock, or envelopes,do the following:
1 From the home screen, navigate to:
Settings > Paper > Tray Configuration > select a tray
2 Configure the size and type of the specialty media.
Configuring Universal paper settings1 From the home screen, touch Settings > Paper > Media Configuration > Universal Setup.
2 Configure the settings.
Loading traysCAUTION—TIPPING HAZARD: To reduce the risk of equipment instability, load each tray separately.Keep all other trays closed until needed.
1 Remove the tray.
Note: To avoid jams, do not remove trays while the printer is busy.
2 Adjust the guides to match the size of the paper you are loading.
Note: Use the indicators on the bottom of the tray to position the guides.
Loading paper and specialty media 23

3 Flex, fan, and align the paper edges before loading.
4 Load the paper stack with the printable side faceup.
Notes:
• For one‑sided printing, load letterhead faceup with the header toward the front of the tray.
• For two‑sided printing, load letterhead facedown with the header toward the back of the tray.
• Do not slide paper into the tray.
• Make sure that the stack height is below the maximum paper fill indicator. Overfilling may causepaper jams.
5 Insert the tray.
If necessary, set the paper size and type to match the paper loaded in the tray.
Loading paper and specialty media 24

Loading the multipurpose feeder1 Open the multipurpose feeder.
2 Adjust the guide to match the size of the paper you are loading.
3 Flex, fan, and align the paper edges before loading.
Loading paper and specialty media 25

4 Load the paper.
• Load paper and card stock with the printable side facedown and the top edge entering the printer first.
• Load envelopes with the flap side up and against the right side of the paper guide. Load Europeanenvelopes with the flap entering the printer first.
Warning—Potential Damage: Do not use envelopes with stamps, clasps, snaps, windows, coatedlinings, or self‑stick adhesives.
5 From the Paper Menu in the control panel, set the paper size and type to match the paper loaded in thetray.
Linking trays1 Open a Web browser, and then type the printer IP address in the address field.
Notes:
• View the printer IP address on the printer home screen. The IP address appears as four sets ofnumbers separated by periods, such as 123.123.123.123.
• If you are using a proxy server, then temporarily disable it to load the Web page correctly.
2 Click Settings > Paper.
Loading paper and specialty media 26

3 Match the paper size and type for the trays you are linking.
Note: To unlink trays, make sure that no trays have the same paper size or type.
4 Save the settings.
Note: You can also change the paper size and type settings from the printer control panel.
Warning—Potential Damage: The temperature of the fuser varies according to the specified paper type. Toavoid printing issues, match the paper type settings in the printer with the paper loaded in the tray.
Loading paper and specialty media 27

Printing
Printing from a computerNote: For specialty media such as labels, card stock, and envelopes, set the paper size and type in theprinter before sending the print job.
1 With a document open, click File > Print.
2 If necessary, adjust the settings.
3 Send the print job.
Printing forms1 From the home screen, navigate to:
Forms and Favorites > select form > Print
2 If necessary, configure the print settings.
3 Send the print job.
Printing from a flash drive1 Insert a flash drive into the USB port.
Notes:
• If you insert the flash drive when an error message appears, then the printer ignores the flash drive.
• If you insert the flash drive while the printer is processing other print jobs, then Busy appears on thedisplay.
2 From the display, touch the document that you want to print.
If necessary, configure other print settings.
Printing 28
3 Send the print job.
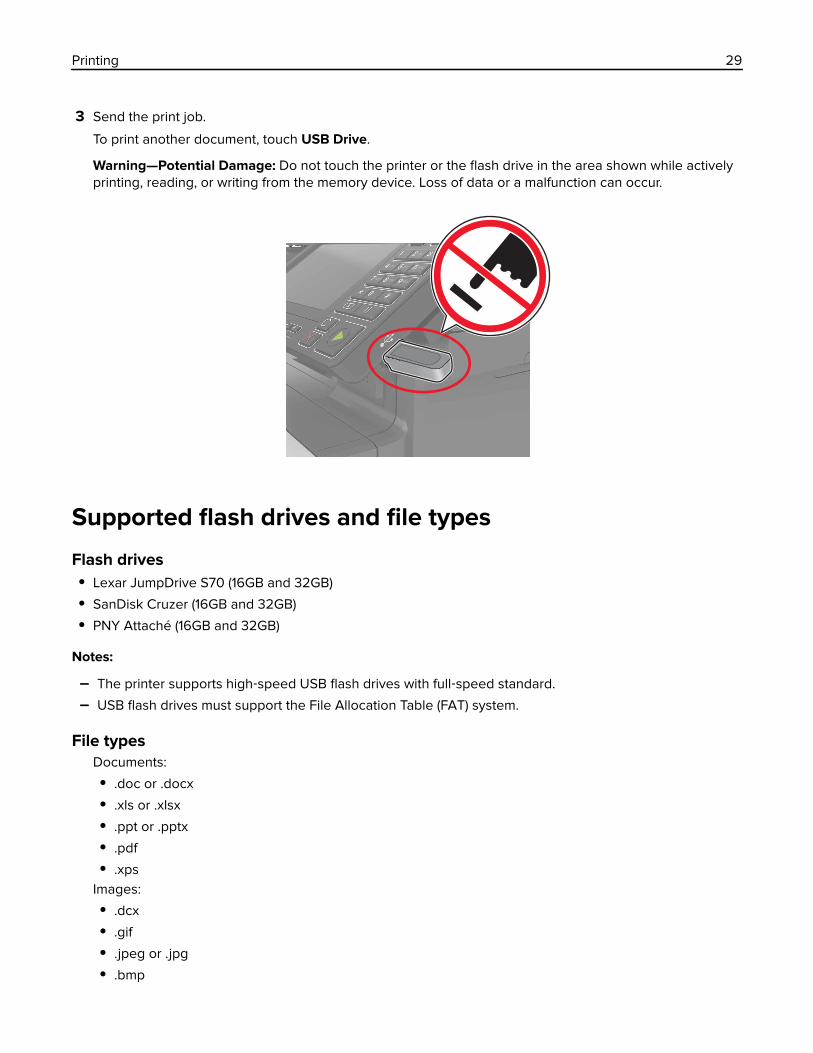
To print another document, touch USB Drive.
Warning—Potential Damage: Do not touch the printer or the flash drive in the area shown while activelyprinting, reading, or writing from the memory device. Loss of data or a malfunction can occur.
Supported flash drives and file types
Flash drives• Lexar JumpDrive S70 (16GB and 32GB)
• SanDisk Cruzer (16GB and 32GB)
• PNY Attaché (16GB and 32GB)
Notes:
– The printer supports high‑speed USB flash drives with full‑speed standard.
– USB flash drives must support the File Allocation Table (FAT) system.
File typesDocuments:
• .doc or .docx
• .xls or .xlsx
• .ppt or .pptx
• .xpsImages:
• .dcx
• .gif
• .jpeg or .jpg
• .bmp
Printing 29

• .pcx
• .tiff or .tif
• .png
Configuring confidential jobs1 From the home screen, touch Settings > Security > Confidential Print Setup.
2 Configure the settings.
Use To
Max Invalid PIN Limit the number of times an invalid PIN can be entered.
Note: When the limit is reached, the print jobs for that user name are deleted.
Confidential JobExpiration
Set the amount of time before confidential jobs are automatically deleted from the printermemory.
Note: Confidential held jobs are stored in the printer until you log in and release ordelete them manually.
Repeat JobExpiration
Set the amount of time before repeat jobs are deleted from the printer memory.
Note: Repeat held jobs are stored so extra copies can be printed later.
Verify Job Expiration Set the amount of time before verify jobs are deleted from the printer memory.
Note: Verify jobs print one copy to check if it is satisfactory before printing theremaining copies.
Reserve JobExpiration
Set the amount of time before reserved jobs are deleted without being printed.
Note: Reserve held jobs are automatically deleted after printing.
Printing held jobs1 With a document open, select File > Print.
2 Select the printer, and then do the following:
• For Windows users, click Properties or Preferences, and then click Print and Hold.
• For Macintosh users, select Print and Hold.
3 Select the print job type.
4 If necessary, assign a user name.
5 Send the print job.
6 From the printer home screen, touch Held Jobs.
7 Send the print job.
Printing a font sample list1 From the home screen, touch Settings > Reports > Print > Print Fonts.
2 Touch PCL Fonts or PostScript Fonts.
Printing 30

Printing a directory listFrom the home screen, touch Settings > Reports > Print > Print Directory.
Canceling a print job
From the printer control panel
1 From the home screen, touch Job Queue.
Note: You can also access this setting by touching the top section of the home screen.
2 Select the job to cancel.
From the computer
1 Depending on the operating system, do either of the following:
• Open the printers folder, and then select your printer.
• From the System Preferences in the Apple menu, navigate to your printer.
2 Select the job to cancel.
Printing 31

Copying
Making copies1 Load an original document into the ADF tray or on the scanner glass.
Notes:
• To avoid a cropped image, make sure that the size of the original document and output is the same.
• To make a quick copy, from the control panel, press .
2 From the home screen, touch Copy, and then specify the size of the original document.
Note: If the document is a mix of different sizes, then select Mixed Letter/Legal.
3 If necessary, specify a tray or feeder and a different output size.
4 Send the copy job.
Copying photos1 Place a photo on the scanner glass.
2 From the home screen, touch Copy > Content > Photo.
3 From the Content Source menu, select the setting that best matches the original photo.
4 Send the copy job.
Copying on letterhead1 Load an original document into the ADF tray or on the scanner glass.
2 From the home screen, touch Copy, and then specify the size of the original document.
3 Touch Copy to, and then select the tray that contains the specialty media.
If you are loading the specialty media into the multipurpose feeder, then navigate to:
Multipurpose Feeder > select the size of the specialty media > Letterhead
4 Send the copy job.
Copying on both sides of the paper (two‑sided)1 Load an original document into the ADF tray or on the scanner glass.
2 From the home screen, touch Copy > Paper Setup.
3 Adjust the settings.
4 Send the copy job.
Copying 32
Reducing or enlarging copies1 Load an original document into the ADF tray or on the scanner glass.
2 From the home screen, navigate to:
Copy > Scale > specify a scale value
Notes:
• Changing the size of the original document or output after setting Scale restores the scale value toAuto.
• Auto is the factory default setting. It adjusts the scan image of the original document to fit the size ofthe paper onto which you are copying.
3 Send the copy job.
Collating copies1 Load an original document into the ADF tray or on the scanner glass.
2 From the home screen, touch Copy, and then set Collate to On.
3 Send the copy job.
Placing separator sheets between copies1 Load an original document into the ADF tray or on the scanner glass.
2 From the home screen, touch Copy > Separator Sheets.
3 Adjust the settings.
4 Send the copy job.
Copying multiple pages onto a single sheet1 Load an original document into the ADF tray or on the scanner glass.
2 From the home screen, touch Copy > Pages Per Side.
3 Adjust the settings.
4 Send the copy job.
Creating a copy shortcut1 From the home screen, touch Copy.
2 Adjust the settings, and then touch .
3 Enter a shortcut name.
4 Apply the changes.
Copying 33

E-mailing
Setting up the e‑mail function1 From the home screen, touch Settings > Device > Preferences > Run Initial Setup.
2 Turn off the printer, wait for about 10 seconds, and then turn it back on.
3 From the Before You Begin screen, select Change the Settings and Continue with the Wizard.
4 From the Fax/Email Server Setup screen, enter the needed information.
5 Finish the setup.
Configuring e‑mail settings1 Open a Web browser, and then type the printer IP address in the address field.
Notes:
• View the printer IP address on the printer home screen. The IP address appears as four sets ofnumbers separated by periods, such as 123.123.123.123.
• If you are using a proxy server, then temporarily disable it to load the Web page correctly.
2 Click Settings > E-mail.
3 Enter the needed information.
4 Apply the changes.
Sending an e-mail
Using the control panel
1 Load an original document into the ADF tray or on the scanner glass.
2 From the home screen, touch E-mail, and then enter the needed information.
Note: You can also enter the recipient using the address book or shortcut number.
3 If necessary, configure the output file type settings.
4 Send the e-mail.
Using the shortcut number
1 From the control panel, press #, and then enter the shortcut number using the keypad.
2 Send the e‑mail.
E-mailing 34

Creating an e-mail shortcut1 From the home screen, touch E‑mail.
2 Configure the settings, and then touch .
3 Enter a shortcut name.
4 Apply the changes.
E-mailing 35

Faxing
Setting up the printer to faxNotes:
• The following connection methods are applicable only in some countries or regions.
• During the initial printer setup, clear the fax function check box and any other function you plan to set uplater, and then touch Continue.
• The indicator light may blink red if the fax function is enabled and not fully set up.
Warning—Potential Damage: Do not touch cables or the printer in the area shown while actively sending orreceiving a fax.
Setting up the fax function1 From the home screen, touch Settings > Device > Preferences > Run Initial Setup.
2 Turn off the printer, wait for about 10 seconds, and then turn it back on.
3 From the Before You Begin screen, select Change the Settings and Continue with the Wizard.
4 From the Fax/Email Server Setup screen, enter the needed information.
5 Finish the setup.
Setting up fax using a standard telephone lineCAUTION—SHOCK HAZARD: To avoid the risk of electrical shock, do not set up this product or makeany electrical or cabling connections, such as the power cord, fax feature, or telephone, during alightning storm.
CAUTION—SHOCK HAZARD: To avoid the risk of electrical shock, do not use the fax feature during alightning storm.
Faxing 36

Setup 1: Printer is connected to a dedicated fax line
1 Connect one end of the telephone cable to the line port of the printer.
2 Connect the other end of the telephone cable to an active analog wall jack.
Notes:
• You can set the printer to receive faxes automatically (Auto Answer On) or manually (Auto Answer Off).
• If you want to receive faxes automatically, then set the printer to pick up on any number of rings that youwant.
Setup 2: Printer is sharing the line with an answering machine
Note: If you subscribe to a distinctive ring service provided by your telephone company, then make sure thatyou set the correct ring pattern for the printer. Otherwise, the printer does not receive faxes even if you haveset it to receive faxes automatically.
Faxing 37

Connected to the same telephone wall jack
1 Connect one end of the telephone cable to the line port of the printer.
2 Connect the other end of the telephone cable to an active analog wall jack.
3 Connect the answering machine to the telephone port of the printer.
Faxing 38

Connected to different wall jacks
1 Connect one end of the telephone cable to the line port of the printer.
2 Connect the other end of the telephone cable to an active analog wall jack.
Notes:
• If you have only one telephone number on your line, then set the printer to receive faxes automatically.
• Set the printer to pick up calls two rings after the answering machine. For example, if the answeringmachine picks up calls after four rings, then set the printer Rings to Answer setting to six.
Faxing 39

Setup 3: Printer is sharing the line with a telephone subscribed to voice mail service
1 Connect one end of the telephone cable to the line port of the printer.
2 Connect the other end of the telephone cable to an active analog wall jack.
3 Connect the telephone to the telephone port of the printer.
Notes:
• This setup works best if you are using voice mail more often than fax, and if you subscribe to adistinctive ring service.
• When you answer the telephone and you hear fax tones, press *9* or the manual answer code on thetelephone to receive the fax.
• You can also set the printer to receive faxes automatically, but turn off the voice mail service when youare expecting a fax.
Faxing 40

Setting up fax using digital subscriber lineCAUTION—SHOCK HAZARD: To avoid the risk of electrical shock, do not set up this product or makeany electrical or cabling connections, such as the power cord, fax feature, or telephone, during alightning storm.
CAUTION—SHOCK HAZARD: To avoid the risk of electrical shock, do not use the fax feature during alightning storm.
Digital subscriber line (DSL) splits your regular telephone line into two channels: voice and Internet. Telephoneand fax signals travel through the voice channel, and internet signals pass through the other channel.
Install a DSL filter to minimize interference between the two channels and ensure a quality connection.
Note: Contact your DSL provider to obtain a DSL filter.
1 Connect the line port of the DSL filter to the wall jack.
2 Connect one end of the telephone cable to the line port of the printer. Connect the other end to the phoneport on the DSL filter.
Faxing 41

3 To connect a telephone to the printer, remove any installed adapter plug from the telephone port of theprinter, and then connect the telephone.
Setting up fax using VoIP telephone serviceCAUTION—SHOCK HAZARD: To avoid the risk of electrical shock, do not set up this product or makeany electrical or cabling connections, such as the power cord, fax feature, or telephone, during alightning storm.
CAUTION—SHOCK HAZARD: To avoid the risk of electrical shock, do not use the fax feature during alightning storm.
1 Connect one end of the telephone cable to the line port of the printer.
2 Connect the other end of the cable to the port labeled Phone Line 1 or Phone Port on the VoIP adapter.
Note: The port labeled Phone Line 2 or Fax Port is not always active. VoIP providers may charge extracost for the activation of the second phone port.
3 Connect the telephone to the telephone port of the printer.
Faxing 42

Notes:
• To check if the telephone port on the VoIP adapter is active, plug an analog telephone into the port, andthen listen for a dial tone.
• If you need two phone ports for your devices, but do not want to pay extra cost, then use a phonesplitter. Plug the phone splitter into the port labeled Phone Line 1 or Phone Port, and then plug theprinter and telephone into the splitter.
• To check the splitter, plug an analog telephone into the splitter, and then listen for a dial tone.
Setting up fax using cable modem connectionCAUTION—SHOCK HAZARD: To avoid the risk of electrical shock, do not set up this product or makeany electrical or cabling connections, such as the power cord, fax feature, or telephone, during alightning storm.
CAUTION—SHOCK HAZARD: To avoid the risk of electrical shock, do not use the fax feature during alightning storm.
Setup 1: Printer is connected directly to a cable modem
Faxing 43

1 Connect one end of the telephone cable to the line port of the printer.
2 Connect the other end of the cable to the port labeled Phone Line 1 or Phone Port on the cable modem.
3 Connect your analog telephone to the telephone port of the printer.
Note: To check if the telephone port on the cable modem is active, connect an analog telephone, and thenlisten for a dial tone.
Setup 2: Printer is connected to a wall jack; cable modem is installed elsewhere in thefacility
1 Connect one end of the telephone cable to the line port of the printer.
2 Connect the other end of the telephone cable to an active analog telephone wall jack.
3 Connect your analog telephone to the telephone port of the printer.
Faxing 44

Setting up fax in countries or regions with different telephone wall jacksand plugs
CAUTION—SHOCK HAZARD: To avoid the risk of electrical shock, do not set up this product or makeany electrical or cabling connections, such as the power cord, fax feature, or telephone, during alightning storm.
CAUTION—SHOCK HAZARD: To avoid the risk of electrical shock, do not use the fax feature during alightning storm.
The standard wall jack adopted by most countries or regions is RJ11. If the wall jack or equipment in your facilityis not compatible with this type of connection, then use a telephone adapter. An adapter for your country orregion may not come with your printer, and you may need to purchase it separately.
There may be an adapter plug installed in the telephone port of the printer. Do not remove the adapter plugfrom the telephone port of the printer if you are connecting to a serial or cascaded telephone system.
Part name Part number
Lexmark adapter plug 40X8519
Faxing 45

Connecting the printer to a non‑RJ11 wall jack
1 Connect one end of the telephone cable to the line port of the printer.
2 Connect the other end of the cable to the RJ11 adapter, and then connect the adapter to the wall jack.
3 If you want to connect another device with a non‑RJ11 connector to the same wall jack, then connect itdirectly to the telephone adapter.
Faxing 46

Connecting the printer to a wall jack in Germany
The German wall jack has two kinds of ports. The N ports are for fax machines, modems, and answeringmachines. The F port is for telephones. Connect the printer to any of the N ports.
1 Connect one end of the telephone cable to the line port of the printer.
2 Connect the other end of the telephone cable to the RJ11 adapter, and then connect the adapter to an Nport.
3 If you want to connect a telephone and answering machine to the same wall jack, then connect the devicesas shown.
Connecting to a distinctive ring serviceA distinctive ring service lets you have multiple telephone numbers on one telephone line. Each telephonenumber is assigned a different ring pattern.
1 From the home screen, touch Settings > Fax > Analog Fax Setup > Fax Receive Settings > Admin Controls> Answer On.
2 Select the ring pattern.
Faxing 47

3 Apply the changes.
Setting the fax date and time1 From the home screen, touch Settings > Device > Preferences > Date and Time > Configure.
2 Configure the settings.
Configuring daylight saving time1 From the home screen, touch Settings > Device > Preferences > Date and Time > Configure.
2 In the Time Zone menu, select Custom.
3 Configure the settings.
Sending a fax
Using the control panel1 Load the original document into the ADF tray or on the scanner glass.
2 From the home screen, touch Fax, and then enter the needed information.
3 If necessary, configure other fax settings.
4 Send the fax job.
Using the computer
For Windows users
1 With a document open, click File > Print.
2 Select the printer, and then click Properties, Preferences, Options, or Setup.
3 Click Fax > Enable fax, and then enter the recipient number.
4 If necessary, configure other fax settings.
5 Send the fax job.
For Macintosh users
1 With a document open, choose File > Print.
2 Select the printer and enter the recipient number.
3 If necessary, configure other fax settings.
4 Send the fax job.
Faxing 48

Scheduling a fax1 Load the original document into the ADF tray or on the scanner glass.
2 From the home screen, navigate to:
Fax > enter the fax number > Send Time
3 Configure the date and time to send the fax.
4 If necessary, configure other fax settings.
5 Send the fax job.
Creating a fax destination shortcut1 From the home screen, touch Fax > To.
2 Enter the recipient number.
Note: To create a group of fax numbers, touch , and then enter another fax number.
3 Touch .
4 Enter a shortcut name.
5 Apply the changes.
Changing the fax resolution1 Load an original document into the ADF tray or on the scanner glass.
2 From the home screen, touch Fax, and then enter the needed information.
3 Adjust the Resolution setting.
4 Send the fax job.
Adjusting the fax darkness1 Load an original document into the ADF tray or on the scanner glass.
2 From the home screen, touch Fax, and then enter the needed information.
3 Adjust the Darkness setting.
4 Send the fax job.
Viewing a fax log1 Open a Web browser, and then type the printer IP address in the address field.
Faxing 49

Notes:
• View the printer IP address on the printer home screen. The IP address appears as four sets ofnumbers separated by periods, such as 123.123.123.123.
• If you are using a proxy server, then temporarily disable it to load the Web page correctly.
2 Click Settings > Reports > Fax.
3 Click Fax Job Log or Fax Call Log.
Blocking junk faxes1 From the home screen, touch Settings > Fax > Analog Fax Setup > Fax Receive Settings > Admin Controls
> Block No Name Fax.
2 Apply the changes.
Holding faxes1 From the home screen, touch Settings > Fax > Analog Fax Setup > Fax Receive Settings > Holding Faxes.
2 Select a mode.
Forwarding a fax1 From the home screen, touch Settings > Fax > Analog Fax Setup > Fax Receive Settings > Admin Controls.
2 Configure the Fax Forwarding, Forward To, and Forward to Shortcut settings.
3 Apply the changes.
Faxing 50

Scanning
Scanning to an FTP server1 Load the original document into the ADF tray or on the scanner glass.
2 From the home screen, touch FTP, and then enter the needed information.
3 If necessary, configure other FTP settings.
4 Send the FTP job.
Creating an FTP shortcut1 From the home screen, touch FTP.
2 Enter the FTP server address, and then touch .
3 Enter a shortcut name.
4 Apply the changes.
Scanning to a flash drive1 Load an original document into the ADF tray or on the scanner glass.
2 Insert the flash drive into the USB port.
3 Select the destination folder, and then touch Scan to USB.
4 If necessary, adjust the scan settings.
5 Send the scan job.
Warning—Potential Damage: Do not touch the printer or the flash drive in the area shown while activelyprinting, reading, or writing from the memory device. Loss of data or a malfunction can occur.
Scanning 51

Sending scanned documents to a computer1 Load an original document into the ADF tray or on the scanner glass.
2 From the home screen, touch Scan Profiles > Scan To Computer.
3 Select the scan profile where you want to save the document.
Scanning 52
Securing the printer
Erasing printer memoryTo erase volatile memory or buffered data in your printer, turn off the printer.
To erase non‑volatile memory or individual settings, device and network settings, security settings, andembedded solutions, do the following:
1 From the home screen, touch Settings > Device > Maintenance > Out of Service Erase.
2 Select the Sanitize all information on nonvolatile memory check box, and then touch ERASE.
3 Follow the instructions on the display.
Erasing printer hard disk memory1 From the home screen, touch Settings > Device > Maintenance > Out of Service Erase.
2 Select the Sanitize all information on hard disk check box, and then touch ERASE.
3 Follow the instructions on the display.
Note: This process can take from several minutes to more than an hour, making the printer unavailablefor other tasks.
Configuring printer hard disk encryption1 From the home screen, touch Settings > Security > Disk Encryption > Start Encryption.
Note: Enabling disk encryption erases the contents of the hard disk. If necessary, back up important datafrom the printer before starting the encryption.
2 Follow the instructions on the display.
Notes:
• Do not turn off the printer during the encryption process. Loss of data can occur.
• Disk encryption can take from several minutes to more than an hour, making the printer unavailablefor other tasks.
• After encryption, the printer returns to the home screen.
Restoring factory default settingsFrom the home screen, touch Settings > Device > Restore Factory Defaults > Restore Settings > Restore allsettings > RESTORE > Start.
For more information, see “Erasing printer memory” on page 53.
Securing the printer 53

Statement of VolatilityYour printer contains various types of memory that can store device and network settings, and user data.
Type of memory Description
Volatile memory Your printer uses standard random access memory(RAM) to temporarily buffer user data during simple printjobs.
Non-volatile memory Your printer may use two forms of non-volatile memory:EEPROM and NAND (flash memory). Both types are usedto store the operating system, device settings, networkinformation and bookmark settings, and embeddedsolutions.
Hard disk memory Some printers have a hard disk drive installed. The printerhard disk is designed for printer-specific functionality.This lets the printer retain buffered user data fromcomplex print jobs, as well as form data, and font data.
Erase the content of any installed printer memory in the following circumstances:
• The printer is being decommissioned.
• The printer hard disk is being replaced.
• The printer is being moved to a different department or location.
• The printer is being serviced by someone from outside your organization.
• The printer is being removed from your premises for service.
• The printer is being sold to another organization.
Disposing of a printer hard disk
Note: Some printer models may not have a printer hard disk installed.
In high‑security environments, it may be necessary to take additional steps to make sure that confidential datastored in the printer hard disk cannot be accessed when the printer—or its hard disk—is removed from yourpremises.
• Degaussing—Flushes the hard disk with a magnetic field that erases stored data
• Crushing—Physically compresses the hard disk to break component parts and render them unreadable
• Milling—Physically shreds the hard disk into small metal bits
Note: Most data can be erased electronically, but the only way to guarantee that all data are completelyerased is to physically destroy each hard disk where data is stored.
Securing the printer 54

Maintaining the printerWarning—Potential Damage: Failure to maintain optimum printer performance, or to replace parts andsupplies, may cause damage to your printer.
Networking
Connecting the printer to a wireless network using Wi‑Fi Protected Setup(WPS)Before you begin, make sure that:
• The access point (wireless router) is WPS‑certified or WPS‑compatible. For more information, see thedocumentation that came with your access point.
• A wireless network adapter is installed in your printer. For more information, see the instructions that camewith the adapter.
Using the Push Button method
1 From the control panel, navigate to:
Settings > Network/Ports > Wireless > Wi‑Fi Protected Setup > Start Push Button Method
2 Follow the instructions on the display.
Using the personal identification number (PIN) method
1 From the control panel, navigate to:
Settings > Network/Ports > Wireless > Wi‑Fi Protected Setup > Start PIN Method
2 Copy the eight‑digit WPS PIN.
3 Open a Web browser, and then type the IP address of your access point in the address field.
Notes:
• View the printer IP address on the printer home screen. The IP address appears as four sets ofnumbers separated by periods, such as 123.123.123.123.
• If you are using a proxy server, then temporarily disable it to load the Web page correctly.
4 Access the WPS settings. For more information, see the documentation that came with your accesspoint.
5 Enter the eight‑digit PIN, and then save the changes.
Maintaining the printer 55

Changing port settings after installing an internal solutions port
Notes:
• If the printer has a static IP address, then do not change the configuration.
• If the computers are configured to use the network name instead of an IP address, then do not changethe configuration.
• If you are adding a wireless internal solutions port (ISP) to a printer previously configured for an Ethernetconnection, then disconnect the printer from the Ethernet network.
For Windows users
1 Open the printers folder.
2 From the shortcut menu of the printer with the new ISP, open the printer properties.
3 Configure the port from the list.
4 Update the IP address.
5 Apply the changes.
For Macintosh users
1 From System Preferences in the Apple menu, navigate to the list of printers, and then select + > IP.
2 Type the IP address in the address field.
3 Apply the changes.
Setting up serial printing (Windows only)1 Set the parameters in the printer.
a From the control panel, navigate to the menu for the port settings.
b Locate the menu for the serial port settings, and then adjust the settings, if necessary.
c Apply the changes.
2 From your computer, open the printers folder, and then select your printer.
3 Open the printer properties, and then select the COM port from the list.
4 Set the COM port parameters in Device Manager.
Notes:
• Serial printing reduces printing speed.
• Make sure that the serial cable is connected to the serial port on your printer.
Maintaining the printer 56

Cleaning printer parts
Cleaning the printerCAUTION—SHOCK HAZARD: To avoid the risk of electrical shock when cleaning the exterior of theprinter, unplug the power cord from the electrical outlet and disconnect all cables from the printer beforeproceeding.
Notes:
• Perform this task after every few months.
• Damage to the printer caused by improper handling is not covered by the printer warranty.
1 Turn off the printer, and then unplug the power cord from the electrical outlet.
2 Remove paper from the standard bin and multipurpose feeder.
3 Remove any dust, lint, and pieces of paper around the printer using a soft brush or vacuum.
4 Wipe the outside of the printer with a damp, soft, lint‑free cloth.
Notes:
• Do not use household cleaners or detergents, as they may damage the finish of the printer.
• Make sure that all areas of the printer are dry after cleaning.
5 Connect the power cord to the electrical outlet, and then turn on the printer.
CAUTION—POTENTIAL INJURY: To avoid the risk of fire or electrical shock, connect the power cordto an appropriately rated and properly grounded electrical outlet that is near the product and easilyaccessible.
Cleaning the scanner glass1 Open the scanner cover.
Maintaining the printer 57

2 Wipe the areas shown with a damp, soft, lint-free cloth.
1 White underside of the scanner cover
2 Scanner glass
3 Automatic document feeder (ADF) glass
4 White underside of the ADF cover
3 Close the scanner cover.
Ordering parts and suppliesTo order supplies in the U.S., contact 1-800-539-6275 for information about Lexmark authorized suppliesdealers in your area. In other countries or regions, go to www.lexmark.com or contact the place where youpurchased the printer.
Note: All life estimates for printer supplies assume printing on letter‑ or A4‑size plain paper.
Checking the status of parts and supplies1 From the home screen, touch Status/Supplies.
2 Select the parts or supplies that you want to check.
Note: You can also access this setting by touching the top section of the home screen.
Using genuine Lexmark parts and suppliesYour Lexmark printer is designed to function best with genuine Lexmark parts and supplies. Use of third-partysupplies or parts may affect the performance, reliability, or life of the printer and its imaging components. It canalso affect warranty coverage. Damage caused by the use of third-party parts and supplies is not covered bythe warranty. All life indicators are designed to function with Lexmark parts and supplies, and may deliverunpredictable results if third-party parts and supplies are used. Imaging component usage beyond the intendedlife may damage your Lexmark printer or its associated components.
Maintaining the printer 58

Ordering toner cartridgesNote: Extremely low print coverage for extended periods of time may negatively affect actual yield and maycause cartridge parts to fail before exhaustion of toner.
Item Worldwide
Black 24B6720
Cyan 24B6717
Magenta 24B6718
Yellow 24B6719
Ordering imaging unit or imaging kitItem All countries and regions
Return Program imaging unit or imaging kit
Black imaging unit 74C0ZK0
Color (CMY) imaging kit 74C0ZV0
Regular imaging unit or imaging kit
Black imaging unit 74C0Z10
Color (CMY) imaging kit 74C0Z50
Ordering a waste toner bottleItem Part number
Waste toner bottle 74C0W00
Ordering a fuser maintenance kitFuser maintenance kit type Part number
XC4150 fuser maintenance kit, type 00, 110–120 V 41X0554
XC4150 fuser maintenance kit, type 01, 220–240 V 41X0556
XC4150 fuser maintenance kit, type 02, 100 V 41X0552
Ordering a transfer moduleItem Part number
Transfer module 40X9929
Maintaining the printer 59
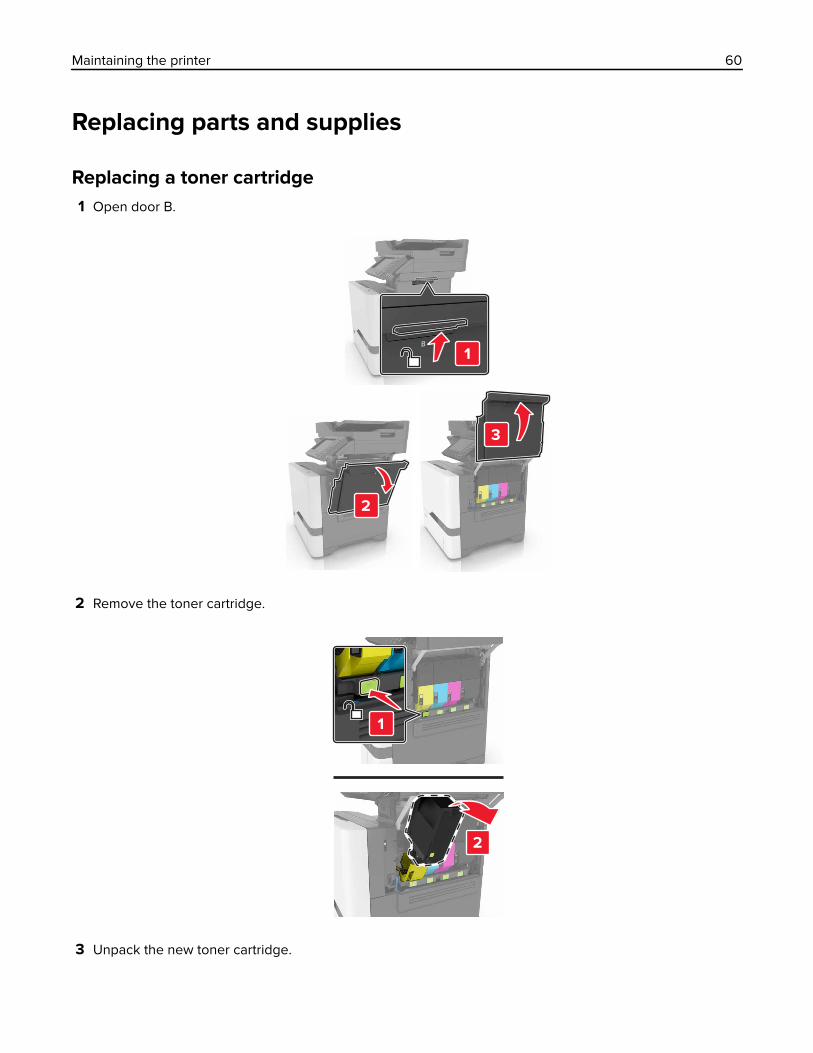
Replacing parts and supplies
Replacing a toner cartridge1 Open door B.
2 Remove the toner cartridge.
3 Unpack the new toner cartridge.
Maintaining the printer 60

4 Insert the new toner cartridge.
5 Close door B.
Replacing the imaging unit1 Open door B.
Maintaining the printer 61

2 Remove the waste toner bottle.
3 Remove the imaging kit.
Maintaining the printer 62

4 Remove the black toner cartridge.
5 Remove the imaging unit.
Warning—Potential Damage: Do not expose the photoconductor unit to direct light for more than 10minutes. Extended exposure to light may cause print quality problems.
Warning—Potential Damage: Do not touch the shiny photoconductor drum under the imaging kit. Doingso may affect the quality of future print jobs.
6 Unpack the new imaging unit.
7 Insert the new imaging unit.
Maintaining the printer 63

8 Insert the black toner cartridge.
9 Insert the imaging kit.
Maintaining the printer 64

10 Insert the waste toner bottle.
11 Close door B.
Replacing the imaging kit1 Open door B.
Maintaining the printer 65

2 Remove the waste toner bottle.
3 Remove the imaging kit.
Maintaining the printer 66
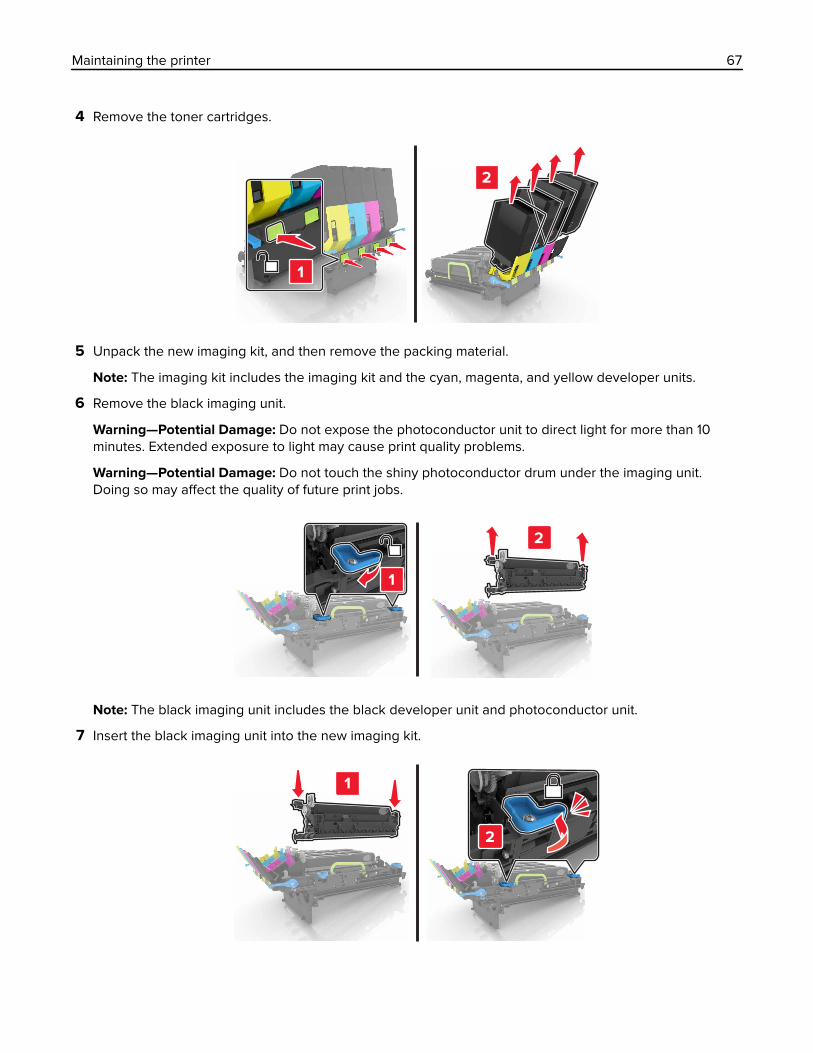
4 Remove the toner cartridges.
5 Unpack the new imaging kit, and then remove the packing material.
Note: The imaging kit includes the imaging kit and the cyan, magenta, and yellow developer units.
6 Remove the black imaging unit.
Warning—Potential Damage: Do not expose the photoconductor unit to direct light for more than 10minutes. Extended exposure to light may cause print quality problems.
Warning—Potential Damage: Do not touch the shiny photoconductor drum under the imaging unit.Doing so may affect the quality of future print jobs.
Note: The black imaging unit includes the black developer unit and photoconductor unit.
7 Insert the black imaging unit into the new imaging kit.
Maintaining the printer 67

8 Insert the toner cartridges.
9 Insert the new imaging kit.
Maintaining the printer 68

10 Insert the waste toner bottle.
11 Close door B.
Replacing the waste toner bottle1 Open door B.
Maintaining the printer 69

2 Remove the waste toner bottle.
3 Unpack the new waste toner bottle.
4 Insert the new waste toner bottle.
5 Close door B.
Replacing the fuser1 Turn off the printer, and then unplug the power cord from the electrical outlet.
2 Open doors A and D.
CAUTION—HOT SURFACE: The inside of the printer might be hot. To reduce the risk of injury from ahot component, allow the surface to cool before touching it.
Maintaining the printer 70

3 Remove the fuser.
4 Unpack the new fuser.
5 Insert the new fuser.
6 Close doors D and A.
7 Connect the power cord to the electrical outlet, and then turn on the printer.
CAUTION—POTENTIAL INJURY: To avoid the risk of fire or electrical shock, connect the power cordto an appropriately rated and properly grounded electrical outlet that is near the product and easilyaccessible.
8 Reset the fuser maintenance counter.
For more information, see “Resetting the maintenance counter” on page 85.
Maintaining the printer 71

Replacing the pick roller
Replacing the pick roller in the 550‑sheet tray
1 Turn off the printer, and then unplug the power cord from the electrical outlet.
2 Remove the tray.
3 Remove the pick roller.
4 Unpack the new pick roller.
Maintaining the printer 72

5 Insert the new pick roller until it clicks into place.
6 Insert the tray.
7 Connect the power cord to the electrical outlet, and then turn on the printer.
CAUTION—POTENTIAL INJURY: To avoid the risk of fire or electrical shock, connect the power cordto an appropriately rated and properly grounded electrical outlet that is near the product and easilyaccessible.
Replacing the pick roller in the multipurpose feeder
1 Turn off the printer, and then unplug the power cord from the electrical outlet.
2 Open the multipurpose feeder.
Maintaining the printer 73

3 Remove the pick roller.
4 Unpack the new pick roller.
5 Insert the new pick roller until it clicks into place.
6 Close the multipurpose feeder.
7 Connect the power cord to the electrical outlet, and then turn on the printer.
CAUTION—POTENTIAL INJURY: To avoid the risk of fire or electrical shock, connect the power cordto an appropriately rated and properly grounded electrical outlet that is near the product and easilyaccessible.
Replacing the separator bracket1 Pull out the tray.
Maintaining the printer 74

2 Remove the separator bracket.
3 Unpack the new separator bracket.
4 Insert the new separator bracket until it clicks into place.
5 Insert the tray.
Maintaining the printer 75

Replacing the ADF input tray1 Open door E.
2 Remove the ADF input tray.
3 Unpack the new ADF input tray.
Maintaining the printer 76

4 Insert the new ADF input tray until it clicks into place.
5 Close door E.
Replacing the ADF scan pad1 Open the scanner cover.
2 Remove the ADF scan pad.
3 Unpack the new ADF scan pad.
Maintaining the printer 77

4 Lay the white area of the ADF scan pad facedown on the scanner glass.
5 Close the scanner cover to stick the ADF scan pad to the cover.
6 Open the scanner cover to check if the ADF scan pad is properly attached to the cover.
7 Close the scanner cover.
Maintaining the printer 78

Replacing the ADF separator roller1 Open door E.
2 Remove the ADF separator roller.
3 Unpack the new ADF separator roller.
Maintaining the printer 79

4 Insert the new ADF separator roller until it clicks into place.
5 Close door E.
Maintaining the printer 80

Replacing the transfer module1 Turn off the printer, and then unplug the power cord from the electrical outlet.
2 Open door B.
3 Remove the waste toner bottle.
Maintaining the printer 81

4 Remove the imaging kit.
5 Open door A.
CAUTION—HOT SURFACE: The inside of the printer might be hot. To reduce the risk of injury from ahot component, allow the surface to cool before touching it.
Maintaining the printer 82

6 Remove the transfer module.
7 Unpack the new transfer module, and then remove the packing material.
Maintaining the printer 83

8 Insert the new transfer module.
9 Close door A.
10 Insert the imaging kit.
Maintaining the printer 84

11 Insert the waste toner bottle.
12 Close door B.
13 Connect the power cord to the electrical outlet, and then turn on the printer.
CAUTION—POTENTIAL INJURY: To avoid the risk of fire or electrical shock, connect the power cordto an appropriately rated and properly grounded electrical outlet that is near the product and easilyaccessible.
14 Reset the maintenance counter. For more information, see “Resetting the maintenance counter” onpage 85.
Resetting the maintenance counter1 From the home screen, touch Settings > Device > Maintenance > Configuration Menu > Supply Usage
And Counters.
2 Select Fuser Reset or ITM Reset.
Moving the printer
Moving the printer to another locationCAUTION—POTENTIAL INJURY: The printer weight is greater than 18 kg (40 lb) and requires two ormore trained personnel to lift it safely.
CAUTION—POTENTIAL INJURY: To avoid the risk of fire or electrical shock, use only the power cordprovided with this product or the manufacturer's authorized replacement.
CAUTION—POTENTIAL INJURY: When moving the printer, follow these guidelines to avoid personalinjury or printer damage:
• Make sure that all doors and trays are closed.
• Turn off the printer, and then unplug the power cord from the electrical outlet.
• Disconnect all cords and cables from the printer.
• If the printer has a caster base, then carefully roll it to the new location. Use caution when passing overthresholds and breaks in flooring.
• If the printer does not have a caster base but is configured with optional trays, then lift the printer off thetrays. Do not try to lift the printer and the trays at the same time.
Maintaining the printer 85

• Always use the handholds on the printer to lift it.
• Any cart used to move the printer must have a surface able to support the full footprint of the printer.
• Any cart used to move the hardware options must have a surface able to support the dimensions of theoptions.
• Keep the printer in an upright position.
• Avoid severe jarring movements.
• Make sure that your fingers are not under the printer when you set it down.
• Make sure that there is adequate clearance around the printer.
Note: Damage to the printer caused by improper moving is not covered by the printer warranty.
Shipping the printerFor shipping instructions, go to http://support.lexmark.com or contact customer support.
Saving energy and paper
Setting up power saver modes
Eco‑Mode
1 From the home screen, touch Settings > Device > Power Management > Eco‑Mode.
2 Select a setting.
Sleep mode
1 From the home screen, touch Settings > Device > Power Management > Timeouts > Sleep Mode.
2 Enter the number of minutes the printer stays idle before it enters Sleep mode.
Hibernate mode
1 From the home screen, touch Settings > Device > Power Management > Timeouts > Hibernate Timeout.
2 Select the amount of time before the printer enters hibernate mode.
Notes:
• Make sure to wake the printer from hibernate mode before sending a print job.
• The Embedded Web Server is disabled when the printer is in hibernate mode.
Adjusting the brightness of printer display1 From the homes screen, touch Settings > Preferences > Screen Brightness.
2 Adjust the setting.
Maintaining the printer 86

Conserving supplies• Print on both sides of the paper.
Note: Two-sided printing is the default setting in the print driver.
• Print multiple pages on a single sheet of paper.
• Use the preview feature to see how the document looks like before printing it.
• Print one copy of the document to check its content and format for accuracy.
Recycling
Recycling Lexmark productsTo return Lexmark products for recycling:
1 Go to www.lexmark.com/recycle.
2 Select the product you want to recycle.
Note: Printer supplies and hardware not listed in the Lexmark Collection and Recycling Program may berecycled through your local recycling center.
Recycling Lexmark packagingLexmark continually strives to minimize packaging. Less packaging helps to ensure that Lexmark printers aretransported in the most efficient and environmentally sensitive manner and that there is less packaging todispose of. These efficiencies result in fewer greenhouse emissions, energy savings, and natural resourcesavings. Lexmark also offers recycling of packaging components in some countries or regions. For moreinformation, go to www.lexmark.com/recycle, and then choose your country or region. Information on availablepackaging recycling programs is included with the information on product recycling.
Lexmark cartons are 100% recyclable where corrugated recycling facilities exist. Facilities may not exist in yourarea.
The foam used in Lexmark packaging is recyclable where foam recycling facilities exist. Facilities may not existin your area.
When you return a cartridge to Lexmark, you can reuse the box that the cartridge came in. Lexmark recyclesthe box.
Returning Lexmark cartridges for reuse or recyclingThe Lexmark Cartridge Collection Program allows you to return used cartridges for free to Lexmark for reuseor recycling. One hundred percent of the empty cartridges returned to Lexmark are either reused ordemanufactured for recycling. The boxes used to return the cartridges are also recycled.
To return Lexmark cartridges for reuse or recycling, follow the instructions that came with the cartridge and usethe prepaid shipping label. You can also do the following:
1 Go to www.lexmark.com/recycle.
2 Select the product you want to recycle.
Maintaining the printer 87

Clearing jams
Avoiding jams
Load paper properly• Make sure that the paper lies flat in the tray.
Correct loading of paper Incorrect loading of paper
• Do not load or remove a tray while the printer is printing.
• Do not load too much paper. Make sure that the stack height is below the maximum paper fill indicator.
• Do not slide paper into the tray. Load paper as shown in the illustration.
• Make sure that the paper guides are positioned correctly and are not pressing tightly against the paper orenvelopes.
• Push the tray firmly into the printer after loading paper.
Use recommended paper• Use only recommended paper or specialty media.
• Do not load paper that is wrinkled, creased, damp, bent, or curled.
Clearing jams 88
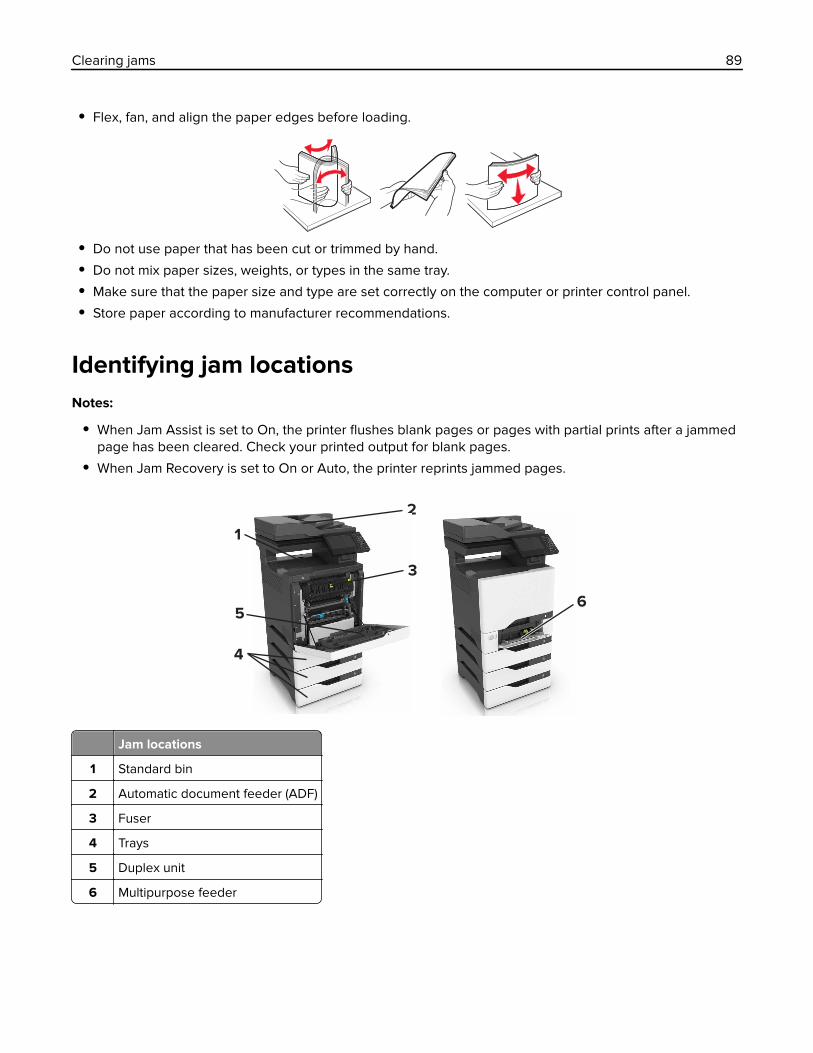
• Flex, fan, and align the paper edges before loading.
• Do not use paper that has been cut or trimmed by hand.
• Do not mix paper sizes, weights, or types in the same tray.
• Make sure that the paper size and type are set correctly on the computer or printer control panel.
• Store paper according to manufacturer recommendations.
Identifying jam locationsNotes:
• When Jam Assist is set to On, the printer flushes blank pages or pages with partial prints after a jammedpage has been cleared. Check your printed output for blank pages.
• When Jam Recovery is set to On or Auto, the printer reprints jammed pages.
Jam locations
1 Standard bin
2 Automatic document feeder (ADF)
3 Fuser
4 Trays
5 Duplex unit
6 Multipurpose feeder
Clearing jams 89

Paper jam in trays1 Pull out the tray.
Warning—Potential Damage: A sensor inside the optional tray is easily damaged by static electricity.Touch a metal surface before removing the jammed paper in the tray.
2 Remove the jammed paper.
Note: Make sure that all paper fragments are removed.
3 Insert the tray.
Clearing jams 90

Paper jam behind door E1 Open door E.
2 Remove the jammed paper.
Note: Make sure that all paper fragments are removed.
3 Close door E.
Paper jam in the multipurpose feeder1 Remove paper from the multipurpose feeder.
2 Pull out the tray.
3 Remove the jammed paper.
Note: Make sure that all paper fragments are removed.
Clearing jams 91

4 Insert the tray.
Paper jam in the standard bin1 Remove the jammed paper.
Note: Make sure that all paper fragments are removed.
2 Open doors A and D, and then remove any paper fragments.
CAUTION—HOT SURFACE: The inside of the printer might be hot. To reduce the risk of injury from ahot component, allow the surface to cool before touching it.
Clearing jams 92

3 Close doors D and A.
Paper jam in door A
Paper jam in the fuser
1 Open door A.
CAUTION—HOT SURFACE: The inside of the printer might be hot. To reduce the risk of injury from ahot component, allow the surface to cool before touching it.
Clearing jams 93

2 Remove the jammed paper.
Note: Make sure that all paper fragments are removed.
Clearing jams 94

3 Open the fuser access door.
4 Remove the jammed paper.
Note: Make sure that all paper fragments are removed.
5 Close door A.
Paper jam in the duplex unit
1 Open door A.
CAUTION—HOT SURFACE: The inside of the printer might be hot. To reduce the risk of injury from ahot component, allow the surface to cool before touching it.
Clearing jams 95

2 Open the duplex cover.
3 Remove the jammed paper.
Note: Make sure that all paper fragments are removed.
Clearing jams 96

4 Close the duplex cover and door A.
Clearing jams 97

Troubleshooting
Network connection problems
Embedded Web Server does not openAction Yes No
Step 1
Check if you are using a supported browser:
• Windows Internet Explorer version 9 or later
• Macintosh Safari version 8.0.3 or later
• Google Chrome
• Mozilla Firefox
Is your browser supported?
Go to step 2. Install a supportedbrowser.
Step 2
Make sure that the printer IP address is correct.View the printer IP address:
• From the home screen
• From the TCP/IP section in the Network/Ports menu
• By printing a network setup page or menu settings page,and then finding the TCP/IP section
Note: An IP address appears as four sets of numbers separatedby periods, such as 123.123.123.123.
Is the printer IP address correct?
Go to step 3. Type the correctprinter IP address inthe address field.
Note: Depending onthe networksettings, you mayneed to type“https://” insteadof “http://” beforethe printer IPaddress to accessthe Embedded WebServer.
Step 3
Check if the printer is on.
Is the printer on?
Go to step 4. Turn on the printer.
Step 4
Check if the network connection is working.
Is the network connection working?
Go to step 5. Contact youradministrator.
Step 5
Make sure that the cable connections to the printer and print serverare secure.
For more information, see the setup documentation that came withthe printer.
Are the cable connections secure?
Go to step 6. Tighten the cableconnections.
Troubleshooting 98

Action Yes No
Step 6
Temporarily disable the Web proxy servers.
Note: Proxy servers may block or restrict you from accessingcertain Web sites including the Embedded Web Server.
Are the Web proxy servers disabled?
Go to step 7. Contact youradministrator.
Step 7
Access the Embedded Web Server again by typing the correct IPaddress in the address field.
Did the Embedded Web Server open?
The problem issolved.
Contact customersupport.
Unable to read flash driveAction Yes No
Step 1
Check if the flash drive is inserted into the front USB port.
Note: The flash drive does not work when it is inserted into therear USB port.
Is the flash drive inserted into the front USB port?
Go to step 2. The problem issolved.
Step 2
Check if the flash drive is supported. For more information, see“Supported flash drives and file types” on page 29
Does the error message still appear?
Go to step 3. The problem issolved.
Step 3
Check if the front USB port is disabled. For more information, see“Enabling the USB port” on page 99.
Does the error message still appear?
Contact customersupport.
The problem issolved.
Enabling the USB portFrom the home screen, touch Settings > Network/Ports > USB > Enable USB Port.
Checking the printer connectivity1 From the home screen, touch Settings > Reports > Network > Network Setup Page.
2 Check the first section of the network setup page, and confirm that the status is connected.
If the status is not connected, then the LAN drop may be inactive, or the network cable may be unpluggedor malfunctioning. Contact your administrator for assistance.
Troubleshooting 99

Hardware options problems
Cannot detect internal optionAction Yes No
Step 1
Turn off the printer, wait for about 10 seconds, and then turn it backon.
Does the internal option operate correctly?
The problem issolved.
Go to step 2.
Step 2
Print a menu settings page, and then check if the internal optionappears in the Installed Features list.
Is the internal option listed in the menu settings page?
Go to step 4. Go to step 3.
Step 3
Check if the internal option is properly installed in the controllerboard.
a Turn off the printer, and then unplug the power cord from theelectrical outlet.
b Make sure that the internal option is installed in the appropriateconnector in the controller board.
c Connect the power cord to the electrical outlet, and then turnon the printer.
CAUTION—POTENTIAL INJURY: To avoid the risk of fireor electrical shock, connect the power cord to anappropriately rated and properly grounded electrical outletthat is near the product and easily accessible.
Does the internal option operate correctly?
The problem issolved.
Go to step 4.
Step 4a Check if the internal option is available in the print driver.
Note: If necessary, manually add the internal option in theprint driver to make it available for print jobs. For moreinformation, see “Adding available options in the print driver”on page 147.
b Resend the print job.
Does the internal option operate correctly?
The problem issolved.
Contact customersupport.
Troubleshooting 100

Internal solutions port does not operate correctlyAction Yes No
Step 1
Print a menu settings page, and then check if the internal solutionsport (ISP) appears in the Installed Features list.
Is the ISP listed in the Installed Features list?
Go to step 3. Go to step 2.
Step 2
Remove, and then install the ISP. For more information, see“Installing an internal solutions port” on page 135.
Note: Use a supported ISP.
Does the ISP operate correctly?
The problem issolved.
Go to step 3.
Step 3
Check the cable and the ISP connection.
a Use the correct cable, and then make sure that it is securelyconnected to the ISP.
b Check if the ISP solution interface cable is securely connectedinto the receptacle of the controller board.
Does the ISP operate correctly?
The problem issolved.
Contact customersupport.
Parallel or serial interface card does not operate correctlyAction Yes No
Step 1
Print a menu settings page, and then check if the parallel or serialinterface card appears in the Installed Features list.
Is the parallel or serial interface card listed in the Installed Featureslist?
Go to step 3. Go to step 2.
Step 2
Remove, and then install the parallel or serial interface card.
For more information, see “Installing an internal solutions port” onpage 135.
Does the parallel or serial interface card operate correctly?
The problem issolved.
Go to step 3.
Step 3
Check the connection between the cable and the parallel or serialinterface card.
Does the parallel or serial interface card operate correctly?
The problem issolved.
Contact customersupport.
Troubleshooting 101

Paper feed problems
Envelope seals when printingAction Yes No
1 Use envelopes that have been stored in a dry environment.
Note: Printing on envelopes with high moisture content can seal theflaps.
2 Resend the print job.
Does the envelope seal when printing?
Contactcustomersupport.
The problem issolved.
Collated printing does not workAction Yes No
Step 1a From the home screen, touch Settings > Print > Layout >
Collate.
b Set Collate to (1,2,3) (1,2,3).
c Resend the print job.
Is the document printed and collated correctly?
The problem issolved.
Go to step 2.
Step 2a From the printer software, set Collate to (1,2,3) (1,2,3).
b Resend the print job.
Is the document printed and collated correctly?
The problem issolved.
Go to step 3.
Step 3a Reduce the number of pages in the print job.
b Resend the print job.
Is the document printed and collated correctly?
The problem issolved.
Contact customersupport.
Troubleshooting 102

Paper curlAction Yes No
Step 1
Move the paper guides in the tray to the correct position for thepaper loaded.
Is the paper still curled?
Go to step 2. The problem issolved.
Step 2a Depending on your operating system, specify the paper type
and weight from the Printing Preferences or Print dialog.
Notes:
• Make sure that the settings match the paper loaded inthe tray.
• You can also change the settings on the printer controlpanel.
b Resend the print job.
Is the paper still curled?
Go to step 3. The problem issolved.
Step 3a Remove paper from the tray, and then turn it over.
b Resend the print job.
Is the paper still curled?
Go to step 4. The problem issolved.
Step 4a Load paper from a fresh package.
Note: Paper absorbs moisture due to high humidity. Storepaper in its original wrapper until you are ready to use it.
b Resend the print job.
Is the paper still curled?
Contact customersupport.
The problem issolved.
Tray linking does not workAction Yes No
Step 1a Check if the trays contain paper of the same size and type.
b Check if the paper guides are positioned correctly.
c Print the document.
Do the trays link correctly?
The problem issolved.
Go to step 2.
Troubleshooting 103

Action Yes No
Step 2a From the home screen, touch Settings > Paper > Tray
Configuration > Paper Size/Type.
b Set the paper size and type to match the paper loaded in thelinked trays.
c Print the document.
Do the trays link correctly?
The problem issolved.
Contact customersupport.
Paper frequently jamsAction Yes No
Step 1a Pull out the tray.
b Check if the paper is loaded correctly.
Notes:
• Make sure that the paper guides are positioned correctly.
• Make sure that the stack height is below the maximumpaper fill indicator.
• Make sure to print on recommended paper size and type.
c Insert the tray.
d Print the document.
Do paper jams still occur frequently?
Go to step 2. The problem issolved.
Step 2a From the Paper menu on the control panel, check if the printer
is detecting the correct paper size.
b Resend the print job.
Do paper jams still occur frequently?
Go to step 3. The problem issolved.
Step 3a Load paper from a fresh package.
b Print the document.
Do paper jams still occur frequently?
Contact customersupport.
The problem issolved.
Troubleshooting 104

Jammed pages are not reprintedAction Yes No
1 From the home screen, touch Settings > Notifications > Jam ContentRecovery.
2 From the Jam Recovery menu, select On or Auto.
3 Apply the changes.
Are the jammed pages reprinted?
The problem issolved.
Contactcustomersupport.
Printing problems
Confidential and other held documents do not printAction Yes No
Step 1a From the control panel, check if the documents appear in the
Held Jobs list.
Note: If the documents are not listed, then print thedocuments using the Print and Hold options.
b Print the documents.
Are the documents printed?
The problem issolved.
Go to step 2.
Step 2
The print job may contain a formatting error or invalid data.
• Delete the print job, and then send it again.
• For PDF files, generate a new file, and then print thedocuments.
Are the documents printed?
The problem issolved.
Go to step 3.
Step 3
If you are printing from the Internet, then the printer may be readingthe multiple job titles as duplicates.
For Windows usersa Open the Printing Preferences dialog.
b From the Print and Hold section, select Keep duplicatedocuments.
c Enter a PIN.
d Resend the print job.
For Macintosh usersa Save and name each job differently.
b Send the job individually.
Are the documents printed?
The problem issolved.
Go to step 4.
Troubleshooting 105

Action Yes No
Step 4a Delete some held jobs to free up printer memory.
b Resend the print job.
Are the documents printed?
The problem issolved.
Go to step 5.
Step 5a Add printer memory.
b Resend the print job.
Are the documents printed?
The problem issolved.
Contact customersupport.
Slow printingAction Yes No
Step 1a Make sure that the printer is not in Eco‑Mode and Quiet Mode.
b Resend the print job.
Is the printer still printing slow?
Go to step 2. The problem issolved.
Step 2a Depending on your operating system, specify the paper type
from the Printing Preferences or Print dialog.
Notes:
• Make sure that the setting matches the paper loaded inthe tray.
• You can also change the setting on the printer controlpanel.
b Resend the print job.
Is the printer still printing slow?
Go to step 3. The problem issolved.
Step 3a Reduce the number of pages to print.
b Resend the print job.
Is the printer still printing slow?
Go to step 4. The problem issolved.
Step 4a Remove held jobs.
b Resend the print job.
Is the printer still printing slow?
Go to step 5. The problem issolved.
Troubleshooting 106

Action Yes No
Step 5a Connect the printer cable securely to the printer and the
computer, print server, option, or other network device.
b Resend the print job.
Is the printer still printing slow?
Go to step 6. The problem issolved.
Step 6a From the Quality menu on the control panel, set the Print
Resolution to 4800CQ.
b Resend the print job.
Is the printer still printing slow?
Go to step 7. The problem issolved.
Step 7a Make sure that the printer is not overheating.
Notes:
• Allow the printer to cool down after a very long print job.
• Observe the recommended ambient temperature for theprinter. For more information, see “Selecting a locationfor the printer” on page 10
b Resend the print job.
Is the printer still printing slow?
Go to step 8. The problem issolved.
Step 8a Add more printer memory.
b Resend the print job.
Is the printer still printing slow?
Contact customersupport.
The problem issolved.
Print jobs do not printAction Yes No
Step 1a From the document you are trying to print, open the Print
dialog, and then check if you have selected the correct printer.
b Resend the print job.
Is the document printed?
The problem issolved.
Go to step 2.
Step 2a Check if the printer is on.
b Resolve any error messages that appear on the display.
c Resend the print job.
Is the document printed?
The problem issolved.
Go to step 3.
Troubleshooting 107

Action Yes No
Step 3a Check if the ports are working and if the cables are securely
connected to the computer and the printer.
For more information, see the setup documentation that camewith the printer.
b Resend the print job.
Is the document printed?
The problem issolved.
Go to step 4.
Step 4a Turn off the printer, wait for about 10 seconds, and then turn it
back on.
b Resend the print job.
Is the document printed?
The problem issolved.
Go to step 5.
Step 5a Remove, and then reinstall the printer software.
Note: The printer software is available athttp://support.lexmark.com.
b Resend the print job.
Is the document printed?
The problem issolved.
Contact customersupport.
Print quality is poor
Blank or white pages
Troubleshooting 108

Action Yes No
Step 1a Remove, and then reinstall the imaging unit or imaging kit.
Warning—Potential Damage: Do not expose the imaging unitor imaging kit to direct light for more than 10 minutes.Extended exposure to light may cause print quality problems.
Warning—Potential Damage: To avoid damage, do not touchthe underside of the imaging unit or imaging kit.
b Resend the print job.
Is the printer still printing blank or white pages?
Go to step 2. The problem issolved.
Step 2
Replace the imaging unit or imaging kit, and then resend the printjob.
Is the printer still printing blank or white pages?
Contact customersupport.
The problem issolved.
Dark print
Action Yes No
Step 1a From the Quality menu on the control panel, select Color
Adjust.b Resend the print job.
Is the print still too dark?
Go to step 2. The problem issolved.
Step 2a Depending on your operating system, reduce the toner
darkness from the Printing Preferences or Print dialog.
Note: You can also change the settings on the printer controlpanel.
b Resend the print job.
Is the print still too dark?
Go to step 3. The problem issolved.
Troubleshooting 109

Action Yes No
Step 3a Depending on your operating system, specify the paper type,
texture, and weight from the Printing Preferences or Printdialog.
Notes:
• Make sure that the settings match the paper loaded inthe tray.
• You can also change the settings on the printer controlpanel.
b Resend the print job.
Is the print still too dark?
Go to step 4. The problem issolved.
Step 4
Make sure that the paper has no texture or rough finishes.
Are you printing on textured or rough paper?
Change the texturesettings to match thepaper you areprinting on.
Go to step 5.
Step 5a Load paper from a fresh package.
Note: Paper absorbs moisture due to high humidity. Storepaper in its original wrapper until you are ready to use it.
b Resend the print job.
Is the print still too dark?
Go to step 6. The problem issolved.
Step 6a Remove, and then reinstall the waste toner bottle.
b From the Quality menu on the control panel, select ColorAdjust.
c Resend the print job.
Is the print still too dark?
Contact customersupport.
The problem issolved.
Ghost images
ABCDABCDABCDABCD
Leading edge
Trailing edge
Troubleshooting 110

Action Yes No
Step 1a Load the tray with the correct paper type and weight.
b Resend the print job.
Do ghost images still appear on prints?
Go to step 2. The problem issolved.
Step 2a Depending on your operating system, specify the paper type
and weight from the Printing Preferences or Print dialog.
Notes:
• Make sure that the settings match the paper loaded inthe tray.
• You can also change the settings on the printer controlpanel.
b Resend the print job.
Do ghost images still appear on prints?
Go to step 3. The problem issolved.
Step 3a From the Quality menu on the control panel, select Color
Adjust.b Resend the print job.
Do ghost images still appear on prints?
Contact customersupport.
The problem issolved.
Gray background
ABCDE
ABCDEABCDE
Leading edge
Trailing edge
Action Yes No
Step 1a From the Quality menu on the control panel, select Color
Adjust.b Resend the print job.
Does gray background still appear on prints?
Go to step 2. The problem issolved.
Troubleshooting 111

Action Yes No
Step 2a Remove, and then reinstall the imaging unit or imaging kit.
Warning—Potential Damage: Do not expose the imaging unitor imaging kit to direct light for more than 10 minutes.Extended exposure to light may cause print quality problems.
Warning—Potential Damage: To avoid damage, do not touchthe underside of the imaging unit or imaging kit.
b Resend the print job.
Does gray background still appear on prints?
Contact customersupport.
The problem issolved.
Horizontal dark lines
ABCDEABCDEABCDE
Note: If horizontal dark lines keep appearing on your prints, then see the “Repeating defects” topic.
Action Yes No
Step 1a Depending on your operating system, specify the tray or feeder
from the Printing Preferences or Print dialog.
b Resend the print job.
Do horizontal dark lines still appear on prints?
Go to step 2. The problem issolved.
Step 2a Depending on your operating system, specify the paper type
and weight from the Printing Preferences or from Print dialog.
Notes:
• Make sure that the settings match the paper loaded inthe tray.
• You can also change the settings on the printer controlpanel.
b Resend the print job.
Do horizontal dark lines still appear on prints?
Go to step 3. The problem issolved.
Troubleshooting 112

Action Yes No
Step 3a Load paper from a fresh package.
Note: Paper absorbs moisture due to high humidity. Storepaper in its original wrapper until you use it.
b Resend the print job.
Do horizontal dark lines still appear on prints?
Go to step 4. The problem issolved.
Step 4a Remove, and then reinstall the imaging unit or imaging kit.
Warning—Potential Damage: Do not expose the imaging unitor imaging kit to direct light for more than 10 minutes.Extended exposure to light may cause print quality problems.
Warning—Potential Damage: To avoid damage, do not touchthe underside of the imaging unit or imaging kit.
b Resend the print job.
Do horizontal dark lines still appear on prints?
Contact customersupport.
The problem issolved.
Horizontal white lines
Leading edge
Trailing edge
Note: If horizontal dark lines keep appearing on your prints, then see the “Repeating defects” topic.
Action Yes No
Step 1a Depending on your operating system, specify the paper type
and weight from the Printing Preferences or Print dialog.
Notes:
• Make sure that the settings match the paper loaded inthe tray.
• You can also change the settings on the printer controlpanel.
b Resend the print job.
Do horizontal white lines still appear on prints?
Go to step 2. The problem issolved.
Troubleshooting 113

Action Yes No
Step 2a Load the specified tray or feeder with the recommended paper
type.
b Resend the print job.
Do horizontal white lines still appear on prints?
Go to step 3. The problem issolved.
Step 3a Remove, and then reinstall the imaging unit or imaging kit.
Warning—Potential Damage: Do not expose the imaging unitor imaging kit to direct light for more than 10 minutes.Extended exposure to light can cause print quality problems.
Warning—Potential Damage: To avoid damage, do not touchthe underside of the imaging unit or imaging kit.
b Resend the print job.
Do horizontal white lines still appear on prints?
Contact customersupport.
The problem issolved.
Incorrect margins
ABCDABCDABCD
Action Yes No
Step 1a Squeeze and slide the paper guides to the correct position for
the size of the paper you are loading.
b Resend the print job.
Are the margins correct?
The problem issolved.
Go to step 2.
Step 2a From the Paper menu on the control panel, check if the printer
is detecting the correct paper size.
b Resend the print job.
Are the margins correct?
The problem issolved.
Go to step 3.
Troubleshooting 114

Action Yes No
Step 3a Depending on your operating system, specify the paper size
from the Printing Preferences or Print dialog.
Notes:
• Make sure that the settings match the paper loaded inthe tray.
• You can also change the settings on the printer controlpanel.
b Resend the print job.
Are the margins correct?
The problem issolved.
Contact customersupport.
Jagged or uneven characters
Action Yes No
a Check if the printer supports the fonts that are installed on yourcomputer.
1 From the control panel, touch:
Settings > Reports > Print > Print Fonts2 Select PCL Fonts or PS Fonts.
b If the font is not supported, then install a supported font. Formore information, contact your administrator.
c Resend the print job.
Do prints still contain jagged or uneven characters?
Contact customersupport.
The problem issolved.
Light print
Troubleshooting 115
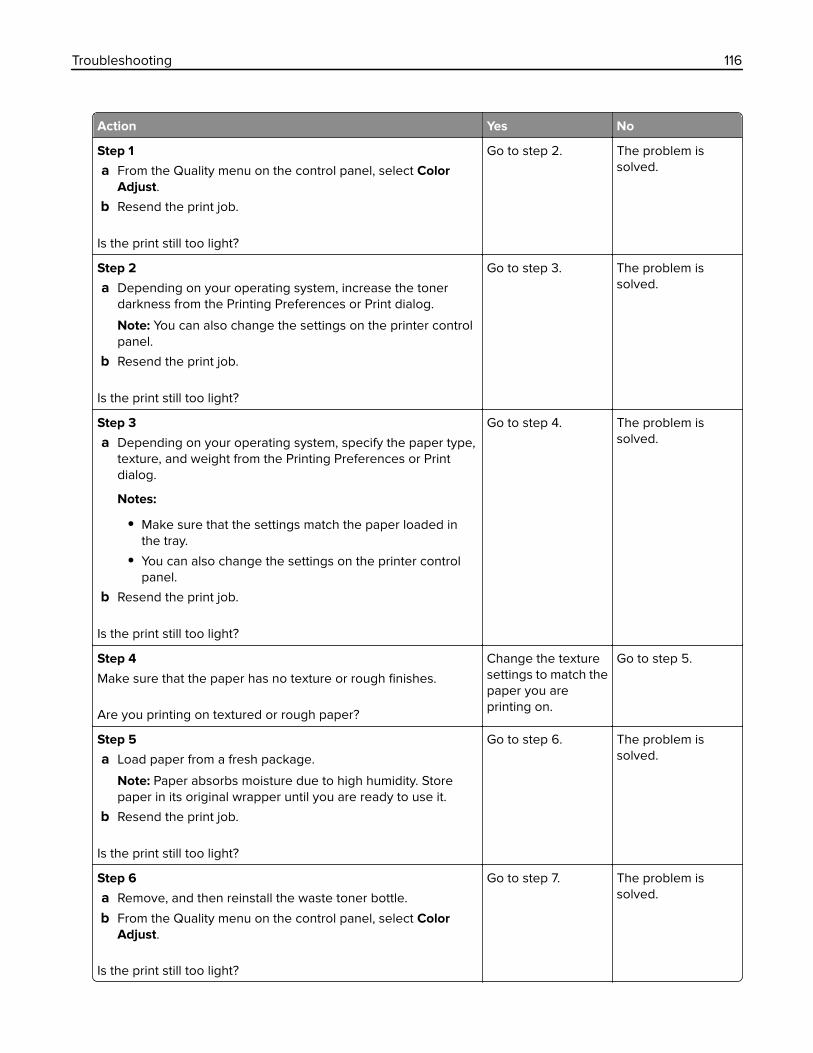
Action Yes No
Step 1a From the Quality menu on the control panel, select Color
Adjust.b Resend the print job.
Is the print still too light?
Go to step 2. The problem issolved.
Step 2a Depending on your operating system, increase the toner
darkness from the Printing Preferences or Print dialog.
Note: You can also change the settings on the printer controlpanel.
b Resend the print job.
Is the print still too light?
Go to step 3. The problem issolved.
Step 3a Depending on your operating system, specify the paper type,
texture, and weight from the Printing Preferences or Printdialog.
Notes:
• Make sure that the settings match the paper loaded inthe tray.
• You can also change the settings on the printer controlpanel.
b Resend the print job.
Is the print still too light?
Go to step 4. The problem issolved.
Step 4
Make sure that the paper has no texture or rough finishes.
Are you printing on textured or rough paper?
Change the texturesettings to match thepaper you areprinting on.
Go to step 5.
Step 5a Load paper from a fresh package.
Note: Paper absorbs moisture due to high humidity. Storepaper in its original wrapper until you are ready to use it.
b Resend the print job.
Is the print still too light?
Go to step 6. The problem issolved.
Step 6a Remove, and then reinstall the waste toner bottle.
b From the Quality menu on the control panel, select ColorAdjust.
Is the print still too light?
Go to step 7. The problem issolved.
Troubleshooting 116

Action Yes No
Step 7
Remove, and then reinstall the imaging kit.
Is the print still too light?
Contact customersupport.
The problem issolved.
Print crooked or skewed
))ABCDE
ABCDEABCDE
Action Yes No
Step 1a Remove the tray.
b Remove the paper, and then load paper from a fresh package.
Note: Paper absorbs moisture due to high humidity. Storepaper in its original wrapper until you are ready to use it.
c Squeeze and slide the paper guides to the correct position forthe size of the paper you are loading.
d Insert the tray.
e Resend the print job.
Is the print still crooked or skewed?
Go to step 2. The problem issolved.
Step 2a Check if you are printing on a supported paper.
b Resend the print job.
Is the print still crooked or skewed?
Contact customersupport.
The problem issolved.
Repeating defects
)
)
)
Troubleshooting 117

Action Yes No
1 From the control panel, touch Help > Supplies Guide.
2 Measure the distance between the defects.
• If the distance between the defects equals 43.90 mm(1.73 in.), or 45.50 mm (1.79 in.), then call customersupport to replace the developer unit of the colorwhere defects are seen.
• If the distance between defects of a single color equals94.20 mm (3.7 in.), 29.80 mm (1.17 in.), or 25.10 mm(0.99 in.), then replace the imaging unit or imaging kit.
• If the distance between the defects equals 37.70 mm(1.48 in.), 78.50 mm (3.09 in.), or 55.0 mm (2.17 in.), thenreplace the transfer module.
• If the distance between defects of all colors equals95.0 mm (3.74 in.), 110 mm (4.33 in.), or 34.60 mm(1.36 in.), then replace the fuser.
Do the repeating defects still appear?
Contact customersupport or yourservicerepresentative.
The problem is solved.
Solid color or black images
Action Yes No
a Remove, and then reinstall the imaging unit or imaging kit.
Warning—Potential Damage: Do not expose the imaging unitor imaging kit to direct light for more than 10 minutes.Extended exposure to light may cause print quality problems.
Warning—Potential Damage: To avoid damage, do not touchthe underside of the imaging unit or imaging kit.
b Resend the print job.
Is the printer still printing solid color or black images?
Contact customersupport.
The problem issolved.
Troubleshooting 118

Text or images cut off
Leading edge
Trailing edge
ABCDEABCDEABCDE
Action Yes No
Step 1a Move the paper guides in the tray to the correct position for the
paper loaded.
b Resend the print job.
Is the page or image still clipped?
Go to step 2. The problem issolved.
Step 2a Depending on your operating system, specify the paper size
from the Printing Preferences or Print dialog.
Notes:
• Make sure that the settings match the paper loaded inthe tray.
• You can also change the settings on the printer controlpanel.
b Resend the print job.
Is the page or image still clipped?
Go to step 3. The problem issolved.
Step 3a Remove, and then reinstall the imaging unit or imaging kit.
Warning—Potential Damage: Do not expose the imaging unitor imaging kit to direct light for more than 10 minutes.Extended exposure to light may cause print quality problems.
Warning—Potential Damage: To avoid damage, do not touchthe underside of the imaging unit or imaging kit.
b Resend the print job.
Is the page or image still clipped?
Contact customersupport.
The problem issolved.
Troubleshooting 119

Toner easily rubs off
Leading edge
Trailing edge
ABC
DEF
Action Yes No
1 Depending on your operating system, specify thepaper type, texture, and weight from the PrintingPreferences or Print dialog.
Notes:
• Make sure that the settings match the paperloaded in the tray.
• You can also change the settings on the printercontrol panel.
2 Resend the print job.
Does the toner still rub off?
Contact customersupport.
The problem is solved.
Uneven print density
Action Yes No
Replace the imaging unit or imaging kit, and then resend the printjob.
Warning—Potential Damage: Do not expose the imaging unit orimaging kit to direct light for more than 10 minutes. Extendedexposure to light can cause print quality problems.
Warning—Potential Damage: To avoid damage, do not touch theunderside of the imaging unit or imaging kit.
Is the print density uneven?
Contact customersupport.
The problem issolved.
Troubleshooting 120

Vertical dark lines or streaks
ABCDEABCDEABCDE
Leading edge
Trailing edge
Action Yes No
a Remove, and then reinstall the imaging unit or imaging kit.
Warning—Potential Damage: Do not expose the imaging unitor imaging kit to direct light for more than 10 minutes.Extended exposure to light can cause print quality problems.
Warning—Potential Damage: To avoid damage, do not touchthe underside of the imaging unit or imaging kit.
b Resend the print job.
Do vertical dark lines or streaks still appear on prints?
Contact customersupport.
The problem issolved.
Vertical white lines
Leading edge
Trailing edge
Action Yes No
a Remove, and then reinstall the imaging unit or imaging kit.
Warning—Potential Damage: Do not expose the imaging unitor imaging kit to direct light for more than 10 minutes.Extended exposure to light may cause print quality problems.
Warning—Potential Damage: To avoid damage, do not touchthe underside of the imaging unit or imaging kit.
b Resend the print job.
Do vertical white lines still appear on prints?
Contact customersupport.
The problem issolved.
Troubleshooting 121

The printer is not respondingAction Yes No
Step 1
Connect the power cord to the electrical outlet.
CAUTION—POTENTIAL INJURY: To avoid the risk of fire orelectrical shock, connect the power cord to an appropriatelyrated and properly grounded electrical outlet that is near theproduct and easily accessible.
Is the printer responding?
The problem issolved.
Go to step 2.
Step 2
Check if the electrical outlet is turned off by a switch or breaker.
Is the electrical outlet turned off by a switch or breaker?
Turn on the switch orreset the breaker.
Go to step 3.
Step 3
Check if the printer is on.
Is the printer on?
Go to step 4. Turn on the printer.
Step 4
Check if the printer is in sleep or hibernate mode.
Is the printer in sleep or hibernate mode?
Press the powerbutton to wake theprinter.
Go to step 5.
Step 5
Check if the cables connecting the printer and the computer areinserted in the correct ports.
Are the cables inserted in the correct ports?
Go to step 6. Make sure to matchthe following:
• The USB cablewith the USB porton the printer
• The Ethernetcable with theEthernet port onthe printer
Step 6
Turn off the printer, reinstall the hardware options, and then turn itback on.
For more information, see the documentation that came with theoption.
Is the printer responding?
The problem issolved
Go to step 7.
Step 7
Install the correct print driver.
Is the printer responding?
The problem issolved
Go to step 8.
Troubleshooting 122

Action Yes No
Step 8
Turn off the printer, wait for about 10 seconds, and then turn it backon.
Is the printer responding?
The problem issolved.
Contact customersupport.
Job prints from the wrong tray or on the wrong paperAction Yes No
Step 1a Check if you are printing on a supported paper.
b Print the document.
Is the document printed from the correct tray or on the correctpaper?
The problem issolved.
Go to step 2.
Step 2a Depending on your operating system, specify the paper size
from the Printing Preferences or Print dialog.
Notes:
• Make sure that the settings match the paper loaded inthe tray.
• You can also change the settings on the printer controlpanel.
b Print the document.
Is the document printed from the correct tray or on the correctpaper?
The problem issolved.
Go to step 3.
Step 3a Check if the trays are not linked.
For more information, see “Linking trays” on page 26
b Print the document.
Is the document printed from the correct tray or on the correctpaper?
The problem issolved.
Contact customersupport.
Color quality problems
Adjusting toner darkness1 From the home screen, touch Settings > Print > Quality.
2 Adjust the toner darkness.
Troubleshooting 123
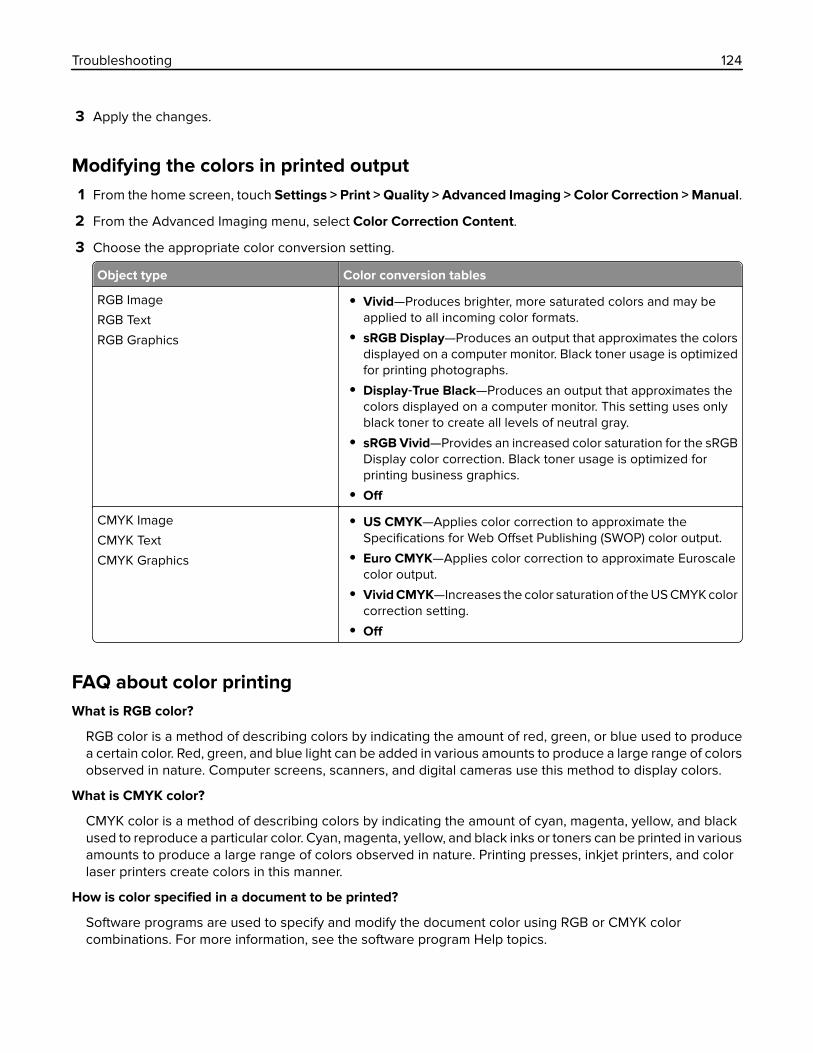
3 Apply the changes.
Modifying the colors in printed output1 From the home screen, touch Settings > Print > Quality > Advanced Imaging > Color Correction > Manual.
2 From the Advanced Imaging menu, select Color Correction Content.
3 Choose the appropriate color conversion setting.
Object type Color conversion tables
RGB Image
RGB Text
RGB Graphics
• Vivid—Produces brighter, more saturated colors and may beapplied to all incoming color formats.
• sRGB Display—Produces an output that approximates the colorsdisplayed on a computer monitor. Black toner usage is optimizedfor printing photographs.
• Display‑True Black—Produces an output that approximates thecolors displayed on a computer monitor. This setting uses onlyblack toner to create all levels of neutral gray.
• sRGB Vivid—Provides an increased color saturation for the sRGBDisplay color correction. Black toner usage is optimized forprinting business graphics.
• Off
CMYK Image
CMYK Text
CMYK Graphics
• US CMYK—Applies color correction to approximate theSpecifications for Web Offset Publishing (SWOP) color output.
• Euro CMYK—Applies color correction to approximate Euroscalecolor output.
• Vivid CMYK—Increases the color saturation of the US CMYK colorcorrection setting.
• Off
FAQ about color printingWhat is RGB color?
RGB color is a method of describing colors by indicating the amount of red, green, or blue used to producea certain color. Red, green, and blue light can be added in various amounts to produce a large range of colorsobserved in nature. Computer screens, scanners, and digital cameras use this method to display colors.
What is CMYK color?
CMYK color is a method of describing colors by indicating the amount of cyan, magenta, yellow, and blackused to reproduce a particular color. Cyan, magenta, yellow, and black inks or toners can be printed in variousamounts to produce a large range of colors observed in nature. Printing presses, inkjet printers, and colorlaser printers create colors in this manner.
How is color specified in a document to be printed?
Software programs are used to specify and modify the document color using RGB or CMYK colorcombinations. For more information, see the software program Help topics.
Troubleshooting 124

How does the printer know what color to print?
When printing a document, information describing the type and color of each object is sent to the printer andis passed through color conversion tables. Color is translated into the appropriate amounts of cyan, magenta,yellow, and black toner used to produce the color you want. The object information determines the applicationof color conversion tables. For example, it is possible to apply one type of color conversion table to text whileapplying a different color conversion table to photographic images.
What is manual color correction?
When manual color correction is enabled, the printer employs user‑selected color conversion tables toprocess objects. Manual color correction settings are specific to the type of object being printed (text,graphics, or images). It is also specific to how the color of the object is specified in the software program(RGB or CMYK combinations). To apply a different color conversion table manually, see “Modifying the colorsin printed output” on page 124.
If the software program does not specify colors with RGB or CMYK combinations, then manual color correctionis not useful. It is also not effective if the software program or the computer operating system controls theadjustment of colors. In most situations, setting the Color Correction to Auto generates preferred colors forthe documents.
How can I match a particular color (such as a corporate logo)?
From the printer Quality menu, nine types of Color Samples sets are available. These sets are also availablefrom the Color Samples page of the Embedded Web Server. Selecting any sample set generatesmultiple‑page prints consisting of hundreds of colored boxes. Each box contains a CMYK or RGB combination,depending on the table selected. The observed color of each box is obtained by passing the CMYK or RGBcombination labeled on the box through the selected color conversion table.
By examining Color Samples sets, you can identify the box with color closest to the color being matched.The color combination labeled on the box can then be used for modifying the color of the object in a softwareprogram. For more information, see the software program Help topics. Manual color correction may benecessary to use the selected color conversion table for the particular object.
Selecting which Color Samples set to use for a particular color‑matching problem depends on:
• The Color Correction setting being used (Auto, Off, or Manual)
• The type of object being printed (text, graphics, or images)
• How the color of the object is specified in the software program (RGB or CMYK combinations)
If the software program does not specify colors with RGB or CMYK combinations, then the Color Samplespages are not useful. Additionally, some software programs adjust the RGB or CMYK combinations specifiedin the program through color management. In these situations, the printed color may not be an exact matchof the Color Samples pages.
The print appears tintedAction No Yes
Adjust the color balance.
a From the home screen, touch Settings > Print > Quality >Advanced Imaging > Color Balance.
b Adjust the setting.
c Resend the print job.
Does the print still appear tinted?
The problem issolved.
Contact customersupport.
Troubleshooting 125
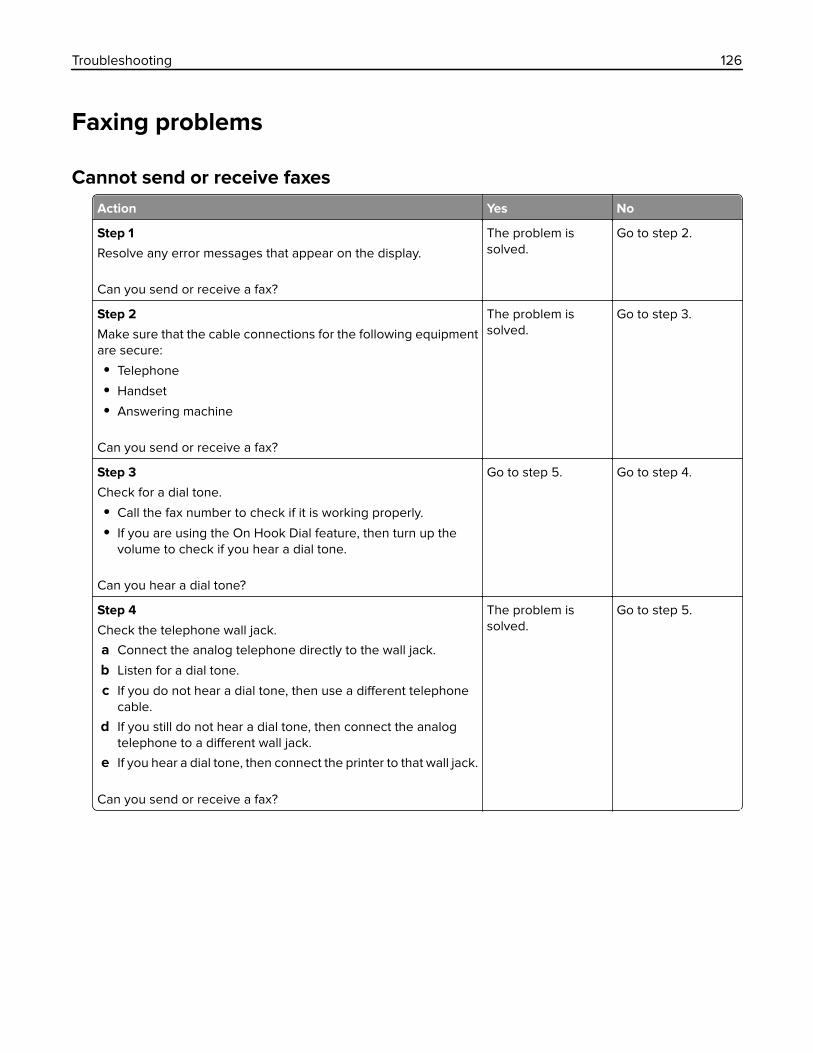
Faxing problems
Cannot send or receive faxesAction Yes No
Step 1
Resolve any error messages that appear on the display.
Can you send or receive a fax?
The problem issolved.
Go to step 2.
Step 2
Make sure that the cable connections for the following equipmentare secure:
• Telephone
• Handset
• Answering machine
Can you send or receive a fax?
The problem issolved.
Go to step 3.
Step 3
Check for a dial tone.
• Call the fax number to check if it is working properly.
• If you are using the On Hook Dial feature, then turn up thevolume to check if you hear a dial tone.
Can you hear a dial tone?
Go to step 5. Go to step 4.
Step 4
Check the telephone wall jack.
a Connect the analog telephone directly to the wall jack.
b Listen for a dial tone.
c If you do not hear a dial tone, then use a different telephonecable.
d If you still do not hear a dial tone, then connect the analogtelephone to a different wall jack.
e If you hear a dial tone, then connect the printer to that wall jack.
Can you send or receive a fax?
The problem issolved.
Go to step 5.
Troubleshooting 126

Action Yes No
Step 5
Check if the printer is connected to an analog phone service or tothe correct digital connector.
• If you are using an Integrated Services for Digital Network(ISDN) telephone service, then connect to an analog telephoneport of an ISDN terminal adapter. For more information, contactyour ISDN provider.
• If you are using DSL, then connect to a DSL filter or router thatsupports analog use. For more information, contact your DSLprovider.
• If you are using a private branch exchange (PBX) telephoneservice, then make sure that you are connecting to an analogconnection on the PBX. If none exists, then consider installingan analog telephone line for the fax machine.
Can you send or receive a fax?
The problem issolved.
Go to step 6.
Step 6
Temporarily disconnect other equipment and disable othertelephone services.
a Disconnect other equipment (such as answering machines,computers, modems, or telephone line splitters) between theprinter and the telephone line.
b Disable call waiting and voice mail. For more information,contact your telephone company.
Can you send or receive a fax?
The problem issolved.
Go to step 7.
Step 7
Scan the original document one page at a time.
a Dial the fax number.
b Scan the document.
Can you send or receive a fax?
The problem issolved.
Contact customersupport.
Troubleshooting 127

Can receive but not send faxesAction Yes No
Step 1
Load the original document properly into the ADF tray or on thescanner glass.
Can you send faxes?
The problem issolved.
Go to step 2.
Step 2
Set up the shortcut number properly.
• Check if the shortcut number is set for the telephone numberthat you want to dial.
• Dial the telephone number manually.
Can you send faxes?
The problem issolved.
Contact customersupport.
Can send but not receive faxesAction Yes No
Step 1
Make sure that the tray or multipurpose feeder is not empty.
Can you receive faxes?
The problem issolved.
Go to step 2.
Step 2
Check the ring count delay settings.
a From the home screen, touch Settings > Fax > Analog FaxSetup > Fax Receive Settings > Rings to Answer.
b If necessary, configure the setting.
Can you receive faxes?
The problem issolved.
Go to step 3.
Step 3
Replace the toner cartridge.
For more information, see the instruction sheet that came with thesupply.
Can you receive faxes?
The problem issolved.
Contact customersupport.
Troubleshooting 128

Poor fax print qualityAction Yes No
Step 1
Enhance the print quality.
a From the home screen, touch Settings > Print > Quality.
b Adjust the settings.
Is the fax print quality satisfactory?
The problem issolved.
Go to step 2.
Step 2
Decrease the incoming fax transmission speed.
a From the home screen, touch Settings > Fax > Analog FaxSetup > Fax Receive Settings > Admin Controls > Max Speed.
b Select a lower transmission speed.
Is the fax print quality satisfactory?
The problem issolved.
Go to step 3.
Step 3
Replace the toner cartridge.
For more information, see the instruction sheet that came with thesupply.
Is the fax print quality satisfactory?
The problem issolved.
Contact customersupport.
Scanning problems
Cannot scan from a computerAction Yes No
Step 1a Turn off the printer, wait for about 10 seconds, and then turn it
back on.
b Resend the scan job.
Can you send the scan job?
The problem issolved.
Go to step 2.
Step 2a Make sure that the cables between the printer and the print
server are secure.
For more information, see the setup documentation that camewith the printer.
b Resend the scan job.
Can you send the scan job?
The problem issolved.
Contact customersupport.
Troubleshooting 129

Partial copies of document or photoAction Yes No
Step 1a Make sure that the document or photo is loaded facedown on
the upper left corner of the scanner glass.
b Copy the document or photo.
Is the document or photo copied correctly?
The problem issolved.
Go to step 2.
Step 2a Match the paper size setting and the paper loaded in the tray.
b Copy the document or photo.
Is the document or photo copied correctly?
The problem issolved.
Contact customersupport.
Poor copy qualityAction Yes No
Step 1a Clean the scanner glass and the ADF glass with a damp, soft,
lint‑free cloth.
b Make sure that the document or photo is loaded facedown onthe upper left corner of the scanner glass.
c Copy the document or photo.
Is the copy quality satisfactory?
The problem issolved.
Go to step 2.
Step 2a Check the quality of the original document or photo.
b Adjust the scan quality settings.
c Copy the document or photo.
Is the copy quality satisfactory?
The problem issolved.
Contact customersupport.
Scan job was not successfulAction Yes No
Step 1
Check the cable connections.
a Make sure that the Ethernet or USB cable is securely connectedto the computer and the printer.
b Resend the scan job.
Is the scan job successful?
The problem issolved.
Go to step 2.
Troubleshooting 130

Action Yes No
Step 2
Check the file you want to scan.
a Make sure that the file name is not already used in thedestination folder.
b Make sure that the document or photo you want to scan is notopen in another application.
c Resend the scan job.
Is the scan job successful?
The problem issolved.
Go to step 3.
Step 3a Make sure that the Append time stamp or the Overwrite
existing file check box is selected in the destinationconfiguration settings.
b Resend the scan job.
Is the scan job successful?
The problem issolved.
Contact customersupport.
Scanner does not closeAction Yes No
Remove obstructions that keep the scanner unit open.
Did the scanner unit close correctly?
The problem issolved.
Contact customersupport.
Scanning takes too long or freezes the computerAction Yes No
Step 1
Close all applications that are interfering with the scan.
Does scanning take too long or freeze the computer?
Go to step 2. The problem issolved.
Step 2
Select a lower scan resolution.
a From the home screen, touch Scan To > Scan Settings.
b Adjust the resolution.
Does scanning take too long or freeze the computer?
Contact customersupport.
The problem issolved.
Troubleshooting 131

Scanner does not respondAction Yes No
Step 1a Check if the printer is turned on.
b Resolve any error messages that appear on the display.
c Copy or scan the document.
Is the scanner responding?
The problem issolved.
Go to step 2.
Step 2a Check if the power cord is connected properly to the printer
and the electrical outlet.
CAUTION—POTENTIAL INJURY: To avoid the risk of fireor electrical shock, connect the power cord to anappropriately rated and properly grounded electrical outletthat is near the product and easily accessible.
b Copy or scan the document.
Is the scanner responding?
The problem issolved.
Go to step 3.
Step 3a Turn off the printer, wait for about 10 seconds, and then turn it
back on.
b Copy or scan the document.
Is the scanner responding?
The problem issolved.
Contact customersupport.
Contacting customer supportWhen you contact customer support, you will need to be able to describe the problem you are experiencing,the message on the printer display, and the troubleshooting steps you have already taken to find a solution.
You need to know your printer model type and serial number. For more information, see the label at theback of the printer. The serial number is also listed on the menu settings page.
Lexmark has various ways to help you solve your printing problem. Visit the Lexmark Web site athttp://support.lexmark.com, and then select one of the following:
TechLibrary
You can browse our library of manuals, support documentation, drivers, and other downloads tohelp you solve common problems.
E-mail You can send an e-mail to the Lexmark team, describing your problem. A service representativewill respond and provide you with information to solve your problem.
Live chat You can chat directly with a service representative. They can work with you to solve your printerproblem or provide assistance through Assisted Service where the service representative canremotely connect to your computer through the Internet to troubleshoot problems, install updates,or complete other tasks to help you successfully use your Lexmark product.
Telephone support is also available. In the U.S. or Canada, call 1-800-539-6275. For other countries orregions, visit http://support.lexmark.com.
Troubleshooting 132

Upgrading and migrating
Hardware
Available internal options• Memory card
– DDR3 DIMM
– Flash memory
• Fonts
– Application cards
• Forms and Bar Code
• PRESCRIBE
• IPDS
• LexmarkTM Internal Solutions Port (ISP)
– MarkNetTM N8360 (802.11 b/g/n/a wireless print server bundled with LEX‑M06‑001 Mobile SolutionsModule)
– IEEE 1284‑B Parallel Card
– RS‑232C Serial Card
Installing a memory cardCAUTION—SHOCK HAZARD: To avoid the risk of electrical shock, if you are accessing the controllerboard or installing optional hardware or memory devices sometime after setting up the printer, then turnthe printer off, and unplug the power cord from the electrical outlet before continuing. If you have anyother devices attached to the printer, then turn them off as well, and unplug any cables going into theprinter.
1 Turn off the printer, and then unplug the power cord from the electrical outlet.
2 Using a flat‑head screwdriver, remove the controller board access cover.
Warning—Potential Damage: Controller board electronic components are easily damaged by staticelectricity. Touch a metal surface on the printer before touching any controller board components orconnectors.
Upgrading and migrating 133

3 Unpack the memory card.
Warning—Potential Damage: Avoid touching the connection points along the edge of the card.
4 Insert the memory card until it clicks into place.
Upgrading and migrating 134

5 Reattach the access cover.
6 Connect the power cord to the electrical outlet, and then turn on the printer.
CAUTION—POTENTIAL INJURY: To avoid the risk of fire or electrical shock, connect the power cordto an appropriately rated and properly grounded electrical outlet that is near the product and easilyaccessible.
Installing an internal solutions portCAUTION—SHOCK HAZARD: To avoid the risk of electrical shock, if you are accessing the controllerboard or installing optional hardware or memory devices sometime after setting up the printer, then turnthe printer off, and unplug the power cord from the electrical outlet before continuing. If you have anyother devices attached to the printer, then turn them off as well, and unplug any cables going into theprinter.
1 Turn off the printer, and then unplug the power cord from the electrical outlet.
2 Using a flat‑head screwdriver, remove the controller board access cover.
Warning—Potential Damage: Controller board electronic components are easily damaged by staticelectricity. Touch a metal surface on the printer before touching any controller board electroniccomponents or connectors.
Upgrading and migrating 135

3 Unpack the internal solutions port (ISP) kit.
1 ISP
2 Mounting bracket
3 Thumbscrews
4 Housing
Upgrading and migrating 136

5 ISP extended cable
4 Install the ISP into its housing.
Upgrading and migrating 137

5 Attach the housing to the controller board access cover.
Upgrading and migrating 138

6 Connect the ISP extended cable to the ISP connector in the controller board.
7 Reattach the controller board access cover.
8 Connect the power cord to the electrical outlet, and then turn on the printer.
CAUTION—POTENTIAL INJURY: To avoid the risk of fire or electrical shock, connect the power cordto an appropriately rated and properly grounded electrical outlet that is near the product and easilyaccessible.
Upgrading and migrating 139

Installing an optional cardCAUTION—SHOCK HAZARD: To avoid the risk of electrical shock, if you are accessing the controllerboard or installing optional hardware or memory devices sometime after setting up the printer, then turnthe printer off, and unplug the power cord from the electrical outlet before continuing. If you have anyother devices attached to the printer, then turn them off as well, and unplug any cables going into theprinter.
1 Turn off the printer, and then unplug the power cord from the electrical outlet.
2 Using a flat‑head screwdriver, remove the controller board access cover.
Warning—Potential Damage: Controller board electronic components are easily damaged by staticelectricity. Touch a metal surface on the printer before touching any components or connectors.
3 Unpack the optional card.
Warning—Potential Damage: Avoid touching the connection points along the edge of the card.
Upgrading and migrating 140

4 Push the card firmly into place.
Note: The entire length of the connector on the card must touch and be flush against the controllerboard.
Warning—Potential Damage: Improper installation of the card may cause damage to the card and thecontroller board.
Upgrading and migrating 141

5 Reattach the access cover.
6 Connect the power cord to the electrical outlet, and then turn on the printer.
CAUTION—POTENTIAL INJURY: To avoid the risk of fire or electrical shock, connect the power cordto an appropriately rated and properly grounded electrical outlet that is near the product and easilyaccessible.
Installing a printer hard diskCAUTION—SHOCK HAZARD: To avoid the risk of electrical shock, if you are accessing the controllerboard or installing optional hardware or memory devices sometime after setting up the printer, then turnthe printer off, and unplug the power cord from the electrical outlet before continuing. If you have anyother devices attached to the printer, then turn them off as well, and unplug any cables going into theprinter.
1 Turn off the printer, and then unplug the power cord from the electrical outlet.
2 Using a flat‑head screwdriver, remove the controller board access cover.
Warning—Potential Damage: Controller board electronic components are easily damaged by staticelectricity. Touch a metal surface on the printer before touching any controller board electroniccomponents or connectors.
Upgrading and migrating 142

3 Unpack the hard disk.
4 Attach the hard disk to the controller board.
Warning—Potential Damage: Do not touch or press the center of the hard disk.
Upgrading and migrating 143

5 Open door B.
6 Open door C.
Upgrading and migrating 144

7 Secure the hard disk to the printer using the thumbscrews.
8 Close doors C and B.
9 Reattach the controller board access cover.
10 Connect the power cord to the electrical outlet, and then turn on the printer.
CAUTION—POTENTIAL INJURY: To avoid the risk of fire or electrical shock, connect the power cordto an appropriately rated and properly grounded electrical outlet that is near the product and easilyaccessible.
Upgrading and migrating 145

Installing optional traysCAUTION—SHOCK HAZARD: To avoid the risk of electrical shock, if you are accessing the controllerboard or installing optional hardware or memory devices sometime after setting up the printer, then turnthe printer off, and unplug the power cord from the electrical outlet before continuing. If you have anyother devices attached to the printer, then turn them off as well, and unplug any cables going into theprinter.
1 Turn off the printer.
2 Unplug the power cord from the electrical outlet, and then from the printer.
3 Unpack the optional tray, and then remove all packing material.
CAUTION—POTENTIAL INJURY: The printer weight is greater than 18 kg (40 lb) and requires two ormore trained personnel to lift it safely.
Note: If optional trays are already installed, then unlock them from the printer before lifting the printer. Donot try to lift the printer and trays at the same time.
4 Align the printer with the optional tray, and then lower the printer until it clicks into place.
5 Connect the power cord to the printer, and then to the electrical outlet.
CAUTION—POTENTIAL INJURY: To avoid the risk of fire or electrical shock, connect the power cordto an appropriately rated and properly grounded electrical outlet that is near the product and easilyaccessible.
6 Turn on the printer.
If necessary, manually add the tray in the print driver to make it available for print jobs. For more information,see “Adding available options in the print driver” on page 147.
Install the printer and hardware options in the following order:
• Optional 550‑sheet tray
• Printer
Upgrading and migrating 146

Software
Installing the printer software1 Obtain a copy of the software installer package.
2 Run the installer, and then follow the instructions on the computer screen.
3 For Macintosh users, add the printer.
Note: Obtain the printer IP address from the TCP/IP section in the Network/Ports menu.
Adding available options in the print driver
For Windows users
1 Open the printers folder.
2 Select the printer you want to update, and then do either of the following:
• For Windows 7 or later, select Printer properties.
• For earlier versions, select Properties.
3 Navigate to the Configuration tab, and then select Update Now ‑ Ask Printer.
4 Apply the changes.
For Macintosh users
1 From System Preferences in the Apple menu, navigate to your printer, and then select Options & Supplies.
2 Navigate to the list of hardware options, and then add any installed options.
3 Apply the changes.
Firmware
Exporting or importing a configuration fileYou can export the configuration settings of your printer into a text file, and then import the file to apply thesettings to other printers.
1 Open a Web browser, and then type the printer IP address in the address field.
Notes:
• View the printer IP address on the printer home screen. The IP address appears as four sets ofnumbers separated by periods, such as 123.123.123.123.
• If you are using a proxy server, then temporarily disable it to load the Web page correctly.
2 Export or import a configuration file for one or multiple applications.
Upgrading and migrating 147

For one applicationa From the Embedded Web Server, click Apps > the application that you want > Configure.
b Click Export or Import.
For multiple applicationsa From the Embedded Web Server, click Export Configuration or Import Configuration.
b Follow the instructions on the screen.
Updating firmwareSome applications require a minimum device firmware level to operate correctly.
For more information on updating the device firmware, contact your Lexmark representative.
1 From the Embedded Web Server, click Settings > Device > Update Firmware.
2 Browse to locate the required flash file.
3 Apply the changes.
Upgrading and migrating 148

Notices
Product informationProduct name:
Lexmark XC4150, XC4140
Machine type:
7528
Model(s):
598, 196
Edition noticeJanuary 2016
The following paragraph does not apply to any country where such provisions are inconsistent with locallaw: LEXMARK INTERNATIONAL, INC., PROVIDES THIS PUBLICATION “AS IS” WITHOUT WARRANTY OF ANYKIND, EITHER EXPRESS OR IMPLIED, INCLUDING, BUT NOT LIMITED TO, THE IMPLIED WARRANTIES OFMERCHANTABILITY OR FITNESS FOR A PARTICULAR PURPOSE. Some states do not allow disclaimer ofexpress or implied warranties in certain transactions; therefore, this statement may not apply to you.
This publication could include technical inaccuracies or typographical errors. Changes are periodically madeto the information herein; these changes will be incorporated in later editions. Improvements or changes in theproducts or the programs described may be made at any time.
References in this publication to products, programs, or services do not imply that the manufacturer intends tomake these available in all countries in which it operates. Any reference to a product, program, or service isnot intended to state or imply that only that product, program, or service may be used. Any functionallyequivalent product, program, or service that does not infringe any existing intellectual property right may beused instead. Evaluation and verification of operation in conjunction with other products, programs, or services,except those expressly designated by the manufacturer, are the user’s responsibility.
For Lexmark technical support, visit http://support.lexmark.com.
For information on supplies and downloads, visit www.lexmark.com.
© 2016 Lexmark International, Inc.
All rights reserved.
GOVERNMENT END USERSThe Software Program and any related documentation are "Commercial Items," as that term is defined in 48C.F.R. 2.101, "Computer Software" and "Commercial Computer Software Documentation," as such terms areused in 48 C.F.R. 12.212 or 48 C.F.R. 227.7202, as applicable. Consistent with 48 C.F.R. 12.212 or 48 C.F.R.227.7202-1 through 227.7207-4, as applicable, the Commercial Computer Software and Commercial SoftwareDocumentation are licensed to the U.S. Government end users (a) only as Commercial Items and (b) with onlythose rights as are granted to all other end users pursuant to the terms and conditions herein.
Notices 149

Licensing noticesAll licensing notices associated with this product can be viewed from the root directory of the installationsoftware CD.
TrademarksLexmark and the Lexmark logo are trademarks of Lexmark International, Inc., registered in the United Statesand/or other countries.
Mac and the Mac logo are trademarks of Apple Inc., registered in the U.S. and other countries.
Microsoft and Windows are either registered trademarks or trademarks of the Microsoft group of companiesin the United States and other countries.
PCL® is a registered trademark of the Hewlett-Packard Company. PCL is Hewlett-Packard Company’sdesignation of a set of printer commands (language) and functions included in its printer products. This printeris intended to be compatible with the PCL language. This means the printer recognizes PCL commands usedin various application programs, and that the printer emulates the functions corresponding to the commands.
PostScript is a registered trademark of Adobe Systems Incorporated in the United States and/or other countries.
The following terms are trademarks or registered trademarks of these companies:
Albertus The Monotype Corporation plc
Antique Olive Monsieur Marcel OLIVE
Apple-Chancery Apple Computer, Inc.
Arial The Monotype Corporation plc
CG Times Based on Times New Roman under license from The Monotype Corporation plc, is aproduct of Agfa Corporation
Chicago Apple Computer, Inc.
Clarendon Linotype-Hell AG and/or its subsidiaries
Eurostile Nebiolo
Geneva Apple Computer, Inc.
GillSans The Monotype Corporation plc
Helvetica Linotype-Hell AG and/or its subsidiaries
Hoefler Jonathan Hoefler Type Foundry
ITC Avant Garde Gothic International Typeface Corporation
ITC Bookman International Typeface Corporation
ITC Mona Lisa International Typeface Corporation
ITC Zapf Chancery International Typeface Corporation
Joanna The Monotype Corporation plc
Marigold Arthur Baker
Monaco Apple Computer, Inc.
Notices 150

New York Apple Computer, Inc.
Oxford Arthur Baker
Palatino Linotype-Hell AG and/or its subsidiaries
Stempel Garamond Linotype-Hell AG and/or its subsidiaries
Taffy Agfa Corporation
Times New Roman The Monotype Corporation plc
Univers Linotype-Hell AG and/or its subsidiaries
All other trademarks are the property of their respective owners.
AirPrint and the AirPrint logo are trademarks of Apple, Inc.
Noise emission levelsThe following measurements were made in accordance with ISO 7779 and reported in conformance with ISO9296.
Note: Some modes may not apply to your product.
1-meter average sound pressure, dBA
Printing 53 (one-sided); 55 (two-sided)
Scanning 53
Copying 56
Ready 16
Values are subject to change. See www.lexmark.com for current values.
Static sensitivity notice
This symbol identifies static-sensitive parts. Do not touch the areas near these symbols without first touchinga metal surface in an area away from the symbol.
Temperature information
Operating temperature and relative humidity 10 to 32.2°C (50 to 90°F) and 15 to 80% RH15.3 to 32.2°C (60 to 90°F) and 8 to 15% RHMaximum wet bulb temperature: 22.8°C (73°F)
Shipping temperature -10 to 40°C (14 to 104°F)
Notices 151

Storage temperature and relative humidity -10 to 40°C (14 to 104°F)
8 to 80% RH
Laser noticeThe printer is certified in the U.S. to conform to the requirements of DHHS 21 CFR, Chapter I, Subchapter J forClass I (1) laser products, and elsewhere is certified as a Class I laser product conforming to the requirementsof IEC 60825-1.
Class I laser products are not considered to be hazardous. The printer contains internally a Class IIIb (3b) AlGaInPlaser that is nominally 15-milliwatts operating in the wavelength region of 650–670 nanometers and enclosedin a non-serviceable printhead assembly. The laser system and printer are designed so there is never any humanaccess to laser radiation above a Class I level during normal operation, user maintenance, or prescribed serviceconditions.
Laser advisory labelA laser notice label may be affixed to this printer as shown:
DANGER - Invisible laser radiation when cartridges are removed and interlock defeated. Avoid exposure to laser beam.
PERIGO - Radiação a laser invisível será liberada se os cartuchos forem removidos e o lacre rompido. Evite a exposição aos feixes de laser.
Opasnost - Nevidljivo lasersko zračenje kada su kasete uklonjene i poništena sigurnosna veza. Izbjegavati izlaganje zracima.
NEBEZPEČÍ - Když jsou vyjmuty kazety a je odblokována pojistka, ze zařízení je vysíláno neviditelné laserové záření. Nevystavujte se působení laserového paprsku.
FARE - Usynlig laserstråling, når patroner fjernes, og spærreanordningen er slået fra. Undgå at blive udsat for laserstrålen.
GEVAAR - Onzichtbare laserstraling wanneer cartridges worden verwijderd en een vergrendeling wordt genegeerd. Voorkom blootstelling aan de laser.
DANGER - Rayonnements laser invisibles lors du retrait des cartouches et du déverrouillage des loquets. Eviter toute exposition au rayon laser.
VAARA - Näkymätöntä lasersäteilyä on varottava, kun värikasetit on poistettu ja lukitus on auki. Vältä lasersäteelle altistumista.
GEFAHR - Unsichtbare Laserstrahlung beim Herausnehmen von Druckkassetten und offener Sicherheitssperre. Laserstrahl meiden.
ΚΙΝΔΥΝΟΣ - Έκλυση αόρατης ακτινοβολίας laser κατά την αφαίρεση των κασετών και την απασφάλιση της μανδάλωσης. Αποφεύγετε την έκθεση στηνακτινοβολία laser.
VESZÉLY – Nem látható lézersugárzás fordulhat elő a patronok eltávolításakor és a zárószerkezet felbontásakor. Kerülje a lézersugárnak való kitettséget.
PERICOLO - Emissione di radiazioni laser invisibili durante la rimozione delle cartucce e del blocco. Evitare l´esposizione al raggio laser.
FARE – Usynlig laserstråling når kassettene tas ut og sperren er satt ut av spill. Unngå eksponering for laserstrålen.
NIEBEZPIECZEŃSTWO - niewidzialne promieniowanie laserowe podczas usuwania kaset i blokady. Należy unikać naświetlenia promieniem lasera.
ОПАСНО! Невидимое лазерное излучение при извлеченных картриджах и снятии блокировки. Избегайте воздействия лазерных лучей.
Pozor – Nebezpečenstvo neviditeľného laserového žiarenia pri odobratých kazetách a odblokovanej poistke. Nevystavujte sa lúčom.
PELIGRO: Se producen radiaciones láser invisibles al extraer los cartuchos con el interbloqueo desactivado. Evite la exposición al haz de láser.
FARA – Osynlig laserstrålning när patroner tas ur och spärrmekanismen är upphävd. Undvik exponering för laserstrålen.
危险 - 当移除碳粉盒及互锁失效时会产生看不见的激光辐射,请避免暴露在激光光束下。
危險 - 移除碳粉匣與安全連續開關失效時會產生看不見的雷射輻射。請避免曝露在雷射光束下。
危険 - カートリッジが取り外され、内部ロックが無効になると、見えないレーザー光が放射されます。 このレーザー光に当たらないようにしてください。
Notices 152

IndexAadapter plug 45adding hardware options
print driver 147adding internal options
print driver 147ADF input tray
replacing 76ADF scan pad
replacing 77ADF separator roller
replacing 79adjusting brightness of printerdisplay 86adjusting toner darkness 123answering machine
setting up 36attaching cables 12available internal options 133avoiding paper jams 88
Bblank pages 108blocking junk faxes 50brightness of printer display
adjusting 86
Ccanceling a print job
from the computer 31from the printer control
panel 31cannot open Embedded WebServer 98Card Copy
setting up 20card stock
loading 25changing port settings
internal solutions port 56checking the printerconnectivity 99checking the status of parts andsupplies 58cleaning
exterior of the printer 57interior of the printer 57
scanner glass 57cleaning the printer 57collating copies
copying 33Color Correction
manual 124Color Correction Content 124color quality, troubleshooting
print appears tinted 125confidential print jobs 30configuring daylight savingtime 48configuring e‑mail settings 34configuring port settings 56connecting printer to distinctivering service 47connecting to a wireless network
using PIN method 55using Push Button method 55
conservation settings Eco‑Mode 86hibernate mode 86sleep mode 86
conserving supplies 87contacting customer support 132control panel
using 14copy troubleshooting
partial copies of documents orphotos 130
poor copy quality 130scanner does not respond 132scanner unit does not close 131
copying both sides of the paper
(two‑sided) 32creating shortcuts 33
copying different paper sizes 32copying from
selected tray 32copying multiple pages on onesheet 33copying on letterhead 32copying photos 32creating shortcuts
e‑mail 35fax destination 49
Customer Support using 21
customer support contacting 132
Ddate and time
fax settings 48daylight saving time,configuring 48developer unit
replacing 65Device Quotas
setting up 21different paper sizes, copying 32digital subscriber line (DSL)
fax setup 41digital telephone service
fax setup 43directory list
printing 31Display Customization
using 19disposing of printer hard disk 54distinctive ring service, fax
connecting to 47documents, printing
from a computer 28DSL filter 41
EEco‑Mode setting 86Eco‑Settings
using 22Embedded Web Server
problem accessing 98emission notices 151enabling the USB port 99encrypting the printer harddisk 53enlarging a copy 33envelopes
loading 25environmental setting
Eco‑Mode 86environmental settings
hibernate mode 86sleep mode 86
Index 153

erasing printer hard diskmemory 53Ethernet cable 12Ethernet port 12exporting a configuration file
using the Embedded WebServer 147
e‑mail creating shortcuts 35setting up 34
e‑mailing configuring e‑mail settings 34using a shortcut number 34using the address book 34using the printer 34
FFAQ about color printing 124fax log
viewing 49fax resolution
changing 49fax setup
country‑ or region‑specific 45digital telephone service 43DSL connection 41standard telephone line
connection 36VoIP 42
fax troubleshooting cannot receive faxes 128cannot send faxes 128cannot send or receive
faxes 126received fax has poor print
quality 129faxing
adjusting darkness 49blocking junk faxes 50changing resolution 49creating shortcuts 49fax setup 36forwarding faxes 50holding faxes 50setting the date and time 48viewing a fax log 49
finding more information aboutthe printer 9firmware
update 148firmware card 133
flash drive printing from 28scanning 51
font sample list printing 30
forms printing 28
Forms and Favorites setting up 19
forwarding faxes 50FTP address
creating shortcuts 51FTP server, scanning to
using the control panel 51fuser
replacing 70fuser maintenance kit
ordering 59
Ggreen settings
Eco‑Mode 86hibernate mode 86sleep mode 86
Hhardware options
trays 146hardware options, adding
print driver 147held jobs 30
printing from a Macintoshcomputer 30
printing from Windows 30held print jobs
printing from a Macintoshcomputer 30
printing from Windows 30hibernate mode
setting 86holding faxes 50home screen
customizing 19showing icons 19
home screen icons using 15
horizontal dark lines 112
Iicons on the home screen
showing 19
imaging kit ordering 59replacing 65
imaging unit ordering 59replacing 61
importing a configuration file using the Embedded Web
Server 147indicator light
printer status 15installing a memory card 133installing a printer hard disk 142installing an internal solutionsport 135installing an optional card 140installing options
printer hard disk 142installing printer 147internal options 133
installing 140memory card 133
internal options, adding print driver 147
internal solutions port installing 135troubleshooting 101
Jjam, clearing
behind door E 91multipurpose feeder 91trays 90
jams avoiding 88locating jam areas 89locations 89
jams, clearing in the duplex unit 93in the fuser 93
Lletterhead
copying on 32light print 115line filter 41linking trays 26loading
card stock 25envelopes 25multipurpose feeder 25
Index 154

loading trays 23
Mmaintenance counter
resetting 85making copies 32manual Color Correction
applying 124memory
types installed on printer 54memory card 133
installing 133menu settings page
printing 16menus diagram 17moving the printer 10, 85multipurpose feeder
loading 25
Nnoise emission levels 151non‑volatile memory 54
erasing 53notices 151, 152
Ooptional card
installing 140options
firmware cards 133internal solutions port 135memory card 133
ordering fuser maintenance kit 59imaging kit 59imaging unit 59toner cartridges 59transfer module 59
ordering supplies waste toner bottle 59
Ppaper
saving 33Universal size setting 23
paper jam behind door E 91paper jam clearing
standard bin 92paper jam in door A 93paper jam in the multipurposefeeder 91
paper jam in the standard bin 92paper jam in trays 90paper jam, clearing
automatic document feeder 91multipurpose feeder 91trays 90
paper jams avoiding 88
paper jams, clearing in the duplex unit 93in the fuser 93
paper size setting 23
paper type setting 23
parallel interface card troubleshooting 101
parts status checking 58
personal identification numbermethod 55phone splitter 42photos
copying 32pick roller
replacing 72placing separator sheetsbetween copies
copying 33port settings
configuring 56power button light
printer status 15power cord socket 12print driver
hardware options, adding 147print job
canceling from the computer 31canceling from the printer
control panel 31print quality
cleaning the scanner glass 57replacing imaging kit 65
print quality troubleshooting blank pages 108crooked print 117dark print 109ghost images appear on
prints 110gray background 111horizontal dark lines 112horizontal white lines 113
jagged or unevencharacters 115
light print 115repeating print defects 117skewed print 117solid color or black images 118text or images cut off 119toner easily rubs off 120uneven print density 120vertical dark lines or streaks
appear on prints 121white pages 108
print troubleshooting collated printing does not
work 102confidential and other held
documents do not print 105envelope seals when
printing 102incorrect margins on prints 114jammed pages are not
reprinted 105job prints from the wrong
tray 123job prints on the wrong
paper 123paper curl 103paper frequently jams 104print jobs do not print 107slow printing 106tray linking does not work 103unable to read flash drive 99
printer basic model 11fully configured 11minimum clearances 10moving 10, 85selecting a location 10shipping 86
printer configurations 11printer display
adjusting the brightness 86printer hard disk
disposing of 54encrypting 53
printer hard disk encryption 53printer hard disk memory
erasing 53printer information
finding 9printer installation 147printer is not responding 122
Index 155

printer menus 17printer options troubleshooting
internal option is notdetected 100
internal solutions port 101parallel interface card 101serial interface card 101
printer ports 12printer settings
restoring to factory defaults 53printing
directory list 31font sample list 30from a computer 28from a flash drive 28menu settings page 16
printing a directory list 31printing a font sample list 30printing a menu settings page 16printing a network setuppage 99printing forms 28printing from a flash drive 28printing from Google Drive 22printing held jobs
from a Macintosh computer 30from Windows 30
Push Button method 55
QQR codes
adding 21
Rrecycling
Lexmark packaging 87Lexmark products 87toner cartridges 87
reducing a copy 33repeat print jobs 30
printing from a Macintoshcomputer 30
printing from Windows 30repeating print defects 117replacing imaging unit 61replacing parts
ADF separator roller 79pick roller 72separator bracket 74transfer module 81
replacing the ADF input tray 76
replacing the ADF scan pad 77replacing the ADF separatorroller 79replacing the imaging kit 65replacing the pick roller 72replacing the separatorbracket 74replacing the transfer module 81replacing the waste tonerbottle 69replacing toner cartridge 60reserve print jobs
printing from a Macintoshcomputer 30
printing from Windows 30resetting the fuser pagecount 85resetting the maintenancecounter 85resetting the transfer modulepage count 85restoring factory defaultsettings 53RJ11 adapter 45
Ssafety information 6, 7, 8saving paper 33Scan Center
setting up 20Scan to Computer
setting up 52scan troubleshooting
cannot scan from acomputer 129
partial copies of documents orphotos 130
poor copy quality 130scan job was not
successful 130scanner does not respond 132scanner unit does not close 131scanning freezes the
computer 131scanning takes too long 131
scanner glass cleaning 57
scanning to an FTP server 51
scanning to a computer 52scanning to a flash drive 51
scanning to an FTP server using the control panel 51
scanning to Google Drive 22scheduling a fax 49selecting a location for theprinter 10sending a fax
scheduled 49using the computer 48using the control panel 48
sending an e‑mail 34separator bracket
replacing 74serial interface card
troubleshooting 101serial printing
setting up 56setting hibernate mode 86setting sleep mode 86setting the paper size 23setting the paper type 23setting the Universal papersize 23setting up Device Quotas 21setting up e‑mail function 34setting up fax
country‑ or region‑specific 45digital telephone service 43DSL connection 41standard telephone line
connection 36VoIP connection 42
setting up fax function 36setting up serial printing 56shipping the printer 86Shortcut Center
using 20shortcuts, creating
copy screen 33FTP address 51
showing icons on the homescreen 19statement of volatility 54storing print jobs 30supplies
conserving 87supplies status
checking 58supplies, ordering
imaging kit 59imaging unit 59toner cartridges 59
Index 156

waste toner bottle 59supported file types 29supported flash drives 29
Ttoner cartridge
replacing 60toner cartridges
ordering 59recycling 87
toner darkness adjusting 123
transfer module ordering 59replacing 81
trays installing 146linking 26loading 23unlinking 26
troubleshooting cannot open Embedded Web
Server 98contacting customer
support 132FAQ about color printing 124printer is not responding 122
troubleshooting, color quality print appears tinted 125
troubleshooting, copy partial copies of documents or
photos 130poor copy quality 130scanner does not respond 132scanner unit does not close 131
troubleshooting, fax cannot receive faxes 128cannot send faxes 128cannot send or receive
faxes 126received fax has poor print
quality 129troubleshooting, print
collated printing does notwork 102
confidential and other helddocuments do not print 105
envelope seals whenprinting 102
incorrect margins on prints 114jammed pages are not
reprinted 105
job prints from the wrongtray 123
job prints on the wrongpaper 123
paper curl 103paper frequently jams 104print jobs do not print 107slow printing 106tray linking does not work 103
troubleshooting, print quality blank pages 108crooked print 117dark print 109ghost images appear on
prints 110gray background 111horizontal dark lines 112horizontal white lines 113jagged or uneven
characters 115light print 115repeating print defects 117skewed print 117solid color or black images 118text or images cut off 119toner easily rubs off 120uneven print density 120vertical dark lines or streaks
appear on prints 121vertical white lines 121white pages 108
troubleshooting, printer options internal option is not
detected 100internal solutions port 101
troubleshooting, scan cannot scan from a
computer 129partial copies of documents or
photos 130poor copy quality 130scan job was not
successful 130scanner does not respond 132scanner unit does not close 131
two‑sided copying 32
Uunable to read flash drive
troubleshooting, print 99
understanding the status of thepower button and indicatorlight 15uneven print density 120Universal paper size
setting 23unlinking trays 26updating firmware
flash file 148USB cable 12USB port 12
enabling 99using
genuine Lexmark parts 58genuine Lexmark supplies 58
using Customer Support 21using Google Drive 22using QR Code Generator 21using the ADF
copying 32using the control panel 14using the home screen 15using the scanner glass
copying 32
Vverify print jobs 30
printing from a Macintoshcomputer 30
printing from Windows 30vertical dark lines or streaksappear on prints 121vertical white lines 121viewing a fax log 49voice mail
setting up 36voice over Internet Protocol(VoIP)
fax setup 42VoIP adapter 42volatile memory 54
erasing 53volatility
statement of 54
Wwaste toner bottle
ordering 59replacing 69
white pages 108
Index 157

wireless network Wi‑Fi Protected Setup 55
Wi‑Fi Protected Setup wireless network 55
Index 158