Embed Size (px)
Citation preview
www.dot.state.pa.us
ePermitting Intermediate Training
Welcome to ePermittingIntermediate Training for PennDOT Users!
PennDOT’s secure system is designed to manage processing of Highway Occupancy Permit applications online!
The Basic training course shows how Applicants can create and submit an application for PennDOT review.
This presentation shows you the ePermitting features used by PennDOT employees to receive, review and respond to submitted applications.
1
www.dot.state.pa.us
ePermitting Intermediate Training
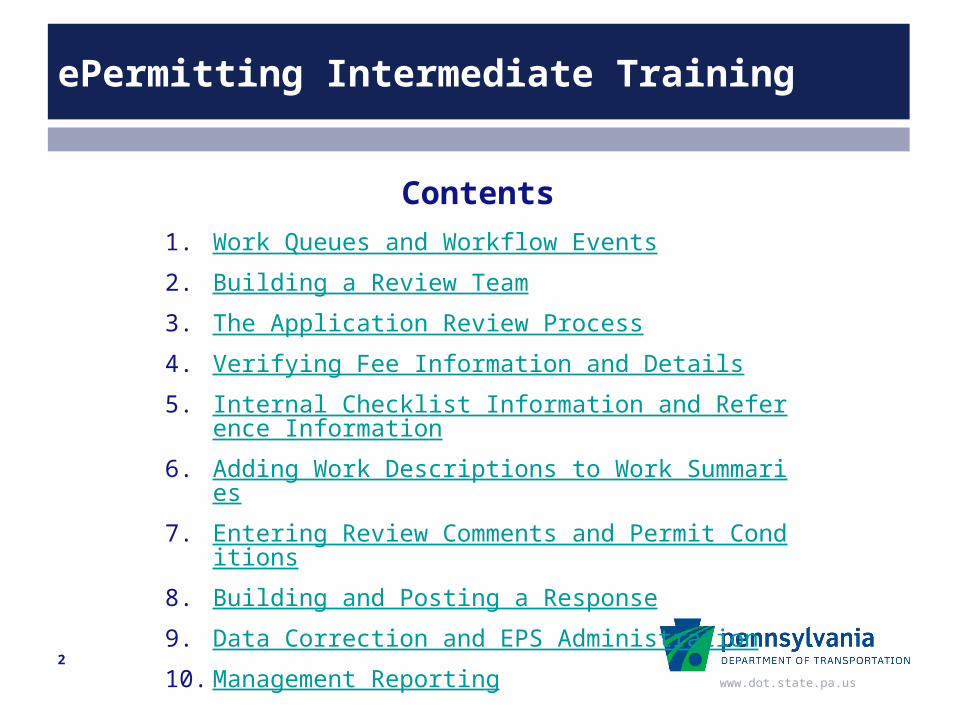
Contents1. Work Queues and Workflow Events
2. Building a Review Team
3. The Application Review Process
4. Verifying Fee Information and Details
5. Internal Checklist Information and Reference Information
6. Adding Work Descriptions to Work Summaries
7. Entering Review Comments and Permit Conditions
8. Building and Posting a Response
9. Data Correction and EPS Administration
10. Management Reporting
2

www.dot.state.pa.us
Work Queues and Workflow 1
Lesson 1
Work Queues and Workflow
Locating assignments using the Work Queue
Completing workflow actions
3
www.dot.state.pa.us
Work Queues and Workflow 1
Work Queue Work is assigned to PennDOT users based on their roles (Receiver,
Reviewer, Responder, etc.). Applications route through the workflow when an action is
performed (Submit, Receive, Complete, etc.) and the application status changes (Submitted, Under Review, Pending Response).
After a workflow step is complete, ePermitting forwards the application to the Work Queue of the next assigned role.
Users open their personal Work Queues to locate and process work. Emails alert users to workflow changes.
4

www.dot.state.pa.us
Work Queue and Workflow 1
Locate tasks assigned to you quickly.Your Work Queue is personalized for your user ID and your ePermitting role.
Tasks assigned to you are stored in the work queue for easy access.
Some work queue tasks are available to multiple people with the same role, such as Receivers. When you select the task, it becomes assigned to you.
For PennDOT users, a Work Queue button appears at the top of all ePermitting screens.
Click Work Queue to view your assigned and in-process tasks.
Opening the Work Queue
5
www.dot.state.pa.us
Work Queue and Workflow 1
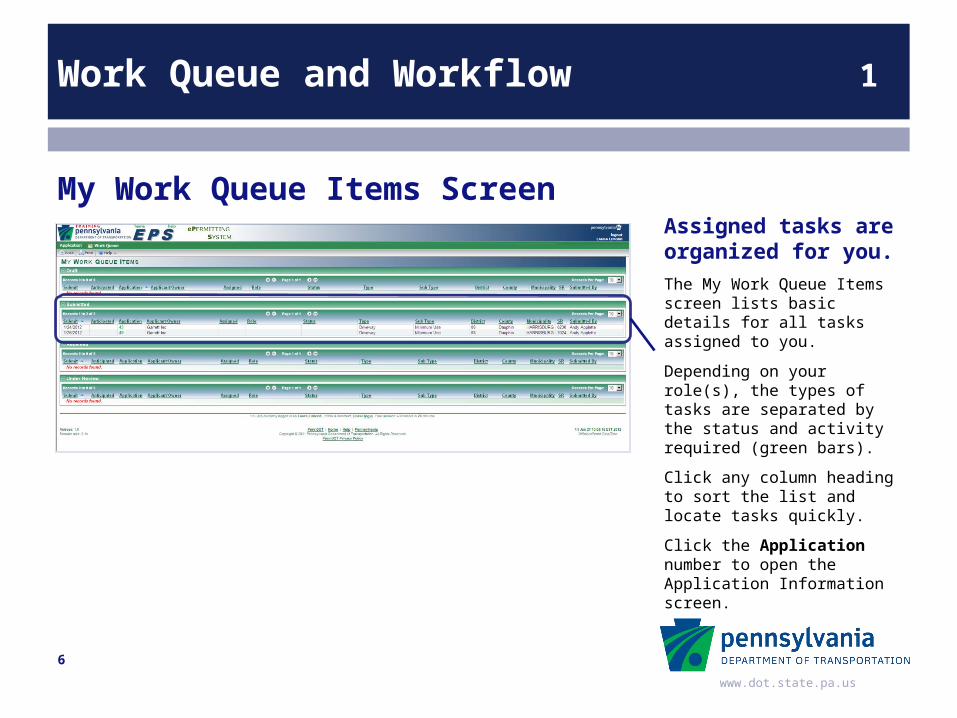
Assigned tasks are organized for you.The My Work Queue Items screen lists basic details for all tasks assigned to you.
Depending on your role(s), the types of tasks are separated by the status and activity required (green bars).
Click any column heading to sort the list and locate tasks quickly.
Click the Application number to open the Application Information screen.
My Work Queue Items Screen
6
www.dot.state.pa.us
Work Queue and Workflow 1
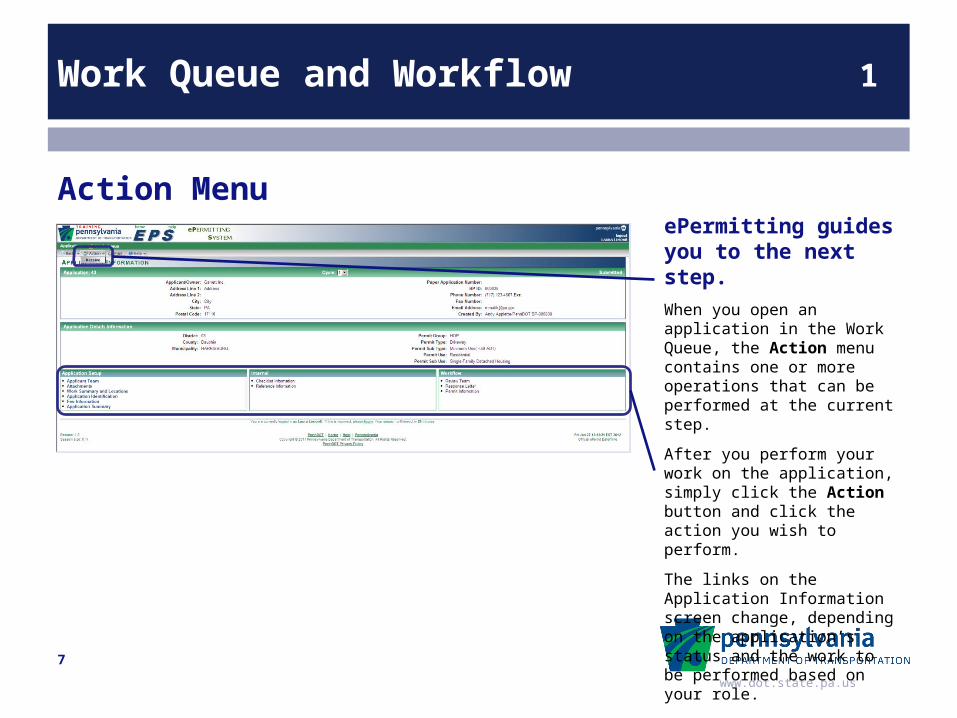
ePermitting guides you to the next step.When you open an application in the Work Queue, the Action menu contains one or more operations that can be performed at the current step.
After you perform your work on the application, simply click the Action button and click the action you wish to perform.
The links on the Application Information screen change, depending on the application’s status and the work to be performed based on your role.
Action Menu
7
www.dot.state.pa.us
Work Queue and Workflow 1
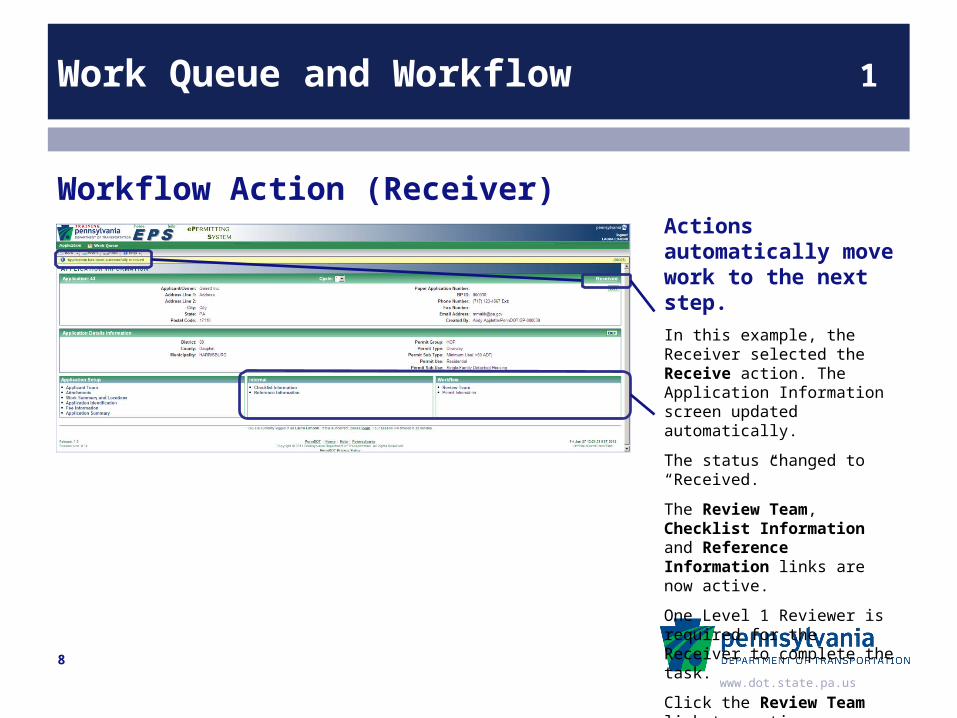
Actions automatically move work to the next step.In this example, the Receiver selected the Receive action. The Application Information screen updated automatically.
The status changed to “Received.”
The Review Team, Checklist Information and Reference Information links are now active.
One Level 1 Reviewer is required for the Receiver to complete the task.
Click the Review Team link to continue.
Workflow Action (Receiver)
8
www.dot.state.pa.us
Work Queue and Workflow 1
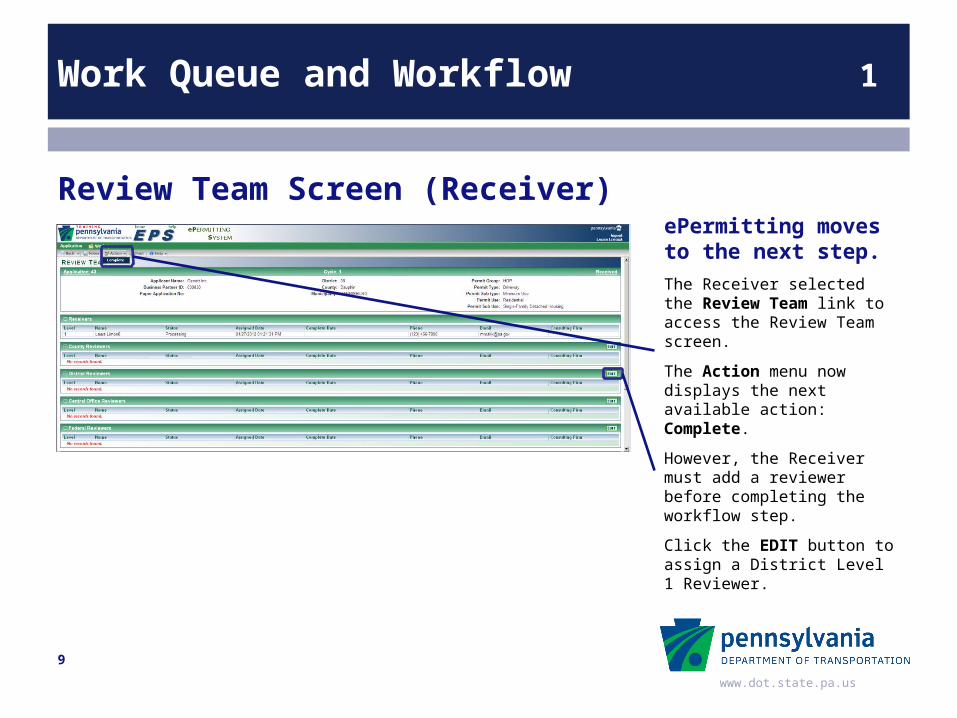
ePermitting moves to the next step.The Receiver selected the Review Team link to access the Review Team screen.
The Action menu now displays the next available action: Complete.
However, the Receiver must add a reviewer before completing the workflow step.
Click the EDIT button to assign a District Level 1 Reviewer.
Review Team Screen (Receiver)
9
www.dot.state.pa.us
Work Queue and Workflow 1
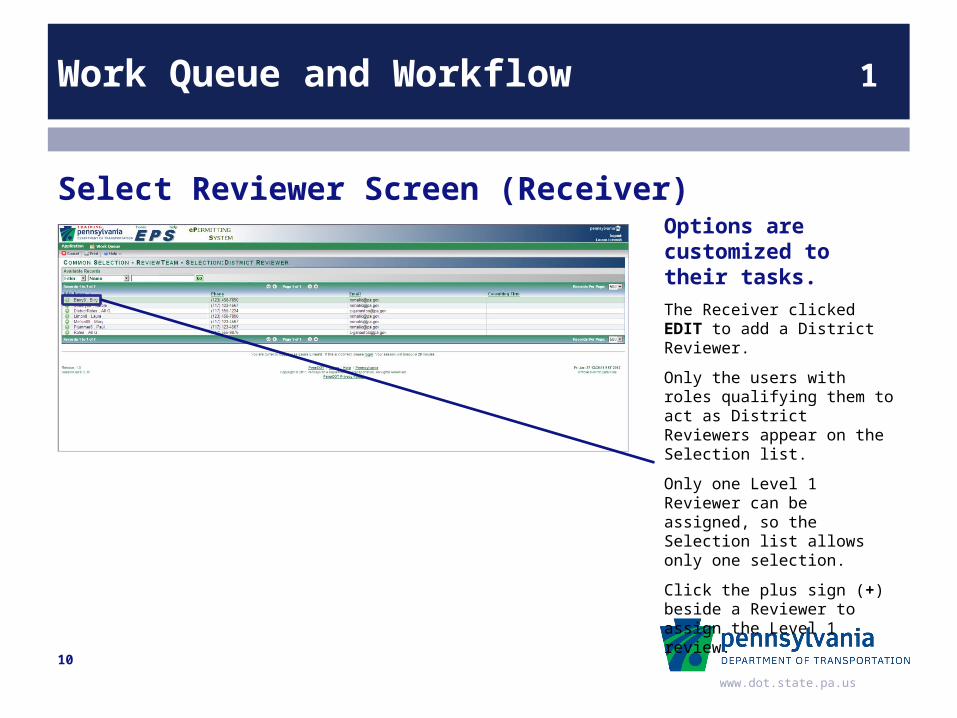
Options are customized to their tasks.The Receiver clicked EDIT to add a District Reviewer.
Only the users with roles qualifying them to act as District Reviewers appear on the Selection list.
Only one Level 1 Reviewer can be assigned, so the Selection list allows only one selection.
Click the plus sign (+) beside a Reviewer to assign the Level 1 review.
Select Reviewer Screen (Receiver)
10
www.dot.state.pa.us
Work Queue and Workflow 1
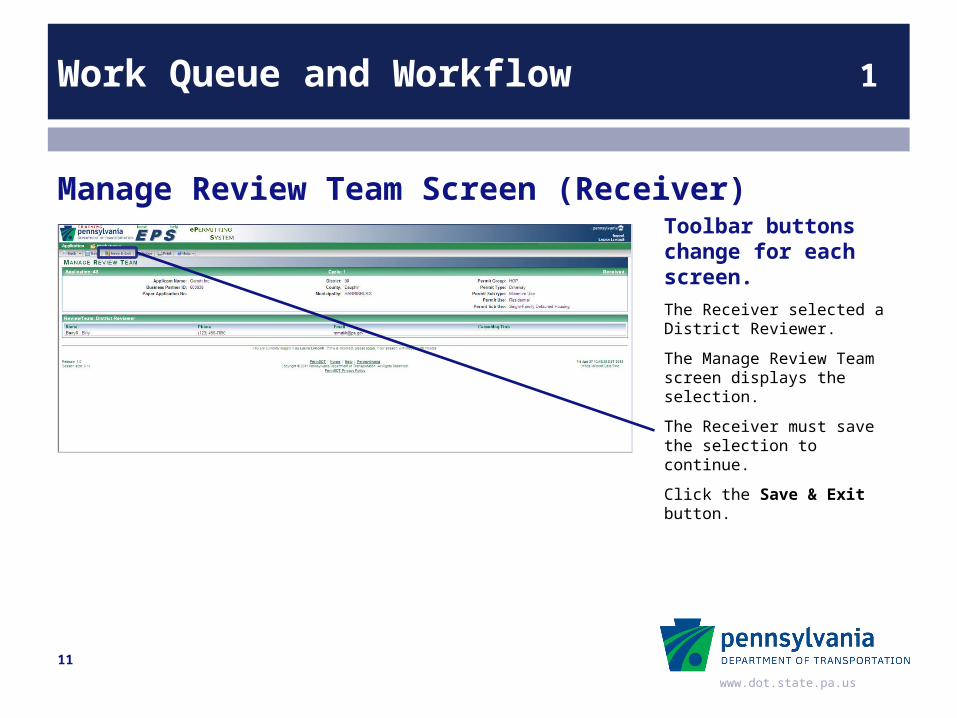
Toolbar buttons change for each screen.The Receiver selected a District Reviewer.
The Manage Review Team screen displays the selection.
The Receiver must save the selection to continue.
Click the Save & Exit button.
Manage Review Team Screen (Receiver)
11
www.dot.state.pa.us
Work Queue and Workflow 1
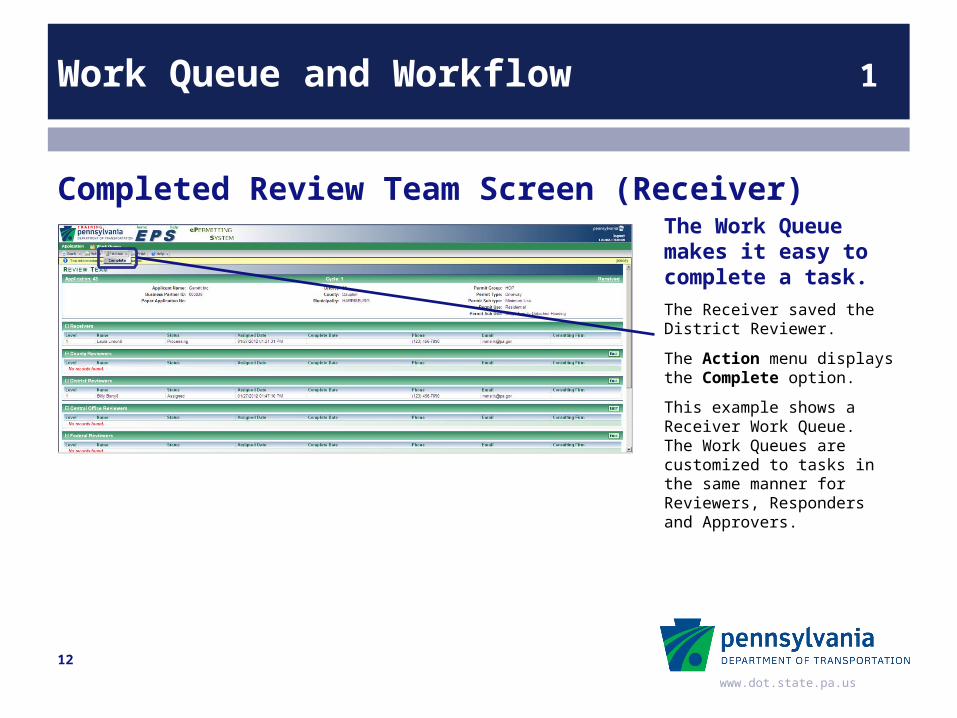
The Work Queue makes it easy to complete a task.The Receiver saved the District Reviewer.
The Action menu displays the Complete option.
This example shows a Receiver Work Queue. The Work Queues are customized to tasks in the same manner for Reviewers, Responders and Approvers.
Completed Review Team Screen (Receiver)
12
www.dot.state.pa.us
Work Queue and Workflow 1
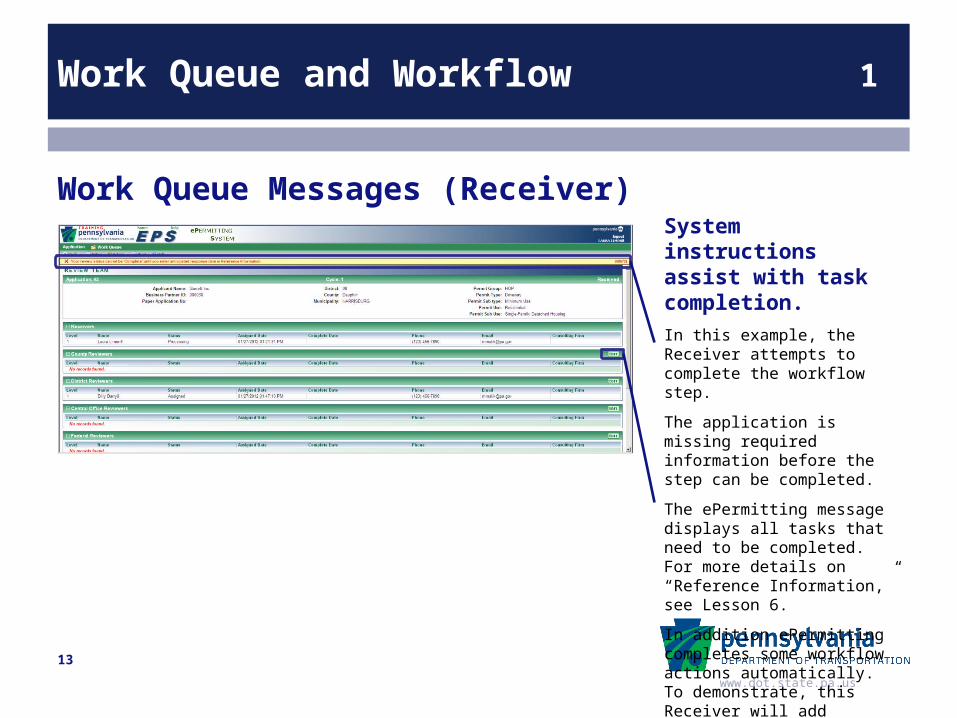
System instructions assist with task completion.In this example, the Receiver attempts to complete the workflow step.
The application is missing required information before the step can be completed.
The ePermitting message displays all tasks that need to be completed. For more details on “Reference Information,” see Lesson 6.
In addition ePermitting completes some workflow actions automatically. To demonstrate, this Receiver will add herself as the County Level 1 Reviewer.
Work Queue Messages (Receiver)
13
www.dot.state.pa.us
Work Queue and Workflow 1
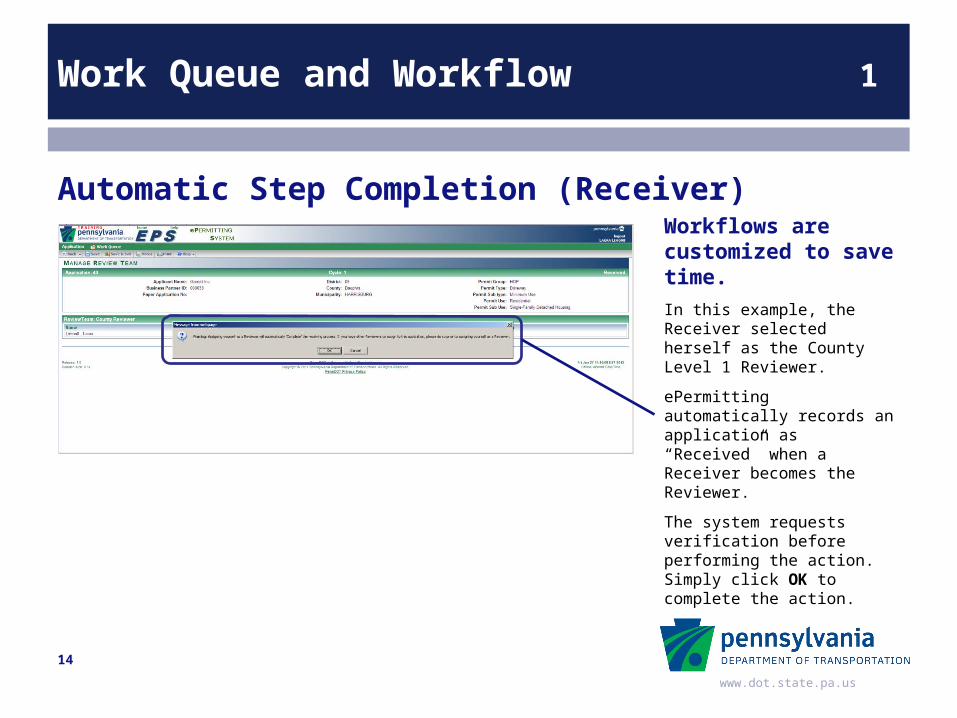
Workflows are customized to save time.In this example, the Receiver selected herself as the County Level 1 Reviewer.
ePermitting automatically records an application as “Received” when a Receiver becomes the Reviewer.
The system requests verification before performing the action. Simply click OK to complete the action.
Automatic Step Completion (Receiver)
14
www.dot.state.pa.us
Work Queue and Workflow 1
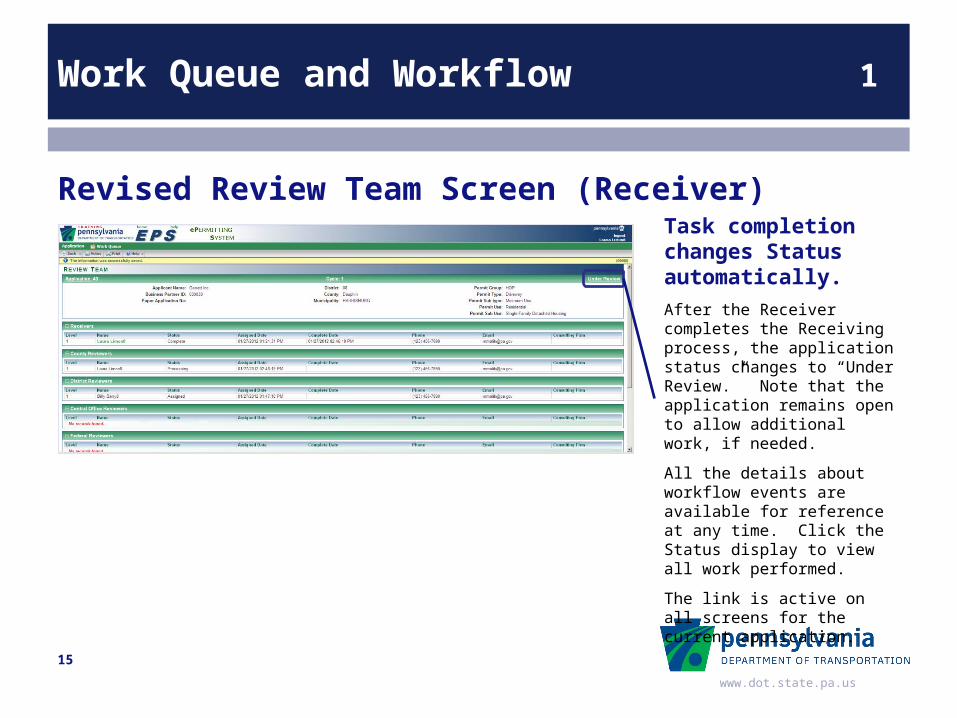
Task completion changes Status automatically.After the Receiver completes the Receiving process, the application status changes to “Under Review.” Note that the application remains open to allow additional work, if needed.
All the details about workflow events are available for reference at any time. Click the Status display to view all work performed.
The link is active on all screens for the current application.
Revised Review Team Screen (Receiver)
15
www.dot.state.pa.us
Work Queue and Workflow 1
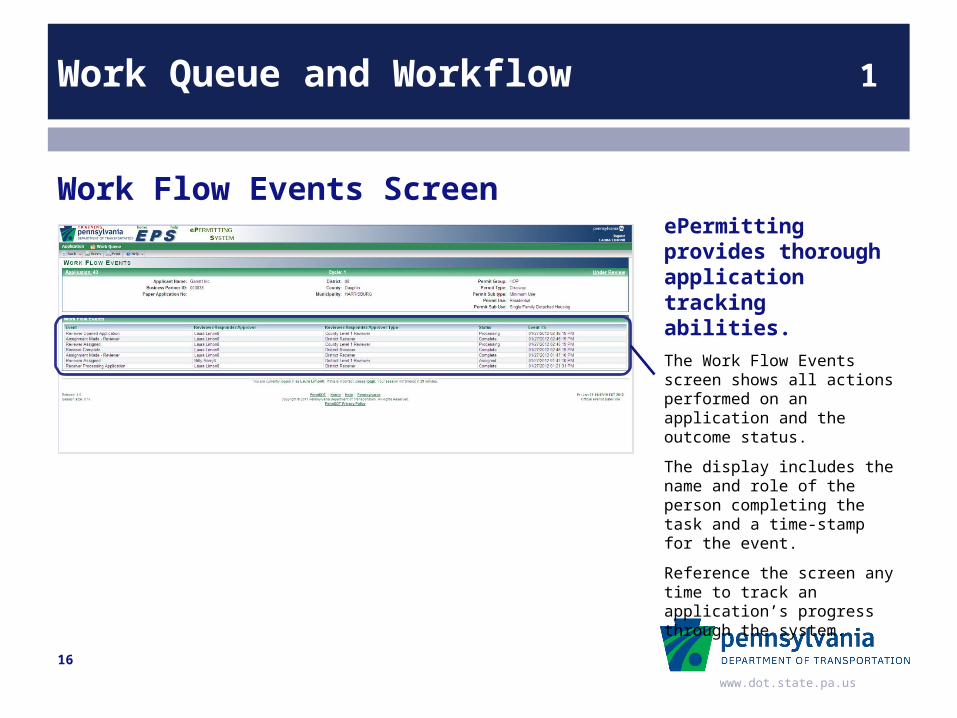
ePermitting provides thorough application tracking abilities.The Work Flow Events screen shows all actions performed on an application and the outcome status.
The display includes the name and role of the person completing the task and a time-stamp for the event.
Reference the screen any time to track an application’s progress through the system.
Work Flow Events Screen
16
www.dot.state.pa.us
Work Queue and Workflow 1
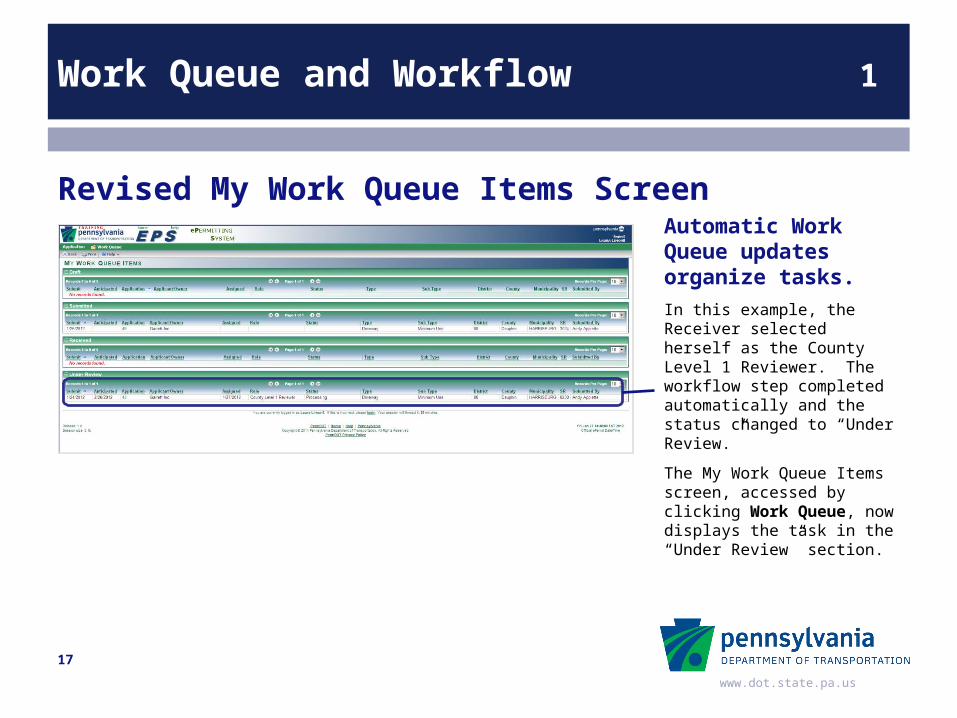
Automatic Work Queue updates organize tasks.In this example, the Receiver selected herself as the County Level 1 Reviewer. The workflow step completed automatically and the status changed to “Under Review.”
The My Work Queue Items screen, accessed by clicking Work Queue, now displays the task in the “Under Review” section.
Revised My Work Queue Items Screen
17
www.dot.state.pa.us
Building a Review Team 2
Lesson 2
Building a Review Team
The roles of receivers and reviewers in the review process
The four types of Level 1 reviewers
Additional levels of reviewers
18
www.dot.state.pa.us
Building a Review Team 2
The Role of ReceiversSubmitted applications automatically go to the work queues of County or District Receivers. Utility permit applications are forwarded to County Receivers. Other permit applications are forwarded to District Receivers.
When a Receiver opens the application, the status changes to “Received.”
The Receiver must assign at least one Level 1 Reviewer.
After the Receiver completes the step, the status changes to “Under Review.”
19
www.dot.state.pa.us
Building a Review Team 2
The Role of ReviewersReviewers are added to the Review Team to perform various functions: Enter data on applications (fees, locations, work descriptions, etc.) Review the application for accuracy and applicability Add conditions before a permit can be issued Add response comments, if needed Attach documents for reference Consult with other reviewers
20
www.dot.state.pa.us
Building a Review Team 2
Level 1 ReviewersAt least one Level 1 Reviewer must review and approve the information on an application before a response is sent. Only one Level 1 Reviewer of each type is permitted: County Level 1 Reviewers are required for utility permits. District Level 1 Reviewers are required for driveway and
miscellaneous permits. Central Office Level 1 Reviewers may be required for some permit
applications. Federal (FHWA) Level 1 Reviewers may be required for permits
affecting Interstate Highways.
21
www.dot.state.pa.us
Building a Review Team 2
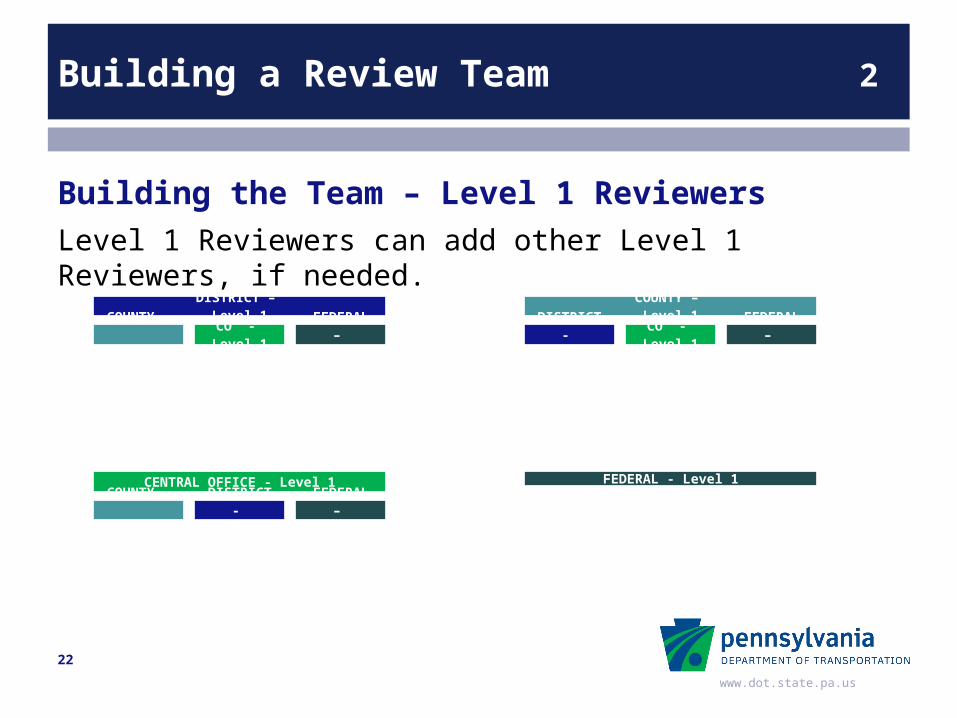
Building the Team – Level 1 ReviewersLevel 1 Reviewers can add other Level 1 Reviewers, if needed.
22
DISTRICT – Level 1
COUNTY - Level 1
CO - Level 1
FEDERAL – Level 1
COUNTY – Level 1
DISTRICT - Level 1
CO - Level 1
FEDERAL – Level 1
CENTRAL OFFICE - Level 1
COUNTY - Level 1
DISTRICT - Level 1
FEDERAL – Level 1
FEDERAL - Level 1
www.dot.state.pa.us
Building a Review Team 2
Building the Team – Adding Level 2 ReviewersLevel 1 Reviewers can add Level 2 Reviewers of the same type.
23
DISTRICT – Level 1
DISTRICT - Level 2
DISTRICT - Level 2
DISTRICT - Level 2
COUNTY – Level 1
COUNTY - Level 2
COUNTY - Level 2
COUNTY - Level 2
CENTRAL OFFICE – Level 1
CO - Level 2
CO - Level 2
CO - Level 2
FEDERAL – Level 1
www.dot.state.pa.us
Building a Review Team 2
Building the Team – Adding Level 3 ReviewersLevel 2 Reviewers can add Level 3 Reviewers of the same type.
24
DISTRICT – Level 1
DISTRICT - Level 2
DISTRICT -
Level 3
DISTRICT - Level 2
DISTRICT -
Level 3
DISTRICT - Level 2
DISTRICT -
Level 3
COUNTY – Level 1
COUNTY - Level 2
COUNTY -
Level 3
COUNTY - Level 2
COUNTY -
Level 3
COUNTY - Level 2
COUNTY -
Level 3
CENTRAL OFFICE – Level 1
CO - Level 2
CO - Level 3
CO - Level 2
CO - Level 3
CO - Level 2
CO - Level 3
FEDERAL – Level 1
www.dot.state.pa.us
Building a Review Team 2
Review Hierarchy – Five Levels of ReviewThe upper-level Reviewer adds other Reviewers and accepts comments and conditions after the lower-level review is complete.
25
LEVEL 1
LEVEL 2
LEVEL 3
LEVEL 4
LEVEL 5
LEVEL 3
LEVEL 4
LEVEL 5
LEVEL 2
LEVEL 3
LEVEL 4
LEVEL 5
LEVEL 3
LEVEL 4
LEVEL 5
www.dot.state.pa.us
Building a Review Team 2
Assigned applications appear in the work queue.If an application is assigned for your review, it will list in your Work Queue. Click Work Queue from any screen to display tasks assigned to you.
The Review Team can be modified when an application is in “Under Review” status. Click the application number to select the application.
Adding reviewers to an application review…
26
www.dot.state.pa.us
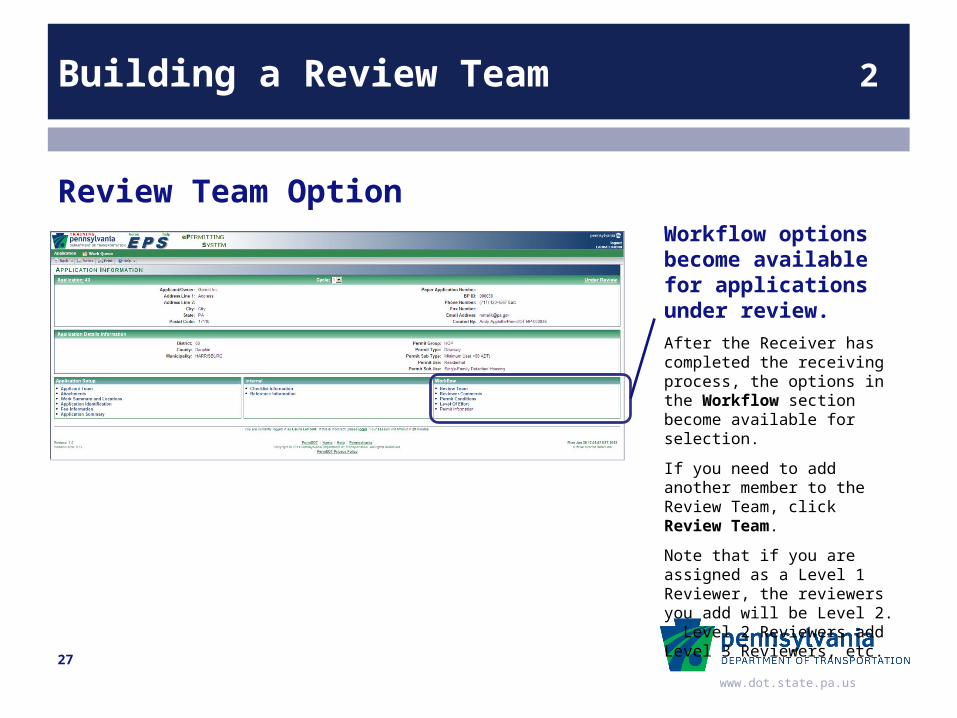
Building a Review Team 2
Workflow options become available for applications under review.After the Receiver has completed the receiving process, the options in the Workflow section become available for selection.
If you need to add another member to the Review Team, click Review Team.
Note that if you are assigned as a Level 1 Reviewer, the reviewers you add will be Level 2. Level 2 Reviewers add Level 3 Reviewers, etc.
Review Team Option
27
www.dot.state.pa.us
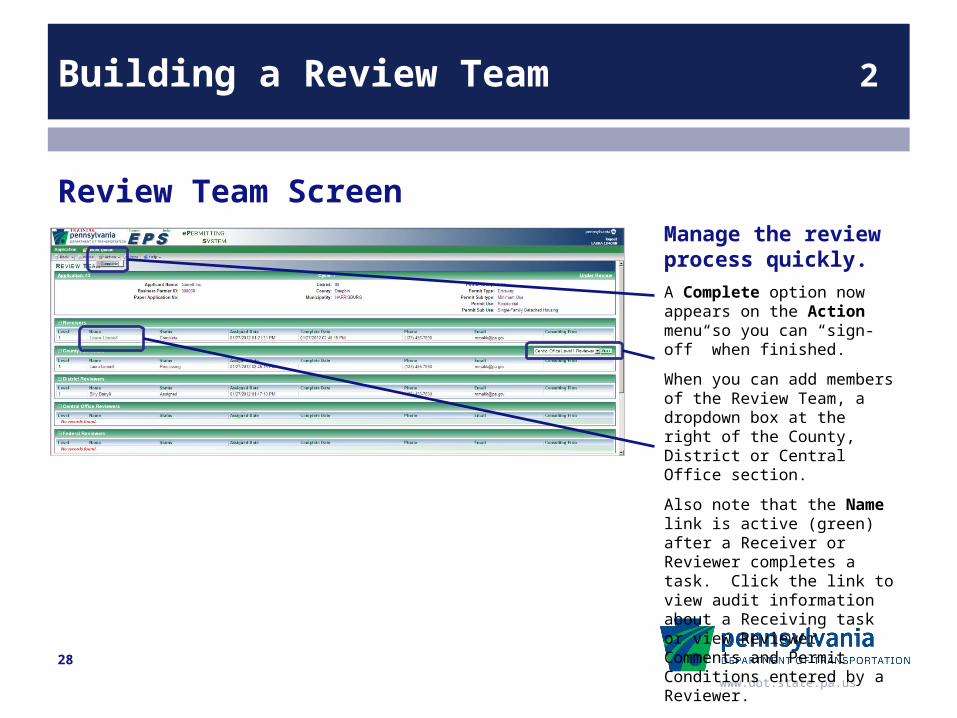
Building a Review Team 2
Manage the review process quickly.A Complete option now appears on the Action menu so you can “sign-off” when finished.
When you can add members of the Review Team, a dropdown box at the right of the County, District or Central Office section.
Also note that the Name link is active (green) after a Receiver or Reviewer completes a task. Click the link to view audit information about a Receiving task or view Reviewer Comments and Permit Conditions entered by a Reviewer.
Review Team Screen
28

www.dot.state.pa.us
Building a Review Team 2
Refer the application to other reviewers when needed.The dropdown box displays all the types and levels of Reviewers you can add to the team.
Level 1 Reviewers can add other types of Level 1 Reviewers when needed.
Reviewers in Levels 1-4 can add lower-level Reviewers of the same type.
Click the dropdown arrow and click the Reviewer type or level to add.
Click EDIT to move to the Review Team selection screen.
Review Team Screen – Add Reviewer
29

www.dot.state.pa.us
Building a Review Team 2
Only available Reviewers are displayed.The Review Team selection screen displays all Reviewers available for the review level and type.
The same Reviewer can be added multiple times and at multiple levels throughout the review process, if needed.
Click the checkbox beside one or more Available Records.
Click the Apply button to add the Reviewer(s) to the Selected Records list.
Click OK to make the selection.
Review Team Selection
30
www.dot.state.pa.us
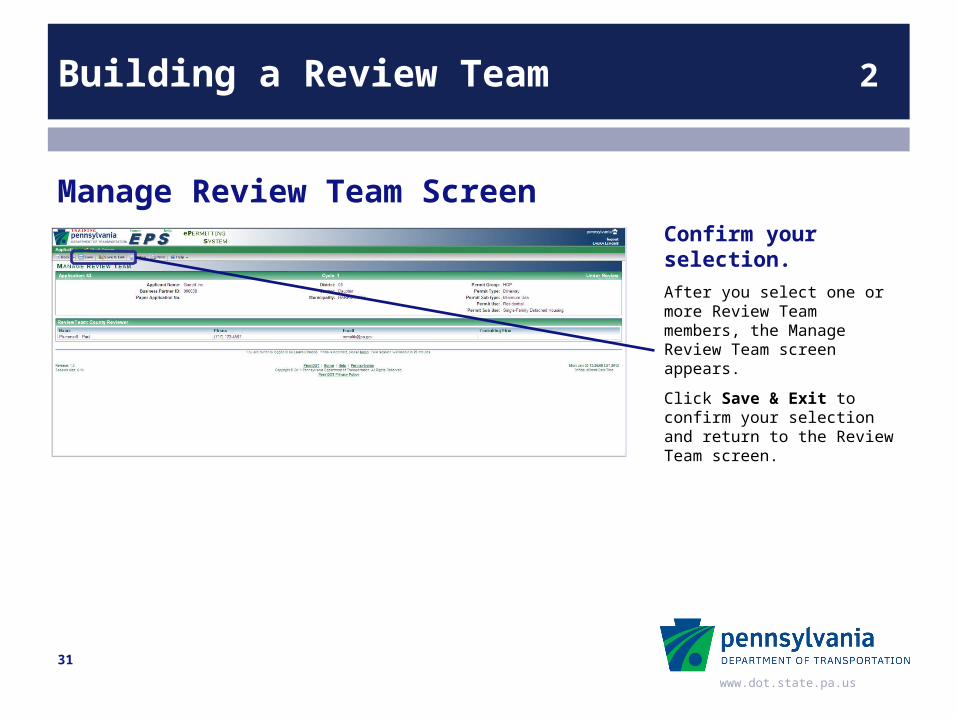
Building a Review Team 2
Confirm your selection.After you select one or more Review Team members, the Manage Review Team screen appears.
Click Save & Exit to confirm your selection and return to the Review Team screen.
Manage Review Team Screen
31
www.dot.state.pa.us
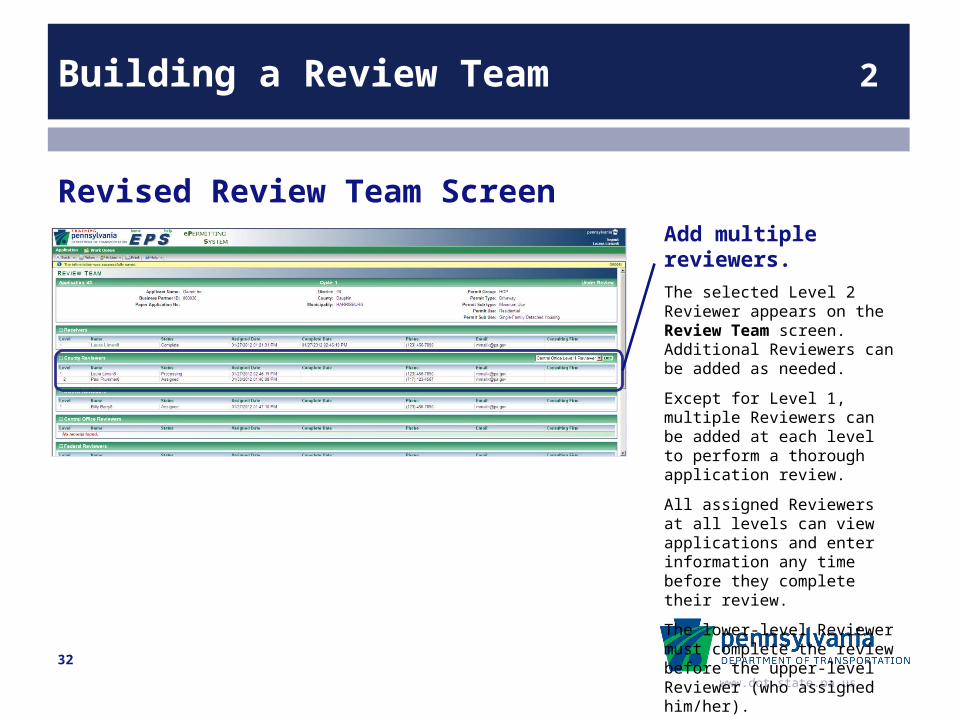
Building a Review Team 2
Add multiple reviewers.The selected Level 2 Reviewer appears on the Review Team screen. Additional Reviewers can be added as needed.
Except for Level 1, multiple Reviewers can be added at each level to perform a thorough application review.
All assigned Reviewers at all levels can view applications and enter information any time before they complete their review.
The lower-level Reviewer must complete the review before the upper-level Reviewer (who assigned him/her).
Revised Review Team Screen
32
www.dot.state.pa.us
The Review Process 3
Lesson 3
The Review Process
An overview of the screens Reviewers use when reviewing applications
Entering Level of Effort and completing a review
33
www.dot.state.pa.us
The Review Process 3
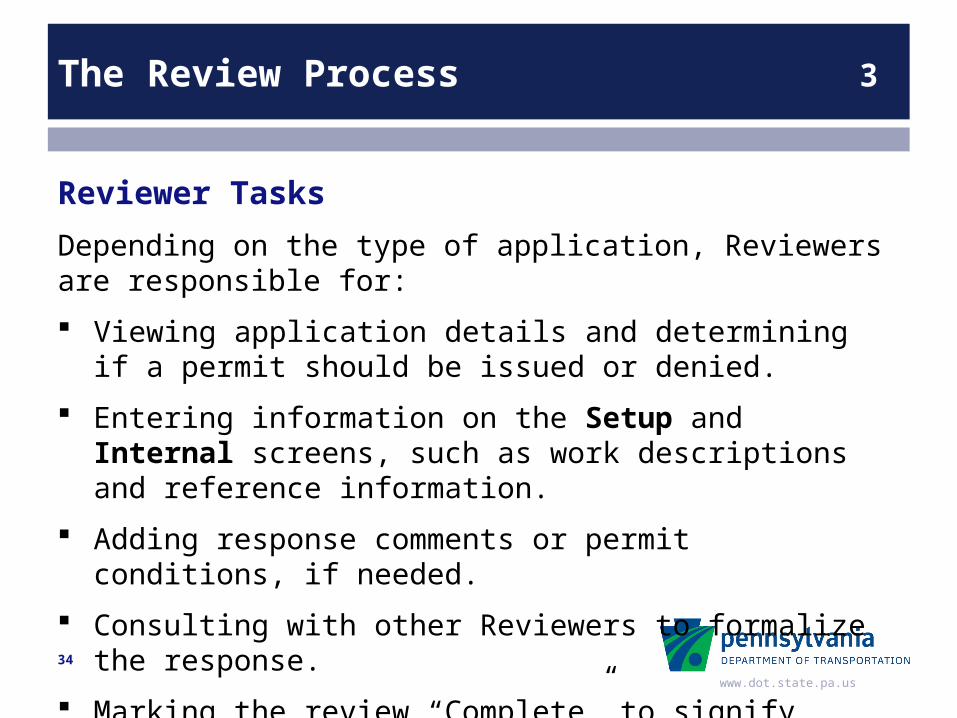
Reviewer Tasks
Depending on the type of application, Reviewers are responsible for:
Viewing application details and determining if a permit should be issued or denied.
Entering information on the Setup and Internal screens, such as work descriptions and reference information.
Adding response comments or permit conditions, if needed.
Consulting with other Reviewers to formalize the response.
Marking the review “Complete” to signify acceptance of application information.
34
www.dot.state.pa.us
The Review Process 3
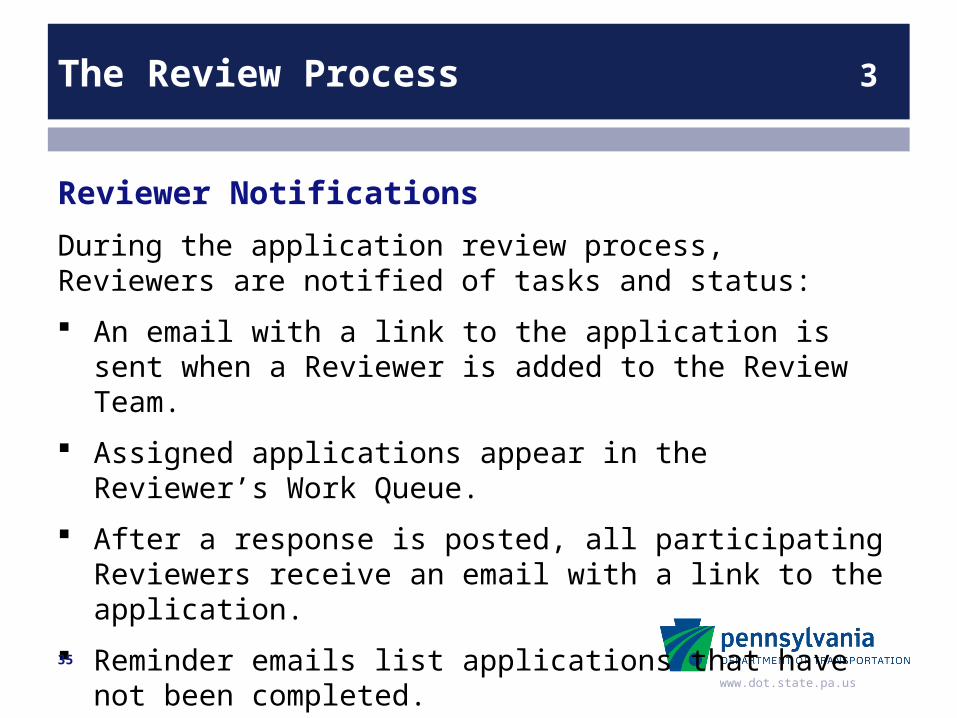
Reviewer Notifications
During the application review process, Reviewers are notified of tasks and status:
An email with a link to the application is sent when a Reviewer is added to the Review Team.
Assigned applications appear in the Reviewer’s Work Queue.
After a response is posted, all participating Reviewers receive an email with a link to the application.
Reminder emails list applications that have not been completed.
35
www.dot.state.pa.us
The Review Process 3
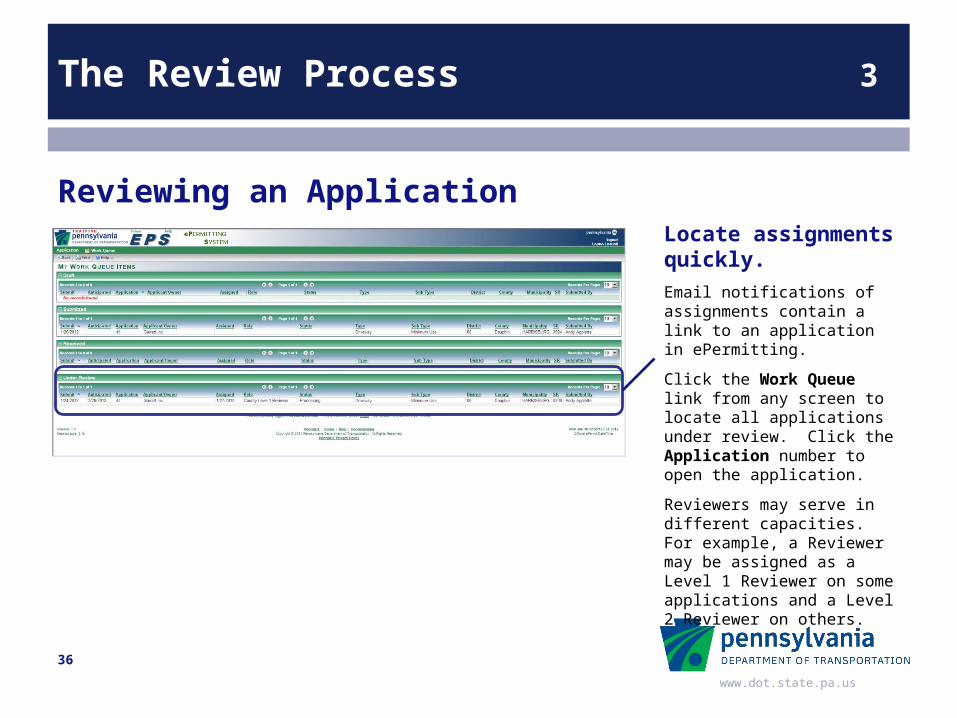
Locate assignments quickly.Email notifications of assignments contain a link to an application in ePermitting.
Click the Work Queue link from any screen to locate all applications under review. Click the Application number to open the application.
Reviewers may serve in different capacities. For example, a Reviewer may be assigned as a Level 1 Reviewer on some applications and a Level 2 Reviewer on others.
Reviewing an Application
36
www.dot.state.pa.us
The Review Process 3
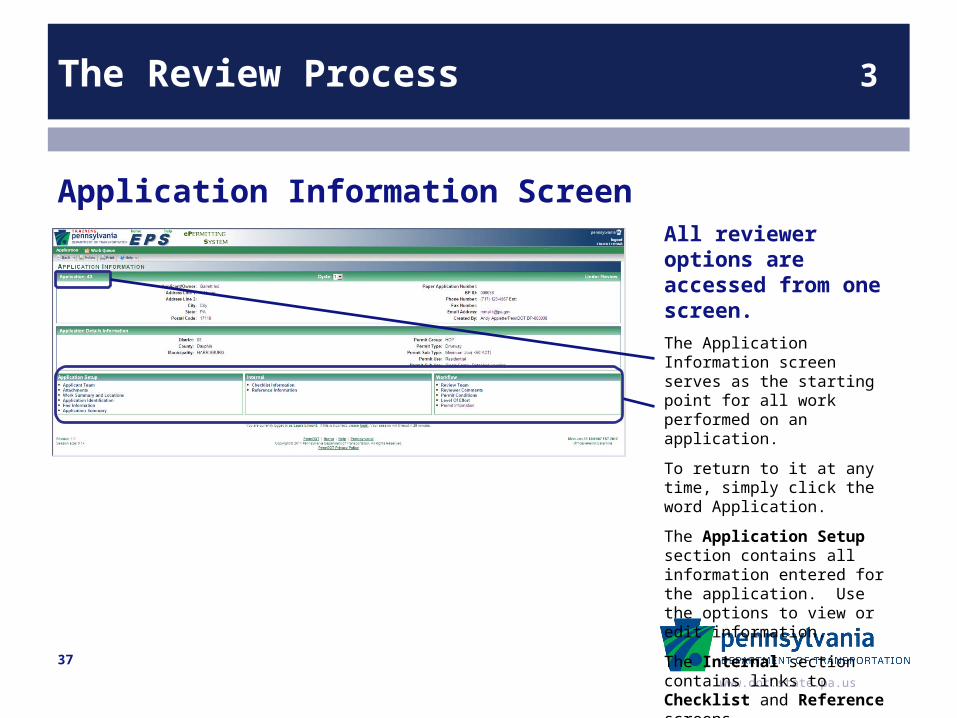
All reviewer options are accessed from one screen.The Application Information screen serves as the starting point for all work performed on an application.
To return to it at any time, simply click the word Application.
The Application Setup section contains all information entered for the application. Use the options to view or edit information.
The Internal section contains links to Checklist and Reference screens.
The Workflow section accesses options to prepare a response and mark the review complete.
Application Information Screen
37
www.dot.state.pa.us
The Review Process 3
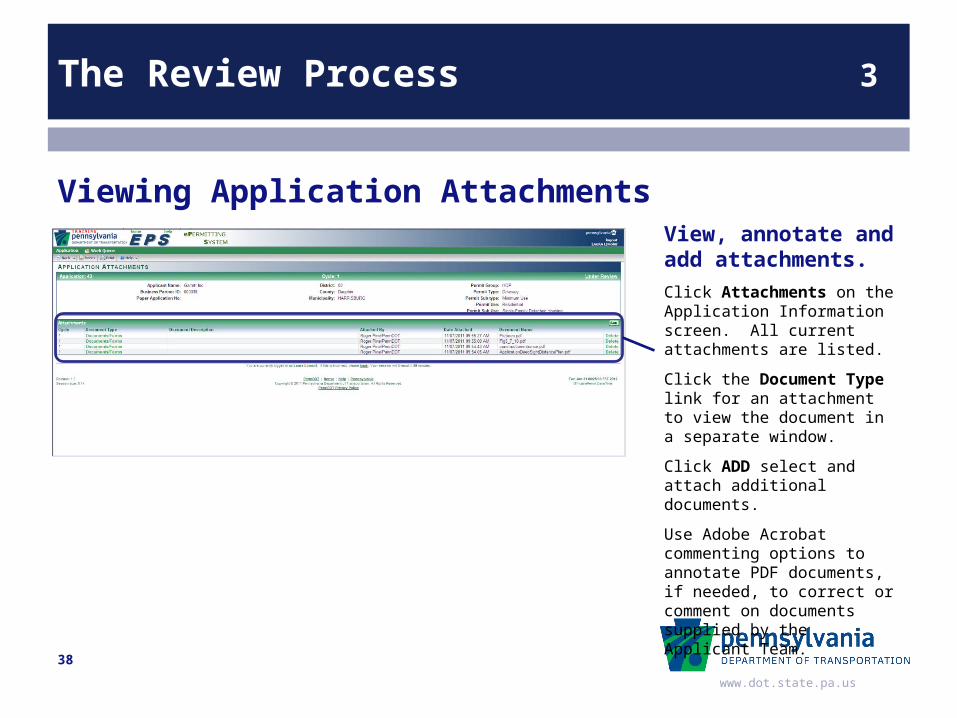
View, annotate and add attachments.Click Attachments on the Application Information screen. All current attachments are listed.
Click the Document Type link for an attachment to view the document in a separate window.
Click ADD select and attach additional documents.
Use Adobe Acrobat commenting options to annotate PDF documents, if needed, to correct or comment on documents supplied by the Applicant Team.
Viewing Application Attachments
38
www.dot.state.pa.us
The Review Process 3
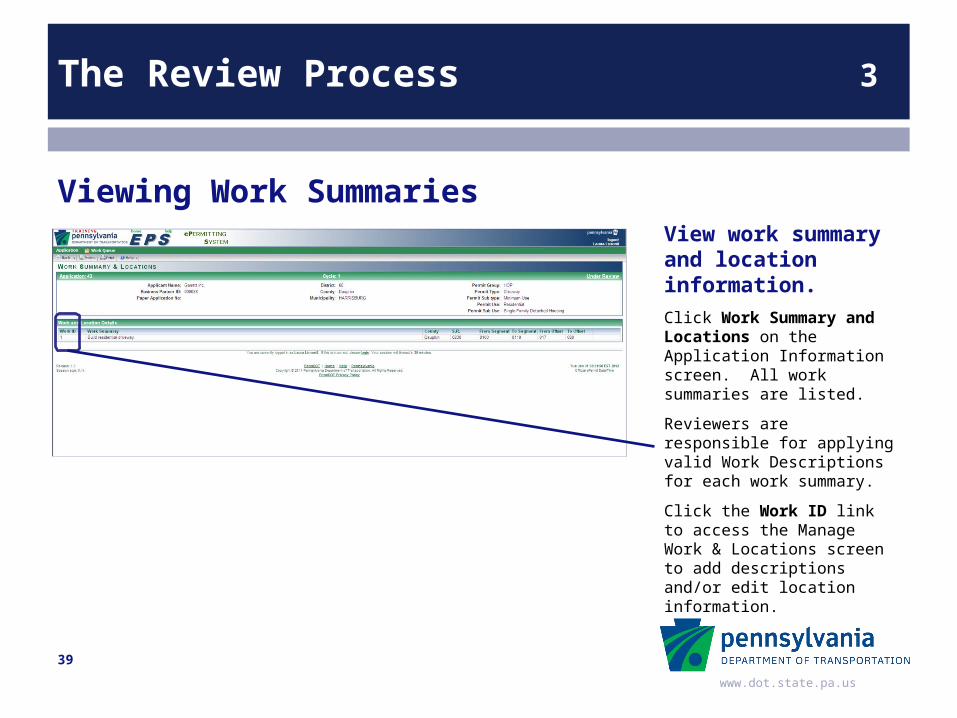
View work summary and location information.Click Work Summary and Locations on the Application Information screen. All work summaries are listed.
Reviewers are responsible for applying valid Work Descriptions for each work summary.
Click the Work ID link to access the Manage Work & Locations screen to add descriptions and/or edit location information.
Viewing Work Summaries
39
www.dot.state.pa.us
The Review Process 3
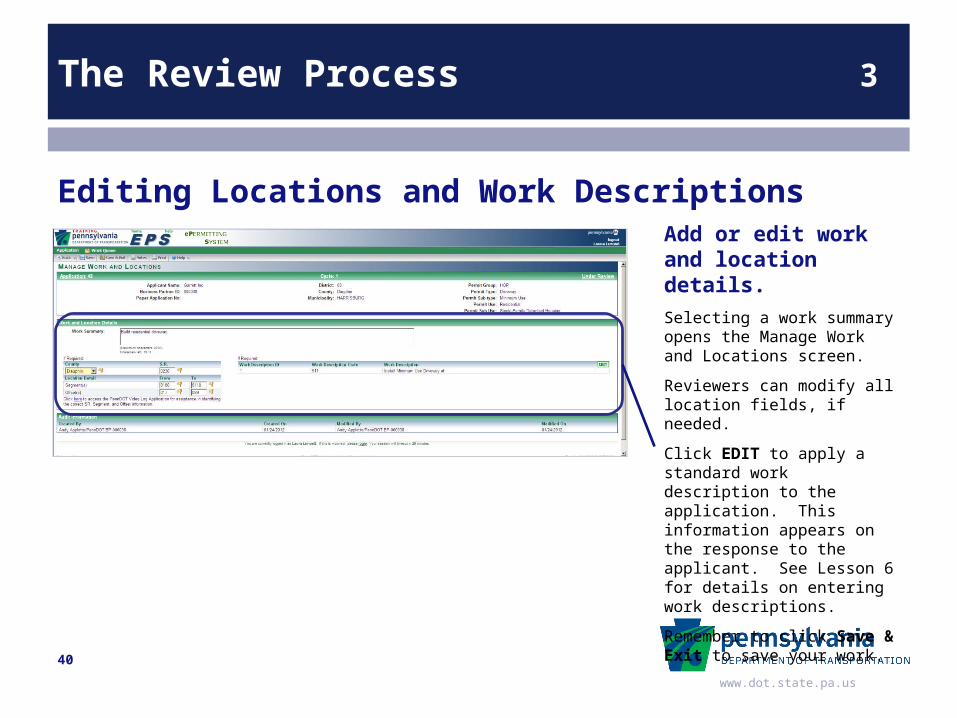
Add or edit work and location details.Selecting a work summary opens the Manage Work and Locations screen.
Reviewers can modify all location fields, if needed.
Click EDIT to apply a standard work description to the application. This information appears on the response to the applicant. See Lesson 6 for details on entering work descriptions.
Remember to click Save & Exit to save your work.
Editing Locations and Work Descriptions
40
www.dot.state.pa.us
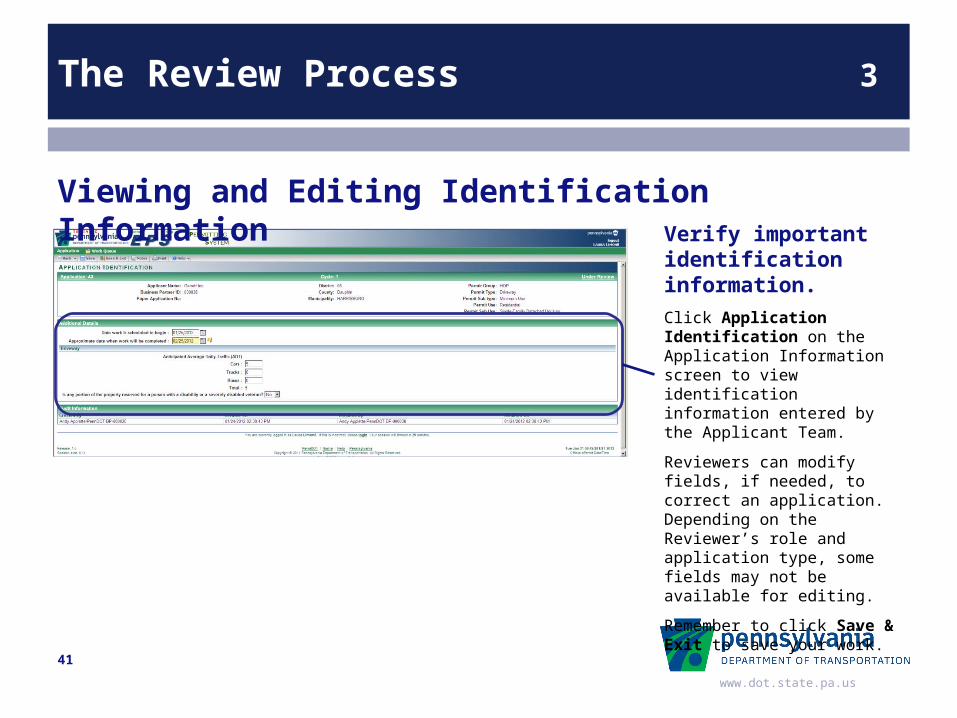
The Review Process 3
Verify important identification information.Click Application Identification on the Application Information screen to view identification information entered by the Applicant Team.
Reviewers can modify fields, if needed, to correct an application. Depending on the Reviewer’s role and application type, some fields may not be available for editing.
Remember to click Save & Exit to save your work.
Viewing and Editing Identification Information
41

www.dot.state.pa.us
The Review Process 3
Verify and edit fee information.Click Fee Information on the Application Information screen to view fees entered by the Applicant Team or Receiver.
Click the Fee Description to view fee details or edit information.
Click ADD FEE if additional fees, such as for inspection, are required. See Lesson 4 for instructions on adding fees.
Remember to click Save & Exit to save your work.
Viewing and Editing Fee Information
42
www.dot.state.pa.us
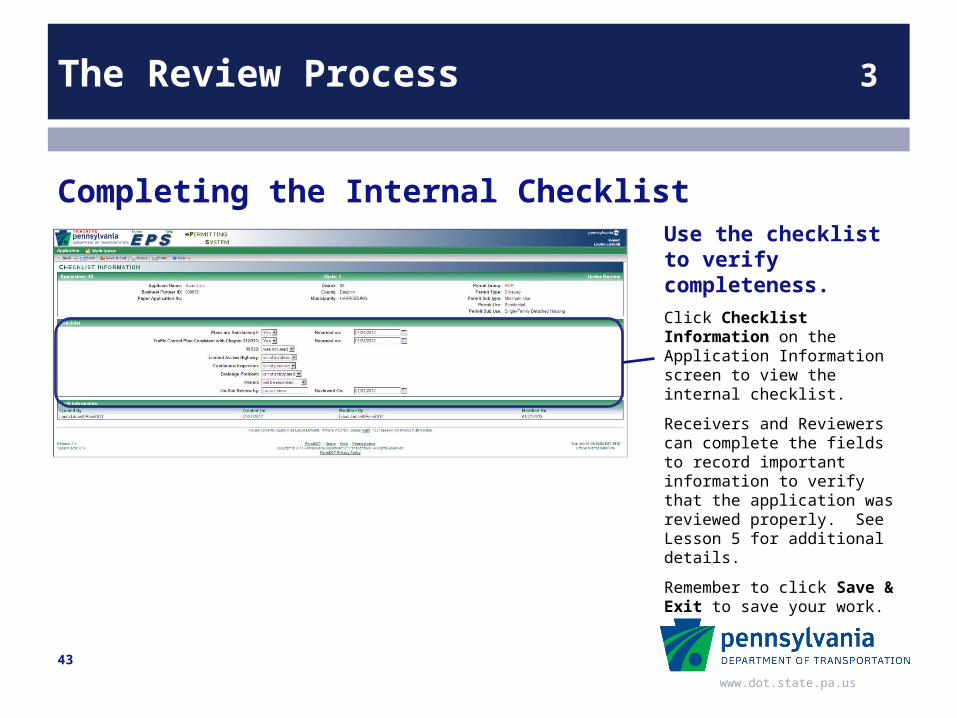
The Review Process 3
Use the checklist to verify completeness.Click Checklist Information on the Application Information screen to view the internal checklist.
Receivers and Reviewers can complete the fields to record important information to verify that the application was reviewed properly. See Lesson 5 for additional details.
Remember to click Save & Exit to save your work.
Completing the Internal Checklist
43
www.dot.state.pa.us
The Review Process 3
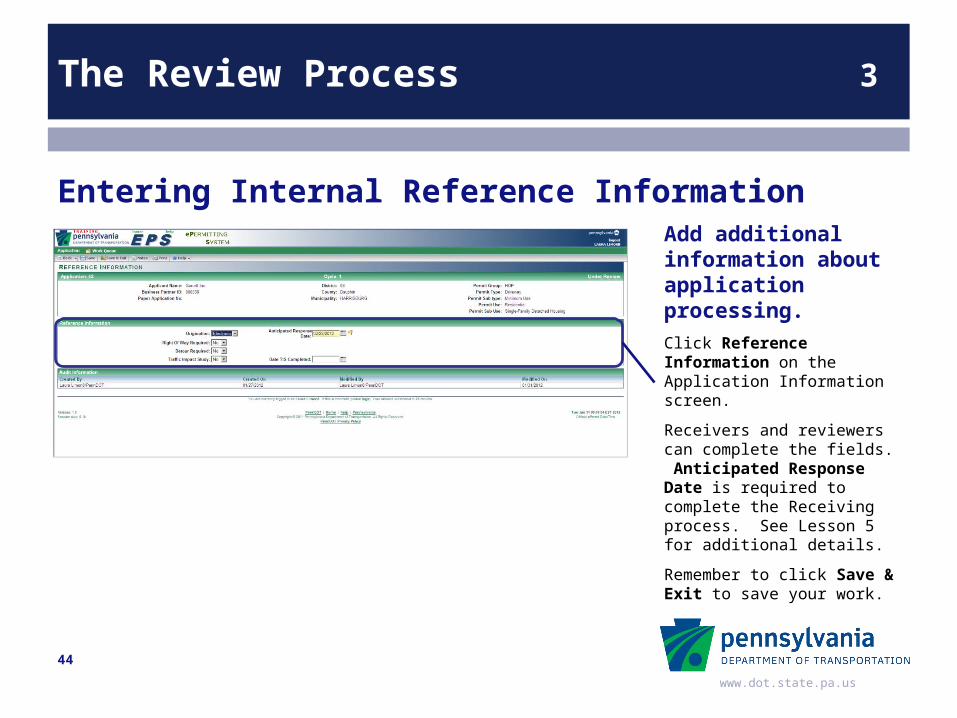
Add additional information about application processing.Click Reference Information on the Application Information screen.
Receivers and reviewers can complete the fields. Anticipated Response Date is required to complete the Receiving process. See Lesson 5 for additional details.
Remember to click Save & Exit to save your work.
Entering Internal Reference Information
44
www.dot.state.pa.us
The Review Process 3
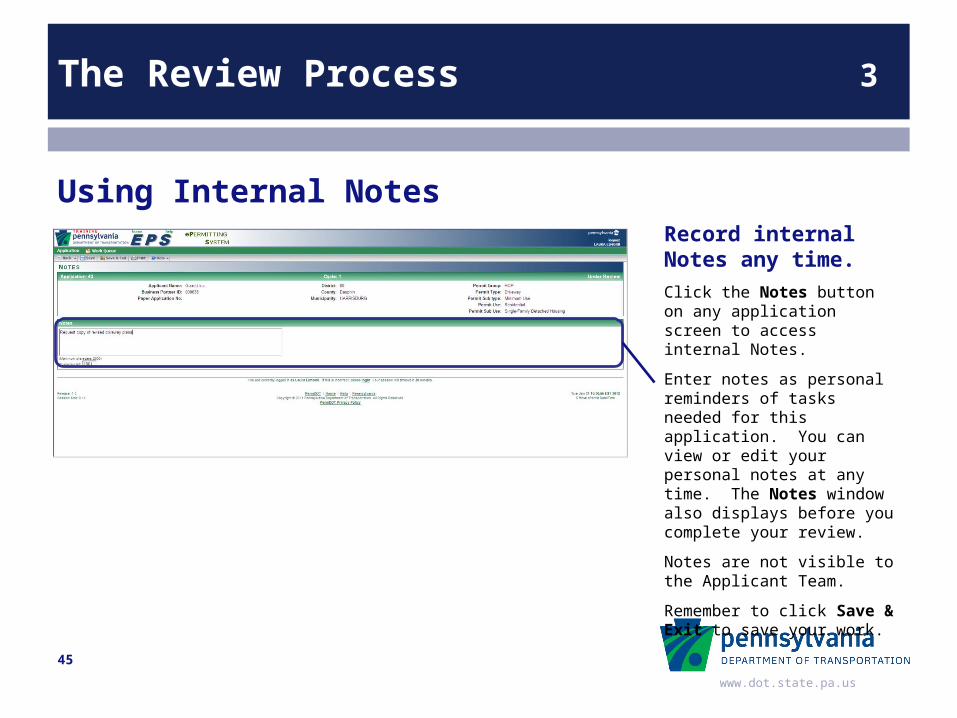
Record internal Notes any time.Click the Notes button on any application screen to access internal Notes.
Enter notes as personal reminders of tasks needed for this application. You can view or edit your personal notes at any time. The Notes window also displays before you complete your review.
Notes are not visible to the Applicant Team.
Remember to click Save & Exit to save your work.
Using Internal Notes
45
www.dot.state.pa.us
The Review Process 3
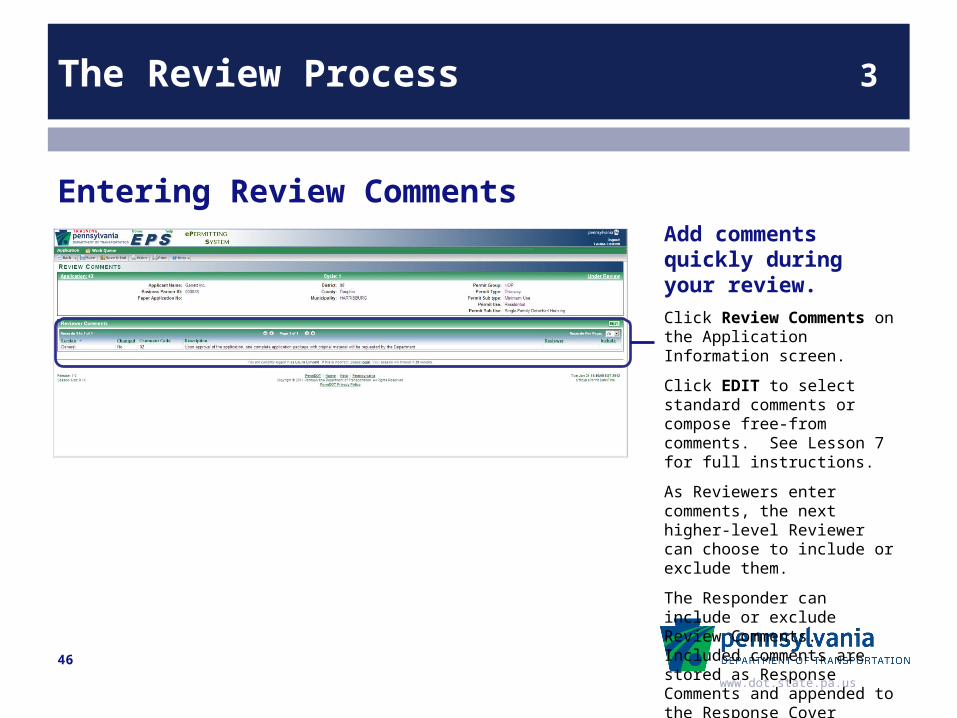
Add comments quickly during your review.Click Review Comments on the Application Information screen.
Click EDIT to select standard comments or compose free-from comments. See Lesson 7 for full instructions.
As Reviewers enter comments, the next higher-level Reviewer can choose to include or exclude them.
The Responder can include or exclude Review Comments. Included comments are stored as Response Comments and appended to the Response Cover Letter.
Entering Review Comments
46
www.dot.state.pa.us
The Review Process 3
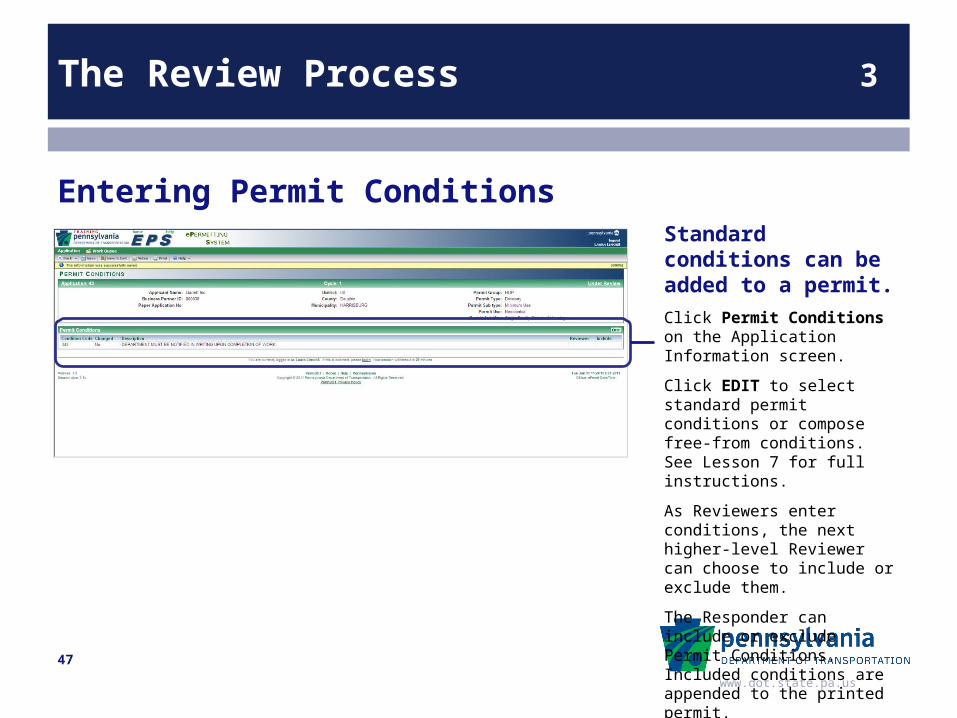
Standard conditions can be added to a permit.Click Permit Conditions on the Application Information screen.
Click EDIT to select standard permit conditions or compose free-from conditions. See Lesson 7 for full instructions.
As Reviewers enter conditions, the next higher-level Reviewer can choose to include or exclude them.
The Responder can include or exclude Permit Conditions. Included conditions are appended to the printed permit.
Entering Permit Conditions
47
www.dot.state.pa.us
The Review Process 3
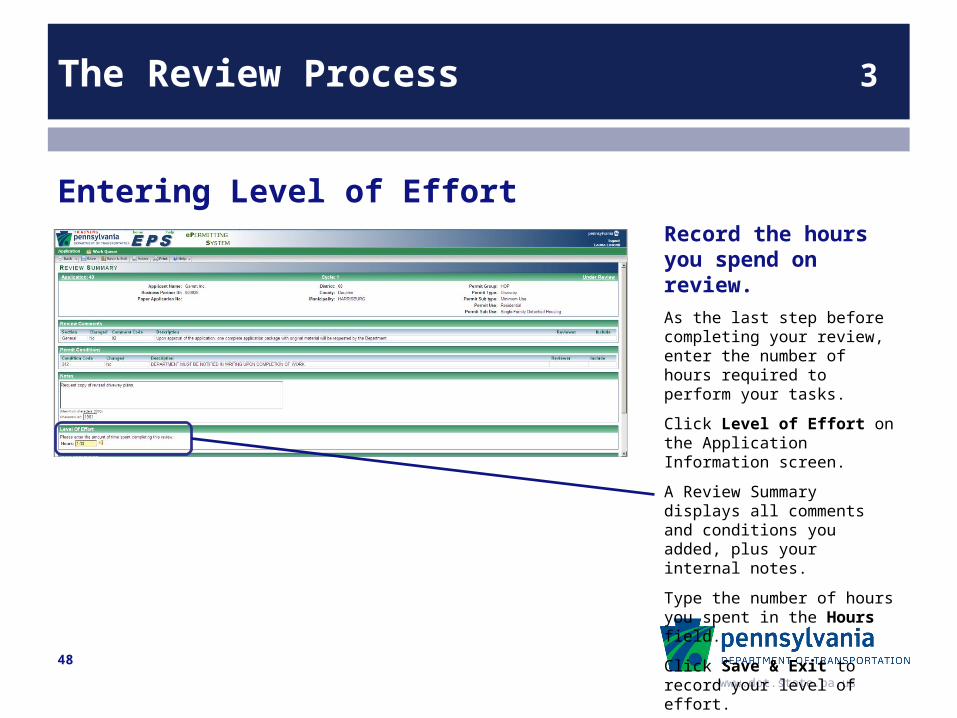
Record the hours you spend on review.As the last step before completing your review, enter the number of hours required to perform your tasks.
Click Level of Effort on the Application Information screen.
A Review Summary displays all comments and conditions you added, plus your internal notes.
Type the number of hours you spent in the Hours field.
Click Save & Exit to record your level of effort.
Entering Level of Effort
48
www.dot.state.pa.us
The Review Process 3
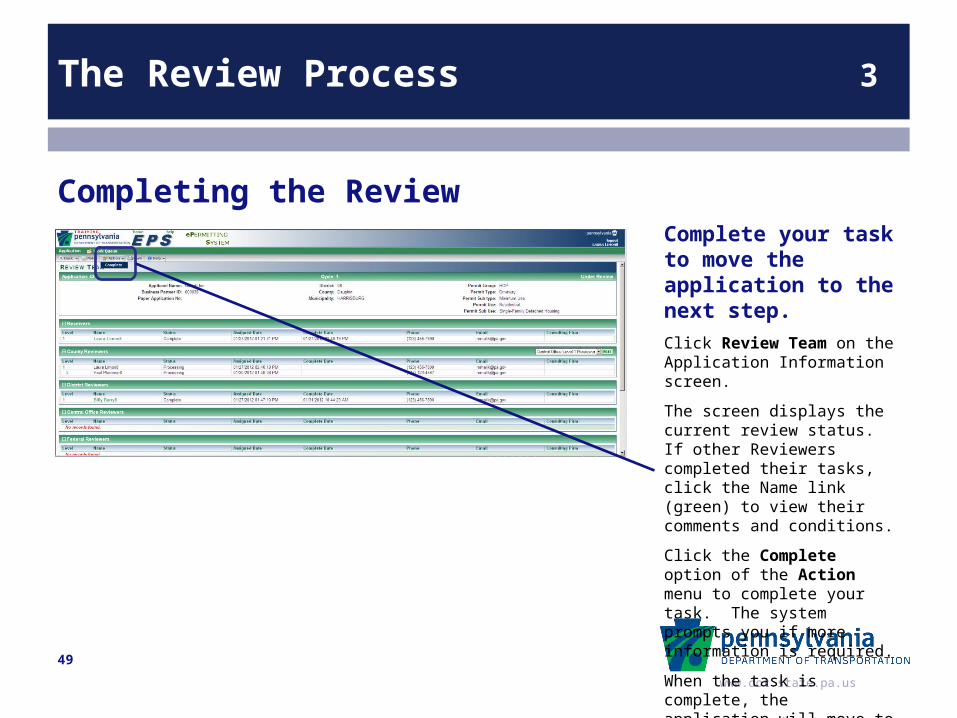
Complete your task to move the application to the next step.Click Review Team on the Application Information screen.
The screen displays the current review status. If other Reviewers completed their tasks, click the Name link (green) to view their comments and conditions.
Click the Complete option of the Action menu to complete your task. The system prompts you if more information is required.
When the task is complete, the application will move to the next workflow step.
Completing the Review
49
www.dot.state.pa.us
Fee Information 4
Lesson 4
Verifying Fee Information and Details
Reviewing application fees
Entering or editing fee details
50
www.dot.state.pa.us
Fee Information 4
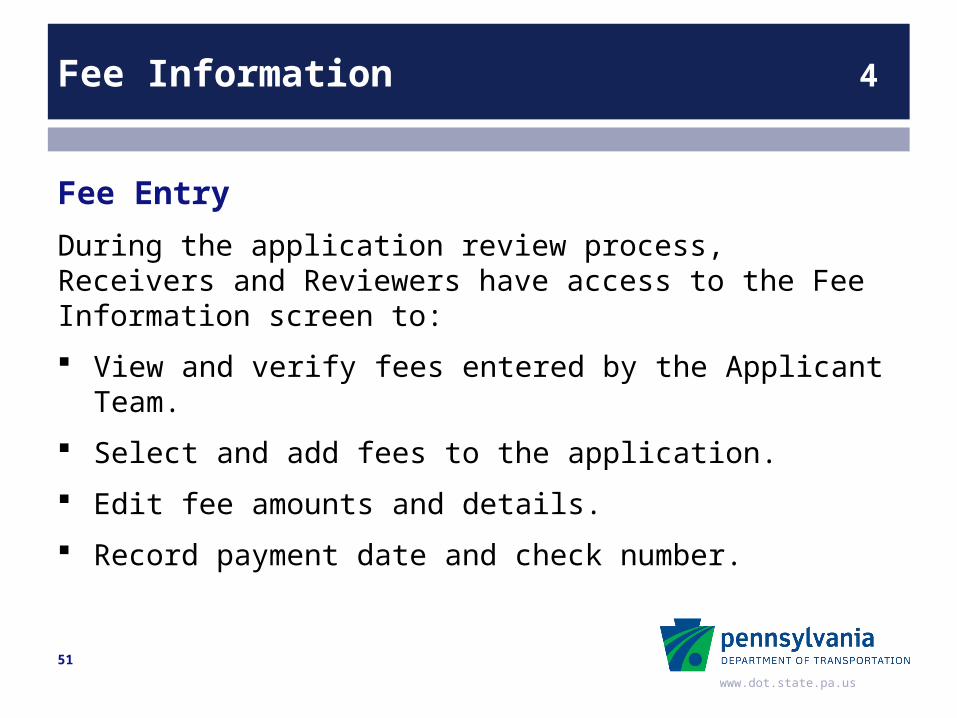
Fee Entry
During the application review process, Receivers and Reviewers have access to the Fee Information screen to:
View and verify fees entered by the Applicant Team.
Select and add fees to the application.
Edit fee amounts and details.
Record payment date and check number.
51
www.dot.state.pa.us
Fee Information 4
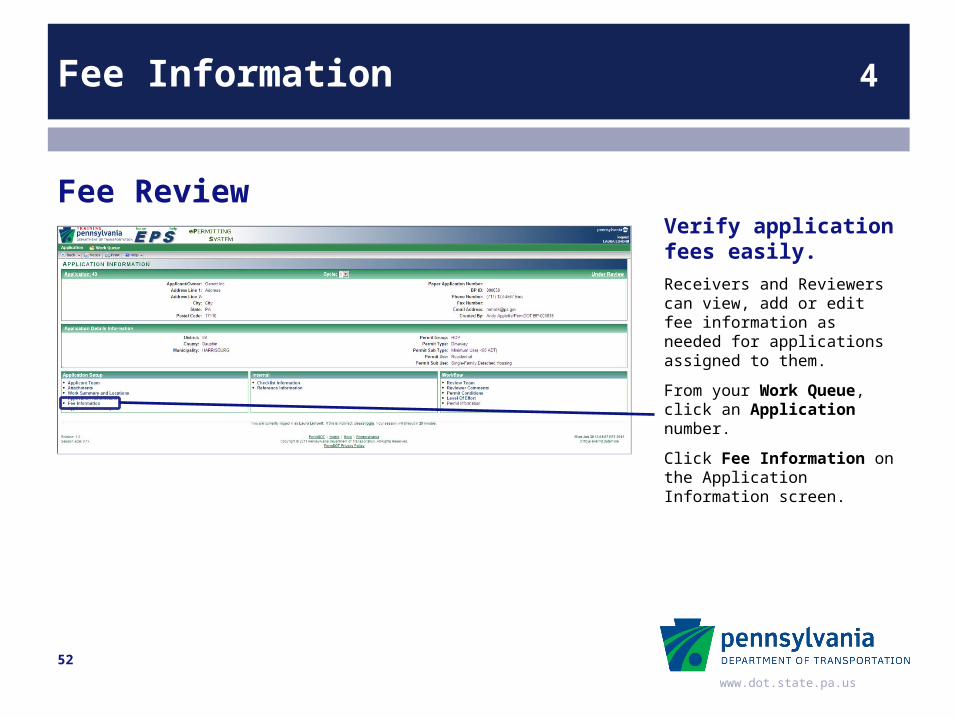
Verify application fees easily.Receivers and Reviewers can view, add or edit fee information as needed for applications assigned to them.
From your Work Queue, click an Application number.
Click Fee Information on the Application Information screen.
Fee Review
52
www.dot.state.pa.us
Fee Information 4
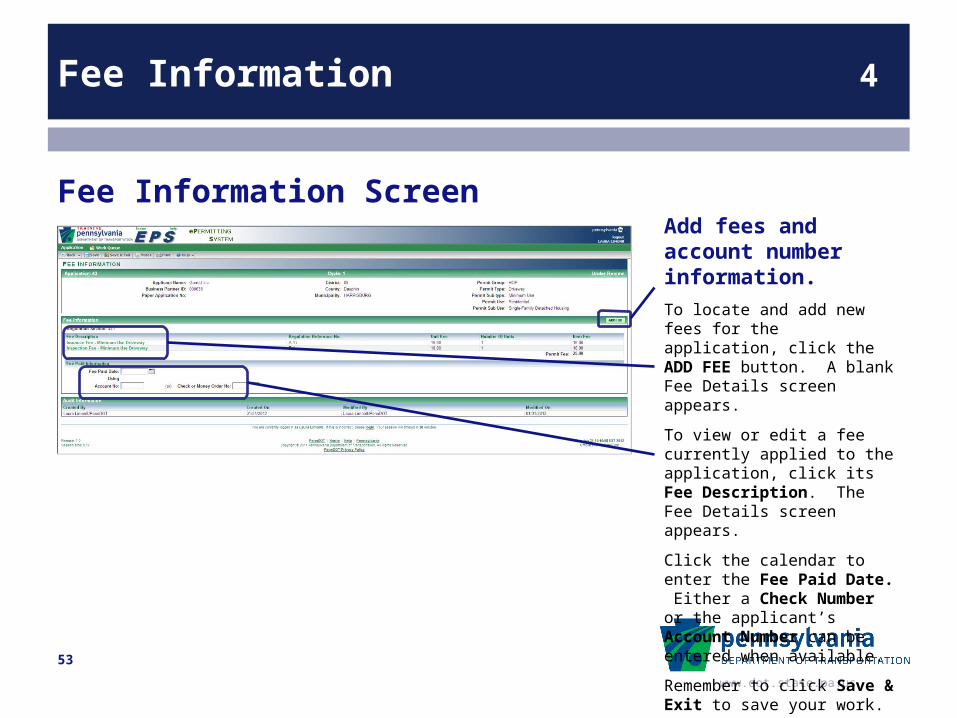
Add fees and account number information.To locate and add new fees for the application, click the ADD FEE button. A blank Fee Details screen appears.
To view or edit a fee currently applied to the application, click its Fee Description. The Fee Details screen appears.
Click the calendar to enter the Fee Paid Date. Either a Check Number or the applicant’s Account Number can be entered when available.
Remember to click Save & Exit to save your work.
Fee Information Screen
53
www.dot.state.pa.us
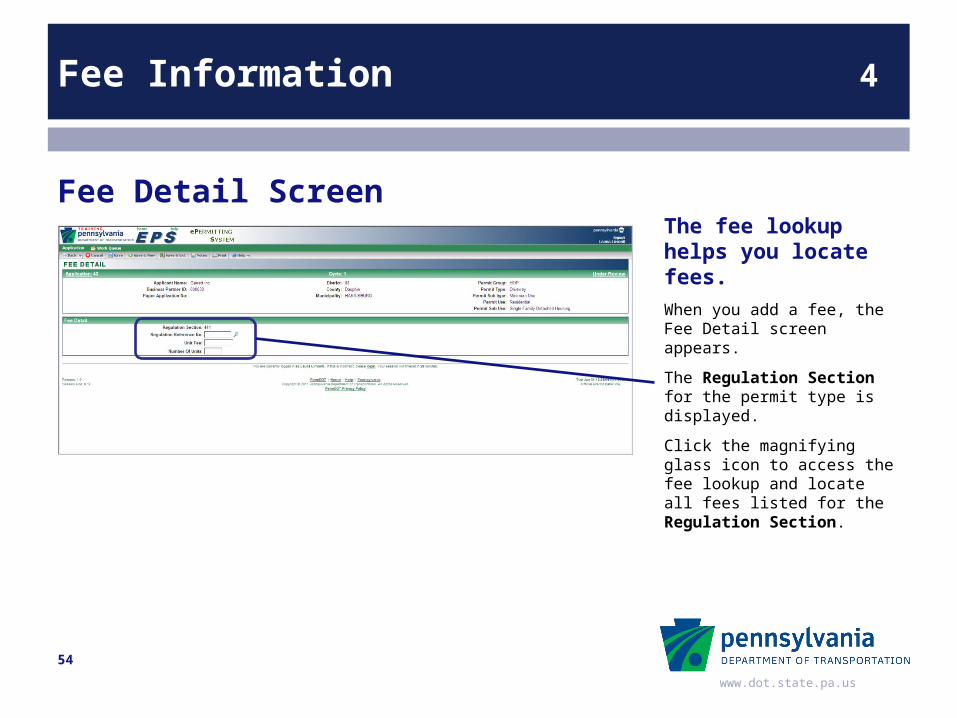
Fee Information 4
The fee lookup helps you locate fees.When you add a fee, the Fee Detail screen appears.
The Regulation Section for the permit type is displayed.
Click the magnifying glass icon to access the fee lookup and locate all fees listed for the Regulation Section.
Fee Detail Screen
54
www.dot.state.pa.us
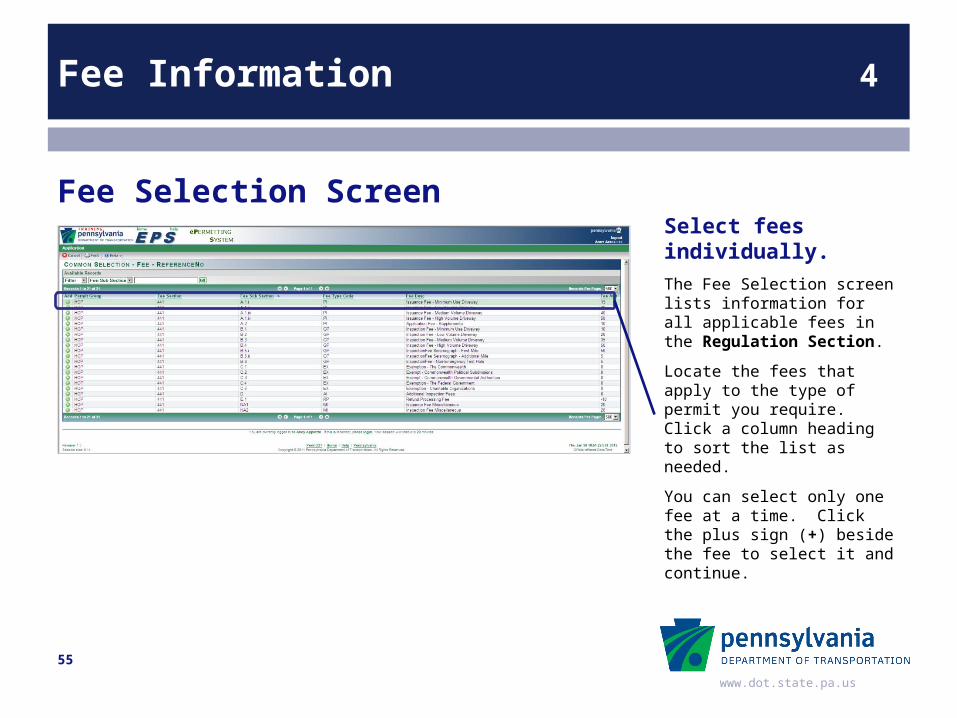
Fee Information 4
Select fees individually.The Fee Selection screen lists information for all applicable fees in the Regulation Section.
Locate the fees that apply to the type of permit you require. Click a column heading to sort the list as needed.
You can select only one fee at a time. Click the plus sign (+) beside the fee to select it and continue.
Fee Selection Screen
55

www.dot.state.pa.us
Fee Information 4
View the details as you select one or more fees.After you select a fee, the Fee Detail screen displays its information in the fields.
Edit the Number of Units, if the work requires more than one fee for installation, inspection, etc.
To apply the fee and add another, click Save & New to return to the Fee Selection screen.
After you have applied all the fees, click Save & Exit to return to the Fee Information screen.
Fee Detail – Selected Fees
56
www.dot.state.pa.us
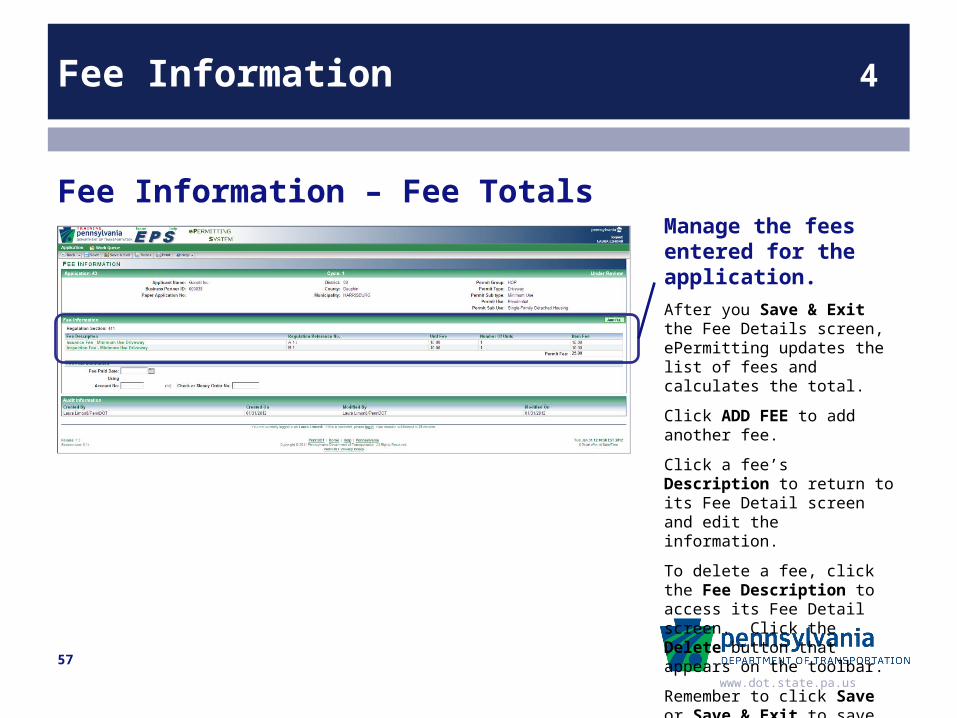
Fee Information 4
Manage the fees entered for the application.After you Save & Exit the Fee Details screen, ePermitting updates the list of fees and calculates the total.
Click ADD FEE to add another fee.
Click a fee’s Description to return to its Fee Detail screen and edit the information.
To delete a fee, click the Fee Description to access its Fee Detail screen. Click the Delete button that appears on the toolbar.
Remember to click Save or Save & Exit to save your work as you go.
Fee Information – Fee Totals
57
www.dot.state.pa.us
Checklist and Reference Information 5
Lesson 5
Internal Checklist Information and Reference Information
Using the Checklist Information
Entering Reference Information
58
www.dot.state.pa.us
Checklist and Reference Information 5
Checklist Information
Receivers and Reviewers use the Checklist Information screen to ensure that the review is complete:
Requirements and completion dates for submitted plans.
Use of M-930 form.
Checks for limited access highway or drainage requirements.
Review requirements.
Applicants cannot access the information.
59
www.dot.state.pa.us
Checklist and Reference Information 5
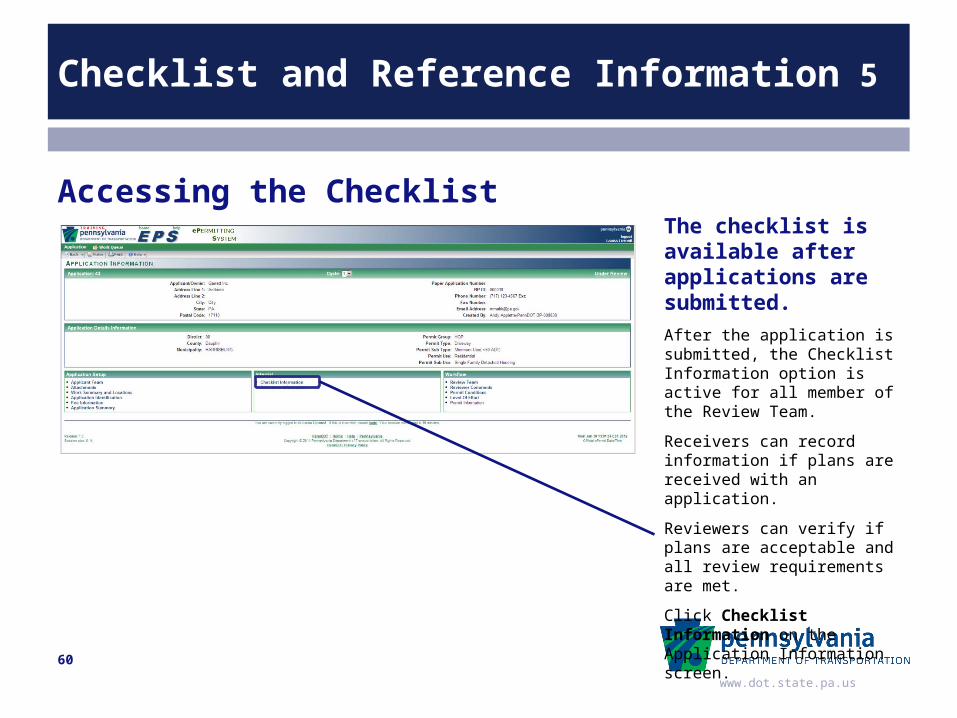
The checklist is available after applications are submitted.After the application is submitted, the Checklist Information option is active for all member of the Review Team.
Receivers can record information if plans are received with an application.
Reviewers can verify if plans are acceptable and all review requirements are met.
Click Checklist Information on the Application Information screen.
Accessing the Checklist
60
www.dot.state.pa.us
Checklist and Reference Information 5
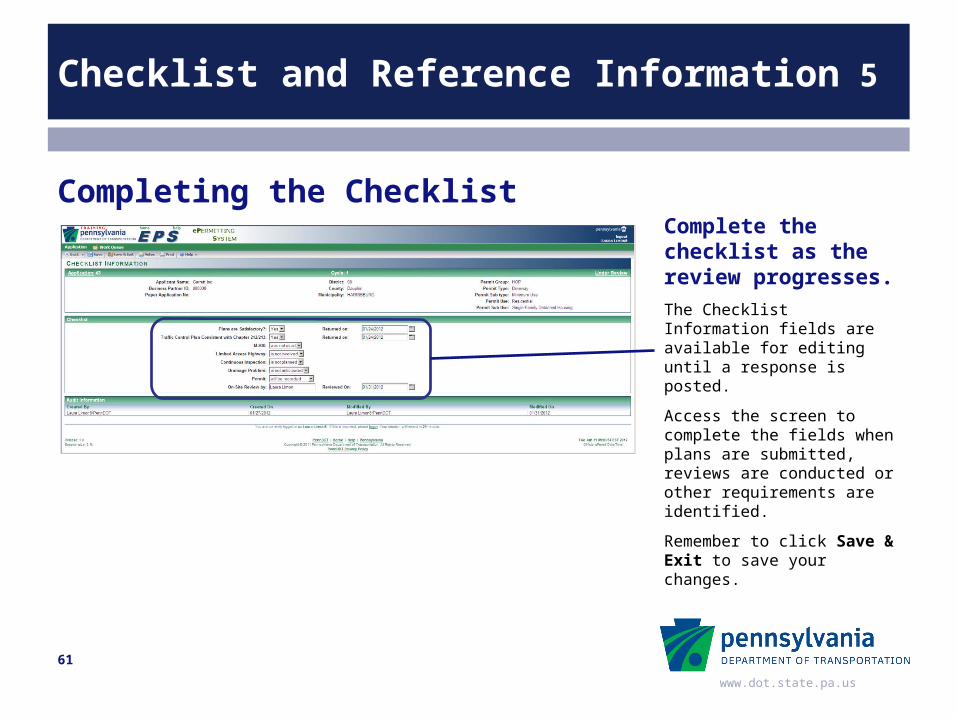
Complete the checklist as the review progresses.The Checklist Information fields are available for editing until a response is posted.
Access the screen to complete the fields when plans are submitted, reviews are conducted or other requirements are identified.
Remember to click Save & Exit to save your changes.
Completing the Checklist
61
www.dot.state.pa.us
Checklist and Reference Information 5
Reference Information
Receivers and Reviewers use the Reference Information screen to record and view requirements for the permit:
Anticipated completion date.
Right of way information.
Detour information.
Traffic Impact Study information.
Applicants can view the screen but cannot edit the information.
62
www.dot.state.pa.us
Checklist and Reference Information 5
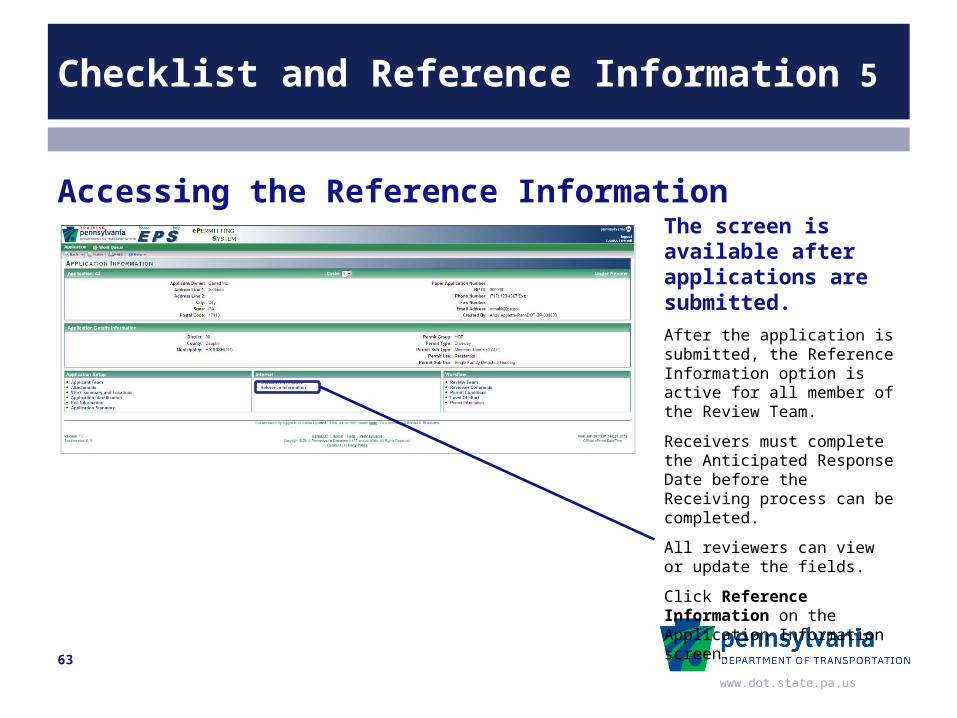
The screen is available after applications are submitted.After the application is submitted, the Reference Information option is active for all member of the Review Team.
Receivers must complete the Anticipated Response Date before the Receiving process can be completed.
All reviewers can view or update the fields.
Click Reference Information on the Application Information screen.
Accessing the Reference Information
63
www.dot.state.pa.us
Checklist and Reference Information 5
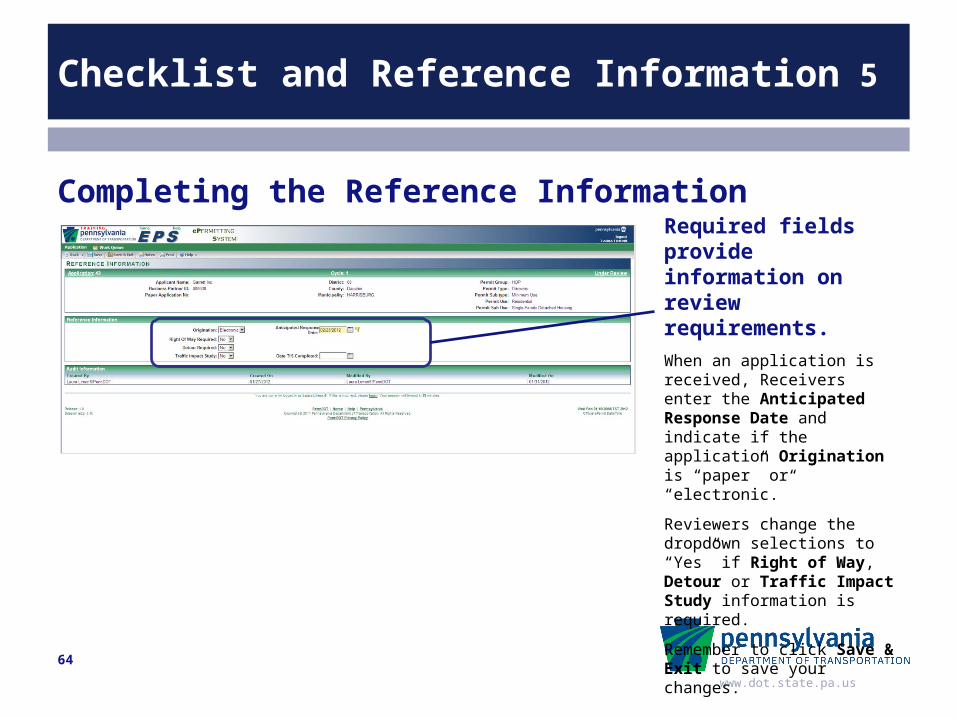
Required fields provide information on review requirements.When an application is received, Receivers enter the Anticipated Response Date and indicate if the application Origination is “paper” or “electronic.”
Reviewers change the dropdown selections to “Yes” if Right of Way, Detour or Traffic Impact Study information is required.
Remember to click Save & Exit to save your changes.
Completing the Reference Information
64
www.dot.state.pa.us
Work Descriptions 6
Lesson 6
Adding Work Descriptions to Work Summaries
Verifying work locations
Applying standard work descriptions
65
www.dot.state.pa.us
Work Descriptions 6
Verifying Work Summaries
Applicants must enter at least one work summary to apply for a HOP permit. Reviewers cannot add new summaries, but they are responsible for:
Verifying that work summaries are valid.
Verifying that location information (SR, segment, offset) is correct.
Adding standard work descriptions to be recorded with permit information.
Applicants complete most of the Work Summary and Locations screen before submitting the application.
66
www.dot.state.pa.us
Work Descriptions 6
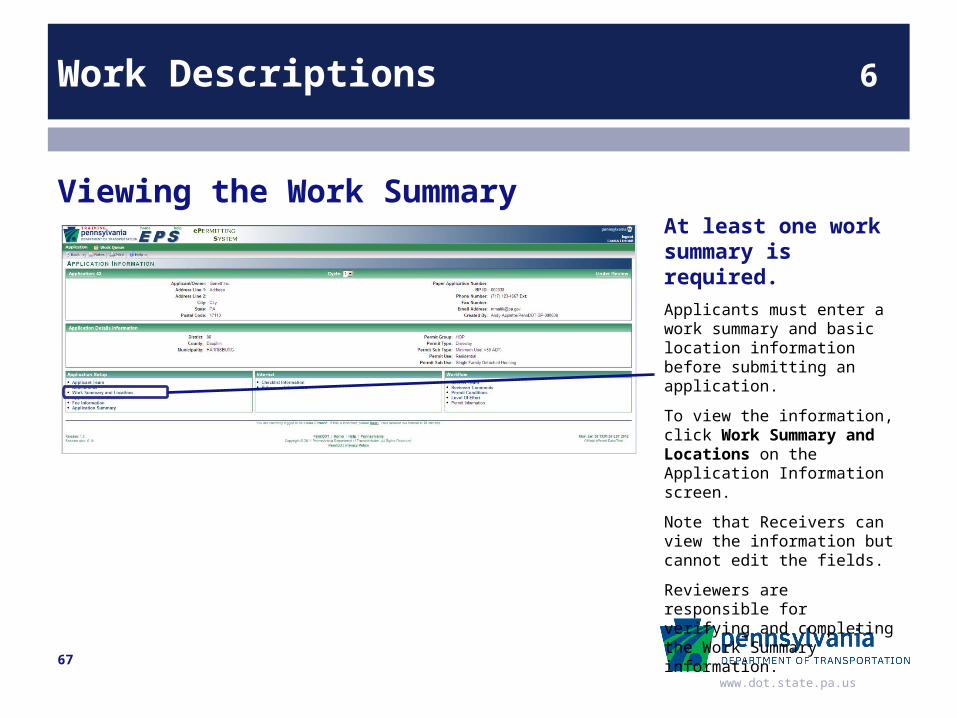
At least one work summary is required.Applicants must enter a work summary and basic location information before submitting an application.
To view the information, click Work Summary and Locations on the Application Information screen.
Note that Receivers can view the information but cannot edit the fields.
Reviewers are responsible for verifying and completing the Work Summary information.
Viewing the Work Summary
67
www.dot.state.pa.us
Work Descriptions 6
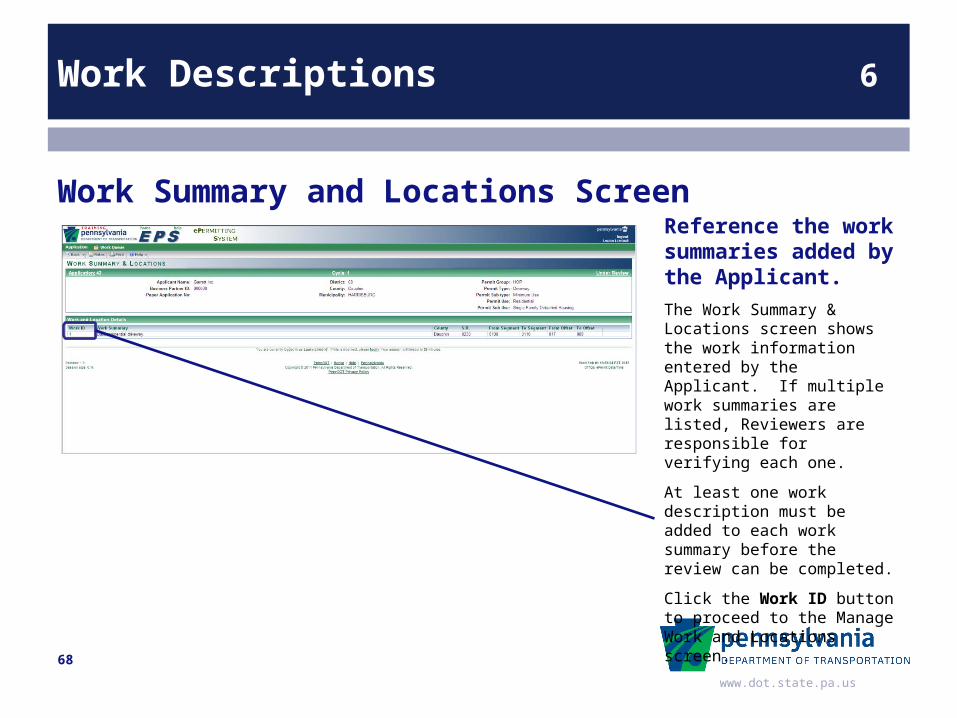
Reference the work summaries added by the Applicant.The Work Summary & Locations screen shows the work information entered by the Applicant. If multiple work summaries are listed, Reviewers are responsible for verifying each one.
At least one work description must be added to each work summary before the review can be completed.
Click the Work ID button to proceed to the Manage Work and Locations screen.
Work Summary and Locations Screen
68
www.dot.state.pa.us
Work Descriptions 6
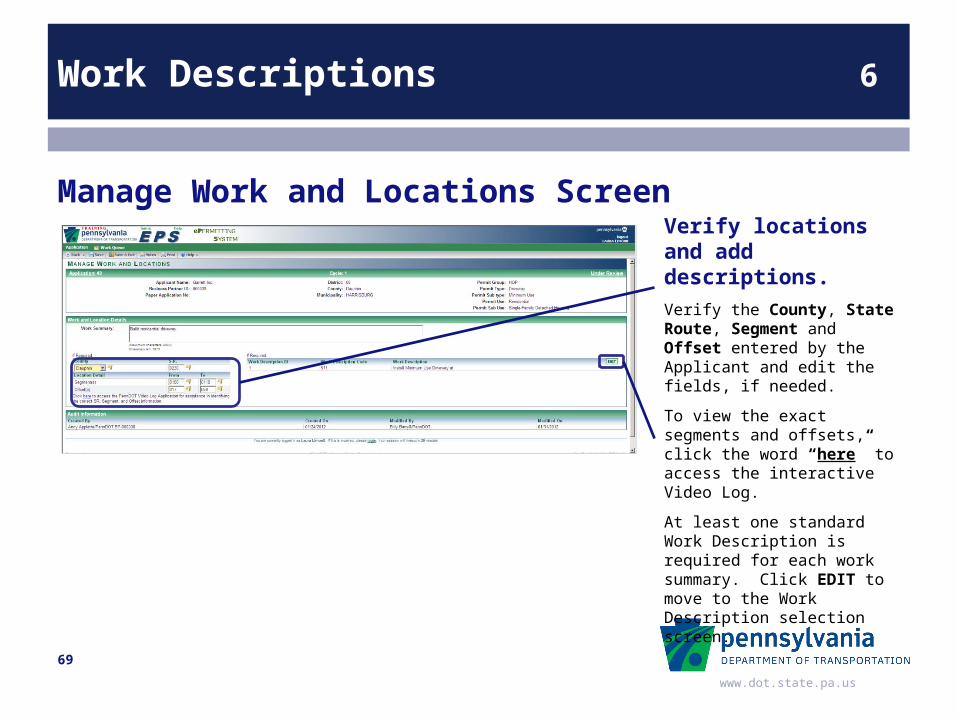
Verify locations and add descriptions.Verify the County, State Route, Segment and Offset entered by the Applicant and edit the fields, if needed.
To view the exact segments and offsets, click the word “here” to access the interactive Video Log.
At least one standard Work Description is required for each work summary. Click EDIT to move to the Work Description selection screen.
Manage Work and Locations Screen
69
www.dot.state.pa.us
Work Descriptions 6
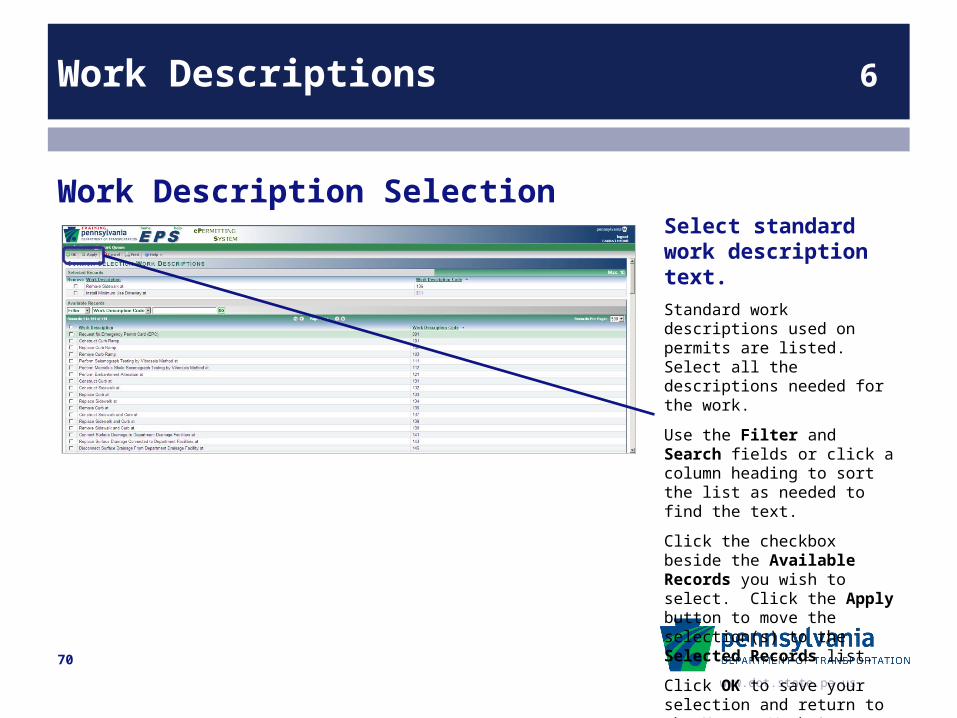
Select standard work description text.Standard work descriptions used on permits are listed. Select all the descriptions needed for the work.
Use the Filter and Search fields or click a column heading to sort the list as needed to find the text.
Click the checkbox beside the Available Records you wish to select. Click the Apply button to move the selection(s) to the Selected Records list.
Click OK to save your selection and return to the Manage Work & Locations screen.
Work Description Selection
70
www.dot.state.pa.us
Work Descriptions 6
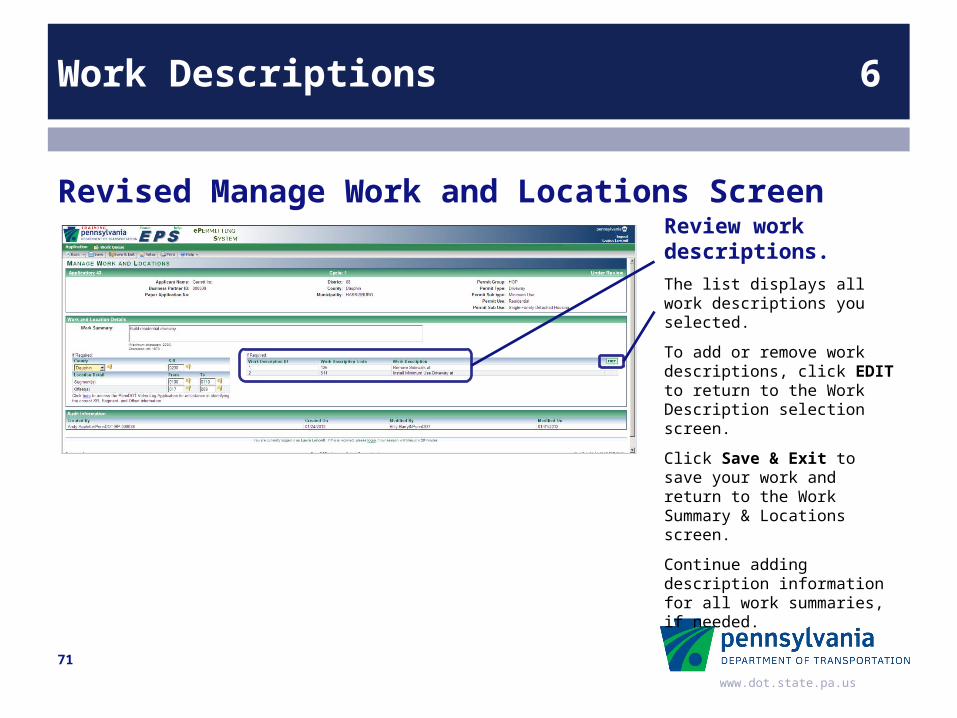
Review work descriptions.The list displays all work descriptions you selected.
To add or remove work descriptions, click EDIT to return to the Work Description selection screen.
Click Save & Exit to save your work and return to the Work Summary & Locations screen.
Continue adding description information for all work summaries, if needed.
Revised Manage Work and Locations Screen
71
www.dot.state.pa.us
Review Comments and Permit Conditions 7
Lesson 7
Review Comments and Permit Conditions
Adding review comments to be appended to the response letter
Adding conditions to be included in the issued permit
Including or excluding comments and conditions entered by other reviewers.
72
www.dot.state.pa.us
Review Comments and Permit Conditions 7
Review CommentsReviewers can add comments to be appended to the response letter. Standardized comments are available for selection. Comments can be customized for the current application.
Reviewers can edit only their own comments.
Level 1 Reviewers can include/exclude comments from Level 2 Reviewers. Level 2 can include/exclude comments from Level 3, etc.
When creating the response, Responders can include/exclude comments from all Reviewers.
Applicants can view the saved comments.
73
www.dot.state.pa.us
Review Comments and Permit Conditions 7
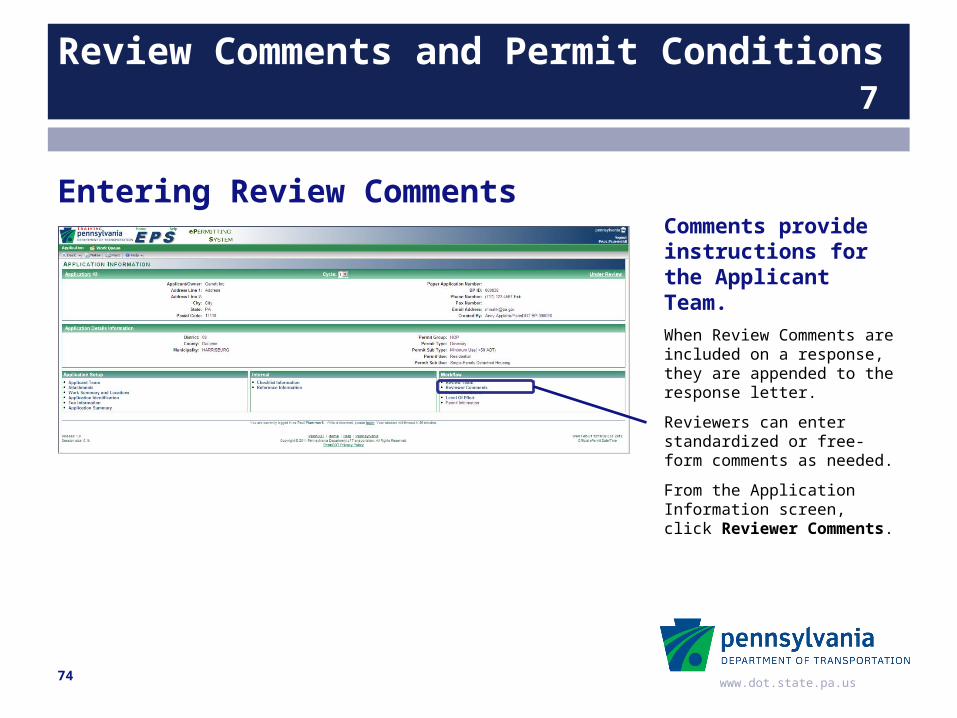
Comments provide instructions for the Applicant Team.When Review Comments are included on a response, they are appended to the response letter.
Reviewers can enter standardized or free-form comments as needed.
From the Application Information screen, click Reviewer Comments.
Entering Review Comments
74

www.dot.state.pa.us
Review Comments and Permit Conditions 7
Add standard or customized review comments quickly.The Review Comments screen lists comments and enables editing.
Click Edit to view and select available comments.
Review Comments Screen
75
www.dot.state.pa.us
Review Comments and Permit Conditions 7
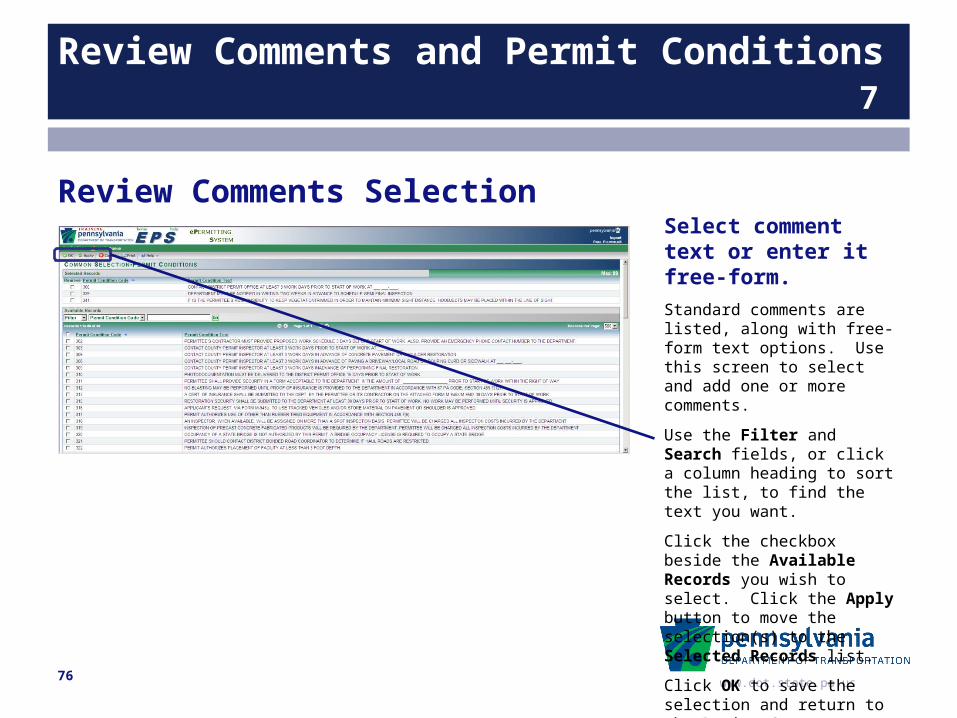
Select comment text or enter it free-form.Standard comments are listed, along with free-form text options. Use this screen to select and add one or more comments.
Use the Filter and Search fields, or click a column heading to sort the list, to find the text you want.
Click the checkbox beside the Available Records you wish to select. Click the Apply button to move the selection(s) to the Selected Records list.
Click OK to save the selection and return to the Review Comments screen.
Review Comments Selection
76
www.dot.state.pa.us
Review Comments and Permit Conditions 7
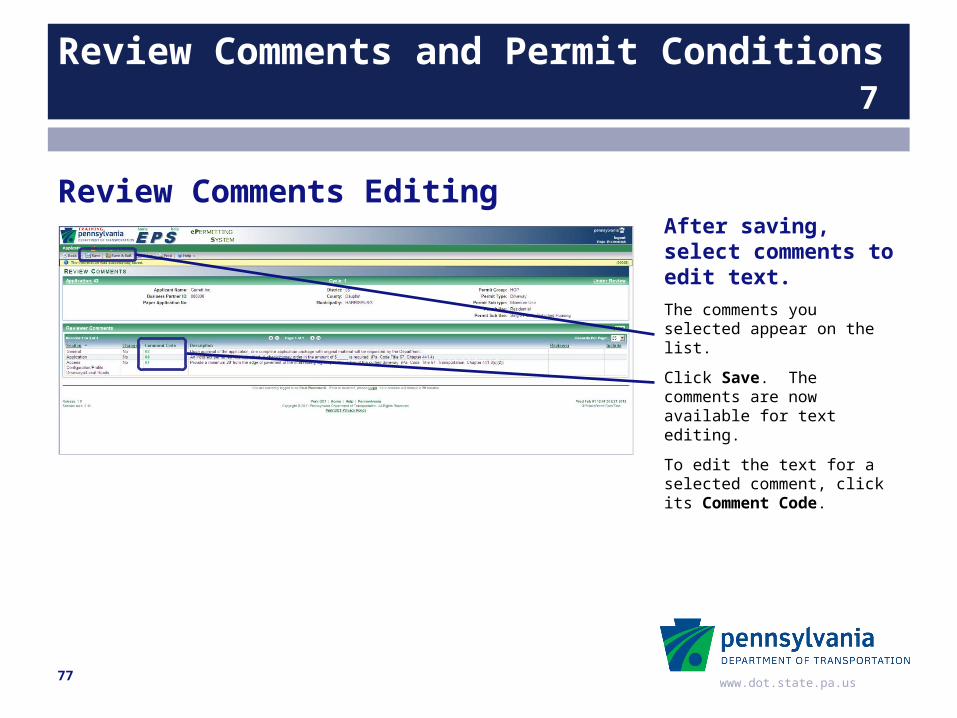
After saving, select comments to edit text.The comments you selected appear on the list.
Click Save. The comments are now available for text editing.
To edit the text for a selected comment, click its Comment Code.
Review Comments Editing
77
www.dot.state.pa.us
Review Comments and Permit Conditions 7
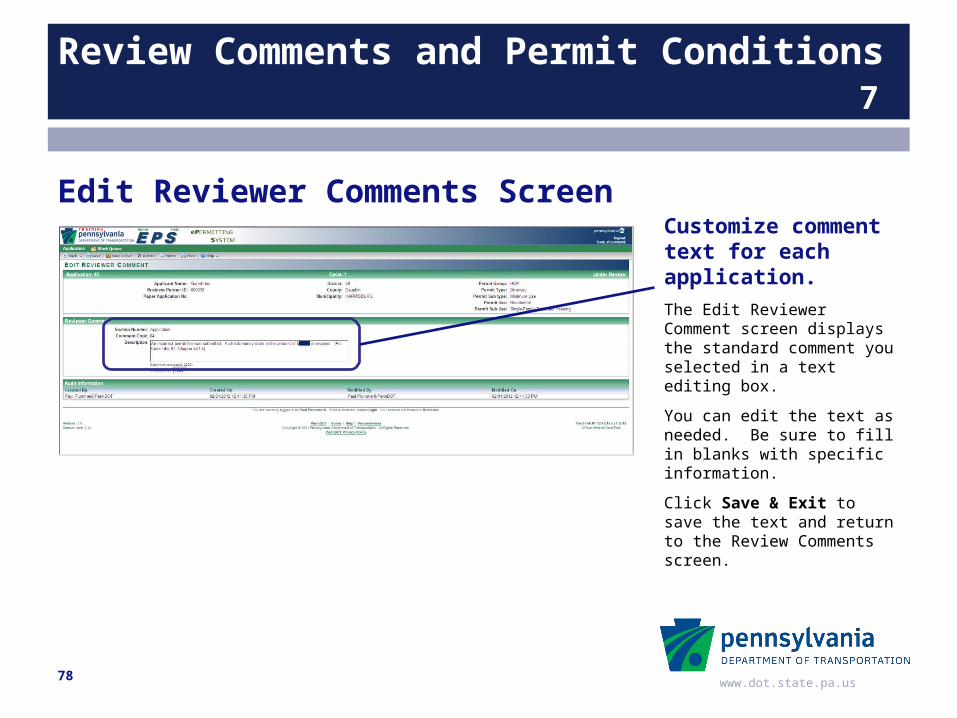
Customize comment text for each application.The Edit Reviewer Comment screen displays the standard comment you selected in a text editing box.
You can edit the text as needed. Be sure to fill in blanks with specific information.
Click Save & Exit to save the text and return to the Review Comments screen.
Edit Reviewer Comments Screen
78
www.dot.state.pa.us
Review Comments and Permit Conditions 7
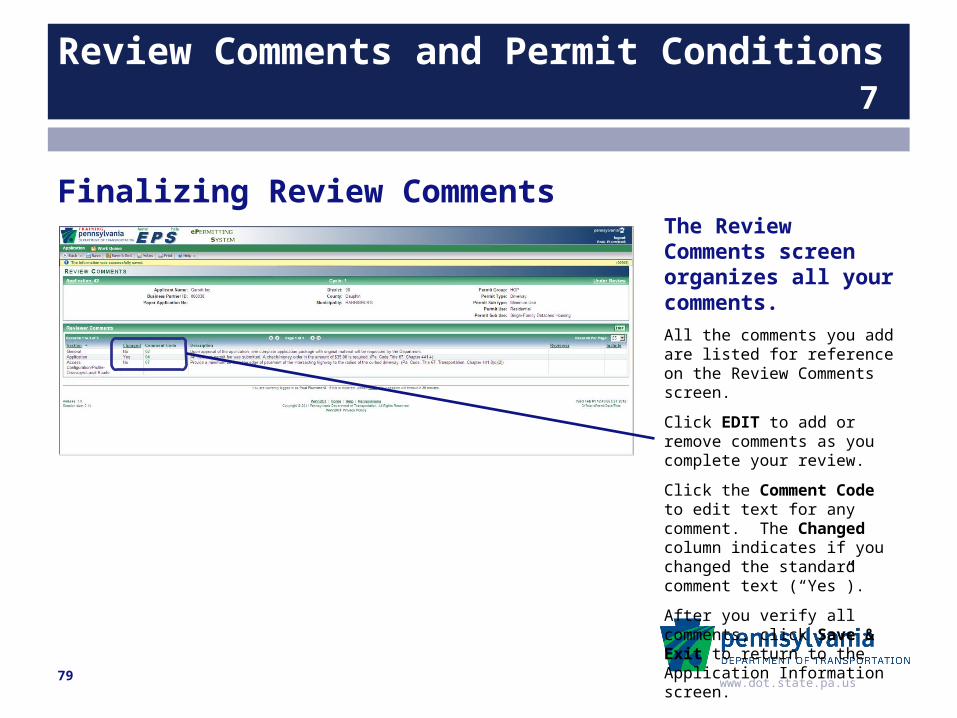
The Review Comments screen organizes all your comments.All the comments you add are listed for reference on the Review Comments screen.
Click EDIT to add or remove comments as you complete your review.
Click the Comment Code to edit text for any comment. The Changed column indicates if you changed the standard comment text (“Yes”).
After you verify all comments, click Save & Exit to return to the Application Information screen.
Finalizing Review Comments
79
www.dot.state.pa.us
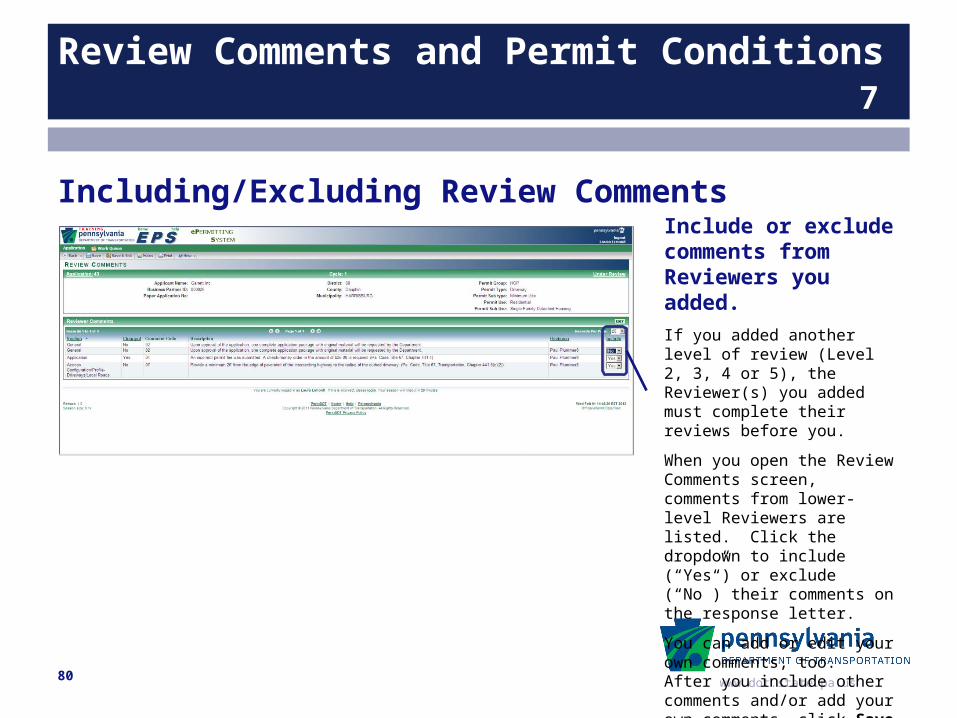
Review Comments and Permit Conditions 7
Include or exclude comments from Reviewers you added.If you added another level of review (Level 2, 3, 4 or 5), the Reviewer(s) you added must complete their reviews before you.
When you open the Review Comments screen, comments from lower-level Reviewers are listed. Click the dropdown to include (“Yes”) or exclude (“No”) their comments on the response letter.
You can add or edit your own comments, too. After you include other comments and/or add your own comments, click Save & Exit.
Including/Excluding Review Comments
80
www.dot.state.pa.us
Review Comments and Permit Conditions 7
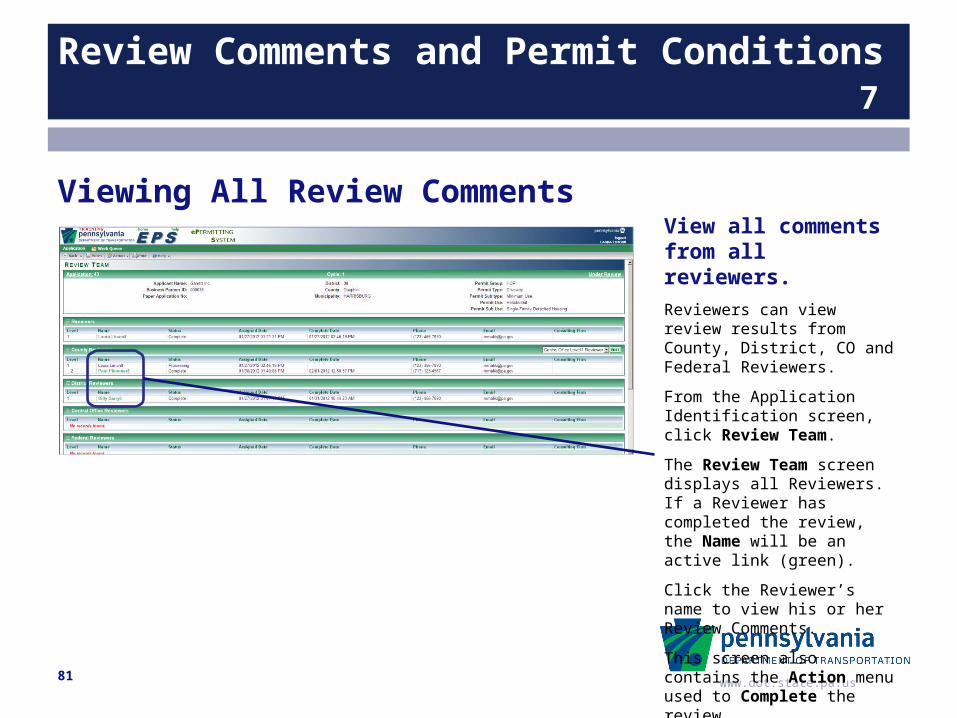
View all comments from all reviewers.Reviewers can view review results from County, District, CO and Federal Reviewers.
From the Application Identification screen, click Review Team.
The Review Team screen displays all Reviewers. If a Reviewer has completed the review, the Name will be an active link (green).
Click the Reviewer’s name to view his or her Review Comments.
This screen also contains the Action menu used to Complete the review.
Viewing All Review Comments
81
www.dot.state.pa.us
Review Comments and Permit Conditions 7
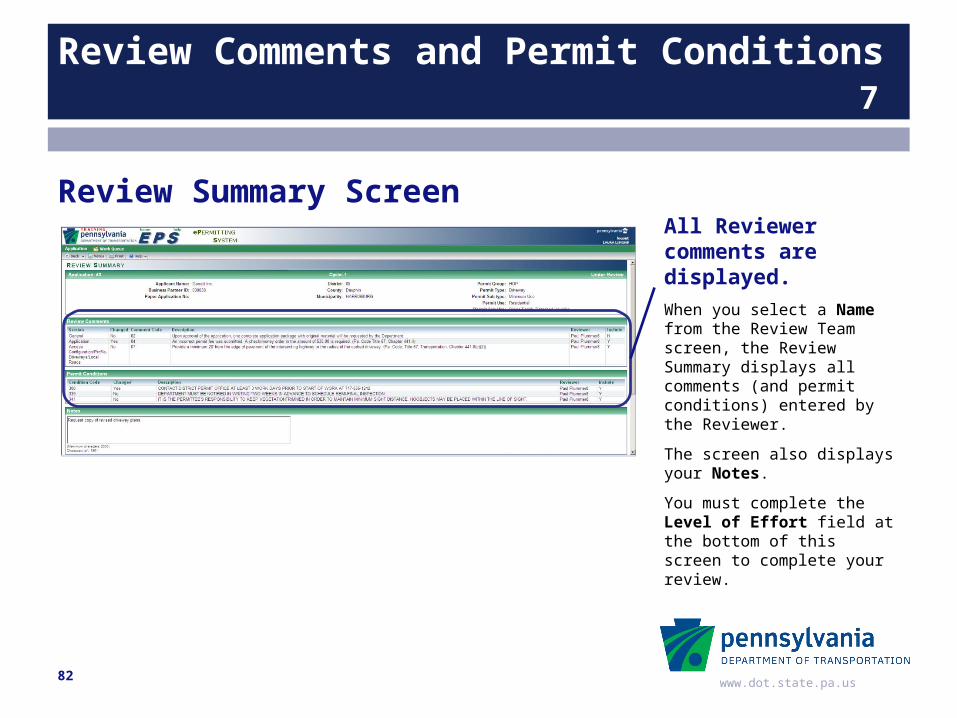
All Reviewer comments are displayed.When you select a Name from the Review Team screen, the Review Summary displays all comments (and permit conditions) entered by the Reviewer.
The screen also displays your Notes.
You must complete the Level of Effort field at the bottom of this screen to complete your review.
Review Summary Screen
82
www.dot.state.pa.us
Review Comments and Permit Conditions 7
Permit ConditionsReviewers can add conditions to be included on the permit. Standardized conditions are available for selection. Conditions can be customized for the current application.
Reviewers can edit only their own conditions.
Level 1 Reviewers can include/exclude conditions from Level 2 Reviewers. Level 2 can include/exclude conditions from Level 3, etc.
When creating the response, Responders can include/exclude conditions from all Reviewers.
Applicants can view the saved conditions.
83
www.dot.state.pa.us
Review Comments and Permit Conditions 7
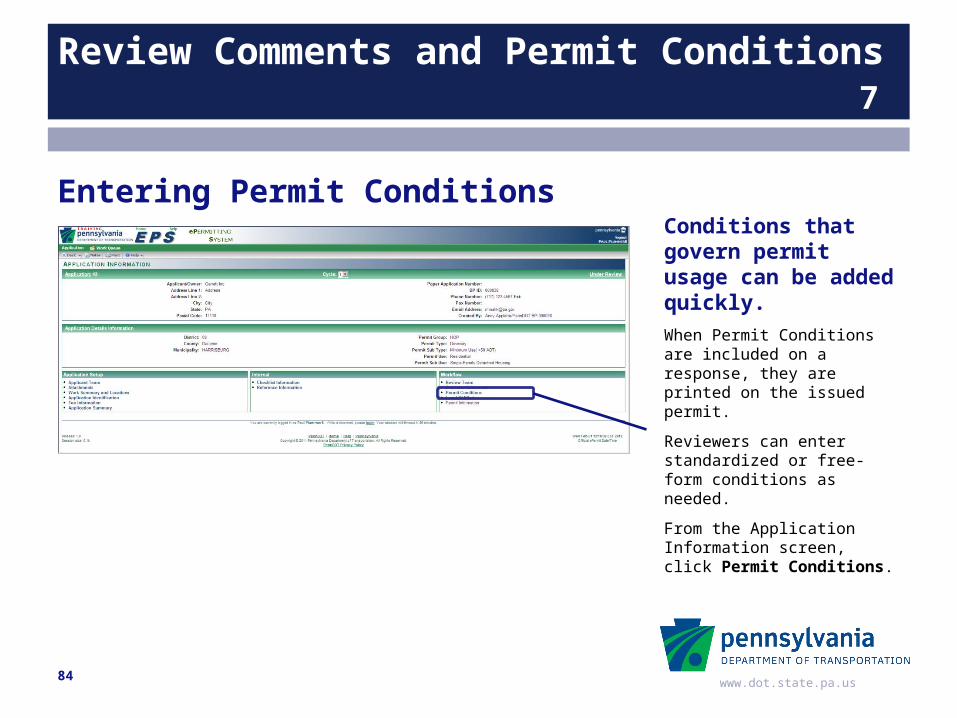
Conditions that govern permit usage can be added quickly.When Permit Conditions are included on a response, they are printed on the issued permit.
Reviewers can enter standardized or free-form conditions as needed.
From the Application Information screen, click Permit Conditions.
Entering Permit Conditions
84
www.dot.state.pa.us
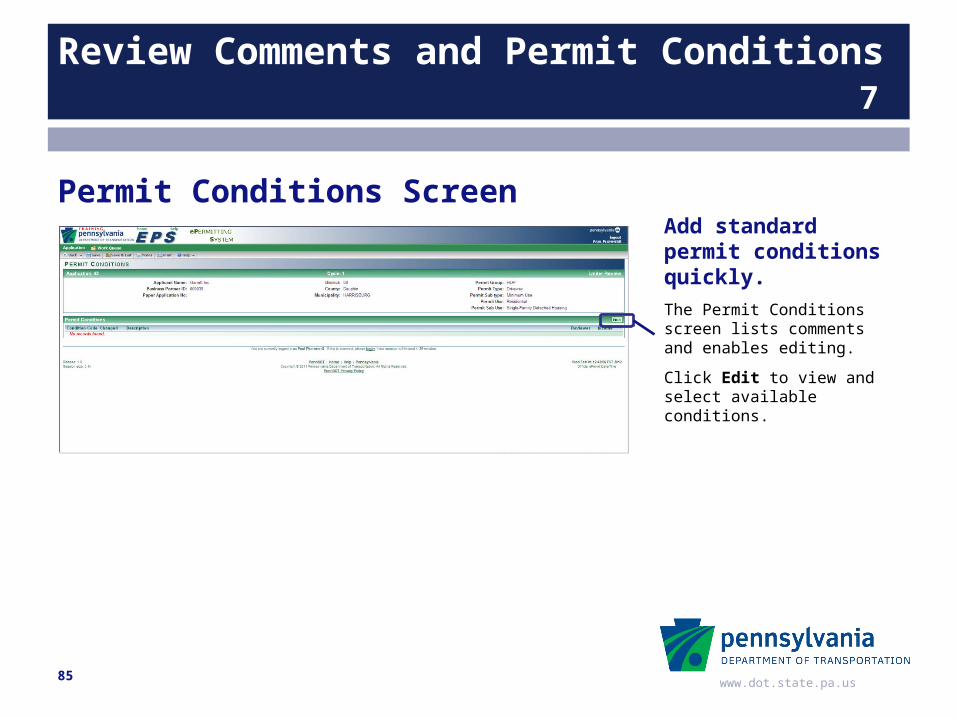
Review Comments and Permit Conditions 7
Add standard permit conditions quickly.The Permit Conditions screen lists comments and enables editing.
Click Edit to view and select available conditions.
Permit Conditions Screen
85
www.dot.state.pa.us
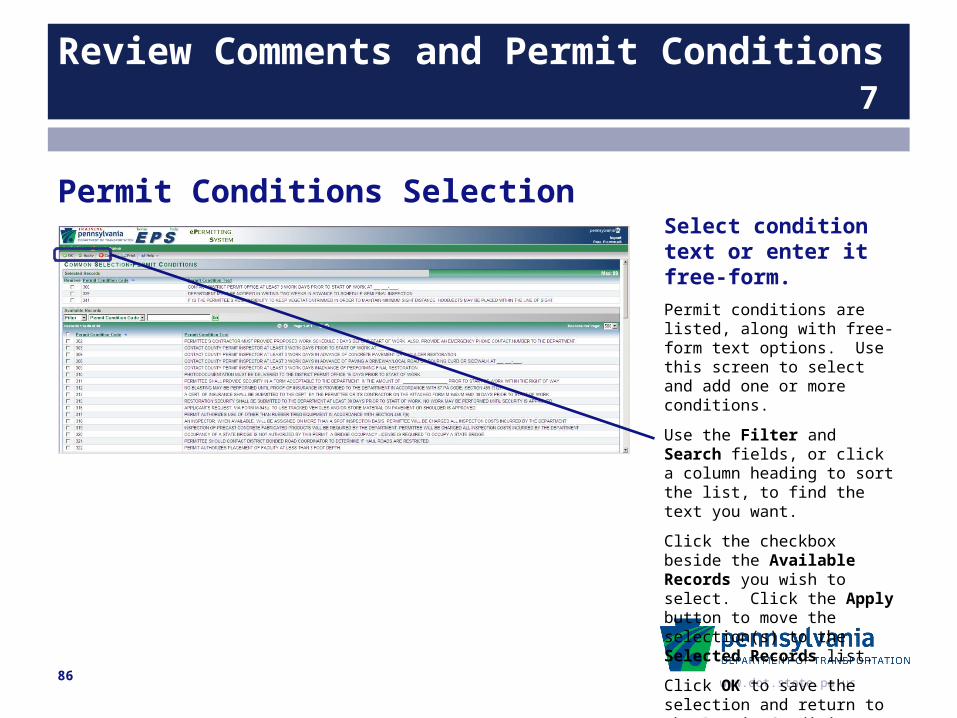
Review Comments and Permit Conditions 7
Select condition text or enter it free-form.Permit conditions are listed, along with free-form text options. Use this screen to select and add one or more conditions.
Use the Filter and Search fields, or click a column heading to sort the list, to find the text you want.
Click the checkbox beside the Available Records you wish to select. Click the Apply button to move the selection(s) to the Selected Records list.
Click OK to save the selection and return to the Permit Conditions screen.
Permit Conditions Selection
86

www.dot.state.pa.us
Review Comments and Permit Conditions 7
After saving, select conditions to edit text.The conditions you selected appear on the list.
Click Save. The conditions are now available for text editing.
To edit the text for a selected condition, click its Condition Code.
Permit Conditions Editing
87

www.dot.state.pa.us
Review Comments and Permit Conditions 7
Customize condition text for each permit.The Update Permit Conditions screen displays the standard condition you selected in a text editing box.
You can edit the text as needed. Be sure to fill in blanks with specific information.
Click Save & Exit to save the text and return to the Permit Conditions screen.
Update Permit Conditions Screen
88
www.dot.state.pa.us
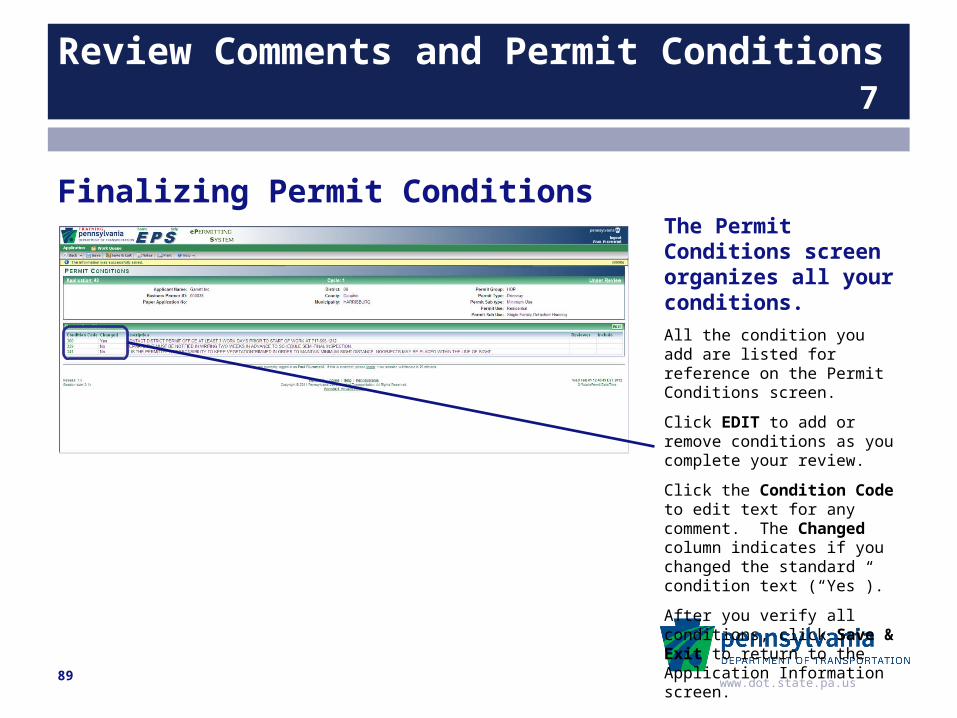
Review Comments and Permit Conditions 7
The Permit Conditions screen organizes all your conditions.All the condition you add are listed for reference on the Permit Conditions screen.
Click EDIT to add or remove conditions as you complete your review.
Click the Condition Code to edit text for any comment. The Changed column indicates if you changed the standard condition text (“Yes”).
After you verify all conditions, click Save & Exit to return to the Application Information screen.
Finalizing Permit Conditions
89
www.dot.state.pa.us
Review Comments and Permit Conditions 7
Include or exclude conditions from Reviewers you added.If you added another level of review (Level 2, 3, 4 or 5), the Reviewer(s) you added must complete their reviews before you.
When you open the Permit Conditions screen, conditions from lower-level Reviewers are listed. Click the dropdown to include (“Yes”) or exclude (“No”) their conditions on the permit.
You can add or edit your own conditions, too. After you include other conditions and/or add your own conditions, click Save & Exit.
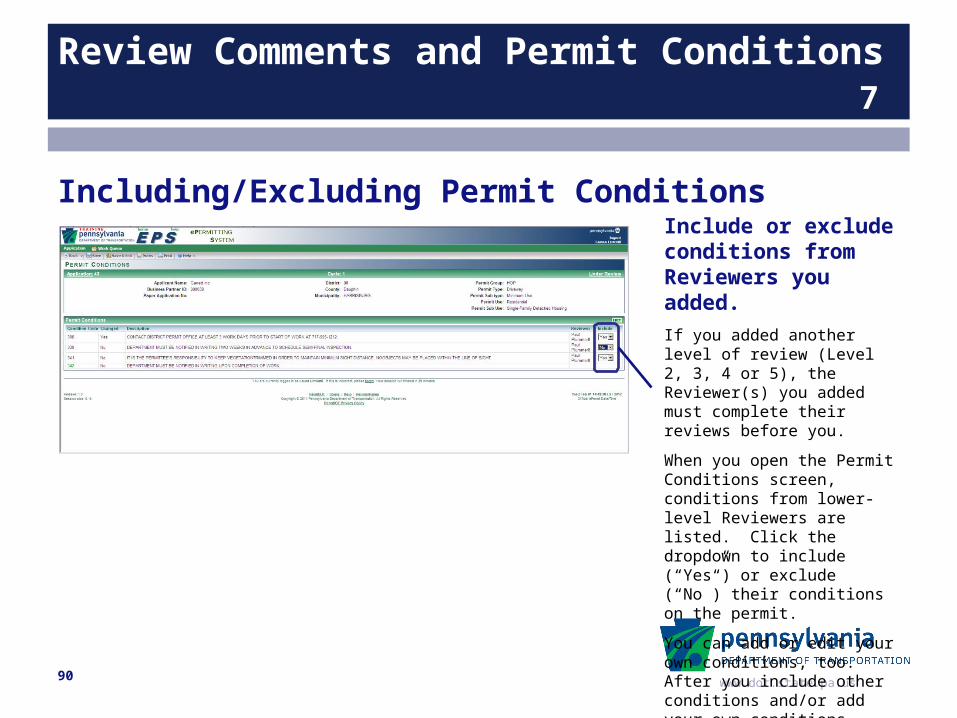
Including/Excluding Permit Conditions
90
www.dot.state.pa.us
Review Comments and Permit Conditions 7
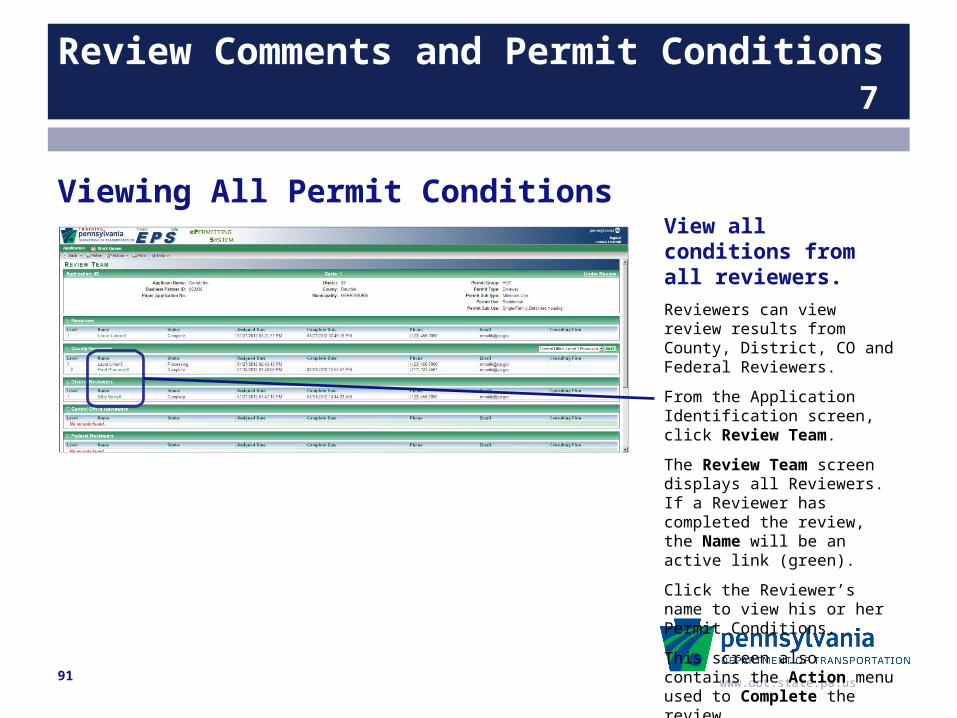
View all conditions from all reviewers.Reviewers can view review results from County, District, CO and Federal Reviewers.
From the Application Identification screen, click Review Team.
The Review Team screen displays all Reviewers. If a Reviewer has completed the review, the Name will be an active link (green).
Click the Reviewer’s name to view his or her Permit Conditions.
This screen also contains the Action menu used to Complete the review.
Viewing All Permit Conditions
91
www.dot.state.pa.us
Review Comments and Permit Conditions 7
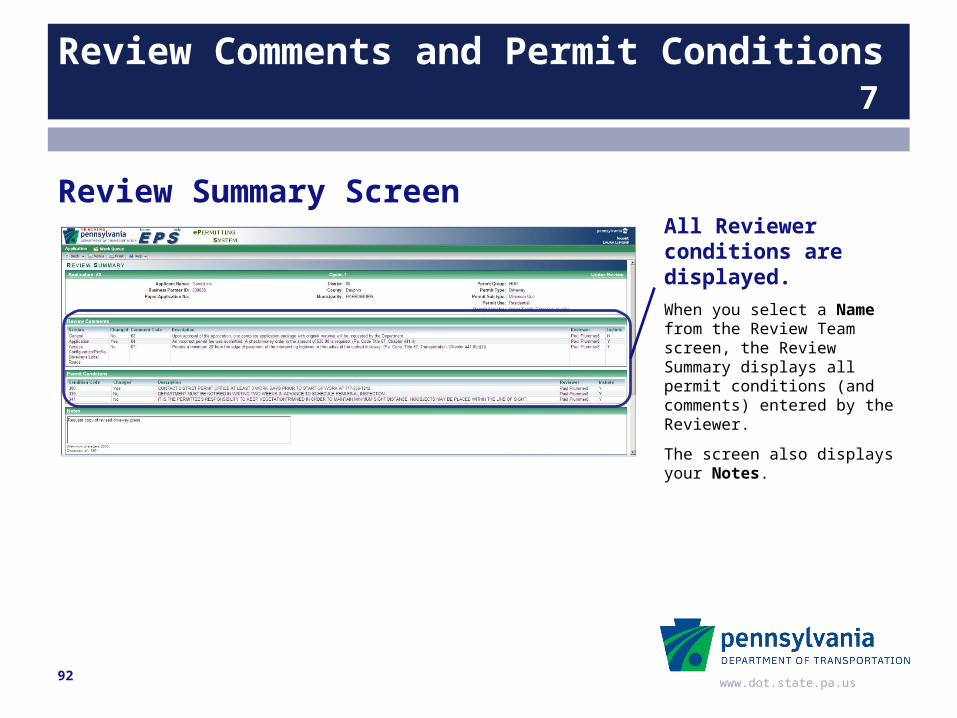
All Reviewer conditions are displayed.When you select a Name from the Review Team screen, the Review Summary displays all permit conditions (and comments) entered by the Reviewer.
The screen also displays your Notes.
Review Summary Screen
92
www.dot.state.pa.us
Building and Posting a Reponse 8
Lesson 8
Building and Posting a Response
Building a cover letter
Adding, including or excluding comments and conditions
Building a response letter
Assigning Approvers
Printing and attaching a permit
Posting the response
93
www.dot.state.pa.us
Building and Posting a Response 8
The Responder RoleResponders are responsible for consolidating all review information, preparing response correspondence and posting the response. Review and correct application information, if needed. Add, include or exclude comments and permit conditions. Build the cover letter. Assign an approver, if needed. Enter IMS permit information and attach the permit, if issued. Generate the response letter and post the response.
94
www.dot.state.pa.us
Building and Posting a Response 8
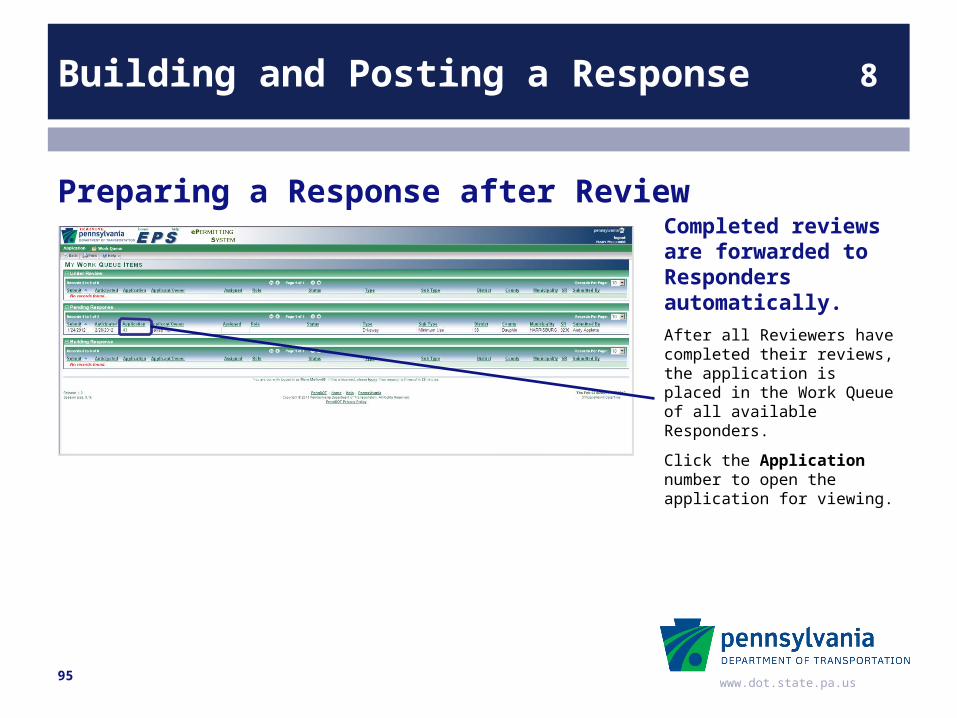
Completed reviews are forwarded to Responders automatically.After all Reviewers have completed their reviews, the application is placed in the Work Queue of all available Responders.
Click the Application number to open the application for viewing.
Preparing a Response after Review
95
www.dot.state.pa.us
Building and Posting a Response 8
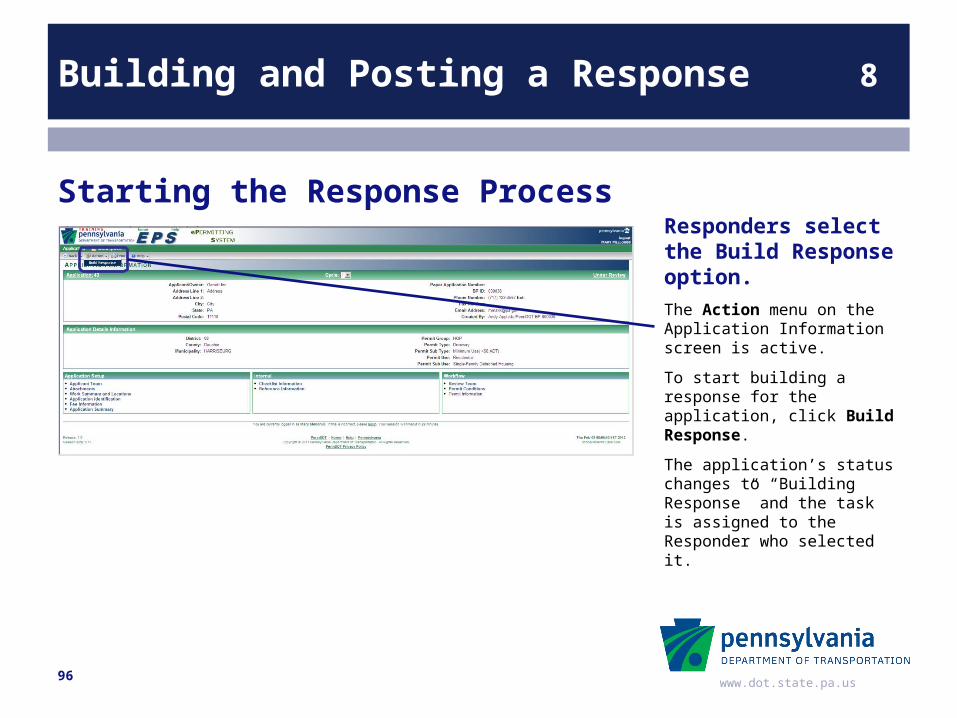
Responders select the Build Response option.The Action menu on the Application Information screen is active.
To start building a response for the application, click Build Response.
The application’s status changes to “Building Response” and the task is assigned to the Responder who selected it.
Starting the Response Process
96
www.dot.state.pa.us
Building and Posting a Response 8
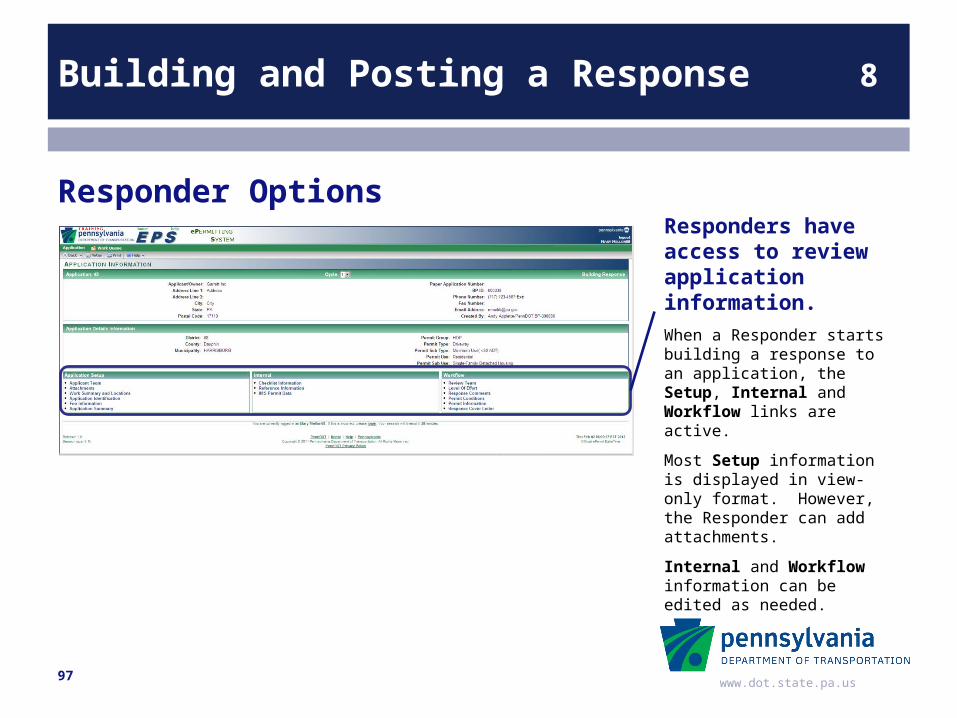
Responders have access to review application information.When a Responder starts building a response to an application, the Setup, Internal and Workflow links are active.
Most Setup information is displayed in view-only format. However, the Responder can add attachments.
Internal and Workflow information can be edited as needed.
Responder Options
97
www.dot.state.pa.us
Building and Posting a Response 8
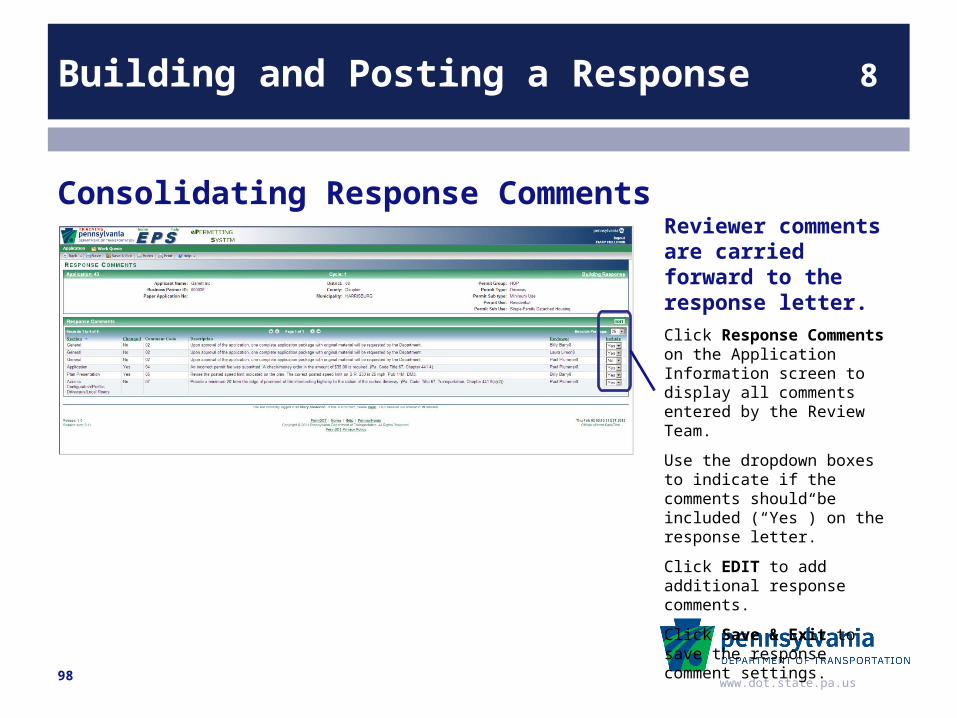
Reviewer comments are carried forward to the response letter.Click Response Comments on the Application Information screen to display all comments entered by the Review Team.
Use the dropdown boxes to indicate if the comments should be included (“Yes”) on the response letter.
Click EDIT to add additional response comments.
Click Save & Exit to save the response comment settings.
Consolidating Response Comments
98
www.dot.state.pa.us
Building and Posting a Response 8
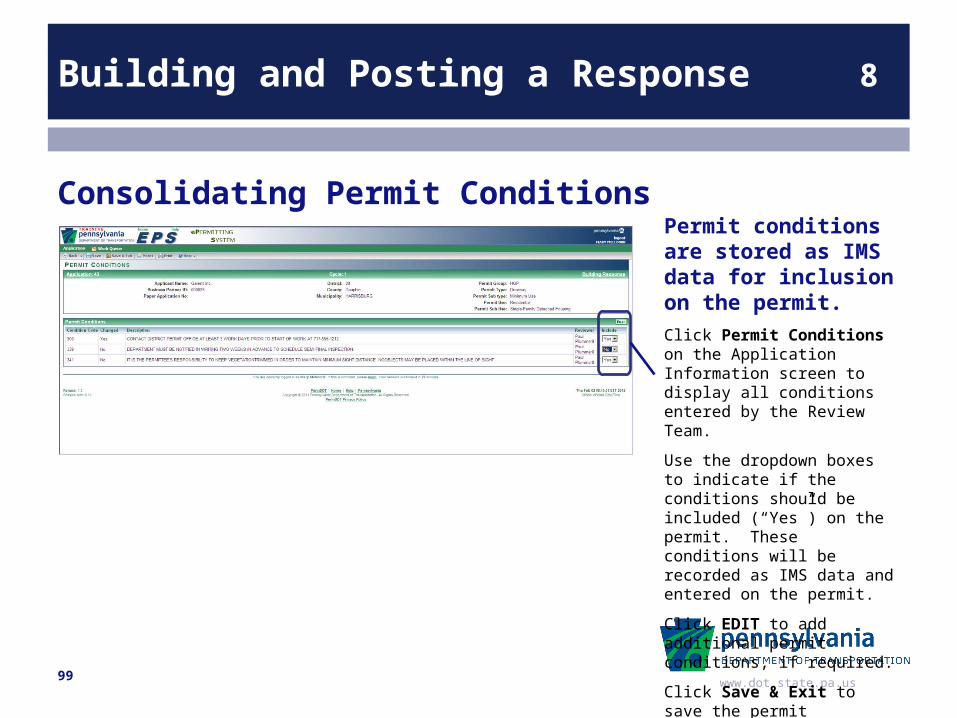
Permit conditions are stored as IMS data for inclusion on the permit.Click Permit Conditions on the Application Information screen to display all conditions entered by the Review Team.
Use the dropdown boxes to indicate if the conditions should be included (“Yes”) on the permit. These conditions will be recorded as IMS data and entered on the permit.
Click EDIT to add additional permit conditions, if required.
Click Save & Exit to save the permit conditions.
Consolidating Permit Conditions
99
www.dot.state.pa.us
Building and Posting a Response 8
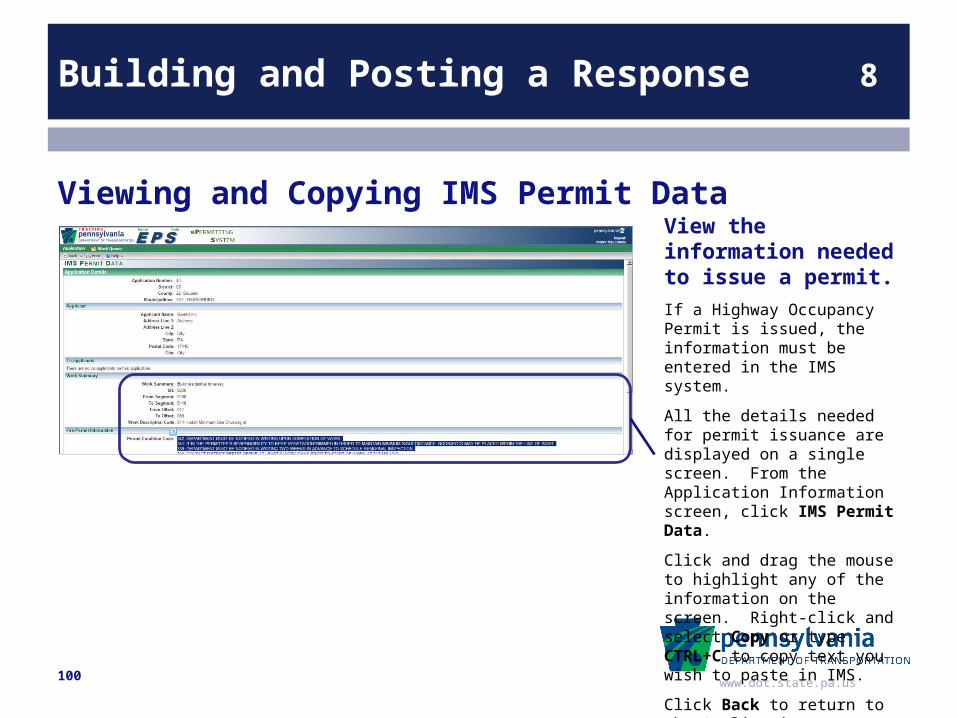
View the information needed to issue a permit.If a Highway Occupancy Permit is issued, the information must be entered in the IMS system.
All the details needed for permit issuance are displayed on a single screen. From the Application Information screen, click IMS Permit Data.
Click and drag the mouse to highlight any of the information on the screen. Right-click and select Copy or type CTRL+C to copy text you wish to paste in IMS.
Click Back to return to the Application Information screen.
Viewing and Copying IMS Permit Data
100
www.dot.state.pa.us
Building and Posting a Response 8
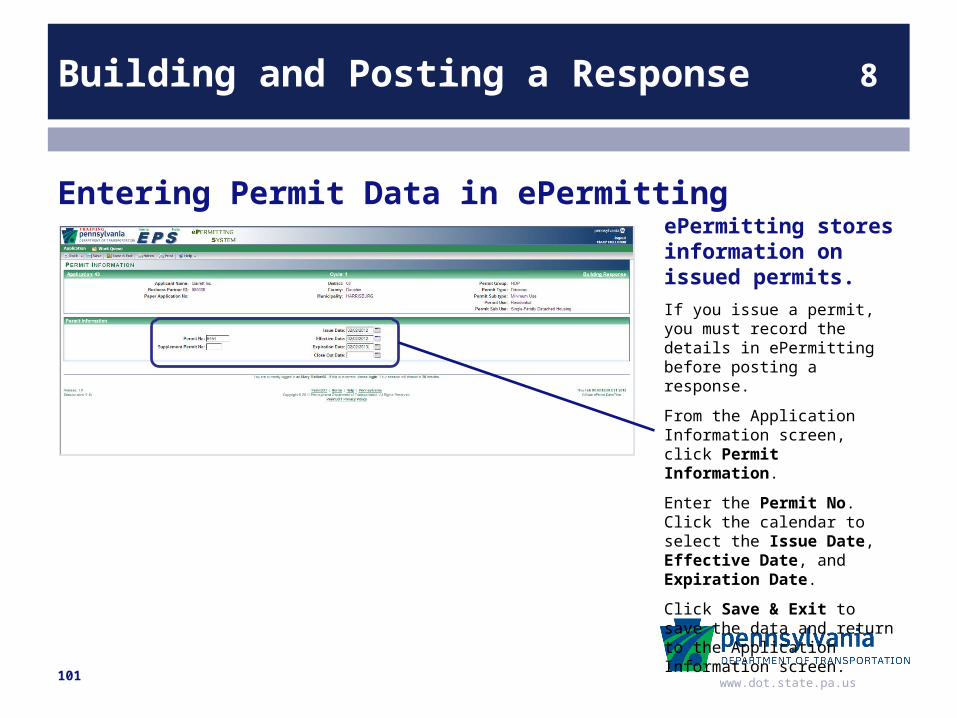
ePermitting stores information on issued permits.If you issue a permit, you must record the details in ePermitting before posting a response.
From the Application Information screen, click Permit Information.
Enter the Permit No. Click the calendar to select the Issue Date, Effective Date, and Expiration Date.
Click Save & Exit to save the data and return to the Application Information screen.
Entering Permit Data in ePermitting
101
www.dot.state.pa.us
Building and Posting a Response 8
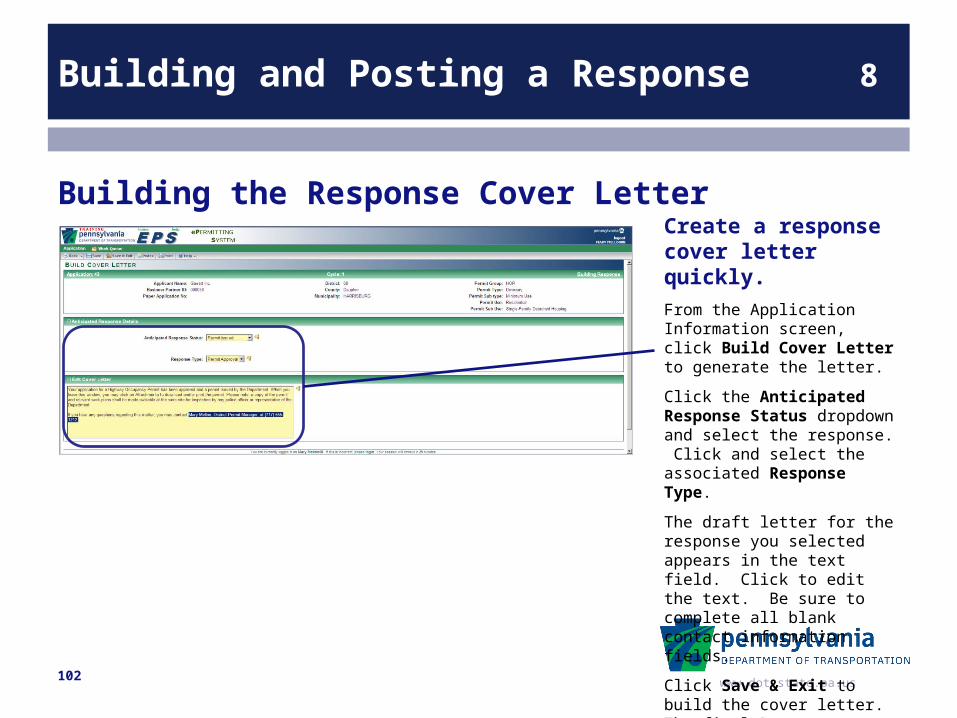
Create a response cover letter quickly.From the Application Information screen, click Build Cover Letter to generate the letter.
Click the Anticipated Response Status dropdown and select the response. Click and select the associated Response Type.
The draft letter for the response you selected appears in the text field. Click to edit the text. Be sure to complete all blank contact information fields.
Click Save & Exit to build the cover letter. The final Response Letter is built automatically.
Building the Response Cover Letter
102
www.dot.state.pa.us
Building and Posting a Response 8
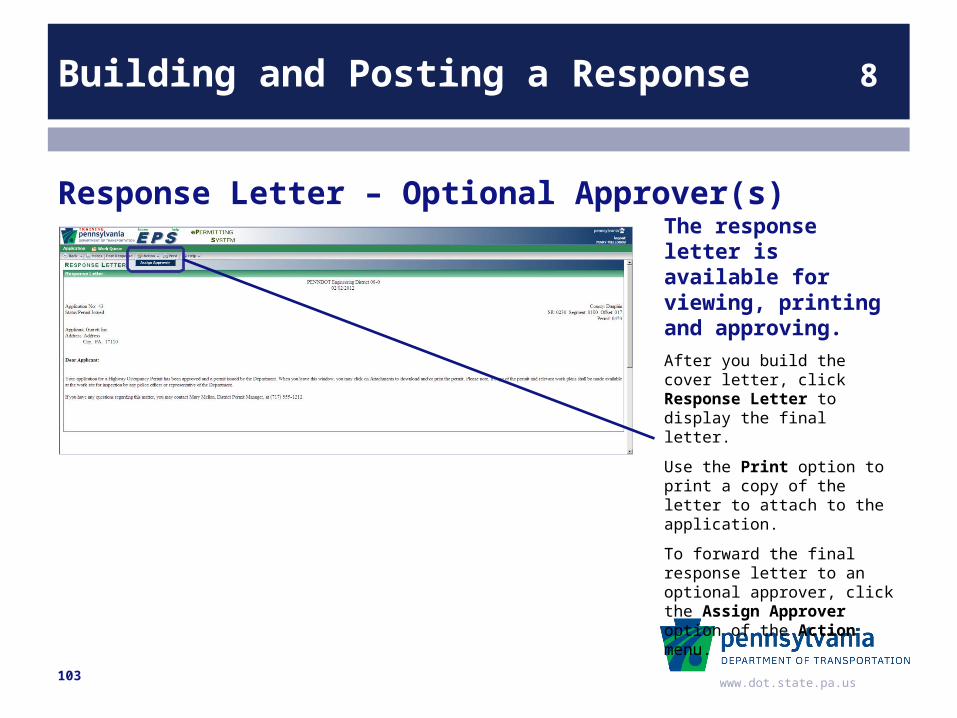
The response letter is available for viewing, printing and approving.After you build the cover letter, click Response Letter to display the final letter.
Use the Print option to print a copy of the letter to attach to the application.
To forward the final response letter to an optional approver, click the Assign Approver option of the Action menu.
Response Letter – Optional Approver(s)
103
www.dot.state.pa.us
Building and Posting a Response 8
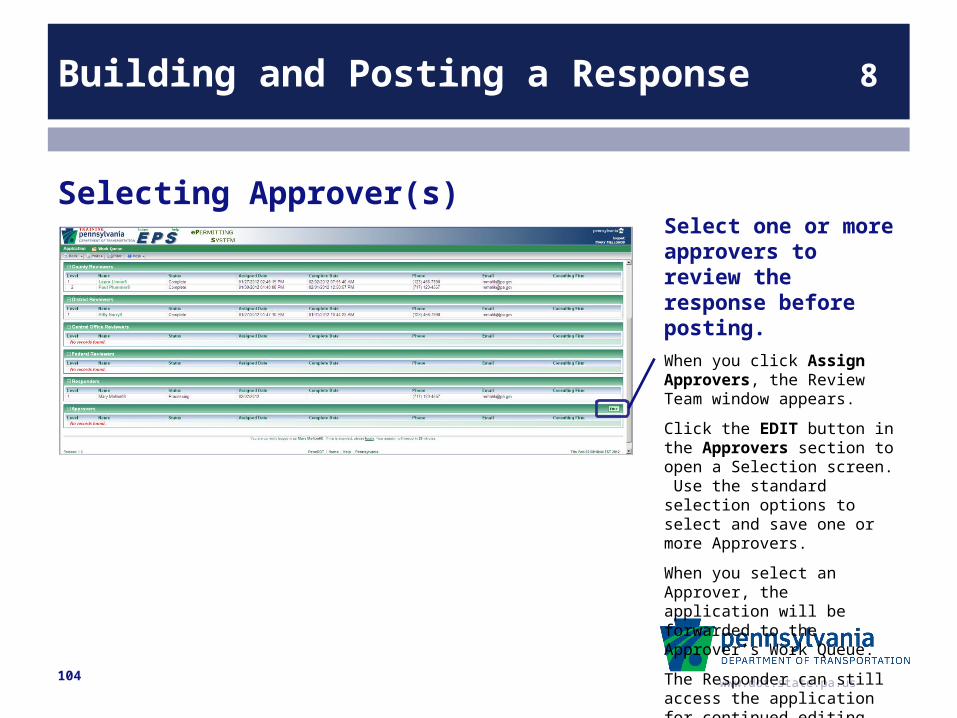
Select one or more approvers to review the response before posting.When you click Assign Approvers, the Review Team window appears.
Click the EDIT button in the Approvers section to open a Selection screen. Use the standard selection options to select and save one or more Approvers.
When you select an Approver, the application will be forwarded to the Approver’s Work Queue.
The Responder can still access the application for continued editing while the application is being approved.
Selecting Approver(s)
104
www.dot.state.pa.us
Building and Posting a Response 8
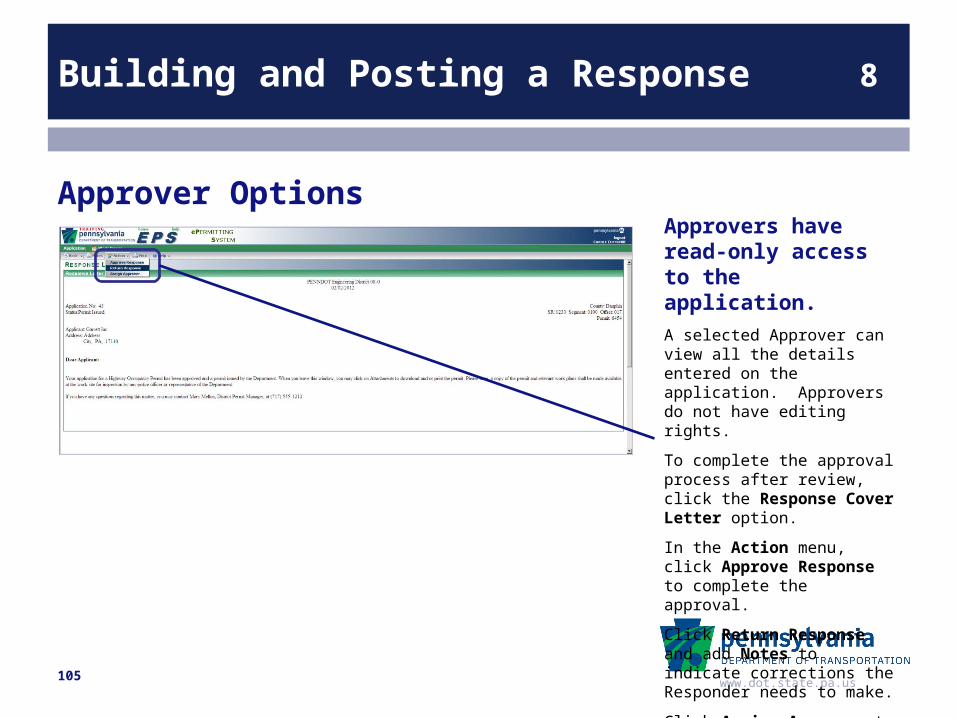
Approvers have read-only access to the application.A selected Approver can view all the details entered on the application. Approvers do not have editing rights.
To complete the approval process after review, click the Response Cover Letter option.
In the Action menu, click Approve Response to complete the approval.
Click Return Response and add Notes to indicate corrections the Responder needs to make.
Click Assign Approver to forward the application to another Approver for review.
Approver Options
105
www.dot.state.pa.us
Building and Posting a Response 8
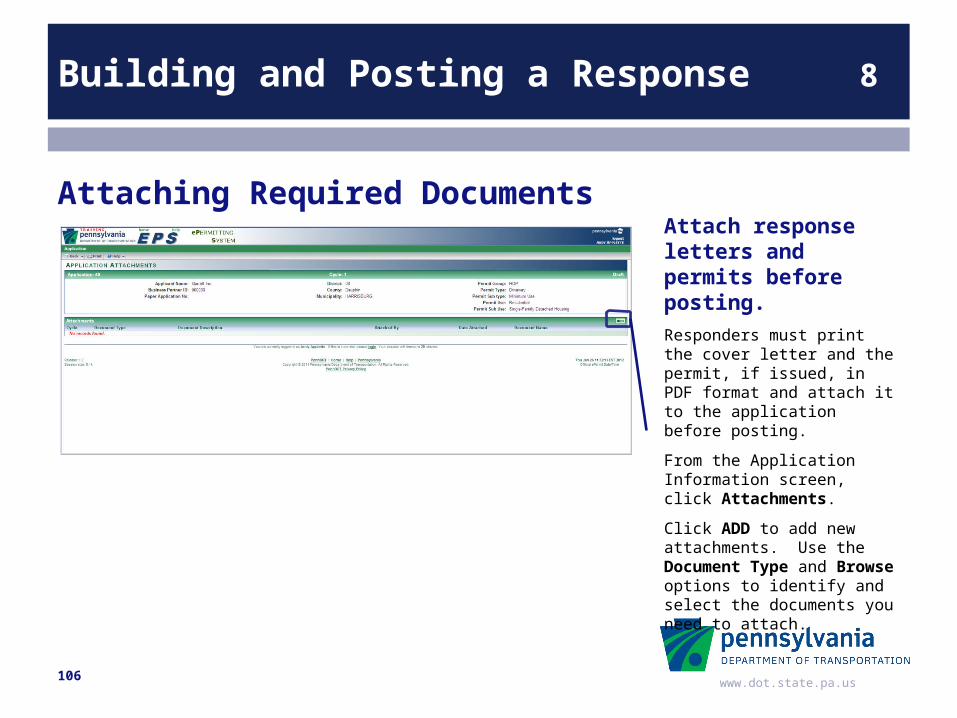
Attach response letters and permits before posting.Responders must print the cover letter and the permit, if issued, in PDF format and attach it to the application before posting.
From the Application Information screen, click Attachments.
Click ADD to add new attachments. Use the Document Type and Browse options to identify and select the documents you need to attach.
Attaching Required Documents
106
www.dot.state.pa.us
Building and Posting a Response 8
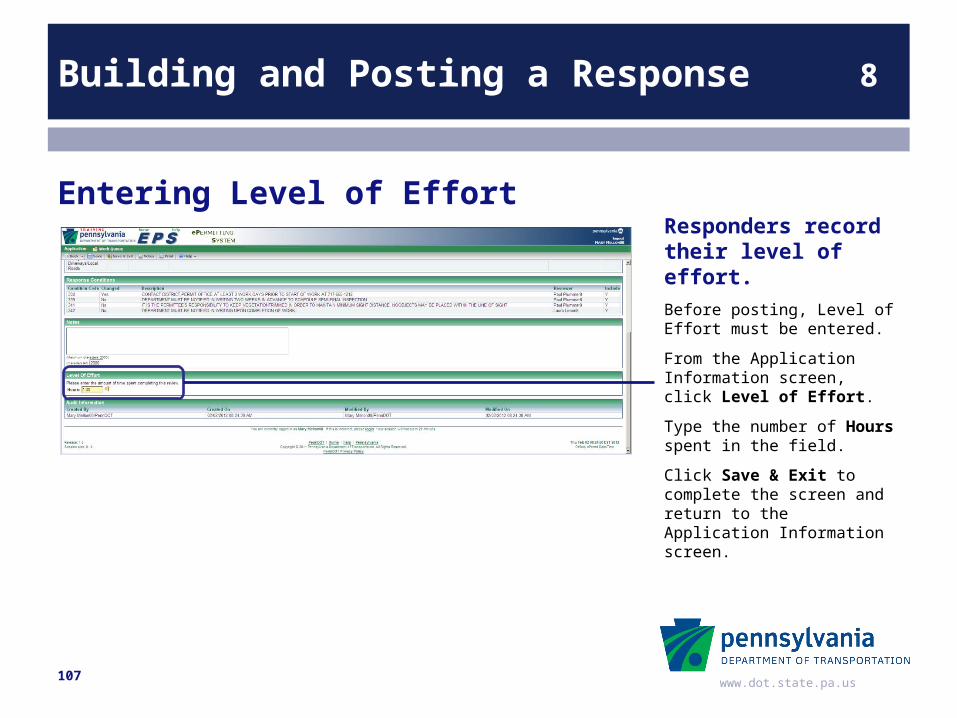
Responders record their level of effort.Before posting, Level of Effort must be entered.
From the Application Information screen, click Level of Effort.
Type the number of Hours spent in the field.
Click Save & Exit to complete the screen and return to the Application Information screen.
Entering Level of Effort
107
www.dot.state.pa.us
Building and Posting a Response 8
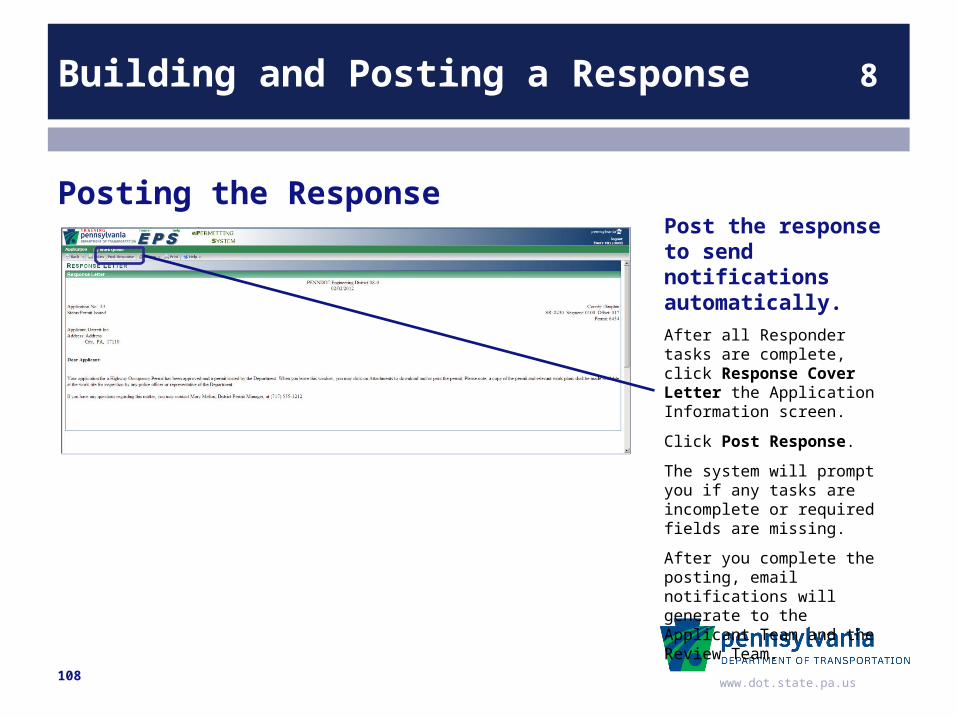
Post the response to send notifications automatically.After all Responder tasks are complete, click Response Cover Letter the Application Information screen.
Click Post Response.
The system will prompt you if any tasks are incomplete or required fields are missing.
After you complete the posting, email notifications will generate to the Applicant Team and the Review Team.
Posting the Response
108
www.dot.state.pa.us
Building and Posting a Response 8
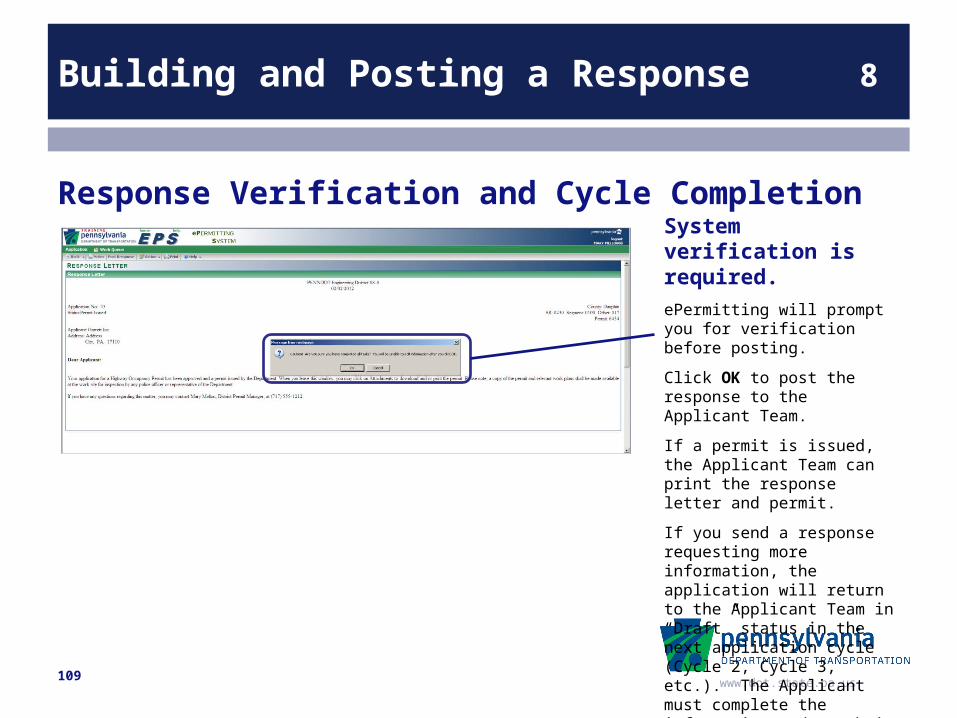
System verification is required.ePermitting will prompt you for verification before posting.
Click OK to post the response to the Applicant Team.
If a permit is issued, the Applicant Team can print the response letter and permit.
If you send a response requesting more information, the application will return to the Applicant Team in “Draft” status in the next application cycle (Cycle 2, Cycle 3, etc.). The Applicant must complete the information and resubmit it to start the next review cycle.
Response Verification and Cycle Completion
109
www.dot.state.pa.us
Data Correction and EPS Administration 9
Lesson 9
Data Correction and EPS Administration
Data Correctors make corrections to in-process applications when needed.
EPS Administrators assist with workflow management.
110
www.dot.state.pa.us
Data Correction and EPS Administration 9
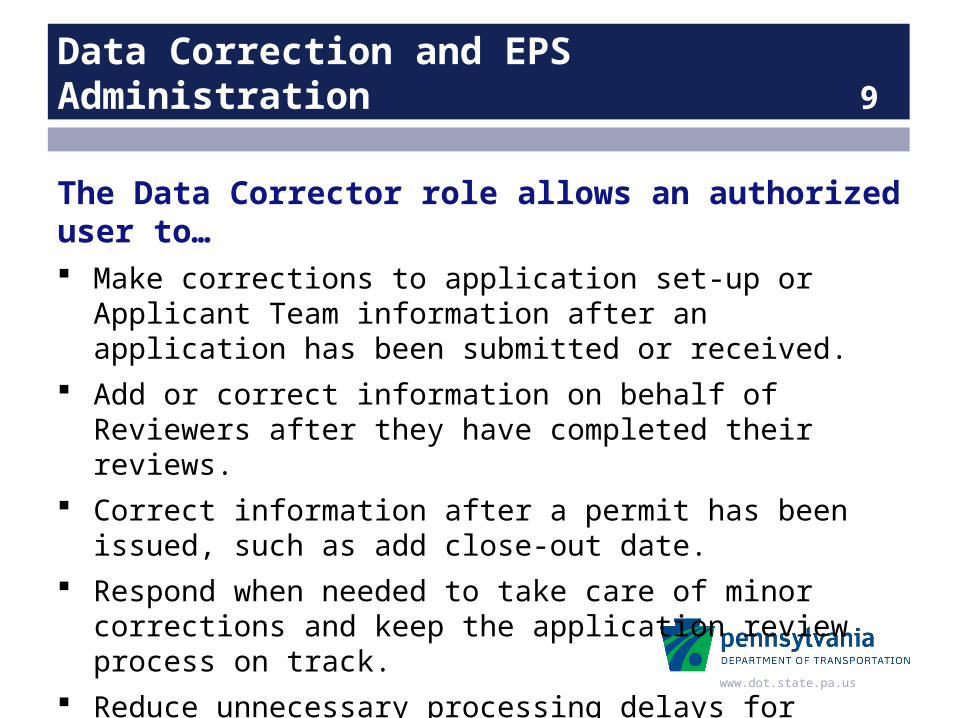
The Data Corrector role allows an authorized user to… Make corrections to application set-up or Applicant Team
information after an application has been submitted or received. Add or correct information on behalf of Reviewers after they have
completed their reviews. Correct information after a permit has been issued, such as add
close-out date. Respond when needed to take care of minor corrections and keep
the application review process on track. Reduce unnecessary processing delays for minor oversights.
www.dot.state.pa.us
Data Correction and EPS Administration 9
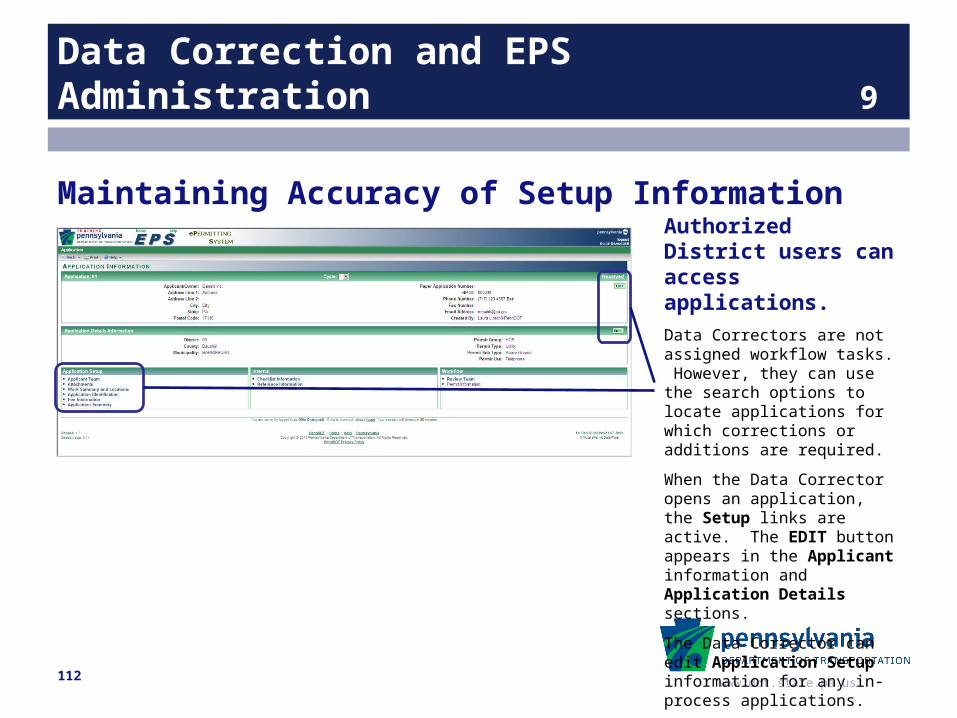
Authorized District users can access applications.Data Correctors are not assigned workflow tasks. However, they can use the search options to locate applications for which corrections or additions are required.
When the Data Corrector opens an application, the Setup links are active. The EDIT button appears in the Applicant information and Application Details sections.
The Data Corrector can edit Application Setup information for any in-process applications.
Maintaining Accuracy of Setup Information
112
www.dot.state.pa.us
Data Correction and EPS Administration 9
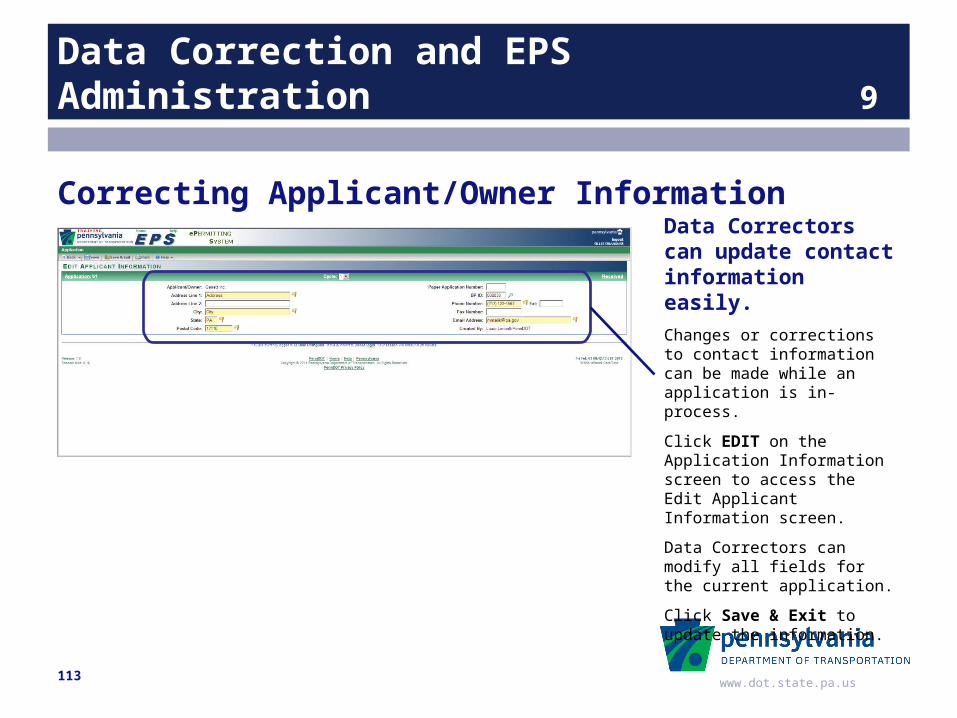
Data Correctors can update contact information easily.Changes or corrections to contact information can be made while an application is in-process.
Click EDIT on the Application Information screen to access the Edit Applicant Information screen.
Data Correctors can modify all fields for the current application.
Click Save & Exit to update the information.
Correcting Applicant/Owner Information
113

www.dot.state.pa.us
Data Correction and EPS Administration 9
Data Correctors keep details accurate.Changes or corrections to certain Application Details Information can be made for in-process applications.
Click EDIT on the Application Information screen to access the Edit Application Details screen.
Data Correctors can modify the Municipality, the Permit Sub Type and Permit Use fields, if needed.
Click Save & Exit to update the information.
Correcting Application Details
114
www.dot.state.pa.us
Data Correction and EPS Administration 9
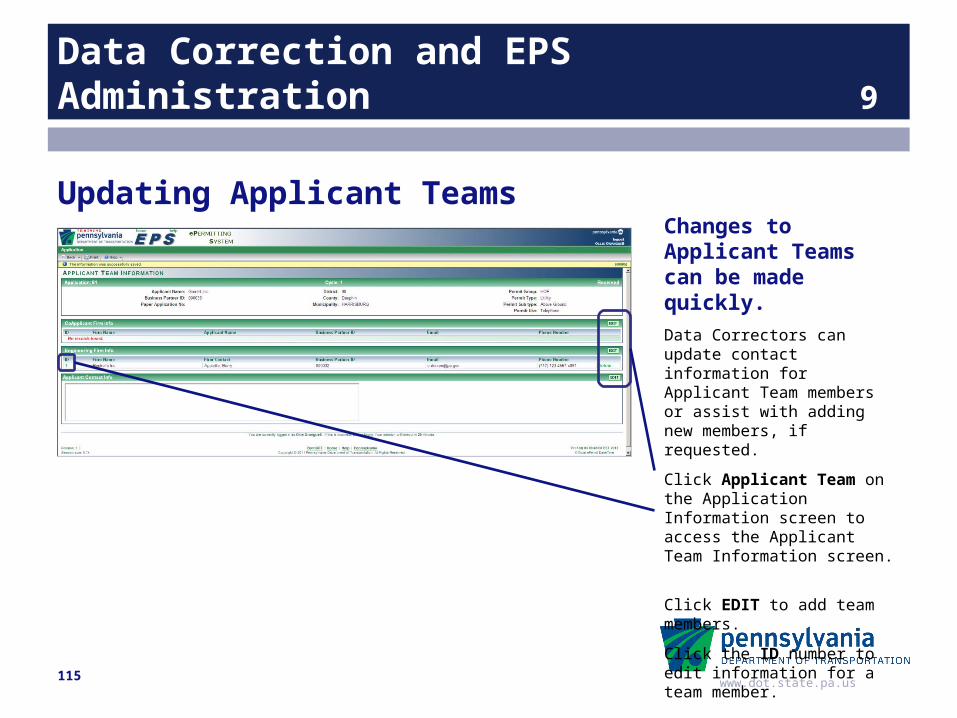
Changes to Applicant Teams can be made quickly.Data Correctors can update contact information for Applicant Team members or assist with adding new members, if requested.
Click Applicant Team on the Application Information screen to access the Applicant Team Information screen.
Click EDIT to add team members.
Click the ID number to edit information for a team member.
Updating Applicant Teams
115
www.dot.state.pa.us
Data Correction and EPS Administration 9
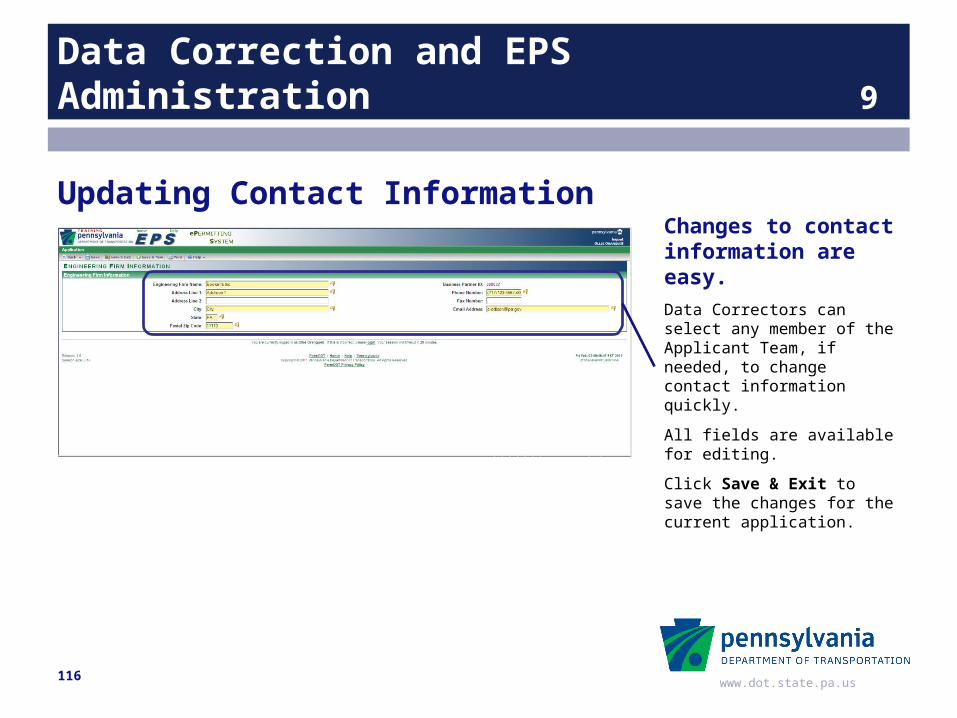
Changes to contact information are easy.Data Correctors can select any member of the Applicant Team, if needed, to change contact information quickly.
All fields are available for editing.
Click Save & Exit to save the changes for the current application.
Updating Contact Information
116
www.dot.state.pa.us
Data Correction and EPS Administration 9
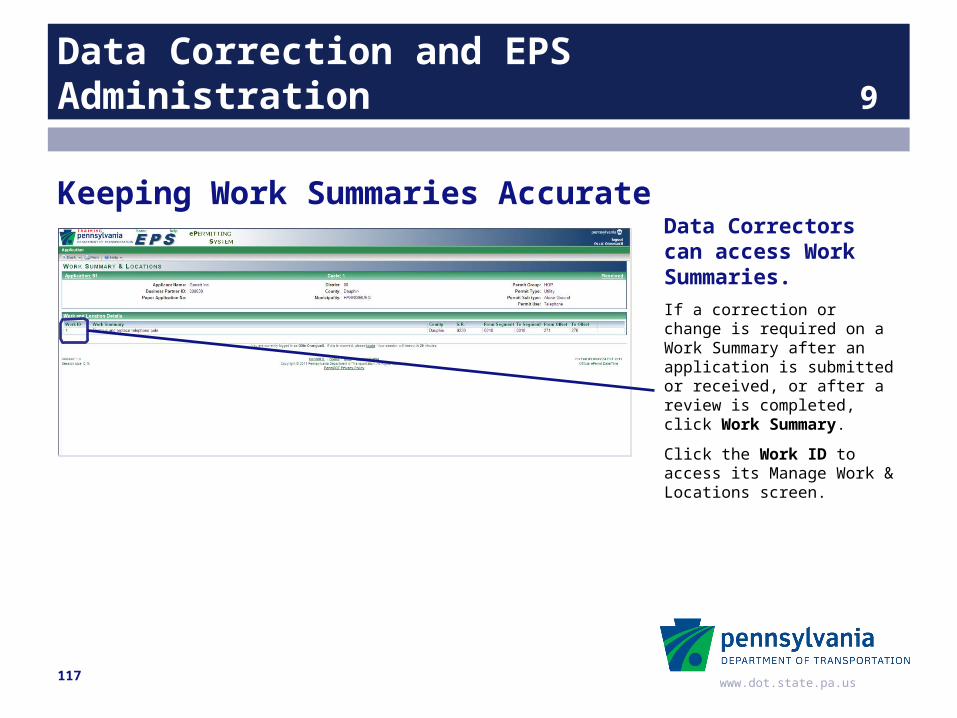
Data Correctors can access Work Summaries.If a correction or change is required on a Work Summary after an application is submitted or received, or after a review is completed, click Work Summary.
Click the Work ID to access its Manage Work & Locations screen.
Keeping Work Summaries Accurate
117
www.dot.state.pa.us
Data Correction and EPS Administration 9
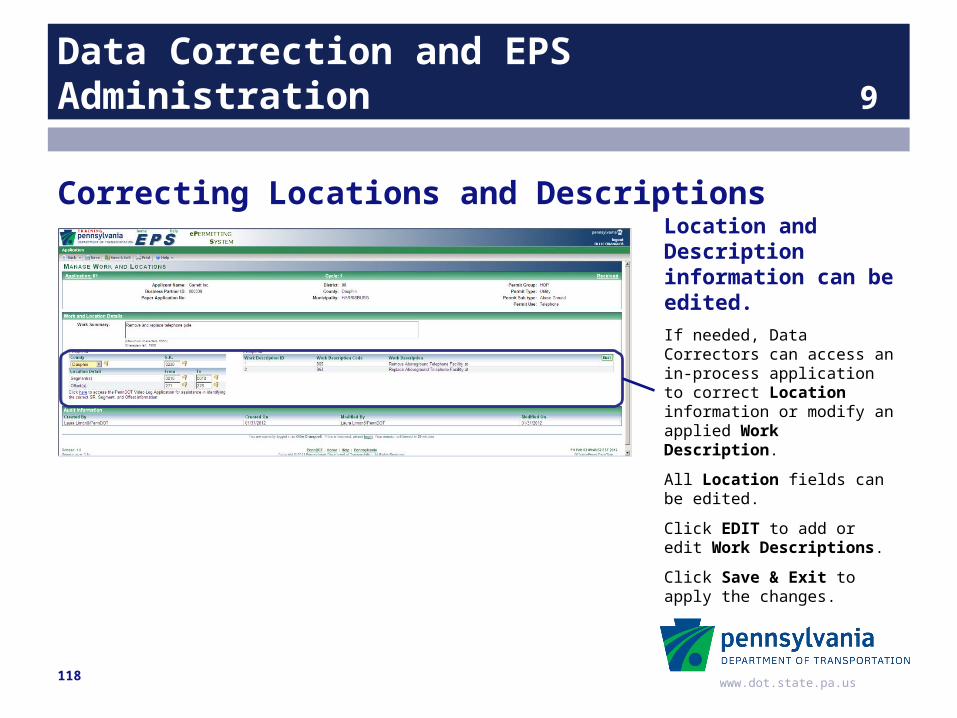
Location and Description information can be edited.If needed, Data Correctors can access an in-process application to correct Location information or modify an applied Work Description.
All Location fields can be edited.
Click EDIT to add or edit Work Descriptions.
Click Save & Exit to apply the changes.
Correcting Locations and Descriptions
118
www.dot.state.pa.us
Data Correction and EPS Administration 9
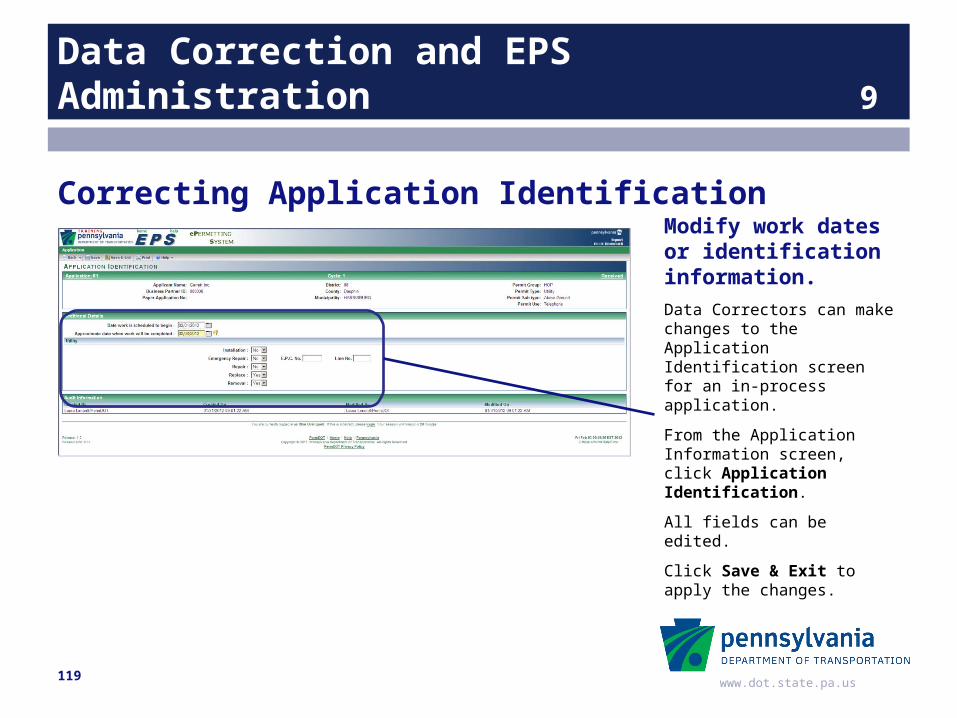
Modify work dates or identification information.Data Correctors can make changes to the Application Identification screen for an in-process application.
From the Application Information screen, click Application Identification.
All fields can be edited.
Click Save & Exit to apply the changes.
Correcting Application Identification
119
www.dot.state.pa.us
Data Correction and EPS Administration 9
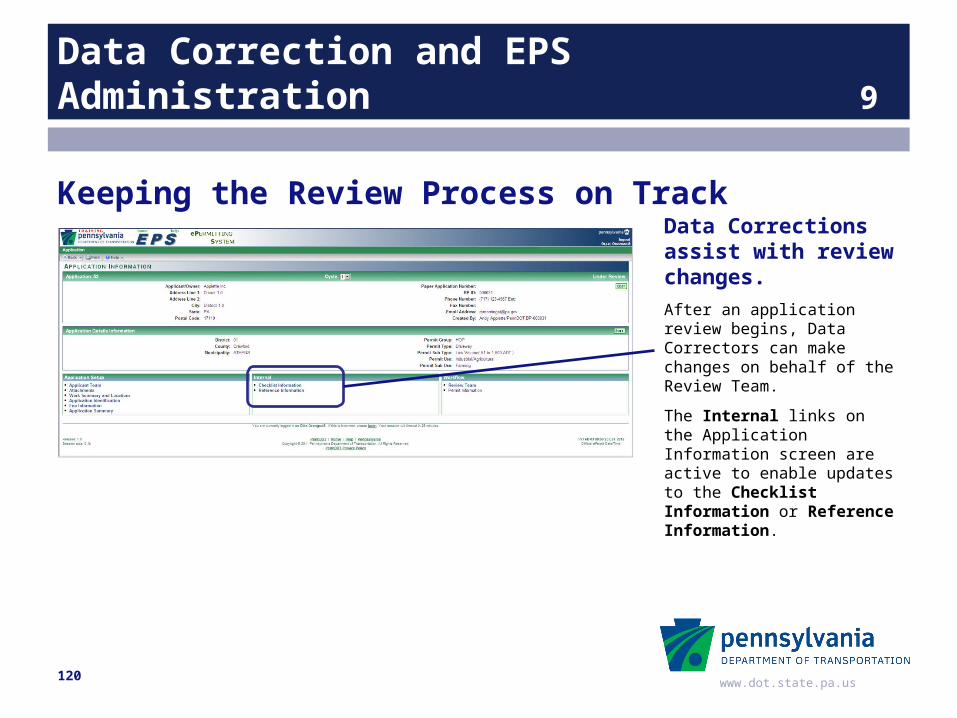
Data Corrections assist with review changes.After an application review begins, Data Correctors can make changes on behalf of the Review Team.
The Internal links on the Application Information screen are active to enable updates to the Checklist Information or Reference Information.
Keeping the Review Process on Track
120
www.dot.state.pa.us
Data Correction and EPS Administration 9
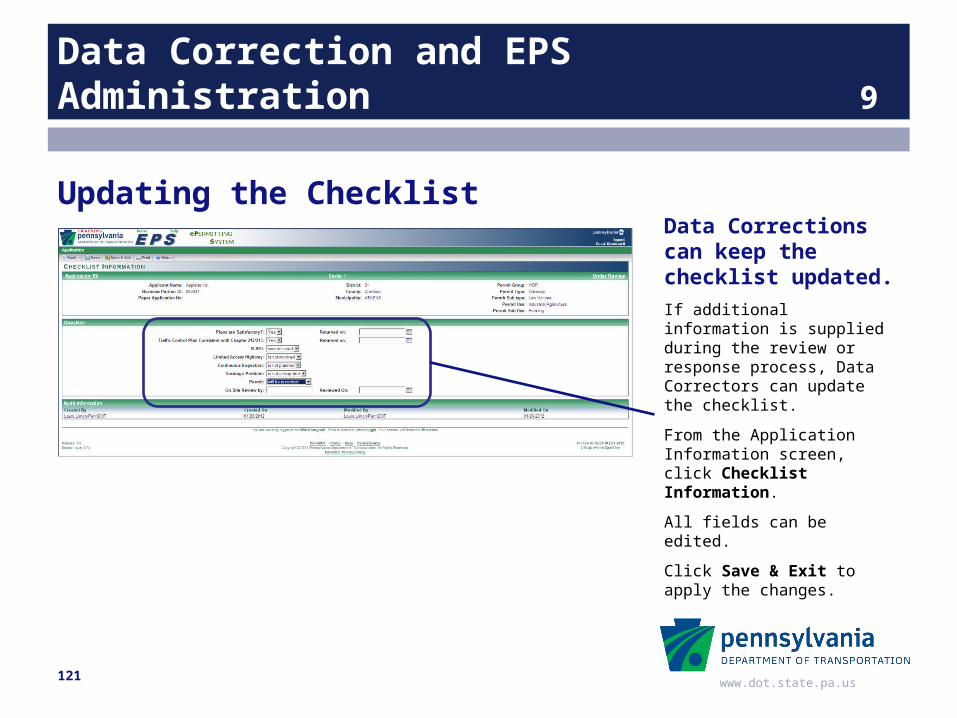
Data Corrections can keep the checklist updated.If additional information is supplied during the review or response process, Data Correctors can update the checklist.
From the Application Information screen, click Checklist Information.
All fields can be edited.
Click Save & Exit to apply the changes.
Updating the Checklist
121
www.dot.state.pa.us
Data Correction and EPS Administration 9
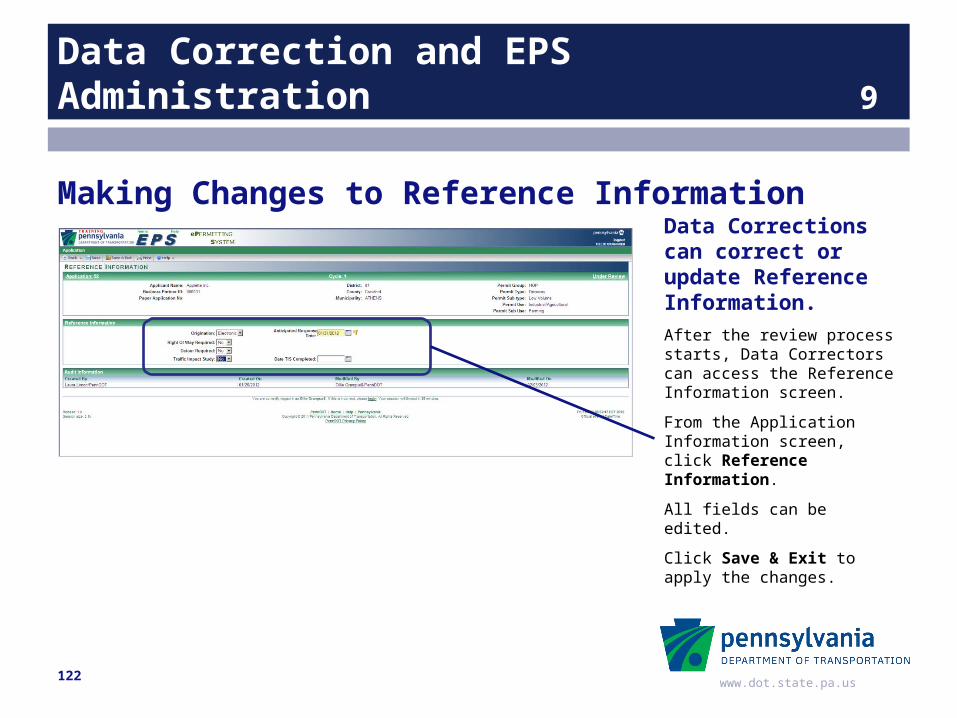
Data Corrections can correct or update Reference Information.After the review process starts, Data Correctors can access the Reference Information screen.
From the Application Information screen, click Reference Information.
All fields can be edited.
Click Save & Exit to apply the changes.
Making Changes to Reference Information
122
www.dot.state.pa.us
Data Correction and EPS Administration 9
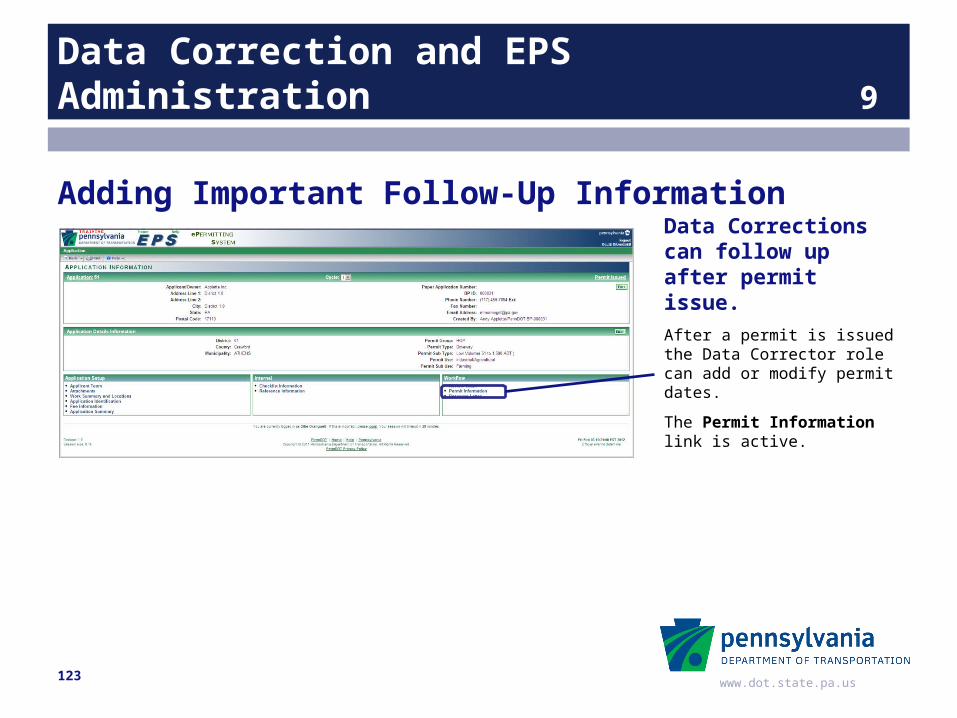
Data Corrections can follow up after permit issue.After a permit is issued the Data Corrector role can add or modify permit dates.
The Permit Information link is active.
Adding Important Follow-Up Information
123

www.dot.state.pa.us
Data Correction and EPS Administration 9
Data Correctors help keep permit details accurate.After a permit is issued, Data Correctors can access the Permit Information screen.
From the Application Information screen, click Permit Information.
All fields can be edited.
Click Save & Exit to apply the changes.
Updating Permit Information
124
www.dot.state.pa.us
Data Correction and EPS Administration 9
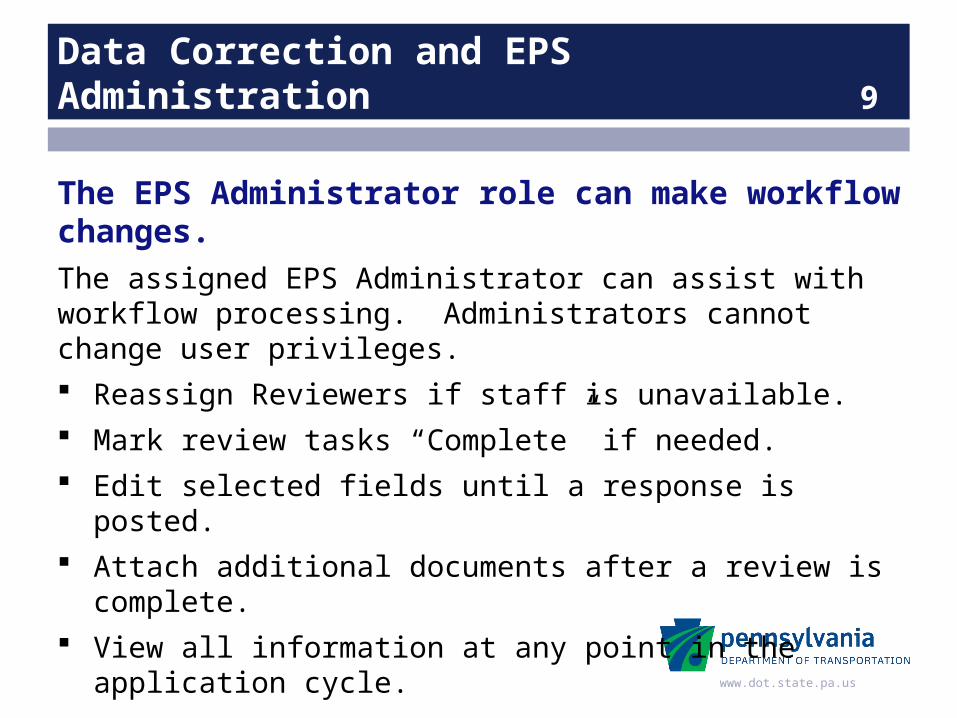
The EPS Administrator role can make workflow changes.The assigned EPS Administrator can assist with workflow processing. Administrators cannot change user privileges. Reassign Reviewers if staff is unavailable. Mark review tasks “Complete” if needed. Edit selected fields until a response is posted. Attach additional documents after a review is complete. View all information at any point in the application cycle.
www.dot.state.pa.us
Data Correction and EPS Administration 9
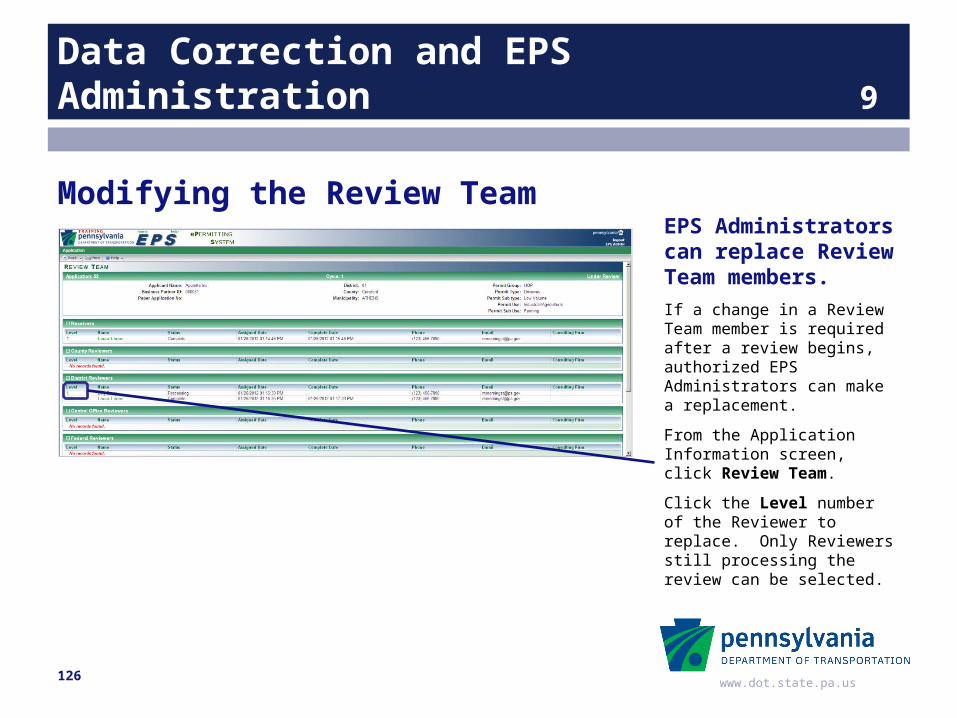
EPS Administrators can replace Review Team members.If a change in a Review Team member is required after a review begins, authorized EPS Administrators can make a replacement.
From the Application Information screen, click Review Team.
Click the Level number of the Reviewer to replace. Only Reviewers still processing the review can be selected.
Modifying the Review Team
126
www.dot.state.pa.us
Data Correction and EPS Administration 9
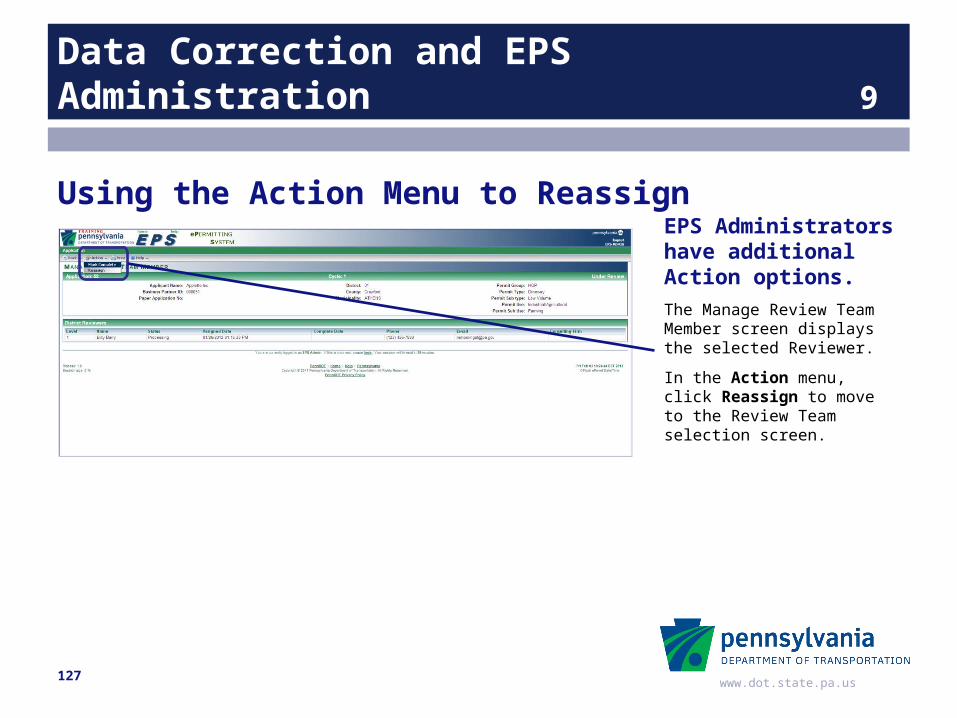
EPS Administrators have additional Action options.The Manage Review Team Member screen displays the selected Reviewer.
In the Action menu, click Reassign to move to the Review Team selection screen.
Using the Action Menu to Reassign
127
www.dot.state.pa.us
Data Correction and EPS Administration 9
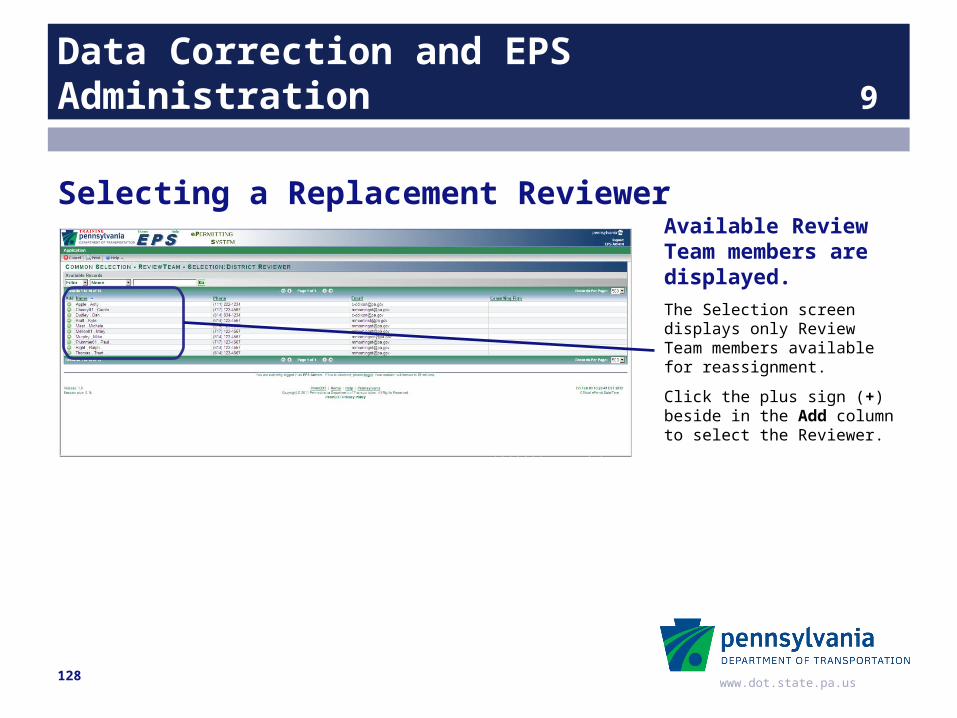
Available Review Team members are displayed.The Selection screen displays only Review Team members available for reassignment.
Click the plus sign (+) beside in the Add column to select the Reviewer.
Selecting a Replacement Reviewer
128
www.dot.state.pa.us
Data Correction and EPS Administration 9
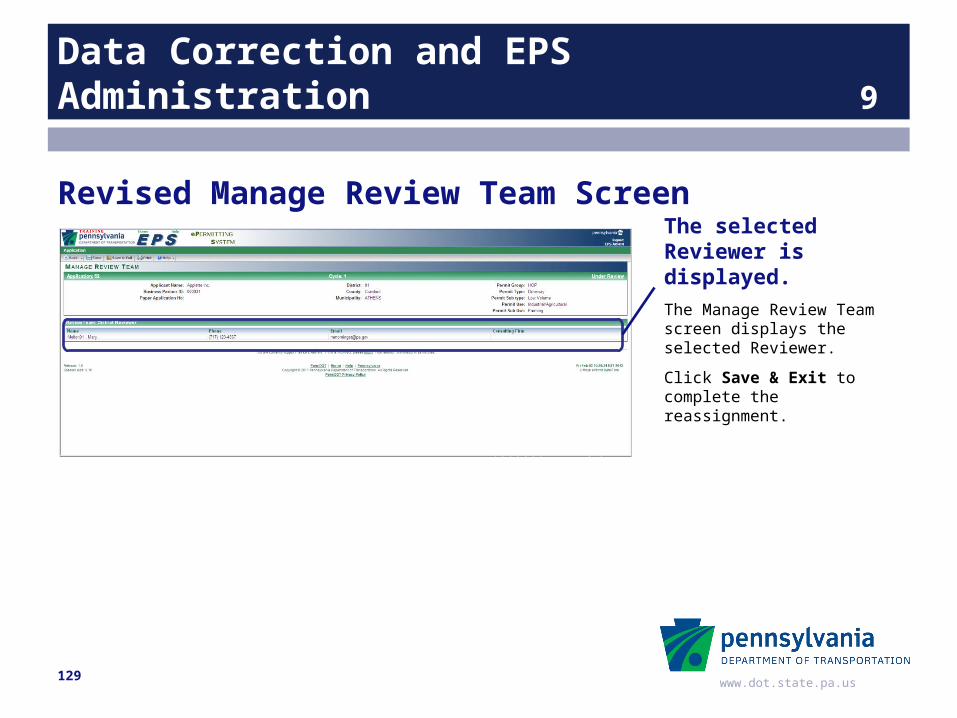
The selected Reviewer is displayed.The Manage Review Team screen displays the selected Reviewer.
Click Save & Exit to complete the reassignment.
Revised Manage Review Team Screen
129
www.dot.state.pa.us
Data Correction and EPS Administration 9
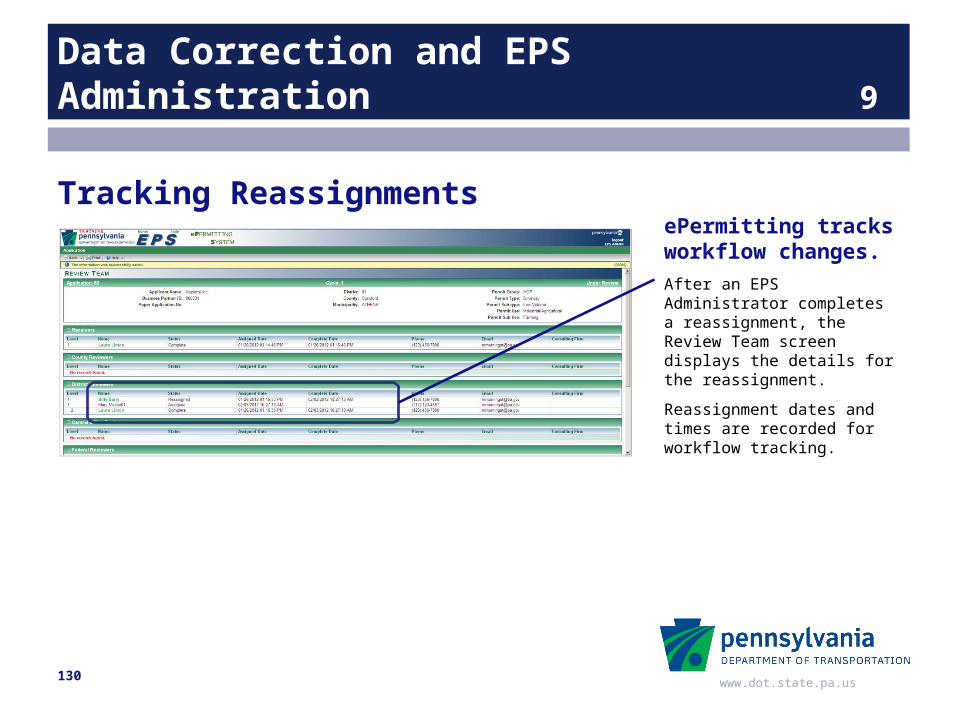
ePermitting tracks workflow changes.After an EPS Administrator completes a reassignment, the Review Team screen displays the details for the reassignment.
Reassignment dates and times are recorded for workflow tracking.
Tracking Reassignments
130
www.dot.state.pa.us
Data Correction and EPS Administration 9
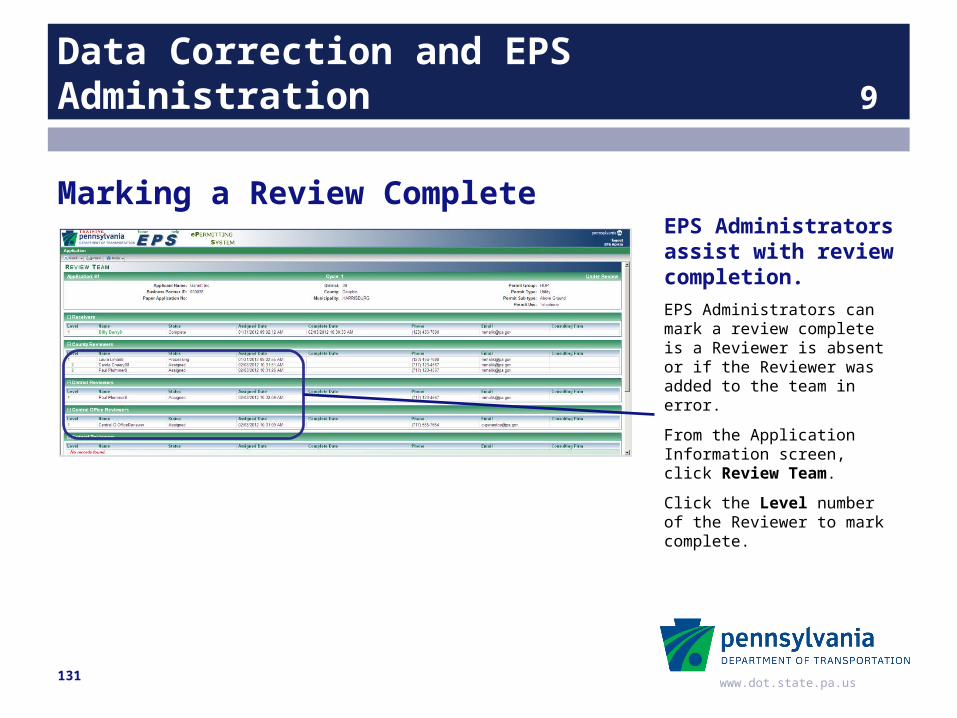
EPS Administrators assist with review completion.EPS Administrators can mark a review complete is a Reviewer is absent or if the Reviewer was added to the team in error.
From the Application Information screen, click Review Team.
Click the Level number of the Reviewer to mark complete.
Marking a Review Complete
131
www.dot.state.pa.us
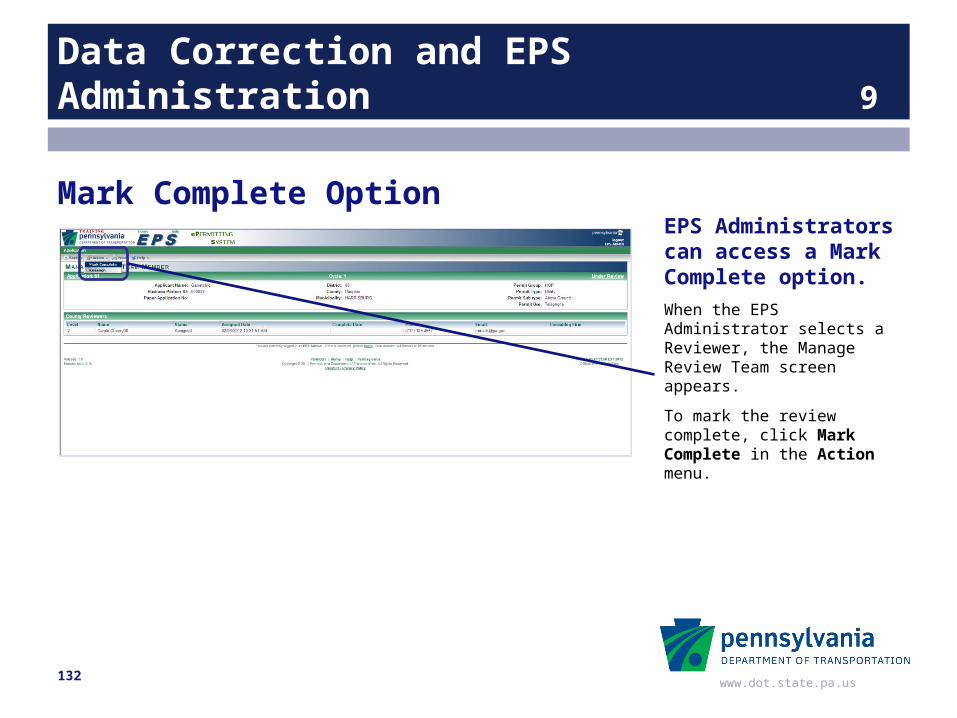
Data Correction and EPS Administration 9
EPS Administrators can access a Mark Complete option.When the EPS Administrator selects a Reviewer, the Manage Review Team screen appears.
To mark the review complete, click Mark Complete in the Action menu.
Mark Complete Option
132
www.dot.state.pa.us
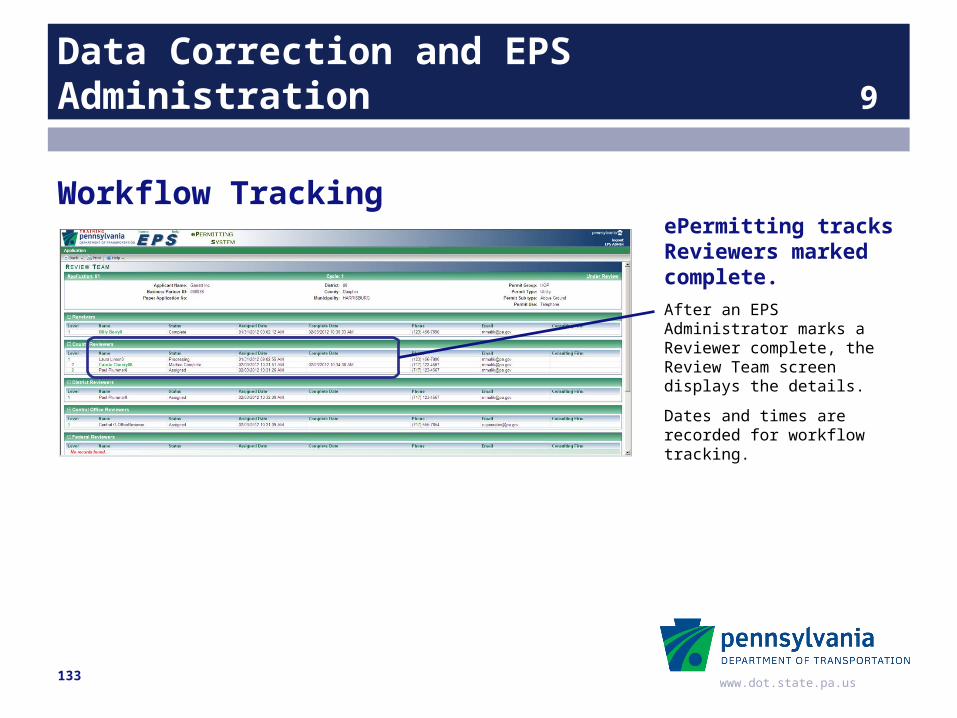
Data Correction and EPS Administration 9
ePermitting tracks Reviewers marked complete.After an EPS Administrator marks a Reviewer complete, the Review Team screen displays the details.
Dates and times are recorded for workflow tracking.
Workflow Tracking
133

www.dot.state.pa.us
Management Reporting 10
Lesson 10
Management Reporting
Accessing InfoView reports.
Customizing report parameters.
Printing reports.
134
www.dot.state.pa.us
Management Reporting 10
ePermitting ReportsReports for ePermitting are generated from InfoView. Security is managed separately by PennDOT IT. An InfoView User Name and Password are required. Report views can be customized with “Parameters” to filter
information on the reports. Report data can be printed or exported as needed.
www.dot.state.pa.us
Management Reporting 10
Application Detail ReportsDetail reports provide information for a selected application. The Information Management System (IMS) Input Report shows all
internal information. The Printable Application provides a comprehensive overview of all
information entered for an application.
www.dot.state.pa.us
Management Reporting 10
Standard Weekly Reports
Tracking reports are generated each weekend. Overdue TIS and HOP Applications TIS and HOP Applications Outside Review Cycles TIS and HOP Applications Outside Timelines TIS and HOP Applications Volume and Review Statistics
The week’s current report information is saved after it generates. Users can customize or filter the views as needed.
www.dot.state.pa.us
Management Reporting 10
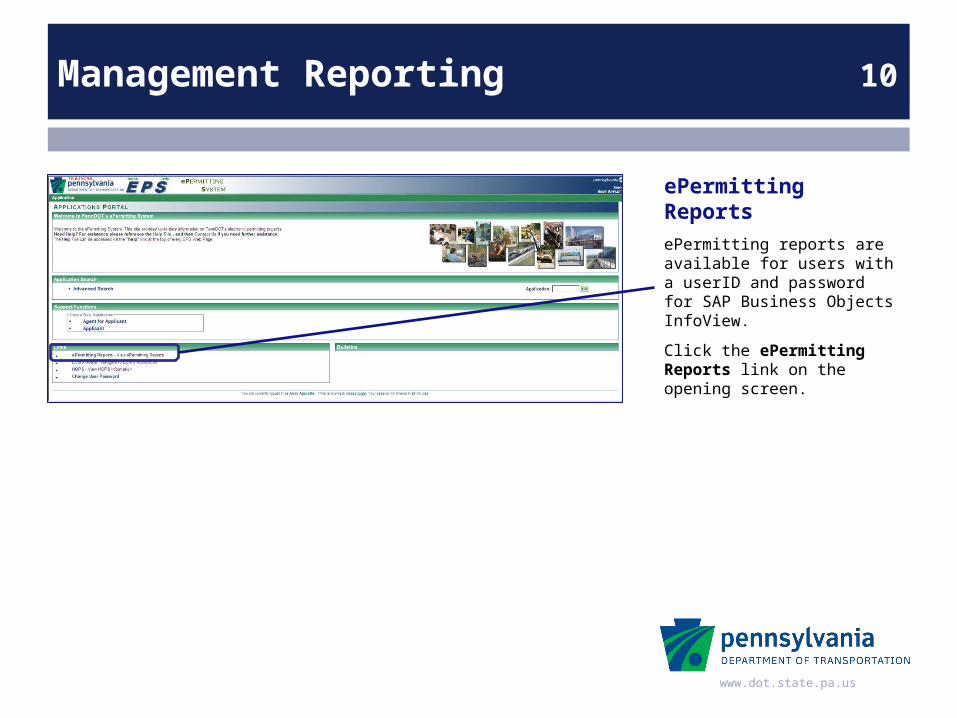
ePermitting ReportsePermitting reports are available for users with a userID and password for SAP Business Objects InfoView.
Click the ePermitting Reports link on the opening screen.
www.dot.state.pa.us
Management Reporting 10
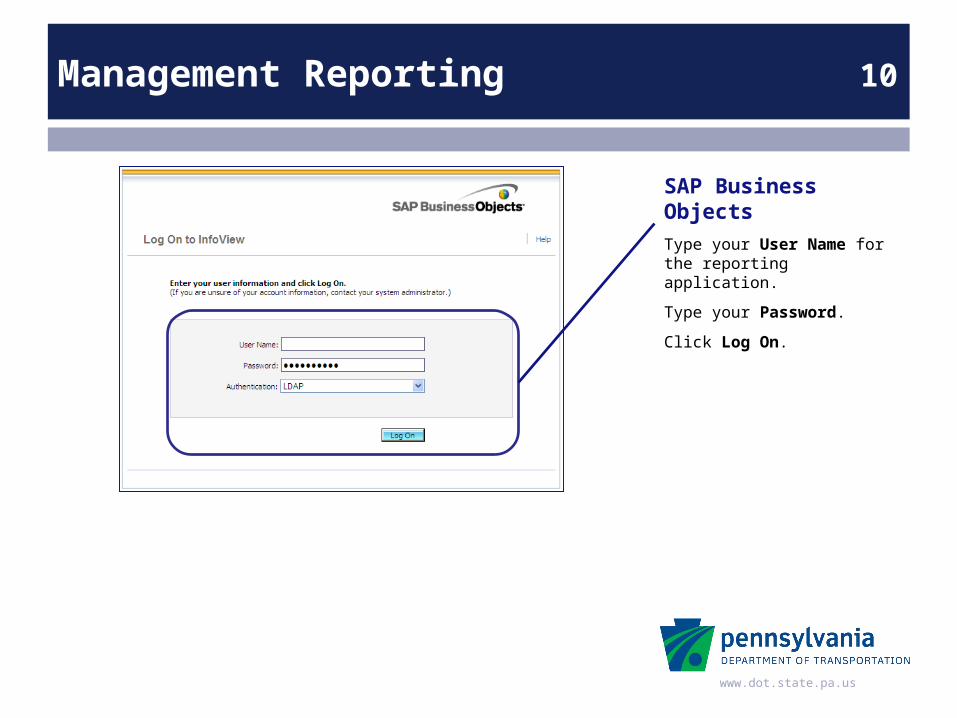
SAP Business ObjectsType your User Name for the reporting application.
Type your Password.
Click Log On.

www.dot.state.pa.us
Management Reporting 10
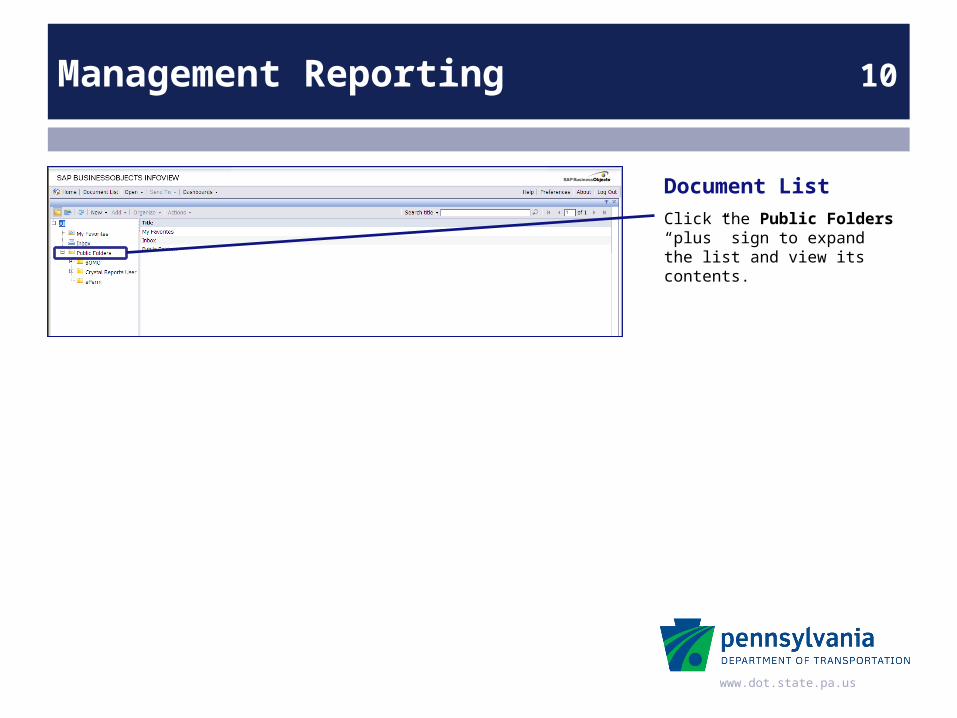
NavigationePermitting reports are located in the public reports folder.
Click Document List to view available reports.
www.dot.state.pa.us
Management Reporting 10
Document ListClick the Public Folders “plus” sign to expand the list and view its contents.
www.dot.state.pa.us
Management Reporting 10
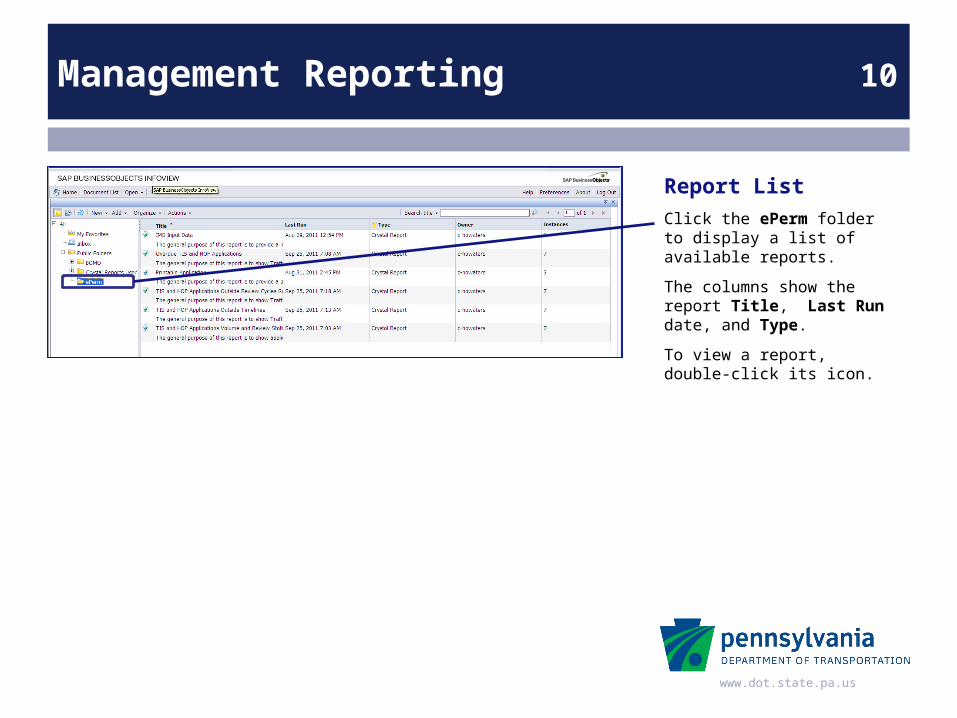
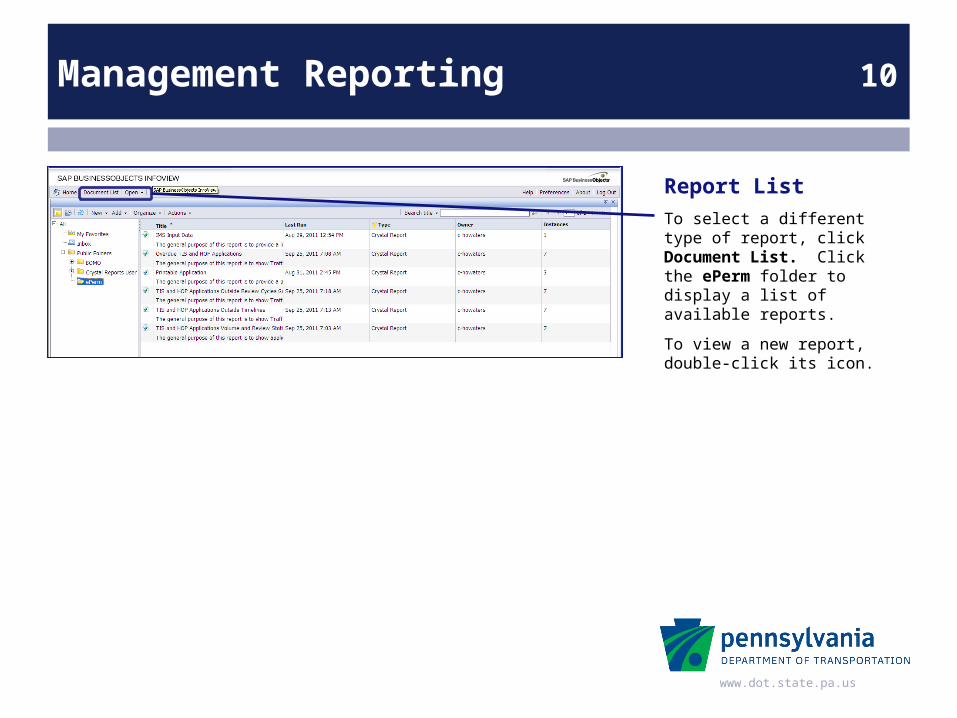
Report ListClick the ePerm folder to display a list of available reports.
The columns show the report Title, Last Run date, and Type.
To view a report, double-click its icon.
www.dot.state.pa.us
Management Reporting 10
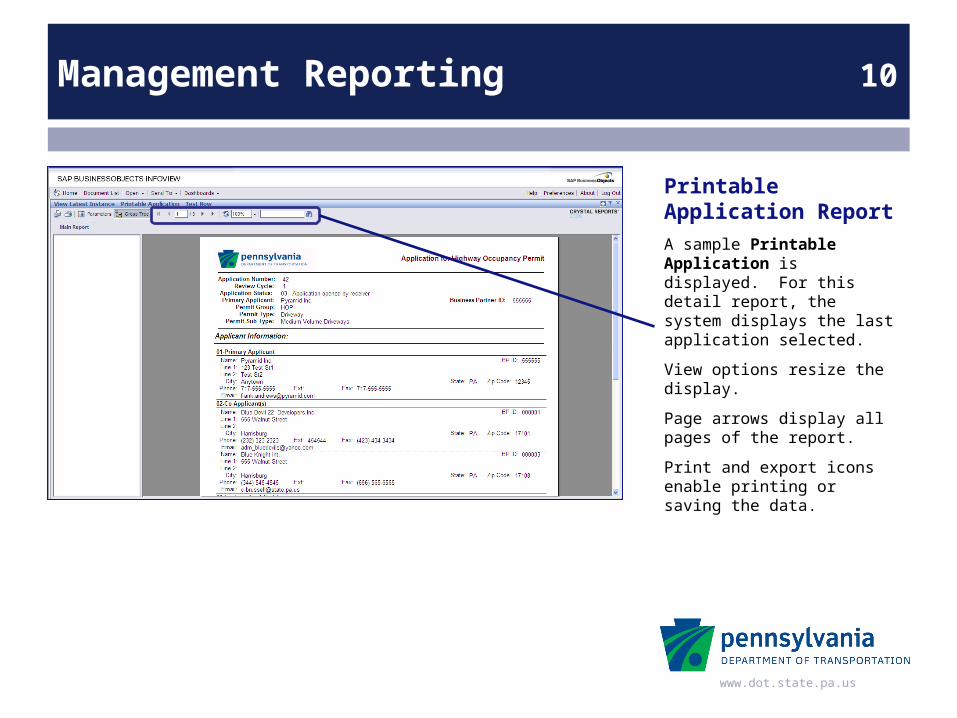
Printable Application ReportA sample Printable Application is displayed. For this detail report, the system displays the last application selected.
View options resize the display.
Page arrows display all pages of the report.
Print and export icons enable printing or saving the data.
www.dot.state.pa.us
Management Reporting 10
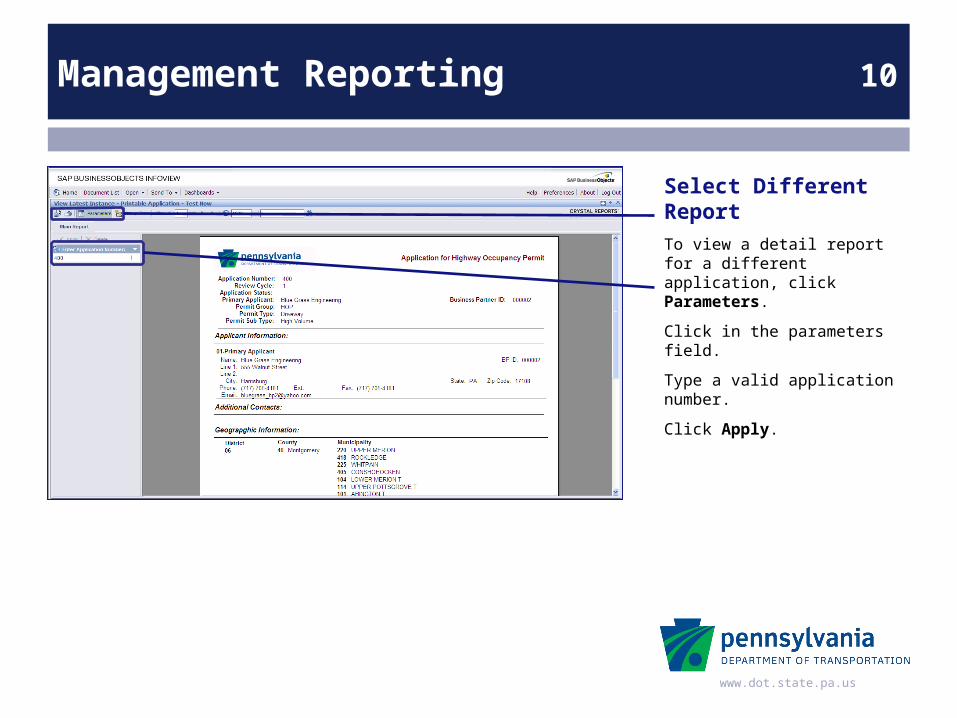
Select Different ReportTo view a detail report for a different application, click Parameters.
Click in the parameters field.
Type a valid application number.
Click Apply.
www.dot.state.pa.us
Management Reporting 10
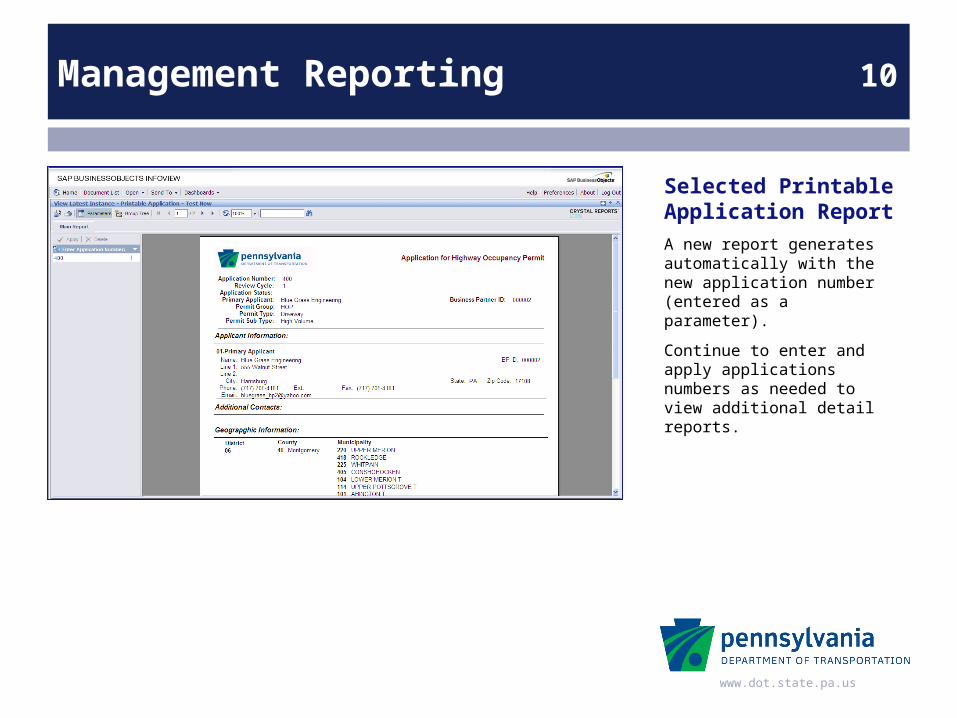
Selected Printable Application ReportA new report generates automatically with the new application number (entered as a parameter).
Continue to enter and apply applications numbers as needed to view additional detail reports.
www.dot.state.pa.us
Management Reporting 10
Report ListTo select a different type of report, click Document List. Click the ePerm folder to display a list of available reports.
To view a new report, double-click its icon.

www.dot.state.pa.us
Management Reporting 10
Printable Weekly ReportA sample Overdue TIS and HOP Applications report is displayed.
Weekly (batch) reports are updated each week with new system information.
View options resize the display.
Page arrows display all pages of the report.
Print and export icons enable printing or saving the data.
You can change the information included in the report using the Parameters button.
www.dot.state.pa.us
Management Reporting 10
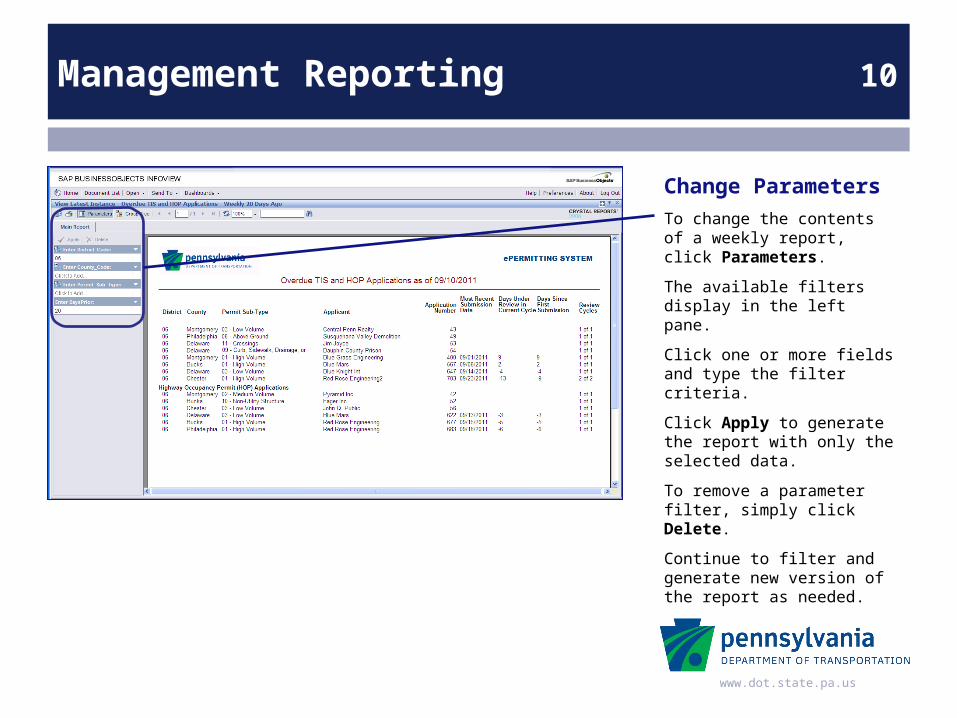
Change ParametersTo change the contents of a weekly report, click Parameters.
The available filters display in the left pane.
Click one or more fields and type the filter criteria.
Click Apply to generate the report with only the selected data.
To remove a parameter filter, simply click Delete.
Continue to filter and generate new version of the report as needed.


![[Language - English] - Oxford Intermediate - Grammar Spectrum Intermediate](https://img.dokumen.tips/doc/110x75/551e643d497959d9398b494d/language-english-oxford-intermediate-grammar-spectrum-intermediate.jpg)