Embed Size (px)
Citation preview

1
PSGP310 www.pyleaudio.com
Personal GPS Training Watch
Quick Start Guide

2
What is GPS?
The Global Positioning System (GPS) is a space-based satellite navigation system that provides location and time information in all weather conditions, anywhere on or near the Earth where there is an unobstructed line of sight to four or more GPS satellites. The system provides critical capabilities to military, civil and commercial users around the world
CAUTION!
Before first time using device, please fully charge the device. Device may get wet after activity, please be noted to dry device before connect
USB charging cable. Before start training, please let antenna face to sky to get GPS fix

3
Symbol Explanation
Symbol Explanations
GPS status indicator Solid with 1 bar: 3D fix with poor signal Solid with 2 bar: 3D fix with good signal Solid with 3 bar: 3D fix with strong signal
Timer icon when training is getting started
Heart rate monitor indication (PSGP410 only)
Battery capacity indication
Speed information indication
Distance information indication
Lap count indication
Current lap distance
Current lap time
Screen Pages Explanation In Menu pages, there are five pages: View Page: This page is for performance review. Race Page: This page is setup for training conditions and GHOST. Go to Page: This page is setup for ROUTE and location finding. Setup Page: This page is setup for device, status check.

4
In Screen Pages, there are seven pages: Time Page: This page shows time information. Timer Page: You may start training and see the training performance there. Split information Page: You may start training and see the training performance of current lap there. Custom Page1: The page item can be configurable and see the performance information. Custom Page2: The page item can be configurable and see the performance information. Ghost Page: The page will appear and how the race information when the GHOST function is active. Map Page: The page will appear the map information with current trace. Ghost Page: The page will appear competition result when the GHOST function is active. Compass Page: This page will be available in W3.
Time Page Timer Page Split informaiton page
Custom Page1 Custom Page2 Map Page Ghost Page (if enable)
Compass page (PSGP410 only)

5
Button Definition
Button Description 1. Power/ESC Press 2 seconds to turn on/off device.
When device is on, quickly press this button will turn on/off the backlight. Press and hold this button for 10 seconds to do hardware reset if the system is halted. In Menu mode, press ESC button shortly to escape from the current page and go back to the previous page.
2. PG /ENTER Switch between the screens of Menu and Screen pages. Press 2 seconds to enter between Menu page and Screen Page alternatively.
3. Up /Start/Stop
To press UP to up to scroll up highlighting an item in Main Menu page. In Timer page, press START button to start timer to start training. In Timer page, press STOP button to stop timer in training. In Map mode, press for zoom in.
4. Down/Lap/Save To press Down to scroll down highlighting an item in Menu page. In Timer page, when timer is counting for training, press Lap button to create a lap. Stop timer while in training, press SAVE button to save training.
1
2 4
3

6
GPS Reception Check
The GPS antenna is located the upper side of the watch. Face this towards the sky for a better reception.
Please hold watch towards the sky to get the best signal and to get GPS fix for training.
You may check the GPS reception status with the screen below:

7
Make your device as a normal watch Due to device can operate under Time Mode up to four weeks. So you can wear it as normal watch. You may follow the bellow procedure to make it as watch:
If standby under time page for 3 minutes, the system will enter to Time Mode.
If you press any key, the system will pop message to ask you press any key for 2 sec to return normal
operation.
How to Set Up Custom Page Set up the custom pages to give more information you like before your training.
1. Press ‘’Page button’’ 2s to enter
MAIN MENU and select SETUP.
2. Choose ‘’ SET PAGES’’ then press
‘’Enter button’’.
3. Chose ‘’ SET PAGE’ then press ‘’Enter button’’ to setup custom page
.
4. You can select the parameter you
want to see.

8
5. After setup, you can see the information on custom page.
6. You may setup “LAP PAGE” to edit the information you want to see in LAP page.
7. You can select the parameter for LAP page.
8. The lap page will appear when the lap is active in training.
How to configure your device before training Before getting training, you may configure your device in the best condition to get more accurate performance. a. Device Setting
1. Please press Page button 2s to enter
Main MENU and then chose SETUP

9
2. To press UP and Down button to select each item for definition.
3. To select Display icon to setup display
4. You may setup the contrast, backlight and night mode in this item.
5. Go to select UNIT.
6. You may setup units and coordination type that you prefer.

10
7. In order to record the more accurate
time, you can set the time zone in this item.
8. To setup your time zone and daylight saving. Your GPS will auto calibrate the time to keep the best accuracy of time by GPS.
9. To setup the beeper condition.
10. You can turn on or off beeper.
11. You can setup the language by this
icon. Select your favorite language.

11
b. User profile setting Personal profile is important for calories calculation, maximum HRM zone reference, you may setup by following the process below.
1. Please press Page button 2s to enter Main MENU and then chose PROFILE
2. To press UP and Down button to select PROFILE
3. You may setup your sex, height, age into this item. The condition is important for training preformation calculation.

12
c. Sensors setting (PSGP410 only) For personal training, in order to get more accurate performance, most trainers will have their training with the accessories like HRM. You may setup by the following the procedure below.
1. Please press Page button 2s to enter Main MENU and then chose PROFILE
2. To press UP and Down button to select SENSOR.
3. To select SENSOR, you may pair you accessories like HRM, CADENCE sensor, SPEED sensor, COMBO sensor or POWER meter.
4. There are five sensors for paring and use.
Ex. SCANNING for HRM.
5. HRM is PAIRING now.
6. HRM is Pairing OK.

13
d. Options setup for your personal training To have your training with more statistic for further analysis, you may setup by following the below procedure.
1. Please press Page button 2s to enter Main MENU and then chose RACE
2. To press UP and Down button to select OPTIONS.
Auto Pause Auto Lap
Alarm Map Mode
3. You may setup the AUTO PAUSE, AUTO LAP, ALARM, MAP MODE, and LEVEL SETTING in this item.
AUTO PAUSE: System will calculate the data in the setting period. AUTO LAP: System will auto split by setting distance or interval. ALRAM: To set alarm and system will alert you when in training. MAP MODE: You can setup the auto zoom in/ out and orientation.
ALARM: There are six setting of alarm for setup: HRM, SPEED, RPM, TIME, DISTANCE, POWER alarm. *HRM Alarm: Set alarm for the heart rate zone. SPEED Alarm: Set the alarm for speed

14
HRM Alarm Speed Alarm
RPM Alarm TIME Alarm
DISTANCE Alarm POWER Alarm
zone. TIME Alarm: Set the alarm for the time interval. *RPM Alarm: Set the alarm for the RPM zone. DISTANCE Alarm: Set the alarm for the particular distance. *POWER Alarm: Set the alarm for power consumption. *Only available for (PSGP410
only)
4. MAP MODE: There two choices for map orientation and scale.
ORIENATION: Direction to north and bird eye view. Scale: You may setup auto scale or manual scale.

15
How to Start Your Training and Save Data
1. When in Menu page, please press and hold OK/ENTER key for 2 seconds. The device will switch to Time page.
2. Press OK/ENTER button to timer page.
3. Press UP/START/STOP button to trigger training start page After trigger the start training screen, please selection the YES/NO icon by UP or DOWN key. Determine the selection by press OK/ENTER button.
4. During the training, you can press Down/LAP button to take lap
Or press OK/ENTER to switch between four workout pages

16
5. Save Workout a. Press UP/START/STOP button to stop the workout b. Press DOWN/LAP button to trigger the save screen popup c. Determine the save or not to save by using OK button
Note
1. If you want to start training again after STOP, please press UP/START/STOP button to resume current workout.
2. Please ensure 3D fix before get training.

17
How to Use GHOST In order to improve your training performance; device provides GHOST to pretend your coach to improve your performance through mutual training and reaction. a. Race with your GHOST by TIME/DIST
Press “Page button” 2s to enter MAIN MENU.
1. Press UP and DOWN to select “GHOST”
2. There are two type for GHOST setting:
a. RACER: To set the target distance and time to finish.
b. CHALLENGE: To use the record to create a ghost to race with you.
3. To set RACER time and distance.
4. Start for racing with GHOST. The result page will show you once race was finished.

18
b. Race with your GHOST by your previous record
Press “Page button” 2s to enter MAIN MENU.
1. Set GHOST in CHALLENGE mode.
2. To select the record you want to race.
3. You can find the interested record to follow up.
4. You may select and press “RACE” to start GHOST.
5. System will ask you to reach the start point to start racing.

19
6. The race will be getting started while start point is reached.
7. The result page will show you once race was finished.
How to Create Routes and follow up You create ROUTE according to the RECORD and make navigation according to ROUTE you created. a. To create a new ROUTE
1. Press “PAGE button” 2s to enter MAIN MENU and select GOTO page and then press “OK”.
2. Select “ROUTE” and press “OK”. 3. Select “CREATE NEW” and press”
OK” 4. Press Up and Down button to switch
RECORD or PC ROUTE. RECORD: The data from current record in device. PC ROUTE: The data transferred from PC host.

20
5. Select which record to have a
compression to generate a new ROUTE file.
6. Select “CREATE” and press “OK”
button.
7. The route has been created.
b. To make a navigation regarding ROUTE.
1. Press “PAGE button” 2s to enter MAIN MENU and select GOTO page and then press “OK”.
2. Select “ROUTE” and press “OK”.
3. Please press “GO ROUTE” to select ROUTE file for navigation.

21
4. Select route file for navigation.
5. System will ask for START and ROUTE. This will start when the START point is reached.
How to Use Interval Training In order to improve your training performance; device provides interval training to build up the training model for your personal training. a. Build a new Interval Training model
Press “Page button” 2s to enter MAIN MENU.
5. Press UP and DOWN to select “INTERVAL”
6. Press UP and DOWN to select “CREATE NEW”
7. Press UP and DOWN to add new section.

22
a. b.
c. d.
e. f.
8. There are six training plans for selection:
a. Run-Time: Set the time interval for running.
b. Run-Distance: Set the distance interval for running.
c. *Heart Rate Zone-Time: Set the time interval for specific running within heart rate zone.
d. Rest time: Set the rest time without anything.
e. Loop: Group the all sections and set the times for loop.
f. *RPM-time: Set the time interval for training within specific RPM.
*Only available for (PSGP410 only)
9. Select “OK” to finish creation.
23
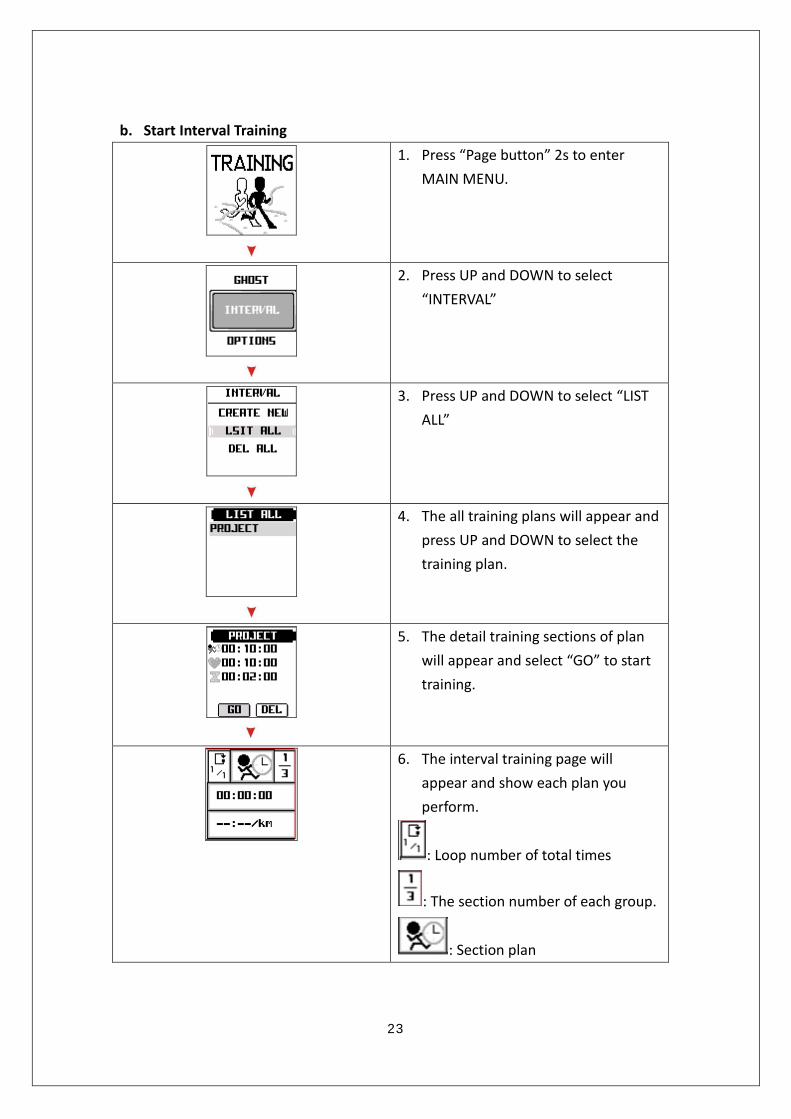
b. Start Interval Training
1. Press “Page button” 2s to enter MAIN MENU.
2. Press UP and DOWN to select “INTERVAL”
3. Press UP and DOWN to select “LIST ALL”
4. The all training plans will appear and press UP and DOWN to select the training plan.
5. The detail training sections of plan will appear and select “GO” to start training.
6. The interval training page will appear and show each plan you perform.
: Loop number of total times
: The section number of each group.
: Section plan

24
How to Use Compass (PSGP410 only) Due to the direction will be unreliable if in still as GPS limitation; W3 embeds 6 axis e-compass and g-sensor to provide the reliable information without annoying manual calibration. a. Declination
Declination is a word used in astronomy to describe one of the two coordinates of the equatorial coordinate system, the other being either right ascension or hour angle. Declination is comparable to latitude, projected onto the celestial sphere, and is measured in degrees north and south of the celestial equator. To eliminate the offset, you can go to Compass\Declination to setup to cancel the error.
Press “Page button” 2s to enter MAIN MENU.
Press UP and DOWN to select “COMPASS”
Press UP and DOWN to select “DECLINATION”
You can Manual or AUTO to input the declination angle.
After input, the magnetic angel will be offset according setup.

25
b. Bearing Bearing means the actual compass direction of the forward course of our aircraft. In land navigation, bearing means the angle between a line connecting us and another object, and a north-south line. You can set the bearing angle to given the direction for navigation.
Press “Page button” 2s to enter MAIN MENU.
Press UP and DOWN to select “COMPASS”
Press UP and DOWN to select “BEARING”
Put the angle between north pole.
Compass will offset according to give you direction.

26
How to Upgrade Firmware
The bellowing procedure is only for firmware upgrade use. 1. Please power off device.
2. Connect USB cable to device and PC
3. System will detect the device and creates the new storage device.

27
4. Select the folder “DEVICE FIRMWARE UPGRADE” of the storage device and enter in.
5. Just copy and paste the firmware file into here; “DEVICE FIRMWARE UPGRADE”.

28
6. Remove cable, and power on device. 7. After few minutes, the firmware upgrade process will be done.
NOTE: Please don’t interrupt while in firmware upgrading. NOTE: User’s manual, PC Software located in “Manual” folder; you can install PC
Software accordingly. Actually, the memory size of GPS devices can store up to 80 hours data by 2
seconds continuously. You may backup Manual to your PC and then erase this folder to have the largest memory capacity.

29
UI Flow Chart The below is the menu tree of device
TREE LEVEL1 TREE LEVEL2 TREE LEVEL3 TREE LEVEL4
VIEW WORKOUT
DEL ALL
MEMORY
TRAINING OPTIONS AUTO LAP
AUTO PAUSE
ALARM
MAP MODE
LEVEL SETTING
GHOST DIST/TIME
CHALLENGE
INTERVAL CREATE NEW
LIST ALL
DEL ALL
**COMPASS DECLINATION BEARING
SETUP SET PAGES SET CUST PAGE 1
SET CUST PAGE 2
SET LAP PAGE
*SENSORS HRM
SPEEED
CADENCE

30
COMBO
POWER
PROFILE
SYSTEM SYSTEM INFO
GPS GET
DEFAULT SET
STATUS
GOTO ROUTE CREATE NEW RECORD
PC ROUTE
GO ROUTE
TRACK BACK
LOCATION
* Only available for (PSGP410 only) ** Only available for (PSGP410 only)


![Gira X17 Tap the [OK] button. The timer is set. 1.4.2.3 Deleting a switching time 1 Open the [Timer overview] page. 2 Tap the [Edit] button. 3 Mark the switching time to be deleted](https://img.dokumen.tips/doc/110x75/5fd48a6f95fd8c1ec364f089/gira-x1-7-tap-the-ok-button-the-timer-is-set-1423-deleting-a-switching-time.jpg)


![INTELLIHEAT HEATED UNDERBLANKET · 1 hour or 9 hours timer. • TIMER - Push the timer button (11) (Diagram [D]) until either 1 hour or 9 hours is illuminated with a green light (10)](https://img.dokumen.tips/doc/110x75/6006202f83b2282d237e4b5e/intelliheat-heated-underblanket-1-hour-or-9-hours-timer-a-timer-push-the-timer.jpg)