Embed Size (px)
Citation preview

AUTOMATICTRANSMISSION
Click on the applicable bookmark to selected the required model year.

23-1
AUTOMATICTRANSMISSION
CONTENTS
SERVICE SPECIFICATIONS 2. . . . . . . . . . . . . . . . .
LUBRICANTS 2. . . . . . . . . . . . . . . . . . . . . . . . . . . . . .
SPECIAL TOOLS 2. . . . . . . . . . . . . . . . . . . . . . . . . .
TROUBLESHOOTING<A/T> 3. . . . . . . . . . . . . . . . . . . . . . . . . . . . . . . . . . . . .<SS4 II> 70. . . . . . . . . . . . . . . . . . . . . . . . . . . . . . . .<Shift Lock and Key Interlock Mechanisms>
92. . . . . . . . . . . . . . . . . . . . . . . . . . . . . . . . . . . . . . . . . .
ON-VEHICLE SERVICE 94. . . . . . . . . . . . . . . . . . .
Basic Adjustment Procedures 94. . . . . . . . . . . . . . . . .
Transfer Oil Check 99. . . . . . . . . . . . . . . . . . . . . . . . . . .
Transfer Oil Change 99. . . . . . . . . . . . . . . . . . . . . . . . .
Location of Control Components 101. . . . . . . . . . . . . .
Control Component Checks 102. . . . . . . . . . . . . . . . . .
Torque Converter Stall Test 105. . . . . . . . . . . . . . . . . .
Fluid Pressure Test 106. . . . . . . . . . . . . . . . . . . . . . . . .
Hydraulic Circuit 110. . . . . . . . . . . . . . . . . . . . . . . . . . . .
Line Pressure Adjustment 111. . . . . . . . . . . . . . . . . . .
Selector Lever Operation Check 111. . . . . . . . . . . . . .
Transfer Shift Lever Operation Check 114. . . . . . . .
Transmission Control Cable Adjustment 114. . . . . .
Transfer-ECU Check 115. . . . . . . . . . . . . . . . . . . . . . . .
Position Indicator Lamp Check 115. . . . . . . . . . . . . . .
TRANSMISSION CONTROL* 116. . . . . . . . . . . . .
SHIFT LOCK AND KEY INTERLOCKMECHANISMS* 120. . . . . . . . . . . . . . . . . . . . . . . . . .
TRANSMISSION ASSEMBLY 122. . . . . . . . . . . . .
TRANSMISSION OIL COOLER 127. . . . . . . . . . .
A/T-ECU 129. . . . . . . . . . . . . . . . . . . . . . . . . . . . . . . .
TRANSFER-ECU 130. . . . . . . . . . . . . . . . . . . . . . . .
WARNING REGARDING SERVICING OF SUPPLEMENTAL RESTRAINT SYSTEM (SRS) EQUIPPED VEHICLES
WARNING!(1) Improper service or maintenance of any component of the SRS, or any SRS-related component, can lead to personal
injury or death to service personnel (from inadvertent firing of the air bag) or to driver and passenger (from renderingthe SRS inoperative).
(2) Service or maintenance of any SRS component or SRS-related component must be performed only at an authorizedMITSUBISHI dealer.
(3) MITSUBISHI dealer personnel must thoroughly review this manual, and especially its GROUP 52B - SupplementalRestraint System (SRS) before beginning any service ormaintenance of any component of the SRSor anySRS-relatedcomponent.
NOTEThe SRS includes the following components: SRS-ECU, SRS warning lamp, air bag module, clock spring, and interconnectingwiring. Other SRS-related components (that may have to be removed/installed in connection with SRS service or maintenance) areindicated in the table of contents by an asterisk (*).

AUTOMATIC TRANSMISSION - Service Specifications/Lubricants/Special Tools23-2
SERVICE SPECIFICATIONSItem Standard value
A/T fluid temperature sen- At 0°C 16.7 - 20.5sor resistance kW At 20°C 7.3 - 8.9
At 40°C 3.4 - 4.2
At 60°C 1.9 - 2.2
At 80°C 1.0 - 1.2
At 100°C 0.57 - 0.69Damper clutch control (DCC) solenoid valve coil resistance (at 20°C) W 2.7 - 3.4
Low & reverse (LR) solenoid valve coil resistance (at 20°C) W 2.7 - 3.4
Second (2ND) solenoid valve coil resistance (at 20°C) W 2.7 - 3.4
Underdrive solenoid valve (UD solenoid valve) coil resistance (at 20°C) W 2.7 - 3.4
Overdrive solenoid valve (OD solenoid valve) coil resistance (at 20°C) W 2.7 - 3.4
Resistance of reduction (RED) solenoid valve coil at (20°C) W 2.7 - 3.4
Stall speed r/min 6G7 2,200 - 2,700
4M4 2,400 - 2,900Line pressure adjustment value kPa 1,010 - 1,050
LUBRICANTSItem Brand Quantity L
Transmission fluid DIA QUEEN ATF SP II M, ATF SP III or equivalent 9.3
Transfer oil Hypoid gear oil SAE 75W-90 or 75W-85W conforming to APIGL-4
2.8
SPECIAL TOOLSTools No. Name Application
MB991502 MUT-II Subassembly
Diagnosis code checking
MB991529 Diagnosis codechecking harness
MB991658 Test harness Voltage measurement of APS
MD998478 Test harness(3P, triangle)
Voltage measurement of crank angle sensor

AUTOMATIC TRANSMISSION - Special Tools/Troubleshooting<A/T> 23-3
Tools ApplicationNameNo.
MD998330(includingMD998331)
Oil pressure gauge(2,942 kPa)
Hydraulic pressure measurement
MD998332 Adapter Oil pressure gauge connection
MD998900 Adapter
TROUBLESHOOTING <A/T>BASIC FLOW OF PROBLEM DIAGNOSIS
Inhibitor switch and APS check(Refer to P.23-97.)
No diagnosis codeoutput (no abnormality)
Ask about trouble symptoms.
Check the A/T fluid.NG
Replace the A/T fluid.
OK
Check the trouble symptoms.
Reading of a diagnosis code(Refer to P.23-4.)
Communicationwith the MUT-IIis not possible
Inspection procedure check bytrouble symptom
Procedure 1 (Refer to P.23-48.)
Diagnosis code output exists No diagnosis codeoutput
Road test (Refer to P.23-5.)
Diagnosis code outputexists
Go to Diagnosis Code List(Refer to P.23-12.)
No diagnosis codeoutput (abnormalityexists)
Check for the cause.Not found
NG
NGRepair
OK
Go to Trouble Symptom List(Refer to P.23-47.)
Verification test (road test)
Found
END
Erase of a diagnosis code(Refer to P.23-4.)
Transient malfunction (Refer toGROUP 00 - Points to Note for
Transient Malfunctions.)
OK

AUTOMATIC TRANSMISSION - Troubleshooting <A/T>23-4
DIAGNOSIS FUNCTIONN RANGE LAMPIf there is a problem with any of the following items whichare related to the A/T system, the N range lamp will flashat a rate of approximately 1 Hz.If the N range lamp is flashing at a rate of approximately1 Hz, check the diagnosis output.D N range lamp flashing item
Input shaft speed sensor system
Output shaft sensor system
Solenoid valve system
Non-synchronization at various shift ranges
A/T control relay system
READING DIAGNOSIS CODESUse the MUT-II or the warning lamp (N range indicator lamp)to take a reading of the diagnosis codes. (Refer to GROUP00 - How to Use Troubleshooting/Inspection Procedures.)
A/T FLUID TEMPERATURE WARNING LAMP
CautionIf the N range lamp illuminates, this serves as anA/T fluid temperature warning. Stop the vehicle ina safe place and let the engine run at idle until theN range lamp switches off.

AUTOMATIC TRANSMISSION - Troubleshooting <A/T>AUTOMATIC TRANSMISSION - Troubleshooting <A/T> 23-5
ROAD TESTNo. Pre-test/opera-
tion conditionsTest/operation Judgment value Check item Diag-
nosiscodeNo.
Inspection pro-cedure if there isan abnormality
1 Ignition switch:OFF
Ignition switch(1) ON
Data List No. 54(1) 10 - 12 V
A/T controlrelay
54 A/T control relaysystem
2 Ignition switch:ONEngine:StopSelector leverposition: P
Selector lever posi-tion(1) P(2) R(3) N(4) D
Data List No. 61(1) P(2) R(3) N(4) D
Inhibitorswitch
- Inhibitor switchsystem
Selector lever opera-tion(1) D (1st)(2) Sports mode se-
lected (1st)(3) Lever moved to
Data ListNo.67 No.68 No.69
(1) OFF OFF OFF
(2) ON OFF OFF
(3) ON ON OFF
(4) ON OFF ON
Select switchUpshiftswitchDownshiftswitch
- Sports modeswitch system
upshift positionand held (2nd)
(4) Lever moved todownshiftposition and held(1st)
Shift indicator lamp(1) D and 1
illuminate(2) Only 1
illuminates(3) Only 2
illuminates(4) Only 1
illuminates
Accelerator pedal(1) Fully closed(2) Depressed(3) Fully opened
Data List No. 11(1) 985 - 1,085 mV(2) Gradually in-
creases from (1)(3) 4,000 mV or
more
APS 111214
APS system
Data list No.25(1) OFF(2) ON
Wide openthrottleswitch
25 Wide openthrottle switchsystem
2 Ignition switch:ONEngine: Stop
Brake pedal(1) Depressed(2) Released
Data List No. 26(1) ON(2) OFF
Stop lampswitch
26 Stop lampswitch system
Selector leverposition: P Transfer shift lever
position(1) Except for 4LLc(2) 4LLc
Data List No. 75(1) OFF(2) ON
4LLc switch - 4LLc switch sys-tem

AUTOMATIC TRANSMISSION - Troubleshooting <A/T>23-6
No. Inspection pro-cedure if there isan abnormality
Diag-nosiscodeNo.
Check itemJudgment valueTest/operationPre-test/opera-tion conditions
3 Ignition switch:STARTEngine: Stopped
Starting test at P or Nposition
Starting should bepossible
Starting pos-sible/notpossible
- Starting notpossible
4 Driving after en-gine has warmedup
Drive for 15 minutesor more until the A/Tfluid temperaturerises to 70 - 80_C.
Data list No.15Gradually rises to 70- 80_C
A/T fluid tem-peraturesensor
15 A/T fluid temper-ature sensor sys-tem
5 Engine: IdlingSelector leverposition: N
Brake pedal (re-test)(1) Depressed(2) Released
Data List No. 26(1) ON(2) OFF
Stop lampswitch
26 Stop lamp switchsystem
A/C switch(1) ON(2) OFF
Data List No. 65(1) ON(2) OFF
Dual pres-sure switch
- Dual pressureswitch system
Accelerator pedal(1) Fully closed(2) Apply
Data List No. 21(1) The engine
speed displayedon the tachome-ter is identical tothe enginespeed displayedon MUT-II.
(2) Gradually in-creases from (1)
Crank anglesensor<6G7>
Enginespeed sen-sor<4M4>
21 Crank angle sen-sor system<6G7>Engine speedsensor system<4M4>
Data ListNo.73 <6G7>No.76 <4M4>(2) Data changes.
Communica-tion with en-gine-ECU
51 Serial commu-nication system
Selector lever posi-tion
No abnormal shockduring shifting
Malfunctionwhen start-
- Engine stalls dur-ing shifting
(1) N to D(2) N to R
Within 2 seconds oftime lag
ing off - N-to-D shocks,large time lag
- N-to-R shocks,large time lag
- N-to-D, N-to-Rshocks, largetime lag
Driving notpossible
- Does not moveforward
- Does not reverse
- Does not move(forward or re-verse)

AUTOMATIC TRANSMISSION - Troubleshooting <A/T> 23-7
No. Inspection pro-cedure if there isan abnormality
Diag-nosiscodeNo.
Check itemJudgment valueTest/operationPre-test/opera-tion conditions
6 Selector leverposition:Sports mode(Must be doneona level andstraight road.)
Selector lever posi-tion and engine(1) Idling in 1st
(Vehiclestopped)
(2) Driving at a
Data List No. 63(2) 1st(3) 2nd(4) 3rd(5) 4th(6) 5th
Shift condi-tion
- -
constant speedof 10 km/h in 1st
(3) Driving at aconstant speedof 30 km/h in 2nd
(4) Driving at aconstant speed
Data List No. 31(2) 0%(3) 100%(4) 100%(5) 100%(6) 100%
Low & re-verse sole-noid valve(LR solenoidvalve)
31 LR solenoidvalve system
constant speedof 50 km/h in 3rd
(5) Driving at aconstant speedof 50 km/h in 4th
(6) Driving at aconstant speed
Data List No. 32(2) 0%(3) 0%(4) 0%(5) 0%(6) 100%
Underdrivesolenoidvalve (UDsolenoidvalve)
32 UD solenoidvalve system
of 70 km/h in 5th(Each conditionshould be main-tained for 10secondsor more)
Data List No. 33(2) 100%(3) 0%(4) 100%(5) 100%(6) 0%
Second sole-noid valve(2ND sole-noid valve)
33 2nd solenoidvalve system
Data List No. 34(2) 100% (5) 0%(3) 100% (6) 0%(4) 0%
Overdrivesolenoidvalve (ODsolenoidvalve)
34 OD solenoidvalve system
Data List No. 35(2) 0% (5) 100%(3) 0% (6) 100%(4) 0%
Reductionsolenoidvalve (REDsolenoidvalve)
35 RED solenoidvalve system
Data List No. 29(1) 0 km/h(5) 50 km/h
Vehiclespeed sen-sor
- Vehicle speedsensor system
Data List No. 22(5) 1,300 - 1,600
r/min
Input shaftspeed sen-sor
22 Input shaftspeed sensorsystem
Data List No. 23(5) 1,300 - 1,600
r/min
Output shaftspeed sen-sor
23 Output shaftsensor system
Selector lever posi-tion and engine(1) Driving at 30
km/h in 2 range,
Data List No. 36(1) 70% - 90% to
0%(2) 70% - 90%
Damperclutch con-trol solenoidvalve (DCC
3652
DCC solenoidvalve system
then fully closethe accelerator.
(2) Driving at aconstant speedof 50 km/h in 4th
Data List No. 52(1) -300 - -100
r/min or 100 -300 r/min
(2) -10 - 10 r/min
solenoidvalve)

AUTOMATIC TRANSMISSION - Troubleshooting <A/T>23-8
No. Inspection pro-cedure if there isan abnormality
Diag-nosiscodeNo.
Check itemJudgment valueTest/operationPre-test/opera-tion conditions
7 Suspends theINVECS-II func-
Use the MUT-II tomonitor data list Nos.
For (1), (2) and (3),the output shaft
Problem dur-ing shifting
- Shocks, engineracing
tion usingMUT-II 11, 23 and 63. speed (vehicle Incorrect - All pointsSelector levelposition:D
(1) Accelerate to 5thgear at an APS
speed) should beidentical, and there shift points - Some points
(Must be doneona level and
gear at an APSoutput of 1.5 V(opening angle
should be no abnor-mal shocks. For (4), No shifting - No diagnosis
codesstraight road.) 30%).(2) Slowly deceler-
ate and stop.
(5) and (6), down-shifting should occurimmediately after
22 Input shaft speedsensor systemate and stop.
(3) Accelerate to 5thgear at an APS
the operation is car-ried out.
23 Output shaft sen-sor system
output of 2.5 V(opening angle50%).
No shiftingfrom 1st to
31 LR solenoidvalve system50%).
(4) At 60 km/h in 5th,select Sports
2nd, or noshifting from 33 2nd solenoid
valve systemmode and shiftdown to 4th.
(5) At 40 km/h in 4th,select Sports
2nd to 1st41 1st without
completion ofshiftingselect Sports
mode and shiftdown to 3rd.
(6) At 20 km/h in 3rd,
42 2nd withoutcompletion ofshifting
shift down to 2nd.(7) At 20 km/h in
2nd, shift downNo shiftingfrom 2nd to
33 2nd solenoidvalve system2nd, shift down
to 1st. 3rd, or noshifting from 34 OD solenoid
valve system3rd to 2nd
42 2nd withoutcompletion ofshifting
43 3rd withoutcompletion ofshifting
No shiftingfrom 3rd to
31 LR solenoidvalve system
4th, or noshifting from 35 RED solenoid
valve system4th to 3rd
43 3rd withoutcompletion ofshifting
44 4th withoutcompletion ofshifting
No shiftingfrom 4th to
32 UD solenoidvalve system
5th, or noshifting from 33 2nd solenoid
valve system5th to 4th
44 4th withoutcompletion ofshifting
45 5th withoutcompletion ofshifting

AUTOMATIC TRANSMISSION - Troubleshooting <A/T> 23-9
No. Inspection pro-cedure if there isan abnormality
Diag-nosiscodeNo.
Check itemJudgment valueTest/operationPre-test/opera-tion conditions
8 Selector leverposition: N
Use the MUT-II tomonitor data list Nos.
The ration of data listNo. 22 and No. 23
No shifting 22 Input shaft speedsensor system
22 and 23.(1) Select R and
should be the sameas the transmission 23 Output shaft sen-
sor systemdrive at 10 km/h. ratio when revers-
ing. 46 Reverse withoutcompletion ofshifting
SHIFT PATTERN<4M4>Upshift pattern
Throttle opening %
100
50
0 1,000 2,000 3,000 4,000 5,000 6,000 7,000
1 2 2 3 3 4
Thick line: Standard shift pattern
Output shaft speed r/min
0 50 100 150 200
4 5
250
2®3move-mentrange
3®4move-mentrange
Vehicle speed km/h
4®5move-mentrange

AUTOMATIC TRANSMISSION - Troubleshooting <A/T>23-10
Downshift patternThrottle opening %
100
50
0 1,000 2,000 3,000 4,000 5,000 6,000 7,000
1 2
2
3 4
Thick line: Standard shift pattern
Output shaft speed r/min
0 50 100 150 200
4 5
250Vehicle speed km/h
3
1 2
2 3
(Sports mode)
(Sportsmode)
3 4(Sportsmode)
(Sportsmode)
4 5
2®3move-mentrange
3®4 move-ment range
<6G7>Upshift pattern
Throttle opening %
100
50
0 1,000 2,000 3,000 4,000 5,000 6,000 7,000
1 2 2 3 3 4
Thick line: Standard shift pattern
Output shaft speed r/min
0 50 100 150 200
4 5
Vehicle speed km/h
2®3 move-ment range
3®4 move-ment range
4®5 move-ment range

AUTOMATIC TRANSMISSION - Troubleshooting <A/T> 23-11
Downshift pattern
5
5
Throttle opening %
100
50
0 1,000 2,000 3,000 4,000 5,000 6,000 7,000
1 2
2
3 4
Thick line: Standard shift pattern
Output shaft speed r/min
0 50 100 150 200
4
Vehicle speed km/h
1 2
2 3
(Sportsmode)
(Sportsmode)
3 4(Sportsmode)
(Sportsmode)
4
3
4®5 move-ment range
2®3move-mentrange

AUTOMATIC TRANSMISSION - Troubleshooting <A/T>23-12
CHART CLASSIFIED BY DIAGNOSIS CODEDiagnosiscode
Diagnosis item Reference page
11 Accelerator pedal position sensor (APS) system Short-circuit 23-13
12 Open circuit 23-14
14 Incorrect sensoradjustment
23-15
15 A/T fluid temperature sensor system Open circuit 23-17
21 Crank angle sensor system<6G7> or engine speed sensorsystem <4M4>
Open circuit 23-18
22 Input shaft speed sensor system Short-circuit/Opencircuit
23-20
23 Output shaft speed sensor system Short-circuit/Opencircuit
23-22
25 Wide open throttle switch system Short-circuit/Opencircuit
23-24
26 Stop lamp switch system Short-circuit 23-25
31 LR solenoid valve system Short-circuit/Opencircuit
23-26
32 UD solenoid valve system Short-circuit/Opencircuit
23-27
33 2nd solenoid valve system Short-circuit/Opencircuit
23-28
34 OD solenoid valve system Short-circuit/Opencircuit
23-29
35 RED solenoid valve system Short-circuit/Opencircuit
23-30
36 DCC solenoid valve system Short-circuit/Opencircuit
23-31
41 1st without completion of shifting 23-32
42 2nd without completion of shifting 23-34
43 3rd without completion of shifting 23-36
44 4th without completion of shifting 23-38
45 5th without completion of shifting 23-40
46 Reverse without completion of shifting 23-42
51 Problem communicating with engine-ECU 23-43
52 Damper clutch control system System malfunc-tion
23-44
54 A/T control relay system Short-circuit toearth/Open circuit
23-45
56 N range lamp system Short-circuit toearth
23-46

AUTOMATIC TRANSMISSION - Troubleshooting <A/T> 23-13
INSPECTION PROCEDURES CLASSIFIED BY DIAGNOSIS CODECode No. 11 Accelerator pedal position sensor (APS)short-circuit system
Probable cause
If the APS output during idling is 4.8 V or higher, it is judged that there isexcessive output, and code No. 11 is output.
D Malfunction of APSD Malfunction of harness or connectorD Malfunction of engine-A/T-ECU <6G7>D Malfunction of A/T-ECU <4M4>D Malfunction of engine-ECU <4M4>
NG
NG
NG
NG
Replace
(1)NG NG
Repair
APS single part check(Refer to GROUP 13 - On-vehicleService.)
Check the followingconnector:D-135
MUT-II Data ListD No.11 APS
OK: Refer to P.23-61 (Data ListChart).
Repair
Check the following connectors:<6G7> D-120, <4M4> D-112
Repair
Repair
Transient malfunction(Refer to GROUP 00 - Points toNote for Transient Malfunctions.)
OK
Measure at APS connector D-135D Disconnect the connector and
measure at the harness side.(1) <6G7> Resistance between
terminal 1 and earth<4M4> Resistance betweenterminal 7 and earthOK: 2 W or less
(2) <6G7> Voltage between terminal2 and earth<4M4> Voltage between terminal8 and earth(Ignition switch: ON)OK: 4.8 - 5.2 V
D Check the harness between theAPS and the engine-A/T-ECU.<6G7>
D Check the harness between theAPS and the engine-ECU. <4M4>
OK
OK
Replace the engine-A/T-ECU orengine-ECU.
(2)NG OK
OK Check the following connectors:<6G7> D-121, <4M4> D-108
Check the trouble symptoms.
OK
APS adjustment(Refer to GROUP 13 - On-vehicleService.)
Check the following connectors:<6G7> D-121, <4M4> D-108
NG
OK
Replace the engine-A/T-ECU orA/T-ECU.
OK
OK
OK
NG
NG
Repair
Repair
D Check the harness between theAPS and the engine-A/T-ECU,and repair if necessary. <6G7>
D Check the harness between theAPS and the engine-ECU, andrepair if necessary. <4M4>
NG
NG
NGCheck the trouble symptoms.
Measure at engine-A/T-ECUconnector D-121 <6G7>, or atA/T-ECU connector D-107 <4M4>.D Measure at the ECU terminalsD Ignition switch: OND <6G7> Voltage between terminal
95 and earthD <4M4> Voltage between terminal
45 and earthOK: Fully close the accelerator
985 - 1,085 mVfully open the accelerator4,000 mV or more
D Check the harness between theAPS and the engine-A/T-ECU,and repair if necessary. <6G7>
D Check the harness between theAPS and the A/T-ECU, andrepair if necessary. <6G7>
NG
Check the following connectors:<6G7> D-120, <4M4> D-112

AUTOMATIC TRANSMISSION - Troubleshooting <A/T>23-14
Code No. 12 Accelerator pedal position sensor (APS)open circuit system
Probable cause
When the APS output is 0.2 V or less while the engine is idling, it is judged thatoutput is too low and code No. 12 is output.
D Malfunction of APSD Malfunction of harness or connectorD Malfunction of engine-A/T-ECU <6G7>D Malfunction of A/T-ECU <4M4>D Malfunction of engine-ECU <4M4>
NG
NG
NG
Replace
NG
NG
Repair
APS single part check (Refer toGROUP 13 - On-vehicle Service.)
Check the following connectors:D-135
MUT-II Data ListD No.11 APS
OK: Refer to P.23-61 (Data ListChart).
Repair
Transient malfunction(Refer to GROUP 00 - Points toNote for Transient Malfunctions.)
OK
Measure at APS connector D-135D Disconnect the connector and
measure at the harness side.D <6G7>Voltage between terminal
2 and earthD <4M4>Voltage between terminal
8 and earthOK: 4.8 - 5.2 V D Check the harness between the
APS and the engine-A/T-ECU,and repair if necessary. <6G7>
D Check the harness between theAPS and the engine-ECU, andrepair if necessary. <4M4>
OKCheck the following connectors:<6G7> D-120, <4M4> D-112
OK
Measure at APS connector D-135.D Use the test harness
(MB991658) to connect onlyterminals 1, 2 and 3 <6G7>, oronly terminals 6, 7 and 8 <4M4>,and then measure at the pickupharness.
D Ignition switch: ON(1) <6G7> Voltage between terminal
2 and earth<4M4> Voltage between terminal8 and earthOK: 4.8 - 5.2 V
(2) <6G7> Voltage between terminal3 and earth<4M4> Voltage between terminal6 and earthOK: Fully close the accelerator
985 - 1,085 mVfully open the accelerator4,000 mV or more
(1)NG Check the following connectors:<6G7> D-120, <4M4> D-112
OK
OK
NG
Repair
Measure at engine-A/T-ECUconnector D-120 <6G7>, or atengine-ECU connector D-112 <4M4>.D Measure at the ECU terminalsD Ignition switch: OND <6G7> Voltage between terminal
46 and earthD <4M4> Voltage between terminal
60 and earthOK: 4.8 - 5.2 V
OK
Repair
RepairCheck the following connectors:<6G7> D-120, <4M4> D-112
NG
Check the trouble symptoms.
OK
Replace the engine-A/T-ECU orengine-ECU.
OK
APS adjustment (Refer to GROUP13 - On-vehicle Service.)
Check the following connectors:<6G7> D-121, <4M4> D-108
OK
(2)NG
OK
Repair
OK
NG
NG
NG
NG
To the next page
D Check the harness between theAPS and the engine-A/T-ECU.<6G7>
D Check the harness between theAPS and the engine-ECU. <4M4>
D Check the harness between theAPS and the engine-A/T-ECU,and repair if necessary. <6G7>
D Check the harness between theAPS and the engine-ECU, andrepair if necessary. <4M4>
D Check the harness between theAPS and the engine-A/T-ECU,and repair if necessary. <6G7>
D Check the harness between theAPS and the engine-ECU, andrepair if necessary. <4M4>

AUTOMATIC TRANSMISSION - Troubleshooting <A/T>AUTOMATIC TRANSMISSION - Troubleshooting <A/T>AUTOMATIC TRANSMISSION - Troubleshooting <A/T> 23-15
OK
OK
From the previous page
OK
Replace the engine-A/T-ECU orA/T-ECU.
OK
Measure at engine-A/T-ECUconnector D-121 <6G7>, or atA/T-ECU connector D-107 <4M4>.D Measure at the ECU terminalsD Ignition switch: OND <6G7> Voltage between terminal
95 and earthD <4M4> Voltage between terminal
45 and earthOK: Fully close the accelerator
985 - 1,085 mVfully open the accelerator4,000 mV or more
NG
NG
NG
Repair
Check the following connectors:<6G7> D-121, <4M4> D-108
NGRepair
Check the trouble symptoms.
Check the following connectors:<6G7> D-121, <4M4> D-108
D Check the harness between theAPS and the engine-A/T-ECU,and repair if necessary. <6G7>
D Check the harness between theAPS and the A/T-ECU, andrepair if necessary. <4M4>
Code No. 14 Accelerator pedal position sensor (APS)incorrect adjustment system
Probable cause
If the APS output is 0.2 V or less or 1.2 V or higher while the engine is idling,it is judged that the APS is incorrectly adjusted, and code No. 14 is output.
D Malfunction of APSD Malfunction of harness or connectorD Malfunction of engine-A/T-ECU <6G7>D Malfunction of A/T-ECU <4M4>D Malfunction of engine-ECU <4M4>
NG
NO
YES
YES
MUT-II Self-Diag CodeD Is code No. 11 output?
Code No. 11 Accelerator pedalposition sensor (APS) short-circuitsystem check (Refer to P.23-13.)
Code No. 12 Accelerator pedalposition sensor (APS) short-circuitsystem check (Refer to P.23-14.)
MUT-II Data ListD No.11 APS
OK: Refer to P.23-61 (Data ListChart).
NGReplace
APS single part check(Refer to GROUP 13 - On-vehicleService.)
OK
NGRepair
OK
Check the following connector:D-135
OK
NO
Transient malfunction(Refer to GROUP 00 - Points toNote for Transient Malfunctions.)
MUT-II Self-Diag CodeD Is code No. 12 output?
To the next page

AUTOMATIC TRANSMISSION - Troubleshooting <A/T>23-16
NG
OK
Check the following connectors:<6G7> D-120, <4M4> D-112
Repair
NGRepair
NGRepair
OK
OK
Check the following connectors:<6G7> D-120, <4M4> D-112
engine-A/T-ECU connector D-120<6G7>Measure at engine-ECU connectorD-112 <4M4>D Measure at the ECU terminalsD Ignition switch: OND <6G7> Voltage between terminal
46 and earthD <4M4> Voltage between terminal
6 and earthOK: 4.8 - 5.2 V
NG
NG
NGCheck the trouble symptoms. Replace the engine-A/T-ECU or
engine-ECU.
OK
Measure at APS connector D-135D Disconnect the connector and
measure at the harness side.D <6G7>Voltage between terminals
2 and earthD <4M4>Voltage between terminals
8 and earth(Ignition switch: ON)
OK: 4.8 - 5.2 V
OK
D Check the harness between theAPS and the engine-A/T-ECU,and repair if necessary. <6G7>
D Check the harness between theAPS and the engine-ECU, andrepair if necessary. <4M4>
D Check the harness between theAPS and the engine-A/T-ECU.<6G7>
D Check the harness between theAPS and the engine-ECU. <4M4>
From the previous pageOK
NG
NG
(1)NG Check the following connectors:<6G7> D-120, <4M4> D-112
(2)NG
Measure at engine-A/T-ECUconnector D-121 <6G7>, or atA/T-ECU connector D-107 <4M4>.D Measure at the ECU terminals.D Ignition switch: OND <6G7> Voltage between terminal
95 and earthD <4M4> Voltage between terminal
45 and earthOK: Fully close the accelerator
985 - 1,085 mVfully open the accelerator4,000 mV or more
OK Check the following connectors:<6G7> C-121, <4M4> C-108
Check the trouble symptoms.
OK
Check the following connectors:<6G7> D-121, <4M4> D-108
NG OK
Replace the engine-A/T-ECU orA/T-ECU.
OK
NG
(3)NG
OK
APS adjustment(Refer to GROUP 13 - On-vehicleService.)
NG
Check the following connectors:<6G7> D-121, <4M4> D-108
D Check the harness between theAPS and the engine-A/T-ECU,and repair if necessary. <6G7>
D Check the harness between theAPS and the engine-ECU, andrepair if necessary. <4M4>
D Check the harness between theAPS and the engine-A/T-ECU,and repair if necessary. <6G7>
D Check the harness between theAPS and the A/T-ECU, andrepair if necessary. <4M4>
D Check the harness between theAPS and the engine-A/T-ECU,and repair if necessary. <6G7>
D Check the harness between theAPS and the A/T-ECU, andrepair if necessary. <4M4>
NG
Measure at APS connector D-135.D Use the test harness
(MB991658) to connect onlyterminals 1, 2 and 3 <6G7>, oronly terminals 6, 7 and 8 <4M4>,and then measure at the pickupharness.
D Ignition switch: ON(1) <6G7> Voltage between terminal
1 and earth<4M4> Voltage between terminal7 and earthOK: 0.5 V or less
(2) <6G7> Voltage between terminal2 and earth<4M4> Voltage between terminal8 and earth(Ignition switch: ON)OK: 4.8 - 5.2 V
(3) <6G7> Voltage between terminal3 and earth<4M4> Voltage between terminal6 and earthOK: Fully close the accelerator
985 - 1,085 mVfully open the accelerator4,000 mV or more
Repair
Repair
Repair
OK
Repair

AUTOMATIC TRANSMISSION - Troubleshooting <A/T> 23-17
Code No. 15 A/T fluid temperature sensor system Probable causeIf the A/T fluid temperature sensor output is 4.5 V or higher even after drivingfor 10 minutes or more (fluid temperature does not rise), it is judged that thereis an open circuit in the A/T fluid temperature sensor and code No. 15 is output.
D Malfunction of A/T fluid temperature sensorD Malfunction of harness or connectorD Malfunction of engine-A/T-ECU <6G7>D Malfunction of A/T-ECU <4M4>
L Refer to the Transmission Workshop Manual.
NG
Transient malfunction (Refer to GROUP 00 - Points to Notefor Transient Malfunctions.)
Check the following connectors: <6G7> D-121, <4M4> D-108
OK
Check the trouble symptoms.
Replace the engine-A/T-ECU or A/T-ECU.
OK
Repair
NG
NG
To the next page
OK
NG
NG
OK
Measure at engine-A/T-ECU connector D-121 <6G7>, or atA/T-ECU connector D-107 <4M4>.D Measure at the ECU terminalsD Ignition switch: OND <6G7> Voltage between terminal 81 and earthD <4M4> Voltage between terminal 43 and earth
OK: 0.5 V or less
NG
OK
Check the following connectors: <6G7> D-122, <4M4> D-108
Check the trouble symptoms.
Replace the engine-A/T-ECU or A/T-ECU.OK
NGReplace the A/T fluid temperature sensor. L
Measure at engine-A/T-ECU connector D-122 <6G7>, or atA/T-ECU connector D-108 <4M4>.D Measure at the ECU terminalsD Ignition switch: OND <6G7> Voltage between terminal 124 and earthD <4M4> Voltage between terminal 44 and earth
OK: A/T fluid temperature3.8 - 4.0 V at 20_C3.2 - 3.4 V at 40_C1.7 - 1.9 V at 80_C
OKMUT-II Data ListD No.15 A/T fluid temperature sensor
OK: When the engine is cold, the temperature is aboutthe same as the atmospheric temperature (air tem-perature).When the engine is hot, the temperature is 70 -80_C.
NG
Repair
NG
Revision
Measure at solenoid valve assembly connector C-04.D Disconnect the connector and measure at the sensor side.D Resistance between terminals 1 and 2
OK: A/T fluid temperature16.7 - 20.5 kW at 0_C7.3 - 8.9 kW at 20_C3.4 - 4.2 kW at 40_C1.9 - 2.2 kW at 60_C1.0 - 1.2 kW at 80_C0.57 - 0.69 kW at 100_C
Check the following connectors: <6G7> C-04, D-122,D-121,<4M4> D-108, C-04

AUTOMATIC TRANSMISSION - Troubleshooting <A/T>AUTOMATIC TRANSMISSION - Troubleshooting <A/T>AUTOMATIC TRANSMISSION - Troubleshooting <A/T>23-18
OK
(2)NG
From the previous page
Repair
OK
Repair
Check the followingconnector:E-113
Repair
Measure at solenoid valve assemblyconnector C-04.D Disconnect the connector and
measure at the harness side.(1) Voltage between terminal 1 and
earth(Ignition switch: ON)OK: 4.8 - 5.2 V
(2) Resistance between terminal 2and earthOK: 2 W or less
OK
OK
OK
NG
NG
(1)NG
NG
D Check the harness between thesolenoid valve assembly and theengine-A/T-ECU (earth line), andrepair if necessary. <6G7>
D Check the harness between thesolenoid valve assembly and theA/T-ECU (earth line), and repair ifnecessary. <4M4>
D Check the harness between thesolenoid valve assembly and theengine-A/T-ECU (power supplyline), and repair if necessary.<6G7>
D Check the harness between thesolenoid valve assembly and theA/T-ECU (power supply line), andrepair if necessary. <4M4>
D Check the harness between thesolenoid valve assembly and theengine-A/T-ECU, and repair ifnecessary. <6G7>
D Check the harness between thesolenoid valve assembly and theA/T-ECU, and repair if necessary.<4M4>
Check the followingconnector:E-113
Check the followingconnector:E-113
Code No. 21 Crank angle sensor <6G7> or engine speedsensor <4M4> system
Probable cause
If no output pulse from the crank angle sensor or engine speed sensor isdetected for 5 seconds or more when the vehicle speed is 25 km/h or more, itis judged that there is an open circuit in the crank angle sensor or an opencircuit in the engine speed sensor, and code No. 21 is output.
D Malfunction of crankshaft sensing blade <6G7>D Malfunction of crank angle sensor <6G7>D Malfunction of engine speed sensor <4M4>D Malfunction of harness or connectorD Malfunction of engine-A/T-ECU <6G7>D Malfunction of A/T-ECU <4M4>
Check the following connectors:<6G7> B-52, <4M4> B-36 Repair
Transient malfunction(Refer to GROUP 00 - Points toNote for Transient Malfunctions.)
OK
NG
NG
OKMUT-II Data ListD No. 21 Crank angle sensor
<6G7>No. 21 Engine speed sensor<4M4>OK: Refer to P.23-61 (Data List
Chart).
To the next page

AUTOMATIC TRANSMISSION - Troubleshooting <A/T> 23-19
OK
NG
Check the following connectors:<6G7> D-120,<4M4> D-113, D-108
OK
OK
Repair
OK
Repair
OK
D Check the harness between thecrank angle sensor and bodyearth, and repair if necessary.<6G7>
D Check the harness between theinjection pump assembly andbody earth, and repair ifnecessary. <4M4>
(1)NG
(2)NG
OK
NG
Measure at engine-A/T-ECUconnector D-120 <6G7>, or atA/T-ECU connector D-107 <4M4>.D Measure at the ECU terminalsD Disconnect connector B-52
<6G7>, or connector B-36<4M4>.
D Ignition switch: OND <6G7> Voltage between terminal
45 and earthD <4M4> Voltage between terminals
33 and earthOK: 4.8 - 5.2 V
NGRepairCheck the following connectors:
<6G7> D-120, <4M4> D-113, D-108
NG
Check the trouble symptoms.
Replace the engine-A/T-ECU orA/T-ECU.
NG
Repair
OKCheck the following connector:B-25X
(3)NG
OK
Measure at crank angle sensorconnector B-52 <6G7>, or atinjection pump assembly connectorB-36 <4M4>.D Disconnect the connector and
measure at the harness side.(1) <6G7> Resistance between
terminal 1 and earth<4M4> Resistance betweenterminal 4 and earthOK: 2 W or less
(2) Voltage between terminal 2 andearth(Ignition switch: ON)OK: 4.8 - 5.2 V
(3) Voltage between terminal 3 andearth(Ignition switch: ON)OK: System voltage
NG
D Check the harness between thecrank angle sensor and theengine-A/T-ECU, and repair ifnecessary. <6G7>
D Check the harness between theinjection pump assembly and theA/T-ECU, and repair if necessary.<4M4>
Check the following connectors:<6G7> B-52, <4M4> B-36
D Check the harness between thecrank angle sensor and theengine control relay, and repair ifnecessary. <6G7>
D Check the harness between theinjection pump assembly and theengine control relay, and repair ifnecessary. <4M4>
From the previous page
OK
NG
Replace the engine-A/T-ECU orA/T-ECU.
Check the trouble symptoms.
RepairNG
NG
Replace the crankshaft sensingblade. <6G7>
Replace the crank angle sensor<6G7> or the engine speed sensor<4M4>.
Check the trouble symptoms.
Check the following connectors:<6G7> B-52, D-120, B-25X<4M4> D-108, D-113, B-36, B-25X
OK
OK
D Check the harness between thecrank angle sensor and theengine-A/T-ECU, and repair ifnecessary. <6G7>
D Check the harness between theengine speed sensor and theA/T-ECU, and repair if necessary.<4M4>
D Check the harness between thecrank angle sensor and theengine control relay, and repair ifnecessary. <6G7>
D Check the harness between theengine speed sensor and theengine control relay, and repair ifnecessary. <4M4>
D Check the harness between thecrank angle sensor and bodyearth, and repair if necessary.<6G7>
D Check the harness between theengine speed sensor and bodyearth, and repair if necessary.<4M4>
Measure the output wave pattern atcrank angle sensor connectorB-52 <6G7>, or at injection pumpassembly connector B-36 <4M4>(using an oscilloscope).D Use the test harness (MD998478)
to connect the terminals, andthen measure at the pickupharness.
D Engine: IdlingD Selector lever position: PD Voltage between terminal 2 and
earthOK: A wave pattern such as the
one shown on P.23-69(Check Procedure Using anOscilloscope) should beoutput, and the maximumvalue should be 4.8 V ormore and the minimum val-ue should be 0.6 V or less.There should be no noisein the output wave pattern.
NG
NGRepair
NGRepair
D Check the harness between thecrank angle sensor and theengine-A/T-ECU. <6G7>
D Check the harness between theinjection pump assembly and theA/T-ECU. <4M4>

AUTOMATIC TRANSMISSION - Troubleshooting <A/T>23-20
Code No. 22 Input shaft speed sensor system Probable causeIf no output pulse from the input shaft speed sensor is detected for 1 second ormore while the vehicle is driving at 30 km/h or more in 4th, it is judged thatthere is a short-circuit or open circuit in the input shaft speed sensor, and codeNo. 22 is output.If code No. 22 is output 4 times, the transmission is locked at 3rd gear (D) or2nd gear (downshift operation in Sports mode) as a fail-safe measure, and the Nrange indicator lamp flashes at 1 Hz.
D Malfunction of input shaft speed sensorD Malfunction of reverse clutch retainerD Malfunction of harness or connectorD Malfunction of engine-A/T-ECU <6G7>D Malfunction of A/T-ECU <4M4>
L Refer to the Transmission Workshop Manual.
Transient malfunction(Refer to GROUP 00 - Points toNote for Transient Malfunctions.)
OK
NG
Check the following connectors:<6G7> D-121, <4M4> D-108
To the next page
NG
OK
NG
NGRepairCheck the following connectors:
<6G7> D-122, <4M4> D-108
Replace the engine-A/T-ECU orA/T-ECU.
OKMUT-II Data ListD No. 22 Input shaft speed sensor
OK: Refer to P.23-61 (Data ListChart).
Repair
OK
NG
NG
Check the trouble symptoms.
OK
Measure at engine-A/T-ECUconnector D-121 <6G7>, or atA/T-ECU connector D-107 <4M4>.D Measure at the ECU terminalsD Ignition switch: OND <6G7> Voltage between terminal
81 and earthD <4M4> Voltage between terminal
43 and earthOK: 0.5 V or less
Replace the engine-A/T-ECU orA/T-ECU.
NGCheck the trouble symptoms.
NG
Check the trouble symptoms.
Check the following connectors:<6G7> D-121, D-122, <4M4> D-108
Replace the engine-A/T-ECU orA/T-ECU.
OK
OK
Measure at engine-A/T-ECUconnector D-122 <6G7>, or atA/T-ECU connector D-108 <4M4>.D Measure at the ECU terminalsD Disconnect C-23D Ignition switch: OND <6G7> Voltage between terminal
103 and earthD <4M4> Voltage between terminal
31 and earthOK: 4.8 - 5.2 V
Measure the output wave pattern ofthe input shaft speed sensor atengine-A/T-ECU connectors D-121and D-122 <6G7>, or at A/T-ECUconnector D-108 <4M4> (using anoscilloscope).D Vehicle speed: approx. 50 km/hD Shift range: 4thD <6G7> Voltage between terminal
81 of D-121 and terminal 103 ofD-122
D <4M4> Voltage between terminal31 of D-108 and terminal 43 ofD-108OK: A wave pattern such as the
one shown on P.23-69(Check Procedure Using anOscilloscope) should beoutput, and the maximumvalue should be 4.8 V ormore and the minimum val-ue should be 0.8 V or less.There should be no noisein the output wave pattern.
NG NGRepair

AUTOMATIC TRANSMISSION - Troubleshooting <A/T> 23-21
(3)NG
From the previous page
OK(1)NG
NG
Repair
Check the followingconnector:E-113
OK
NG
Repair
Check the followingconnector:E-113
OK
(2)NG
NG
Repair
Check the harness between theinput shaft speed sensor and theignition switch, and repair ifnecessary.
Check the following connectors:D-208, D-213, D-32, E-115
NG
Check the trouble symptoms.
OK
NGRepairCheck the following connectors:
D-208, D-213, D-32, E-115, E-113
NGRepair
OK
NG
Check the trouble symptoms.
OKEliminate the cause of the noise.Overhaul the A/T. L
D Replace the reverse clutchretainer.
Check the trouble symptoms.
Replace the input shaft speedsensor. L
OK
OK
NGRepair
Check the following connectors:<6G7> D-121, D-122, C-23, <4M4>D-108, C-23
OK
D Check the harness between theinput shaft speed sensor and theengine-A/T-ECU (earth line), andrepair if necessary. <6G7>
D Check the harness between theinput shaft speed sensor and theA/T-ECU (earth line), and repair ifnecessary.<4M4>
D Check the harness between theinput shaft speed sensor and theengine-A/T-ECU (sensor line),and repair if necessary. <6G7>
D Check the harness between theinput shaft speed sensor and theA/T-ECU (sensor line), and repairif necessary.<4M4>
Measure at input shaft speed sensorconnector C-23.D Disconnect the connector and
measure at the harness side.(1) Resistance between terminal 1
and earthOK: 2 W or less
(2) Voltage between terminal 2 andearth(Ignition switch: ON)OK: 4.8 - 5.2 V
(3) Voltage between terminal 3 andearth(Ignition switch: ON)OK: System voltage
D Check the harness between theinput shaft speed sensor and theengine-A/T-ECU (earth line).<6G7>
D Check the harness between theinput shaft speed sensor and theA/T-ECU (earth line). <4M4>
D Check the harness between theinput shaft speed sensor and theignition switch.

AUTOMATIC TRANSMISSION - Troubleshooting <A/T>23-22
Code No. 23 Output shaft speed sensor system Probable causeIf the output from the output shaft speed sensor is 50% or less continuously for1 second or more while the vehicle is driving at 30 km/h or more in 4th, it isjudged that there is a short-circuit or open circuit in the output shaft speedsensor, and code No. 23 is output.If code No. 23 is output 4 times, the transmission is locked at 3rd gear (D) or2nd gear (downshift operation in Sports mode) as a fail-safe measure, and the Nrange indicator lamp flashes at 1 Hz.
D Malfunction of output shaft speed sensorD Malfunction of direct planetary carrierD Malfunction of harness or connectorD Malfunction of engine-A/T-ECU <6G7>D Malfunction of A/T-ECU <4M4>
L Refer to the Transmission Workshop Manual.
NGRepair
NG
Transient malfunction(Refer to GROUP 00 - Points toNote for Transient Malfunctions.)
OK
NG
Check the following connectors:<6G7> D-122, <4M4> D-108
To the next page
NG
OK
NGRepairCheck the following connectors:
<6G7> D-122, <4M4> D-108
Replace the engine-A/T-ECU orA/T-ECU.
OKMUT-II Data ListD No. 23 Output shaft speed
sensor systemOK: Refer to P.23-61 (Data List
Chart).
Repair
OK
OK
NG
Check the trouble symptoms.
OK
Measure at engine-A/T-ECUconnector D-121 <6G7>, or atA/T-ECU connector D-107 <4M4>.D Measure at the ECU terminalsD Ignition switch: OND <6G7>Voltage between terminals
81 and earthD <4M4> Voltage between terminal
43 and earthOK: 0.5 V or less
Replace the engine-A/T-ECU orA/T-ECU.
NGCheck the trouble symptoms.
NG
Check the trouble symptoms.
Check the following connectors:<6G7> D-121, D-122, <4M4> D-108
Replace the engine-A/T-ECU orA/T-ECU.
OK
Measure at engine-A/T-ECUconnector D-122 <6G7>, or atA/T-ECU connector D-108 <4M4>.D Measure at the ECU terminalsD Disconnect C-02D Ignition switch: OND <6G7>Voltage between terminals
104 and earthD <4M4> Voltage between terminal
32 and earthOK: 4.8 - 5.2 V
NG
Measure the output wave pattern ofthe output shaft speed sensor atengine-A/T-ECU connectors D-121and D-122 <6G7>, or at A/T-ECUconnector D-108 <4M4> (using anoscilloscope).D Vehicle speed: approx. 50 km/hD Shift range: 4thD <6G7> Voltage between terminal
81 of D-121 and terminal 104 ofD-122
D <4M4> Voltage between terminal32 of D-108 and terminal 43 ofD-108OK: A wave pattern such as the
one shown on P.23-69(Check Procedure Using anOscilloscope) should beoutput, and the maximumvalue should be 4.8 V ormore and the minimum val-ue should be 0.8 V or less.There should be no noisein the output wave pattern.
NGRepair
NG

AUTOMATIC TRANSMISSION - Troubleshooting <A/T> 23-23
NG
From the previous page
OK(1)NG
NG
Repair
Check the followingconnector:E-113
OK
NG
Repair
Check the followingconnector:E-113
OK
Replace the output shaft speedsensor. L
(2)NG
(3)NG
NG
Repair
Measure at output shaft speedsensor connector C-23.D Disconnect the connector and
measure at the harness side.(1) Resistance between terminal 1
and earthOK: 2 W or less
(2) Voltage between terminal 2 andearth(Ignition switch: ON)OK: 4.8 - 5.2 V
(3) Voltage between terminal 3 andearth(Ignition switch: ON)OK: System voltage
Check the harness between theoutput shaft speed sensor and theignition switch, and repair ifnecessary.
OKCheck the following connectors:D-208, D-213, D-32, E-115
NG
Check the trouble symptoms.
OK
NGRepair
Check the following connectors:D-208, D-213, D-32, E-115, E-113
NGRepair
OK
NG
Check the trouble symptoms.
NGEliminate the cause of the noise.Overhaul the A/T.
D Replace the direct planetarycarrier.
Check the trouble symptoms.
OK
NGRepair
Check the following connectors:<6G7> D-121, D-122, C-24, <4M4>D-108, C-24
D Check the harness between theoutput shaft speed sensor andthe engine-A/T-ECU (earth line),and repair if necessary. <6G7>
D Check the harness between theoutput shaft speed sensor andthe A/T-ECU (sensor line), andrepair if necessary. <4M4>
D Check the harness between theoutput shaft speed sensor andthe engine-A/T-ECU (earth line),and repair if necessary. <6G7>
D Check the harness between theoutput shaft speed sensor andthe A/T-ECU (earth line), andrepair if necessary. <4M4>
D Check the harness between theoutput shaft speed sensor andthe engine-A/T-ECU. <6G7>
D Check the harness between theoutput shaft speed sensor andthe A/T-ECU. <4M4>
D Check the harness between theoutput shaft speed sensor andthe ignition switch.

AUTOMATIC TRANSMISSION - Troubleshooting <A/T>23-24
Code No.25 Wide open throttle switch system Probable causeIf the wide open throttle switch does not turn OFF when the accelerator pedal isnot depressed, there is a short circuit in the wide open throttle switch anddiagnosis code No. 25 is output.
D Malfunction of wide open throttle switchD Malfunction of harness and connectorsD Malfunction of engine-A/T-ECU <6G7>D Malfunction of A/T-ECU <4M4>
Transient malfunction(Refer to GROUP 00 - Points to Note for TransientMalfunctions.)
OK
OK
OK
OK
NG
OK
NG
NG
Check the trouble symptoms.
Replace the engine-A/T-ECU or A/T-ECU.
Measure at Wide open throttle switch connector D-134D Disconnect the connector and measure at the harness
side.D Ignition switch: OND Voltage between terminal 1 and earth
OK: System voltage
NGReplace
NG
Repair
Check the following connectors: <6G7-L.H. drive vehicles>D-122, D-134, <6G7-R.H. drive vehicles> D-122, E-11, D-124,D-134, <4M4-L.H. drive vehicles> D-109, D-134, <4M4-R.H. drivevehicles> D-109, E-11, D-124, D-134
Check the following connector: <L.H. drive vehicles> D-14 D Check the harness between the Wide open throttle switchand the engine-A/T-ECU, and repair if necessary. <6G7>
D Check the harness between the Wide open throttle switchand the A/T-ECU, and repair if necessary. <4M4>
MUT-II Data listD No.25 Wide open throttle switch
OK: The switch turns ON when fully open the acceleratorthe switch turns OFF when fully close the accelera-tor.
Wide open throttle switch single part check
Repair
NG

AUTOMATIC TRANSMISSION - Troubleshooting <A/T> 23-25
Code No. 26 Stop lamp switch system Probable causeIf the stop lamp switch is continuously on for 5 minutes or more while thevehicle is being driven, it is judged that there is a short-circuit in the stop lampswitch and code No. 26 is output.
D Malfunction of brake pedalD Malfunction of stop lamp switchD Malfunction of harness or connectorD Malfunction of engine-A/T-ECU <6G7>D Malfunction of A/T-ECU <4M4>
NG
NG
MUT-II Data ListD No. 26 Stop lamp switch system
OK: The switch turns ON whenbrake pedal is depressedthe switch turns OFF whenthe brake pedal is released.
Transient malfunction(Refer to GROUP 00 - Points toNote for Transient Malfunctions.)
OK
OKOK
OK
NG
Repair
Repair
Check the following connectors:<L.H. drive vehicles> D-26, D-27<R.H. drive vehicles> D-124, D-27
Check the harness between the stoplamp switch and the battery, andrepair if necessary.
OK
OK
NG
Brake pedal height check(Refer to GROUP 35A - On-vehicleService.)
OK
NGAdjust
OK
OK
NG
NG
Check the trouble symptoms. Replace the engine-A/T-ECU orA/T-ECU.
Check the following connectors:<6G7-L.H. drive vehicles> D-27, D-26,D-33, E-13, D-128, D-122,<6G7-R.H. drive vehicles> D-27,D-124,E-13, D-128, D-122,<4M4-L.H. drive vehicles> D-27, D-26,D-33, E-13, D-128, D-109<4M4-R.H. drive vehicles>D-27,D-124,E-13, D-128, D-109
Measure at engine-A/T-ECUconnector D-122 <6G7>, A/T-ECUconnector D-109 <4M4>.D Measure at the ECU terminalsD <6G7> Voltage between terminals
123 and earthD <4M4> Voltage between terminal
59 and earthOK: System voltage when brake
pedal is depressed1 V or less when the brakepedal is released
Measure at stop lamp switchconnector D-136.D Disconnect the connector and
measure at the harness side.D Voltage between terminals 2 and
earthOK: System voltage
NGReplace
NGRepair
Stop lamp switch check(Refer to GROUP 35A - On-vehicleService.)
Check the following connector:D-136
Repair
NG
Check the following connectors:<6G7> D-122, <4M4> D-109
D Check the harness between thestop lamp switch and theengine-A/T-ECU, and repair ifnecessary. <6G7>
D Check the harness between thestop lamp switch and theA/T-ECU, and repair if necessary.<4M4>
D Check the harness between thestop lamp switch and the battery,and repair if necessary.

AUTOMATIC TRANSMISSION - Troubleshooting <A/T>23-26
Code No. 31 LR solenoid valve system Probable causeIf the drive terminal voltage of the LR solenoid valve is 3.0 V or less, it isjudged that there is a short-circuit or open circuit in the LR solenoid valve, andthe corresponding code is output.The transmission will be fixed in 3rd as a fail-safe measure, and the N rangeindicator will flash at a rate of 1 Hz.
D Malfunction of LR solenoid valveD Malfunction of harness or connectorD Malfunction of engine-A/T-ECU <6G7>D Malfunction of A/T-ECU <4M4>
L Refer to the Transmission Workshop Manual.
NO
YES
OK
MUT-II Self-Diag CodeD Is code No. 54 output?
Code No. 54 - A/T control relay system check(Refer to P.23-103.)
OK
NG
Transient malfunction(Refer to GROUP 00 - Points to Note for TransientMalfunctions.)
MUT-II Actuator TestD No. 1 LR solenoid valve
OK: Sound of operation can be heard
OK
Check the following connectors: <6G7> D-122, <4M4> D-109
OK
NG
NG
Replace the engine-A/T-ECU or A/T-ECU.
Repair
OK
Check the trouble symptoms.
OK
NG
Check the following connectors: E-113, D-12
NGRepair
Check the harness between the solenoid valve assembly andthe A/T control relay, and repair if necessary.
Check the following connectors: <6G7> D-122, E-113, D-12<4M4> D-109, E-113, D-12
NG
NGRepairCheck the following connector: C-04
Replace the LR solenoid valve L
OK
Measure at solenoid valve assembly connector C-04.D Disconnect the connector and measure at the solenoid
valve side.D Resistance between terminals 6 and 10
OK: 2.7 - 3.4 W
OK
Measure at engine-A/T-ECU connector D-122 <6G7>, or atA/T-ECU connector D-109 <4M4>.D Measure at the ECU terminalsD Ignition switch: OND <6G7> Voltage between terminal 129 and earthD <4M4> Voltage between terminal 62 and earth
OK: System voltage
D Check the harness between the solenoid valve assemblyand the engine-A/T-ECU, and repair if necessary. <6G7>
D Check the harness between the solenoid valve assemblyand the A/T-ECU, and repair if necessary. <4M4>
D Check the harness between the solenoid valve assemblyand the A/T control relay, and repair if necessary.
NG
Repair
NGMeasure at solenoid valve assembly connector C-04.D Disconnect the connector and measure at the harness
side.D Ignition switch: OND Voltage between terminal 10 and earth
OK: System voltage
AUTOMATIC TRANSMISSION - Troubleshooting <A/T> 23-27
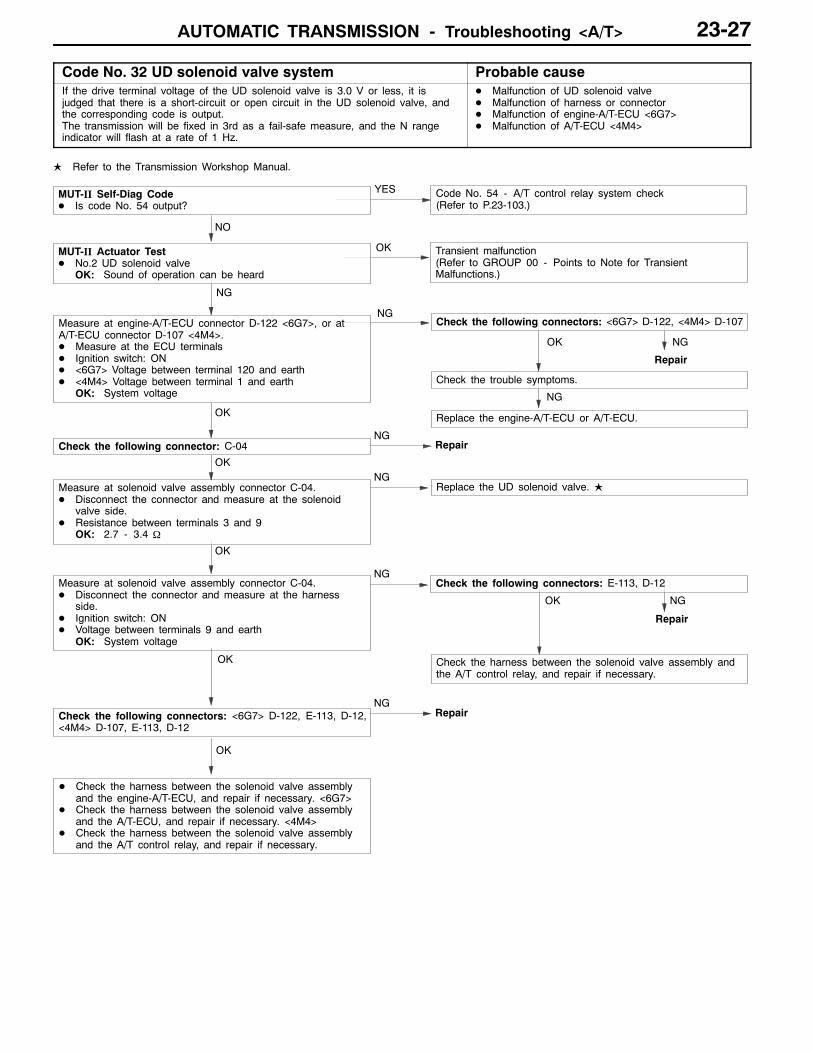
Code No. 32 UD solenoid valve system Probable causeIf the drive terminal voltage of the UD solenoid valve is 3.0 V or less, it isjudged that there is a short-circuit or open circuit in the UD solenoid valve, andthe corresponding code is output.The transmission will be fixed in 3rd as a fail-safe measure, and the N rangeindicator will flash at a rate of 1 Hz.
D Malfunction of UD solenoid valveD Malfunction of harness or connectorD Malfunction of engine-A/T-ECU <6G7>D Malfunction of A/T-ECU <4M4>
L Refer to the Transmission Workshop Manual.
NO
YES
OK
MUT-II Self-Diag CodeD Is code No. 54 output?
Code No. 54 - A/T control relay system check(Refer to P.23-103.)
OK
NG
Transient malfunction(Refer to GROUP 00 - Points to Note for TransientMalfunctions.)
MUT-II Actuator TestD No.2 UD solenoid valve
OK: Sound of operation can be heard
OK
Check the following connectors: <6G7> D-122, <4M4> D-107
OK
NG
NG
Replace the engine-A/T-ECU or A/T-ECU.
Repair
OK
NG
Check the trouble symptoms.
OK
NG
Check the following connectors: E-113, D-12
NGRepair
Check the harness between the solenoid valve assembly andthe A/T control relay, and repair if necessary.
Check the following connectors: <6G7> D-122, E-113, D-12,<4M4> D-107, E-113, D-12
NG
NGRepairCheck the following connector: C-04
Measure at solenoid valve assembly connector C-04.D Disconnect the connector and measure at the harness
side.D Ignition switch: OND Voltage between terminals 9 and earth
OK: System voltage
Replace the UD solenoid valve. L
OK
Measure at solenoid valve assembly connector C-04.D Disconnect the connector and measure at the solenoid
valve side.D Resistance between terminals 3 and 9
OK: 2.7 - 3.4 W
OK
Measure at engine-A/T-ECU connector D-122 <6G7>, or atA/T-ECU connector D-107 <4M4>.D Measure at the ECU terminalsD Ignition switch: OND <6G7> Voltage between terminal 120 and earthD <4M4> Voltage between terminal 1 and earth
OK: System voltage
D Check the harness between the solenoid valve assemblyand the engine-A/T-ECU, and repair if necessary. <6G7>
D Check the harness between the solenoid valve assemblyand the A/T-ECU, and repair if necessary. <4M4>
D Check the harness between the solenoid valve assemblyand the A/T control relay, and repair if necessary.
NG
Repair

AUTOMATIC TRANSMISSION - Troubleshooting <A/T>23-28
Code No. 33 2nd solenoid valve system Probable causeIf the drive terminal voltage of the 2nd solenoid valve is 3.0 V or less, it isjudged that there is a short-circuit or open circuit in the 2nd solenoid valve, andthe corresponding code is output.The transmission will be fixed in 3rd as a fail-safe measure, and the N rangeindicator will flash at a rate of 1 Hz.
D Malfunction of 2nd solenoid valveD Malfunction of harness or connectorD Malfunction of engine-A/T-ECU <6G7>D Malfunction of A/T-ECU <4M4>
L Refer to the Transmission Workshop Manual.
NO
YES
OK
MUT-II Self-Diag CodeD Is code No. 54 output?
Code No. 54 - A/T control relay system check(Refer to P.23-103.)
OK
NG
Transient malfunction(Refer to GROUP 00 - Points to Note for TransientMalfunctions.)
MUT-II Actuator TestD No. 3 2nd solenoid valve
OK: Sound of operation can be heard
OK
Check the following connectors: <6G7> D-122, <4M4> D-107
OK
NG
NG
Replace the engine-A/T-ECU or A/T-ECU.
Repair
OK
Check the trouble symptoms.
OK
NG
Check the following connectors: E-113, D-12
NGRepair
Check the harness between the solenoid valve assembly andthe A/T control relay, and repair if necessary.
Check the following connectors: <6G7> D-122, E-113, D-12,<4M4> D-107, E-113, D-12
NG
NGRepairCheck the following connector: C-04
Replace the 2nd solenoid valve. L
OK
Measure at solenoid valve assembly connector C-04.D Disconnect the connector and measure at the solenoid
valve side.D Resistance between terminals 4 and 9
OK: 2.7 - 3.4 W
OK
Measure at engine-A/T-ECU connector D-122 <6G7>, or atA/T-ECU connector D-107 <4M4>.D Measure at the ECU terminalsD Ignition switch: OND <6G7> Voltage between terminal 106 and earthD <4M4> Voltage between terminal 16 and earth
OK: System voltage
D Check the harness between the solenoid valve assemblyand the engine-A/T-ECU, and repair if necessary. <6G7>
D Check the harness between the solenoid valve assemblyand the A/T-ECU, and repair if necessary. <4M4>
D Check the harness between the solenoid valve assemblyand the A/T control relay, and repair if necessary.
Repair
NG
NGMeasure at solenoid valve assembly connector C-04.D Disconnect the connector and measure at the harness
side.D Ignition switch: OND Voltage between terminals 9 and earth
OK: System voltage

AUTOMATIC TRANSMISSION - Troubleshooting <A/T> 23-29
Code No. 34 OD solenoid valve system Probable causeIf the drive terminal voltage of the OD solenoid valve is 3.0 V or less, it isjudged that there is a short-circuit or open circuit in the OD solenoid valve, andthe corresponding code is output.The transmission will be fixed in 3rd as a fail-safe measure, and the N rangeindicator will flash at a rate of 1 Hz.
D Malfunction of OD solenoid valveD Malfunction of harness or connectorD Malfunction of engine-A/T-ECU <6G7>D Malfunction of A/T-ECU <4M4>
L Refer to the Transmission Workshop Manual.
NO
YES
OK
MUT-II Self-Diag CodeD Is code No. 54 output?
Code No. 54 - A/T control relay system check(Refer to P.23-103.)
OK
NG
Transient malfunction(Refer to GROUP 00 - Points to Note for TransientMalfunctions.)
MUT-II Actuator TestD No.4 OD solenoid valve
OK: Sound of operation can be heard
OK
Check the following connectors: <6G7> D-122, <4M4> D-107
OK
NG
NG
Replace the engine-A/T-ECU or A/T-ECU.
Repair
OK
NG
Check the trouble symptoms.
OK
NG
Check the following connectors: E-113, D-12
NGRepair
Check the harness between the solenoid valve assembly andthe A/T control relay, and repair if necessary.
Check the following connectors: <6G7> D-122, E-113, D-12,<4M4> D-107, E-113, D-12
NG
NGRepairCheck the following connector: C-04
Replace the OD solenoid valve. L
OK
Measure at solenoid valve assembly connector C-04.D Disconnect the connector and measure at the solenoid
valve side.D Resistance between terminals 5 and 9
OK: 2.7 - 3.4 W
OK
Measure at engine-A/T-ECU connector D-122 <6G7>, or atA/T-ECU connector D-107 <4M4>.D Measure at the ECU terminalsD Ignition switch: OND <6G7> Voltage between terminal 130 and earthD <4M4> Voltage between terminal 14 and earth
OK: System voltage
D Check the harness between the solenoid valve assemblyand the engine-A/T-ECU, and repair if necessary. <6G7>
D Check the harness between the solenoid valve assemblyand the A/T-ECU, and repair if necessary. <4M4>
D Check the harness between the solenoid valve assemblyand the A/T control relay, and repair if necessary.
Repair
NG
Measure at solenoid valve assembly connector C-04.D Disconnect the connector and measure at the harness
side.D Ignition switch: OND Voltage between terminals 9 and earth
OK: System voltage

AUTOMATIC TRANSMISSION - Troubleshooting <A/T>23-30
Code No. 35 RED solenoid valve system Probable causeIf the drive terminal voltage of the RED solenoid valve is 3.0 V or less, it isjudged that there is a short-circuit or open circuit in the RED solenoid valve, andthe corresponding code is output.The transmission will be fixed in 3rd as a fail-safe measure, and the N rangeindicator will flash at a rate of 1 Hz.
D Malfunction of RED solenoid valveD Malfunction of harness or connectorD Malfunction of engine-A/T-ECU <6G7>D Malfunction of A/T-ECU <4M4>
L Refer to the Transmission Workshop Manual.
Repair
NO
YES
OK
MUT-II Self-Diag CodeD Is code No. 54 output?
Code No. 54 - A/T control relay system check(Refer to P.23-103.)
OK
NG
Transient malfunction(Refer to GROUP 00 - Points to Note for TransientMalfunctions.)
MUT-II Actuator TestD No.5 RED solenoid valve
OK: Sound of operation can be heard
OK
Check the following connectors: <6G7> D-122, <4M4> D-109
OK
NG
NG
Replace the engine-A/T-ECU or A/T-ECU.
Repair
OK
NG
Check the trouble symptoms.
OK
NG
Check the following connectors: E-113, D-12
NGRepair
Check the harness between the solenoid valve assembly andthe A/T control relay, and repair if necessary.
Check the following connectors: <6G7> D-122, E-113, D-12,<4M4> D-109, E-113, D-12
NG
NGCheck the following connector: C-04
Replace the RED solenoid valve.L
OK
Measure at solenoid valve assembly connector C-04.D Disconnect the connector and measure at the solenoid
valve side.D Resistance between terminals 8 and 10
OK: 2.7 - 3.4 W
OK
Measure at engine-A/T-ECU connector D-122 <6G7>, or atA/T-ECU connector D-109 <4M4>.D Measure at the ECU terminalsD Ignition switch: OND <6G7> Voltage between terminal 119 and earthD <4M4> Voltage between terminal 51 and earth
OK: System voltage
D Check the harness between the solenoid valve assemblyand the engine-A/T-ECU, and repair if necessary. <6G7>
D Check the harness between the solenoid valve assemblyand the A/T-ECU, and repair if necessary. <4M4>
D Check the harness between the solenoid valve assemblyand the A/T control relay, and repair if necessary.
Repair
NG
Measure at solenoid valve assembly connector C-04.D Disconnect the connector and measure at the harness
side.D Ignition switch: OND Voltage between terminal 10 and earth
OK: System voltage

AUTOMATIC TRANSMISSION - Troubleshooting <A/T> 23-31
Code No. 36 DCC solenoid valve system Probable causeIf the drive terminal voltage of the DCC solenoid valve is 3.0 V or less, it isjudged that there is a short-circuit or open circuit in the DCC solenoid valve, andcode No. 36 is output.The transmission will be fixed in 3rd as a fail-safe measure, and the N rangeindicator will flash at a rate of 1 Hz.
D Malfunction of DCC solenoid valveD Malfunction of harness or connectorD Malfunction of engine-A/T-ECU <6G7>D Malfunction of A/T-ECU <4M4>
L Refer to the Transmission Workshop Manual.
NO
YES
OK
MUT-II Self-Diag CodeD Is code No. 54 output?
Code No. 54 - A/T control relay system check(Refer to P.23-103.)
OK
NG
Transient malfunction(Refer to GROUP 00 - Points to Note for TransientMalfunctions.)
MUT-II Actuator TestD No. 6 DCC solenoid valve
OK: Sound of operation can be heard
OK
Check the following connectors: <6G7> D-122, <4M4> D-107
OK
NG
NG
Replace the engine-A/T-ECU or A/T-ECU.
Repair
OK
NG
Check the trouble symptoms.
OK
NG
Check the following connectors: E-113, D-12
NGRepair
Check the harness between the solenoid valve assembly andthe A/T control relay, and repair if necessary.
Check the following connectors: <6G7> D-122, E-113, D-12,<4M4> D-107, E-113, D-12
NG
NGRepairCheck the following connector: C-04
Replace the DCC solenoid valve. L
OK
Measure at solenoid valve assembly connector C-04.D Disconnect the connector and measure at the solenoid
valve side.D <4M4> Resistance between terminal 7 and 10
OK: 2.7 - 3.4 W
OK
Measure at engine-A/T-ECU connector D-122 <6G7>, or atA/T-ECU connector D-107 <4M4>.D Measure at the ECU terminals.D Ignition switch: OND <6G7> Voltage between terminal 107 and earthD <4M4> Voltage between terminal 15 and earth
OK: System voltage
D Check the harness between the solenoid valve assemblyand the engine-A/T-ECU, and repair if necessary. <6G7>
D Check the harness between the solenoid valve assemblyand the A/T-ECU, and repair if necessary. <4M4>
D Check the harness between the solenoid valve assemblyand the A/T control relay, and repair if necessary.
Repair
NG
Measure at solenoid valve assembly connector C-04.D Disconnect the connector and measure at the harness
side.D Ignition switch: OND Voltage between terminal 10 and earth
OK: System voltage
AUTOMATIC TRANSMISSION - Troubleshooting <A/T>23-32
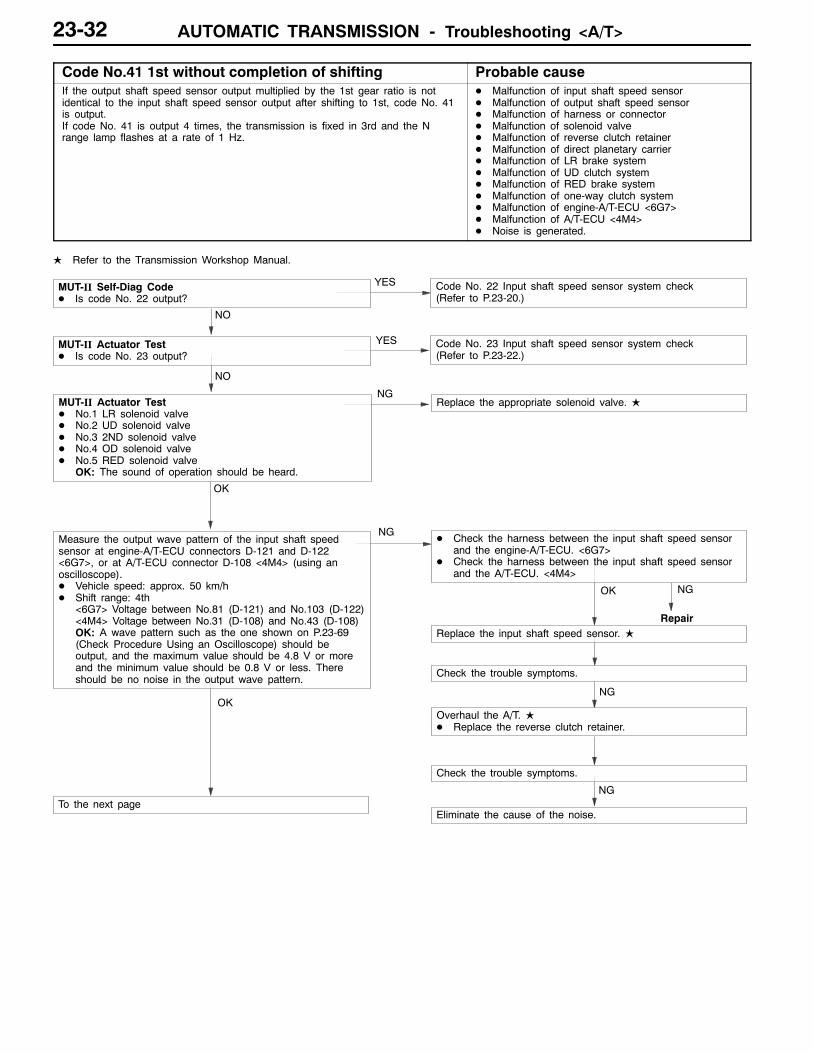
Code No.41 1st without completion of shifting Probable causeIf the output shaft speed sensor output multiplied by the 1st gear ratio is notidentical to the input shaft speed sensor output after shifting to 1st, code No. 41is output.If code No. 41 is output 4 times, the transmission is fixed in 3rd and the Nrange lamp flashes at a rate of 1 Hz.
D Malfunction of input shaft speed sensorD Malfunction of output shaft speed sensorD Malfunction of harness or connectorD Malfunction of solenoid valveD Malfunction of reverse clutch retainerD Malfunction of direct planetary carrierD Malfunction of LR brake systemD Malfunction of UD clutch systemD Malfunction of RED brake systemD Malfunction of one-way clutch systemD Malfunction of engine-A/T-ECU <6G7>D Malfunction of A/T-ECU <4M4>D Noise is generated.
L Refer to the Transmission Workshop Manual.
Repair
NO
YES
YES
MUT-II Self-Diag CodeD Is code No. 22 output?
Code No. 22 Input shaft speed sensor system check(Refer to P.23-20.)
OK
NO
Code No. 23 Input shaft speed sensor system check(Refer to P.23-22.)
MUT-II Actuator TestD Is code No. 23 output?
NG
NGMUT-II Actuator TestD No.1 LR solenoid valveD No.2 UD solenoid valveD No.3 2ND solenoid valveD No.4 OD solenoid valveD No.5 RED solenoid valve
OK: The sound of operation should be heard.
Replace the appropriate solenoid valve. L
D Check the harness between the input shaft speed sensorand the engine-A/T-ECU. <6G7>
D Check the harness between the input shaft speed sensorand the A/T-ECU. <4M4>
Replace the input shaft speed sensor. L
NG
Check the trouble symptoms.
Overhaul the A/T. LD Replace the reverse clutch retainer.
Check the trouble symptoms.
Eliminate the cause of the noise.To the next page
Measure the output wave pattern of the input shaft speedsensor at engine-A/T-ECU connectors D-121 and D-122<6G7>, or at A/T-ECU connector D-108 <4M4> (using anoscilloscope).D Vehicle speed: approx. 50 km/hD Shift range: 4th
<6G7> Voltage between No.81 (D-121) and No.103 (D-122)<4M4> Voltage between No.31 (D-108) and No.43 (D-108)OK: A wave pattern such as the one shown on P.23-69(Check Procedure Using an Oscilloscope) should beoutput, and the maximum value should be 4.8 V or moreand the minimum value should be 0.8 V or less. Thereshould be no noise in the output wave pattern.
OK
OK
NG
NG

AUTOMATIC TRANSMISSION - Troubleshooting <A/T> 23-33
NG
Replace the valve body assembly. L
Check the trouble symptoms.
Replace the engine-A/T-ECU or A/T-ECU.
Check the trouble symptoms.
Repair
OK
NG D Check the harness between the output shaft speed sensorand the engine-A/T-ECU. <6G7>
D Check the harness between the output shaft speed sensorand the A/T-ECU. <4M4>
Replace the output shaft speed sensor. L
OK
Check the trouble symptoms.
Overhaul the A/T. LD Replace the direct planetary carrier.
Check the trouble symptoms.
Eliminate the cause of the noise.
To the next page
Measure the output wave pattern of the output shaft speedsensor at engine-A/T-ECU connectors D-121 and D-122<6G7>, or at A/T-ECU connector D-108 <4M4> (using anoscilloscope).D Vehicle speed: approx. 50 km/hD Shift range: 4th
<6G7> Voltage between No.81 (D-121) and No.104 (D-122)<4M4> Voltage between No.32 (D-108) and No.43 (D-108)OK: A wave pattern such as the one shown on P.23-69(Check Procedure Using an Oscilloscope) should beoutput, and the maximum value should be 4.8 V or moreand the minimum value should be 0.8 V or less. Thereshould be no noise in the output wave pattern.
OK
NG
Overhaul the A/T. LD Replace the UD clutch. (Code No. 42, 43 or No. 44 is
output, or no other codes are output.)D Replace the LR brake. (Code No. 46 is output, or no other
codes are output.)D Replace the RED brake. (Code No. 42, 43 or No. 46 is
output, or no other codes are output.)D Replace the one-way clutch (OWC-L). (No other codes are
output.)D Replace the one-way clutch (OWC-D). (Code No. 42 or
No. 43 is output, or no other codes are output.)
NG
NGNG

AUTOMATIC TRANSMISSION - Troubleshooting <A/T>23-34
Code No. 42 2nd without completion of shifting Probable causeIf the output shaft speed sensor output multiplied by the 2nd gear ratio is notidentical to the input shaft speed sensor output after shifting to 2nd, code No. 42is output.If code No. 42 is output 4 times, the transmission is fixed in 3rd and the Nrange lamp flashes at a rate of 1 Hz.
D Malfunction of input shaft speed sensorD Malfunction of output shaft speed sensorD Malfunction of harness or connectorD Malfunction of solenoid valveD Malfunction of reverse clutch retainerD Malfunction of direct planetary carrierD Malfunction of 2ND brake systemD Malfunction of UD clutch systemD Malfunction of RED brake systemD Malfunction of one-way clutch systemD Malfunction of engine-A/T-ECU <6G7>D Malfunction of A/T-ECU <4M4>D Noise is generated.
L Refer to the Transmission Workshop Manual.
Repair
NO
YES
YES
MUT-II Self-Diag CodeD Is code No. 22 output?
Code No. 22 Input shaft speed sensor system check(Refer to P.23-20.)
OK
NO
Code No. 23 Output shaft speed sensor system check(Refer to P.23-22.)
MUT-II Actuator TestD Is code No. 23 output?
NG
NGMUT-II Actuator TestD No.1 LR solenoid valveD No.2 UD solenoid valveD No.3 2ND solenoid valveD No.4 OD solenoid valveD No.5 RED solenoid valve
OK: The sound of operation should be heard.
Replace the appropriate solenoid valve. L
D Check the harness between the input shaft speed sensorand the engine-A/T-ECU. <6G7>
D Check the harness between the input shaft speed sensorand the A/T-ECU. <4M4>
Replace the input shaft speed sensor. L
NG
Check the trouble symptoms.
Overhaul the A/T. LD Replace the reverse clutch retainer.
Check the trouble symptoms.
Eliminate the cause of the noise.To the next page
Measure the output wave pattern of the input shaft speedsensor at engine-A/T-ECU connectors D-121 and D-122<6G7>, or at A/T-ECU connector D-108 <4M4> (using anoscilloscope).D Vehicle speed: approx. 50 km/hD Shift range: 4th
<6G7> Voltage between No.81 (D-121) and No.103 (D-122)<4M4> Voltage between No.31 (D-108) and No.43 (D-108)OK: A wave pattern such as the one shown on P.23-69(Check Procedure Using an Oscilloscope) should beoutput, and the maximum value should be 4.8 V or moreand the minimum value should be 0.8 V or less. Thereshould be no noise in the output wave pattern.
OK
OK
NG
NG

AUTOMATIC TRANSMISSION - Troubleshooting <A/T> 23-35
NG
Replace the valve body assembly. L
Check the trouble symptoms.
Replace the engine-A/T-ECU or A/T-ECU.
Check the trouble symptoms.
Repair
OK
NG D Check the harness between the output shaft speed sensorand the engine-A/T-ECU. <6G7>
D Check the harness between the output shaft speed sensorand the A/T-ECU. <4M4>
Replace the output shaft speed sensor. L
OK
Check the trouble symptoms.
Overhaul the A/T. LD Replace the direct planetary carrier.
Check the trouble symptoms.
Eliminate the cause of the noise.
From the previous page
Measure the output wave pattern of the output shaft speedsensor at engine-A/T-ECU connectors D-121 and D-122<6G7>, or at A/T-ECU connector D-108 <4M4> (using anoscilloscope).D Vehicle speed: approx. 50 km/hD Shift range: 4th
<6G7> Voltage between No.81 (D-121) and No.104 (D-122)<4M4> Voltage between No.32 (D-108) and No.43 (D-108)OK: A wave pattern such as the one shown on P.23-69(Check Procedure Using an Oscilloscope) should beoutput, and the maximum value should be 4.8 V or moreand the minimum value should be 0.8 V or less. Thereshould be no noise in the output wave pattern.
OK
NG
Overhaul the A/T. LD Replace the UD clutch. (Code No. 41, 43 or No. 44 is
output, or no other codes are output.)D Replace the 2ND brake. (Code No. 44 or No. 45 is output,
or no other codes are output.)D Replace the RED brake. (Code No. 41, 43 or No. 46 is
output, or no other codes are output.)D Replace the one-way clutch (OWC-D). (Code No. 41 or
No. 43 is output, or no other codes are output.)
NG
NGNG

AUTOMATIC TRANSMISSION - Troubleshooting <A/T>23-36
Code No.43 3rd without completion of shifting Probable causeIf the output shaft speed sensor output multiplied by the 3rd gear ratio is notidentical to the input shaft speed sensor output after shifting to 3rd, code No. 43is output.If code No. 43 is output 4 times, the transmission is fixed in 3rd and the Nrange lamp flashes at a rate of 1 Hz.
D Malfunction of input shaft speed sensorD Malfunction of output shaft speed sensorD Malfunction of harness or connectorD Malfunction of solenoid valveD Malfunction of reverse clutch retainerD Malfunction of direct planetary carrierD Malfunction of UD clutch systemD Malfunction of OD clutch systemD Malfunction of RED brake systemD Malfunction of one-way clutch systemD Malfunction of engine-A/T-ECU <6G7>D Malfunction of A/T-ECU <4M4>D Noise is generated.
L Refer to the Transmission Workshop Manual.
Repair
NO
YES
YES
MUT-II Self-Diag CodeD Is code No. 22 output?
Code No. 22 Input shaft speed sensor system check(Refer to P.23-20.)
OK
NO
Code No. 23 Output shaft speed sensor system check(Refer to P.23-22.)
MUT-II Actuator TestD Is code No. 23 output?
NG
NGMUT-II Actuator TestD No.1 LR solenoid valveD No.2 UD solenoid valveD No.3 2ND solenoid valveD No.4 OD solenoid valveD No.5 RED solenoid valve
OK: The sound of operation should be heard.
Replace the appropriate solenoid valve. L
D Check the harness between the input shaft speed sensorand the engine-A/T-ECU. <6G7>
D Check the harness between the input shaft speed sensorand the A/T-ECU. <4M4>
Replace the input shaft speed sensor. L
NG
Check the trouble symptoms.
Overhaul the A/T. LD Replace the reverse clutch retainer.
Check the trouble symptoms.
Eliminate the cause of the noise.To the next page
Measure the output wave pattern of the input shaft speedsensor at engine-A/T-ECU connectors D-121 and D-122<6G7>, or at A/T-ECU connector D-108 <4M4> (using anoscilloscope).D Vehicle speed: approx. 50 km/hD Shift range: 4th
<6G7> Voltage between No.81 (D-121) and No.103 (D-122)<4M4> Voltage between No.31 (D-108) and No.43 (D-108)OK: A wave pattern such as the one shown on P.23-69(Check Procedure Using an Oscilloscope) should beoutput, and the maximum value should be 4.8 V or moreand the minimum value should be 0.8 V or less. Thereshould be no noise in the output wave pattern.
OKNG
NG
OK

AUTOMATIC TRANSMISSION - Troubleshooting <A/T> 23-37
NG
Replace the valve body assembly. L
Check the trouble symptoms.
Replace the engine-A/T-ECU or A/T-ECU.
Check the trouble symptoms.
Repair
OK
NGD Check the harness between the output shaft speed sensor
and the engine-A/T-ECU. <6G7>D Check the harness between the output shaft speed sensor
and the A/T-ECU. <4M4>
Replace the output shaft speed sensor. L
OK
Check the trouble symptoms.
Overhaul the A/T. LD Replace the direct planetary carrier.
Check the trouble symptoms.
Eliminate the cause of the noise.
To the next page
Measure the output wave pattern of the output shaft speedsensor at engine-A/T-ECU connectors D-121 and D-122<6G7>, or at A/T-ECU connector D-108 <4M4> (using anoscilloscope).D Vehicle speed: approx. 50 km/hD Shift range: 4th
<6G7>Voltage between No.81 (D-121) and No.104 (D-122)<4M4> Voltage between No.32 (D-108) and No.43 (D-108)OK: A wave pattern such as the one shown on P.23-69(Check Procedure Using an Oscilloscope) should beoutput, and with the maximum value should be 4.8 V ormore and the minimum value should be 0.8 V or less.There should be no noise in the output wave pattern.
OK
NG
Overhaul the A/T. LD Replace the UD clutch. (Code No. 41, 42 or No. 44 is
output, or no other codes are output.)D Replace the OD clutch. (Code No. 44 or No. 45 is output,
or no other codes are output.)D Replace the RED brake. (Code No. 41, 42 or No. 46 is
output, or no other codes are output.)D Replace the one-way clutch (OWC-D). (Code No. 41 or
No. 42 is output, or no other codes are output.)
NG
NGNG

AUTOMATIC TRANSMISSION - Troubleshooting <A/T>23-38
Code No.44 4th without completion of shifting Probable causeIf the output shaft speed sensor output multiplied by the 4th gear ratio is notidentical to the input shaft speed sensor output after shifting to 4th, code No. 44is output.If code No. 44 is output 4 times, the transmission is fixed in 3rd and the Nrange lamp flashes at a rate of 1 Hz.
D Malfunction of input shaft speed sensorD Malfunction of output shaft speed sensorD Malfunction of harness or connectorD Malfunction of solenoid valveD Malfunction of reverse clutch retainerD Malfunction of direct planetary carrierD Malfunction of UD clutch systemD Malfunction of 2ND brake systemD Malfunction of OD clutch systemD Malfunction of DIR clutch systemD Malfunction of engine-A/T-ECU <6G7>D Malfunction of A/T-ECU <4M4>D Noise is generated.
L Refer to the Transmission Workshop Manual.
Repair
NO
YES
YES
MUT-II Self-Diag CodeD Is code No. 22 output?
Code No. 22 Input shaft speed sensor system check(Refer to P.23-20.)
OK
NO
Code No. 23 Output shaft speed sensor system check(Refer to P.23-22.)
MUT-II Actuator TestD Is code No. 23 output?
NG
NGMUT-II Actuator TestD No.1 LR solenoid valveD No.2 UD solenoid valveD No.3 2ND solenoid valveD No.4 OD solenoid valveD No.5 RED solenoid valve
OK: The sound of operation should be heard.
Replace the appropriate solenoid valve. L
D Check the harness between the input shaft speed sensorand the engine-A/T-ECU. <6G7>
D Check the harness between the input shaft speed sensorand the A/T-ECU. <4M4>
Replace the input shaft speed sensor. L
NG
Check the trouble symptoms.
Overhaul the A/T. LD Replace the reverse clutch retainer.
Check the trouble symptoms.
Eliminate the cause of the noise.To the next page
Measure the output wave pattern of the input shaft speedsensor at engine-A/T-ECU connectors D-121 and D-122<6G7>, or at A/T-ECU connector D-108 <4M4> (using anoscilloscope).D Vehicle speed: approx. 50 km/hD Shift range: 4th
<6G7> Voltage between No.81 (D-121) and No.103 (D-122)<4M4> Voltage between No.31 (D-108) and No.43 (D-108)OK: A wave pattern such as the one shown on P.23-69(Check Procedure Using an Oscilloscope) should beoutput, and the maximum value should be 4.8 V or moreand the minimum value should be 0.8 V or less. Thereshould be no noise in the output wave pattern.
OK
OK
NG
NG

AUTOMATIC TRANSMISSION - Troubleshooting <A/T> 23-39
NG
Replace the valve body assembly. L
Check the trouble symptoms.
Replace the engine-A/T-ECU or A/T-ECU.
Check the trouble symptoms.
Repair
OK
NG D Check the harness between the output shaft speed sensorand the engine-A/T-ECU. <6G7>
D Check the harness between the output shaft speed sensorand the A/T-ECU. <4M4>
Replace the output shaft speed sensor. L
OK
Check the trouble symptoms.
Overhaul the A/T. LD Replace the direct planetary carrier.
Check the trouble symptoms.
Eliminate the cause of the noise.
From the previous page
Measure the output wave pattern of the output shaft speedsensor at engine-A/T-ECU connectors D-121 and D-122<6G7>, or at A/T-ECU connector D-108 <4M4> (using anoscilloscope).D Vehicle speed: approx. 50 km/hD Shift range: 4th
<6G7> Voltage between No.81 (D-121) and No.104 (D-122)<4M4> Voltage between No.32 (D-108) and No.43 (D-108)OK: A wave pattern such as the one shown on P.23-69(Check Procedure Using an Oscilloscope) should beoutput, and the maximum value should be 4.8 V or moreand the minimum value should be 0.8 V or less. Thereshould be no noise in the output wave pattern.
OK
NG
Overhaul the A/T. LD Replace the UD clutch. (Code No. 41, 42 or No. 43 is
output, or no other codes are output.)D Replace the OD clutch. (Code No. 43 or No. 45 is output,
or no other codes are output.)D Replace the DIR clutch. (Code No. 45 is output, or no
other codes are output.)
NG
NGNG

AUTOMATIC TRANSMISSION - Troubleshooting <A/T>23-40
Code No.45 5th without completion of shifting Probable causeIf the output shaft speed sensor output multiplied by the 5th gear ratio is notidentical to the input shaft speed sensor output after shifting to 5th, code No. 45is output.If code No. 45 is output 4 times, the transmission is fixed in 3rd and the Nrange lamp flashes at a rate of 1 Hz.
D Malfunction of input shaft speed sensorD Malfunction of output shaft speed sensorD Malfunction of harness or connectorD Malfunction of solenoid valveD Malfunction of reverse clutch retainerD Malfunction of direct planetary carrierD Malfunction of 2ND brake systemD Malfunction of OD clutch systemD Malfunction of DIR clutch systemD Malfunction of engine-A/T-ECU <6G7>D Malfunction of A/T-ECU. <4M4>D Noise is generated.
L Refer to the Transmission Workshop Manual.
Repair
NO
YES
YES
MUT-II Self-Diag CodeD Is code No. 22 output?
Code No. 22 Input shaft speed sensor system check(Refer to P.23-20.)
OK
NO
Code No. 23 Output shaft speed sensor system check(Refer to P.23-22.)
MUT-II Actuator TestD Is code No. 23 output?
NG
NGMUT-II Actuator TestD No.1 LR solenoid valveD No.2 UD solenoid valveD No.3 2ND solenoid valveD No.4 OD solenoid valveD No.5 RED solenoid valve
OK: The sound of operation should be heard.
Replace the appropriate solenoid valve. L
D Check the harness between the input shaft speed sensorand the engine-A/T-ECU. <6G7>
D Check the harness between the input shaft speed sensorand the A/T-ECU. <4M4>
Replace the input shaft speed sensor. L
NG
Check the trouble symptoms.
Overhaul the A/T. LD Replace the reverse clutch retainer.
Check the trouble symptoms.
Eliminate the cause of the noise.To the next page
Measure the output wave pattern of the input shaft speedsensor at engine-A/T-ECU connectors D-121 and D-122<6G7>, or at A/T-ECU connector D-108 <4M4> (using anoscilloscope).D Vehicle speed: approx. 50 km/hD Shift range: 4th
<6G7> Voltage between No.81 (D-121) and No.103 (D-122)<4M4> Voltage between No.31 (D-108) and No.43 (D-108)OK: A wave pattern such as the one shown on P.23-69(Check Procedure Using an Oscilloscope) should beoutput, and the maximum value should be 4.8 V or moreand the minimum value should be 0.8 V or less. Thereshould be no noise in the output wave pattern.
OKNG
NG
OK

AUTOMATIC TRANSMISSION - Troubleshooting <A/T> 23-41
NG
Replace the valve body assembly. L
Check the trouble symptoms.
Replace the engine-A/T-ECU or A/T-ECU.
Check the trouble symptoms.
Repair
OK
NG D Check the harness between the output shaft speed sensorand the engine-A/T-ECU. <6G7>
D Check the harness between the output shaft speed sensorand the A/T-ECU. <4M4>
Replace the output shaft speed sensor. L
OK
Check the trouble symptoms.
Overhaul the A/T. LD Replace the direct planetary carrier.
Check the trouble symptoms.
Eliminate the cause of the noise.
From the previous page
Measure the output wave pattern of the output shaft speedsensor at engine-A/T-ECU connectors D-121 and D-122<6G7>, or at A/T-ECU connector D-108 <4M4> (using anoscilloscope).D Vehicle speed: approx. 50 km/hD Shift range: 4th
<6G7> Voltage between No.81 (D-121) and No.104 (D-122)<4M4> Voltage between No.32 (D-108) and No.43 (D-108)OK: A wave pattern such as the one shown on P.23-69(Check Procedure Using an Oscilloscope) should beoutput, and the maximum value should be 4.8 V or moreand the minimum value should be 0.8 V or less. Thereshould be no noise in the output wave pattern.
OK
NG
Overhaul the A/T. LD Replace the OD clutch. (Code No. 43 or No. 44 is output,
or no other codes are output.)D Replace the 2ND brake. (Code No. 42 is output, or no
other codes are output.)D Replace the DIR clutch. (Code No. 44 is output, or no
other codes are output.)
NG
NGNG

AUTOMATIC TRANSMISSION - Troubleshooting <A/T>23-42
Code No. 46 Reverse without completion of shifting Probable causeIf the output shaft speed sensor output multiplied by the reverse gear ratio is notidentical to the input shaft speed sensor output after shifting to reverse, codeNo. 46 is output.If code No. 46 is output 4 times, the transmission is fixed in 3rd and the Nrange lamp flashes at a rate of 1 Hz.
D Malfunction of input shaft speed sensorD Malfunction of output shaft speed sensorD Malfunction of harness or connectorD Malfunction of solenoid valveD Malfunction of reverse clutch retainerD Malfunction of direct planetary carrierD Malfunction of LR brake systemD Malfunction of REV clutch systemD Malfunction of RED clutch systemD Malfunction of engine-A/T-ECU <6G7>D Malfunction of A/T-ECU <4M4>D Noise is generated.
L Refer to the Transmission Workshop Manual.
Repair
NO
YES
YES
MUT-II Self-Diag CodeD Is code No. 22 output?
Code No. 22 Input shaft speed sensor system check(Refer to P.23-20.)
OK
NO
Code No. 23 Output shaft speed sensor system check(Refer to P.23-22.)
MUT-II Actuator TestD Is code No. 23 output?
NG
NGMUT-II Actuator TestD No.1 LR solenoid valveD No.2 UD solenoid valveD No.3 2ND solenoid valveD No.4 OD solenoid valveD No.5 RED solenoid valve
OK: The sound of operation should be heard.
Replace the appropriate solenoid valve. L
D Check the harness between the input shaft speed sensorand the engine-A/T-ECU. <6G7>
D Check the harness between the input shaft speed sensorand the A/T-ECU. <4M4>
Replace the input shaft speed sensor. L
NG
Check the trouble symptoms.
Overhaul the A/T. LD Replace the reverse clutch retainer.
Check the trouble symptoms.
Eliminate the cause of the noise.To the next page
Measure the output wave pattern of the input shaft speedsensor at engine-A/T-ECU connectors D-121 and D-122<6G7>, or at A/T-ECU connector D-108 <4M4> (using anoscilloscope).D Vehicle speed: approx. 50 km/hD Shift range: 4th
<6G7> Voltage between No.81 (D-121) and No.103 (D-122)<4M4> Voltage between No.31 (D-108) and No.43 (D-108)OK: A wave pattern such as the one shown on P.23-69(Check Procedure Using an Oscilloscope) should beoutput, and the maximum value should be 4.8 V or moreand the minimum value should be 0.8 V or less. Thereshould be no noise in the output wave pattern.
OK
OK
NG
NG

AUTOMATIC TRANSMISSION - Troubleshooting <A/T> 23-43
NG
Replace the valve body assembly. L
Check the trouble symptoms.
Replace the engine-A/T-ECU or A/T-ECU.
Check the trouble symptoms.
Repair
OK
NG D Check the harness between the output shaft speed sensorand the engine-A/T-ECU. <6G7>
D Check the harness between the output shaft speed sensorand the A/T-ECU. <4M4>
Replace the output shaft speed sensor. L
OK
Check the trouble symptoms.
Overhaul the A/T. LD Replace the reverse clutch.
Check the trouble symptoms.
Eliminate the cause of the noise.
From the previous page
Measure the output wave pattern of the output shaft speedsensor at engine-A/T-ECU connectors D-121 and D-122<6G7>, or at A/T-ECU connector D-108 <4M4> (using anoscilloscope).D Vehicle speed: approx. 50 km/hD Shift range: 4th
<6G7> Voltage between No.81 (D-121) and No.104 (D-122)<4M4> Voltage between No.32 (D-108) and No.43 (D-108)OK: A wave pattern such as the one shown on P.23-69(Check Procedure Using an Oscilloscope) should beoutput, and the maximum value should be 4.8 V or moreand the minimum value should be 0.8 V or less. Thereshould be no noise in the output wave pattern.
OK
NG
Overhaul the A/T. LD Replace the LR brake. (Code No. 41 is output, or no other
codes are output.)D Replace the REV clutch. (No other codes are output.)
Replace the RED brake. (Code No. 41, 42 or No. 43 isoutput, or no other codes are output.)
NG
NGNG
Code No. 51 Communication problem with engine-ECU Probable causeIf normal communication cannot be carried out successfully for 1 second ormore when the ignition switch is at the ON position, the system voltage is 10 Vor higher and the engine speed is 450 r/min or higher, code No. 51 is output.Furthermore, code No. 51 is also output if a communication problem withreceiving data continues for 4 seconds or more under the same conditions.
D Malfunction of engine-A/T-ECU <6G7>D Malfunction of engine-ECU <4M4>D Malfunction of A/T-ECU <4M4>D Malfunction of harness or connector <4M4>
Check the following connectors: D-112, D-109NG
Repair
OKNG
Repair
OK
Check the trouble symptoms.NG
Replace the engine-ECU.Check the trouble symptoms.NG
<4M4>
<6G7>
Check the harness between the engine-ECU and theA/T-ECU.
Malfunction of A/T-ECU
Malfunction of engine-A/T-ECU

AUTOMATIC TRANSMISSION - Troubleshooting <A/T>23-44
Code No. 52 Damper clutch control system Probable causeIf the DCC solenoid valve drive duty ratio is 100% for a continuous period of 4seconds or more when the damper clutch starts operating, it is judged that thereis a problem with the damper clutch control system, and code No. 52 is output.
D Malfunction of input shaft speed sensorD Malfunction of DCC solenoid valveD Malfunction of harness or connectorD Malfunction of reverse clutch retainerD Malfunction of engine-A/T-ECU <6G7>D Malfunction of A/T-ECU <4M4>D Malfunction of torque converter
L Refer to the Transmission Workshop Manual.
MUT-II Self-Diag CodeIs code No. 22 output?
YESCode No. 22 Input shaft speedsensor system check (Refer toP.23-20.)
NO
NG
Check the trouble symptoms.NG
Check the trouble symptoms.
NG
Eliminate the cause of the noise.
OK
Replace the DCC solenoid valve. LNG
MUT-II Actuator TestD No. 6 DCC solenoid valve
OK: Sound of operation can beheard
Replace the input shaft speedsensor. L
NGRepair
OK
Measure the output wave pattern ofthe output shaft speed sensor atengine-A/T-ECU connectors D-121and D-122 <6G7>, or at A/T-ECUconnector D-108 <4M4> (using anoscilloscope).D Vehicle speed: approx. 50 km/hD Shift range: 4th
<6G7> Voltage between terminal81 of D-121 and terminal 103 ofD-122<4M4> Voltage between terminal31 of D-108 and terminal 43 ofD-108OK: A wave pattern such as the
one shown on P.23-69(Check Procedure Using anOscilloscope) should beoutput, and the maximumvalue should be 4.8 V ormore and the minimum val-ue should be 0.8 V or less.There should be no noisein the output wave pattern.
Overhaul the A/T. LD Replace the reverse clutch
retainer.
NG
Replace the valve body assembly. L
Check the trouble symptoms.
Replace the engine-A/T-ECU orA/T-ECU.
Replace the torque converter.NG
Check the trouble symptoms.
OK
D Check the harness between theinput shaft speed sensor and theengine-A/T-ECU. <6G7>
D Check the harness between theinput shaft speed sensor and theA/T-ECU. <4M4>
NG

AUTOMATIC TRANSMISSION - Troubleshooting <A/T> 23-45
Code No. 54 A/T control relay system Probable causeIf the A/T control relay voltage is less than 7 V after the ignition switch is turnedto the ON position, it is judged that there is a short-circuit to earth or opencircuit in the A/T control relay, and code No. 54 is output.The transmission will be fixed in 3rd as a fail-safe measure, and the N rangeindicator will flash at a rate of 1 Hz.
D Malfunction of A/T control relayD Malfunction of harness or connectorD Malfunction of engine-A/T-ECU <6G7>D Malfunction of A/T-ECU <4M4>
A/T control relay check(Refer to P.23-103.)
Replace
Transient malfunction(Refer to GROUP 00 - Points toNote for Transient Malfunctions.)
OK
NG
Check the following connectors:<6G7> D-120, <4M4> D-109
OK
OK
NG
Repair
OK
RepairCheck the following connector: <L.H.drive vehicles> A-04, <R.H. drivevehicles> D-145
NG
(1)NG
(2)NG
NG
Measure at engine-A/T-ECUconnector D-120 <6G7>, or atA/T-ECU connector D-109 <4M4>.D Measure at the ECU terminals.D <6G7> Voltage between terminal
50 and earthD <4M4> Voltage between terminal
71 and earthOK: System voltage
Replace the engine-A/T-ECU orA/T-ECU.
NGCheck the trouble symptoms.
OKMUT-II Service DataD No. 54 A/T control relay
OK: System voltage
(3)NG
OK
Measure at A/T control relayconnector D-12.D Disconnect the relay and
measure at the connector side.(1) Voltage between terminal 1 and
earthOK: System voltage
(2) Resistance between terminal 2and earthOK: 2 W or less
(3) Voltage between terminal 4 andearth(Ignition switch: ON)OK: System voltage
OK
Check the following connector: D-12 ReplaceNG
Check the harness between the A/Tcontrol relay and the battery.
NG
OK
RepairCheck the following connector: D-14
Check the harness between the A/Tcontrol relay and body earth.
Repair
OK
NG
NG
D Check the harness between theA/T control relay and theengine-A/T-ECU. <6G7>
D Check the harness between theA/T control relay and theA/T-ECU, and repair if necessary.<4M4>
D Check the harness between theA/T control relay and theengine-A/T-ECU. <6G7>
D Check the harness between theA/T control relay and theA/T-ECU. <4M4>
Measure at engine-A/T-ECUconnector D-121 <6G7>, or atA/T-ECU connector D-107 <4M4>.D Measure at the ECU terminals.D Ignition switch: OND <6G7> Voltage between terminals
77, 89 and earthD <4M4> Voltage between terminals
2, 3 and earthOK: System voltage OK
D Check the harness between theA/T control relay and the battery.
D Check the harness between theA/T control relay and theengine-A/T-ECU. <6G7>
D Check the harness between theA/T control relay and theA/T-ECU, and repair if necessary.<4M4>
NG
Check the following connectors:<6G7> D-121, <4M4> D-107
OK
NG
Repair

AUTOMATIC TRANSMISSION - Troubleshooting <A/T>23-46
Code No. 56 N range lamp system Probable causeIf the N range signal is OFF after the N range lamp illuminates (ON), it isjudged that there is a short-circuit to earth in the N range lamp, and code No.56 is output.
D Malfunction of Combination meterD Malfunction of harness or connectorD Malfunction of engine-A/T-ECU <6G7>D Malfunction of A/T-ECU <4M4>
OK
OK
NG
OK
NGRepairCheck the following connectors:
<6G7> D-122, E-11, <4M4> E-11,E-113, D-109
Check the harness between thecombination meter and earth, andrepair if necessary.
OK
OK
Measure at combination meterconnector D-01.D Disconnect the connector and
measure at the harness side.D Resistance between terminal 57
and earthOK: 2 W or less
NG NGRepairCheck the following connector: D-30
OK
Measure at combination meterconnector D-03.D Disconnect the connector and
measure at the harness side.D Resistance between terminal 3
and earthOK: No continuity
NGRepair
OK
NG
Replace the engine-A/T-ECU orA/T-ECU.
Check the trouble symptoms.
OK
Check the following connectors:<6G7> D-30, D-122, E-11, <4M4>D-30, E-11, D-109, E-113
NGRepair
NGReplace
NGRepair
N range indicator valve check(Refer to GROUP 52A - InstrumentPanel.)
Check the following connectors:D-01, D-03
D Check the harness between thecombination meter and theengine-A/T-ECU, and repair ifnecessary. <6G7>
D Check the harness between thecombination meter and theA/T-ECU, and repair if necessary.<4M4>
D Check the harness between thecombination meter and earth.
D Check the harness between thecombination meter and theengine-A/T-ECU. <6G7>
D Check the harness between thecombination meter and theA/T-ECU. <4M4>

AUTOMATIC TRANSMISSION - Troubleshooting <A/T> 23-47
CHART CLASSIFIED BY TROUBLE SYMPTOMSTrouble Symptom Inspection pro-
cedure No.Reference page
Communication with the MUT-II is not possible. 1 23-48
Driving not possible Starting not possible 2 23-49
Does not move forward 3 23-49
Does not reverse 4 23-50
Does not move (forward or reverse) 5 23-51
Malfunction when starting Engine stalls during shifting 6 23-51off N- to-D shocks, large time lag 7 23-52
N- to-R shocks, large time lag 8 23-53
N- to-D, N- to-R shocks, large time lag 9 23-54
Problem during shifting Shocks, engine racing 10 23-54
Incorrect shift points All points 11 23-55
Some points 12 23-56
No shifting No diagnosis code 13 23-56
Problem during driving Poor acceleration 14 23-57
Vibration 15 23-57
Inhibitor switch system 16 23-58
Shift switch assembly system 17 23-58
Dual pressure switch system 18 23-59
Vehicle speed sensor system 19 23-59
4LLc switch system 20 23-60

AUTOMATIC TRANSMISSION - Troubleshooting <A/T>23-48
INSPECTION PROCEDURES CLASSIFIED BY TROUBLE SYMPTOMInspection procedure 1
Communication with the MUT-II is not possible. Probable causeIf communication with the MUT-II is not possible, the cause is probably amalfunction of the diagnosis line or the A/T-ECU is not functioning.
D Malfunction of diagnosis lineD Malfunction of harness or connectorD Malfunction of engine-A/T-ECU <6G7>D Malfunction of A/T-ECU <4M4>
Is communication with other systems possibleusing the MUT-II?
NOCheck the MUT-II diagnosis line, and repair ifnecessary.
YES
Measure at engine-A/T-ECU connector D-120,D-121 <6G7>, or at A/T-ECU connectors D-107and D-109 <4M4>.D Disconnect the connector and measure at the
harness side.D Ignition switch: ON
<6G7> Voltage between terminals 41, 47 andearth<4M4> Voltage between terminals 11, 24 andearthOK System voltage<6G7> Continuity between terminals 76, 97,
88 and earth<4M4> Continuity between terminals 13, 25,
26, 12, 72 and earthOK Continuity
OKCheck the following connectors: <6G7> D-120,D-121, <4M4> D-107, D-109
NGRepair
OK
Check the trouble symptoms.
NG
Replace the engine-A/T-ECU or A/T-ECU.
NG
NGRepair
OK
Check the trouble symptoms.NG
D Check the harness between theengine-A/T-ECU and the ignition switch, andrepair if necessary. <6G7>
D Check the harness between the A/T-ECU andthe ignition switch, and repair if necessary.<4M4>
D Check the harness between theengine-A/T-ECU and earth, and repair ifnecessary. <6G7>
D Check the harness between the A/T-ECU andearth, and repair if necessary. <4M4>
Check the following connectors: <6G7> A-04,B-25X, D-128, D-120, D-121, D-14, <4M4> D-208,D-213, D-32, E-13, D-107, D-109, D-14

AUTOMATIC TRANSMISSION - Troubleshooting <A/T> 23-49
Inspection procedure 2
Starting not possible Probable causeIf the engine will not start when the selector lever is at the P or N position, thecause is probably a malfunction of the inhibitor switch system, the transmissioncontrol cable assembly, the engine system, the torque converter or the oil pump.
D Malfunction of inhibitor switch systemD Malfunction of transmission control cable assemblyD Malfunction of engine systemD Malfunction of torque converterD Malfunction of oil pumpD Malfunction of engine-A/T-ECU <6G7>D Malfunction of A/T-ECU <4M4>
L Refer to the Transmission Workshop Manual.
NG
Inspection Procedure 16: Inhibitor switch system check (Referto P.23-58.)
NGRepair or replace
OK
Torque converter checkD Check for incorrect installation (inserted at an angle, etc.)
or damaged splines.
NGIf repair is possible, repair the damaged part.If repair is not possible because the splines are damaged,replace the torque converter assembly.
OK
Replace the oil pump assembly. L(The oil pump cannot be disassembled.)
Engine system checkD Control system, ignition system, fuel system, vehicle body
NGRepair
OK
Transmission control cable assembly checkNG
Repair
OK
Check the trouble symptoms. Replace the engine-A/T-ECU or A/T-ECU.
Inspection procedure 3
Does not move forward Probable causeIf the vehicle does not move forward when the engine is idling and the selectorlever is moved from N to D, 3, 2 or L, or if it is shifted to 1st or 2nd in Sportsmode, the cause is probably a problem with line pressure, or a malfunction ofthe UD clutch or valve body.
D Abnormal line pressureD Malfunction of UD solenoid valveD Malfunction of UD clutch systemD Malfunction of valve bodyD Malfunction of engine-A/T-ECU <6G7>D Malfunction of A/T-ECU <4M4>
L Refer to the Transmission Workshop Manual.
MUT-II Actuator TestD No.2 UD solenoid valve
OK: Sound of operation can be heard
NGReplace the solenoid valve. L
OK
Fluid pressure test (Refer to P.23-106.)D Measure the fluid pressure at each element in 1st in
Sports modeStandard value: Refer to P.23-106.
NG Disassemble, clean and re-assemble the valve body. LD Make sure that the mounting bolts are not loose and that
the O-ring and valve body are not damaged or positionedincorrectly.
D If the extent of the damage looks too bad for repairs to becarried out, replace the valve body assembly.OK
UD clutch system checkD Remove the transmission assembly, the valve body cover
and the valve body.D Blow air through the UD clutch oil hole in the transmission
case, and check that the piston operates to maintainpressure.
UD clutch check LD Check for a problem such as burnt facing, poor piston
sealing or interference with the retainer.
OK
Check the trouble symptoms.
NG
Replace the engine-A/T-ECU or A/T-ECU.
NG
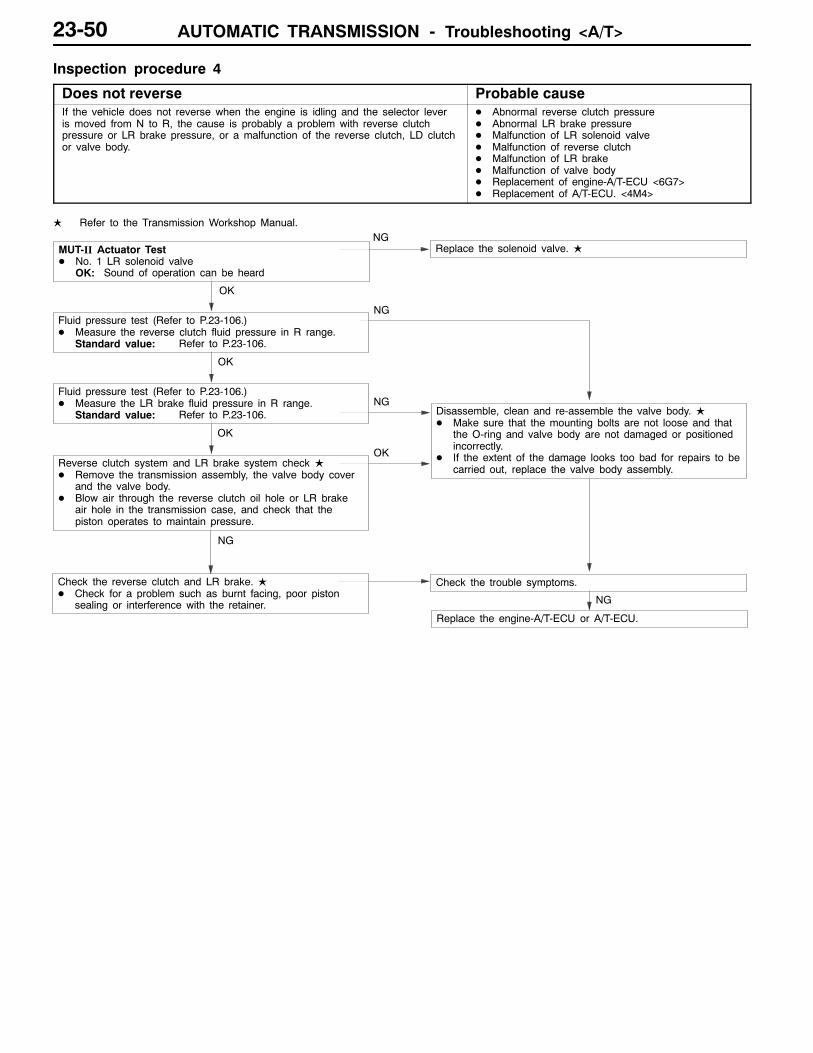
AUTOMATIC TRANSMISSION - Troubleshooting <A/T>23-50
Inspection procedure 4
Does not reverse Probable causeIf the vehicle does not reverse when the engine is idling and the selector leveris moved from N to R, the cause is probably a problem with reverse clutchpressure or LR brake pressure, or a malfunction of the reverse clutch, LD clutchor valve body.
D Abnormal reverse clutch pressureD Abnormal LR brake pressureD Malfunction of LR solenoid valveD Malfunction of reverse clutchD Malfunction of LR brakeD Malfunction of valve bodyD Replacement of engine-A/T-ECU <6G7>D Replacement of A/T-ECU. <4M4>
L Refer to the Transmission Workshop Manual.NG
Replace the solenoid valve. L
OK
NG
OK
NGDisassemble, clean and re-assemble the valve body. LD Make sure that the mounting bolts are not loose and that
the O-ring and valve body are not damaged or positionedincorrectly.
D If the extent of the damage looks too bad for repairs to becarried out, replace the valve body assembly.
OK
Reverse clutch system and LR brake system check LD Remove the transmission assembly, the valve body cover
and the valve body.D Blow air through the reverse clutch oil hole or LR brake
air hole in the transmission case, and check that thepiston operates to maintain pressure.
OK
Check the reverse clutch and LR brake. LD Check for a problem such as burnt facing, poor piston
sealing or interference with the retainer.
NG
Check the trouble symptoms.
Replace the engine-A/T-ECU or A/T-ECU.
NG
MUT-II Actuator TestD No. 1 LR solenoid valve
OK: Sound of operation can be heard
Fluid pressure test (Refer to P.23-106.)D Measure the reverse clutch fluid pressure in R range.
Standard value: Refer to P.23-106.
Fluid pressure test (Refer to P.23-106.)D Measure the LR brake fluid pressure in R range.
Standard value: Refer to P.23-106.

AUTOMATIC TRANSMISSION - Troubleshooting <A/T>AUTOMATIC TRANSMISSION - Troubleshooting <A/T> 23-51
Inspection procedure 5
Does not move (forward or reverse) Probable causeIf the vehicle does not move forward or reverse when the selector lever ismoved to any position while the engine is idling, the cause is probably aproblem with line pressure or a malfunction of the oil pumps and valve bodies inthe power train.
D Abnormal line pressureD Malfunction of power train componentsD Malfunction of oil pumpD Malfunction of valve bodyD Malfunction of engine-A/T-ECU <6G7>D Malfunction of A/T-ECU <4M4>
L Refer to the Transmission Workshop Manual.
Fluid pressure test (Refer to P.23-106.)D Measure the fluid pressure at each element in 1st, 2nd
and reverse.Standard value: Refer to P.23-106.
OKCheck the power train components LD Disassemble the transmission and check the condition of
components such as the planetary carrier, output shaft anddifferential.
NG
Replace the oil pump assembly. L(The oil pump cannot be disassembled.)
Disassemble, clean and re-assemble the valve body. LD Make sure that the mounting bolts are not loose and that
the O-ring and valve body are not damaged or positionedincorrectly.
D If the extent of the damage looks too bad for repairs to becarried out, replace the valve body assembly.
NG
NG
Check the trouble symptoms.
Replace the engine-A/T-ECU or A/T-ECU.
Inspection procedure 6
Engine stalls during shifting Probable causeIf the engine stalls when the selector lever is moved from N to D or R while theengine is idling, the cause is probably a malfunction of the engine system, DCCsolenoid valve, valve body, or torque converter (damper clutch).
D Malfunction of engine systemD Malfunction of DCC solenoid valveD Malfunction of valve bodyD Malfunction of torque converter (malfunction of
damper clutch)D Malfunction of engine-A/T-ECU <6G7>D Malfunction of A/T-ECU <4M4>
L Refer to the Transmission Workshop Manual.
Engine system checkD Control system, ignition system, fuel system, vehicle body
NGRepair or replace
OK
Replace the DCC solenoid valve. L
Disassemble, clean and re-assemble the valve body. LD Make sure that the mounting bolts are not loose and that
the O-ring and valve body are not damaged or positionedincorrectly.
D If the extent of the damage looks too bad for repairs to becarried out, replace the valve body assembly.
NGReplace the torque converter assembly.
Check the trouble symptoms.
Replace the engine-A/T-ECU or A/T-ECU.
NG

AUTOMATIC TRANSMISSION - Troubleshooting <A/T>23-52
Inspection procedure 7
N-to-D shocks, large time lag Probable causeIf abnormal shocks or a time lag of 2 seconds or more occurs when theselector lever is moved from N to D while the engine is idling, the cause isprobably abnormal UD clutch pressure, or a malfunction of the UD clutch, valvebody or APS.
D Abnormal UD clutch pressureD Malfunction of UD solenoid valveD Malfunction of UD clutch systemD Malfunction of valve bodyD Malfunction of APSD Malfunction of engine-A/T-ECU <6G7>D Malfunction of A/T-ECU <4M4>
L Refer to the Transmission Workshop Manual.
NO
MUT-II Actuator TestD No.2 UD solenoid valve
OK: Sound of operation can be heard
NGReplace the solenoid valve. L
OK
When starting offShocks are sometimes generated.
NG
UD clutch check LD Check for a problem such as burnt facing, poor piston
sealing or interference with the retainer.
NG
Code No. 11, 12, 14 APS system check (Refer to P.23-13, 14and 15.)
Disassemble, clean and re-assemble the valve body. LD Make sure that the mounting bolts are not loose and that
the O-ring and valve body are not damaged or positionedincorrectly.
D If the extent of the damage looks too bad for repairs to becarried out, replace the valve body assembly.
OK
During shifting
Fluid pressure test (Refer to P.23-106.)D Measure the UD clutch fluid pressure when shifting from N
to D.Standard value: Refer to P.23-106.
MUT-II Data ListD No.11 APS
OK: Increases in proportion to the accelerator pedal open-ing angle.
YES
OK
OK
UD clutch system check LD Remove the transmission assembly, the valve body cover
and the valve body.D Blow air through the UD clutch oil hole in the transmission
case, and check that the piston operates to maintainpressure.
NG
Check the trouble symptoms.
Replace the engine-A/T-ECU or A/T-ECU.
NG
When are shocks generated?

AUTOMATIC TRANSMISSION - Troubleshooting <A/T> 23-53
Inspection procedure 8
N to R shocks, large time lag Probable causeIf abnormal shocks or a time lag of 2 seconds or more occurs when theselector lever is moved from N to R while the engine is idling, the cause isprobably abnormal reverse clutch pressure or LD brake pressure, or amalfunction of the reverse clutch, LR brake, valve body or APS.
D Abnormal reverse clutch pressureD Abnormal LR brake pressureD Malfunction of LR solenoid valveD Malfunction of reverse clutchD Malfunction of LR brakeD Malfunction of valve bodyD Malfunction of APSD Malfunction of engine-A/T-ECU <6G7>D Malfunction of A/T-ECU <4M4>
L Refer to the Transmission Workshop Manual.NG
Replace the solenoid valve. L
NG
Check the reverse clutch and LR brake. LD Check for a problem such as burnt facing, poor piston
sealing or interference with the retainer.
OK
Reverse clutch system and LR brake system check LD Remove the transmission assembly, the valve body cover
and the valve body.D Blow air through the reverse clutch oil hole or LR brake
air hole in the transmission case, and check that thepiston operates to maintain pressure.
NG
Code No. 11, 12, 14 APS system check (Refer to P.23-13, 14and 15.)
Disassemble, clean and re-assemble the valve body. LD Make sure that the mounting bolts are not loose and that
the O-ring and valve body are not damaged or positionedincorrectly.
D If the extent of the damage looks too bad for repairs to becarried out, replace the valve body assembly.
OK
NG
OK
Fluid pressure test (Refer to P.23-106.)D Measure the LR brake fluid pressure in R range.
Standard value: Refer to P.23-106.
NO
NG
During shifting
Fluid pressure test (Refer to P.23-106.)D Measure the reverse clutch fluid pressure in R range.
Standard value: Refer to P.23-106.
MUT-II Data ListD No.11 APS
OK: Increases in proportion to the accelerator pedal open-ing angle.
YES
OK
OK
When are shocks generated?When starting off
Shocks are sometimes generated.
Check the trouble symptoms.
Replace the engine-A/T-ECU or A/T-ECU.
NG
MUT-II Actuator TestD No. 1 LR solenoid valve
OK: Sound of operation can be heard

AUTOMATIC TRANSMISSION - Troubleshooting <A/T>23-54
Inspection procedure 9
N-to-D and N-to-R shocks, large time lag Probable causeIf abnormal shocks or a time lag of 2 seconds or more occurs when theselector lever is moved from N to both D and R while the engine is idling, thecause is probably abnormal line pressure, or a malfunction of the oil pump orvalve body.
D Abnormal line pressureD Malfunction of oil pumpD Malfunction of valve bodyD Malfunction of engine-A/T-ECU <6G7>D Malfunction of A/T-ECU <4M4>
L Refer to the Transmission Workshop Manual.
OK
When are shocks generated?
During shifting
Replace the oil pump assembly. L(The oil pump cannot be disassembled.)
When starting off
Disassemble, clean and re-assemble the valve body. LD Make sure that the mounting bolts are not loose and that
the O-ring and valve body are not damaged or positionedincorrectly.
D If the extent of the damage looks too bad for repairs to becarried out, replace the valve body assembly.
NGFluid pressure test (Refer to P.23-106.)D Measure the fluid pressure at each element in 1st, 2nd
and reverse.Standard value: Refer to P.23-106.
NGAdjust the line pressure. (Refer to P.23-111.)
Check the trouble symptoms.
Replace the engine-A/T-ECU or A/T-ECU.
NG
Inspection procedure 10
Shocks, engine racing Probable causeIf shocks occur when driving due to upshifting or downshifting, or thetransmission speed becomes higher than the engine speed, the cause isprobably abnormal line pressure or a malfunction of a solenoid valve, oil pump,valve body or of a brake or clutch.
D Abnormal line pressureD Malfunction of solenoid valveD Malfunction of oil pumpD Malfunction of valve bodyD Malfunction of brake or clutchD Malfunction of engine-A/T-ECU <6G7>D Malfunction of A/T-ECU <4M4>
L Refer to the Transmission Workshop Manual.
MUT-II Actuator TestD No.1 LR solenoid valveD No.2 UD solenoid valveD No.3 2ND solenoid valveD No.4 OD solenoid valveD No.5 RED solenoid valve
OK: Sound of operation can be heard
NGReplace the solenoid valve. L
OK
Adjust the line pressure. (Refer to P.23-111.)NG
Replace the oil pump assembly. L(The oil pump cannot be disassembled.)
OK
Brake and clutch check LD Check for a problem such as burnt facing, poor piston
sealing or interference with the retainer.
NG
Disassemble, clean and re-assemble the valve body. LD Make sure that the mounting bolts are not loose and that
the O-ring and valve body are not damaged or positionedincorrectly.
D If the extent of the damage looks too bad for repairs to becarried out, replace the valve body assembly.
Replace the engine-A/T-ECU or A/T-ECU.
Check the trouble symptoms.
NG

AUTOMATIC TRANSMISSION - Troubleshooting <A/T> 23-55
Inspection procedure 11
All points (incorrect shift points) Probable causeIf all shift points are incorrect during driving, the cause is probably a malfunctionof the output speed sensor, APS or solenoid valve.
D Malfunction of output shaft speed sensorD Malfunction of APSD Malfunction of solenoid valveD Abnormal line pressureD Malfunction of valve bodyD Malfunction of engine-A/T-ECU <6G7>D Malfunction of A/T-ECU <4M4>
L Refer to the Transmission Workshop Manual.NG
Code No. 23 Output shaft speed sensor system (Refer toP.23-22.)
OKNG
Code No. 11, 12, 14 APS system check (Refer to P.23-13, 14and 15.)
OK
MUT-II Data ListD No. 31 RED solenoid valve duty ratioD No. 32 UD solenoid valve duty ratioD No. 33 2ND solenoid valve duty ratioD No. 34 OD solenoid valve duty ratioD No. 35 RED solenoid valve duty ratio
OK:No.31 No.32 No.33 No.34 No.35
Driving at aconstant speed in 1st0% 0% 100% 100% 0%
Driving at a constant speed in 2nd100% 0% 0% 100% 0%
Driving at a constant speed in 3rd100% 0% 100% 0% 0%
Driving at a constant speed in 4th0% 0% 100% 0% 100%
Driving at a constant speed in 5th0% 100% 0% 0% 100%
NGReplace the solenoid valve. L
NG
Check the trouble symptoms.
OK
Adjust the line pressure. (Refer to P.23-111.)
NG
Disassemble, clean and re-assemble the valve body. LD Make sure that the mounting bolts are not loose and that
the O-ring and valve body are not damaged or positionedincorrectly.
D If the extent of the damage looks too bad for repairs to becarried out, replace the valve body assembly.
Replace the engine-A/T-ECU or A/T-ECU.
MUT-II Data ListD No. 23 Output shaft speed sensor system
OK: Increases in proportion to vehicle speed.
MUT-II Data ListD No.11 APS
OK: Increases in proportion to the accelerator pedal open-ing angle.

AUTOMATIC TRANSMISSION - Troubleshooting <A/T>23-56
Inspection procedure 12
Some points (incorrect shift points) Probable causeIf some of the shift points are incorrect while driving, the cause is probably amalfunction of the valve body, or it is a characteristic of control and is not amalfunction.
D Malfunction of valve bodyD Malfunction of engine-A/T-ECU <6G7>D Malfunction of A/T-ECU <4M4>
L Refer to the Transmission Workshop Manual.INVECS-II cancel commandD Cancels INVECS-II using MUT-II.
YES
Problem is a characteristic of controland is not a malfunction.
YES
Is standard shifting normal?NO
Does the problem occur when theATF temperature is less than 35°Cor higher than 120°C?
NODisassemble, clean and re-assemblethe valve body. LD Make sure that the mounting
bolts are not loose and that theO-ring and valve body are notdamaged or positioned incorrectly.
D If the extent of the damage lookstoo bad for repairs to be carriedout, replace the valve bodyassembly.
Check the trouble symptoms.
Replace the engine-A/T-ECU orA/T-ECU.
NG
Inspection procedure 13
No diagnosis code (no shifting) Probable causeNo shifting during drivingHowever, if a diagnosis code is not output, the cause is probably malfunction ofthe inhibitor switch system, the shift switch assembly, the engine A/T-ECU orthe A/T-ECU.
D Malfunction of Inhibitor switchD Malfunction of shift switch assembly systemD Malfunction of engine-A/T-ECU <6G7>D Malfunction of A/T-ECU <4M4>
Does the transmission stay at 3rd inD range?
NOMUT-II Data ListD No. 61 Inhibitor switch
OK: The ECU input signal andthe selector lever positionshould correspond.
NGInspection Procedure 16: Inhibitorswitch system check (Refer toP.23-58.)
YES
OK
NGInspection Procedure 17: Shift switchassembly system check (Refer toP.23-58.)
NO
Power supply circuit checkD Check for an open circuit in the
harness, a poor connectorconnection or a blown fuse wire.
D If there is a blown fuse, checkfor whatever caused the blownfuse and replace the problempart.
YES
Replace the engine-A/T-ECU orA/T-ECU.
MUT-II Data ListD No.67 Select switchD No.68 Shift switch (UP)D No.69 Shift switch (DOWN)
OK: The ECU input signal andthe selector lever positionshould correspond.
Check the trouble symptoms.
OK
NG
YES
Is power being supplied to theA/T-ECU or to theengine-A/T-ECU?
NO
Is the backup power supply beingsupplied to the A/T-ECU or to theengine-A/T-ECU?

AUTOMATIC TRANSMISSION - Troubleshooting <A/T> 23-57
Inspection procedure 14
Poor acceleration Probable causeIf the vehicle does not accelerate after downshifting, the cause is probably amalfunction of the engine system or of a brake or clutch.
D Malfunction of engine systemD Malfunction of brake or clutchD Malfunction of engine-A/T-ECU <6G7>D Malfunction of A/T-ECU <4M4>
L Refer to the Transmission Workshop Manual.
Engine system checkD Control system, ignition system, fuel system, vehicle body
NGRepair or replace
OK
Brake and clutch check LD Check for a problem such as burnt facing, poor piston
sealing or interference with the retainer.
Check the trouble symptoms.
Replace the engine-A/T-ECU or A/T-ECU.
NG
Inspection procedure 15
Vibration Probable causeIf vibration occurs when accelerating or decelerating while driving at a constantspeed or driving in top range, the cause is probably abnormal damper clutchpressure, or a malfunction of the engine system, DCC solenoid valve, torqueconverter or valve body.
D Abnormal damper clutch pressureD Malfunction of engine systemD Malfunction of DCC solenoid valveD Malfunction of torque converterD Malfunction of valve bodyD Malfunction of engine-A/T-ECU <6G7>D Malfunction of A/T-ECU <4M4>
L Refer to the Transmission Workshop Manual.NG
Replace the DCC solenoid valve. L
OK
Does the problem still occur when the engine coolanttemperature sensor is disconnected?
YESEngine system checkD Control system, ignition system, fuel system, vehicle body
NO
Fluid pressure test (Refer to P.23-106.)D Measure the damper clutch fluid pressure.
Standard value: Refer to P.23-106.
NG Disassemble, clean and re-assemble the valve body. LD Make sure that the mounting bolts are not loose and that
the O-ring and valve body are not damaged or positionedincorrectly.
D If the extent of the damage looks too bad for repairs to becarried out, replace the valve body assembly.
OK
Replace the torque converter assembly. Check the trouble symptoms.
Replace the engine-A/T-ECU or A/T-ECU.
OK
MUT-II Actuator TestD No. 6 DCC solenoid valve
OK: Sound of operation can be heard

AUTOMATIC TRANSMISSION - Troubleshooting <A/T>AUTOMATIC TRANSMISSION - Troubleshooting <A/T>23-58
Inspection procedure 16
Inhibitor switch system Probable causeThe cause is probably a malfunction of the inhibitor switch circuit or the ignitionswitch circuit.
D Malfunction of Inhibitor switchD Malfunction of ignition switchD Malfunction of harness or connectorD Malfunction of engine-A/T-ECU <6G7>D Malfunction of A/T-ECU <4M4>
Inhibitor switch check (Refer to P.23-98.)NG
OK
Inhibitor switch connector C-05 voltage checkD Disconnect the connector and measure at the
harness side.D Voltage between terminal 7 and earth
(Ignition switch: ON)OK: System voltage
OK
Check the following connectors: D-208, D-213,D-32, E-115, C-05
NGRepair
OK
Check the harness between the inhibitor switchand the ignition switch.
OK
Check the trouble symptoms.
NG
NG
Repair
Check the trouble symptoms.
Replace
NGRepair
Ignition switch check
NG
Repair
D Check the harness between the inhibitorswitch and the engine-A/T-ECU. <6G7>
D Check the harness between the inhibitorswitch and the A/T-ECU. <4M4>
OK
Replace the engine-A/T-ECU or A/T-ECU.NG
NG
OK
Check the following connectors: <6G7> C-05,E-113, D-128, D-122, <4M4> C-05, E-115, D-128,B-109
Inspection procedure 17
Shift switch assembly system Probable causeThe cause is probably a malfunction of the inhibitor switch circuit, shift switchassembly circuit, or of the engine-A/T-ECU or A/T-ECU.
D Malfunction of inhibitor switchD Malfunction of select switchD Malfunction of shift switch (UP)D Malfunction of shift switch (DOWN)D Malfunction of harness or connectorD Malfunction of engine-A/T-ECU <6G7>D Malfunction of A/T-ECU <4M4>
Inhibitor switch check (Refer to P.23-98.)NG
Inhibitor switch checkD Inspection Procedure 16: Inhibitor switch system check
(Refer to P.23-58.)OK
Shift switch assembly check (Refer to P.23-117.)NG
Replace
OK
D Check the harness between the shift switch assembly andthe engine-A/T-ECU. <6G7>
D Check the harness between the shift switch assembly andthe A/T-ECU. <4M4>
NGRepair
OK
Check the trouble symptoms.NG
Replace the engine-A/T-ECU or A/T-ECU.
OK
Check the following connectors: <6G7> E-117, E-113,D-122, <4M4> E-117, E-113, D-109
NGRepair

AUTOMATIC TRANSMISSION - Troubleshooting <A/T> 23-59
Inspection procedure 18
Dual pressure switch system Probable causeThe cause is probably a malfunction of the dual pressure switch circuit, or of theengine-A/T-ECU or A/T-ECU.
D Malfunction of dual pressure switchD Malfunction of harness or connectorD Malfunction of A/C systemD Malfunction of engine-A/T-ECU <6G7>D Malfunction of A/T-ECU <4M4>
Dual pressure switch check(Refer to GROUP 55 � On-Vehicle Service.)
NG
Measure at engine-A/T-ECU connector D-121<6G7> or at A/T-ECU connector D-107 <4M4>.D Disconnect the connector and measure at the
harness side.D Ignition switch: OND A/C switch: OND <6G7> Voltage between terminal 83 and earth
<4M4> Voltage between terminal 10 andearthOK: System voltage
OK
Check the following connectors: <6G7> D-121,A-04, <4M4> D-107, A-04
NGRepair
OK
Check the trouble symptoms.
Replace
A/C system check (Refer to GROUP 55 -Troubleshooting.)
NG
Replace the engine-A/T-ECU or A/T-ECU.
NG
Inspection procedure 19
Vehicle speed sensor system Probable causeThe cause is probably a malfunction of the vehicle speed sensor circuit, or ofthe A/T-ECU or the engine-A/T-ECU.
D Malfunction of vehicle speed sensorD Malfunction of connectorD Malfunction of engine-A/T-ECU <6G7>D Malfunction of A/T-ECU <4M4>
MUT-II Data ListD No.29 Vehicle speed sensor
OK: Refer to P.23-61 (Data List Chart).
NOSpeedometer check(Refer to GROUP 54A - Combination Meter.)
OK
OK
NG
NG
YES
Is the speedometer correct?
OKTransient malfunction (Refer to GROUP 00 - Points to Notefor Transient Malfunctions.)
Check the trouble symptoms.
Replace the engine-A/T-ECU or A/T-ECU.
NG
Check the following connectors: <6G7> C-09, E-113, E-13,D-121 <4M4> C-09, E-113, E-13, D-109
D Check the harness between the engine-A/T-ECU and thevehicle speed sensor. <6G7>
D Check the harness between the A/T-ECU and the vehiclespeed sensor. <4M4>
Repair
NGRepair

AUTOMATIC TRANSMISSION - Troubleshooting <A/T>23-60
Inspection procedure 20
4LLc switch system Probable causeThe cause is probably a malfunction of the 4LLc switch circuit, or of theengine-A/T-ECU or A/T-ECU.
D Malfunction of 4LLc switchD Malfunction of harness or connectorD Malfunction of engine-A/T-ECU <6G7>D Malfunction of A/T-ECU <4M4>
4LLc switch check (Refer to P.23-99.)NG
4LLc switch connector C-06 voltage checkD Disconnect the connector and measure at the
harness side.D Ignition switch: OND Voltage between terminal 1 and earth
OKF System voltage
Check the following connectors: <6G7> C-06,E-113, D-122, <4M4> C-06, E-113, D-107
NGRepair
OK
Check the trouble symptoms.
Replace
OK
Replace the engine-A/T-ECU or A/T-ECU.
NG
D Check the harness between 4LLc switch andthe engine-A/T-ECU, and repair if necessary.<6G7>
D Check the harness between 4LLc switch andthe A/T-ECU, and repair if necessary. <4M4>
Check the following connector: C-06
NG
Repair
OKNG
OK

AUTOMATIC TRANSMISSION - Troubleshooting <A/T> 23-61
DATA LIST REFERENCE TABLEDatalist No.
Check item Inspection conditions Normal condition
11 APS Ignition switch: ONEngine: Stopped
Accelerator pedal:Fully closed
985 - 1085 mVEngine: StoppedSelector lever posi-tion: P
Accelerator pedal:Depressed
Gradually increases from the abovevalue.
Accelerator pedal:Fully open
4000 mV or higher
15 A/T fluid tempera-ture sensor
Driving after en-gine has warmedup
Drive for 15 minutesor more until the ATFtemperature reaches70 - 80°C.
Gradually increases to 70 - 80°C.
21 Crank angle sen-sor <6G7>
Engine: IdlingSelector lever posi-
Compare the enginespeeds displayed on
Identicalsor <6G7>Engine speed sen-sor <4M4>
Selector lever posi-tion: P
speeds displayed onthe tachometer andthe MUT-II.
22 Input shaft speedsensor
Shift range: 4th Driving at a constantspeed of 50 km/h in4th
1300 - 1600 r/min
23 Output shaft speedsensor
Shift range: 4th Driving at a constantspeed of 50 km/h in4th
1300 - 1600 r/min
25 Wide open throttle Accelerator pedal Released OFFswitch position Depressed ON
26 Stop lamp switch Ignition switch: ONEngine: Stopped
Brake pedal: De-pressed
ONEngine: Stopped
Brake pedal: Re-leased
OFF
29 Vehicle speed sen-sor
Selector lever posi-tion: Sports mode
Idling in 1st(Vehicle stopped)
0 km/h
Driving at a constantspeed of 50 km/h in3rd
50 km/h
31 LR solenoid valveduty ratio
Selector lever posi-tion: Sports mode
Data List No. No. 31 No. 32 No. 33 No. 34 No.35
32 UD solenoid valveduty ratio
Driving at a constantspeed in 1st
0% 0% 100% 100% 0%
33 2nd solenoid valveduty ratio
Driving at a constantspeed in 2nd
100% 0% 0% 100% 0%
34 OD solenoid valveduty ratio
Driving at a constantspeed in 3rd
100% 0% 100% 0% 0%
35 RED solenoidvalve duty ratio
Driving at a constantspeed in 4th
0% 0% 100% 0% 100%
Driving at a constantspeed in 5th
100% 100% 0% 0% 100%

AUTOMATIC TRANSMISSION - Troubleshooting <A/T>23-62
Datalist No.
Normal conditionInspection conditionsCheck item
36 DCC solenoidvalve duty ratio
Shift range: 2nd Driving at 30 km/h in2 range, then fullyclose accelerator.
70% - 90% -to- 0%
Driving at 50 km/h in4th
70% - 90%
52 Damper clutch slipamount
Shift range: 2nd Driving at 30 km/h in2 range, then fullyclose accelerator.
-300 - 100 r/min or 100 - 300 r/min
Driving at a constantspeed of 50 km/h in4th
-10 - 10 r/min
54 Control relay out-put voltage
Ignition switch:OFF
Ignition switch: ON 10 - 12 V
61 Inhibitor switch Ignition switch: ONEngine: Stopped
Selector lever posi-tion: P
PEngine: Stopped
Selector lever posi-tion: R
R
Selector lever posi-tion: N
N
Selector lever posi-tion: D
D
63 Shift position Selector lever posi-tion:Sports mode
Driving at a constantspeed of 10 km/h in1st
1st
Driving at a constantspeed of 30 km/h in2nd
2nd
Driving at a constantspeed of 50 km/h in3rd
3rd
Driving at a constantspeed of 50 km/h in4th
4th
Driving at a constantspeed of 70 km/h in5th
5th
65 Dual pressure Engine: Idling A/C switch: ON ONswitch A/C switch: OFF OFF
66 OD-OFF signal<Vehicles with
While auto-cruisecontrol is operating
While driving on alevel road
OFF
auto-cruise controlsystem> While climbing an
inclineON

AUTOMATIC TRANSMISSION - Troubleshooting <A/T> 23-63
Datalist No.
Normal conditionInspection conditionsCheck item
67 Select switch Ignition switch: ONEngine: Stopped
(Data List No. ) No.67
No.68
No. 69Engine: Stopped
Selector lever posi-tion: D
OFF OFF OFF
68 Upshift switch Selector lever opera-tion: Sports modeselected
ON OFF OFF
69 Downshift switch Selector lever opera-tion: Lever moved toupshift position andheld
ON ON OFF
Selector lever opera-tion: Lever moved todownshift positionand held
ON OFF ON
73 Target effective en-gine pressure<6G7>
Engine: IdlingSelector lever posi-tion: N
Accelerator pedal:fully closed to de-pressed
Data changes.
75 4LLc switch Ignition switch: ONEngine: Stopped
Transfer lever posi-tion: 4LLc
ON
Transfer lever posi-tion:Other than the above
OFF
76 Theoretical effec-tive engine pres-sure<4M4>
Engine: IdlingSelector lever posi-tion: N
Accelerator pedal:fully closed to de-pressed
Data changes.
ACTUATOR TEST TABLEItem No. Check item Test contents Inspection conditions Normal condition
1 LR solenoid valve The solenoid valve Ignition switch: ON The sound of opera-
2 UD solenoid valve specified by the MUT- Selector lever posi- tion should be heard
3 2nd solenoid valveII is driven at 50%duty for 5 seconds.No
tion: PEngine: Stopped
when the solenoidvalve is driven.
4 OD solenoid valve other solenoid valvesEngine: StoppedThrottle (accelerator)
5 RED solenoid valveare energised.
Opening angle volt-
6 DCC solenoid valveage: Less than 1 V<6G7>,
7 1st shift indicator lamp The indicator lamp for<6G7>,less than1.2V<4M4> The shift indicator
8 2nd shift indicator lamp the shift stage speci- The fail-safe functionshould not be operat-
lamp illuminates.
9 3rd shift indicator lampfied by the MUT-IIilluminates for 3 sec-
should not be operat-ing.
10 4th shift indicator lamp onds.
11 5th shift indicator lamp
12 A/T control relay The A/T control relayturns off for 3 sec-onds.
Data List No. 54(1) During test: 0 V(2) Normal: System voltage
(V)

AUTOMATIC TRANSMISSION - Troubleshooting <A/T>AUTOMATIC TRANSMISSION - Troubleshooting <A/T>23-64
INVECS-II CANCEL COMMANDItem No. Item Contents NOTE
14 INVECS-II Stops the INVECS-II control and changesgear according to the standard shift pattern.
Use this procedure when carry-ing out road test procedure 7.This function cancels the stop-ping of INVECS-II control whenthe ignition switch is turned OFFand then back ON.
A/T-ECU TERMINAL VOLTAGE TABLE<6G7>
Ter-minalNo.
Check item Inspection conditions Standard value
50 A/T control relay Ignition switch: OFF 0 V
Ignition switch: ON 10 - 12 V76 Earth At all times 0 V
77 Solenoid valve power supply Ignition switch: OFF 0 V
Ignition switch: ON System voltage81 Sensor earth At all times 0 V
88 Earth At all times 0 V
89 Solenoid valve power supply Ignition switch: OFF 0 V
Ignition switch: ON System voltage97 Earth At all times 0 V
101 Inhibitor switch P Ignition switch: ONSelector lever position: P
System voltage
Ignition switch: ONSelector lever position: Other than the above
0 V
102 Inhibitor switch D Ignition switch: ONSelector lever: D
System voltage
Ignition switch: ONSelector lever position: Other than the above
0 V
103 Input shaft speed sensor Measure between terminals (57) and (103) using anoscilloscope.Engine: 2 000 r/minShift range: 4th
Check ProcedureUsing an Oscillo-scope (Refer toP.23-69.)
104 Output shaft speed sensor Measure between terminals (57) and (104) using anoscilloscope.Engine: 2 000 r/minShift range: 4th
Check ProcedureUsing an Oscillo-scope (Refer toP.23-69.)
105 1st shift indicator lamp Shift range: 1st System voltage
Shift range: Other than the above 0 V

AUTOMATIC TRANSMISSION - Troubleshooting <A/T>AUTOMATIC TRANSMISSION - Troubleshooting <A/T> 23-65
Ter-minalNo.
Standard valueInspection conditionsCheck item
106 2nd solenoid valve Engine: IdlingShift range: 2nd
System voltage
Engine: IdlingShift range: Park
7�9 V
107 DCC solenoid valve Engine: IdlingShift range: 1st
System voltage
108 Inhibitor switch R Engine: IdlingSelector lever position: R
System voltage
Engine: IdlingShift range: Other than the above
0 V
109 Select switch Ignition switch: ONSelector lever operation: Sports mode
System voltage
Ignition switch: ONSelector lever operation: Other than the above
0 V
110 Downshift switch Ignition switch: ONSelector lever operation: Downshifted in Sports modeand lever held
System voltage
Ignition switch: ONSelector lever operation: Other than the above
0 V
112 4LLc switch Ignition switch: ONTransfer lever position: 4LLc
System voltage
Ignition switch: ONTransfer lever position: Other than the above
0 V
115 Wide open throttle switch Accelerator pedal: Released System voltage
Accelerator pedal: Depressed 0 V
117 3rd shift indicator lamp Shift range: 3rd System voltage
Shift range: Other than the above 0 V
118 2nd shift indicator lamp Shift range: 2nd System voltage
Shift range: Other than the above 0 V
119 RED solenoid valve Engine: IdlingShift range: 5th
System voltage
Engine: IdlingShift range: Park
7 - 9 V
120 UD solenoid valve Engine: IdlingShift range: 1st
System voltage
Engine: IdlingShift range: Park
7 - 9 V
121 Inhibitor switch N Ignition switch: ONSelector lever position: N
System voltage
Ignition switch: ONSelector lever position: Other than the above
0 V
122 Upshift switch Ignition switch: ONSelector lever operation: Upshifted in Sports mode andlever held
System voltage
Ignition switch: ONSelector lever operation: Other than the above
0 V
123 Stop lamp switch Ignition switch: ONBrake pedal Depressed
System voltage
Ignition switch: ONBrake pedal Released
0 V

AUTOMATIC TRANSMISSION - Troubleshooting <A/T>AUTOMATIC TRANSMISSION - Troubleshooting <A/T>23-66
Ter-minalNo.
Standard valueInspection conditionsCheck item
124 A/T fluid temperaturesensor ATF temperature: 20°C 3.8 - 4.0 V
ATF temperature: 40°C 3.2 - 3.4 V
ATF temperature: 80°C 1.7 - 1.9 V
127 5th shift indicator lamp Shift range: 5th System voltage
Shift range: Other than the above 0 V
128 4th shift indicator lamp Shift range: 4th System voltage
Shift range: Other than the above 0 V
129 LR solenoid valve Engine: IdlingShift range: Park
System voltage
Engine: IdlingShift range: 2nd
7 - 9 V
130 OD solenoid valve Engine: IdlingShift range: 3rd
System voltage
Engine: IdlingShift range: Park
7 - 9 V
<4M4>
1 2 3 4 5 6 7 8 9 10 11 12 13
14 15 16 17 18 19 20 21 22 23 24 25 26
31 32 33 34 35 36 37 38
39 40 41 42 43 44 45 46
51 52 53 54 55 56 57 58 59 60 61
62 63 64 65 66 67 68 69 70 7271
Ter-minalNo.
Check item Inspection conditions Standard value
1 UD solenoid valve Engine: IdlingShift range: 1st
System voltage
Engine: IdlingShift range: Park
7 - 9 V
2 Solenoid valve power supply Ignition switch: OFF 0 V
Ignition switch: ON System voltage
3 Solenoid valve power supply Ignition switch: OFF 0 V
Ignition switch: ON System voltage
4 1st shift indicator lamp Shift range: 1st System voltage
Shift range: Other than the above 0 V
5 3rd shift indicator lamp Shift range: 3rd System voltage
Shift range: Other than the above 0 V
6 5th shift indicator lamp Shift range: 5th System voltage
Shift range: Other than the above 0 V
9 4LLc switch Transfer lever: 4LLc System voltage
Transfer lever: Other than the above 0 V

AUTOMATIC TRANSMISSION - Troubleshooting <A/T> 23-67
Ter-minalNo.
Standard valueInspection conditionsCheck item
10 A/C compressor load signal A/C switch: OFF 0 V
A/C switch: ON System voltage
11 Power supply Ignition switch: OFF 0 V
Ignition switch: ON System voltage
12 Earth At all times 0 V
13 Earth At all times 0 V
14 OD solenoid valve Engine: IdlingShift range: 3rd
System voltage
Engine: IdlingShift range: Park
7 - 9 V
15 DCC solenoid valve Engine: IdlingShift range: 1st
System voltage
16 2nd solenoid valve Engine: IdlingShift range: 2nd
System voltage
Engine: IdlingShift range: Park
7 - 9 V
17 2nd shift indicator lamp Shift range: 2nd System voltage
Shift range: Other than the above 0 V
18 4th shift indicator lamp Shift range: 4th System voltage
Shift range: Other than the above 0 V
24 Power supply Ignition switch: OFF 0 V
Ignition switch: ON System voltage
25 Earth At all times 0 V
26 Earth At all times 0 V
31 Input shaft speed sensor Measure between terminals (31) and (43) using anoscilloscope.Engine: 2 000 r/minShift range: 4th
Check Procedureusing an Oscillo-scope (Refer toP.23-69.)
32 Output shaft speed sensor Measure between terminals (32) and (43) using anoscilloscope.Engine: 2 000 r/minShift range: 4th
Check Procedureusing an Oscillo-scope (Refer toP.23-69.)
33 Engine speed sensor Engine: Idling 2.0 - 2.4 V
38 Backup power supply At all times System voltage
43 Sensor earth At all times 0 V
44 A/T fluid temperature sensor A/T fluid temperature 20°C 3.8 - 4.0 V
A/T fluid temperature 40°C 3.2 - 3.4 V
A/T fluid temperature 80°C 1.7 - 1.9 V
45 Accelerator pedal position Accelerator pedal: Fully closed (engine stopped) 0.985 - 1.085 Vsensor (APS) Accelerator pedal: Fully open (engine stopped) 4.0 V or higher
51 RED solenoid valve Engine: IdlingShift range: 5th
System voltage
Engine: IdlingShift range: Park
7 - 9 V
53 Output communication with Engine: Idling Other than 0 Vengine-ECU Selector lever position: D

AUTOMATIC TRANSMISSION - Troubleshooting <A/T>23-68
Ter-minalNo.
Standard valueInspection conditionsCheck item
54 Input communication with Engine: Idling Other than 0 Vengine-ECU Selector lever position: D
55 Inhibitor switch P Ignition switch: ONSelector lever position: P
System voltage
Ignition switch: ONSelector lever position: Other than the above
0 V
56 Inhibitor switch N Ignition switch: ONSelector lever position: N
System voltage
Ignition switch: ONSelector lever position: Other than the above
0 V
57 Select switch Ignition switch: ONSelector lever operation: Sports mode
System voltage
Ignition switch: ONSelector lever operation: Other than the above
0 V
58 Downshift switch Ignition switch: ONSelector lever position: Downshifted in Sports modeand lever held
System voltage
Ignition switch: ONSelector lever operation: Other than the above
0 V
59 Stop lamp switch Ignition switch: ONBrake pedal Depressed
System voltage
Ignition switch: ONBrake pedal Released
0 V
62 DIR solenoid valve Engine: IdlingShift range: Park
System voltage
Engine: IdlingShift range: 2nd
7 - 9 V
65 Wide open throttle switch Accelerator pedal: Released 4.5 - 5.5 V
Accelerator pedal: Depressed Less than 0.4 V
66 Inhibitor switch R Ignition switch: ONSelector lever position: R
System voltage
Ignition switch: ONSelector lever position: Other than the above
0 V
67 Inhibitor switch D Ignition switch: ONSelector lever position: D
System voltage
Ignition switch: ONSelector lever position: Other than the above
0 V
68 Upshift switch Ignition switch: ONSelector lever position: Upshifted in Sports mode andlever held
System voltage
Ignition switch: ONSelector lever position: Other than the above
0 V
69 Vehicle speed sensor When stopped 0 V
When starting to drive forward slowly. 0 V and 5 V alter-nates
71 A/T control relay Ignition switch: OFF 0 V
Ignition switch: ON 10 - 12 V
72 Earth Ignition switch: ON 0 V

AUTOMATIC TRANSMISSION - Troubleshooting <A/T> 23-69
CHECK PROCEDURE USING AN OSCILLOSCOPECheck item Inspection conditions Normal condi-
tion(Wave patternsample)
Crank angle sensor Selector lever position: N Idling (vehicle stopped) Wave pattern A
Input shaft speed sen-sor
Shift range: 4th Driving at a constant speed of 50km/h in 4th (Engine: 1 800 - 2 100
Wave pattern B
Output shaft speedsensor
r/min)
Vehicle speed sensor
LR solenoid valve Ignition switch: ON Force-drive the solenoid valves Wave pattern C
UD solenoid valve Engine: Stopped (actuator test).
2nd solenoid valveSelector lever position: P
OD solenoid valveThrottle (accelerator) openingangle voltage:
RED solenoid valve Less than1V<6G7>, less than1.2
DCC solenoid valveV <4M4>
Wave pattern sample
Wave pattern A
(V)
(ms)
Wave pattern B(V)
(ms)
Wave pattern C(V)
(ms)

AUTOMATIC TRANSMISSION - Troubleshooting <SS4 II>23-70
TROUBLESHOOTING <SS4 II>DIAGNOSIS FUNCTIONCENTER DIFFERENTIAL LOCK LAMPWhen a problem occurs in the transfer system, the centerdifferential lock lamp flashes at a rate of 1 Hz.When the center differential lock lamp is flashing at a rateof 1 Hz, check the diagnosis output.
READING DIAGNOSIS CODESUse the MUT-II or the center differential lock lamp to readthe diagnosis codes. (Refer to GROUP 00 - Guide toTroubleshooting and Inspection Procedures.)
CHART CLASSIFIED BY DIAGNOSIS CODEDiagnosiscode
Diagnosis item Reference page
11 Power supply voltage system Voltage drop 23-72
12 Overvoltage 23-72
13 Main relay system (inside ECU) Relay problem 23-72
21 Accelerator pedal position sensor (APS) system Open circuit/Malfunc-tion of sensor
23-73
22 Front propeller shaft speed sensor system Open circuit/Short-cir- 23-75
23cuit/Malfunction of sen-sor
24 Rear propeller shaft speed sensor system Open circuit/Short-cir- 23-77
25cuit/Malfunction of sen-sor
26 Stop lamp switch system Open circuit/Short-cir-cuit/Malfunction oflamp/Malfunction ofswitch
23-79
31 Transfer shift lever switch system Open circuit/Short-cir-cuit/Malfunction ofswitch
23-80
32 Transfer position switch system Malfunction of transfershift mechanism/Mal-function of actuator
23-81
33 Transfer position switch system Open circuit/Short-cir-cuit/Malfunction ofswitch
23-81
34 Freewheel engage solenoid valve system Open circuit/Short-cir-cuit/Malfunction of so-lenoid valve
23-82

AUTOMATIC TRANSMISSION - Troubleshooting <SS4 II> 23-71
Diagnosiscode
Reference pageDiagnosis item
35 Freewheel engage switch system Open circuit/Short-cir-cuit/Malfunction ofswitch
23-83
41 Shift actuator (short-circuit/open circuit) system Open circuit/Short-cir-cuit/Malfunction of ac-tuator/Malfunction ofECU
23-84
42 Shift actuator (short-circuit) system Short-circuit/Malfunc-tion of actuator/Mal-function of ECU
23-85
43 Shift actuator (open circuit) system Open circuit/Malfunc-tion of actuator/Mal-function of ECU
44 Shift actuator (overload) system Malfunction of transfershift mechanism/Mal-function of actuator
23-86
45 Tyre problem Incorrect tyre pres-sure/Uneven tyre sizes
23-86
51 Malfunction of transfer-ECU 23-86

AUTOMATIC TRANSMISSION - Troublehshooting <SS4 II>23-72
INSPECTION PROCEDURES CLASSIFIED BY DIAGNOSIS CODECode No. 11, 12 Power supply voltage system Probable causeCode No. 11 is output to indicate a drop in voltage if the power supply voltage dropsbelow 9.5 V.Code No. 12 is output to indicate overvoltage if the power supply voltage rises above18 V.
D Malfunction of ignition switchD Malfunction of harness or connectorD Malfunction of transfer-ECU
NG
OK
OK
Repair
NG
Replace
NG
Ignition switch single part check(Refer to GROUP 54 - Ignition Switch.)
Check the following connectors: <L.H. drive vehicles> D-208,D-210, D-32, E-115, E-105, <R.H. drive vehicles> D-208, D-210,E-115, E-105
Repair
Transient malfunction (Refer to GROUP 00 - Points to Notefor Transient Malfunctions.)
Measure at transfer-ECU connector E-105D Measure at ECU terminals.D Ignition switch: OND Voltage between terminal 13 and earth
OK: System voltage
Check the harness between the ignition switch and thetransfer-ECU, and repair if necessary.
OK
Replace the transfer-ECU.
OK
OK
NGNG
Check the trouble symptoms.
MUT-II Data ListD No. 9 Ignition voltage
OK: Refer to P.23-87 (Data List Chart).
NG
Check the following connector: E-105
Code No. 13 Main relay (inside ECU) system Probable causeCode No. 13 is output to indicate a relay malfunction if the voltage rises to 6 Vor higher when the relay is off, or if it drops below 6 V when the relay is on.
D Malfunction of transfer-ECU
Replace the transfer-ECU.

AUTOMATIC TRANSMISSION - Troublehshooting <SS4 II> 23-73
Code No. 21 Accelerator pedal position sensor (APS)system
Probable cause
Code No. 21 is output to indicate an open circuit in the APS or an incorrectadjustment when the APS output voltage drops below 0.2 V while the engine isidling.
D Malfunction of APSD Malfunction of harness or connectorD Malfunction of transfer-ECUD Malfunction of throttle valve controller <6G7>D Malfunction of engine-ECU <4M4>
NG
NG
NG
Repair
MUT-II Data ListD No. 1 APS
OK: Refer to P.23-87 (Data ListChart).
NGReplaceAPS single part check
(Refer to GROUP 13 - On-vehicleService.)
OK
NGRepair
OKCheck the following connector:D-135
OK
D Check the harness between theAPS and the throttle valvecontroller, and repair if necessary.<6G7>
D Check the harness between theAPS and the engine-ECU, andrepair if necessary. <4M4>
OK
Check the following connectors:<6G7> D-11, <4M4> D-112
Repair
NGRepair
NGRepair
OK
D Check the harness between theAPS and the throttle valvecontroller. <6G7>
D Check the harness between theAPS and the engine-ECU. <4M4>
OK
Check the following connectors:<6G7> D-11, <4M4> D-112
Measure at throttle valve controllerconnector D-11 <6G7>, or atengine-ECU connector D-112 <4M4>.D Measure at ECU terminals.D Ignition switch: OND <6G7> Voltage between terminal
6 and earthD <4M4> Voltage between terminal
60 and earthOK: 4.8 - 5.2 V
NG
NG
NGCheck the trouble symptoms. Replace the throttle valve controller
or the engine-ECU.
OK
Measure at APS connector D-135D Disconnect the connector and
measure at the harness side.D Voltage between terminal 8 and
earth(Ignition switch: ON)
OK: 4.8 - 5.2 V
To the next page
Transient malfunction(Refer to GROUP 00 - Points toNote for Transient Malfunctions.)
OK
AUTOMATIC TRANSMISSION - Troublehshooting <SS4 II>23-74
OK
OK
OK
NG
NG
NG(1)NG Check the following connectors:
<6G7> D-11, <4M4> D-112 Repair
OK
D Check the harness between theAPS and the throttle valvecontroller, and repair if necessary.<6G7>
D Check the harness between theAPS and the engine-ECU, andrepair if necessary. <4M4>
OK
(2)NG
Measure at transfer-ECU connectorE-105D Measure at ECU terminals.D Ignition switch: OND Voltage between terminal 13 and
earthOK: Fully close the accelerator
985 - 1,085 mVfully open the accelerator4,000 mV or more Check the followingconnector:E-105
Check the trouble symptoms.
OK
Check the following connectors:E-105, E-113
NG
Replace the transfer-ECU.
OK
NG
Repair
Check the harness between the APSand the transfer-ECU, and repair ifnecessary.
Check the harness between the APSand the transfer-ECU, and repair ifnecessary.
From the previous page
(3)NG
Measure at APS connector D-135.D Use the test harness
(MB991658) to connect onlyterminals 6, 7 and 8, andmeasure at the pickup harness.
D Ignition switch: ON(1) Voltage between terminal 7 and
earthOK: 0.5 V or less
(2) Voltage between terminal 8 andearthOK: 4.8 - 5.2 V
(3) Voltage between terminal 6 andearthOK: Fully close the accelerator
985 - 1,085 mVfully open the accelerator4,000 mV or more
APS adjustment(Refer to GROUP 13 - On-vehicleService.)
Check the following connectors:E-113, E-105
Repair

AUTOMATIC TRANSMISSION - Troublehshooting <SS4 II> 23-75
Code No. 22, 23 Front propeller shaft speed sensorsystem
Probable cause
Code No. 22 is output to indicate an open circuit or short-circuit in the frontpropeller shaft speed sensor if no signal is input from the front propeller shaftspeed sensor when shifting from 2WD to 4WD while driving at medium to lowspeeds.Code No. 23 is output to indicate an open circuit or short-circuit in the frontpropeller shaft speed sensor if the signal input from the front propeller shaftspeed sensor is unstable when the freewheel engage switch is on.
D Malfunction of front propeller shaft speed sensorD Malfunction of harness or connectorD Malfunction of transfer-ECU
Transient malfunction (Refer to GROUP 00 - Points to Notefor Transient Malfunctions.)
OK
NG
OK
OK
To the next page
NG
OK
NG
NG
Repair
Replace the transfer-ECU.
OKMUT-II Data ListD No. 2 Front propeller shaft speed sensor
OK: Refer to P.23-87 (Data List Chart).
OK
OK
NG
OK
Measure at transfer-ECU connector E-105D Measure at ECU terminals.D Ignition switch: OND Voltage between terminals 18 and earth
OK: 0.5 V or less
NG
Repair
Replace the transfer-ECU.
NG
Check the trouble symptoms.
Check the trouble symptoms.
Replace the transfer-ECU.
OK
OK
Measure at transfer-ECU connector E-105D Measure at ECU terminals.D Disconnect front propeller shaft speed sensor connector
C-17.D Ignition switch: OND Voltage between terminals 7 and earth
OK: 4.8 - 5.2 V
Measure the front propeller shaft speed sensor output wavepattern at transfer-ECU connector E-105 (using anoscilloscope).D Vehicle speed: approx. 50 km/hD Shift range: 3rdD Voltage between terminals 7 - 18
OK: A wave pattern such as the one shown on P.23-69(Check Procedure Using an Oscilloscope<Wave pat-tern B>) should be output, and the maximum valueshould be 4.8 V or more and the minimum valueshould be 0.8 V or less.There should be no noise in the output wave pattern.
NGRepairCheck the following connectors: C-17, E-105
NG
NG
Repair
Check the following connector: E-105
Repair
NG
Check the harness between the front propeller shaft speedsensor and the transfer-ECU.
Check the following connector: C-17
Check the trouble symptoms.
Check the following connector: E-105

AUTOMATIC TRANSMISSION - Troublehshooting <SS4 II>23-76
(2)NG
(3)NG
From the previous page
(1)NG
OK
NG
Measure at front propeller shaft speed sensor connector C-17.D Disconnect the connector and measure at the harness
side.(1) Resistance between terminal 1 and earth
OK: 2 W or less(2) Voltage between terminal 2 and earth
(Ignition switch: ON)OK: 4.8 - 5.2 V
(3) Voltage between terminal 3 and earth(Ignition switch: ON)OK: System voltage
Check the harness between the front propeller shaft speedsensor and the ignition switch, and repair if necessary.
Check the following connectors: D-208, D-213, D-32, E-115
NG
Check the trouble symptoms.
Check the harness between the front propeller shaft speedsensor and the transfer-ECU, and repair if necessary. (Earthline)
Replace the front propeller shaft speed sensor
OK
OKRepair
Check the harness between the front propeller shaft speedsensor and the transfer-ECU, and repair if necessary. (Sensorline)
Eliminate the cause of the noise.
NG
Check the trouble symptoms.
NGRepair
OKNG
Repair
OK
D Check the harness between the front propeller shaft speedsensor and the transfer-ECU.
D Check the harness between the front propeller shaft speedsensor and the ignition switch.
Check the following connectors: D-208, D-213, D-32, E-115,E-105

AUTOMATIC TRANSMISSION - Troublehshooting <SS4 II> 23-77
CodeNo. 24, 25 Rear propeller shaft speed sensor system Probable causeCode No. 24 is output to indicate an open circuit or short-circuit in the rearpropeller shaft speed sensor if the signal input from the rear propeller shaftspeed sensor is unstable when the APS voltage is 1.5 V or higher.Code No. 25 is output to indicate an open circuit or short-circuit in the rearpropeller shaft speed sensor if the signal input from the rear propeller shaftspeed sensor is unstable when the freewheel engage switch is on.
D No. 3 Rear propeller shaft speed sensorD Malfunction of harness or connectorD Malfunction of transfer-ECU
Transient malfunction (Refer to GROUP 00 - Points to Notefor Transient Malfunctions.)
OK
NG
Check the following connector: E-105
OK
OK
To the next page
NG
OK
NG
NG
Repair
Check the following connector: C-08
Replace the transfer-ECU.
OKMUT-II Data ListD No. 3 Rear propeller shaft speed sensor
OK: Refer to P.23-87 (Data List Chart).
OK
OK
NG
Check the trouble symptoms.
OK
Measure at transfer-ECU connector E-105D Measure at ECU terminals.D Ignition switch: OND Voltage between terminals 18 and earth
OK: 0.5 V or less
NG
Repair
Replace the transfer-ECU.
NG
Check the trouble symptoms.
Check the trouble symptoms.
Replace the transfer-ECU.
OK
OK
Measure at transfer-ECU connector E-105D Measure at ECU terminals.D Disconnect rear propeller shaft speed sensor connector
C-08.D Ignition switch: OND Voltage between terminals 9 and earth
OK: 4.8 - 5.2 V
Measure the rear propeller shaft speed sensor output wavepattern at transfer-ECU connector E-105 (using anoscilloscope).D Vehicle speed: approx. 50 km/hD Shift range: 3rdD Voltage between terminals 9 - 18
OK: A wave pattern such as the one shown on P.23-69(Check Procedure Using an Oscilloscope) should beoutput, and the maximum value should be 4.8 V ormore and the minimum value should be 0.8 V orless.There should be no noise in the output wave pattern.
NGRepairCheck the following connectors: C-08, E-108
NG
NG
Repair
Check the following connector: E-108
Repair
NG
Check the harness between the rear propeller shaft speedsensor and the transfer-ECU.

AUTOMATIC TRANSMISSION - Troublehshooting <SS4 II>23-78
(2)NG
(3)NG
From the previous page
(1)NG
OK
NG
Measure at rear propeller shaft speed sensor connector C-08.D Disconnect the connector and measure at the harness
side.(1) Resistance between terminal 1 and earth
OK: 2 W or less(2) Voltage between terminal 2 and earth
(Ignition switch: ON)OK: 4.8 - 5.2 V
(3) Voltage between terminal 3 and earth(Ignition switch: ON)OK: System voltage
Check the harness between the rear propeller shaft speedsensor and the ignition switch, and repair if necessary.
Check the following connectors: D-208, D-213, D-32, E-115
NG
Check the trouble symptoms.
Check the harness between the rear propeller shaft speedsensor and the transfer-ECU, and repair if necessary. (Earthline)
Replace the rear propeller shaft speed sensor
OK
OK
Repair
Check the harness between the rear propeller shaft speedsensor and the transfer-ECU, and repair if necessary. (Sensorline)
Eliminate the cause of the noise.
NG
Check the trouble symptoms.
NGRepair
OKNG Repair
OK
D Check the harness between the rear propeller shaft speedsensor and the transfer-ECU.
D Check the harness between the rear propeller shaft speedsensor and the ignition switch.
Check the following connectors: D-208, D-213, D-32, E-115,E-105

AUTOMATIC TRANSMISSION - Troublehshooting <SS4 II> 23-79
Code No. 26 Stop lamp switch system Probable causeCode No. 26 is output to indicate a short-circuit in the stop lamp switch whenthe stop lamp switch is continuously on for 15 minutes or more when the vehiclespeed is 15 km/h or higher.
D Malfunction of brake pedalD Malfunction of stop lamp switchD Malfunction of harness or connectorD Malfunction of transfer-ECU
NG
NG
NG
MUT-II Data ListD No. 23 Stop lamp switch system
OK: ON when brake pedal is depressedOFF when the brake pedal is released
Transient malfunction(Refer to GROUP 00 - Points to Note for TransientMalfunctions.)
OK
OK
OK
OK
NG
D Check the harness between the stop lamp switch and thetransfer-ECU, and repair if necessary.
D Check the harness between the stop lamp switch and thebattery, and repair if necessary.
Repair
Check the harness between the stop lamp switch and thebattery, and repair if necessary.
OK
OK
Brake pedal height check(Refer to GROUP 35 - Brake Pedal.)
OK
NG Adjust
OK
OK
NG
NG
Check the trouble symptoms. Replace the transfer-ECU.
Measure at transfer-ECU connector E-108D Measure at ECU terminals.D Voltage between terminals 34 and earth
OK: System voltage when brake pedal is depressed1 V or less when brake pedal is released
Measure at stop lamp switch connector D-136.D Disconnect the connector and measure at the harness
side.D Voltage between terminals 2 and earth
OK: System voltage
NGReplace
NGRepair
Stop lamp switch check(Refer to GROUP 35 - Brake Pedal.)
Check the following connector: D-136
RepairNG
Check the following connector: E-108
Repair
Check the following connectors: <L.H. drive vehicles> D-27,D-26, D-33, E-105, E-108, <R.H. drive vehicles> D-124, E-115,E-108, D-27
Check the following connectors: <L.H. drive vehicles> D-27,D-26, <R.H. drive vehicles> D-27, D-124

AUTOMATIC TRANSMISSION - Troublehshooting <SS4 II>23-80
Code No. 31 Transfer lever switch system Probable causeCode No. 31 is output to indicate an open circuit or short-circuit in the transferlever switch if the input signal from the transfer lever switch is unstable.
D Malfunction of transfer lever switchD Malfunction of harness or connectorD Malfunction of transfer-ECU
NG
NG
MUT-II Data ListD No. 6 Transfer lever position
OK: Refer to P.23-87 (Data List Chart).
Transient malfunction(Refer to GROUP 00 - Points to Note for TransientMalfunctions.)
OK
OK
OK
OK
NG
D Check the harness between the transfer lever switch andthe transfer-ECU, and repair if necessary.
D Check the harness between the transfer lever switch andthe ignition switch, and repair if necessary.
Repair
Check the harness between the transfer lever switch and theignition switch, and repair if necessary.
OK
OK
NG
OK
OK
NG
NG
Check the trouble symptoms. Replace the transfer-ECU.
Measure at transfer-ECU connector E-105D Measure at ECU terminals.D Ignition switch: ON(1) Transfer lever position: 2H> Voltage between terminal 20
and earth(2) Transfer lever position: 4H> Voltage between terminal 21
and earth(3) Transfer lever position: 4H> Voltage between terminal 22
and earth(4) Transfer lever position: 4H> Voltage between terminal 23
and earthOK: System voltage
Measure at transfer lever switch connector E-19.D Disconnect the connector and measure at the harness
side.D Ignition switch: OND Voltage between terminal (1) and earth
OK: System voltage
NGReplace
NGRepair
Transfer lever switch check (Refer to P.23-117.)
Check the following connector: E-19
RepairNG
Check the following connector: E-105
Repair
Check the following connectors: D-208, D-213, D-32, E-115,E-105
Check the following connectors: D-208, D-213, D-32, E-115

AUTOMATIC TRANSMISSION - Troublehshooting <SS4 II> 23-81
Code No. 32, 33 Transfer position switch system Probable causeCode No. 32 is output to indicate an open circuit or short-circuit in a transferposition switch, a malfunction of the shift actuator or a malfunction of thetransfer shift mechanism when transfer selection does not complete while driving.Code No. 33 is output to indicate an open circuit or short-circuit in a transferposition switch if the input signal from the transfer position switch is unstable.
D Malfunction of transfer position switchD Malfunction of harness or connectorD Malfunction of transfer-ECUD Malfunction of shift actuatorD Malfunction of transfer shift mechanism
L Refer to the Transmission Workshop Manual.
OK
Transient malfunction (Refer to GROUP 00 - Points to Notefor Transient Malfunctions.)
OK
NG
Check the harnesses between the transfer position switchesand the transfer-ECU, and repair if necessary.
OK
NGOK
OK
NG
Replace the transfer-ECU.
NGReplaceTransfer lever switch check (Refer to P.23-117.)
RepairNG
Repair
Check the trouble symptoms.NG
OK
Replace the shift actuator. L
MUT-II Data ListD No. 7 Transfer position
OK: Refer to P.23-87 (Data List Chart).
NG
Actuator test(Only No.32)D No. 2, No. 3 Shift actuator
OK Refer to P.23-89 (Actuator Test).
Measure at transfer-ECU connector E-108D Measure at ECU terminals.D Ignition switch: OND Voltage between terminals 43, 44, 45, 46, 47 and earth
OK: System voltage
Check the following connectors: C-06, C-07, C-14, C-15, C-16
Check the following connector: E-108

AUTOMATIC TRANSMISSION - Troublehshooting <SS4 II>23-82
Code No. 34 Freewheel engage solenoid valve system Probable causeCode No. 34 is output to indicate an open circuit or short-circuit in the freewheelengage solenoid valve when the transfer-ECU terminal voltages are not thesame while current is being supplied to the freewheel engage solenoid valve.
D Malfunction of freewheel engage solenoid valveD Malfunction of harness or connectorD Malfunction of transfer-ECU
NG
NG
MUT-II Actuator TestD No. 1 Freewheel engage solenoid valve
OK: The solenoid valve operates for 5 seconds.
Transient malfunction (Refer to GROUP 00 - Points to Notefor Transient Malfunctions.)
OK
OK
OK
OK
NG
D Check the harness between the freewheel engage solenoidvalve and the transfer-ECU, and repair if necessary.
D Check the harness between the freewheel engage solenoidvalve and the ignition switch, and repair if necessary.
Repair
Check the harness between the freewheel engage solenoidvalve and the ignition switch, and repair if necessary.
OK
OK
OK
NGCheck the trouble symptoms. Replace the transfer-ECU.
Measure at transfer-ECU connector E-108D Measure at ECU terminals.D Transfer: 4WDD Ignition switch: OND Voltage between terminals 41 and earth
OK: System voltage
Measure at freewheel engage solenoid valve connectors A-40and A-41.D Disconnect the connector and measure at the harness
side.D Ignition switch: OND Voltage between terminal 1 and earth
OK: System voltage
NGReplace
NGRepair
Freewheel engage solenoid valve check(Refer to GROUP 26 - On-Vehicle Service.)
Check the following connectors: A-40, A-41
RepairNG
Check the following connector: E-108
NG
Repair
OK
Check the following connectors: <L.H. drive vehicles> D-208,D-210, D-27, A-15, A-16, A-04, E-113, E-108, <R.H. drive vehicles>D-208, D-210, D-27, A-15, A-16, D-143, E-113, E-108,
Check the following connectors: D-208, D-210, D-27, A-15

AUTOMATIC TRANSMISSION - Troublehshooting <SS4 II> 23-83
Code No. 35 Freewheel engage switch system Probable causeCode No. 35 is output to indicate an open circuit or short-circuit in the freewheelengage switch when the freewheel engage switch condition does not correspondto the fact that current is being supplied to the freewheel engage solenoid valve.
D Malfunction of freewheel engage switchD Malfunction of harness or connectorD Malfunction of transfer-ECU
NG
(1)NG
MUT-II Data ListD No. 38 Freewheel engage switch
OK: Refer to P.23-87 (Data List Chart).
Transient malfunction (Refer to GROUP 00 - Points to Notefor Transient Malfunctions.)
OK
OK
OK
OK
NG
Repair
Check the following connector: B-40
Check the harness between the freewheel engage switch andearth, and repair if necessary.
OK
OK
Check the trouble symptoms. Replace the transfer-ECU.
Measure at freewheel engage switch connector B-54.D Disconnect the connector and measure at the harness
side.(1) Resistance between terminal 1 and earth
OK: 2 W or less(2) Voltage between terminal 2 and earth
(Ignition switch: ON)OK: System voltage
NGReplace
NGRepair
Freewheel engage switch check (Refer to GROUP 26 -Freewheel Clutch.)
Check the following connector: B-54
MUT-II Self-Diag CodeD Is code No. 34 output?
Code No. 34 Freewheel engage solenoid valve system check(Refer to P.23-82.)
YES
NO
NG
(2)NG
NGOKRepair
Check the following connectors: E-108, E-113, B-40
Check the harness between the freewheel engage switch andthe transfer-ECU, and repair if necessary.
Check the following connector: B-54 Repair
NG

AUTOMATIC TRANSMISSION - Troublehshooting <SS4 II>23-84
Code No. 41 Shift actuator system (open circuit orshort-circuit)
Probable cause
Code No. 41 is output to indicate an open circuit or short-circuit in the shiftactuator if the transfer-ECU terminal voltage is higher than the main relayvoltage (90% of the rated voltage), or lower than the main relay voltage (10% ofthe rated voltage) when shift operation is not being carried out.
D Malfunction of shift actuatorD Malfunction of harness or connectorD Malfunction of transfer-ECU
L Refer to the Transmission Workshop Manual.
NG
NG
NG
MUT-II Data ListD No. 12 Shift actuator voltage
OK: Refer to P.23-87 (Data List Chart).
Transient malfunction (Refer to GROUP 00 - Points to Notefor Transient Malfunctions.)
OK
OK
NG
Check the harness between the shift actuator and thetransfer-ECU, and repair if necessary.
Repair
OK
OK
OK
OK
NG
NG
Replace the transfer-ECU.
Check the following connectors: C-11, E-105Measure at shift actuator connector C-11.D Disconnect the connector and measure at the harness
side.D Drive the shift actuator in accordance with MUT-II actuator
test No. 2.D Voltage between terminals 2 and earth
OK: System voltageD Drive the shift actuator in accordance with MUT-II actuator
test No. 3.D Voltage between terminal 1 and earth
OK: System voltage
Measure at transfer-ECU connector E-105D Measure at ECU terminals.D Drive the shift actuator in accordance with MUT-II actuator
test No. 2.D Voltage between terminal 1 and earth
OK: System voltageD Drive the shift actuator in accordance with MUT-II actuator
test No. 3.D Voltage between terminals 3 and earth
OK: System voltage
RepairNG
Check the following connector: C-11
Repair
Replace the shift actuator. L
Check the following connector: E-105
Check the trouble symptoms.

AUTOMATIC TRANSMISSION - Troublehshooting <SS4 II> 23-85
Code No. 42 Shift actuator system (short-circuit) Probable causeCode No. 43 Shift actuator system (open circuit)Code No. 42 is output to indicate a short-circuit in the shift actuator if the shiftactuator current is +1 A greater than the target value while the actuator is beingdriven.Code No. 43 is output to indicate an open circuit in the shift actuator if the mainrelay voltage is lower than 6 V, or the shift actuator current is 0.1 A lower thanthe actual value while the actuator is being driven.
D Malfunction of shift actuatorD Malfunction of harness or connectorD Malfunction of transfer-ECU
L Refer to the Transmission Workshop Manual.
NG
NG
MUT-II Data ListD No. 10 Shift actuator voltage
OK: Refer to P.23-87 (Data List Chart).
Transient malfunction (Refer to GROUP 00 - Points to Notefor Transient Malfunctions.)
OK
OK
NG
Check the harness between the shift actuator and thetransfer-ECU, and repair if necessary.
Repair
Check the following connector: E-105
OK
OK
NG
OK
OK
NG
NG
Check the trouble symptoms.
Replace the transfer-ECU.
Check the following connectors: C-11, E-105Measure at shift actuator connector C-11.D Disconnect the connector and measure at the harness
side.D Drive the shift actuator in accordance with MUT-II actuator
test No. 2.D Voltage between terminals 2 and earth
OK: System voltageD Drive the shift actuator in accordance with MUT-II actuator
test No. 3.D Voltage between terminal 1 and earth
OK: System voltage
Measure at transfer-ECU connector E-105D Measure at ECU terminals.D Drive the shift actuator in accordance with MUT-II actuator
test No. 2.D Voltage between terminal 1 and earth
OK: System voltageD Drive the shift actuator in accordance with MUT-II actuator
test No. 3.D Voltage between terminals 3 and earth
OK: System voltage
RepairNG
Check the following connector: C-11
Repair
Replace the shift actuator. L

AUTOMATIC TRANSMISSION - Troublehshooting <SS4 II>AUTOMATIC TRANSMISSION - Troublehshooting <SS4 II>23-86
Code No. 44 Shift actuator system (overload) Probable causeCode No. 44 is output to indicate an overload of the shift actuator when thetotal time calculated for driving the shift actuator exceeds 5 minutes.
D Malfunction of shift actuatorD Malfunction of harness or connectorD Malfunction of transfer-ECUD Malfunction of transfer shift mechanism
L Refer to the Transmission Workshop Manual.
NG
NG
MUT-II Data ListD No. 12 Shift actuator voltage
OK: Refer to P.23-87 (Data List Chart).
Transient malfunction (Refer to GROUP 00 - Points to Notefor Transient Malfunctions.)
OK
OK
NG
Check the harness between the shift actuator and thetransfer-ECU, and repair if necessary.
Repair
Check the following connector: E-105
OK
NGOK
OK
NG
Replace the transfer-ECU.
Check the following connectors: C-11, E-105Measure at shift actuator connector C-11.D Disconnect the connector and measure at the harness
side.D Drive the shift actuator in accordance with MUT-II actuator
test No. 2.D Voltage between terminals 2 and earth
OK: System voltageD Drive the shift actuator in accordance with MUT-II actuator
test No. 3.D Voltage between terminal 1 and earth
OK: System voltage
Measure at transfer-ECU connector E-105D Measure at ECU terminals.D Drive the shift actuator in accordance with MUT-II actuator
test No. 2.D Voltage between terminal 1 and earth
OK: System voltageD Drive the shift actuator in accordance with MUT-II actuator
test No. 3.D Voltage between terminals 3 and earth
OK: System voltage
RepairNG
Check the following connector: C-11
Repair
MUT-II Actuator testD No. 2, No. 3 Shift actuator
OK Refer to P.23-89 (Actuator Test).
OK
NGReplace the shift actuator. L
Code No. 45 Incorrect tyre diameters Probable causeCode No. 45 is output to indicate incorrect tyre pressure, uneven tyre sizes ornon-uniform tyre brands, which have caused a large difference in speed betweenthe front and rear wheel speeds and the setting values when the freewheelengage switch is on.
D Malfunction of tyreD Malfunction of transfer-ECU
NG
Replace
Replace the transfer-ECU.
NG
Check the trouble symptoms.
OK
Tyre Check
Code No. 51 Malfunction of transfer-ECU Probable causeCode No. 51 is output when a problem with the transfer-ECU is detected. D Malfunction of transfer-ECU
Replace the transfer-ECU.

AUTOMATIC TRANSMISSION - Troubleshooting <SS4 II> 23-87
DATA LIST REFERENCE TABLEItemNo.
Check item Inspection conditions Normal condition
1 Accelerator pedal Engine: Stopped Accelerator pedal: Fully closed 985 - 1,085 mVposition sensor(APS)
Selector lever position:P
Accelerator pedal: Depressed Gradually increases fromthe above value.
Accelerator pedal: Fully open 4000 mV or higher
2 Front propeller shaftspeed sensor
Transfer position: 4WD Driving at a constant speed of30 km/h
30 km/h
3 Rear propeller shaft Transfer position: 4WD Driving at a constant speed of 30 km/h3 Rear propeller shaftspeed sensor
Transfer position: 4WD Driving at a constant speed of30 km/h
30 km/h
4 Difference betweenfront and rear pro-peller shaft speeds
Transfer position: 4WD Driving at a constant speed of30 km/h
Within 5 km/h
5 Vehicle speed Idling in 1st (Vehicle stopped) 0 km/h
Driving at a constant speed of 50 km/h in 3rd 50 km/h
6 Transfer lever posi- Ignition switch: ON Transfer shift lever position: 2H 2Htion Engine: Stopped Transfer shift lever position: 4H 4H
Transfer shift lever position:4HLc
4HLc
Transfer shift lever position:4LLc
4LLc
7 Transfer position Driving at a constantspeed of 10 km/h
Transfer shift lever position:2H® 4H
2H - 4H® 4H
Transfer shift lever position:4H® 4HLc
4H - 4HL® 4HL
Engine: StoppedSelector lever position:
Transfer shift lever position:4HLc® 4LLc
4HL - 4LL® 4LL
N Transfer shift lever position:4LLc® 4HLc
4HL - 4LL® 4HL
Driving at a constantspeed of 10 km/h
Transfer shift lever position:4HLc® 4H
4H - 4HL® 4H
Transfer shift lever position:4H® 2H
2H - 4H® 2H
8 Main relay voltage Ignition switch: ON System voltage (V)
9 Ignition voltage Ignition switch: ON System voltage (V)
10 Shift actuator cur-rent
During transfer selection (while motor is running) 0 A® 0.2 A® 0 A
11 Target current During transfer selection (while motor is running) 0 A® 1.5 A® 0 A
12 Shift actuator volt-age
Ignition switch: ONSelector lever position: NTransfer shift lever position: 2H ® 4H (or 4H ® 4HLc,4HLc® 4LLc)
System voltage (V)
Ignition switch: ONSelector lever position: NTransfer shift lever position: 4LLc®4HLc (or 4HLc®4H,4H® 2H)
System voltage (V)

AUTOMATIC TRANSMISSION - Troubleshooting <SS4 II>23-88
ItemNo.
Normal conditionInspection conditionsCheck item
21 Ignition switch Ignition switch: ON ON
Ignition switch: OFF OFF
22 Transmission identi-fication
Vehicles with A/T A/T
23 Stop lamp switch Ignition switch: ON Brake pedal: Depressed ONEngine: Stopped Brake pedal: Released OFF
24 Transfer lever Transfer shift lever position: 2H ONswitch 2H Transfer shift lever position: Other than the above OFF
25 Transfer lever Transfer shift lever position: 4H ONswitch 4H Transfer shift lever position: Other than the above OFF
26 Transfer lever Transfer shift lever position: 4HLc ONswitch 4HLc Transfer shift lever position: Other than the above OFF
27 Transfer lever Transfer shift lever position: 4LLc ONswitch 4LLc Transfer shift lever position: Other than the above OFF
28 Engine identification Petrol vehicles PETROL
Diesel vehicles DIESEL
30 Freewheel engage During 2WD ONsolenoid valve During 4WD OFF
31 Inhibitor switch N Selector lever position: N ON
Selector lever position: Other than the above OFF
32 Inhibitor switch P Selector lever position: P ON
Selector lever position: Other than the above OFF
33 2WD switch Driving conditions: 2WD (2H) ON
Driving conditions: Other than the above OFF
34 2WD/4WD switch Driving conditions: 2WD (2H), 4WD (4H) ON
Driving conditions: Other than the above OFF
35 4H switch Driving conditions: 4WD (4H), 4WD (4HLc) ON
Driving conditions: Other than the above OFF
36 Center differential Driving conditions: 4WD (4HLc), 4WD (4LLc) ONlock switch Driving conditions: Other than the above OFF
37 4LLc switch Driving conditions: 4WD (4LLc) ON
Driving conditions: Other than the above OFF
38 Freewheel engage During 2WD OFFswitch During 4WD ON

AUTOMATIC TRANSMISSION - Troubleshooting <SS4 II>AUTOMATIC TRANSMISSION - Troubleshooting <SS4 II> 23-89
ACTUATOR TEST TABLEItemNo.
Check item Test contents Inspection conditions Normal condition
1 Freewheel engage so-lenoid valve
The freewheel en-gage solenoid valveis driven.
Ignition switch: ONSelector lever position:P
If the freewheel engagesolenoidvalve is on, it is turned off, and ifit is off, it is turned on.
2 Shift actuator Themotor inside theshift actuator is runin the forward direc-tion.
PEngine: 0 r/minVehicle speed: 0 km/h(vehicle stopped)
If the transfer is at the 2H, 4H or4HLc position, it shifts from thatposition to the 2H, 4H, 4HLc,4LLc positions in that order, andthen returns to the originalposition. If it is at the 4LLcposition, no shifting is carriedout.
3 Themotor inside theshift actuator is runin the reverse direc-tion.
If the transfer is at the 4H, 4HLcor 4LLc position, it shifts fromthat position to the 4LLc, 4HLc ,4H, 2H positions in that order,and then returns to the originalposition. If it is at the 2Hposition,no shifting is carried out.
TRANSFER-ECU TERMINAL VOLTAGE TABLE
NOTEThere are two ECUs with the same shape inside the floorconsole, one above the other. The top ECU is the ABS-ECU,and it has a blue connector. The bottom ECU is thetransfer-ECU, and it has a green connector.
ABS-ECU
Transfer-ECU connector
Transfer-ECU

AUTOMATIC TRANSMISSION - Troubleshooting <SS4 II>23-90
Ter-minalNo.
Check item Inspection conditions Standard value
1 Shift actuator Transfer shift lever position: 2H® 4H 5.6 V ® 11.0 V ®5.6 V
3 Shift actuator Transfer shift lever position: 4H® 2H 5.6 V ® 11.0 V ®5.6 V
5 Accelerator pedal position Accelerator pedal: Fully closed (engine stopped) 0.985 - 1.085 Vsensor (APS) Accelerator pedal: Fully open (engine stopped) 4.0 V or higher
7 Front propeller shaft speedsensor
Measure the voltage between terminals 7 and 18 usingan oscilloscope.Engine: 2 000 r/minShift range: 4th
Oscilloscope checkprocedure (Refer toP. 23-69 <WavePattern B>.)
9 Rear propeller shaft speedsensor
Measure the voltage between terminals 9 and 18 usingan oscilloscope.Engine: 2 000 r/minShift range: 4th
Oscilloscope checkprocedure (Refer toP. 23-69 <WavePattern B>.)
11 Diagnosis output When normal (no diagnosis codes are output) 0 V and 5 V alterna-tes
13 Power supply Ignition switch: OFF 0 V
Ignition switch: ON System voltage
18 Sensor earth At all times 0.5 V or less
20 Transfer lever switch 2H Transfer shift lever position: 2H System voltage
Transfer shift lever position: Other than the above 0 V
21 Transfer lever switch 4H Transfer shift lever position: 4H System voltage
Transfer shift lever position: Other than the above 0 V
22 Transfer lever switch 4HLc Transfer shift lever position: 4HLc System voltage
Transfer shift lever position: Other than the above 0 V
23 Transfer lever switch 4LLc Transfer shift lever position: 4LLc System voltage
Transfer shift lever position: Other than the above 0 V
24 Diagnosis control � �
25 Earth At all times 0 V
26 Earth At all times 0 V
31 Backup power supply At all times System voltage
32 Inhibitor switch N Selector lever position: N System voltage
Selector lever position: Other than the above 0 V
33 Inhibitor switch P Selector lever position: P System voltage
Selector lever position: Other than the above 0 V
34 Stop lamp switch Brake pedal: Depressed System voltage
Brake pedal: Released 0 V
35 Earth At all times 0 V
37 Rear wheel indicator lamp Other than during transfer selection System voltage
38 Front wheel indicator lamp During 4WD System voltage
39 Earth <6G7> At all times 0 V

AUTOMATIC TRANSMISSION - Troubleshooting <SS4 II> 23-91
Ter-minalNo.
Standard valueInspection conditionsCheck item
40 Center differential locklamp
During 4WD (4HLc or 4LLc) System voltage
41 Solenoid valve A, B Transfer shift lever position: 2H 1 V
Transfer shift lever position: Other than 2H System voltage
42 Earth At all times 0 V
43 2WD switch Transfer shift lever position: 2H 0 V
Transfer shift lever position: Other than 2H 10.5 V
44 2WD/4WD switch Transfer shift lever position: 2H or 4H 0 V
Transfer shift lever position: 4HLc or 4LLc 10.5 V
45 4H switch Transfer shift lever position: 4H or 4HLc 0 V
Transfer shift lever position: 2H or 4LLc 10.5 V
46 Center differential lock Transfer shift lever position: 4HLc or 4LLc 0 Vswitch Transfer shift lever position: 2H or 4H 10.5 V
47 4HLc switch Transfer shift lever position: 4LLc 0 V
Transfer shift lever position: Other than 4LLc 10.5 V
50 Freewheel engage switch Transfer position: 2WD 10.5 V
Transfer position: 4WD 0 V

AUTOMATIC TRANSMISSION -Troubleshooting<Shift Lock and Key Interlock Mechanisms>23-92
TROUBLESHOOTING <SHIFT LOCK AND KEY INTERLOCKMECHANISMS>DIAGNOSIS FUNCTIONInput signal check procedureConnect the MUT-II or a voltage meter to the diagnosis connector, and check the inhibitor switch (reverse)input signal.(Refer to GROUP 00 - Guide to Troubleshooting and Inspection Procedures.)
INSPECTION CHART CLASSIFIED BY TROUBLE SYMPTOMSTrouble Symptom Inspection
procedureNo.
Referencepage
When the ignition switch is at a position other than the LOCK position, the selector levercan be moved from the P to the R position even though the brake pedal is not depressed.
1 23-92
When the ignition switch is at a position other than the LOCK position, the selector levercannot be moved from the P to the R position even though the brake pedal is beingdepressed.
2 23-92
The ignition switch is at the LOCK position, but the selector lever can be moved from theP to the R position when the brake pedal is depressed.
3 23-93
The selector lever cannot be easily moved from the P to the R position. 4 23-93
The selector lever cannot be moved from the R to the P position. 5 23-93
The ignition key cannot be turned to the LOCK position when the selector lever is at the Pposition.
6 23-93
The ignition key can be turned to the LOCK position even when the selector lever is at aposition other than the P position.
7 23-93
INSPECTION PROCEDURES FOR TROUBLE SYMPTOMInspection procedure 1
When the ignition switch is at a position other than theLOCK position, the selector lever can be moved from theP to the R position even though the brake pedal is notdepressed.
Probable cause
The cause is probably a malfunction of the selector lever assembly lock cam orof the shift lock cable unit.
D Malfunction of lock camD Malfunction of shift lock cable unit
Check by referring to the probable causes.
Inspection procedure 2
When the ignition switch is at a position other than theLOCK position, the selector lever cannot be moved fromthe P to the R position even though the brake pedal isbeing depressed.
Probable cause
The cause is probably a malfunction of the selector lever assembly, transmissioncontrol cable, shift lock cable unit or the ignition key cylinder lock bar.
D Malfunction of selector lever assemblyD Malfunction of transmission control cableD Malfunction of shift lock cable unitD Malfunction of lock bar
Check by referring to the probable causes.

AUTOMATIC TRANSMISSION - Troubleshooting<Shift Lock and Key Interlock Mechanisms>23-93
Inspection procedure 3
The ignition switch is at the LOCK position, but theselector lever can be moved from the P to the R positionwhen the brake pedal is depressed.
Probable cause
The cause is probably a malfunction of the shift lock cable unit or of the ignitionkey cylinder lock bar.
D Malfunction of shift lock cable unitD Malfunction of lock bar
Check by referring to the probable causes.
Inspection procedure 4
The selector lever cannot be easily moved from the P tothe R position.
Probable cause
The cause is probably a malfunction of the selector lever assembly, transmissioncontrol cable, shift lock cable unit or the ignition key cylinder lock bar.
D Malfunction of selector lever assemblyD Malfunction of transmission control cableD Malfunction of shift lock cable unitD Malfunction of lock bar
Check by referring to the probable causes.
Inspection procedure 5
The selector lever cannot be moved from the R to the Pposition.
Probable cause
The cause is probably a malfunction of the selector lever assembly or of thetransmission control cable.
D Malfunction of selector lever assemblyD Malfunction of transmission control cable
Check by referring to the probable causes.
Inspection procedure 6
The ignition key cannot be turned to the LOCK positionwhen the selector lever is at the P position.
Probable cause
The cause is probably a malfunction of the selector lever assembly, shift lockcable unit or the ignition key cylinder lock bar.
D Malfunction of selector lever assemblyD Malfunction of shift lock cable unitD Malfunction of lock bar
Check by referring to the probable causes.
Inspection procedure 7
The ignition key can be turned to the LOCK position evenwhen the selector lever is at a position other than the Pposition.
Probable cause
The cause is probably a malfunction of the shift lock cable unit or of the ignitionkey cylinder lock bar.
D Malfunction of shift lock cable unitD Malfunction of lock bar
Check by referring to the probable causes.

AUTOMATIC TRANSMISSION - On-vehicle Service23-94
ON-VEHICLE SERVICEBASIC ADJUSTMENT PROCEDURESAUTOMATIC TRANSMISSION FLUID (ATF) CHECK
NOTEWhen replacing the transmission with a new one, overhaulingthe existing transmission, or driving in a harsh condition, theATF cooler line should always be flushed out and ATF shouldbe replaced with a new one.
1. Drive the vehicle until the ATF temperature reaches thenormal temperature (70 - 80°C).
NOTE1) Measure ATF temperature using MUT-II.2) Check the oil level referring to the characteristics chart
shown at left if it takes some time to reach the normaloperation temperature of ATF (70 - 80°C.)
2. Park the vehicle on a level surface.3. Move the selector lever to all positions to fully charge
the torque converter and the fluid lines with ATF, andthen move the selector lever to the �N� position.
4. After wiping away any dirt from around the oil level gauge,pull out the oil level gauge and check the level of ATF.
NOTEIf the ATF has a burnt smell, or if it has become verycontaminated or dirty, it means that the ATF has becomecontaminated by minute particles from bushings (metal)or worn parts. In such a case, the transmission needsto be overhauled and the ATF cooler line needs to beflushed out.
5. Check that the ATF level is between the �HOT� markson the oil level gauge. If the ATF level is too low, addmore ATF until the level reaches between the �HOT�marks.
Automatic transmission fluid:DIA QUEEN ATF SP II M, SP III or equivalent
NOTEIf the ATF level is too low, the oil pump draws air intothe system along with the ATF, and air bubbles will thusform in the fluid circuit. This will cause a drop in fluidpressure and cause the shift points to change and theclutches and brakes to slip.If the ATF level is too high, the gear will churn the ATFand cause bubbles to develop, which can then causethe same problems as when the ATF fluid is too low.In either case, the air bubbles can cause overheatingand oxidation of the ATF, and also prevent the valves,clutches and brakes from operating normally. In addition,if bubbles develop in the ATF, the ATF can overflow fromthe transmission vent holes and be mistaken for leaks.
6. Securely re-insert the oil level gauge.
Oillevelgauge
0
(mm)-30
40
-20
-10
10
Temperature (°C)60
20
Oillevel
-4080

AUTOMATIC TRANSMISSION - On-vehicle Service 23-95
AUTOMATIC TRANSMISSION FLUID (ATF)REPLACEMENT
NOTEBefore replacing the transmission with a new one, overhaulingthe existing transmission, or connecting the cooler pipe tothe transmission, the ATF cooler line should always be flushedout.If you have an ATF changer, use the ATF changer to flushthe ATF. If you do not have an ATF changer, follow theprocedure given below.1. Remove the hose shown in the illustration which allows
the ATF to flow from the ATF cooler (built into the radiator)to the transmission.
2. Start the engine and discharge the ATF.Driving conditions: N range, idling
NOTEThe engine should be stopped within one minute of itbeing started. If the ATF has all been discharged beforethis, stop the engine at that point.Discharge amount: Approx. 4.0 L
3. Remove the drain plug at the bottom of the transmissioncase to drain out the remaining ATF.
Discharge amount: Approx. 2.0 L4. Install the drain plug with a gasket in between, and tighten
it to the specified torque.
Tightening torque: 32 ± 2 N×m5. Pour in new ATF through the oil filler tube.
Amount to add: Approx. 6.0 L
NOTEStop pouring in the ATF once 6.0 litre has been pouredin.
6. Repeat the operation in step 2.
NOTECarry out steps 2 and 6 so that at least 8.0 litre hasbeen discharged from the cooler hose. After this,discharge a small quantity of ATF and check forcontamination. If the ATF is contaminated, repeat steps5 and 6.
7. Pour in new ATF through the oil filler tube.
Amount to add: Approx. 4.0 L
8. Connect the hose which was disconnected in step 1, andthen securely re-insert the oil level gauge.
9. Start the engine, and let it run at idle for 1 - 2 minutes.10. Move the selector lever to all positions once, and then
return it to the N position.

AUTOMATIC TRANSMISSION - On-vehicle Service23-96
11. Check that the ATF level on the oil level gauge is at the�COLD� mark. If it is not up to this mark, add more ATF.
12. Drive the vehicle until the ATF temperature reaches thenormal temperature (70 - 80°C), and then re-check theATF level.The ATF level must be between the HOT marks.
NOTE(1) The �COLD� mark is for reference only; the �HOT�
marks should be used as the standard for judgment.(2) Measure ATF temperature using MUT-II.(3) Check the oil level referring to the characteristics chart
shown at left if it takes some time until reaching thenormal operation temperature of ATF (70 - 80C.)
13. Securely insert the oil level gauge into the oil filler tube.
ATF COOLER LINE FLUSHING PROCEDURE
NOTEIf replacing the transmission with a new one, if overhaulingthe existing transmission, or if the ATF has deterioratedor is contaminated, the ATF cooler line must always beflushed out.
1. Remove the hose shown in the illustration which allowsthe ATF to flow from the ATF cooler (built into the radiator)to the transmission.
2. Start the engine and discharge the ATF.Driving conditions: N range, idling
NOTEThe engine should be stopped within one minute of itbeing started.If the ATF has all been discharged beforethis, stop the engine at that point.
Discharge amount: Approx. 4.0 L3. Pour in new ATF through the oil filler tube.
Amount to add: Approx. 4.0 L
Oillevelgauge
0
(mm)
-30
40
-20
-10
10
Temperature (°C)60
20Oillevel
-4080

AUTOMATIC TRANSMISSION - On-vehicle Service 23-97
NOTEStop pouring in the ATF once 4.0 litre has been pouredin.
4. Repeat the operation in step 2.
NOTECarry out steps 2 and 6 so that at least 8.0 L has beendischarged from the cooler hose.After this, discharge asmall quantity of ATF and check for contamination.If theATF is contaminated, repeat steps 3 and 4.
5. Carry out the procedure in �Automatic Transmission Fluid(ATF) Replacement� from step 3 onwards.
ACCELERATOR PEDAL POSITION SENSOR (APS)ADJUSTMENTRefer to GROUP 13 - On-vehicle Service.
INHIBITOR SWITCH CONTINUITY CHECK
Item Terminal No.
1 2 3 7 8 9 10
P
R
N
D
NOTEThe inhibitor switch has 7 positions, but only four positions(P, R, N and D) are used.
Inhibitor switch
PR
ND32L

AUTOMATIC TRANSMISSION - On-vehicle Service23-98
INHIBITOR SWITCH AND CONTROL CABLEADJUSTMENT1. Move the selector lever to the N position.2. Loosen the adjusting nut, and set the manual control
lever upper and lower to the free condition.3. Move themanual control lever lower to the neutral position.4. Loosen the inhibitor switch body mounting bolt, and then
turn the inhibitor switch to adjust so that the hole at theend of the manual control lever lower and the hole inthe inhibitor switch body flange (section A - A in theillustration at left) are aligned.
5. Tighten the inhibitor switch body mounting bolt to thespecified torque.
Tightening torque: 11 ± 1 N×mNOTEBe careful not to let the inhibitor switch body slip outof place.
6. Gently push the transmission control cable in the directionof B as shown in the illustration at left, and tighten theadjusting nut to the specified torque.
Tightening torque: 24 ± 4 N×m7. Check that the selector lever is at the �N� position.8. Check that the transmission shifts to the correct range
corresponding to the position of the selector lever, andthat it functions correctly in that range.
2WD/4WD SWITCH CONTINUITY CHECKCheck the continuity between the terminals of the blackconnector shown in the illustration at left and the transfercase.
Transfer lever position Continuity
2H, 4H Continuity
4HLc, 4LLc No continuity
4H SWITCH CONTINUITY CHECKCheck the continuity between the milky-white connectorterminals shown in the illustration at left and the transfercase.
Transfer lever position Continuity
2H, 4LLc No continuity
4H, 4HLc Continuity
Flangehole
A
A
Section A - A
B
End hole
Inhibitorswitch body
Manual con-trol leverlower
Manual controllever upper
Adjusting nut
Manual con-trol leverlower
Inhibitor switchmounting bolt
Transmission controlcable

AUTOMATIC TRANSMISSION - On-vehicle ServiceAUTOMATIC TRANSMISSION - On-vehicle Service 23-99
CENTER DIFFERENTIAL LOCK SWITCH CONTINUITYCHECKCheck the continuity between the terminals of the brownconnector shown in the illustration at left and the transfercase.
Transfer lever position Continuity
2H, 4H No continuity
4HLc, 4LLc Continuity
2WD SWITCH CONTINUITY CHECKCheck the continuity between the terminals of the blackconnector shown in the illustration at left and the transfercase.
Transfer lever position Continuity
2H Continuity
4H, 4HLc, 4LLc No continuity
4LLc SWITCH CONTINUITY CHECKCheck the continuity between the terminals of the brownconnector shown in the illustration at left and the transfercase.
Transfer lever position Continuity
4LLc Continuity
2H, 4H, 4HLc No continuity
TRANSFER OIL CHECK1. Remove the oil filler plug.2. Check that the oil reaches the hole at the bottom of the
oil filler plug.3. Check that the oil is not severely contaminated, and that
it has an appropriate level of viscosity.4. Install the oil filler plug, and tighten it to the specified
torque.
Tightening torque: 32 ± 2 N×m
TRANSFER OIL CHANGE1. Remove the oil drain plug and drain the oil.2. Install the oil filler plug, and tighten it to the specified
torque.
Tightening torque: 32 ± 2 N×m
3. Remove the oil filler plug, and pour in oil until it reachesthe bottom of the oil filler plug.
Filler plugDrain plug
Transfer oil

AUTOMATIC TRANSMISSION - On-vehicle Service23-100
Specified lubricant:Hypoid gear oil SAE 75W-90 or 75W-85Wconforming to API GL-4
Oil level: 2.8 L
4. Install the oil filler plug, and tighten it to the specifiedtorque.
Tightening torque: 32 ± 2 N×m

AUTOMATIC TRANSMISSION - On-vehicle Service 23-101
LOCATION OF CONTROL COMPONENTSName Symbol Name Symbol
Input shaft speed sensor O Freewheel engage switch N
Output shaft speed sensor V Vehicle speed sensor T
Crank angle sensor <6G7> B Stop lamp switch F
Engine speed sensor <4M4> D Shift actuator S
A/T fluid temperature sensor U A/T control solenoid valve assembly U
Inhibitor switch P Diagnosis connector I
Wide open throttle switch H Engine-ECU <4M4> L
Shift switch (UP, DOWN) J A/T-ECU <4M4> L
Select switch J Engine-A/T-ECU <6G7> L
Dual pressure switch C Transfer-ECU E
Accelerator pedal position sensor (APS) G A/T control relay M
Center differential lock switch R
Solenoid valve A, B A 2WD/4WD switch R
Transfer lever switch K 2WD switch R
Front propeller shaft speed sensor Q 4H switch R
Rear propeller shaft speed sensor W 4LLc switch R
A B C D
E
F G H I J K
L M
N O P Q R S T
U V
A C
<6G7> <4M4>
W

AUTOMATIC TRANSMISSION - On-vehicle Service23-102
CONTROL COMPONENT CHECKSCRANK ANGLE SENSOR CHECK <6G7>Refer to GROUP 13A - Troubleshooting.
ENGINE SPEED SENSOR CHECK <4M4>Refer to GROUP 13B - Troubleshooting.
ACCELERATOR PEDAL POSITION SENSOR (APS)CHECKRefer to GROUP 13A - On-vehicle Service.INHIBITOR SWITCH CONTINUITY CHECKRefer to P.23-98.
STOP LAMP SWITCH CHECKRefer to 35A - Brake Pedal.
VEHICLE SPEED SENSOR CHECKRefer to GROUP 54 - Combination Meter.
DUAL PRESSURE SWITCH CHECKRefer to GROUP 55A - On-vehicle Service.
A/T FLUID TEMPERATURE SENSOR CHECK1. Remove the A/T fluid temperature sensor.
2. Measure the resistance between terminals (1) and (2)of the A/T fluid temperature sensor.Standard value:Temperature (°C) Resistance [kW]
0 16.7 - 20.5
20 7.3 - 8.9
40 3.4 - 4.2
60 1.9 - 2.2
80 1.0 - 1.2
100 0.57 - 0.69
A/T fluid temperaturesensor
ATF

AUTOMATIC TRANSMISSION - On-vehicle ServiceAUTOMATIC TRANSMISSION - On-vehicle ServiceAUTOMATIC TRANSMISSION - On-vehicle Service 23-103
NOTEThe N range indicator lamp on the combination meterflashes when the temperature reaches approximately125°C or higher, and then stops flashing when thetemperature drops below approximately 115°C.
3. If the A/T fluid temperature sensor resistance and thetemperature when the N range indicator lamp is flashingor switched off are outside the standard value ranges,replace the A/T fluid temperature sensor.
A/T CONTROL RELAY CHECK1. Remove the A/T control relay.
2. Use jumper leads to connect terminal (2) of the A/T controlrelay to the battery (�) terminal, and terminal (4) to thebattery (+) terminal.
3. Check the continuity between terminals (1) and (3) ofthe A/T control relay while alternately connecting anddisconnecting the jumper leads from the battery terminals.
Jumper leads Continuity between terminals(1) and (3)
Connected Continuity
Disconnected No continuity
4. If there is a malfunction, replace the A/T control relay.
A/T CONTROL SOLENOID VALVE ASSEMBLY CHECK1. Remove the valve body cover.2. Disconnect the connectors for each solenoid valve.
A/T control relay
UD solenoid valve
DCC solenoid valve LR solenoid valve
OD solenoid valve
2nd solenoid valveRED solenoid valve

AUTOMATIC TRANSMISSION - On-vehicle Service23-104
3. Measure the resistances between terminals (1) and (2)of each solenoid valve.
Standard value:
Name Resistancevalue
Damper clutch control (DCC) solenoidvalve
2.7 - 3.4 kW at20°C
Low & reverse solenoid valve (LR solenoidvalve)
Second solenoid valve (2ND solenoidvalve)
Underdrive solenoid valve (UD solenoidvalve)
Overdrive solenoid valve (OD solenoidvalve)
Reduction (RED) solenoid valve
4. If a measurement value is outside the standard valuerange, replace the solenoid valve.
SELECT SWITCH CHECKRefer to P.23-119.
SHIFT SWITCH ASSEMBLY CHECKRefer to P.23-119.

AUTOMATIC TRANSMISSION - On-vehicle Service 23-105
TORQUE CONVERTER STALL TESTThe purpose of this test is to measure the maximum enginespeed when the torque converter stalls in D or R rangesin order to check the torque converter operation and theholding performance of the clutches and brakes which arebuilt into the transmission.
NOTEFor safety, the front and rear of the vehicle should be keptclear of other people while this test is being carried out.
1. Check the ATF level, the ATF temperature and the enginecoolant temperature.D ATF level: �HOT� position on oil level gaugeD ATF temperature: 70 - 80°CD Engine coolant temperature: 80 - 100°C
2. Place wheel locks on both the left and right front wheels.3. Pull the parking brake lever to apply the parking brake
and depress the brake pedal fully.4. Start the engine.5. Move the selector lever to the D position, fully depress
the accelerator pedal and quickly take a reading of themaximum engine speed at this time.
Caution(1) Do not keep the throttle fully open for any longer
than 8 seconds.(2) If carrying out the stall test two or more times,
move the selector lever to the N position and runthe engine at a speed of 1000 r/min to let theATF cool down before the next test is carried out.
Standard value - Stalling speed:2,200 - 2,700 r/min <6G7>2,400 - 2,900 r/min <4M4>
6. Move the selector lever to the R position and repeat thetest described above.
Standard value - Stalling speed:2,200 - 2,700 r/min <6G7>2,400 - 2,900 r/min <4M4>
Torque converter stall test judgment1. High stalling speed in both D and R ranges
D Low line pressureD Low & reverse brake slipping
2. High stalling speed in D range onlyD Underdrive clutch slipping
3. High stalling speed in D range onlyD Reverse clutch slippingD Reduction brake slipping
4. High stalling speed in both D and R rangesD Malfunction of torque converterD Poor engine output
Torque converter
Reverse clutch
Low &reversebrake
Underdrive clutch
Reduction brake
One-way clutch

AUTOMATIC TRANSMISSION - On-vehicle Service23-106
FLUID PRESSURE TEST1. Let the engine warm up until the ATF temperature is
70 - 80°C.2. Jack up the vehicle so that the tires can spin freely.3. Install the special tool (MD998330: 2 992 kPa oil pressure
gauge) and the adapters (MD998332,MD998900 ) to eachhydraulic pressure outlet port.
4. Measure the various hydraulic pressures under theconditions given in the standard hydraulic pressure table,and check that the measurements are within the standardvalue ranges.
5. If themeasurements are outside the standard value range,remedy the problem while referring to the hydraulicpressure test diagnosis table.
NOTERC : Reverse clutch pressure portTR : Torque converter pressure portTA : Damper clutch pressure portOC : Overdrive clutch pressure port2B : Second brake pressure portLB : Low & brake pressure portUC : Underdrive clutch pressure portRB : Reduction brake pressure portDC : Direct clutch pressure port
STANDARD HYDRAULIC PRESSURE TABLEMeasurement conditions Standard hydraulic pressure kPa
Selectorleverposition
Shiftrangeposition
En-ginespeedr/min
Underdriveclutch pres-sure[UD pres-sure]
Reverseclutch pres-sure[RC pres-sure]
Overdriveclutchpressure[OD pres-sure]
Directclutchpressureport[DIR pres-sure]
Low & brakepressure[LR pressure]
Secondbrake pres-sure[2ND pres-sure]
Reductionbrake pres-sure[RB pres-sure]
Torqueconverterpressure[DR pres-sure]
P - 2,500 - - - - 260 - 340 - 1,010 - 1,050 500 - 700
R Reverse 2,500 - 1,270 - 1,770 - - 1,270 - 1,770 - 1,270 - 1,770 500 - 700
N - 2,500 - - - - 260 - 340 - 260 - 340 500 - 700
Sportsmode
1st 2,500 1,010 - 1,050 - - - 1,010 - 1,050 - 1,010 - 1,050 500 - 700
2nd 2,500 1,010 - 1,050 - - - - 1,010 - 1,050 1,010 - 1,050 500 - 700
3rd 2,500 784 - 882 - 784 - 882 - - - 784 - 882 450 - 650
4th 2,500 784 - 882 - 784 - 882 784 - 882 - - - -
5th 2,500 784 - 882 - 784 - 882 784 - 882 - 784 - 882 - -

AUTOMATIC TRANSMISSION - On-vehicle ServiceAUTOMATIC TRANSMISSION - On-vehicle Service 23-107
HYDRAULIC PRESSURE TEST DIAGNOSIS TABLE
Symptom Problem location
All hydraulic pressures are too high Malfunction of regulator valve
All hydraulic pressures are too low Malfunction of oil pumpBlocked oil filterBlocked oil coolerMalfunction of regulator valveMalfunction of relief valveIncorrect valve body installation
Abnormal hydraulic pressure in R rangeonly
Malfunction of regulator valve
Abnormal hydraulic pressure in 3rd or 4thonly
Malfunction of regulator valveMalfunction of switch bulb
Abnormal UD pressure only Malfunction of oil seal K, L, M or QMalfunction of underdrive solenoid valveMalfunction of underdrive pressure control valveAbnormality with check ballBlocked orificesIncorrect valve body installation
Abnormal REV pressure only Malfunction of oil seal A, B or CAbnormality with check ballBlocked orificesIncorrect valve body installation
Abnormal OD pressure only Malfunction of oil seal D, E or FMalfunction of overdrive solenoid valveMalfunction of overdrive pressure control valveAbnormality with check ballBlocked orificesIncorrect valve body installation
Abnormal DIR pressure only Malfunction of oil seal R, S or TMalfunction of low & reverse solenoid valve (also used for the directclutch)Malfunction of low & reverse pressure control valveMalfunction of switch bulbMalfunction of fail-safe valve CBlocked orificesIncorrect valve body installation
Abnormal LR pressure only Malfunction of oil seal I, J or PMalfunction of low & reverse solenoid valve (also used for the directclutch)Malfunction of low & reverse pressure control valveMalfunction of switch bulbMalfunction of fail-safe valve AAbnormality with check ballBlocked orificesIncorrect valve body installation
Abnormal 2ND pressure only Malfunction of oil seal G, H or OMalfunction of second solenoid valveMalfunction of second pressure control valveMalfunction of fail-safe valve BBlocked orificesIncorrect valve body installation

AUTOMATIC TRANSMISSION - On-vehicle Service23-108
Symptom Problem location
Abnormal RED pressure only Malfunction of oil seal U or VMalfunction of reaction solenoid valveMalfunction of reduction pressure control valveBlocked orificesIncorrect valve body installation
Abnormal DR pressure only Blocked oil coolerMalfunction of oil seal NMalfunction of damper clutch control solenoid valveMalfunction of damper clutch control solenoid valveMalfunction of torque converter pressure control valveBlocked orificesIncorrect valve body installation
Pressure applied to non-operating element Incorrect transmission control cable adjustmentMalfunction of manual valveIncorrect valve body installation

AUTOMATIC TRANSMISSION - On-vehicle Service 23-109
Oil seal layout
A B C D E F G H I J K L MN
O
Q
P
T S R
V
U

AUTOMATIC TRANSMISSION - On-vehicle Service23-110
HYDRAULIC CIRCUITParking & Neutral
2 41 3 5 7
810
11 12
13
1415
1617 18 19 20 21
22 23 24 25 26 27
28
29
6
30
Lubrica-tion
8 8 8 8 89
31 3233 34
35
1. Reverse clutch2. LR brake3. 2nd brake4. UD clutch5. OD clutch6. RED clutch7. DIR clutch8. Accumulator9. Check ball10. Damper clutch11. Fail-safe valve A12. Fail-safe valve B13. Fail-safe valve C14. Damper clutch control solenoid valve15. Switch bulb16. Oil cooler17. LR pressure control valve18. 2nd pressure control valve
19. UD pressure control valve20. OD pressure control valve21. RED pressure control valve22. DCC solenoid valve23. LR solenoid valve24. 2ND solenoid valve25. UD solenoid valve26. OD solenoid valve27. RED solenoid valve28. Torque converter pressure control valve29. Regulator valve30. Manual valve31. Oil filter32 Oil pump33. Relief valve34. Oil strainer35. Oil pan

AUTOMATIC TRANSMISSION - On-vehicle Service 23-111
LINE PRESSURE ADJUSTMENT1. Discharge the ATF, and then remove the valve body cover.2. Turn the adjusting screw shown in the illustration at left
to adjust the UD pressure until it is at the standard value.The pressure increases when the screw is turnedanti-clockwise.
NOTEAdjust to the middle of the standard range when thetransmission is at the 1st or 2nd gear.
Standard value: 1,010 - 1,050 kPa
Change in pressure for a single full turn of theadjusting screw: 35 kPa
3. Install the valve body cover, and then pour in the specifiedamount of ATF.
4. Carry out a fluid pressure test. (Refer to P.23-106.)Readjust if necessary.
SELECTOR LEVER OPERATION CHECK1. Apply the parking brake, and check that the selector lever
moves smoothly and accurately to each range position.2. Check that the engine starts when the selector lever is
at the N or P position, and that it does not start whenthe selector lever is in any other position.
3. Start the engine, release the parking brake, and checkthat the vehicle moves forward when the selector leveris moved from N range to 1st or 2nd gear, and that thevehicle reverses when the selector lever is moved toR range.
4. Stop the engine.5. Turn the ignition switch to the ON position, and check
that the backup lamp illuminates and the buzzer soundswhen the selector lever is shifted from P to R range.
NOTEThe A/T mis-operation prevention mechanism is providedso that the selector lever cannot be moved from the Pposition if the ignition switch is at a position other thanthe LOCK (OFF) position and the brake pedal is notdepressed.
Adjusting screw
Operation when the ignition switch isturned to a position other than LOCK(OFF), the brake pedal is depressed andthe pushbutton is kept pressed
Operation when the pushbutton isnot pressed
Operation when the pushbutton iskept pressed

AUTOMATIC TRANSMISSION - On-vehicle Service23-112
KEY INTERLOCK MECHANISM CHECK1. Carry out the following check.Inspectionprocedure
Inspection conditions Check details (Normal condition)
1 Brake pedal:Depressed
Ignition switch position:LOCK (OFF) or pulled out
The selector lever cannot be moved from the P positionto any other position when the pushbutton on theselector lever is not being pressed.
2 Ignition switch position:Other than �LOCK (OFF)or pulled out�
The selector lever can easily be moved from the Pposition to some other position when the pushbutton onthe selector lever is being pressed.
3 Brake pedal:Released
Selector lever position:Other than �P�
The ignition switch will not turn to the LOCK position.
4 Selector lever position:�P�
The ignition switch can turn smoothly to theLOCK (OFF)position.
2. If the above operations do not occur correctly, adjust theshift lock cable unit by the following procedure.(1) Remove the front floor console, and then provisionally
install the selector lever knob. (Refer to GROUP 52A.)(2) Move the selector lever to the P position and turn
the ignition switch to the LOCK (OFF) position.(3) Loosen the shift lock cable unit fixing bolt, and then
while pushing the lever in the direction of B and theunit in direction of C, tighten the bolt to the specifiedtorque of 5.0 ± 1.0 N×m.
(4) Lift the lock guide to unlock the key interlock cable.(5) While pushing the cap of the key interlock cable in
the direction of B, lower the lock guide to lock thecable.
NOTEThe lock position at this time (the amount by whichthe cap is pushed) represents the amount ofadjustment for the key interlock cable. If the keyinterlock cable does not operate correctly, adjust thelock position.
3. After adjusting, check the operation once more. If theoperation is still incorrect, replace the shift lock cable unit.(Refer to P.23-120)
Lock releasedLock guideView A
Locked
LeverCap
Key interlock cable
Shift lock cable unitFixing bolt
C
B
A

AUTOMATIC TRANSMISSION - On-vehicle Service 23-113
SHIFT LOCK MECHANISM CHECK1. Carry out the following check.Inspectionprocedure
Inspection conditions Check details (Normal condition)
1 Brake pedal:Depressed
Ignition switch position:�ACC�
The selector lever cannot be moved from the P positionto any other position when the pushbutton on theselector lever is not being pressed.
2 The selector lever can easily be moved from the Pposition to some other position when the pushbutton onthe selector lever is being pressed.
3 Brake pedal: The selector lever can easily be moved from the RReleased position to the P position when the pushbutton on the
selector lever is being pressed.
2. If the above operations do not occur correctly, adjust theshift lock cable unit by the following procedure.(1) Remove the front floor console, and then provisionally
install the selector lever knob.(Refer to GROUP 52A.)(2) Move the selector lever to the P position and turn
the ignition switch to the LOCK (OFF) position.(3) Loosen the shift lock cable unit fixing bolt, and then
while pushing the lever in the direction of B and theunit in direction of C, tighten the bolt to the specifiedtorque of 5.0 ± 1.0 N×m.
(4) Lift the lock guide to unlock the key interlock cable.(5) While pushing the cap of the key interlock cable in
the direction of B, lower the lock guide to lock thecable.
NOTEThe lock position at this time (the amount by whichthe cap is pushed) represents the amount ofadjustment for the key interlock cable. If the keyinterlock cable does not operate correctly, adjust thelock position.
3. After adjusting, check the operation once more. If theoperation is still incorrect, replace the shift lock cable unit.(Refer to P.23-120)
Lock releasedLock guideView A
Locked
LeverCap
Key interlock cable
Shift lock cable unitFixing bolt
C
B
A

AUTOMATIC TRANSMISSION - On-vehicle Service23-114
TRANSFER SHIFT LEVER OPERATION CHECK1. Check that the transfer shift lever moves smoothly and
correctly to each transfer positionwhen the lever is pusheddownwards and moved.
2. Apply the parking brake, turn the ignition switch to theON position and move the selector lever to N range.
3. Check that the 4WD indicator lamp illuminates, flashesor switches off according to the pattern shown in theillustration when the transfer shift lever is move to eachtransfer position.
4. If the selection is not completed even after 5 secondsor more have passed, carry out the following procedure.(1) Return the transfer shift lever to the position it was
at before selection.(2) Start the engine, drive the vehicle straight forward,
and then stop the engine.(3) Apply the parking brake, and then move the selector
lever to the N position.(4) Operate the transfer shift lever once more.
NOTEIf the vehicle is not fully stopped or if the selectorlever is at a position other than N when selecting4HLc or 4LLc, the 4WD indicator lamp will flash morequickly than normal, and the 4WD range will not beselected. This is a normal phenomenon which servesto control the smooth selection of 4HLc and 4LLc.
TRANSMISSION CONTROL CABLEADJUSTMENT1. Move the selector lever to the N position.2. Loosen the upper control lever adjusting nut.3. Check that the inhibitor switch is at N range.4. Adjust the upper control lever so that there is no slackness
or excessive tightness in the transmission control cable,and then tighten the adjusting nut to the specified torque.
Tightening torque: 24 ± 4 N×m
5. Check that the transmission shifts to the correct rangecorresponding to the position of the selector lever, andthat it functions correctly in that range.
:Flashing:On :Off
<4HLc« 4LLc>
<4H« 4HLc>
<2H« 4H>
Selectioncompleted
2H 4H
4LLc
4H 4HLc
4HLc
Beforeselection
Duringselection
Transmission
Upper control lever
Front of vehicleAdjusting nut

AUTOMATIC TRANSMISSION - On-vehicle Service 23-115
TRANSFER-ECU CHECK1. Remove the indicator panel and the floor console front
panel. (Refer to GROUP 52A - Floor Console.)2. Measure the transfer-ECU terminal voltage. (Refer to
P.23-89.)
POSITION INDICATOR LAMP CHECK1. Remove the indicator panel. (Refer to GROUP 52A -
Floor Console.)2. Check that there is continuity between terminals (1) and
(2) and between terminals (3) and (4).
Transfer-ECU
Floor console
Indicator panel

AUTOMATIC TRANSMISSION - Transmission Control23-116
TRANSMISSION CONTROLREMOVAL AND INSTALLATION
NOTEWhen removing and installing the transmission control cable and shift lock cable unit, be careful notto hit them against the SRS-ECU.
2
3
1
7
4
5.0 ± 1.0 N×m
12 ± 2 N×m
5.0 ± 1.0 N×m
8
12 ± 2 N×m
5
6
9
Selector lever assembly andtransmission control cableassembly removal stepsD Front floor console (Refer to GROUP
52A.)1. Transfer shift lever and bracket as-
sembly"BA 2. Shift lock cable unit connection
3. Transmission control harness connec-tion
4. Transmission control cable connection5. Selector lever assemblyD Front exhaust pipe (Refer to GROUP
15.)
AA" "AA 6. Transmission control cable assembly
Transfer shift lever removal stepsD Indicator panel (Refer to GROUP 52A
- Floor Console.)7. Transfer shift lever8. Bracket
Wide open throttle switch removalstep9. Wide open throttle switch

AUTOMATIC TRANSMISSION - Transmission Control 23-117
REMOVAL SERVICE POINTAA" TRANSMISSION CONTROL CABLE ASSEMBLY
REMOVAL1. Support the transmission mount center member with a
transmission jack, and then remove the transmissionmount center member mounting bolts.
2. Lower the transmission so that there is enough roomavailable to remove the transmission control cableassembly mounting nuts, and then remove thetransmission control cable assembly mounting nuts.
INSTALLATION SERVICE POINTS"AA TRANSMISSION CONTROL CABLE ASSEMBLY
INSTALLATIONAfter installing the transmission control cable assembly, installthe transmission mount center member mounting bolts andtighten them to the specified torque of 44 ± 10 N×m.
"BASHIFT LOCK CABLE UNIT INSTALLATION1. Provisionally install the selector lever knob, and thenmove
the selector lever to the P position and turn the ignitionswitch to the LOCK (OFF) position.
2. After installing the rod of the shift lock cable unit to thelock cam of the selector lever assembly, install the boltsof the shift lock cable unit.
3. Check the operation of the selector lever assembly. (Referto P.23-111.)
INSPECTIONTRANSFER SHIFT LEVER SWITCH CONTINUITYCHECK
Switch position Terminal No.
1 2 3 4 5
2H
4H
4HLc
4LLc
Transmis-sion jack
Transmission mountcenter membermounting bolts
Bolt
Lock cam
Rod
4LLc4HLc 4H
2H

AUTOMATIC TRANSMISSION - Transmission Control23-118
SELECTOR LEVER ASSEMBLYDISASSEMBLY AND REASSEMBLY
13
2
1
3 5
4.9 ± 1.0 N×m
14
2.5 ± 0.4 N×m
4
7
9
8
6 1817
11
10
10
19
21
20
16
13 ± 2 N×m
12
15
Disassembly steps1. Knob cover B2. Knob cover A3. Shift knob4. Sleeve5. Pushbutton6. Detent spring7. Snap ring8. Shaft9. Arm assembly10. Bushing11. Arm cover
12. Bolt13. Universal joint14. Lever assembly15. Stay cover16. Shift switch assembly17. Snap ring18. Malfunction of lock cam19. Detent plate assembly20. Collar21. Base bracket

AUTOMATIC TRANSMISSION - Transmission Control 23-119
INSPECTIONSHIFT SWITCH ASSEMBLY CONTINUITY CHECK
Switch position Terminal No.
1 3 4 5 7 8
Select switch ON
OFF
Shift switch ON(UP)
OFF
Shift switch ON(DOWN) OFF
Shift switch(DOWN)
ONON
OFF
ON
OFF
Shift switch(UP)
Select switch

AUTOMATIC TRANSMISSION - Shift Lock and Key Interlock Mechanisms23-120
SHIFT LOCK AND KEY INTERLOCK MECHANISMSREMOVAL AND INSTALLATION
NOTEWhen removing and installing the transmission control cable and shift lock cable unit, be careful notto hit them against the SRS-ECU.
5.0 ± 1.0 N×m
5
4
2
1
3
6
View A32
:Tab position
A
Removal stepsD Front floor console (Refer to GROUP
52A.)D Switch panel and lower column cover
(Refer to GROUP 52A - InstrumentPanel.)
"AA 1. Shift lock cable unit connection
AA" 2. Key interlock cable connection3. Cover4. Lock bar5. Shift lock cable connection6. Shift lock cable unit

AUTOMATIC TRANSMISSION - Shift Lock and Key Interlock Mechanisms 23-121
REMOVAL SERVICE POINTAA"KEY INTERLOCK CABLE REMOVALTurn the ignition switch to the ACC position, and then pullthe key interlock cable out from the ignition key cylinder.
INSTALLATION SERVICE POINT"AASHIFT LOCK CABLE UNIT INSTALLATION1. Provisionally install the selector lever knob, and thenmove
the selector lever to the P position and turn the ignitionswitch to the LOCK (OFF) position.
2. After installing the rod of the shift lock cable unit to thelock cam of the selector lever assembly, install the boltsof the shift lock cable unit.
3. Check the operation of the selector lever assembly.(Referto P.23-111.)
Bolt
Lock cam
Rod

AUTOMATIC TRANSMISSION - Transmission Assembly23-122
TRANSMISSION ASSEMBLYREMOVAL AND INSTALLATION
NOTEThe rear propeller shaft incorporates a carbon fibre-reinforced plastic tube, so be sure to refer to GROUP25 during removal.
<6G7>
Pre-removal and Post-installation OperationsD Skid Plate And Under Cover Removal and InstallationD Transmission Fluid and Transfer Oil Draining and
Filling (Refer to P.23-95 and P.23-99.)D Front and Rear Propeller Shaft Removal and
Installation (Refer to GROUP 25.)
D Front Exhaust Pipe Removal and Installation(Refer to GROUP 15.)
D Radiator Shroud Lower Cover Removal andInstallation (Refer to GROUP 14.)
24 ± 4 N×m
4
5
9
6
8
7
2
1
44 ± 8 N×m
30 ± 3 N×m
49 ± 3 N×m
36 ± 5 N×m11 ± 1 N×m
11 ± 1 N×m
3
11 ± 1 N×m
Removal steps1. Oil level gauge assembly2. Transmission control cable connection
AA" 3. Drive plate connection bolts4. Heater hose connection5. Cover
6. Starter motor7. Starter cover8. Oil pan connection bolts9. Battery cable connection

AUTOMATIC TRANSMISSION - Transmission Assembly 23-123
1524 ± 5 N×m
26 ± 4 N×m
44 ± 10 N×m
44 ± 10 N×m
44 ± 10 N×m
24 ± 5 N×m
53 ± 5 N×m35 ± 6 N×m
36 ± 6 N×m
10
16 13
14
121117
42 ± 2 N×m
5.0 ± 1.0 N×m
89 ± 9 N×m 44 ± 10 N×m
74 ± 10 N×m
10. Oil cooler tube connection11. Dynamic damper12. Tension wire bracketD Support the transmission with a
transmission jack13. Transmission mount center member
assembly
14. Transmission mount insulatorassembly
AB" 15. Transmission harness connectorconnection
"AA 16. Transmission assembly17. Tension wire

AUTOMATIC TRANSMISSION - Transmission Assembly23-124
<4M4>
Pre-removal and Post-installation OperationsD Skid Plate and Under Cover Removal and InstallationD Transmission Fluid and Transfer Oil Draining and
Filling (Refer to P.23-95 and P.23-99.)D Front and Rear Propeller Shaft Removal and
Installation (Refer to GROUP 25.)D Front Exhaust Pipe and Catalytic Converter Removal
and Installation (Refer to GROUP 15.)
D Radiator Shroud Lower Cover Removal andInstallation (Refer to GROUP 14.)
D Intercooler Assembly Removal and Installation(Refer to GROUP 15.)
22 ± 4 N×m
8
7
3
9
2
1
44 ± 8 N×m
49 ± 3 N×m
49 ± 6 N×m5
6
4
11 ± 1 N×m
Removal steps1. Oil level gauge assembly2. Transmission control cable connection3. Exhaust support bracket4. Battery cable connection5. Spacing rubber
6. Dust coverAA" 7. Drive plate connection bolts
8. Heater hose connection9. Starter motor

AUTOMATIC TRANSMISSION - Transmission Assembly 23-125
15
24 ± 5 N×m
26 ± 4 N×m
44 ± 10 N×m
44 ± 10 N×m
44 ± 10 N×m
24 ± 5 N×m
53 ± 5 N×m
35 ± 6 N×m
35 ± 6 N×m
10
16 13
14
12
1117
42 ± 2 N×m
5.0 ± 1.0 N×m
44 ± 10 N×m
49 ± 6 N×m
10. Oil cooler tube connection11. Dynamic damper12. Tension wire bracketD Support the transmission with a
transmission jack13. Transmission mount center member
assembly
14. Transmission mount insulatorassembly
AB" 15. Transmission harness connectorconnection
"AA 16. Transmission assembly17. Tension wire
REMOVAL SERVICE POINTSAA"DRIVE PLATE CONNECTION BOLT REMOVAL1. While turning the crankshaft, remove the six connection
bolts.2. Push the torque converter towards the transmission so
that none of it is near the engine.

AUTOMATIC TRANSMISSION - Transmission Assembly23-126
AB" TRANSMISSION HARNESS CONNECTORDISCONNECTION
1. Lower the transmission to a position where thetransmission harness connector can be disconnected,and then disconnect the connector.
Symbol Connector nameA Transmissionwiring harness andbatterywiringharness
combinationB Output shaft speed sensorC A/T control solenoid valve assemblyD 4LLc (Direct low range 4WD) switchE 2WHEY operation detection switchF Rear propeller shaft speed sensorG Vehicle speed sensorH Shift actuatorI 2WHEY/4WD detection switchJ 4H (Full time 4WD) detection switchK Center differential lock detection switchL Front propeller shaft speed sensorM Oxygen sensor (Rear)N Inhibitor switchO Oxygen sensor (Front)P Input shaft speed sensor
2. Place the disconnected transmission harness so that itstays on the vehicle body.
INSTALLATION SERVICE POINTS"AA TRANSMISSION ASSEMBLY INSTALLATIONThe bolt lengths differ according to where they are to beinstalled, so do not install them in the wrong place.
<6G7>
Bolts d ´ l mmA 12 ´ 40B 12 ´ 55
<4M4>
Bolts d ´ l mmC 10 ´ 25D 10 ´ 45E 10 ´ 50
NO
LK
J
ED
CB
A
I
F G
H
PTransmissionwiring harness
M
A
B
AA
A
B
<6G7>
Startermotor
<4M4>
Startermotor
C
CEE
C
D
D
B
C
D
C

AUTOMATIC TRANSMISSION - Transmission Oil Cooler 23-127
TRANSMISSION OIL COOLERREMOVAL AND INSTALLATION
Pre-removal and Post-installation OperationsD Transmission Fluid Draining and Filling
(Refer to P.23-95 and P.23-99.)D Skid Plate and Under Cover Removal and Installation
<6G7>
8
17
21
18
15
16
14
1
14
19
20
23
10
13
5
4
67
12
11
5.0 ± 1.0 N×m
5.0 ± 1.0 N×m42 ± 2 N×m
12 ± 2 N×m
9
5.0 ± 1.0 N×m
12 ± 2 N×m
Transmission oil cooler removalsteps1. Hose2. Distance piece3. Bushing4. Transmission oil return tube5. Hose6. Distance pieceD Headlight assembly
(Refer to GROUP 54A.)7. Bushing8. Transmission oil cooler bracket9. Distance piece10. Bushing11. Transmission oil cooler bracket12. Transmission oil cooler
Transmission oil cooler tubeassembly removal steps
"BA 13. Eye bolt"BA 14. Gasket
15. Transmission oil cooler tube bracket"BA 16. Transmission oil cooler tube assembly"AA 17. Return hose"AA 18. Feed hose
19. Hose20. Hose21. Transmission oil cooler tube assembly

AUTOMATIC TRANSMISSION - Transmission Oil Cooler23-128
<4M4>
8
17
21
18
15 16
14
1
14
19
20
23
10
13
5
4
67
12
11
5.0 ± 1.0 N×m
5.0 ± 1.0 N×m 42 ± 2 N×m
12 ± 2 N×m
9
5.0 ± 1.0 N×m
12 ± 2 N×m
Transmission oil cooler removalsteps1. Hose2. Distance piece3. Bushing4. Transmission oil return tube5. Hose6. Distance pieceD Headlight assembly
(Refer to GROUP 54A.)7. Bushing8. Transmission oil cooler bracket9. Distance piece10. Bushing11. Transmission oil cooler bracket12. Transmission oil cooler
Transmission oil cooler tubeassembly removal steps
"BA 13. Eye bolt"BA 14. Gasket
15. Transmission oil cooler tube bracket"BA 16. Transmission oil cooler tube assembly"AA 17. Return hose"AA 18. Feed hose
19. Hose20. Hose21. Transmission oil cooler tube assembly

AUTOMATIC TRANSMISSION - Transmission Oil Cooler, A/T-ECU 23-129
INSTALLATION SERVICE POINTS"AA FEED HOSE/RETURN HOSE INSTALLATIONInstall the feed hose and return hose so that the markingsare positioned as shown in the illustration.
"BA TRANSMISSION OIL COOLER TUBE ASSEMBLY/GASKET/ EYE BOLT INSTALLATION
Provisionally tighten the eye bolts onto the transmission andprovisionally secure the pipes with the clamps, and then fullytighten the eye bolts.Furthermore, tighten the clamps in order starting from theone closest to the transmission.
A/T-ECUREMOVAL AND INSTALLATION<6G7> Refer to GROUP 13A - Engine-A/T-ECU; <4M4>Refer to GROUP 13C - Engine-ECU.
INSPECTIONECU TERMINAL VOLTAGE MEASUREMENT<6G7>Refer to P.23-64; <4M4>Refer to P.23-66.
Front of vehicle
Marking
Return hose
Feed hose

AUTOMATIC TRANSMISSION - Transfer-ECU23-130
TRANSFER-ECUREMOVAL AND INSTALLATION
Pre-removal and Post-installation OperationsIndicator Panel and Floor Console Front Panel Removaland Installation (Refer to GROUP 52A - Floor Console.)
4.9 ± 1.0 N×m
Transfer-ECU
INSPECTIONECU TERMINAL VOLTAGE MEASUREMENTRefer to P.23-89.

Service Bulletins
Click on the applicable bookmark to select the Service Bulletin.

TECHNICAL SERVICE PLANNINGINTERNATIONAL CAR ADMINISTRATION OFFICE. MITSUBISHI MOTORS CORPORATION
1MSB-01E23-501
SERVICE BULLETIN NO. : MSB-01E23-501
DATE : 2001-3-20 <MODEL>(EC)PAJERO/MON-
<M/Y>01-10
SUBJECT : CORRECTION TO TRANSMISSION REMOVAL STEPS(EC)PAJERO/MONTERO(V60,70)
01 10
GROUP : AUTOMATIC TRANSMIS-SION
DRAFTNO. : 00SY122809
CORRECTION INTERNATIONALCARCARADMINISTRATION T MASAKI - MANAGERADMINISTRATIONOFFICE
T. MASAKI - MANAGERTECHNICAL SERVICE PLANNING
1. Description:On the 6G7 engine equipped vehicle, correction has been made to the transmission removal steps.
2. Applicable Manuals:
Manual Pub. No. Page
2001 PAJEROWorkshop Manual VOL.1
PWJE0001 (1/2) (English) 23-122
2001 MONTEROWorkshop Manual VOL.1
PWJS0002 (1/2) (Spanish) 23-122
2001 PAJERO/MONTEROCD-ROM
PWJT0008R-A (English)(Spanish)(French)(Dutch)
-

2MSB-01E23-501
3. Details:
Cover <Correct>
<Incorrect><Incorrect>
Drive plate connection bolts <Correct>
A
<Deleted>
<Added>
<Incorrect>
5<Correct>
<Correct>
<Incorrect>
3

AUTOMATIC TRANSMISSION - Gneral/Sealant/Special Tool 23-1
GROUP 23
AUTOMATIC TRANSMISSIONGENERALOUTLINE OF CHANGEWhen the inhibitor switch is at the “P” position, it does not send a signal to the transfer-ECU any longer.Due to this change, data list item No.32 has be deleted from the section “Troubleshooting - SS4 II”and transfer-ECU terminal No.33 has been discontinued.SEALANTItem Specified sealant Remark
Oil pan MITSUBISHI genuine sealant part No. MD166584 or equivalent Semi-drying sealant
SPECIAL TOOLTool No. Name Application
MD998727 Oil pan remover Oil pan removal

AUTOMATIC TRANSMISSION - Oil Pan23-2
OIL PANREMOVAL AND INSTALLATION
Pre-removal and Post-installation OperationsD Transmission Fluid Draining and FillingD Under Cover Removal and Installation
24 ± 4 N·m
2
1 44 ± 8 N·m
3
44 ± 10 N·m
44 ± 10 N·m
26 ± 4 N·m11 ± 1 N·m
Removal steps1. Oil level gauge assemblyD Support the transmission with a
transmission jack
2. Transmission mount center memberassembly
AA" "AA 3. Oil pan
REMOVAL SERVICE POINTAA"OIL PAN REMOVALAfter removing the oil pan mounting bolts, remove the oilpan with special tool MD998727 and a brass bar.
MD998727
MD998727

AUTOMATIC TRANSMISSION - Oil Pan 23-3
INSTALLATION SERVICE POINT"AAOIL PAN INSTALLATION1. Remove sealant from the oil pan and transmission case
mating surfaces.2. Degrease the sealant-coated surface and the
transmission mating surface.3. Clean the magnet and install it in the hollow of the oil
pan base.
NOTEIf the oil pan is replaced, reuse the cleaned magnet.
4. Apply MITSUBISHI genuine sealant part No. MD166584or equivalent around the gasket surface of the oil panas specified in the illustration.
NOTEThe sealant should be applied in a continuous beadapproximately 3 mm in diameter.
5. Tighten the mounting bolts to the specified torque.
Tightening torque: 11 ± 1 N·m
Magnet