Embed Size (px)
Citation preview

WordPress Editors Guide A complete guide to Editors functions in WordPress

2
Table of Contents
Quick Start .................................................................................................................................. 5 Login...............................................................................................................................................................5 Profile ............................................................................................................................................................ 6 Edit/Add New Pages......................................................................................................................................7 Edit/Add New Posts ..................................................................................................................................... 8
Editors Guide .............................................................................................................................. 9
Login ........................................................................................................................................... 9
The Dashboard.......................................................................................................................... 10 The Admin Window Explained ................................................................................................................... 11
The Header ................................................................................................................................................ 11 The Sidebar................................................................................................................................................ 11 The Editor..................................................................................................................................................13 The Footer .................................................................................................................................................15
Dashboard Modules .................................................................................................................................... 15 Right Now..................................................................................................................................................15 Recent Comments.....................................................................................................................................15 Incoming Links ........................................................................................................................................ 16 Quick Press .............................................................................................................................................. 16 Recent Drafts ........................................................................................................................................... 16 WordPress Blog........................................................................................................................................ 16 Other WordPress News ........................................................................................................................... 16
Admin Bar................................................................................................................................. 17
Profile ....................................................................................................................................... 17 Personal Options ......................................................................................................................................... 18 Name ............................................................................................................................................................ 19 Contact Info ................................................................................................................................................. 19
Content..................................................................................................................................... 19 Pages Vs Posts.............................................................................................................................................. 19
Page ..........................................................................................................................................................20 Post...........................................................................................................................................................20
The Editor ................................................................................................................................. 22 The Toolbar..................................................................................................................................................22
Insert/Edit Link........................................................................................................................................24 The Kitchen Sink .........................................................................................................................................27 Upload/Insert...............................................................................................................................................32 Edit Image ....................................................................................................................................................32
Pages ........................................................................................................................................ 35 Pages.............................................................................................................................................................35
Edit Page...................................................................................................................................................37 The Title ...................................................................................................................................................37 The Permalink ..........................................................................................................................................37 The Content .............................................................................................................................................38 Word Count .............................................................................................................................................38 Custom Fields...........................................................................................................................................38

3
Discussion ................................................................................................................................................39 Page Author .............................................................................................................................................39 Page Revisions..........................................................................................................................................39 Publish...................................................................................................................................................... 41 Trash A Page ............................................................................................................................................ 41 Restore Or Delete A Page ........................................................................................................................42 Attributes .................................................................................................................................................42
Add New Page..............................................................................................................................................43
Posts ......................................................................................................................................... 44 Posts ............................................................................................................................................................ 44
Edit Post ...................................................................................................................................................45 Sticky Post............................................................................................................................................... 46 Format..................................................................................................................................................... 46 Categories ............................................................................................................................................... 46 Post Tags..................................................................................................................................................47 Quick Edit ................................................................................................................................................47 Trash A Post............................................................................................................................................ 49 Restore Or Delete A Post........................................................................................................................ 49 View ..........................................................................................................................................................50
Add New Post ..............................................................................................................................................50 Post Tags ...................................................................................................................................................... 51
Edit Post Tags .......................................................................................................................................... 52 Quick Edit ................................................................................................................................................ 52
Categories.....................................................................................................................................................52 Edit Category ...........................................................................................................................................54 Quick Edit ................................................................................................................................................54
Media ....................................................................................................................................... 54 Add Image ....................................................................................................................................................55
Add Image From Computer..................................................................................................................... 55 Add Image From URL ..............................................................................................................................57 Add Image From Media Library ..............................................................................................................58 Add Image To Gallery ..............................................................................................................................59
Featured Image ............................................................................................................................................ 61 Adding Other Media ...................................................................................................................................62
Embed Media............................................................................................................................................62 Add Media From Computer.................................................................................................................... 64 Add Media From URL ..............................................................................................................................65 Add Media To Gallery ..............................................................................................................................65 Add Media From Media Library ..............................................................................................................65
Library ......................................................................................................................................................... 66 Edit .......................................................................................................................................................... 68 Cropping Or Scaling An Image .............................................................................................................. 68 Other Editing Image Icons ......................................................................................................................70 Delete........................................................................................................................................................ 71 View .......................................................................................................................................................... 71
Add New....................................................................................................................................................... 71
Links ......................................................................................................................................... 72 Links .............................................................................................................................................................72
Edit ...........................................................................................................................................................73 Delete........................................................................................................................................................77

4
Add New.......................................................................................................................................................77 Link Categories ............................................................................................................................................78
Edit ...........................................................................................................................................................79 Quick Edit ................................................................................................................................................79 Delete....................................................................................................................................................... 80
Comments ................................................................................................................................ 80 Approve/Unapprove.................................................................................................................................... 81 Spam............................................................................................................................................................. 81 Trash.............................................................................................................................................................82 Edit ...............................................................................................................................................................82 Quick Edit ....................................................................................................................................................83 Reply .............................................................................................................................................................83
Tools ......................................................................................................................................... 84 Turbo ........................................................................................................................................................... 84 Press This .................................................................................................................................................... 84

5
Quick Start
Login
Enter your Username and Password as supplied by your web developer or IT Department to log in to the administration system
Once you're in you will see the Dashboard:

6
1. The first thing you need to do is change your password to something more meaningful that you can remember. Click on Profile towards the bottom of the left hand menu.
Profile
Here you can update any of your personal information, including your password, which is found at the bottom of this page. Click on the Update Profile button when you're done.

7
Now it's time to add some content or edit some existing content. If you are unsure whether you should be using Pages or Posts, read Pages vs. Posts in the Editors Guide.
Edit/Add New Pages
1. The first field you need to fill in is the page title. 2. Then use the visual editor to enter the content for your page.
Hint: Click on the Full Screen button:
This allows you to edit your page in full screen mode, giving you greater control over your work area.
NB: You cannot save your changes when in full screen mode so always toggle back to normal screen mode to update your content.
3. The four buttons next to Upload/Insert allow you to add media such as images, audio and video and assign titles and descriptions to media files. For more detailed information about this process, read the Media section in the Editors Guide.
4. When you are happy with your page, click on the Preview button found at the top right corner of the Publish module on the right hand side of the page. This will give a real life preview of how your page will look on your website.

8
5. Once you're happy for your page to go public, click on the Publish button at the bottom of the Publish module. If you are editing an existing page this button is called Update Page.
Edit/Add New Posts
Adding or Editing Posts functions much the same as Pages, however there are some additional information you need to enter.
1. You can change the presentation of your posts by setting up Format. 2. You will also need to assign the post to a category which will affect where and when the
post appears on the website. 3. On the right hand side underneath the Categories module you can add Post Tags to your
post. Post Tags are like keywords that visitors may use to search for related articles. For example, adding the tag "wedding" to a catering article and a photography article may help your visitors find related content on your website.
4. There is also an option to add a Featured Image to your post.
You can preview posts just like pages and edit existing posts same with existing pages as well. When you want to go public or save your changes click on the Publish or Update Post button.

9
Editors Guide Welcome to the administration system that manages all of the content for your website. You have been made an Editor within the system, which means you have been granted access to create new content and edit existing content. This guide will walk you through the steps involved.
The first task you have to do is to log in to the system so you can make changes or add a content.
Login By now, you should have been given a username and a password by your developer or IT department.
The login screen looks like this:
Simply type your username into the rectangle (or field) labeled “Username” and then click in the field labeled “Password” and enter your password.
Hint: You can also use the “tab” key on the keyboard to move into the “Password” field and make it active.

10
Take care to make sure the details you enter into both of these fields exactly match the details you have been supplied. The username is usually case-‐sensitive (meaning that uppercase and lowercase letters are different) and the password is always case-‐sensitive.
You can place a tick in the box labeled "Remember Me" and the system will attempt to remember you to save you having to enter these details next time.
Technical: These details will be stored in the system memory until you empty your internet browser's memory or clear your history. It doesn't matter if you don't understand this all, what is important is that if you tick this box it can save you time in the future.
Once you entered the correct details, click on the "Log In" button, or hit the "enter" key on your keyboard.
If you have forgotten your password click on the text that reads "Lost your password?" and you will be taken to this screen:
Type your username or email address into the field and click on the "Get New Password" button. A new password will be emailed to you.
Once you have your new password, login.
When you have logged in you will be taken to The Dashboard.
The Dashboard The Dashboard screen, also considered the home page of the admin system, looks like this:

11
The Admin Window Explained The Dashboard, along with all of the screens you will come across in the admin system, consists of the following four key elements:
• The Header • The Sidebar • The Editor • The Footer
The Header
The header looks like this:
The header provides you with:
• A link to visit your website as the rest of the world sees it • A drop down list of quick links for adding content to your website (these will be
covered later in more detail in their own sections) • A link to your profile "Howdy, editor" • A link to Log Out of the system
These features will be explained in more detail later on.
The Sidebar
The sidebar looks like this:

12
The sidebar provides you with a comprehensive list of tools that allow us to perform functions in the admin system. Each set of tools is grouped into what we call "widgets".
Hint: Each widget (with the exception of Comments) has a drop down arrow in the top-‐right corner, which allows you to expand or collapse the widget.
You can also expand or collapse the entire sidebar by clicking on the horizontal line with the arrows in between the widgets Dashboard and Posts and also in between Comments and Profile
This is useful for saving space on your screen.
When you first log in, the "Posts" widget should be expanded to reveal the tools available to you.
In order from top to bottom, our widgets are:
• The Dashboard o Dashboard
• Posts o Post o Add New o Categories o Post Tags
13
• Media o Library o Add New
• Links o Links o Add New o Link Categories
• Pages o Pages o Add New
• Comments • Profile
o Your Profile • Tools
o Tools
Each of these tools will be explained in more detail later on.
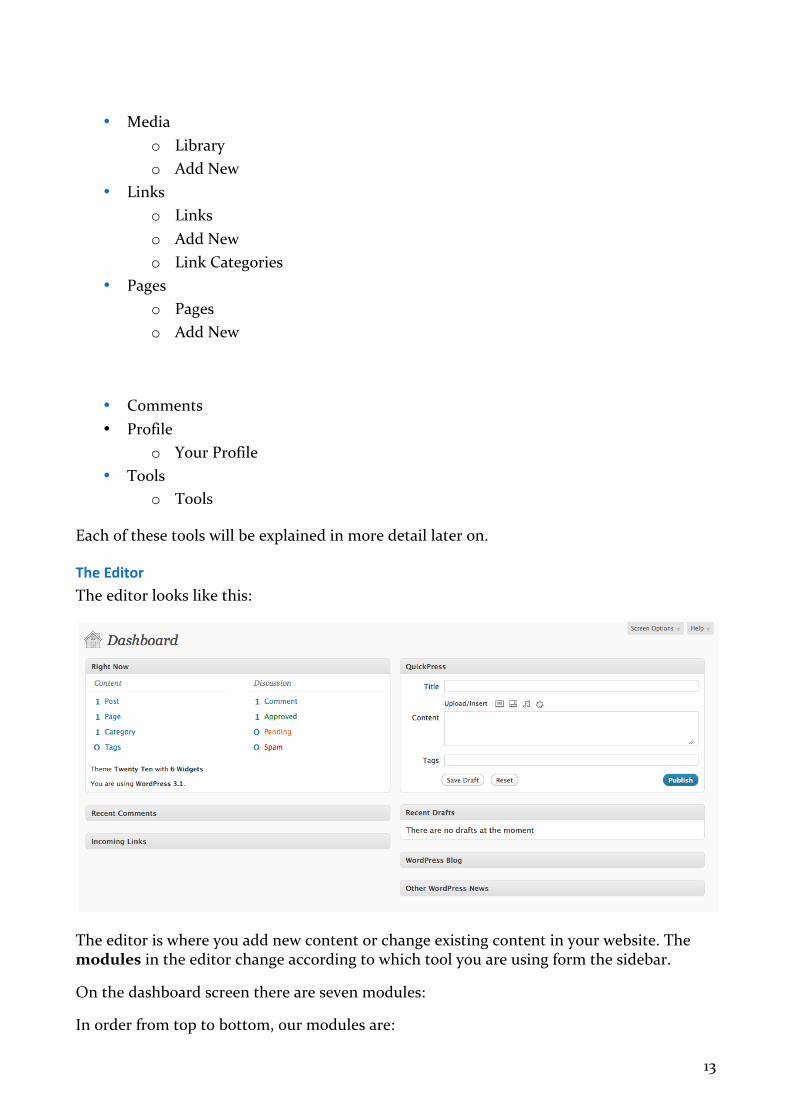
The Editor
The editor looks like this:
The editor is where you add new content or change existing content in your website. The modules in the editor change according to which tool you are using form the sidebar.
On the dashboard screen there are seven modules:
In order from top to bottom, our modules are:

14
• Right Now • Recent Comments • Incoming Links • Quick Press • Recent Drafts • WordPress Blog and • Other WordPress News
Each of these modules will be explained in more detail later on.
Hint: Many modules within the admin system can be picked up and moved around in order for you to better manage your work area.
To move a module position, move the mouse over the grey bar at the top of the module until the mouse becomes a cross with arrows like this:
Then hold down the mouse button and move the module to its new location.
If a module is unable to be moved or cannot be moved to the location you chose, it will automatically return to its original position.
Modules can also be expanded and collapsed by clicking on the down arrow in the top-‐right corner of each module
In the top-‐right corner of the editor you will find two buttons:
• Screen Options, and • Help
If you click on the Screen Options button a module will slide open allowing you to hide or show any of the modules in the editor. This gives you greater control over your work area.
Clicking on the Help button will slide open the Help module and provide tips for the screen you are in.

15
Technical: This help module is designed more for developers and the IT department so more than likely you will not need it. All the help you need should be right here in this user's guide.
The Footer
The footer looks like this:
The footer contains a link to the WordPress website, documentation and feedback forum as well as a version number so you always know which version of WordPress you are running. The footer also provides a visual cue for you that you are at the end of the page.
Dashboard Modules
Right Now
The first module on the dashboard screen is called "Right Now" and provides you with a snapshot of the content in your website.
In the example there is 1 Post, 1 Page, 1 Category and 0 Tags as well as 1 Comment. This one comment has been approved and therefore shows as 1 Approved, 0 Pending and 0 Spam.
We'll cover each of these in more detail later on.
You'll notice that the information in this module also links to the relevant sections of the admin system. For example: 1 Page links to the "Edit Pages" screen. This provides easy navigation between admin sections.
The Right Now module also tells you the name of the theme you are using, how many widgets are being used in the sidebar of your website and the version of WordPress you are running.
Technical: Themes, widgets and version upgrades are tasks assigned to administrators. As an editor, you are not able to make these changes.
Recent Comments
The Recent Comments module shows the most recent comments made by visitors to your website. If you position the mouse over a comment, a menu appears underneath it with the following options:
• Unapprove
16
• Reply • Edit • Spam • Trash
There is also a View All button that links to the Comments screen in the admin system where you can view all the comments that have been made.
We'll cover Comments in more detail later on.
Comments may not necessarily be enabled on your website. If they are not enabled then just ignore the Recent Comments module.
Incoming Links
The Incoming Links module displays how many other blog sites are linking to your site. This is primarily used as part of a Search Engine Visibility strategy and may not be relevant to you.
Quick Press
The QuickPress module allows you to write and publish a post right here from the dashboard or save it as a draft and revise it later.
This will make sense once you have read the Add New Post section. Just know that this is a handy tool for quickly jotting down ideas while they are fresh and before you lose your train of thought.
Recent Drafts
The Recent Drafts module displays any posts that have been written and saved as drafts, waiting to be published. If there were any drafts here, you can click on the title, make any revisions and either save it again or publish it to the website.
WordPress Blog
The WordPress Blog displays recent entries by WordPress developers about the general ongoing evolution of the WordPress platform. This may or may not interest you.
Other WordPress News
The Other WordPress News module shows other news relating to the ongoing development of the WordPress platform. As above, this may or may not interest you.
For day-‐to-‐day use, you could safely turn off the WordPress Blog and Other WordPress News modules by clicking on the Screen Options button in the top-‐right corner and un-‐ticking the appropriate boxes.

17
Admin Bar If you enable the admin bar in your profile you will see the Admin Bar as a thin grey bar that appears at the top of the page. The admin bar can be switched on or off on the “live” website and the admin dashboard in your profile settings.
Starting from the left, the admin bar contains a small picture (avatar) of whoever is logged into the site. Following the avatar is the username of the person logged in.
The username is a dropdown list, which consists of:
• Edit My Profile -‐ a link to Profile page. • Dashboard -‐ a link to Dashboard page. • Log Out -‐ a quick way to log out your admin control.
Next is the Add New dropdown list which links to add a new page or post.
Next is the link to the Comments page
The Admin Bar's left panel looks like this:
On the right side of the admin bar is a Search form, for quickly searching existing page or post on your website.
This Search form functions like any other search form. You just need to type in the title of the page or post that you are looking for and hit the search button.
The right side of the Admin Bar looks like this:
Profile You can access your profile by clicking on the Profile widget in the sidebar or clicking on your username next to the word "Howdy" in the header. This "Howdy" reference is a way of letting you know that you are logged in under your username. Some admin systems may have multiple users logged in at once so this is a useful tool for making sure you are logged in correctly.
The Profile screen looks like this:

18
In the Profile screen you can change your personal options, name and contact information.
Personal Options The Visual Editor is what you will use when writing or editing posts and pages in the website. Disabling the visual editor means you will only be able to write posts and pages using html and will have no visual representation of the content you're working with.
Caution: It is recommended that you do not tick this box unless you are an experienced html programmer and are familiar with WordPress.
The Admin Color Scheme allows you to change the color scheme of the admin system to your preference.
Keyboard Shortcuts allow you to navigate and perform functions in the comments screen. This is useful if you receive a large number of comments from visitors to your site. If you do not have comments enabled please ignore the following paragraph.
Briefly, if the keyboard shortcuts box is ticked you can move up and down through your list of comments by using the keys "k" and "j" respectively. Once a comment is selected (as shown by a light blue background) you can use the following commands on the keyboard:
• a – approves the comment • s – marks the comment as spam • d – deletes the comment • u – unapproves the comment

19
• r – replies to the comment, and • q – allows for a quick edit of the comment
More information is available at the official documentation for WordPress:
http://codex.wordpress.org/Keyboard_Shortcuts
Name Your username is set when you are established as a user in the system by the administrator and cannot be changed. You can change your first name, last name and nickname as well as how your name will be displayed on the website. Depending on how your website has been designed, your name may be displayed as an author of posts or pages that you have contributed. The option labeled "Display name publicly as" is where you can determine how you want your name displayed to the public.
Contact Info Your email address is required and is entered when the administrator establishes you as a user in the system. If your email address is incorrect or changes, update it here. You can also enter more optional personal information like your website address, AIM (AOL Instant Messenger) name, Yahoo Instant Messenger name and Yabber/Google Talk name as well as a brief biography. Some of this information may be shown publicly on your website depending on how it has been setup.
NB: If you are unsure about any of this, consult with your web developer or IT department.
If you have been assigned a password that you did not set, you can change your password here to one that you will remember. Measure the strength of your password with the strength indicator. Maintaining a strong password is important to make sure you are the only person logging in and making changes under your username.
Caution: Strong passwords are at least seven characters long and contain a combination of upper and lower case letters as well as numbers and symbols such as !@#”?$%^&*()
When you have made all of your changes, click on the “Update Profile” button and all of your personal profile details will be updated in the system.
Content
Pages Vs Posts The admin system provides two ways of creating content for your website:

20
• A page, or • A post.
To determine which is the best option for your content, you need to first understand the difference between the two.
Page
A page includes an overall structure for presenting information on your website. For example: a page will include the header, (top part of the page usually containing a logo and navigation menu), a section for the main content of the page and a footer (the bottom part of the page usually containing some legal information, copyright notices and other links). A page may also include a sidebar on the left or right hand side containing links to other sections of the site
Pages are not generally updated or changed on a regular basis, however some of the content on a page, including posts, may be updated regularly.
Think of a page as you would if you were reading a newspaper. The one page can be broken up into many different sections for a feature article, related stories and advertisements.
Pages are generally accessed by the main navigation menu on your website.
Examples of pages on your website might include About Us, Contact Details, Mission Statement, Products and Services and Legal Information.
Post
Considering the newspaper model, a post can be thought of as essentially one article. It is written and published at a given point in time about a particular subject in a specific category and posted on a certain page. The sports page, for example may contain several posts from the sports category.
Posts are primarily written as part of a blog (web based log of events -‐ or journal). However posts have multiple functions and using them creatively can give you greater control over the management of your websites content.
Posts belong to one or more categories and can be sorted and displayed in all sorts of ways on your website.
Examples of posts on your website might include press releases, product fact sheets, general news articles and blog entries.
Technical: Posts can live on pages – in the main content area. Pages cannot live on posts.

21
The following screenshots may help to explain the difference between a page and a post.
A page:
A post:

22
If you are updating your site or adding content on a regular basis, it is more than likely you will be using posts.
NB: If you are still unsure about whether or not to use a page or a post for your content, consult your web developer or IT department.
Now that you have an understanding of the difference between a page and a post, let's look at how to edit existing content or add new content.
We're going to start off easy by editing an existing page to get you familiar with the tools you need to use.
The Editor
The Toolbar Above The Editor rectangle there is a toolbar containing common tools for formatting your content. Similar to some word processing programs like Microsoft Word, the standard tools are, from left to right:

23
Bold – to make text bold.
Italic – to put text in italics.
Strikethrough – to mark text as deleted
Bullet List – also known as an unordered list:
• This is an item in a bulleted list • This is a second bulleted item.
Numbered List – also known as an ordered list:
1. This is an item in a numbered list 2. This is a second item in a numbered list.
Blockquote – used for quoting somebody in an article.
Justify left – align the text in the paragraph left.
Justify Center – align the text in the center.
Justify Right – align the text right.
Link – insert a link to another webpage (also called a hyperlink).
Unlink – remove the hyperlink.

24
Insert ‘More’ Tag – this splits the page into two parts. This may result in your website displaying the content before the ‘More’ tag and placing a “read more” link for users to click through and read the full page
Spellcheck – check the spelling of the content. Use the drop down arrow to choose a language from the list if required.
Fullscreen – this allows you to edit your page in full screen mode, giving you greater control over your work area. NB: You cannot save your changes when in full screen mode so always toggle back to normal screen mode to update your content.
Show/Hide Kitchen Sink – this button turns on or off the extra buttons available on the toolbar.
Insert/Edit Link To add a link to your page or post, highlight the word that you want to make the link.
Then click on the insert/edit link button.

25
A pop up window will appear allowing you to edit your hyperlink according to what page or site you want to link to, the title of the link and if you want your link to open in a new window.

26
URL is where you enter the address of the website or page where you want to link to.
Title is the title of the link. Users will see this when the hover their mouse over the link.
If you want to link to an existing page or post in your site you have two options. One is to search for the title of the page or post,

27
Or choose a page from the list of recent pages or posts that is automatically displayed at the bottom of the pop up window.
Using the search box or choosing one of the recent pages or posts will generate the URL and title for your link.
Once satisfied with your changes click the Save Link or Add Link button.
The Kitchen Sink With the kitchen sink button turned on the toolbar looks like this:
The following tools are now available to you, from left to right:
Format – this option formats the selected text as a paragraph, address, preformatted, heading or sub-‐heading.
Underline – to underline text.
Justified – to justify text both left and right.
Text Color – to change the color of the text.
Paste Plain Text – this button will open a pop up dialog box to allow you to paste plain text into your page.
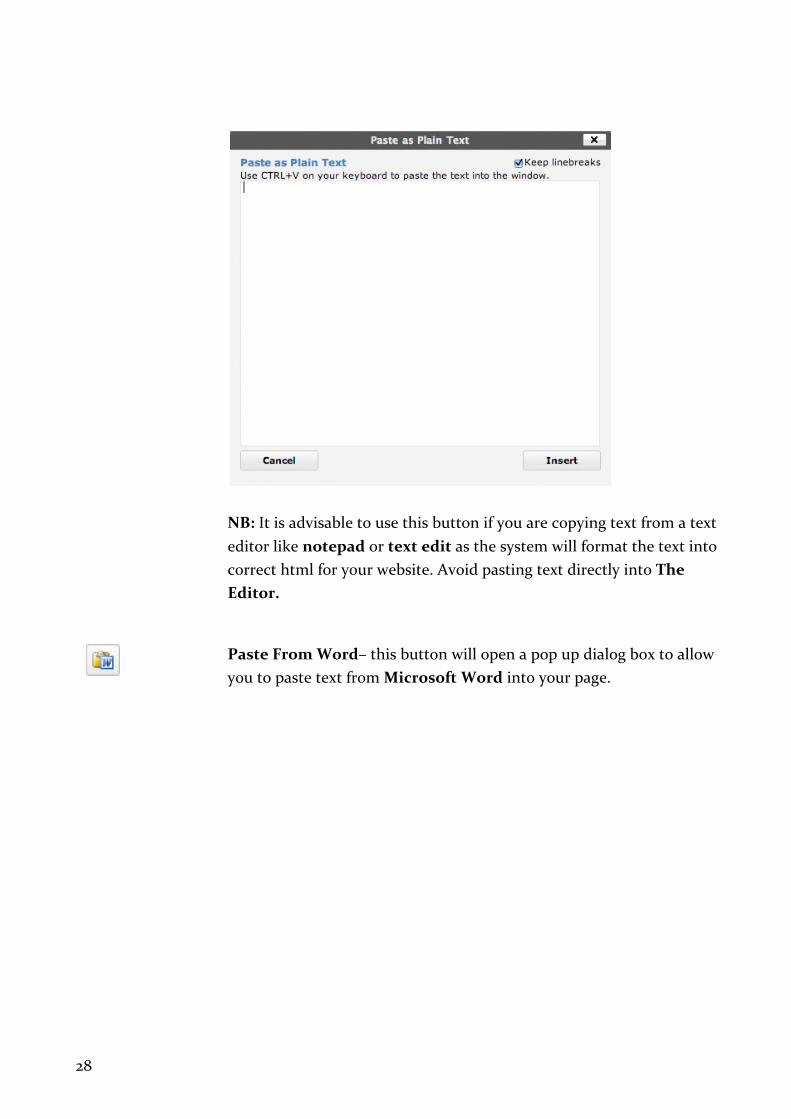
28
NB: It is advisable to use this button if you are copying text from a text editor like notepad or text edit as the system will format the text into correct html for your website. Avoid pasting text directly into The Editor.
Paste From Word– this button will open a pop up dialog box to allow you to paste text from Microsoft Word into your page.

29
NB: It is advisable to use this button if you are copying text from Microsoft Word as the system will format the text into correct html for your website. Avoid pasting text directly into The Editor.
Remove Formatting – remove all formatting from the selected text.
Embed Media – this button will open a pop up dialog box allowing you to embed various types of media directly into your page. For example: Flash, QuickTime, Shockwave, Windows Media or Real Media.

30
Select the type of media you want to embed, the file or url of the media and set the dimensions. Preview the media and then click on insert to embed the media or cancel to cancel the process. There are more settings under the Advanced tab that relate to each specific type of media being inserted. NB: Consult your web developer or IT Department for the correct settings for your type of media.
Custom Character – this button will open a pop up dialog box allowing you to insert custom characters such as diacritics for words like café and façade as well as various currency and legal symbols.

31
Simply click on the symbol to insert into your page.
Outdent – removes the indent from the start of a line in a paragraph.
Indent – indents the start of a line in a paragraph.
Undo – this reverses, or “un-‐does” the last thing you did in The Editor. If you hit the undo button more than once it will undo your previous actions in reverse order. NB: You cannot undo an action once you have Updated the page or Saved it as a draft
Redo – this reverses the undo, or “re-‐does” the last thing you un-‐did in The Editor. So if you hit the undo button by mistake you can re-‐do with this button.
Help – this button open a pop up dialog box with some more information on the functions of the Visual Editor
NB: Your web developer or IT department may have installed additional buttons on your toolbar to the ones listed above. If this is the case, consult them for explanations.
Use the tools available to you in the toolbar to design your page the way you want it.

32
Upload/Insert Directly above the toolbar there are four buttons that allow you to add media to your page.
These functions are covered later in the Media section. However, there may be an image already in your page that you want to edit.
Technical: This help module is designed more for developers and the IT department so more than likely you will not need it. All the help you need should be right here in this user's guide.
Other media like video, audio and pdf files cannot be edited once they are inserted into a page, they must be deleted and re-‐inserted.
Edit Image You can edit images to change the way they appear on your page.
To edit an image, click on the image to reveal the Edit Image and Delete Image buttons:

33
The Delete Image button will delete the image from the page immediately. The Edit Image button will open the following pop up dialog box:

34
Use the Size slider to alter the size of the image on the page and edit the alignment by choosing None, Left, Center or Right. You can also change the Title, Caption and Link URL of the image.
There are more detailed settings under the Advanced Settings tab that may affect the way your image is displayed on your website.
NB: You should consult your web developer or IT department about whether or not to use these settings.
When you are happy with your settings, click the Update button or choose the Cancel button to cancel your changes.

35
Pages
Pages You can access the Pages screen by choosing Edit from the Pages widget in the sidebar
The Pages screen looks like this:
At the top of the Pages screen, you will find two sub-‐headings directly underneath the page title:
• All (total number of pages) and • Published (number of pages actually published on the website)
Depending on the content already in your system there may be more sub-‐headings including:
• Pending Review (number of pages pending review) • Draft (number of draft pages waiting to be published) and • Private (number of pages published but not visible to the public)
These sub-‐headings give you a snapshot of the status of the pages in your system and will make more sense as you move through this section.
To the right of these sub-‐headings and underneath the screen options and help buttons you will find a search tool. This is useful for searching through all of your pages for a specific word or phrase if you have forgotten where it is.
Directly beneath the sub-‐headings you will find a Bulk Actions drop down menu. This menu allows you to edit or move to trash multiple pages at once. The edit function allows

36
you change the parent, template, comments, status or pings of multiple pages at once while the move to trash option allows you to move multiple pages to trash bin at once
The edit options will make more sense as you move through this section.
If you choose to move multiple pages to the trash at once a Trash link will appear next to the All link. The Trash link is where you can find all the items that you have deleted in the past 30 days.
To select a page for a bulk action simply place a tick in the box to the left of the page's name. Placing a tick in the box next to the word "Title" at the top of the list of pages will select all pages in the list at once. Once your pages are selected, choose an action from the Bulk Actions drop down menu and click on the Apply button.
To the immediate right of the Bulk Actions menu is the Filter Menu for filtering the pages that you wish to display, categorized from the month your WordPress blog was created. By default, it is set to display all pages from all dates.
Underneath the Bulk Actions drop down you will find a table listing all the pages in your website. The columns in the table are, from left to right:
• The select tick box (to select or deselect a page for editing or deleting) • Title (the title of the page) • Author (the author of the page) • Comments (the number of comments made by visitors to the page) • Date (the date the page was published on the website)
Clicking on the title of the page will take you to Edit Page screen as described in the next section. Clicking on the author will filter the list of pages in the table to pages written only by that author. Clicking on the comments icon will take you to the Edit page as described later on.
At the bottom of the list there is another Bulk Actions drop down menu that functions exactly like the one at the top. This is useful if you have a large number of pages in the list and need to scroll down to view them.
If you place the mouse over a page title, a menu appears underneath it with the following options:
• Edit • Quick Edit • Trash, and

37
ViewQuick Edit, Trash and View are covered in greater detail later on. For now, let’s look at editing some content.
Edit Page
The Edit Page screen looks like this:
This screen, like most screens in the admin system, can be thought of as a form that needs to be filled out.
The Title The first field is the page title, which currently has the word “Sample Page” in it. This means the page is called “Sample Page” and will be referred to as such in the main navigation menu on your website.
If you want to change the title of this page simply type in the new title and hit the tab key to move to the next field or the enter key to save your changes.
The Permalink The next field that needs information is the page permalink. If you do not see the Permalink field underneath the page title it is probable that your website does not have permalinks activated so ignore this section and move on to the content. If your website has permalinks activated then you can enter a customized url (universal resource locator) or address for this page. This is how the rest of the world will find this page. Permalinks are used for Search Engine Visibility purposes.

38
NB: If you are unsure about what to use as the permalink for the page consult your web developer or IT department.
The Content The next field that requires information is the content of the page. This is the actual content (words and pictures) that make up the page on the website.
To edit the content of the page click in the large white rectangle that contains the current content. We call this area The Editor.
Technical: At the top right corner you will find two tabs Visual and HTML. The Visual Editor, (an option we set earlier under Profile) provides you with a visual representation of the content you’re working with. The HTML Editor allows you to manipulate the content using HyperText Markup Language -‐ the language that websites are built on.
Caution: It is recommended to use the Visual Editor unless you are an experienced HTML programmer
To edit or add text, simply type.
Word Count Underneath The Editor you will find a bar that contains some additional information about your page.
On the left hand side is the Word Count: a count of the words in your page.
On the right hand side, you will find some information about when the page was last edited or saved and by whom.
At the bottom right corner of this bar is a resize handle that you can drag down or up in order to resize The Editor, giving you greater control over your work area.
Hint: The following sections may also be visible on the screen depending what has been hidden on the screen options menu.
Custom Fields Below The Editor is the Custom Fields section. This gives you the opportunity to add custom fields to your pages for greater control over sorting and displaying information on your website.

39
For example: you could add a custom field called “Hierarchy” to your page and give it a value of “1”. Your web developer could then use this custom field in your theme to re-‐arrange the order of pages in a sitemap, for instance.
To add a custom field to a page simply enter the name of the custom field in the Name field and the value for this page in the Value field and then click on the Add Custom Field button.
Hint: Once a custom field has been added to the system you can then choose to add that custom field to any other page by selecting it from the drop down list that will appear in the name field.
NB: You should consult your web developer or IT department about whether or not to use Custom Fields
Discussion The discussion section allows you to choose whether or not the page is open to discussion by visitors to your website. You have two options:
1. Allow Comments, and 2. Allow Pings
Allowing comments will allow visitors to leave a comment on your page. Allowing pings will allow visitors to link to your page from their own page and will appear in your comments section as a link.
Comments and Pings may or may not be enabled on your site, so setting these options here may have no effect on the way your site looks and behaves.
NB: You should consult your web developer or IT department about whether or not to your site is enabled for Comments and/or Pings.
Page Author The Page Author drop down list allows you to choose the author of the page. This may be handy if your website is designed to display archives of content by specific people in your organization.
Page Revisions The Page Revisions section shows you when this page has been revised and by whom. Clicking on a revision's date will show you the page, as it existed at that point in time, using the basic html viewer, not the visual viewer. This is useful if you have made some changes and updated the page but decide you want to go back to where you were earlier on.

40
Underneath the page content you now have the option to compare revisions by selecting the left hand radio button of one and the right hand radio button of another in the page revisions list and clicking on the Compare Revisions button.
The older revision is shown on the left and the newer revision on the right. The differences will be highlighted so you can easily decide which version you want to use.
Once you have decided which version to use, identify the revision by its date and time stamp and then choose "Restore" next to the revision in the Page Revisions list below to restore that revision as the page. This revision then becomes the updated page replacing the

41
current version, which then becomes the first revision in the Page Revisions list, so you'll never lose a version of the page.
Publish One of your best friends in the admin system is the "Preview" button. This button allows you to preview changes before you publish them for the public to see. The preview button will show you exactly what the page will look like by opening a new window of your browser and displaying your changes. At this point, the public cannot see your work.
You can preview your changes and make more alterations for as long as you like without the public ever seeing your changes as long as you don't hit the "Update Page" button. Once you click the "Update Page" button your changes will be published on your website for the rest of the world to enjoy.
Underneath the Preview button there is some information about your page and who has access to it online.
Clicking on the Edit link next to "Status : Published" will give you a drop down list with three options:
• Published (for the world to see) • Pending Review (for a colleague to review before publishing) • Draft (for you to keep working on before publishing)
Clicking on the Edit link next to “Visibility : Public” will give you a drop down list with three options:
• Public (for the world to see) • Password protected (at which point you will need to enter a password and only
those with the password will be able to view it on the website) • Private (only visible in the admin system)
The publish date option allows you to choose when the page is to be published. If you choose a time in the future, the page will not be visible on your site until that time.
Once you are happy with your settings, click on the "Update Page" button to save your changes.
Hint: The “Update Page” button may change to “Publish” depending on the status of your page
Trash A Page To delete a page, click on the "Move to Trash" link to the left of the "Update" button. That page will be moved to the Trash link located next to the All link.

42
You can undo the deletion of the page by clicking the link that will appear above after you click the Move to Trash button.
Caution: Once a page has been moved to Trash, you can recover it (see Next link below).
Restore Or Delete A Page If a Trash link exists, located next to the All link, you may want to click on it to locate all the pages that you have deleted for the past 30 days.
Hover your mouse over to the title of the page that you want to delete or restore, and a sub-‐menu of options will appear below.
Choose Restore to recover your deleted page or choose Delete Permanently to delete the page forever.
Caution: WordPress will empty the trash every 30 days.
Attributes You can change the following additional page attributes in this section:
• Parent o If there are multiple pages in your system, you can assign a page as the parent
for this page. This page then becomes a sub-‐page or child of the parent. For example: Design, might be a sub-‐page of the page Services. In this case you would make Services the parent for the page Design.

43
• Template o You can assign a template for each page based on how your website has been
developed. • Order
o You can change the order of the pages in your website hierarchy which may affect the way they are displayed in your navigation menu.
NB: You should consult your web developer or IT Department before changing any of these attributes.
To save your changes, click on the Update Page button.
Add New Page You can access the Add New Page screen by choosing Add New from the Pages widget in the sidebar.
The Add New Page screen looks like this:
This screen functions exactly like the Edit Page screen with the exception that the "Update Page" button is now the "Publish" button because the page has never been published. Once the page is published this button will become the "Update Page" button.

44
There is no content on a new page so you are free to be creative and design your own page from scratch.
Hint: It's a good idea to plan your page on paper or in an application you are familiar with, like Microsoft Word for example, before entering the content into the admin system.
Posts
Posts Please read the Pages and Add New Page sections before continuing with this section.
You can access the Posts screen by choosing Posts from the Posts widget in the sidebar
The Posts screen looks like this:
This screen functions exactly like the Pages screen with the following additions:
• Next to the Bulk Actions menu there are two filter options that allow you view posts according to either date or category. Simply choose your desired option from the drop down menu and click on the Filter button. This is useful if you have many posts in the system and gives you greater control over your work area.
• On the far right of the filter options there are two buttons allowing you to view posts in List View (the default setting) or Excerpt View. Excerpt View displays an excerpt

45
of each post giving you more information about your content so you can make an accurate decision about the post you wish to edit.
• In the list of posts that are available to edit you will also notice two additional columns, Categories and Tags. These will be explained in greater detail later on.
As in the Pages screen, clicking on the post title will take you to the Post screen as described in the next section. Clicking on the author will filter the posts in the list to posts written only by that author. Clicking on the category will filter the posts in the table to posts belonging only to that category. Clicking on a tag will filter the posts in the table to posts assigned that tag.
Edit Post
The Edit Post screen looks like this:
This screen functions exactly like the Edit Page screen with the following additions:
• All references to Page are now to Post • In the Publish section under the Visibility setting there is an option to stick the
post to the front page of the website • Instead of Attributes you will find Format, Categories, Post Tags and Featured
Image on the right hand side underneath the Publish section.
As in the Edit Pages screen, clicking on the post title will take you to the Post screen as described in the next section. Clicking on the author will filter the posts in the list to posts written only by that author. Clicking on the category will filter the posts in the table to

46
posts belonging only to that category. Clicking on a tag will filter the posts in the table to posts assigned that tag.
Sticky Post In the Publish section, under Visibility, there is an option to stick the post to the front page of the website. This means that this post is ranked as highly important and will always show on the front page of the website regardless of any other content being displayed. This functionality may or may not be utilized in the development of your site.
NB: You should consult your web developer or IT Department before using the sticky post function.
Format
Format, or sometimes called Post Format, allows setting a post as a certain format. Some example formats are aside, gallery, link, and quote. This will allow themes to style these posts according to format.
Setting a post format will change the way posts are being displayed into the site.
For example if you set your post to have aside format, when you view the list of your posts on your actual website you will notice titles are gone.
Once you set up your post to have a definite format option. You will notice its post format is indicated next to the title of your post.
NB: You should consult your web developer or IT Department before using format.
Categories Content on your website is more than likely divided up into several categories relating to subject matter. For example: a financial planner’s website may be divided into the categories, "shares", "superannuation" and "property". Assigning a post to a category will determine where exactly on the website the post will be displayed.

47
To assign a post to a category, simply place a tick in the box next to the category name. You can assign a post to more than one category. If you do not assign a post to a category it will be assigned to the "Uncategorized" category by default.
To add a new category, click on the link that reads "+ Add New Category" and enter the name of the new category.
Post Tags Tags allow you to assign one or more tags, or keywords, to a post. If your website has been developed to display tags they can help your users navigate to other posts containing similar information or keywords. For example: a post about catering for a wedding may contain the keywords “catering” and “wedding”. Clicking on the tag “wedding” may take the user to other posts assigned the tag “wedding” like booking a wedding photographer, or finding wedding cars.
To add a tag to a post, enter the tag in the Add new tag field and click on the Add button. The tag will appear below immediately with the heading Tags used on this post:
To remove a tag from a post, click on the “x” next to the tag in the list.
To choose from a list of the most widely used tags in the site, click on the link that reads “Choose from the most popular tags” and a list of tags will appear for you to choose from. Simply click on the tag(s) you want to use and they will automatically be linked to this post.
NB: You should consult your web developer or IT Department before using tags.
Quick Edit As previously detailed, placing the mouse over a page or post title in the Edit Pages or Edit Posts screen gives you the option to Edit, Quick Edit, Delete or View the page or post. We have covered the Edit option in length so now it's time to look at the other options available.
The Quick Edit Page screen looks like this:

48
From this screen you can make quick changes to the page without editing the actual content of the page.
On the left hand side you can change the title, the slug, the date of publication, the author and the visibility, that is whether or not the page is password protected or private.
On the right hand side you can edit the page parent, the order of the page in the main menu, the template assigned to the page as well as allowing or disallowing comments and/or pings and finally the publication status of the page.
You can cancel your changes at anytime by clicking on the Cancel button or you can save your changes by clicking on the Update Page button.
The Quick Edit Post screen looks like this:
From this screen you can make quick changes to the post without editing the actual content of the post.
On the left hand side you can change the title, the slug, the date of publication, the author and the visibility, that is whether or not the post is password protected or private.

49
On the right hand side you can edit the categories the post belongs to, the tags assigned to the post as well as allowing or disallowing comments and/or pings and finally the publication status of the post including whether or not the post is sticky.
You can cancel your changes at anytime by clicking on the Cancel button or you can save your changes by clicking on the Update Page button.
Trash A Post
Clicking on the Trash option under any page or post title will allow you to move that certain page or post in a Trash bin and you could confirm this action soon as a confirmation message shows above saying that your page or post has been moved to trash with an Undo link.
Hint: Once a page or post has been moved to Trash, you can recover it back (see Next link below).
Restore Or Delete A Post If a Trash link exists, located next to the All link, you may want to click it to locate all the posts that you have deleted for the past 30 days.
Hover your mouse over to the title of the post that you want to delete or restore, and a sub menu of options will appear below.
Choose Restore to recover back your deleted post or choose Delete Permanently to delete the post forever.

50
Caution: WordPress will empty the trash every 30 days.
View
Clicking on the View option under a page or post title will take you to the page or post on your website so you can see how it appears to the rest of the world.
Add New Post You can access the Add New Post screen by choosing Add New from the Posts widget in the sidebar
The Add New Post screen looks like this:

51
This screen functions are exactly like the Edit Post screen with the exception that the "Update Post" button is now the "Publish" button because the post has never been published. Once the post is published this button will become the "Update Post" button.
There is no content on a new post so you are free to be creative and design your own post from scratch.
Post Tags You can access the Post Tags screen by choosing Post Tags from the Posts widget in the sidebar
The Post Tags screen looks like this:
Add New Tag section is at the top of the screen. To add a new tag enter the Tag name and Tag slug and click on the Add Tag button. The tag name can be the full name of the tag to be used, for example "wedding catering". The slug will be a search engine friendly version of the tag. If you do not enter the slug the system will automatically create one consisting of all lowercase words separated by a hyphen, for example "wedding-‐catering".
On the right of the screen is a table that lists all of the tags in the system. Clicking on the tag name will take you to the edit tag screen for that tag. Clicking on the number under posts will take to you to the Edit Post screen with a list of posts assigned with this tag.

52
Placing the mouse over the name of a tag in the list displays a menu of options as previously explained.
The Bulk Actions menu functions as previously explained.
Edit Post Tags
The Edit Post Tag screen looks like this:
Simply edit the tag name and tag slug and click on the Update Post Tag button to make your changes.
Quick Edit
Quick Edit allows you to edit the name and slug of the tag only.
Categories You can access the Categories screen by choosing Categories from the Posts widget in the sidebar
The Categories screen looks like this:

53
Directly beneath the popular categories list is the Add a New Category section. Popular Categories are listed at the top of the screen. Clicking on a category in the list will take you to the Edit Categories screen, which is described in the next section.
To add a new category enter the Category Name and Category Slug, choose a Category Parent from the drop down list, enter the Description for the category and click on the Add Category button.
The category name can be the full name of the category to be used, for example "wedding catering". The slug will be a search engine friendly version of the category. If you do not enter the slug the system will automatically create one consisting of all lowercase words separated by a hyphen, for example "wedding-‐catering".
Hint: Categories can have a hierarchy. For example, "Weddings" may be a parent category for the sub-‐categories of "catering", "photography" and "cars". If the category you are adding is a sub-‐category, choose the parent category from the drop down list.
On the right of the screen is a table that lists all of the categories in the system. Clicking on the category name will take you to the edit category screen for that category. Clicking on the number under posts will take to you to the Edit Post screen with a list of posts assigned to this category.
Placing the mouse over the name of a category in the list displays a menu of options as previously explained.

54
The Bulk Actions menu functions as previously explained in the Edit Pages section
You do not have access rights to use the category to tag converter so just ignore this option.
Edit Category
The Edit Category screen looks like this:
Simply edit the category name, category slug, category parent and description and click on the Update Category button to make your changes.
Quick Edit
Quick Edit allows you to edit the name and slug of the category only.
Media Adding media to your website can be done in one of two ways:
1. Directly into a page or post 2. Added to the media library and then added to a page or post
Firstly, let’s look at adding media directly into a page or post.
In the Edit Post, Edit Page, Add New Post and Add New Page screens there are four buttons that allow you to add media to your page.
In order, from left to right, these buttons allow you to add Images, Video, Audio and Media.

55
Add Image Clicking on the add image button will open a pop up dialog box that looks like this:
There are three locations you can choose to add an image from.
1. From computer 2. Another webpage (From URL), and 3. Media Library
Once you have added media to your page you can also add it to a gallery, which will display thumbnails of your media on the page and provide links to the individual files. This is handy if you’re using multiple images on the one page for example. This is covered in greater detail in the Add Image To Gallery section.
Add Image From Computer To add an image from your computer, click on the Select Files button.
Technical: By default, the system will use the flash uploader to allow uploading of multiple files at once. If the image upload function causes you problems, switch to the browser uploader by clicking on the link that reads Browser Uploader. The

56
browser uploader will only allow you upload one file at a time.
After you have uploaded your images into the system you will be able to add titles and descriptions as well as set the size and alignment of the image on your page:
The uploader will now show you a thumbnail (small, cropped version) of the image you uploaded. Enter a title for your image as well as a caption and a description. Depending on the way your website has been developed, the caption and/or description may appear below the image on your page. Entering a title and caption for each image will help your webpage become more visible to search engines like Google and Yahoo!
If you want the image to link to another page, enter a URL in the Link URL field. You can also use the File URL button to have image link to itself (which will display the image on its own page) or the Post URL button to have the image link back to the same page we are already on. This may help people find your webpage who are searching the internet using an image search tool like Google Images for example.
The alignment setting allows you to align the image to the left of the text, in the center or to the right. Any of these settings will force the text to wrap around the image. A setting of
57
none will place the image on its own line and the text will appear above and below it but not next to it.
The size of the image can also be set by choosing thumbnail, medium, large or full size. Be aware that choosing thumbnail may crop your image and display the center of your image so you may lose information towards the edges. The image will appear on your website very similar to the thumbnail that appears on this very screen.
When you are happy with your settings, click on the Insert into Post button to insert the image into your page.
Hint: The Add Media functionality is identical for adding media to a page or a post.
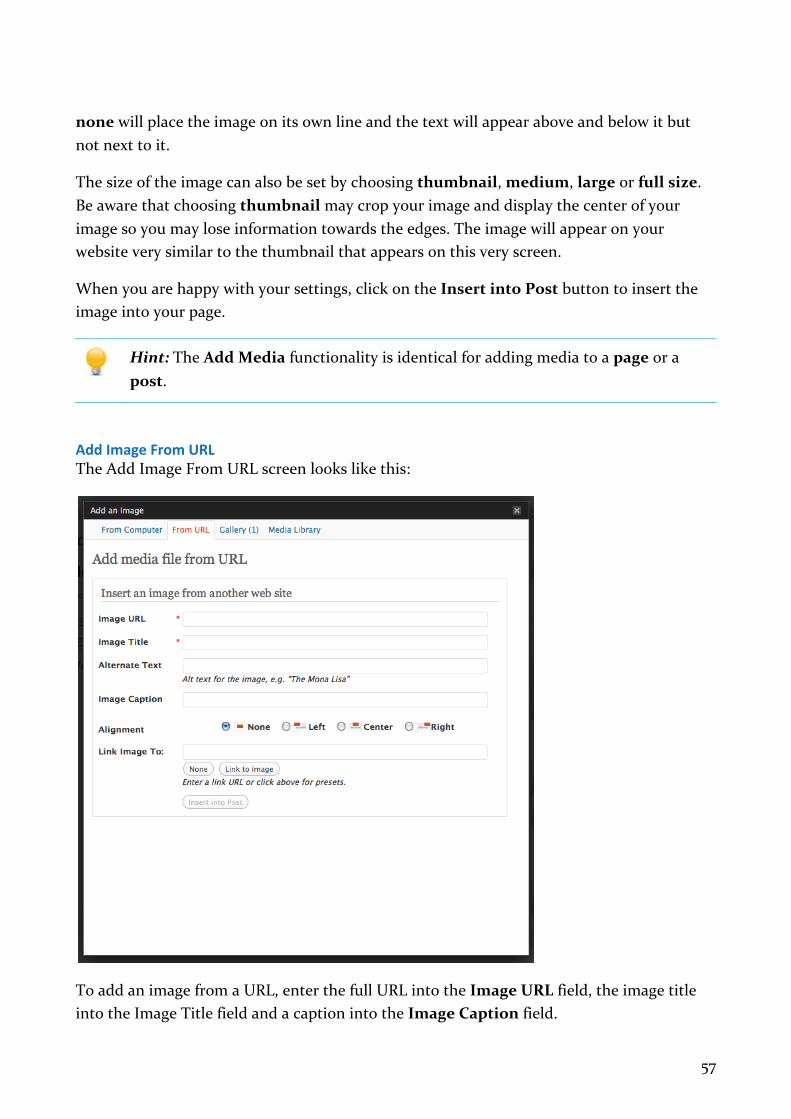
Add Image From URL The Add Image From URL screen looks like this:
To add an image from a URL, enter the full URL into the Image URL field, the image title into the Image Title field and a caption into the Image Caption field.

58
Then choose the alignment of the image as None, Left, Center or Right as previously explained.
Finally choose a link for the image and click on the Insert into Post button.
Add Image From Media Library The Add Image From Media Library screen looks like this:
At the top right of this screen, a search bar allows you to search for specific media. At the top left your existing media is displayed by type, (All, Image, Video, Audio) to give you a quick reference as to how much media you have at your disposal. You can also filter the media on display by choosing a date from the drop down list and clicking on the Filter button.
Beneath these filter and search options, your media is listed. Clicking on the Show text to the right of any media item will display all the options for using that media item in the following screen:

59
These options are identical to the options given when you Add Media From Computer. When you are happy with your settings, click on the Insert into Post button. If you wish to make changes to the settings for the files in the media library without inserting any media into your page or post, click on the Save all changes button. This will remember the changes you have made for the next time you access the media library.
Alternatively, if you wish to delete the file from your media library, click on the Delete permanently link.
Add Image To Gallery The Add Image To Gallery screen looks like this:

60
Any media you add to a page or post is automatically included in a Gallery for that page or post.
You can sort the order of media in the gallery by clicking on any media file, holding down the mouse button and dragging it to a new position in the list. You can also manually enter the order for each media file in the Order box.
Clicking on the Show link will show you the options as previously explained in the media library section.
The gallery settings on this page allow you to link the thumbnails of your media files to either the image file (displayed on its own in the web browser) or the attachment page which looks and feels like a normal post on your website but contains only the media file.
You can also choose to display the images by menu order (as they appear in the list above) by name or date. Choosing descending will reverse the order you have chosen. Gallery columns will organize the gallery into the number of columns you specify. For example, if you specify three columns and you have five images on the gallery, the gallery will display a row of three thumbnails followed by a second row of two.

61
Once you are happy with your settings, click on the Insert gallery button to insert the gallery into your page or post.
Featured Image Featured Image Panel looks like this:
To set a featured image for a post or page, scroll to the bottom right of the edit screen, and click featured image.
You can either, upload an image from your computer, from a URL, if you already have uploaded image to this page or post, then you can choose one from the Gallery, or you can choose from the Media Library.
Once you have chosen an image, you can edit the title, alternative text, caption and description.

62
Scroll down and click -‐ Use as featured image.
Your Featured Panel will now look like this:
Then click update button to save all changes.
If your website has been set up to use this feature then this image will be used represent this page or post.
Adding Other Media Adding other media (video, audio, pdf files, word documents) directly into a page or post will display a link on the page to the media you have added. If a user clicks on the link their browser will then display the media using the settings they have specified. Adding video, audio and other media content works exactly the same regardless of the type of media being added.
Embed Media You can easily embed video, images, and other content into your WordPress site from the following sites:
• YouTube • Vimeo • DailyMotion • blip.tv • Flickr (both videos and images) • Viddler

63
• Hulu • Qik • Revision3 • Scribd • Photobucket • PollDaddy • Google Video • WordPress.tv (only VideoPress-‐type videos for the time being)
There are two simple ways to do it.
First is by placing the cursor of the mouse to whichever part of the post or page you want the embedded video to appear. Then click Add Video and choosing From URL tab.
Paste in the URL of the video and put a title in which you wanted that URL to be link in.
And click Insert into Post button, the result of this will be a link leading to the video URL you have just entered.
The other one is by using the Embed tag. It supports videos, images, text, and more.

64
To do it, just copy and paste in the URL of the video that you want to embed and wrap that URL in the [embed] shortcode
Remember to copy only the video or image URL with no links attached.
The end result of this is the actual video embedded in your page or post.
When done editing you may hit Update, to save the changes you have done.
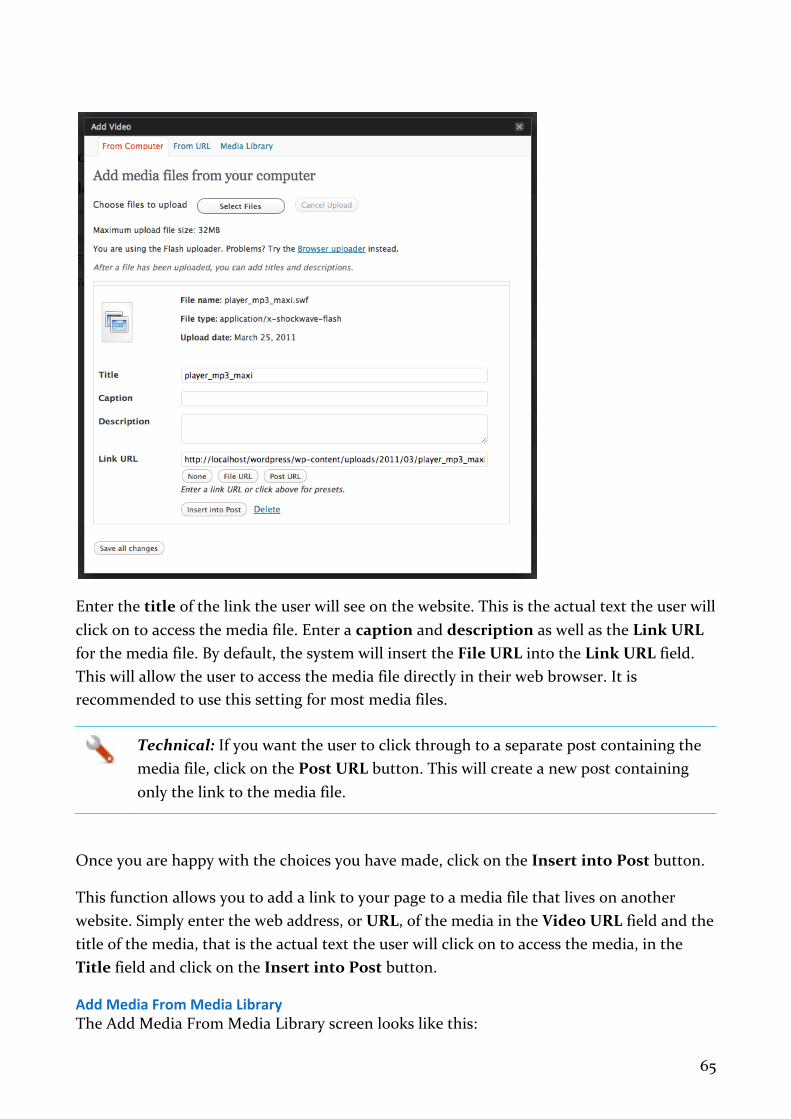
Add Media From Computer The Add Media From Computer screen looks like this:
As previously outlined in Add Image From Computer, click on the Select Files button and choose your media files to upload. Once the media files have uploaded into the system you will be able to add titles and descriptions:
65
Enter the title of the link the user will see on the website. This is the actual text the user will click on to access the media file. Enter a caption and description as well as the Link URL for the media file. By default, the system will insert the File URL into the Link URL field. This will allow the user to access the media file directly in their web browser. It is recommended to use this setting for most media files.
Technical: If you want the user to click through to a separate post containing the media file, click on the Post URL button. This will create a new post containing only the link to the media file.
Once you are happy with the choices you have made, click on the Insert into Post button.
This function allows you to add a link to your page to a media file that lives on another website. Simply enter the web address, or URL, of the media in the Video URL field and the title of the media, that is the actual text the user will click on to access the media, in the Title field and click on the Insert into Post button.
Add Media From Media Library The Add Media From Media Library screen looks like this:

66
This screen functions exactly as outlined in the Add Image From Media Library section.
We have covered adding media into a page or post; now let's look at browsing through the media library as well as adding media to the library for later use.
Library The Media Library can be accessed from the Media widget:
The Media Library screen looks like this:

67
The Media Library lists all the media that have been uploaded into the system. Whether you upload media directly into pages or posts or into the media library, once any media has been uploaded into the system it will be available for you to use in the media library. Once the media is in the media library it can be used on any page or post throughout the site.
At the top left of the Media Library screen, your media is sorted into type and tallied to give you a quick reference as to how much media, and what type of media, are available for you to use. Clicking on any of these headings will filter the list to media of that type only. At the top right of the screen there is a handy Search bar allowing you to search the Media Library for any files containing particular words.
Technical: This search function will search the file names, titles and descriptions of all files in the library.
Directly beneath the media type headings and search bar is the Bulk Actions drop down menu, which essentially allows you to delete permanently multiple files at once, as previously explained. Next to the Bulk Actions menu is a date filter that allows you to filter the media list to media uploaded in a certain month. Simply choose the date you require from the drop down list and click on the Filter button.
Below the bulk actions and filter tools is the list of media. The list displays a thumbnail of the media file, the file name and type, the author who uploaded the media, any pages or posts the media file is currently attached to, any comments on those pages or posts, and the date the media were uploaded. Media that are not an image will show a generic thumbnail for that media type. For example, Audio will show a thumbnail of musical notes, and Video will show a thumbnail of a clapperboard with a play button.
Clicking on the page or post in the "Attached to" column will take you to the Edit screen for that page or post.

68
Clicking on the comments icon will take you to the Edit screen, which is covered in more detail later.
Placing the mouse over the media file thumbnail or name will display the Options menu, allowing you to Edit or Delete Permanently the media file or View the media file as its own post.
Edit Clicking on Edit, or in fact the media file name or thumbnail, will take you to the Edit Media screen, which looks like this:
At the top of the Edit Media screen, you will find a larger thumbnail of the media file, the file name, type, and the date when it was uploaded.
Click on the Edit Image button (button shown below), and it will lead you to an image editor. This section is further explained when you click on the Next link below.
The fields you can edit are the Title, Caption and Description.
Once you are happy with your changes, click on the Update Media button.
Cropping Or Scaling An Image The Edit Media Toolbar

69
Crop
Rotate Counter Clockwise
Rotate Clockwise
Flip Vertically
Flip Horizontally
Undo
Redo
To crop an image, click and drag the mouse to the image to select the desired part. If satisfied with the desired part, click the crop icon in the Edit Media toolbar.
You may click the help link beside the image crop title to help you with cropping the image.
When you wish to scale an image, click Scale Image on the right part of the page.

70
Change dimensions according to your desired size and hit the Scale button.
When done editing, you may hit Save and Update Media, to save the changes you have made.
Other Editing Image Icons Other editing icons for images include rotating counter-‐clockwise and clockwise, flipping vertically and horizontally, undo and redo.
You may rotate an image, either counter-‐clockwise or clockwise, with the help of the second and the third icon from the left of the editing image toolbar.
And you may flip an image, either vertically or horizontally, with the help of the fourth and fifth icon from the left of the editing image toolbar.
While the two other icons left were helpful, if you wish to undo or redo an editing action that you have just made.

71
Thumbnail Settings gives you an option on where do you want to apply the changes you made with the image.
When done editing, you may hit Save and Update Media, to save the changes you have done.
Delete Clicking on the Delete Permanently option under any media file title will delete the media file permanently.
Caution: Once a media file has been deleted, you cannot get it back.
View Clicking on View will show you the media file as its own post on your website.
Add New You can add new media directly to the media library by clicking on Add New in the Media widget:
The Add New Media, or Upload New Media screen looks like this:
To add new media click on the Select Files button. This functions exactly the same as adding media directly to a page or post.
Once you have uploaded your file you will be able to set the Title, Caption and Description for the file:

72
Enter the Title, Caption and Description into the appropriate fields and click on the Save all changes button to save your changes in the media library.
Links The links section is used to manage links from your website to other websites as displayed in a separate links section on your site. This may or not be part of your site development so this section may not be relevant to you.
Links contained in your pages and posts are not managed in this section.
NB: If you are unsure about whether or not to use this section, consult with your web developer or IT department.
Links To edit your existing links click on Edit in the links widget:
The Edit Links screen looks like this:
This screen functions like many other screens in the admin system. A list of your links is displayed in a table with the Bulk Actions, Filter and Search tools at the top, the details for each link in the table and another Bulk Actions tool at the bottom of the table.
The table of links shows you the name of the link, that is the text your visitors will see on your website, the actual web address, or URL, of the link, the category the link belongs to,

73
any relationship data, the visibility status of the link and the rating which is the ranking of the Link, which can be used to sort links within Categories.
Link categories are different to post categories and managed completely separate. Link categories may include Internal Departments, Sub-‐Branch Offices or Customers.
If you position the mouse over a link title, a menu of options will appear allowing you to Edit or Delete the link.
Edit The top half of the Edit Link screen looks like this:
On this screen you can change:
• The name of the link, that is the actual text your visitors will see on your website • The web address of the link, be sure to include the “http://” • The description of the link, which may appear when a visitor hovers over the link • Any categories the link belongs to, you can also add new categories here by clicking
on the + Add New Category link • The target of the link, that is the window the link will open in.
Technical: By default, links are set to the option of “none” and will open in the same window as the page they are displayed on. It is recommended not to change this option.

74
At the top right of this screen is the Visit Link button, allowing you to visit the link to check if you have entered the correct URL, an option to keep the link private, meaning it will not be visible to the public, as well as the Update Link button, which allows you to save your changes and the Delete link.
The bottom half of the Edit Link screen looks like this:
Both Link Relationship and Advanced can be completely ignored and your links will still work, so only read this section if you know it is relevant to your website.
The following information regarding Link Relationship has been sourced from the official WordPress codex at:
http://codex.wordpress.org/Links_Add_New_SubPanel

75
XFN stands for XHTML Friends Network. WordPress allows for the generation of XFN attributes automatically so you can show how you are related to the authors/owners of site to which you are linking. XFN tags are an effort to add meaning to the connections (links) on the World Wide Web, and are gaining in popularity.
When you add a new link you may specify in this section of the SubPanel the relationship you share in real life with the author of the page to which you're linking. This will automatically add a rel="X" attribute to the HTML code for the link (where X is the relationship you specify).
XFN relationships are optional for WordPress links. You can leave everything in this section blank and all your links will still work.
To specify your relationship, use the following.
identity
Use this checkbox if the link is to another of your own websites. This relationship is exclusive of all others.
friendship
These radio buttons allow you to specify one of four different types of friendships:
• acquaintance -‐ Someone with whom you have exchanged greetings and not much (if any) more -‐-‐ maybe a short conversation or two.
• contact -‐ Someone with whom you know how to get in touch.
• friend -‐ Someone you consider a friend. A compatriot, buddy, home (boy|girl) that you know.
• none -‐ Use this if you want to leave the friendship category blank.
physical
Check the met checkbox if this is someone whom you have actually met in person.
professional
These two checkboxes allow you to specify your professional relationship with the author of the link's site.
• co-‐worker -‐ Someone with whom you work or someone who works at the same organization as you.
• colleague -‐ Someone in the same field of study or activity.

76
geographical
Use these three radio buttons to specify how you relate geographically to the author of the link's site.
• co-‐resident -‐ Someone with whom you share a street address. A roommate. A Flatmate. A member of your family living in the same home.
• neighbor -‐ Someone who lives nearby, perhaps only at an adjacent street address or doorway.
• none -‐ Use this if you want to leave the geographical category blank.
family
Six radio buttons to specify your familial relationship.
• child -‐ Your genetic offspring. Or someone that you have adopted and take care of.
• kin -‐ A relative. Someone you consider part of your extended family.
• parent -‐ Your progenitor. Or someone who has adopted and takes care (or took care) of you.
• sibling -‐ Someone with whom you share a parent.
• spouse -‐ Someone to whom you are married.
• none -‐ Use this if you want to leave the family category blank.
romantic
Use these four checkboxes to define how you are "romantically" related to the author of the site.
• muse -‐ Someone who brings you inspiration.
• crush -‐ Someone on whom you have a crush.
• date -‐ Someone you are dating.
• sweetheart -‐ Someone with whom you are intimate and at least somewhat committed, possibly exclusively.

77
The last section on the Edit Link screen is called Advanced. Whether or not any of the information you enter in the advanced section has any effect on your website will depend on how your site has been developed.
NB: If you are unsure about whether or not to use this section, consult with your web developer or IT department.
The Image Address field allows you to enter the URL of an image you wish to associate with the link.
The RSS Address allows you to enter the address of any RSS feeds that may be present on the site you are linking to.
Notes are a place for you to make some notes about the link for your own reference.
Rating is a setting that allows you to rate the link from 0 -‐ 9. Again, what your website does with this rating depends on how your site has been developed.
Delete Clicking on the Delete option under any link will open a pop up dialog box asking if you are sure you want to delete the link. Clicking on OK will delete the link and clicking on Cancel will cancel your actions.
Caution: Once a link has been deleted, you cannot get it back.
Add New To add new links click on Add New in the links widget:
The Add New Link screen looks like this:

78
This screen functions exactly the same as the Edit Link screen, with the exception that it is empty of all data, so you need to enter the information for your new link and the Update Link button is now known as the Add Link button.
Link Categories To add new link categories or edit your existing link categories click on Link Categories in the links widget:
The Link Categories screen looks like this:

79
This screen functions exactly the same as the Edit Categories screen under Categories in the Posts widget, with the exception that you cannot assign a parent category to a link category.
Placing the mouse over the name of a link category in the list displays a menu of options.
Edit The Edit Link Category screen looks like this:
This screen functions exactly the same as the Edit Category screen under Categories in the Posts widget, with the exception that you cannot assign a parent category to a link category.
Quick Edit Quick Edit allows you to edit the name and slug of the link category only:

80
This screen functions exactly the same as the Edit Category screen under Categories in the Posts widget, with the exception that you cannot assign a parent category to a link category.
Delete Clicking on the Delete option under any link category will open a pop up dialog box asking if you are sure you want to delete the link category. Clicking on OK will delete the link category and clicking on Cancel will cancel your actions.
Comments Visitors to your site can make comments on pages or posts. Comments are a good way to encourage user contributions to your site and help foster a sense of community. Comments may or may not be enabled on your site depending on how it has been developed.
NB: If you are unsure about whether or not comments are enabled, consult with your web developer or IT department.
If comments are enabled then you can view, edit and reply to comments by clicking on the Comments widget in the sidebar. You can also mark comments as spam, approve or unapprove them and delete them.
The Edit Comments screen looks like this:

81
This screen displays any comments made by visitors on your website. At the top left of the screen your comments are sorted into status and tallied. At the top right is the Search tool. Underneath the tally headings are the familiar Bulk Actions and Filter tools. The filter tool allows you to view comments, pings or both in the table list.
The table of comments displays the Author, that is the actual visitor to your website who made the comment, the comment itself and the post or page the comment was made on.
Placing the mouse over any comment in the list will display a menu of options. The comments menu options are:
• Approve/Unapprove • Reply • Quick Edit • Edit • Spam, and • Trash
Approve/Unapprove If a comment is approved it will be visible to the public on your website. Depending on the nature and/or subject matter of the comment you may want to prevent it from being displayed on the website until further consideration by yourself or a colleague. If you "Unapprove" a comment it will marked as pending. This means the comment remains in the system but is not published on the website until it is approved.
Spam If a comment is considered spam it may automatically end up in the spam section, depending on how your site has been developed. If you think a comment is spam and it has been approved, or is marked as "pending", you can mark it as "spam" and the system will hold the comment in the spam section until further action. From the spam section you can approve comments to be published or delete them. This works in a similar way to the spam filters in many popular email programs.

82
Trash Clicking on the Trash option under any comment will move that comment to the Trash link located above, next to the Spam link.
Click the Trash link to locate all the items that you have deleted for the past 30 days.
Hover your mouse over to the title of the comment that you want to delete or restore, and a sub-‐menu of options will appear below.
Choose Restore to recover back your deleted comment or choose Delete Permanently to delete the comment forever.
Edit The Edit Comment screen looks like this:

83
This screen allows you to edit the comment, including the author's name, email and URL, as well as the body of the comment. You can also change the status of the comment by using the radio buttons in the right-‐hand side Status widget.
To save your changes, click on the Update Comment button or click on the Move to Trash link to move the comment to Trash.
Quick Edit The Quick Edit comment screen looks like this:
This screen allows you to edit the author's name, email and URL as well as the body of the comment from within the comments list table, without loading a whole new page.
Reply The Reply To Comment screen looks like this:

84
This screen allows you to reply to any comment on your website. Simply enter your reply in the bottom half of the editor and click on the Submit Reply button or the Cancel button to cancel your reply. Once you submit a reply it will be published on you website for the public to view.
Tools
Turbo This user’s guide does not provide support for Turbo; however more information is available at:
http://gears.google.com/
NB: Before using Turbo you should consult with your web developer or IT department.
Press This Some of the following information has been sourced from Lorelle on WordPress:
http://lorelle.wordpress.com/2005/09/15/wordpress-‐power-‐user-‐features-‐just-‐press-‐it/
Press This is a bookmarklet: a little application that runs in your web browser (Internet Explorer, Firefox, Safari) and lets you grab bits of websites and publish them on your website.
You need to save the Press This application to your bookmarks or favorites before you can use it.

85
Then, when you are visiting a site you want to post about on your website, just click the Press This link in your favorites or bookmarks and a window will pop up with either your website's login or, if you are already logged in, a condensed version of the Write Post screen. Inside will be the title filled out with the title of the website you are visiting (if there is one) and a link in the Editing text area. You just fill in the text, mark the categories, then save it as a draft or private or publish it.
The Press This screen looks like this:
NB: Before using Press This you should consult with your web developer or IT department and you should seek legal advice regarding using content from other websites on your own site.


![How Outpatient Palliative Care Teleconsultation ...patient-professionalrelationship,whichis considered thekeytopalliative care[20].Inparticu- lar,thisstudy investigates thepractical](https://img.dokumen.tips/doc/110x75/5e42d87bc09f1d60171fc4e5/how-outpatient-palliative-care-teleconsultation-patient-professionalrelationshipwhichis.jpg)