Embed Size (px)
Citation preview

Created by Linda D. Resch And Linda C. JosephInstructional Information Services
2000
1
Word Processing with Microsoft Word 2000
1. Launch Microsoft Word by clicking on the Start button in the Task Bar.2. Click on Programs.3. Choose Microsoft Word from the list of programs.
4. The Office Assistant Welcome appears the first time you start Microsoft Word.Click Start Using Microsoft Word. The main screen of Microsoft Word will be displayed.
Microsoft Word Screen
You will want to become familiar with this screen and what each of the features can do whenyou click on them.
Try This: Place you mouse on top of the B icon in the Formatting Tool Bar. Do not click! Whathappened? This is a nice feature to assist you while you are learning Microsoft Word.
MMMMeeeennnnuuuu
FFFFoooorrrrmmmmaaaattttttttiiiinnnngggg
TTTToooooooollllbbbbaaaarrrr
SSSSttttaaaannnnddddaaaarrrrdddd
TTTToooooooollllbbbbaaaarrrr
IIIInnnnsssseeeerrrrttttiiiioooonnnn
PPPPooooiiiinnnntttt
SSSSttttaaaattttuuuussss
BBBBaaaarrrr
RRRRuuuulllleeeerrrrssss

Created by Linda D. Resch And Linda C. JosephInstructional Information Services
2000
2
Creating a New Document
1. From the File Menu, select New. The main screen of Microsoft Word will be displayed. Youcan also Open a document that has already been saved.
2. Before you begin typing text, you should setup the page. Select Page Setup from the FileMenu. You can change the margins, select the paper size, and place a border around yourdocument.
Do This: Change the margins so that the top, bottom, right, and left are all 1".
3. If you want to add a border to your document, choose Format form the Menu Bar and selectBorders and Shading.

Created by Linda D. Resch And Linda C. JosephInstructional Information Services
2000
3
Select the setting, style, color, width or artwork and click OK.
Inserting a Graphic
Rather than have you find any old graphic, it seems important that you have some context in howyou might use this program with students. A Website has been setup to enable you to learnanother skill that will be very important in the current information age. How do you save agraphic from the Web and insert it into your Word document? The next set of instructions willshow you exactly how to do it. Later, you can go back and practice or have your students followthese same instructions.
1. Minimize Microsoft Word. Click on Netscape.
2. Type this address in the location box http://www.cyberbee.com/portraits/kids.html
3. Click on one of the thumbnail images to view a larger image.

Created by Linda D. Resch And Linda C. JosephInstructional Information Services
2000
4
4. To save the large image, right click on the mouse and choose Save Image As.
5. Save it to the folder called My Documents or on a 3 1/2" Disk. You can either keep the nameof the file or rename it. Whatever you do, remember the name of the file.
You now have a graphic to insert into your Word Document.

Created by Linda D. Resch And Linda C. JosephInstructional Information Services
2000
5
6. Switch back to Microsoft Word. You do this by locating the Word icon in the Task Bar andclicking on it.
7. Pull Down Insert from the Menu Bar and select Picture from File. You can also insert Clip Artthat is part of the Microsoft Office package.
8. Select your photograph from the My Documents folder or 3 1/2" Disk. Click on Insert.
MMMMiiiiccccrrrroooossssoooofffftttt
WWWWoooorrrrdddd
TTTTaaaasssskkkk
BBBBaaaarrrr

Created by Linda D. Resch And Linda C. JosephInstructional Information Services
2000
6
9. Resize the picture by clicking on it. Then drag one of the handles diagonally.
10. Center the picture by clicking on it. Then click on the Center icon in the Formatting Bar.

Created by Linda D. Resch And Linda C. JosephInstructional Information Services
2000
7
Formatting Text
1. Select a font and size for your document from the Formatting Toolbar. Hold down on thearrow and highlight your selection. To change text that has already been typed, highlight it byholding the mouse key and dragging over it. Then choose the font and size.
2. Bold, Italic, and Underline can be selected from the Formatting Toolbar. You will probablywant to use bold for titles or words that you want to stand out.
Created by Linda D. Resch And Linda C. JosephInstructional Information Services
2000
8
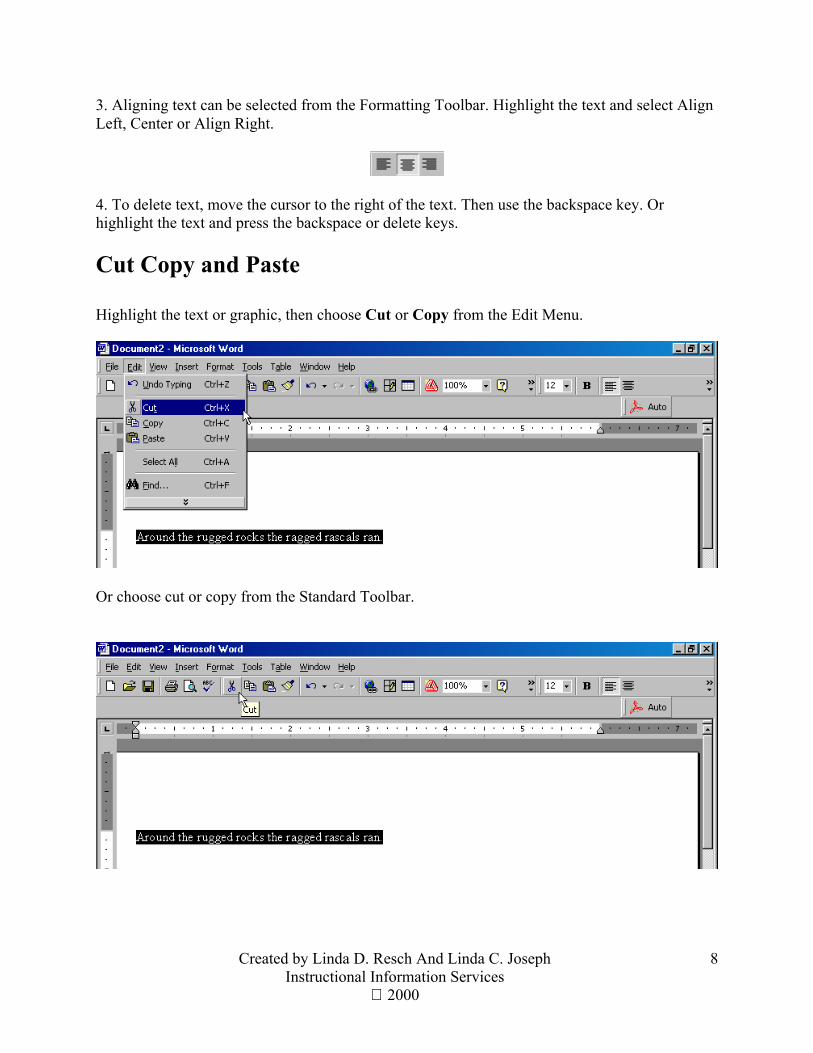
3. Aligning text can be selected from the Formatting Toolbar. Highlight the text and select AlignLeft, Center or Align Right.
4. To delete text, move the cursor to the right of the text. Then use the backspace key. Orhighlight the text and press the backspace or delete keys.
Cut Copy and Paste
Highlight the text or graphic, then choose Cut or Copy from the Edit Menu.
Or choose cut or copy from the Standard Toolbar.

Created by Linda D. Resch And Linda C. JosephInstructional Information Services
2000
9
Inserting a Table
Tables are useful for entering information and keeping the text aligned. You can insert thenumber of rows and columns by selecting Table from the Standard Toolbar.
Inserting Page Numbers
1. Choose Insert from the Menu Bar and select Page Number.
2. Select the position, alignment, and whether to show the number on the first page. You can alsopreview the formatting.

Created by Linda D. Resch And Linda C. JosephInstructional Information Services
2000
10
Spell Checking
Microsoft Word automatically spell checks as you type your document. A red underline indicatesthat there is an error. To obtain a list of suggestions, choose Tools from the Menu Bar and selectSpelling and Grammar. Or select Spelling and Grammar from the Standard Toolbar. Be certainthat you check your spelling and also have another person check. If you type form when youreally mean from, the spell checker will not catch the mistake.
Saving Your Document
1. Choose Save from the File Menu or Save from the Standard Toolbar.

Created by Linda D. Resch And Linda C. JosephInstructional Information Services
2000
11
2. Name your file and select either My Documents or 31/2 Floppy Disk. Then click Save.
Previewing and Printing Your Document
1. Choose Print Preview from the File Menu or from the Standard Toolbar.

Created by Linda D. Resch And Linda C. JosephInstructional Information Services
2000
12
2. A screen will be displayed that will allow you to view each page of the document. Click on thePrinter icon to print or click on Close to go back and make changes.
PPPPrrrriiiinnnntttteeeerrrrClose