Embed Size (px)
Citation preview

UCL EDUCATION & INFORMATION SUPPORT DIVISIONINFORMATION SYSTEMS
Word 2003
Mail Merge
UCL Information Systems

Document No. IS-051 v3
Introduction 2 UCL Information Systems

ContentsIntroduction........................................................................................................................................................................2
What is Mail Merge..........................................................................................................................................................2Data Source files...............................................................................................................................................................2
Fields............................................................................................................................................................................2Records.........................................................................................................................................................................2
Planning a data file...........................................................................................................................................................2Creating Letters..................................................................................................................................................................3
Getting started with Mail Merge Wizard..........................................................................................................................3Step 1 - Choosing a document type..............................................................................................................................3Step 2 - Selecting a starting document.........................................................................................................................3Step 3 - Data source......................................................................................................................................................3Step 4 - Write the letter................................................................................................................................................4Step 5 - Preview letter..................................................................................................................................................4Step 6 - Complete the Merge........................................................................................................................................5
Saving the letters..............................................................................................................................................................5Merging a saved letter......................................................................................................................................................5
Creating and Sending Emails............................................................................................................................................6
Creating Envelops..............................................................................................................................................................7
Creating Labels...................................................................................................................................................................8Choosing labels................................................................................................................................................................8
Creating Directories.........................................................................................................................................................10
Using Mail Merge Templates..........................................................................................................................................11
Filtering and Sorting Records.........................................................................................................................................12Filtering data...................................................................................................................................................................12Sorting data.....................................................................................................................................................................12
Merging from Excel..........................................................................................................................................................13
Merging from Access........................................................................................................................................................13
Merging Emails from Outlook........................................................................................................................................14
Word Merge Fields...........................................................................................................................................................15Ask Field........................................................................................................................................................................15Inserting the bookmark...................................................................................................................................................15Creating an Ask field......................................................................................................................................................15Merging the Ask field.....................................................................................................................................................16Fill-in Field.....................................................................................................................................................................16Merging the Fill-in field.................................................................................................................................................16If..then..else....................................................................................................................................................................16
Checking and Reporting Errors..........................................................................................................................................18
UCL Information Systems

IntroductionWhat is Mail Merge The Word Merge feature enables you to combine a main document, eg, a letter, with a data source, eg, a list of names and addresses. When these two files are merged, they can create personalised copies of the main document to everyone on the data source list. Mail Merge requires two types of files. One file will contain the standard details and specific codes where the merged data will appear when the Mail Merge is processed and the other holds the variable information. The two types of files are called the Data Source and the Main Document.The Main Document can be a letter, mailing labels, invoices, etc. The Data Source is a list that contains the individual information to be printed on each copy of the main document. The Data Source need not be a Word document. It is possible to merge a Main document to an Excel worksheet or and Access database or an Outlook address book.Any number of Main Documents can use a single data file. The Data Source file can have as many items as required.
Data Source filesA Data Source file is made up of Records and Fields and is normally held in the form of a Table. Each row of the Table is a complete Record. Each Column in the table is a list of Fields. Therefore, each Record MUST contain the same number and type of Fields even if it means leaving a field, which is not required, empty.In this example there are three Records, each with eight Fields. The merged document will result in three letters, each with up to eight pieces of
information inserted.
FieldsEach field is given a Field name, e.g., First name, Last name, Address1, Address2, Postcode, etc. Field names must adhere to the following rules:1. They must not exceed 40 characters in length.2. They should not contain spaces (use the underscore character if necessary
to separate words).3. Can include numbers but must begin with a letter.4. Must be unique.
RecordsThe first row of the Data Source where all the field names are displayed is called the Header Record. A file that contains only a Header Record is called a
Introduction 2 UCL Information Systems

Header File. This is sometimes required when a Data Source from a different application is to be used.
Planning a data fileTime spent planning your Data Source file will be time well spent as the data can be used for various applications. It is advantageous to break the information down into several fields, rather than just one of two. For example, rather than have a name such as Mrs Kelly N Bloggs as one field, you could create four fields as follows: Title, FirstName, Initials, Surname. You could then sort or select on any of these fields if required. It is easy to add, change or remove Records and/or Fields if and when necessary.
Creating LettersGetting started with Mail Merge WizardThe Mail Merge Wizard task pane allows you to perform the task of creating a Mail Merge in an easy step by step method. To access the wizard:From the Tools menu, select Letters and Mailings then Mail Merge Wizard….
Step 1 - Choosing a document typeHaving displayed the Mail Merge Wizard, the first step in creating a Mail Merge is to choose the type of the document that you wish to create. The document types are as follows:
Letters Each record appears as a standard letterE-Mail Messages
Each record appears as an e-mail
Envelopes Each record appears on a separate page of envelope layout size
Labels Each record appears as one label on a sheet of labels
Directory Records appear as a simple list in a single document
In the following example the Letter option has been selected
Step 2 - Selecting a starting document
To create a mailing letter main document: 1. From the Mail Merge Wizard choose whether you want to
use the current document, a new one using a template or an existing document.
UCL Information Systems 3 Creating Letters

2. Click on Next to move to step 3. (Or click on Previous to go back to step 1.)
Step 3 - Data sourceThe third step involves choosing a file to use as your Data Source, then inserting the corresponding fields into your Main Document.Use an existing list1. Click the Use an existing data list button.2. Click the Browse button to select the relevant file.Select from Outlook contacts1. Use this option to access your Outlook Contacts folder.2. Select Choose Contacts Folder.3. Select the relevant folder.Type a new list1. Click on Type a new list.2. Click on the create button to create a new data list.3. Type in the data entries.After selecting the relevant option click on next.Step 4 – Prepare the Main DocumentAt this point the letter can be composed. Space should be left so that the merge data fields can be inserted. The data fields can also be entered at this point.Inserting Data Fields1. Position the cursor where the data field is to go.2. Select More items from the task pane.
The Insert merge field dialog box opens.
3. Choose the required field and click on the Insert button.4. Repeat steps 1 - 3 for each required field.
Introduction 4 UCL Information Systems

5. Click on Close when finished.6. Then click on next to proceed to the next step.
Step 5 - Preview Main DocumentThis step allows you to see the finished, merged document and allows you to make modifications.To edit an individual document use the following buttons on the task bar to manoeuvre to the relevant letter:You can also exclude certain records from the final merge by clicking on the Exclude this recipient button also on the task paneClick on next to complete the merge.
Step 6 - Complete the MergeIn this step you are offered two options:
Print…. You will be asked whether you want all the records printed, some of the records or just the current one. If you want to save your merged file you will need to do so before using this option. (See ‘Saving the File’ below.)
Edit individual letters
This option will ask the same as the print option but will merge the data to screen rather than the printer. This will give you the opportunity to edit the document before printing.A new document window is opened. Make any changes required and print in the normal way.
UCL Information Systems 5 Creating Letters

Saving the merged fileIf you want to save the file (i.e. after the merge), you can do it in the normal way – but before printing.If you want to save the form (i.e. the form file before merge) – go to Window, File | Save and then save the file.Helpful Hint:The letter after merge would normally comprise several pages. The file before merge would normally be one page only.
Merging a saved letterTo merge the same letter again:1. Open the letter. A message similar to the one below will be
displayed:2. Click Yes to continue.3. Edit the document as
required and merge to new document or print as necessary.
Introduction 6 UCL Information Systems

Creating and Sending EmailsUsing Mail Merge, you can send emails to a group of recipients, and personalise the email message that each person receives. You can use the Mail Merge Wizard to create a group e-mail distribution.
Note Your system must include a MAPI-compatible e-mail program, such as Microsoft Outlook. The procedures of creating Mail Merge emails are very similar to creating letters.Step 1: From the Mail Merge task pane, select E-mail messages. Step 2: Select your starting document – the default option is to use the current document, if there is any. (Same as creating a letter or labels, see Creating Letters3)
Step 3: Choose an existing recipient list or create a new one.
1. In case of importing the contact list from Microsoft Outlook, under Select recipients, click Select from Outlook contacts.
2. Click Choose Contacts Folder.
3. In the Select Contact List folder dialog box, click the contact list you want
4. Click OK. (Please see P.13 for details about how to import contact list from Outlook)
Depending on the type of Data Source you select, other dialog boxes may appear asking you to request specific information.
For example, if your Data Source is a Microsoft Excel worksheet that has information on multiple worksheets, you need to select the worksheet containing the information you want, and then click OK.
All of the entries in the Data Source appear in the Mail Merge Recipients dialog box, where you can refine the list of recipients to include in the merge.Step 4: Compose your email message just like composing a regular email message. If you have not already done so, in the main document, type the text that you want to appear in every e-mail message. Insert Merge Fields where you want to merge names and other information such as the greetings.Step 5: Preview the email messages. The message will be merged one recipient at a time.
Step 6: Complete the distribution settings, and send the messages.
1. Click Electronic Mail.
UCL Information Systems 7 Creating Letters

2. In the Merge to E-mail dialog box, finalize the distribution settings.
3. In the To box, verify that Email_Address or the equivalent is displayed.
This ensures that Microsoft Word merges e-mail addresses into the To line of your messages, not some other merge field information.
1. In the Subject line box, type the subject line you want to use for all the messages.
2. In the Mail format box, select the mail format you want to use (bear in mind, when you choose plain text format, you will lose the Rich Text formats, e.g., different font size and colours. Some email programmes at the recipient’s end, may not support HTML format, in which case your format will not be displayed correctly.)
3. Under Send records, select the records you want to merge.
To complete the merge and send the messages, click OK.
Creating EnvelopesUsing Mail Merge, you can create and print addressed envelopes for mass mailing. The first few steps of creating Mail Merge Envelopes are similar to creating merge letters.Step 1: From the Mail Merge task pane, select Envelopes.
Step 2: Click Change document layout. Click Envelope options. In the Envelope Options dialog box, select the options you want, such as the envelope size, and then click OK.
You can also start with an existing design.
1. In the Start from existing box, select the document containing the envelope you want, and then click Open. If you don't see the document, click More files, and then click Open.
2. In the Open dialog box, locate the document you want, and then click Open. Microsoft Word displays the document in the document window.
3. If you decide to use a different envelope document instead, click Start from existing document, and then select a different document.
4. If you want to change the layout, click Change document layout, and then click Envelope options.
Introduction 8 UCL Information Systems
Step 3: Choose or create a data source, and then select the recipient list. All of the entries in the Data Source appear in the Mail Merge Recipients dialog box, where you can refine the list of recipients to include in the merge.
Step 4: Modify the envelop contents and layout. Switch to the Print Layout View from the View menu, if you are not currently in this view. If you want to include a return address on your envelope, type it in the upper-left corner. Click in the centre of the envelope to insert a text box.
Step 5: Preview the email Envelopes. The Envelopes will be merged one recipient at a time.
Step 6: Finalise the merge. To personalize individual documents, you actually complete the merge, and then edit the information you want in the resulting merged document.
Step 7: Print the Envelopes. In Step 6 of the Mail Merge Wizard (Complete the merge), click Print. In the Merge to Printer dialog box, do one of the following, and then click OK.
1. To print all the documents, click All. To print the document that you see in the document window, click Current record.
2. To print a range of documents, click From, and then type the record numbers in the From and To boxes.
3. In the Print dialog box, select the options you want.
UCL Information Systems 9 Creating Letters

Creating Labels
Choosing labelsDifference from previous merge1. In Step 1, Select document type labels.2. Select label options.
The following dialogue box appears:3. Select the required label (i.e. L7163).4. Click OK.
Avery L7163 labels layout
5. Choose the Data Source as detailed in the previous section. The document layout on screen changes as shown here:
6. Click Next to go to the next step.
Introduction 10 UCL Information Systems

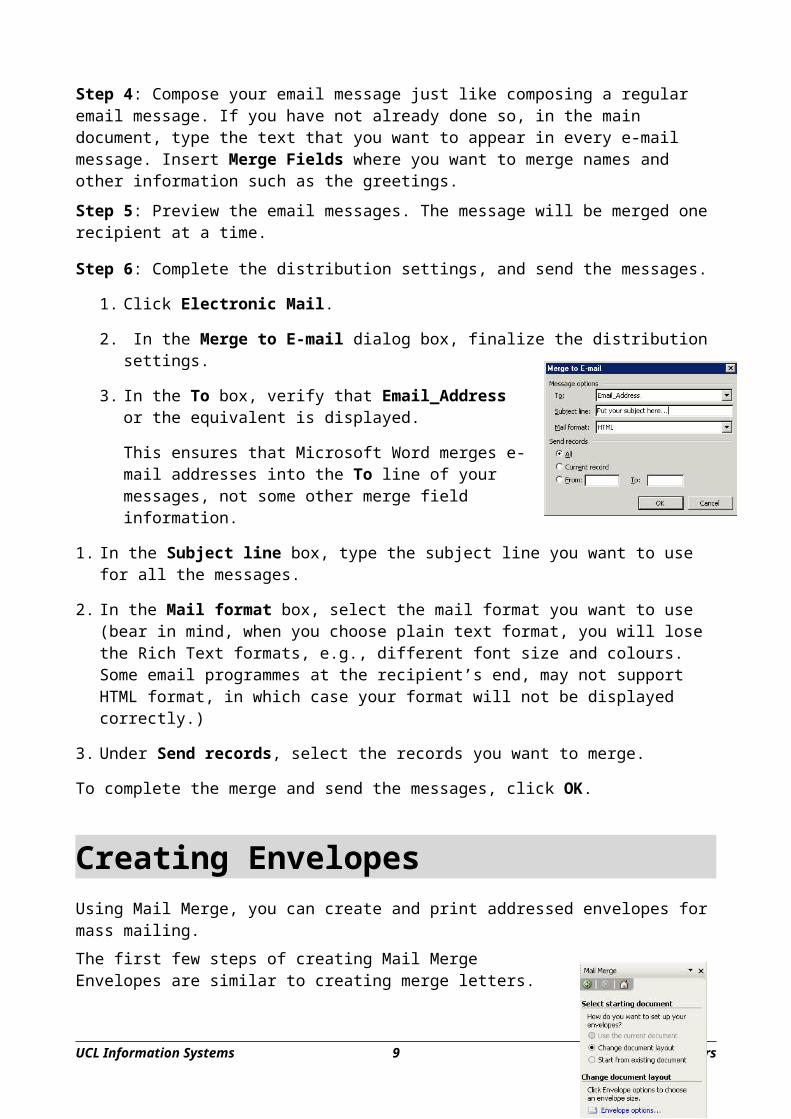
7. Click on more items on the task bar to display the fields.
8. Position the required fields on the label top left. Add any text and formatting. See below:
9. Once the data for the label is complete click on the Update all labels button on the toolbar to transfer the merge codes to the rest of the labels – see below:
UCL Information Systems 11 Creating Letters

A
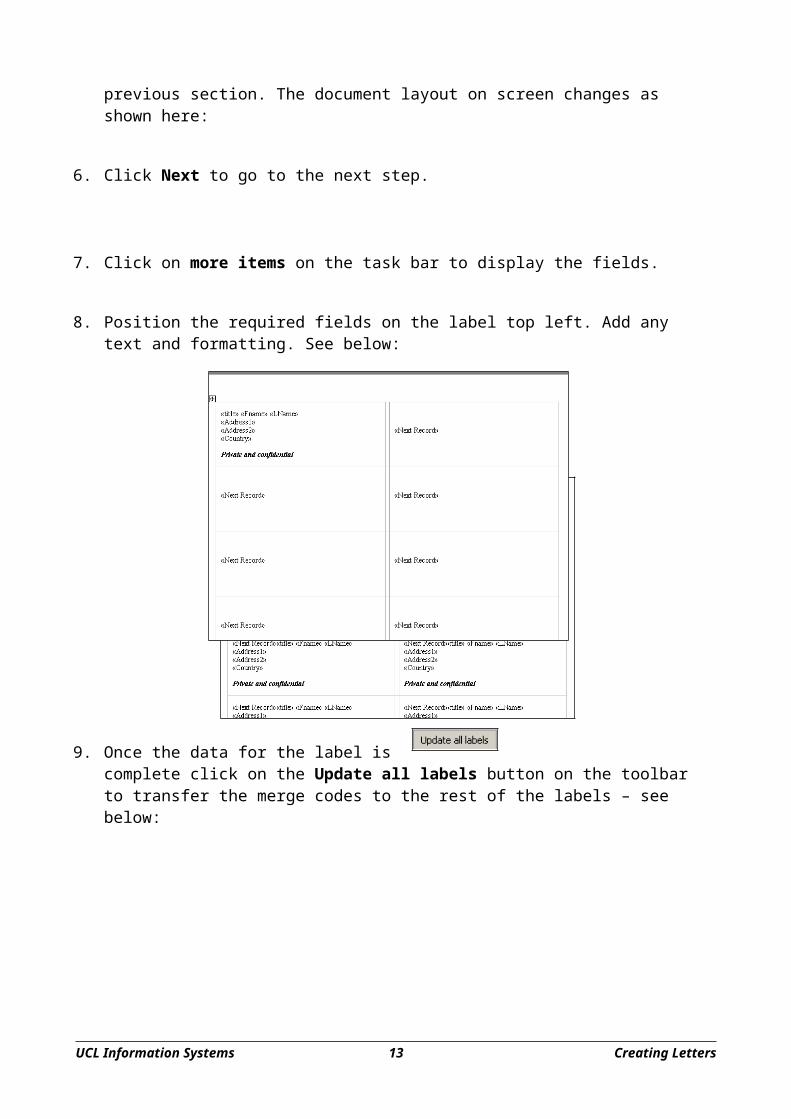
After Update
10. Click on next to preview the labels. The document now appears similar to the following figure:
11. Preview the labels. 12. Complete Merge.
The labels can then be merged or printed in the same way as other merged documents.
Introduction 12 UCL Information Systems
Creating DirectoriesA directory is where all the data is merged into one document. It contains either a catalogue, or a printed list of addresses.Difference from previous merge:Step 1: From the Mail Merge task pane, select Directory. Step 2: Select your starting document – the default option is to use the current document, if there is any. (Same as creating a letter or labels)Step 3: Choose an existing list or create a new one. (Same as creating a letter or labels.)Step 4: Arrange the directory. Here you design the layout of your directory and insert the required fields. In the following example a table is drawn up with the objective of merging the data into the table.Example:Draw a one row table:
Insert the required fields: Example:
Step 5: Preview directory. The data will be merged one record at a time.Example:
Step 6: Complete the merge and then choose to merge to new document. The screen should look similar to below:
Note that the directory is a straight list of records that all appear on the same document.
UCL Information Systems 13 Creating Letters
Using Mail Merge Templates
After you’ve selected the document type, you can choose to create the document from a Mail Merge Template. When you click Start from a template and then click Select template in the task pane, you open the Select Template dialog box. From there, you can open one of the many templates that are installed with Word. You can also access the hundreds of templates available on the Microsoft Office Online Web site.There are many templates available in Microsoft Word, and you can always download new templates to suit you from Microsoft Office Online. You can also create your own template (e.g. company letter head), in order to keep your documents consistent and professional. In the Select template dialog box, you can browse through all the Microsoft Office templates available. You will notice that there is a specific section labelled as Mail Merge. Mail Merge templates are different, because they already have merge data fields inserted (e.g., recipient’s address, title and name), so that you can conveniently generate mass quantity of documents by just selecting or inputting your data source. You can preview the template in the preview area by highlighting the template’s icon. When you choose to create a new document, you will then proceed with the Mail Merge document. When you choose to create a new template, your work will be saved as a template for future use.
Please note: when a template has been selected, you will then return to the Select starting document dialog box, you should now be able to see the template applied to the document. If you are happy with the template applied, you should select Use the current document to proceed to the next step.
Introduction 14 UCL Information Systems

Filtering and Sorting Records
Filtering data
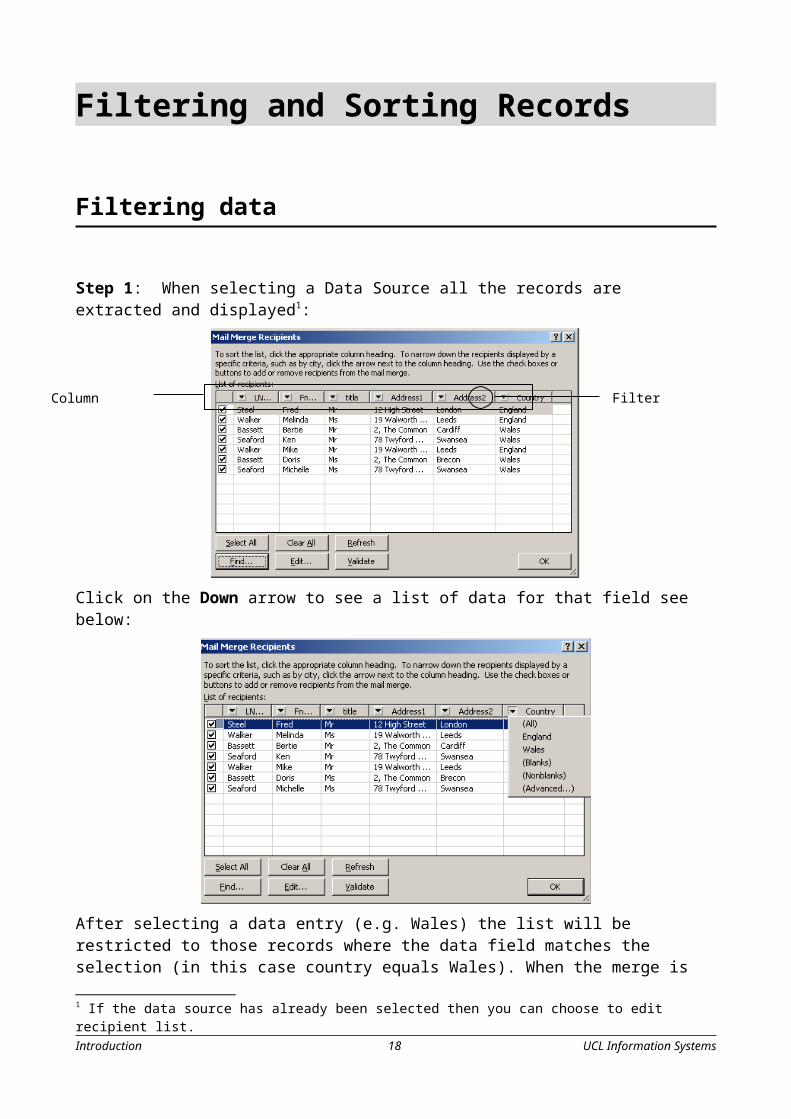
Step 1: When selecting a Data Source all the records are extracted and displayed1:
Click on the Down arrow to see a list of data for that field see below:
After selecting a data entry (e.g. Wales) the list will be restricted to those records where the data field matches the selection (in this case country equals Wales). When the merge is completed only those records that match the criteria will be merged.
1 If the data source has already been selected then you can choose to edit recipient list.UCL Information Systems 15 Creating Letters
Filter arrowColumn Headers

Sorting dataTo sort data click on the header of the column to be sorted (e.g. last name) and the column sorts, click again to sort in descending order. The data will be merged in the order as they appear on the screen.
Introduction 16 UCL Information Systems
Merging from ExcelWhen merging from an Excel spreadsheet you should ensure that the first row of the spreadsheet (or named area if using one) contains the field names.Differences from original merge:Step 1: Select Use an existing list and browse to the required spreadsheet.When selecting the Data Source an additional window will open asking you to a) choose the sheet that contains the data and, b) to confirm that the first row contains the column headers (the field names)
Note that it will also list any named ranges that it finds in the spreadsheet.After selecting the sheet/named range click on OK and continue the merge as normal.
Merging from AccessDifferences from original merge:Step 1: Select Use an existing list and browse to the required Access database.When selecting the Data Source an additional window will open asking you to choose the table or query that contains the data:
After selecting the table/query click on OK and continue the merge as normal.
UCL Information Systems 17 Creating Letters
Merging Emails from OutlookDifferences from original merge:Step 1: Select email messagesStep 2: Current documentStep 3: Select Outlook contacts and then select Choose contacts folder. The following dialogue box is displayed:
Choose the appropriate Contacts book and click OK. From the data list displayed select the email recipients and click OK.
Step 4: Write the email message, inserting any required merge fields – example below:
Step 5: Preview your merge.Step 6: Complete the merge and click on electronic mail. The dialogue box on the right displayed:
Type in a subject line to appear on all emails, select any other required option then click on OK to send the emails.
Introduction 18 UCL Information Systems

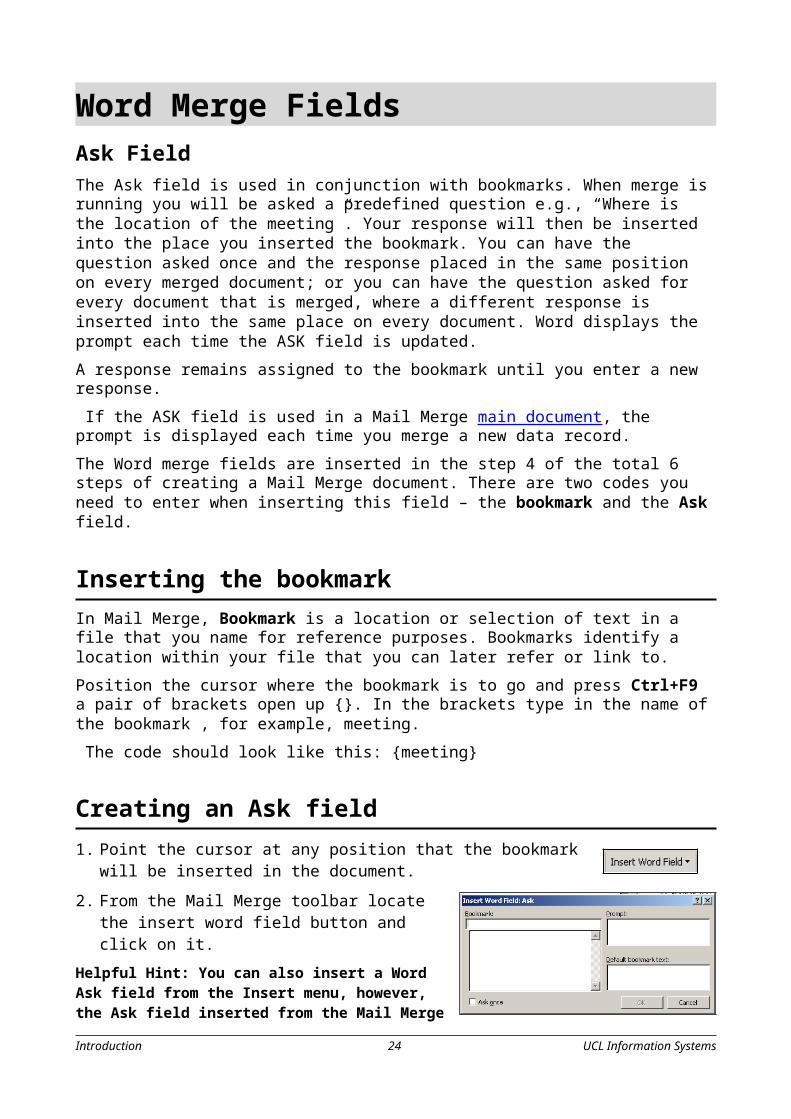
Word Merge FieldsAsk FieldThe Ask field is used in conjunction with bookmarks. When merge is running you will be asked a predefined question e.g., “Where is the location of the meeting”. Your response will then be inserted into the place you inserted the bookmark. You can have the question asked once and the response placed in the same position on every merged document; or you can have the question asked for every document that is merged, where a different response is inserted into the same place on every document. Word displays the prompt each time the ASK field is updated. A response remains assigned to the bookmark until you enter a new response. If the ASK field is used in a Mail Merge main document, the prompt is displayed each time you merge a new data record.The Word merge fields are inserted in the step 4 of the total 6 steps of creating a Mail Merge document. There are two codes you need to enter when inserting this field – the bookmark and the Ask field.
Inserting the bookmarkIn Mail Merge, Bookmark is a location or selection of text in a file that you name for reference purposes. Bookmarks identify a location within your file that you can later refer or link to.Position the cursor where the bookmark is to go and press Ctrl+F9 a pair of brackets open up {}. In the brackets type in the name of the bookmark , for example, meeting. The code should look like this: {meeting}
Creating an Ask field1. Point the cursor at any position that the bookmark will be
inserted in the document. 2. From the Mail Merge toolbar locate the
insert word field button and click on it.Helpful Hint: You can also insert a Word Ask field from the Insert menu, however, the Ask field inserted from the Mail Merge toolbar is specifically designed for Merge documents. Therefore, it is recommended that you insert the Ask field from the Mail Merge toolbar.
3. From the list displayed select Ask. The following dialog box will appear:
Field Description ExampleBookmark Where the users response is to be entered
in the document.meeting
Prompt The question to ask the user Where is the meeting to be
UCL Information Systems 19 Creating Letters

heldDefault bookmark text
A default response London
Ask once Check here if the question is to be asked once and the same user response is to be entered on every document
4. Fill in the necessary details and click OK.
Introduction 20 UCL Information Systems

Merging the Ask fieldWhen merge is in process, the following dialog box will be displayed:If you have selected the Ask once option, the message will only appear once. Otherwise, it will appear every time when a new document is merged.Type in your response and click on OK. The response will then appear at the position of the bookmark. Helpful Hint : You can use a bookmark at multiple positions in the same document. For example you can have a sentence like this:The meeting will be held in {meeting}.And another further on:Please contact our {meeting} manager for further information.The result of the ‘Ask’ question will be placed in both positions.
Fill-in FieldA Fill-in field is similar to the Ask field, except that bookmarks will not be used, and the user’s response will be placed right at the position of the fill-in code.1. To insert a Fill-in field, position the cursor within the
document where the user response is to be entered. 2. From the merge toolbar locate the Insert Word Field button and click on
it.3. From the list select Fill-in, The following dialog box
will appear:4. Type in the question you need to ask the user, and
also the default response if there is any. 5. Tick the check box if you only want the question to
be asked once. 6. Click OK when the required entries have been
made.
Merging the Fill-in fieldAs with Ask field the question will be asked. Different from the Ask field, the user response will be entered on the document at the point where the fill-in code was entered.Helpful Hint: Ask or Fill-in?Use Ask when you want the same information to appear on the page more than once. Otherwise, you can use Fill-in.
UCL Information Systems 21 Creating Letters

If..then..elseThis command allows you to have text entered depending on the value of a data field. For example if you have some data of a person who partially lives in Leeds and partially lives in London, you can use the IF statement to print the following if the data field town = Leeds.The meeting will be held in the Northern Area office on September 16th.Or print the following if the data field town = LondonThe meeting will be held in the South East Area office on September 23rd.This means that the process of generating the outputs in the fields with be pretty much automated, other than asking you to input a response at each time when you use Ask or Fill-in.
Inserting the If…Then…Else FieldTo use a Fill-in field, locate the cursor within the document where the user response is to be entered. From the merge toolbar click on the Insert Word Field button and from the list select If..Then..Else. The following dialog box will appear:
Fill in the details as required:
Text Description ExampleField Name This is what to compare DepartmentComparison Compare the data Equal toCompare to The data TrainingInsert this text If comparison is true
insert this textTraining Manager
Otherwise insert this text
If comparison is NOT true insert this text
Sales Manager
In this example we have the following text:
Without code the text looks like:We would like to remind you that health and safety literature is available from the .Introduction 22 UCL Information Systems
If statement to go here

With the code (Alt+F9] so merge codes are revealed):
The text Sales Manager will be inserted if the department for the merged record equals Sales, other wise it will insert the text Training Manager
UCL Information Systems 23 Creating Letters
Checking and Reporting ErrorsYou can check for errors by clicking on the Check for Errors icon on the Mail Merge toolbar. After clicking the icon, the following dialogue box will be displayed. Select the required option and click OK.
Word will then automatically check all the Mail Merge documents, and report the possible errors. You can then amend them one by one, until all errors are cleared.
Introduction 24 UCL Information Systems