Embed Size (px)
Citation preview

WOODLOC® 5S FLOAT-IN INSTALLATION INSTRUCTIONS
Applicable to:
Kährs Avanti 13mm 1/2” Kährs Original 15mm 5/8” Kährs Supreme 15mm 5/8”
Kährs940 Centre Circle Suite 1000Altamonte Springs, FL 32714 Tel: 1.800.800.5247 Fax: 407.260.9933 [email protected] www.kahrs.com
PROTECT YOUR INVESTMENT!Maintain your warranty: Only use Kährs branded
underlayments, moldings, cleaning
supplies, and accessories.
FEBRUARY 2017

WOODLOC® 5S FLOAT-IN NSTALLATION INSTRUCTIONS
JOBSITE
Underlayments
• Kährs Combo-System Underlayment Combo Foam Underlayment System with Overlap: The width of a row of Combo-System Underlayment is comprised of 40” of underlayment plus an 8” overlap flap. The overlap flap guards the flooring from moisture at the seams, where the rows of underlayment are laid side by side. The overlap flap has a peel and stick strip to aid the installation process. 1. Layout 1st row of underlayment (logo side down, blue side up) with the overlap flap facing the starting wall. Allow the underlayment to wrap up the wall, on the ends, approx. 2”.2. Reach under and grab the overlap flap and pull it up so it lies against the starting wall. Trim this over lap flap back to leave approx. 2” of plastic up the wall. (Use this cut off section to repair damage in the underlayment as needed*, see note below).3. Lay 2nd row of underlayment flush to first. Make sure the overlap flap is next to 1st row, and the ends wrap up the walls. (If flooring installation has already begun, make sure to stop the floor ing approx. 8 inches from the side of the underlayment to allow for the installation of the overlap flap.)4. Again, reach under and grab the overlap flap. Pull the flap up and fold it back to expose the peel and stick strip. Remove the white protective cover from the adhesive strip. Lay overlap flap across the 1st row of underlayment and press into place.5. Continue this procedure row by row until the entire floor area is covered.
*Note: When connecting a new roll of underlayment to the end of the roll you are working on, or for repairing any tears or cuts in the underlayment; overlay the butt joints or the damaged area with a spare piece of overlap plastic. This spare piece should overlay by approx. 8”. Hold the spare piece in place with tape. Do NOT overlap underlayment. Overlap flap only.
Cover the entire floor area and run the underlayment up the perimeter walls approximately 2”. This provides a secure enclosure for the flooring. After the floor is installed and before the installation of the baseboards, the excess underlayment should be trimmed to the height of thefloor surface using a fine trimming blade. The use of the Combo-System Underlayment is also approved for Radiant Heat applications.
• Kährs QuietStride QuietStride can be installed three different ways as a Karelia underlayment. 1. Float-in Installations: First install 6 mil polyethylene plastic loose-laid, seams overlapped 8”. Run plastic up the wall 2” (trim excess after installation, before installing trim). Loose-lay QuietStride on top of plastic, wall to wall, and butt all seams together (taping seams preferred). Use of QuietStride with polyethylene plastic is approved for float-in Radiant Heat applications.2. Direct Glue-Down: Install QuietStride wall to wall, butt all seams together (do not tape seams), directly adhering to subfloor with pressure sensitive adhesive or a premium multi-purpose adhesive. Fully adhere Kährs flooring to underlayment using approved adhesive and trowel (see Glue-Down Installation for details). Note: an approved concrete sealer must be used if calcium chloride test exceeds 3lbs. for Kährs Moisture Protection Warranty to apply.3. Direct Glue-Down over “float-in” underlayment: First install 6 mil polyethylene plastic loose-laid, seams over-lapped 8”. Run plastic up wall 2” (trim excess after installation, before installing trim). Loose-lay QuietStride on top of plastic, wall to wall, butt all seams together (do not tape seams). Fully adhere Kährs flooring to under-layment using approved adhesive and trowel (see Glue-Down Installation for details). Note: a concrete sealer must be used if calcium chloride test exceeds 3lbs. for Kährs Moisture Protection Warranty to apply.

WOODLOC® 5S FLOAT-IN NSTALLATION INSTRUCTIONS
JOBSITE
Underlayments
Specialty adhesives (pressure sentitive) have been developed for adhering QuietStride underlayment directly to the subfloor for use in “double-stick” installations. The adhesive is a quick, inex-pensive technique for affixing QuietStride Underlayment to the subfloor, then gluing the Kährs flooring to the QuietStride Underlayment with one of the adhesive manufacturer’s approved wood flooring adhesives. The adhesive manufacturer can also recommend the specialty adhesive that is best for this application.
• Kährs Eco+ Underlayment with Vapor Bloc
Kahrs Eco+ underlayment can be installed utilizing the floating or nail-down installation method with the film side up, fabric size down. NOTE: Nail-down installation method compromises the vapor barrier. Do NOT glue down Eco+ with Vapor Bloc. Eco+ without Vapor Bloc film is available for glue down installation. For more information contact Kahrs customer service at 800-800-5247.
1. Be sure the sub-floor is clean and dry.
2. Roll out one section of the Eco+ with Vapor Bloc parallel to the wall and in the same direction as you plan to install the wood flooring. The product will roll out with the Vapor Bloc film up and the foam side down to the sub-floor.
3. Next install the wooden planks atop the underlayment in accordance with the specific installation instructions for that product. Be sure that you can still see the edge of the underlayment so that you can properly line up the next roll.
4. Install the next section of underlayment, butting the foam underlayment seams together. Remove the release film and press the overlapping Vapor Bloc film into the pre-applied adhesive, making certain the film is securely bonded to the adjacent section of underlayment. Repeat the above steps until the installation is complete.
5. Be sure to allow appropriate expansion gaps at the perimeter and any vertical fixed objects as specified in the installation instructions.
Important: Kährs does not guarantee the performance of any non-Kährs branded underlayment.

WOODLOC® 5S FLOAT-IN NSTALLATION INSTRUCTIONS
Purpose: To ensure proper expansion space around all walls, doors, and obstructions.
Required Expansion
Rules: 1) Kährs requires 1/16” of expansion space for every 3’ of Connected Area width or 9’ of Connected Area length (whichever is greater). This expansion space must be left around all walls, doors and obstructions. Minimum expansion requirement is 1/2”. 2) No connected flooring can span greater than 80’ in width or 160’ in length. Notes: 1) Connected area is defined as all areas connected without a break. If Room A and Room B both are to have flooring installed and are directly connected, or connected by a hallway, with-out a t-molding, the connected area is the width of both Room A and Room B, and the hall way (if applicable). Obstructions can include cabinets, islands, and the wall opposite the start-ing wall in the same room, if the flooring continues to another room without a break. Multiple calculations may need to be made to best determine the amount cut from the starting row. 2) The direction of the flooring must be determined prior to calculating the required expansion space. The Connected Area width is parallel to the board width. The Connected Area length is parallel to the board length.
8
LAYOUT
Required Expansion
Required Expansion Reference Chart
Connected Area Width Required Expansion Space*
Connected Area Length Required Expansion Space*
Up to 24’ 1/2” Up to 72’ 1/2”
24’-40’ 3/4” 72’ to 120’ 3/4”
* Determine the required expansion space for both width and length, then use the larger of the 2 on allsides, and around all obstructions.

WOODLOC® 5S FLOAT-IN NSTALLATION INSTRUCTIONS
Please see our website - www.kahrs.com for Kahrs Floor Care Guide and Lifetime Guarantee.
Installation: Floating: Maximum room dimensions for a Woodloc® 5S floating floor are 80’.across the boards or 160’. lengthwise. Floors exceeding either of these dimensions require use of “T-Molding.” A minimum of one butt seam is required in every row, regardless of width (e.g. hallways). Never attach any permanent object through the flooring, affixing it to the subfloor. A float-in floor must be free to expand and contract in all directions.
Kahrs Flooring is approved for installations in ½ bathrooms only (no bathrooms including showers or bath tubs)
Expansion in Large Areas: You may be able to attain the necessary added expansion by trimming the wallboard (i.e. sheetrock) or raising baseboards before installing floor. This will allow the floor to expand underneath the wall. For complete information please refer to Required Expansion Reference Charts on pages 8 and 9 in the Layout section of this Guide. A Kährs floor requires 1/16” expansion for every 3’ across width and 1/16” expansion for every 9’ along length. For example, a 28’ x 28’ space requires an expansion gap of 9/16” around the edge of the flooring. Adhesive Tape on Kährs Floors: The use of adhesive tape on any Kährs floor for any reason (i.e. to fasten temporary protection) is not recommended and is not covered in our warranty.
Additional Finishing Coating: For additional wear protection, a waterborne urethane finish is compatible with Kährs factory finishes. Contact Arboritec (1-877-416-5972) or Bona Kemi USA, Inc. (1-800-574-4674) for recommended products, application and warranty information. Follow manufacturers instructions for recoating a prefinished wood floor. Kährs International, Inc. does not guarantee the performance and/or durability of these products.
9
TOOLS & TECHNIQUES
Important Installation Notes

WOODLOC® 5S FLOAT-IN NSTALLATION INSTRUCTIONS
TOOLS & TECHNIQUES
Float-In Installation for Woodloc® 5S
Notes: • For subfloor and environmental specifications and requirements, see Jobsite / Subfloor Preparation section. Floating installation requires the use of Kährs Approved Underlayment Systems. Refer to Underlayment section of this Guide. • Kährs flooring is covered by a Limited Lifetime Warranty. However, Warranty coverage may be lost due to failure to strictly follow all installation instructions and recommendations or the use of improper materials or tools. READ ALL INSTRUCTIONS CAREFULLY. IMPORTANT! • Do not open packages until ready to begin installation! Inspect boards as you go. Kährs flooring is sealed at the factory with a 7% moisture content. Opening cartons to acclimate the flooring (as with some solid strip flooring) could result in a difficult installation. • As an installer, it is your responsibility to be aware of the grade, Relative Humidity of the room, and moisture content of the subfloor. You should check that each plank is free of damage or manufacturing defects. Any unusable boards should be set aside for later replacement.
Step 1 Start in corner and lay first board with tongue side toward walls (Fig 1). Proper expansion space can be achieved by pull-ing floor away from wall once first three rows have been installed (reference Step 6). For proper expansion refer to calculation worksheet.
WOODLOC® 5S FLOAT-IN NSTALLATION INSTRUCTIONS
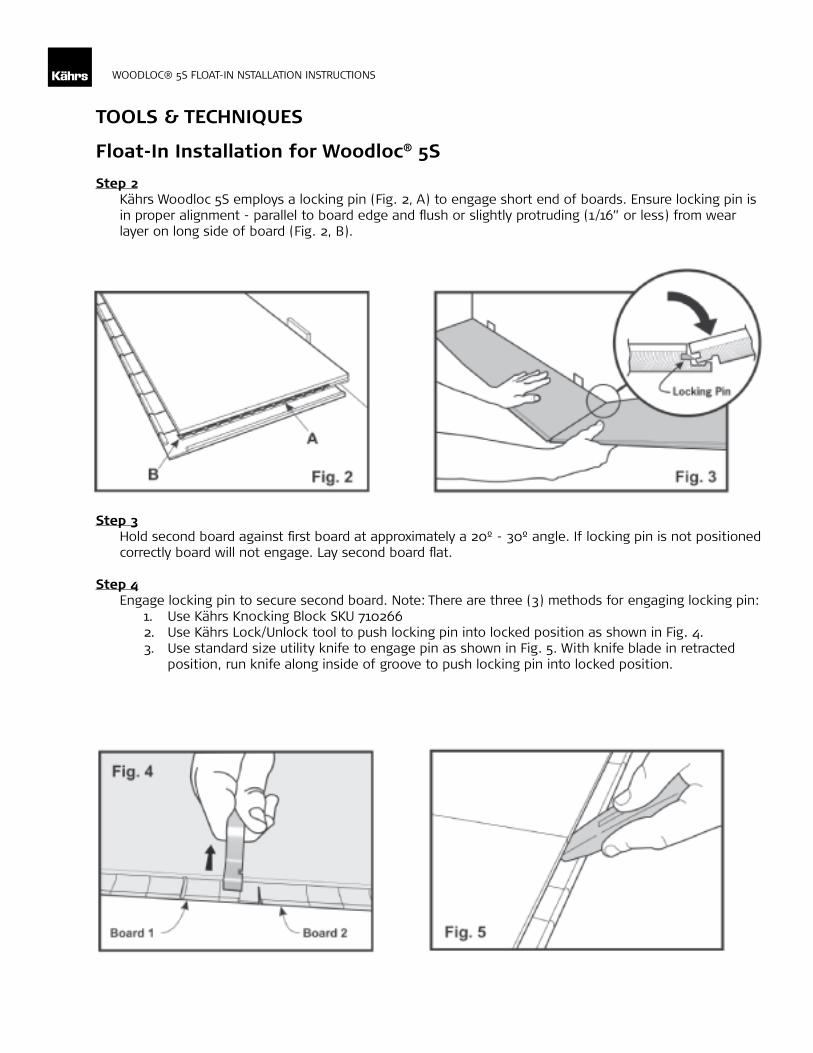
Step 2 Kährs Woodloc 5S employs a locking pin (Fig. 2, A) to engage short end of boards. Ensure locking pin is in proper alignment - parallel to board edge and flush or slightly protruding (1/16” or less) from wear layer on long side of board (Fig. 2, B).
Step 3 Hold second board against first board at approximately a 20º - 30º angle. If locking pin is not positioned correctly board will not engage. Lay second board flat. Step 4 Engage locking pin to secure second board. Note: There are three (3) methods for engaging locking pin: 1. Use Kährs Knocking Block SKU 710266 2. Use Kährs Lock/Unlock tool to push locking pin into locked position as shown in Fig. 4. 3. Use standard size utility knife to engage pin as shown in Fig. 5. With knife blade in retracted position, run knife along inside of groove to push locking pin into locked position.
TOOLS & TECHNIQUES
Float-In Installation for Woodloc® 5S

WOODLOC® 5S FLOAT-IN NSTALLATION INSTRUCTIONS
TOOLS & TECHNIQUES
Float-In Installation for Woodloc® 5S
* Locking pins in first row can be engaged as second row boards are installed, however best results may be obtained by using method 1 or 2, thereby locking first row boards as you go.
Step 5 Install second row boards as shown in Fig. 6. If possible, start second row with left-over piece from last board of first row. Hold board at approximately a 20º - 30º angle to board in front. Press forward to engage joint and lay flat on floor. Continue until entire second row is installed. End joints must be staggered by at least 20”. Butt seam must be placed in each row regard less of width, e.g. hallways.
Step 6 When three rows have been laid, pull floor away from starting wall until there is proper amount of expansion space. Place expansion shims between floor and wall to maintain this space, as shown in Fig. 7., then continue installation as described.
Step 7 - Custom Fitting First or Last Rows If first (or last) row must be cut to match crooked wall, first disengage row of boards adjacent to crooked wall by gripping long side and pulling upward while simultaneously giving long joint a light tap along entire length (Fig. 8). Now trace shape of wall onto first/last row boards, making sure space is allowed for expansion. See Fig. 9 at right. Saw to shape.

WOODLOC® 5S FLOAT-IN NSTALLATION INSTRUCTIONS
TOOLS & TECHNIQUES
Float-In Installation for Woodloc®
Step 8 After sawing row to shape, engage and lock all end joint locking pins and lift entire row and reinstall to adjacent row (Fig. 10). Slide rows back into position against wall. Place expansion shims between floor and wall.
Step 9 If doorjamb (or similar) needs to be cut, use piece of board and piece of Combo Underlayment to obtain correct height (Fig. 11). If new board needs to be tapped into place, be sure to protect edges with scrap of wood before tapping with handblock. If boards cannot be easily angled under door frame or similar, cut away locking edge as shown in Fig. 12. Then apply Landobond adhesive and install board as shown in Fig. 13.

WOODLOC® 5S FLOAT-IN NSTALLATION INSTRUCTIONS
TOOLS & TECHNIQUES
Float-In Installation for Woodloc® 5S
Disengaging Boards Boards can be laid from all directions if necessary. Woodloc® 5S dismantles easily (see Fig. 14). This enables easier planning for difficult installation areas. To disengage locked boards, first detach entire row and place on flat surface. Using Kährs Woodloc Handblock, tap on exposed groove or tongue until boards unlock (Fig. 14). After Installation Clean floor using dry dust mop or damp (lightly misted or well rung out) mop or cloth. Regularly use Kährs Wood Floor Cleaner for best results. Do not use oil soap or water-emulsion, self polishing waxes. NEVER wet mop floor. Place Peel & Stick Floor Protectors on furniture legs to prevent damage. See Kährs Floor Care Guide & Lifetime Guarantee for full details (available at www.kahrs.com). For prefinished oiled floors, please refer to Natural Oiled Floors Maintenance and Rennovation Procedures at www.kahrs.com Maintenance Clean floor using dry dust mop or damp (lightly misted or well rung out) mop or cloth. Regularly use Kährs Wood Floor Cleaner for best results. Do not use oil soap or water-emulsion, self polishing waxes. Never wet mop floor. Place Peel & Stick Floor Protectors on furniture legs to prevent dam-age. See Kährs Floor Care Guide & Lifetime Guarantee for full details (available at www.kahrs.com). NOTE: Oiled floors must be oiled with Kährs Satin Oil (710553) after installation and prior to use.

WOODLOC® 5S FLOAT-IN NSTALLATION INSTRUCTIONS
FOLLOW UP
Recoating your Kährs Floor
Kährs floors can be renewed without removing the factory finish. As a floor ages, normal wear and tear will cause a floor to lose its luster. This is natural - it happens to all wood floors. To renew the luster and extend the wear layer of the Kährs floor, recoat with water based urethane coating. Recoating should be done when necessary. Don’t wait until the finish has worn down. Call your professional flooring contractor for recommendations as soon as you see a wear pattern developing. Additional Finishing Coating: For additional wear protection, a waterborne urethane finish is compatible with Kährs factory finishes. Contact Arboritec (1-877-416-5972) or Bona Kemi USA, Inc. (1-800-574-4674) for recommended products, application and warranty information. Follow manufacturers instructions for recoating a prefinished wood floor. Kährs International, Inc. does not guarantee the performance and/or durability of these products.

Kährs940 Centre Circle Suite 1000Altamonte Springs, FL 32714 Tel: 1.800.800.5247 Fax: 407.260.9933 [email protected] www.kahrs.com
![__gloabl__ proc(float *arr,float *brr){ float v; __shared__ float shared[L]; shared[threadIdx.x] = brr[threadIdx.x]; __syncthreads(); if(threadIdx.x!=0){](https://img.dokumen.tips/doc/110x75/56649eeb5503460f94bfc7bd/gloabl-procfloat-arrfloat-brr-float-v-shared-float-sharedl.jpg)