Embed Size (px)
Citation preview
Wolfson Audio Card
Contents
1. Introduction to Wolfson Audio C
2. Features
3. How to install to Raspberry Pi
4. Installing software to run on Raspberry Pi
5. Getting started with audio from your Wolfson Audio Card
6. Soundcard usage scenarios
7. Annexe
a. Datasheet of WM5102
b. Datasheet of WM8804 SPDIF receiver/transmitter
c. Datasheet of WM7220 Digital Microphone Module
d. Schematic diagram of soundcard
e. Feature header signal assignment
f. Performance
g. Electrical architecture of the soundcard
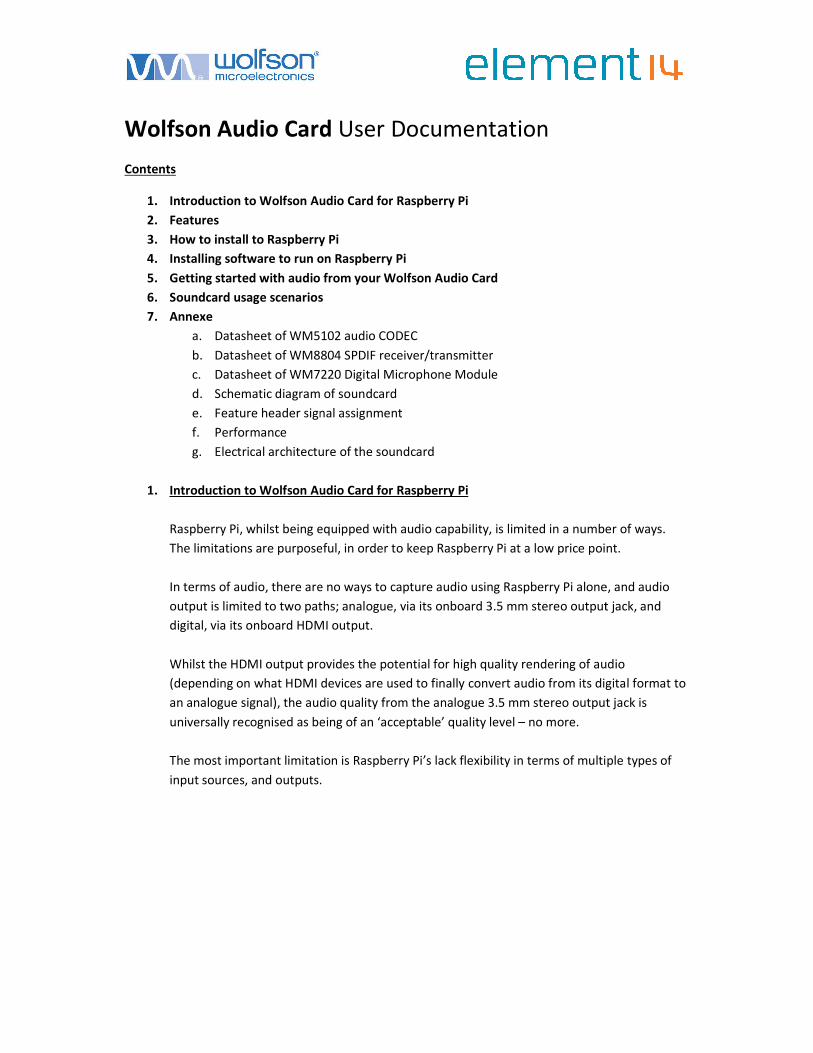
1. Introduction to Wolfson Audio Card for Raspberry Pi
Raspberry Pi, whilst being equipped with audio capability, is limited in
The limitations are purposeful, in order to keep Raspberry Pi at a low price point.
In terms of audio, there are no ways to capture audio using Raspberry Pi
output is limited to two paths; analogue, via
digital, via its onboard HDMI output.
Whilst the HDMI output provides the potential for
(depending on what HDMI devices are used to finally convert audio from its digital format to
an analogue signal), the audio quality
universally recognised as being of an ‘acceptable’ quality level
The most important limitation is Raspberry Pi’s
input sources, and outputs.
ard User Documentation
Wolfson Audio Card for Raspberry Pi
to Raspberry Pi
software to run on Raspberry Pi
Getting started with audio from your Wolfson Audio Card
Soundcard usage scenarios
Datasheet of WM5102 audio CODEC
WM8804 SPDIF receiver/transmitter
WM7220 Digital Microphone Module
diagram of soundcard
Feature header signal assignment
Electrical architecture of the soundcard
Wolfson Audio Card for Raspberry Pi
Raspberry Pi, whilst being equipped with audio capability, is limited in a number of ways.
limitations are purposeful, in order to keep Raspberry Pi at a low price point.
here are no ways to capture audio using Raspberry Pi alone
output is limited to two paths; analogue, via its onboard 3.5 mm stereo output jack
onboard HDMI output.
provides the potential for high quality rendering of audio
(depending on what HDMI devices are used to finally convert audio from its digital format to
), the audio quality from the analogue 3.5 mm stereo output jack is
ecognised as being of an ‘acceptable’ quality level – no more.
The most important limitation is Raspberry Pi’s lack flexibility in terms of multiple types of
input sources, and outputs.
a number of ways.
limitations are purposeful, in order to keep Raspberry Pi at a low price point.
alone, and audio
put jack, and
audio
(depending on what HDMI devices are used to finally convert audio from its digital format to
from the analogue 3.5 mm stereo output jack is
flexibility in terms of multiple types of
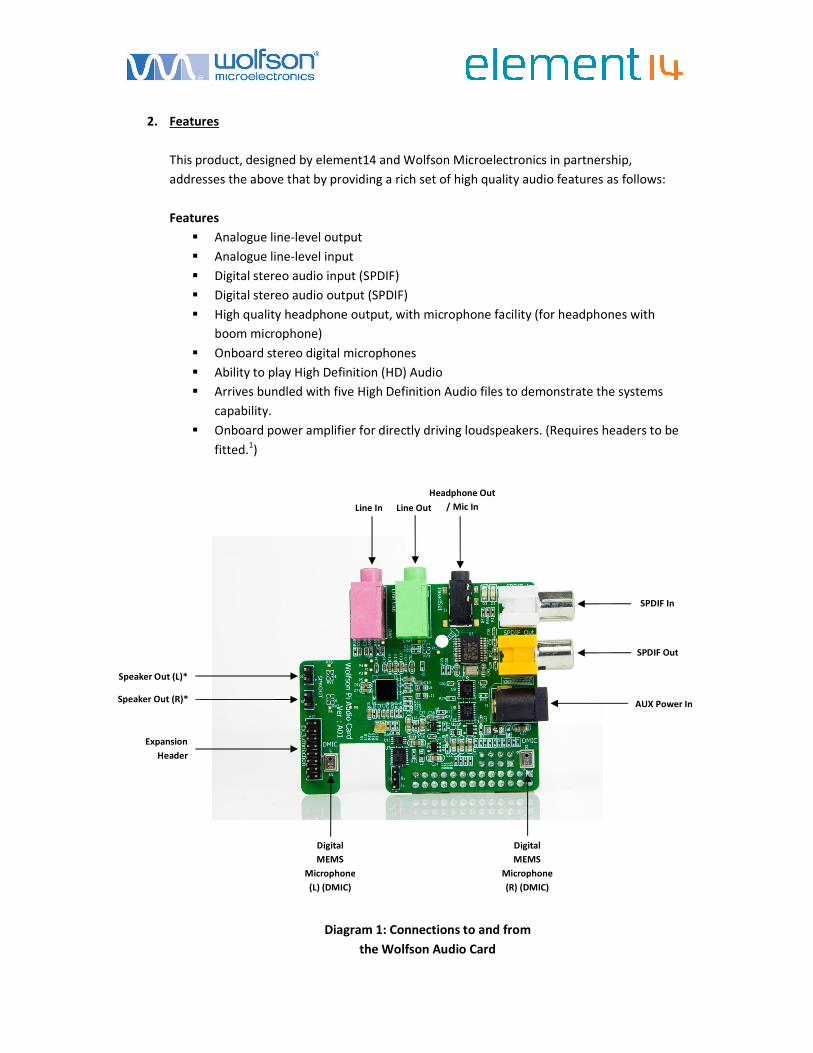
2. Features
This product, designed by element14
addresses the above that by providing a rich set of high quality
Features
� Analogue line-level
� Analogue line-level input
� Digital stereo audio input (SPDIF)
� Digital stereo audio output (SPDIF)
� High quality headphone output, with microphone facility (for headpho
boom microphone)
� Onboard stereo digital microphones
� Ability to play High Definition
� Arrives bundled with fi
capability.
� Onboard power amplifier for directly driving loudspeakers.
fitted.1)
Digital
MEMS
Microphone
(L) (DMIC)
Expansion
Header
Speaker Out (L)*
Speaker Out (R)*
element14 and Wolfson Microelectronics in partnership
at by providing a rich set of high quality audio features as follows:
level output
level input
ereo audio input (SPDIF)
Digital stereo audio output (SPDIF)
High quality headphone output, with microphone facility (for headpho
boom microphone)
Onboard stereo digital microphones
Ability to play High Definition (HD) Audio
Arrives bundled with five High Definition Audio files to demonstrate the systems
Onboard power amplifier for directly driving loudspeakers. (Requires headers to be
Digital
MEMS
icrophone
(L) (DMIC)
Line Out Line In
Digital
MEMS
Microphone
(R) (DMIC)
Headphone Out
/ Mic In
Diagram 1: Connections to and from
the Wolfson Audio Card
in partnership,
features as follows:
High quality headphone output, with microphone facility (for headphones with
ve High Definition Audio files to demonstrate the systems
Requires headers to be
AUX Power In
SPDIF In
SPDIF Out
3. How to connect the Wolfson Audio Card
This Wolfson soundcard has been designed to plug in to
compatible with Raspberry Pi
the 8-pin audio GPIO connector, known as P5, and located right next to the GPIO header as
show below.
Diagram 2: Raspberry Pi with P5 connector outlined in red
It uses innovative sprung connecto
solder an 8-pin header to your Raspberry Pi,
a. Ensure the eight pads on connector P5 on Raspberry Pi are free of dirt and grease. If
necessary, use a little degreaser, such as a very small amount of detergent on a lightly
dampened paper towel, and wipe the eight pads clean. Leave them to dry thoroughly.
b. If necessary, repeat the process with the sprung connectors on the soundcard.
c. Locate the nylon pillar in t
image below, and tighten. Don’t over tighten.
d. Push the soundcard onto Raspberry Pi, making sure the board is pressed all the way, and
that all eight pins have made contact with Raspberry Pi.
Wolfson Audio Card to Raspberry Pi
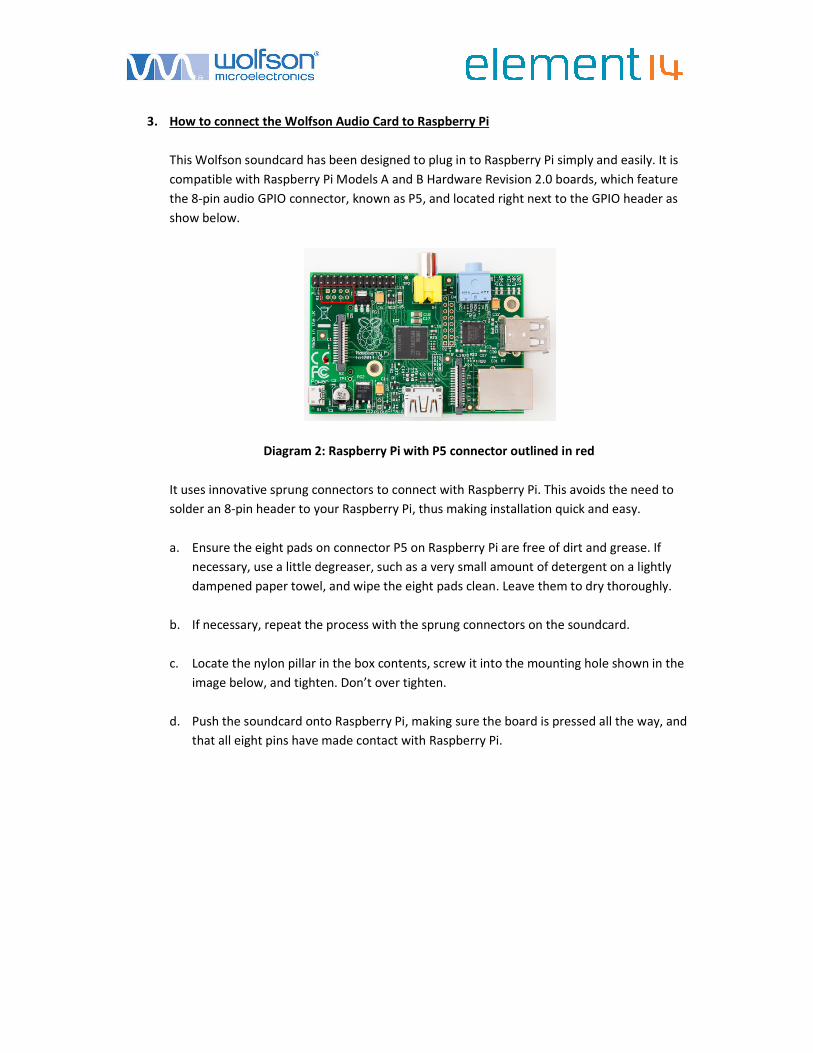
This Wolfson soundcard has been designed to plug in to Raspberry Pi simply and easily. It is
compatible with Raspberry Pi Models A and B Hardware Revision 2.0 boards, which feature
connector, known as P5, and located right next to the GPIO header as
Diagram 2: Raspberry Pi with P5 connector outlined in red
It uses innovative sprung connectors to connect with Raspberry Pi. This avoids the need to
pin header to your Raspberry Pi, thus making installation quick and easy.
Ensure the eight pads on connector P5 on Raspberry Pi are free of dirt and grease. If
degreaser, such as a very small amount of detergent on a lightly
dampened paper towel, and wipe the eight pads clean. Leave them to dry thoroughly.
If necessary, repeat the process with the sprung connectors on the soundcard.
Locate the nylon pillar in the box contents, screw it into the mounting hole shown in the
image below, and tighten. Don’t over tighten.
Push the soundcard onto Raspberry Pi, making sure the board is pressed all the way, and
that all eight pins have made contact with Raspberry Pi.
Raspberry Pi simply and easily. It is
2.0 boards, which feature
connector, known as P5, and located right next to the GPIO header as
rs to connect with Raspberry Pi. This avoids the need to
making installation quick and easy.
Ensure the eight pads on connector P5 on Raspberry Pi are free of dirt and grease. If
degreaser, such as a very small amount of detergent on a lightly
dampened paper towel, and wipe the eight pads clean. Leave them to dry thoroughly.
If necessary, repeat the process with the sprung connectors on the soundcard.
he box contents, screw it into the mounting hole shown in the
Push the soundcard onto Raspberry Pi, making sure the board is pressed all the way, and
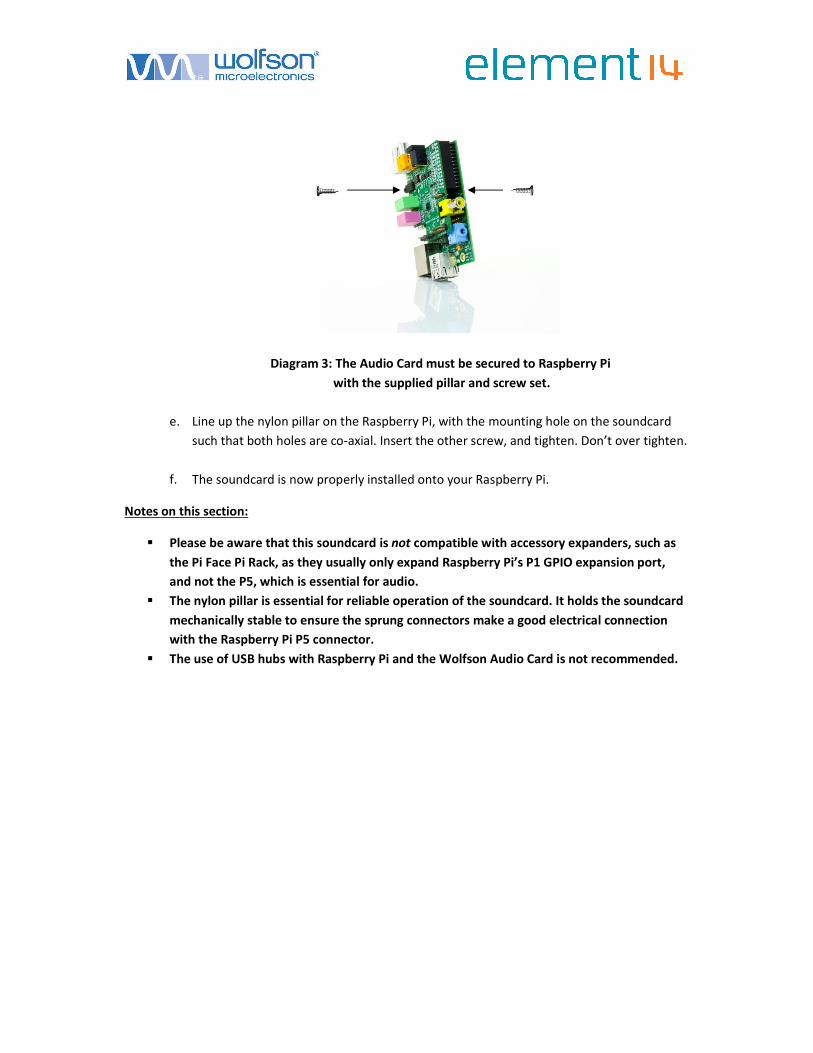
Diagram 3: The Audio Card must be s
e. Line up the nylon pillar on the Raspberry Pi, with the mounting hole on the soundcard
such that both holes are co
f. The soundcard is now properly installed on
Notes on this section:
� Please be aware that this soundcard is
the Pi Face Pi Rack, as they usually only expand
and not the P5, which is essential for audio.
� The nylon pillar is essential for reliable operation of the soundcard. It holds the soundcard
mechanically stable to ensure the sprung connectors make a good electrical
with the Raspberry Pi P5 connector.
� The use of USB hubs with Raspberry Pi and the Wolfson Audio Card is not recommended.
Diagram 3: The Audio Card must be secured to Raspberry Pi
with the supplied pillar and screw set.
Line up the nylon pillar on the Raspberry Pi, with the mounting hole on the soundcard
such that both holes are co-axial. Insert the other screw, and tighten. Don’t over
The soundcard is now properly installed onto your Raspberry Pi.
Please be aware that this soundcard is not compatible with accessory expanders, such as
, as they usually only expand Raspberry Pi’s P1 GPIO expansion port,
and not the P5, which is essential for audio.
The nylon pillar is essential for reliable operation of the soundcard. It holds the soundcard
mechanically stable to ensure the sprung connectors make a good electrical connection
with the Raspberry Pi P5 connector.
The use of USB hubs with Raspberry Pi and the Wolfson Audio Card is not recommended.
ecured to Raspberry Pi
Line up the nylon pillar on the Raspberry Pi, with the mounting hole on the soundcard
ghten. Don’t over tighten.
compatible with accessory expanders, such as
Raspberry Pi’s P1 GPIO expansion port,
The nylon pillar is essential for reliable operation of the soundcard. It holds the soundcard
connection
The use of USB hubs with Raspberry Pi and the Wolfson Audio Card is not recommended.
4. Installing software to run on Raspberry Pi
This version of the manual is written for
the card is downloaded as a fully integrated all
the box. We have created a full operating system solution that contains all the drivers, and
some bundled extras. It will work straight away when d
and set up for the first time.
1. Download the most recent image file
a known location on your Windows computer. The file ca
as the file downloads.
2. The file .img has been compressed into a
time. That means, before you can do anything else, that file needs to be restored to its
original form again. You may already have a zip/unzip tool installed on your comp
(check by right-clicking on the .zip file
it and should use it), but if not,
PeaZip, simply right click on the .zip file, and select
3. When you have done this, you get a single file called an Image File, or
snapshot of what needs to be written to the SD Card.
4. Next, you need a tool to install the
Win32DiskImager, and it is
image-writer. Simply download this program file and follow the instructi
on your Windows computer.
5. Follow the instructions provided with
System to your SD Card. This process will require the SD Card to be inserted into a SD
Card slot on your computer, and for you to k
computer. The write process itself can take some time.
WARNING: Make sure you select the correct device to write the Operating System to.
Selecting the wrong destination could result in unrecoverable
DOUBLE CHECK.
6. Win32DiskImager will tell you when this process has been completed and when it has,
remove the SD Card. Now insert it into the SD card slot of your Raspberry Pi. It is worth
keeping the Operating System file on your computer for
just in case.
7. Now, power up your Raspberry Pi and Wolfson Audio Card.
8. The small red indicator
started up, and then a small green indicator
Installing software to run on Raspberry Pi
manual is written for early adopting users. The software required to run
the card is downloaded as a fully integrated all-in-one package that will simply work out of
the box. We have created a full operating system solution that contains all the drivers, and
some bundled extras. It will work straight away when downloaded, written to an SD Card,
and set up for the first time.
most recent image file from www.element14.com/wolfson
a known location on your Windows computer. The file can be quite large, so be patient
has been compressed into a .zip format in order to minimise download
. That means, before you can do anything else, that file needs to be restored to its
original form again. You may already have a zip/unzip tool installed on your comp
clicking on the .zip file – if you see the Extract all… option, then you have
, but if not, try PeaZip available at http://peazip.com. In the case of
, simply right click on the .zip file, and select Peazip > Extract here.
When you have done this, you get a single file called an Image File, or .img
snapshot of what needs to be written to the SD Card.
Next, you need a tool to install the .img file to the SD Card. A popular tool is called
and it is available at this address https://launchpad.net/win32
Simply download this program file and follow the instructions to install it
on your Windows computer.
Follow the instructions provided with Win32DiskImager for writing the Operating
System to your SD Card. This process will require the SD Card to be inserted into a SD
Card slot on your computer, and for you to know where you saved the .img
computer. The write process itself can take some time.
Make sure you select the correct device to write the Operating System to.
the wrong destination could result in unrecoverable data loss. Be
will tell you when this process has been completed and when it has,
remove the SD Card. Now insert it into the SD card slot of your Raspberry Pi. It is worth
keeping the Operating System file on your computer for future rewrites to your SD Card,
Now, power up your Raspberry Pi and Wolfson Audio Card.
small red indicator will light up on the Raspberry Pi, indicating the main chip has
small green indicator will begin to flash, indicating data is being
required to run
that will simply work out of
the box. We have created a full operating system solution that contains all the drivers, and
ownloaded, written to an SD Card,
www.element14.com/wolfson, and save it in
n be quite large, so be patient
format in order to minimise download
. That means, before you can do anything else, that file needs to be restored to its
original form again. You may already have a zip/unzip tool installed on your computer
option, then you have
In the case of
.img. This is a
file to the SD Card. A popular tool is called
https://launchpad.net/win32-
ons to install it
for writing the Operating
System to your SD Card. This process will require the SD Card to be inserted into a SD
.img file on your
Make sure you select the correct device to write the Operating System to.
data loss. Be careful and
will tell you when this process has been completed and when it has,
remove the SD Card. Now insert it into the SD card slot of your Raspberry Pi. It is worth
future rewrites to your SD Card,
will light up on the Raspberry Pi, indicating the main chip has
sh, indicating data is being
read from/written to the SD Card. The TV/monitor (provided it’s switched on of course)
will begin to show the Linux boot sequence.
9. This image has been designed to boot into the Graphical User Interface, so that when
the boot process has been completed, you should see a desktop
go.
Notes on this section:
� It is intended that, ultimately,
starting with Raspbian. The All
� Even though they are already included in the All
items required for the soundcard are available separately at
www.element14.com/wolfson
� Once the system has booted up, it is suggested that one complete reboot cycle is
performed before attempting any of the next steps.
� You may notice ‘trace errors’ during boot up. These are regarded as harmless, and
will not appear on future releases.
read from/written to the SD Card. The TV/monitor (provided it’s switched on of course)
will begin to show the Linux boot sequence.
This image has been designed to boot into the Graphical User Interface, so that when
rocess has been completed, you should see a desktop, then you are
It is intended that, ultimately, drivers will be fully integrated in future OS downloads,
starting with Raspbian. The All-in-One approach will then no longer be necessary.
Even though they are already included in the All-in-One package, all the downloadable
items required for the soundcard are available separately at
www.element14.com/wolfson, including the HD Audio tracks, and the Use Case Scripts.
system has booted up, it is suggested that one complete reboot cycle is
performed before attempting any of the next steps.
You may notice ‘trace errors’ during boot up. These are regarded as harmless, and
will not appear on future releases.
read from/written to the SD Card. The TV/monitor (provided it’s switched on of course)
This image has been designed to boot into the Graphical User Interface, so that when
then you are ready to
drivers will be fully integrated in future OS downloads,
longer be necessary.
One package, all the downloadable
HD Audio tracks, and the Use Case Scripts.
system has booted up, it is suggested that one complete reboot cycle is
You may notice ‘trace errors’ during boot up. These are regarded as harmless, and they
5. Getting started with audio on your Wolfson Audio Card
The Wolfson Audio Soundcard
sources. It is designed to work with the Linux operating system, and as such takes advantage
of ALSA, the Advanced Linux Sound Architecture. You can read
project.org.
In the OS download referred to in section 4. above, the supported audio player is
and labelled Music Player on the desktop
performing an audio task, whether that is
a. The Use Case has to be defined first, so that the sound device is configured properly.
A Use Case is simply a set of commands that are run in series, which set the audio
card up. They define the signal paths for any audio t
example, if you want to play audio to speakers, you’d run the script for that case. A
script is a collection of commands that can be run in a single instruction.
b. The action to play/record
The Use Case definition is set up by running one of a set of scripts that are supplied in the
software package. It is done this way:
a. To run any kind of script, it is necessary to start a
LXTerminal on the desktop (or indeed, any oth
b. The terminal allows you type commands directly instructing the OS to form
operations you want to perform. Start by typing
and folders that are contained in the home directory that t
opens in.
c. A set of use cases have been put placed into this directory for you, as follows:
Getting started with audio on your Wolfson Audio Card
The Wolfson Audio Soundcard renders and captures high quality audio from a variety of
sources. It is designed to work with the Linux operating system, and as such takes advantage
of ALSA, the Advanced Linux Sound Architecture. You can read more about this at
In the OS download referred to in section 4. above, the supported audio player is
on the desktop. In general, there are two main stages to
performing an audio task, whether that is to play a file, or record one:
has to be defined first, so that the sound device is configured properly.
A Use Case is simply a set of commands that are run in series, which set the audio
card up. They define the signal paths for any audio that is played or recorded. So, for
example, if you want to play audio to speakers, you’d run the script for that case. A
script is a collection of commands that can be run in a single instruction.
play/record can then be executed.
se definition is set up by running one of a set of scripts that are supplied in the
It is done this way:
script, it is necessary to start a Terminal session. Double click on
on the desktop (or indeed, any other terminal programme you prefer).
The terminal allows you type commands directly instructing the OS to form
operations you want to perform. Start by typing dir. That will give you a list of files
and folders that are contained in the home directory that the Terminal session
A set of use cases have been put placed into this directory for you, as follows:
renders and captures high quality audio from a variety of
sources. It is designed to work with the Linux operating system, and as such takes advantage
more about this at www.alsa-
In the OS download referred to in section 4. above, the supported audio player is LXmusic,
In general, there are two main stages to
has to be defined first, so that the sound device is configured properly.
A Use Case is simply a set of commands that are run in series, which set the audio
hat is played or recorded. So, for
example, if you want to play audio to speakers, you’d run the script for that case. A
script is a collection of commands that can be run in a single instruction.
se definition is set up by running one of a set of scripts that are supplied in the
session. Double click on
er terminal programme you prefer).
The terminal allows you type commands directly instructing the OS to form
. That will give you a list of files
he Terminal session
A set of use cases have been put placed into this directory for you, as follows:
# Audio Function
1. Play an audio file to your headphones
2.
Play an audio file to the line out jack
3.
Play an audio file to loudspeakers
4.
Play an audio file to the SPDIF output of
your card.
5. Record from onboard digital
microphones
6. Record from the boom
your gamer/VoIP headphones
7. Record from the analogue Line In socket
9. Record from the SPDIF input of your
card.
10.
Reset all audio paths
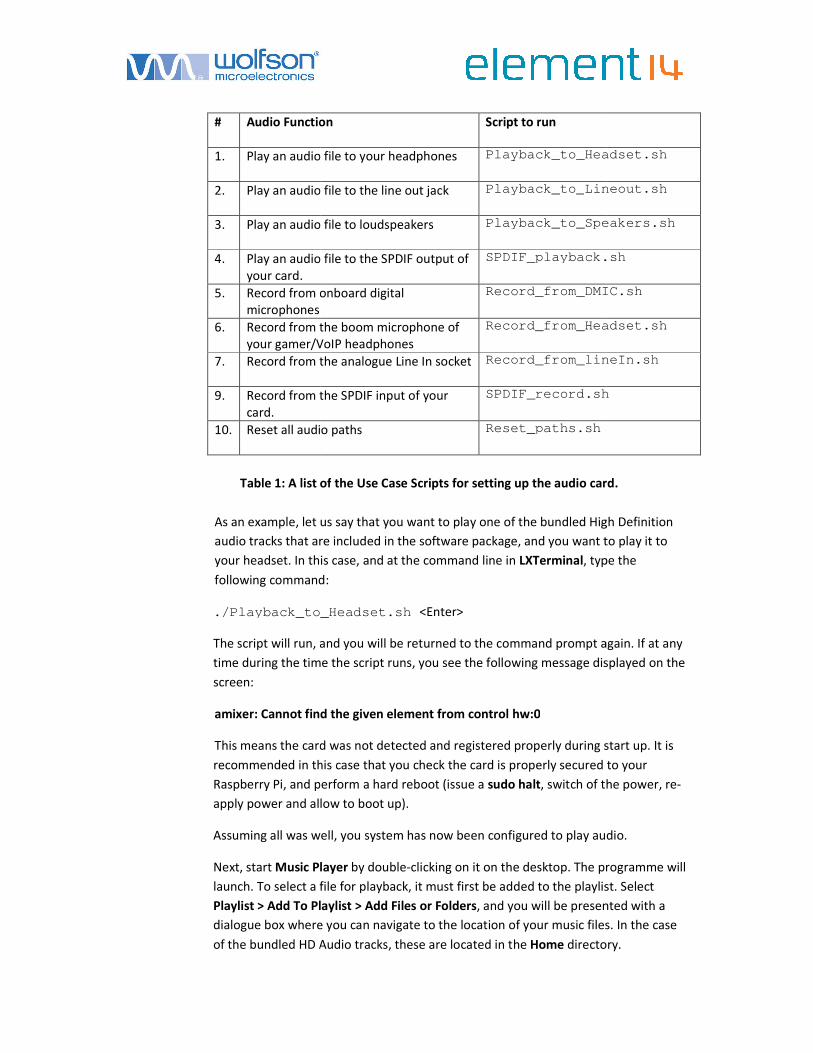
Table 1: A list of
As an example, let us say that
audio tracks that are included in the software package
your headset. In this case, and
following command
./Playback_to_Headset.sh
The script will run, and you will be returned to the command prompt again. If at any
time during the time the script runs, you see the following message displayed
screen:
amixer: Cannot find the given element from control hw:0
This means the card was not detected and registered properly during start up. It is
recommended in this case that you check the card is properly secured to your
Raspberry Pi, and pe
apply power and allow to boot up).
Assuming all was well, you system has now been configured to play audio.
Next, start Music Player
launch. To select a file for playback, it must first be added to the playlist. Select
Playlist > Add To Playlist > Add Files or Folders
dialogue box where you can navigate to
of the bundled HD Audio tracks, these are located in the
Audio Function Script to run
Play an audio file to your headphones Playback_to_Headset.sh
Play an audio file to the line out jack Playback_to_Line
Play an audio file to loudspeakers Playback_to_Speakers.sh
Play an audio file to the SPDIF output of SPDIF_playback.sh
Record from onboard digital
Record_from_DMIC.sh
Record from the boom microphone of
your gamer/VoIP headphones
Record_from_Headset.sh
Record from the analogue Line In socket Record_from_lineIn.sh
Record from the SPDIF input of your SPDIF_record.sh
Reset all audio paths Reset_paths.sh
Table 1: A list of the Use Case Scripts for setting up the audio card.
As an example, let us say that you want to play one of the bundled High Definition
audio tracks that are included in the software package, and you want to play it to
In this case, and at the command line in LXTerminal, type the
ollowing command:
Playback_to_Headset.sh <Enter>
The script will run, and you will be returned to the command prompt again. If at any
time during the time the script runs, you see the following message displayed
amixer: Cannot find the given element from control hw:0
This means the card was not detected and registered properly during start up. It is
recommended in this case that you check the card is properly secured to your
Raspberry Pi, and perform a hard reboot (issue a sudo halt, switch of the power, re
apply power and allow to boot up).
Assuming all was well, you system has now been configured to play audio.
Music Player by double-clicking on it on the desktop. The programme will
launch. To select a file for playback, it must first be added to the playlist. Select
Playlist > Add To Playlist > Add Files or Folders, and you will be presented with a
dialogue box where you can navigate to the location of your music files.
of the bundled HD Audio tracks, these are located in the Home directory.
Playback_to_Headset.sh
ineout.sh
Playback_to_Speakers.sh
SPDIF_playback.sh
Record_from_DMIC.sh
Record_from_Headset.sh
Record_from_lineIn.sh
SPDIF_record.sh
the Use Case Scripts for setting up the audio card.
you want to play one of the bundled High Definition
, and you want to play it to
, type the
The script will run, and you will be returned to the command prompt again. If at any
time during the time the script runs, you see the following message displayed on the
This means the card was not detected and registered properly during start up. It is
recommended in this case that you check the card is properly secured to your
, switch of the power, re-
Assuming all was well, you system has now been configured to play audio.
clicking on it on the desktop. The programme will
launch. To select a file for playback, it must first be added to the playlist. Select
, and you will be presented with a
the location of your music files. In the case
directory.
Select the file(s) you want to play, and then click on the
The files you added will now be available for playback in the Playlist.
Finally, plug in your headphones in to t
Now, double-click on the item you wish to play, and
track to your headphones.
The scripts for playback are cumulative in nature. So, taking the above example into
account, where we have enabled playback
play audio to the line out jack as well with the following command:
Playback_to_Lineout.sh
What happens is that audio playback is enabled for both headset
If that is not what you want, and s
playback paths enabled, then just run the following command first:
Reset_paths.sh
Now, select the single output that you want to play to.
Notes on this section:
� If you are recording to, or playing back
an SD Card that is Class 6 and above. The class directly correlates with speed of reading
and writing to the card. When playing HD Audio, the rate of data being read from the
card is significant, and a low ca
Similarly when recording
� Whilst the onboard hardware CODEC is capable of handling multichannel audio,
Raspberry Pi is not. Therefore, the card will not allow the decoding of compressed
multichannel audio via its SPDIF in connector.
� The system will remember what the last used use case
to that one unless you choose another.
Select the file(s) you want to play, and then click on the Add button.
The files you added will now be available for playback in the Playlist.
Finally, plug in your headphones in to the Headphone socket.
click on the item you wish to play, and Music Player will play the audio
track to your headphones.
The scripts for playback are cumulative in nature. So, taking the above example into
account, where we have enabled playback to a headset, if we then run the script to
play audio to the line out jack as well with the following command:
Playback_to_Lineout.sh <Enter>
What happens is that audio playback is enabled for both headset and line out.
If that is not what you want, and simply want to reset all the paths back to NO
playback paths enabled, then just run the following command first:
Reset_paths.sh <Enter>
Now, select the single output that you want to play to.
If you are recording to, or playing back from your SD Card, it is important that you use
an SD Card that is Class 6 and above. The class directly correlates with speed of reading
and writing to the card. When playing HD Audio, the rate of data being read from the
card is significant, and a low card will leave occasional gaps in the audio experience.
Similarly when recording.
Whilst the onboard hardware CODEC is capable of handling multichannel audio,
Raspberry Pi is not. Therefore, the card will not allow the decoding of compressed
dio via its SPDIF in connector.
he system will remember what the last used use case was. After a reboot, it
to that one unless you choose another.
will play the audio
The scripts for playback are cumulative in nature. So, taking the above example into
to a headset, if we then run the script to
line out.
imply want to reset all the paths back to NO
from your SD Card, it is important that you use
an SD Card that is Class 6 and above. The class directly correlates with speed of reading
and writing to the card. When playing HD Audio, the rate of data being read from the
rd will leave occasional gaps in the audio experience.
Whilst the onboard hardware CODEC is capable of handling multichannel audio,
Raspberry Pi is not. Therefore, the card will not allow the decoding of compressed
was. After a reboot, it will return

6. Soundcard usage scenarios
The Wolfson Audio Card is flexible with regards to how it can be connected to various
of input devices (sources), and output devices (sinks).
the digital domain, the SPDIF digital audio connections allow this. High quality a
audio capture and playback is also made available with this card.
� Connecting speakers to your Audio Card
The Wolfson Pi Audio Card contains an on board Class D power amplifier, capable of
delivering up to 1.4W per channel, directly to external loud
required to allow this are in locations J6 (left) and J3 (right), but they are not populated
as standard.
1 You can solder your own pair of male 0.1” headers, by purchasing from
Farnell/Newark/element14. Suggested models are as fo
Region
North America
Europe
Asia Pacific
Warning:
� Once fitted, be extremely careful not to accidently short the speaker pins.
Doing so could
� It is necessary to supply auxiliary power to the Audio Card in order to drive
external loudspeakers.
current delivery capability of 2
diameter 2.1mm, and external diameter 5.5mm.
With your Raspberry Pi powered down, connect speakers to the newly fitted headers.
Make sure your speakers
pins that one pin is marked with a white dot. Your speaker cable should be polarised as
well, with perhaps one core being colour
how you connect, for example, the red cable goes to the connector with the dot on both
pins.
Before playing a file to your speakers, you must run the appropriate Use Case Script to
play to loudspeakers. Then play a file using the
� Connecting your audio card to
You can connect your audio card to digital amplifiers and receivers (also known
collectively as ‘sinks’) using the
ge scenarios
Audio Card is flexible with regards to how it can be connected to various
input devices (sources), and output devices (sinks). If you’d prefer to keep your audio in
the digital domain, the SPDIF digital audio connections allow this. High quality a
audio capture and playback is also made available with this card.
Connecting speakers to your Audio Card
The Wolfson Pi Audio Card contains an on board Class D power amplifier, capable of
delivering up to 1.4W per channel, directly to external loudspeakers. The connectors
required to allow this are in locations J6 (left) and J3 (right), but they are not populated
your own pair of male 0.1” headers, by purchasing from
Farnell/Newark/element14. Suggested models are as follows:
Distributor Part Number
Newark 60H4177
Farnell 9733302
element14 9733302
Table 2: Suppliers of 0.1” headers.
Once fitted, be extremely careful not to accidently short the speaker pins.
could damage the Audio Card.
It is necessary to supply auxiliary power to the Audio Card in order to drive
external loudspeakers. An external power supply with output voltage of 5V,
current delivery capability of 2,000mA, a centre positive power plug of internal
diameter 2.1mm, and external diameter 5.5mm.
With your Raspberry Pi powered down, connect speakers to the newly fitted headers.
Make sure your speakers are connected in phase. To do this, observe on the header
pins that one pin is marked with a white dot. Your speaker cable should be polarised as
well, with perhaps one core being coloured red, and the other black. Be consistent with
example, the red cable goes to the connector with the dot on both
Before playing a file to your speakers, you must run the appropriate Use Case Script to
play to loudspeakers. Then play a file using the LXmusic player.
Connecting your audio card to a SPDIF sink
You can connect your audio card to digital amplifiers and receivers (also known
collectively as ‘sinks’) using the phono/RCA/Cinch SPDIF output jack. The Wolfson Audio
Audio Card is flexible with regards to how it can be connected to various types
If you’d prefer to keep your audio in
the digital domain, the SPDIF digital audio connections allow this. High quality analogue
The Wolfson Pi Audio Card contains an on board Class D power amplifier, capable of
speakers. The connectors
required to allow this are in locations J6 (left) and J3 (right), but they are not populated
Once fitted, be extremely careful not to accidently short the speaker pins.
It is necessary to supply auxiliary power to the Audio Card in order to drive
output voltage of 5V,
,000mA, a centre positive power plug of internal
With your Raspberry Pi powered down, connect speakers to the newly fitted headers.
. To do this, observe on the header
pins that one pin is marked with a white dot. Your speaker cable should be polarised as
ed red, and the other black. Be consistent with
example, the red cable goes to the connector with the dot on both
Before playing a file to your speakers, you must run the appropriate Use Case Script to
You can connect your audio card to digital amplifiers and receivers (also known
SPDIF output jack. The Wolfson Audio

Card can deliver audio in bit depths of up to 24
resolutions this high.
Warnings:
� Be very careful when setting the output gain and volume control on your
amplifier, especially if
occur if the volume is too high.
� Connecting your audio car
You can connect your audio card to
3.5mm line output jack.
that is not too high, and should be suitable for most
� Connecting your audio card to a Line level source
Capturing audio using your Wolfson Audio Card is straightforward as well. In the case of
an analogue line level source, simply connect your analogue source to the Audio Card by
connecting to the red 3.5 mm input jack. Then, run the appropriate use case to set up
the audio card routing and gains properly.
You can capture audio to a file by using the
Raspberry Pi. The arecord
saves it directly to Raspberry Pi’s mass storage memory as an uncompressed audio file.
For example, if you would like to capture audio from the line in jack, first of all, it is
necessary to tell the audio card to
done by running the following command:
./Record_from_lineIn.sh
Now, we need to use the arecord command
follows:
arecord –Dhw:0 –
record_from_line_in.wav
(Note: the above should be entered as a single line, and not two lines as shown here.)
Recording will start. Press CTRL
A brief explanation of the options above is as follows:
-c = Number of channels. Here, we specify two, for stereo.
-f = Recording format. In this case, we are asking for 16
- r = Sample rate. We ask here for 44,100 audio samples per second.
Card can deliver audio in bit depths of up to 24-bit. Make sure your sink can support
Be very careful when setting the output gain and volume control on your
amplifier, especially if it is a powerful type. Loudspeaker damage can easily
occur if the volume is too high.
Connecting your audio card to a Line level sink
You can connect your audio card to analogue amplifiers and receivers by using
output jack. The use case scripts have been set up to provide a line out level
that is not too high, and should be suitable for most amplifiers and receivers.
Connecting your audio card to a Line level source
Capturing audio using your Wolfson Audio Card is straightforward as well. In the case of
an analogue line level source, simply connect your analogue source to the Audio Card by
nnecting to the red 3.5 mm input jack. Then, run the appropriate use case to set up
the audio card routing and gains properly.
You can capture audio to a file by using the arecord command at a command prompt on
arecord command will allow you to flexibly capture live audio, and
saves it directly to Raspberry Pi’s mass storage memory as an uncompressed audio file.
For example, if you would like to capture audio from the line in jack, first of all, it is
necessary to tell the audio card to switch audio into the card from that source. This is
done by running the following command:
./Record_from_lineIn.sh <Enter>
Now, we need to use the arecord command to capture the audio to a specified file as
–c 2 –f S16_LE –r 44100
record_from_line_in.wav <Enter>
(Note: the above should be entered as a single line, and not two lines as shown here.)
Recording will start. Press CTRL-C to stop recording.
A brief explanation of the options above is as follows:
Number of channels. Here, we specify two, for stereo.
Recording format. In this case, we are asking for 16-bit, Little Endian.
Sample rate. We ask here for 44,100 audio samples per second.
can support
Be very careful when setting the output gain and volume control on your
Loudspeaker damage can easily
by using the green
The use case scripts have been set up to provide a line out level
amplifiers and receivers.
Capturing audio using your Wolfson Audio Card is straightforward as well. In the case of
an analogue line level source, simply connect your analogue source to the Audio Card by
nnecting to the red 3.5 mm input jack. Then, run the appropriate use case to set up
command at a command prompt on
you to flexibly capture live audio, and
saves it directly to Raspberry Pi’s mass storage memory as an uncompressed audio file.
For example, if you would like to capture audio from the line in jack, first of all, it is
switch audio into the card from that source. This is
to capture the audio to a specified file as
(Note: the above should be entered as a single line, and not two lines as shown here.)
bit, Little Endian.
To find out more about this command, type:
arecord -–help <Enter>
If you wish to compress the audio file into other formats, there are other programmes
that can be installed on Raspberry Pi to do this.
at www.ffmpeg.org. Its use and implementation is beyond the
A General Warning If Editing Use Case Scripts
� Use case scripts can be adjusted
� In particular, the gain of those inputs can be adjust
� The result can be an extrem
the volume of any amplifier, or active speaker connected to this card, before
playing back any audio tracks.
To find out more about this command, type:
<Enter>
If you wish to compress the audio file into other formats, there are other programmes
that can be installed on Raspberry Pi to do this. ffmpeg is such a programme, available
. Its use and implementation is beyond the scope of this document.
Editing Use Case Scripts
Use case scripts can be adjusted to accommodate various types of sources.
In particular, the gain of those inputs can be adjusted to make them very sensitive.
The result can be an extremely LOUD output signal. It is always advisable to reduce
the volume of any amplifier, or active speaker connected to this card, before
playing back any audio tracks.
If you wish to compress the audio file into other formats, there are other programmes
is such a programme, available
scope of this document.
odate various types of sources.
ed to make them very sensitive.
ely LOUD output signal. It is always advisable to reduce
the volume of any amplifier, or active speaker connected to this card, before

7. Annexe
a. Datasheet of WM5102 audio CODEC
The key technology that is used at the heart of the Wolfson Audio Card, is an Audio
Hub (CODEC) device.
that has been designed
devices. It combines wideband telephony voice processing with a flexible, high
performance audio hub CODEC
know more about this device, take a look at it here:
www.element14.com/community/docs/DOC
audio-space
b. Datasheet of WM8804 SPDIF receiver/transmitter
The WM8804 allows digital audio data to be transmitted and received to t
card via the phono/RCA jacks, and works in partnership with the WM5102. You can
read more about this device by checking out the following datasheet:
www.element14.com/community/docs/DOC
audio-space
c. Datasheet of WM7220
The WM7220 is a Digital Microphone Module (DMIC), that is based on MEMS
technology. MEMS, or Micro
combine small scale electronics on a silicon die, together with a mechanical
component that can interact with the physical environment. In this case, the
mechanical element responds to acoustic pressure waves and converts
digital audio data stream. Read more here:
www.element14.com/community/docs/DOC
audio-space
d. Schematic diagram
If you are interested in knowing how the Wolfson Audio Card has been designed, the
schematic diagram is available to view as a .pdf document, on the element14.com
website at the following address:
www.element14.com/community/docs/DOC
audio-space
Datasheet of WM5102 audio CODEC
The key technology that is used at the heart of the Wolfson Audio Card, is an Audio
Hub (CODEC) device. The WM5102 is a highly-integrated low-power audio system
that has been designed for use in smartphones, tablets and other portable audio
combines wideband telephony voice processing with a flexible, high
performance audio hub CODEC, and is capable of delivering HD audio. If you’d like to
know more about this device, take a look at it here:
www.element14.com/community/docs/DOC-65664?ICID=Pi-Accessories
Datasheet of WM8804 SPDIF receiver/transmitter
The WM8804 allows digital audio data to be transmitted and received to t
card via the phono/RCA jacks, and works in partnership with the WM5102. You can
read more about this device by checking out the following datasheet:
www.element14.com/community/docs/DOC-65664?ICID=Pi-Accessories
7220 Digital Microphone Module (MEMS)
The WM7220 is a Digital Microphone Module (DMIC), that is based on MEMS
technology. MEMS, or Micro-Electrical-Mechanical Systems, are devices that
combine small scale electronics on a silicon die, together with a mechanical
component that can interact with the physical environment. In this case, the
mechanical element responds to acoustic pressure waves and converts
digital audio data stream. Read more here:
www.element14.com/community/docs/DOC-65664?ICID=Pi-Accessories
agram
If you are interested in knowing how the Wolfson Audio Card has been designed, the
schematic diagram is available to view as a .pdf document, on the element14.com
website at the following address:
www.element14.com/community/docs/DOC-65689?ICID=Pi-Accessories
The key technology that is used at the heart of the Wolfson Audio Card, is an Audio
power audio system
smartphones, tablets and other portable audio
combines wideband telephony voice processing with a flexible, high-
, and is capable of delivering HD audio. If you’d like to
Accessories-wolfson-
The WM8804 allows digital audio data to be transmitted and received to the audio
card via the phono/RCA jacks, and works in partnership with the WM5102. You can
Accessories-wolfson-
The WM7220 is a Digital Microphone Module (DMIC), that is based on MEMS
hanical Systems, are devices that
combine small scale electronics on a silicon die, together with a mechanical
component that can interact with the physical environment. In this case, the
mechanical element responds to acoustic pressure waves and converts them in to a
Accessories-wolfson-
If you are interested in knowing how the Wolfson Audio Card has been designed, the
schematic diagram is available to view as a .pdf document, on the element14.com
Accessories-wolfson-

e. Feature header signal assignment
Pin Name Type
1 +5V Power Pin
2 +3.3V Power Pin
3 AIF3LRCLK Digital in/
4 AIF3TXDAT Digital out
5 AIF3RXDAT Digital in
6 AIF3BCLK Digital in/
7 GND Power Pin
8 GND Power Pin
9 SCLK Digital in
10 SDA Digital in/
11 PDMDAT Digital out
12 PDMCLK Digital out
13 GND Power Pin
14 GND Power Pin
15 GPIO4 Digital in/out
16 GPIO3 Digital in/out
Table 3: GPIO signal definitions
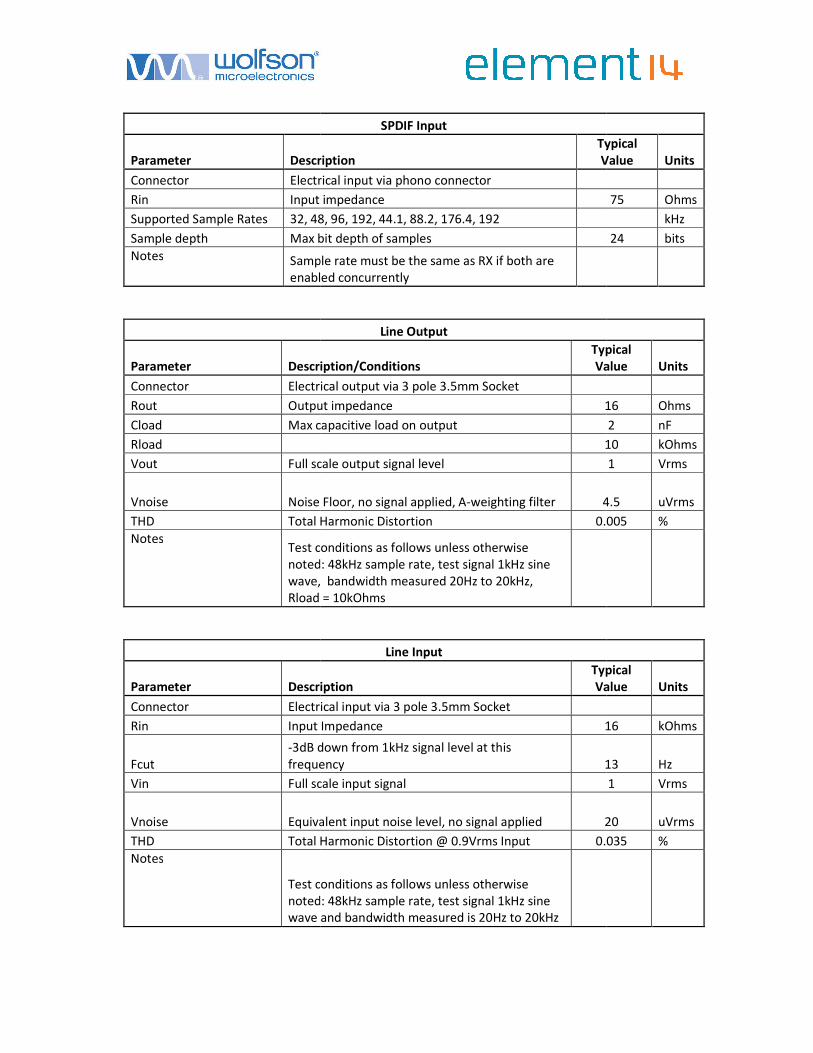
f. Performance and Specification
During the design process, the board layout was optimised to ensure each of the
Wolfson Microelectronics devices performed optimally, providing users with an
exceptional audio experience. Measured performance of the board is as follows:
Parameter Description
Connector Electrical output via phono connector
Rout Output impedance
Supported Sample Rates 32, 48, 96, 192, 44.1, 88.2, 176.4, 192
Sample depth Max bit depth of samples
Notes
Sample rate must be the same as TX if both are
enabled concurrently
Feature header signal assignment
Power
domain
Description
Power Pin 5.0V 5V supply, less than 300ma.
Power Pin 3.3V 3.3V supply, less than 300ma.
n/out 0 - 3.3V Audio interface 3 left/right clock
ut 0 - 3.3V Audio interface 3 TX digital audio
n 0 - 3.3V Audio interface 3 RX digital audio data
n/out 0 - 3.3V Audio interface 3 bit clock
Power Pin 0 Digital ground
Power Pin 0 Digital ground
n 0 - 3.3V Control Interface clock input
n/out 0 - 3.3V Control Interface data input and output
Digital out 0 - 3.3V Digital speaker (PDM) data output
Digital out 0 - 3.3V Digital speaker (PDM) clock output
Power Pin 0 Digital ground
Power Pin 0 Digital ground
Digital in/out 0 - 3.3V General purpose pin GPIO4
Digital in/out 0 - 3.3V General purpose pin GPIO3
Table 3: GPIO signal definitions
Performance and Specification
During the design process, the board layout was optimised to ensure each of the
Wolfson Microelectronics devices performed optimally, providing users with an
exceptional audio experience. Measured performance of the board is as follows:
SPDIF Output
Description
Typical
Value
Electrical output via phono connector
Output impedance
32, 48, 96, 192, 44.1, 88.2, 176.4, 192
Max bit depth of samples
Sample rate must be the same as TX if both are
enabled concurrently
Audio interface 3 left/right clock
Audio interface 3 TX digital audio data
Audio interface 3 RX digital audio data
Control Interface data input and output
Digital speaker (PDM) data output
Digital speaker (PDM) clock output
During the design process, the board layout was optimised to ensure each of the
Wolfson Microelectronics devices performed optimally, providing users with an
exceptional audio experience. Measured performance of the board is as follows:
Typical
Value Units
75 Ohms
kHz
24 bits
Parameter Description
Connector Electrical input via phono connector
Rin Input impedance
Supported Sample Rates 32, 48, 96, 192,
Sample depth Max bit depth of samples
Notes Sample rate must be the same as RX if both are
enabled concurrently
Parameter Description/Conditions
Connector Electrical output via
Rout Output impedance
Cload Max capacitive load on output
Rload
Vout Full scale output signal level
Vnoise Noise Floor, no signal applied, A
THD Total Harmonic
Notes Test conditions as follows unless otherwise
noted: 48kHz sample rate, test signal 1kHz sine
wave, bandwidth measured 20Hz to 20kHz,
Rload = 10kOhms
Parameter Description
Connector Electrical
Rin Input Impedance
Fcut
-3dB down from 1kHz signal level at this
frequency
Vin Full scale input signal
Vnoise Equivalent input noise level, no signal applied
THD Total Harmonic
Notes
Test conditions as follows unless otherwise
noted: 48kHz sample rate, test signal 1kHz sine
wave and bandwidth measured is 20Hz to 20kHz
SPDIF Input
Description
Typical
Value
Electrical input via phono connector
Input impedance
32, 48, 96, 192, 44.1, 88.2, 176.4, 192
Max bit depth of samples
Sample rate must be the same as RX if both are
enabled concurrently
Line Output
Description/Conditions
Typical
Value
Electrical output via 3 pole 3.5mm Socket
Output impedance 16
Max capacitive load on output
10
Full scale output signal level
Noise Floor, no signal applied, A-weighting filter 4.5
Total Harmonic Distortion 0.005
Test conditions as follows unless otherwise
noted: 48kHz sample rate, test signal 1kHz sine
wave, bandwidth measured 20Hz to 20kHz,
Rload = 10kOhms
Line Input
Description
Typical
Value
Electrical input via 3 pole 3.5mm Socket
Input Impedance 16
3dB down from 1kHz signal level at this
frequency 13
Full scale input signal
Equivalent input noise level, no signal applied 20
Total Harmonic Distortion @ 0.9Vrms Input 0.035
Test conditions as follows unless otherwise
noted: 48kHz sample rate, test signal 1kHz sine
wave and bandwidth measured is 20Hz to 20kHz
Typical
Value Units
75 Ohms
kHz
24 bits
Typical
Value Units
16 Ohms
2 nF
10 kOhms
1 Vrms
4.5 uVrms
0.005 %
Typical
Value Units
16 kOhms
13 Hz
1 Vrms
20 uVrms
0.035 %
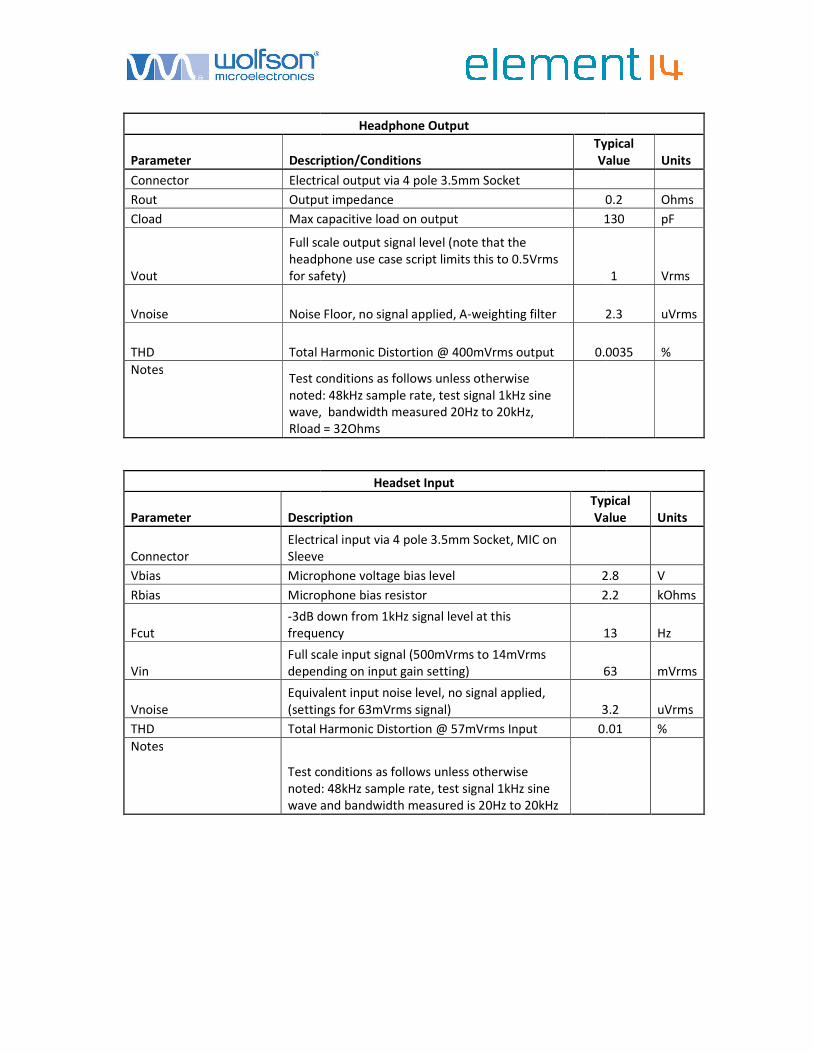
Parameter Description/Conditions
Connector Electrical output via 4 pole 3.5mm Socket
Rout Output impedance
Cload Max capacitive load on output
Vout
Full scale output signal level (note that the
headphone use case script limits this to 0.5Vrms
for safety)
Vnoise Noise Floor, no signal applied, A
THD Total Harmonic Distortion @ 400mVrms output
Notes Test conditions as follows unless otherwise
noted: 48kHz sample rate, test signal 1kHz sine
wave, bandwidth measured 20Hz to 20kHz,
Rload = 32Ohms
Parameter Description
Connector
Electrical input via 4 pole 3.5mm
Sleeve
Vbias Microphone voltage bias level
Rbias Microphone bias resistor
Fcut
-3dB down from 1kHz signal level at this
frequency
Vin
Full scale input signal (500mVrms to 14mVrms
depending on input gain setting)
Vnoise
Equivalent input noise level, no signal applied,
(settings for 63mVrms signal)
THD Total Harmonic Distortion @ 57mVrms Input
Notes
Test conditions as follows unless otherwise
noted: 48kHz sample rate, test signal 1kHz
wave and bandwidth measured is 20Hz to 20kHz
Headphone Output
Description/Conditions
Typical
Value
Electrical output via 4 pole 3.5mm Socket
Output impedance 0.2
Max capacitive load on output 130
Full scale output signal level (note that the
headphone use case script limits this to 0.5Vrms
for safety)
Noise Floor, no signal applied, A-weighting filter 2.3
Total Harmonic Distortion @ 400mVrms output 0.0035
Test conditions as follows unless otherwise
noted: 48kHz sample rate, test signal 1kHz sine
wave, bandwidth measured 20Hz to 20kHz,
Rload = 32Ohms
Headset Input
Description
Typical
Value
Electrical input via 4 pole 3.5mm Socket, MIC on
Sleeve
Microphone voltage bias level 2.8
Microphone bias resistor 2.2
3dB down from 1kHz signal level at this
frequency 13
Full scale input signal (500mVrms to 14mVrms
depending on input gain setting) 63
Equivalent input noise level, no signal applied,
(settings for 63mVrms signal) 3.2
Total Harmonic Distortion @ 57mVrms Input 0.01
Test conditions as follows unless otherwise
noted: 48kHz sample rate, test signal 1kHz sine
wave and bandwidth measured is 20Hz to 20kHz
Typical
Value Units
0.2 Ohms
130 pF
1 Vrms
2.3 uVrms
0.0035 %
Typical
Value Units
2.8 V
2.2 kOhms
13 Hz
63 mVrms
3.2 uVrms
0.01 %
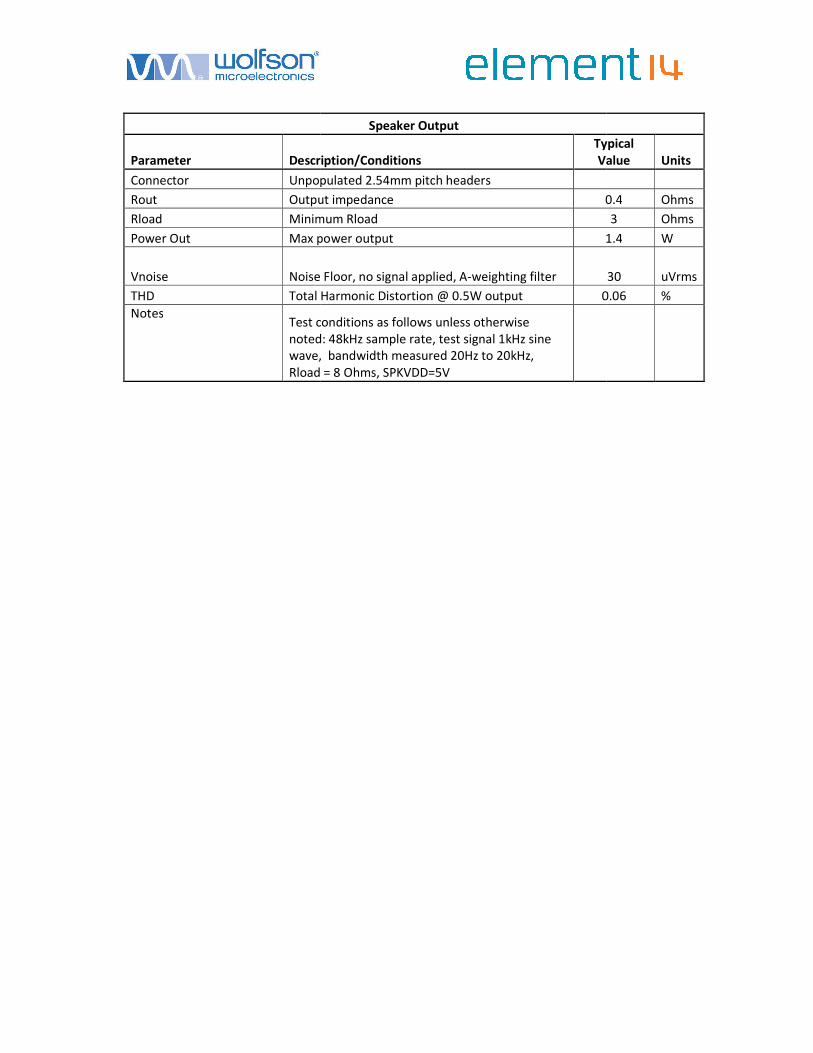
Parameter Description/Conditions
Connector Unpopulated 2.54mm pitch headers
Rout Output impedance
Rload Minimum Rload
Power Out Max power
Vnoise Noise Floor, no signal applied, A
THD Total Harmonic Distortion @ 0.5W output
Notes Test conditions as follows unless otherwise
noted: 48kHz sample rate, test signal 1kHz sine
wave, bandwidth measured 20Hz to 20kHz,
Rload = 8 Ohms, SPKVDD=5V
Speaker Output
Description/Conditions
Typical
Value
Unpopulated 2.54mm pitch headers
Output impedance 0.4
Minimum Rload
Max power output 1.4
Noise Floor, no signal applied, A-weighting filter
Total Harmonic Distortion @ 0.5W output 0.06
Test conditions as follows unless otherwise
noted: 48kHz sample rate, test signal 1kHz sine
wave, bandwidth measured 20Hz to 20kHz,
Rload = 8 Ohms, SPKVDD=5V
Typical
Value Units
0.4 Ohms
3 Ohms
1.4 W
30 uVrms
0.06 %

g. Electrical architecture of the audio card
Diagram 4: Audio architecture of the Wolfson
Diagram 5: Power management
Electrical architecture of the audio card
Diagram 4: Audio architecture of the Wolfson audio card
Power management architecture of the Wolfson audio card
architecture of the Wolfson audio card
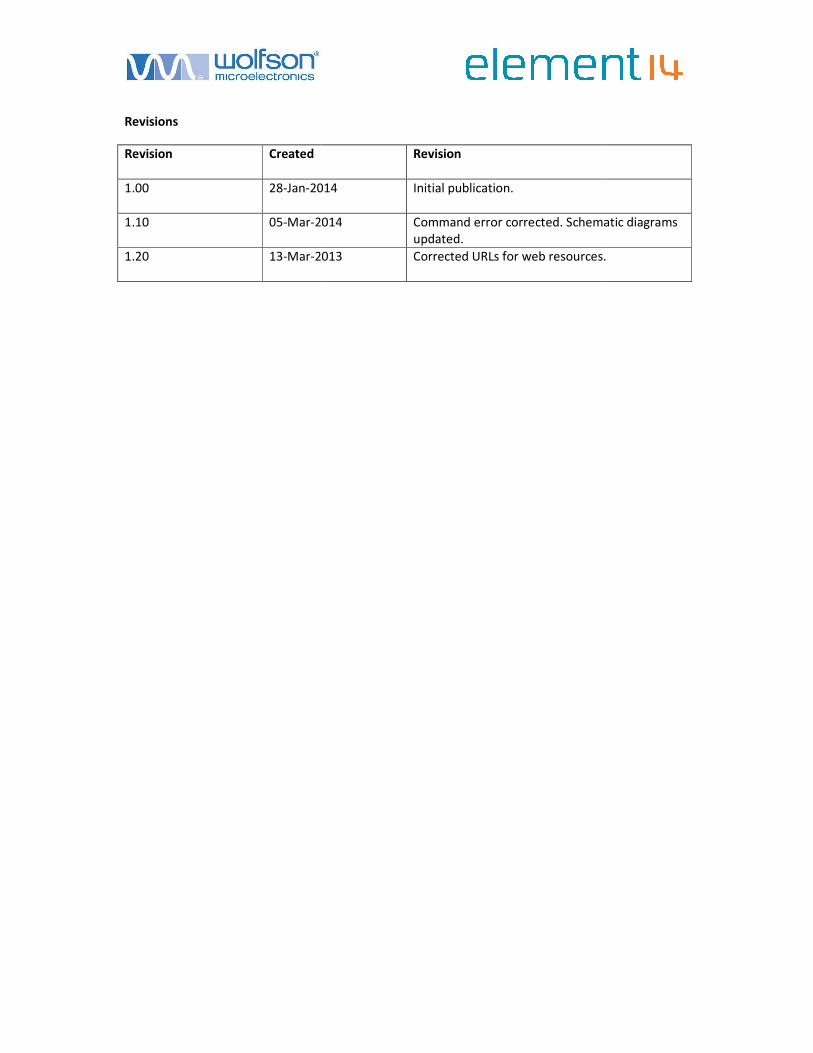
Revisions
Revision
Created
1.00 28-Jan-2014
1.10 05-Mar-2014
1.20
13-Mar-2013
Revision
2014 Initial publication.
2014 Command error corrected. Schematic diagrams
updated.
2013 Corrected URLs for web resources.
Command error corrected. Schematic diagrams
Corrected URLs for web resources.