Embed Size (px)
Citation preview

Wolfgang Unger2010 – Gergely Rózsa
Solution Embedded Products
Microsoft Embedded Channel• Windows XP Pro for Embedded Devices• Windows Vista Embedded• WEPOS / Windows POSReady• Windows Embedded Standard• Windows XP Embedded
1

Wolfgang Unger2010 – Gergely Rózsa
XP Embedded – Tools Installation
• Installation Procedure– Disc 1 (X10-50442)
• Install Tools• Install Microsoft SQL Desktop Edition• Install Component Database
– Disc 2 (X10-50443)• Contains Component Database
– Disc 3 (X10-50444)• Upgrade Database to SP2• Upgrade Tools to SP2
– FP2007 Installation (X13-14119)• Upgrade Database to FP2007• Upgrade Tools to FP2007
– Update Rollup 1.0 (X13-82297)• Import Components to Database
– Service Pack 3 (Xxx-xxxxx)• Import Components to Database 2

Wolfgang Unger2010 – Gergely Rózsa
Solution Embedded Products
Microsoft Embedded Channel• Windows XP Pro for Embedded Devices• Windows Vista Embedded• Windows Embedded POSReady• Windows Embedded Standard
3

Wolfgang Unger2010 – Gergely Rózsa
What is Windows Embedded Standard
• Componentized Version of Windows XP Professional– Fully compatible to full version of XP Professional– Contains all functions of XP Professional
• + additional Embedded Features
• Allows to create a fully customized WindowsWhich contains only the functions you need- smaller footprint
- No Windows Product Activation- Create one master image- Clone it as often as you need it- License the image with the license sticker
4
Wolfgang Unger2010 – Gergely Rózsa
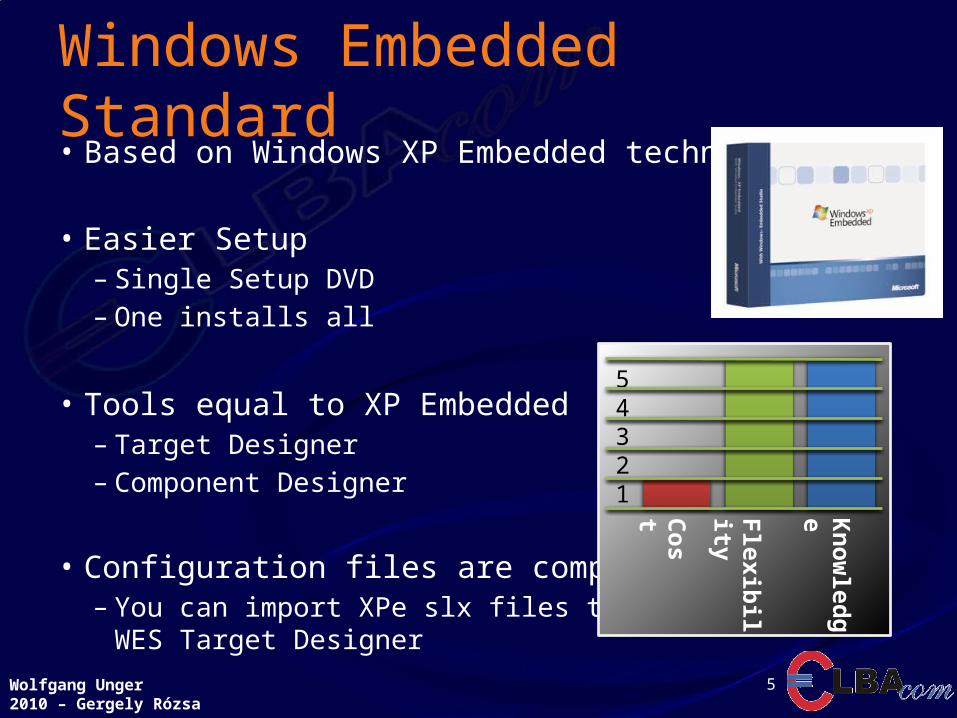
Windows Embedded Standard• Based on Windows XP Embedded technology
• Easier Setup– Single Setup DVD– One installs all
• Tools equal to XP Embedded– Target Designer– Component Designer
• Configuration files are compatible– You can import XPe slx files to
WES Target Designer
54321
Cost
Flexibility
Knowledge
5

Wolfgang Unger2010 – Gergely Rózsa
New Features in Windows Embedded Standard
• Microsoft Silverlight (3.0)• .NET Framework 3.5 (4.0)• RDP 6.1 (7.0)• Power Shell 2.0• Windows Installer 4.5• WSDAPI• Network Access Protection• Sysprep• SCCM Operating System Deployment (OSD)• XP Support Tools• On-Screen Keyboard• Etc..
6

Wolfgang Unger2010 – Gergely Rózsa
How to build an Image
7
Get Hardwareinformation
Get Soft
waredependencies
Build the Image
Transfer the Image

Wolfgang Unger2010 – Gergely Rózsa
8
Windows Embedded Studio
Target Designer
Component DesignerDatabase Manager Target Analyzer
TAP.EXE

Wolfgang Unger2010 – Gergely Rózsa
Windows Embedded Studio
• Target Designer– Tool to build your
XP Embedded / WES Image– Add the needed components to your configuration
– Dependency Check
– Build the Image
9

Wolfgang Unger2010 – Gergely Rózsa
Target Designer
10
Componentlist
• Contains all available comoponents in the component database
• Bold Items– Marco Components

Wolfgang Unger2010 – Gergely Rózsa
Target Designer
11
Components in the image
• Displays all components added to the image
• Some components have additional settings

Wolfgang Unger2010 – Gergely Rózsa
Target Designer
12
Componentsettings
Wolfgang Unger2010 – Gergely Rózsa
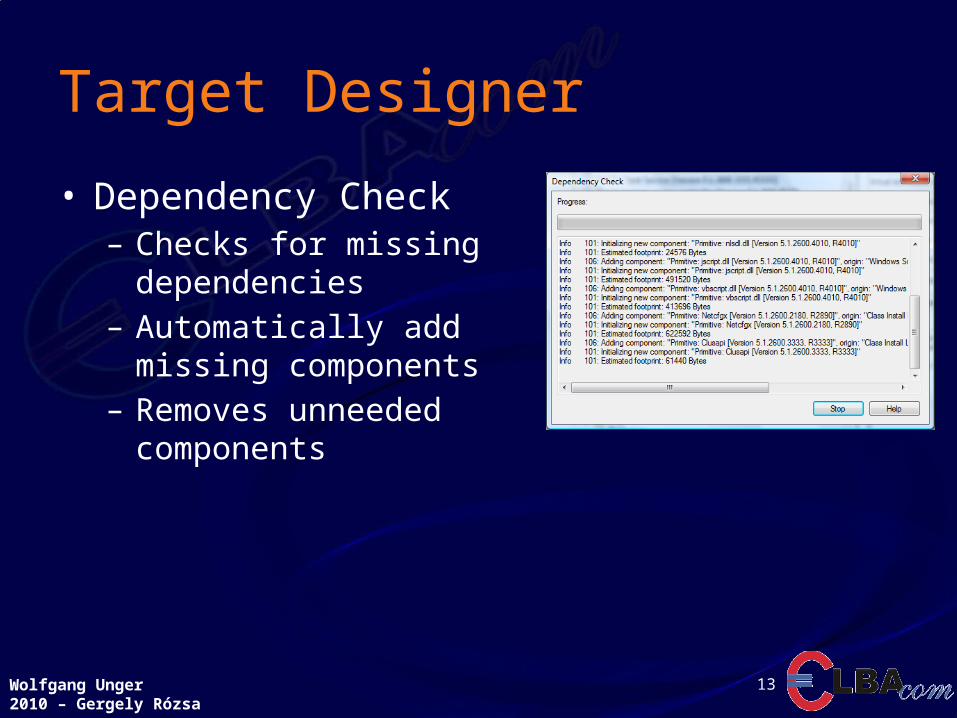
Target Designer
• Dependency Check– Checks for missing dependencies– Automatically add missing
components– Removes unneeded components
13

Wolfgang Unger2010 – Gergely Rózsa
14
Windows Embedded Studio
Target Designer
Component DesignerDatabase Manager Target Analyzer
TAP.EXE
Wolfgang Unger2010 – Gergely Rózsa
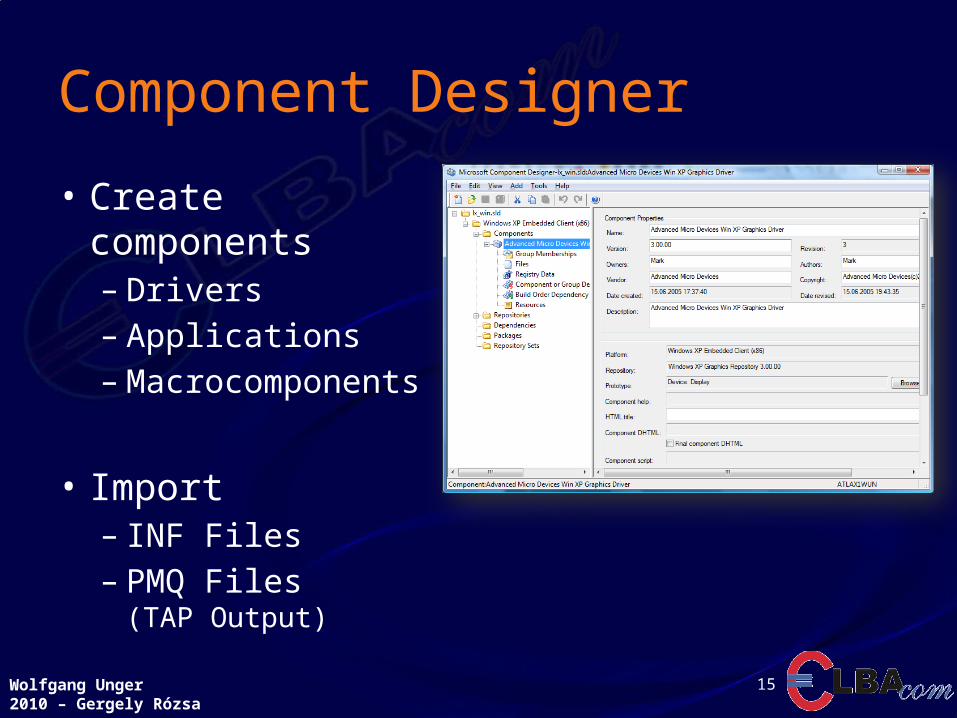
Component Designer
• Create components– Drivers– Applications– Macrocomponents
• Import– INF Files– PMQ Files
(TAP Output)
15

Wolfgang Unger2010 – Gergely Rózsa
Component Designer
• Importing Drivers– Import INF File– Specify the repository
(where the files are located)
– Save the component
– Import the new sld file into the database
16

Wolfgang Unger2010 – Gergely Rózsa
17
Windows Embedded Studio
Target Designer
Component DesignerDatabase Manager Target Analyzer
TAP.EXE

Wolfgang Unger2010 – Gergely Rózsa
Component Database Manager
• Used to– Change the component
database location– Import components– View installed
components– Delete components
18

Wolfgang Unger2010 – Gergely Rózsa
How to build an Image
19
Get Hardwareinformation
Get Soft
waredependencies
Build the Image
Transfer the Image

Wolfgang Unger2010 – Gergely Rózsa
20
Windows Embedded Studio
Target Designer
Component DesignerDatabase Manager Target Analyzer
TAP.EXE
Wolfgang Unger2010 – Gergely Rózsa
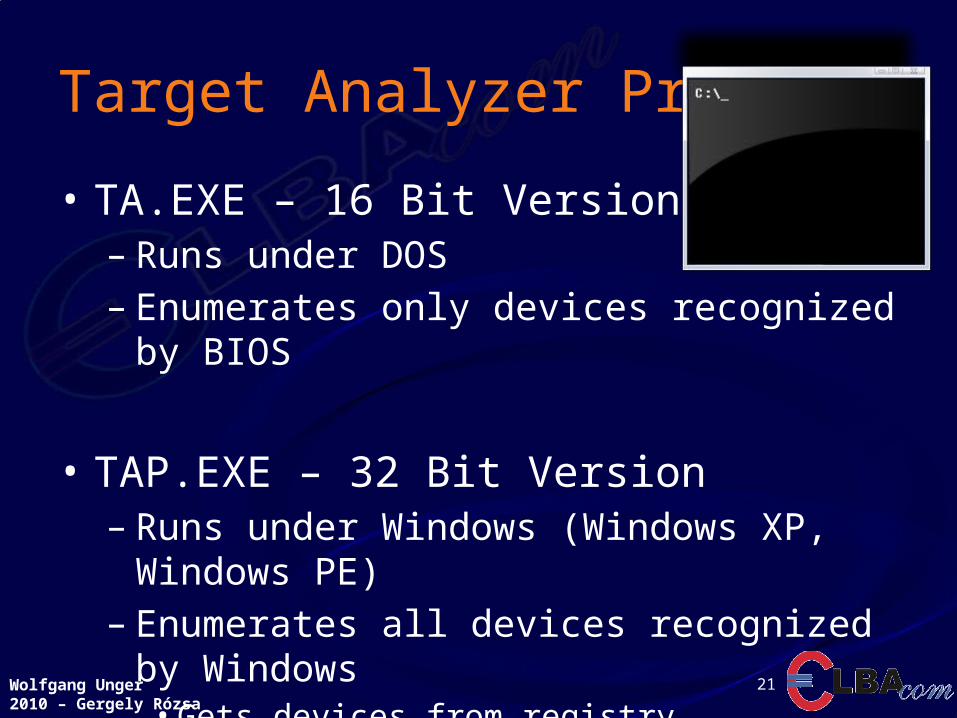
Target Analyzer Probe
• TA.EXE – 16 Bit Version– Runs under DOS– Enumerates only devices recognized by BIOS
• TAP.EXE – 32 Bit Version– Runs under Windows (Windows XP, Windows PE)– Enumerates all devices recognized by Windows
• Gets devices from registry
21

Wolfgang Unger2010 – Gergely Rózsa
Target Analyzer Probe
• Creates an output file devices.pmq– XML file
• Contains HW-Ids of devices
• File can be imported to– Target Designer– Component Designer
22

Wolfgang Unger2010 – Gergely Rózsa
How to build an Image
23
Get Hardwareinformation
Get Soft
waredependencies
Build the Image
Transfer the Image

Wolfgang Unger2010 – Gergely Rózsa
Dependency Walker
• Lists all dependenciesof an executable
• Create a filter in Target Designer tosearch for the needed files
http://www.dependencywalker.com
Wolfgang Unger2010 – Gergely Rózsa
25
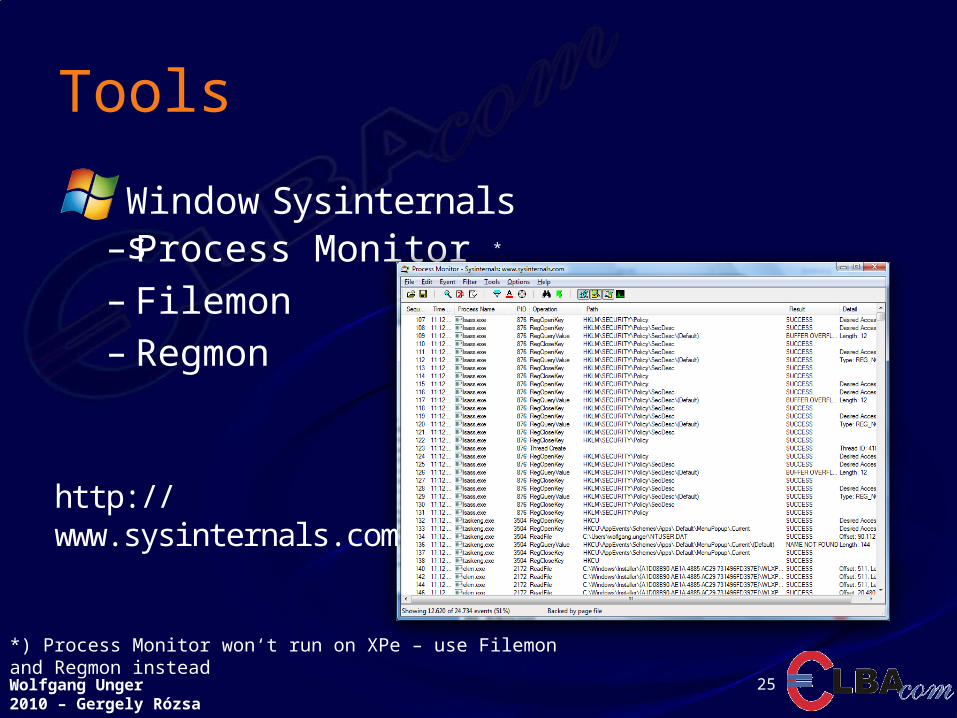
Tools
– Process Monitor *
– Filemon– Regmon
Windows Sysinternals
*) Process Monitor won‘t run on XPe – use Filemon and Regmon instead
http://www.sysinternals.com

Wolfgang Unger2010 – Gergely Rózsa
Gathering Hardware Information
• Boot Windows Embedded Standard Setup DVD• Connect an USB drive to the system or map a
network drive• Change to the writable drive• Run TAP
– Creates devices.pmq
26

Wolfgang Unger2010 – Gergely Rózsa
Importing the Hardwareinformation
• Click File – Import• Select devices.pmq• Click Start
Target Designer willsearch for the devices in the Database
27

Wolfgang Unger2010 – Gergely Rózsa
Adding components
• Add Components – Enterprise Features– Minlogon Sample Macro
• Running Dependency Check
28

Wolfgang Unger2010 – Gergely Rózsa
Adding components
• Tasks– Conflict– Multiple Choice
29

Wolfgang Unger2010 – Gergely Rózsa
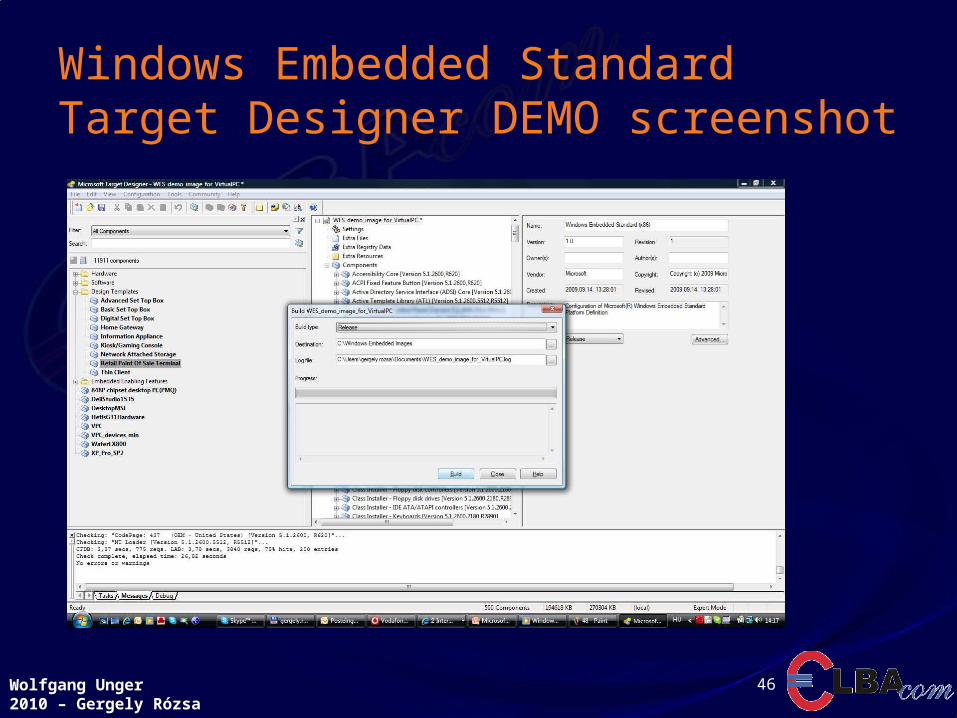
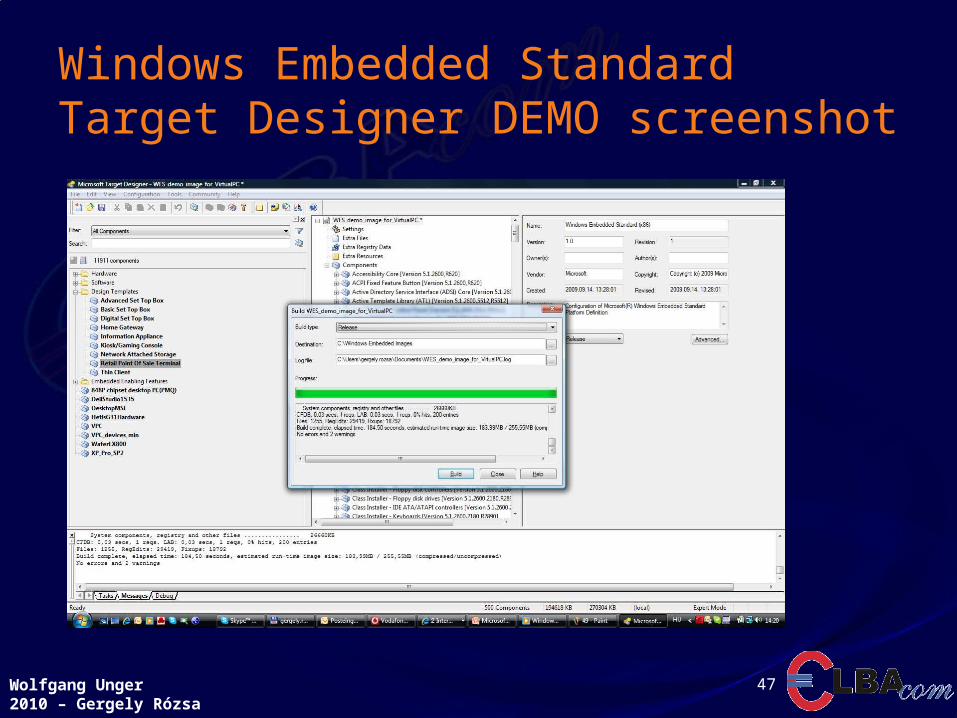
Building the image
• Building the image
– Creates directory structurein the given output directory
30
Wolfgang Unger2010 – Gergely Rózsa
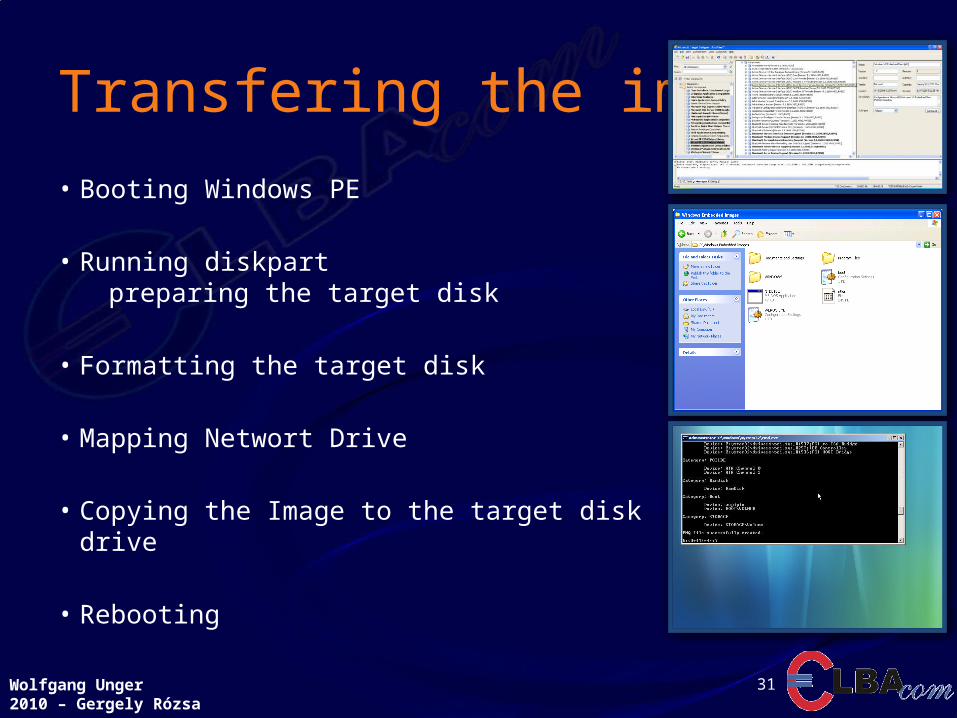
Transfering the image
• Booting Windows PE
• Running diskpartpreparing the target disk
• Formatting the target disk
• Mapping Networt Drive
• Copying the Image to the target disk drive
• Rebooting
31

Wolfgang Unger2010 – Gergely Rózsa
Windows Embedded Standard Boot
• Boots into First Boot Agent
32

Wolfgang Unger2010 – Gergely Rózsa
First Boot Agent
• Initial configuration of the image
• creates user accounts• installs PnP devices• component / file registration• installation of applications (RunOnce, .NET 2.0)

Wolfgang Unger2010 – Gergely Rózsa
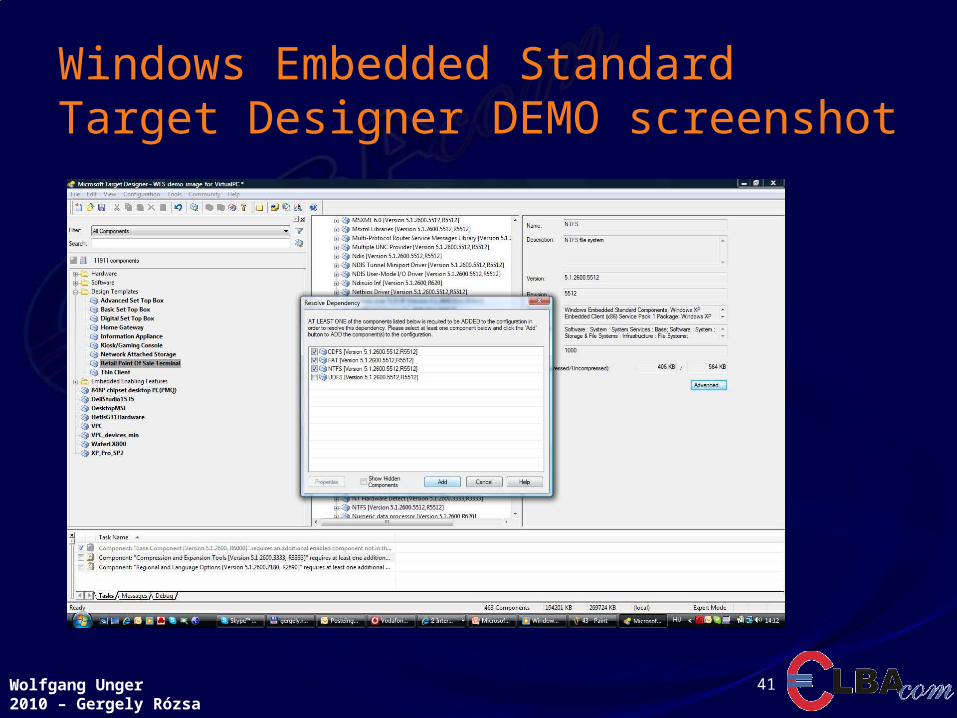
Windows Embedded Standard Target Designer DEMO screenshot
34

Wolfgang Unger2010 – Gergely Rózsa
Windows Embedded Standard Target Designer DEMO screenshot
35

Wolfgang Unger2010 – Gergely Rózsa
Windows Embedded Standard Target Designer DEMO screenshot
36

Wolfgang Unger2010 – Gergely Rózsa
Windows Embedded Standard Target Designer DEMO screenshot
37

Wolfgang Unger2010 – Gergely Rózsa
Windows Embedded Standard Target Designer DEMO screenshot
38

Wolfgang Unger2010 – Gergely Rózsa
Windows Embedded Standard Target Designer DEMO screenshot
39

Wolfgang Unger2010 – Gergely Rózsa
Windows Embedded Standard Target Designer DEMO screenshot
40
Wolfgang Unger2010 – Gergely Rózsa
Windows Embedded Standard Target Designer DEMO screenshot
41

Wolfgang Unger2010 – Gergely Rózsa
Windows Embedded Standard Target Designer DEMO screenshot
42

Wolfgang Unger2010 – Gergely Rózsa
Windows Embedded Standard Target Designer DEMO screenshot
43

Wolfgang Unger2010 – Gergely Rózsa
Windows Embedded Standard Target Designer DEMO screenshot
44
Wolfgang Unger2010 – Gergely Rózsa
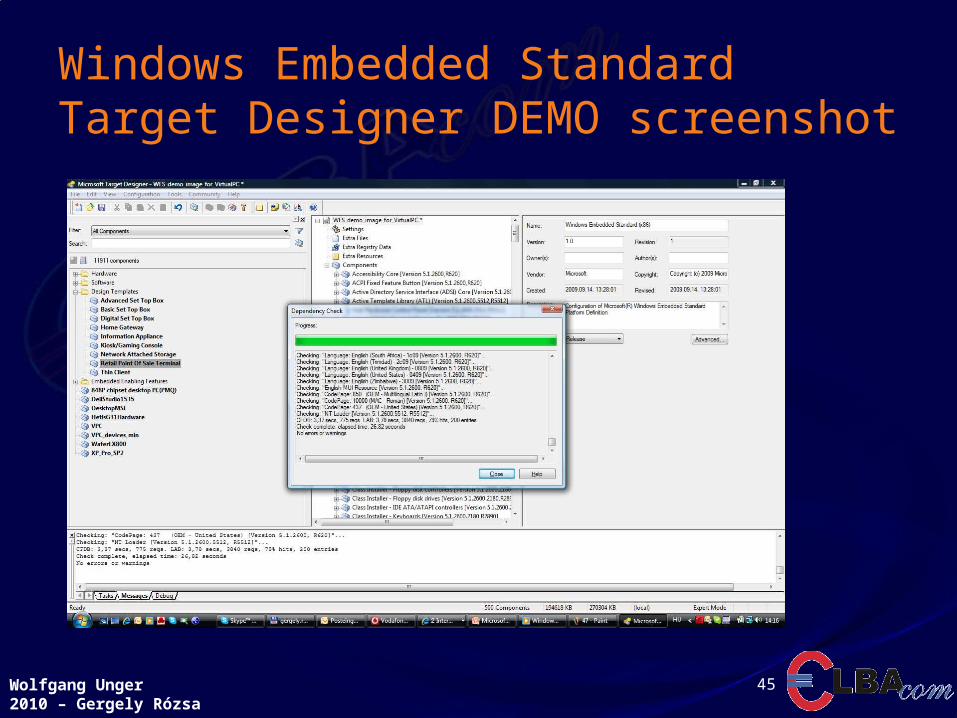
Windows Embedded Standard Target Designer DEMO screenshot
45
Wolfgang Unger2010 – Gergely Rózsa
Windows Embedded Standard Target Designer DEMO screenshot
46
Wolfgang Unger2010 – Gergely Rózsa
Windows Embedded Standard Target Designer DEMO screenshot
47

Wolfgang Unger2010 – Gergely Rózsa
Windows Embedded Standard Target Designer DEMO screenshot
48

Wolfgang Unger2010 – Gergely Rózsa
Windows Embedded Standard Target Designer DEMO screenshot
49

Wolfgang Unger2010 – Gergely Rózsa
Windows Embedded Standard Target Designer DEMO screenshot
50

Wolfgang Unger2010 – Gergely Rózsa
Windows Embedded Standard Target Designer DEMO screenshot
51

Wolfgang Unger2010 – Gergely Rózsa
Windows Embedded Standard DEMO
52

Wolfgang Unger2010 – Gergely Rózsa
Custom Bootlogo
• Create a 640x480 16 color bitmap• Save as Boot.bmp in Windows directory• Edit boot.ini
– Add /NOGUIBOOT /BOOTLOGO

Wolfgang Unger2010 – Gergely Rózsa
Minlogon
• Removes the Windows Logon Windows• Removes Windows is loading screen• Uses SYSTEM account
• No Domainparticipation possible• No Userlogin possible

Wolfgang Unger2010 – Gergely Rózsa
Custom Shell
[HKEY_LOCAL_MACHINE\Software\Microsoft\Windows NT\CurrentVersion\Winlogon]
Shell=<absolute path to application>
How?• Create a registry entry in your image in Target Designer• Create a custom component for your application with the registry
entry included• Change it later in the final image
55

Wolfgang Unger2010 – Gergely Rózsa
Windows Embedded – Tools
• TA / TAP
• Image Diff Engine
• Windows PE – Windows Preinstallation Environment (WAIK)
56

Wolfgang Unger2010 – Gergely Rózsa
Image Diff Engine
• Tool to update existing images• Allows update from SP2 to SP3 in the field
• Compares two images and saves only the differences– Files– Registry
57
- =

Wolfgang Unger2010 – Gergely Rózsa
Image Diff Engine
• Difference is saved in a single directory including a XML file describing all changes
• The extracted changes can be applied to a running image– After a reboot the image runs with all changes
• IDIFF.exe– Used to create the difference output
• IDA.exe– Used to update an existing image with the extracted information
58

Wolfgang Unger2010 – Gergely Rózsa
Windows Embedded – Windows PE
• Windows Preinstallation Environment
• Bootable Mini Windows• Diskpreparation• Image Transfer
59

Wolfgang Unger2010 – Gergely Rózsa
System Cloning Tool
• Fbreseal.exe– Removes all unique Ids– User SIDs– Computername– Networksettings– Autologon
• Important if you use the same image in the same network
60

Wolfgang Unger2010 – Gergely Rózsa
Oeminfo.ini
[Version]Microsoft Windows XP and the Windows .NET Server familyWinVer=5.01
[General]Manufacturer=FabricamModel=DEMOPC[Support Information]Line1="Call +44-118-909-2480"
Create a file oeminfo.ini in c:\windows\system32 folder.
Add the OEM information
Wolfgang Unger2010 – Gergely Rózsa
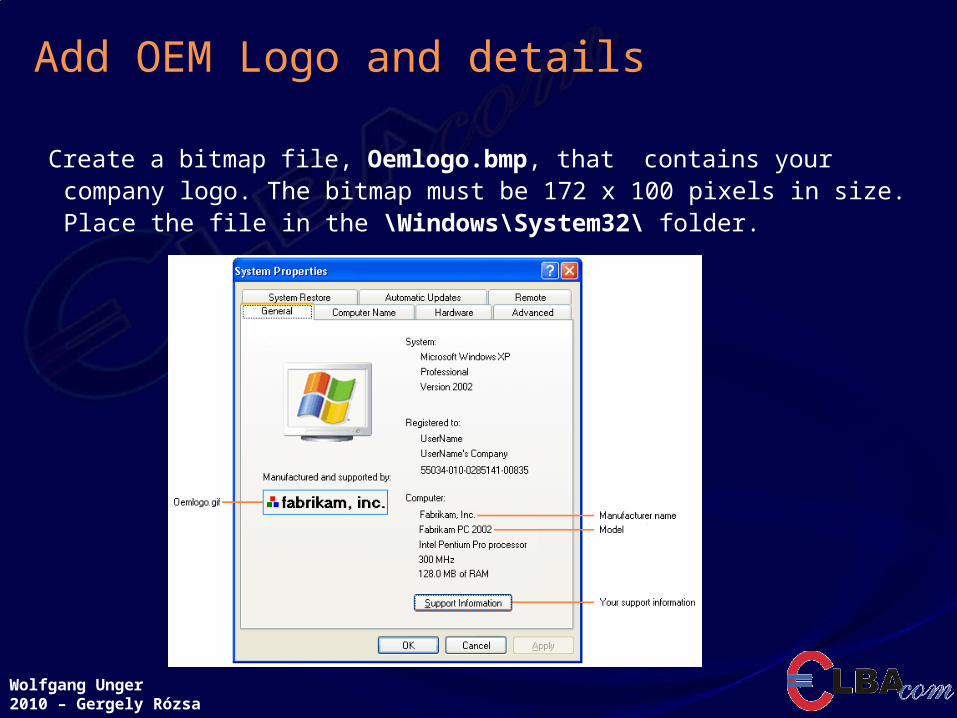
Create a bitmap file, Oemlogo.bmp, that contains your company logo. The bitmap must be 172 x 100 pixels in size. Place the file in the \Windows\System32\ folder.
Add OEM Logo and details

Wolfgang Unger2010 – Gergely Rózsa
Customisation
• Hide Windows XP startup splash logoAdd the switch “/noguiboot” to the default entry in the Boot.ini This switch disables the bitmap that displays the progress bar for Windows XP Professional startup
multi(0)disk(0)rdisk(0)partition(1)\WINNT="Microsoft Windows XP Professional" /fastdetect /noguiboot
Adding the “/bootlogo” switch to the end of the default entry line shown above will show the bitmap located at %systemroot%\boot.bmp, provided it is a 640x480, 16 color bitmap.
• Change colors of logon screenslogon screen background should be set to black by adding a value of 0 0 0 to the following registry values:
HKEY_USERS\.DEFAULT\Control Panel\Colors\BackgroundHKEY_LOCAL_MACHINE\SOFTWARE\Microsoft\WindowsNT\CurrentVersion\Winlogon\Background

Wolfgang Unger2010 – Gergely Rózsa
Customisation
• Hide Windows Fatal Error Messages When a STOP message (a fatal system error message) displays in Windows XP, the computer enters debug mode for troubleshooting purposes. The error message appears on a blue screen, and the first few lines are similar to the following sample error message:
Stop 0x0000001e (c000009a 80123f36 02000000 00000246)Unhandled Kernel exception c000009a from 8123f26Address has base at 80100000 ntoskrnl.exe
If such an event occurs, the computer can be configured to restart automatically through the Startup and Recovery options. This approach would effectively prevent the device from remaining on the blue screen (and the cryptic information it displays) until physical intervention is arranged.
This setting can also be configured through the following registry change:-
• System Key:[HKEY_LOCAL_MACHINE\SYSTEM\CurrentControlSet\Control\CrashControl]
• Value Name: AutoReboot• Data Type: REG_DWORD (DWORD Value)• Value Data: (0 = disabled, 1 = auto reboot)
OR you can simply set the checkbox on Target Designer „User interface core” component’s settings window. (If you want to acchieve automatical restart after BSOD...)
Wolfgang Unger2010 – Gergely Rózsa
Customisation
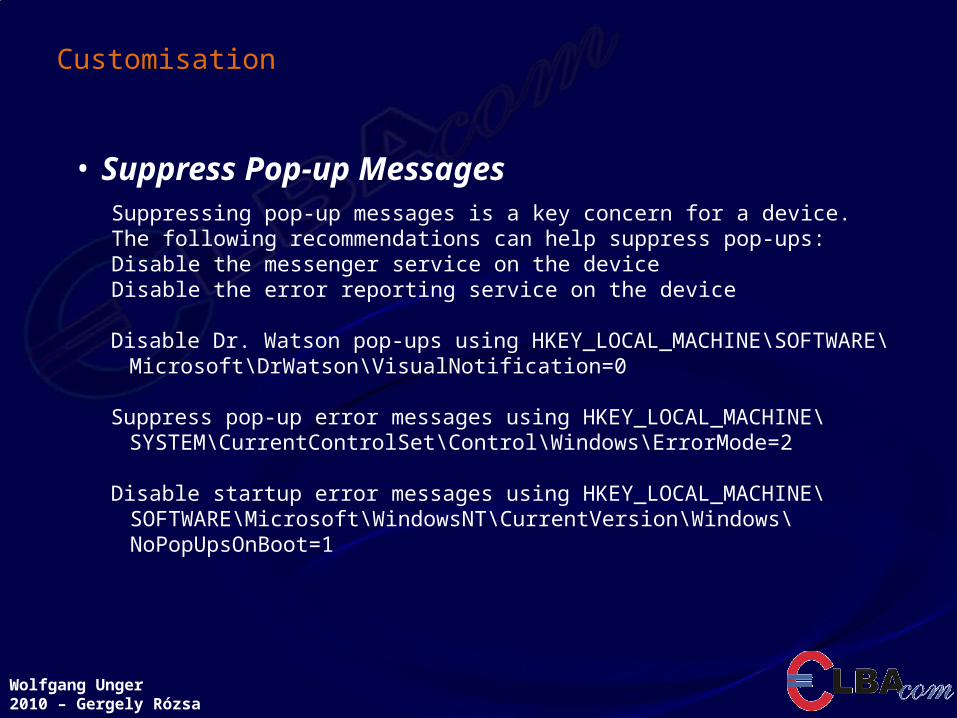
• Suppress Pop-up MessagesSuppressing pop-up messages is a key concern for a device. The following recommendations can help suppress pop-ups:Disable the messenger service on the deviceDisable the error reporting service on the device
Disable Dr. Watson pop-ups using HKEY_LOCAL_MACHINE\SOFTWARE\Microsoft\DrWatson\VisualNotification=0
Suppress pop-up error messages using HKEY_LOCAL_MACHINE\SYSTEM\CurrentControlSet\Control\Windows\ErrorMode=2
Disable startup error messages using HKEY_LOCAL_MACHINE\SOFTWARE\Microsoft\WindowsNT\CurrentVersion\Windows\NoPopUpsOnBoot=1

Wolfgang Unger2010 – Gergely Rózsa
66

Wolfgang Unger2010 – Gergely Rózsa
Windows Embedded Standard Evaluation
• Get a free 120-Day Evalation Kit from us!
• Fully functional
• Saved configuration isfully compatible to full version
67
Wolfgang Unger2010 – Gergely Rózsa
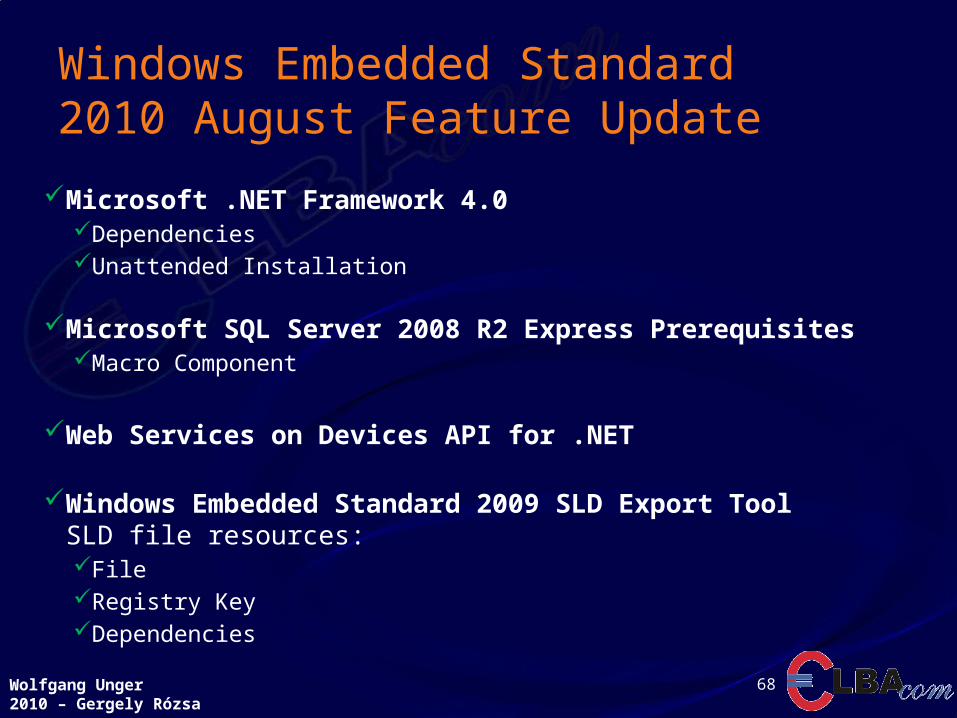
Windows Embedded Standard2010 August Feature Update
68
Microsoft .NET Framework 4.0 Dependencies Unattended Installation
Microsoft SQL Server 2008 R2 Express Prerequisites Macro Component
Web Services on Devices API for .NET
Windows Embedded Standard 2009 SLD Export Tool SLD file resources: File Registry Key Dependencies

Wolfgang Unger2010 – Gergely Rózsa
69
Clone and deployment of POSReady and WES
•Reseal the image. (Sysprep and FBReseal)
•Capture the image. (IMAGEX)•imagex /capture c: z:\images\winxp.wim “DEMOPC 1000”•Deploy the image. (IMAGEX)imagex /apply z:\images\winxp.wim 1 c:
•Remote deployment:•WDS and RIS is also available. (Windows Server technologies.)•Pre-Boot Execution Environment (PXE) compatible network adapter needed.
•Create Recovery CD using WinPE.MORE DETAILS IN THE AFTERNOON FROM WOLFGANG UNGER

Wolfgang Unger2010 – Gergely Rózsa
Windows Embedded Standard
Questions….
70