Embed Size (px)
Citation preview

Like what you see?Buy the book at
the Focal Bookstore
Animating with Blender Hess
ISBN 978-0-240-81079-9

29
Storyboarding and the Story Reel
Objectives
● Storyboarding basics ● Suggested tools ● Creating the storyboards ● Telling the story ● Recording a temporary soundtrack for timing ● Assembling a story reel in Blender’s Sequence Editor
Inbox
Coming into this chapter, you need:
● A fi nished story
Storyboarding Basics
Before you take your story into 3D, you need to visualize it in a less time-consuming medium. Storyboards provide an effi cient way to move the ideas and words of your story into a visual format. At their most basic, storyboards are a series of drawings, either real (on sheets of paper) or virtual (drawn directly into a digital painting program), that show the sequential action of your story. They can become incredibly detailed for shots that feature complicated action, showing every character pose. Depending on your speed and ability at sketching, you may opt for a more simplifi ed work fl ow, making sure that all of the major actions are shown.
Each storyboard represents an actual shot from the animation, framed as it would appear in its fi nal form on the screen.
Chapter 4
CH04-K81079.indd 29CH04-K81079.indd 29 7/11/2008 5:48:49 PM7/11/2008 5:48:49 PM

30
Animating with Blender
Figures 4.1–4.6 Several storyboards from The Beast along with the accompanying production shot
4.1 4.2
4.3 4.4
4.5 4.6
CH04-K81079.indd 30CH04-K81079.indd 30 7/11/2008 5:48:49 PM7/11/2008 5:48:49 PM

31
Storyboarding and the Story Reel
Notice how closely the fi nal shots follow the composition of the corresponding storyboards. Without the mechanics of animation and 3D to worry about, you can concentrate on quickly developing the composi-tional strength and organization of the story. If you make a bad drawing, it only costs you a few minutes to draw it again. If you compose a scene poorly in 3D, it may cost you weeks.
In addition to static images, storyboards can also contain notes, arrows, or lines to indicate motion and camera directions.
Let’s take a look at a portion of the script from The Beast and follow the process of storyboarding. Here’s the excerpt:
THE BEAST HITS THE SNOOTY DOG BY THROWING THE BONE, THEN FOLLOWS UP WITH SEVERAL
OTHER TOYS. FINALLY, THE SNOOTY DOG IS KNOCKED FROM HIS PERCH.
Immediately you are hit with a directorial decision: How to frame this shot? There are several ways to do it:
● A long to medium shot that shows both the dog and the Beast at the same time. This in turn could be done from behind the Beast, with him taking up most of the foreground, from behind the dog, or from a more neutral, omniscient position.
● From the dog’s point of view. ● From the Beast’s point of view.
Figures 4.7–4.8 Camera directions and motion lines 4.84.7
CH04-K81079.indd 31CH04-K81079.indd 31 7/11/2008 5:48:52 PM7/11/2008 5:48:52 PM
32
Animating with Blender
Figure 4.12 The dog’s point of view Figure 4.13 The Beast’s point of view
4.9 4.10
Figures 4.9–4.11 Both characters are in the shot from several perspectives 4.11
CH04-K81079.indd 32CH04-K81079.indd 32 7/11/2008 5:48:53 PM7/11/2008 5:48:53 PM
33
Storyboarding and the Story Reel
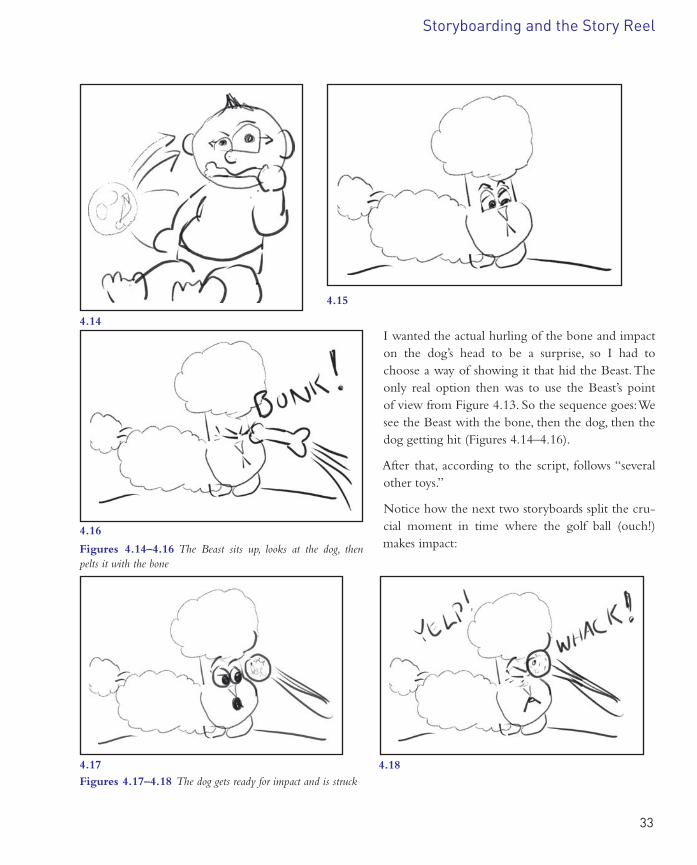
I wanted the actual hurling of the bone and impact on the dog’s head to be a surprise, so I had to choose a way of showing it that hid the Beast. The only real option then was to use the Beast’s point of view from Figure 4.13 . So the sequence goes: We see the Beast with the bone, then the dog, then the dog getting hit (Figures 4.14–4.16).
After that, according to the script, follows “ several other toys. ”
Notice how the next two storyboards split the cru-cial moment in time where the golf ball (ouch!) makes impact: Figures 4.14–4.16 The Beast sits up, looks at the dog, then
pelts it with the bone
4.15
4.14
4.16
Figures 4.17–4.18 The dog gets ready for impact and is struck 4.184.17
CH04-K81079.indd 33CH04-K81079.indd 33 7/11/2008 5:48:55 PM7/11/2008 5:48:55 PM

34
Animating with Blender
Now, I had to decide how to hit the dog so hard that it is knocked from its perch. I really didn’t want to show a bone-crushing impact, after all this is supposed to be somewhat funny, but it still had to happen. One way to lessen the visual distaste of something like this is to put it off screen. So I decided to try cutting away to the silly dog for a moment.
I realized that this may create the expecta-tion in the viewer that the silly dog will be next on the Beast’s hit list. But when the next toy goes sailing past, and the silly dog doesn’t even blink — he’s that clueless — it will be another minor surprise, hopefully
leading to a laugh. Once again, the crucial moment is split, with the toy car suspended just before impact in one storyboard and the crunch lines and sound effect in the next (Figures 4.22–4.23).
Looking ahead in the script, I knew that I had to switch perspectives at some point to bring the mother and the kitchen into the story. Because the snooty dog was off camera anyway and there was a strong visual line of action with the fl ying toy car, this seemed like a decent place to change the point of view. The next shot then, showing the snooty dog recoiling and falling, is from an entirely different angle. In retrospect, this is probably the weakest directorial decision in the animation. Changing to a complete reverse angle for a shot is generally inadvisable, and, although the continuous action of the dog’s recoil and the wider shot that includes the mother helps it to work, it only barely scrapes by.
Figure 4.21 The silly dog only pants and grins. Don’t blame him, he’s only a prop!
Remember that storyboarding is a guide to action that is later used for animation. All of your important poses, facial expressions, and moments in time should have a storyboard.
Continuing, we see a determined expression on the dog’s face, followed by a miss!
Figures 4.19–4.20 The dog dodges!
4.19 4.20
CH04-K81079.indd 34CH04-K81079.indd 34 7/11/2008 5:48:57 PM7/11/2008 5:48:57 PM

35
Storyboarding and the Story Reel
Note the motion lines and sound effect notations throughout these storyboards that help to show the action in the still images, giving them a comic book panel effect.
The storyboards for the rest of the animation are available in the production fi les portion of the included disc in the “ storyboards ” folder.
Suggested Tools
Many artists prefer to prepare storyboards in “ real life ” as opposed to digitally. The advantage of doing so is that small cards with sketches are extremely easy to arrange and rearrange to test different orders of action
Figures 4.22–4.23 Is that a car coming my way?
4.22 4.23
Figures 4.24–4.25 The dog succumbs to the Beast’s missiles
4.24 4.25
CH04-K81079.indd 35CH04-K81079.indd 35 7/11/2008 5:48:58 PM7/11/2008 5:48:58 PM
36
Animating with Blender
and scenes. It is also simple to swap variations on a particular storyboard to see how it changes the fl ow of the shot.
If you will be creating your storyboards using traditional tools, you will need the following:
● Paper : Unlined 3 � � 5 � index cards will work well. ● Pencil : Any drawing implement will work, but if you have a favorite artist’s pencil, feel free to use it. ● A board : You’ll need a cork-backed bulletin board and pins or a blank wall or artist’s table and masking tape.
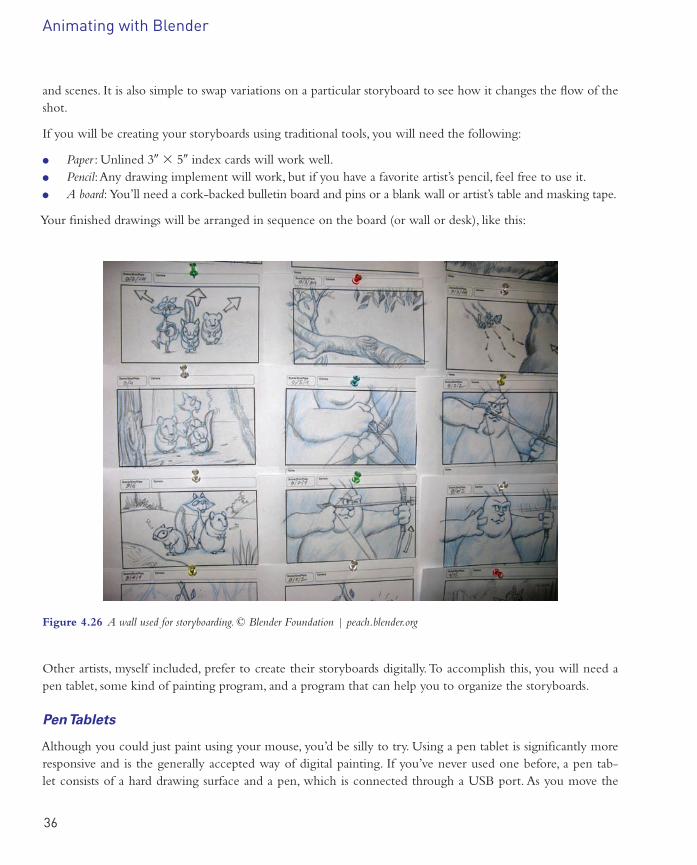
Your fi nished drawings will be arranged in sequence on the board (or wall or desk), like this:
Figure 4.26 A wall used for storyboarding. © Blender Foundation | peach.blender.org
Other artists, myself included, prefer to create their storyboards digitally. To accomplish this, you will need a pen tablet, some kind of painting program, and a program that can help you to organize the storyboards.
Pen Tablets
Although you could just paint using your mouse, you’d be silly to try. Using a pen tablet is signifi cantly more responsive and is the generally accepted way of digital painting. If you’ve never used one before, a pen tab-let consists of a hard drawing surface and a pen, which is connected through a USB port. As you move the
CH04-K81079.indd 36CH04-K81079.indd 36 7/11/2008 5:48:59 PM7/11/2008 5:48:59 PM

37
Storyboarding and the Story Reel
Paint Software
In addition to the commercial-grade, relatively expensive image editing and paint programs like Adobe® Photoshop® and Corel® Painter™ X, there are a number of free or low cost alternatives that have suitable func-tionality for drawing your storyboards.
While the GIMP (GNU Image Manipulation Program, www.gimp.org ) is the current open source option for image editing, my personal favorite is a program called ArtRage, a natural media painting application from Ambient Design, a New Zealand-based graphics software company. The full edition of the software is available for Windows and Macintosh computers from http://www.ambientdesign.com for only $25.
pen across the surface, it controls the cursor on screen. Most pen tablets include pressure sensitivity , which means that the harder you press with the pen, the more “ force ” is applied digitally when painting or drawing, mimicking the response of real artists ’ media. Some better tablets are also sensitive to the angle that the pen is held at for an even more realistic experience.
The industry standard product is sold by Wacom® and their excellent reviews in a variety of publications and online boards, as well as personal experience, show the reason why. In the context of a larger production, their expense is negligible, but to someone producing their own short animation, it will seem high. Wacom cur-rently makes a series of tablets called Bamboo™ that are fairly inexpensive (the smallest is under $100), and still receives great reviews both on quality and responsiveness. Of course, depending on your skills as a sketch artist, even this may be more than you need. A simple product search on the Internet will turn up a number of off-brand or generic pen tablets that cost signifi cantly less and that, as long as they have pressure sensitivity, will work just fi ne for creating simple storyboards.
Figure 4.27 My workstation setup, with very cheap pen tablet
CH04-K81079.indd 37CH04-K81079.indd 37 7/11/2008 5:49:00 PM7/11/2008 5:49:00 PM

38
Animating with Blender
If you have ever worked with real media (pas-tels, oil paints, etc.), you will fi nd that ArtRage mimics the experience very well. Many of the techniques you use in traditional art have a great digital counterpart, allowing you to make illus-trations and paintings that appear as though they were done with the traditional tools.
All of the storyboards for The Beast were drawn in ArtRage.
Blender’s Image Editor
If you have Blender and are not the fi nicky type, you already have an image editor suffi cient for the needs of storyboard creation.
To fi nd it, run Blender and confi gure a screen so that a single window dominates. Change that window to the UV/Image Editor type.
Figure 4.30 Blender featuring a UV/Image Editor window
Figure 4.29 A faux oil painting created with ArtRage
Figure 4.28 ArtRage 2.5
CH04-K81079.indd 38CH04-K81079.indd 38 7/11/2008 5:49:02 PM7/11/2008 5:49:02 PM

39
Storyboarding and the Story Reel
Before you can use this window for painting, you need to create a new image. Do this by selecting New from the Image menu on the win-dow header. The dialog that pops up gives you options for naming the new image and choosing a size. For now, set the Width to 800 and the Height to 600 . Using the color picker between the Width and Alpha controls, select a pure white (RGB 0,0,0) for the background.
New Image
Name:Untitled
Width: 800
Height: 600
Alpha: 1.000
UV Test Grid
32 bit Float
OK
Figure 4.31 The New Image dialog
Figure 4.32 The Format panel of the Scene buttons
Aspect Ratio It is a good idea to choose your fi nished format and size before you begin to create your story-boards so that the framing you work out will translate properly into 3D. There are some small technical considerations, but the real question is, “How do you want your fi nished animation to look, and where will it most likely be viewed?”
The main choices are fi lm, high-defi nition TV, and standard video.
While you almost certainly won’t be rendering your animation at fi lm resolution (2048 � 1108), the aspect ratio (1.85:1) can be attractive if you want your project to look like a movie.
If your target is to show on widescreen TVs or DVDs, then a widescreen HD size (1920 � 1080; 1280 � 720; or 852 � 480) and aspect ratio (16:9) will make sense.
Finally, standard video resolution (648 � 486 for NTSC in the United States or 720 � 486 PAL in Europe) and aspect ratio (4:3) is still hanging around and fi ts well for full screen playback on many existing and new computer monitors and televisions. Please note that these screen aspect ratios are not the same as the pixel aspect ratio, and should not be entered into the AspX and AspY fi elds on the Render Buttons Format panel.
When you click OK , the UV/Image Editor is fi lled with your new blank image. Press the 1 key on the number pad to have Blender zoom the image to 100%. Before painting, choose Save from the Image menu on the header, then assign the image a fi lename. The image is saved in the format specifi ed in the Format panel of the Scene buttons ( F10) .
To enable the paint tools for this particular image, either click the pencil icon on the window header or choose Texture Painting from the Image menu ( Figure 4.33 ).
CH04-K81079.indd 39CH04-K81079.indd 39 7/11/2008 5:49:06 PM7/11/2008 5:49:06 PM

40
Animating with Blender
Finally, press the C key to bring up a panel with the image painting brush tools. This panel allows you to choose paint col-ors, brush type and settings, and color blending modes. While Blender’s image editor isn’t the most advanced paint applica-tion in the world, it does have enough options to make set-tings appropriate for sketching a little hard to come by. Figure 4.34 shows the panel confi gured for a decent approximation of a sharp-pointed felt tip marker.
The settings in Figure 4.35 show a confi guration appropriate for washing some color into a storyboard after the sketch, if you choose to do that. The brush size can be adjusted depending on the overall size of the image and the area you are coloring.
Remember that if you choose to sketch your storyboards directly within Blender’s image editor, there is only a single level of Undo, and your image will not automatically be saved if you accidentally close the program. Unlike other image edit-ing programs, there are no selections or masking available and no easy way to actually erase mistakes.
Creating the Storyboards
At this point, your artistic sense must begin to take over a bit. Read through your script, close your eyes, and try to visualize
OR
Figure 4.33 Enabling Texture Painting
Figure 4.34 Felt-tip marker settings
Figure 4.35 A good setup for applying some color
CH04-K81079.indd 40CH04-K81079.indd 40 7/11/2008 5:49:09 PM7/11/2008 5:49:09 PM

41
Storyboarding and the Story Reel
the fi rst shot. Using your storyboarding tools of choice, draw it. Line characters or whatever is appropriate to your skill level in sketching are fi ne, as long as you will be able to tell one character or item from another.
When you have the fi rst shot drawn, pin it in the upper left corner of the board if you are using physical tools (pencil and index cards). If you are creating your storyboards digitally, save the image into your storyboards directory, using the following convention:
Board Number � Description.Extension
Board numbers should start with “ 005 ” and go up by fi ves (010, 015, etc.). You do this so that if you decide to enhance a sequence of storyboards with a few extra drawings, then you can keep them numbered sequentially without renaming all of your fi les. If you’re really nervous about it, you can number by tens.
The description is a very short description of what the storyboard depicts.
Of course, the extension is dictated by the format in which you choose to save the illustrations. The PNG for-mat is usually a good choice for storyboards because it keeps a good balance between fi le size and image quality, although you are free to use your favorite format, as long as it is one that Blender will be able to import later.
A segment of the “ storyboards ” folder from The Beast can be seen in Figure 4.36 . Notice how several story-boards have been inserted into the “ by fi ves ” numbering sequence.
Figure 4.36 A partial listing of the storyboard fi les from The Beast
As you proceed to draw your storyboards, make sure that you include a storyboard for each action or sig-nifi cant moment that takes place. It can be useful, as shown earlier, to create before and after storyboards of quickly occurring actions. Add arrows to show motion. Scribble notes on camera movement, sound effects, or an ything else that you think is important. Include bits of dialog where applicable. Relevant set elements and props should be drawn, but don’t become bogged down drawing every detail of every shot.
CH04-K81079.indd 41CH04-K81079.indd 41 7/11/2008 5:49:11 PM7/11/2008 5:49:11 PM
42
Animating with Blender
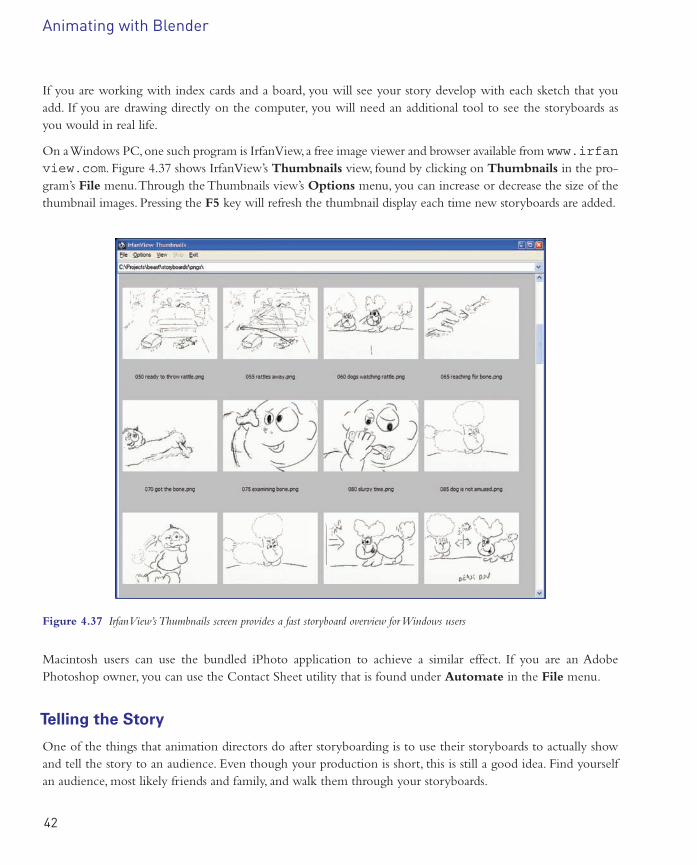
If you are working with index cards and a board, you will see your story develop with each sketch that you add. If you are drawing directly on the computer, you will need an additional tool to see the storyboards as you would in real life.
On a Windows PC, one such program is IrfanView, a free image viewer and browser available from www.irfanview.com . Figure 4.37 shows IrfanView’s Thumbnails view, found by clicking on Thumbnails in the pro-gram’s File menu. Through the Thumbnails view’s Options menu, you can increase or decrease the size of the thumbnail images. Pressing the F5 key will refresh the thumbnail display each time new storyboards are added.
Figure 4.37 IrfanView’s Thumbnails screen provides a fast storyboard overview for Windows users
Macintosh users can use the bundled iPhoto application to achieve a similar effect. If you are an Adobe Photoshop owner, you can use the Contact Sheet utility that is found under Automate in the File menu.
Telling the Story
One of the things that animation directors do after storyboarding is to use their storyboards to actually show and tell the story to an audience. Even though your production is short, this is still a good idea. Find yourself an audience, most likely friends and family, and walk them through your storyboards.
CH04-K81079.indd 42CH04-K81079.indd 42 7/11/2008 5:49:12 PM7/11/2008 5:49:12 PM

43
Storyboarding and the Story Reel
If you have a physical wall full of storyboards, grab a yardstick, tell the story and begin to direct your audience’s attention to the relevant boards. If you are doing it digitally, you can show each image full screen with the slideshow feature of any number of applications such as IrfanView, iPhoto, or Google’s Picasa™. In either case, the point is to show someone who doesn’t already know the story the storyboards, while you narrate. This last point is critical because what you are looking for here is feedback on what the viewers misunderstood (or completely failed to understand), what they thought went on too long, whether your jokes worked, and if anything just plain didn’t make sense. Sometimes when you’ve lived with a story for several weeks or months, certain things become so obvious to you that you completely forget to mention them to your audience. Doing this, while potentially cringe inducing, is a valuable part of the short animation creation process. It’s a chance to get the bugs worked out of everything long before you begin to put in the real time and hard work. Also, you may have lived with the story for so long already that the plot points, jokes, and twists may have lost their punch for you. A fresh audience can, hopefully, restore your faith in the project.
Of course, there will be problems. One of the benefi ts of working with storyboards, though, is that they are quick to make and easily replaced. If your test audience pointed out that you missed giving out a crucial bit of information, add a couple of new storyboards. If you are having diffi culty getting a strong vision of a cer-tain set of actions, storyboard it from several perspectives and see which works best.
Rearranging sections of your story can help too, but that is easier to do in real life with physical cards than it is to do digitally. If you want to rearrange entire sections of your digital storyboards, it can be a little more involved because we want to keep the images in the proper sequence when the fi les are arranged alphabeti-cally. It will become easy to rearrange digital sections in the next step, so you may want to wait until then.
Whatever the case, you should come out of the process with a series of storyboards that properly lead the audience through the story you intend to tell. At this point, if you have been working with physical story-boards, you will need to scan them into your computer as a numbered series of image fi les. When scanning, it is a good idea to follow the naming and size/aspect ratio conventions mentioned earlier in this chapter. The need to scan and name each of the sketches is one of the arguments for creating the storyboards digitally to begin with. The Beast has only 86 storyboard sketches, and I would not have wanted to scan them all.
Recording a Temporary Soundtrack for Timing
Remember back during the story creation process where we had you acting out the story in real time to make an estimate of the running length? Well, it is time to fi nalize that process. In the next step, you will be compiling your storyboards into an animated, timed slideshow, set to a temporary sound track.
Grab a cheap PC microphone, fi re up whichever bundled sound recording application came with your sys-tem (you can see Chapter 8 for more information on recording sound), and get ready to act again. What fun! You had no idea you’d be up to these kinds of shenanigans when you started this project!
Your vision of the story has no doubt solidifi ed as you worked through storyboard creation. You should have an excellent idea at this point how the story will actually function on screen.
Press Record in your sound application and act the story directly into the microphone, visualizing the story-boards while you do so. If more than one person talks at a time in your production, get a friend to help you.
CH04-K81079.indd 43CH04-K81079.indd 43 7/11/2008 5:49:13 PM7/11/2008 5:49:13 PM

44
Animating with Blender
The actual timing of individual words or hard dialog isn’t as important right now as getting the overall timing correct. Make sounds to signal the start and end of actions (grunts, smashing noises, screams, and so forth) so that you will be able to place their storyboards properly in time.
Place this recording in your project’s sound folder under a name such as “ dirt track ” or “ temp sound. ” (For some embarrassing fun, you can fi nd the “dirt track.wav” fi le in the sound folder of the included disc to hear my own preliminary soundtrack for The Beast.) If the recording program gives you options and formats to choose from, choose 16-bit WAV format at 44,100 kHz. If not, don’t worry about it. Those are the most com-mon settings. Now open up the slide show viewer you used when you narrated the story for your test audi-ence, play the audio you just recorded, and try to follow the soundtrack by advancing the slide show manually at the right times. Give it a few tries to make sure that there are no parts of the action you missed when cre-ating the temporary soundtrack. If you did miss something, just go back and make a new recording. It will only take a couple of minutes.
Just like when you were estimating the length of the animation in the story phase, building a soundtrack adds a real-world time scale to your project.
Assembling a Story Reel in Blender’s Sequence Editor
With the storyboards and a rough soundtrack created, you will assemble them into an animated story reel . When you paged through your storyboards as a slideshow with the soundtrack playing, you were actually making a temporary story reel on the fl y.
The story reel is a self-playing animation that marries your storyboards to your rough soundtrack. If done well, it will give an excellent sense of the look and feel of the action in the fi nished animation. In fact, as you proceed with your work later in the project, you will be replacing the storyboards in the story reel with pre-views and a fi nal, rendered animation as you complete them. In this way, the story reel evolves over time until it becomes the fi nal edit of your fi nished, rendered animation!
Because of this, the story reel is vital to your project. All of your work in story, planning, animation, and rendering come together there. It will be your guide.
You can create your story reel directly within Blender’s Video Sequence Editor.
The initial story reel fi le for The Beast is called, “beginning_story_reel.blend,” and it is available in the included disc’s storyreel directory.
Let’s examine the way that you build a story reel in the Sequence Editor. Figure 4.38 The fi nished storyboard-based story reel for The Beast
CH04-K81079.indd 44CH04-K81079.indd 44 7/11/2008 5:49:13 PM7/11/2008 5:49:13 PM

45
Storyboarding and the Story Reel
In Figure 4.39 , you can see that the larger part of the screen has been split hori-zontally, and both halves have been set to Video Sequence Editor windows. The bottom one is the default visualiza-tion of the Sequencer. The top has been switched to display the Sequencer pre-view, as shown in Figure 4.40 . On the right side of the screen is a buttons win-dow showing the Sequencer Buttons context of the Scene Buttons (F10) .
The Video Sequence Editor is one of the “ black holes ” of Blender. If you’ve never done any video work, you may have known it was there but considered it to be advanced Blender voodoo. Its primary purpose is to string together sequences (the name!) of still images and video
Figure 4.39 A Sequence Editor confi guration. Depending on your window confi guration, the panels may be arranged in a different order than presented here
Figure 4.40 Choosing the Preview visualization
NOTEThe Video Sequence Editor screen is often referred to in online and printed documentation as either the Sequencer or the VSE . You should become familiar with both terms so that you can make use of other tutorials without confusion.
clips, sync them up with audio tracks, and output a single, long piece of video or animation. Sounds like it’s exactly what you need to create the story reel. Images and video will be added and manipulated in the bot-tom half of the screen, while the preview of the current frame will be shown in the top. The VSE obeys most of Blender’s interface conventions, as you will see.
CH04-K81079.indd 45CH04-K81079.indd 45 7/11/2008 5:49:14 PM7/11/2008 5:49:14 PM

46
Animating with Blender
With the mouse over the timeline in the VSE workspace, press the space bar to pop up the Add Sequence Strip menu, just as if pressing space to add an object in Blender’s 3D view. From the menu, choose Image Sequence , as in Figure 4.41 .
This brings up the fi le chooser screen. Using the right mouse button, select all of the story-board image fi les that you placed in your sto-ryboards directory. The images will be brought into Blender in alphanumeric order, so it is important that you’ve named them as specifi ed before. With all of the image fi les highlighted for selection, (1) enable Relative Paths at the bottom of the screen and (2) click Select Images ( Figure 4.42 ).
NOTEBefore you continue, save this fi le with a name such as “storyreel_master.blend” in the sto-ryreel directory for your project. We are about to use assets with relative links, which will not work unless the fi le is saved. Also, confi rm that the fi le is using the proper pixel size and frame rate for your project.
1,
2,
Figure 4.42 Selecting multiple fi les and enabling Relative Paths
Figure 4.41 Adding an image sequence
When the VSE workspace returns, a Sequence strip will be stuck to your mouse cursor in transform mode. This is just like moving objects in 3D in Blender; clicking the right mouse button will cancel, while click-ing the left mouse button will drop the strip at the cursor’s current location. Be careful if you use the right
CH04-K81079.indd 46CH04-K81079.indd 46 7/11/2008 5:49:15 PM7/11/2008 5:49:15 PM

47
Storyboarding and the Story Reel
mouse button to cancel the transformation because the import will still have taken place, dropping the images in sometimes very hard to fi nd places in the workspace. Notice ( Figure 4.43 ) the different elements of the Sequencer Image Strip while it is being moved:
● The numbers on either end of the strip indicate the start and end frames the strip would have if you accepted the current transformation.
● The fi rst number inside the body of the strip indicates how many images (your storyboards) are con-tained in the strip.
● The full disk path and fi le name of the fi rst image fi le in the strip is given
START
FRAME
END
FRAME
FULL
PATH
# OF
IMAGES
Figure 4.43 An Image Strip in transform mode
Move the strip until the indicator for the start frame is 1, meaning that the sequence of images will begin on frame 1 of the animation. The particular horizontal channel the strip is in is not important right now. Press the left mouse button to accept the position. If something went wrong and the strip ended up somewhere other than frame 1, just follow the Blender convention to move something: select the strip with the right mouse button and press the G key to begin a movement transform.
When the image strip is in proper position, try scrubbing through the VSE’s timeline by holding down the left mouse button and dragging in the workspace. As you scrub across the area occupied by the image strip, you should see the images display and change in the preview window in the upper portion of the screen. If the pre-view image is very small, or if you are only seeing an extremely magnifi ed version, position your mouse over the preview window and use the mouse’s scroll wheel and middle mouse button to adjust the zoom and positioning.
If you watch carefully, you’ll see that each image occupies only a single frame in time, hardly the effect we’re looking for. In a moment, we’ll see how to change that, but fi rst we need to get Blender ready for our animation.
WARNINGIf you forget to set the frame rate, resolution, or aspect ratio at this step, it can lead to mis-matched render sizes, audio/video sync problems, and timing issues that could spell disaster for your project. If you’ve saved your project’s animation settings as a Blender default as suggested in the last chapter, you should be fi ne.
CH04-K81079.indd 47CH04-K81079.indd 47 7/11/2008 5:49:17 PM7/11/2008 5:49:17 PM

48
Animating with Blender
If you haven’t already done so, switch the buttons window to the Render Buttons context, and set the frame rate and re nder size in pixels to match that of your fi nished anima-tion ( Figure 4.44 ). In the Sequencer panel of the Sound Block context, enable the Sync and Scrub options ( Figure 4.45 ). Sync forces Blender to maintain accurate time during sequence playback, causing it to skip the display of frames if things are taking too long to process. Scrub causes Blender to play audio as you use your left mouse button to scrub along the timeline, making it easier to synchronize your storyboards with events in the rough soundtrack.
Figure 4.45 Sync and Scrub enabled
Figure 4.44 FPS and size adjusted
With the animation settings prepared and confi rmed, add your rough soundtrack. Press the space bar over the VSE workspace and choose Audio (wav) . Select the audio fi le you created as a rough soundtrack (the WAV fi le) and place it in the VSE beginning on frame 1, just like the image strip. With the audio in place, pressing Alt-A (the standard Blender command to Play Animation) should cause the sound to begin to play while the storyboard images fl ash past in the preview window.
The Edit panel back in the Scene Button’s Sequence context will show the start and end frames of the audio clip in the First and Last information fi elds. You will most likely have to use the mouse’s scroll wheel (or just press the Home key) to fi t the entire audio strip onto the screen at once. In Figure 4.46 , you can see the small size of the purple image strip (85 frames), com-pared to the much larger green audio strip (4103 frames). When you have the audio strip positioned, make sure that it is selected (right mouse button), and then enable the Lock button in the Edit panel.
Also, using the information shown about the sound strip in the display, set Blender’s End frame animation counter in the Render Buttons to the last frame of the sound strip. Figure 4.46 Audio and image strips from The Beast
CH04-K81079.indd 48CH04-K81079.indd 48 7/11/2008 5:49:19 PM7/11/2008 5:49:19 PM
49
Storyboarding and the Story Reel
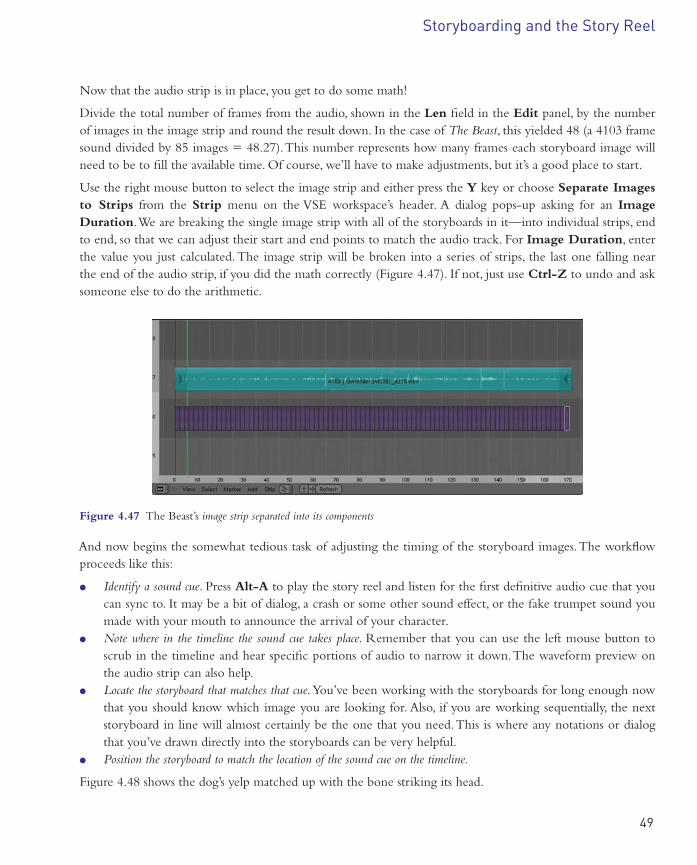
Now that the audio strip is in place, you get to do some math!
Divide the total number of frames from the audio, shown in the Len fi eld in the Edit panel, by the number of images in the image strip and round the result down. In the case of The Beast , this yielded 48 (a 4103 frame sound divided by 85 images � 48.27). This number represents how many frames each storyboard image will need to be to fi ll the available time. Of course, we’ll have to make adjustments, but it’s a good place to start.
Use the right mouse button to select the image strip and either press the Y key or choose Separate Images to Strips from the Strip menu on the VSE workspace’s header. A dialog pops-up asking for an Image Duration . We are breaking the single image strip with all of the storyboards in it—into individual strips, end to end, so that we can adjust their start and end points to match the audio track. For Image Duration , enter the value you just calculated. The image strip will be broken into a series of strips, the last one falling near the end of the audio strip, if you did the math correctly ( Figure 4.47 ). If not, just use Ctrl-Z to undo and ask someone else to do the arithmetic.
Figure 4.47 The Beast’s image strip separated into its components
And now begins the somewhat tedious task of adjusting the timing of the storyboard images. The workfl ow proceeds like this:
● Identify a sound cue . Press Alt-A to play the story reel and listen for the fi rst defi nitive audio cue that you can sync to. It may be a bit of dialog, a crash or some other sound effect, or the fake trumpet sound you made with your mouth to announce the arrival of your character.
● Note where in the timeline the sound cue takes place . Remember that you can use the left mouse button to scrub in the timeline and hear specifi c portions of audio to narrow it down. The waveform preview on the audio strip can also help.
● Locate the storyboard that matches that cue. You’ve been working with the storyboards for long enough now that you should know which image you are looking for. Also, if you are working sequentially, the next storyboard in line will almost certainly be the one that you need. This is where any notations or dialog that you’ve drawn directly into the storyboards can be very helpful.
● Position the storyboard to match the location of the sound cue on the timeline.
Figure 4.48 shows the dog’s yelp matched up with the bone striking its head.
CH04-K81079.indd 49CH04-K81079.indd 49 7/11/2008 5:49:21 PM7/11/2008 5:49:21 PM

50
Animating with Blender
There are several techniques to move the image strips around that we will discuss next, but this is the basic procedure. As you match storyboards to sound cues, you press Alt-A to preview your work, tweaking things a frame at a time if necessary.
Sequencer Tools for Working with Image Strips
Although the Video Sequence Editor shares some of the rest of Blender’s commands and work fl ow, it has its own quirks and hidden secrets. Actually, by bringing in a series of images and a sound clip and splitting them into their components, you have already acquired signifi cantly more Sequencer knowledge than a great many Blender users.
First, a little more Sequence strip anatomy. Notice the inward pointing arrows on either end of each image strip. Image strips can be right mouse button selected and moved with the G key, just like any other Blender object. The handles, though, can be individually selected and G key moved, allowing you to extend the length of time that the strip covers. In Figure 4.49 , you can see that the top strip has had its right handle moved to the right, and the bottom one has had its right handle moved to the left, making them longer and shorter, respectively, than the one in the middle. The bottom strip is in the middle of its transformation, with the right most handle selected.
Figure 4.48 Sound synced to the proper storyboard in The Beast
CH04-K81079.indd 50CH04-K81079.indd 50 7/11/2008 5:49:21 PM7/11/2008 5:49:21 PM

51
Storyboarding and the Story Reel
Sequence strips may also be selected and moved in groups. The standard right mouse button and B key selec-tion methods apply. Selected strips can be deleted with the X key or duplicated with Shift-D .
When moving a sequence strip (or several at once), Blender will not allow you to move it into a space already occupied by another strip. If this happens, the outline of the moving strip will turn red as a warning. If you accept the transform by pressing the left mouse button while the strips are overlapping, the moved strip will be automatically placed adjacent to the blocking strip, if there is room, or put into a neighboring channel if there is not ( Figures 4.50–4.51 ).
Figure 4.49 Adjusting the handles to lengthen and shorten sequence strips
Figure 4.50 A strip transforming to overlap will be outlined in red
CH04-K81079.indd 51CH04-K81079.indd 51 7/11/2008 5:49:23 PM7/11/2008 5:49:23 PM

52
Animating with Blender
The main tool you will use when working with a list of image strips laid out end to end like this is the Extend from Frame command, which is triggered by the E key. If you are familiar with Blender’s model-ing work fl ow, you can think of it as an Extrude tool for sequence strips. Extend from Frame looks at three things: which strips are selected, where the current frame marker lies, and where the mouse is when the E key is pressed. It then enters a grab/move/transform mode that lets you move all handles on the mouse side of the frame marker together. That sounds odd, but Figures 4.52 and 4.53 show its practical use. If you have all image strips selected and place the frame marker in the middle of one of the strips, using Extend from Frame will cause that strip to grow and shrink, while all others attached to it move along with it, maintain-ing their original boundaries.
ALL SELECTED
MOUSE ON
RIGHT OF FRAME
MARKER
Figures 4.52 Using Extend from Frame causes all handles and strips on the right of the current frame marker to transform together
Figure 4.51 The transformed strip has been offset because overlap is not allowed
CH04-K81079.indd 52CH04-K81079.indd 52 7/11/2008 5:49:24 PM7/11/2008 5:49:24 PM

53
Storyboarding and the Story Reel
So if you have used the A key to select all of the strips in the sequencer and moved them so that the begin-ning of a particular strip matches a sound cue, you now have an easy way of making that strip shrink or grow so that the next strip begins at the next sound cue. With all of the strips selected (this is why we locked the sound strip earlier—to prevent it from being affected when we did this), position the current frame marker with the left mouse button in the middle of the strip whose position you are sure of. If you need to move the right side of the strip, put your mouse to the right of the current frame marker; if you need to move the left handle of the strip, position the cursor to the left. Press the E key and move the mouse back and forth to see how the transform functions. All other strips on the side of the cursor that are adjacent to the central strip will move along with it, allowing you to grow and shrink the central strip without introducing gaps or caus-ing overlap.
The great advantage to using this method of adjusting the image strips over simply grabbing the handles indi-vidually and pulling them around is that you never have to worry about gaps or overlaps occurring between images. Everything stays neatly together. Although the description of the functionality is complex, after using it a few times, its value will become apparent.
However, if you do need to break things up and start really shuffl ing strips around, here are some tools that can make your life easier:
● Ctrl or Alt right mouse button : Using either Ctrl or Alt (not both at once), while right mouse button select-ing a strip selects both the strip and one that immediately borders it. If you use Ctrl, it selects the one on the left. Alt selects the one on the right. In addition, the two handles on the border between the strips are directly selected. This is useful for adjusting the boundary frame between the two strips without moving their outer limits ( Figure 4.54 ). This selection method adds to any existing selections, so you may want to use the A key to make sure that nothing else is selected fi rst.
● Ctrl or Alt right mouse button � 2: Adding a second click to the previous command will select all strips to the right or left of the directly selected one. This allows you to quickly and easily select and move entire blocks of strips at once, say, to make room for an additional strip.
Figures 4.53 Using Extend from Frame causes all handles and strips on the mouse side of the current frame marker to transform together
CH04-K81079.indd 53CH04-K81079.indd 53 7/11/2008 5:49:26 PM7/11/2008 5:49:26 PM

54
Animating with Blender
● Ctrl-Alt right mouse button : Using both modifi er keys at once while selecting a strip selects the strip, plus any strips that border it immediately on the left and right. The interior handles are directly selected, allowing you to move the center strip back and forth while the outermost handles remain in place ( Figure 4.55 ).
Figure 4.54 Changing the boundary between two strips with Ctrl-Alt selection
Figure 4.55 Moving a strip between two others with Ctrl-Alt selection
Watching and Exporting the Story Reel
As you’ve been working, no doubt you have been using Alt-A to watch the evolving story reel in the pre-view window of the Sequence Editor. As long as you are using fairly modern hardware, Blender will easily be able to show it in real time.
CH04-K81079.indd 54CH04-K81079.indd 54 7/11/2008 5:49:27 PM7/11/2008 5:49:27 PM

55
Storyboarding and the Story Reel
Before exporting the story reel as an anima-tion, there is one more thing to do. The Scene Buttons contain a Stamp panel that begins its life docked behind the Format panel. By bring-ing that panel forward and clicking the Enable Stamp and Draw Stamp buttons, you can have Blender burn various informational notes into the animation for later reference. Set the panel up as in Figure 4.56 to include both the frame number and the time stamp in the animation. This will make it very easy later on to use the story reel as a reference for timing.
If you would like to show the animation outside of Blender, the render controls that you use for making and saving still images all apply, with a few additions. First, you must enable the Do Sequence button in the Anim panel of the Render Buttons (F10 , Figure 4.57 ) . Then you choose one of the animation formats from the Format panel: either MOV, AVI, or FFMPEG, depending on your operating system and needs. Finally, you enter a path and fi lename on the Output panel so that Blender knows where to store the animation. Clicking the folder icon to the left of the path fi eld will open the fi le picker so that you can interactively choose the save path. A good suggestion at this point would be to use the export folder you created in the last chapter. The Output and Format panels are shown in Figure 4.58 . When you are ready to generate an animation of your story reel, press the Anim button, as opposed to the Render button.
Figure 4.57 The Do Sequence button tells Blender to “ render ” the strips in the sequencer
Figure 4.58 The Output and Format panels set to save an animation
Figure 4.56 The Stamp panel
CH04-K81079.indd 55CH04-K81079.indd 55 7/11/2008 5:49:29 PM7/11/2008 5:49:29 PM

56
Animating with Blender
Summary
Storyboarding involves the creation of a comic-like series of images that describe the action in your story. Storyboards help to organize your thoughts in the way that action and staging will take place in 3D and can also point out problems in the way the story was constructed.
While storyboards can be drawn with either traditional or digital tools, at some point, they must be brought into the computer and organized. When there, the storyboards are synced with a temporary soundtrack to create a story reel. The story reel becomes the core of your animation production and provides your fi rst chance to get a feel for timing and action.
Outbox
● A series of storyboards that effectively tell your story ● A rough soundtrack to assist with timing ● A master story reel BLEND fi le that will serve as the basis for all future animation work
The Peach Perspective On storyboarding: How closely were the storyboards for BBB followed once production began? When you deviated from them, did you reboard or just plow through without them?
Sacha: The storyboards were followed as closely as possible during the entire process. We’re talking about composition, action, body language, facial expressions, and so on. When changes in a later phase were necessary, we went back to the storyboard and placed them directly into the animatic. The importance of a storyboard (and later the animatic) also showed the danger of it: Minor fl aws that found a way into the storyboard could always be unintentionally copied in the fi nal work. Sometimes storyboards were less detailed, which gave the artists more freedom for interpretation, just as long as it fi t in the whole.
CH04-K81079.indd 56CH04-K81079.indd 56 7/11/2008 5:49:31 PM7/11/2008 5:49:31 PM


![Azure Interview Questions v0 - Windows Azure... · d ] } } ( Ì µ / v À ] Á y µ ] } v w p x ï 6wuxfwxuh ri wkh errn 7kh errn kdv ehhq vwuxfwxuhg lqwr ydulrxv](https://img.dokumen.tips/doc/110x75/5a79125e7f8b9a07628befd4/azure-interview-questions-v0-windows-azured-v-y-v-w-p-x-6wuxfwxuh.jpg)


![l Z À ] Á ( } WZ/D K ^ ^^/KE Ç : } Z v Ç Z ]...FUHDWHG DQ LQWHUHVWLQJ HQMR\DEOH DQG LQIRUPDWLYH ERRN WR HQOLJKWHQ WKH UHDGHU DERXW WKH QDWXUH RI WKH 5LHPDQQ +\SRWKHVLV DQG SHUKDSV](https://img.dokumen.tips/doc/110x75/5f1bf1adee426e12095677af/l-z-wzd-k-ke-z-v-z-fuhdwhg-dq-lqwhuhvwlqj-hqmrdeoh.jpg)


![(UVDW]WHLOOLVWH 3DUWV ERRN 3LËFHV GH UHFKDQJH](https://img.dokumen.tips/doc/110x75/62aae763c1af876267745e8e/uvdwwhloolvwh-3duwv-errn-3lfhv-gh-uhfkdqjh.jpg)