Embed Size (px)
Citation preview


Wiring Basics
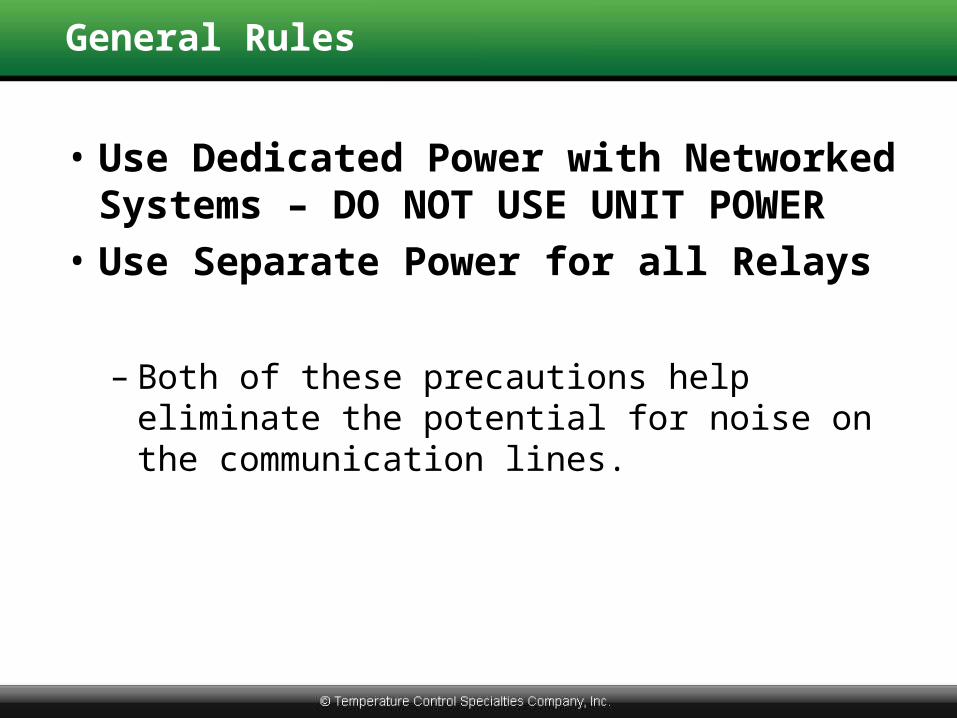
General Rules
• Use Dedicated Power with Networked Systems – DO NOT USE UNIT POWER
• Use Separate Power for all Relays
– Both of these precautions help eliminate the potential for noise on the communication lines.

General Rules --continued
• Use a Transformer with Adequate Power• SZ Series Stats 8 VA max• SZ/SL Series Controllers 5 VA max• 2100 Series Controllers 15 VA max• QD1010/QD1011a 1 VA max• QD2020i/ie 6 VA max
• Maintain Power and Comm. Polarity• +24V to +24V to +24V… & -24V to -24V to -24V …• A to A to A… & B to B to B… & Ref to Ref to Ref…

General Rules --continued
• Use Separate Power for Controllers and Actuators NOT Manufactured by TCS
– All SZ/SL Controllers are Half-wave Rectified– Other Manufacturer’s may be Half- or Full-
wave

Half Wave vs. Full Wave Rectification
Commonly Called “3-Wire” Devices

Half Wave vs. Full Wave Rectification--continued
Commonly Called “4-Wire” or “Floating” Devices

Half Wave vs. Full Wave Rectification--continued

General Rules --continued
• Use Separate Power for Controllers and Actuators…… if Half-wave, You Could Share a Transformer
… if Full-wave, Must use Separate Transformers
… if Not Sure use Separate Transformers
A transformer is an
inexpensive insurance policy.

Inputs

General Practices – Inputs
• Use Shielded, Twisted-pair Cable … Use the RED & BLACK Sensor Wires (clip white)
• Ground Shield at One End ONLY… Preferably at the Sensor
• All Wire Has Resistance…… Use the RTD Zero Pots to Fine Tune
Readings
a Couple of Degrees by Adjusting Them Slightly (Only After all Other Inaccuracies are Eliminated)
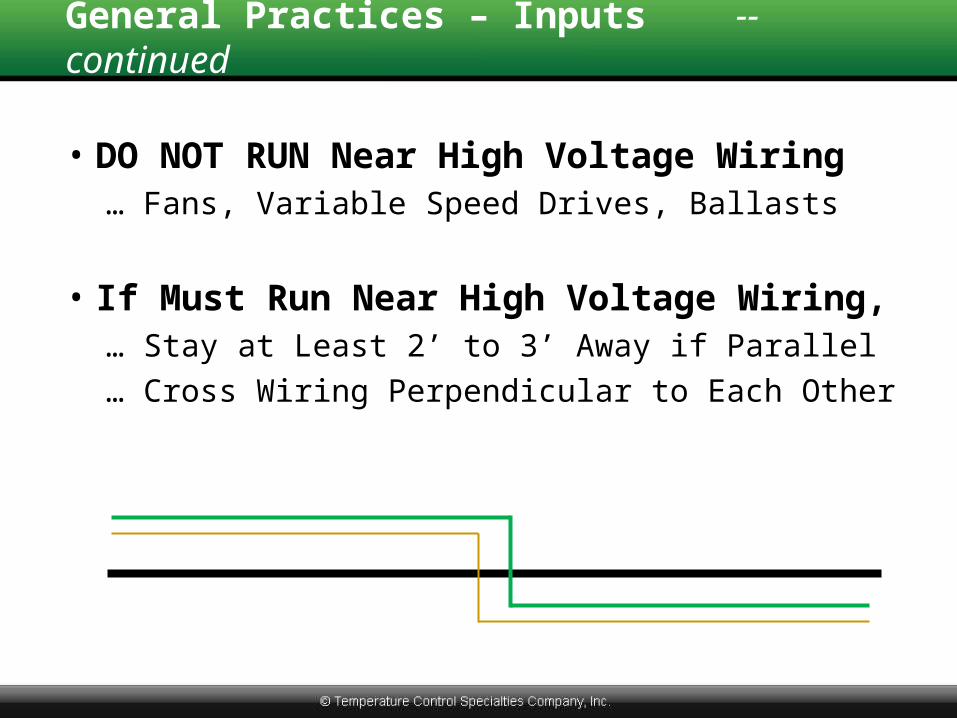
General Practices – Inputs --continued
• DO NOT RUN Near High Voltage Wiring… Fans, Variable Speed Drives, Ballasts
• If Must Run Near High Voltage Wiring,… Stay at Least 2’ to 3’ Away if Parallel
… Cross Wiring Perpendicular to Each Other

Analog Inputs - Resistive
100 Platinum RTDResistance Change is Linear
with Temperature
Resistance @ 32 °F 100 Temp. Coefficient 0.216 /°F
Example Resistances - 70 °F => 108.21 110 => 78.3 °F
1000 Platinum RTDResistance Change is Linear
with Temperature
Resistance @ 32 °F 1000 Temp. Coefficient 2.16 /°F
Example Resistances - 70 °F => 1082.1
1110 => 78.3 °F
NOTE: You Must “Break the Circuit” to Measure/Check an RTD

Averaging Platinum RTD Sensors
• Single Sensor vs. Multiple Sensors…Continuous Averaging Probe (return or mixed air)
…Combination of Single Point Sensors (4, 9,16, etc.)
• Wiring Options…By Hand (series / parallel wiring of sensors)
…Install an Averaging Kit (wired in series)
Examples on Following Slides
1R1
— 1R2
— 1Rn
— 1RT
—++ … +
=
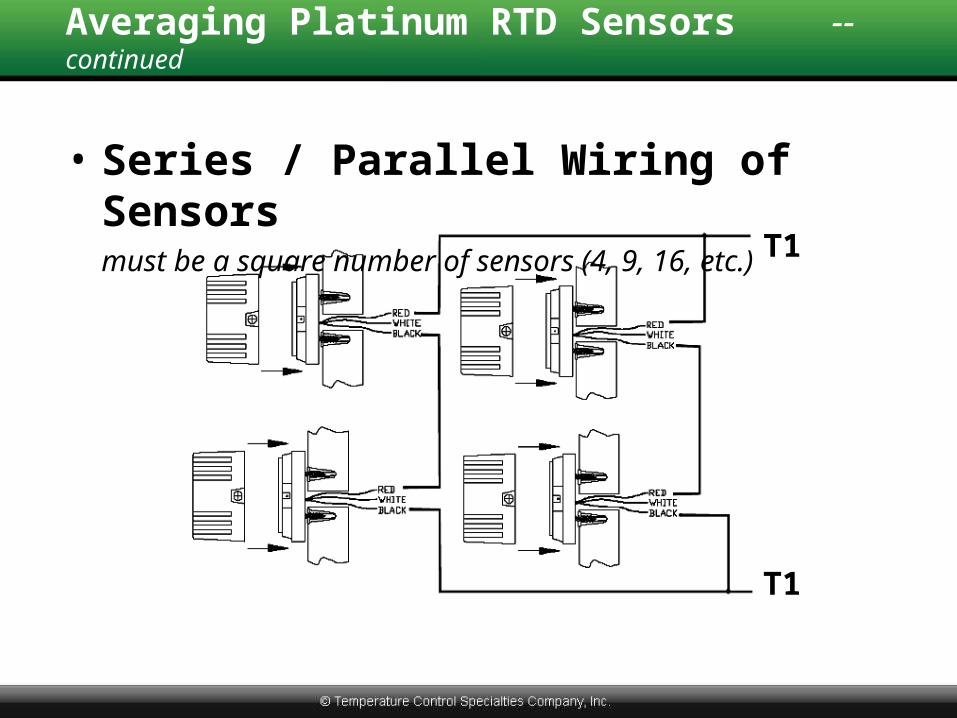
Averaging Platinum RTD Sensors -- continued
• Series / Parallel Wiring of Sensorsmust be a square number of sensors (4, 9, 16, etc.)
T1
T1

Averaging Platinum RTD Sensors -- continued
• Averaging Kit (wired in series)
2 Zones = TS3020 3 Zones = TS3030

4-20 mA Transmitters/Transducers
4 to 20 mA Signal is Linear to the Selected Span
For example – a 20°F to 120°F => 4mA @ 20°F, 20mA @ 120°F0.16 mA/°F
a 40°F to 90°F => 4mA @ 20°F, 20mA @ 90°F0.32 mA/°F
Used For: Temperature, Humidity, Pressure, CO2, CO, Light Level, etc.
NOTE: “S” Series Controllers Provide DC Power for 4-20 mA Inputs
Analog Inputs - Current

Measuring 4-20 mA Inputs
• To verify a 4-20 mA signal, you can…– Measure the mA Directly by Breaking the
Circuit and Inserting an Ammeter (Difficult to do)
– Measure the Voltage Across AI and Ground, Then Compare it to Expected Values (See Below):
Input Impedance / Expected Voltages for TCS Products Having 4-20 mA Inputs
SZ Series Devices 250 1 to 5 VAll Other Products 100 0.4 to 2 V

Wiring a 4-20 mA Input (Loop Powered Transmitter)
•Temperature Sensor
•Humidity Sensor
•Pressure Sensor
•And Others…
Measure Here To Verify Signal
NOTE: Set meter to read DC voltage.

Wiring a 4-20 mA Input (Self-Powered Transmitter)
•CO2 Sensor
•And Others…
Measure Here To Verify Signal
NOTE: Set meter to read DC voltage.

Relay / SwitchSimple On/Off Signal
Can be Momentary or Continuous(depending on application and programming)
Digital Input is SHORTED, CLOSED, ON, or LOWDigital Input is OPEN, OFF, or HIGH
Used For: Door Closure, Pressure Switch, Photocell, Occupancy, etc.
NOTE: Digital Inputs are Dry Contacts ONLY…
… Powering the DI Will Damage the Controller
… if Using Powered Signal, Use an External Relay to Isolate DI
Digital Inputs – Contact Closure

Wiring a Digital Input --continued
Note: If all the controllers are powered with the same transformer…
… you may use the same set of contacts directly into up to 6 controllers.
Even in this case, we still recommend using a relay with multiple, separate contacts at the controller (or a peanut relay).

Outputs

General Practices – Digital Outputs
• Output Relays Rated at 24VAC @ 2 A… if Power Exceeds this use a Pilot Relay
• Digital Outputs are Dry Contact (Not Powered)
… Power can be Supplied to External Relays by Running Power to the “R” Terminal
• 2 sets of Power MUST NOT go to 1 Relay,Either, use a Separate Transformer to Power “R”
or, Operate the 2nd Unit Through External Relay

Wiring Digital/Relay Outputs
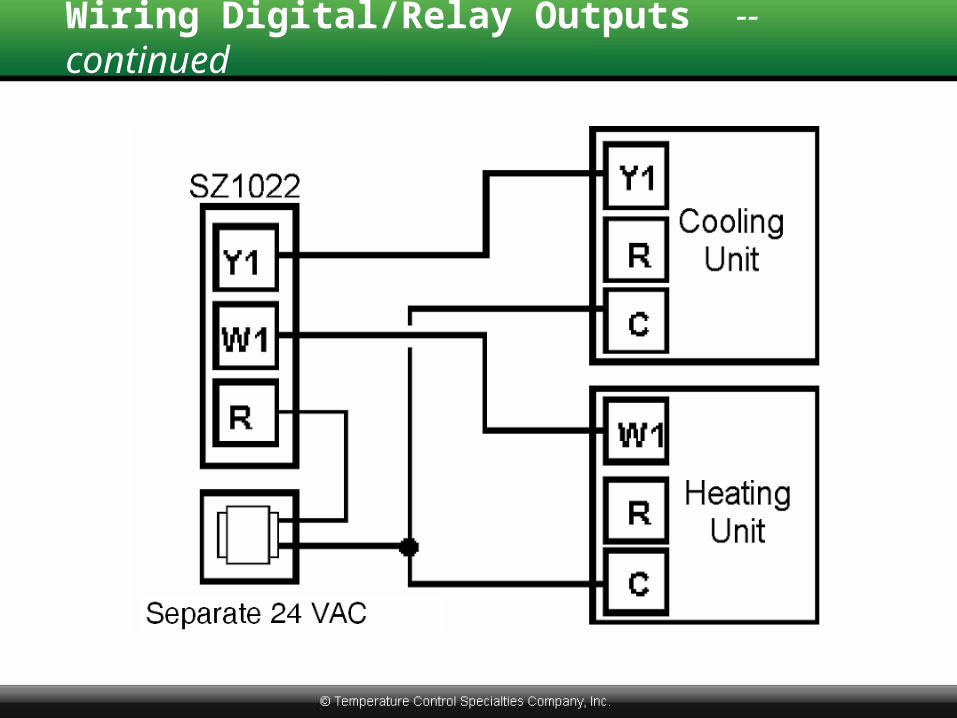
Wiring Digital/Relay Outputs -- continued

Wiring Digital/Relay Outputs -- continued

General Practices – Analog (4-20 mA) Outputs
• Analog Outputs Should Not be Powered
• We use “Current Source” Outputs…Current is Pushed from the Controller Back to
Ground
• Analog Outputs can be Shared… as a Current Signal… as a Voltage Signal (preferable)

Sharing an Analog Output as a Current Signal
Note: Total Impedance for all Devices MUST be LESS THAN 600 ohms.If total impedance exceeds 600 ohms, the output WILL NOT reach max. value (20 mA).
Not theBest Solution

Converting a Current Output (4-20 mA) to a Voltage
Note: 500 ohm Resistor is Included with All Controllers with Modulating Outputs
** Use Resistor to Convert to Voltage Signal **

Sharing an Analog Output as a Voltage Signal
Note: Total Impedance is Not an Issue When Sharing as a Voltage Signal

Networks

General Practices – Networks
• Supports all Common Configurations– Star, Daisy Chain, Tree, Bus, Hybrid, etc.
• Integrity of Comm. Wiring Must be Maintained or the Network Will not Work… A to A to A, B to B to B, Ref. to Ref. to Ref.
• Minimize Potential Causes of Noise– Avoid Power Wires, Frequency Drives, Ballasts– Leave as Little Exposed Wire as Possible– Ground the Shield at ONE End

General Practices – Networks -- continued
• Each Device Has Unique Address (not 248)
• Baud Rate MUST be the Same Across the Entire Network (Stats, Controls, Comm. Devices)
• Install Terminating Resistor at Both Ends as Required
• See “Support Resources” – “FAQ Superstats™” Catalog page 355– “Network Wiring and Setup” page 390– “Troubleshooting Network Wiring” page 396– “Checkout & Troubleshooting” on Product Ins.

Checking the Network Communication Bus
• Avoid Noise by Grounding the Shield – AT ONE END ONLY
• Check the Voltages on the Comm. Bus– Measure the Voltage Across the Specified
Points, Then Compare it to Values Shown BelowNote: These values do not guarantee network communication.
A to B 0 VAC 1 to 4 VDCA to REF 0 VAC 0 to 1 VDC B to REF 0 VAC 2 to 5 VDC
A or B to Shield 0 VAC 0 VDC

Network Wiring

Network Wiring -- continued
Terminal Block on Thermostat
Connection at the Thermostats (except end)
To S-series ControllersTo S-series Controllers
REF

Network Wiring -- continued

Dealing with Large Networks

How many repeaters do I need ?
# ControllersLength of Wire (ft.)# Repeaters
up to 64 up to 4,000 0
up to 128 up to 8,000 1
up to 192 up to 12,000 2
up to 255 up to 16,000 3

Where do I get a repeater?
QD1011a

Other Network Considerations
• Wireless vs. Wired Installation– Labor Savings & Logistical Benefits– No Need for Isolated Power– Not Always Sure What is “Inside the Walls”
• On-site vs. Remote Access– Who Needs Access and When– Standalone -or- Central Server– Analog Phone Line -or- Dedicated Internet

Wiring Troubleshooting
• See “Support Resources” – “FAQ Superstats™” Catalog page 355– “Network Wiring and Setup” page 390– “Troubleshooting Network Wiring” page 396– “Checkout & Troubleshooting” on Product Ins.
• Verify A to A, B to B, Ref. to Ref.*** DO NOT Use Shield as Ref. Wire ***
• Verify Power Polarity
• Verify Isolated Transformer(s)

Where to Get Help or Answers
• Instructions Sent with Product
• TCS Basys Controls Catalog
• Training & Reference Manual
• www.tcsbasys.com
• Call TCS Directly – 800-288-9383

Hands-On Wiring Exercise

Wiring Diagram for Training Room…
Power Supply &Comm. Connection

Remember…
• Power Wiring – White 24+Black 24-
• Comm. Wiring – Blue BYellow A
(Amber)Red Ref
• Controller address is badge #
• Verify baud rate is 9.6 kbps

Wr pUpa