Embed Size (px)
Citation preview
Wireless NVR kit Quick installation guide
1
Wireless NVR kit Quick installation guide
Wireless NVR kit Quick installation guide
2
Hardware description
1 Statement
Thank you very much for your purchase, follow this guide step by step, for and easy plug and play
installation.
2 Safety precautions
Set the DVR up on a level surface. Ensure the DVR can ventilate and the ventilation is
not blocked.
Do not place any objects on top of the DVR.
Keep liquids away from the DVR in case of spillages.
When connecting the DVR to the power ensure the voltage is compatible.
It is advised to periodically remove dust from the printed circuit board gently with a fine
brush to ensure optimal performance for long term use.
If problems arise with the DVR battery it is advised not to replace this yourself. Always
replace with an equivalent battery type.
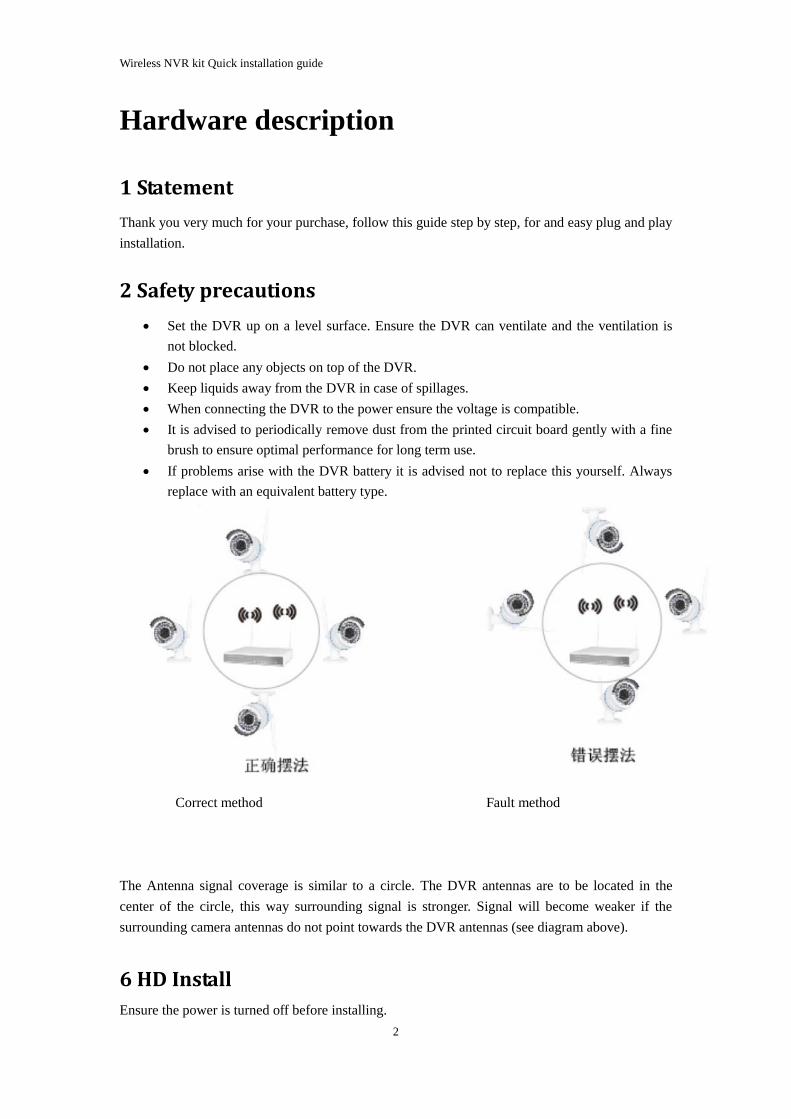
Correct method Fault method
The Antenna signal coverage is similar to a circle. The DVR antennas are to be located in the
center of the circle, this way surrounding signal is stronger. Signal will become weaker if the
surrounding camera antennas do not point towards the DVR antennas (see diagram above).
6 HD Install
Ensure the power is turned off before installing.

Wireless NVR kit Quick installation guide
3
Installation steps:
Remove the DVR screw
Connect the HDD cable and power cable.
Assemble the screw and fix the HDD cable in to the bottom of the DVR.
Ensure the cover is closed and fixed into place.
7 Rear Panel Description
8 Turn on/off
Conform that your home plug voltage matches to the DVR voltage. Using the ON/OFF button
switch the DVR on, a power light will flash to confirm the DVR has power and is switched on.
9 NVR,IPC parameter list
NVR parameter
Operating System Embedded Linux OS
AV(audio/video)input Network Video 4CH 8CH
Network Video input broadband 20Mbps
AV(audio/video)
output
HDMI input 1ch, resolution: 1024x768, 1336x768,
1440x900,1920x1080P
VGA output 1ch, resolution: 1024x768, 1336x768,
1440x900,1920x1080P
AV CODEC Video Resolution DI/720P/960P
Specification synch-playback 4CH 8CH
Video Control Video/Capture mode Manual、Time、Motion、Alarm

Wireless NVR kit Quick installation guide
4
IPC Specification
Playback mode Real time 、Routine、Event
Backup USB backup
HDD Type 1*SATA interface
Max Capacity 4 TB at most for each
External Interface Network Interface 1 adaptable RJ45 10M/100M,
2 WIFI interface
USB Interface 2 USB 2.0
Network Control Protocol UPnP (play&plug)、SMTP(email service)、
PPPoE (dial-up)、DHCP (Automatically
Obtain an IP address),etc...
Others Power DC 12V 3A
Consumption(excluding HDD) 5W
Working Temperature -10℃—55℃
Working Humidity 10%—90%
Size 257x210x45mm
Weight(excluding HDD) ≤1Kg
Operating System Embedded Linux
Image Sensor 1/4”Progressive Scan Sensor
S/N Ratio >39.1dB
Resolution 1280x720 16:9 High Definition
Minimum Illumination Color:0.1 Lux
B/W:0.01 Lux
Lens 4mm
OSD Date, Time & Title
White Balance Auto
Day & Night Auto/Color/BW
3D-DNR Auto
Mirror/Flip On/Off
Privacy Masking 4 Zone Selectable
Frame Specification Two Steaming at the Same Time:
H.264 128x720@30fps or below
H.264 640x480@30fps or below
Anti-thunder Level Standard IEC6100-4-5
Power Input DC12V-1A
Consumption ≤6W
Interface RJ45/WIFI 802.11b/g/n
Working Temperature/Humidity -10℃ to +50℃/30% to80% RH
Storage Temperature/Humidity -20℃ to +60℃/20% to90% RH

Wireless NVR kit Quick installation guide
5
Software operation
1 add camera by matching code
Steps:
Right click the main interface.
Click “System set up”.
Click “Channel setup”.
Click “Quick adding”.
Select “Video manage”.
There are two ways to add the cameras to the wireless DVR. “Code add” or “Auto add”.
By using the “Code add” method the camera will transmit video images through the wireless
connection, the IP will be 17.20.14.X
By using the “Auto add” method the camera will transmit video images through the cable, the IP
will be 172.25.123.X
Note: The cameras have been matched by the factory. There is no need to add other cameras. If
you need to add a new camera firstly take the network cable and connect the NVR LAN port and
power on the device to ensure there is an available channel
2 Video playback
Steps:
Right click the main menu.
Click “Video playback”.
Choose channel number.
Choose record mode.
In “Search” enter the beginning and end time – click “search”.
The recording will appear, drag the time bar – click playback to start.
Playback icon introduction:
Playback l frame previous
Playblack l frame next
Size 205(L)x70(W)X50(H)mm
Weight 500g

Wireless NVR kit Quick installation guide
6
Play
Puse
Fast forward x2,x4,x8
3 Video backup
Steps:
Right click main menu.
Click “Video backup”.
Choose channel number.
Choose record mode.
In “search” enter beginning and end time – click “search”.
The recordings will appear – choose the video you want t backup.
Click “Video backup”.
Tips: DVR can store 32GB of footage.
4 Video detection
Step 1:
Right click the main menu.
Click “System setup”.
Click “Record setup”.
Choose motion, choose all, click “copy to” and click “OK” to save the setting.
Step 2:
Choose video detection.
Set sensitivity as required.
Choose motion, set alarm or email as required, click “OK” to save the setting.
Wireless NVR kit Quick installation guide
7
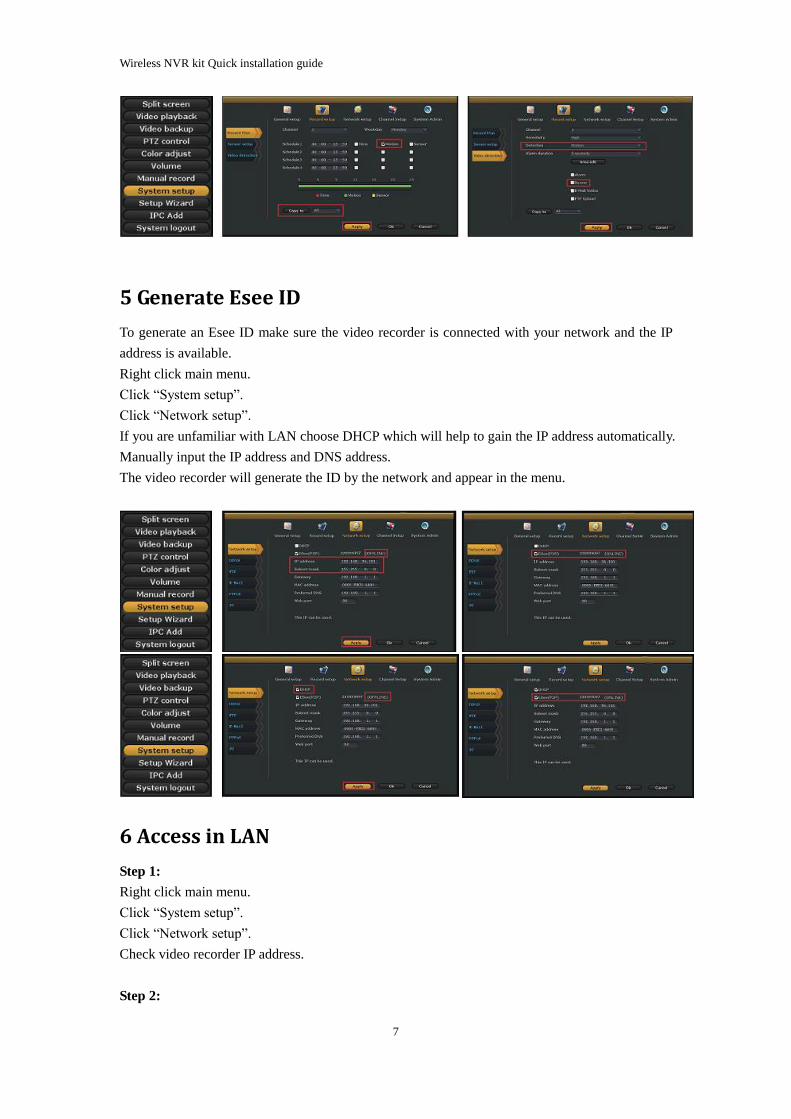
5 Generate Esee ID
To generate an Esee ID make sure the video recorder is connected with your network and the IP
address is available.
Right click main menu.
Click “System setup”.
Click “Network setup”.
If you are unfamiliar with LAN choose DHCP which will help to gain the IP address automatically.
Manually input the IP address and DNS address.
The video recorder will generate the ID by the network and appear in the menu.
6 Access in LAN
Step 1:
Right click main menu.
Click “System setup”.
Click “Network setup”.
Check video recorder IP address.
Step 2:

Wireless NVR kit Quick installation guide
8
Input port number (unless port is set to 80, no need to re-enter)
In your internet browser input the IP address.
LAN log in webpage will appear, input your username and password – click log in.
Tip:
Ensure the video recorder and computer are on the same network.
7 Access in WAN
Step 1:
Right click main menu.
Click “System setup”.
Click “Network setup”.
Check the video recorder IP address.
Step 2:
Enter www.e-seenet.com in your internet browser.
Log in webpage will appear, input ID, user name and password – click log in.
Step 3:
Once access is successful you can access the video recorder upload and computer download.
Each channel needs to be above 20KB.
8 Android mobile application download and installation

Wireless NVR kit Quick installation guide
9
1. Using web browser go to www.e-seenet.com and click “Help”.
Click “Software download”.
Find the Android mobile app, download to save to computer and copy to mobile to install.
2. Scan the 2D code with your mobile device.
Download to your mobile.
If your mobile device does not support the 2D code you can visit
www.e-seenet.com/help/download.php on your mobile and download from here.
9 Iphone application download and installation
Go to the App store on your Iphone.
Search Eseenet.
Put the Apple ID password in and then click download
10 Esee mobile application (Eseenet)-Add device
Log in to Eseenet app.
Click “+” icon.

Wireless NVR kit Quick installation guide
10
Enter the “edit device” page.
Input the video recorder log in information.
Once added successfully a page will appear (see diagram below).
Click channel number to get video.
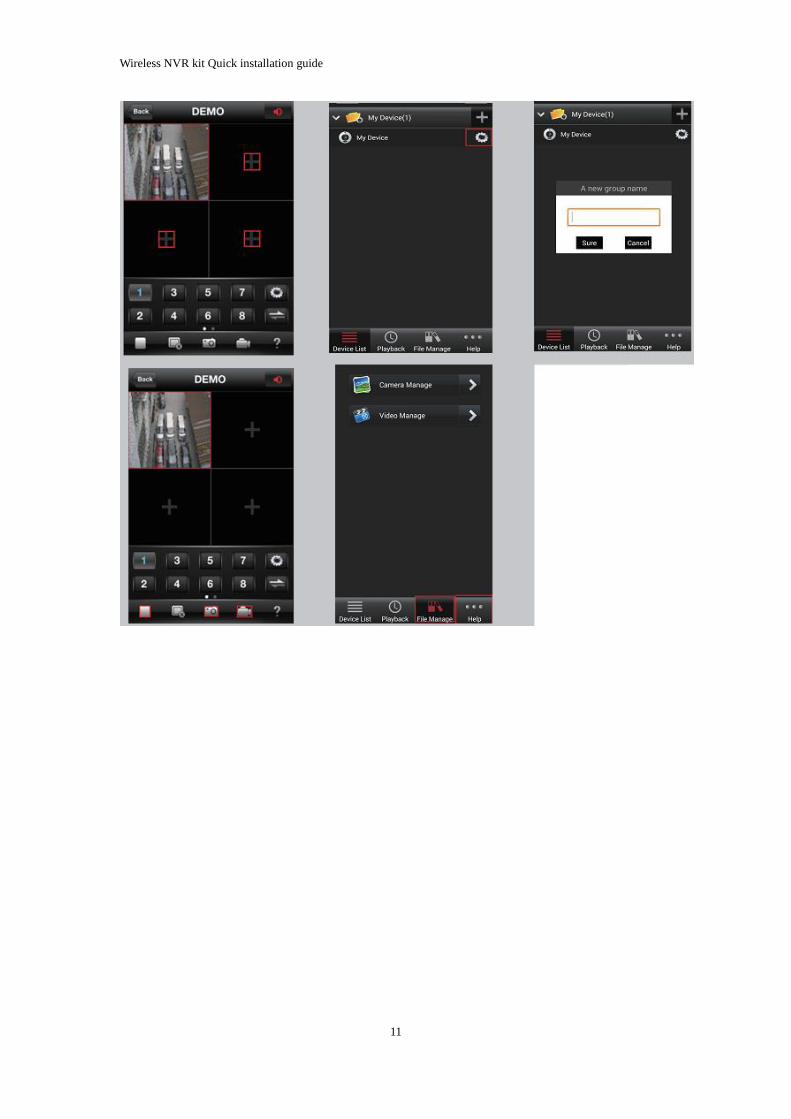
11 Esee mobile application (Eseenet)—function
Channel 1 will be added automatically, click “+” to add more channels.
You can also edit video recorder log in information here.
Add device group.
Play/Pause snapshot/Record.
File management and more settings are available here.
Wireless NVR kit Quick installation guide
11

Wireless NVR kit Quick installation guide
12