Embed Size (px)
DESCRIPTION
marcio
Citation preview

Windows-XP Driver Installation Page 1 of 26 25-Oct-02
Windows-XP Driver Installation
This document will present the steps needed to install or update the Drivers for MosChip products, or another manufacturer’s product based on a MosChip product.
For this example, the Nm9835CV was used as the test case.
This device offers two Serial Ports, and one IEEE-1284 style Parallel Port.
1. Download the appropriate Drivers from the Web-Site. a. http://www.moschip.com
i. Click the “Products” button. ii. Click the “PCI” button. iii. In the row for the product you wish to install, click “Drivers, Release
Notes and Installation Guides” . iv. Click the icon under the Operating System you are using.
b. Allow the “ .zip” file to be downloaded to your local computer.
c. Unzip the Driver files to a directory on your Hard Disk, or to a Floppy Diskette.
d. Check the new folder with the Driver files for a “Readme” file that may have additional or special installation instructions. Use those instructions in addition to, or instead of, these instructions if present.

Windows-XP Driver Installation Page 2 of 26 25-Oct-02
2. Installing Drivers for the first time. a. Shutdown Windows.
b. Turn the Power to the computer OFF.
c. Insert the peripheral card into the computer.
d. Insure that there are no external devices connected to the Ports at this time. They can interfere with the installation of the Drivers.
e. Turn the computer ON.
f. Windows should detect the new card, and automatically invoke the “Found New Hardware” wizard.
i. Select “Install from a list or specific location (Advanced)”.
ii. Press “Next” to start the installation.

Windows-XP Driver Installation Page 3 of 26 25-Oct-02
g. At the dialog box which says “Please choose your search and installation options”
i. Click “Search for the best driver in these locations”. ii. Click “Include this location in the search”.
iii. Click “Browse” to locate the directory containing the downloaded Drivers. iv. Click “Next” to continue.

Windows-XP Driver Installation Page 4 of 26 25-Oct-02
h. Windows will start installing the Drivers, but will stop with a Dialog Box stating that the software has not passed Windows Logo testing.
i. Click “Continue Anyway” to proceed. Our testing has not revealed anything to indicate our Drivers will harm a Windows-xp system.

Windows-XP Driver Installation Page 5 of 26 25-Oct-02
i. At the next dialog,
i. Click “Finish” when Windows says it has finished installing the Drivers.
Windows-XP Driver Installation Page 6 of 26 25-Oct-02
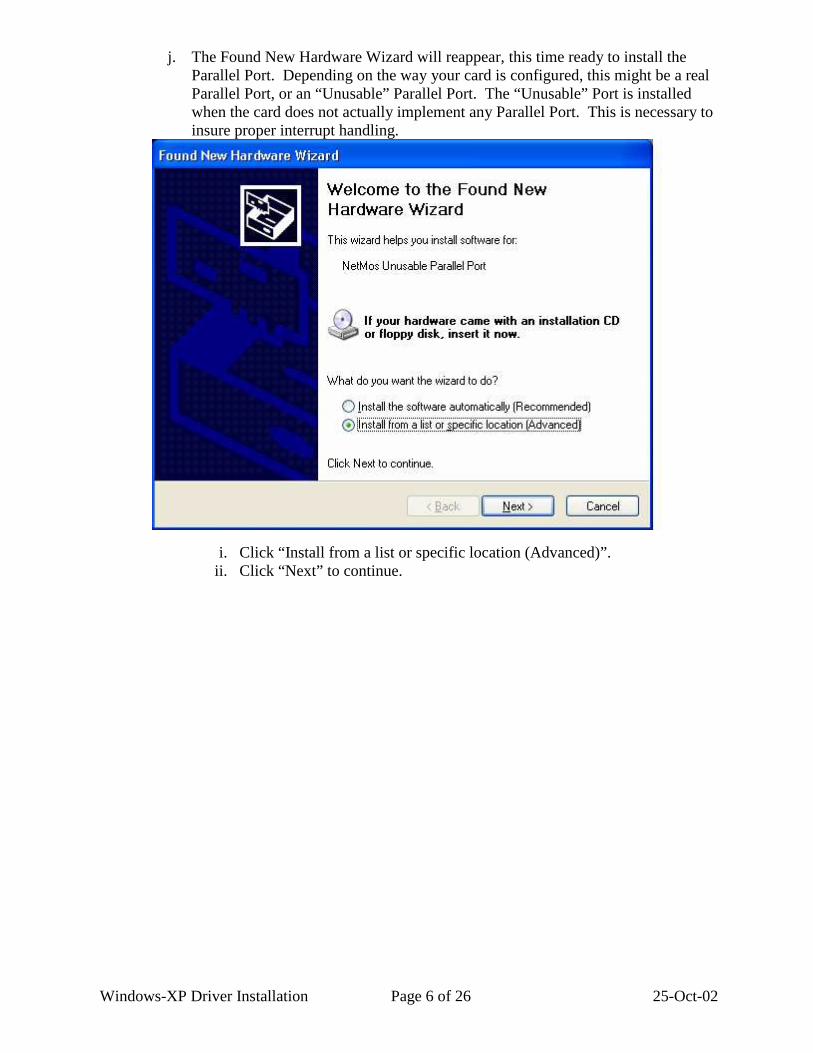
j. The Found New Hardware Wizard will reappear, this time ready to install the Parallel Port. Depending on the way your card is configured, this might be a real Parallel Port, or an “Unusable” Parallel Port. The “Unusable” Port is installed when the card does not actually implement any Parallel Port. This is necessary to insure proper interrupt handling.
i. Click “Install from a list or specific location (Advanced)”. ii. Click “Next” to continue.

Windows-XP Driver Installation Page 7 of 26 25-Oct-02
k. Windows will again ask for the location of the Driver files. Use the same location as last time, the one containing the downloaded files.
i. Click “Search for the best driver in these locations”. ii. Click “Include this location in the search”.
iii. Click “Browse” to locate the directory containing the downloaded Drivers. iv. Click “Next” to continue.
Windows-XP Driver Installation Page 8 of 26 25-Oct-02
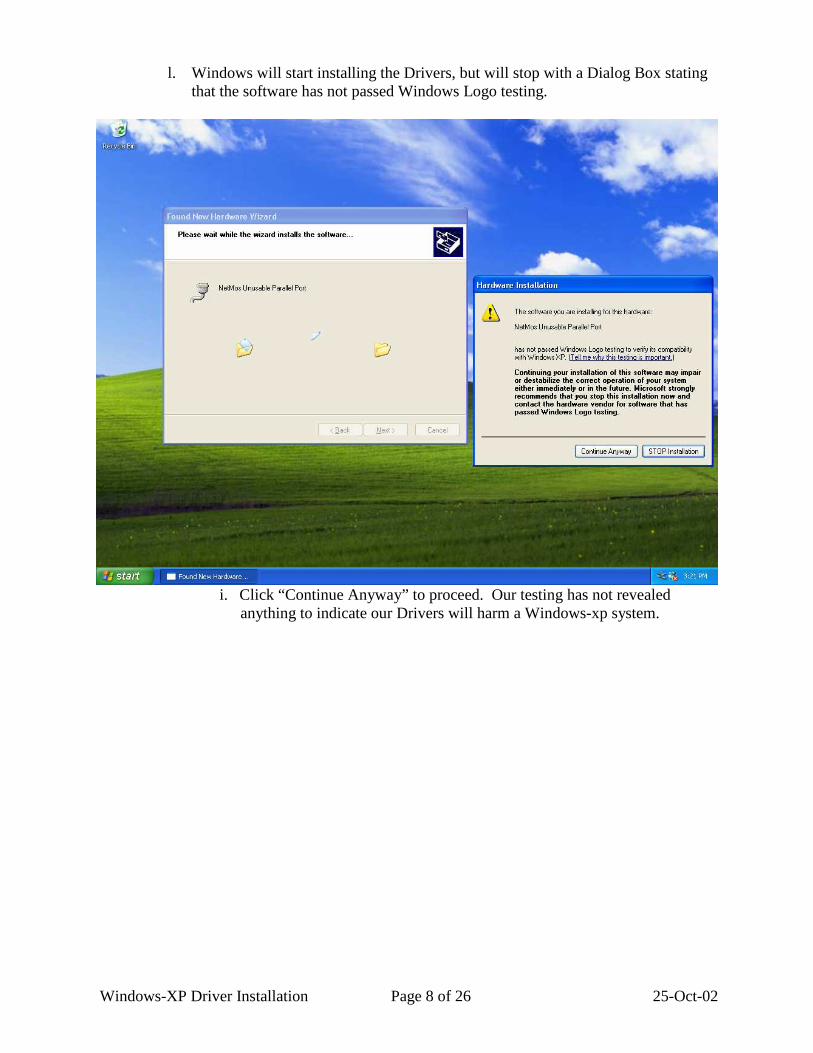
l. Windows will start installing the Drivers, but will stop with a Dialog Box stating that the software has not passed Windows Logo testing.
i. Click “Continue Anyway” to proceed. Our testing has not revealed anything to indicate our Drivers will harm a Windows-xp system.

Windows-XP Driver Installation Page 9 of 26 25-Oct-02
m. At the next dialog,
i. Click “Finish” when Windows says it has finished installing the Drivers.

Windows-XP Driver Installation Page 10 of 26 25-Oct-02
n. The Found New Hardware Wizard will reappear, this time ready to install the first Serial Port.
i. Click “Install from a list or specific location (Advanced)”. ii. Click “Next” to continue.

Windows-XP Driver Installation Page 11 of 26 25-Oct-02
o. Windows will again ask for the location of the Driver files. Use the same location as last time, the one containing the downloaded files.
i. Click “Search for the best driver in these locations”. ii. Click “Include this location in the search”.
iii. Click “Browse” to locate the directory containing the downloaded Drivers. iv. Click “Next” to continue.

Windows-XP Driver Installation Page 12 of 26 25-Oct-02
p. Windows will start installing the Drivers, but will stop with a Dialog Box stating that the software has not passed Windows Logo testing.
i. Click “Continue Anyway” to proceed. Our testing has not revealed anything to indicate our Drivers will harm a Windows-xp system.

Windows-XP Driver Installation Page 13 of 26 25-Oct-02
q. At the next dialog,
i. Click “Finish” when Windows says it has finished installing the Drivers.

Windows-XP Driver Installation Page 14 of 26 25-Oct-02
r. The Found New Hardware Wizard will reappear, this time ready to install the second Serial Port.
i. Click “Install from a list or specific location (Advanced)”. ii. Click “Next” to continue.

Windows-XP Driver Installation Page 15 of 26 25-Oct-02
s. Windows will again ask for the location of the Driver files. Use the same location as last time, the one containing the downloaded files.
i. Click “Search for the best driver in these locations”. ii. Click “Include this location in the search”.
iii. Click “Browse” to locate the directory containing the downloaded Drivers. iv. Click “Next” to continue.

Windows-XP Driver Installation Page 16 of 26 25-Oct-02
t. Windows will start installing the Drivers, but will stop with a Dialog Box stating that the software has not passed Windows Logo testing.
i. Click “Continue Anyway” to proceed. Our testing has not revealed anything to indicate our Drivers will harm a Windows-xp system.

Windows-XP Driver Installation Page 17 of 26 25-Oct-02
u. At the next dialog,
i. Click “Finish” when Windows says it has finished installing the Drivers.

Windows-XP Driver Installation Page 18 of 26 25-Oct-02
v. When the Windows desktop is displayed, the Driver installation is complete.

Windows-XP Driver Installation Page 19 of 26 25-Oct-02
3. Check Driver Installation. a. Open the Windows Device Manager
i. Right-Click the “My Computer” icon in the “Start” menu. ii. Select “Properties” from the drop-down menu.
iii. Click the “Hardware” tab. iv. Click the “Device Manager” button to show the current Hardware list.
b. Confirm that the New Hardware has been included
i. NetMos Multi-I/O card is in the Device List
ii. NetMos Ports have been added iii. In my case, two new Serial Ports were added. iv. The Nm9835CV can also provide an additional Parallel Port, however in
this case the “Unusable” Parallel Port Driver was installed. The EEPROM used to configure the chip was set up to provide Serial Ports only. Since the Parallel Port Hardware was not enabled, the normal Parallel Driver was not installed.

Windows-XP Driver Installation Page 20 of 26 25-Oct-02
At this point, the new Ports should be ready for use. Some versions of Windows, and some Drivers, will allow the user to change some of the settings for the new Ports, while other versions will not. Things that might be able to be changed are:
• the Port Numbers (COM5 >> COM2 for example)
• re-mapping to Legacy I/O Addresses (COM2 = 2F8 instead of FFD0 for example) in general : DOS, Win-95, Win-98 and Win-me will allow re-mapping while Win-NT, Win-2000, and Win-xp will not.
• The Parallel Port Mode (Bi-Directional, EPP, ECP)

Windows-XP Driver Installation Page 21 of 26 25-Oct-02
Removing Previously Installed Drivers Sometimes it will be desirable or even necessary to remove the previously installed drivers, so that a new, clean installation can be performed. Drivers can get corrupted when being written to their installation medium (CD-ROM etc.). If this happens, the drivers may not install properly. Even if the installation proceeds without errors, the drivers may not work. Sometimes older outdated drivers are shipped with a product. Newer machines may require newer updated drivers, but the older drivers prevent them from being installed. The easiest way to remove old drivers is to use the NMUNINST.EXE program. If this is not available, or does not solve the problem, it might be necessary to remove the old drivers manually.
1. Using NMUNINST.EXE to remove old Drivers
a. Turn the computer OFF.
b. Remove the peripheral card. This will insure that none of the old Driver components will be used, allowing them to be removed from the system.
c. Boot the system up normally.
d. Locate and run the NMUNINST.EXE program. This program is usually loaded into the “windows\system” or “windows\system32” directory. Using the “find” command from the “Start Menu” will help locate this file.
e. Re-boot the computer with the card still removed from the system.
f. Shut the computer OFF. Re-install the card, and turn the computer back ON.
g. When installing the Drivers this time, use the ones downloaded from the MosChip web-site. It is likely that the reason the old drivers needed to be removed was because they were attempting to use files belonging to a different version of Windows from the one currently running on the machine (parts of Windows-98 loaded instead of Windows-NT for example).
2. Removing the old Drivers Manually
a. Turn the computer OFF.
b. Remove the peripheral card. This will insure that none of the old Driver components will be used, allowing them to be removed from the system.
c. Boot the system up normally.
d. Create a temporary directory that will hold the old driver files until we are sure they can be deleted.

Windows-XP Driver Installation Page 22 of 26 25-Oct-02
e. Search for currently installed Driver files.
i. In the “Start Menu” click “Search” and then “For Files or Folders…”
ii. Search for nm*.?nf
iii. Leave the Driver files downloaded from the web-site where they are. iv. Delete or move any other files found by the search. These will usually
be located in the “c:\windows\inf” directory. Remove files found in the “c:\windows\lastgood\inf” directory as well.

Windows-XP Driver Installation Page 23 of 26 25-Oct-02
f. Do another search, using a different file naming format
i. Search for : oem*.?nf
ii. Only show items containing : NetMos
iii. Make a note of the file names found, but do not delete them yet.

Windows-XP Driver Installation Page 24 of 26 25-Oct-02
g. Do the search again, this time removing the specified word “NetMos”
i. Search for : oem*.?nf
ii. Delete or move any files found by the search that are similar to the
previous search.
1. Additional files may be shown here with a “.pnf” extension. These are “Pre-Compiled” Installation Files, and should be deleted along with the corresponding “.inf” file.
2. Only delete files that match the previous search. If “oem0.inf” was found in the previous search, do not delete “oem3.inf” here for example.

Windows-XP Driver Installation Page 25 of 26 25-Oct-02
h. Search once more with yet another file naming scheme.
i. Search for : NetMos*.*
ii. Delete or move any suspect files found by the search.
(in this case, none of these files will cause Driver related problems.)

Windows-XP Driver Installation Page 26 of 26 25-Oct-02
i. Re-boot the computer with the card still removed from the system.
j. Shut the computer OFF. Re-install the card, and turn the computer back ON.
k. When installing the Drivers this time, use the ones downloaded from the MosChip web-site. It is likely that the reason the old drivers needed to be removed was because they were attempting to use files belonging to a different version of Windows from the one currently running on the machine (parts of Windows-98 loaded instead of Windows-NT for example).
l. If everything works properly, you may delete the items moved into the temporary directory. If some other device starts showing problems, you may have removed a driver file that was not related to the NetMos card. Putting that file back into “windows\inf” and re-booting should fix the problem with the other device. You may need to experiment if more than one file is involved. Under these conditions, it would probably be best to un-install the NetMos Drivers (so not to get mixed versions like before), replace files until the other device works properly, then re-install the NetMos Drivers. This is a very unlikely situation, but correcting a Driver mis-match situation can be a time consuming and involved process.