Embed Size (px)
Citation preview

WIND CONNECTION MANAGER for WINDOWS
Index
1. Installation 2. Starting the WIND Connection Manager for Laptops
2.1 Area "Menus and Connection Management" 2.2 Area "Details" 2.3 Area "Statistics"
3. Connection 4. Settings
4.1 Profile 4.2 Network
4.2.1 Select Connection 4.2.2 Select Network
4.3 History 4.4 PIN
4.4.1 Activate/Deactivate PIN 4.4.2 Change PIN
4.5 Info
5. SMS/MMS 6. Contacts
1. Installation of WIND Connection Manager
• Please start Windows and close all other applications.
• Please insert the CD, if you have activated Auto Play the installation routine will start automatically. Otherwise please go to Start->Run and enter D:\WINDConnectionManager.exe, where D: would be your CD drive. Click OK to execute the command.
• Please select the appropriate language.
• Installation will be executed.
• Please plug in the data card (do not forget to have inserted a SIM card) and click on “Detect”.
2. Starting the WIND Connection Manager for Laptops
WIND Connection Manager offers everything you need to manage the mobile Internet communication on your Laptop:
• Internet connection and Email download
• SMS/MMS Manager
• Managing contacts from SIM and Outlook
After installing the WIND Connection Manager, a new entry will be placed in the program menu. Straight after installation, the main window of the application is visible on your screen. In case this does not happen, you can start the application from "Start -> Programs -> WIND Connection Manager". Whenever the application is active a status icon will also appear in the toolbar in the bottom right-hand corner of your desktop
The main window of the WIND Connection Manager is at the heart of the application. Here you can see the status of your WIND Connection Manager, how much time you have spent on the internet and which data throughput you should expect. You can connect to the internet and send emails or short messages from this window. You will find the following buttons and symbols on the main window:
[Image 1]
The main application is split into three areas. By tapping on the buttons you can expand/collapse the window areas:
• Area "Menus and Connection Management"
• Area "Details"
• Area "Statistics"
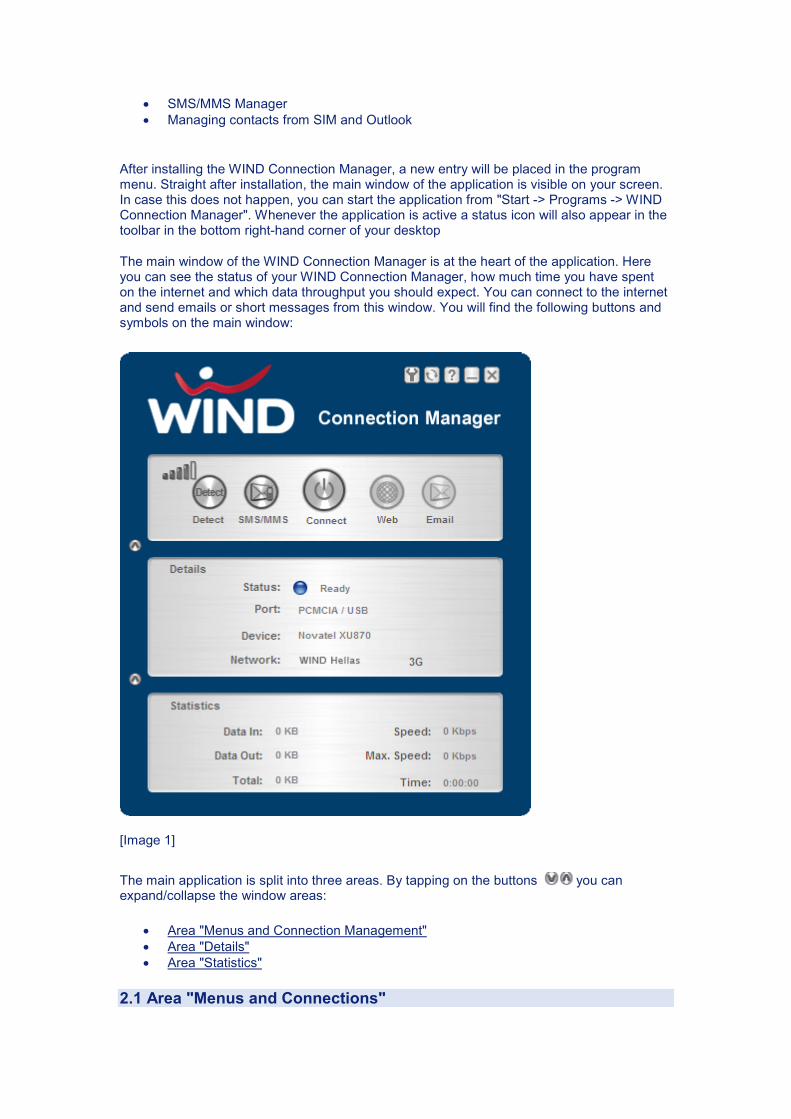
2.1 Area "Menus and Connections"
[Image 2]
This area is split in 2 areas: Area A
Button Description
Settings
• Profile (managing your profiles)
• Network (selecting connection and network)
• History (data volume transferred)
• PIN (PIN settings)
• Info
Update database
• Update database (roaming partner)
• Install drivers
Help
Minimize
Icon will appear in system tray area
Close
Area B
Button Description
Detect Button enabled only if your are not connected to the Internet with a data card. Tap on this button to detect your hardware and network parameter.
SMS/MMS Button only enabled if no mobile Internet connection via data card. Link to the implemented SMS/MMS application
Connect Button to connect or disconnect
Web Link button to preferred browser
Εmail Link button to preferred Email application
Indicator Description
Indicator of network signal strength
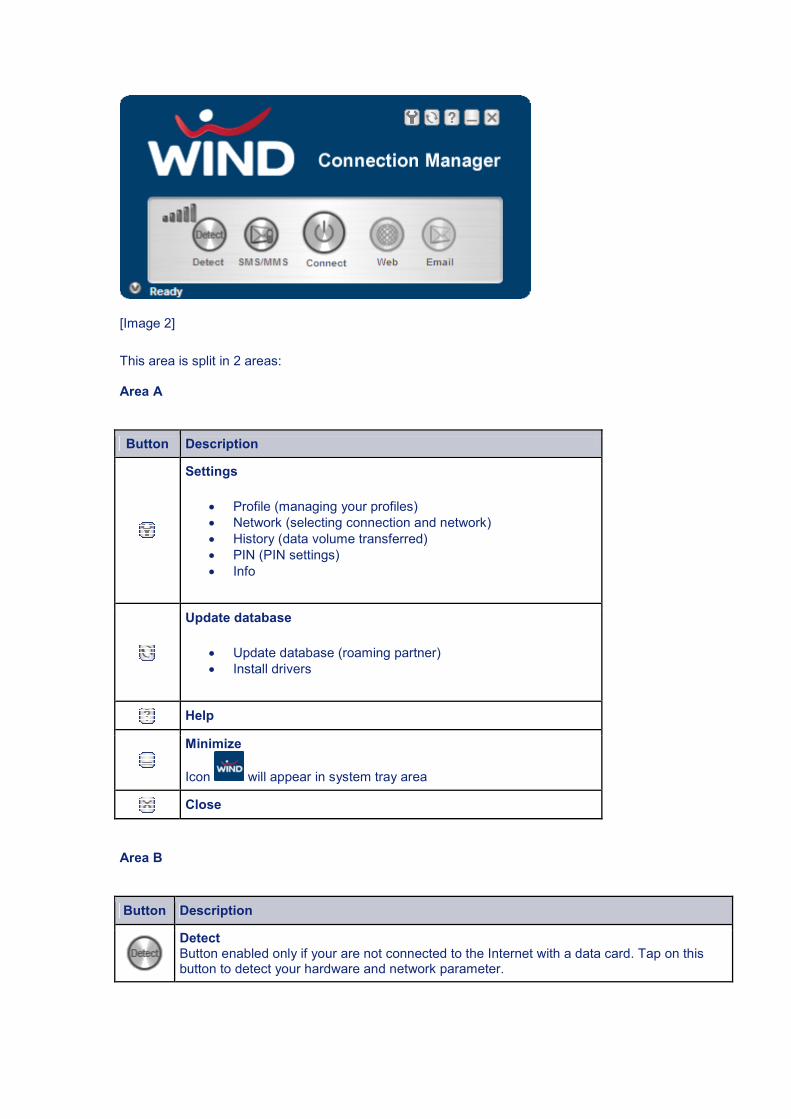
2.2 Area "Details"
[Image 3]
Details about your connection
Label Description
Status
Connecting to modem
Ready, you can establish connection
Connected
Failure
Port Port of data card
Card Card's name
Network Network name and network mode
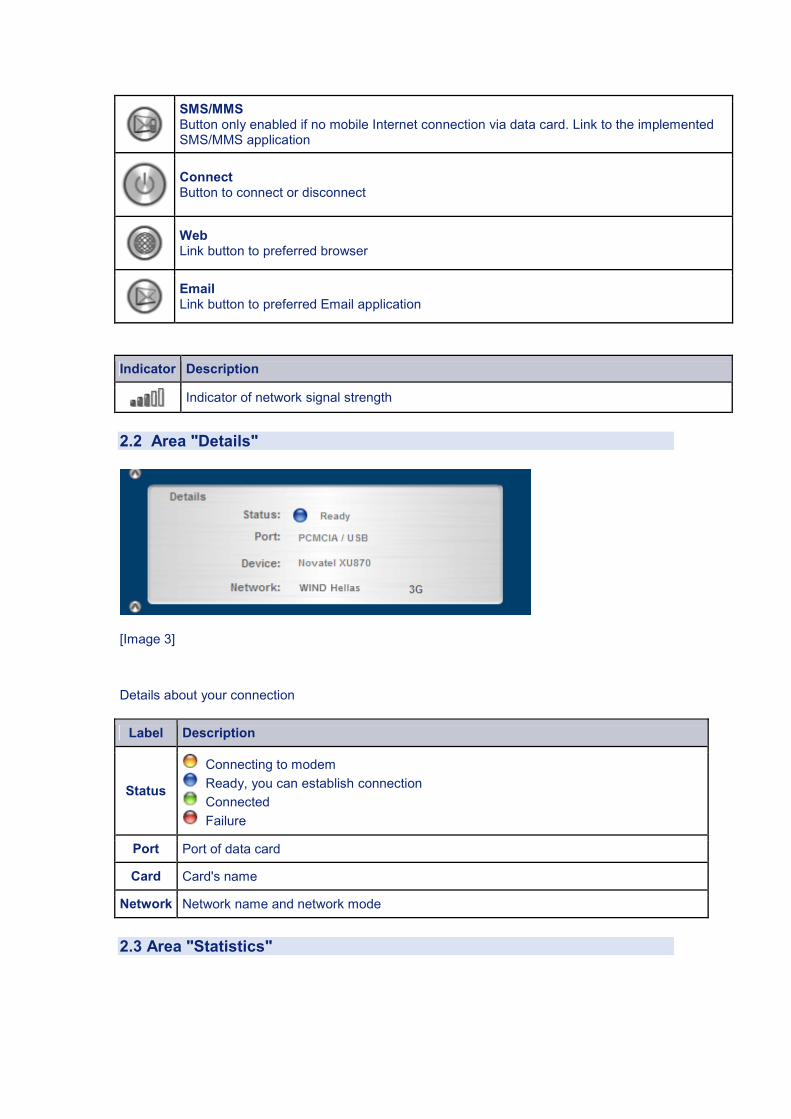
2.3 Area "Statistics"
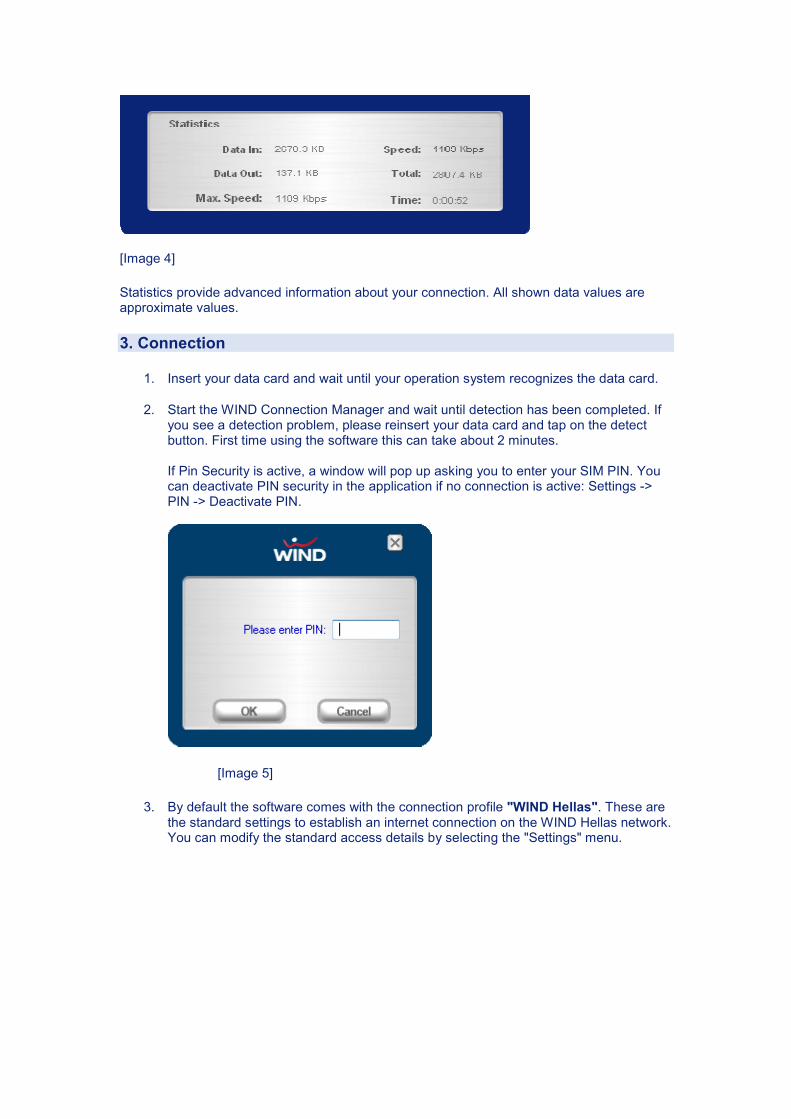
[Image 4]
Statistics provide advanced information about your connection. All shown data values are approximate values.
3. Connection
1. Insert your data card and wait until your operation system recognizes the data card.
2. Start the WIND Connection Manager and wait until detection has been completed. If you see a detection problem, please reinsert your data card and tap on the detect button. First time using the software this can take about 2 minutes. If Pin Security is active, a window will pop up asking you to enter your SIM PIN. You can deactivate PIN security in the application if no connection is active: Settings -> PIN -> Deactivate PIN.
[Image 5]
3. By default the software comes with the connection profile "WIND Hellas". These are the standard settings to establish an internet connection on the WIND Hellas network. You can modify the standard access details by selecting the "Settings" menu.
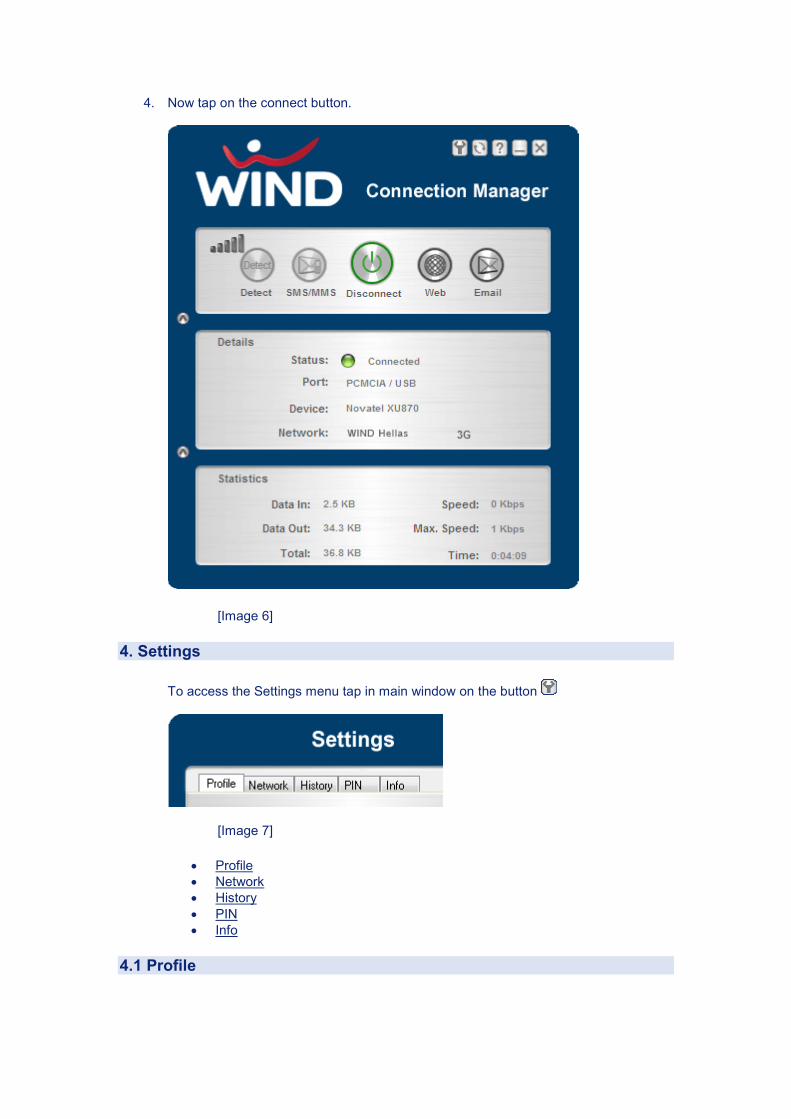
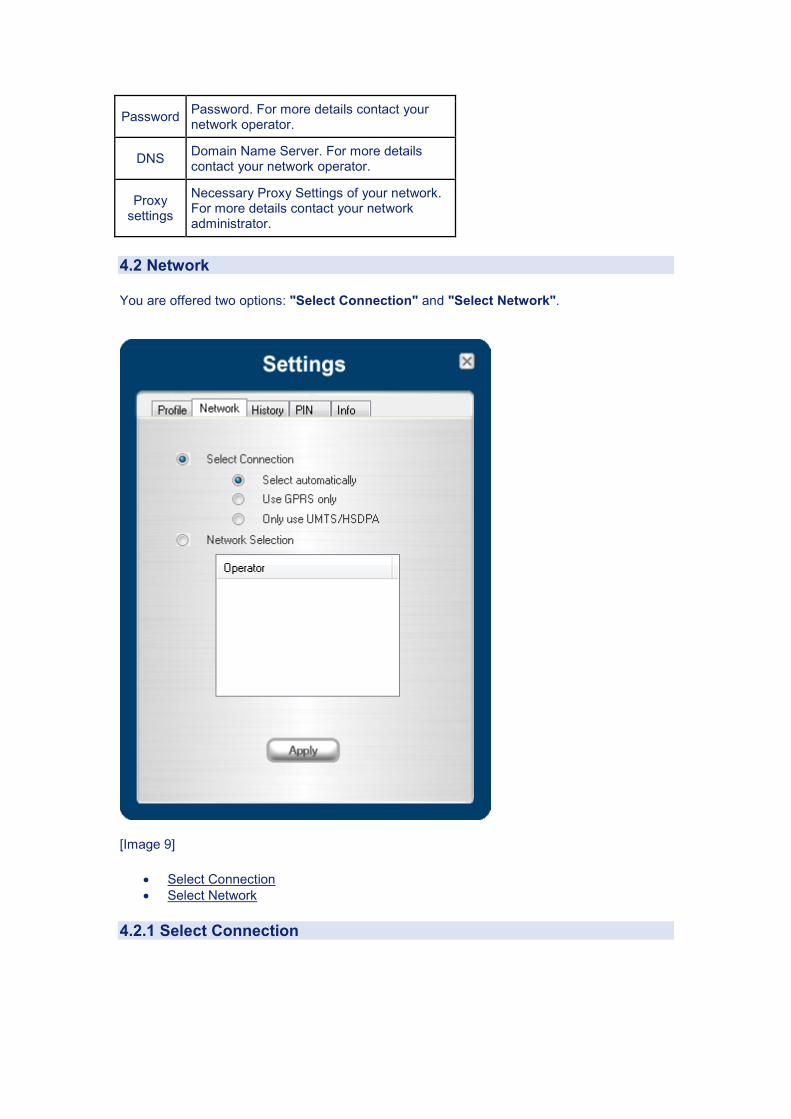
4. Now tap on the connect button.
[Image 6]
4. Settings
To access the Settings menu tap in main window on the button
[Image 7]
• Profile
• Network
• History
• PIN
• Info
4.1 Profile

You are free to create your own connection profile. Once a new profile has been created it will appear in the dropdown menu Profiles. You can select it by tapping on Set Profile to use it.
[Image 8]
Button Description
Create a new profile
Edit a profile
Delete a profile
Save a profile
Set the Profile you want to use
Label Description
Profile Name
Profile name, should be unique, use only Latin characters
APN Access Point Name of your network operator. For more details contact your network operator.
Username Username. For more details contact your network operator.
Password Password. For more details contact your network operator.
DNS Domain Name Server. For more details contact your network operator.
Proxy settings
Necessary Proxy Settings of your network. For more details contact your network administrator.
4.2 Network
You are offered two options: "Select Connection" and "Select Network".
[Image 9]
• Select Connection
• Select Network
4.2.1 Select Connection

[Image 10]
Three different settings are available here:
Label Description
Select automatically
Selects the best suited network available
Only use GPRS
Use only GPRS for a connection
Only use UMTS/HSDPA
Use only UMTS/HSDPA for a connection.
Select and tap on Register. If the change is successful you will retrieve a message "Network changed successfully". Close this window and wait until you see signal strength in the main window, then you can establish a connection. Attention: Changing the connection mode can block your data card. If you can not establish an internet connection, take out the data card, close the WIND Connection Manager, reinsert the data card, start the WIND Connection Manager anew and tap on detect. Wait until you see the signal strength in the main window. Now you can establish the connection.

4.2.2 Select Network
In this dialog you may select any available network. It is useful when you are abroad. Automatic mode will select the preferred network of your network operator.
[Image 11]
If you select “Network selection” you will get a list of network options.
1. Automatic Selection 2. Retrieving Networks...
The marked network is your logged-in network. Attention: The network list will only appear if the “connection settings” is "Only use GPRS" or "Only use UMTS/HSDPA". Select the network and tap on the register button. If the change is successful you will see the message "Network changed successfully". Close this window and wait until you see the signal strength in the main window and then you can establish the connection.
4.3 History
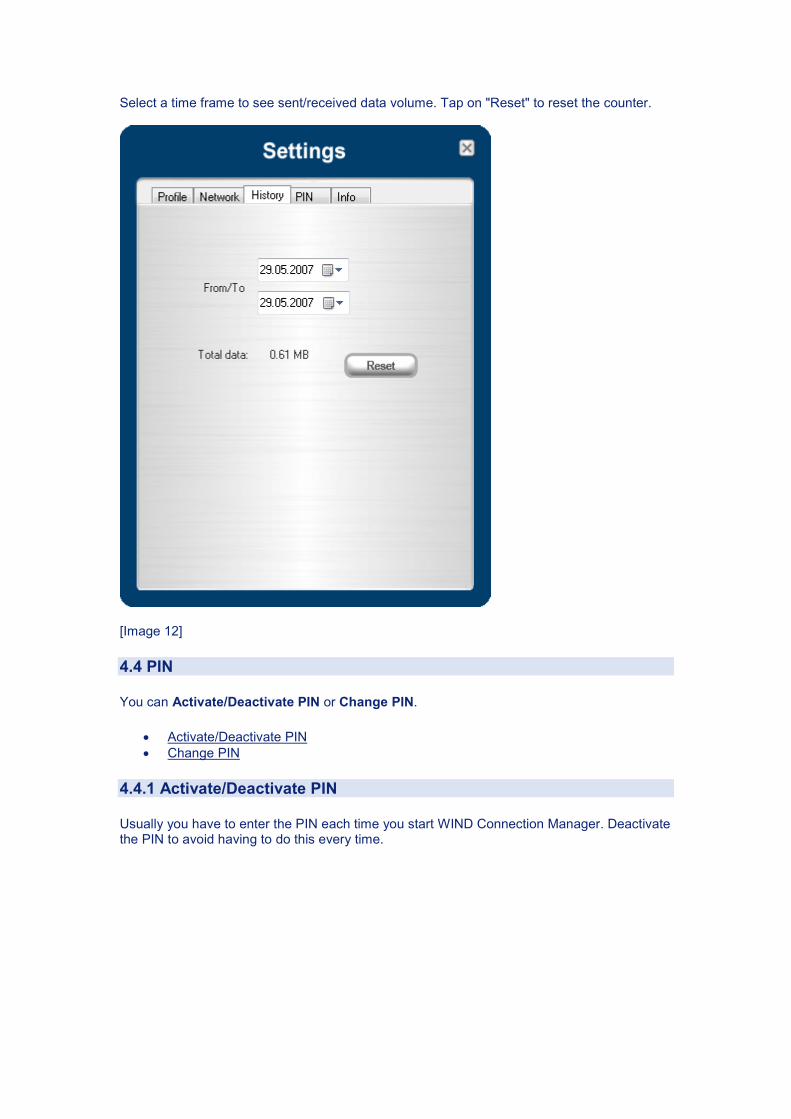
Select a time frame to see sent/received data volume. Tap on "Reset" to reset the counter.
[Image 12]
4.4 PIN
You can Activate/Deactivate PIN or Change PIN.
• Activate/Deactivate PIN
• Change PIN
4.4.1 Activate/Deactivate PIN
Usually you have to enter the PIN each time you start WIND Connection Manager. Deactivate the PIN to avoid having to do this every time.
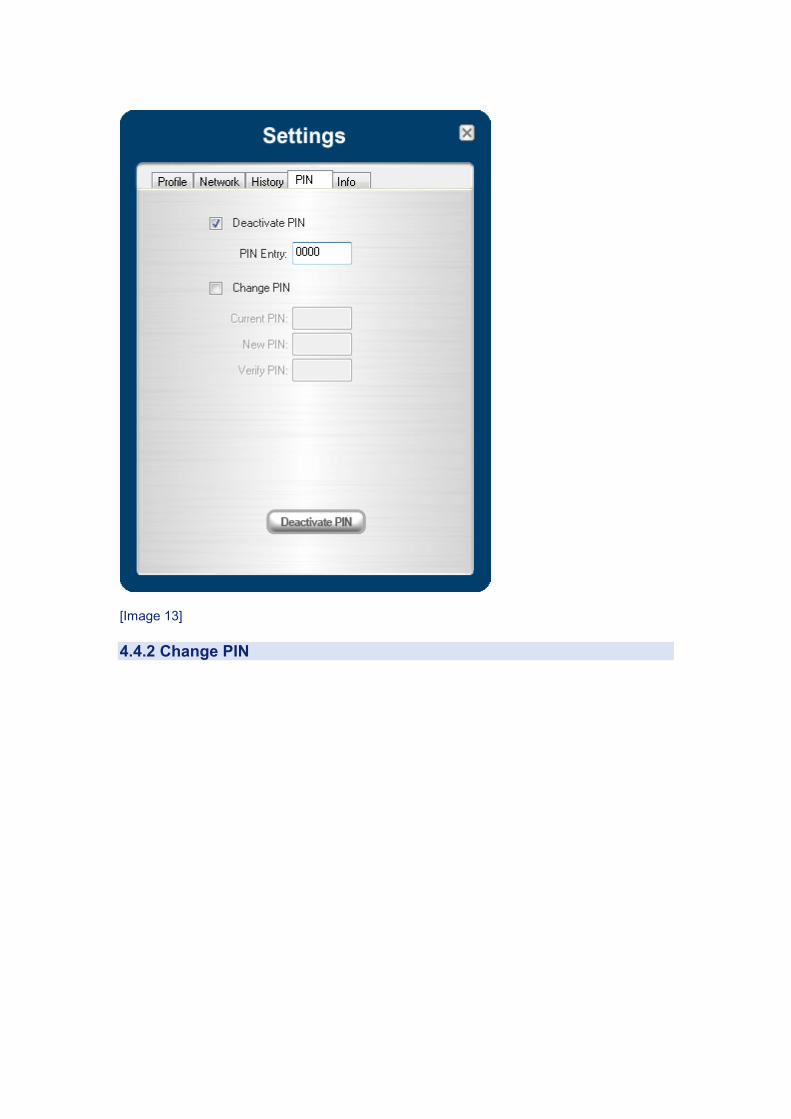
[Image 13]
4.4.2 Change PIN
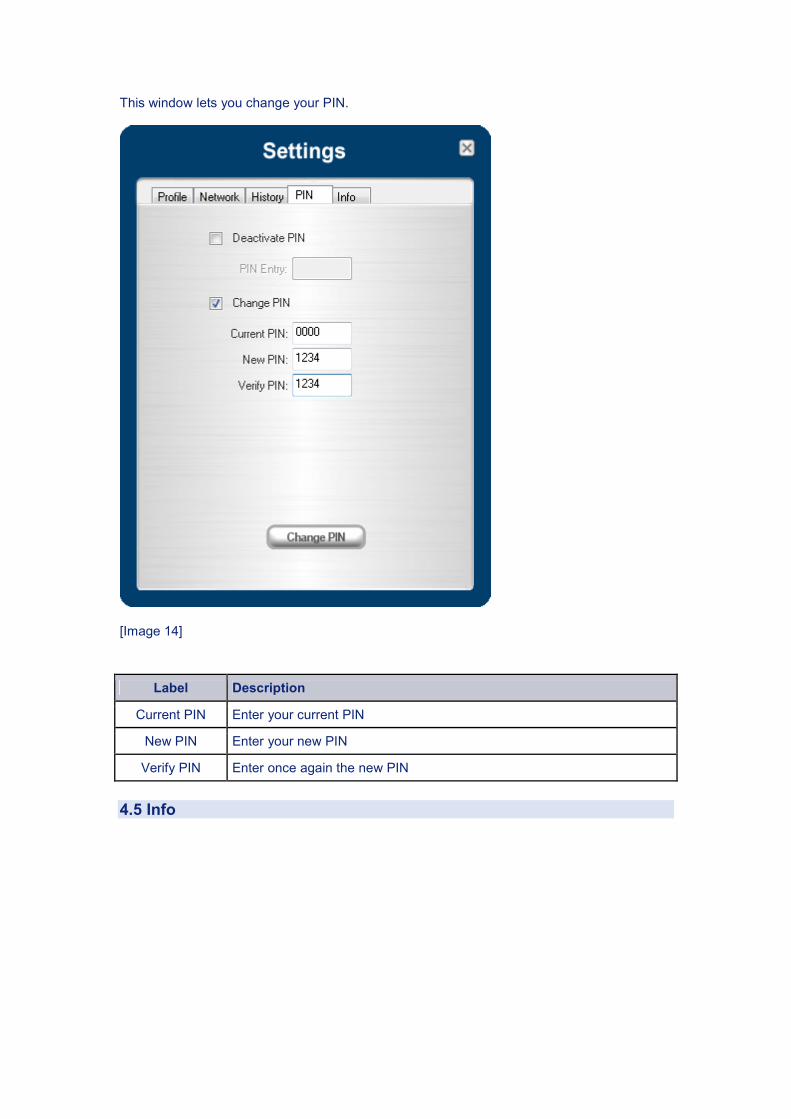
This window lets you change your PIN.
[Image 14]
Label Description
Current PIN Enter your current PIN
New PIN Enter your new PIN
Verify PIN Enter once again the new PIN
4.5 Info
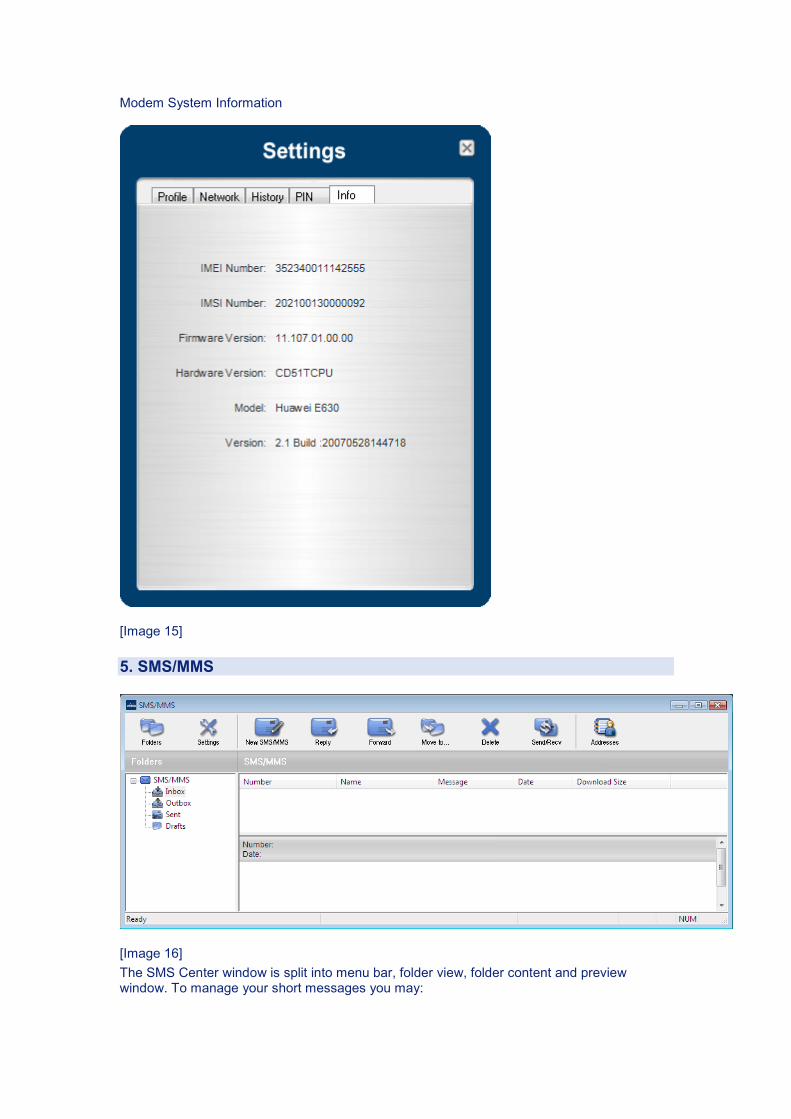
Modem System Information
[Image 15]
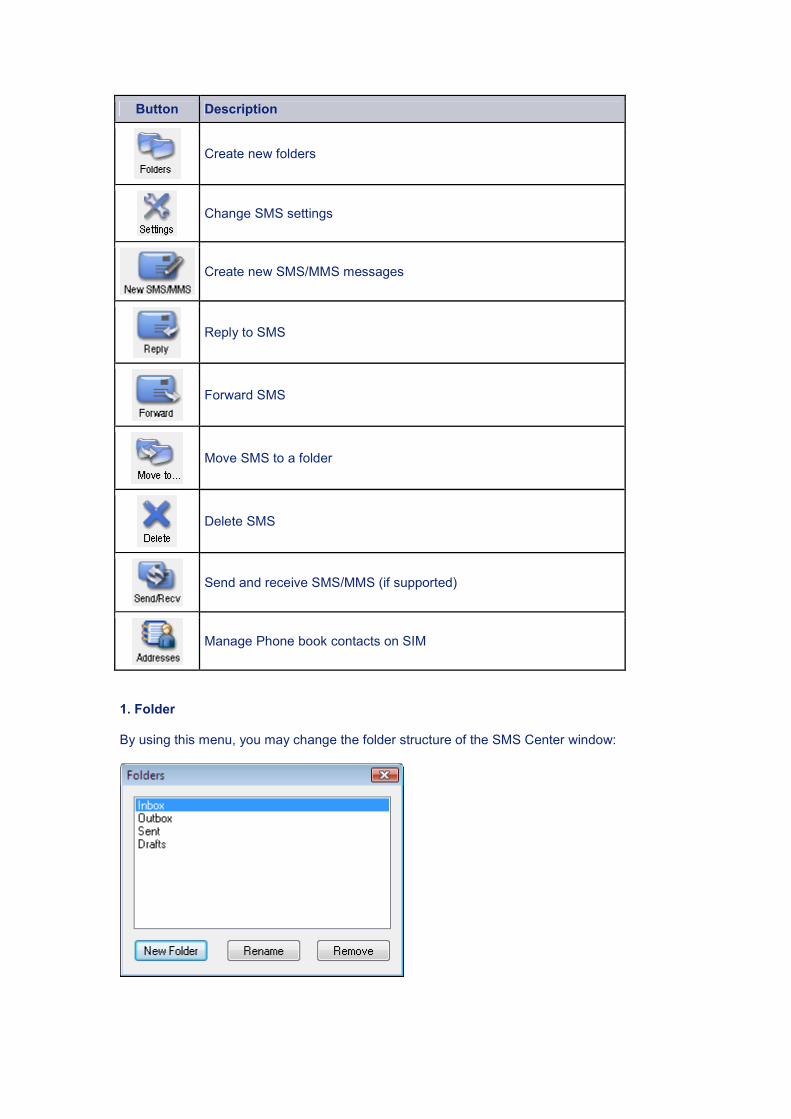
5. SMS/MMS
[Image 16]
The SMS Center window is split into menu bar, folder view, folder content and preview window. To manage your short messages you may:
Button Description
Create new folders
Change SMS settings
Create new SMS/MMS messages
Reply to SMS
Forward SMS
Move SMS to a folder
Delete SMS
Send and receive SMS/MMS (if supported)
Manage Phone book contacts on SIM
1. Folder By using this menu, you may change the folder structure of the SMS Center window:
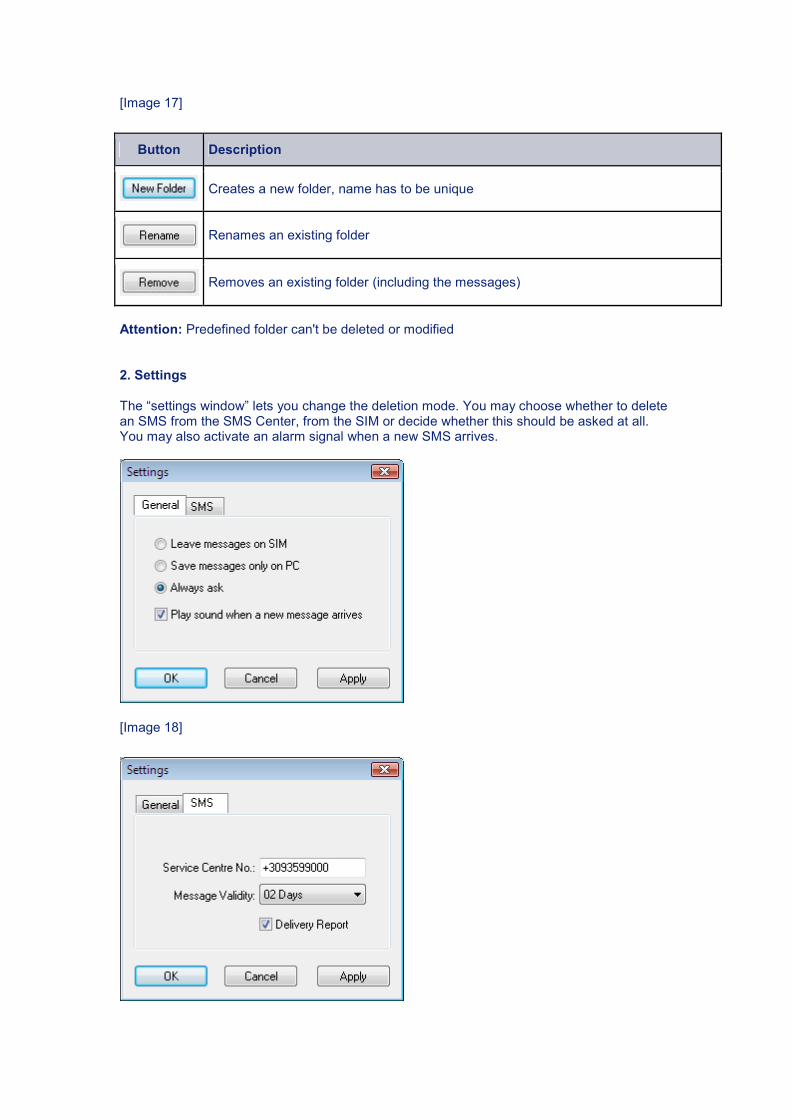
[Image 17]
Button Description
Creates a new folder, name has to be unique
Renames an existing folder
Removes an existing folder (including the messages)
Attention: Predefined folder can't be deleted or modified 2. Settings The “settings window” lets you change the deletion mode. You may choose whether to delete an SMS from the SMS Center, from the SIM or decide whether this should be asked at all. You may also activate an alarm signal when a new SMS arrives.
[Image 18]
[Image 19]
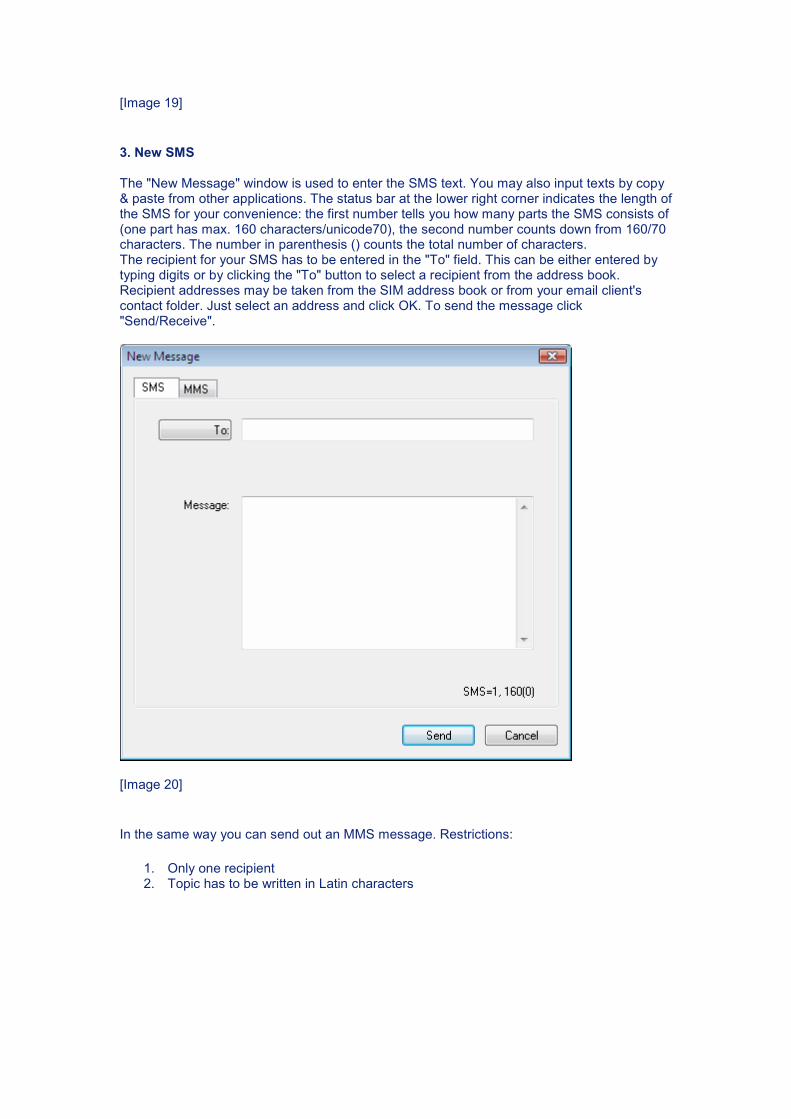
3. New SMS The "New Message" window is used to enter the SMS text. You may also input texts by copy & paste from other applications. The status bar at the lower right corner indicates the length of the SMS for your convenience: the first number tells you how many parts the SMS consists of (one part has max. 160 characters/unicode70), the second number counts down from 160/70 characters. The number in parenthesis () counts the total number of characters. The recipient for your SMS has to be entered in the "To" field. This can be either entered by typing digits or by clicking the "To" button to select a recipient from the address book. Recipient addresses may be taken from the SIM address book or from your email client's contact folder. Just select an address and click OK. To send the message click "Send/Receive".
[Image 20]
In the same way you can send out an MMS message. Restrictions:
1. Only one recipient 2. Topic has to be written in Latin characters

[Image 21]
4. Reply Highlight a message to which you want to reply, for example in the inbox folder, then click the "Reply" button. The "New Message" window opens and the recipient address is already filled in the "To" field. Continue as before when sending a new message. 5. Forward Highlight an SMS, which you want to forward. Click the "Forward" button. The "New Message" window opens, however the message text is already copied. Continue as before when sending a new message. 6. Move SMS... Highlight the SMS to be moved and click the "Move SMS" button. A small window opens that lets you select the destination folder. Select the folder to which the message should be moved, then click "Move". 7. Delete Highlight the SMS which you want to delete. Click "Delete" to remove the message. 8. Send/Receive
Messages will be sent and/or received by pressing this button.
6. Contacts
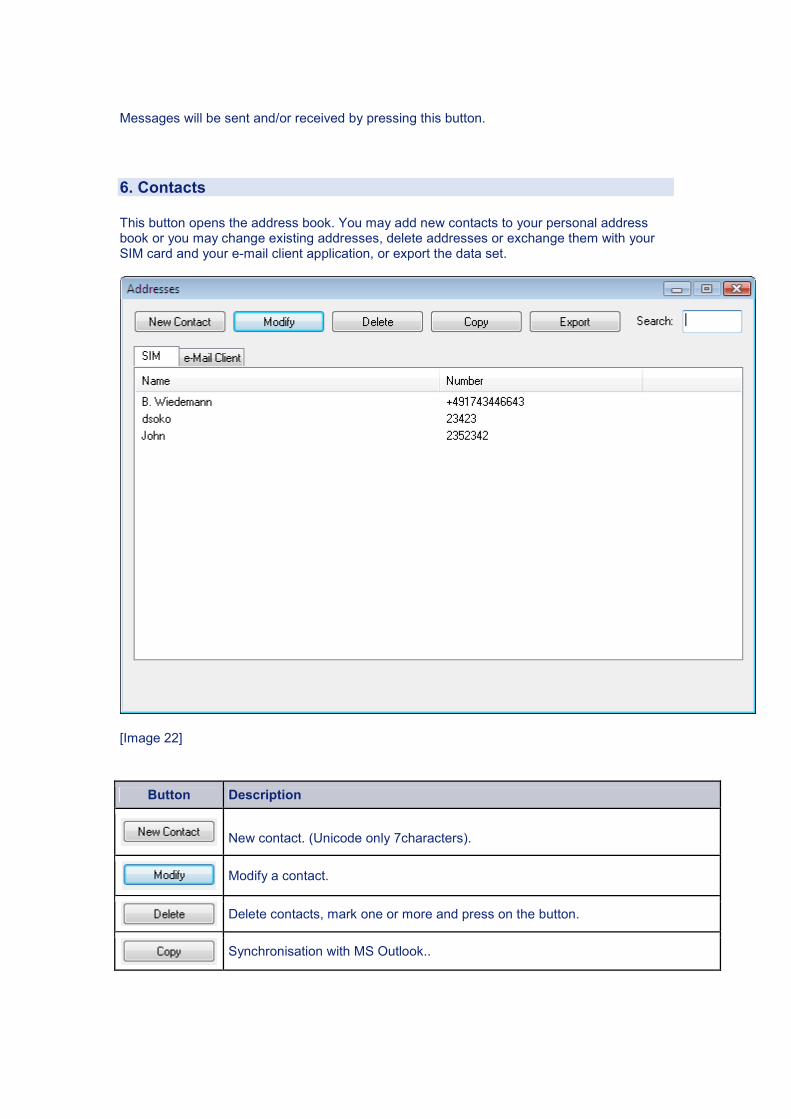
This button opens the address book. You may add new contacts to your personal address book or you may change existing addresses, delete addresses or exchange them with your SIM card and your e-mail client application, or export the data set.
[Image 22]
Button Description
New contact. (Unicode only 7characters).
Modify a contact.
Delete contacts, mark one or more and press on the button.
Synchronisation with MS Outlook..
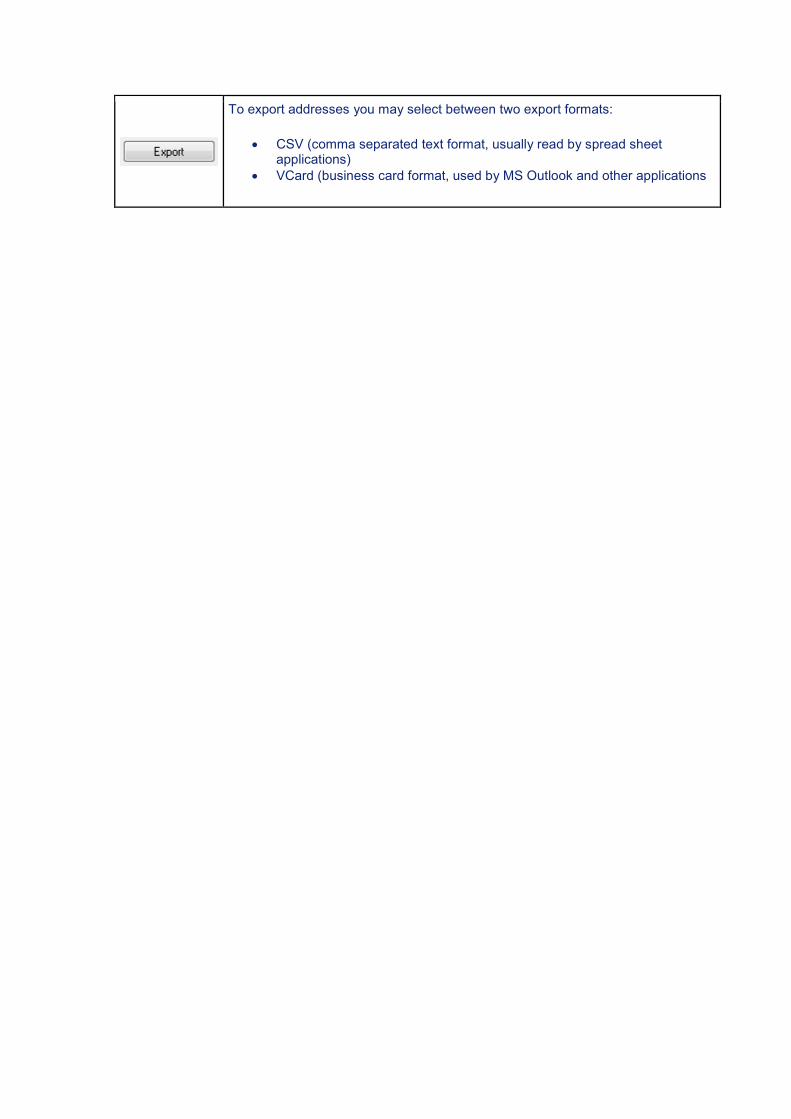
To export addresses you may select between two export formats:
• CSV (comma separated text format, usually read by spread sheet applications)
• VCard (business card format, used by MS Outlook and other applications