Embed Size (px)
Citation preview

WIFI SPRINKLER TIMER
Users ManualFor: 57946, 57950, 91946, 91950, 04080, 04082
91946-50 rC
2
Thank you for purchasing the Orbit® B-hyve™ wifi sprinkler timer. At Orbit, we share your passion for a beautiful landscape while protecting our most valuable resource–water. For over 40 years, this passion has driven us to deliver top of the line irrigation products to millions of customers all around the world. Our slogan, “Conservation through Innovation,” has driven our product development in timers for decades and continues to define our direction today with the B-hyve™ smart wifi sprinkler timer.
Nature is a wonderful gardener and is always subtly working with you to take care of your landscape. Bees provide a great example of this remarkable, unseen effort to help your plants grow. The beehive is the central hub where this effort is coordinated, and the communication happens. While nature does a great job, sometimes a little help is needed. That is where we come in. When you connect your B-hyve™ timer to your wifi, you are plugging in to nature. The local weather, along with some inputs about your landscape, will work together to deliver the right amount of water to your plants, eliminating water waste and saving you money. Thanks for connecting and welcome to B-hyve™!
Welcome to B-hyve™ Connecting with B-hyve™
This device complies with Part 15 of the FCC Rules and Industry Canada license exempt RSS standards. Operation is subject to the following two conditions: (1) This device may not cause harmful interference, and (2) this device must accept any interference received, including interference that may cause undesired operation. FCC Warning: Any changes or modifications not expressly approved by the party responsible for compliance could void the user’s authority to operate this equipment.Note: This equipment has been tested and found to comply with the limits for a Class B digital device, pursuant to Part 15 of the FCC Rules. These limits are designed to provide reasonable protection against harmful interference in a residential installation. This equipment generates, uses, and can radiate radio frequency energy and, if not installed and used in accordance with the instructions, may cause harmful interference to radio
communications. However, there is no guarantee that interference will not occur in a particular installation. If this equipment does cause harmful interference to radio or television reception, which can be determined by turning the equipment off and on, the user is encouraged to try to correct the interference by one of the following measures:• Reorient or relocate the receiving antenna.• Increase the separation between the equipment and the receiver.• Connect the equipment into an outlet on a circuit different from that to
which the receiver is connected.• Consult the dealer or an experienced radio/TV technician for help.This device meets the FCC and IC requirements for RF exposure in public or controlled environments. The end user is advised to maintain a distance of 20 cm from the controller and any personnel to ensure compliance with RF exposure regulations.This Class B digital apparatus complies with Canadian ICES-003

3
Contents in the Box . . . . . . . . . . . . . . . . . . . . . . 4
Getting Started . . . . . . . . . . . . . . . . . . . . . . . . . . 5
Timer Installation . . . . . . . . . . . . . . . . . . . . . . . . . 6
Uninstalling/Reinstalling . . . . . . . . . . . . . . . . . . 8
The B-hyve App . . . . . . . . . . . . . . . . . . . . . . . . . . 9
Timer Controls/Features. . . . . . . . . . . . . . . . . 10
Simple Controls . . . . . . . . . . . . . . . . . . . . . . . . . . 11
Using the Dial . . . . . . . . . . . . . . . . . . . . . . . . . . . .12
Using the Back and Clear Buttons . . . . . . . . .13
Using the Program (PROG ABCD) Button . .14
Using the Rain Delay Button . . . . . . . . . . . . . . .15
Timer LCD . . . . . . . . . . . . . . . . . . . . . . . . . . . . . . .16
Programming the Timer . . . . . . . . . . . . . . . . . . .17
Manual Operation . . . . . . . . . . . . . . . . . . . . . . . 23
Table of Contents
Remember, you can set your timer up with the app. But, if you don’t have wifi or just want to make an adjustment while you are outside, you can do it at the timer. Timer changes will be reflected in the app, and app changes will be reflected at the timer.
For more detailed instructions or troubleshooting information, visit bhyve.orbitonline.com
Also, the app has help screens and video to assist you with wifi connections, programming, smart watering and other general questions you may have.
If the app and the website don’t have what you’re looking for, please call our technical support line.
Help1-800-488-6156 or 1-801-299-5555
www.orbitonline.com bhyve.orbitonline.com
Before returning this sprinkler timer to the store, contact Orbit® Technical Service at: 1-800-488-6156, 1-801-299-5555

4
Contents in the Box
Wifi Sprinkler Timer
Screwdriver
Installation Hardware
Keys
Quick Start Guide
A
A
D
B
B
D
E
C
C
E

5
Getting Started
Your B-hyve™ sprinkler timer is great for new installations or for replacing an old sprinkler timer. Here are some basic steps to get your timer set up and get you closer to saving water and money.
Install the timer Choose a location on your property with a good wifi signal.
Install the B-hyve™ app on your smart device You will need a smart device to connect the timer to wifi.
Setup your timer with the app or at the timer Your timer works with and without wifi. It can be programmed with your smart device or at the timer interface.
Note: If replacing a timer, it is helpful to take a photo of the wires before you remove them from the old timer.

6
Timer Installation
Select a location Choose a location near power and away from direct sunlight, if possible. Make sure to leave room for the timer door to open completely.
Mount the timer Install a screw (included) into the wall. Use the expanding anchors (included) for plaster, masonry or drywall installations. Hang the timer on the installed screw using the keyhole slot. Level the timer and use the second screw in one of the preformed mounting holes to secure the timer.
Connect valve wires Strip 1/2" (12 mm) of insulation from each wire. Connect one wire from each valve to a “Common” (COM) wire and the other wires to a numbered terminal (only one wire per terminal.)
Keyhole
Pre-formedMounting Holes
No. 8 Screw
Wall
1/8"
Small Hole–for running 5 or 7 strand wire straight into the box
1/2", 3/4" and 1" knock-outs for larger systems with more wire bundles
Knock-out for hardwired installations
Bottom View
Strip Wire
Push In
Loosen Screw
Tighten Screw
Note: We recommend you consult an electrician for hardwired installations.

7
Timer Installation–Connecting to WIFI
Note: We recommend you consult an electrician for hardwired installations.
FOR OPTIMUM TIMER PERFORMANCE, CONNECT
TO WIFI TO RECEIVE THE LATEST TIMER UPDATES.
Plug in your Orbit® B-hyve™ timer Once your B-hyve™ timer is plugged into the power source, it will automatically look to pair with your smart device. In the top left corner of the timer screen the “Bluetooth” icon will flash with a graduated blinking sequence. This indicates that your timer is ready to pair with a smart device.
Connect to your Orbit® B-hyve™ timer Open your B-hyve™ app, create an account or login, and follow the step-by-step process to add and set up your device. The B-hyve™ app will connect to your device and you will, then, be guided to connect to your home Wi-Fi network.
Connect to your Wi-Fi network Select your network from the list and enter the password for the network to connect your timer to your Wi-Fi signal. When connected, the Wi-Fi icon on the timer will stop blinking and show solid lines, indicating your signal strength. Note: If you do not see your network name in the list, tap the refresh button in the app. If your network name still does not appear, tap “Advanced” in the app and enter your network name and password. This device will only connect through 2.4 GHz Wi-Fi networks. 5.0 GHz networks are not supported and will not appear in your app.
8
Uninstalling/Reinstalling
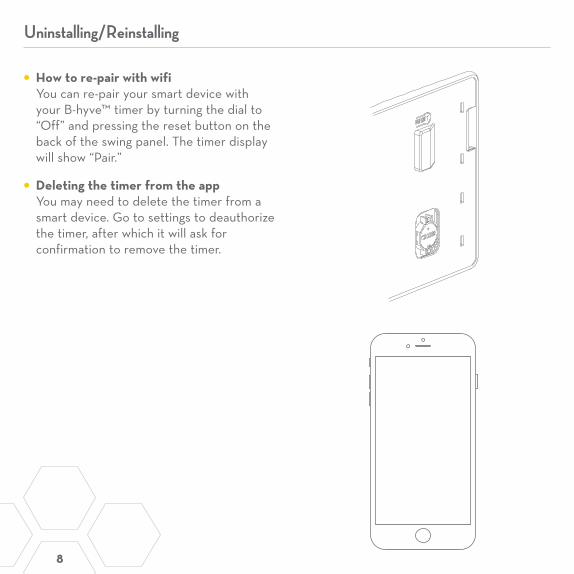
How to re-pair with wifi You can re-pair your smart device with your B-hyve™ timer by turning the dial to “Off” and pressing the reset button on the back of the swing panel. The timer display will show “Pair.”
Deleting the timer from the app You may need to delete the timer from a smart device. Go to settings to deauthorize the timer, after which it will ask for confirmation to remove the timer.

9
The B-hyve™ App
Timer Connected Symbol
Rain Delay
Calendar
Programs
Remote Control or Home Button
Zone List
Settings
Next Zone
Stop Watering
Running Status/Messaging
Weather/Temp.
Note: The app will guide you through initial set up of your sprinkler timer. In addition, there are help icons throughout the app with more information and useful tips.

10
Timer Controls/Features
Your timer was built to make installation easy and fast, while providing convenient controls to make adjustments directly when you’re standing in front of the timer, or from anywhere in the world with the B-hyve™ app.
CAUTION: DANGER OF EXPLOSION IF BATTERY IS INCORRECTLY REPLACED. REPLACE ONLY WITH THE SAME OR EQUIVALENT TYPE RECOMMENDED BY THE MANUFACTURER. DISPOSE OF USED BATTERIES ACCORDING TO THE MANUFACTURER’S INSTRUCTIONS.
Lock and Latch
Weather Resistant Cover
Dial
Digital Display
Swing Door Panel
Battery Compartment
Transformer
Wiring Terminals
Reset Button
Line Cord
A
A
B
B
C
C
D
D
E
E
E
F
F
G
G
H
H
I
IJ
J

11
Simple Controls
Programming at the timer can be done whether you are connected to wifi or not. It allows the gardener who left their phone inside to run a manual cycle, or adjust programming as needed and keep dirty hands away from the phone.
Buttons Function
Scroll up or down, left or right and push to make a selection
CLEAR To clear a setting
PROG ABCD To move to different programs: A, B, C, and D
BACK To go back a step
RAIN DELAYTo pause operation for 1 to 32 days
due to rain or other factors

12
Using the DIAL
The DIAL can be used to scroll up or down, left or right on menus, dates and times.
Press the DIAL to confirm a selection, to deselect or to skip a running station.

13
Using the BACK and CLEAR Buttons
The BACK button can be used return to the main menu, or can be pushed twice to return to auto.
The CLEAR button can be used to clear entries in a selected screen.
The CLEAR button may also be used to cancel Rain Delay, cancel a running program or cancel a manual watering cycle.

14
Using the PROGRAM (PROG ABCD) Button
The A, B, C, D and Smart programs provide the flexibility to set up and run different programs for plants with different watering needs. For example: you could set your lawn zones to run on program A, your flowerbeds to run on program B and your garden to run on program C. Or, you can set up your zones to use smart watering and the timer will use local weather and on-site information to automatically set a watering schedule for you.
The PROG ABCD button toggles between programs when setting up or modifying start times, run times, how long and budget.
Press PROG ABCD to turn on or off programs that have been set-up. A, B, C, D or Smart will illuminate to show programs that are active and will water.
Note: To water in smart mode only, the Phone icon is the only program that should be showing in the LCD.
Note: If you do not see the program letter (A, B, C, D or the water drop) in the LCD, that program will not water. Press PROG ABCD until you see the program(s) that you wish to water.

15
Using the RAIN DELAY Button
The RAIN DELAY button can be used to turn off all watering for a duration of 1 to 32 days.
Press RAIN DELAY repeatedly, or turn the dial after pressing rain delay once, until the desired number of days is showing in the LCD.
To cancel a rain delay, press CLEAR.

16
Timer LCD
Main Menu Function
AUTO Set program is running
MANUAL To water stations manually
DATE/TIME Set clock time, Year, Month, and Day
START TIME Set time to begin watering
RUN TIME Set watering duration for each station
HOW OFTEN Set frequency of watering days
BUDGET Adjust overall watering as a percentage
OFF Turn all stations/functions off
Status Bar Function
WIFI
Solid–shows signal strength of wifi and indicates that it is connected.
Graduated Blinking–indicates the timer is in pairing mode.
Blinking–it is not connected to wifi.
Solid, with an exclamation point–communicating with wifi, but not communicating with Orbit’s servers.
FAULT Indicates a short in a zone
%Indicates that water budgeting has been adjusted
RAIN DROP Indicates a zone is watering
NO AC There is no AC power getting to the timer
BATTERY
Indicates a low battery. The battery only functions to keep the time and date in the event of power loss. Your program is stored in non-volatile memory and will not be lost if your timer loses power.
CURRENT TIME
If connected to wifi, this is set automatically. Or it can be set manually in Date/Time.

17
Programming the Timer–AUTO and OFF
Note: Programming for each of the features covered here can be accomplished at the timer or with the app.
The timer should be in AUTO during the irrigation season and OFF in the winter months or the non-irrigation months.
Turn the dial to the AUTO position and press the dial or just leave it there to keep it in AUTO.
If the dial selection is left in any position other than OFF, it will revert back to AUTO after approximately 20 seconds.
To turn your timer OFF, turn the dial to OFF and press the dial or just leave it in the OFF position.

18
Programming the Timer–DATE/TIME
If you are connected to wifi, the time and date will automatically be sent to the sprinkler timer.
To set the date and time manually, turn the dial until the selection box is on DATE/TIME and press the dial.
Set the date by turning the dial until the correct year, month and day are shown and press the dial to confirm each selection.
When setting the time, press the dial when the right time is set. Be careful to make sure that the am/pm selection is correct.
Note: Programming for each of the features covered here can be accomplished at the timer or with the app.

19
Programming the Timer–START TIME
This is the time that the first zone will begin watering. Only one start time is needed to run each station in the program.
Turn the dial until the selection box is on START TIME and press the dial.
Turn the dial to the desired start hour and press the dial to confirm the selection.
Turn the dial to the desired start minute and press the dial to confirm the selection.
Note: only one start time is needed to run all of your zones and that start time will show up as 1st. If additional start times are needed, repeat this process. Additional start times are helpful to avoid run off and allow time for the soil to absorb the water.
Press PROG ABCD to set up start times for additional programs.
Note: Programming for each of the features covered here can be accomplished at the timer or with the app.

20
Programming the Timer–RUN TIME
This is where you will set up how long each zone will run.
Turn the dial until the selection box is on RUN TIME and press the dial.
The station number will flash–turn the dial until the desired zone is flashing and press the dial.
The duration for that zone will flash–turn the dial until the desired duration is showing and press the dial.
Repeat this process for each zone you wish to set up.
If you wish to set-up zones in different programs, A B C or D, press the PROG ABCD button until the program is showing in the LCD.
Note: Programming for each of the features covered here can be accomplished at the timer or with the app.

21
Programming the Timer–HOW OFTEN
This will determine HOW OFTEN (what days or interval) the timer will water.
Turn the dial until the selection box is on HOW OFTEN and press the dial.
Rotate the dial until the desired day of the week or INT, ODD or EVEN is flashing and press the dial.
If days of the week are chosen, repeat this process until all of the desired watering days have a box around them.
If INT (interval) is chosen, rotate the dial until the desired number of days between waterings is showing.
If you are setting up additional programs, A B C or D press the PROG ABCD button until the program is showing in the LCD and repeat this process.
Note: Programming for each of the features covered here can be accomplished at the timer or with the app.

22
Programming the Timer–BUDGET
The water budgeting feature makes it easy to change all of your run times without having to change them one by one.
Turn the dial until the selection box is on BUDGET and press the dial.
Adjusting budget will adjust all of the run times in a program by the percentage chosen.
Example: If you have zones set up to water for 10 minutes and you adjust your budget from 100% to 150%, those same zones will water for 15 minutes without having to change each run time.
Water budgeting is an easy way to adjust all zones for seasonal changes.
If you are setting up additional programs, A, B, C or D press the PROG ABCD button until the program is showing in the LCD and repeat this process.
Note: Programming for each of the features covered here can be accomplished at the timer or with the app.

23
Manual Operation
Manual is used to test zones or run an extra cycle for a zone, a program or for all zones.
Turn the dial until the selection box is on MANUAL and press the dial.
ALL will be displayed in the LCD.
To water all zones– • Press the dial while ALL is displayed and it will ask for a duration. • Rotate the dial to the desired duration. • Press the dial to begin watering.
To water a specific program-A, B, C or D– • When ALL is displayed, rotate the dial until the program you wish to water is showing. • Press the dial to begin watering the specified program.
To water a specific zone– • When ALL is displayed, rotate the dial past the A, B, C, D programs until STATION and a number appear and press the dial. • Rotate the dial to the desired zone and press the dial to enter a duration. • Rotate the dial to the desired duration and press the dial to begin watering.
Note: you can program more than one specific zone using this process. Repeat the steps for zone selection and duration to water additional zones.

IMPORTANT INFORMATION ABOUT YOUR RIGHTS AND OBLIGATIONS, AS WELL AS LIMITATIONS AND EXCLUSIONS THAT MAY APPLY TO YOU.
1. YOUR RIGHTS AND THIS LIMITED WARRANTYThis Limited Warranty gives you specific legal rights. You may also have other legal rights that vary by state, province or jurisdiction. The disclaimers, exclusions, and limitations of liability under this Limited Warranty will not apply to the extent prohibited by applicable law. For a full description of your legal rights you should refer to the laws applicable in your jurisdiction and you may wish to contact a relevant consumer advisory service.
2. WHAT THIS LIMITED WARRANTY COVERS; PERIOD OF COVERAGEOrbit Irrigation Products, Inc. (“Orbit”) warrants to the owner of the enclosed product that the product contained in this box (“Product”) will be free from defects in materials and workmanship for a period of two (2) years from the date of delivery following the original retail purchase (the “Warranty Period”). If the Product fails to conform to this Limited Warranty during the Warranty Period, Orbit will, at its sole discretion, either (a) repair or replace any defective Product or component; or (b) accept the return of the Product and refund the money actually paid by the original purchaser for the Product. Repair or replacement may be made with a new or refurbished product or components, at Orbit’s sole discretion. If the Product or a component incorporated within it is no longer available, Orbit may replace the Product with a similar product of similar function, at Orbit’s sole discretion. This is your sole and exclusive remedy for breach of this Limited Warranty. Any Product that has either been repaired or replaced under this Limited Warranty will be covered by the terms of this Limited Warranty for the longer of thirty (30) days from the date of delivery or the remaining Warranty Period. This Limited Warranty is transferable from the original purchaser to subsequent owners, but the Warranty Period will not be extended in duration or expanded in coverage for any such transfer.
3. WARRANTY CONDITIONS; HOW TO GET SERVICE IF YOU WANT TO CLAIM UNDER THIS LIMITED WARRANTYBefore being able to claim under this Limited Warranty, the owner of the Product must notify Orbit of the intention to claim by visiting www.orbitonline.com/contact during the Warranty Period and provide a description of the alleged failure, and comply with Orbit’s return shipping instructions. Orbit will have no warranty obligations with respect to a returned Product if it determines, in its reasonable discretion after examination of the returned Product, that the Product is an Ineligible Product (defined below). Orbit will bear all costs of return shipping to owner and will reimburse any shipping costs incurred by the owner, except with respect to any Ineligible Product, for which owner will bear all shipping costs.
4. WHAT THIS LIMITED WARRANTY DOES NOT COVERThis warranty does not cover the following (collectively “Ineligible Products”): Products marked as “sample” or sold “AS IS”; or Products that have been
subject to: (a) modifications, alterations, tampering, or improper maintenance or repairs; (b) handling, storage, installation, testing, or use not in accordance with instructions provided by Orbit; (c) abuse or misuse of the Product; (d) breakdowns, fluctuations, or interruptions in water supply, electric power or the telecommunications network; or (e) Acts of God, including lightning, flood, tornado, earthquake, or hurricane. This warranty does not cover consumable parts, including batteries, unless damage is due to defects in materials or workmanship of the Product, or software (even if packaged or sold with the product). Orbit recommends that you use only authorized service providers for maintenance or repair. Unauthorized use of the Product or software can impair the Product‘s performance and may invalidate this Limited Warranty.
Unless explicitly promising a “guarantee,” Orbit does not guarantee or promise any specific level of water savings, garden and lawn health, or other benefit from the use of a Product or any feature of it. Actual water savings, garden and lawn health, and other benefits vary with factors beyond Orbit’s control or knowledge.
5. DISCLAIMER OF WARRANTIESEXCEPT AS STATED ABOVE IN THIS LIMITED WARRANTY, AND TO THE MAXIMUM EXTENT PERMITTED BY APPLICABLE LAW, ORBIT DISCLAIMS ALL EXPRESS, IMPLIED, AND STATUTORY WARRANTIES AND CONDITIONS WITH RESPECT TO THE PRODUCT, INCLUDING THE IMPLIED WARRANTIES OF MERCHANTABILITY AND FITNESS FOR A PARTICULAR PURPOSE. TO THE MAXIMUM EXTENT PERMITTED BY APPLICABLE LAW, ORBIT ALSO LIMITS THE DURATION OF ANY IMPLIED WARRANTIES OR CONDITIONS TO THE DURATION OF THIS LIMITED WARRANTY.
6. LIMITATION OF DAMAGESIN ADDITION TO THE ABOVE WARRANTY DISCLAIMERS, IN NO EVENT WILL ORBIT BE LIABLE FOR ANY CONSEQUENTIAL, INCIDENTAL, EXEMPLARY, OR SPECIAL DAMAGES, INCLUDING ANY DAMAGES FOR LOST DATA OR LOST PROFITS, ARISING FROM OR RELATING TO THIS LIMITED WARRANTY OR THE PRODUCT, AND ORBIT’S TOTAL CUMULATIVE LIABILITY ARISING FROM OR RELATED TO THIS LIMITED WARRANTY OR THE PRODUCT WILL NOT EXCEED THE AMOUNT ACTUALLY PAID FOR THE PRODUCT BY THE ORIGINAL PURCHASER.
7. LIMITATION OF LIABILITYYOU HAVE THE ABILITY TO USE CERTAIN ORBIT SERVICES (“SERVICES”) WITH YOUR PRODUCTS. YOUR USE OF THOSE SERVICES ARE SUBJECT TO SEPARATE TERMS OF SERVICE.
8. VARIATIONS THAT MIGHT APPLY TO THIS LIMITED WARRANTYSome jurisdictions do not allow limitations on how long an implied warranty lasts or exclusions/limitations on incidental or consequential damages, so some of the limitations set out above may not apply to you.
Orbit Irrigation Products, Inc.Orbit Sprinkler Timer Limited Warranty

INFORMATIONS IMPORTANTES CONCERNANT VOS DROITS ET OBLIGATIONS, AINSI QUE LES LIMITES ET EXCLUSIONS POUVANT S’APPLIQUER �À VOTRE CAS.
1. VOS DROITS ET CETTE GARANTIE LIMITÉECette garantie limitée vous octroie des droits juridiques spécifiques. Il est possible que vous bénéficiez d’autres droits juridiques variant d’un état, d’une province ou d’une juridiction à l’autre. Les exonérations, exclusions et limitations de responsabilité dans le cadre de cette garantie limitée ne s’appliqueront pas dans la mesure interdite par le droit applicable. Pour une description complète de vos droits juridiques, consultez les lois applicables à votre juridiction ou contactez un service de conseil aux consommateurs adéquat.
2. COUVERTURE ET PÉRIODE DE COUVERTURE DE CETTE GARANTIE LIMITÉEOrbit Irrigation Products, Inc. (« Orbit ») garantit au propriétaire du produit joint que le produit contenu dans cette boîte (« Produit ») sera exempt de vice de matériel et de fabrication pour une durée de deux (2) ans suivant la date de livraison suite à l’achat au détail d’origine (la « Période de garantie »). Si le produit s’avère non conforme à cette Garantie limitée durant la Période de garantie, Orbit devra, à sa seule discrétion, soit (a) réparer ou remplacer tout Produit ou composant défectueux, soit (b) accepter le retour du Produit et rembourser la somme payée pour le Produit par l’acheteur d’origine. Orbit pourra, à sa seule discrétion, réparer ou remplacer le Produit ou le composant par un Produit ou un composant neuf ou remis en état. Si le Produit ou un composant qui le constitue n’est plus disponible, Orbit pourra, à sa seule discrétion, remplacer le Produit par un produit de fonction similaire. Ceci constitue votre recours unique et exclusif en cas de violation de cette Garantie limitée. Tout Produit ayant été réparé ou remplacé dans le cadre de cette Garantie limitée sera couvert par les dispositions de cette Garantie limitée pour les 30 jours suivant la date de la livraison ou pour le restant de la Période de garantie, la durée la plus longue ayant prévalence. Cette Garantie limitée est transférable de l’acheteur d’origine aux propriétaires subséquents, mais la Période de garantie ne peut pas être prolongée ni sa couverture augmentée pour un tel transfert.
3. CONDITIONS DE LA GARANTIE; PROCESSUS DE RÉCLAMATION À SUIVRE POUR OBTENIR UNE RÉPARATION OU UN REMPLACEMENT DANS LE CADRE DE CETTE GARANTIE LIMITÉEAvant de pouvoir procéder à une réclamation dans le cadre de cette Garantie limitée, le propriétaire du Produit doit avertir Orbit de son intention de procéder à une réclamation en visitant www.orbitonline.com/contact durant la Période de garantie et fournir une description de la défaillance présumée, et suivre les instructions de retour du produit fournies par Orbit. Orbit n’est soumis à aucune obligation de garantie concernant un Produit retourné si Orbit détermine, raisonnablement et après examen du Produit retourné, que le Produit est un Produit inadmissible (défini ci-dessous). Orbit prendra en charge les frais de retour du Produit au propriétaire et remboursera tous les frais d’expédition encourus par le propriétaire, excepté si le Produit s’avère être un Produit inadmissible, auquel cas le propriétaire sera responsable de tous les frais d’expédition.
4. CE QUE CETTE GARANTIE LIMITÉE NE COUVRE PASCette garantie ne couvre pas ce qui suit (collectivement « Produits inadmissibles
») : Les Produits portant le marquage « Échantillon » ou vendus « EN L’ÉTAT », ou les Produits soumis à ce qui suit : (a) modifications, altérations, bricolages, ou entretien et réparations inadéquats; (b) manipulation, stockage, installation, tests ou utilisation non conformes aux instructions fournies par Orbit; (c) abus ou utilisation incorrecte du Produit; (d) défaillances, fluctuations ou interruptions de l’approvisionnement en eau, de l’alimentation électrique ou du réseau de télécommunication; ou (e) cas fortuits, y compris foudre, inondation, tornade, tremblement de terre et ouragan. Cette garantie ne couvre pas les pièces consommables, y compris les piles, sauf si le dommage est causé par un vice de matériel ou de fabrication du Produit ou du logiciel (même si elles sont emballées ou vendues avec le produit). Orbit recommande d’utiliser uniquement les fournisseurs de service agréés pour l’entretien et les réparations. Une utilisation non autorisée du Produit ou du logiciel peut compromettre la performance du Produit et annuler cette Garantie limitée.
Sauf en cas de promesse explicite d’une « garantie », Orbit ne garantit pas ni ne promet aucun résultat spécifique en ce qui concerne les économies d’eau et la santé d’un jardin ou d’un gazon, ni aucun autre avantage, suite à l’utilisation du Produit ou d’une de ses fonctionnalités. Les résultats réels sur les économies d’eau et la santé d’un jardin ou d’un gazon, et tout autre avantage, varient en fonction de facteurs hors du contrôle ou de la connaissance d’Orbit.
5. EXCLUSION DE GARANTIESEXCEPTÉ TEL QU’ÉNONCÉ CI-DESSUS DANS CETTE GARANTIE LIMITÉE, ET DANS LA MESURE MAXIMUM PERMISE PAR LE DROIT APPLICABLE, ORBIT REJETTE TOUTE GARANTIE ET CONDITION EXPRESSE, IMPLICITE ET LÉGALE CONCERNANT LE PRODUIT, Y COMPRIS LES GARANTIES IMPLICITES DE QUALITÉ MARCHANDE ET D’ADÉQUATION À UN BUT PARTICULIER. DANS LA MESURE MAXIMUM PERMISE PAR LE DROIT APPLICABLE, ORBIT LIMITE ÉGALEMENT LA DURÉE DE TOUTE GARANTIE OU CONDITION IMPLICITE À LA DURÉE DE CETTE GARANTIE LIMITÉE.
6. LIMITATION DES DOMMAGESEN PLUS DES EXONÉRATIONS DE GARANTIE CI-DESSUS, ORBIT NE SERA EN AUCUN CAS RESPONSABLE DES DOMMAGES CONSÉCUTIFS, ACCESSOIRES, EXEMPLAIRES OU SPÉCIAUX, Y COMPRIS TOUT DOMMAGE CAUSANT UNE PERTE DE DONNÉES OU DE PROFIT, RÉSULTANT OU DÉCOULANT DE CETTE GARANTIE LIMITÉ OU DU PRODUIT, ET LA RESPONSABILITÉ CUMULÉE TOTALE D’ORBIT RÉSULTANT OU DÉCOULANT DE CETTE GARANTIE LIMITÉE OU DU PRODUIT NE DÉPASSERA PAS LE MONTANT RÉELLEMENT PAYÉ POUR LE PRODUIT PAR L’ACHETEUR D’ORIGINE.
7. LIMITATION DE RESPONSABILITÉVOUS POUVEZ UTILISER CERTAINS SERVICES ORBIT (« SERVICES ») AVEC VOS PRODUITS. VOTRE UTILISATION DE CES SERVICES EST SOUMISE À DES CONDITIONS DE SERVICE SÉPARÉES.
8. DES VARIATIONS PEUVENT S’APPLIQUER À CETTE GARANTIE LIMITÉECertaines juridictions n’autorisent pas les limitations de durée d’une garantie implicite ni les exclusions/limitations des dommages accessoires et consécutifs; en conséquence certaines limitations énoncées ci-dessus peuvent ne pas s’appliquer à votre cas.
Orbit Irrigation Products, Inc.Minuterie d’arrosage OrbitGarantie Limitée

23
Fonctionnement manuel
Le fonctionnement manuel est utilisé pour tester les zones ou pour activer un cycle d’arrosage supplémentaire pour une zone, un programme ou toutes les zones.
Tournez le cadran jusqu’à ce que la case de sélection soit sur MANUAL et appuyez sur le cadran.
ALL (Toutes) s’affiche sur l’afficheur ACL.
Pour arroser toutes les zones – • Appuyez sur le cadran pendant que ALL est affiché. Une invite vous demande d’indiquer la durée. • Tournez le cadran jusqu’à la durée désirée. • Appuyez sur le cadran pour commencer l’arrosage.
Pour arroser un programme spécifique A, B, C ou D – • Lorsque ALL est affiché, tournez le cadran jusqu’à ce que le programme à arroser s’affiche. • Appuyez sur le cadran pour commencer l’arrosage d’un programme spécifique.
Pour arroser une zone spécifique – • Lorsque ALL est affiché, tournez le cadran au-delà des programmes A, B, C, D jusqu’à STATION et un chiffre apparaît. Appuyez sur le cadran. • Tournez le cadran jusqu’à la zone désirée et appuyez sur le cadran pour entrer une durée. • Tournez le cadran jusqu’à la durée désirée et appuyez sur le cadran pour commencer l’arrosage.
Remarque : Vous pouvez programmer plus d’une zone spécifique en suivant cette méthode. Répétez les étapes pour sélectionner la zone et la durée d’arrosage de zones supplémentaires.

22
Programmation de la minuterie – BUDGET
La fonctionnalité de budgétisation de l’eau permet de modifier toutes les durées d’activation simultanément au lieu d’une à la fois.
Tournez le cadran jusqu’à ce que la case de sélection soit sur BUDGET et appuyez sur le cadran.
Le réglage du budget règle toutes les durées d’activation d’un programme donné selon le pourcentage choisi.
Exemple : Si vos zones sont réglées pour un arrosage de 10 minutes et que vous modifiez votre budget de 100 % à 150 %, ces zones seront arrosées pendant 15 minutes sans que vous ayez à modifier chaque durée d’arrosage.
La budgétisation de l’eau permet d’ajuster facilement toutes les zones en fonction des saisons.
Remarque : La programmation de chaque fonctionnalité décrite dans ce document peut être réalisée sur la minuterie ou via l’application.
Pour définir des programmes supplémentaires, A B C ou D, appuyez sur le bouton PROG ABCD jusqu’à ce que le programme soit affiché sur l’afficheur ACL et répétez ces étapes.

21
Programmation de la minuterie – HOW OFTEN (Fréquence)
Ceci permet de déterminer LA FRÉQUENCE (jours ou intervalles) d’arrosage.
Tournez le cadran jusqu’à ce que la case de sélection soit sur HOW OFTEN (Fréquence) et appuyez sur le cadran.
Tournez le cadran jusqu’à ce que le jour de la semaine désiré ou INT, ODD (Impair) ou EVEN (Pair) clignote et appuyez sur le cadran.
Si les jours de la semaine sont choisis, répétez ces étapes jusqu’à ce que tous les jours d’arrosage souhaités soient entourés d’une case.
Si INT (intervalle) est choisi, tournez le cadran jusqu’à ce que le nombre de jours souhaité entre chaque arrosage soit indiqué.
Pour définir des programmes supplémentaires, A B C ou D, appuyez sur le bouton PROG ABCD jusqu’à ce que le programme soit affiché sur l’afficheur ACL et répétez ces étapes.
Remarque : La programmation de chaque fonctionnalité décrite dans ce document peut être réalisée sur la minuterie ou via l’application.

20
Programmation de la minuterie – RUN TIME (Durée d’arrosage)
Il s’agit de programmer la durée d’arrosage de chaque zone.
Tournez le cadran jusqu’à ce que la case de sélection soit sur RUN TIME (Durée d’arrosage) et appuyez sur le cadran.
Le numéro de la station clignote – tournez le cadran jusqu’à ce que la zone désirée clignote et appuyez sur le cadran.
La durée définie pour cette zone clignote – tournez le cadran jusqu’à ce que la durée désirée s’affiche et appuyez sur le cadran.
Répétez ces étapes pour chaque zone que vous souhaitez définir.
Si vous voulez définir des zones dans différents programmes, A B C ou D, appuyez sur le bouton PROG ABCD jusqu’à ce que le programme soit affiché sur l’afficheur ACL.
Remarque : La programmation de chaque fonctionnalité décrite dans ce document peut être réalisée sur la minuterie ou via l’application.
19
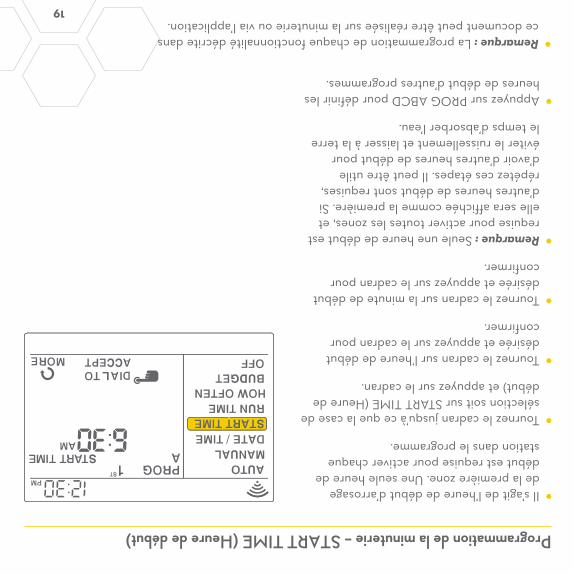
Programmation de la minuterie – START TIME (Heure de début)
Il s’agit de l’heure de début d’arrosage de la première zone. Une seule heure de début est requise pour activer chaque station dans le programme.
Tournez le cadran jusqu’à ce que la case de sélection soit sur START TIME (Heure de début) et appuyez sur le cadran.
Tournez le cadran sur l’heure de début désirée et appuyez sur le cadran pour confirmer.
Tournez le cadran sur la minute de début désirée et appuyez sur le cadran pour confirmer.
Remarque : Seule une heure de début est requise pour activer toutes les zones, et elle sera affichée comme la première. Si d’autres heures de début sont requises, répétez ces étapes. Il peut être utile d’avoir d’autres heures de début pour éviter le ruissellement et laisser à la terre le temps d’absorber l’eau.
Appuyez sur PROG ABCD pour définir les heures de début d’autres programmes.
Remarque : La programmation de chaque fonctionnalité décrite dans ce document peut être réalisée sur la minuterie ou via l’application.

18
Programmation de la minuterie – DATE/TIME (Date/Heure)
Si vous êtes connecté à la Wi-Fi, la date et l’heure sont automatiquement envoyées à la minuterie d’arrosage.
Pour régler manuellement l’heure et la date, tournez le cadran jusqu’à ce que la case de sélection montre DATE/TIME et appuyez sur le cadran.
Réglez la date en tournant le cadran sur l’année, le mois et le jour corrects et appuyez sur le cadran pour confirmer chaque sélection.
Pour le réglage de l’heure, appuyez sur le cadran une fois l’heure correcte définie. Assurez-vous que la sélection AM/PM est correcte.
Remarque : La programmation de chaque fonctionnalité décrite dans ce document peut être réalisée sur la minuterie ou via l’application.
17
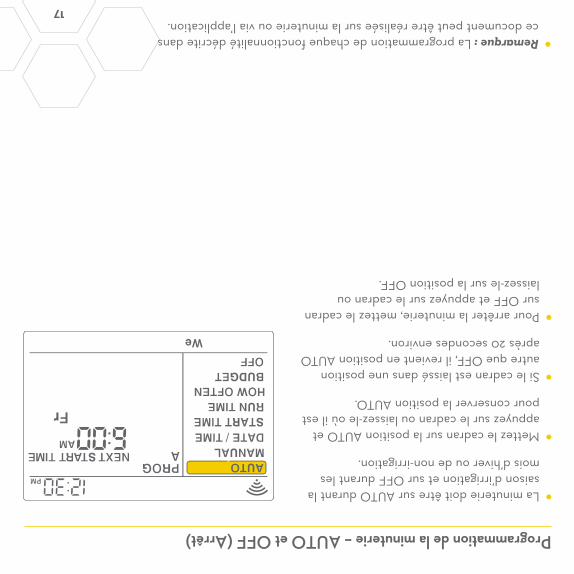
Programmation de la minuterie – AUTO et OFF (Arrêt)
La minuterie doit être sur AUTO durant la saison d’irrigation et sur OFF durant les mois d’hiver ou de non-irrigation.
Mettez le cadran sur la position AUTO et appuyez sur le cadran ou laissez-le où il est pour conserver la position AUTO.
Si le cadran est laissé dans une position autre que OFF, il revient en position AUTO après 20 secondes environ.
Pour arrêter la minuterie, mettez le cadran sur OFF et appuyez sur le cadran ou laissez-le sur la position OFF.
Remarque : La programmation de chaque fonctionnalité décrite dans ce document peut être réalisée sur la minuterie ou via l’application.

16
Afficheur ACL
Menu principalFonction
AUTOLe programme est en cours d'exécution
MANUAL (MANUEL)Arrosage manuel des stations
DATE/TIME (DATE/HEURE)
Réglage de l’heure, de l’année, du mois et du jour
START TIME (HEURE DE DÉMARRAGE)
Réglage de l’heure de début de l’arrosage
RUN TIME (DURÉE D’ARROSAGE)
Réglage de la durée d’arrosage pour chaque station
HOW OFTEN (FRÉQUENCE)
Réglage de la fréquence des jours d’arrosage
BUDGETRéglage de l’arrosage global sous forme de pourcentage
OFF (ARRÊT)Arrêt de toutes les stations/fonctions
Barre d’étatFonction
WI-FI
Continu – indique la puissance du signal Wi-Fi et indique qu’elle est connectée.
Clignotement gradué – indique que la minuterie est en mode de couplage.
Clignotement – n’est pas connectée à la Wi-Fi.
Continu, avec un point d’exclamation – communique avec la Wi-Fi, mais ne communique pas avec les serveurs d’Orbit.
FAULT (ERREUR)
Indique un court-circuit dans une zone
%Indique que le budget réservé à l’eau a été ajusté
GOUTTE DE PLUIE
Indique qu’une zone est en cours d’arrosage
NO AC (PAS D’ALIM.)
L’électricité n’est pas connectée à la minuterie
PILE
Indique une pile faible. La pile fonctionne uniquement pour conserver la date et l’heure en cas de coupure électrique. Votre programme est stocké dans la mémoire non volatile et ne sera pas perdu si la minuterie est débranchée.
HEURE ACTUELLE
Si la minuterie est connectée à la Wi-Fi, l’heure est automatiquement définie. Ou elle peut être définie manuellement dans Date/Heure.

15
Utilisation du bouton RAIN DELAY (DÉLAI EN CAS DE PLUIE)
Le bouton RAIN DELAY (DÉLAI EN CAS DE PLUIE) peut être utilisé pour désactiver tout l’arrosage pour une durée de 1 à 32 jours.
Appuyez à plusieurs reprises sur RAIN DELAY ou tournez le cadran après avoir appuyé une fois sur Rain Delay, jusqu’à ce que le nombre de jours souhaité soit affiché dans l’afficheur ACL.
Pour annuler un délai en cas de pluie, appuyez sur CLEAR.

14
Using the PROGRAM (PROG ABCD) Button
Les programmes A, B, C, D et intelligents offrent la souplesse requise pour configurer et exécuter divers programmes pour les plantes nécessitant un arrosage différent. Par exemple, vous pouvez régler vos zones de gazon sur le programme A, vos plates-bandes sur le programme B et votre jardin sur le programme C. Ou vous pouvez régler vos zones sur l’arrosage intelligent pour que la minuterie utilise la météo locale et les informations du site pour définir automatiquement un programme d’arrosage.
Le bouton PROG ABCD alterne entre les programmes pour configurer les heures de début, les temps et les durées de fonctionnement et le budget, et pour les modifier.
Appuyez sur PROG ABCD pour activer ou désactiver des programmes déjà configurés. A, B, C, D ou Smart (Intelligent) s’illuminent pour indiquer les programmes qui sont actifs et utilisés pour l’arrosage.
Remarque : Pour utiliser seulement l’arrosage en mode intelligent, l’icône du téléphone est le seul programme qui doit être affiché sur l’afficheur ACL.
Remarque : Si vous ne voyez pas la lettre du programme (A, B, C, D ou la goutte d’eau) sur l’afficheur ACL, ce programme n’est pas utilisé pour arroser. Appuyez sur PROG ABCD jusqu’à ce que les programmes souhaités s’affichent.

13
Utilisation des boutons BACK (RETOUR) et CLEAR (EFFACER)
Le bouton BACK (RETOUR) peut être utilisé pour revenir au menu principal, ou peut être pressé deux fois pour retourner au mode automatique.
Le bouton CLEAR (EFFACER) permet d’effacer les entrées dans un écran sélectionné.
Le bouton CLEAR (EFFACER) peut également être utilisée pour annuler un délai en cas de pluie, annuler un programme en cours ou annuler un cycle d’arrosage manuel.

12
Utilisation du CADRAN
Le CADRAN peut être utilisé pour défiler vers le haut, le bas, la gauche ou la droite sur les menus, les dates et les heures.
Appuyez sur le CADRAN pour confirmer une sélection, désélectionner ou passer à une station en fonctionnement.

11
Commandes simples
Vous pouvez programmer la minuterie que vous soyez connecté à la Wi-Fi ou pas. Ceci permet au jardinier qui a laissé son téléphone à l’intérieur d’exécuter un cycle manuel ou d’ajuster les programmes selon le besoin sans salir son téléphone.
BoutonsFonction
Faites défiler vers le haut, le bas, la gauche ou la droite et appuyez pour sélectionner
CLEAR (ANNULER)
Pour effacer un réglage
PROG ABCDPour passer à différents programmes : A, B,
C et D
BACK (RETOUR)Pour retourner à l’étape précédente
RAIN DELAY (DÉLAI PLUIE)
Pour mettre en pause de 1 à 32 jours en raison d’averses ou d’autres facteurs

10
Caractéristiques et commandes de la minuterie
Votre minuterie a été conçue pour une installation facile et rapide, avec des commandes pratiques pour effectuer des réglages directement sur la minuterie ou n’importe où dans le monde avec l’application B-hyve™.
Verrou et loquet
Résistant aux intempéries couvercle
Cadran
Afficheur numérique
Panneau de porte pivotant
Pile Compartiment
Transformateur
Bornes de câblage
Bouton de réinitialisation
Cordon d’alimentation
A
B
C
D
E
F
G
H
I
J
ATTENTION : IL Y A DANGER D’EXPLOSION S’IL Y A REMPLACEMENT INCORRECT DE LA BATTERIE, REMPLACER UNIQUEMENT AVEC UNE BATTERIE DU MÊME TYPE OU D’UN TYPE ÉQUIVALENT RECOMMANDÉ PAR LE CONSTRUCTEUR. METTRE AU REBUT LES BATTERIES USAGÉES CONFORMÉMENT AUX INSTRUCTIONS DU FABRICANT.
A
B
C
D
E
E
F
G
H
I
J

9
L’application B-hyve™
Symbole de minuterie connectée
Délai pluie
Calendrier
Programmes
Télécommande ou bouton Accueil
Liste des zones
Réglages
Zone suivante
Arrêter l’arrosage
État de fonctionnement/Messagerie
Météo/Temp.
Remarque : La aplicación le guiará a través de la configuración inicial del temporizador de su aspersor. Además, dispone de iconos de ayuda por toda la aplicación con más información y consejos útiles.

8
Désinstallation/Réinstallation
Rejumelage avec la Wi-Fi Vous pouvez rejumeler votre appareil intelligent à votre minuterie B-hyve™ en tournant le cadran sur « Off » (Arrêt) et en appuyant sur le bouton de réinitialisation situé au dos du panneau pivotant. L’affichage de la minuterie indiquera « Pair » (Jumeler).
Suppression de la minuterie dans l’application Il est possible que vous deviez supprimer la minuterie d’un appareil intelligent. Accédez à Réglages pour retirer l’autorisation de la minuterie, après quoi une invite vous demandera de confirmer le retrait de la minuterie.

7
Installation de la minuterie – Connexion à la Wi-Fi
Enchufe su cronómetro Orbit® B-hyve™ Dispositivo inteligente. En la esquina superior izquierda de la pantalla del cronómetro titilará el ícono “Bluetooh” con una sequencia graduada de parpadeo. Esto indica que su cronómetro está listo para emparejarse con su dispositivo inteligente.
Conectese a su cronómetro Orbit® B-hyve™ Abra su aplicación B-hyve™, cree una cuenta o conéctese, y siga el proceso paso a paso para añadir y establecer su dispositivo. La aplicación B-hyve™ se conectará a su dispositivo y luego será guiado para conectarse a la red Wi-Fi de su hogar.
Conéctese a su red Wi-Fi Seleccione su red de la lista e introduzca su clave de la red para conectar su cronómetro a su señal Wi-Fi. Una vez conectado el ícono Wi-Fi en su cronómetro dejará de parpadear y mostrará líneas sólidas, indicando la fuerza de su señal.
Nota: Si usted no ve el nombre de su red en la lista, toque el botón de refrescar en la aplicación. Si el nombre de su red no aparece, toque “Advanced” (Avanzado) en la aplicación e introduzca el nombre y clave de su red. Este dispositivo solo se conecta a través de redes WiFi de 2.4 GHz. No soportan las redes de 5.0 GHz y estas no aparecerán en su aplicación.

6
Installation de la minuterie
Choix d’un emplacement Choisissez un emplacement proche de l’alimentation électrique et à l’abri de la lumière directe du soleil, si possible. Veillez à laisser suffisamment de place pour pouvoir complètement ouvrir la porte de la minuterie.
Montage de la minuterie Installez une vis (fournie) dans le mur. Utilisez les ancres expansibles (incluses) pour une installation sur plâtre, maçonnerie ou cloison sèche. Accrochez la minuterie sur la vis en utilisant le trou de serrure. Mettez la minuterie à niveau et utilisez la deuxième vis dans l’un des trous de montage préformé pour la sécuriser.
Connections des fils de la vanne Dénudez 12 mm (1/2 po) d’isolant sur chaque fil. Connectez un fil de chaque vanne à un fil Commun (COM) et les autres fils à une borne numérotée (un seul fil par borne).
Keyhole
Pre-formedMounting Holes
No. 8 Screw
Wall
1/8"
Petit trou – pour acheminer les fils à 5 ou 7 brins directement dans la boîte
Débouchures de 1/2 po, 3/4 po et 1 po pour les systèmes plus volumineux comprenant plus de faisceaux de fils
Débouchures pour les installations câblées
Bottom View
Dénudez le fil
Enfoncez
Desserrez la vis
Serrez la vis
Remarque : Nous vous recommandons de consulter un électricien pour les installations câblées.
Vue de dessous
MurTrous de montage
préformés
1/8 po
Vis n° 8
Trou en forme d’entrée de clé
5
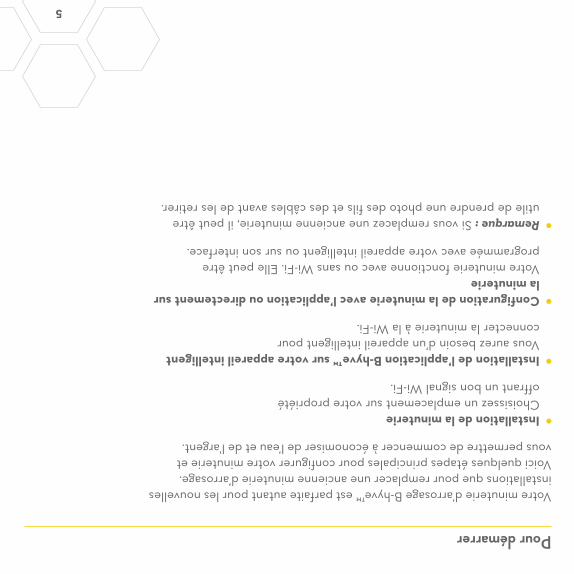
Pour démarrer
Votre minuterie d’arrosage B-hyve™ est parfaite autant pour les nouvelles installations que pour remplacer une ancienne minuterie d’arrosage. Voici quelques étapes principales pour configurer votre minuterie et vous permettre de commencer à économiser de l’eau et de l’argent.
Installation de la minuterie Choisissez un emplacement sur votre propriété offrant un bon signal Wi-Fi.
Installation de l’application B-hyve™ sur votre appareil intelligent Vous aurez besoin d’un appareil intelligent pour connecter la minuterie à la Wi-Fi.
Configuration de la minuterie avec l’application ou directement sur la minuterie Votre minuterie fonctionne avec ou sans Wi-Fi. Elle peut être programmée avec votre appareil intelligent ou sur son interface.
Remarque : Si vous remplacez une ancienne minuterie, il peut être utile de prendre une photo des fils et des câbles avant de les retirer.
4
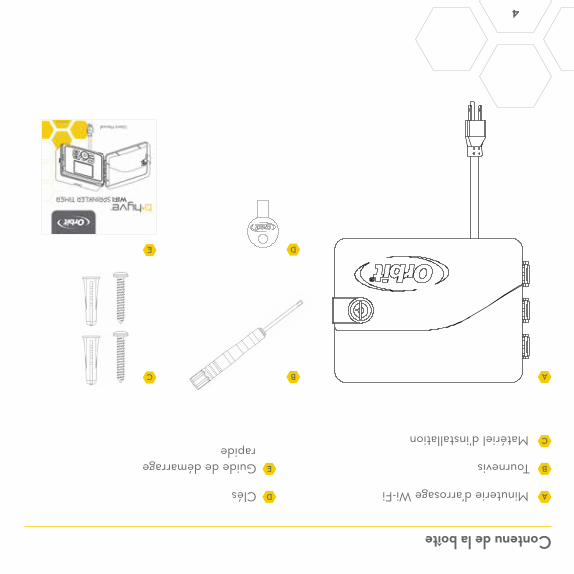
Contenu de la boîte
Minuterie d’arrosage Wi-Fi
Tournevis
Matériel d’installation
Clés
Guide de démarrage rapide
A
A
D
B
B
D
E
C
C
E

3
Contenu de la boîte ...........................4
Pour démarrer ................................5
Installation de la minuterie .....................6
Désinstallation/Réinstallation...................8
L’application B-hyve ...........................9
Caractéristiques et commandes de la minuterie...............................10
Commandes simples...........................11
Utilisation du cadran..........................12
Utilisation des boutons Retour et Effacer.......13
Utilisation du bouton de programmation (PROG ABCD)...............................14
Utilisation du bouton Délai en cas de pluie .....15
Afficheur ACL ...............................16
Programmation de la minuterie................17
Fonctionnement manuel ......................23
Table des matières
N’oubliez pas que vous pouvez configurer la minuterie avec l’application. Mais si vous n’avez pas la Wi-Fi ou si vous souhaitez simplement procéder à un ajustement lorsque vous êtes dans votre jardin, vous pouvez utiliser directement la minuterie. Les modifications faites sur la minuterie seront reflétées dans l’application et vice-versa.
Pour obtenir des instructions plus détaillées ou des informations sur le dépannage, visitez bhyve.orbitonline.com
En outre, l’application dispose d’écrans d’aide et de vidéos pour vous aider avec les connexions Wi-Fi, la programmation, l’arrosage intelligent et d’autres questions d’arrosage générales que vous pourriez avoir.
Si l’application et le site Web n’ont pas ce que vous cherchez, veuillez appeler notre ligne d’assistance technique.
Aide1-800-488-6156 or 1-801-299-5555
www.orbitonline.com bhyve.orbitonline.com
Avant de retourner cette minuterie d’arrosage au magasin, contactez le Service d’assistance technique Orbit® au : 1-800-488-6156 ou 1-801-299-5555
2
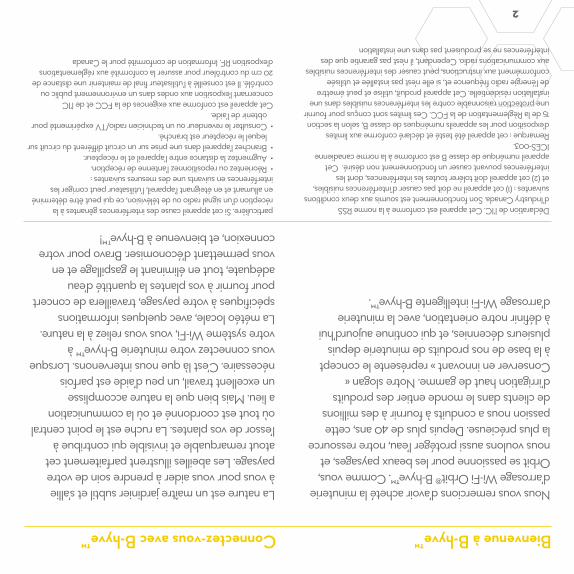
Nous vous remercions d’avoir acheté la minuterie d’arrosage Wi-Fi Orbit® B-hyve™. Comme vous, Orbit se passionne pour les beaux paysages, et nous voulons aussi protéger l’eau, notre ressource la plus précieuse. Depuis plus de 40 ans, cette passion nous a conduits à fournir à des millions de clients dans le monde entier des produits d’irrigation haut de gamme. Notre slogan « Conserver en innovant » représente le concept à la base de nos produits de minuterie depuis plusieurs décennies, et qui continue aujourd’hui à définir notre orientation, avec la minuterie d’arrosage Wi-Fi intelligente B-hyve™.
Déclaration de l’IC. Cet appareil est conforme à la norme RSS d’Industry Canada. Son fonctionnement est soumis aux deux conditions suivantes : (1) cet appareil ne doit pas causer d’interférences nuisibles, et (2) cet appareil doit tolérer toutes les interférences, dont les interférences pouvant causer un fonctionnement non désiré. Cet appareil numérique de classe B est conforme à la norme canadienne ICES-003.Remarque : cet appareil été testé et déclaré conforme aux limites d’exposition pour les appareils numériques de classe B, selon la section 15 de la Règlementation de la FCC. Ces limites sont conçus pour fournir une protection raisonnable contre les interférences nuisibles dans une installation résidentielle. Cet appareil produit, utilise et peut émettre de l’énergie radio fréquence et, si elle n’est pas installée et utilisée conformément aux instructions, peut causer des interférences nuisibles aux communications radio. Cependant, il n’est pas garantie que des interférences ne se produisent pas dans une installation
La nature est un maître jardinier subtil et s’allie à vous pour vous aider à prendre soin de votre paysage. Les abeilles illustrent parfaitement cet atout remarquable et invisible qui contribue à l’essor de vos plantes. La ruche est le point central où tout est coordonné et où la communication a lieu. Mais bien que la nature accomplisse un excellent travail, un peu d’aide est parfois nécessaire. C’est là que nous intervenons. Lorsque vous connectez votre minuterie B-hyve™ à votre système Wi-Fi, vous vous reliez à la nature. La météo locale, avec quelques informations spécifiques à votre paysage, travaillera de concert pour fournir à vos plantes la quantité d’eau adéquate, tout en éliminant le gaspillage et en vous permettant d’économiser. Bravo pour votre connexion, et bienvenue à B-hyve™!
Bienvenue à B-hyve™Connectez-vous avec B-hyve™
particulière. Si cet appareil cause des interférences gênantes à la réception d’un signal radio ou de télévision, ce qui peut être déterminé en allumant et en éteignant l’appareil, l’utilisateur peut corriger les interférences en suivants une des mesures suivantes : • Réorientez ou repositionnez l’antenne de réception. • Augmentez la distance entre l’appareil et le récepteur. • Branchez l’appareil dans une prise sur un circuit différent du circuit sur
lequel le récepteur est branché. • Consulter le revendeur ou un technicien radio/TV expérimenté pour
obtenir de l’aide. Cet appareil est conforme aux exigences de la FCC et de l’IC concernant l’exposition aux ondes dans un environnement public ou contrôlé. Il est conseillé à l’utilisateur final de maintenir une distance de 20 cm du contrôleur pour assurer la conformité aux réglementations d’exposition RF. Information de conformité pour le Canada

WIFI SPRINKLER TIMER
Manuel de l’utilisateurPour: 57946, 57950, 91946, 91950, 04080, 04082
MINUTERIE D’ARROSAGE WI-FI
91946-50 rC


![WIFI SPRINKLER TIMER€¦ · • Press the dial to begin the rain delay. • [CLEAR] button stops the rain delay and scheduled watering will resume. • At the end of the selected](https://img.dokumen.tips/doc/110x75/5f348fbc20b74a50ff137c5d/wifi-sprinkler-timer-a-press-the-dial-to-begin-the-rain-delay-a-clear-button.jpg)